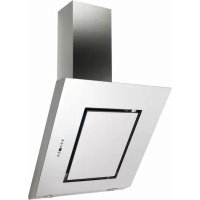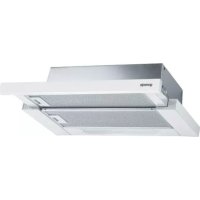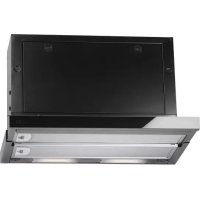
DFG602ORAS - Basket GORENJE - Free user manual and instructions
Find the device manual for free DFG602ORAS GORENJE in PDF.
Download the instructions for your Basket in PDF format for free! Find your manual DFG602ORAS - GORENJE and take your electronic device back in hand. On this page are published all the documents necessary for the use of your device. DFG602ORAS by GORENJE.
USER MANUAL DFG602ORAS GORENJE
UK Instruction on mounting and use
UK - Instruction on mounting and use
Consult the designs in the front pages referenced in the text
by alphabet letters.
Closely follow the instructions set out in this manual. All
responsibility, for any eventual inconveniences, damages or
fires caused by not complying with the instructions in this
manual, is declined.
Note: the elements marked with the symbol “(*)” are optional
accessories supplied only with some models or elements to
purchase, not supplied.
The hood is designed to be used either for exhausting or filter
The hood is equipped with a top air outlet B for discharge of
fumes to the outside (exhaust pipe and pipe fixing clamps not
If the hood is supplied with carbon filter, then it must be
When there is no exhaust duct for venting outdoors, you can
use a carbon filter.
The air is depurated by the filter and put again in the
surrounding. To use the appliance in this version, proceded as
If the hood is not supplied with carbon filter, then it must
be ordered and mounted.
The filtered air is returned from atop the cabinet through a
duct that passes through the cabinet itself.The diameter of the
duct must be the same as that of flange H.
The deflector J can be fixed to the outlet hole using the two
screws provided. Fig. 4-5
The minimum distance between the supporting surface for the
cooking vessels on the hob and the lowest part of the range
hood must be not less than 43cm from electric cookers and
65cm from gas or mixed cookers.
If the instructions for installation for the gas hob specify a
greater distance, this must be adhered to.
Electrical connection
The mains power supply must correspond to the rating
indicated on the plate situated inside the hood. If provided with
a plug connect the hood to a socket in compliance with current
regulations and positioned in an accessible area. If it not fitted
with a plug (direct mains connection) or if the plug is not
located in an accessible area apply a bi-polar switch in
accordance with standards which assures the complete
disconnection of the mains under conditions relating to over-
current category III, in accordance with installation
IMPORTANT: Before re-connecting the hood circuit to the
mains supply and checking the efficient function, always
check that the mains cable is correctly assembled and that it
has NOT remained crushed inside the compartment of the
same during the installation stage.
Before beginning installation:
• Check that the product purchased is of a suitable size for
the chosen installation area.
• To facilitate installation, remove the fat filters and the
other parts allowed and described here, dismantle and
To remove see also the relative paragraphs.
• Remove the active carbon (*) filter/s if supplied (see also
relative paragraph). This/these is/are to be mounted only
if you want lo use the hood in the filtering version.
• Check (for transport reasons) that there is no other
supplied material inside the hood (e.g. packets with
screws (*), guarantees (*), etc.), eventually removing
them and keeping them.
• If possible, disconnect and move freestanding or slide-in
range from cabinet opening to provide easier access to
rear wall/ceiling. Otherwise put a thick, protective
covering over countertop, cooktop or range to protect
from damage and debris. Select a flat surface for
assembling the unit. Cover that surface with a protective
covering and place all canopy hood parts and hardware
• Disconnect the hood during electrical connection, by
turning the home mains switch off.
• In addition check whether near the installation area of the
hood (in the area accessible also with the hood mounted)
an electric socket is available and it is possible to
connect a fumes discharge device to the outside (only
• Carry out all the masonry work necessary (e.g.
installation of an electric socket and/or a hole for the
passage of the discharge tube).
Expansion wall plugs are provided to secure the hood to most
types of walls/ceilings. However, a qualified technician must
verify suitability of the materials in accordance with the type of
wall/ceiling. The wall/ceiling must be strong enough to take
the weight of the hood. Do not tile, grout or silicone this
appliance to the wall. Surface mounting only.
This hood is designed for fitting in a cabinet or on some other
The diameter of the ventilation duct must be the same as the
that of the flange mounted on the ventilation hole on the hood.
To mount the hood proceed as follows:
- Position the drilling template inside the left cupboard on
the right hand side with the arrow point towards the back
- Drill the holes marked on the template.
- Repeat the procedure for the right hand cupboard
- If the sides of the cupboards are 18 mm thick, insert 49
spacers Z on the sides of the hood.
- Fix the hood to the cupboard using four screws N. Fig. 8
Additional instructions for the montage
The hood can be installed in cabinets with different depths,
the front of the box must always be in line with the cabinet.
For alignment adjust the back stops of the box. For box
adjustment, loosen screws “M” and slide square plates “G” as
necessary and tighten screws “M”. Fig. 9
Description of the hood
2. Motor Speed Switch
3. Illumination of the cooking surface
4. Grease Filters/grease filter support grate
5. Light Cover Supports
Model with Grease Filter Support Grate
Opening the Grease Filter Support Grates - Fig. 2.1
a. Remove the pull-out drawer completely.
b. Push the A knobs inwards toward each other (in the
“Open” direction as indicated on the plastic knob itself).
c. To remove the grates completely, use the B spring
fasteners, which act as pins to hold the grate in place
Model with Self-supporting Metal Filters
Removing the Grease Filters - Fig. 2.2
a. Remove the pull-out drawer completely.
b. Press the side handles C (some models are supplied with
handles Z - Fig. 2.3) towards the opposite side and
Putting the Filters Back in Place
a. Remove the pull-out drawer completely and mount the
grease filter so that it covers the drawer.
b. Close the drawer and install the remaining grease filter.
Opening the Light Cover Support
a. Remove the pull-out drawer completely.
b. According to model in possession:
Lamp D with hook locks type A - Fig.2.2
Move the bracket hook locks towards each other (in
direction “Open” as printed on the plastic part of the lock).
Lamp F with hook locks type S - Fig. 1.2
Move the hook locks as indicated by the arrows and
completely remove the lamp from the housing (Fig. 1.3).
The hood is fitted with a control panel with aspiration speed
selection control and a light switch to control cooking area
Use the high suction speed in cases of concentrated kitchen
vapours. It is recommended that the cooker hood suction is
switched on for 5 minutes prior to cooking and to leave in
operation during cooking and for another 15 minutes
approximately after terminating cooking.
Before performing any maintenance operation, isolate the
hood from the electrical supply by switching off at the
connector and removing the connector fuse.
Or if the appliance has been connected through a plug and
socket, then the plug must be removed from the socket.
The cooker hood should be cleaned regularly (at least with the
same frequency with which you carry out maintenance of the
fat filters) internally and externally. Clean using the cloth
dampened with neutral liquid detergent. Do not use abrasive
Traps cooking grease particles.
If situated inside the support grill, it may be one of the
Paper filter must be replaced once a month or if colouring
appears on upper side, in such cases the colouring is evident
through the grill openings.
Sponge filter should be washed with hot soapy water once a
month and replaced every 5 to 6 washes.
Metallic filter must be cleaned once a month, with non
abrasive detergents, by hand or in dishwasher on low
temperature and short cycle.
When washed in a dishwasher, the grease filter may discolour
slightly, but this does not affect its filtering capacity.
Removing the Grease Filters (for models wtih grease filter
To remove the dirty grease filter, proceed as follows:
a. Remove the pull-out drawer completely and open the
ventilation grates that support the grease filters.
b. Remove the Q fasteners for the grease filter and remove
it (Fig. 10.1). If special metal filters have been installed,
press on the plastic springs R to unhook them (Fig.
c. When washing or replacing the grease filter, wash the
grate as well with warm soapy water.
d. Remount the new filter or the old one after it has dried
Charcoal filter (filter version only)
It absorbs unpleasant odours caused by cooking.
The saturation of the activated charcoal occurs after more or
less prolonged use, depending on the type of cooking and the
regularity of cleaning of the grease filter.
In any case it is necessary to replace the cartridge at least
every four mounths (or when the filter saturation indication
system – if envisaged on the model in possession – indicates
To fit or replace a carbon filter:
a. Request a charcoal filter from the retailer, specifying the
model and type of hood.
Caution! Some charcoal filters come covered with a plastic10
film to protect their filtering properties. If this is the case,
remove the film before installing the filter.
b. Remove the pull-out drawer completely.
c. Remove the grease filters or the grates.
d. Place the activated carbon filter in position:
1) Version with one motor: insert the filter in its housing
over the plastic grill and rotate it until it locks in
2) Version with two motors: to assemble the filter,
insert it in its seating and fix it in position using the
e. Remove the grease filters or grills
To remove the carbon filter, follow the procedure described in
item 1) or 2), depending on the version) in the reverse order.
Disconnect the hood from the electricity.
Warning! Prior to touching the light bulbs ensure they are
a. Remove the pull-out drawer.
b. Open the light cover support or the back grease filter
c. Always replace burnt-out lamps, according to what is
provided for your appliance, with olive-shaped max. 40
Watt (E 14) bulbs, or neon-lamp 14 Watt max., or PL
lamp 11 Watt (one PL lamp appliance) or PL 9 Watt (two
d. Close the light cover support or the back grease filter
If the lights do not work, make sure that the lamps are fitted
properly into their housings before you call for technical
WARNING! Do not connect the appliance to the mains until
the installation is fully complete.
Before any cleaning or maintenance operation, disconnect the
hood from the mains by removing the plug or disconnecting
the home mains switch. The appliance is not intended for use
by children or persons with impaired physical, sensorial or
mental faculties, or if lacking in experience or know-how,
unless they are under supervision or have been trained in the
use of the appliance by a person responsible for their safety.
Children should be monitored to ensure that they do not play
Never use the hood without effectively mounted grating.!
The hood must NEVER be used as a support surface unless
specifically indicated.
The premises must be sufficiently ventilated, when the kitchen
hood is used together with other gas combustion devices or
The suctioned air must not be conveyed into a conduit used
for the disposal of the fumes generated by appliances that
combust gases or other fuels.
The flaming of foods beneath the hood itself is severely
The use of exposed flames is detrimental to the filters and
may cause a fire risk, and must therefore be avoided in all
Any frying must be done with care in order to make sure that
the oil does not overheat and burst into flames.
As regards the technical and safety measures to be adopted
for fume discharging it is important to closely follow the
relations provided by the competent authorities.
The hood must be regularly cleaned on both the inside and
outside (AT LEAST ONCE A MONTH, it is in any event
necessary to proceed in accordance with the maintenance
instructions provided in this manual)..
Failure to follow the instructions as concerns hood and filter
cleaning will lead to the risk of fires.
We decline any responsibility for any problems, damage or
fires caused to the appliance as the result of the non-
observance of the instructions included in this manual.
This appliance is marked according to the European directive
2002/96/EC on Waste Electrical and Electronic Equipment
(WEEE). By ensuring this product is disposed of correctly, you
will help prevent potential negative consequences for the
environment and human health, which could otherwise be
caused by inappropriate waste handling of this product.
on the product, or on the documents
accompanying the product, indicates that this appliance may
not be treated as household waste. Instead it shall be handed
over to the applicable collection point for the recycling of
electrical and electronic equipment. Disposal must be carried
out in accordance with local environmental regulations for
For more detailed information about treatment, recovery and
recycling of this product, please contact your local city office,
your household waste disposal service or the shop where you
purchased the product.11
IT - Istruzioni di montaggio e d'uso
Friturestegning skal ske under opsyn for at forhindre, at den
Electronic Equipment (WEEE). Ved at sørge for, at dette
2002/96/EC, Waste Electrical and Electronic Equipment
and Electronic Equipment, WEEE).
Electrical and Electronic Equipment (WEEE)
2002/96/EC, Waste Electrical and Electronic Equipment
- Waste Electricаl and Electronic Equipment (WEEE).
2002/96/ES, Waste Electrical and Electronic Equipment