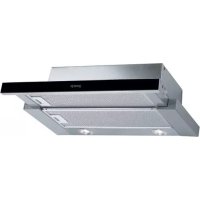
USER MANUAL DF 6316 BX GORENJE
EN - Instruction on mounting and use
EN - Instruction on mounting and use
Closely follow the instructions set out in this manual. All responsibility for any eventual inconveniences, damages, or fires caused by not complying with the instructions in this manual is declined. The hood is conceived for the suction of cooking fumes and steam and is destined only for domestic use.
It is important to conserve this booklet for consultation at any moment. In the case of sale, cession, or move, make sure it is together with the product. Read the instructions carefully: there is important information about installation, use, and safety. Do not carry out electrical or mechanical variations on the product or on the discharge conduits.
Note: the elements marked with the symbol (*) are optional accessories supplied only with some models or elements to purchase, not supplied.

Caution
WARNING! Do not connect the appliance to the mains until the installation is fully complete.
Before any cleaning or maintenance operation, disconnect the hood from the mains by removing the plug or disconnecting the mains electrical supply.
Always wear work gloves for all installation and maintenance operations.
The appliance is not intended for use by children or persons with impaired physical, sensorial, or mental faculties, or if lacking in experience or knowledge, unless they are under supervision or have been trained in the use of the appliance by a person responsible for their safety.
This appliance is designed to be operated by adults. Children should be monitored to ensure that they do not play with the appliance.
This appliance is designed to be operated by adults. Children should not be allowed to tamper with the controls or play with the appliance.
Never use the hood without effectively mounted grating!
The hood must NEVER be used as a support surface unless specifically indicated.
The premises where the appliance is installed must be sufficiently ventilated when the kitchen hood is used together with other gas combustion devices or other fuels.
The ducting system for this appliance must not be connected to any existing ventilation system which is being used for any other purpose such as discharging exhaust fumes from appliances burning gas or other fuels.
The flaming of foods beneath the hood itself is severely prohibited.
The use of exposed flames is detrimental to the filters and may cause a fire risk, and must therefore be avoided in all circumstances.
Any frying must be done with care in order to make sure that the oil does not overheat and ignite.
Accessible parts of the hood may become hot when used with cooking appliance.
With regards to the technical and safety measures to be
adopted for fume discharging it is important to closely follow the regulations provided by the local authorities.
The hood must be regularly cleaned on both the inside and outside (AT LEAST ONCE A MONTH).
This must be completed in accordance with the maintenance instructions provided in this manual. Failure to follow the instructions provided in this user guide regarding the cleaning of the hood and filters will lead to the risk of fires.
Do not use or leave the hood without the lamp correctly mounted due to the possible risk of electric shocks.
We will not accept any responsibility for any faults, damage or fires caused to the appliance as a result of the non-observation of the instructions included in this manual.
This appliance is marked according to the European directive 2002/96/EC on Waste Electrical and Electronic Equipment (WEEE). By ensuring this product is disposed of correctly, you will help prevent potential negative consequences for the environment and human health, which could otherwise be caused by inappropriate waste handling of this product.

The symbol on the product, or on the documents accompanying the product, indicates that this appliance may not be treated as household waste. Instead it should be taken to the appropriate collection point for the recycling of electrical and electronic equipment. Disposal must be carried out in accordance with local environmental regulations for waste disposal.
For further detailed information regarding the process, collection and recycling of this product, please contact the appropriate department of your local authorities or the local department for household waste or the shop where you purchased this product.
Additional Installation Specifications:
Use only the fixing screws supplied with the product for installation.
Use the correct length screws which are identified in the Installation Guide.
WARNING! Failure to install the screws or fixing device in accordance with these instructions may result in electrical hazards.
Use
The hood is designed to be used either for exhausting or filter version.

Ducting version
In this case the fumes are conveyed outside of the building by means of a special pipe connected with the connection ring located on top of the hood.
Attention! The exhausting pipe is not supplied and must be purchased apart.
Diameter of the exhausting pipe must be equal to that of the connection ring.
In the horizontal runs the exhausting pipe must be slightly slanted (about 10°) and directed upwards to vent the air easily from the room to the outside.
Attention! If the hood is supplied with active charcoal filter, then it must be removed.
Connect the hood and discharge holes on the walls with a diameter equivalent to the air outlet (connection flange).
Use a duct of the minimum indispensable length.
Use a duct with as few elbows as possible (maximum elbow angle: 90°).
Avoid drastic changes in the duct cross-section.
Use a duct as smooth as possible inside.
The duct must be made of certified material.
Attention! If the hood is supplied with carbon filter, then it must be removed.

Filter version
One active charcoal filter is needed for this and can be obtained from your usual retailer.
The filter removes the grease and smells from the extracted air before sending it back into the room through the upper outlet grid.
Attention! If the hood is not supplied with carbon filter, then it must be ordered and mounted.
Installation
The minimum distance between the supporting surface for the cooking equipment on the hob and the lowest part of the range hood must be not less than 50 cm from electric cookers and 65 cm from gas or mixed cookers.
If the instructions for installation for the gas hob specify a greater distance, this must be adhered to.

Electrical connection
The mains power supply must correspond to the rating indicated on the plate situated inside the hood. If provided with a plug connect the hood to a socket in compliance with current regulations and positioned in an accessible area, after installation. If it not fitted with a plug (direct mains connection) or if the plug is not located in an accessible area, after installation, apply a double pole switch in accordance with
standards which assures the complete disconnection of the mains under conditions relating to over-current category III, in accordance with installation instructions.
Warning! Before re-connecting the hood circuit to the mains supply and checking the efficient function, always check that the mains cable is correctly assembled.
The hood is provided with a special power cable; if the cable is damaged, request a new one from Technical Service.
Mounting
Before beginning installation:
- Check that the product purchased is of a suitable size for the chosen installation area.
- Remove the charcoal (*) filter(s) if supplied (see also relative paragraph). This/these is/are to be mounted only if you want to use the hood in the filtering version.
- Check (for transport reasons) that there is no other supplied material inside the hood (e.g. packets with screws (*), guarantees (*), etc.), eventually removing them and keeping them.
- If possible, disconnect and move freestanding or slide-in range from cabinet opening to provide easier access to rear wall/ceiling. Otherwise put a thick, protective covering over countertop, cooktop or range to protect from damage and debris. Select a flat surface for assembling the unit. Cover that surface with a protective covering and place all canopy hood parts and hardware in it.
- In addition check whether near the installation area of the hood (in the area accessible also with the hood mounted) an electric socket is available and it is possible to connect a fumes discharge device to the outside (only suction version).
- Carry out all the masonry work necessary (e.g. installation of an electric socket and/or a hole for the passage of the discharge tube).
This hood is designed for fitting in a cabinet or on some other support.
Operation
The hood is fitted with a control panel with aspiration speed selection control and a light switch to control cooking area lights.
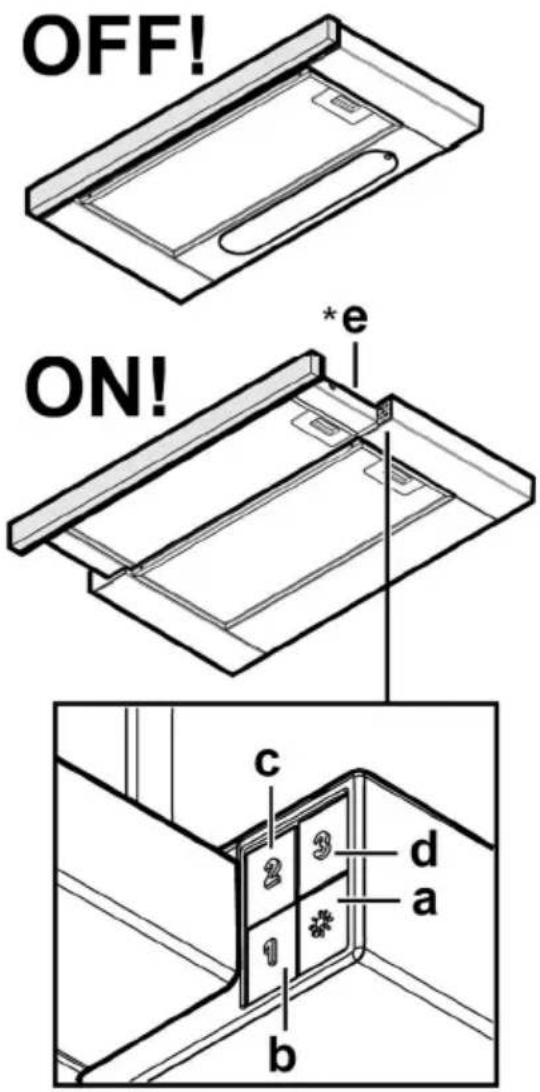
a. ON/OFF light switch b. Speed 1/OFF switch c. 2-speed selection d. 3-speed selection
(*)e. Pull-Out Printer equipped with a "slow motion" automatic closing system
Use the high suction speed in cases of concentrated kitchen vapours. It is recommended that the cooker hood suction is switched on for 5 minutes prior to cooking and to leave in operation during cooking and for another 15 minutes approximately after terminating cooking.
Maintenance
ATTENTION! Before performing any maintenance operation, isolate the hood from the electrical supply by switching off at the connector and removing the connector fuse.
Or if the appliance has been connected through a plug and socket, then the plug must be removed from the socket.
Cleaning
The cooker hood should be cleaned regularly (at least with the same frequency with which you carry out maintenance of the fat filters) internally and externally. Clean using the cloth dampened with neutral liquid detergent. Do not use abrasive products. DO NOT USE ALCOHOL!
WARNING: Failure to carry out the basic cleaning recommendations of the cooker hood and replacement of the filters may cause fire risks.
Therefore, we recommend observing these instructions.
The manufacturer declines all responsibility for any damage to the motor or any fire damage linked to inappropriate maintenance or failure to observe the above safety recommendations.
Grease filter - Fig. 10-21
Traps cooking grease particles.
The grease filter must be cleaned once a month using non aggressive detergents, either by hand or in the dishwasher, which must be set to a low temperature and a short cycle. When washed in a dishwasher, the grease filter may discolour slightly, but this does not affect its filtering capacity.
To remove the grease filter, pull the spring release handle.
Charcoal filter (filter version only) - Fig. 20 It absorbs unpleasant odours caused by cooking.
The saturation of the charcoal filter occurs after more or less prolonged use, depending on the type of cooking and the regularity of cleaning of the grease filter.
In any case it is necessary to replace the cartridge at least every four months.
The charcoal filter may NOT be washed or regenerated.
Remove the grease filters.
Apply one charcoal filter on each side and hook it onto the hood.
Refit the grease filter.
Replacing lamps
Disconnect the hood from the electricity.
Warning! Prior to touching the light bulbs, ensure they are cooled down.
Extract the drawer completely.
Remove the grill.
Replace the damaged lamp.
Use only 035mm E14 28W halogen candle lamps.
Put the grill back.
Some models have halogen lamps:
- Using a flat head screwdriver or equivalent tool, carefully pry loose the light cover.
- Remove the damaged light and replace with a new 12 Volt, 20 Watt (Maximum) halogen light made for a G-4 base, SUITABLE FOR USE IN OPEN LUMINAIRES. Follow package directions and do not touch the new light with bare hands.
- Reinstall the light cover. (It will snap shut.)
If the lights do not work, make sure that the lamps are fitted properly into their housings before you call for technical assistance.
DO NOT USE ALCOHOL!
The use of an open flame is strictly prohibited.
The use of an open flame is dangerous for the filter and may cause fire, so it must be absolutely avoided.
The top must be cleaned under supervision to avoid ignition of the oil.
Some parts may become hot when used with the cooker hood.
Regarding the technical and safety measures that must be applied for the disposal of the lamp, you must strictly follow the regulations in the manual of the local competent authorities.
The hood must be cleaned frequently, both inside and outside (at least once a month, and always follow the maintenance instructions given in these guidelines).
Failure to maintain the hood and to replace and clean the filters may lead to a fire hazard.
Do not use or leave the hood without properly installed lamps! Danger of electric shock!
No responsibility is accepted for any malfunction, fire, or damage caused to the device as a result of failure to follow the instructions.
This device complies with the requirements of: - European Directive 2002/96/EC - Waste Electrical and Electronic Equipment (WEEE). Please ensure that this device is recycled according to the regulations for this product, in order to contribute to the protection of the environment and your health.

This product is marked by the crossed-out wheeled bin symbol. This means that this product must not be treated as household waste, but must be handed over to collection points specifically designated for recycling of electrical and electronic equipment. Please refer to local regulations for waste processing. For more detailed information regarding the disposal, collection, and recycling of this product, please contact your local municipal services, household waste collection services, and the store where you purchased this product.
Use
The hood is intended for: suction and exhaust of air with filtration, while simultaneously recirculating it.

Exhaust air version
The air is exhausted outside through an exhaust pipe connected to the connection flange.
The diameter of the exhaust pipe must correspond to the diameter of the connection piece.
Attention! The exhaust pipe is not included with the accessories and must be purchased separately.
In the horizontal section, the pipe must be slightly inclined upwards (about 10°) to facilitate the exhaust of
air.
If the hood is equipped with an activated carbon filter, it must be removed.
Connect the hood to the exhaust pipe and the wall openings. The diameter of the pipe must correspond to the diameter of the connection flange for air exhaust.
Use pipes with the necessary length. Use pipes with the shortest possible length (maximum bend: 90°; do not bend the pipe sharply!). Use pipes with the smoothest possible inner surface. The material of the pipes must comply with the standards in force.
Attention! If the hood is equipped with an activated carbon filter, it must be removed.

Filter version
The extracted air is purified by passing through the filters before being recirculated into the room. To use the hood in this operating mode, you must install a complete filter system at the base of the filter with activated carbon.
Warning! If the appliance is not equipped with an active carbon filter, the hood must be installed in evacuation mode before use.
Installation
The minimum distance between the surface on which the cooking vessels are placed and the lower part of the kitchen hood must be not less than 50 cm in the case of electric cookers and not less than 65 cm in the case of gas or combined cookers.
If the instructions for the gas cooker specify a greater distance, this must be taken into account.

Electrical connection
The plug must be connected to a socket that complies with the regulations in force, installed on the inner side of the hood. If the hood is equipped with a plug for connection to the mains, the connection must be made in accordance with the standards in force. If it is not equipped with a plug (direct connection to the mains), or if the plug is not in an accessible place for connection, use a double-pole switch that complies with the standards, so as to ensure complete disconnection of the mains under overvoltage category III, in accordance with the installation rules.
Warning! Before connecting the hood to the mains and checking that it works properly, check that the cables are installed correctly.
The hoods are equipped with a special power cable; if the cable is damaged, contact the after-sales service to obtain a new one.
Mounting
Before proceeding with the installation:
- Make sure that the product you have purchased corresponds in size to the chosen installation location. Remove the carbon filter / filters if they are active (it comes off if the model you have chosen has one). To do this, follow the instructions in the relevant paragraph. Mount the filters again in case you wish to use the hood in the filtering version. Make sure that during transport no foreign objects have entered the inside of the hood, such as screws, warranty cards, etc.; if you find any, remove them and keep them. If possible, disassemble and move the furniture that is placed in the immediate vicinity of the place where you intend to install the hood. In this way you will have better access to the wall where the installation will be carried out. In the opposite case, be careful not to damage the furniture and all the parts during installation. Choose a flat surface and cover it with a suitable cloth, on which to place the hood and its accessories. Make sure that in the vicinity of the place where you intend to install the hood there is easy access to the electrical outlet and also that it is possible to connect to the exhaust duct (only for the suction version).
- Perform all necessary operations, for example install the electrical contact and/or make the hole for the passage of the exhaust pipe. The hood is equipped with fixing brackets for the larger part of the wall and the ceiling.
This hood must be installed on a wall or other support.
Start of use
The appliance is equipped with a control panel with the option to adjust the suction speed and the lighting of the product.
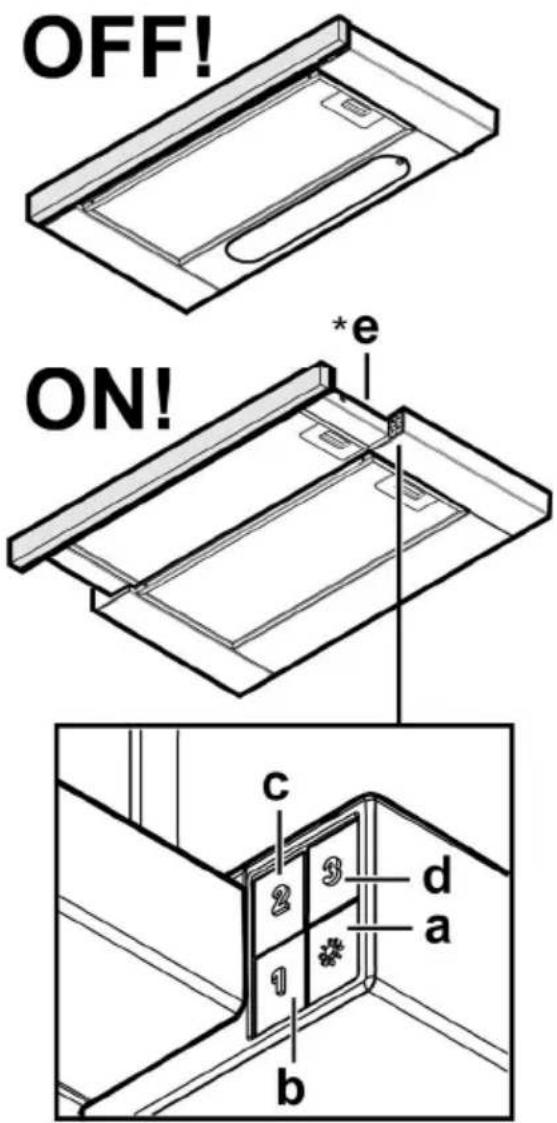
a. Lighting ON/OFF. b. OFF/speed 1. c. Speed 2. d. Speed 3.
(*)e. The device is equipped with a system for automatic shutdown "slow motion".
If during cooking it is used intensively, the motor operates at maximum. It is recommended to turn on the extractor 5 minutes before starting to cook and leave it running for 15 minutes after finishing.
Maintenance
Warning! Before any operation related to cleaning or maintenance, disconnect the extractor from the mains by removing the plug or switching off the main switch of the house.
Cleaning
The extractor should be cleaned frequently (or at least as often as you clean the filters), both inside and outside. Use a damp cloth and neutral liquid detergents.
Avoid detergents containing abrasives. particles.
Warning! Never clean with a sponge!
Warning! Failure to comply with the cleaning standards of the extractor may cause a fire hazard. Strictly follow the instructions!
No responsibility is assumed for any damage to the motor and fire caused by improper maintenance or failure to follow these instructions.
Filters
Fig.10-21
The filter retains the greasy particles separated during cooking.
Ionuctva be venh mesec neytralen preparat. Mne se pvny INN v svdomina mashina na niska temperatura i kratak rezhim na izmivane.
Pri mene na filtara za maznini v svdomina mashina e vazmozhno toj da se ovezhit, no tova v nikakav sluchaj ne namalyava sposobnostta mu na filtirane.
Za da razglobite filtara za mazninite, printe firkata prez himenizma.
Filtar saktivna vuglen (samo za filtirane na vazduh)
Fig. 20
Zadarzhna hipna gtinna miprizma, koyato se otdeelya pri prashkane.
Filtar saktivna vuglen se zamulyava priblizitelno sled 6-8 mesetsa period na izpolzvane v zavisimost ot nachina na gotvene i ot tova kolko chesto pochistvate filtara.
Vav vseki sluchaj e neobhodimo da podmenite filtara s aktivna vuglen na vseki chetiri mesetsa ili kogato indikatorat za zasilane na filtara pokazhe, che e neobhodimo.
Ne se me hito mozhe da se izpolzva povtorno.
Ostranete filtara za maznini.
Postaveno e in saktivna vuglen i izvaden ot dvete strani na aspirota i gazonoporete.
Montirate otnovo filtara za maznini.
Normala na el. kruzhki
Izklyuchete uredata ot el. mrezha.
Vnimanie! Predi da vzemete v raka el. kruzhkite proverete dali sa izstinali.
Replace the damaged part.
Remove the protective film.
Tighten the damaged screw.
Use only halogen lamps type "CBeu" 035 MM. E14 28W.
Mount the counterweight.
Some models are equipped with halogen lamps:
- Using a screwdriver or similar tool, remove the cap of the light fixture.
- Replace the burnt-out lamp.
Use only halogen lamps 12V, maximum 20W-G4, being careful not to touch the bulb.
- Close the hood (when closing, it clicks).
If the lamps do not light, check that they are installed correctly, then contact a specialist.
Strictly follow the instructions provided in this
manual. We disclaim any responsibility for accidents, malfunctions, or fires on the appliance resulting from failure to follow the instructions in this manual. The kitchen hood has the function of extracting smoke and steam during cooking and is intended for household use only.
! It is important to keep this manual so that you can consult it at any time. In case you sell this product, give it away, or move, make sure it always stays with the product. ! Read the instructions carefully: they contain important information about installation, use, and safety. ! Do not make any mechanical or electrical modifications to the product or to the exhaust pipes.
Note: Details marked with "(*)" are optional accessories that are supplied only with certain models or details that are not included because they need to be purchased.

Warnings
Do not leave children unattended so that they do not play with the appliance.
Do not use the extractor hood if the grille is not correctly installed!
It is strictly forbidden to use the extractor hood as a support surface, unless specifically stated otherwise.
Ensure adequate ventilation of the room when using the extractor hood in the kitchen at the same time as other appliances using gas or other fuels.
The extracted air must not be discharged through a duct used for exhausting fumes from appliances burning gas or other fuels.
It is strictly forbidden to cook dishes over an open flame, as the free flame could damage the filters and become a fire hazard; therefore, refrain from doing so in any case.
Frying with a large quantity of oil must be done under constant supervision, keeping in mind that overheated oil can ignite.
When used together with other cooking appliances, the exposed parts of the appliance may become very hot. As for technical measures and safety conditions for the discharge of fumes, strictly follow the rules provided by local competent authorities.
Perform periodic cleaning of the extractor hood both inside and outside (at least once a month, following the conditions specifically provided in the maintenance instructions for this appliance).
Failure to follow the instructions for cleaning the extractor hood and for replacing and cleaning the filters may become a fire hazard.
Do not use or leave the extractor hood without correctly installed lamps, due to the possible risk of electric shock.
We disclaim all responsibility for malfunctions, damage, or fire of the appliance resulting from failure to follow the instructions provided in this manual.
This product is marked in accordance with European Directive 2002/96/EC on the disposal of electrical and electronic equipment (WEEE).
By ensuring the correct disposal of this product, you will help prevent potential negative consequences for the environment and human health.
The label on the product itself for accompanying documentation indicates that when disposing of this product, it must not be treated as household waste. Instead, it should be handed over to an appropriate collection point for the recycling of electrical and electronic equipment for subsequent disposal.
Disposal must be carried out in accordance with local regulations for waste disposal.
For more detailed information on the rules for handling such products, their disposal and recycling, contact your local authorities, the waste disposal service, or the store where you purchased this product.
Operation
The hood is designed to operate in either extraction mode or recirculation mode.

Extraction mode with air exhaust
In this mode, vapors are discharged outside through the duct pipes connected to the connecting ring. The diameter of the exhaust pipe must match the diameter of the connecting ring.
Attention! The exhaust pipe is not included in the package and must be purchased separately.
The horizontal pipe must be slightly inclined upwards (by about 10°) so that the air can be expelled more quickly. If the hood is equipped with a charcoal filter, make sure it is
Connect the hood to the exhaust pipe with a diameter corresponding to the air outlet opening (connecting flange).
! Use a pipe with the minimum necessary length. ! Use a pipe with the minimum number of bends (maximum bend angle: 90°). Avoid sudden changes in pipe cross-section. The inner surface of the pipe used must be as smooth as possible. ! The pipe material must be approved according to standards.
Attention! If the hood is equipped with a charcoal filter, make sure it is.

Recirculation mode
A charcoal filter available from your distributor must be used. The extracted air is deodorized and purified before being returned to the room through the top grille.
Attention! If the hood is not equipped with a charcoal filter, order and install it before use.
Installation
The distance between the lower edge of the hob and the hood must be at least 50 cm for electric hobs, and at least 65 cm for gas or combination hobs.
If the installation instructions for the gas hob specify a greater distance, take this into account.

Electrical connection
The voltage must correspond to the voltage indicated on the data plate, which is located inside the appliance. If the plug is fitted, plug it into a socket that complies with current regulations and is accessible even after installation. If the plug is not fitted (direct connection to the mains) or if the socket is not accessible after installation, use a two-pole switch that ensures complete disconnection from the mains under overvoltage category III conditions, in accordance with installation instructions.
Warning! Before connecting the electrical system of the hood to the mains, check that it is properly earthed and ensure that the power cable is correctly installed.
The hood has a special power cable; in case of damage, it must be ordered from the technical service department.
Installation
Before installation:
- Check that the dimensions of the hood you have purchased fit the chosen installation location.
- Remove the charcoal filters, if present (see also the relevant section). The filters are installed only if you want to use the hood in recirculation mode. Check that no objects remain inside the hood that were placed there during transport (e.g., bags of screws, warranty documents, etc.). If present, remove and keep them. If possible, detach and move any furniture elements located above the hood or near its installation area, to ensure free access to the wall/ceiling where the hood will be fixed. If this is not possible, protect the furniture and other items as carefully as possible during installation. Choose a flat surface, cover it with protective covering, and place the hood and mounting parts on it.
- Make sure that near the hood installation area (in a zone accessible even after installation) there is a power socket and a hole for the flue pipe that vents outdoors (only in extraction mode).
- Perform all necessary work (e.g., installing the power socket and/or drilling the hole for the flue pipe).
The hood's flue pipe must be attached to the wall cabinet or another supporting item.
Operation
The exhaust hood is equipped with a control unit for the exhaust fan speed and lighting for illuminating the work surface.
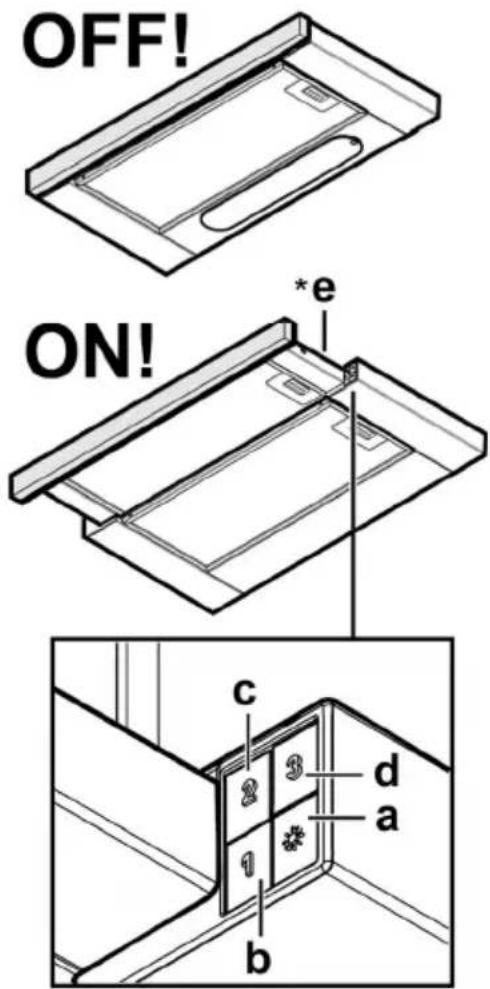
a. Lighting switch ON/OFF. b. Switch OFF/Speed 1 c. Speed switch 2 d. Speed switch 3
(*)e. The exhaust hood is equipped with an automatic closing system "slow motion"
Use the intensive mode of the hood operation in case of particularly high concentration of kitchen vapors. We recommend turning on the hood 5 minutes before the start of the cooking process and leaving it on for 15 minutes after the end of the process.
Maintenance
Warning! Before performing any cleaning or maintenance operation, disconnect the hood from the electrical supply, disconnecting the plug or the main switch of the room.
Cleaning
The hood should be cleaned frequently both inside and outside (at least with the same frequency as the grease filters). For cleaning, use a special cloth moistened with a neutral liquid detergent. Do not use products containing abrasive materials.
DO NOT USE ALCOHOL!
Warning: Failure to follow the cleaning rules of the appliance and replacement of filters may lead to a risk of fire. Therefore, we recommend following the instructions provided.
We disclaim any liability for possible damage to the motor and for fires arising as a result of improper repair or non-compliance with the above warnings.
Grease filters
Fig. 10-21
Retains grease particles coming from the hood.
The filters should be cleaned monthly with non-abrasive detergents, by hand or in the dishwasher at low temperature and economical cycle.
During operation, some dimming of the lamp may occur, but its light output characteristic remains absolutely unchanged.
Replace the burnt-out lamp.
Use only halogen lamps 035 mm E14 28W.
Reinstall the lamp filters and pull out the grid.
Some models are equipped with halogen lamps on:
- Remove the lamp with a small screwdriver or similar tool.
- Replace the burnt-out lamp. For this, use only halogen lamps 12V -20W max G4, do not touch them with your hands.
- Close the hood (fastening with clips).
If the lighting system does not work, check the correct installation of the lamps in the sockets before contacting the technical support center.
Before starting installation:
- Check the dimensions of the purchased hood against the chosen installation space. The filter/duct/vent must be present (also check the corresponding dimensions). The filter/duct/vent must be
installed according to the hood you want to use during the recirculation period.
Check that the inside of the hood is not blocked by objects placed there during transport (e.g., packaging, screws, warranty documents, etc.), and if so, remove them and keep them. Carefully remove and dispose of any packaging materials found inside and around the hood before installation, to ensure better access to the walls/ceiling when the hood will be fixed. If it is not possible to protect the furniture and other objects during installation, cover the work surface with protective covering and place the hood and parts for fixing on it. Also check that in the installation area of the hood (accessible also after hood installation) there is a power outlet and a vent for the exhaust, which leads outside (or in recirculation mode). Perform all necessary work (e.g., installation of the power outlet and/or making the exhaust duct opening).
The hood must be installed on a hanging element or on a support system.
Functioning
The control panel is designed to control the blowing intensity and the light control for illuminating the working surface.
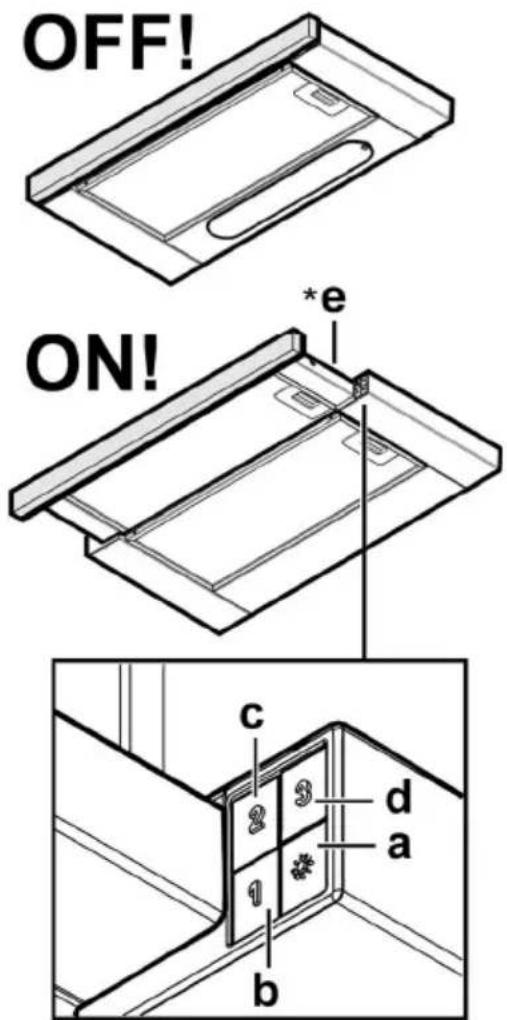
a. Turn the light ON/OFF. b. Turn OFF/speed 1 c. Switch speed 2 d. Switch speed 3
(*)e. Pull-out nozzle with automatic lock "slow motion".
Use intensive blowing in case of especially high concentration of dust particles. We recommend turning it on 5 minutes before starting to blow and keeping it on for 15 minutes after finishing blowing.
Cleaning
Warning! Before any cleaning or maintenance operation, disconnect the appliance from the power supply, pulling out the plug or switching off the main switch.
Cleaning
Clean the appliance regularly, both outside and inside (at least with the same frequency as the cleaning).
For cleaning the filter, use a special cloth or a neutral cleaning agent.
Do not use abrasive materials or solvents. Do not use alcohol!
Warning: Failure to follow the cleaning and maintenance instructions may lead to risk of damage. Therefore, we recommend following the provided instructions.
All responsibility is disclaimed for any damage or injuries caused by improper repair or failure to follow the above precautions.
Filter for dust - Fig. 10-21
Retains dust particles that arise during cooking.
Fully clean it after each use with non-abrasive agents, manually or in a dishwasher at low temperature and with a short cycle.
If the grease filter is not cleaned in time, it may lose its properties, but its characteristics from cleaning with a dishwasher will not change. The grease filter cleaning process should be carried out by hand, highlighting and filtering.
Charcoal filter (only in recirculation mode) Max. 20
Absorbs kitchen odors.
Checking the charcoal filter for saturation is carried out after a full period of use, depending on the type of kitchen and the regularity of filter cleaning. In any case, it is necessary to replace the cartridge at least every three months.
Not suitable for washing in a dishwasher.
Remove the grease filters.
Place the charcoal filter on each side and secure it to the hood.
Install the grease filters.
Replacement
Disconnect the hood from the power supply.
Attention! Before touching the lamps, make sure they have cooled down. Completely pull out the drawer to remove the grille.
Replace the halogen lamp. Use only halogen lamps with 35 mm E14 28W base. Install the grille.
Some models have halogen lamps:
- Remove the protective element with the help of a small screwdriver or similar tool.
- Replace the halogen lamp. Use only the specified halogen lamps with 12V-20W max G4, do not touch them with your hands.
- Remove the protective film (before use).
If the appliance does not work, check the lamp installation in the socket before contacting the technical support center.
Variant with recirculation
The extracted air is passed through the filter and then returned to the room. For using the hood in this variant, it is necessary to install an additional filter system based on activated carbon.
Attention! If the hood is not equipped with a filter, it must be ordered and installed before use.
Installation
The minimum distance between the hob and the lower part of the hood must not be less than 50 cm for electric hobs and 65 cm for gas or combined hobs. If the installation instructions for the gas hob specify a greater distance, this must be respected.
Electrical connection
The main power supply must correspond to the rating shown on the rating plate inside the hood. If the hood is equipped with a plug, connect it to the socket in accordance with the safety regulations and positioning of the plug after installation. If it is not equipped with a plug (direct connection to the electrical supply) or if the plug is not suitable for the location, after installation, install a multi-pole switch in accordance with the standards that ensure complete disconnection from the electrical supply under conditions of overvoltage category III, in accordance with the installation instructions.
Warning! Before (re)connecting the hood to the electrical supply and checking its functionality, always check that the power cable is correctly installed.
The hood is supplied with a special power cable; in case of cable damage, contact a qualified technician for replacement.
Operation
Before starting the installation:
Prepare the hood for installation according to the instructions for installation space. - The filter(s) should be installed if they are supplied (see the corresponding paragraph). They are installed only if the hood is to be used with the filter version. - Check that the inside of the hood (transport packaging) does not contain any material from the packaging (e.g., cardboard with staples and nails, etc.). If there is any, remove it and dispose of it. If possible, place the hood on the furniture under the installation space (floor or table) to have a better accessibility. Among other things, protect the furniture and follow other work instructions that may be useful. Choose a flat surface and cover it to protect the furniture and the hood from damage. Check, among other things, that near the installation space of the hood (in the space that is provided and with the hood installed) there is an electrical outlet available and that it can be connected to the device for exhausting the vapors to the outside (only the version with suction). - Make the necessary electrical work (e.g., installing an outlet and/or an opening for the exhaust duct).
This type of hood must be installed inside a cabinet or in another part of the kitchen.
Operation
The hood is operated with the control panel of the speed regulator for suction and the regulator for lighting, located on the front of the hood.
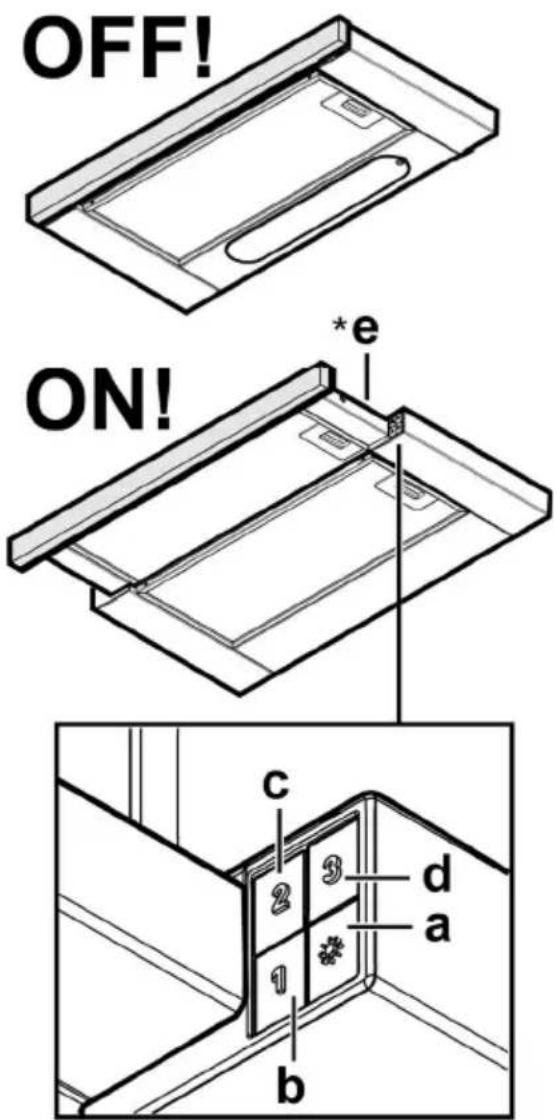
a. Switch for on/off and light. b. Switch for off/speed 1 c. Speed 2 d. Speed 3 (*)e. Timer with automatic shut-off "slow motion".
Use the highest speed in case of high concentration of vapors in the kitchen. We recommend turning on the suction 5 minutes before starting to cook and leaving it running for about 15 minutes after finishing cooking.
Maintenance
Warning! Before any cleaning or maintenance operation, disconnect the hood from the electrical mains by unplugging the plug or by switching off the household circuit breaker.
Cleaning
The hood must be cleaned regularly (at least with the same frequency with which the grease filters are maintained) both inside and outside. For cleaning, use a cloth dampened with mild neutral detergent.
Do not use products containing abrasives. DO NOT USE ALCOHOL!
Warning! Failure to follow the instructions regarding cleaning the hood and replacing the filters may lead to fire risk. It is recommended to follow the instructions provided. The manufacturer disclaims any liability for possible damage to the motor or fire caused by improper maintenance or failure to follow the instructions.
Grease filter
No. 10-21
For collecting the grease, it consists of the plate from the cooking.
The filter must be replaced with a non-return valve, or with a machine for replacing the oil at short intervals.
With the replacement of the filter, the filter for the oil may lose some of its characteristics for filtering, but the water is not changed.
To remove the filter, lift it up and take it out for disposal.
Filter with active charcoal (only for the variant with filtering)