1171250502 - Lighting BRENNENSTUHL - Free user manual and instructions
Find the device manual for free 1171250502 BRENNENSTUHL in PDF.
| Product Type | High-performance LED projector |
| Brand | Brennenstuhl |
| Model | 1171250502 |
| Rated voltage | 220 – 240 V~50 Hz |
| Protection class | I |
| Protection rating (IP) | IP65 |
| Power | 10 W (1 x 10 W) |
| Dimensions (protective cover) | 110,5 x 83 x 4 mm |
| Detector type | Without detector |
| Power supply | Mains |
| Main functions | Indoor/outdoor lighting, wall mounting, high brightness |
| Maintenance and cleaning | Clean with a dry or slightly damp cloth. Do not use solvents. |
| Safety | Installation by qualified personnel, cut power before maintenance, mandatory grounding, do not look directly into the beam. |
| Spare parts and repairability | No replaceable parts. The LED source cannot be replaced. Replace the entire projector in case of defect. |
| General information | Compliant with WEEE directive (2012/19/EU). Do not dispose of with household waste. |
Frequently Asked Questions - 1171250502 BRENNENSTUHL
User questions about 1171250502 BRENNENSTUHL
0 question about this device. Answer the ones you know or ask your own.
Ask a new question about this device
Download the instructions for your Lighting in PDF format for free! Find your manual 1171250502 - BRENNENSTUHL and take your electronic device back in hand. On this page are published all the documents necessary for the use of your device. 1171250502 by BRENNENSTUHL.
USER MANUAL 1171250502 BRENNENSTUHL
GB Operating Instructions 8
3
2
flowchart
graph LR
    A["Rectangular Structure with internal lines"] --> B["Rectangle with diagonal lines"]
GB OperatingInstructions Chip LED Light
Please note: Please read these instructions carefully prior to mounting the light and store them in a safe location afterwards!
SPECIFICATIONS
Protection class: I
Nominal voltage: 220–240 V\~50 Hz
Model: Output: Type of Motion Protective cover protec- detector: dimensions: tion:
| L CN 110 IP65 | 10 W (1 x 10 W) | IP65 | no | 110.5 x 83 x 4 mm |
| L CN 110 PIR IP44 | 10 W (1 x 10 W) | IP44 | yes | 110.5 x 83 x 4 mm |
| L CN 130 IP65 | 30 W (1 x 30 W) | IP65 | no | 220.5 x 180.5 x 4 mm |
| L CN 130 PIR IP44 | 30 W (1 x 30 W) | IP44 | yes | 220.5 x 180.5 x 4 mm |
| L CN 150 IP65 | 50 W (1 x 50 W) | IP65 | no | 281.5 x 231 x 4 mm |
| L CN 150 PIR IP44 | 50 W (1 x 50 W) | IP44 | yes | 281.5 x 231 x 4 mm |
| L CN 180 IP65 | 80 W (1 x 80 W) | IP65 | no | 303.5 x 225.5 x 5 mm |
The heavy-duty LED light is suitable for indoor and outdoor lighting applications and is designed for permanent installation. Do not use this light for any other purposes.
SAFETY NOTES
- The light must be installed and serviced by a qualified technician.
- Always turn off the power supply before installing or servicing the light.
- The light must be properly earthed.
- Do not use this light without properly attached gaskets!
- LED lights are extremely bright! Avoid looking straight into an LED light beam, as doing so could result in irreversible eye damage.
- Damaged protective covers must be replaced with an original Brennenstuhl protective cover before the light can be used again.

flowchart
graph LR
    A["Symmetrical Structure"] --> B["Rectangular Block"]
    style A fill:#f9f,stroke:#333
    style B fill:#bbf,stroke:#333
- If the mains supply cable of the light is damaged it must be replaced by a qualified technician in order to avoid risks.
MOUNTING AND CONNECTION TO THE POWER SUPPLY
- Do not attach the light to a surface that is subject to vibrations.
- Mounting position: If possible the light should be mounted using the wall bracket. Lights with a motion detector must be mounted as shown in Fig. 1.
- Mark the position of the bore-holes that are needed to attach the wall bracket and drill the required holes in the wall. Attach the bracket to the wall using suitable screws.
- Open the light's terminal box.
GB
Operating Instructions Chip LED Light
- Guide the connecting cable through the cable gland and connect it to the light's lustre terminal as shown in Fig. 2 (left image shows 10 W version, right image shows 30 W version and higher. N = blue cable, earthing symbol = green / yellow cable, L = brown cable).
- Make sure the cable is securely fastened in the cable gland.
- Replace the cover of the terminal box. Make sure the gasket is seated correctly.
- Fasten the light to the wall bracket using the screws and nuts included with the package. Set the light to the desired position and tighten the screws.
DESCRIPTION OF OPERATION
(For Versions with a Motion Detector)
The light is equipped with an infrared sensor. It turns on automatically whenever the sensor detects movement in its vicinity
Try not to aim the motion detector in the direction of swimming pools, heater vents, air conditioners or objects which are subject to large variations in temperature. Avoid pointing the motion detector at trees or shrubs and at areas where pets like to move about.
Make sure when mounting the light that the motion detector is most sensitive to things that move through its detection range from side to side and least sensitive to things that move straight at the device.
ADJUSTING THE MOTION DETECTOR
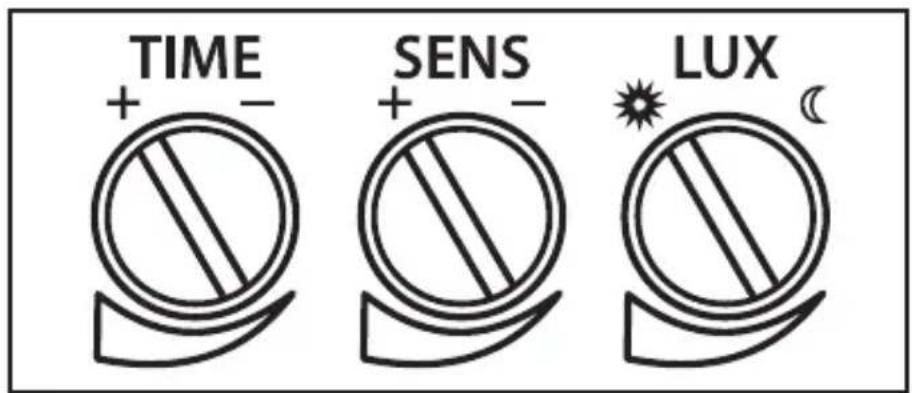
There are three knobs on the underside of the light (see Fig. 3).
Setting the time (TIME):
Use the TIME knob to set how long the light remains on after the last movement (between 10 seconds and 4 minutes). Turn the TIME knob clockwise to increase the time span.
Sensitivity (SENS):
This knob can be used to adjust the sensitivity of the sensor. Turn the SENS knob clockwise to increase sensitivity.
Light Setting (LUX):
The LUX setting determines how dark it must be before the sensor turns on the light. The sun symbol (*) shows that the sensor is active during the day and at night. If the knob is set to moon (C), the sensor only works at night. To adjust the sensor, wait until the desired level of ambient light has been reached. Turn the knob all the way to the moon symbol (C), then turn the knob slowly towards the sun symbol (*) until the light turns on if movement is detected.
The light will thereafter turn on automatically at the preset level of darkness whenever a movement is detected.
Motion detector: passive infrared sensor
Detection range: up to 12 m / up to 180 ° (horizontal)
Time setting: approx. 10 sec–4 min
MAINTENANCE AND CLEANING
All maintenance work must be carried out by a qualified electrician.
PLEASE NOTE: The LED light does not contain parts that need servicing. The LED light source cannot be replaced. If necessary, replace the entire light.
Do not use solvents, corrosive cleaners or the like. Use a dry or slightly moist cloth for cleaning ONLY.
Dispose of electrical devices in an environmentally responsible manner!
Do not dispose of electrical devices with household rubbish!
In accordance with Directive 2012/19/EU on waste electrical and electronic equipment, used electrical equipment must be collected separately and reused or recycled in an environmentally responsible manner.
Please contact your local authorities for available disposal options for your worn-out device.
Addresses
flowchart
graph LR
    A["Rectangle with internal lines and diagonal hatching"] --> B["Rectangular block with internal lines and diagonal hatching"]

BESCHRIJVING VAN DE WERKING
flowchart
graph LR
    A["Rectangle with internal lines and arrows"] --> B["Rectangular block with internal lines and arrows"]
flowchart
graph LR
    A["Cross-shaped structure"] --> B["Rectangular block with internal lines"]
flowchart
graph LR
    A["Rectangle with internal lines and dots"] --> B["Rectangular block with internal lines and dots"]
flowchart
graph LR
    A["Rectangle with diagonal lines inside"] --> B["Rectangular block with internal lines and slats"]
flowchart
graph LR
    A["Cross-shaped structure"] --> B["Rectangular block with internal lines"]
flowchart
graph LR
    A["Cross-shaped structure"] --> B["Rectangular block with internal lines"]

flowchart
graph LR
    A["Cross-shaped structure"] --> B["Rectangular block with internal lines"]

flowchart
graph TD
    A["Rectangle with diagonal lines and dots"] --> B["Rectangular block with horizontal lines and dots"]

flowchart
graph LR
    A["Symmetrical structure"] --> B["Rectangular block with internal lines"]
flowchart
graph LR
    A["Rectangle with internal lines and shaded regions"] --> B["Rectangular block with internal lines and shaded regions"]
flowchart
graph LR
    A["Cross-shaped structure"] --> B["Rectangular block with internal lines"]
flowchart
graph LR
    A["Rectangle with internal lines and shaded regions"] --> B["Rectangular block with internal lines and shaded regions"]
flowchart
graph LR
    A["Cross-shaped structure"] --> B["Rectangular block with internal lines"]
flowchart
graph LR
    A["Rectangle with internal diagonal lines and two curved segments"] --> B["Rectangular block with internal lines and three diagonal lines"]

flowchart
graph LR
    A["Rectangle with internal lines and dots"] --> B["Rectangular block with internal lines and dots"]
flowchart
graph LR
    A["Rectangle with internal lines and diagonal hatching"] --> B["Rectangular block with internal lines and diagonal hatching"]