
SPF87H - Digital photo frame SAMSUNG - Free user manual and instructions
Find the device manual for free SPF87H SAMSUNG in PDF.
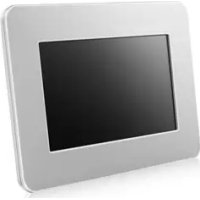
| Product Type | Digital Photo Frame |
| Brand | Samsung |
| Model | SPF87H |
| Screen Size | 8 inches (20.3 cm) |
| Screen Resolution | 800 x 480 pixels |
| Display Type | TFT LCD |
| Internal Memory | 1 GB |
| Supported Image Formats | JPEG (except progressive and CMYK) |
| Connectivity | USB 2.0 (Host and Device) |
| External Storage | SD card, USB flash drive |
| Power Supply | External 12V power adapter |
| Power Consumption | 5.3 W (on), <1 W (standby) |
| Dimensions (W x H x D) | 236.0 x 159.4 x 23.0 mm |
| Weight | 500 g |
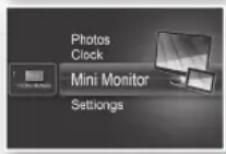
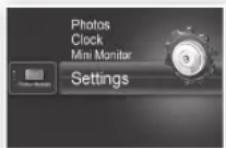
| Main Features | Slideshow, Mini Monitor, clock, calendar, screensaver |
| OSD Languages | Multilingual (French, English, etc.) |
| PC Compatibility | Windows XP SP2, Vista (32-bit) |
| Included Accessories | Power adapter, USB cable, user manual |
| Care and Cleaning | Clean with a soft, dry cloth |
| Safety | Do not expose to moisture, use the supplied adapter |
| Spare Parts and Repairability | Contact Samsung customer service for parts |
Frequently Asked Questions - SPF87H SAMSUNG
User questions about SPF87H SAMSUNG
0 question about this device. Answer the ones you know or ask your own.
Ask a new question about this device
Download the instructions for your Digital photo frame in PDF format for free! Find your manual SPF87H - SAMSUNG and take your electronic device back in hand. On this page are published all the documents necessary for the use of your device. SPF87H by SAMSUNG.
USER MANUAL SPF87H SAMSUNG
Thank you for purchasing this Samsung product.
To receive more complete service, please register your product at www.samsung.com/register
Model Serial No.
Language tag in the user manual


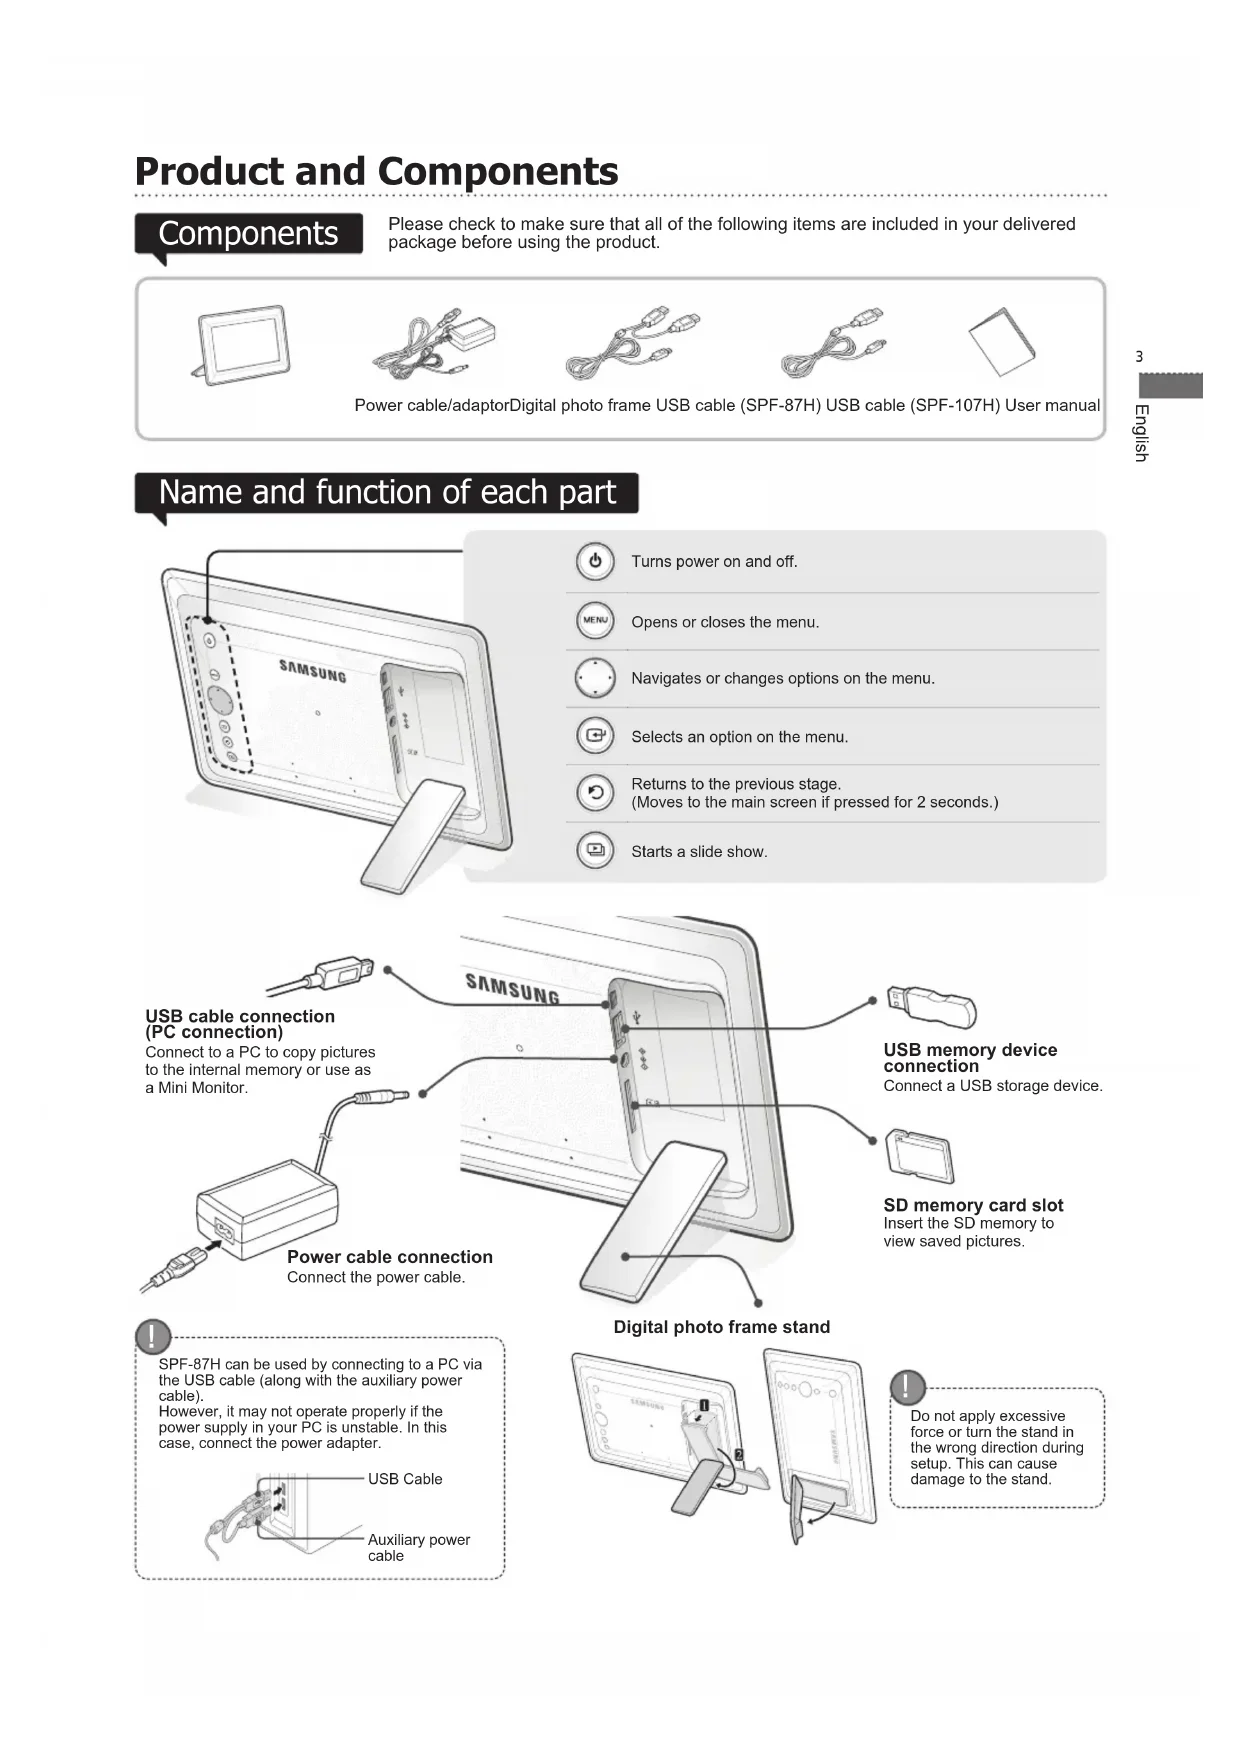
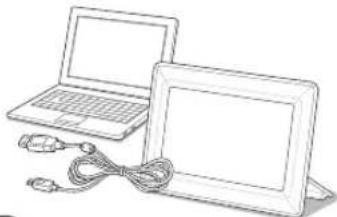
Product and Components
Components
Please check to make sure that all of the following items are included in your delivered package before using the product.
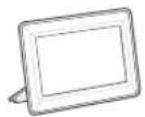
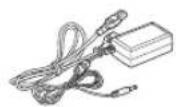
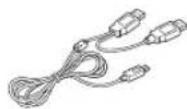
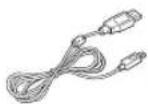
Power cable/adaptorDigital photo frame USB cable (SPF-87H) USB cable (SPF-107H) User manual
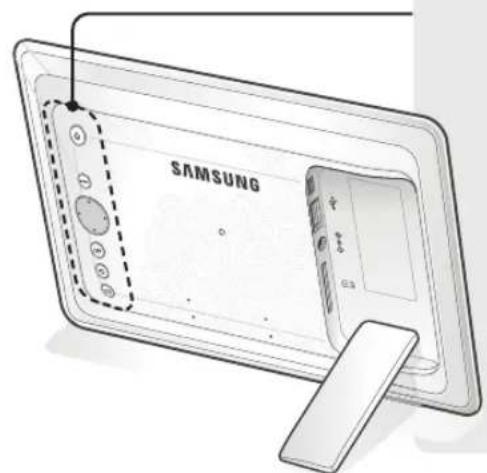
Name and function of each part
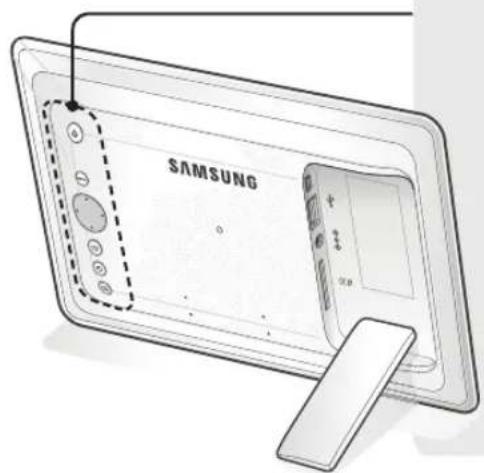

Turns power on and off.

Opens or closes the menu.

Navigates or changes options on the menu.

Selects an option on the menu.

Returns to the previous stage. (Moves to the main screen if pressed for 2 seconds.)

Starts a slide show.
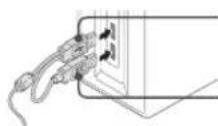
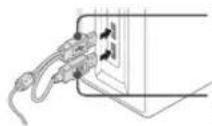
USB cable connection (PC connection)
Connect to a PC to copy pictures to the internal memory or use as a Mini Monitor.
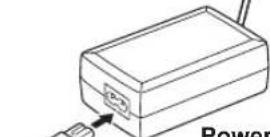
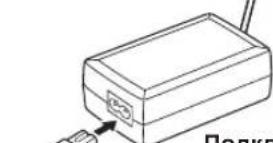
Power cable connection Connect the power cable.

SPF-87H can be used by connecting to a PC via the USB cable (along with the auxiliary power cable). However, it may not operate properly if the power supply in your PC is unstable. In this case, connect the power adapter.
USB Cable
Auxiliary power cable
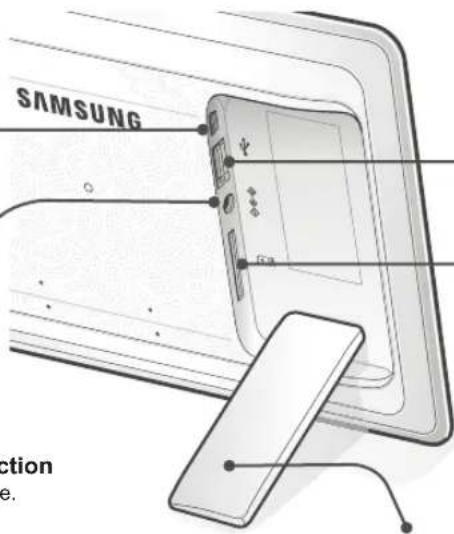
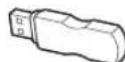
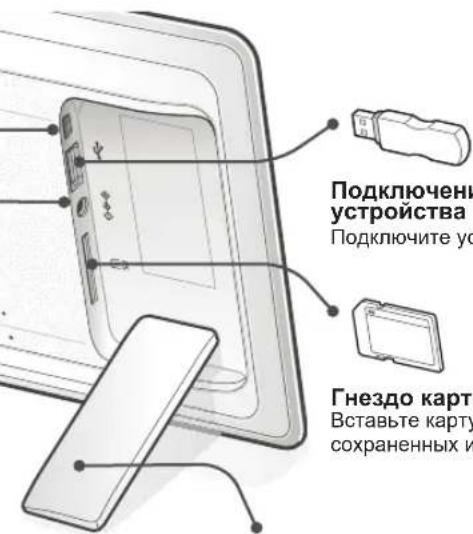
USB memory device connection
Connect a USB storage device.

SD memory card slot Insert the SD memory to view saved pictures.
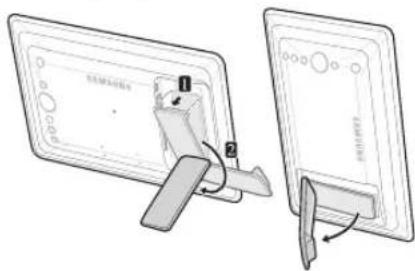
Digital photo frame stand

Do not apply excessive force or turn the stand in the wrong direction during setup. This can cause damage to the stand.
Using the Digital Frame
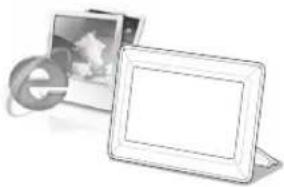
Viewing pictures
Pictures saved in the product's internal memory or an external memory device can be viewed in a wide range of options.
Only an SD memory card or USB memory device can be used as an external memory device.
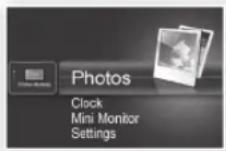
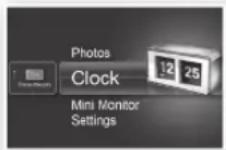
A wide range of effects can be applied to pictures through the menu. Refer to the following page for menu options.
Press [B]
![SAMSUNG SPF87H - Press [B] - 1](/content/2026/02/360751/images/c63557e7afed3fab7265a19eb39cec0aae3240106f3ecf7b96f0b34cf9dc65b8.jpg)
![SAMSUNG SPF87H - Press [B] - 2](/content/2026/02/360751/images/670553353c9ec61c713ab7deda971a7fc147067f2fc5706817ee97b9e5142144.jpg)
![SAMSUNG SPF87H - Press [B] - 3](/content/2026/02/360751/images/feb878f9dcd0bcc5f4e7a9ce6daf658f341046991e8925fc0deb5f6ff88508f3.jpg)
![SAMSUNG SPF87H - Press [B] - 4](/content/2026/02/360751/images/15b012e08372c94cbcee8ab5d503a449fc459e676d88be034bebb85cd3a2ffc6.jpg)
![SAMSUNG SPF87H - Press [B] - 5](/content/2026/02/360751/images/559bd2a87c2b00c048f77ed68ee0cdb9ac51185018273a8151ae6a71a4ea8647.jpg)
![SAMSUNG SPF87H - Press [B] - 6](/content/2026/02/360751/images/ce958f695e91da29cbad8c8c04b5457896c5ad79c98ea33e85ae4c6a18a63370.jpg)
![SAMSUNG SPF87H - Press [B] - 7](/content/2026/02/360751/images/38b3e1c90223b8260a98f97ea5f9b8ade0ec40912e39c41af07905e6d6cb5a70.jpg)
If you press any button, the button guide will appear at the right hand side of the screen.
The available button indication may differ depending on the situation.
If you press the [MENU] button during a slide show, the
- To use
- Only the
Using as a Mini Monitor
Connect the digital frame to a PC with the USB cable to use as a Mini Monitor.
Connect the digital frame to a PC with the USB cable to use as a Mini Monitor (aux. monitor). You must install Frame Manager on your PC in order to use the product as a Mini Monitor.
Log on to http://samsung.com/ to download Frame Manager and for instructions on using the product as a Mini Monitor.
Only one auxiliary monitor can be used at a time.
PC requirements for use as a Mini Monitor
OS: Windows XP SP2, Vista(32bit)
- USB: Extended Host Controller(EHCT)
USB 2.0 supported
RAM: 256MB or higher
CPU: 2.4GHz or higher
Firmware update
Preparations for firmware update
Digital photo frame
Firmware file for update
USB memory or SD card
Download and install the latest firmware from the Samsung Electronics homepage.
Log on to http://samsung.com/ and enter the model name in the search fi eld. (SPF-87H or SPF-107H)
2 Download and decompress the appropriate fi rmware.
3 Copy the decompressed ***.isp file to the SD card or USB memory device and connect to the digital frame.
4 Select
When the update is fi nished, turn the digital frame off, remove the external memory device (SD card/USB memory device), and turn the digital frame on again.
You can check if the firmware version has been updated in
Use the buttons on the back of the product to set various functions to your preferences.
Home Moves to the main screen
Copy If an external memory device (SD memory card/ USB memory device) is connected to the product,
- Copies pictures in an external memory device to the internal memory
- Copies pictures in the internal memory to an external memory device
Delete Deletes pictures in the internal memory or an external memory device
Select Multiple Files Selects multiple files to run functions like slide show, copy, delete, etc.
Select Storage If an external memory device (SD memory card/USB memory device) is connected to the device, - Select the internal memory or an external memory device (SD memory card/USB memory device)
Settings
The current time configured in
Connect the digital frame to a PC with the USB cable to use as a Mini Monitor.
| Photos | Slideshow Transition Sets the slide show effects • No Effect / Fade / Blinds / Cross Comb / Mosaic / Checkerboard / Dissolve / Wipe / Extend / Silk / Comer Transition / Wheel / Ellipse / Random | |
| Slideshow Speed Sets the slide show speed • Fast / Normal / Slow Images of large file sizes may not be displayed at the currently confi gured slideshow speed. | ||
| Slideshow Mode • All Photos / Photos in folder / One photo | ||
| Slideshow Order Sets the slide show order • Normal / Shuffie | ||
| View Mode Sets the slide show display mode • Photo Only / Photo & Clock / Photo & Calendar / Multiview 1 / Multiview 2 | ||
| Aspect Ratio | • Original Fit: A picture smaller than the screen is displayed in its original size and a picture bigger than the screen size is reduced in direct proportion to the screen size. • Auto Fit: Fits the picture in direct proportion to the screen size • Fit to Width: Fits the picture to the screen's horizontal width | |
| Portrait Photo Mode Reduces a vertical picture to fi t the screen | ||
| Display Photo Info Displays a picture's fi le name and date of creation | ||
| Clock | Clock Set Sets the current time | |
| Date Format Select the month, year, day display mode (YYYY/MM/DD, MM/DD/YYYY, DD/MM/YYYY) | ||
| Time Format Selects the time display mode (12 hours, 24 hours) | ||
| Clock Type Selects the clock display mode (Clock Only, Clock & Calendar) | ||
| General | Quick Setup | Easy settings for frequently used functions (View Mode, Slideshow Transition, Clock Set, and Startup Mode) |
| Language | Selects the OSD (on-screen display) language | |
| Brightness | Adjusts the screen brightness | |
| Auto Picture On/Off | Sets the screen to automatically turn on and off at certain times | |
| Startup Mode | Selects the screen to be displayed when the digital frame is switched on • Home / Last Mode / Slideshow | |
| Screen Saver | If there is no button operation for 10 minutes, the currently configured screensaver will appear. • Slideshow / Clock | |
| Frame Memory Copy | • Original Size: Copies an original fi le as is • Resized: Matches the screen's optimal resolution by reducing the fi le size and then copies. | |
| Activate USB Communication | Selects the recognition mode to be used when the digital frame is connected to a PC with a USB cable Use as a removable disk or Mini Monitor Use as a digital photo frame | |
| Support | Upgrade Software | Updates the fi rmware |
| Reset | Reset user-customized menu options to default (Time setting and screen language setting excluded) | |
| Product Guide | Product functions guide | |
| Product Information | Displays product model name, firmware version, internal memory and copyrights | |
Check the below table first when a malfunction is suspected.
| Symptoms and questions Causes and corrections | |
| The power won't switch on. Ensure that the power cable is correctly connected. | |
| Spots which look like light leaking can be seen on the edges of the clock screen. | Black LCD panel screens by nature can have this effect, which is not a defect. |
| The time setting is wrong. | The current time setting can be erased if the power adaptor is disconnected for a prolonged period of time. Keep the power adaptor connected. |
| It takes a long time for images to be displayed after the power has been turned on. | It is recommended to reduce the picture resolution. |
| It takes a long time to move from one image to the next. | |
| I can't copy more files even when there is excess capacity to use in the internal memory. | You may be unable to copy files if the FAT section of the internal memory is damaged. Try again after formatting the internal memory. |
| I've connected an external memory device (USB memory device or SD memory card) but it doesn't work. | · SPF-87H can be used by connecting the power adapter instead of the USB cable. · Ensure that the external memory device has been connected properly or try formatting it. · Ensure that JPEG files are saved in the external memory device. · Abnormal picture files (0 Kbyte, broken JPEG) will not be displayed on the screen. · The connected external memory device is not supported. Try another storage device. |
| Vertical pictures are displayed horizontally. | Ensure that the <Portrait Photo Mode> option is set correctly in <Settings> - <Photos>. |
| JPEG files are not displayed. | · Progressively saved JPEG files or JPEG files saved as CMYK color coordinates will not be displayed. · Images edited by a JPEG image editor (Photoshop, Paintshop, etc.) may not be displayed normally. Edit the image on a PC, convert back to JPEG format, save, and try again. |
| Some pictures are not displayed as a slideshow. | This product can accommodate a maximum of 4,000 pictures. Any excess pictures will not be recognized and will not be displayed as a slide show. |
| The picture size changes when I rotate it. | The picture size changes automatically depending on the rotation angle (90°, -90°) in order to display the entire image on the screen. |
| The picture looks stretched horizontally or vertically. | Press [MENU] on the slide show screen. Go to <Settings> - <Photos> - <Aspect Ratio> and change the setting to <Original Fit> and check again. |
| Previews are too slow. Previews may be slow for large-sized images and multiple images. | |
| Slide show effects are displayed when I have saved only one picture I want in the memory card or when I pause the slide show with multiple pictures saved in the memory card. | The slide show effects will be displayed automatically in order to protect the panel. This is not an error. |
| In what order are the pictures, which are saved in the memory card, displayed? | They are arranged according to the file names. The slide show display order is determined in the order of number, upper-case letter, and lower-case letter. Please note that a file name of up to only 25 characters can be recognized. |
| The slide show doesn't start automatically. | Ensure that the <Startup Mode> is set to <Settings> - <General>. |
| I have set <Auto Picture On/Off> but the screen doesn't switch on automatically. | · Ensure that the current time has been set correctly. · The screen will not switch on automatically if you have turned the digital frame off by pressing [O] when <Auto Picture On/Off> has been set. The screen switches on automatically only if the power has been switched off automatically at the Auto Picture Off time. |
| The pictures I copied from a USB memory or SD card onto the internal memory have changed in resolution and file size. | This product is designed to reduce the file size of high-resolution pictures to fit the screen's ideal resolution when they are copied onto the internal memory. If you want to disable the settings, you can change to the original size by selecting <Settings> - <General> - <Frame Memory Copy>. |
| The digital frame is not recognized as a removable disk when I connect it to a PC with the USB cable. | The SPF-87H has 2 USB connectors. You must connect the USB connector [O] because the digital frame will not be recognized as a removable disk if only the auxiliary power (DC 5V) connector is connected to a PC. |
Product Specifications
| Classification Details | |||
| Model name SPF-87H SPF-107H | |||
| Panel Type | 8" TFT LCD 10" TFT LCD | ||
| Resolution 800 x 480 1024 x 600 | |||
| Supported format | JPEG (Progressive or CMYK type pictures are not supported.) | ||
| Internal memory | 1 GB | ||
| USB | Host (USB 2.0) / Device (USB 2.0) | ||
| Power supply | Rating | External DC power supply device (12 V) | |
| Power consumption | General: 5.3 W / Power off: Under 1 W | General: 5.9 W / Power off: Under 1 W | |
| General | Size (Width x height x depth) | 236.0 x 159.4 x 23.0 mm | 280.0 x 188.0 x 23.0 mm |
| Weight | 500 g | 600 g | |
| The product design may differ according to the model, and specifications are subject to change without prior notice for product performance enhancement. | |||
| This device is a Class B digital apparatus. | |||
Současti
| Klasa Szczegóy | ||
| Nazwa modelu SPF-87H | SPF-107H | |
| Panel Typ Ekran LCD 8" TFT | Ekran LCD 10" TFT | |
| Rozdzielczość 800 x 480 | 1024 x 600 | |
| Obslugiwane formaty JPEG (Obrazy progrés) wne i zapisane w palecie CMYK nie są obslugiwane.) | ||
| Pamięć wewétrzna 1 GB | ||
| USB Host (USB 2.0) / Urzadzenia (USB 2.0) | ||
| Zasilanie Klasifikacja Zematrźny zasilaczn prȩdu zmiennego (12 V) | ||
| Zużcie energhi Ogólnie: 5,3 W / Zasilanie wymią矫zone: Poniȩzej 1 W Ogólnie: 5,9 W / Zasilanie wymią矫zone: Poniȩzej 1 W | ||
| Ogólne Wymiary (szer. x wys. x glęb.) 236,0 x 159,4 x 23,0 mm 280,0 x 188,0 x 23,0 mm | ||
| Waga 500 g 600 g | ||
| Konstrukura produktuMZEZI WZEJI WZEJI OZEZI WZEJI WZEJI OZEZI WZEJI OZEZI WZEJI OZEZI WZEJI OZEZI WZEJI OZEZI WZEJI OZEZI WZEJI OZEZI WZEJI OZEZI WZEJI OZEZI WZEJI OZEZI WZEJI OZEZI WZEJI OZEZI WZEJI OZEZI WZEJI OKI WZEJI OKI OKI OKI OKI OKI OKI OKI OKI OKI OKI OKI OKI OKI OKI OKI OKI OKI OKI OKI OKI OKI OKI OKI OKI OKI OKI OKI OKI OKI OKI OKI OKI OKI OKI OKI OKI OKI OKI OKI OKI OKI OKI OKI OKI OKI OKI OKI OKI OKI OKI OKII OKI OKII OKII OKII OKII OKII OKII OKII OKII OKII OKII OKII OKII OKII OKII OKII OKII OKII OKII OKII OKII OKII OKII OKII OKII OKII OKII OKII OKII OKII OKII OKII OKII OKII OKII OKII OKII OKII OKII OKII OKII OKII OKII OKII OKII OKII OKII OKII OKII OKII OKII OKI OKII OKII OKII OKII OKII OKII OKII OKII OKII OKII OKII OKII OKII OKII OKII OKII OKII OKII OKII OKII OKII OKII OKII OKII OKII OKII OKII OKII OKII OKII OKII OKII OKII OKII OKII OKII OKII OKII OKII OKII OKII OKII OKII OKII OKII OKII OKII OKI OKII OKI OKII OKII OKII OKII OKII OKII OKII OKII OKII OKII OKII OKII OKII OKII OKII OKII OKII OKII OKII OKII OKII OKII OKII OKII OKII OKII OKII OKII OKII OKII OKII OKII OKII OKII OKII OKII OKII OKII OKII OKII OKII OKII OKII OKII OKII OKII OKI OKII OKII OKI OKII OKII OKII OKII OKII OKII OKII OKII OKII OKII OKII OKII OKII OKII OKII OKII OKII OKII OKII OKII OKII OKII OKII OKII OKII OKII OKII OKII OKII OKII OKII OKII OKII OKII OKII OKII OKII OKII OKII OKII OKII OKII OKII OKII OKII OKII OKI OKI OKII OKII OKII OKII OKII OKII OKII OKII OKII OKII OKII OKII OKII OKII OKII OKII OKII OKII OKII OKII OKII OKII OKII OKII OKII OKII OKII OKII OKII OKII OKII OKII OKII OKII OKII OKII OKII OKII OKII OKII OKII OKII OKII OKII OKII OKII OKII OKII OKI OKI OKII OKI OKII OKI OKII OKI OKII OKI OKII OKI OKII OKI OKII OKI OKII OKI OKII OKI OKII OKI OKII OKI OKII OKI OKII OKI OKII OKI OKII OKI OKII OKI OKII OKI OKII OKI OKII OKI OKII OKI OKII OKI OKII OKI OKII OKI OKII OKI OKII OKI OKI OKII OKI OKII OKI OKII OKI OKII OKI OKII OKI OKII OKI OKII OKI OKII OKI OKII OKI OKII OKI OKII OKI OKII OKI OKII OKI OKII OKI OKII OKI OKII OKI OKII OKI OKII OKI OKII OKI OKII OKI OKII OKI OKII OKI OKII OKI OKI OKII OKII OKI OKII OKI OKII OKI OKII OKI OKII OKI OKII OKI OKII OKI OKII OKI OKII OKI OKII OKI OKII OKI OKII OKI OKII OKI OKII OKI OKII OKI OKII OKI OKII OKI OKII OKI OKII OKI OKII OKI OKII OKI OKII OKI OKII OKI OKII OKI OKII OKII OKI OKII OKI OKII OKI OKII OKI OKII OKI OKII OKI OKII OKI OKII OKI OKII OKI OKII OKI OKII OKI OKII OKI OKII OKI OKII OKI OKII OKI OKII OKI OKII OKI OKII OKI OKII OKI OKII OKI OKII OKI OKII OKI OKII OKI OKII OKII OKI OKI OKII OKI OKII OKI OKII OKI OKII OKI OKII OKI OKII OKI OKII OKI OKII OKI OKII OKI OKII OKI OKII OKI OKII OKI OKII OKI OKII OKI OKII OKI OKII OKI OKII OKI OKII OKI OKII OKI OKII OKI OKII OKI OKII OKI OKII OKII OKI OKII OKII OKI OKII OKI OKII OKI OKII OKI OKII OKI OKII OKI OKII OKI OKII OKI OKII OKI OKII OKI OKII OKI OKII OKI OKII OKI OKII OKI OKII OKI OKII OKI OKII OKI OKII OKI OKII OKI OKII OKI OKII OKI OKII OKI OKII OKI OKI OKII OKI OKI OKII OKI OKII OKI OKII OKI OKII OKI OKII OKI OKII OKI OKII OKI OKII OKI OKII OKI OKII OKI OKII OKI OKII OKI OKII OKI OKII OKI OKII OKI OKII OKI OKII OKI OKII OKI OKII OKI OKII OKI OKII OKI OKII OKI OKII OKII OKII OKI OKII OKI OKII OKI OKII OKI OKII OKI OKII OKI OKII OKI OKII OKI OKII OKI OKII OKI OKII OKI OKII OKI OKII OKI OKII OKI OKII OKI OKII OKI OKII OKI OKII OKI OKII OKI OKII OKI OKII OKI OKII OKI OKII OKI OKII OKI OKI OKI OKII OKI OKII OKI OKII OKI OKII OKI OKII OKI OKII OKI OKII OKI OKII OKI OKII OKI OKII OKI OKII OKI OKII OKI OKII OKI OKII OKI OKII OKI OKII OKI OKII OKI OKII OKI OKII OKI OKII OKI OKII OKI OKII OKI OKII OKI OKII OKII OKII OKI OK II OKI OKII OKI OKII OKI OKII OKI OKII OKI OKII OKI OKII OKI OKII OKI OKII OKI OKII OKI OKII OKI OKII OKI OKII OKI OKII OKI OKII OKI OKII OKI OKII OKI OKII OKI OKII OKI OKII OKI OKII OKI OKII OKI OKII OKI OKII OKI OKII OKI OK II OKI OKII OKI OKII OKI OKII OKI OKII OKI OKII OKI OKII OKI OKII OKI OKII OKI OKII OKI OKII OKI OKII OKI OKII OKI OKII OKI OKII OKI OKII OKI OKII OKI OKII OKI OKII OKI OKII OKI OKII OKI OKII OKI OKII OKI OKII OK I OKII OKI OKII OKI OKII OKI OKII OKI OKII OKI OKII OKI OKII OKI OKII OKI OKII OKI OKII OKI OKII OKI OKII OKI OKII OKI OKII OKI OKII OKI OKII OKI OKII OKI OKII OKI OKII OKI OKII OKI OKII OKI OKII OKI OKII OKI OKII OKI OKII OK I OKII OKI OK II OKI OK II OKI OK II OKI OK II OKI OK II OKI OK II OKI OK II OKI OK II OKI OK II OKI OK II OKI OK II OKI OK II OKI OK II OKI OK II OKI OK II OKI OK II OKI OK II OKI OK II OKI OK II OKI OK II OKI OK II OKI OK II OKI OK II OKI OK II OKI OK II OKI OK IOK II OKI OK II OKI OK II OKI OK II OKI OK II OKI OK II OKI OK II OKI OK II OKI OK II OKI OK II OKI OK II OKI OK II OKI OK II OKI OK II OKI OK II OKI OK II OKI OK II OKI OK II OKI OK II OKI OK II OKI OK II OKI OK II OKI OK II OKI OK II OKI OK II OKI Ok II OKI Ok II OKI Ok II OKI Ok II OKI Ok II OKI Ok II OKI Ok II OKI Ok II OKI Ok II OKI Ok II OKI Ok II OKI Ok II OKI Ok II OKI Ok II OKI Ok II OKI Ok II OKI Ok II OKI Ok II OKI Ok II OKI Ok II OKI Ok II OKI Ok II OKI Ok II OKI Ok II OKI Ok II OKI ok II ok II ok II ok II ok II ok II ok II ok II ok II ok II ok II ok II ok II ok II ok II ok II ok II ok II ok II ok II ok II ok II ok II ok II ok II ok II ok II ok II ok II ok II ok II ok II ok II ok II ok II ok II ok II ok II ok II ok II ok II ok II ok II ok II ok II ok II ok II ok II ok II ok II ok IOK IOK IOK IOK IOK IOK IOK IOK IOK IOK IOK IOK IOK IOK IOK IOK IOK IOK IOK IOK IOK IOK IOK IOK IOK IOK IOK IOK IOK IOK IOK IOK IOK IOK IOK IOK IOK IOK IOK IOK IOK IOK IOK IOK IOK IOK IOK IOK IOK IOK IOLNIE WOJNIK WOJNIK WOJNIK WOJNIK WOJNIK WOJNIK WOJNIK WOJNIK WOJNIK WOJNIK WOJNIK WOJNIK WOJNIK WOJNIK WOJNIK WOJNIK WOJNIK WOJNIK WOJNIK WOJNIK WOJNIk WOJNIK WOJNIK WOJNIK WOJNIK WOJNIK WOJNIK WOJNIK WOJNIK WOJNIK WOJNIK WOJNIK WOJNIK WOJNIK WOJNIK WOJNIK WOJNIK WOJNIK WOJNIK WOJNIK WOJNI K WOJNIK WOJNIK WOJNIK WOJNIK WOJNIK WOJNIK WOJNIK WOJNIK WOJNIK WOJNIK WOJNIK WOJNIK WOJNIK WOJNIK WOJNIK WOJNIK WOJNIK WOJNIK WOJNIK WOJNIKA WOJNIK WOJNIK WOJNIK WOJNIK WOJNIK WOJNIK WOJNIK WOJNIK WOJNIK WOJNIK WOJNIK WOJNIK WOJNIK WOJNIK WOJNIK WOJNIK WOJNIK WOJNIK WOJNIK WOJNIKI WOJNIK WOJNIK WOJNIK WOJNIK WOJNIK WOJNIK WOJNIK WOJNIK WOJNIK WOJNIK WOJNIK WOJNIK WOJNIK WOJNIK WOJNIK WOJNIK WOJNIK WOJNIK WOJNIK WOJNIKE WOJNIK WOJNIK WOJNIK WOJNIK WOJNIK WOJNIK WOJNIK WOJNIK WOJNIK WOJNIK WOJNIK WOJNIK WOJNIK WOJNIK WOJNIK WOJNIK WOJNIK WOJNIK WOJNIK WOJNIKK WOJNIK WOJNIK WOJNIK WOJNIK WOJNIK WOJNIK WOJNIK WOJNIK WOJNIK WOJNIK WOJNIK WOJNIK WOJNIK WOJNIK WOJNIK WOJNIK WOJNIK WOJNIK WOJNIK WOJNICK WOJNIK WOJNIK WOJNIK WOJNIK WOJNIK WOJNIK WOJNIK WOJNIK WOJNIK WOJNIK WOJNIK WOJNIK WOJNIK WOJNIK WOJNIK WOJNIK WOJNIK WOJNIK WOJNIK WOJNIHK WOJNIK WOJNIK WOJNIK WOJNIK WOJNIK WOJNIK WOJNIK WOJNIK WOJNIK WOJNIK WOJNIK WOJNIK WOJNIK WOJNIK WOJNIK WOJNIK WOJNIK WOJNIK WOJNIK WOJNIOK WOJNIK WOJNIK WOJNIK WOJNIK WOJNIK WOJNIK WOJNIK WOJNIK WOJNIK WOJNIK WOJNIK WOJNIK WOJNIK WOJNIK WOJNIK WOJNIK WOJNIK WOJNIK WOJNIK WOJNI.K WOJNIK WOJNIK WOJNIK WOJNIK WOJNIK WOJNIK WOJNIK WOJNIK WOJNIK WOJNIK WOJNIK WOJNIK WOJNIK WOJNIK WOJNIK WOJNIK WOJNIK WOJNIK WOJNIK WOJNIΚ WOJNIK WOJNIK WOJNIK WOJNIK WOJNIK WOJNIK WOJNIK WOJNIK WOJNIK WOJNIK WOJNIK WOJNIK WOJNIK WOJNIK WOJNIK WOJNIK WOJNIK WOJNIK WOJNIK WOJNIκ WOJNIK WOJNIK WOJNIK WOJNIK WOJNIK WOJNIK WOJNIK WOJNIK WOJNIK WOJNIK WOJNIK WOJNIK WOJNIK WOJNIK WOJNIK WOJNIK WOJNIK WOJNIK WOJNIK WOJNI,K WOJNIK WOJNIK WOJNIK WOJNIK WOJNIK WOJNIK WOJNIK WOJNIK WOJNIK WOJNIK WOJNIK WOJNIK WOJNIK WOJNIK WOJNIK WOJNIK WOJNIK WOJNIK WOJNIK WOJNI、OK WOJNIK WOJNIK WOJNIK WOJNIK WOJNIK WOJNIK WOJNIK WOJNIK WOJNIK WOJNIK WOJNIK WOJNIK WOJNIK WOJNIK WOJNIK WOJNIK WOJNIK WOJNIK WOJNIK WOJINI、OK WOJNIK WOJNIK WOJNIK WOJNIK WOJNIK WOJNIK WOJNIK WOJNIK WOJNIK WOJNIK WOJNIK WOJNIK WOJNIK WOJNIK WOJNIK WOJNIK WOJNIK WOJNIK WOJNIK WOJO、OK WOJO、OK WOJO、OK WOJO、OK WOJO、OK WOJO、OK WOJO、OK WOJO、OK WOJO、OK WOJO、OK WOJO、OK WOJO、OK WOJO、OK WOJO、OK WOJO、OK WOJO、OK WOJO、OK WOJO、OK WOJO、OK WOJO、OK WOJO、ok WOJO、OK WOJO、OK WOJO、OK WOJO、OK WOJO、OK WOJO、OK WOJO、OK WOJO、OK WOJO、OK WOJO、OK WOJO、OK WOJO、OK WOJO、OK WOJO、OK WOJO、OK WOJO、OK WOJO、OK WOJO、OK WOJO、OK WOJO、Ok WOJO、OK WOJO、OK WOJO、OK WOJO、OK WOJO、OK WOJO、OK WOJO、OK WOJO、OK WOJO、OK WOJO、OK WOJO、OK WOJO、OK WOJO、OK WOJO、OK WOJO、OK WOJO、OK WOJO、OK WOJO、OK WOJO、OK WOJO、 | ||
Produ e componentes
Components
PykoBoDCTBO nIb3OBaTeJIa
Ha3BaHne n ΦyHKzna KaXdoJ DeTaJIaN

BkIIOUeHHe N BbIKIOUeHHe nITaHnA.

OTkpblTne 3akpbblMeHIO.

IepemEeHHe Hnn H3MeHHeHne npaMeTpOB B MeHIO.

Bb6op npapameTpOB MeHIO.

Bo3Bpat K npdeIbIyIeMy Iary (nepexoK rIaBHomY kpaH npn HaxaTm B TeueHne 2 ceKyHd).

3anycknoka3a cnaiIOB
NoKIOUeyne Ka6eJy USB (noKIOUeyne K KOMnbIOTe
POncoeINHnTe KPCnIaKoNIpOBaHnna03bpaKeHH BO BCTpoEHHy NaMaTbNJNNCNoJIb3OBAHnBaBnBaKaeCTBe MiniMonitor.
IopKnHueHneKa6eNaNTaHn
PoiKnIOUHTe KaBebI NITaHn.
SPF-87H MOKHO INOJIb3ObaTb TOnIbKO npn noIKNIOeHN Kpa3bemyPC c NOMOIO bIO ka6eJy USB (a TaKke DOnONHInTeBHorO Ka6eJnyNTAHIN).
OHaKO OH MoKet paobotb HenpaBInbHo,ecn6NOK nTAnBa B PC paobTaH HeycTouNoB.3OTM CNYae NOcoeDmHTe aanTeP nTtAnHa
Kaejib OSB
DononHnTeIbHbN Ka6BeNtNAHTAH
IopKIOUOHe 3aONMHaIOUeO yctpOcTBA USB
PoiKIOUHTe yCTPOINCTBO xpaHEnn USB
THe3doKapTbI nAMrTn SD
Bctabte Kapty SD npocmotpa coxpanehhbx n06paxhen.
IodctBaKuΦpOBoNΦOTopamKn


He npnaraIte ycnnn,
ecnn noCTaBA
NoOBpaYBaTc TpyDM.
3To 3HaHT, Bb6paHO
HepePHe HanpAbeHne.
B ATOM Cnyae MoXHO
NOBpeDnTB NoCTaBAy.
UTo6bI NcNoJIb3OBAbT cIΦpOByIO paMky B KaueCTBe Mini Monitor, noKlnHHTe ee K PC c NOMoCbIO Ka6eJIa USB.

| Фото | Пелеков сладов Установская заховская заховская заховская заховская заховская заховская заховская заховская заховская заховская заховская заховская заховская заховская заховская заховская заховская заховская заховская заховская заховская заховская заховская заховская заховская заxtаювский сладовский сладовский сладовский сладовский сладовский сладовский сладовский сладовский сладовский сладовский сладовский сладовский сладовский сладовский сладовский сладовский сладовский сладовский сладовский сладовский сладовский сладовский深夜ювский深夜ювский深夜ювский深夜ювский深夜ювский深夜ювский深夜ювский深夜ювский深夜ювский深夜ювский深夜ювский深夜ювский深夜ювский深夜ювский深夜ювский深夜ювский深夜ювский深夜ювский深夜ювский深夜ювский深夜ювский深夜ювский深夜ювский深夜ювский深夜ювский深夜юьюн的眼аюн的眼аюн的眼аюн的眼аюн的眼аюн的眼аюн的眼аюн的眼аюн的眼аюн的眼аюн的眼аюн的眼аюн的眼аюн的眼аюн的眼аюн的眼аюн的眼аюн的眼аюн的眼аюн的眼аюн的眼аюн的眼аюн的眼аюн的眼аюн的眼аюн的眼aюн的眼aюн的眼aюн的眼aюн的眼aюн的眼aюн的眼aюн的眼aюн的眼aюн的眼aюн的眼aюн的眼aюн的眼aюн的眼aюн的眼aюн的眼aюн的眼aюн的眼aюн的眼aюн的眼aюн的眼aюн的眼aюн的眼aюн的眼aюн的眼aюн的眼bюн的眼bюн的眼bюн的眼bюн的眼bюн的眼bюн的眼bюн的眼bюн的眼bюн的眼bюн的眼bюн的眼bюн的眼bюн的眼bюн的眼bюн的眼bюн的眼bюн的眼bюн的眼bюн的眼bюн的眼bюн的眼bюн的眼bюн的眼bюн的眼bюн的眼aюн的眼aюн的眼aюн的眼aюн的眼aюн的眼aюн的眼aюн的眼aюн的眼aюн的眼aюн的眼aюн的眼aюн的眼aюн的眼aюн的眼aюн的眼aюн的眼aюн的眼aюн的眼aюн的眼aюн的眼aюн的眼aюн的眼aюн的眼aюн的眼gюн的眼gюн的眼gюн的眼gюн的眼gюн的眼gюн的眼gюн的眼gюн的眼gюн的眼gюн的眼gюн的眼gюн的眼gюн的眼gюн的眼gюн的眼gюн的眼gюн的眼gюн的眼gюн的眼gюн的眼gюн的眼gюн的眼gюн的眼gюн的眼gюн的眼aюн的眼aюн的眼aюн的眼aюн的眼aюн的眼aюн的眼aюн的眼aюн的眼aюн的眼aюн的眼aюн的眼aюн的眼aюн的眼aюн的眼aюн的眼aюн的眼aюн的眼aюн的眼aюн的眼aюн的眼aюн的眼aюн的眼aюн的眼aюн的眼dюк的眼dюк的眼dюк的眼dюк的眼dюк的眼dюк的眼dюк的眼dюк的眼dюк的眼dюк的眼dюк的眼dюк的眼dюк的眼dюк的眼dюк的眼dюк的眼dюк的眼dюк的眼dюк的眼dюк的眼dюк的眼dюк的眼dюк的眼dюк的眼dюк的眼dюk的眼dюк的眼dюк的眼dюк的眼dюк的眼dюк的眼dюк的眼dюк的眼dюк的眼dюк的眼dюк的眼dюк的眼dюк的眼dюк的眼dюк的眼dюк的眼dюк的眼dюк的眼dюк的眼dюк的眼dюк的眼dюк的眼dюк的眼dюк的眼dюк的眼dюks的眼dюк的眼dюк的眼dюк的眼dюк的眼dюк的眼dюк的眼dюк的眼dюк的眼dюк的眼dюк的眼dюк的眼dюк的眼dюк的眼dюк的眼dюк的眼dюк的眼dюк的眼dюк的眼dюк的眼dюк的眼dюк的眼dюк的眼dюк的眼dюк的眼dюК的眼dюк的眼dюк的眼dюк的眼dюк的眼dюк的眼dюк的眼dюк的眼dюк的眼dюк的眼dюк的眼dюк的眼dюк的眼dюк的眼dюк的眼dюк的眼dюк的眼dюк的眼dюк的眼dюк的眼dюк的眼dюк的眼dюк的眼dюк的眼dюк的眼dю�眼的 | Фото | Береков сладов Установская заховская заховская заховская заховская заховская заховская заховская заховская заховская заховская заховская заховская заховская заховская заховская заховская заховская захов字第静静地静止的静止的静止的静止的静止的静止的静止的静止的静止的静止的静止的静止的静止的静止的静止的静止的静止的静止的静止的静止的静止的静止的静止的静止的静止的静止的静止的静止的静止的静止的静止的静止的静止的静止的 |
| Росторы сладов Истановская заховская заховская заховская захов字第静静地静止的静止的静止的静止的静止的静止的静止的静止的静止的静止的静止的静止的静止的静止的静止的静止的静止的静止的静止的静止的静止的静止的静止的静止的静止的静止的静止 | |||
| Чаы | Настоячесу встановкеTekушero Всейлары Дд.Слд.Дд.Слд.Дд.Слд.Дд.Слд.Дд.Слд.Дд.Слд.Дд.Слд.Дд.Слд.Дд.Слд.Дд.Слд.Дд.Слд.Дд.Слд.Дд.Слд.Дд.Слд.Дд.Слд.Дд. Фразмат даты Быбор Фразмат даты (псиро, меси, рд). (YYYY/MM/DD, MM/DD/YYYY, DD/MM/YYYY) Фразмат вретени Быбор Фразмат вретени (12 садов, 24 са). (Плчесу вретени Быбор розам,在几乎所有的情况下,在几乎所有情况下,在几乎所有情况下,在几乎所有情况下,在几乎所有情况下,在几乎所有情况下,在几乎所有情况下,在几乎所有情况下,在几乎所有情况下,在几乎所有情况下,在几乎所有情况下,在几乎所有情况下,在几乎所有情况下,在几乎所有情况下,在几乎所有情况下,在几乎所有情况下,在几乎所有情况下,在几乎所有情况下,在几乎所有情况下,在几乎所有情况下,在几乎所有情况下,在几乎所有情况下,在几乎所有情况下,在几乎所有情况下,在几乎所有情况下,在几乎所有情况下,在几乎所有情况下,在几乎所有情况下,在几乎所有情况下,在几乎所有情况下,在几乎所有情况下,在几乎所有情况下,在几乎所有情况下,在几乎所有情况下,在几乎所有情况下在几乎所有情况下在几乎所有情况下在几乎所有情况下在几乎所有情况下在几乎所有情况下在几乎所有情况下在几乎所有情况下在几乎所有情况下在几乎所有情况下在几乎所有情况下在几乎所有情况下在几乎所有情况下在几乎所有情况下在几乎所有情况下在几乎所有情况下在几乎所有情况下在几乎所有情况下在几乎所有情况下在几乎所有情况下在几乎所有情况下在几乎所有情况下在几乎所有情况下在几乎所有情况下在几乎所有情况下在几乎所有情况下在几乎所有情况下在几乎所有情况下在几乎所有情况下在几乎所有情况下在几乎所有情况下在几乎所有情况下在几乎所有情况下在几乎所有情况下在所有静止的静止的静止的静止的静止的静止的静止的静止的静止的静止的静止的静止的静止的静止的静止的静止的静止的静止的静止的静止的静止的静止的静止的静止的静止的静止的静止的静止的静止的静止的静止的静止的静止的调和(调和)调和(调和)调和(调和)调和(调和)调和(调和)调和(调和)调和(调和)调和(调和)调和(调和)调和(调和)调和(调和)调和(调和)调和(调和)调和(调和)调和(调和)调和(调和)调和(调和)调和(調和)调和(调和)调和(调和)调和(调和)调和(调和)调和(调和)调和(调和)调和(调和)调和(调和)调和(调和)调和(调和)调和(调和)调和(调和)调和(调和)调和(调和)调和(调和)调和(调和)调 和(调和)调和(调和)调和(调和)调和(调和)调和(调和)调和(调和)调和(调和)调和(调和)调和(调和)调和(调和)调和(调和)调和(调和)调和(调和)调和(调和)调和(调和)调和(调和)调和(调和)(调和)(调和)(调和)(调和)(调和)(调和)(调和)(调和)(调和)(调和)(调和)(调和)(调和)(调和)(调和)(调和)(调和)(调和)(调和)(调和)(调和)(调和)(调和)(调和)(调和)(调和)(调和)(调和)(调和)(调和)(调和)(调和)(调和)(调节)调和(调节)调和(调节)调和(调节)调和(调节)调和(调节)调和(调节)调和(调节)调和(调节)调和(调节)调和(调节)调和(调节)调和(调节)调和(调节)调和(调节)调和(调节)调和(调节)调和(调节)调和(调节)调和(调节)调和(调节)调和 (调节)调和(调节)调和(调节)调和(调节)调和(调节)调和(调节)调和(调节)调和(调节)调和(调节)调和(调节)调和(调节)调和(调节)调和(调节)调和(调节)调和(调节)调和(调节)调和(调节)调和(调节)调和(调节)调和(调节)调和 | ||
| ОBSTUEY | Береков сладов Установская заховская заховская заховская заховская заховская заховская заховская заховская заховская заховская заховская заховская заховская заховская заховская заховская заховская захов字第静静地静止的静止的静止的静止的静正的静止的静止的静止的静止的静止的静止的静止的静止的静止的静止的静止的静止的静止的静止的静止的静止的静止的静止的静止的静止的静止的静止的静止的静止的静止的静止的静止的静止的静止的静止的静止的静止的静止 | ||
| ПONDERTK | ОBSTUEY п overd借贷поггамmarно объединения Сбоч Сбоч Сбоч Сбоч Сбоч Сбоч Сбоч Сбоч Сбоч Сбоч Сбоч Сбоч Сбоч Сбоч Сбоч Сбоч Сбоч Сбоч Сбоч Сбоч Сбоч Сбоч Сбоч Сбоч Сбоч Сб Wass Сб Wass Сб Wass Сб Wass Сб Wass Сб Wass Сб Wass Сб Wass Сб Wass Сб Wass Сб Wass Сб Wass Сб Wass Сб Wass Сб Wass Сб Wass Сб Wass Сб Wass Сб Wass Сб Wass Сб Wass Сб Wass Сб Wass Сб Wass Сб Wass Сб� Сб Wass Сб Wass Сб Wass Сб Wass Сб Wass Сб Wass Сб Wass Сб Wass Сб Wass Сб Wass Сб Wass Сб Wass Сб Wass Сб Wass Сб Wass Сб Wass Сб Wass Сб Wass Сб Wass Сб Wass Сб Wass Сб Wass Сб Wass Сб Wass Сбass Сб Wass Сб Wass Сб Wass Сб Wass Сб Wass Сб Wass Сб Wass Сб Wass Сб Wass Сб Wass Сб Wass Сб Wass Сб Wass Сб Wass Сб Wass Сб Wass Сб Wass Сб Wass Сб Wass Сб Wass Сб Wass Сб Wass Сб Wass Сб Wass Сб WS Сб Wass Сб Wass Сб Wass Сб Wass Сб Wass Сб Wass Сб Wass Сб Wass Сб Wass Сб Wass Сб Wass Сб Wass Сб Wass Сб Wass Сб Wass Сб Wass Сб Wass Сб Wass Сб Wass Сб Wass Сб Wass Сб Wass Сб Wass Сб Wass Сб W Сб Wass Сб Wass Сб Wass Сб Wass Сб Wass Сб Wass Сб Wass Сб Wass Сб Wass Сб Wass Сб Wass Сб Wass Сб Wass Сб Wass Сб Wass Сб Wass Сб Wass Сб Wass Сб Wass Сб Wass Сб Wass Сб Wass Сб Wass Сб Wass Сб WW Сб WW Сб WW Сб WW C C C C C C C C C C C C C C C C C C C C C C C C C C C C C C C C C C C C C C C C C C C C C C C C C C c C C C C C C C C C C C C C C C C C C C C C C C C C C C C C C C C C C C C C C C C C C C C C C C C C B C C C C C C C C C C C C C C C C C C C C C C C C C C C C C C C C C C C C C C C C C C C C C C C C C D C C C C C C C C C C C C C C C C C C C C C C C C C C C C C C C C C C C C C C C C C C C C C C C C C E C C C C C C C C C C C C C C C C C C C C C C C C C C C C C C C C C C C C C C C C C C C C C C C C C O C C C C C C C C C C C C C C C C C C C C C C C C C C C C C C C C C C C C C C C C C C C C C C C C C G C C C C C C C C C C C C C C C C C C C C C C C C C C C C C C C C C C C C C C C C C C C C C C C C C N C C C C C C C C C C C C C C C C C C C C C C C C C C C C C C C C C C C C C C C C C C C C C C C C C S S S S S S S S S S S S S S S S S S S S S S S S S S S S S S S S S S S S S S S S S S S S S S S S S S C C C C C C C C C C C C C C C C C C C C C C C C C C C C C C C C C C C C C C C C C C C C C C C C C T T T T T T T T T T T T T T T T T T T T T T T T T T T T T T T T T T T T T T T T T T T T T T T T T T C C C C C C C C C C C C C C C C C C C C C C C C C C C C C C C C C C C C C C C C C C C C C C C C C L L L L L L L L L L L L L L L L L L L L L L L L L L L L L L L L L L L L L L L L L L L L L L L L L L c c c c c c c c c c c c c c c c c c c c c c c c c c c c c c c c c c c c c c c c c c c c c c c c c c C C C C C C C C C C C C C C C C C C C C C C C C C C C C C C C C C C C C C C C C C C C C C C C C c c c c c c c c c c c c c c c c c c c c c c c c c c c c c c c c c c c c c c c c c c c c c c c c c e e e e e e e e e e e e e e e e e e e e e e e e e e e e e e e e e e e e e e e e e e e e e e e e e e c c c c c c c c c c c c c c c c c c c c c c c c c c c c c c c c c c c c c c c c c c c c c c c c c l c c c c c c c c c c c c c c c c c c c c c c c c c c c c c c c c c c c c c c c c c c c c c c c c c f f f f f f f f f f f f f f f f f f f f f f f f f f f f f f f f f f f f f f f f f f f f f f f f f f c c c c c c c c c c c c c c c c c c c c c c c c c c c c c c c c c c c c c c c c c c c c c c c c c b c c c c c c c c c c c c c c c c c c c c c c c c c c c c c c c c c c c c c c c c c c c c c c c c c t t t t t t t t t t t t t t t t t t t t t t t t t t t t t t t t t t t t t t t t t t t t t t t t t t c c c c c c c c c c c c c c c c c c c c c c c c c c c c c c c c c c c c c c c c c c c c c c c c c g g g g g g g g g g g g g g g g g g g g g g g g g g g g g g g g g g g g g g g g g g g g g g g g g g c c c c c c c c c c c c c c c c c c c c c c c c c c c c c c c c c c c c c c c c c c c c c c c c c r r r r r r r r r r r r r r r r r r r r r r r r r r r r r r r r r r r r r r r r r r r r r r r r r r c c c c c c c c c c c c c c c c c c c c c c c c c c c c c c c c c c c c c c c c c c c c c c c c c n C c c c c c c c c c c c c c c c c c c c c c c c c c c c c c c c c c c c c c c c c c c c c c c c c c c c c c c c c c c c c c c c c c c c c c c c c c c c c c c c c c c c c c c c c c c c c c c c c c c c c d c d c d c d c d c d c d c d c d c d c d c d c d c d c d c d c d c d c d c d c d c d c d c d c d c d c d c d c d c d c d c d c d c d c d c d c d c d c d c d c d c d c d c d c d c d c d c d c d c d c c d c d c d c d c d c d c d c d c d c d c d c d c d c d c d c d c d c d c d c d c d c d c d c d c d c d c d c d c d c d c d c d c d c d c d c d c d c d c d c d c d c d c d c d c d c d c d c d c d C C C C C C C C C C C C C C C C C C C C C C C C C C C C C C C C C C C C C C C C C C C C C C C C C C C C C C C C C C C C C C C C C C C C C C C C C C C C C C C C C C C C C C C C C C C C C C C C C C C C D C D C D C D C D C D C D C D C D C D C D C D C D C D C D C D C D C D C D C D C D C D C D C D C D C D C D C D C D C D C D C D C D C D C D C D C D C D C D C D C D C D C D C D C D C D C D C D C D C D C C D C D C D C D C D C D C D C D C D C D C D C D C D C D C D C D C D C D C D C D C D C D C D C D C D C D C D C D C D C D C D C D C D C D C D C D C D C D C D C D C D C D C D C D C D C D C D C D C D D C D C D C D C D C D C D C D C D C D C D C D C D C D C D C D C D C D C D C D C D C D C D C D C D C D C D C D C D C D C D C D C D C D C D C D C D C D C D C D C D C D C D C D C D C D C D C D C D C D D D C D C D C D C D C D C D C D C D C D C D C D C D C D C D C D C D C D C D C D C D C D C D C D C D C D C D C D C D C D C D C D C D C D C D C D C D C D C D C D C D C D C D C D C D C D C D C D C D C C C D C D C D C D C D C D C D C D C D C D C D C D C D C D C D C D C D C D C D C D C D C D C D C D C D C D C D C D C D C D C D C D C D C D C D C D C D C D C D C D C D C D C D C D C D C D C D C D C C D D C D C D C D C D C D C D C D C D C D C D C D C D C D C D C D C D C D C D C D C D C D C D C D C D C D C D C D C D C D C D C D C D C D C D C D C D C D C D C D C D C D C D C D C D C D C D C D C D D C C D C D C D C D C D C D C D C D C D C D C D C D C D C D C D C D C D C D C D C D C D C D C D C D C D C D C D C D C D C D C D C D C D C D C D C D C D C D C D C D C D C D C D C D C D C D C D C D C C C C D C D C D C D C D C D C D C D C D C D C D C D C D C D C D C D C D C D C D C D C D C D C D C D C D C D C D C D C D C D C D C D C D C D C D C D C D C D C D C D C D C D C D C D C D C D C D C D D C D D C D C D C D C D C D C D C D C D C D C D C D C D C D C D C D C D C D C D C D C D C D C D C D C D C D C D C D C D C D C D C D C D C D C D C D C D C D C D C D C D C D C D C D C D C D C D C D C C D C C D C D C D C D C D C D C D C D C D C D C D C D C D C D C D C D C D C D C D C D C D C D C D C D C D C D C D C D C D C D C D C D C D C D C D C D C D C D C D C D C D C D C D C D C D C D C D C D D C C O N T N T N T N T N T N T N T N T N T N T N T N T N T N T N T N T N T N T N T N T N T N T N T N T N T N T N T N T N T N T N T N T N T N T N T N T N T N T N T N T N T N T N T N T N T N T N T N T N T N T N 7 5 6 7 6 7 6 7 6 7 6 7 6 7 6 7 6 7 6 7 6 7 6 7 6 7 6 7 6 7 6 7 6 7 6 7 6 7 6 7 6 7 6 7 6 7 6 7 6 7 6 7 6 6 7 6 7 6 7 6 7 6 7 6 7 6 7 6 7 6 7 6 7 6 7 6 7 6 7 6 7 6 7 6 7 6 7 6 7 6 7 6 7 6 7 6 7 6 7 6 7 6 8 7 6 7 6 7 6 7 6 7 6 7 6 7 6 7 6 7 6 7 6 7 6 7 6 7 6 7 6 7 6 7 6 7 6 7 6 7 6 7 6 7 6 7 6 7 6 7 6 7 7 6 7 6 7 6 7 6 7 6 7 6 7 6 7 6 7 6 7 6 7 6 7 6 7 6 7 6 7 6 7 6 7 6 7 6 7 6 7 6 7 6 7 6 7 6 7 6 7 8 7 6 7 6 7 6 7 6 7 6 7 6 7 6 7 6 7 6 7 6 7 6 7 6 7 6 7 6 7 6 7 6 7 6 7 6 7 6 7 6 7 6 7 6 7 6 7 6 6 6 6 6 6 6 6 6 6 6 6 6 6 6 6 6 6 6 6 6 6 6 6 6 6 6 6 6 6 6 6 6 6 6 6 6 6 6 6 6 6 6 6 6 6 6 6 6 6 7 6 6 6 6 6 6 6 6 6 6 6 6 6 6 6 6 6 6 6 6 6 6 6 6 6 6 6 6 6 6 6 6 6 6 6 6 6 6 6 6 6 6 6 6 6 6 6 7 6 7 6 7 6 7 6 7 6 7 6 7 6 7 6 7 6 7 6 7 6 7 6 7 6 7 6 7 6 7 6 7 6 7 6 7 6 7 6 7 6 7 6 7 6 7 7 7 7 7 7 7 7 7 7 7 7 7 7 7 7 7 7 7 7 7 7 7 7 7 7 7 7 7 7 7 7 7 7 7 7 7 7 7 7 7 7 7 7 7 7 7 7 7 7 8 7 8 7 8 7 8 7 8 7 8 7 8 7 8 7 8 7 8 7 8 7 8 7 8 7 8 7 8 7 8 7 8 7 8 7 8 7 8 7 8 7 8 7 8 7 8 7 8 7 7 8 7 8 7 8 7 8 7 8 7 8 7 8 7 8 7 8 7 8 7 8 7 8 7 8 7 8 7 8 7 8 7 8 7 8 7 8 7 8 7 8 7 8 7 8 7 8 8 7 8 8 7 8 8 7 8 8 7 8 8 7 8 8 7 8 8 7 8 8 7 8 8 7 8 8 7 8 8 7 8 8 7 8 8 7 8 8 7 8 8 7 8 8 7 8 8 8 7 8 8 8 8 8 8 8 8 8 8 8 8 8 8 8 8 8 8 8 8 8 8 8 8 8 8 8 8 8 8 8 8 8 8 8 8 8 8 8 8 8 8 8 8 8 8 8 8 8 8 7 8 8 8 8 8 8 8 8 8 8 8 8 8 8 8 8 8 8 8 8 8 8 8 8 8 8 8 8 8 8 8 8 8 8 8 8 8 8 8 8 8 8 8 8 8 7 8 8 8 7 8 8 8 8 8 8 8 8 8 8 8 8 8 8 8 8 8 8 8 8 8 8 8 8 8 8 8 8 8 8 8 8 8 8 8 8 8 8 8 8 8 8 7 8 8 8 8 8 8 7 8 8 8 8 8 8 8 8 8 8 8 8 8 8 8 8 8 8 8 8 8 8 8 8 8 8 8 8 8 8 8 8 8 8 8 8 8 8 8 8 8 8 7 8 8 7 8 8 7 8 8 7 8 8 8 8 8 8 8 8 8 8 8 8 8 8 8 8 8 8 8 8 8 8 8 8 8 8 8 8 8 8 8 8 8 8 8 8 8 8 8 8 8 8 8 8 8 8 7 8 8 7 8 8 7 7 8 8 7 8 8 7 8 8 7 8 8 7 8 8 7 8 8 7 8 8 7 8 8 7 8 8 7 8 8 7 8 8 7 8 8 7 8 8 7 8 8 7 8 8 7 8 8 7 7 8 8 7 8 8 7 8 8 7 8 8 7 8 8 7 8 8 7 8 8 7 8 8 7 8 8 7 8 8 7 8 8 7 8 8 7 8 8 7 7 8 8 7 8 8 7 8 8 8 7 8 8 8 8 8 8 8 8 8 8 8 8 8 8 8 8 8 8 8 8 8 8 8 8 8 8 8 8 8 8 8 8 8 8 8 8 8 8 7 8 8 7 8 8 7 8 8 7 8 7 8 8 7 8 8 7 8 8 7 8 8 7 8 8 7 8 8 7 8 8 7 8 8 7 8 8 7 8 8 7 8 8 7 8 8 7 8 8 7 8 8 7 8 8 7 7 8 7 8 8 7 8 8 7 8 8 7 8 8 7 8 8 7 8 8 7 8 8 7 8 8 7 8 8 7 8 8 7 8 8 7 8 8 7 8 8 7 8 8 7 8 8 7 8 7 8 8 7 8 8 7 8 8 7 8 8 7 8 8 7 8 8 7 8 8 7 8 8 7 8 8 7 8 8 7 8 8 7 8 8 8 7 8 8 7 8 8 7 8 8 7 8 8 7 8 8 7 8 8 7 8 8 7 8 8 7 8 8 7 8 8 7 8 8 7 8 8 7 8 8 7 8 8 7 8 8 7 8 7 7 8 8 7 8 8 7 8 8 7 8 8 7 8 8 7 8 8 7 8 8 7 8 8 7 8 8 7 8 8 7 8 8 7 8 8 7 8 8 7 8 8 7 8 8 7 8 7 |
Понск и устараенье несправност
PnB03HKnHOBeHm HncnpaBHOCTe nepBbIM JeIOM o6paTtEc bKa daHHo TaJIuCe.
| Симпомы в Ворочь范围内。(поставlementа) Питанные в Ворочь范围内.(поставlementа) Питанные в Ворочь范围内.(поставlementа) Питанные в Ворочь范围内.(пostавlementа) Питанные в Ворочь范围内.(пostавlementа) Питанные в Ворочь范围内.(пostавlementа) Питанные в Ворочь范围内.(пostавlementа) Питанные в Ворочь范围内.(пostавlementа) Питанные в Ворочь范围内.(пostавlementа) Питанные в Ворочь范围内. Питанные в Ворочь范围内. Питанные в Ворочь范围内. Питанные в Ворочь范围内. Питанные в Ворочь范围内. Питанные в Ворочь范围内. Питанные в Ворочь范围内. Питанные в Ворочь范围内. Питанные в Ворочь范围内. Питанные в Ворочь范围内. Питанные в Ворочь范围内. Питанные в Ворочь范围内. Питанные в Ворочь范围内. Питанные в Ворочь范围内. Питанные в Ворочь范围内. Питанные в Ворочь范围内. Питанные в Ворочь范围内. Питанные в Ворочь范围内. Питанные в Ворочь范围内. ПITANHIVI KILOVJIYI KILOVJIYI KILOVJIYI KILOVJIYI KILOVJIYI KILOVJIYI KILOVJIYI KILOVJIYI KILOVJIYI KILOVJIYI KILOVJIYI KILOVJIYI KILOVJIYI KILOVJIYI KILOVJIYI ПITANHIVI KILOVJIYI KILOVJIYI KILOVJIYI KILOVJIYI KILOVJIYI KILOVJIYI KILOVJIYI KILOVJIYI KILOVJIYI KILOVJIYI KILOVJIYI KILOVJIYI KILOVJIYI KIROVJIYI KILOVJIYI KILOVJIYI KILOVJIYI KILOVJIYI KILOVJIYI KILOVJIYI KILOVJIYI KILOVJIYI KILOVJIYI KILOVJIYI KILOVJIYI KILOVJIYI KILOVJIYI KILOVJYI KILOVJIYI KILOVJIYI KILOVJIYI KILOVJIYI KILOVJIYI KILOVJIYI KILOVJIYI KILOVJIYI KILOVJIYI KILOVJIYI KILOVJIYI KILOVJIYI KILOVJIYI KILOVJIY! ПITANHIVI KILOVJIYI KILOVJIYI KILOVJIY! ПITANHIVI KILOVJIYI KILOVJIY! ПITANHIVI KILOVJIY! ПITANHIVI KILOVJIY! ПITANHIVI KILOVJIY! ПITANHIVI KILOVJIY! ПITANHIVI KILOVJIY! ПITANHIVI KILOVJIY! ПITANHIVI KILOVJIY! ПITANHIVI GOLIOVII KILOVJIY! ПITANHIVI KILOVJIY! ПITANHIVI KILOVJIY! ПITANHIVI KILOVJIY! ПITANHIVI KILOVJIY! ПITANHIVI KILOVJIY! ПITANHIVI KILOVJIY! ПITANHIVI KIKOVOII YILOVII KILOVJIY! ПITANHIVI KIKOVOII YILOVII KILOVJIY! ПITANHIVI KIKOVOII YILOVII KILOVJIY! ПITANHIVI KIKOVOII YILOVII KILOVJIY! ПITANHIVI KIKOVOII YILOVII KILOWII YILOVII KILOVJIY! ПITANHIVI KIKOVOII YILOVII KILOVII YILOVII KILOVJIY! ПITANHIVI KIKOVOII YILOVII KILOVII YILOVII KILOVII YILOVII KILOVII YILOVII KILOVII YILOVII KILOVII YILOVII KILOVII YILOVII KILOVII YILOVII KILOVII YILOVII KILOVII YILOVII KILOVII YILOVII KILOWII YILOVII KILOVII YILOVII KILOVII YILOVII KILOVII YILOVII KILOVII YILOVII KILOVII YILOVII KILOVII YILOVII KILOVII YILOVII KILOVII YILOVII KILOVII YILOVII KILOL ПITANHIVI KIKOVOII YILOVII KILOVII YILOVII KILOVII YILOVII KILOVII YILOVII KILOVII YILOVII KILOVII YILOVII KILOVII YILOVII KILOVII YILOVII KILOVII YILOVII KI ПITANHIVI KIKOVOII YILOVII KILOVII YILOVII KILOVII YILOVII KILOVII YILOVII KILOVII YILOVII KI ПITANHIVI KIKOVOII YILOVII KILOVII YILOVII KILOVII YILOVII KI ПITANHIVI KIKOVOII YILOVII KILOVII YILOVII KI ПITANHIVI KIKOVOII YILOVII KILOVII YILOVII KI ПITANHIVI KIKOVOII YILOVII KILOVII YILOVII KI ПITANHIVI KIKOVOII YILOVII KILOVII Y ПITANHIVI KIKOVOII YILOVII KILOVII Y ПITANHIVI KIKOVOII YILOVII KILOVII Y ПITANHIVI KIKOVOII YILOVII KILOVII Y ПITANHIVI KIKOVOII YILOVII KILOVII Y ПITANHIVI GOLIOVII YILOVII KILOVII Y ПITANHIVI KIKOVOII YILOVII KILOVII Y ПITANHIVI KIKOVOII YILOVII KILOVII Y ПITANHIVI KIKOVOII YILOVII KILOVII Y ПITANHIVI KIKOVOII YILOVII KIT ПITANHIVI KIKOVOII YILOVII KILOVII Y ПITANHIVI KIKOVOII YILOVII KILOVII Y ПITANHIVI KIKOVOII YILOVII KILOVII Y ПITANHIVI KIKOVOII YILOVII KILOVII Y ПITANHIVI LOKOVOII YILOVII KILOVII Y ПITANHIVI KIKOVOII YILOVII KILOVII Y ПITANHIVI LOKOVOII YILOVII KILOVII Y ПITANHIVI KIKOVOII YILOVII KILOVII Y ПITANHIVI LOKOVOII YILOV II KILOVII Y ПITANHIVI KIKOVOII YILOVII KILOVII Y ПITANHIVI LOKOVOII YILOVII KILOVII Y ПITANHIVI KIKOVOII YILOVII KILOVII Y ПITANHIVI LOKOVOII YILOVII KILOVII Y Од��ожины рисуну (л.л. л.л. л.л. л.л. л.л. л.л. л.л. л.л. л.л. л.л. л.л. л.л. л.л. л.л. л.л. л.л. л.л. l.l. l.l. l.l. l.l. l.l. l.l. l.l. l.l. l.l. l.l. l.l. l.l. l.l. l.l. l.l. l.l. l.l. КИЗБЕСТССССССССССССССССССССССССССССССССССССССССССССССССССССССССССССССССССССССССССССССССССССССССССССССССССССCS ПITANHIVI KIKOVOII YILOVII KILOVII YILOVII KILOVII YILOVII KILOVII YILOVII KILOVII YILOVII KILOVII YILOVII KILOVII YILOVII KILOVII YILOVII KILOVII YILOVII KIROVII YILOVII KILOVII YILOVII KILOVII YILOVII KILOVII YILOVII KILOVII YILOVII KILOVII YILOVII KILOVII YILOVII KILOVII YILOVII KILOVII YILOVII KILOVII YILOVII KI ПITANHIVI KIKOVOIII YILOVII KILOVII YILOVII KILOVII YILOVII KILOVII YILOVII KILOVII YILOVII KILOVII YILOVII KILOVII YILOVII KILOVII YILOVII KILOVII YILOVII KILOVII YILOVII KILOVIII YILOVII KILOVII YILOVII KILOVII YILOVII KILOVII YILOVII KILOVII YILOVII KILOVII YILOVII KILOVII YILOVII KILOVII YILOVII KILOVII YILOVII KILOVII YILOVII KILOVOII YILOVII KILOVII YILOVII KILOVII YILOVII KILOVII YILOVII KILOVII YILOVII KILOVII YILOVII KILOVII YILOVII KILOVII YILOVII KILOVII YILOVII KILOVII YILOVII KI Од��ожины (л.л. л.л. л.л. л.л. л.л. л.л. л.л. л.л. л.л. л.л. л.л. л.л. л.л. л.л. л.л. л.л. $л. "KIDROB" (Ф.Ф.Ф.Ф.Ф.Ф.Ф.Ф.Ф.Ф.Ф.Ф.Ф.Ф.Ф.Ф.Ф.Ф.Ф.Ф.Ф.Ф.Ф.Ф.Ф.Ф.Ф.Ф.Ф.Ф.Ф.Ф.Ф.Ф.Ф.Ф.Ф.Ф.Ф.Ф.Ф.Ф.Ф.Ф.Ф.Ф.Ф.Ф.Ф.Ф.Ф. ПITANHIVI KIKOVOII YILOVII KILOVII YILOVII KILOVII YILOVII KILOVII YILOVII KILOVII YILOVII KILOVII YILOVII KILOVII YILOVII KILOVII YILOVII KILOVII YILOVII KILOVOII YILOVII KILOVOII YILOVII KILOVOII YILOVII KILOVOII YILOVII KILOVOII YILOVII KILOVOII YILOVII KILOVOII YILOVII KILOVOII YILOVII KILOVOII YILOVII KILOVOII YILOVII KILOVII YILOVII KILOVOII YILOVII KILOVOII YILOVII KILOVOII YILOVII KILOVOII YILOVII KILOVOII YILOVII KILOVOII YILOVII KILOVOII YILOVII KILOVOII YILOVII KILOVII YILOVII KILOVII YILOVII KILOVOII YILOVII KILOVOII YILOVII KILOVOII YILOVII KILOVOII YILOVII KILOVOII YILOVII KILOVOII YILOVII KILOVOII YILOVII KILOVII YILOVII KILOVOII YILOVII KILOVII YILOVII KILOVOII YILOVII KILOVOII YILOVII KILOVOII YILOVII KILOVOII YILOVII KILOVOII YILOVII KILOVOII YILOVII KILOVOII YILOVII KILOVII YILOVII KILOVII YILOVII KILOVII YILOVII KILOVOII YILOVII KILOVOII YILOVII KILOVOII YILOVII KILOVOII YILOVII KILOVOII YILOVII KILOVOII YILOVII KILOVII YILOVII KILOVOII YILOVII KILOVOII YILOVII KILOVII YILOVII KILOVOII YILOVII KILOVOII YILOVII KILOVOII YILOVII KILOVOII YILOVII KILOVOII YILOVII KILOVOII YILOVII KILOVII YILOVII KILOVOII YILOVII KILOVII YILOVII KILOVII YILOVII KILOVOII YILOVII KILOVOII YILOVII KILOVOII YILOVII KILOVOII YILOVII KILOVOII YILOVII KILOVOII YILOVII KILOVII YILOVII KILOVII YILOVII KILOVOII YILOVII KILOVII YILOVII KILOVOII YILOVII KILOVOII YILOVII KILOVOII YILOVII KILOVOII YILOVII KILOVOII YILOVII KILOVOII YILOVII KILOVII YILOVII KILOVII YILOVII KILOVII YILOVII KILOVII YILOVII KILOVOII YILOVII KILOVII YILOVII KILOVOII YILOVII KILOVOII YILOVII KILOVOII YILOVII KILOVOII YILOVII KILOVOII YILOVII KILOVII YILOVII KILOVOII YILOVII KILOVOII YILOVII KILOVOII YILOVII KILOVII YILOVII KILOVOII YILOVII KILOVOII YILOVII KILOVOII YILOVII KILOVOII YILOVII KILOVOII YILOVII KILOVII YILOVII KILOVOII YILOVII KILOVII YILOVII KILOVOII YILOVII KILOVII YILOVII KILOVOII YILOVII KILOVOII YILOVII KILOVOII YILOVII KILOVOII YILOVII KILOVOII YILOVII KILOVII YILOVII KILOVII YILOVII KILOVOII YILOVII KILOVOII YILOVII KILOVII YILOVII KILOVOII YILOVII KILOVOII YILOVII KILOVOII YILOVII KILOVOII YILOVII KILOVOII YILOVII KILOVII YILOVII KILOVII YILOVII KILOVII YILOVII KILOVOII YILOVII KILOVII YILOVII KILOVOII YILOVII KILOVOII YILOVII KILOVOII YILOVII KILOVOII YILOVII KILOVII YILOVII KILOVOII YILOVII KILOVOII YILOVII KILOVOII YILOVII KILOVOII YILOVII KILOVII YILOVII KILOVOII YILOVII KILOVOII YILOVII KILOVII YILOVII KILOVOII YILOVII KILOVII YILOVII KILOVOII YILOVII KILOVOII YILOVII KILOVOII YILOVII KILOVOII YILOVII KILOVII YILOVII KILOVOII YILOVII KILOVII YILOVII KILOVOII YILOVII KILOVOII YILOVII KILOVII YILOVII KILOVOII YILOVII KILOVOII YILOVII KILOVOII YILOVII KILOVOII YILOVII KILOVII YILOVII KILOVOII YILOVII KILOVII YILOVII KILOVII YILOVII KILOVOII YILOVII KILOVII YILOVII KILOVOII YILOVII KILOVOII YILOVII KILOVOII YILOVII KILOVOII YILOVII KILOVII YILOVII KILOVII YILOVII KILOVOII YILOVII KILOVOII YILOVII KILOVOII YILOVII KILOVII YILOVII KILOVOII YILOVII KILOVOII YILOVII KILOVOII YILOVII KILOVOII YILOVII KILOVII YILOVII KILODOSSS ПITANHIVI KIKOVOII YILOVII KILOVII YILOVII KILOVII YILOVII KILOVII YILOVII KILOVII YILOVII KILOVII YILOVII KILOVOII YILOVII KILOVOII YILOVII KILOVOII YILOVII KILOVOII YILOVII KILOVII YILOVII KILOVOII YILOVII KILOVOII YILOVII KILOVOII YILOVII KILODOSSS ПITANHIVI KIKOVOII YILOVII KILOVII YILOVII KILOVII YILOVII KILOVII YILOVII KILOVOII YILOVII KILOVOII YILOVII KILOVOII YILOVII KILOVOII YILOVII KILOVOII YILOVII KILOVOII YILOVII KILOGON ПITANHIVI KIKOVOII YILOVII KILOVII YILOVII KILOVII YILOVII KILOVOII YILOVII KILOVOII YILOVII KILOVOII YILOVII KILOVOII YILOVII KILOVOII YILOVII KILOVOII YILOVII KILOVOII YILOVII KILOGON ПITANHIVI KIKOVOII YILOVII KILOVII YILOVII KILOGON ПITANHIVI KIKOVOII YILOVII KILOVII YILOVII KILOGON ПITANHIVI KIKOVOII YILOVII KILOGON ПITANHIVI KIKOVOII YILOVII KILOGON ПITANHIVI KIKOVOII YILOVII KILOGON ПITANHIVI KIKOVOII YILOVII KILOGON ПITANHIVI KIKOVOII YILOVII KILOGON ПITANH IV I SINOSEOVA ПITANHIVI KIKOVOII YILOVII KILOGON ПITANHIVI KIKOVOII YILOVII KILOGON ПITANHIVI KIKOVOII YILOVII KILOGON ПITANHIVI KIKOVOII YILOVII KILOGON ПITANHIVI KIKOVOII YILOWII KILOGON ПITANHIVI KIKOVOII YILOWII KILOGON ПITANHIVI KIKOVOII YILOWII KILOGON ПITANHIVI KIKOVOII YILOWII KILOGON ПITANHIVI KIKOVOII YILOWII KILOGON ПITANHIVI KIKODOSSS ПITANHIVI KIKODOSSS ПITANHIVI KIKODOSSS ПITANHIVI KIKODOSSS ПITANHIVI KIKODOSSS ПITANHIVI KIKODOSSS ПITANHIVI KIKODOSSS ПITANHIVI KIKODOSSS ПITANHIVI KIMOYOVA ПITANHIVI KIMOYOVA ПITANHIVI KIMOYOVA ПITANHIVI KIMOYOVA ПITANHIVI KIMOYOVA ПITANHIVI KIMOYOVA ПITANHIVI KIMOYOVA ПITANHIVI KIMOYOVA ПITANHIVI KIMOYOVA ПITAMHIVI GOLIOVII ПITAMHIVI GOLIOVII ПITAMHIVI GOLIOVII ПITAMHIVI GOLIOVII ПITAMHIVI GOLIOVII ПITAMHIVI GOLIOVII ПITAMHIVI GOLIOVII ПITAMHIVI GOLIOVII ПITAMHIVI GOLIOVII ПITAHMIVI GOLIOVII ПITAHMIVI GOLIOVII ПITAHMIVI GOLIOVII ПITAHMIVI GOLIOVII ПITAHMIVI GOLIOVII ПITAHMIVI GOLIOVII ПITAHMIVI GOLIOVII ПITAHMIVI GOLIOVII ПITAHMIVI GOLFIO ПITAHMIVIS ПITAHMIVIS ПITAHMIVIS ПITAHMIVIS ПITAHMIVIS ПITAHMIVIS ПITAHMIVIS ПITAHMIVIS ПITAHMIVIS ПITAHMIVIS ПITAHMIVIS ПITAHMIVIS ПITAHMIVIS ПITAHMIVIS ПITAHMIVIS PITAHMIVIS ПITAHMIVIS ПITAHMIVIS ПITAHMIVIS ПITAHMIVIS ПITAHMIVIS ПITAHMIVIS ПITAHMIVIS ПITAHMIVIS ПITAHMIVIS ПITAHMIVIS ПITAHMIVIS ПITAHMIVIS ПITAHMIVIS ПITAMHIVIS ПITAHMIVIS ПITAHMIVIS ПITAHMIVIS ПITAHMIVIS ПITAHMIVIS ПITAHMIVIS ПITAHMIVIS ПITAHMIVIS ПITAHMIVIS ПITAHMIVIS ПITAHMIVIS ПITAHMIVIS ПITAHMIVIS ПITAHMIVS ПITAHMIVS ПITAHMIVS ПITAHMIVS ПITAHMIVS ПITAHMIVS ПITAHMIVS ПITAHMIVS ПITAHMIVS ПITAHMIVS ПITAHMIVS ПITAHMIVS ПITAHMIVS ПITAHMIVS ПITAHMIVS PITAHMIVS ПITAHMIVS ПITAHMIVS ПITAHMIVS ПITAHMIVS ПITAHMIVS ПITAHMIVS ПITAHMIVS ПITAHMIVS ПITAHMIVS ПITAHMIVS ПITAHMIVS ПITAHMIVS ПITAHMIVS ПITAMHIVS ПITAHMIVS ПITAHMIVS ПITAHMIVS ПITAHMIVS ПITAHMIVS ПITAHMIVS ПITAHMIVS ПITAHMIVS ПITAHMIVS ПITAHMIVS ПITAHMIVS ПITAHMIVS ПITAHMIVS ПITAHMIVIS ПITAHMIVS ПITAHMIVS ПITAHMIVS ПITAHMIVS ПITAHMIVS ПITAHMIVS ПITAHMIVS ПITAHMIVS ПITAHMIVS ПITAHMIVS ПITAHMIVS ПITAHMIVS ПITAHMIVS PITAHMIVS PITAHMIVS PITAHMIVS PITAHMIVS PITAHMIVS PITAHMIVS PITAHMIVS PITAHMIVS PITAHMIVS PITAHMIVS PITAHMIVS PITAHMIVS PITAHMIVS PITAHMIVS PITAMHIVS PITAHMIVS PITAHMIVS PITAHMIVS PITAHMIVS PITAHMIVS PITAHMIVS PITAHMIVS PITAHMIVS PITAHMIVS PITAHMIVS PITAHMIVS PITAHMIVS PITAHMIVS PITAHMIVIS PITAHMIVS PITAHMIVS PITAHMIVS PITAHMIVS PITAHMIVS PITAHMIVS PITAHMIVS PITAHMIVS PITAHMIVS PITAHMIVS PITAHMIVS PITAHMIVS PITAHMIVS PITAHMIVS ПITAHMIVS PITAHMIVS PITAHMIVS PITAHMIVS PITAHMIVS PITAHMIVS PITAHMIVS PITAHMIVS PITAHMIVS PITAHMIVS PITAHMIVS PITAHMIVS PITAHMIVS PITAMHIVS PITAMHIVS PITAHMIVS PITAHMIVS PITAHMIVS PITAHMIVS PITAHMIVS PITAHMIVS PITAHMIVS PITAHMIVS PITAHMIVS PITAHMIVS PITAHMIVS PITAHMIVS PITAHMIVSS PITAHMIVSS PITAHMIVSS PITAHMIVSS PITAHMIVSS PITAHMIVSS PITAHMIVSS PITAHMIVSS PITAHMIVSS PITAHMIVSS PITAHMIVSS PITAHMIVSS PITAHMIVSS PITAHMIVSS PITAHMIVSS РITAHMIVSS PITAHMIVSS PITAHMIVSS PITAHMIVSS PITAHMIVSS PITAHMIVSS PITAHMIVSS PITAHMIVSS PITAHMIVSS PITAHMIVSS PITAHMIVSS PITAHMIVSS PITAHMIVSS PITAHMIVSS PITAMHIVS PITAHMIVSS PITAHMIVSS PITAHMIVSS PITAHMIVSS PITAHMIVSS PITAHMIVSS PITAHMIVSS PITAHMIVSS PITAHMIVSS PITAHMIVSS PITAHMIVSS PITAHMIVSS PITAHMIVSS PITAHMIVS PITAHMIVSS PITAHMIVSS PITAHMIVSS PITAHMIVSS PITAHMIVSS PITAHMIVSS PITAHMIVSS PITAHMIVSS PITAHMIVSS PITAHMIVSS PITAHMIVSS PITAHMIVSS PITAHMIVSS ПITAHMIVSS PITAHMIVSS PITAHMIVSS PITAHMIVSS PITAHMIVSS PITAHMIVSS PITAHMIVSS PITAHMIVSS PITAHMIVSS PITAHMIVSS PITAHMIVSS PITAHMIVSS PITAHMIVSS PITAHMIVSS PITAOHIVS PITAOHIVS PITAOHIVS PITAOHIVS PITAOHIVS PITAOHIVS PITAOHIVS PITAOHIVS PITAOHIVS PITAOHIVS PITAOHIVS PITAOHIVS PITAOHIVS PITAOHIVS PITAOHIVS ПITAOHIVS PITAOHIVS PITAOHIVS PITAOHIVS PITAOHIVS PITAOHIVS PITAOHIVS PITAOHIVS PITAOHIVS PITAOHIVS PITAOHIVS PITAOHIVS PITAOHIVS PITAOHIVS PITAHMIVS PITAHMIVS PITAHMIVS PITAHMIVS PITAHMIVS PITAHMIVS PITAHMIVS PITAHMIVS PITAHMIVS PITAHMIVS PITAHMIVS PITAHMIVS PITAHMIVS PITAHM4N PITAHM4N PITAHM4N PITAHM4N PITAHM4N PITAHM4N PITAHM4N PITAHM4N PITAHM4N PITAHM4N PITAHM4N PITAHM4N PITAHM4N PITAHM4N PITAHM4N TAKHPOSOVA КИЗБЕСТССССССССССССССССССССССССССССССССССССССССССССССССССССССССССССССССССССССССССССССССССССССССССССC ПITANHIVS ПITANHIVS ПITANHIVS ПITANHIVS ПITANHIVS ПITANHIVS ПITANHIVS ПITANHIVS ПITANHIVS ПITANHIVS ПITANHIVS ПITANHIVS ПITANHIVS ПITANHIVS ПITANHIVS PITAHM4N PITAHM4N PITAHM4N PITAHM4N PITAHM4N PITAHM4N PITAHM4N PITAHM4N PITAHM4N PITAHM4N PITAHM4N PITAHM4N PITAHM4N PITAHM4 N PITAHM4N PITAHM4N PITAHM4N PITAHM4N PITAHM4N PITAHM4N PITAHM4N PITAHM4N PITAHM4N PITAHM4N PITAHM4N PITAHM4N PITAHM4N PITAHM4N ПITAHM4N PITAHM4N PITAHM4N PITAHM4N PITAHM4N PITAHM4N PITAHM4N PITAHM4N PITAHM4N PITAHM4N PITAHM4N PITAHM4N PITAHM4N PITAHM4N PITAOHIVS PITAOHIVS PITAOHIVS PITAOHIVS PITAOHIVS PITAOHIVS PITAOHIVS PITAOHIVS PITAOHIVS PITAOHIVS PITAOHIVS PITAOHIVS PITAOHIVS PITAOHIVS РТАМВДСССССССССССССССССССССССССССССССССССССССССССССССССССССССССССССССССССССССССССССССССССССССССССССССССССCC ПITANHIVS ПITANHIVS ПITANHIVS ПITANHIVS ПITANHIVS ПITANHIVS ПITANHIVS ПITANHIVS ПITANHIVS ПITANHIVS ПITANHIVS ПITANHIVS ПITANHIVS ПITANHIVS РТАМВДСССССССССССССССССССССССССССССССССССССССССССССССССССССССССССССССССССССССССССССССССССССССССC ПITANHIVS ПТАМВДССССССССССССССССССССССССССССССССССССССССССССССССССССССССССССССССССССССССССССССССССССССССССССССC ПITANHIVIS ПТАМВДСССССССССССССССССССССССССССССССССССC ПITANHIVIS ПТАМВДССССССССССССССССССССССC ПITANHIVIS ПТАМВДСССССССССССССССССC ПITANHIVIS ПТАМВДССССССССССССC ПITANHIVIS ПТАМВДСССССССССC ПITANHIVIS ПТАМВДСССССССC ПITANHIVIS ПТАМВДССССССC ПITANHIVIS ПТАМВДСССССC ПITANHIVIS ПТАМВДССССC ПITANHIVIS ПТАМВДСССC ПITANHIVIS ПТАМВДССC ПITANHIVIS ПТАМВДССC ПITANHIVIS ПТАМВДСC ПITANHIVIS ПТАМВДСC ПITANHIVIS ПТАМВДСC ПITANHIVIS ПТАМВДСC ПITANHIVIS ПТАМВДСC ПITANHIVIS ПТАМВДСC ПITANHIVIS ПТАМВДСC PITANHIVIS ПТАМВДСC PITANHIVIS ПТАМВДСC PITANHIVIS ПТАМВДСC PITANHIVIS ПТАМВДСC PITANHIVIS ПТАМВДСC PITANHIVIS ПТАМВДСC PITANH4N PITAHM4N PITAHM4N PITAHM4N PITAHM4N PITAHM4N PITAHM4N PITAHM4N PITAHM4N PITAHM4N PITAHM4N PITAHM4N PITAHM4N PITAHM4N PITAHM4 N RANKING OF THE FOLLOWING VOTIENTS OF THE FOLLOWING PRACTICE. (М.Ф.Ф.Ф.Ф.Ф.Ф.Ф.Ф.Ф.Ф.Ф.Ф.Ф.Ф.Ф.Ф.Ф.Ф.Ф.Ф.Ф.Ф.Ф.Ф.Ф.Ф.Ф.Ф.Ф.Ф.Ф.Ф.Ф.Ф.Ф.Ф.Ф.Ф.Ф.Ф.Ф.Ф.Ф.Ф.Ф.Ф.Ф.Ф.Ф.Φ.Ф.Ф.Ф.Ф.Ф.Ф.Ф.Ф.Ф.Ф.Ф.Ф.Ф.Ф.Ф.Ф.Ф.Ф.Ф.Ф.Ф.Ф.Ф.Ф.Ф.Ф.Ф.Ф.Ф.Ф.Ф.Ф.Ф.Ф.Ф.Ф.Ф.Ф.Ф.Ф.Ф.Ф.Ф.Ф.Ф.Ф.Ф.Ф.Ф.φ. (М.Ф.Ф.Ф.Ф.Ф.Ф.Ф.Ф.Ф.Ф.Ф.Ф.Ф.Ф.Ф.Ф.Ф.Ф.Ф.Ф.Ф.Ф.Ф.Ф.Ф.Ф.Ф.Ф.Ф.Ф.Ф.Ф.Ф.Ф.Ф.Ф.Ф.Ф.Ф.Ф.Ф.Ф.Ф.Ф.Ф.Ф.Ф.Ф. (М.Ф.Ф.Ф.Ф.Ф.Ф.Ф.Ф.Ф.Ф.Ф.Ф.Ф.Ф.Ф.Ф.Ф.Ф.Ф.Ф.Ф.Ф.Ф.Ф.Ф.Ф.Ф.Ф.Ф.Ф.Ф.Ф.Ф.Ф.Ф.Ф.Ф.Ф.Ф.Ф.Ф.Ф.Ф.Ф.Ф.Ф.Ф.Ф (М.Ф.Ф.Ф.Ф.Ф.Ф.Ф.Ф.Ф.Ф.Ф.Ф.Ф.Ф.Ф.Ф.Ф.Ф.Ф.Ф.Ф.Ф.Ф.Ф.Ф.Ф.Ф.Ф.Ф.Ф.Ф.Ф.Ф.Ф.Ф.Ф.Ф.Ф.Ф.Ф.Ф.Ф.Ф.Ф.Ф.Ф.Ф.Ф.Φ. (М.Ф.Ф.Ф.Ф.Ф.Ф.Ф.Ф.Ф.Ф.Ф.Ф.Ф.Ф.Ф.Ф.Ф.Ф.Ф.Ф.Ф.Ф.Ф.Ф.Ф.Ф.Ф.Ф.Ф.Ф.Ф.Ф.Ф.Ф.Ф.Ф.Ф.Ф.Ф.Ф.Ф.Ф.Ф.Ф.Ф.Ф.Ф.Ф.F. (М.Ф.Ф.Ф.Ф.Ф.Ф.Ф.Ф.Ф.Ф.Ф.Ф.Ф.Ф.Ф.Ф.Ф.Ф.Ф.Ф.Ф.Ф.Ф.Ф.Ф.Ф.Ф.Ф.Ф.Ф.Ф.Ф.Ф.Ф.Ф.Ф.Ф.Ф.Ф.Ф.Ф.Ф.Ф.Ф.Ф.Ф.Ф.Ф- |
TexHnueckne XapaKTePnCTnKn n3deJna
If you have any questions or comments relating to Samsung products, please contact the SAMSUNG customer care center.
| Region Country Contact Center Web Site | |||
| North America | CANADA 1-800 | SAMSUNG(726-7864) http://www.samsung.com/ca | |
| MEXICO 01-800 | SAMSUNG(726-7864) http://www.samsung.com/mx | ||
| U.S.A 1-800-SAMSUNG(726-7864) http://www.samsung.com/us | |||
| Latin America | ARGENTINA 0800 | 333-3733 http://www.samsung.com/ar | |
| BRAZIL | 0800-124-4214004-0000 | http://www.samsung.com/br | |
| CHILE 800-SAMSUNG(726-7864) http://www.samsung.com/cl | |||
| Nicaragua 00-1800 | 00-5077267 http://www.samsung.com/latin | ||
| Honduras | 800-7919267 | http://www.samsung.com/latin | |
| COSTA RICA | 0-800-507-7267 | http://www.samsung.com/latin | |
| ECUADOR 1-800 | -10-7267 | http://www.samsung.com/latin | |
| EL SALVADOR | 800-6225 | http://www.samsung.com/latin | |
| GUATEMALA | 1-800-299-0013 | http://www.samsung.com/latin | |
| JAMAICA | 1-800-234-7267 | http://www.samsung.com/latin | |
| PANAMA 800-7267 | http://www.samsung.com/latin | ||
| PUERTO RICO | 1-800-682-3180 | http://www.samsung.com/latin | |
| REP. DOMINICA | 1-800-751-2676 | http://www.samsung.com/latin | |
| TRINIDAD &TOBAGO | 1-800-SAMSUNG(726-7864) http://www.samsung.com/latin | ||
| VENEZUELA 0-800 | -100-5303 | http://www.samsung.com/latin | |
| COLOMBIA | 01-8000112112 | http://www.samsung.com.co | |
| Europe | BELGIUM | 02 201 2418 | http://www.samsung.com/be (Dutch)http://www.samsung.com/be_fr (French) |
| CZECH REPUBLIC | 800 - SAMSUNG (800-726786) | http://www.samsung.com/cz | |
| Samsung Zrt., Čěská organizačné složka, Oasis Florenc, Sokolovská394/17, 180 00, Praha 8 | |||
| DENMARK 8 - SAMSUNG(7267864) | http://www.samsung.com/dk | ||
| FINLAND | 30 - 6227 515 | http://www.samsung.com/fi | |
| FRANCE 01 4863 0000 | http://www.samsung.com/fr | ||
| GERMANY 01805 - SAMSUNG(726-7864 € 0,14/Min) | http://www.samsung.de | ||
| HUNGARY 06-80-SAMSUNG(726-7864) http://www.samsung.com/hu | |||
| ITALIA | 800-SAMSUNG(726-7864) http://www.samsung.com/it | ||
| LUXEMBURG | 02 261 03 710 | http://www.samsung.com/lu | |
| NETHERLANDS | 0900-SAMSUNG (0900-7267864) (€ 0,10/Min) | http://www.samsung.com/nl | |
| NORWAY | 3 - SAMSUNG(7267864) | http://www.samsung.com/no | |
| POLAND | 0 801 1SAMSUNG(172678)022-607-93-33 | http://www.samsung.com/pl | |
| PORTUGAL | 80820-SAMSUNG(726-7864) | http://www.samsung.com/pt | |
| SLOVAKIA 0800-SAMSUNG(726-7864) | http://www.samsung.com/sk | ||
| SPAIN 902 - 1 - SAMSUNG (902 172 678) | http://www.samsung.com/es | ||
| SWEDEN | 075 - SAMSUNG(726 78 64) | http://www.samsung.com/se | |
| U.K | 0845 SAMSUNG (7267864) | http://www.samsung.com/uk | |
| EIRE | 0818 717 100 | http://www.samsung.com/ie | |
| AUSTRIA | 0810 - SAMSUNG(7267864, € 0.07/min) | http://www.samsung.com/at | |
| Switzerland | 0848 - SAMSUNG(7267864, CHF 0.08/min) | http://www.samsung.com/ch | |
| CIS | RUSSIA | 8-800-555-55-55 | http://www.samsung.ru |
| KAZAKHSTAN | 8-10-800-500-55-500 | http://www.samsung.com/kz ru | |
| UZBEKISTAN | 8-10-800-500-55-500 | http://www.samsung.com/kz ru | |
| KYRGYZSTAN | 00-800-500-55-500 | - | |
| TADJIKISTAN | 8-10-800-500-55-500 | - | |
| UKRAINE | 8-800-502-0000 | http://www.samsung.ua | |
| LITHUANIA | 8-800-77777 | http://www.samsung.com/lt | |
| LATVIA | 8000-7267 | http://www.samsung.com/lv | |
| ESTONIA | 800-7267 | http://www.samsung.com/ee | |
SAMSUNG


- Language tag in the user manual
- Product and Components
- Components
- Name and function of each part
- USB cable connection (PC connection)
- USB memory device connection
- Using the Digital Frame
- Viewing pictures
- Press [B]
- Using as a Mini Monitor
- PC requirements for use as a Mini Monitor
- Firmware update
- Preparations for firmware update
- Současti
- Produ e componentes
- Ha3BaHne n ΦyHKzna KaXdoJ DeTaJIaN
- NoKIOUeyne Ka6eJy USB (noKIOUeyne K KOMnbIOTe
- IopKnHueHneKa6eNaNTaHn
- IopKIOUOHe 3aONMHaIOUeO yctpOcTBA USB
- THe3doKapTbI nAMrTn SD
- IodctBaKuΦpOBoNΦOTopamKn
- Понск и устараенье несправност
- TexHnueckne XapaKTePnCTnKn n3deJna
Brand : SAMSUNG
Model : SPF87H
Category : Digital photo frame