USER MANUAL RGPM 51 S EINHELL
- Safety information
- Layout
- Items supplied
- Intended use
- Technical data
- Before starting the equipment
- Operation
- Cleaning, maintenance, storage, transport and ordering of spare parts
-
Disposal and recycling
-
Troubleshooting guide
Important!
When using the equipment, a few safety precautions must be observed to avoid injuries and damage. Please read the complete operating instructions and safety regulations with due care. Keep this manual in a safe place, so that the information is available at all times. If you give the equipment to any other person, hand over these operating instructions and safety regulations as well. We cannot accept any liability for damage or accidents which arise due to a failure to follow these instructions and the safety instructions.
1. Safety instructions for hand-operated lawn mowers
Note
- Read the directions with due care. Familiarize yourself with the settings and proper operation of the machine.
- Never allow children or other persons who are not familiar with the operating instructions to use the mower. Contact your local governmental agency for information regarding minimum age requirements for operating the mower.
- Never mow in the direct vicinity of persons - especially children - or animals. Always keep in mind that the operator is responsible for accidents involving other persons and/or their property.
- If you give the equipment to any other person, give them these operating instructions as well.
Preliminary measures
- Always wear sturdy, non-slip footwear and long trousers when mowing. Never mow barefoot or in sandals.
- Check the grounds on which the machine will be used and remove all objects that could be caught up and violently flung out of the chute.
-
Warning: Petrol is highly flammable! Therefore: - Only store petrol in containers designed to hold petroleum-based liquids.
-
Only refuel out in the open and do not smoke during the refueling process.
- Always refuel the lawn mower before starting the engine. Always ensure that the fuel tank cap is closed when the engine is running and when the mower is hot; also do not refuel.
- If petrol has overflowed, do not under any circumstances attempt to start the engine. Instead, remove the machine from the affected area. Avoid starting the engine until the petrol fumes have completely evaporated.
- For safety reasons, the petrol tank and other
tank closures must be replaced if they are damaged.
- Replace defective mufflers.
- Before using the mower, visually inspect it to ensure that the blade, mounting bolts and the entire cutting apparatus are in good working order (i.e. not worn out or damaged). To prevent any imbalance, replace worn out or damaged blades and mounting bolts as a set only (if applicable).
- Please note that where a mower has more than one blade, the rotation of one of the blades can cause the others to rotate as well.
Handling
- Do not let the combustion engine run in enclosed areas, as dangerous carbon monoxide gas can build up.
- Only mow in broad daylight or in well-lit conditions. Avoid using the machine on wet grass as far as possible.
- Always maintain good footing on inclines.
- Only operate the machine at a walking pace.
- For machines with wheels: Always mow across hills i.e. never straight up or straight down.
- Be particularly careful when you change direction on a slope.
- Do not mow on overly steep inclines.
- Always be extra careful when turning the mower around and when pulling it towards you.
- Switch off the lawn mower and ensure that the blade has stopped rotating whenever the mower has to be tilted for transporting over areas other than lawns and whenever it has to be moved from or to the area you want to mow.
- Never use the lawn mower if the blade or safety grilles are damaged, or without the attached guards, e.g. deflectors and/or grass catching devices.
- Do not adjust or overclock the engine speed settings.
- Release the engine brake before you start the engine.
- Start the engine with care, in accordance with the manufacturer's instructions. Make sure that your feet are far enough away from the mower blade!
- Do not tilt the lawn mower when you start the engine unless the mower must raised off of the ground a little in order to start it. In the latter case, tilt the mower as little as absolutely necessary and only raise the side opposite to that of the user.
- Never start the engine while standing in front of the chute.
- Never move your hands or feet toward or under
GB
any rotating parts. Keep clear of the chute opening at all times.
- Never lift or carry a lawn mower with the engine running.
- Switch off the engine and pull the spark plug boot:
- before you dislodge any blockages or clogs in the chute.
- before carrying out any checks, cleaning, maintenance or other work on the lawn mower
- if the lawn mower strikes a foreign body, examine it for signs of damage and carry out any necessary repairs before restarting and continuing to work with the mower. If the lawn mower begins to experience exceptionally strong vibrations, immediately switch it off and check it.
- Switch off the engine:
- when you leave the lawn mower.
- before you refuel.
- When you switch off the engine, move the speed lever to the Off position. Close the petrol stopcock.
- Operation of the machine at higher than normal speed can lead to an increased risk of accidents.
- Take care when carrying out installation work on the machine, and avoid trapping fingers between the moving cutting tool and the fixed parts of the machine.
Maintenance and storage
- Make sure that all nuts, bolts and screws are tightened securely and that the machine is in safe working condition.
- Never store the mower (with petrol in the tank) inside a building in which petrol fumes could come into contact with open flames or sparks.
- Allow the motor to cool before you put the lawn mower in an enclosed area.
- In order to avoid fire hazards, keep the engine, exhaust and the area around the fuel tank free from grass, leaves and leaking grease (oil).
- Routinely check the grass basket for signs of wear and impaired functionality.
- For your own safety, replace worn or damaged parts without delay.
- If the fuel tank should require emptying this should only be done in the open air using a petrol suction pump (available from DIY shops)

CAUTION!
Read all safety regulations and instructions.
Any errors made in following the safety regulations and instructions may result in an electric shock, fire and/or serious injury.
Keep all safety regulations and instructions in a safe place for future use.
Explanation of the symbols on the machine
(fig.9):
1) Read the operating instructions
2) Important! Danger from catapulted parts. Keep a safe distance.
3) Important! Switch off the engine and pull the spark plug boot before doing any maintenance, repair, cleaning or adjustment work.
4) Fill with oil and fuel before starting the mower.
5) Caution! Wear ear protection and safety goggles.
6) Engine start/stop lever (I=Engine on; 0=Engine off)
7) Drive lever (clutch lever)
8) Risk of cut injuries. Caution: rotating cutters.
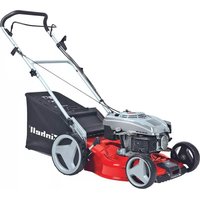
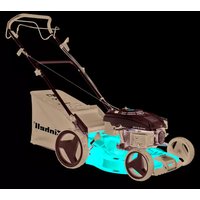
2. Layout (Fig. 1-10)
- Engine start/stop lever - engine brake
- Top push bar
- Throttle lever
- Starter cable
- Lower push bar
- Filling level indicator debris bag
- Debris bag
- Ejector flap
- Cutting height adjustment
- Tank filler cap
- Oil-filler neck
- 2 x cable ties
- Spark plug wrench
- 2 × square head screws for top push bar
- 2 screws for upper push bar with high speed clamping function
- Side ejector cover
- 4 x star nuts for push bar
- Drive lever (clutch lever)
- Drive wheel (left and right)
- Side ejector adaptor
- Mulching adaptor
- Cover for lower push bar
3. Items supplied
Please check that the article is complete as specified in the scope of delivery. If parts are missing, please contact our service center at the latest within 5 work days after purchasing the article and upon presentation of a valid bill of purchase. Also, refer to the warranty table in the warranty provisions at the end of the operating instructions.
- Open the packaging and take out the equipment with care.
- Remove the packaging material and any packaging and/or transportation braces (if available).
Check to see if all items are supplied.
Inspect the equipment and accessories for transport damage.
If possible, please keep the packaging until the end of the guarantee period.
IMPORTANT
The equipment and packaging material are not toys. Do not let children play with plastic bags, foils or small parts.
There is a danger of swallowing or suffocating!
Petrol lawn mower
Upper push bar and lower push bar
Side ejector adaptor
Mulching adaptor
Grass basket (two-piece)
Cover for the lower push bar (2x)
Spark plug wrench
Star nut (4x)
Quick-tightening screw (2x)
Square head screw (2x)
Cable clip (2x)
Petrol service manual
Original operating instructions
4. Intended use
The equipment may only be used for the tasks it is designed to handle. Any other use is deemed to be a case of misuse. The user/operator and not the manufacturer will be liable for any damage or injuries of any kind caused as a result of this.
The petrol lawn mower is intended for private use i.e. for use in home and gardening environments.
Private use of the lawn mower refers an annual operating time generally not exceeding that of 50 hours, during which time the machine is primarily used to maintain small-scale, residential lawns and home/hobby gardens. Public facilities, sporting halls, and agricultural/forestry applications are excluded.
Please note that our equipment has not been designed for use in commercial, trade or industrial applications. Our warranty will be voided if the machine is used in commercial, trade or industrial businesses or for equivalent purposes.
The operating instructions as supplied by the manufacturer must be kept and referred to in order to ensure that the lawn mower is properly used and maintained. The instructions contain valuable information on operating, maintenance and servicing conditions.
Important! Due to the high risk of bodily injury to the user, the lawn mower may not be used to trim bushes, hedges or shrubs, to cut scaling vegetation, planted roofs, or balcony-grown grass, to clean (suck up) dirt and debris off walkways, or to chop up tree or hedge clippings. Moreover, the lawn mower may not be used as a power cultivator to level out high areas such as molehills.
For safety reasons, the lawn mower may not be used as a drive unit for other work tools or toolkits of any kind.
5. Technical data
Note:
The enclosed manual from Briggs & Stratton provides detailed technical data on the engine!
RG-PM 48 S B&S
Engine type:
Single cylinder four-stroke engine, 158 ccm
Working speed: 2800 min ^1 /1,9 kW
Fuel: standard
Cutting height adjustment: central, (30-75 mm)
Cutting width: 480 mm
Weight: 36
Sound and vibration
L_DA sound pressure level 85.6 dB(A)
KwA uncertainty 3 dB
Wear ear-muffs.
The impact of noise can cause damage to hearing. Vibration emission value a_h = 6.1 m/s^2
Kuncertainty = 1.5m / s^2
GB
RG-PM 51 S B&S
Engine type:
Single cylinder four-stroke engine, 190 ccm
| Working speed: 2800 min | /2,5 kW |
| Fuel: standard |
| Cutting height adjustment: central, (30-75 mm) |
| Cutting width: 510 mm |
| Weight: 39 |
Sound and vibration
LDA sound pressure level 74 dB(A)
KpA uncertainty 4 dB
LWA sound power level 98 dB(A)
K_WA uncertainty 2 dB
Wear ear-muffs.
The impact of noise can cause damage to hearing. Vibration emission value a_h = 6.4 m/s^2
K uncertainty = 1.5m / s^2
6. Before starting the equipment
6.1 Assembling the components
Some parts of the mower come disassembled. For quick and easy assembly, read and follow the instructions below.
Important! You will need the following additional tools (not supplied) for assembly, and also for maintenance work:
A flat oil drip tray (for changing the oil)
A 1 liter measuring jug (oil/petrol resistant)
A petrol can
A funnel (suitable for the tank's petrol filler neck)
Household wipes (to wipe up oil/petrol residue; dispose of these at a filling station)
A petrol suction pump (plastic, available from DIY stores)
An oil can with hand pump (available from DIY stores)
Assembly
- Affix the lower push bar (Fig. 3a/Item 5) to the mower housing and set the desired working height. 3 different working heights are available. Each peg on the lower push bar can be inserted into a hole situated directly opposite to it, on the mower housing, for example A-A (Fig. 3). The
lower push bar must be equally adjusted on both sides. Now affix the cover (Fig. 3a/Item 23) and attach the push bar (5) using the square head screws (15) and the star screws (18) as shown in Figure 3a.
- Fasten the top push bar to the bottom push bar using a screw (Fig. 3b/Item 16) and a star screw (Fig. 3b/Item 18) on each side. Make sure that the lobes of the screws are folded towards the inside so that the high speed clamping function remains operational.
- Insert the grip of the starter cord (Fig. 3c/Item 4) into the hook provided for that purpose as shown in Figure 3c.
- Fasten the cords to the push bar with the supplied cable ties (Fig. 3d/Item. 13).
- The debris bag should be assembled as shown in Figure 3e. For this, insert the upper lugs of the debris bag carefully into the openings on the lower debris bag.
- Lift the ejector flap (Fig. 4 / Item 8) with one hand and hook in the grass bag (Fig. 4/Item 7) as shown in Figure 4
6.2 Setting the cutting height
Important! Adjust the cutting height only when the engine is switched off and the plug boot has been pulled.
Before you begin to mow, check to ensure that the blade is not blunt and that none of the fasteners are damaged. To prevent any imbalance, replace blunt and/or damaged blades as a set only (if applicable). To carry out this check, first switch off the engine and pull the spark plug boot.
The cutting height is centrally adjusted with the cutting height adjustor lever (Fig. 7/Item 9). Up to 5 different cutting heights can be selected.
Pull the adjustor lever out and select the desired cutting height. The lever snaps into the desired position.
7. Operation
Note:
For detailed information on starting the engine, refer to the enclosed manual from Briggs & Stratton.
Important.
The engine does not come with oil in it.
Therefore, be sure to add oil before starting the
engine. You will also need to fill in petrol, as this is also not supplied upon delivery.
In order to avoid any unintentional start-ups of the lawn mower, it comes equipped with an engine brake (Fig. 5a/Item 1) which must be pulled back before the engine can be started. When the engine control lever is released it must return to its initial position, at which point the engine automatically switches off.
You can control the rotation speed of the blade using the speed lever (Fig. 6).
Before you start mowing, you should run through this operation several times in order to ensure that the machine is working properly.
Whenever you need to perform any kind of adjustment and/or repair work on your lawn mower, wait until the blade has come to a complete stop.
Always switch off the engine before carrying out any adjustments, maintenance or repairs.
Note:
- Engine brake (Fig. 5a/Item 1): Use the lever to stop the engine. When you release the lever the engine and the blade stop automatically (Fig. 5b). To mow, hold the lever in the working position. Before you start to mow, check the start/stop lever several times to be sure that it is working properly. Ensure that the tension cable can be smoothly operated (i.e. is not catching or kinking in any way).
- Speed lever (Fig. 6): Move this lever in order to increase or decrease the engine speed. (Tortoise = Slow / Hare = Fast)
- Drive lever (clutch lever) (Fig. 5a/Item 19): If you press this (Fig. 5c) the clutch for the drive will be closed and the lawnmower will start to move with the motor running.
Release the drive lever in good time to stop the moving lawnmower. Practice starting and stopping before you use the mower for the first time until you are familiar with controlling the mower.
- Caution: The blade begins to rotate as soon as the engine is started.
Important:
Before you start the engine, move the motor brake several times to be sure that the stop cable is properly working. Note: The engine is factory set to a speed that is optimal for cutting and blowing grass into the basket and is designed to provide many years of use.
- Check the oil level.
- Fill the tank with petrol when it is empty, using a
funnel and measuring vessel. Make sure that the petrol is clean.
Note: Use only unleaded petrol as fuel.
Warning: Never use more than one safety petrol can. Do not smoke when refueling. Switch off the engine before refueling and allow the engine to cool down for a few minutes.
Mulching
In the mulching mode the cuttings are shredded in the enclosed mower housing and then spread back onto the lawn. It is not necessary to gather and dispose of the grass.
Important: Mulching is only possible if the lawn is relatively short. Optimum results can be achieved only with a mulching blade (available as an accessory).
To use the mulching function, disconnect the debris bag, slide the mulching adaptor into the ejector opening (Fig. 5d/Item 22) and close the ejector opening.
Side ejector
You should fit the mulching adaptor (Item 22) in order to use the side ejector. Connect the side ejector adaptor (Fig. 5e/Item 21) as shown in Figure 5e.
Filling level indicator debris bag
The debris bag is equipped with a filling level indicator (Fig. 2/Item 6). This will be opened by the air current produced by the mower. If the flap falls during mowing, the debris bag is full and should be emptied. To ensure that the filling level indicator works properly, the holes under the flap must be kept clean and permeable.
7.1 Before mowing
- Make sure that you are properly dressed when mowing. Wear sturdy, non-slip footwear; do not wear sandals or tennis shoes.
- Inspect the blade. A blade that is bent or damaged in any other way must be immediately exchanged for a genuine Einhell replacement blade.
- Do not fill the fuel tank indoors, but rather out in the open. Use a filling funnel and a measuring jug. Wipe off any spilled petrol.
- Read and follow in the instructions in the operating manual as well as the information regarding the engine and accessory equipment. Store the manual in a place where it can be readily accessed by other users of the machine.
GB
- Exhaust gas is dangerous. Only start the engine out in the open.
- Make sure that all the guards are fitted and that they are in good working order.
- The machine should only be operated by persons who are well informed with the way it works, and who are in reasonably good physical condition.
- It can be dangerous to mow the grass when it is wet. Try to ensure that you only mow the grass when it is dry.
- Advise children and others to keep well away from the lawn mower.
- Never mow the grass in poor visibility.
- Remove all loose objects from the lawn before you start mowing the grass.
7.2 Tips for proper mowing
Important! Never open the chute flap when the catch bag has been detached (to be emptied) and the engine is still running. The rotating blade can cause serious injuries!
Always carefully fasten the chute flap and grass basket. Switch off the engine before emptying the grass basket.
Always ensure that a safe distance (provided by the length of the long handles) is maintained between the user and the mower housing. Be especially careful when mowing and changing direction on slopes and inclines. Maintain a solid footing and wear sturdy, non-slip footwear and long trousers. Always mow along the incline (not up and down).
For safety reasons, the lawn mower may not be used to mow inclines whose gradient exceeds 15 degrees. Use special caution when backing up and pulling the lawn mower. Tripping hazard!
7.3 Mowing
Only use a sharp blade that is in good condition. This will prevent the grass blades from fraying and the lawn from turning yellow.
Try to mow in straight lines for a nice, clean look. Insodoing, the mowing swaths should always overlap each other by a few centimeters in order to avoid bare strips.
Keep the underside of the mower housing clean and remove grass build-up. Deposits not only make it more difficult to start the mower; they decrease the quality of the cut and make it harder for the machine to bag the grass. Always mow along inclines (not up
and down). Slightly turning the front wheels up the hill while mowing will prevent the mower from sliding out of the straight line. Select the cutting height according to the length of the grass. If the lawn has grown quite a bit, mow over it several times so that no more than 4cm of grass are cut at one time.
Switch off the engine before doing any checks on the blade. Keep in mind that the blade continues to rotate for a few seconds after the engine has been switched off. Never attempt to manually stop the blade.
Regularly check to see if the blade is securely attached, is in good condition and is sharp. If the contrary is the case, sharpen the blade or replace it. In the event that the blade strikes an object, immediately switch off the lawn mower and wait for the blade to come to a complete stop. Then inspect the condition of the blade and the blade mount. Replace any parts that are damaged.
Tips for proper mowing:
- Pay attention to ensure that you do not run into or over anything that could damage the mower. The lawn mower could be damaged and/or the machine could inflict bodily injury.
- A hot engine, exhaust or drive unit can burn the skin if touched. Thus, do not touch these parts unless the mower has been switched off for a while and you know that they have cooled down!
- Use extra caution when mowing on inclines and steep grades.
- Insufficient daylight or even a sufficient level of artificial light is one reason not to mow.
- Check the mower, the blade and other parts if they have struck a foreign object or if the machine vibrates more than usual.
- Do not make any adjustments or repairs until the engine has been switched off. Pull the plug boot.
- Pay special attention if you are mowing directly next to a street or are close by one (traffic). Always keep the grass chute pointed away from the street.
- Avoid mowing in places where the wheels have trouble gripping or mowing is unsafe in any other way. Before you back up, ensure that nobody is standing behind you (especially little children, who are more difficult to see).
- When mowing over thick, high grass, select the highest cutting level and mow at a slower speed. Before you remove any grass or blockages of any kind, switch off the engine and pull the plug boot.
- Never remove any safety-related parts.
- Never fill the engine with petrol when it is hot or
is running.
7.4 Emptying the grass basket
As soon as grass clippings start to trail the lawn mower, it is time to empty the grass basket. Important! Before taking off the grass basket, switch off the engine and wait until the blade has come to a stop.
To take off the grass basket, use one hand to lift up the chute flap and the other to grab onto the basket handle (Fig. 4). Remove the basket.
For safety reasons, the chute flap automatically falls down after removing the grass basket and closes off the rear chute opening. If any grass remains in the opening, it will be easier to restart the engine if you pull the mower back approx. 1 meter.
Do not use your hands or feet to remove clippings in or on the mower housing, but instead use suitable tools such as a brush or a hand broom.
In order to ensure that the majority of grass clippings are picked up, the inside of both the catch bag and especially the air grill must be cleaned after each use.
Reattach the catch bag only when the engine is switched off and the blade is stopped.
Using one hand, lift up the chute flap, while grabbing onto the basket handle with the other. Hang in the basket from the top.
7.5 After mowing
- Allow the engine to cool before you put the lawn mower in an enclosed area.
- Remove grass, foliage, grease and oil before storing the mower. Do not place any objects on top of the mower.
- Check all the screws and nuts once more before you start to use the lawn mower again. Tighten any loose screws.
- Also be sure to empty the grass basket.
- Pull the spark plug boot to prevent unauthorized use.
- Ensure that you do not park the mower next to any source of danger. Petrol fumes can lead to explosions.
- Only original parts or parts approved by the manufacturer may be used for repairs (see address on the warranty certificate).
- If the lawn mower is not going to be used for an extended period, empty the petrol tank using a petrol suction pump.
-
Tell your children not to use the mower. It is not a toy.
-
Never place petrol near an ignition source. Always use a can that is approved to store petrol. Keep petrol away from children.
-
Oil and maintain the machine.
8. Cleaning, maintenance, storage, transport and ordering of spare parts
Important: The enclosed engine manual from Briggs & Stratton provides maintenance information and maintenance interval information on the engine.
Important:
Never work on or touch conducting parts on the ignition unit with the engine running. Always pull the spark plug boot from the spark plug before starting any work of care or maintenance. Never perform any work on the machine while it is running. Any work not described in these Operating Instructions must be performed by an authorized service workshop only.
8.1 Cleaning
After each use, the mower should be thoroughly cleaned (especially the underside and blade receptacle).
Note: Before you tilt the lawnmower onto its side, empty the fuel tank completely with a petrol pump. The lawnmower must not be tilted more than 90 degrees. The simplest time to remove dirt and grass is directly after mowing. Dried residual grass and dirt could cause damage to the mowing operation. Make sure the grass ejector canal is free from residual pieces of grass and remove these if necessary.
Never clean the mower with a direct jet of water or a high pressure cleaner. The motor must stay dry. Aggressive cleaning agents such as cold cleaning solvent or petroleum ether must not be used.
8.2 Maintenance
Important: The enclosed engine manual from Briggs & Stratton provides maintenance information and maintenance interval information on the engine.
Dispose of soiled maintenance material and media at the appropriate collection point
8.2.1 Wheel axles and wheel hubs
These should be lightly greased once a season. To do so, remove the wheel caps with a screwdriver and slacken the fastening screws on the wheels.
GB
8.2.2 Blade
For safety reasons you should only ever have your blade sharpened, balanced and mounted by an authorized service workshop. For optimum results it is recommended that the blade should be inspected once a year.
Changing the blade (Fig. 8)
Only ever use original spare parts when having the blade replaced. The marking on the blade must be matched with the number given in the list of spare parts. Never have any other model of blade fitted.
Damaged blades
Should the blade, in spite of all precautions, come into contact with an obstruction, shut down the engine immediately and pull the spark plug boot. Tip the lawn mower onto its side and check the blade for damage. Damaged or bent blades must be replaced. Never attempt to bend a bent blade back to straight again. Never mow the lawn with a bent or heavily worn blade as this will cause vibrations and can lead to further damage to the lawn mower.
Important: There is a risk of injury if you work with a damaged blade.
Resharpening the blade
The blades can be resharmed with a metal file. In order to avoid imbalance, the blade should be resharmed by an authorized service workshop.
8.2.3 Care and adjustment of the cables
Oil the cables at regular intervals and check that they move easily.
8.2.4 Inspecting the V-belt
To inspect the V-belt you must remove the V-belt cover (Fig. 8/Item D).
8.2.5 Repairs
After any repair or maintenance work, check that all safety-related parts are in place and in proper working order.
All parts which may cause injury must be kept where they are inaccessible to children or others.
Important: In accordance with product liability legislation we are not liable for any damages caused by improper repairs or the use of spare parts that are not original spare parts or parts approved by us. In addition, we are also not liable for any damages arising from improper repairs. Such work should be performed by a customer services workshop or authorized specialist. The same applies to accessory parts.
8.2.6 Times of use
Lawn mowers are only permitted to be used on workdays between the hours of 7.00 a.m. and 7.00 p.m. Please comply with statutory regulations, which may vary from location to location.
8.3 Preparing the mower for long-term storage
Caution: Do not empty the petrol tank in enclosed areas, near fire or when smoking. Petrol fumes can cause explosions and fire.
- Empty the petrol tank with a petrol suction pump.
- Start the engine and let it run until any remaining petrol has been used up.
- Be sure to clean the entire machine to protect the paint.
- Store the machine in a well-ventilated place.
8.4 Preparing the mower for transportation
- Empty the petrol tank (see item 6.3.1).
- Always let the engine run until it has used up the remainder of petrol in the tank.
- Empty the engine oil from the warm engine.
- Remove the spark plug boot from the spark plug.
- Cleaning the equipment.
- Remove the start tension cable from the hook (Fig. 3c). Slacken the wing nuts and fold down the upper push bar.
- Wedge a few layers of corrugated cardboard between the upper and lower push bars and the engine in order to prevent any chafing.
8.5 Ordering replacement parts
Please quote the following data when ordering replacement parts:
-Type of machine
Article number of the machine
- Identification number of the machine
Replacement part number of the part required
For our latest prices and information please go to www.isc-gmbh.info
9. Disposal and recycling
The unit is supplied in packaging to prevent its being damaged in transit. This packaging is raw material and can therefore be reused or can be returned to the raw material system.
The unit and its accessories are made of various types of material, such as metal and plastic.
Defective components must be disposed of as special waste. Ask your dealer or your local council.
10. Faults and remedies for faults
Caution: Always switch off the engine and pull the ignition cable before starting any inspection or adjustment work.
Caution: If, after making an adjustment or repair to the engine, you let it run for a few minutes, remember that the exhaust and other parts will get hot. Thus, do not touch parts that emanate heat, as these may burn you.
Important. If problems arise in connection with the engine, please refer to the enclosed manual from Briggs & Stratton.
| Fault Possible cause | Remedy | |
| Loud while running, machine vibrates heavily | - Screws are loose | - Check screws |
| - Blade fasteners are loose | - Check blade fasteners |
| - Blade is unbalanced | - Replace blade |
| Engine does not start - Brake lever | not pressed | - Press brake lever |
| - Fuel tank is empty | - Refill with fuel |
| Uneven mowing results - Blade is blunt | - Cutting height is too low | - Sharpen the blade |
| - Engine speed is too low | - Set correct height |
| - Set lever to max. |
| Unsatisfactory bagging of the grass | - Engine speed is too low | - Set speed lever to max. |
| - Cutting height is too low | - Set correct height |
| - Blade is worn | - Replace the blade |
| - Basket is clogged | - Empty the basket |
GB
Warranty conditions:
iSC GmbH guarantees the repair of defects or replacement of the equipment in accordance with the overview below, whereby statutory guarantee claims are not affected.
| Category Example Warranty | |
| Defect with regard to material or construction | | 24 months |
| Wear parts Air filter, Bowden cables, | grass basket, tires, drive clutch | 6 months |
| Consumables Blades Warranty only | n case of an | immediate defect (24 hours after purchase / date on the bill) |
| Missing parts 5 work days | | |
With regard to consumables, wear parts and missing parts iSC GmbH guarantees a correction of defects or a new delivery only if the defect is reported within 24 hours (consumables), 5 work days (missing parts) or 6 months (wear parts) after purchase and the purchase date is verified with the bill.
In case of defects concerning the material or construction, we kindly request you to submit the equipment together with the fully completed warranty card supplied with the equipment. It is important that you fill in an exact description of the defect.
To do so, answer the following questions:
- Did the equipment work at all or was it defective from the beginning?
Did you notice anything (symptom or defect) prior to the failure?
What malfunction does the equipment have in your opinion (main symptom)? Describe the malfunction.
Sommaire :
6. Pre puštanja u pigeon
Vymena noze (obr. 8)
Peryilipane BincuHnHaTa Ha p3aHe:
乙HTpaIHo (30-75MM)
UmpoynHa Ha p3aHe: 510 MM
Tero: 39 Kr
UyMnBn6paun
HnBOHa3BvKOHOHaIraHe LpA 74 deun6ena (A)
HecnpynpocT KDA 4eunbeJa
HnBOHa3BvKObMoUHOCrLwA 98 deu6eena(A)
Hecnpynoct KwA 2eunbea
Hocete3aunTa3a cnyxa.
Bb3deIcTBeTeHaUyMaMoKeDaIpeuN3BnKa 3aY6aHaCnyxa.
EMNCHHOHcTOnHOCTHaBn64M/ceK
HecnryphocT K =1,5M/cεκ²
6.ПпсдпснаньЕкрлоацяЯ
6.1 MoHTaH N KOMNoHEHTN.
PnIOCTaBkata HAKOu YACTn Ca DEMOHTPaHn.
MOnTaJbTeJIeCEH, aKO CE cna3BaT cIeHNITe yKa3aHn.
BHHMaHHe!PnMOHTaJa 3a paBoTne no
noDpBHKaTa ce HyKaete OT CneHn
OIOJIbIHHTeH INHCTpMEnT, KOITo He Ce CbIbPka B O6ema Ha DOCTaBkA:
ПLOCKa Cb6npaTeHa BaHa 3a MacNo (3a CMHa Ha MacNo)
MepuTeHa Kofa 1 NHTbp (Macno/
6eH3nHOyCTOnyNBa)
eHaTy6a3a6eH3nH
Фунna(noDxOyIa3aTanaTa3aHaJIbAHeHa 6eHnHape3epBoapa)
OMaunHKnbpn(3aH36bpcBaHe Ha MacNo /OCTaTbUOT6eH3nH;ekoIorocb6pa3HOOTcpanBaHa pe3epBoapa)
6eH3HHOBa CMyKaTeJIHa NOMNa (NJaCTMaCOBO H3IbJIHeHne,MOKe Da Ce 3aKyn Ha CTponTeJHnTe Na3apu)
eHa pBaHa MaCbOHa cPbHa NOMnA (MOKe Da ce 3aKynn Ha cTPOnteHnTe naapu)
MOHTAH
1.CnoKeTe doJHnata NoBnHnHa cKo6a (fHr. 3a/No3.5) Bbpyx Kopnyca Ha Kocaukata n HactpoIte NcKaHata pa60THa BnCOUHnA. Morat da ce HacTpor 3 pa3NHyn pa60THn BnCOUHn, 3a ueIra PbXHete Kpanuata Ha DoJIHata NOBnHnHa cKo6a B CbOTBeTHHe CpeUyLeHaun OTbOpn Bbpyx KopNyca Ha Kocaukata KaTO Hanp. A-A (fHr. 3). DOnHata NdoBnHnHa cKo6a Tpr6Ba da ce HacTpor ON dtBe TcpaHn EdnHBO. Cer a cNoKeTe NOKPbAunTE IIOChn (fHr. 3a/No3.23) n FHKpaiTe NOBnKhata cKo6a (5) C BnHTOBeTe C KBaDpaTHa rIbAa (15) INBnTOBeTe- 3Be3da (18) KaTo e Ha fNrypa 3a.
2.3aTeHHeTe RopHaTnNoBnHnCaCKo6a 3a DOnHATA NoBnHnKa CCKo6a C NO eHN BnHT (ΦnF. 3b/No3.16) n EHN BnHT-3Be3da (ΦnR. 3b/No3. 18) ot DBete cTpaHn. BHImaBaIte 3a ToBA, Ye npN CTaHaNe CCKo6tne Ha BnHTObe (16) ca O6bPhATn HABbTpE, 3a Da ce 3ana3n FyHKuYrTa Ha 6bp30 3aTaRaHe.
3.3aHaeTe pBkaTa Ha 3aDnBnBaUTo BbJKe 3a CTapT (PHr. 3c/No3.4) Ha npEbnHeHaTa 3a CEHTa KyKa KaKTo e NOKa3aHo Ha nR. 3c.
4.ФИКСИРаTe 3aДВИХБaUHTe BbJHcTeC npIIOXeHnTe Ka6eJIHn Bp3Kn (ΦnR.3d/No3.13) 3a NOdBVIKHHaTc K06a.
5. YIbNtEnHaTa TOp6a TpRb8a Da Ce MoHTnpa KaKTo Ce BnKaHa Ha QInr. 3e. 3a eJTe BAHMaTeINo IxhHeTpe NlaHHte Ha rOpaTa yIbNtEnHa TOp6a B OTBOpriHa dOJIHaTa yIbNtEnHa TOp6a
6. NOBHHeTe N3XbBpIaI KAnak (ΦnR. 4/No3.8) c eHa pKa n 3aKaYeTe yNoBteJIHata Top6a 3a TpeBa (ΦnR. 4/No3.7) KaKTo e nOka3Ho Ha ΦnR. 4.
6.2 Perynnpahe BncoHHata Ha p3aHe BnHMane! Perynpaneto Ha BncoHHata Ha p3aHe Tp6Ba Da ce npabn camo npH n3HHoue HmOpn H3TerIeH uencei Ha 3anaJIteJHATA CBeue.
PpeiDa npnCTbNITe KbM KcOeHe, npOBepTe DaJIpeXeUaT NHTcpymENT He e N3TbNEH JaIIN BauInTe cpeCTBa 3a 3akpenBaHe He ca NobpeDeHN. 3aMeHeTe N3TbNeH /nIIN nobpeHn peKeu HnHCTpyMeHTn pni Heo6xoHmocT B KomJIeHT, 3aJa He npEn3BnKaTe Dnc6baIaHc. Pn Ta3n npOBepKa
H3KIOUHeTe MOTopa N H3DbPnaIte MpeXOBnA ⅢeNcEJI.
PeynpaHTo Ha BnCOHHaTa Ha pr3aHe ce n3BpWbA CEHTpAlHo C IocTa 3a peYnPaHa Ha BnCOHHaTa Ha pr3aHe (H3O6p.7/No3.9).Morat Da Ce HAcTpoBaT 5 pa3NJHn BnCOHHn Ha pr3aHe.
H3dbpnaTepeylnpaunnoCTnabn HacptpoTe JHeJHaTBAuCOUHa Ha p3aHe. IocTbTce fncncpaB HeJHaTApNo3nur.
7.06cnykBaHe
Yka3aHHe: ToHnna npoec Ha nychaHe Ha DnBraTeJIe Huynte ot npnloKeHaTnHcTpynnHa BpnrC & CtpetbH.
BHHMaHHe!
DBratIeTcEdoCTaB63MacNo.ETo 3aio HnpeMeHHO HanbHHeTe MacNo npEni NpCKA B EHCnloataua. Tpa6Ba CbIo Da c He HbHN 6eHN, Tb KaTO B CbCToHHe 3a DoCTabHa HMA HAnbJIHeH 6e3Hn.
3a da ce n36erHe HeKeIaTeHNO BkIIOUBaHe Ha KocAkhata, Ta e OobpydBaHa c MToPna CnnpaKa (n3o6p. 5a/No3. 1), KOrTO TPr8Ba Da ce 3aDeiCTBa, npedn da ce BkIIOu KocAkhata. Pnpi OCBo6OJdaBaHeTo Ha NcTa HA MToPnHa TcNpaChra Ta TPr8Ba Da ce BbPhe B INxOJa HnO3nIy I MToPbT ABTOMaTHHO Ce INKIIIOvBa.
C perynatopa 3a rata MoKeTe 3a perynipate ckopocTt Na o6oPOnTe Ha Hoka (Abb. 6).
Ipei Da 3aOnOHeTe Da KocHTe TpeBa, Tp8Ba Da NOBTOPIte To3n IpOuec HRAKOIO bTn, 3a Da cTe CnHyprH, Ye BCNUHO FOHNIOHnpa TOHO. BcEKN PtT KORATO Tp8Ba Da N3BbPwITE HRAKBN paOToNo NaCTPOIKN N/IN peMOHT Ha rpaDNHCkata KOCaHa, N3aKaKeT, DOkATO HOXbT Cnpe Da ce DnKn. IpeNi BCaNKBn paOTo No NaCTpoKn, NOpdpbXkn H pOMeHT N3KIOUOBaTE DBrAteJIa.
Yka3aHHN:
1.MotopHa cnpaHa (H3o6p.5a/No3.1): H3noI3BaIte NoCTa, 3a da N3KIOHHTe MOTopa. Horato OcB6ObHdAbate NoCTa, MOTOpBTn peKeIHT HOX ABOTAMUHNO CnIpaT. Ppi KocHeTO dPbIXe NOCTa B paBOtHO NOnOKeHne (H3o6p.5b).PipeH cbuHNCHOTO KocHe, MHOrOKpaTHo Tpr6Ba Da npOBepITE NoCTa 3a CTapTHpAHe/CnIPaHe.YBepeTe ce, He 3aDbNKBaIto BxHe e JecHO DoCTbNHO.
BG
- Peryatop 3a ras (H3o6p.6): Pn6ytaTe ro, 3a da yBENHTe Hn HamaNTe CKOPoCTTa HA MOTopa. (KOCtEHpyka = 6aBHO / 3aeK = 6bp30)
- XoOB loCT loCT 3a CbeHNHTeY (n3O6p. 5a/No3.19): Ako ro 3aDenCTBaTe (n3O6p.5c), ce 3aTBapra CbeHNHTeYrA 3a XoOBO 3aBvHBAHe N Kocaykata 3aONyBa Da BbPBrN pN BbPTuC Ce MOTop. OcboOBeTe CBOEBPeMeHHO XoOBn IocT, 3a Da CnpTe XoJa Ha Kocaykata. YnpaxHHe TtpBtBaHTo nCnPaHTo npEi NpBTO KOceHe, npEn Da ce DoBepnte Ha XoOBNTe NOIOKeHn.
- PnpDynpDnTeNo YhazAHne: PeKeuHT HOK CE BpTN, KOraTO MOTOpBt CE BkIoUH. BAnHO: PpeN CTaptnpaHeTo Ha MOTopa, PnIDBnHeTe MHorokpatHO MOTOpHaTa CNpaKa, 3a Da IpoBePte DaJIb BxKeTo 3a CnPaHe CbIo FOHyKnOHaHpA Do6pe. Da ce Cb6IIOAba: MotOpBt E npEHa3HaueH 3a CKoPoCT Ha pRzAHe 3a TpeBa N 3a N3XbPnHe Ha TpeBa B KOuHTo N 3a PnpDblKnTeJHa EKcNlOaTauH Ha MOTopa.
5.ПювэрbaiteНИВОТаHaMaCNo.
- HanbHHepepeepBoaapc6eH3nH, KOraTOce H3npa3HN H3NOJ3BaIteyHnHcBMeH3ypa. YBepeTe ce, Ye 6eH3nHbT eYNCt.
Aa ce cb6IIOdaBa: H3noJI3BaIte cAmO 6e3oJOBeH 6eH3nH.
IpeynpeHdHeN: H3noJ3BaIte BnHaRn cMo eHa 6e3oJcAeha 6e3nHOBA Ty6a. He npuTe npn TbJIHeHO Ha 6e3nH. N3KIOUbaTe MOTopa npedn HAIbAHeto Ha 6e3HN OCTaBeTe MOToB Ta ce OxlaHn HRAKOJIHO MNHyTN.
Mylnipane
PnM MyIHypaHETO HApR3aHnrrMaTePnA1 Ce pa3dpo6Ra B 3aTBopeHnKOpNc Ha KocaHaTa n OTHOBo ce p3npedEnbpxy TpeBHaTa PIOU. CbHpaHTo HApTBePa N EKnOroCb6pa3HOTo OTCTpaHBAHe OTnada.
BHHMaHHe: MyIyHpaHTo E b3MoKHO cAmO npn OTOHcHTeMolKa TpeBa IIOIo. ONTImaHIn pe3yJITaNtE NOCTrHHeTe cAmO npn HAIuHne Ha MyIyHpaU HOK (MOKe Da ce 3aKyPi KaTO dONbIHNTEHa cAcT).
3a da ce n3no13Ba 7yHKnIraTa Ha MyIynIpaHe, OTHaCyTe KooUeTo I np6yTaIe aIaNTepa 3a MyIynIpaHe (N3o6p.5d /no3.22) B KaHana 3a N3XBpIHa He 3aTbOpTe KlaIaTa 3a N3XBpJIHa.
CtpaHnHNo n3XbBpIaHe
3a da n3no3BaTe cTpaHnHOTo n3xBbpIHe, Tp6Ba Da ce MOHTnpa aadAntepbT 3a MyIHpAne (no3.22). OkayTe aanTepe 3a cTpaHnH0n3XBpIHe (n3o6p.5e/no3.21), KaKTo e Noka3aHo Ha n3o6paKeHne 5e.
HnHa3a HNBOTo Ha nBHeHe yNoBHTHa Top6a
YIOBHTHaTOp6aHMa HNdkaun3a HnBO Ha bJIHe (Fir.2/No3.6).TaeOTbApraOT B3dUWHnI NOTOKoITO KocauHata Oba3yBa npn EKcIIoAtaun. ANO NO BpeMe HA KOCeHTo KanaKbT ce 3aTbOpn,TO YIOBHTHaTOp6aE PbLnHa T Pr8Ba Da ce HnPa3HN.3a da DeHCTBa 6e3ynpeHOn HNdkaunTa 3a HnBO Ha PbHe,OTbOpIne nok Kanaka Tpr8Ba BNHaN da Ca NCTn I np03paHn.
7.1 PpeHIOeHeTo
BakHH yHa3aHn:
1.ObleyeTe ce noDxOJaHIO.HocTe 3paBn oByBn mAlKn caHaIu nn ObyBkn 3a TeHC.
2.Поверете ржшпгоховe.HoK,KoToe orbHAT mN NOBpeH,Tp6Ba da ce noDmeHc opuHaJIeH HOK.
3. HanbIhete 6eH3nHOBnpe3epBoap Ha oTKpnto. NIOJ3BaIte FyHHa 3a IJIHeHe N MeHITeH e pe3epBoap. H3bPwTe H3TEKInna HABhN 6eH3nH.
4.Прочетeteи са3BaHTe pБКOBODCTBOTO 3a yNTope6a И сьTO таHa YK3aAHnRA OTHCHO MOTOPA И дОпБЛнTeHnIteуpeДи. ПЗETe pБКOBODCTBOTO ДСТБИNOсьо n 3aДpyг nOL3BATEHn HAуpeДa.
5. Ra3OBeTe OT aycnyxa ca onaChn. BkIIOyBaYte MOTOPa cMo HA OTKPHTO.
6. YBepTe Ce, Ye BCnKuYka3aHn3a 6e3oNaChocT Ca HAnCe N CbUo TaKa Ye FyHKuOHnP aDobpe.
7. YpeBb Tpr6Ba Da ce 06cnykBa cmo OT IInCe, KOeTo e NOxOyIoo 3a TOBa.
8. Hoceho npn MOKpa TpeBa MOKe Da ce OKaHe onaCHO. Kocete TpeBaTa IO Bb3MOKHOCT cyxa.
9.Инстугтураи Te Дугг Лице Лип Deца Да CTOTДалу OT KocaykaTа.
10. HnKora He Kocete npn loa BNDIMOCT.
11. BdngraTe IeKaaHn HAOKOIO npedMeTN npedN KOceHETO OT 3emrTa.
6.2 Yka3aHnHa 3a npabHnHO HocHe BHHMaHHe! Hkora He OTbapraTe Klanata 3a nXbPJIHe, KORATO pncnocO6neHETo 3a yIaBHe Ce n3npa3Ba H MOTOpT Oe pa60Tu. BpTaunrCe motop MoHe Da DoBeede DO HapaHbAHn.
BnHaBn BnHMaTeIHO 3aKpeBaNte HlaNaTa 3a
13XbPJIHe N KOuYeTO 3a TpeBa. Pn H3BaKaHaeTo
npEdBaPHTeHNO H3KnUOyBaNTE MoTopa.
3aadaeHOTOppe3 HnnpablaBaunTe dpbKnn 6e09acho pa3cTOnHHne MeJy Kopnyca Ha HoHa n Oo3BaTeJIr BnHArN Tp86Ba Da ce cna3Ba. Pn KocHe N pOPMHa Ha NocOKATA Ha DnHexHe N OTKOCn i CTpbMn CkLOHObe CJIeBb Oco6eHo da Ce BHNMaBA. BHNMaBAte 3a 6e3onacnHc TcOeH, HOCete oByBKn C yToHNBn Ha NoDxIb3BaHe, rpa#fepHn NOmEtKN n Dbln NaTaTANO. Kocete BnHaHn HapceHNo Ha CKIoHa.
CknloHObe na15 rpaDyca haklon He Tp86Ba da ce KocrT C KocaHkata no npuHHn, CBbp3aHn C 6e3oNaChocTtA.
БыдeteOCO6eHOBHIMMaTeJIHn npn npnDbNKBaHe Ha3aI npn H3bPpBaHa NaCauKaTa. OnaChocOT npenBbaHe!
7.3 KocHeTo
Hocete camo c octpn, 63ynpuehno fynkunohupaui HOKOBe, 3a da He ce pa3pbΦHaT ctpbKoBeTe TpeBa n TpeBHATA pIoUd Ha He NoKbJtEE.
C cen noctnraheTo Ha nIcTo p3aHe ynpabnaBaiTe TpaHNCkata Kocayka No Bb3MOXHOCT NO npABN TpaEeTOpH. PnTOBa Te3n TpaEeTOpH BNHaRn Tp6Ba Da ce pnpokprr C HRAKIO caHTmEtpa, 3a da He OCTaBat INBnU.
Pnase To 3paHa Ha Kopnyca Ha KocauKaTa
HCT N 3aBbJNHTeJIHO OCTpaHraBaIte TpeBHNTe
HacnaBarHnHa. HacnaBarHnTa 3atpydHnBaT
npoueca Ha BVIOUbaHe, BLOsABat KaecTBOTO Ha
pra3aHe n 3XXBpIaHETo Ha TpeBaTa. Ha
CKHOOBTe TPAeKTOPIA Ha p3aHe Tp6Ba Da e
HaNPeHcNO CnPmO CKIOHa. Xb3raHeto Ha
KocauKaTa Ce PpeoTbPaTBA NoceDcTBOM
HaKIOHeNo IIOJOKeHne Hareope. N3apeTe
BvOCuHnATA Ha p3aHe cNopei DeEchTBtEHLHata
DbJbHnHa Ha TpeBHata PIOOU. HanpabeTe HnKoJIKO
npemHabHnA, Taka He MaKcIMyM 4 CM TpeBHn
Piou Da CE n3paBHNabeHbK.
IpeDn Da n3BbpWTe KaKBaTO n da e npOBepKa Ha HOxA, n3KIOUcTe MOTopa. IOMNCIeTe 3a TOBa,Ye HOXbT CnE dN3KIOUcBAHcTo HA MOTOP aPdBJIKAba Da ce BbpTN OSe HraKoIKo cekyHn. HNKora He ONITBaHTe Da cnpete HOxA.
PepoBpBaTe,daHnHOxBt e npaBnHO 3akpenen,daHn E BoDpo CbCTOAHne H DoBe hatoH. UInΦoBaIte ro nHr rnoDMHeTe, aKcLnyaT He e TaKbB.B cLyay,Ye Hampaunr Ce B DnuKeHHe HOX yapn Ha npedMeT, cnpeTe
KocayataN3uKaIteDOKaTOHOHbTHaNbHnO cnpe.IpOBepTe CLeI TOBA CbCToHnETo Ha HOKa nHaHOKOBnA DpbHau. B Cnya,Ye ToI e NOBpeH, Tpr6Ba Da ce cmEH.
Yka3aHn npn KocHeTo:
- BHIMabaIte 3a TBbPn IppeMTeH. HocaKaTaMOKe Da ce NobpeH NIN Da Bb3HNKHAT HapaHbAHN.
- EINH ropeu MoTOp, aycnyx Hn 3aBnKBaU MExAHN3bM MOKe Da npEiN3BnKa n3rapHnA. CJeDoBaTeNo He nnNaIte.
3.Писнлоови ИИСТьМНи HAHLOHeHn TepeHn KOCETe BHIMATEJIHO.
4.ЛиncBaаataДневна CBETInHa ИИн He DOCTaTbHOTo I3HcyCTBeHO OCBetJIeHne ca npuHnHa da ce npeyctahOBn P83aHeto.
5.Поверяваite KocaykaTа,ноки npугп Te aKo ce HATbKHeTe Na ChyKdo TAnI KOrato ypeBt TpeNTn NO-CINHO OT HOpMaJIHOTO.
6.He npepnpnemai Te HnKaBn npomEn no NaCTpOHaKaTa nn peMOHT, npEi Da CTe n3KIOUyInn ppeN TOBa MoToPA. N3d bpNaIte 7eCena Ha 3anaNTeHata CBeu.
- H a n l B 6n30ct do yueta BHIMabaTe 3a yuHHTO DnBKeHne. N3xBpIe TpeBaTa daJeYUHaTa.
8.ИЗБЯВаTe MeCTa,КБДЕТО KОЛЕЛATA He 3arpe6BaT ИИн КОCEHTo e HecTa6nHNo.IIpeHn DBINKHeHne Ha3aD ce yBepTe,Ye MaIIN Deua He ceHAMnPaT 3aD Bac.
9.Bbcta,BncoKa TpeBa HacTpoTe Ha-NBcOKaTa CTenEH HA P3aHe N Kocete No-6aBHO. Ptpei OTcpanHaBeHTo Ha TpeBaIIN DpyrN 3aNyUbaHn,HkIIOuBaYte MoTOp H OCBO6OxDabAaTe 3anaIInTeHNHaKabEn.
- HnKora He n3BaJdaJte YactH, KOUTO cIyHaT 3a 6e3oNaChocT.
- HnKora He HanBaIte 6eH3nH B MOTopa, KOITOBce OSe e Ropeu, IIN pa6oTu.
7.4 H3npa3BaHe Ha KoWteTo 3a TpeBa
AkoIO BpeMe Ha KOceHeTo OCTaHaT OCTaTbU O TpeBa,TO KOWHTO Tp6Ba Da CE N3npa3Hn.
BHHMaHHe!Ppeu CHeMaHTo Ha KooUeTo, H3KJIIOuBaIte MOTopa N3UaKaIte CnnpaHTo HA peHKeun HNCTpymENT.
C cen n3BaKaHaHeTo Ha KowHeTo NobDnHHeTe c eHaTa pKa KlaNaTa 3a N3XbPnHe, C pyrata pKa H3BaDeTe KowHeTo 3a HoceuTa DpBkKa (N3o6p.4). Cbo6pa3Ho npEdnucnHeTo 3a 6e3onacnoCT Klanata 3a N3XbPnHe Ce 3aTbapn OTKaCbAbeTo Ha KowHeTo 3aTbApn 3aDnHOTBOP 3aN3XbPnHe.AKOpn TOBa B OTBopa
BG
OCTaHaT OCTaTbCn OT TpeBa, 3a IeCHO BKNIOUbaHe Ha MoTOpa e ueleScbO6pa3Ho Kocaykata Da ce N3dbpNa C OKoI01MaHa3aAd.
He oTcpanBaIte OCTaBtO T Hap3aHnMaTePnA B KOpNyCa Ha KocayKaTa N no paobTHnIHCTpyMeHT pUHO Nn C KpaKa, a C NOxOJaN NOMoHN CpeDCTBa HAp. YeTHa Nm MeTla.
CcŋraHaptnaHnHaDobpo Cb6puHaeKoUeTO noc6eHO B3dyuHATApeWetKa Tp8BaJa ca noHCTENOTBbTpeCJIedN3NoJ3BaHETO.
OkaBaIte KOUeTo cAmo npu n3HIOueH MOTOp n CnpaH peKeu HNCTpyMeHT.
IobnraTe Klaata 3a n3xBpnahe C eHaTa pKa, a c Dpyrata PbKa dPbKTe KOuHcTo 3a dpBHKaTn OKaUBaHTe OTrope.
7.5 CneepaheTo
- Han- Hanpei BnHaHn OCTaBnTe MoTopa Da ce OXlaDi, PpeDi Da NkLIOuHTe KocauKaTa B 3aTBOpEno NomeueHne.
- OTrpaHbAte TpeBa, Wyma, Cma3Ha M Maclo npedn cKlndpAneTo. He cnlaipaTe dpyrnpedmetn Bbpxy Kocaykata.
3.IpeHIOBTOHPaTAYnoTpe6a npOBepBaIte BCNU BnHTOBe IraKn. Pa3Xla6eHN BnHTOBe Tp6Ba Da ce 3aterHat 3dpabo.
4.Изпраэнete кошуeto 3a улаве на Треварpeni noВТОРнаТуnotpe6a.
5.Ocbo6oTeE 3aIpaTHeTa Cbeu, 3a IpeOeTbPaTHe Heno3B0JeHa yNtpe6a.
6.ObbPHeTe BHHMaHHe Ha ToBa KocaKaTa Da He Ce N3HIOUyBa Do N3TOuHnK Ha ONaCHOCrI. RaOBOte N3napeHnMoraT Da DOBeDaTdo EKCPLO3Hn.
7.Пи ремонта Трба Да ce ИЗЮЛБВа само OпгИнHaJIH YuactN Ил TaKINb YaCTN, KОТTO cap pa3peшENOTIpOuN3BODHTeIЯ(BuXTe aDpeca HaДOKумЕТАЗ rapaHцИЯ).
8.Пи NO-прдьнгintHo HeH3nO3BaHe Ha KocaHaTa,ИЗпраЗHTe 6EH3nHOBny pe3epBoap C 6EH3nHOBATA CMyKaTeJIHa NOMna.
9.Инстугктуаре Deца Та He non3baT Kocayka.Ta He e Inpauka.
- HnKora He cxbxaHbAaTe 6eH3nB 6bn3oCTdo n3TOUHK Ha NcKpn. N3pON3BaIte BUNH npOBepHa Ty6a. DpbXte 6eH3Ha daJeOT deua.
- Hane Te n oanbpaHnaye yepa.
8.Поунстван,порьхи, CBxpaneHne,ТраHCnOptИnpьчКаHa pe3epBHN qactN
BHHMaHHe: HOpMaUa3aTexHuecKaTa NOpMbKa HHTepBaJIte Ha NOdpbKa 3a DBratEeIe Ha Mepe B npJIOHeHa NHCTpyuua 3a DBratEeHa Briggs & Stratton.
BHHMaHHe:
Pa6oTe cAmO npn pa6oTeu, MoTOp do TOKOnpOBoDAnu CactN Ha 3aNaIInTeHbAte ype6a HnI NnAe Te3n. N3dbPbBaTe nped BcraKa pa6oTa NOndpBxHkata N oCcnyHbAHeTO uenCeLa Ha 3aNaIInTeHbAte CBeUOT 3aNaIInTeHbAte CBeU. Hnkora He n3BbPbBaTe KaKBTo N da e pa6oTn npn pa6oTeu ypeD. Pa6oTn, KONTO He ca OncaHb TOBA p6HOBCTBO 3a yNoTpe6a, Bn Tpr6BaIoo da ce N3BbPbBaTcAMo B OToPi3npan CneuaIIN3npaH cepBn3.
8.1NoCTBaHe
CleB BcHb yNtpe6a Kocayka Ta Tpa6Ba da ce noHCTBa rpnKInBO.Oo6eHO doHnata cTpHa HIOKOBINDbpKaH.3a ceIHa KaHOHeTe rpaHnCKaTa Kocayka Ha JLaBATA cTpHa (cnpMaTanata 3a HAIbVAHE HA MACJO.
Yka3aHHe: Ppei Da ha KaIOHnTe rpaHnHcTa T KocauKa Ha CbOTBeTHata CtpaHa, HauNHO 3npa3HePe p3epBoapaa 3a roPBOC6beH3nHOBA cMyKateHa NOMHa. KocauKaTae He Tp8Ba da ce HauKnaHn Ra9pOyca.Hai-Necho ue OTcPaHnTe MpbCoTnAra HocetHe. Cyxu OCTaBtu OT TpeBa mPbCoTnMoraTda DOBedaTO yBpeHdahe Ha peHima Ha KocHe. IpoBepBaIte daJI Na KaHaNbT 3a H3XbPraHe Ha TpeBa e CbOboeH OT ctaTbUHTe OT TpeBa n Pn Heo6XoDmOcT rO CTpaHnBaIte. Hnkora He NoCHCTBaIte KocauKaTae C BoDa cTpy aHbc CpeDCTBO 3a YncTeHe NO BnCOKO hAraHaMe. MoTopt TaRbDa a OctaHe cyx. ArpeCBHn NoCHCTBaun CpeDCTBa KATO CTydeHN noOHCTBaun CpeDCTBa NN6beH3N 3a npombaHe He Tp8Ba Da ce H3No13BaT.
8.2 PpBnHa
BHHMaHHe: INΦopMaζη 3a NOdPbXHaTa n HHTepBaJIHTe Ha NOdPbXHa No OTHOWeHne Ha DBIrataIe Σ He HamePHTe B pNlOHeHOTo pbHObOcTBo 3a DBIrataIe Ha Briggs & Stratton.
PpeaBte 3ambpceH noDpBeH MaTepaHn CypOBHN 3a npOn3BOcTBeH cEIn B PpeBnDeH 3a
ceta c6openhnykT
8.2.1 OcH Ha KOJIeNo I rJaBHHn Ha KOJIeNo
Tp6Ba Da ce CMA3BAT NeKo BeHbX Ha ce3OH.3a
IeNTa I3BaTe KanaUte Ha IaBnHaTc O TBePtKa
n pa3xa6eTe 3akpenBaUte BoIToBE Ha KOJeNaTa.
8.2.2 HOHOBe
Hocete HOKa Cn No npuHHN, Cbbp3aHc 6e0anacHOCTTa B OTOPI3pAH CNEUaJIIN3pAH cepBn3 aHaOCTPHe, 6aIaNCHpAne N MOHTnpAne. 3a da NOCTHHeTe ONTImaIepe3yIITa Ha paOta, ce npenopbYBa BeHbXrOdIIHoo HOKbT Da c npOBepBA.
CMHa Ha H0Ha (H3o6p.8)
Pn CMHaTa Ha peKeuH NOK Tp6Ba Da ce H3NO3BaTcMoOprHNaHnHpe3epBn Yactn. O6o3NaabaHeTo Ha HOKa Tp6Ba Da CbBnaJa c nocOeHnHa cncbKa Cpe3epBn Yactn Homep. Hnkora He MoHTnpaTe Dpyr HOx.
IobpeHn HHOBe
B cnya,Ye BbnpKeMaKcImaHaTa npEpa3nBOcT HOXB T BLe3e B CbnpNKoCHOBeHnC npEaTCTBHe, He3a6abHO N3KIOUte MeTOpAp n 3dIbnPaeTe UeNCela Ha 3anaJIteJIHATA CBeu. O6bpHeTe KocauKaTa CtpaHNo I npOBepeTe HOKOBe 3a NobPeJa. NobpeDeHN JNOrbHATn HOKOBe CLeBa Da Ce NoDMeHr. HNKORA He 3npaBraTe OTHOBO OrbHaT HoH. HNKORA he paBoTe COrbHAt NIN CNlHO N3HOceH HOK, TOBA npEIN3BnKBa Bn6paunN MoKe da DoBedeDo dpyrN NobpeDn NO KocauKaTa.
BHHMaHHe: Pn pa6Oa c nobpeH HOK cbueCTbBya onaCHOCT O HapaHaBaHe.
IpeHaTo4BaHe Ha HOHOBE
OctpnetaHaHoxaMoraTdaCeIpeHaToCbat C metaHaNla.3aDaceN36berHeDnc6aIahC, WllofoBaHETO Tp8Ba Da ce N3BbPwBa cAmO OTOpnsipan CneuAunnIpaH cepBn3.
8.2.3IopdpbHHHa nHaCTpOHa Ha 3aBnKBaUNTE BbHeta
HamaacnBaBte 3aBnKbAunTe BxKeTa No-ecTo n npOBepBaTe 3a IeKO DnKHeHne.
8.2.4 NpOBepHa Ha KInHOB pembK 3a da npOBepHe KInHOBnpeMbK, H3BaTe KaNaKa Ha KInHOBnpeMbK (H3O6p.8/No3.D).
8.2.5 PemOH
CneI pemont nIIN NOIINbXnKc ce yBepTe,Ye BCNKN TeXHnueckn 6eONaChn Yactn Ca MOHTnpaHn nCa B 6e3ynpeuHO cbCToHnE. KpneuNTe pncOBe OT HapaHraBaHe cAte N naTe HeoCTbHn 3a dpyrnn Iua n Deua.
BHHMaHHe: CbIaNcHO 3aKoHa 3a OTROBOPHOCT Ha npOn3BOJTeJIra 3a HeIOCTaTbUH Na IpoDyKuYrTa HE HOCIM OTROBOPHOCT 3a 5eTI, KOHT Ca npUnHEnH NocpeCDTBOM pEMOH HE nnpEHa3NaueHMe HJN KOrATo npn Pe3epBHNe TAcTH He CE n3NoI3BaTOpINHaHInH Nactn HnnpEOCTABHnOT HacTH. CbIo TaKa He HOCIM OTROBOPHOCT 3a 5eTI BCJeCDTBnE Ha pEMOH, HecBo6pa3EH cN3NCKBaHnRA. Bb3JaarTe pEMOHTa H cepBn3Ha cLyXb3a 3a O6ClyKBaHe Ha KIneHTn HnHa OTOpHnHPan CneuaHnCT. CbIoTO BAKn H 3a KOMPiKeTByBaunTe YaCTn.
8.2.6 PpOdbJnHHTeHocT Ha pa6oTa
HocauKHT TpR6Ba Da CE NcKAT B EKcNlOaTuaCncaMoBpa60THDNHbAACOBTeOT7.00-19.00 Yaca.Cb6JIouDaBaiTe,MOJ3aHOHOBITE pa3npoe6n,KoHToMORat Da ca pa3nnuHNHa IOKaIHO HBO.
8.3IodrotOBKa 3a CnlaHpaHe Ha HocaHaTa
PpeynpeinteHNo yka3aHHe: He otctpaHraBaTe 6eH3nHa B 3aTbOpeHn NOMEseHn, B 6bn3oCT do Obrn nnpn npneHe. Raobn napn Moat da PpeHNBkAT EKcIIO3nn nIIN orbH.
1.Изпраэн electeбинHOвярсepBoap c 6eH3nHOBA CMyKaTeJIHa NOMЯ.
2. BhloheMoTopa n octaBeTe MoTopa da pa6oTH,doKaTO ce 3pa3XoHn OCTaHaJIHT 6eH3HH.
3.ПоинстeteцелЯурд,за дпрдпгплakobOTO nOKPNTne.
4.CbXpaHraBaIte ypeHa Ido6pe npoBetpBO MRCTO.
8.4IoproTOBkaHaHocaynata3a TpaHCnpTnpe
1.Изпраэнete peэрьоара 3a 6eH3nH (BnKTe Tocka8.3/1).
2. Octabete MOTOPa da pa60TH,doKaTo ce H3pa3XoDn OCTaHaJIrT 6eH3nH.
3.ИзпраэнеTe MOTOPHOTOMACNo OT TOnJIINr MOTOp.
4.ИЗbaDETe ΜEπCeIa Na3aJIaNTeJIHaTc CBeI,OT 3aJIaNTeJIHaTc CBeI.
5.ПочнстeteMaшиннаТ.
6. Okayete CTapTOBOTO 3aDnKBAIO BbKe 3a
BG
KykaTa (N3O6p. 3c). Pa3xla6eTe KpnHaTnTe raKn n CbAteTe rOpHata npnIb3raa CkOba HADOny. PnTOBa BnHMaBnTe 3a TOBa npn O6pbuaHeTo CTapTOBnTE BbKeTa Da He ce OrbHAT.
- HabnTe HrkoIIO pIacTa BeJINaIe MeJHy roHaTaN DOnHATA npINb3raUa cKoBa n MOTopa, 3a Da ce N36eHer TprHe.
8.5 NopbykaHa pe3epeBn qactn:
Pn npbukata Ha pe3epBn yactn Tp8ba da ce nocoyat cneHNTE daHHN:
BudHaypeda
Aptnkylen Homep Haypea
HdENTnKauNoH Homep Ha ypea
HomepHa Heo6xOIMMaTa pe3epBHa qact
AkyaHnIeHN IHHΦopMaunIe HamePHTe Ha www.isc-gmbh.info
9. EKJIOORcbo6pa3Ho OTCpaHbAHe N NOBTOPO H3NOJ3BaHe
UpeBt ce HAMnpa B ONAKOBKa, 3a da ce npedotbpaTATeTN pRn TpAHCnOpTnpaHTo. Ta3N ONAOKBa PpeCTabIbRA CypOBHa N 3aTOBA MOKe Da ce N3NOJ3Ba NOBTOPO H Nm da Ce BbpHE KbM YKbJa 3a NOBTOPA npepaOToHa cypOBHHTe. UpeBt N HeROBIne cactn Ca cbctabeHNOT pa3JIHn MaTePnaJI, KaTO HApIMep MeTAJI N INaCTMaCn. IVXbPLeTe DeEeKTHTE MoTAtKHn UACTn 3a EKoIOnocBo6Pa3HO OTcPaHBAHe Ha oTPOBNi OTnAdtu. Ocbedomete CE b CneuaJIIN3IpaH mAr3Hn NnB O6uHhCkata aDMNHcTpaIy!
10. План за оTKрпван Ha HeH3npaBHOCTN
Ipeynpeintelno yka3aHne: Hn-Hanpe n3KIOUeTe MoTopa n 3dbpnaTe 3anaNTenHna Ka6e, nped na pnpimete npoBepkn nn Hactpokn.
IpeynpeinteH yka3aHne: Ako cneJ hactpoKa Hn nonpaBka MOTOpbTe pa6oTn HKOJIHO MNHTN, NOMcIte 3a TOBa, Ye aycnybT n npyTu cA ropeu. CneObaTeHNo He doKocBaITe, 3a da n36BerHeTe n3rapHH.
BHHMaHHe. Ako ce noBRT npo6lemn, Honto He ce dblHaT ha dBHrataeIa, npoyetete MoI npJIOHeHATA NcHCTpyuHa Briggs & Stratton.
| Hén3npaBHOCT B'3MOJHNI pRNU | HNI OTCTPAnBaHe | |
| HecpOKoEH XOD, CINHO BIVbRIPAu,
урED | - БOLTOBe pa3Xla6eHIn
- 3akpeINBaHTo Na HOJa
pa3Xla6eH0
- HoxOBe He bALanCnPaHn | - Поверетe boITOBeTe
- Поверетe зakpenBaHne Ha HOJa
- Повмehete HOKOBeTe |
| MOTOpBT He pa6Otn - CnIPaChen loCT | - HeHaTnCHaT
- HATnCHete CnIPaChnJIaLoCT | - Повмehete zapaJIteJIHnTa CBeUc
- KpanHuTe 3a 6eH3IN 3aTBOpEnO |
| TPreBnAra TIIooi NOxblTЯBa,
pa3pe3bT HePABnOMepeH | - HoxBT He e ocTbp
- TbByPe MAlKa BnCOUnHa 3a
РЯЗанe
- HAOCTpe TEOHKOBeTe | - HabTpoIe npaBnIHnTa
BnCOUnHa
- TbByPe MAlKn OboPOTn Ha
ДВиrAteJIa
- HabTpoIe loCTa Ha MaKc. |
| ИзхoДТ 3a ИЗВьрлЯне на
ТPreBAta He eЧИСТ | - TbByPe MAlKn OboPOTn Na
ДВиrAteJIa
- HabTpoIe loCTa 3a Ra3 Na MaKc.
- TbByPe MAlKa BnCOUnHa 3a
РЯЗанe
- HabTpoIe пrabILnO | - ИЗнOCeH HOJ
- Сmehete HOKOBeTe
- 3aДрьСтЕно КОчe
- ИЗпраЗнete кошЧeTO |
BG
TapaanuONHHyCNOBnA:
Φa. iSC OOД rapaHTnpa OTOcTpaHЯBaHe Na DepeKNTe pecn. CMHa Ha ypeDa B cBtBeTcTBne C daHeTa no-dony Ta6nua, KaTo 3aKaOHnTe npTeHcHm 3a npEoCTabEHrapaHcHn OCTaBaT He3acErHaTn.
2009/105/EC
2006/95/EC
2006/28/EC
2005/32/EC
2004/108/EC
2004/22/EC
1999/5/EC
□97/23/EC
□90/396/EC
89/686/EC_96/58/EC
2006/42/EC
Annex IV
Notified Body: Notified Body No.:
Reg.No.:
2000/14/EC_2005/88/EC
Annex V
Annex VI
Noise: measured LWA = 93 dB (A); guaranteed LWA = 96 dB (A) P = 1.9 kW; L/0 = cm
Notified Body: TÜV Süd Industrie Service GmbH, Westendstrasse 199, 80686 München (0036)
2004/26/EC
Emission No.: e1197/68SA2004/26029202
Standard references: EN 836; EN ISO 14982
Subject to change without notice Wiesenweg 22, D-94405 Landau/Isar
Documents registrar: Robert Mayn
2009/105/EC
2006/95/EC
2006/28/EC
2005/32/EC
2004/108/EC
2004/22/EC
1999/5/EC
□97/23/EC
□90/396/EC
□89/686/EC_96/58/EC
2006/42/EC
Annex IV
Notified Body: Notified Body No.:
Reg.No.:
2000/14/EC_2005/88/EC
Annex V
Annex VI
Noise: measured LWA = 96 dB (A); guaranteed LWA = 98 dB (A) P = 2.5 kW; L/O = cm
Notified Body: TÜV Süd Industrie Service GmbH, Westendstrasse 199, 80686 München (0036)
2004/26/EC
Emission No.: e1197/68SA2004/26029601
Standard references: EN 836; EN ISO 14982
Subject to change without notice Wiesenweg 22, D-94405 Landau/Isar
Documents registrar: Robert Mayn
D
The reprinting or reproduction by any other means, in whole or in part, of documentation and papers accompanying products is permitted only with the express consent of ISC GmbH.
F
La rém IPSG GmbH.
①
All of our products undergo strict quality checks to ensure that they reach you in perfect condition. In the unlikely event that your device develops a fault, please contact our service department at the address shown on this guarantee card. Of course, if you would prefer to call us then we are also happy to offer our assistance under the service number printed below. Please note the following terms under which guarantee claims can be made:
- These guarantee terms cover additional guarantee rights and do not affect your statutory warranty rights. We do not charge you for this guarantee.
- Our guarantee only covers problems caused by material or manufacturing defects, and it is restricted to the rectification of these defects or replacement of the device. Please note that our devices have not been designed for use in commercial, trade or industrial applications. Consequently, the guarantee is invalidated if the equipment is used in commercial, trade or industrial applications or for other equivalent activities. The following are also excluded from our guarantee: compensation for transport damage, damage caused by failure to comply with the installation/assembly instructions or damage caused by unprofessional installation, failure to comply with the operating instructions (e.g. connection to the wrong mains voltage or current type), misuse or inappropriate use (such as overloading of the device or use of non-approved tools or accessories), failure to comply with the maintenance and safety regulations, ingress of foreign bodies into the device (e.g. sand, stones or dust), effects of force or external influences (e.g. damage caused by the device being dropped) and normal wear resulting from proper operation of the device. This applies in particular to rechargeable batteries for which we nevertheless issue a guarantee period of 12 months.
The guarantee is rendered null and void if any attempt is made to tamper with the device.
- The guarantee is valid for a period of 2 years starting from the purchase date of the device. Guarantee claims should be submitted before the end of the guarantee period within two weeks of the defect being noticed. No guarantee claims will be accepted after the end of the guarantee period. The original guarantee period remains applicable to the device even if repairs are carried out or parts are replaced. In such cases, the work performed or parts fitted will not result in an extension of the guarantee period, and no new guarantee will become active for the work performed or parts fitted. This also applies when an on-site service is used.
- In order to assert your guarantee claim, please send your defective device postage-free to the address shown below. Please enclose either the original or a copy of your sales receipt or another dated proof of purchase. Please keep your sales receipt in a safe place, as it is your proof of purchase. It would help us if you could describe the nature of the problem in as much detail as possible. If the defect is covered by our guarantee then your device will either be repaired immediately and returned to you, or we will send you a new device.
Of course, we are also happy offer a chargeable repair service for any defects which are not covered by the scope of this guarantee or for units which are no longer covered. To take advantage of this service, please send the device to our service address.
Also refer to the restrictions of this warranty concerning wear parts/consumables and missing parts as set forth in the warranty conditions of these operating instructions.
BULLETIN DE GARANTIE
Chere CLIENT, Cher Client
Stimate clienta, stimate client,
produsele noastre sunt supuse unui control de calitate riguros. Daca totusi vreodata acest aparat nu va functiona ireprosabil ne pare foarte rau si va rugam sa va adresati la centril service indicat la finalul acestui certificat de garantie. Bineinteles ca va stam si la Telefon cu placere la disposzitie, la numerele de service mentionate mai jos. Pentru revendicare pretentilor de garantie trebuie tinut cont de urmatoarele:
eeppeeppeeppeeppeeppeeppeeppeeppeeppeeppeeppeeppeeppeeppeeppeeppeeppeeppeeppeeppeeppeeppeeppeeppeeppeeppeeppeeppeeppeeppeeppeeppeeppeeppeeppeeppeeppeeppeeppeeppeeppeeppeeppe

□N13N
mnnn / N-baeaeaeae
eepnne eepnne ennnnne nnnnne nee eee eee eee eee eee eee eee eee eee eee eee eee eee eee eee eee eee eee eee eee eee eee eee eee eee eee eee eee eee eee eee eee eee eee eee eee eee
0
HOZd
N/
COS!N-Neon
00:02-00:8 F-W oJyqwb-6s!MMM 609 02 L G08 L0 :eHrO H eAeS