
WD 7.700 P - Pressure washer Kärcher - Free user manual and instructions
Find the device manual for free WD 7.700 P Kärcher in PDF.
User questions about WD 7.700 P Kärcher
0 question about this device. Answer the ones you know or ask your own.
Ask a new question about this device
Download the instructions for your Pressure washer in PDF format for free! Find your manual WD 7.700 P - Kärcher and take your electronic device back in hand. On this page are published all the documents necessary for the use of your device. WD 7.700 P by Kärcher.
USER MANUAL WD 7.700 P Kärcher
Regi s and win! www.karcher.com
| 17 | 18 19 | 20 | 21 | 22 | 23 | 24 | 25 | |
| WD 7.2xx | ● | ● | ● | ● | ● | ● | ○ | ○ |
| WD 7.3xx | ● | ● | ● | ● | ● | ● | ○ | ○ |
| WD 7.5xx | ● | ● | ● | ● | ● | ● | ○ | ○ |
| WD 7.7xx | ● | ● | ● | ● | ● | ● | ● | ● |


Inhaltsverzeichnis
General notes. EN .7
Safety instructions EN .8
Description of the Appliance EN . . .8
Operation EN.10
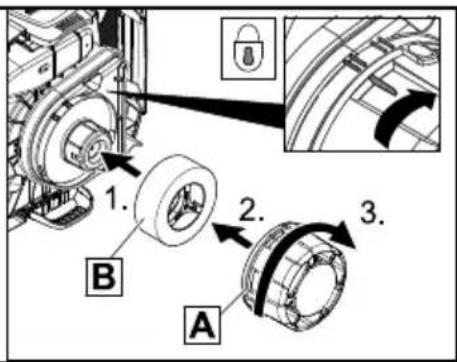
Maintenance and care . . . EN . . 11
Troubleshooting EN.12
Technical specifications... EN...12
General notes
Dear Customer,

Please read and comply with these original instructions prior
to the initial operation of your appliance and store them for later use or subsequent owners.
Proper use
The appliance is intended for use as a Multi-Purpose Vac corresponding to the descriptions given in these operating instructions and the safety notes.
This appliance has been designed for use in private households and is not intended for commercial use.
- Protect the unit from rain. Do not store outside.
- Caution: Always use a pre-separator while vacuuming ashes and soot (order no. 2.863-139).
Use the Multi-Purpose Vac only with:
- Original filter bag.
- Original spare parts, accessories and special accessories.
The manufacturer is not responsible for any damages that may occur on account of improper use or wrong operations.
Environmental protection

The packaging material can be recycled. Please do not place the packag
ing into the ordinary refuse for disposal, but arrange for the proper recycling.

Old appliances contain valuable materials that can be recycled. Please
arrange for the proper recycling of old appliances. Please dispose your old appliances using appropriate collection systems.
Disposing the filters and filter bags
Filters and filter bags are made from environment-friendly materials.
They can therefore be disposed off through the normal household garbage provided you have not sucked in substances that are not permitted to be thrown into household garbage.
Notes about the ingredients (REACH)
You will find current information about the ingredients at:
www.kaercher.com/REACH
Warranty
The terms of the guarantee applicable in each country have been published by our respective national distributors. We will repair possible faults on your unit free of charge within the warranty period, insofar as the faults are caused by material defects or defective workmanship. Guarantee claims should be addressed to your dealer or the nearest authorized customer service centre, and supported by documentary evidence of purchase.
(See address on the reverse)
Customer Service
Our KÄRCHER branch will be pleased to help you further in the case of questions or faults.
(See address on the reverse)
Ordering spare parts and special attachments
At the end of the operating instructions you will find a selected list of spare parts that are often required.
You can procure the spare parts and the attachments from your dealer or your KARCHER branch office.
(See address on the reverse)
Safety instructions
- This device is not intended for use by persons (including children) with reduced physical, sensory or mental abilities or lacking experience and/or knowledge, unless they are supervised by a person responsible for their safety or are instructed by these persons on the use of the device. Children should be supervised, to ensure that they do not play with the device.
- Keep packaging film away from children - risk of suffocation!
- Switch the appliance off after every use and prior to every cleaning/maintenance procedure.
- Risk of fire. Do not vacuum up any burning or glowing objects.
- The appliance may not be used in areas where a risk of explosion is present.
△Electrical connection
The appliance may only be connected to alternating current. The voltage must correspond with the type plate on the appliance.
Risk of electric shock
Never touch the mains plug and the socket with wet hands.
Always hold the plug rather than the cable when disconnecting the power cord.
Check the power cord with mains plug for damage before every use. If the power cord is damaged, please arrange immediately for the exchange by an authorised customer service or a skilled electrician.
To avoid accidents due to electrical faults we recommend the use of sockets with a line-side current-limiting circuit breaker (max. 30 mA nominal tripping current).
Caution
Certain materials may produce explosive vapours or mixtures when agitated by the suction air!
Never vacuum up the following materials:
-
Explosive or combustible gases, liquids and dust particles (reactive dust particles)
-
Reactive metal dust particles (such as aluminium, magnesium, zinc) in combination with highly alkaline or acidic detergents
- Undiluted, strong acids and alkalies
- Organic solvents (such as petrol, paint thinners, acetone, heating oil).
In addition, these substances may cause the appliance materials to corrode.
Description of the Appliance
Illustrations on fold-out pages!
These operating instructions describe the basic models of the Multi-Purpose Vacs shown on the front cover.
Depending on the model, there are differences in the equipment and included accessories.
When unpacking the product, make sure that no accessories are missing and that none of the package contents have been damaged. If you detect any transport damages please contact your dealer.
- included in the scope of delivery
possible accessories
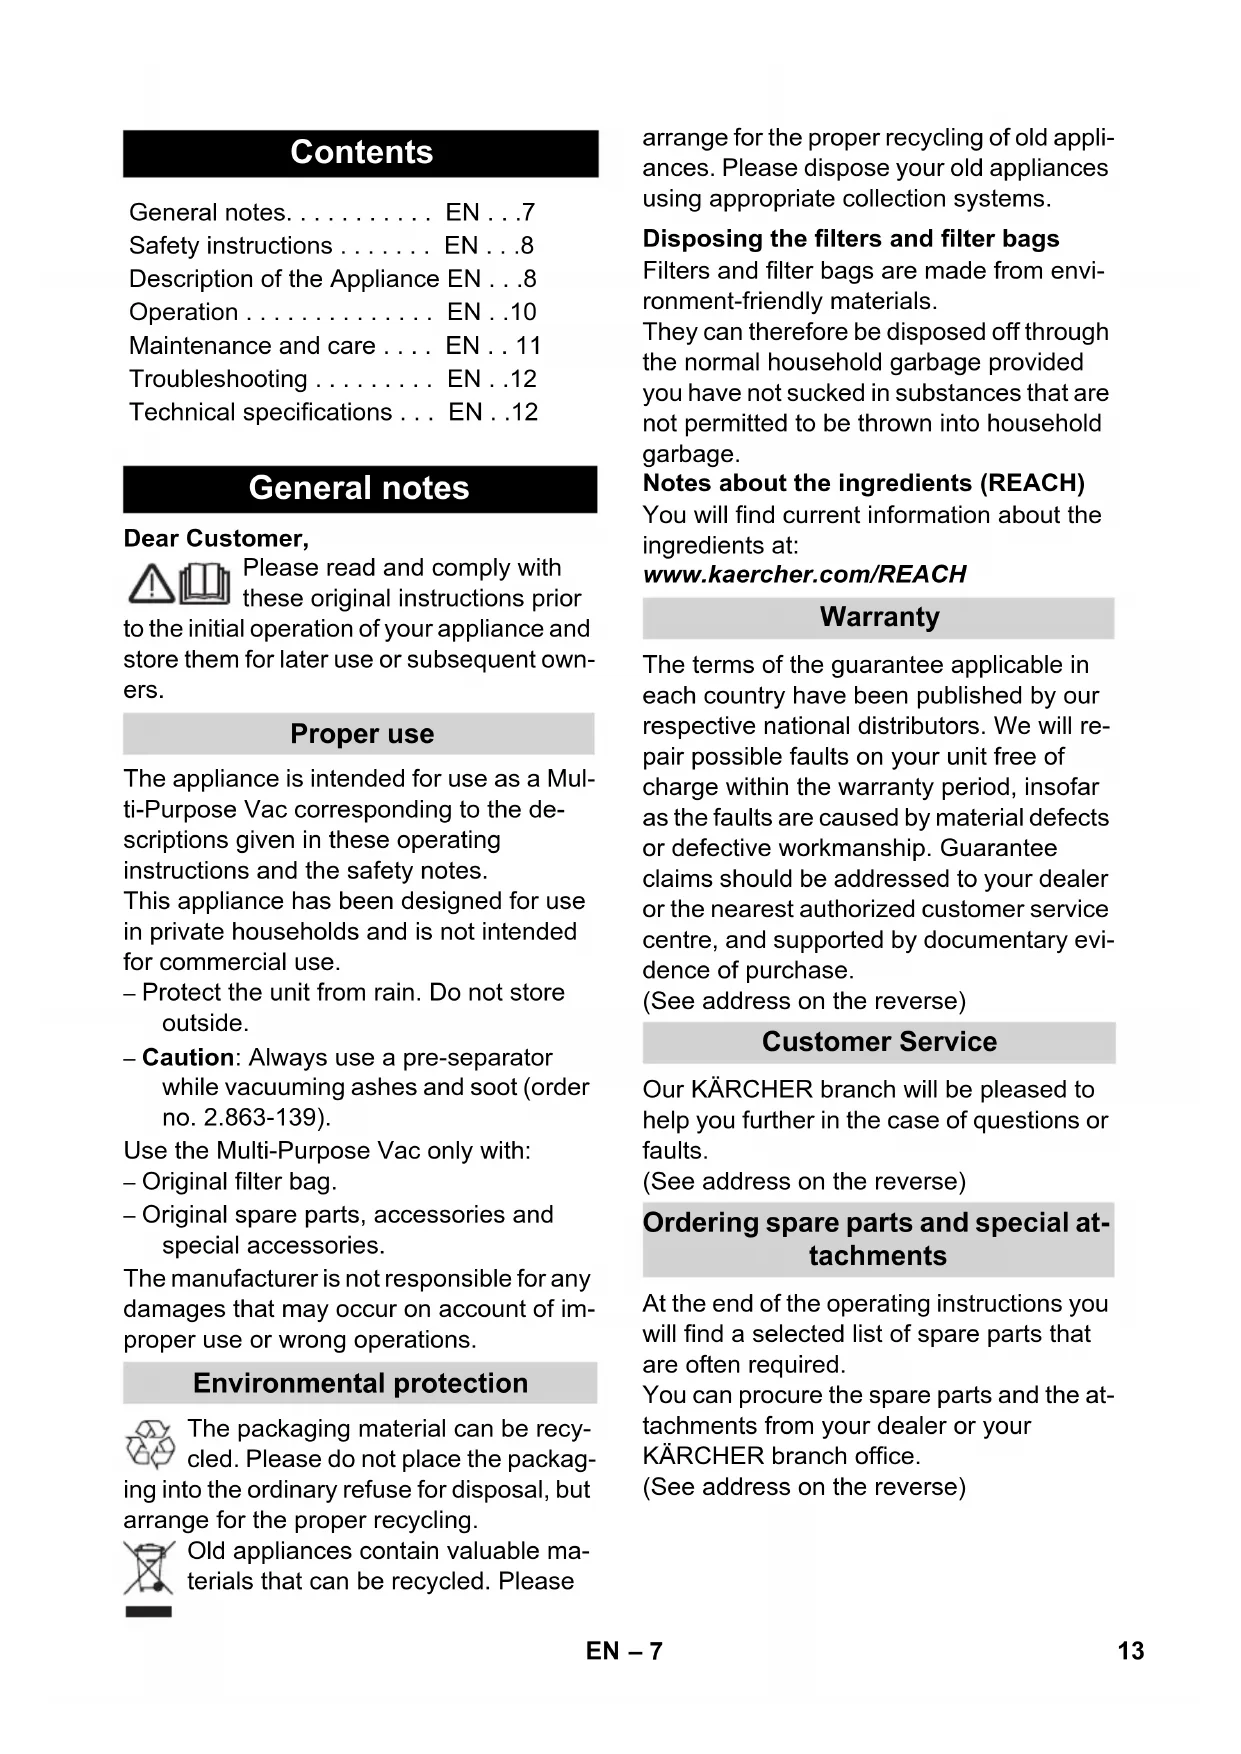
Suction hose connection
To connect the suction hose during vacuuming.
Note: In order to disconnect it, push down with your thumb and pull the suction hose out.
2 Machine socket
To connect an electric tool.
Note: Observe the maximum connected power (see Chapter "Specifications").
3 Blowing connection
Connect the suction hose to the blower connection, this will activate the blower function.
4 Carrying handle
To carry the appliance or to remove the appliance head after unlocking.
Filter flap release button
Push handle
7Express filter cleaning button
8 Filter cleaning display
9 Accessory compartment, hook
This accessory compartment allows the storage of the suction hose, suction nozzles and the mains cable.
Key for mains cable retraction
Rotary switch (ON/OFF)
12 Parking position
To rest the floor nozzle during work interruptions.
13 Accessory storage container
This accessory compartment allows the storage of the suction pipes or other accessories.
14 Container closure
Pull out to open, push in to lock.
15 Wheels
16 Swivel casters
17 Flat fold filter with frame (already installed in the appliance)
Caution
Filters and their frames must always be inserted during operation.
18 Filter bag intake
Caution: Please do not dispose of! Is hooked into the interior of the container, is used to hold the filter bag.
Filter bag
Note: Do not use a filter bag for wet vacu-uming!
Recommendation for appliances without filter cleaning: To vacuum fine dust, use the filter bag.
20 Suction hose with handle
21 Suction tubes 2 × 0.5 ~m
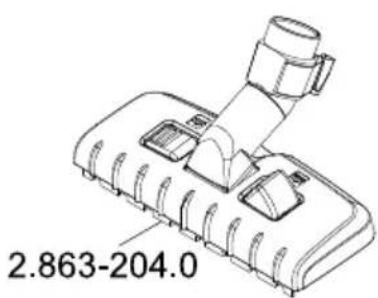
Floor nozzle (with switching lever)
For vacuuming dust from hard surfaces and carpets:
Lever on symbol for carpets
Lever on symbol for hard surfaces
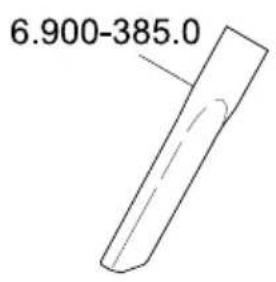
23 Crevice nozzle
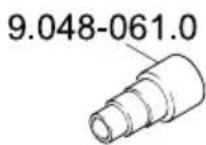
24 Adapter
To connect the suction hose with an electric tool.
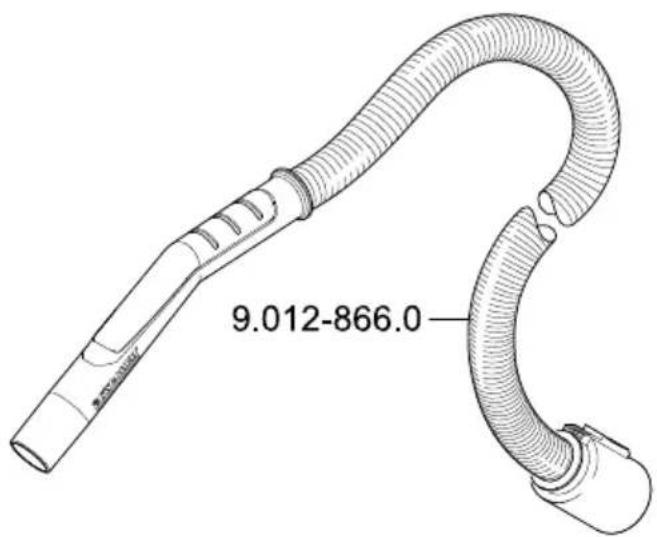
25 Flexible tool hose
For more flexibility when working with electric tools.
Note: Can also be used with an adapter.
Operation
Always work with an inserted flat fold filter - during wet as well as dry vacuum cleaning!
Before Startup
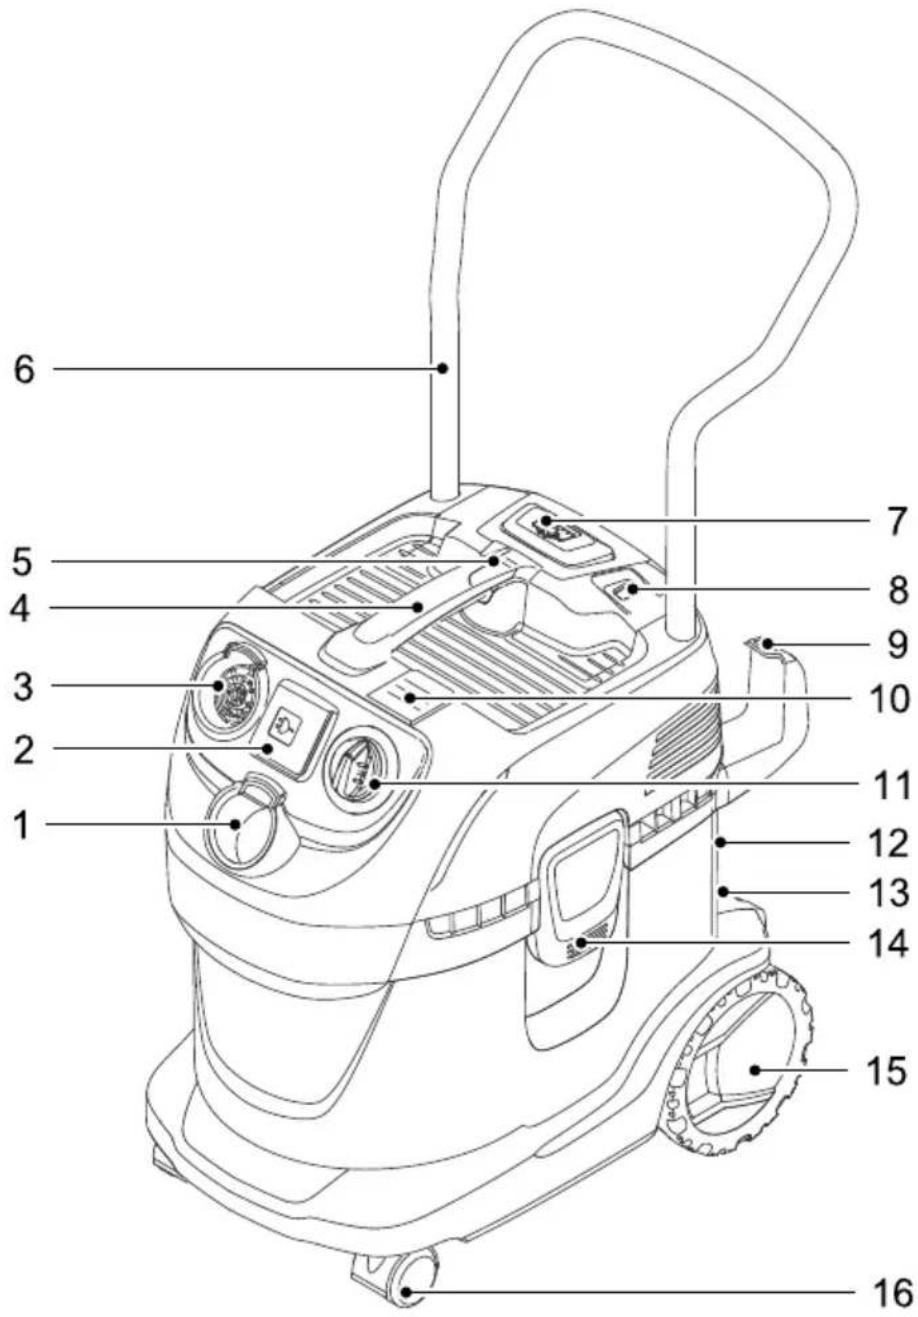
Illustration A1
Remove the appliance head and take the contents out of the container.
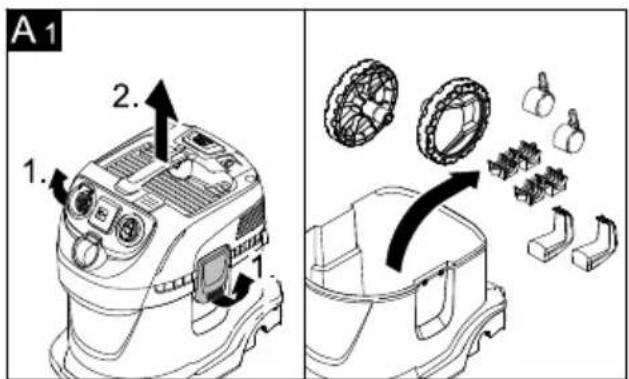
Illustration A2
Turn the container, press in the swivel casters in the openings at the base of the container till the end-point.
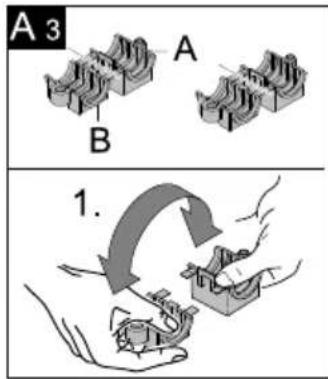
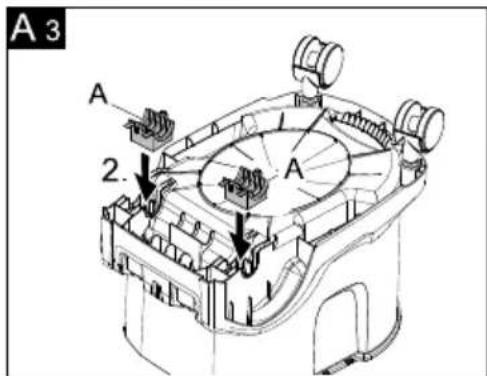
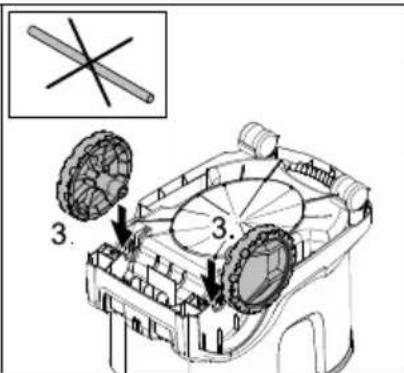
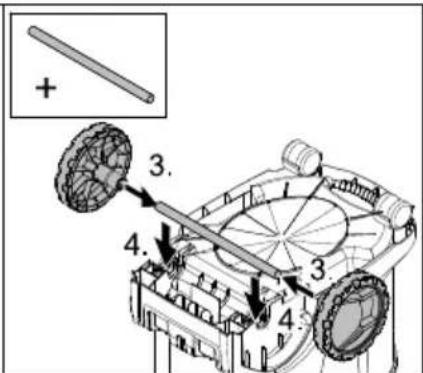
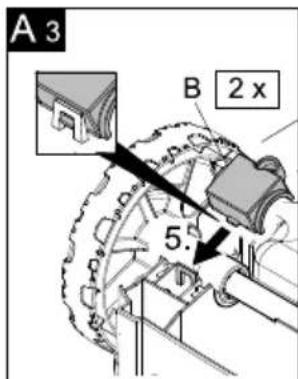
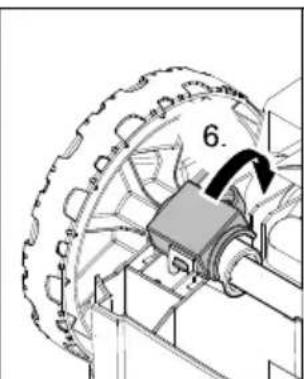
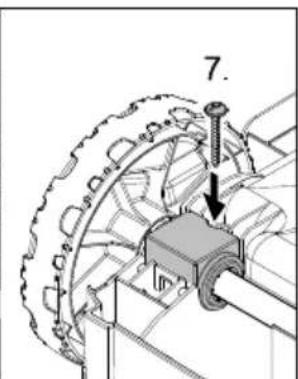
Illustration A3
Install the rear wheels: Break the bearing halves apart and press the large halves into the wheel pickup.
For appliances without axle: Place the wheels into the wheel intake.
For appliances with axle: Attach the wheels to the axle and place into wheel intake.
Finally, hook the smaller halves into the larger ones and screw them in.
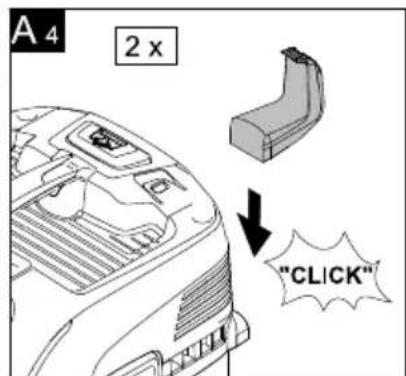
Illustration A4
Install the hook.
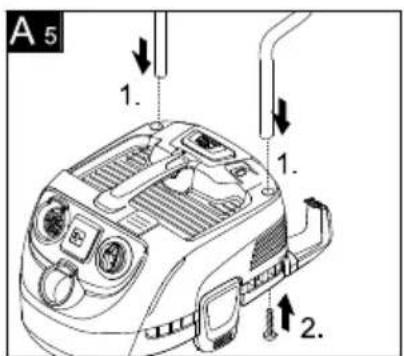
For appliances with pushing handle: Illustration A5
Insert the pushing handle into the two respective openings in the appliance head from above and press them down all the way. Secure from below using 2 screws.
Note: If the pushing handle is removed later on, the bottom openings must be closed up with the two screws for functional reasons.
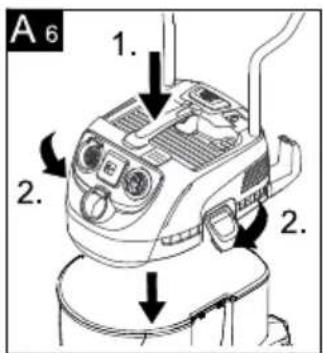
Illustration A6
Insert and lock the appliance head.
Start up
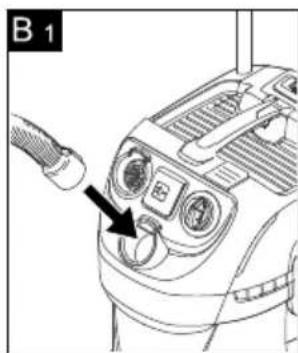
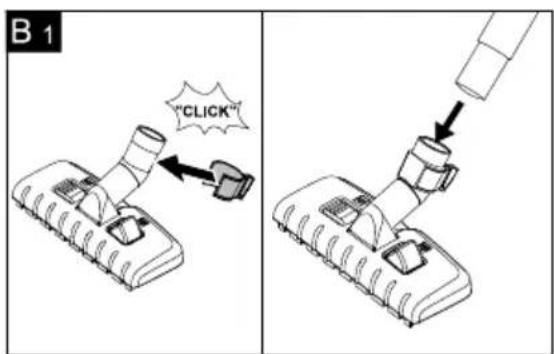
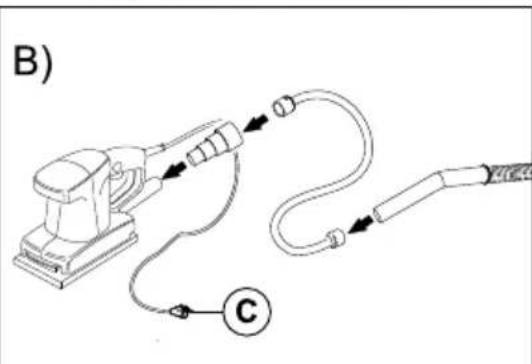
Illustration B1
Connect accessories.
Illustration B2
Plug in the main plug.
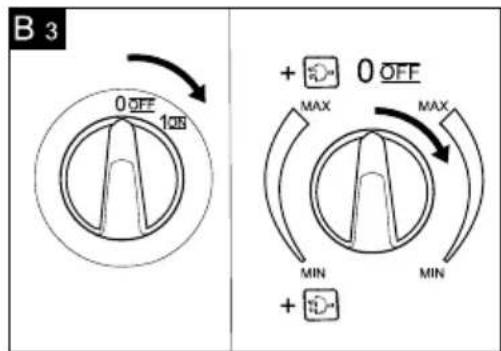
Illustration 33
Turn on the machine.
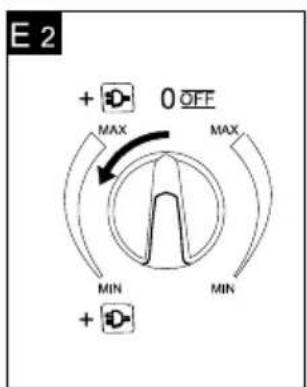
For appliances without built-in socket.
Position I: Suction or blowing
Position 0: Appliance is switched off
For appliances with built-in socket
Position MAX: Suction or blowing.
Position+MAX:Vacuuming with connected electric tool
Performance regulation: Reduce the suction if necessary during vacuuming, blowing or when working with an electric tool.
Position 0: The appliance is switched off. Electric tool is supplied with voltage.
Dry vacuum cleaning
Work only with a dry flat fold filter! Illustration C1
Recommendation for appliances without filter cleaning: To vacuum fine dust, use the filter bag.
The filling level of the filter bag depends on the dirt that is sucked in.
Clogged filter bags can burst - therefore make sure to replace the filter bag in a timely manner!
The filter bag needs to be replaced more frequently while sucking in fine dust, sand, etc.
For appliances with ExPress filter cleaning: When vacuuming without a filter bag, the filter cleaning indicator lights up red if the flat fold filter needs to be cleaned.
Use the filter cleaning.
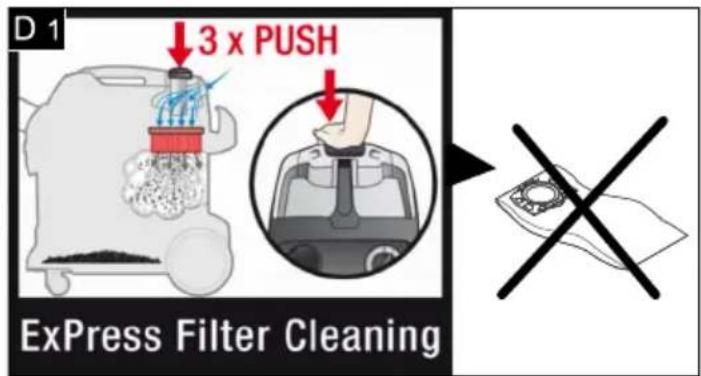
Express filter cleaning
The ExPress filter cleaning is intended for the vacuuming of large volumes of fine dust without the filter bag inserted.
If the filter cleaning indicator is red, clean the flat fold filter:
Illustration D1
Press the filter cleaning key 3 × times with the appliance switched on; wait about 4 seconds between the individual presses.
Note: After several filter cleaning processes or if the filter cleaning indicator is red, check the container for its fill volume. Empty the container if needed.
Wet vacuum cleaning
Attach the accessories to vacuum moisture or wetness to the suction pipes or directly to the handle.
Caution:
Do not use a filter bag!
Immediately switch the appliance off if foam forms or liquids escape!
Note: If the container is full a float closes the suction opening and the appliance works at a higher speed. Switch off the appliance immediately and empty the container.
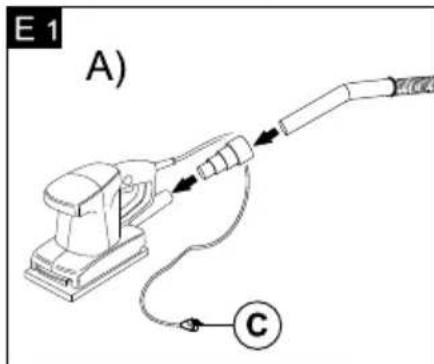
Working with electrical power tools
Adapt the adapter to the connection diameter of the electric tool using a knife if necessary.
Illustration E1
A) Plug the enclosed adapter onto the handle of the suction hose and connect the electric tool with the connection.
or
B) Use the flexible tool hose to gain more flexibility in your work. Connect this hose to the suction hose and to the adapter and then to the connection of the electric tool.
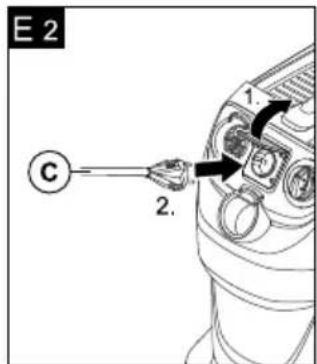
Illustration E2
For appliances with built-in socket: Connect the mains plug of the electric power tool to the vacuum cleaner.
Switch the appliance on (move the rotary switch to the left to position +MAX) and start working.
Note: The suction turbine starts with a delay of 0.5 seconds after the electric tool has been switched on. After the electric tool has been switched off, the suction turbine will continue to run for approx. 5 seconds to suck in the remaining dirt from the suction hose.
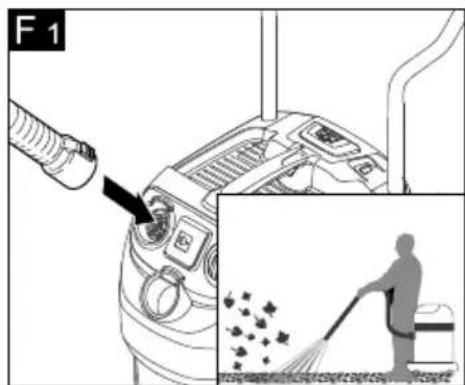
Blowing function
Cleaning hard to reach locations or, where vacuuming is not possible, like leaves from a gravel bed.
Illustration F1
Connect the suction hose to the blower connection, this will activate the blower function.
Interrupting operation
Turn off the appliance.
Illustration G1
Hook the floor nozzle into the parking position.
Finish operation
Turn off the appliance and disconnect the mains plug.
Empty the container
Illustration H1
Remove the appliance head and empty the reservoir filled with wet or dry dirt.
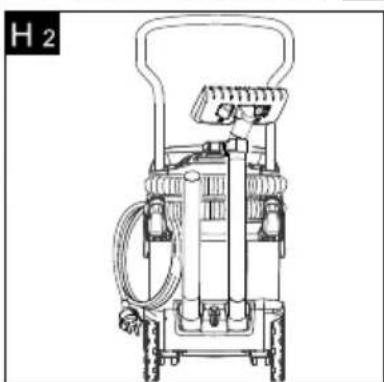
Storing the appliance
Illustration H2
Store the accessories and the mains cable on the appliance and store the appliance in dry rooms.
Maintenance and care
Danger
Turn off the appliance and remove the mains plug prior to any care and maintenance work.
Repair works may only be performed by the authorized customer service.
Caution
Do not use abrasives, glass or universal cleaners! Never immerse the appliance in water.
Clean the appliance and accessory parts made of plastic with a commercial plastic cleaner.
If required, rinse the container and accessories with water properly and dry them before reuse.
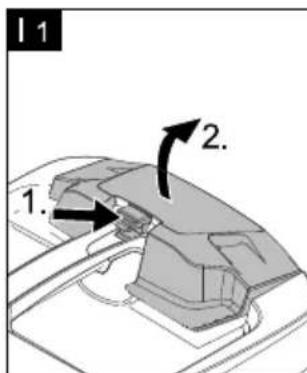
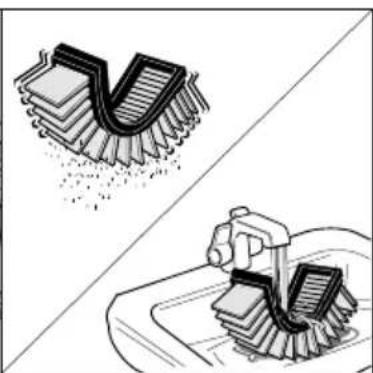
Clean flat fold filter
Illustration 1
For appliances without filter cleaning:
Release and open the filter flap. Remove the frame and filter and knock the dirt out of the filter. Clean the filter under running water if necessary. Do not rub or brush the filter dry.
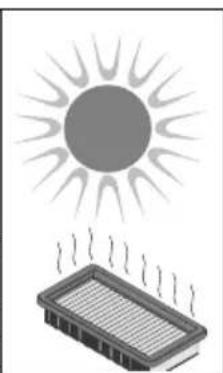
Let it dry completely prior to installation.
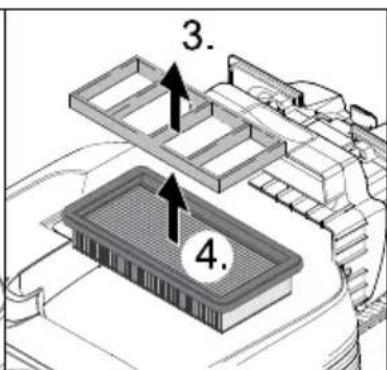
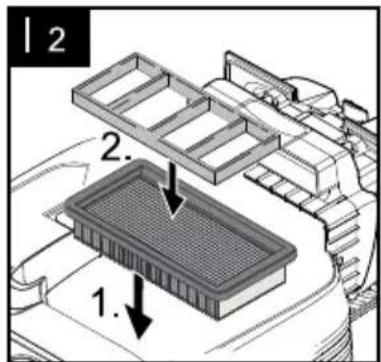
Illustration 12
After that, insert the filter first and then the frame.
For appliances with ExPress filter cleaning: Use the filter cleaning (see Chapter "ExPress filter cleaning").
Note: If the suction performance is still not satisfactory, in spite of the cleaning, separate the suction hose from the pipes, hold the opening of the suction hose shut/close it and activate the filter cleaning button three more times with the suction hose held shut.
Troubleshooting
Mains cable retraction does not function
The mains cable is probably dirty, clean the mains cable.
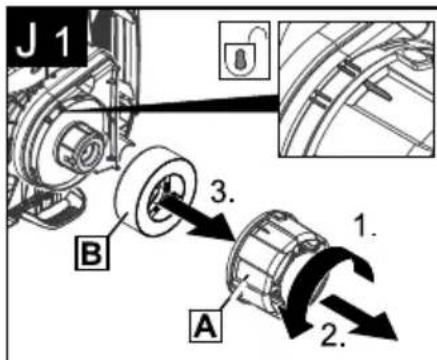
Water is leaking
Turn off the appliance immediately. Illustration J1
Clean the floater system.
Remove the appliance head, unscrew the floater basket (A) in the direction of the arrow and remove it. Remove the floater (B) and clean both under flowing water.
To install, first insert the floater, then add the floater basket and lock it.
Decreasing cleaning power
If the suction power becomes less, check the following points:
Accessories, suction hose or suction tubes are clogged, please remove the obstruction.
Flat fold filter contaminated:
For appliances without ExPress filter cleaning: Remove the flat fold filter and clean it (see chapter "Cleaning the flat fold filter").
For appliances with ExPress filter cleaning: Activate the filter cleaning button 3 times; if necessary, repeat the cleaning process with the suction hose closed (held shut) (see Chapter "Cleaning flat fold filter").
Clean the filter under running water if necessary.
Replace damaged flat folded filter.
Filter bag is full: Insert new filter bag (Order No. refer to spare parts list at the end of this manual).
Caution
Please do not dispose of the filter bag intake!
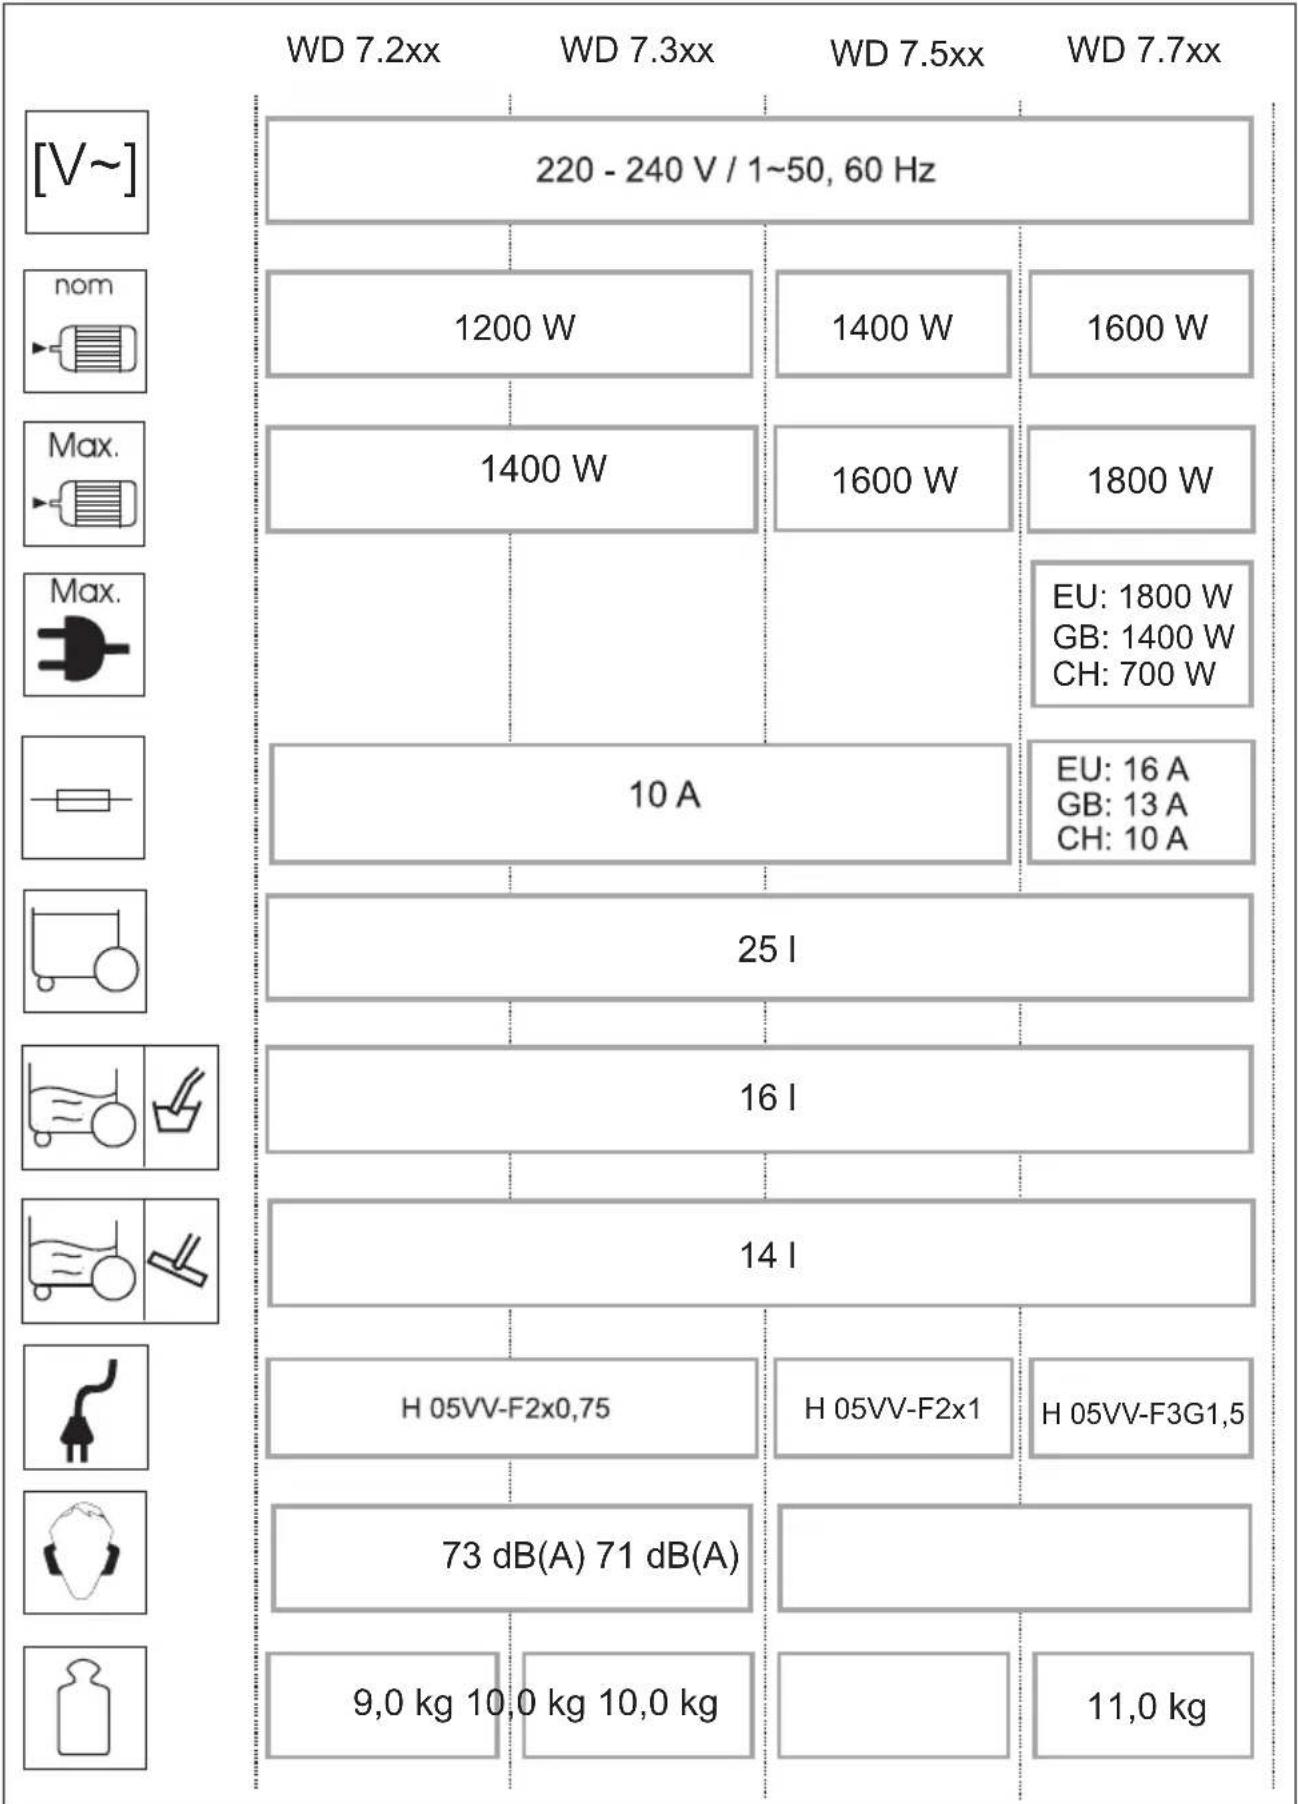
Technical specifications
The specifications are listed on the flaps. In the following, you will find the explanation of the symbols used.
| V~ | Voltage |
| nort | Output Pnom |
| Max. | Output Pmax |
| Max. | Max. connection output of appliance socket |
| Mains fuse (slow-blow) | |
| Container capacity | |
| Water intake with handle | |
| Water intake with floor nozzle | |
| Power cord | |
| Sound pressure level (EN 60704-2-1) | |
| Weight (without accessories) |
Subject to technical modifications!
Table des matieres
Consignes generales . . . FR . . .7
www.kaercher.com/REACH
Garantie
www.kaercher.com/REACH
Garanzia
www.kaercher.com/REACH
Garantie
www.kaercher.com/REACH
Garantía
www.kaercher.com/REACH
Garantia
www.kaercher.com/REACH
Garanti
Træk ud for at abne, skub ind for at lase.
15 Hjul
16 Styrehjul
17 Flad foldefilter med ramme
www.kaercher.com/REACH
Garanti
www.kaercher.com/REACH
Garanti
I alla lander galler de av vart ansvariga forsaljningsbolag utformade garantivillkor.
www.kaercher.com/REACH
Takuu
www.kaercher.com/REACH
Eyyúnón
www.kaercher.com/REACH
Garanti
Calismayi yarida kesme
www.kaercher.com/REACH
TapaHTy
B KaKdoi cTpaHe DeIcTByIOT COOTBETCTBeHHo rapaHTnHbIe ycIOBnA, I3DaHHbIe yNoJHomOueHHoOpraHn3aCnei C6bItaHaWe npOdykUuN B daHHoI cTpaHe.Bo3MOxHbIe HncnPabHOCTn np6Opa B TeueHne rapaHTnHOrO cPoka Mbl ycTpaHЯe6ecnPaTHO, ecn npuHa 3akIouaetcB DeΦeKTax MaTepnaIob nnn Own6kax npn N3rTOBLeHN. B cnYuae BO3NHKnOBehnnpTeH3n B TeueHne rapaHTnHOrO cPoka npoc6Ba o6paTaBcA, ImeA npn Ce6e YekO pOKynke, B TopROByO opraHn3aCnIO, npoDaBswyo Bam np6Op nIn B 6nXaMswyo
ynoHMOueHHyo cnyk6y cepBnCHoro 06CnyKuBaHna.
(Adpec yka3aHa o6oPoTe)
CepBnchna cny6a
B cnlyae BO3HnKHOBeHnB BOpocOB nIIN noJomok Haaw fnnnaJfnpMbIKARCHER nOMoKeT Bam pa3peWntb IX.
(Adpec yka3aHa o6oPoTe)
3aka3 3apanachbix yacteH n cneun-albHbIX npHaJdJeXHOCTeH
Bb6op Han6oJee yacto Heo6xOIMbIX 3a- nchaTeBbl HaJeTe B KOHcE INHCTpyKcIN IIO 3KcPnyatauN.
3aapanchbte yacntn npnaedexknoctn Bbl mokeTe noIyunb y BaWero dIepe nIn B cnnaJe cnpMbI KARCHER.
(Adpec yka3aHa o6oPoTe)
Yka3aHnI IO TexHnKe 6e30na-CHOCTN
- 3mo ycmpoucmeo He npedHa3Naheo dna uCnoB3O6aHua JIOdbMu (6 mom yucne u deme) c oepaHueHHbIMu qu3uyeckmu, ceHCOPHBIMu unu ymcm-8ehbIMU cnocobocmru unu nuamauC omycmceuem onbima u/ unu 3HaHu, 3a uCKnIOyeHuem clyuaee, ecnu 3a obecneueHuem 6e3OpacHocmu ux pa6ombl H6IHOaOM cneuaJIbHO nOdoomoeHbIe luca unu OHU nOlyuayom om Hux yka3aHua, kacaIouecra uCnoB3O6aHua ycmpoucmea. Heo6xodumo cledum 3a dembmu, He pa3pewamb um u2pambc ycmpoucmbom.
- Ynakoeohyio nIeHky depkume no-daIbwe om demeu, cyuecmeyem ona-chocmb ydyuueHu!
- Ppu6op cneyem omknioyamb noce kaxdozo npumehnur u neped npoe-deHuem ouucmku/mexHueeckozo ob-cnyxuaHura.
- Onachocmb noxapa. He donyckamb ecacbibaHua 2opuux unu mneuux npedmemoe.
- 3Kcnnyamaua npubopa 60 63pb1800-nacHbIX 3OHax 3anpeuzaemca.
IodKIOUeHue Kcemu numaHua
Pp6op cneyem eknoamb moIbko 8 cemb nepemeHHo2o moka. HanpxKeHue doJxHo coomBemcmeOBamb yka3aHuaM 8 3a6odckou ma6nUke np6opa.
Onachocmb npaxeHua mokom
Hu b koem cnyuae He npukacaumecb K cemebomy uHypuy u po3emke MOKpbIMU pykamu.
Cemeou ka6ebb 6pamb monbko 3a buKy, HnB38 8bIKIooamb npu6op, 6bImrauaBaey u3 po3emku 3a uHyp.
Ipeod nayanom paobombic npubopom npoeepmb cemeoou whyp u wmencehnyu buky ha npedmem noepexdehu. Poepekdenbui cemeoou whyp doJxhen 6bimb He3amadnumelbHO 3aMeHen ynonHomooenHou cnjXbou cepueucho2o o6cnykua-Hua/cneuauncmom-3neKmpukom.
Bo u36exaHue Hecyaemhbix cnyuae8, C6raHHbIX C 3neKmpuuecm8OM, Mbl peKoMeHdyem ucnonb30eaHue po3emok C npedeKJIoueHHbIM ycmpoucmeBOM 3auumbl om moka noepexkdeHua (MaKC. HomuHaJIbHa cuna moka cpaabmbiaHua: 30 mA).
△BHumaHue
HekomopbIe eueecmea npu cmeenuu co
ecabieaeMbIM 03dyxOM Mozym 6pa3oebi-
bam 63pbIEOONachbIe napbl uNU cmecU!
Hukozda He bcacbIaamb cnedyioue ee
ueecmea:
B3pbieaybte unu zoipouye 2a3bl, xudokcuu npblb (peakmuHaar nblnb)
Peakmuehaa Memannuuecka nbInb (hanpumep, anomhuu, mazhu, uHK) e coeduneuu c cunbHbIMu ueNoHymu u KucnomHbIMu MOouumcpecdma
- Hepa36ab8neHHbIe cunbHbIe Kucnombu u uenoyu
OpauHueckue pacmboopumeu (Ha npumep,6eH3un,pacmbopumelb,aue-moH,Ma3ym).
Kpome mo2o 3mu 6euecmea Mozym pa3b- edamb uCnOJIb308aHHbIe e npu6ope Ma- mepuanbl.
Описане пибopa
BhumaHue: He ebipacbiamb!
Bewaetc Bnytpn pe3epByapa n npedHa3-HaueH dJa 3axIma nbInecoCHOro MeuKa.
19 ΦильtpoBaJIbHbI MewoK
Yka3aHne:ДЯЧИCTKNBOBlaXHOMpeKIMe He CNeIyETnpIMeHrTbMeWOKДЯc6opa nbIN!
Pekomendaцядя yctpoicTB 6e3 Чистkn Фпьтpa: Рп BCacbIBaHn MeI- Кои nbIи cneDyET yCTaHaBnBaTb nbIneC- борнь MeWOk.
20 BcacbBaIOUmIshnCpykoN
21 BcabsBaIOuIe Tpy6Kn 2x0,5M
22 HacaKa Ina noJa
(cpbyaromnepeKnueHna)
ДячNTКTNBepDbIX INKOBPOBbIX NOKpbI-TN:
PbIur Ha OTMeTKe ⅢJ KOBPOBbIX NO-KpbITNI
PbIar Ha OTMeTKe -ДЯ TBeRDbIx NO-KpbITN
ΦopcyHkaДЯЧNTKN WBOB N CTbIKOB
24AanTep
Для-coeДиЕнЯ BCacbIBAIOUeRo IlaHra c эл ektpoOБоруdoBaHneM.
25 Tn6Km ⅢaHr nHcTpymeHa
→ PpncoeHnHTb npHaJneKHOCTN
PnCyHok B2
BcTaBbTe wTeNceIbHyIO BnIKy B 3NeK- Tpopo3eTKy.
PnCyHOK B3
BbIKHIOUHTe npn6op.
BycTpoiCTBax 6e3 BcTpoEHHOI po3eTKN
ПОЗИСЯ I:ВсасьИВане ИЛН HaHHeTa-Hne BO3dUxa.
→Позцяг 0:УстpoиCTBO BыIKJIIOyeHO.
B yctpoiCTbax co BcTpoEHHO p03eTKoI
Положене MAKC.:Всасьване пинНагнетанe BO3dya.x.
→Полхене+MAKC:ВсасьBaHne cпрсоeДинEHbIMNэЛeКТрчecKIMN INHCTpyMeHTaMn
→ PeryjIaTOp MOUHocTn: Pn Heo6xOJIMOCtN, Pn BCaCbIBaHm NII Pn pa6oTe C 3JIeKTPuYeCKMn INHcTpymEHTamn CHN3ITb MOUHOCTb BCaCbIBaHnA.
Полжени 0: YстpoиCTBO BKNIOUeHO. Haэлекпоннсгимп NOДаETСЯ напяжени.
Cyxara nctka
Pa6omamb moIbko npu cyxom cknadyamom unlbmpe!
PncyHok C1
PekomeHdauniaIyctpoiCTB6e3 YnCTKnΦnIbTpap:PiN BCacbIBaHmMeJIKOI PbIIN CneDyeT yCTaHaBnBaTb PbIInec-6OpHbIMeWOk.
CTeNeHb 3aNoJIHeHnI NbIeSc6OpHOro MeUka 3aBnCnT OT BCacbIBaEMoI rpr-3N.
YcTaHOBHeHHbIM MeoK dJa c6opa
PbIIM MoKeT IOnHyTb, PO3ToMy eRo
CneDyET CBOeBpeMeHNO 3aMeHHTb!
PpIMeIKo Pbln, necke NTd. PbIeC-
6OpHbIMeWOk Heo6xOJNo MeHrTb YaA
Ie.
B yctpoicTBax c cnctemoy nuctkn Фиьтpa ExPress:Првсасын 6e3 nbIec6bOpHOro Meшka ИндИКaTOp OuchCTkn Фиьтра ropnt KpacHBIM CBetOM,ecIN He-06xOdIMO OuchNTb CKlaJaTuAByI ΦиьTp.
OuHCTnTbΦnJIbTp.
CnCTema qncTk n pnbTpa ExPress
Ouuctka qnltpa ExPress nCnoIb3yeTcB Cnyae BCacbIBaHn60nbIoro KOnueCTBa MeKoI nbIIN 6e3 yCTaHOBHeHHOrO MeSKa dIra c6opa nbIIN.
PpOn3BecTn YNCTKy CknaAdyatoTO φnIb- Tpa,ecnHnDnKATOp OuNCTKn φnIbTpA rOpNT KpaChbIM LBeTOM:
PucyHOK D1
Tpn pa3a HaxaTb KHONky uNCTKN pInb-tpa npn pa6oTaHouem yCtpoNCTBe, npn 3Tom NOdoXdaTb 4 cekyHdbI MeKdy HaXkATnA M.
Yka3aHne: Pocne MHOrOKpaTHoN YnCTKn QnIbTpa Nn npn ropAeM Kpa-CHOM INDnKaTope YnCTKn QnIbTpa npOBepNTy yPOBeH 3aONHeHnpe-3epByapa. Pn Heo6xOIMocTn ydaJIHTb COdEpxmoe n3 pe3epByapa.
YnCTka BO BJaXHOM pexHMe
→Дя BCacbIBaHnBlaIgNIIIN BnaXHOy6OpKn HaTeB JxelaMble npHaIJIexKHOCTn Ha BCacbIBaIOUne Tpy6KnIIN pPMAHO pyKy.
△BHUMaHue:
ucnoIb306aHue pfunbmpo6aIbHO2o MeuKa He donyckaemcra!
Ipu o6pa3o8aHuu neHbI uNu 8bimeKaHuu
KudKocmu npubop Hadnejum He3ameJUmmeNbHO 8bIKnOuymb!
Yka3aHue: npu nonHom pe3epeyape exoHoe om8epcme 3akpbiaemc nonnaekom, a npubop hauHaem pa6omamb cNo8biweHHbIM uCJOM o6opomoe. Ppu6op
cneoyem He3aMeDNumeIbHo 8bIKIOUumb, a u3 pe3epeyapa - ydaIumb codepXumoe.
Pa6ota c 3JIeKTpnuYeCKnMn NHcTpyMeHTaMn
→Прин Heo6xOДIMOCTNпriKpeNTbК эЛeКТрOБОруДованю aДaNTep c Ho-жOM, COOTBeTCTByUHm ДиamTepy NOДКЛЮЧЕНЯ.
PucyHok E1
A)HaTeb Ha pykU BCacbIBaIOeRo ⅢnaHra HaxOJaIscB KOMnJIeKTe aAnTep N COeINHTb C MeCTOM NOKJIHOueHNA 3JIeKTPOINHCTpyMeHTa.
→nnn
6)Дябьшey rmbkoctn npn pa6ote nCNoIb3OBaTb IJnaHr INHCTpyMeHTa. CoeINHTb erO co BCacbIBaIOUm IJnaHrom n, npn Heo6xOIMOCtN, c aJaANTepOM, a 3aTeM NOdkNIOHTb 3JIeKTPoINHCTpyMeHT.
PncyHok E2
→ДЯустpoиCBCoBCTpoeHNoi po-3etko:ВctaBHTcTeByIO BnIKy 3JIeKTPuYeCKOrO INHCTpyMeHTa B nbIneCOC.
→ BkIIOuHTb np6Op (NOBOPOTbIi Bbl- KJIIOUaTeIb BJIeBO B NOJKeHne +MAKC.) n haauTb pa6Oty.
Yka3aHue: KaK moIbKO 3JIeKmpouHcmpymeHm 6KIIOuaemcra, 8CaCbIaeIo-ua mypbuHa 3aNyckaemcra c 0,5ceKyHDoHbIM 3aMeDJIeHuEe. Ppu 6bl-KIIOyeHu 3JIeKmpouHcmpymeHma 8CaCbIaIoUa mypbuHa npodOnkaem paBomamb no uHepuu eue npumepHo 5 ceKyHd, yMo6bl ecocamb ocmamku Mycopa u3 wJNa2a.
Функця подачи B03dуxa
OuNTka TpydnooctyHbIX MeCT NIM MeCT, rDe BCacBbAHne He BO3MOxHO, HApnMpE, ydaJIeHne IInCTbeB n3 rpaBn. PucyHok F1
→ПрсоeДиНть BCaCbIBAIOшlaHк NOДКЛЮчЕнIO ДЯ NOДачи BO3dYxa. Tem caMbIM aKTINBnpyeTcЯ ФунKця npOdyBKN.
PpepbB pa6oTe
→ BbIKJIIOUHTe npu6Op.
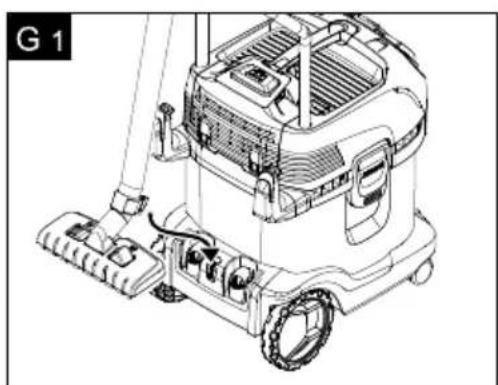
PncyHok G1
YcTaHOBnTb HacaKy dJa nOJa B napKOBOUHoe NOpJxKeHne.
OkoHuaHne pa60TbI
BbIKIOHTb npIbOp n BblTaunTb ceTeByIO BNkY.
OnopoxHHntb pe3epByap
PucyHok H1
→ ChЯть rolOBky yctpoiCTBa, onopoxHHTb pe3epByap c BnaXHoI nIc cyxoi Ipr3bIO.
XpaHHe yctpoIcTba
PncyHok H2
YIIOXHTb npHaJnEJxHocTn n CeTeBOy Ka6eJIb B yCTpOiCtBO n XpaHNTb ero B cyHXN NOMeUeHNrX.
YxOД n TeXHnueckoe o6cIy- XINBaHne
Onachocmb
Ipu npoBeDeHuu IIO6bIX pa6om no yxody u mexHuueckomy o6cnyKueaHuo annapam cneOyem bIKIOUumb, a cemeoU whyp - bHymb u3 po3emku. PEmohnble pa6ombu u pa6ombi c 3JeKmpuueckmu y3nAmu Moaym npou3BO-dumbc moJbKO ynoHOMoehHOu cnyk6o cepBuchozo o6cnyKuaHua.
△BHumaHue
He uclnoIb3oBamb yucmuaux nacm, mouux cpecmde nra cmeknau yHuepcanbHbIX MOUux cpecm! 3aPeeuaemcnoepykaMb npubop e body.
→Пиборипинадлжнои3иСКуСCTВЕHHbIX MaTePnaJIOB CJIeДуET YNCTNTb CTaHДapTHbIMMOJOUIMNCpeДCTBAMNДЯИСКУСТBEHHbIX MaTePnaJIOB.
→Pn Heo6xOaMocTu 6aK n DeTaHn npOnoNocKaTb BOoN N BbICyuNTb DJIa NocJeDuOuSeRo NCNoJb3OBaHn.
Ynctka cknadyaToro fInbTpa
PncyHok 1
→ДЯустpoиCTB6e3CnCTeMbIYNCTKNФньТра:
Pa36IOKnPOBaTb N OTKpbITb KpbIuKy nIbTpA. BbInyTppaM Ny nIINbTp, BblTPycNTb nINbTp. Pn Heo6xOAnMoCTn nIBTp npOMbITb NOc cTpyeBODbl. He BbltnpaTb N He YnCTNTb nINbTp 5eTkoN.
IOnHOCTbIO BbICyUHTb nepei yCTaHOB-KoI.
Abbildung 2
3aTeM yCTaHOBNTb CHaHaJa nIbTp, a NOTOM pamy.
ByctpoicTBaxc cncTeMoJ uNCTKn 0nIbTpApExPress:BkJIouHTb CnCTeMy uNCTKn 0nIbTpap (cm. pa3deJ «CnCTema uNCTKn 0nIbTpAp ExPress').
Yka3aHHe: EcIn, HecMOTpHa YnCTKy, MOUHOCTb BCaCbIBAHn He DoCTaTOUHO BbICOKa, OTCOeHNHTb BCaCbIBaHOuNn ⅢJAAHr OT Tpy6, DePkaTb 3aKpbITbIM/3a- KpbITb OTBepCTne BCaCbIBaIOeTo ⅢJAAHra N, eSe pa3, npn 3aKpbITom ⅢJAAHre HaKaTb Tpr pa3a KNONky dJa YnCTKn QnIbTpA.
Ceteboi shyp He cMaTbIBaetc
BepoTHO, ceTeBOH uHyp 3aRpy3HeH. OuNCTnTb ceTeBOH uHyp.
Boda BbIXoI NT n3 yctpoiCTBa
HemeIeHHo BbIKIOuHTb yCTpOiCTBO.
PncyHok J1
→Прочипь NonЯвковую систуМу: Chять rolOBky yctpoiCTBa, OTkpYtNB KOp3ину NonЯвka (A)В hapaBneHn, y3a3aHHOM cTePkOi, n ChrTb. Пocл e YdaJIITb NonЯвOK (B)И npomblb o6e DeTaIInpOTouHoi BODOI.
www.kaercher.com/REACH
Garancia
www.kaercher.com/REACH
Záruka
www.kaercher.com/REACH
Garancija
www.kaercher.com/REACH
Gwarancja
Mult stimate client,

www.kaercher.com/REACH
Conditii de garantie
www.kaercher.com/REACH
Záruka
www.kaercher.com/REACH
Jamstvo
www.kaercher.com/REACH
Garancija
U svakoj zemlji vaze uslovi garancije koje je objavila naša prodajna sluzba. U garantnom roku besplatno otklanjamo sve smetnje na uredaju ako se radi o gresci materijala ili proizvodnim manama. U slučaju ostvarivanja garantnih prava obratite se svom prodavcu ili ovlasćenoj servisnoj sluzbi; prilozite pribor i originalni račun.
(Adresu cete naci na poledini)
Servisna sluzba
www.kaercher.com/REACH
TapaHcHn
BbB Bcya CtpaHa Ca BaIiDn N3daJeHn-Te yCNoBna 3a rapaHcNra OT cTpaHa HaHaWe OTOpu3nPaHO DpyXeCTBO 3a pa3- npocTpaHeHne Ha npOdyKTnTe Hn. EBeHTyAJIHN NOBpeDN BypeDa B pAMKnTe Ha Cpoka Ha rapaHcNraTa ce OTcPraHbAT 6e3- PnATHo, aKO npUHHaTa 3a TEx e B MaTepnAJa IIN npn npOn3BOdCTBOTO. B cnUyai Ha n3PON3BaHe Ha npABOTo Ha rapaHcNra Ce o6pbuaTe, MoJ, KbM BaShn TBproBeu nn Hau-6bn3Knr OTOpu3npan cepBN3, KaTO npEcdTaBnTe 6OpyDbAheTo n DokymeHTa 3a NOKynka.
(AdpeCte ige HamepTe Ha 3aHaTa cTpaHn-ua)
Cnyx6a 3a pa6oTa c KIneHTn
PnBbnpocn n nobpeDn Baunr Dtncptn6yTop Ha KARCHER ue Bn nomorHe c ydoBOJIcTBne.
(AdpeCnTe ige HamePte Ha 3aHaTa CtpaHnca)
Yka3aHnna 3a 6e3oNaCHOCT
To3u ypeo He e npedha3naeH 3a ynpompe6a om luca (eknouumelno deua) c oapauyu Hncuxuuecku, ceh3opnu u ymcbehu cnocobocmu uu c heocmambyeH onum u/uu c heocmambHu n03HaHua, ocbeH aKO He ce KOHmpoIupam om om2oBOpHo 3a mX-Hama cu2ypnocm luue uu ca noLyuJU om Hezo uncmpykuu, kaKa da u3non3am ypea. Deuama bu mpra6-6ano da ce Habnlodaam, 3a da ce 2apaHmupa, ye He cu uepaam cypeoa.
-Дрьхme onakobvHomo pOnuO daNe-ye om deua, cBueecmeyea onachocm om 3adywabahe!
- Ypeobm da ce u3Klnoyea cneo 8crako u3non3eae uuu npedu 8cko noucmeaHe/ noodpBXka.
- Onachocm om noxap. He 3acmykeaume 2opu uu mnee npedmemu.
3a6paHa e pa6omama 8be 63puo00nacHu NOMeueHua.
EneKmpuuecko 3axpaHeaHe
Cepb3baume ypeda cmo KbM npomeHnue mok. HanpexeHuemo mp6ea da cbom- bemcmeha uumupaHomo ebpxymenkama Ha ypeda Hanpexehue.
Onachocm om mokoe ydap
Hukozha He dokoeaume mpekoobua kaben u uencena c enaJn pu bue.
MpexoBua Ka6en da ce xeauna camo 3a uencena, da He ce dbpna om KOhmacma 3a Ka6ena.
Ipedu eca ynompeba npoeepraume mpekoobka kabcn c uencena 3a nopedu.
IopepeHmpexKoBu Ka6enmpaHe3a- 6aHo da ce 3amHu om omopu3upaH cepB3/cneuaunucm -eekpmexHuk.
3a da u36e2heme a8apuu c moka, Bu npenopb4yame da u3non36ame KOHmaKmu, npedu koumo e MOhmupaan npedna3umen (makcumaHno 30 mA HOMUHaHa cuna ha moka 3a 3adeucmbahe).
△BHumaHue
Ipu 3a6uxpnahe c 6b3dyxa 3a 6cMyKeaHe onpepeHn eeueecmea mosam da o6pa- 3y6am ekcnno3u6Hu napu unu cmecu!
Hukozha He u3cmykaume cnehdume ee-uecmea:
- Ekncno3uBu unu 2opmu 2a3oBe, meuocmu u npaxoBe (peakmuBu npaxoBe)
PeakmuHume MemanHu npaxoBu (Ha np. anyMuHu, Ma2He3u, uHK) 6b8 6pb3ka cbc cunHo akmu6Hu u Kucelu noucmbau npenapamu - Hepa3peDeHu cunHu KucenHu u ochoeU
op2aHuHu pa3meOpumenu (Ha np. 6eH3uH, pa3peDumenu 3a 6ou, aue-moH, Ha ma).
Ocehen moea me3u beuecmea Mozam da noepedam mamepuanume, u3non3eaHn npu u3pa6omkama Ha ypea.
Описане на урEDA
BuxTe cxemnte Ha cTpaHn-Te Ha OTbaprHe!

ToBa YnBtBaHe 3a yNOrpe6a onncBa OCHOBHnTe MoJeHn Ha NocOeHnTe Ha npEHaTa obNoKka npaxocMyKaUKn 3a MOKpo/ cyxo nOuNCtBaHe.
CnopeM MoeJa NIma pa3JnKn B o6OpPyDbaHeTo N DoCTaBeHnTe npHaIJIeXHocTn.
Pn pa3oNaKOBaHe npOBepTe daN B ONAKOBAtA JINCBaT npHaJNeXHOCTN OT OKOMJIeKTOBkata NIMI NMa NOBpeHn elemHTN. Pn nobpei npTpaHCnpTa yBeDoMeTe TbproBeuca,OT KOrOTO CTe 3aKynnu ypeDa.
BKNIOUeH BO6ema Ha IOCTaBAka
Bb3MOXHa npHaIeXHOCT
Bpb3ka 3a BcMyKaTeHnMa MapKyu
3a cBbp3BaHe Ha Mapkyua 3a 3acMyKBaHe npn n3cMyKBaHe.
Yka3aHne: 3a cBaJIaHe HaTnCHeTe ΦnKcA-Topa C napeu N n3TeJrTe BCMyKaTeJHHa Mapkyu.
2 KoHTaKT Ha ypeDa
3a cBbP3BaHe Ha eNeKTpUYeCKn IHCTpyMeHT.
Yka3aHHe: Cna3BaIte MaKcMaJIHaTa InpncBeiINHTeJIHa MoUHOCT (Bux 2na6a ,TexHuYeCKu daHHU").
Bpzb3ka 3a n3duyxBaHe
IocTaBete CmyKaTeJIHHn MapKyuB OTBopa 3a n3dYXBaHe, TakaФункцЯТа Ha n3dYXBaHe e aKTINBupaHa.
4 Dpbkka 3a Hoche
3a Hocene Ha ypeda nnn 3a CbaJnHe Ha rnaBaTa Ha ypeDa cneI ne6loKnpaHe.
5 De6nokupa6byToH KlaHa HaΦnTbpa
6 PnIb3raa cko6a
7 ByToH 3a noUncTbaHe Ha cHnITbpaExpress
8 INdikaun 3a nouchTbaHe Ha cnntbpa
9 Kyka B MЯCTOTO 3a cxbxpaHeHne Ha npHaJNeXHoCTn
ToBa MЯCTO 3a CbXpaHHeHne Ha npHaIeJxHOCTUte N03BOJRA Ba CbXpaHHeHneTO Ha CMyKaTeJIHHa MapKyu, BCMyKaTeJIHHte IIO3N IN MPexKOBn Ka6eJ.
10 ByToH 3a npi6upaHe Ha MpeXoBnKa6eI
BbptauepeKbcBaay (BKJI/IM3KJI)
12 P03nza 3a napknpaHe
3a cBaIaHe Ha noObata dIO3a npn npeKbcBaHe Ha pa6oTa.
13 MЯсTo 3a cБхpaHeHne Ha npHaД- lexKHOCTn pe3epBoap
Toba MЯCTO 3a CbXpaHeHne Ha npHaIJIeJXHOCTn NO3BOJRA Ba CbXpaHeHne HaBCMyKaTeJIHn Tpb6n IIN dpyrN npHaIJIeJXHOCTn.
14 Tann ha pe3epBoapa
3a OTbaprHe n3TeIneTe HABbH, 3a 6JIOKpaHe HaTnChTe HaBbTppe.
15 Konena
16 Bodeu Koneja 3a npDvXBaHe
17Плоськфнгтbp c pamka (Beee e nocTaBeHa Bypeda)
△BHumaHue
ФиMbpym u npuHaJexaUama pamka mpa6ea da ce nocmae m eHa2u npu u3- noJ38aHe.
18 3aKpeBbHe Ha cHNTbPbHaTa TOp-6nUka
BHumaue: Mon He u3x6bpyme! Ako ce OKaun BvB BvTpewHOCTTa Ha pe-3epBoapa, cnjkn 3a 3akpenBaHe Ha qnil-TbpaT Top6nka.
19 ΦИЛТьрнa Top6ичka
Yka3aHne: 3a MOKpo N3cMyKBaHe He 6nBa Da ce nocTabr qntbPHa TOp6nUka!
Ipenopbka npu ypei6e3 nouchTbaHe HaΦnTbpa: 3a 3acMykBaHe HaΦnH npax nocTabeTe ΦnTbphata Top6uKa.
20 BcmykaTeJenH MapkyC pBkoXBaTka
21 BcmykaTeJIHn Tpb6n 2x0,5M
22ПоюваДIO3a (c loCT 3a npeBknHouBaHe)
3a n3cmykbaHe Ha TBbpNIOBbpxHOCTN INoIOBe C KINIMN:
IocT Ha CnMBOJa 3a NOIOBE C KINIMN
IOCT Ha CnMBOJa 3a TBbpN NOBbpxHOCTN
23ДIO3a 3a NOUHCTBaHe HaФугn
24 AanTep
3a cBbP3BaHe Ha Mapkya 3a 3acMyKBaHe C eJeKTpUYeCKn INHCTpyMeHT.
25 TbBkab Mapkyu 3a HcTpymeHTN
3a noBueye rBbKaBOcT npn pa6Ota c eNeK-TPnueckn INHCTpyMeHTN.
Yka3aHne: Moxe da ce n3noJ3Ba n c aanTOp.
06cnyxbahe
Pa6omeme eunau c nocmaeHna nnocbK u m b p, KaKmo npu MOKpo, maKa u npu cyxo u3cMyKbaHe!
Ppei nyskaHe B ekcnloataun
Фигура A1
→ CbaTe rIaBaTa Ha ypeDa, n3BaTe cBdRpXaHneTo OT pe3epBOapa.
Фигура A2
3aBbptTe pe3epBoapa, BOeunTe KOJIeIa npITnCHte B OTBOpHTe Ha nOdaHa pe3epBoapa do ynop.
Φnrypa A3
MoNTaX Ha 3aHnTe KoJeJa: IV3BaIe-Te BLOKKeTe Ha Iarepa eHa OT dpyra N PINTuCHeTe FOJEMITE NOIOBnHKN B NoEMaHeTo Ha KOJIeJaTa.
Ipn ypeDn 6e3 oc: NocTaBeTe KOJIeJATA B NOEmaHTo Ha KOJIeJaT.
Pn ypeu c oc: TbxheTe KOJIeNaTa B OCTa I NOCTaBeTe B NoEMaHTo Ha KOJIeJaTata.
CneT OBa OKaYeTe MaJIKInTe NIOOBHKN B ROJEMITE NOJOBHNK IN IIN 3aBnHTe.
Фигура A4
→ MoHTnpaIte KyKaTa.
Pn ypei c nIb3raa cko6a:
Φuγpa A5
BkapaTe nIb3raUaTa cKo6a B DBaTa npeBnDeHn OTbopa Ha rJaBaTa Ha ypeDa I npuTncHeTe DoKpaHaoNy. OcnrypeTe rC dBA 6oNTa OTOny.
Yka3aHHe: Ako nIb3raaata cKo6a ce DeMOHTnpa DOIbJHnTeJIHO, DOnHnTe OTBOPN OTHOBo Tp8Ba Da 6bDat 3aTBopeHn CDbata 60nTa, 3a Da yHK- CuOHnPaT.
Фигура A6
ПoctabeteиблokupaTe rnaBaTaHa ypeDa.
PycKaHe Bekcnploatauia
Φnrypa B1
→ПркpenBaHeHa npHaДнeжHocTn
Фигура B2
BknHouTe eencena B eIeKtpueckata mpeka.
Φnrypa B3
Da ce BkIIOu ypeJa.
Pn ypei 6e3 Brpaen en ceJ
IouncBaHe Ha nlocknqnTbp
Φnrypa 11
Ipn ypei6e3 nouHCTBaHe Ha fNtbpa ExPress: DEmoHTnpaIte nNoUcHTe Te IIOCKnA QnITbP (BnKTe rnaBa "PouchTbaHe Ha IIOCKnA QnITbP"
Ipn ypei n c nouuctBaHe Ha qnltbpa ExPress: 3aJeicTbaTe 6byToHa 3a nouuctBaHe Ha qnltbpa 3x, eBENT. NOBTOpeTe nouuctBaHcTo Cbc 3aTBOpeH BcMyKaTeJIeH MapKyu (BnxTe rnaBa ,NoouctBaHe Ha qnltbpa"). Ipn Huxda nouucteTe qnltbpa noJ Teuaa Boda.
→ПодмеHTe NOBpeHnЯ ПLOcBkФИNTbP.
Φиntbphata Top6nukae nblna: NocCTaBeTe HOBa φиntbphata Top6nuka (Homepa 3a npbuku euxme om cnu
cBka Ha pe3ep8Hu yacMu 8 KpaHa ma3u uHcmpyKuur).
△BHumaHue
He u3x8bpyme pfumtbphamoop6uka!
TexHnueckn daHHN
TexHnuecknte daHHn ce HAMnpaT Ha OTBaPraunTe ce cTpaHn. CneDbA oBcHeHne Ha n3NoJ3BaHnTe TaM CmBOJN.
| V~ | Нарlexенue |
| morm | Мошност P_HOM. |
| Maz. | Мошност PMAKC. |
| Maz. | Мадс. поисд. мошност на Контакт ha урEDA |
| - | Проблел (инертын) |
| Обем Ha peзервога | |
| Помаиме Ha BOДа с рькхват-kaTA | |
| Помаиме Ha BOДa C поовату дюза | |
| Зхсаньш кабел | |
| Донустимо НИВО Ha ШуM (EN 60704-2-1) | |
| Тerglio (бeз пинадлесности) |
3ana3aMe cu npabomo Ha mexHuyeCKU u3MeHeHua!
Sisukord
Uldmärkusi ET.7
Ohutusalased markused . . ET . . .7
Seadme osad ET...8
Käsitsemine ET.9
www.kaercher.com/REACH
Garantii
www.kaercher.com/REACH
Garantija
www.kaercher.com/REACH
Garantija
3 Micce nID'cHaHHaHnA pO3dBy
PnEHaTBCMOKtyBaJIbHNIJNaHrDo nIiKnIOyeHHaI NOaHi NobITpy. Tm camM aKTHByeTbcA yHKci npOdyBaHHa.
4 PyuKa
BctaHOBneHmMiOk dny 360py nny moKe IOnHyTu, TOMy NOro cnId CBOeHuacHo 3amHiTb.
Pn BCMOKTyBaHHi Nnny, nicky Ta iH. cnid qactiwe 3miHOBaTu iNbTpbyBaIbHNI MiwoK.
B npnctpox 3 yHKciEIO OunueneHnA fIbTpib ExPress: Pn BCMOKtyBaHHi 6e3 BnKOpNCtAHnA fIbTpbyBaJIbHO rO mIsha iHdNkaTOp OunueneHnA fIbTppy Ropntb YepBOHm KOJIbOpOM B TOMy BInpaIky, JaIcNo Heo6xIDHo OUnCTNTn CKJaDuaCTn fIbTp.
OuHCTnTnΦiNbTp.
OuHneHHa iJbtpy ExPress
OuHcHnHaIbtpy ExPress 3diinCHIOeTbcB B pa3i BCMOKTyBaHHa BeNkoi KJIbKocTi dpi6Horo Nny 6e3 BCTaHOBJeHOro Mioka dny 36opy Nny. RaKuo iNDkaTOp OuaHHe HnAipTy rOpNTb YepBOHm KOJbOpOM, npOBecn OouHcHncknaJaactoro fInbtpy:
MaHIOHOK D1
Tpn pa3n HATNCHTN KHONKY OCHUeHHaIbTpY Ha npauOyOMy npucTpoi, npu cboMy noeKaTu 4 ceKHym MIX HA TNCHeHHaM.
Pnmitka: Nicra 6araTOKpArHOrO ouHsEHHa fInbtpy a6o npu cepBOHOMy iNdkatopi ouHsEHHa fInbtpy npeBipnTi pBeHb 3anOBHeHHa pe3epByapy. Pn Heo6xIDHOCTi BnOpOxHNtPe3epByap.
Bolore npn6npaHna
→ДЯ yCMOKTyBaHHa BOJOrn a6o BOJOrO rnpBupHnHaJaRTn 6axaHe DoaTKOBe o6naDHaHHa YCMOKTyBaJIbHi Tpy6Kn a6o npraMo Ha pyky.
△yeaa:
He bukopucmooyume pfimbyaunu miouk!
HeaHObumKhymu npucmpiu, kUo 3'ebunacnHa a6o npocmynae pida!
Ipumimka: Kaio pe3epeyap noeHu, nonna6OK 3akpuae omeip dny ECMokmyeaHn i npucpiu npauoc 3 6iNbwm yucnom oepmie! Heauiho Bumkhymu npucpiu ma bunopoxHumu pe3epeyap.
BnKOpncTaHNe eJekTpOiHcTpymeHTiB
→При Heo6xIDHocTi npKpInTu Do eIeKTPoiHCTpyaIantep 3 HOXem,io BiIOBidae IaMeTpPy NiIKIIOUeHHa
MaHIOHOK E1
JLlJgJxJzJxJxJxJxJxJxJxJxJxJxJxJxJxJxJxJxJxJxJxJxJxJxJxJxJxJxJxJxJxJxJxJxJxJxJxJxJxJxJxJxJxJxJxJxJxJxJxJxJxJx
bawal gals
11
0o o0g jol g ojge JU ailll .
: jll
y. aJL sC qDd all clll
. oJ L JI J I J
.
12
.
.
.
.
.
.
.
.
.
.
.
.
.
.
.
.
.
.
.
.
.
.
.
.
.
.
.
.
.
.
.
ExPress JJ J J J J J J J J J J J J J J J J J J J J J J J J J J J J J J J J J J J J J J J J J J J J J J J J J J J J J J J J J J J J J J J J J J J J J J J J J J J J J J J J J J J J J J J J J J J J
Express 1
Express 0>g s s s s s s s s s s s s s s s s s s s s s s s s s s s s s
J 1
D1
1 4 1
J
gJrj 0000000000000000000000000000000000000000000000000000
pJrJl JdIaJrJrJrJrJrJrJr
g. jJl cIol sGoo
.
A4
.
: a 0s oas oos jol oje JU aunll
A5
f 1cI no a aiaa oaslll
Jawl Jgbsolg
pJwJawJnLqol.
.
a 100
Ll lll 10e| 2
.aaagwJy
A6
.
J
B1
.
B2
.
B3
Jg>JJ Joo 0
Sro ssaaa oosjall aeg>U ailll
1gJ 1
JaaJcGgjgl:gsogll
Sro ssaaa oosjall oje>U aaiu
.
01y b2yI: 00yI y+
aiaoo auij5
bawll oJy:oo
pJxwJasllgfoillglo
JU|j|is Usg,ulrso|d
auiyI aYI .gJgJl0 gogJI
J 0gj
Jrj Jg j
JUJIOLIa
aal 2j0rJxLgJl
gaaa 23
24
. aui jolai ay bawll gbr Jgj
25
pIaJawL Jaal sic aigall no jaAL
U
a>la.
p|xwyl
iYllg Jaell, Yc lails sgball
aill> 6gww, s0a
- 1
J 1
A1
Jg211 1g jge J
.
A2
aagg jy
J 1
.
A3
aalecljpe aeeaeelll
00sll aaley Iaolg Jaoall
a1 > a2 > a3 > a4 > a5 > a6 > a7 > a8 > a9 > a10 > a11 > a12 > a13 > a14 > a15 > a16 > a17 > a18 > a19 > a20 > a21 > a22 > a23 > a24
g: jj gjll jgeJU aill
aJol
wJg:Jg>aj0sgjall oje>U aWll
Jolg lgsogjll
Date ^1 / ^2
a>gll 16
aalaae aae aee
17
(JjJg>JJp
aI/1JbVg jXe//pIaI
jglj1p/2xuw/uc4
18
1ao aolilipc
Jol25 pssnn JzJd aee ae
J
19
pIaewyawyabjllbaaWbga>la
Jx
a02xunll oje>U aunll a
pcll jjll lal JyLJy
J 1
20
0.5×2bawll oJwla 21
22
( a + b > 1,b < 1)
a a a a a a a a a a
:JwUy oBzai
poc no 15wbl p0gogllagg sic
j 1
JJI
Laaa
aIaaal IaIaaIaI
1
aXaa aie baaai gbr Jg
bawll
a>
pbsgolg yll gol abawll
S G = S ACD = S COD + S DCE
jgljU
aJyS oI aJ Jgj
ab > x00
.("ailllilll"Jgjbj).Jog
3
J 1
.
4
.56 2jgljgJ J
5
6
ExpressJ
8
9
p0b jj0i 0i aaxll a2a
JgUgUgUgUgUgUgUgUgUgUgUgUgUgUgUgUgUgUgUgUgUgUgUgUgUgUgUgUgUgUgUgUgUgUgUgUgUgUgUgUgUgUgUgUgUgUgUgUgUgUg
J
10
(/)Jg 11
JU 100000000000000000000000000000000000000000000000000000000000000000000000000000000000
aW/
bIg/ oJ/ jS/ jS/ gall
glg// go lal/ dic jLjU J
1aaiy
:laIb0 aJI// slw/ baW y
glj>yl/gJjZe/JuA/ll /jle// - (aYcJI// ayj// Jlglw/
Jio) JclaiU Jl// nJle// Jlc -
iic (ciJ// ,pGuaicla// ,pGugog//
agxl// cIb// JlWg go Ielz/
. ag// aia2a//
ooJrJgag// Jolie// Jolao>Y/ -
, j// Jio) aia// aGge// Jgal/ -
CJ// g, Gw// Jg// Jjog
.(J>lu//
Igall oJ/ jS/ jS/ jI/ aIy
gO gddaa// Jolj //
jIgJl I
aal aal jai gall
Jgall Jjgl Jl D
Jolal jll xc gogall wll
aBrrnssuauu auiuul
.ajg
JU u aasillbIg ggrg
Gggo Ie Lw pnnlllgl
JLgall Lc ciu
a| a> 10g b
Jd aIg j 2jw gba J .lalxw| j
XaJgJgIgBcJGooJI kK
aaWgoEgJgJgOoKARCI (aJzll aZaoI g>go ungljll)
aLwI
sJ jg/110 p/21w/ jg y -
jgile (Jl/b/1111) 1
y/la/5gl/49a//gl/00jg-
z/1Jg/00yLc/1w/11
lc/3/11/11/11/11/11/11/11/11/11/11/11/11/11/11/11/11/11/11/11/11/11/11/11/11/11/
aWla>
oLgUaLgUaLgUaUaUaUaUaUaUaUaUaUaUaUaUaUaUaUaUaUaUaUaUaUaUaUaUaUaUaUaUaUaUaUaUaUaUaUaUaUaUaUaUaUaUaUaUaUaUaUaUaUaU
Lg aaiiaaiaa
yoo oolc yaaai all 1g2U gaoa .olaal
aag aag aadg ogey sgs y g p dsswys g wddg odsc y A Lg 1s j. iJ .gio oslaewy J
p2j go golg y a dll o j
.aaJg>
J 1
a a 100 no jJlJI Jusg jJlJI g uu .aiu
aLggo aI ysgy I Jb
aLw f lalj 1g
aLw g Lgio aLzill dikay.ajiaJl aolaoJI .aJiaJl aolaoJI
laiaai
JI JI I I I I I I I I I I I I I I I I I I
LJ aBJIaAai all gswll 5r lgsia
J 1 J 1 J 1 J 1 J 1 J 1 J 1
g>9jJbCll0
a> .g. g|g|g|g
a aaa 1s20 0g jlaal glxw
cLac aod jgol g0gJl
.
(a)
cXaoll aod
J KARCHER
g>g aJ> f oclwll Jkaw a95
JbcIgI Jwaw
(a)
aolc|laJr
JaaJI sjjc
J 1 Jd ocl j
Jg Jg | 1
[foj] go Jolal pSjgeJ
JrLs. JdI Ie oJgJU
J 1 J 1
jgljlllssaillg 1sla
J
yU
f 0glll aolgauu l gjglg jy 10000000000000000000000000000000000000000
aRJU aLrs aisos aoL
.
pJjJgJlIi
aLbuaa aauo aol
JU 1
- 2 < j < 0
.>g#d|aJrJlJSLoJf aJz
yj, pJwJg sJrJbJ: aJ -
:JlI J) 10
2.863139.(
J 1 J
:lll lglgVl aIgJl
JxJy JxJy Jus
gAaLlalgAaLlalj
aJyI aJgOyI JxJy
JrJ 1aI aIgssaaJaiJ J
a 120
J 1 JgA U
5.964-776.0 14.08.2012

5.964-776.0 14.08.2012
AE Karcher FZE, P.O. Box 17416, Jebel Ali Free Zone, Dubai, United Arab Emirates, 4 8861177 • www.karcher.ae
AT Alfred Kärcher Ges.m.b.H., Lichtblaustraße 7, 1220 Wien, 01 250 600 • www.kaercher.at
AU Karcher Pty. Ltd., 40 Koornang Road, Scoresby 3179, Victoria, Australia, 1800 675 714 • www.karcher.com.au
BE Kärcher N.V., Industriebweg 12, 2320 Hoogstraten, 0900 10027 • www.karcher.be
CH Kärcher AG, Industriestrasse 16, 8108 Dällikon, Kärcher SA, Croix-du-Péage, 1029 Villars-Ste-Croix, 0844 850 863 • www.kaercher.ch
CN Karcher (Shanghai) Cleaning Systems Co. Ltd., East Part, Building 20, No. 1000, Jinhai Road, Pudong, Shanghai, 201206
021 5076 8018 • www.karcher.cn
CZ Kärcher spel. s r.o., Modletice 141, 251 01 Ricany, 0323 606 014 www.kaercher.cz
DE Alfred Kärcher GmbH &Co. KG, Service-Center Gissigheim, Im Gewerbegebiet 2, 97953 Königheim-Gissigheim, 07195 903 2065 • www.kaercher.de
DK Kärcher A/S, Slotsherrensvej 411 C, 2610 Rødovre, 70 206 667 • www.karcher.dk
EE Karcher OÜ, Pirita tee 102, 12011 Tallinn, 600 5831 • www.karcher.com
ES Karcher, S.A., Pol. Industrial Font del Radium, Josep Trueta, 6-7, 08403 Granollers (Barcelona), 902 170 068 • www.karcher.es
FI Kärcher OY, Yrittäjantie 17, 01800 Klaukkala, 0207 413 600 • www.karcher.fi
FR Kärcher S.A.S., Z.A. des Petits Carreaux, 5, avenue des Coquelicots, 94865 Bonneuil-sur-Marne, 01 43 99 67 70 • www.karcher.fr
GBKärcher (U.K.) Ltd., Kärcher House, Beaumont Road, Banbury, Oxon OX16 1TB, 01295 752 000 • www.karcher.co.uk
GRKärcher Cleaning Systems A.E., 31-33, Nikitara str. & Konstantinoupoleos str., 13671 Aharnes, 210 2316 153 • www.karcher.gr
HK Karcher Limited, Unit 10, 17/F., Apec Plaza, 49 Hoi Yuen Road, Kwun Tong, Kowloon, 2357 5863 • www.karcher.hk
HU Kärcher Hungaria KFT, Tormásrét ut 2. (Vendelpark), 2051 Biatorbagy, 23 530 640 • www.kaercher.hu
IE Kärcher Limited (Ireland), C1 Centrepoint Business Park, Oak Road, Dublin 12, 014097777 • www.kaercher.ie
IN Karcher Cleaning Systems Pvt. Ltd., Plot No. D-120, Sector-63, Noida 201307,Uttar Pradesh, 01204661800 · www.karcher.in
IT Kärcher S.p.A., Via A. Vespucci 19, 21013 Gallarate (VA), 848 99 88 77 • www.karcher.it
JP Kärcher (Japan) Co., Ltd., Irene Kärcher Building, No. 2, Matsusaka-Daira 3-chome, Taiwa-cho, Kurokawa-gun, Miyagi 981-3408, 022 344 3140 • www.karcher.co.jp
KR Karcher Co. Ltd. (South Korea), 872-2 Sinjeong-Dong, Yangcheon-Gu, Seoul, Korea Zip code 158-856 02-322 6588, A/S. 1544-6577 • www.karcher.co.kr
KZ TOO Karcher, pr. Raimbeka, ug. ul. Kommunalnaja 169/1, Zhetysujskij Rajon 050050 Almaty, 8777 227 6565 • www.karcher.kz
LT UAB Karcher, Ukmerges 285, LT - 06313 Vilnius, 85 2031690 • www.karcher.lt
LU Karcher N.V., Industriebweg 12, 2320 Hoogstraten, 0032 0900 10027 • www.karcher.be
LV Karcher SIA, Marupes nov., Marupe, Karla Ulma na gatte 101, Riga, LV-1046, 867 808 707 • www.karcher.com
MDI.M. Karcher S.R.L., Bogdan Voievod Str. 7, 2068 Chisinau 022 806 300 • www.kaercher.md
MYKarcher Cleaning Systems Sdn. Bhd., 71 & 73 Jalan TPK 2/8, Taman Perindustrian Kinrara, 47100 Puchong, Selangor Darul Ehsan, Malaysia, 03 8073 3000 • www.karcher.com.my
NL Kärcher B.V., Postbus 474, 4870 AL Etten-Leur, 0900 33 444 33 • www.karcher.nl
NOKärcher AS, Stanseveien 31, 0976 Oslo, 24 17 77 00 • www.karcher.no
NZ Karcher Limited, 12 Ron Driver Place, East Tamaki, Auckland, New Zealand, 09 274 4603 • www.karcher.co.nz
PL Kärcher Sp. z o.o., Ul. Stawowa 140, 31-346 Kraków, 012 6397 222 • www.karcher.pl
PT Neoparts S.A., Av. Infante D. Henrique, Lote 35, 1800-218 Lisboa, 218 558 300 • www.karcher.pt
ROKarcher Romania s.r.l., Sos. Odaii 439 Sector 1, RO-013606 Bucuresti, 0372 709 001, www.kaercher.ro
RU OOO "Kepxep", yn., ΘneKTpO3aBOndcka, d.27, cTp.2, 107023 r.MockBa, 495 228 39 45 • www.karcher.ru
SE Kärcher AB, Tagenevägen 31, 42537 Hisings-Kärra, 031 577 300 • www.karcher.se
SG Karcher South East Asia Pte. Ltd., 5 Toh Guan Road East, #01-00 Freight Links Express Distripark, Singapore 608831, 6897-1811 • www.karcher.com.sg
SK Karcher Slovakia, s.r.o., Bratislavská 25, 94901 Nitra, 037 6555 798 • www.kaercher.sk
TR Kärcher Servis Ticaret A.S., Mahmutbey Mahallesi Istoc, Petrol Plaza C-Blok Kat: 2-3, Bagcilar, 34218 Istanbul 0212 659 43 69 • www.karcher.com.tr
TWKarcher Limited, 7/F, No. 66, Jhongijheng Rd., Sinjhuang City, Taipei County 24243, 2 2991 5533 • www.karcher.tw
UA Karcher Ltd., Petropavlivska Str., 4, Petropavlivska Borschagivka, Kyiv region, 08130, 0800 500 48 90 • www.karcher.ua
ZA Karcher (Pty) Ltd., 144 Kuschke Street, Meadowdale, Edenvale, 1614, 0115745360 · www.karcher.co.za


