HP710PAR - Vacuum without a bag HOOVER - Free user manual and instructions
Find the device manual for free HP710PAR HOOVER in PDF.
User questions about HP710PAR HOOVER
0 question about this device. Answer the ones you know or ask your own.
Ask a new question about this device
Download the instructions for your Vacuum without a bag in PDF format for free! Find your manual HP710PAR - HOOVER and take your electronic device back in hand. On this page are published all the documents necessary for the use of your device. HP710PAR by HOOVER.
USER MANUAL HP710PAR HOOVER
INSTRUKTIONSMANUAL(SE) P 37
KAYTTOOHJE (FI) P 41
OAHIEXPHSEΩ(GR) .P 45
PYKOBOOCTBO NOJb3OBATEJIa (RU) ....P 49
INSTRUKCJA OBSLUGI (PL) P 53
NAVOD KOBSLUZE (CZ) P 57
NAVODILA ZA UPORABO(SI).P 61
UZIVATEL'SKA PRIRUCKA(SK)P65
KULLANIM KILAVUZU(TR) .P 69
HASZNALATI UTMUTATO(HU)P 73
Certain Models Only *May vary according to models
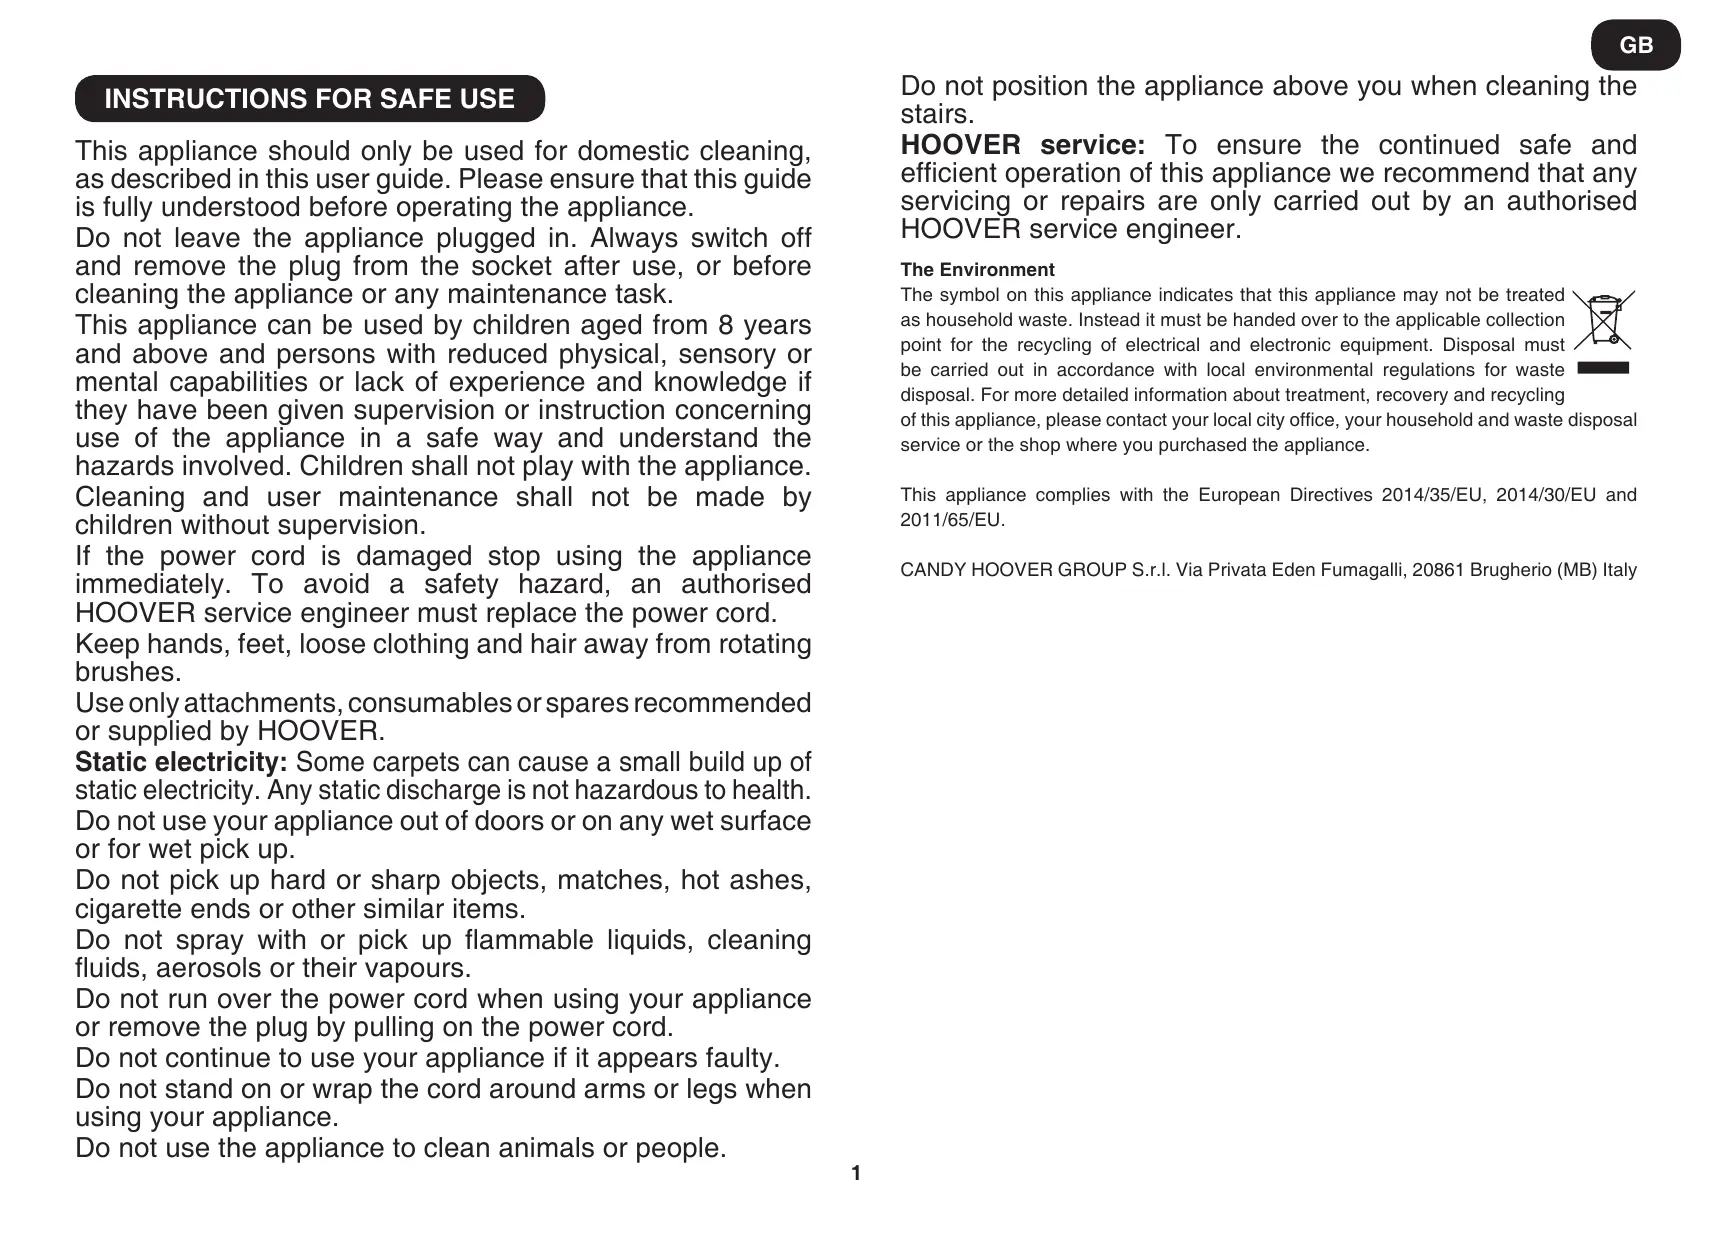
INSTRUCTIONS FOR SAFE USE
This appliance should only be used for domestic cleaning, as described in this user guide. Please ensure that this guide is fully understood before operating the appliance.
Do not leave the appliance plugged in. Always switch off and remove the plug from the socket after use, or before cleaning the appliance or any maintenance task.
This appliance can be used by children aged from 8 years and above and persons with reduced physical, sensory or mental capabilities or lack of experience and knowledge if they have been given supervision or instruction concerning use of the appliance in a safe way and understand the hazards involved. Children shall not play with the appliance.
Cleaning and user maintenance shall not be made by children without supervision.
If the power cord is damaged stop using the appliance immediately. To avoid a safety hazard, an authorised HOOVER service engineer must replace the power cord.
Keep hands, feet, loose clothing and hair away from rotating brushes.
Use only attachments, consumables or spares recommended or supplied by HOOVER.
Static electricity: Some carpets can cause a small build up of static electricity. Any static discharge is not hazardous to health.
Do not use your appliance out of doors or on any wet surface or for wet pick up.
Do not pick up hard or sharp objects, matches, hot ashes, cigarette ends or other similar items.
Do not spray with or pick up flammable liquids, cleaning fluids, aerosols or their vapours.
Do not run over the power cord when using your appliance or remove the plug by pulling on the power cord.
Do not continue to use your appliance if it appears faulty.
Do not stand on or wrap the cord around arms or legs when using your appliance.
Do not use the appliance to clean animals or people.
Do not position the appliance above you when cleaning the stairs.
HOOVER service: To ensure the continued safe and efficient operation of this appliance we recommend that any servicing or repairs are only carried out by an authorised HOOVER service engineer.
The Environment
The symbol on this appliance indicates that this appliance may not be treated as household waste. Instead it must be handed over to the applicable collection point for the recycling of electrical and electronic equipment. Disposal must be carried out in accordance with local environmental regulations for waste disposal. For more detailed information about treatment, recovery and recycling of this appliance, please contact your local city office, your household and waste disposal service or the shop where you purchased the appliance.
This appliance complies with the European Directives 2014/35/EU, 2014/30/EU and 2011/65/EU.
CANDY HOOVER GROUP S.r.l. Via Privata Eden Fumagalli, 20861 Brugherio (MB) Italy
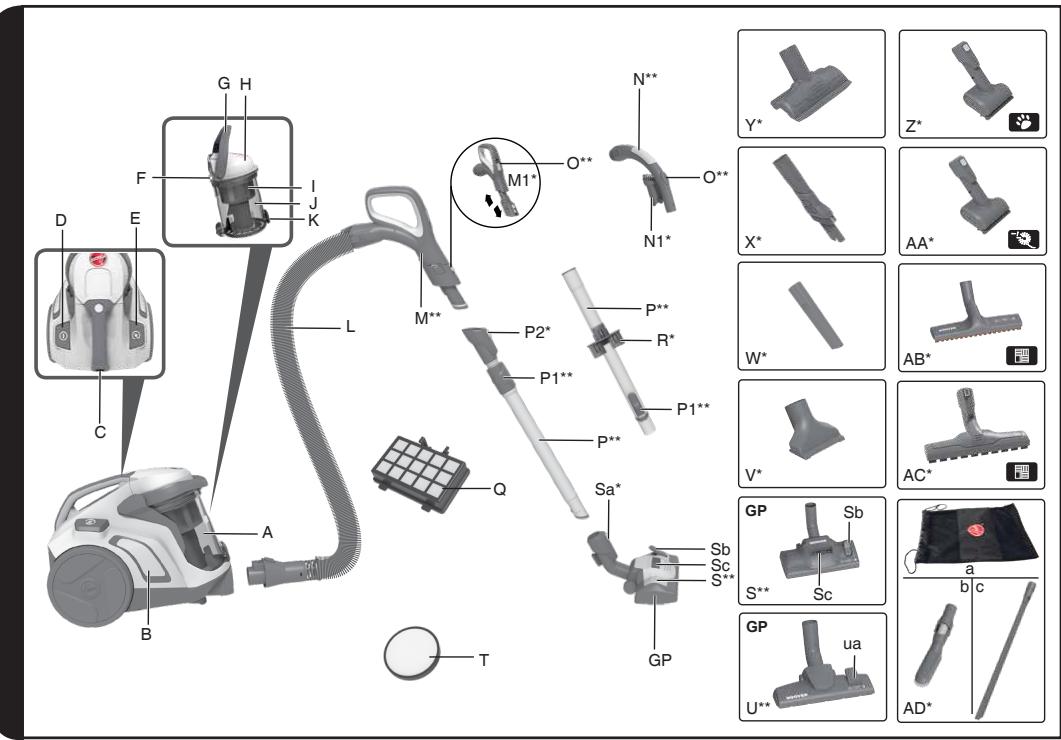
GETTING TO KNOW YOUR CLEANER
A. Dust Bin Assembly
B. Cleaner Main Body
C. Parking Slot
D. On/Off Power Control Button
E. Cord Reel Button
F. Dust Bin Lid Opening Latch
G. Dust Bin Release Handle
H. Dust Bin Lid
I. Separation System with integrated Shroud Cleaning System
J. Dust Bin
K. Dust Bin flap Release Button
L. Hose
M. Advanced Comfort Handle with Soft Grip, Suction Regulator and Integrated Accessories (See M1) M1. Integrated Accessories: Built-in Crevice Tool, Dusting Brush and Furniture Tool
N. Intelligent Handle with integrated Dusting Brush N1. Integrated Dusting Brush
O. Handle Suction Regulator
P. Telescopic Tube P1. Telescopic Tube Adjuster*
P2. Telescopic Tube Secure Connection*
Q. Exhaust Filter
R. Accessory Holder
S. Carpet and Floor Nozzle (GP) Sa. Carpet and Floor Nozzle Secure Connection Sb. Floor Type Selector Pedal Sc. Nozzle Suction Regulator*
T. Pre-motor Filter
U. Carpet and Floor Nozzle (GP) Ua. Floor Type Selector Pedal
V. Furniture Tool
W. Crevice Tool
X. Long 2in1 Tool
Y. Advanced Furniture Nozzle
Z. Mini Turbo Dual Action Pet Hair Remover Nozzle
AA. Mini Turbo Dual Action Allergen Remover Nozzle
AB. Parquet Extra Nozzle
AC. Parquet Extra Care Nozzle
AD. Accessories Car Kit*:
a. Accessories Bag
b. Big Dusting Brush
c. XL Flexible Crevice Tool
ASSEMBLING YOUR CLEANER
Remove all components from the packaging.
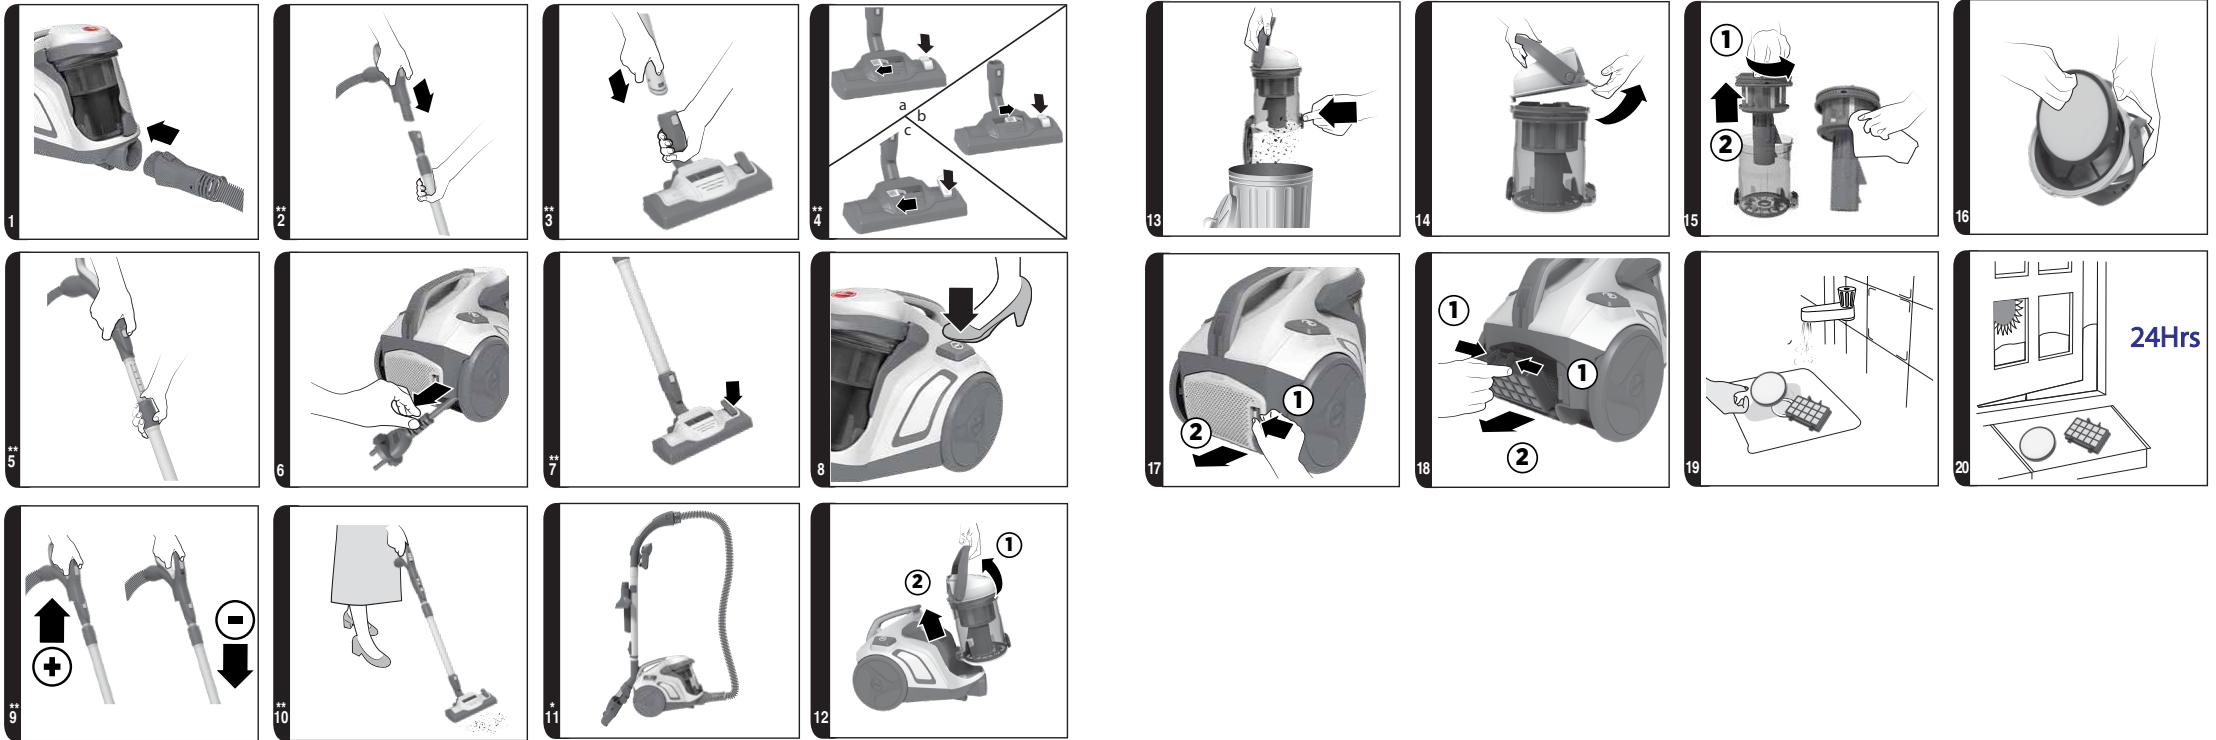
- Connect the hose to the cleaner main body, ensuring it clips and locks into position. To release: simply press the buttons on the hose end and pull. [1]
- Connect the hose handle* to the end of the extension tube upper, or accessories if required. [2]
- Connect the extension tube lower to the carpet and floor nozzle*, [3] or accessories if required.
- The cleaning accessory tools can be stored after use on the underside of the extension tube, using the accessory holder provided.
USING YOUR CLEANER
- Extract power cord and plug it into the power supply. Do not pull the cord beyond the red marker. [6]
- Adjust the length of the telescopic tube by moving the telescopic tube adjuster** up and raise or lower the hose handle to the most comfortable cleaning position. [5]
- Carpet & Floor Nozzle**. Press the pedal on the nozzle [4] to select the ideal cleaning mode for the floor type.
Hard Floor: The brushes are lowered to protect the floor.
Carpet: With lifted brushes for the deepest clean.
Carpet & Floor Nozzle**: [4]
- Hard floor Cleaning: Press the floor type selector pedal on the nozzle on Hard Floor mode and adjust the nozzle suction regulator to open [4a] or close [4b] position for the most comfortable cleaning position. In this position brushes are lowered to protect hard floors.
- Carpet Cleaning: Press the floor type selector pedal on the nozzle on Carpet mode and adjust the nozzle suction regulator to open position. In this position brushes are raised for a deeper cleaning of your carpet. [4c] It's suggested to open the nozzle suction regulator on carpet to allow a better sliding.
- Switch the cleaner on by pressing the On/Off button on the cleaner main body. [8]
- Fixed Power Control* - The cleaner will operate at a fixed power setting.
Advanced Comfort Handle with Integrated Accessories:\*\* [M, M1]
- Built-in Crevice Tool: The hose handle end can be used as a crevice tool to reach narrow spaces.
Furniture Tool: Press the latches on both sides of the handle and slide downwards to release the furniture tool to clean soft surfaces and textiles (curtains, upholstery). - Dusting Brush: Press the latches on both sides of the handle and slide downwards, then push the slider to the end to release the built-in dusting brush. Ideal for hardsurfaces (bookshelves, keyboards, skirting boards).
- Suction Regulator: Adjust the suction by opening or closing the air valve on the handle. [9, O]
Intelligent Handle**: [N,N1]
- Suction Regulator** [O]: Adjust the suction power by opening or closing the air valve on the handle.
- Dusting Brush: It is integrated directly underneath the hose handle.
- Switch off at the end of use by pressing the On/Off Button on the cleaner main body. Unplug and rewind the power cord by pressing the cord reel button.
- Parking and storage - The tube can be parked for temporary storage while in use, or in the storage position when not in use. [11]
ACCESSORIES
To obtain the best performance and efficiency it is recommended that the correct nozzles are used for the main cleaning operations. These nozzles are indicated in the diagrams by the letters GP, HF or CA.
A nozzle type GP can be used to clean both carpet and hard floor.
A nozzle type HF is suitable for use only on hard floor.
A nozzle of type CA is suitable for use only on carpet.
The other nozzles are accessories for specialist cleaning tasks and are recommended for occasional use only.
All accessories can be fitted to the end of the handle* or the end of the telescopic tube.
Accessory Set**:
Crevice Tool - For corners and hard to reach areas.
Furniture Nozzle - For soft furniture and fabrics.
Dusting Brush - For bookshelves, frames, keyboards and other delicate areas.
Dual Action Pet Hair Remover Nozzle* [Z] - Use the mini turbo nozzle on stairs or for deep cleaning on textile surfaces and other hard to clean areas. Particularly suitable for pet hairs removal.
Dual Action Allergen Remover Nozzle* [AA] - Use the mini turbo nozzle on stairs or for deep cleaning on textile surfaces and other hard to clean areas, particularly suitable for allergen removal.
Parquet Extra Care and Parquet Extra nozzles* [AC,AB] – For parquet floors and other delicate floors.
Long 2in1 Tool* [X] - Crevice tool and dusting brush - It allows to clean hard-to-reach areas such as bookshelves and high corners.
IMPORTANT: Do not use mini turbo nozzles on rugs with long fringes, animal hides and carpet pile deeper than 15mm . Do not keep the nozzle stationary while brush is rotating.
Car Kit Accessories* [AD]:
XL Flexible Crevice Tool* - Ideal for car cleaning. Its length enables cleaning of difficult areas to reach, narrow crevices.
Large Dusting Brush with integrated Furniture nozzle* - Suitable to clean the soft & delicate surfaces for both car and home.
Accessories' bag* - For tidy storage of all the accessories.
CLEANER MAINTENANCE
Emptying the Dust Bin
When the dust reaches the max level indicator on the container, empty the dust bin.
IMPORTANT: To maintain optimum performance do not allow the dust exceed the max level indicator.
-
Switch the cleaner off by pressing the On/Off button on the cleaner main body [8], and unplug the power cable.
-
Lift the dust bin release handle and remove the dust bin assembly from the cleaner. [12]
- Hold the dust bin with one hand and with the other hand press the dust bin flap release button. [13]
- Close the dust bin flap and refit the dust bin assembly to the cleaner main body.
Cleaning the washable filters
The cleaner is fitted with a blue filter pack. To maintain optimum cleaning performance regularly remove the filters and tap against the side of the bin to release dust. The filters should be washed every 5 bin empties or when the filter has excessive dust level.
IMPORTANT: All bagless cleaners require regular filter cleaning. Failure to clean your filters may result in air blockage, overheating and product failure. This may invalidate your guarantee.
IMPORTANT: Regularly check and maintain the filters.
IMPORTANT: Always ensure the filter pack is fully dry before use.
To access the pre-motor filter:
- Lift the dust bin release handle and remove the dust bin assembly from the cleaner. [12]
- Hold the dust bin with one hand and with the other hand lift the dust bin lid opening latch to open the bin lid. [14]
- Remove the pre-motor filter located in the bin lid. [16]
- Gently tap and wash the pre-motor filter. Do not use hot water or detergents. Remove excess water from the filter and leave to dry fully before re-using. [19, 20]
- Reassemble the pre-motor filter to the dust bin lid once fully dry and refit to the cleaner.
To access the exhaust filter:
- Unclip the exhaust filter cover from the rear of the cleaner main body. [17]
- Remove the exhaust filter from the rear of the cleaner. [18]
- Gently tap and wash the filter using warm water. Do not use hot water or detergents. Remove excess water from the filter and leave to dry fully before re-using. [19, 20]
- Refit the exhaust filter to the rear of the cleaner once fully dry and refit the exhaust filter cover.
IMPORTANT: Do not use the product without the filter pack fitted.
Cleaning the dust bin / separation unit
This cleaner uses a separation system and shroud cleaning system unique to Hoover. If necessary the separation unit can be disassembled from the dust bin and cleaned.
- Lift the dust bin release handle and remove the dust bin assembly from the cleaner. [12]
- Hold the dust bin with one hand and with the other hand lift the dust bin lid opening latch to open the dust bin lid. [14]
- Remove the separation system (including the integrated shroud cleaning system) from the dust bin. [15]
-
If necessary, use a cloth to remove excessive dust from the separation system (including the integrated shroud cleaning system).
-
Place the dust bin under tap water. Rinse with lukewarm water. Wash internal surfaces of the dust bin with water only. DO NOT use soap detergents to wash the internals of the dust bin.
- Reassemble the internal component to the dust bin, ensuring all components are dry.
- Close over the dust bin lid and refit dust bin assembly to cleaner.
Removing a blockage
- Check if the dust bin is full. If so refer to 'Emptying the dust bin'.
- If the dust bin is empty but suction is still low:
A. Do the filters need cleaning? If so refer to 'Cleaning the washable filters'.
B. Check if there is any other blockage in the system - Use a rod or pole to remove anyblockage from the extension tube or flexible hose.
C. Check if pre-motor filter is fitted.
D. Check if the separation unit needs to be cleaned. Refer to 'Cleaning the separation unit'.
USER CHECKLIST
Should you have a problem with the product, complete this simple user checklist before calling your local Hoover service.
- Is there a working electricity supply to the cleaner? Please check with another electrical appliance.
- Is the dust container over-filled? Please refer to 'Cleaner Maintenance'.
- Is the Filter blocked? Please refer to 'Cleaning the filter'.
- Is the hose or nozzle blocked? Please refer to 'Removing a blockage from the system'.
- Has the cleaner overheated? If so, it will take approximately 30 minutes to automatically reset.
IMPORTANT INFORMATION
Hoover spares and Consumables
Always replace parts with genuine Hoover spares. These are available from your local Hoover dealer or direct from Hoover. When ordering parts always quote your model number.
Hoover Service
Should you require service at any time, please contact your local Hoover Service Office.
Quality
BSI ISO 9001
Hoover's factories have been independently assessed for quality. Our products are made using a quality system which meets the requirements of ISO 9001.
Your Guarantee
The guarantee conditions for this appliance are as defined by our representative in the country in which it is sold. Details regarding these conditions can be obtained from the dealer from whom the appliance was purchased. The bill of sale or receipt must be produced when making any claim under the terms of this guarantee.
Subject to change without notice.
INSTRUCTIONS DE SÉCURITÉ D'UTILISATION
Poignée comfort**: [N,N1]
Intelligenter Handgriff\*\*: [N,N1]
Intelligente handgreep\*\*: [N,N1]
Asa intelligente**: [N,N1]
Intelligent handtak**: [N,N1]
VEDLIKEHOLD AV STØVSUGEREN
Tommestvbeholderen
Nár stóvet nár indikatoren for maksimalnivaet i beholderen ma stóvbeholderen tømnes.
HeKOTOpbIX BnIOB MoKeT 06pa3OBbIBaTbCtATNueCKOe 3JIeKTpnuYeCTBO. Pa3pI CTaTNueCKOro 3JIeKtpnuYeCTBa He npEiCTaBnIeT ONaCHOCrI DnIy 3IDOPOBBy.
He npimeha Te np6op BHe nomeeHn, Ha BlaXhIX NOBepxHOCTaX IJI N dJa c6opa XndKoCTeI.
He nCnoIb3yIe np6op IJra c6opa ocTpbIX npEIMeTOB, cNueK, Tropaero nePJa, OKypKOB nIi aHaIOnuHbIX npEIMeTOB.
He paçnbijIe nII He co6npaIe roIpOuNe JxNdkoCTn, YnCTaIe cpeIcTBA, a3pO30JI nII npOuNe napbl.
He nepebo3nte nbilecoc uepe3 npoBOd nITaHnI He TAHnte 3a npoBOd, BbIHmMaBnKy n3 pO3eTKn.
Bcnyae HeicnpaBHOCTnHe CneJeT npOJkaTb NOBaTbC np6opom.
He cToIe Ha npOBoJe n He HamaTbIbaIte erO Ha pyKy nn Hory B npOceCe IcNoJb3OBaHnI np6Opa.
He nCnoJIb3yIe np6Op dIy OUcNTKJ XINBOTHbIX IJIY IIOJeI.
He pa3meuTe np6Op hAd co6oB BO BpeM y6OpKn IeCTHnU.
CepBnchna clyx6a HOOVER: Ira rapaHTnn 6e3oNaCHO n HaJeXHO pa6Otbl DaHHoro np60pa Mbl peKOMeHnyem nprrlaaTb aBTOpN3OBaHHbIX INJKeHepOB cepBnCHOH clyx6bl HOOVER Ira BbINOJIHeHnRA TexHnueckoR O6cIyXnBaHnRA n peMOHTa.
Okpykaioa a cpea
CnMBOH Na daHHOM npu6ope yka3bIbaet Ha TO, YTO erO HeJIb3y utnI3npoBaT BMeCTe C 6bITOBbIMN OTXdAMN. ERO Heo6xOdIMN cdaBaTb B COOTBeTCTByIOUmN pyHK T npiema IJRA DaJIbHeIwe nepepa6OTKn 3JeKTPnuCecknx N 3JeKTPoHNbIX qAcTeY. UTIN3aunr DOJXHa PPOBODtBcR B COOTBeTCTBUN C MeCTHBIMN npaBUNAMN NO 3aUnTE OkpykaHOSe CpeDbI yTuIN3aunr OTXdOB. 3a 60Jee nOpRo6Hoi INΦopMauneN IO 6paueHIO C daHHbIM npu6Opom, erO yTuIN3aunr N nepepa6OTKe o6paTIteCB B MeCTHbE OprAHb I BlactN, B cIyJ6y utnI3aunr OTXdOB uIN B MaRa3In, rDe Bbl npu6peHn daHHbI npu6Op.
OCTaHbTe COCTaBHeIyacTn NblneCocA nYnaKOBKn.
- Ппсоевине Шанг К корпуну пьлесoca, сдяза тем, чтобл OH BOWeI B rHe3do И Встал В павильnomоложени. Дя OTcoевиненя постTo habKMITE KhoJKN Ha KOHceшанга и NOTAHTE. [1]
-
Ha Bepxhem KOnZe pa3dBnJHcN Tpy6bI yCTaHOBIne pyKoTky** IJIaNrA nIIN dpyrIe npHaJdJIeXHocTn* NO HeO6XODIMOCtN. [2]
-
CoeINHnTe HxHn KpaBbDnHOn Tpy6bC HacadKo IJIa YNCTKN KOpOB NII IN TBepDbIX HAnOJIbHbIX NOKpbITn** [3] IINI 3aKpeINTe akCEccyapbl* npI Heo6XoDMOCtN.
- После уборки Вbl можeteхран'tь* habадки n akceccуapbl c huxнecltopohbl BblBnЖнгТубblВспциальнOM degxataene.
3KCNPLYATAUINyPiJIENCOCA
1.ИЗВЕКИТЕshурпintанииpoДКЛIOЧИТEBuILKу shHypa Kpo3eTke эл ekTpOПNTaHЯ. 3anpeuaetcBytIraNbA TbshHyprdaieekpachOHOTMeTKn.[6]
2. Otperynupyte dinyu Hny Teleckonuuecko Tpy6bl, nepemectnb peryjTOp** BBepx n noHb nn Onyctnb pykOaTKy 7laHaR b Han60one ydo6Hoe dny60pKn noJoxeHne. [5]
3. Hacadka non/KoBep*.HaxMnte Ha neaJIb, npedcMOTpeHHyO Ha hacAdke [4], yTo6bl Bb6paTb ONImalhBi peXIM qNCTKN B 3aBNCUMOCTN OT TnPa HAnOpIbHO r NOKpbITnA. TBePdoe HanoIbHo eNOKpbITne:ДЯ 3aunIb HAnOpIbHO r NOKpbITnA qETKN OnyeHb KoBpOBoe nOKpbITne:ПонЯТьe qETKN -ДЯ HAn6Joe rIy60Ko OuNCTKn.
Hacánda non/koBep**: [4]
- y6opka TbepybIX HanoIbHbIX nokpItn: IpepeBdTe pyuar Bb6opa Tnna HanoIbHoro nokpItnHa HacaJKe B noLoXeHne «TbePdoe nokpItne» I nepeMeCTnte peryIaTOp BCaCbBaHnB HA OTKpblToe [4a] nii 3akpblToe [4b] noLoXeHne dny Hau6olee yDobHoy y6opKn. B 3tOM noLoXeHn BblBnraOTc qETkn dny 3aunTbI TbePdOrO HanoIbHoro nokpItn.
- Y6opka KoBpO: IpepeBeinte pbIurg BbI6opa Tnna HanaonIbHoro NOKpbITnHa HacaIKe B noloxeHne «KOBep» u nepemecnte peryIaTOp BCaCbIBaHnB OTKpbIToe noloxeHne. B 3tOM noloxeHnn 1eTkn POnHraTbI dny 6oJee rIy6okoi OuncTkn KOBpa. [4c] Ha KOBpe peKomeHdyETcR OTKpbITb OTBepCTne peryIaTopa BCaCbIBaHn Dny 6oJee pIaNbHoro cKoJIbXeHnI.
- BkIIOUHTe PbJneCoc, HaxaB KHOnKy BKn./BbIKn. Ha Kopnyce PbJneCocca. [8]
- ΦИКсИрОВаннай моциhoeTb* - Пылесoc 6удeт pa6oTaTb пи ФИКсИрОВаннй MOUHOCtN.
Pуka co BCtpoeHHbIMn akceccyapamn:** [M, M1]
BCTpoenHna ⅢeBaHa HacAnka: KoHeu ⅢaHra MoKet 6bTb NcNoIb3ObaH dIy 6OpKn y3KnX MecT BMeCTo ⅢeBoH HaCaKn.
- Hacadka Дя Me6eHn: HaxMITE Ha φικCaTOpbI, paCποNoXeHHbIe no 6okam, n nepemecTIne pyuKy, yTo6bl nCπoNtB3OBAbT Me6eJIbHyU HacadKy dIra OunCTKN TeKCTnIbHbIX nДpyrnx MЯrkx NOBepxHocTei (WToPbI, o6nbKa).
- Μετκα δλγαληνην ένλινη: HαχΜιnte ha φικcaTOpβi, paçπολοχΕHhbIe no 6okam, ένερεmeCTnte pyuKy Bnɪz, 3aTeM HαχΜιnte ha cnaɪdεp, qTObI NCπoJIb3OBA Tb BCTpoEHHyU έμεTKy δλγανην. έndealbHo nɒxOДNT ἀλ ΚηUCTKN TbePdbIx NOBepxHocTei (KλaBuaTpya, έΠηHTycbl, KΗχΚhble ΝΟΝΚ).
- Perylajtop mozhoctn notoka Bo3dyxa**: OtperyunpyTe MozHocTb BCaCbIBaHn, OTkpBBAJ nn 3aKpbBBAJ BO3duyHbIe KlaIaNbI Ha pyuKe. [9, 0^** ]
Pyka\*\*: [N,N1]
TEXHUNECKOE OBCJNYXINBAHNE IIbJIECOCA
Ouictka nbIle60pHnka
KaTToJIbKO KOJIInueCTBO
OuHCTKa MOUoIuxxca HnIbTpOB
B nbInecoce yctahOBlen h nIbTp rony6oro zbeta. B ceJx coXpaHEnn OONtMaJIbHO pa6oTocno6hOCTn nbIeCoCA peryIaRPhO ydaIaIe Te n3 0nIbTPOB nbIb, IerKIM NOCTyKNBaHnEM o KpaMycOpHOrO 6aka. 0nIbTpblcJeYET npOMbIBaTB nocLe 5 uNCTOK nbIeScOpHnka, a TaKxe B clyae N36blTOUHOrO HAKOnJIeHnraNbIIN.
BHIMAHHE! Φиьтпь BCex 6e3meшковых Mоделу ПьilecoCOB HxJaOTcB Perуларно очістke.ЕсNi He oUицаТь Φиьтпь,эTO MOжТ npИБECTN KбLOКИРОВKe BO3dYshoro NOTOKa,перреви NOJOMKE ПьilecoCа.эTO MOжТ npИБECTN K aHHylnipobanu BaweJ rapaHTn.
BHHMAHNE! Perylaepno npoBepaTe 0n ouuau Te n npn Heo6xOumoctn.
BHHMHAHNE! Npeed yctaHOBkoon fNlbTpa y6eNTecb B TOM, YTO OH Do KOHca npocyuwen.