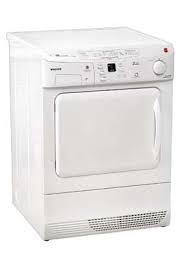
FREESPACE EVO FV70-FV50 - Vacuum without a bag HOOVER - Free user manual and instructions
Find the device manual for free FREESPACE EVO FV70-FV50 HOOVER in PDF.
User questions about FREESPACE EVO FV70-FV50 HOOVER
0 question about this device. Answer the ones you know or ask your own.
Ask a new question about this device
Download the instructions for your Vacuum without a bag in PDF format for free! Find your manual FREESPACE EVO FV70-FV50 - HOOVER and take your electronic device back in hand. On this page are published all the documents necessary for the use of your device. FREESPACE EVO FV70-FV50 by HOOVER.
USER MANUAL FREESPACE EVO FV70-FV50 HOOVER
INSTRUKTIONSMANUAL (SE) P 37
KAYTTOOHJE (FI) .P 41
OAHIEXPHSEΩE(GR) .P45
PYKOBOCTBO NOJIb3OBATENRA (RU) ....P 49
INSTRUKCJA OBSLUGI (PL) P 53
NAVOD KOBSLUZE (CZ) P 57
NAVODILA ZA UPORABO (SI) P 61

PRINTED IN P.R.C.
48011179/0
GENERATION FUTURE

INSTRUCTIONS FOR SAFE USE
This appliance should only be used for domestic cleaning, as described in this user guide. Please ensure that this guide is fully understood before operating the appliance.
Do not leave the appliance plugged in. Always switch off and remove the plug from the socket after use, or before cleaning the appliance or any maintenance task.
This appliance can be used by children aged from 8 years and above and persons with reduced physical, sensory or mental capabilities or lack of experience and knowledge if they have been given supervision or instruction concerning use of the appliance in a safe way and understand the hazards involved. Children shall not play with the appliance. Cleaning and user maintenance shall not be made by children without supervision.
If the power cord is damaged stop using the appliance immediately. To avoid a safety hazard, an authorised HOOVER service engineer must replace the power cord.
Keep hands, feet, loose clothing and hair away from rotating brushes.
Use only attachments, consumables or spares recommended or supplied by HOOVER.
Static electricity: Some carpets can cause a small build up of static electricity. Any static discharge is not hazardous to health.
Do not use your appliance out of doors or on any wet surface or for wet pick up.
Do not pick up hard or sharp objects, matches, hot ashes, cigarette ends or other similar items.
Do not spray with or pick up flammable liquids, cleaning fluids, aerosols or their vapours.
Do not run over the power cord when using your appliance or remove the plug by pulling on the power cord.
Do not continue to use your appliance if it appears faulty.
HOOVER service: To ensure the continued safe and efficient operation of this appliance we recommend that any servicing or repairs are only carried out by an authorised HOOVER service engineer.
Do not stand on or wrap the cord around arms or legs when using your appliance.
Do not use the appliance to clean animals or people.
Do not position the appliance above you when cleaning the stairs.
The Environment
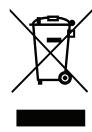
The symbol on this appliance indicates that this appliance may not be treated as household waste. Instead it must be handed over to the applicable collection point for the recycling of electrical and electronic equipment. Disposal must be carried out in accordance with local environmental regulations for waste disposal. For more detailed information about treatment, recovery and recycling of this appliance, please contact your local city office, your household and waste disposal service or the shop where you purchased the appliance.

This appliance complies with the European Directives 2006/95/EC, 2004/108/EC and 2011/65/EU.
HOOVER Limited, Pentrebach, Merthyr Tydfil, Mid Glamorgan, CF48 4TU, UK
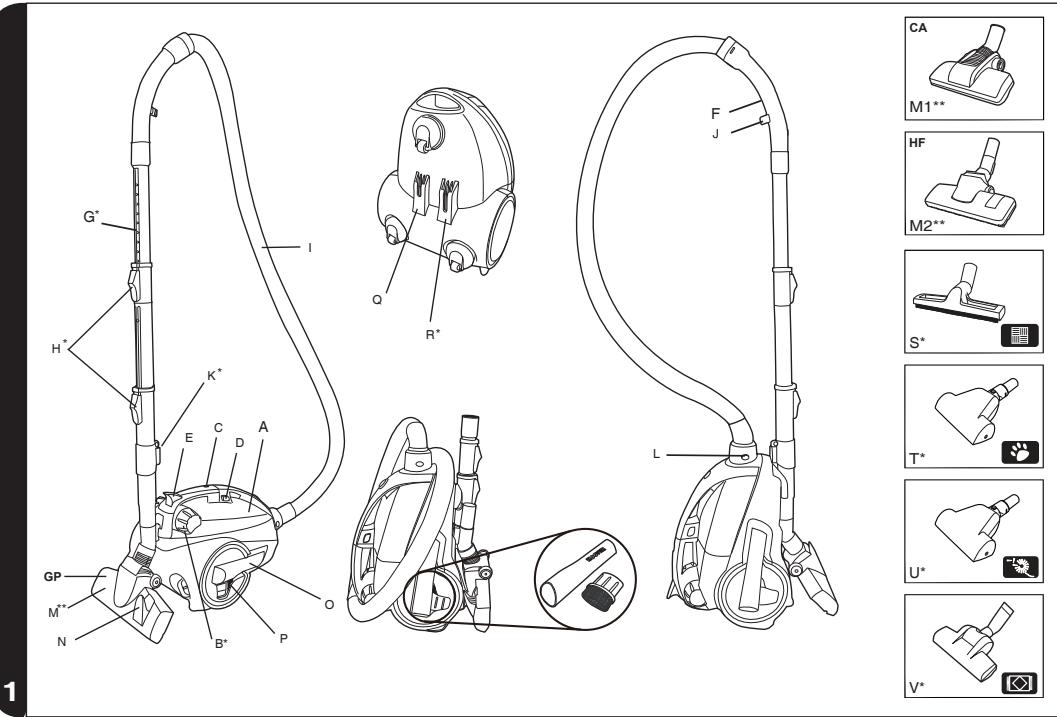
GETTING TO KNOW YOUR CLEANER
A. Cleaner main body
B. On/Off & Variable Power Control Roller
C. Bag Check Indicator
D. Bag Door Release Buttons
E. Hose Latch
F. Handle
G. Telescopic Tube
H. Telescopic Tube Adjusters
I. Hose
J. Handle Hook
K. Telescopic Tube Parking Hook
L. Hose Release Buttons
M. Carpet and Floor nozzle(GP)**
M1. Carpet Nozzle (CA)
M2. Hard Floor Nozzle (HF)
N. Floor Type Selector
O. Crevice Tool
P. Dusting Brush
Q. Nozzle Parking Slot
R. Telescopic Tube Parking Slot
S. Parquet Nozzle
T. Pet Hair Remover Mini Turbo Nozzle
U. Allergen Remover Mini Turbo Nozzle
V. Grand Turbo Nozzle
ASSEMBLING YOUR CLEANER
Remove all components from the packaging.
- Connect the hose to the cleaner main body, ensuring it clips and locks into position. To release: simply press the two buttons on the hose end and pull. [2]
- Connect the handle to the tube upper end [3].
- Connect the carpet and floor nozzle to the tube lower end. [4]
USING YOUR CLEANER
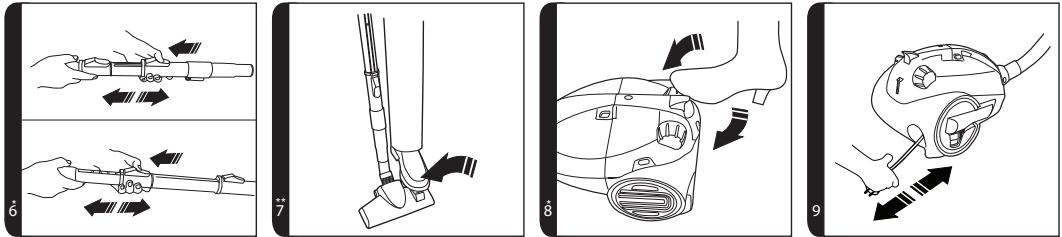
- Extract power cord and plug it into the power supply. [5] Do not pull the cord beyond the red marker.
- Adjust the telescopic tube to the desired height by moving the telescopic tube adjuster up and raise or lower the handle to the most comfortable cleaning position. [6]
- Carpet & Floor Nozzle. Press the floor type selector on the nozzle [7] to select the ideal cleaning mode for the floor type.
Hard Floor - Brushes are lowered to protect the floor.
Carpet - Brushes are raised for the deepest clean.
- Switch the cleaner on by rotating the On/Off Variable Power Control Roller clockwise on the rear of the cleaner main body. [8]
- Adjust the power level by rotating the On/Off Variable Power Control Roller to the desired level. [8]
- Switch off at the end of use by rotating the On/Off Variable Power Control Roller anticlockwise to the end. [8] Unplug and gently pull the power cord out of the cleaner and the cord will begin to automatically retract back into the cleaner. [9]
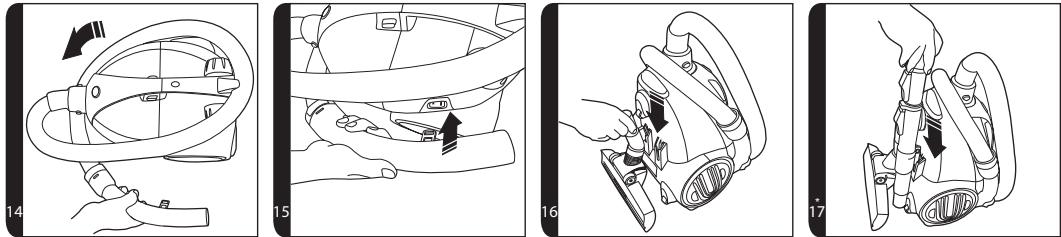
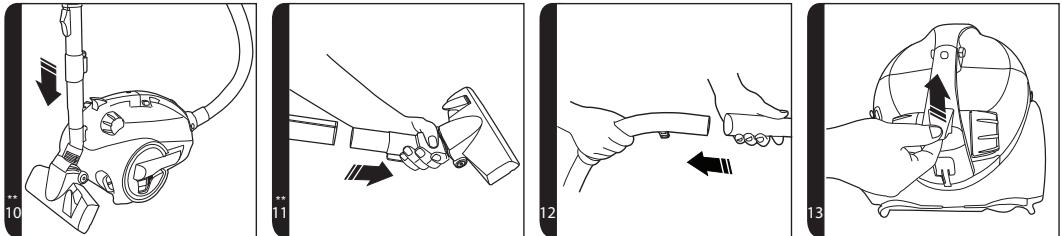
- Parking and Storage - The flexible hose and tube can be parked for temporary storage while in use [10] or in the Nanopack storage position when not in use: Retract the telescopic tube to its storage length [6]. Remove the nozzle from the end of the telescopic tube [11] and remove the hose handle from the telescopic tube [12]. Lift the hose latch at the rear of the cleaner [13] and wrap the flexible hose around the product [14]. Park the hose handle on the product [15]. Assemble the nozzle into the parking slot underneath the product [16]. Assemble the telescopic tube into the remaining parking slot underneath the product [17].
CLEANER MAINTENANCE
Replacing The Dust Bag
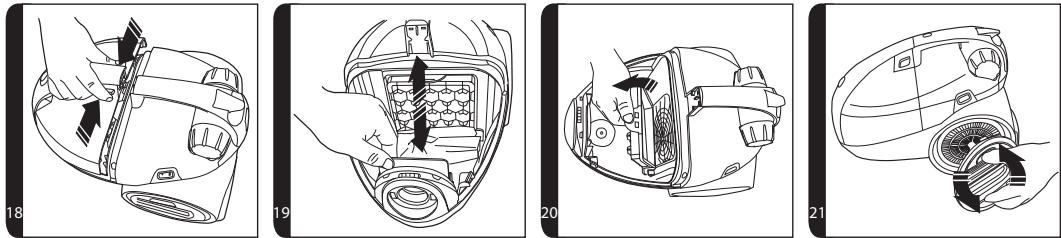
If the bag check indicator [1C] is red please check and, if necessary, replace the bag.
- Remove the hose from the cleaner [2].
- Press the Bag Door Release buttons and remove bag door [18].
- Pull the bag collar to remove the dust bag [19] and carefully dispose the bag into a bin.
- Fit a new bag into the cleaner by inserting the bag collar into the bag holder [19].
IMPORTANT: The hose must be removed before removing or replacing the dust bag.
REMEMBER: The bag check indicator may be red if an obstruction has occurred. In this case refer to 'Removing A Blockage From the System'.
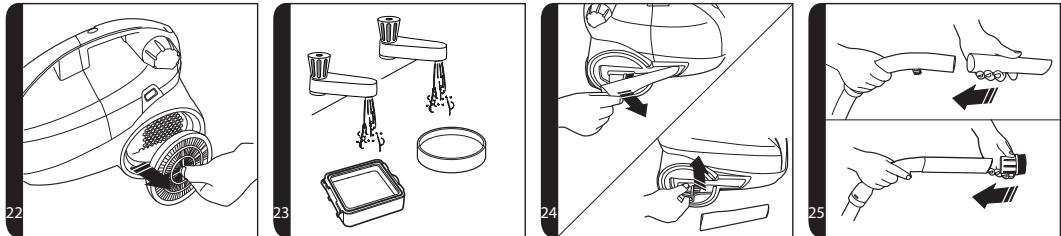
Cleaning the Filters
To maintain optimum performance of your cleaner, please wash the pre-motor filter and exhaust filter after each 5 bag changes.
To remove the pre-motor filter:
- Open the bag door and remove the dust bag from the cleaner (see "Replacing The Dust Bag").
- Press the latch at the top of the pre-motor filter frame to unlock it from the cleaner. Tilt and remove the filter from the cleaner [20].
To remove the exhaust filter:
- Unlock the door by rotating the door along arrows indicated [21].
- Remove the filter pack from the recess [22].
Gently tap and wash the filter packs using hand warm water [23]. Remove excess water from the filters with a dry cloth and leave to dry fully before re-using. Reassemble filter packs once fully dry and refit to the cleaner.
Remember: Do not use hot water or detergents. In the unlikely event of the filters becoming damaged, fit a Genuine Hoover consumable. Do not try and use the product without a dust bag or filter fitted.
Cleaning the permanent dust bag (depending on model)
To maintain optimum performance we recommend that you wash the permanent bag after every 5 full bags. Empty the contents of the Bag into a bin, wash the Bag under handwarm water, remove excess water with a dry cloth and leave to dry fully before replacing.
Removing a Blockage From The System
If the bag check indicator is red:
- Check if the bag is full. If so refer to 'Replacing The Dust Bag'.
- If it is not full, then;
A Do the filters need cleaning? If so refer to 'Cleaning the Filter'.
B. Check if there is any other blockage in the system - Use a rod or a pole to remove any blockage from the telescopic tube or flexible hose.
C. Check for and clear any blockage in the Nozzle.
Warning - The bag check indicator will turn red if the cleaner is used when full, if there is a blockage or if the filters are dirty. If the cleaner is used for a significant period of time with the bag check indicator is red, a thermal cut out will switch the cleaner off to prevent overheating. The bag check indicator turn green once the cleaner has switched off to signal that the thermal cut out has been activated. If this should happen, switch the cleaner off, unplug and correct the fault. It will take about 45 minutes for the cut out to automatically reset.
ACCESSORIES
To obtain the best performance and energy efficiency#1 it is recommended that the correct nozzles are used for the main cleaning operations. These nozzles are indicated in the diagrams by the letters GP, HF or CA.
A nozzle type GP can be used to clean both carpet and hard floor.
A nozzle type HF is suitable for use only on hard floor.
A nozzle of type CA is suitable for use only on carpet.
The other nozzles are accessories for specialist cleaning tasks and are recommended for occasional use only.
It is important to note that this vacuum cleaner is supplied with an Energy Label as required by European Regulation (EU) 665/2013.
If the label shows a red prohibition circle on the left covering the carpet symbol, then this indicates that the vacuum cleaner is not suitable use on carpets.
If the label shows a red prohibition circle on the right covering the hard floor symbol, then this indicates that the vacuum cleaner is not suitable for use on hard floors.
*Certain Models Only ** Certain models only, nozzles may vary according to model
^1 NOTE: Dust pick up ability carpet, dust pick up ability hard floor, and energy efficiency in accord with Commission Regulations (EU) 665/2013 and (EU) 666/2013.
Please see the model specification on the packaging label for inclusion of accessories to individual models.
All accessories can be fitted to the hose handle or the end of the telescopic tube.
Crevice Tool – For corners and hard to reach areas. Remove the Crevice tool from the accessories holder [24] and fit to the hose handle [25] or telescopic tube.
Dusting Brush - For bookshelves, frames, keyboards and other delicate areas. Remove the dusting brush from the accessories holder [24] and fit to the crevice tool then fit to the hose handle [25] or telescopic tube.
Parquet Nozzle* – For parquet floors and other delicate floors.[1S]
Pet Hair Remover Mini Turbo Nozzle* - Use the mini turbo nozzle on stairs or for deep cleaning on textile surfaces and other hard to clean areas. Particularly suitable for pet hairs removal. [1T]
Allergen Remover Mini Turbo Nozzle* - Use the mini turbo nozzle on stairs or for deep cleaning on textile surfaces and other hard to clean areas. Particularly suitable for allergen removal. [1U]
Grand Turbo Nozzle* - Use the Grand Turbo Nozzle for deep cleaning on carpets. [1V]
IMPORTANT: Do not use the Grand Turbo Nozzle or Mini Turbo Nozzles on rugs with long fringes, animal hides and carpet pile deeper than 15mm . Do not keep the nozzle stationary while the brush is rotating.
USER CHECKLIST
Should you have a problem with the product, complete this simple user checklist before calling your local Hoover service.
- Is there a working electricity supply to the cleaner? Please check with another electrical appliance.
- Is the Bag over-filled? Please refer to 'Cleaner Maintenance'.
- Is the filter blocked? Please refer to 'Cleaner Maintenance'.
- Is the hose or nozzle blocked? Please refer to 'Removing a blockage from the system'.
- Has the cleaner overheated? If so, it will take approximately 45 minutes to automatically reset.
IMPORTANT INFORMATION
Hoover spares and Consumables
Always replace parts with genuine Hoover spares. These are available from your local Hoover dealer or direct from Hoover. When ordering parts always quote your model number.
| Microfiber Bag | H71 | 35601069 |
| Pre-Motor Filter | S107 | 35601057 |
| Exhaust Microfilter | T102 | 35601056 |
| Complete Flexible Hose | D122 | 35601055 |
| Carpet & Floor Smart Nozzle | G202EE | 35601595 |
| Carpet & Floor Smart Nozzle | G217SE | 35601610 |
Hard Floor Extra Nozzle G207EE 35601600
Hard Floor Smart Nozzle G206SE 35601599
Carpet Extra Nozzle G210EE 35601603
Parquet Extra Nozzle G90PCB 35600934
Mini Turbo Nozzle J32 35600817
Turbo Nozzle J57 35601239
Hoover Service
Should you require service at any time, please contact your local Hoover Service Office.
Quality
BSI ISO 9001: Hoover's factories have been independently assessed for quality. Our products are made using a quality system which meets the requirements of ISO 9001.
Your Guarantee
The guarantee conditions for this appliance are as defined by our representative in the country in which it is sold. Details regarding these conditions can be obtained from the dealer from whom the appliance was purchased. The bill of sale or receipt must be produced when making any claim under the terms of this guarantee.
Subject to change without notice.
INSTRUCTIONS DE SECURITE D'UTILISATION
VEDLIKEHOLD AV STØVSUGEREN
Bytte stovposen
MHCTPYKLIMN NOTEXHNIKE BE3ONACHOCTN
Данныnpиборпpeнha3нayehToькОДЯdomaшноИспользованяВ COOTBETCTBиC OПиcaHиМ,прИБeDEHHbIMВ HacToIseMPykoBOdCTBeNoIb3OBaTeЯ.П配电чemпиctуПNTbКэКПлУаТaциДaHHOrO6blTOBOrO3JIeKTPoPnpi6opa,y6eIITecbВ TOM,чTO Bbl NOHImaeteHaCTOJaeepykoBOdCTBO.
He octabny Te np6op BkIoueHHbIM b po3etky. Iocne nCNoJb3OBaHnI nn nepeD ouNCTKO nn O6cLyKuBaHneM BCErDa BblHMaTe BnIKy n3 po3etKn.
IeTN cTAPSe BOCbMn IeT, a TaKxpe LInca Co CHNXeHHbIM ΦH3Nueckm, CeHCOPHbIM Nll yMCTBeHHbIM pa3BNTnem Nll OTCyTCTBnEM ONbTa Nll 3HaHn OB yCTPOINCTBE MOryt NCNoJIb3OBaTb yCTPOINCTBO NOJ pINCMOTpOM Nll ecNn OHN DOJIb3OBaHn yCTPOINCTBa N IOHMaOT pNCKN, KOtOpbl MoXeT NOBLeuB co6oEro INcNoJIb3OBaHne. C yCTPOINCTBOM He DOJIb3IOgPaTb IeTI. He cIeDyET dOnyckaTb IeTei K OUnCTke n O6ClyJbNAHnIO npIN60pa 6e3 pINCMOTpa B3PocNbIX.
Ecn npoBOD nHTaHnI NOBpeJdeH, HEmeJIeHNO OTKJIIOUHTe np6Op. Bo n36exaHne yrpo3bI 6e3OpaCHocTn 3aMeHy npoBOda nHTaHnI DOJKeH npoBOaNTb aBTOpN3OBaHHbI INJKeHep cepBvncHO cnJx6bl HOOVER.
He npn6nnkaTe Bpaaioounec TeK n pyKaM, Horam, 6oItaoueioc oJekde n BOLOcam.
IcnoIb3yIte TOnbKO Te HacaIKn, paCXoIhble MaTePnaJIbI nn 3aIacHbIe qactN, KOtOpblpepeKOMeHdyETnnnNoCTabJIeT HOOVER.
CTaTnueeCKoe 3JNEKTPnuecTBo: HeKOTOpbIe TINbI KOBPOBbIX NOKpbITN CNOCO6HbI HaKaPnIBaTb He6OJIbWo3apRd CTaTnueeCKOrO 3JNEKTPnuecTBa. Pa3pRd CTAtNueeCKOrO 3JNEKTPnuecTBa He IpeDCTaBnREt ONaCHOCTN DnIg 3IDOPOBbY.
He npimehaTe npnbop Bhe nomeeHn,Ha BnaJXbIX NOBepxHOCTaX uIN dJa c6opa XnIDKOCTeI.
He nCpOJIb3yIte npI6Op IJЯ c6Opa OcTpbIX ppeIMeTOB, CnIueK, TropaYeToIeIIa, OKypKOB IIJI aHaIOnrUnHbIX OBeKTOB.
He paçnbjIyTe nIи He co6npaIte ropUoyne JNdkoCTN, YnCTaIe cpeIcTBA,a3pO30JIu IIn npOyne napbl.
He nepebo3nte cBoi np6op uepe3 npoBOd nHTaHnI He TAHNTe 3a npOBOD, BbIHMa8 BNJKy I3 pO3eTKI.
B clyuae HeincnpaBHOCTn He cIeJyET npoJoxaTb NOlb30BaTbCra npi6Opom.
CepBnchA cnJx6a HOOVER: Ira rapaHTn 6e3oNaChO n HaJeXHO pa60tI daHHoro npi6opa Mbl peKOMeHdyem npurlaWAtb ABTOpU3OBaHHbIX INJxHeHepOB cepBnCHOH CNJx6bl HOVER Ira BbIOJIHeHn TeXHnueCKOrO O6cLyXnBaHN n peMOHTa.
He cToIe Ha npOBoJe n He HamaTbIbaIe erO Ha pyKy IInn Hory B npOceCe nCnoJb3OBaHnra npi6opa.
He noIb3yI TeCb npI6Opom IJIa OUInCTKJ XINBOTHbIX INJI LIODeI.
He pa3meaIte np6Op haIc o6oB BO BpeMa y6OpKn IecTHNu.
Okpymaioua cepa:
CnBON Ha daHOM npi6ope yka3bIbaet Ha To, qTo eRo HeJb3a yTuINImIOBaTb BMeCTe
C 6bIOTOBIMN OTXOJaMn. Ero Heo6xOJIMO CdaBaTb B COOTBETCTBYUOJn IyHKT pInema
Далдалбнше nepepa60КУл ektpnuecknxИлкpoHHbIXЧаTe.УтлииЗацяN
ДОЛЖна ПОВОДИТСВЕВ COOTBETCTBIM C MECTHBIM N PIPINPOOOOxPAHITeJIbHbIMN
IpaBnamn no yTuJn3aun oTxoOob. 3a 6oone noPpObHou nHΦopMaunei no o6paueHIO C
dAnHbIM np6oPOM, erO yTuJIn3aCmN nepepa6OTke o6paTnTeCb B MeCThBle opraHbI Bnactu, B
Cnyk6y yTnIu3aun OTXoIOB uIN B MaRa3IN, rDe bI npNo6pei DaHbI np6Op.

YTo6bI n3BJeUb BbInyCKHOJ 0nIbTp,
- OToPnTe KpbIshky, noBopauHbAe ee nO hAnpaBneHnO, o6o3NaueHHOMy CTrpeJIkAmn [21].
2.ИЗВLEКТЕФИЛТРУОУΚАССЕТу [22].
AkkypaTHo npomOte fHbtpuOyU KaccTe TY TepNoB OBOo [23]. YdaJIte OCTaBHyOc BDOy C fHbTPOB C NOMOsbU cyXo TkaHN ipeD yCTaHOBko DaIte NM PONHOCTbIO BBICOXHyTB. Co6epnTe fHbtpuOyU KaccTe TY Nocle npocuShK u YCTaHOBtBE PbJIeOC.
POMHNTe! 3anpeaetc npombivka ropeyew BOOJ NIM MOUzMM cpeCTBaMn. BepoarTHocTB nobpeintb fniltp ouehb mana, HO eCNI 3TO pON30JeT, yCTAHOBITE HOBBI JINBtpr Hoover. 3anpeaetc nCpOJIb3OBAHne nbIeocca 6e3 MeuKa dJa C6opa nblnn nn yCTaHOBHeHHoro fnilbtpa.
Bce npnHaJnxHocTmMoryT 6bITb yCTaHOBJIeHbI Ha pyKoTKe IlaHaRa IIN Ha KOHcTeleckOncuYeCKOn Tpy6bl.
UeBnHacKa, -PpeHa3NaueHa dIy OuNCTKn yTIOB n TpyNDIOCTyNHbIX MecT. CHIMITE UeByo HacAky C depkataI npHaJNeXHocTe [24] n yCTaHOBnTe Ha pyKOaTke 7naHra [25] nII TeleckOJIneCkoTpy6e.
UeTKa Dnay ydaenHna nblln - IJy KNHXhblx nOLOK, pAMOK KAPTNH, KNaBuaTpN INpOuNX DeJIKAthbIX NOBepXHOCTe. ChIMNTE UeTKy Dnay ydaJeHnra Nbln C depXaTeNn npHaIaNEXHOCTe [24] n yctahOBnTe Ha uSeJeByIO HacAdKy, KOToPA, B CBOIO OuepeDb, UcTaHaBnBaETcH a pykoTke 7nAHaRa [25] nII NteeCKOnuYeCKo Tpy6e.
HacaKa Iy napKeTa* -Iy napKeTHbIX IIOOB IN dpYrNX IIOOB, Tpe6yUOxN OCTpOxHoro 6oBaueHn.[1S]
MnHtTyp6oHaCaJa dIy ydaJeHn YepCTN XJBOTbIX* - MmH tpy6o etsKa npedha3HaueHa dIy ChTKn IeCTHnC nII nn rIy6okOuOCTKn TkaHeBbIX NOBepxHOcteN i DpyrNX TpydHNOcOCTynHbIX dIy ChTKn MeCT. Oco6eHNo pOnXoDIT dIy ydaJeHn YepCTN XJBOTbIX.[1T]
MnHn-Typ6oHaCaJa dIy ydaenHna anlepreHOB* - MnHn Tpy6o 1eTka npedHa3NaheHa dIy cnCTKn IecTHNIc IINr rny6okO kOnCTkn TkAHeBbIX NOBepxHOctTe n DpyrNt TpydHOoctTyHbIX dIy cnCTKn MeCt. Oco6eHHo NpOxDxoNDIT dIy ydaenHna anlepreHOB. [1U]
Typ6oHacJaKa Grand* - Typ6oHacJaKa Grand npedHa3NaHea dIra Iy6OkO uNCTKn KObPoB. [1V]
BHIMAHHE! He npimehyte Typ6o HacaKg Grand n MHHn-Typ6oHacaKg IJny ChTKN KObpNKOB C dInHHo 6axpOMo, MeCT dInTeIbHorO ppe6bIAHn JXMBOTbIX N KOBPOB C BOPCOM 60one 15 MM. He dePKeTHe HacaKg HenoDBrXHO, B TO BPeM KaK BpaAaetCa 7eTka.
AHKETA NOJb3OBATEJIa
Ecn y Bac Bo3nKIn CNOxHocTn C nCnOlb3OBaHNem DaHHoro n3dEny, npOCm 3aONHnTb 3Ty HeCIOXHyO aHKeTy dIy IOnb3OBaTeN pyepo6paueHneB MecTHyIO cepBnCHyIO cnyk6y KOMNaHn Hoover.
- Побадетслп на пьilecos pa6ooye habprжень? Роверпс с пою дуlorо элькtripueckoro рибopa.
- He nepenonHeHn mmeok? Cm. pa3dEJ «TexHueckoe 6cbnyxuBaHne nbIeoca».
He 3acopuncra nI b p? Cm. pa3dien «Texnueckoe o6cnykBaHne nblncoca».
He 3acopunncb nI uHaHn IuN HacaKa? Cm. pa3JeIyUcTpaHHeHne 3acopoB B cncTeMe>.
He neperepecn 1n nbilecoc? B 3tOM cnyae nbilecoc aBToMaTuYeCKn BEpHecrBa pa6ooye coctoHHne npimepno ue3 45 MNHyT.
BAKHAR INHOFOPMAUIN
3anachbte yactn npacxohbte MaTePnaIbI KOMnHn Hoover
Pn 3aMeHe qacteN nCNoB3yIte Toblko WtAThbIe 3aNaChbIe qactn npacXoHbIe MaTePnaJIbI npOn3BoDCTBa KOMpaHIn Hoover. Ix MoKHO npno6peTn y BaWero MeCTHoro DnIepa KOMpaHIn Hoover nIIH enOpceIcTBeHHBO B KOMpaHIn Hoover. Pn oOfOpMneHn 3aKa3a Ha 3aNaChbIe qactn O6ra3aTeJbHo Yka3bIbaIe Homep MoeJI nblncocca.
| Microfiber Bag | H71 | 35601069 |
| Pre-Motor Filter | S107 | 35601057 |
| Exhaust Microfilter | T102 | 35601056 |
| Complete Flexible Hose | D122 | 35601055 |
| Carpet & Floor Smart Nozzle | G202EE | 35601595 |
| Carpet & Floor Smart Nozzle | G217SE | 35601610 |
| Hard Floor Extra Nozzle | G207EE | 35601600 |
| Hard Floor Smart Nozzle | G206SE | 35601599 |
| Carpet Extra Nozzle | G210EE | 35601603 |
| Parquet Extra Nozzle | G90PCB | 35600934 |
| Mini Turbo Nozzle | J32 | 35600817 |
| Turbo Nozzle | J57 | 35601239 |
KauectBO
3aObI KOMnHnn Hoover npoJn He3aBncmMyoUeHky kaueCTBa. Ha7a npoduknna n3rotabInBaetcA c npimHeHnem cnCTEmbl KaueCTBa, yDObJIeTBopraIoJe Tpe6OBaHnAm cTaNapTa ISO 9001.
Bawa rapaHTnA
YcnoBnra rapaHTnn dnaDaHOrO 6bIbTOBOr 3JeKtpueckoro npnbopa onpeDeneJIOCT haunm npedctabInTelem B cTpaHe, rDe 3OT 3JeKTPoPnp6Op npoAn. Bolee noPpO6Hyu INΦOpMaunio 6 3TxN yCNoBnX Bbl MoKeTe nOnyUInb y DnInepa, npOdaBwero 3JeKTPoPnp6Op. Ppi npeBbAbeHn nPeTeH3n I NO ycNoBnM daHHbIX rapaHTn HbIX o8aTeNbCTB, doJIxeh 6bITb npedctabInen Yek nIIIN KBtAnCnna Ha npOdaHbI TOBap.
N3MeHeHnMoYt 6bItb BHeceHb6e3 yBeDOMneHnA.