
CVT 5097 - Dishwasher LADEN - Free user manual and instructions
Find the device manual for free CVT 5097 LADEN in PDF.
| Product type | Upright freezer |
| Brand | LADEN |
| Model | CVT 5097 |
| Net capacity | 120 L (estimated) |
| Dimensions (H x W x D) | 140 x 60 x 60 cm (estimated) |
| Weight | 40 kg (estimated) |
| Power supply | 220-240 V, 50 Hz |
| Power consumption | 100 W (estimated) |
| Refrigerant | R600a (isobutane) |
| Freezing capacity | 4 kg/24h (estimated) |
| Storage time in case of power failure | 10 h (estimated) |
| Noise level | 42 dB (estimated) |
| Climate class | SN-T (from 10°C to 43°C) |
| Adjustable thermostat | Yes, from MIN to MAX |
| Quick freeze function | Yes (MAX position) |
| Reversible door | Yes (right/left) |
| Number of drawers/bins | 3 (estimated) |
| Ice cube tray | Yes |
| Defrosting | Manual |
| Interior cleaning | Warm water and mild detergent |
| Warranty | 2 years (standard) |
| Usage | Domestic |
Frequently Asked Questions - CVT 5097 LADEN
User questions about CVT 5097 LADEN
0 question about this device. Answer the ones you know or ask your own.
Ask a new question about this device
Download the instructions for your Dishwasher in PDF format for free! Find your manual CVT 5097 - LADEN and take your electronic device back in hand. On this page are published all the documents necessary for the use of your device. CVT 5097 by LADEN.
USER MANUAL CVT 5097 LADEN
Instructions for use
Mode d'emploi
Gebruiksaanwijzing
PRECAUTIONS AND GENERAL
RECOMMENDATIONS
USING THE FREEZER
DEFROSTING AND CLEANING THE FREEZER
CLEANING AND MAINTENANCE
TROUBLESHOOTING GUIDE
AFTER-SALES SERVICE
INSTALLATION AND DOOR REVERSIBILITY
ELECTRICAL CONNECTION
BEFORE USING THE APPLIANCE
- Your new appliance is designed to be used in the household and similar applications such as:
- kitchen areas in shops, offices and other working environments
- farm houses
- by clients in hotels, motels, residences, bed & breakfasts.
To get the most out of your new appliance, read the user handbook carefully. It contains a description of the appliance as well as useful tips.
Keep this handbook for future consultation.
- After unpacking the appliance, make sure it is not damaged and that the door closes properly. Any damage must be reported to the dealer within 24 hours of delivery of the appliance.
- Wait at least two hours before switching the appliance on, to ensure that the refrigerant circuit is fully efficient.
- Installation of the appliance and electrical connections must be carried out by a qualified electrician, in accordance with the manufacturer's instructions and local safety regulations.
- Clean the inside of the appliance before using it.
SAFEGUARDING THE ENVIRONMENT
I. Packing

The packaging material is 100% recyclable and carries the recycling symbol. For disposal, comply with the local regulations.
Keep the packaging materials (plastic bags, polystyrene parts, etc.) out of reach of children, as they are a potential source of danger.
2. Scrapping/Disposal
The appliance is manufactured using recyclable material.
This appliance is marked according to the European directive 2002/96/CE on Waste Electrical and Electronic Equipment (WEEE). By ensuring that this product is correctly disposed of, you will help prevent potential negative consequences for the environment and the health of people.
The symbol on the appliance, or on the accompanying documents, indicates that this appliance should not be treated as domestic waste but must be taken to a special collection centre for the recycling of electrical and electronic equipment. When scrapping the appliance, make it unusable by cutting off the power cable and removing the doors and shelves so that children cannot easily climb inside and become trapped. Scrap the appliance in compliance with local regulations on waste disposal, taking it to a special collection centre; do not leave the appliance unattended even for a few days, since it is a potential hazard for children. For further information on the treatment, scrapping and recycling of this product, contact your competent local office, the household waste collection service or the shop where you purchased the appliance.
Note:
this appliance does not contain CFCs. The refrigerant circuit contains R134a (HFCs) or R600a (HCs), see the rating plate inside the appliance.
Appliances with Isobutane (R600a): Isobutane is a natural gas with low environmental impact. Caution is required, however, since isobutane is flammable. Therefore, make sure the refrigerant circuit pipes are not damaged.
This product mat contain fluorinated greenhouse gases covered by the Kyoto Protocol; the refrigerant gas is contained in a hermetically sealed system. Refrigerant gas: R134a has a global warming potential (GWP) of 1300.
Declaration of conformity
This product has been designed for preserving food and is manufactured in compliance with Regulation (CE) No. 1935/2004.
C
This appliance has been designed, manufactured and marketed in compliance with:
- the safety objectives prescribed in the Low Voltage Directive 2006/95/CE (which replaced Directive 73/23/CEE as amended);
the protection requirements of Directive "EMC" 2004/108/EC.
The electrical safety of the appliance can only be guaranteed if the product is connected to an approved earth connection.

PRECAUTIONS AND GENERAL RECOMMENDATIONS
INSTALLATION
- The appliance must be handled and installed by two or more persons.
- Be careful not to damage the floors when you move the appliance (e.g. parquet flooring).
- During installation, make sure the appliance does not damage the power cable.
- Make sure the appliance is not near a heat source.
- To guarantee adequate ventilation, leave a space on both sides and above the appliance and follow the installation instructions.
- Keep the appliance ventilation openings free.
- Do not damage the appliance refrigerant circuit pipes.
- Install and level the appliance on a floor strong enough to take its weight and in a place suitable for its size and use.
- Install the appliance in a dry and well-ventilated place. The appliance has been configured for operation in places where the temperature falls within the following ranges, and within the climatic class given on the rating plate. The appliance may not work properly if it is left for a long time at a temperature outside the specified range.
| Climatic Class | T. temp. (°C) | T. temp. (°F) |
| SN | From 10 to 32 | From 50 to 90 |
| N | From 16 to 32 | From 61 to 90 |
| ST | From 16 to 38 | From 61 to 100 |
| T | From 16 to 43 | From 61 to 110 |
- Ensure that the voltage indicated on the appliance data plate corresponds to the domestic supply voltage.
- Do not use single/multiple adapters or extension cables.
- For the water connection, use the pipe supplied with the new appliance; do not reuse the one from the previous appliance.
- Power cable modification or replacement must only be carried out by qualified personnel or the After-sales Service.
- It must be possible to disconnect the appliance from the mains by unplugging it or by means of a two-pole switch fitted upline of the socket.
SAFETY
- Do not use the appliance to store aerosol cans or receptacles containing propellants or flammable substances.
- Do not store or use petrol, flammable liquids or gas in the vicinity of this or other electrical appliances. The fumes can create a fire hazard or explosion.
- Do not use mechanical, electric or chemical means other than those recommended by the Manufacturer to speed up the defrost process.
- Do not use or place electrical appliances inside the product if they are not of the type expressly authorised by the Manufacturer.
- The appliance is not intended for use by persons (children included) with restricted physical, sensory or mental capabilities or without experience and knowledge of the appliance, unless they are under the supervision or instruction of a person responsible for their safety.
- To avoid the risk of children becoming trapped and suffocating, do not allow them to play or hide inside the appliance.
- Do not swallow the contents (non-toxic) of the ice packs (in some models).
- Do not eat ice cubes or ice lollies immediately after taking them out of the freezer since they may cause cold burns.
USE
- Before servicing or cleaning the appliance, unplug it from the mains or disconnect the electrical power supply.
- All appliances equipped with an ice-maker and water dispenser must be connected to a water supply that only delivers drinking water (with mains water pressure of between 0.17 and 0.81 Mpascals (1.7 and 8.1 bar)). Ice-makers and/or water dispensers not directly connected to the water supply must be filled with drinking water only.
- Use the refrigerator compartment to store fresh food only and the freezer compartment to store frozen food, to freeze fresh food, and to make ice cubes only.
- Do not store glass containers with liquids in the freezer since they may burst.
The Manufacturer declines any liability if the above advice and precautions are not respected
USING THE FREEZER
The freezer can be used for storing already frozen food and for freezing fresh food.
Switching on the freezer for the first time
- The freezer temperature does not have to set with the thermostat because the appliance is already factory-set.
- Plug in the appliance.
- Only place food in the freezer 2 hours after switching on.
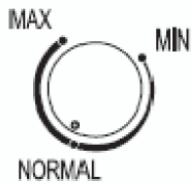
Temperature adjustment
Settings from MIN to MAX: increase the cooling temperature.
Thermostat setting:
MIN - storing food for short periods;
NORMAL - storing food for longer periods;
MAX - storing food for long periods and freezing food.
Note:
The room temperature, how often the door is opened and the position of the appliance can affect the temperature inside the freezer.
Take these factors into account when setting the thermostat.
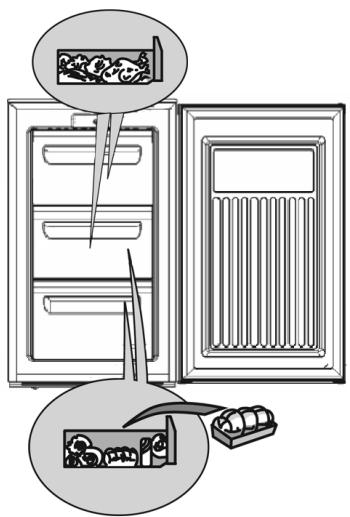
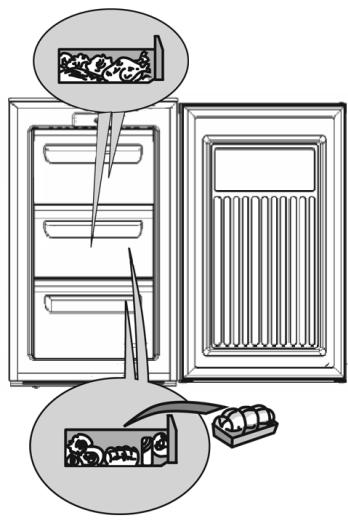
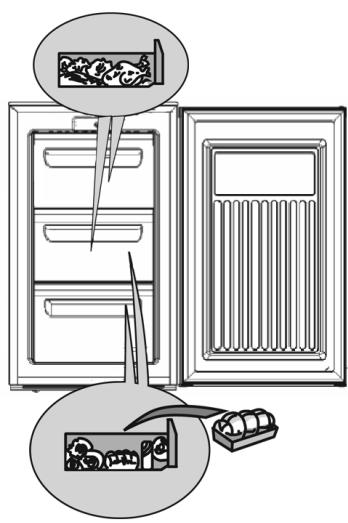
Freezing
Place the maximum amount indicated on the rating plate, in the middle compartment, taking care not to place it in contact with already frozen food.
For optimum appliance performance, turn the thermostat knob to Max, introduce the food to be frozen, and after 24 hours turn the knob back to Normal.
In general, around 24 hours of "MAX" function is sufficient after adding food; after this time, deselect the "MAX" function (if present).
Important:
When freezing small amounts of food, the food can be placed in any compartment except the bottom drawer.
Also, in order to save energy, the fast freeze function (if present) does not have to be activated.
Thermostat
Control unit
Advice for freezing and storing fresh food.
- Before freezing, wrap and seal fresh food in: aluminium foil, transparent film, waterproof plastic bags, polyethylene containers with lids or freezer containers suitable for the food being frozen.
- Food must be fresh and of prime quality.
- If possible, fresh vegetables and fruit should be frozen immediately after being picked, to preserve the nutritional substances, structure, consistency, colour and flavour.
Note:
- Always leave hot food to cool before placing in the freezer.
- Consume fully or partially thawed foods immediately. Do not refreeze unless the thawed food is used to prepare a ready meal. Once cooked, the thawed food can be refrozen.
Important:
The table opposite gives the recommended storage times for frozen fresh foods.
Classification of frozen foods
Put the frozen products in the freezer and classify them. It is advisable to indicate the storage date on the packs, to ensure their use before the expiry dates.
Advice for storing deep-frozen food
When purchasing deep-frozen food products:
- Make sure the packaging is not damaged, otherwise the food can deteriorate. If the package is swollen or has damp patches, it has not been stored in optimum conditions and may have started to thaw.
Purchase frozen food last and use thermal bags to carry it. - Place frozen foods in the freezer as soon as you get home.
- Do not refreeze partially thawed food products; consume them within 24 hours.
- Avoid or reduce temperature variations to a minimum. Respect the expiry date on the pack.
- Always follow the instructions given on the pack for storing frozen foods.
| MONTHS | FOOD |
| 1-3 | |
| 4-7 | |
| 8-12 |

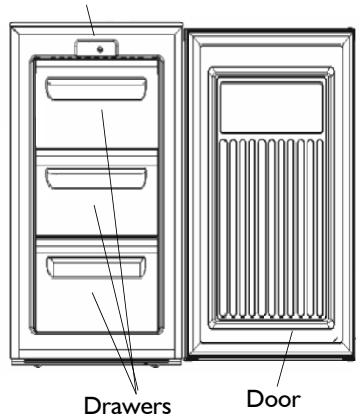
Removing the drawers
- Pull out the drawers as far as they go, then lift slightly and remove.
Note:
The drawers can be removed in order to obtain more space.
Make sure that the load does not exceed the limit (if present) indicated on the side walls of the appliance.
Making ice cubes
- Fill the ice cube tray 2/3 full and place it in the special freezer compartment.
- Do not use sharp or pointed instruments to detach the tray if it is stuck to the bottom of the freezer.
- Bend the ice tray slightly to remove the cubes.
Note:
The freezer door will not re-open easily immediately after closing. Wait a few minutes before opening again in order to allow for compensation of the vacuum created.
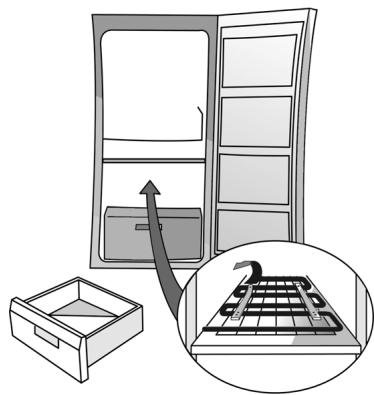
Fig.1
DEFROSTING AND CLEANING THE FREEZER
Before any cleaning or maintenance operation, always unplug the appliance or disconnect it from the power supply.
Defrost the freezer once or twice a year, or when the frost on the refrigeration grills is excessive.
It is perfectly normal for frost to form on the grills. The amount of frost and the speed at which it accumulates depend on room conditions how often the door is opened, and tends to accumulate more on the upper grills.
It is advisable to defrost the freezer when it is nearly empty.
- Open the door and remove all food products, wrapping them close together in newspaper and place in a very cool place or in a portable cooler.
- Leave the freezer door open to allow the frost to melt.
- Clean the inside of the freezer with a sponge soaked in lukewarm water and/or neutral detergent. Do not use abrasive substances.
- Rinse and dry thoroughly.
- Put the food back into the freezer.
- Close the freezer door.
- Plug in the appliance.
- Switch the freezer on.
CLEANING AND MAINTENANCE
Periodically clean the condenser at the back of the appliance with a vacuum cleaner or brush.
For long vacations
- Empty the freezer.
- Disconnect the freezer from the power supply.
- Defrost and clean the inside.
- Leave the door open to prevent the formation of unpleasant odours and to eliminate the moisture inside.
TROUBLESHOOTING GUIDE
I. The appliance does not work.
- Is there a power failure?
Is the main switch turned on? - Are the household electrical system protection devices efficient?
Is the thermostat correctly set?
Was the appliance switched on correctly?
2. Excessive frost build-up.
Is the defrost water drain correctly positioned?
Was the door properly shut?
Notes:
- If the front edge of the appliance is hot, this is not a defect but prevents the formation of condensate.
- Gurgling and hissing noises due to expansion in the refrigerant circuit are normal.
AFTER-SALES SERVICE
Before contacting the After-Sales Service:
- See if you can solve the problems on your own (see "Troubleshooting guide").
- Switch the appliance on again to see if the problem has been eliminated. If it has not, disconnect the appliance again and repeat the operation after one hour.
- If the problem persists, contact the After-Sales Service.
Specify:
the type of fault,
the model,
- the Service number (the number after the word SERVICE on the rating plate inside the appliance),
- your full address,
- your telephone number and area code.
SERVICE 0000 000 0000

INSTALLATION AND DOOR REVERSIBILITY
- Install the freezer away from heat sources. Installation in a hot environment, direct exposure to the sun or installation near heat sources (heaters, radiators, cookers) will increase power consumption and should therefore be avoided.
-
If this is not possible, the following minimum distances must be respected:
-
30~cm from coal or paraffin stoves;
- 3cm from electric and/or gas stoves.
Install the appliance in a dry, well-ventilated place - Clean the inside (see "Defrosting and cleaning the freezer").
- Fit the accessories.
Electrical connection
- Electrical connections must be made in accordance with local regulations.
- Voltage and power consumption are indicated on the rating plate inside the appliance.
- Earthing of the appliance is compulsory by law. The manufacturer declines all liability for injury to persons or animals and for damage to property resulting from failure to observe the above procedures and reminders.
- If the plug and socket are not of the same type, have the socket replaced by a qualified electrician.
- Do not use extension leads or adapters.
Disconnecting the appliance
Electrical disconnection must be possible either by unplugging the appliance or by means of a double-pole switch located upline from the socket.
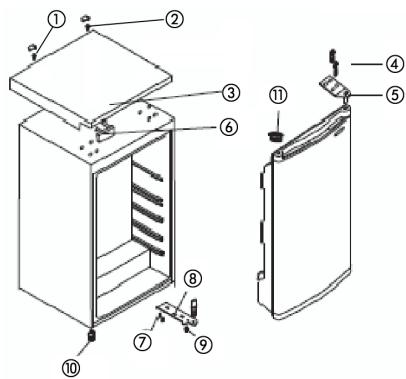
Door reversibility
If necessary for installation purposes, the direction of door opening can be changed from right to left (depending on how it is supplied).
Important! The appliance must not be connected to the power supply during operations to reverse door opening. Unplug the appliance from the mains before starting.
A. Remove the two screws (1/2) on the rear of the top (3) with the aid of a Phillips screwdriver
B. Remove the plastic top (3) and the hinge hole cover cap (11)
C. Remove the two screws (4) holding the top hinge (5)
D. Move the cover (6) to the opposite side
E. Tilt the appliance and remove the two screws (7) holding the bottom hinge (8) and the corresponding foot (9)
F. Remove the foot (10) of the opposite hinge side and invert the position with the foot (9) of point (E)
G. Fit the bottom hinge (8) and the top hinge (5) on the opposite side, repeating the steps from point A to point D in reverse order
1./2.top screws
3. top
4. top hinge screws
5. top hinge
6. cover
7. bottom hinge screws
8. bottom hinge
9. hinge side foot
10. foot
II. hinge hole cover cap
Location Requirements
To ensure trouble-free operation, the appliance must not be exposed to temperatures below 16^ or above 32^ .
Avoid the following installation locations: kitchens with no ventilation, outside spaces, greenhouses, garages. For correct functioning, the appliance must be installed:
in a dry place.
Away from direct sunlight.
Away from extreme temperatures (away from cookers or other heat sources).
As the appliance will be very heavy when full, it must be positioned on a sound, strong floor.
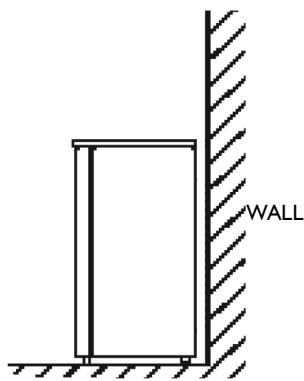
Ventilation requirements
Push the freezer gently into place until it is the optimum distance from the wall.
Ensure that once positioned, there is at least 50~mm clearance above the appliance.
If there is insufficient space available above, leave a distance of 25 mm on both sides.
Check that the appliance is not crushing the power supply cable.
No parts that may become hot must be left exposed. Where possible, the rear of the appliance should be near the wall, leaving sufficient space for air to circulate.
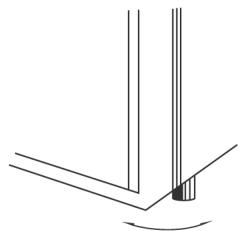
Leveling
The appliance must be level; to eliminate any rocking: check that the appliance is vertical and that both adjustment devices are resting firmly on the floor, so that the compartment is level.
Level the appliance, loosening the appropriate adjustment device positioned at the front (using your fingers or a screwdriver).
The appliance is heavy. Exercise due caution when moving it.
*For detailed specifications, see the rating plate on the rear of the freezer. The specifications are subject to alteration without prior notice.
Note:
The direction of door opening can be changed. If this operation is performed by After-sales Service it is not covered by the warranty.


ELECTRICAL CONNECTION
1) For Great Britain only
Warning - this appliance must be earthed
Fuse replacement
If the mains lead of this appliance is fitted with a BS I363A I3amp fused plug, to change a fuse in this type of plug use an A.S.T.A. approved fuse to BS I362 type and proceed as follows:
- Remove the fuse cover (A) and fuse (B).
- Fit replacement 13A fuse into fuse cover.
- Refit both into plug.
Important:
The fuse cover must be refitted when changing a fuse and if the fuse cover is lost the plug must not be used until a correct replacement is fitted.
Correct replacement are identified by the colour insert or the colour embossed in words on the base of the plug.
Replacement fuse covers are available from your local electrical store.
2) For the Republic of Ireland only
The information given in respect of Great Britain will frequently apply, but a third type of plug and socket is also used, the 2-pin, side earth type.
3) Socket outlet / plug (valid for both countries)
If the fitted plug is not suitable for your socket outlet, please contact Whirlpool Service for further instruction. Please do not attempt to change plug yourself. This procedure needs to be carried out by a qualified Whirlpool technician in compliance with the manufactures instructions and current standard safety regulations.

MODE D'EMPLOI
AVANT D'UTILISER L'APPAREIL
CONSEILS POUR LA PROTECTION DE L'ENVIRONMENT
PRECAUTIONS ET RECOMMANDATIONS GENÉRALES
COMMENT FAIRE FONCTIONNER LE CONGÉLATEUR
COMMENT DÉGIVRER ET NETTOYER LE CONGÉLATEUR
NETTOYAGE ET ENTRETION
DIAGNOSTIC RAPIDE
SERVICE APRÉS-VENTE
INSTALLATION ET RÉVERSIBILITÉ DE LA PORTE
AVANT D'UTILISER L'APPAREIL
| MOIS | ALIMENTS | |
| 1-3 | ||
| 4-7 | ||
| 8-12 | ||
Extraction des bacs
LIMPEZA E MANUTENÇÂO
GUIDA RICERCA GUASTI
SERVIZIO ASSISTENZA TECHNICA
INSTALLAZIONE E REVERSIBILITA PORTA
PRIMA DI USARE L'APPARECCHIO
| MESI | CIBI | |
| 1-3 | ||
| 4-7 | ||
| 8-12 | ||

GUIDA RICERCA GUASTI
IPIN XPHESIMOIOIHSETE TO IPOION
Houkeun Toun exete ayopaei exei oxediaote i yia oikiakn xpon, kaowc kai yia xpon o: -Kouicex wpvw evyaia,ckataotmuatov n/kai ypaepiwv
- aypoktnmuata
- EVOOExia, TAVOExia, xWpouc diaoVns, TAVOExia tUIOu "bed & breakfast" via XpHON aTO eUOVwEvouc TEAteC.
Tia va xpnoiOIOinOE tov kaIutepo Duvato TpOTo Tn OuaKeun oac, aoc Tnapakaloume va diaBaoETe TPOeKTIa TIG obnyies XpOnc OTiOioies 8 pEITE TIV Tpeipvapn Tou PoiovTOc KAI xpnoieos oumuouc.
ΦuáξεTo TApóv Evyεipidio yia Kaθε μελλοντικn xρηση.
1.Aoou aTououkeuaoetn oukeun, Beaiwveote otE ovexi cKi otKAEivei TEaia nToptA.Tuxovcncipetieva avapepovtato kataotnua TwnoncEvTOC 24 wov an tov npadoan tou piovtoc.
2. SuvioTOUe VA TEPiEVETE TOUAxIOV duo wpe TPIV ΘeOe OE λeIToupyia TN OuaKeun, VIA va EITIpaTe ITO yukTIKO KkLwua va Eivai TAnpoc AtodotIK.
3.BeBaiWveOte Oti n EYkataaON KI n NAEKtpiKn SuVDoN TpaayatotIOuovTAt oTo Evav EIOKEUeVO Texviko uOpwva ME TcOOnyieC TOU KATAOKEuaTn KAI OEuMOPpwon Me TOUC TOTIKOUKAVoEvC VIA TNV aOFAAia.
4. Kaθαρίσε Το Σωιτερικό του προγόντος πριν το χρησιμοτοήσετε.
Zuouaies yia th biatnpon Twv katepsiuyevwv Tpoqipwv
Kata Tnv ayopá Twv kateyuvywv Tpoφipwv, βεbaωθεiTe 0Ti:
Houkeuaia n To TnakeTo eivai avetapga, yiata Tpofipua μTOpéi va aaloiωθouv. Av eva TnakeTo eivai pouokwévo n TAPouoiacei λekedec uypoiaac, dEv exei diatnpθei otic IàviKcσuvθnkec kai μTOpéi va exei ev μpeiξeaywoeI.
Ayopacet Ta kateyuveva Tpofiia Teleutaia KAI xpnoiioite Thepikcs Toavtes ia n metapop
Molc qtae t o otiti oac, balea eouw ta kateuyuve tpoipua oToV katauwktn.
MnvauxTe gava Ta TpOipua Tou exouv Evpei Eeayoei, aaaa kaataaawote Ta eo a 24 wepc.
- Atiopeuyete n meiwete oTo elaxioto Tc diakmuavoeis Tns
- thepokpaiaç. Tnpite tvn neepounvia ληngns tou
- avapépetai otn ouokeuaia.
Akoouthei Teavta tC onyies oukeuaiai yia tn 0iatnpnTowkateyuuyevwTpOipuWv.
| MHNEΣ | TPOΦIMA |
| 1-3 | |
| 4-7 | |
| 8-12 |
INNAN APPARATEN ANVÄNDS
MILJÖRÄD
FÖRSIKTIGHETSÄTGÄRDER OCH ALLMÄNNA FÖRSLAG
ANVÄNDNING AV FRYSEN OCH DESS FUNKTIONER
AVFROSTNING OCH RENGÖRING AV FRYSEN
RENGÖRING OCH UNDERHÄLL FELSÖKNING
SERVICE
INSTALLATION OCH OMHÄNGNING AV DÖRR
INNAN APPARATEN ANVÄNDS
RENGJØRING OG VEDLIKEHOLD
FEILSKINGSLISTE
SERVICE
INSTALLASJON OG OMHENGSLING AV
DØREN
FØR APPARATET TAS I BRUK
RENGJØRING OG VEDLIKEHOLD
OPSTILLING OG VENDING AF DØREN
FØR APPARATET TAGES I BRUG
Regulering at temperature
OPSTILLING OG VENDING AF DØREN
| MÉSÍCE | JÍDLA |
| 1-3 | |
| 4-7 | |
| 8-12 |
Vvjmutí zásuvek
| MESIACE | POTRAVINY |
| 1-3 | |
| 4-7 | |
| 8-12 |
Vybratie kosov
PYKOBODCTBO NO NONCKY HENCINPABHOCTEI
CEPBNUCHbI ΚEHTP
YCTAHOBKA ППБОРА И ИЗMEHEHNE HABECKI DBEPN
3aayBleHne O COOTBETCTBNN
CobetbI no 3aMopaxnBaHHIO n XpaHeHHIO CBexNX npOdyKTOB.
3aBepHnTe n 3aneuatae Te CBexne npOdyKtbl, PpeHa3HaueHHbIe IJIra 3aMopaxKbHaHn: B FOJbry, pO3paunHyIOJIeHNy, HEnpOMOKaEMbIe PJIaCTNKOBbIe NaKeTbI, POIN3TNJIeHOBbIe EMKOCTN C KpbIshKoI, CNEUAnJBHbIe EMKOCTN, PpINOdHbIe IJIra 3aMopaxKbHaHn pOdyKTOB.
-Пюдукты Должныбытс CBEXUMN N OTЛИHORO KahectBa.
- CBexnE OBOUH N ΦpykTbI, NO BO3MOXHOCTN, CJIeDyET 3aMopaxNBaTb Cpa3y PocNe TORO, KAK OHN 6blN CO6paHbI, B CEJAX COxPAHEHIN IITaTeJIbHbIX CBOIcTB, CTpyKTypbI, KOHCNCTeHcHIN, ZBeTa N BKyCa.
Приимеанne:
Bcerda daTe ropyIM npOdyKTAM OCTbITb, npEeJe YEM KlaCTb INB MOpO3nIbHNK.
- HemeJeHNO nCNoJb3yIe B nIuSy pa3MopOxeHHbIe nnu qactnHPO pa3MOpOxeHHbIe npOdyKtbl. He NoDBeprAte INx NOBTOPHOMy 3aMopaxnBaHNIO, KpOme CnyaEB, KOrda pa3MOpOxeHHbI npOdyKT NcNoJIb3yeTcra IJr pnpiroTOBJIeHn rOTOBORo 6JIHOa. Pocne npnrTOBJIeHn, pa3MopOxeHHbI npOdyKT MoXET bItb CHOBA 3aMopOxeH.
BHHMaHHe:
Для onpeendeHЯ donyctmblix cpoKOB xpaHeHn CBexnx n 3aMopoxeHHbIX npOdykTOB o6paTntecb K Ta6lnue, npNBBeDEHHoI prdom.
KlaccnΦnkauzna 3amopoxeHHbIX npoaykTOB
IIOLOXInTe 3aMOpOKeHHbIe IpoDyKtbl B MOpO3nJIbHnK nHaIINuInTe INx Ha3BaHnE Ha yNaKOBKe.
Pekomehdyetc TaKke yka3aTb Ha ynaKOBKe DaTy 3aKlaJKn Ha XpaHEnHe IJr OeBceJeHn CBOEbpemEHOrO NcNoJIb3OBAHn IpoDyKTa B NiIuY.
CObetbI NO xpaHeHHIO 3amOpOKeHHbIX npOdyKTOB
B MOMENT npnoobpeTeHnA 3aMOpoxeHHbIX pOdyKTOB y6eIntecb B CJIeDyUoIeM:
- YnakOBka nIIN paKET He NOBpeXeHbI, TaK KaK 3TO MoKet Bbl3BaTb nopUy npOdykTa. EcIn nAkET B3dYt, INI Ha HEM BnDhl BnAaXhble PnTHa, 3TO O3HaayeT, yTO OH XpaHJIcR He B ONTIMaJIbHbIX ycNoBmIx, N TO yXe MOR NaaTbCnpoceCC pa3MopaxKnBaHnI.
- Покуразе заморожениные позутBI В полдню Oчерь и дя IXпеговOSTИСпOLTБУТЕ Термocymк.
Cpa3y Je IO BO3BpaUeHn IOMOI NOLOXHTe 3aMOpOKeHHbIe IPOdYKTbI B MOpO3NJbHNK. - He подевраи Te часчуно pa3мороженипpoДукты ПОВТOPHOMу 3amopaxINBaHHIO, a ИСПОЛьЗУTe INx B Teченze 24ЧаСов.
- I36eRaTe nJIn CBeIInTe K MInHmMy My nepeNaIbI TemnepaTpbl. Co6JIouaTe DaTy 3aBepSeHn Cpoka xpaHeHry, yKa3aHHyIO Ha yPaKOBKe.
Bcerda npndepknaBaiTecb yka3aHn no xpaHeHIO 3amopOKeHHbIX npOdyKToB, npUBeDeHHbIX Ha INx ynapokBke.
MECRAbl IPODyKtbl
| 1-3 | ||
| 4-7 | ||
| 8-12 |
N3BJeHHe RaIKOB
-ПOTЯНITEяшкIN hapyxdo ynpa, cIeRka npINIOdHIMnTe N BbIHbTe nx.
Приимеанно:
Дя COЗдадиьшeroобема BHyTpni KaMepbl MOxHOBbIHyTb n3 Hee RaUNK.
Clende 3a TeM, TTo6bI Ha rpy3Ka Ha bokOBbIe CTeHKn np6Opa He npeBbIaJa yka3aHHbIe npeJeIbI (ecIn TaKOBbIe IMeIoTc).
Bbipa60tka Ky6nKOB Jbda
- HanoJIHnTe BaHNochky IJIa Na Ha 2/3 emKoCTn BOIoN I NOCTaBbTe ee B COOTBeTCTByUoIe eOtJeHeNe IJI 3amopaxuBaHnI.
Bcnyae ecn BaHHOchka npImep3aet Ko nHy MOp03nIbHnka, He NOb3yTeCb IJIe ee OTdJIeHn 3aoCTpeHHbIMn IIN pExkyIuMn IpeMeTaMn. - YTo6bI ObleJHTb OTdJIeHHe Ky6KOB Jbda OT BaHHOcN, CJERKa COrHInTe ee.
Приимechани:
Повторhoe packpbltne Дерць MОрозинka CPA3y noche TORO,ΚΑΚΟΗ ΜБΙΝΑ 3aKpbIta,OKa3bIBAeTcγ 3aTpUdHHTeJIbHbIM.
CneJyET noJoxdaTb DBe nJIn TprMnHytbl, YTO6bl npOn3OuJa KOMpeHcaZnra CO3DaHHORo NOHNKeHHORo DaBJeHnA.

Pnc.1
PA3MOPAXKIBAHNE IN YBOPKA MOPO3nJIbHNKA
Ipeed BbInOJIHeHem KAKNX-Jn6o Onpaun no 06cIyXuBaHnIO nJIn y6OpKe BbIHbTe BNJKy N3 pO3eTKN INBbIKJIIOHTe 3JeKTPnueCKoe nITahHe.
PekomeHdyeTcpa3MopaxNBaTb MOp03nJbHnK 1 nI 2 pa3a B roD nIIN B cIyueae o6pa3ObaHnHa OXnaJdaIOuNX peIeTKaX n36bIToUHOro KOJInuYeCTBa INHe.
06pa3OBAHHe Ibda Ha peWetKax CnCTeMbI OXlaJxDeHnRABJIeTcH HopMaJIbHbIM RaJIeHMeM. KoINueCTBO n cKOpocTb erO hAKoJIpeHnra 3aBnCt OT ycJIOBNI OKpyXaIOSeI Cpebl N OT KOInueCTBa OTKpbIBaHNI DBepciI.
CoBeTyem npOn3BODnTb pa3MopaxnBaHne npu MNHmAlbHOM 3aNaCe npOdyKToB.
- OTkpoIte DBepuN BbIhTe BCE npOdyKtbl, 3aBepHnte INB rA3eTHyIO bMyArN NOLOXHTe PIIOTHO dpyK dpBy B pOxJaHOM MeCTe NIN B TepMOCymKy.
- OctabTe DBePcU MOpO3nJIbHnKa OTKpbIToI dJa
-обecneueHn TaHnI bDa.
BbIMoTe BHyTpeHHIOU qaCTb MOpO3nJIbHnka ry6ko, CMOueHHoB TTeIIOB BOe n/INB paCTBope HeITpaJIbHOro MOIOSeRo cpeIcTBa. He IOnJIb3yIteCb a6pa3NHBbIMN BeIeCTBaMn. - BbIMOnTe n TtuaTeJIbHO BbICyUInTe BHyTpEHHIIO NOBepxHOCt b MOpO3NJIbHNka.
- Пложиные розукты.
3akpoIte Ibepcy MOpO3NlbHnka.
BHObB BCTaBbTe BUNKy B pO3eTKy.
BkIIOUHTe MOpO3nJIbHnK.
ЧИСТКА И YXОД
PepnoDnueckn OunuAaTe PbJIeCOCOM NIn UeTKoN KOHdEHCaTOp, paCNoJIOXeHHbI C 3aJHeI CTOpOhbl npi6opa.
Pn dIInTeJbHOM OTCyTCTBm
- Bынты BCE подуктуи 3 Морозиьнka.
- OTKJIIOUHTe npIbOp OT 3JIeKTpOcTeN.
- BылолнITE pa3MopaxINBaHne И BыIMоЛte KaMepу n3HyTpN.
- OctabbTe DBepb OTKpbIToT dI npdeynpekxdHn NOBLeHn HnnpaTHbIX 3anaxOB n BnaXHoCTn BHyTpni np6opa.
PYKOBODCTBO NO NONCKY HENCPABHOCTEIN
OcToPoXHo NoITaJIKNBaIte MOpO3NlBHyIO KaMepy, NOKa OHa He OKaXeTcRa Ha NaIeXaUeM pacCTOarHIN OT CTehbl. HAd OKOHaTeJbHO yCTaHOBJeHHbIM npi6OpOM DoJHXO OCTaBaTbCBAODHO pOcTpaHCTBO BbICOTOn He MeHee 50 MM.
EcIn CBepxCy CBO6OJHOro MeCTa HeT,HeO6XoJIMO OCTaBnTb He MeHee 25 MM CBO6OJHOro IpocTpaHCTBa IIO OBeEM CTOpOHam Pnp6opa.
Y6eIITecb, YTO cTeBOI shHyp He nepeaBHeN KOpnycom npi6opa.
Harpebaiouneca yactn npnbopa He doJXhbl 6bItb IOCTynbl. 3aJnra CTeHka npnbopa nO BO3MOxHOCTN DOJXHa HaxoITbcr y CTeHbl; Mekdy HUMn DoJXHO 6bItb TOJIbKO paCCToHne, Heo6XoIMoe dIy oBeCpeHnBEHTNJLAIuN.
YctahOBka np6opa B ropn3oHTaIbHoe noJoxeHne
I3aKaTe DBe-tpn MNHyTN, 3a DaJeTe Bb3MOXHOCT 3a KOMpeHCipaHe Ha 06pa3yBaJIoTO Ce HJIraHe.

Φur.1
M3NCKBaHn7a HnCTaJnpaHe
3a ocniIpyraBe Ha npabINHO fYHKUOHNpaHe, ypeIbT He TpI6Ba Ia 6bIe N3IOJKeH Ha TeMpePaTyprn NO-HNCKn OT 16°C nII, no-BVCOKn OT 32°C.
IpeopbUba ce, da ce n36rBa noCTaBHeTo Ha ypeDa B kxHЯ 6e3 BeHTnlaun, BbHNo NOMEueHne,
opaHkepnaR.3a daФyHKUOHpa npabuHno,
ypeIbT TpOBA Da ObIe INHCTaIIpaH: B cyxa cpeJa.
- BEFORE USING THE APPLIANCE
- SAFEGUARDING THE ENVIRONMENT
- Packing
- Scrapping/Disposal
- Note:
- Declaration of conformity
- C
- PRECAUTIONS AND GENERAL RECOMMENDATIONS
- INSTALLATION
- SAFETY
- USE
- USING THE FREEZER
- Switching on the freezer for the first time
- Temperature adjustment
- Freezing
- Place the maximum amount indicated on the rating plate, in the middle compartment, taking care not to place it in contact with already frozen food.
- Important:
- Advice for freezing and storing fresh food.
- Classification of frozen foods
- Advice for storing deep-frozen food
- Removing the drawers
- Making ice cubes
- DEFROSTING AND CLEANING THE FREEZER
- CLEANING AND MAINTENANCE
- For long vacations
- TROUBLESHOOTING GUIDE
- The appliance does not work.
- Excessive frost build-up.
- Notes:
- AFTER-SALES SERVICE
- Before contacting the After-Sales Service:
- INSTALLATION AND DOOR REVERSIBILITY
- Electrical connection
- Disconnecting the appliance
- Door reversibility
- Location Requirements
- Ventilation requirements
- Leveling
- 1) For Great Britain only
- Warning - this appliance must be earthed
- Fuse replacement
- 2) For the Republic of Ireland only
- 3) Socket outlet / plug (valid for both countries)
- MODE D'EMPLOI
- AVANT D'UTILISER L'APPAREIL
- Extraction des bacs
- LIMPEZA E MANUTENÇÂO
- PRIMA DI USARE L'APPARECCHIO
- GUIDA RICERCA GUASTI
- IPIN XPHESIMOIOIHSETE TO IPOION
- Zuouaies yia th biatnpon Twv katepsiuyevwv Tpoqipwv
- INNAN APPARATEN ANVÄNDS
- FØR APPARATET TAS I BRUK
- RENGJØRING OG VEDLIKEHOLD
- FØR APPARATET TAGES I BRUG
- Regulering at temperature
- OPSTILLING OG VENDING AF DØREN
- Vvjmutí zásuvek
- Vybratie kosov
- 3aayBleHne O COOTBETCTBNN
- CobetbI no 3aMopaxnBaHHIO n XpaHeHHIO CBexNX npOdyKTOB.
- Приимеанne:
- BHHMaHHe:
- KlaccnΦnkauzna 3amopoxeHHbIX npoaykTOB
- CObetbI NO xpaHeHHIO 3amOpOKeHHbIX npOdyKTOB
- N3BJeHHe RaIKOB
- Приимеанно:
- Bbipa60tka Ky6nKOB Jbda
- Приимechани:
- PA3MOPAXKIBAHNE IN YBOPKA MOPO3nJIbHNKA
- ЧИСТКА И YXОД
- Pn dIInTeJbHOM OTCyTCTBm
- PYKOBODCTBO NO NONCKY HENCPABHOCTEIN
- YctahOBka np6opa B ropn3oHTaIbHoe noJoxeHne
- M3NCKBaHn7a HnCTaJnpaHe
Brand : LADEN
Model : CVT 5097
Category : Dishwasher