
MMB6382M - MMB6382M - MMB6382M--B - Blender BOSCH - Free user manual and instructions
Find the device manual for free MMB6382M - MMB6382M - MMB6382M--B BOSCH in PDF.
User questions about MMB6382M - MMB6382M - MMB6382M--B BOSCH
0 question about this device. Answer the ones you know or ask your own.
Ask a new question about this device
Download the instructions for your Blender in PDF format for free! Find your manual MMB6382M - MMB6382M - MMB6382M--B - BOSCH and take your electronic device back in hand. On this page are published all the documents necessary for the use of your device. MMB6382M - MMB6382M - MMB6382M--B by BOSCH.
USER MANUAL MMB6382M - MMB6382M - MMB6382M--B BOSCH
Register your new device on MyBosch now and get free benefits: bosch-home.com/ welcome

VitaPower Serie | 4
MMB63..
[de] Gebrauchsanleitung Standmixer 8
[en] User manual Blender 26
[fr] Manuel d'utilisation Blender 42
[it] Manuale utente Frullatore 61
[nl] Gebruikershandleiding Mixer 79
[da] Betjeningsvejledning Blender 95
[no] Bruksanvisning Blender 111
[sv] Bruksanvisning Blender 127
[fi] Käytöohje Tehosekoitin 143
[es] Manual de usuario Batidora 159
[pt] Manual do utiliser Triturador 177
[el] Exyeiipio xpiotn MnIevr 195
[tr] Kullanim kilavuzu Mikser 217
[pl] Instrukcja obslugi Mikser 236
[uk] KepiBnHTBO 3 ekCnpyataui CtaioHapn6neHep 256
[ru] RykoBoDCTBO noIb3OBaTeIa Minkcep 274
[ar] 296
A
B

C

D

E

F

G
1
8

7
9
10
11
12


3
4
5
6
7
8
9
10

11
12
13
15
17
14
16
18


19
21
23
20
22
24
| √ | √ | ||
| × | √ | ||
| × | √ |
26

27
28
29

30

31
32
| MIN-MAX | Clean Smoothie 1x2 x Min-MAX | |||||
| 60% +40% | √ | √ | 300-1300 200-500 | Smoothie | 1-2 x 1-2 x | |
| 70% +30% | √ | √ | 300-1300 200-500 | Smoothie | 1-2 x 1-2 x | |
| 40% +60% | √ | √ | 300-1000 200-600 | Smoothie | 1-3 x 1-2 x | |
| 60% +40% | √ | √ | 300-1300 200-600 | Smoothie | 1-2 x 1-2 x | |
| 40% +60% | √ | √ | 300-1500 200-600 | min | 20-30 s 20-30 s | |
| <70°C | √ | × | 300-1000 | min | 30-60 s | |
| 60% +40% <50°C | √ | √ | 300-1000 200-600 | max | 45-90 s 45-60 s | |
| + | √ | √ | 300-1300 | max | 45-90 s | |
| * | √ | × | 5-10x10g | Ice Crush | 1 x | |
| 180 °C 10 min <30 °C | × | √ | 400 | max | 120 s |
Inhaltsverzeichnis
Sicherheit 9
Safety 27
General information 27
Intended use. 27
Restriction on user group. 28
Safety instructions 28
Avoiding material damage. 31
Environmental protection and saving energy 31
Disposing of packaging 31
Unpacking and checking 31
Unpacking the appliance and parts 31
Scope of delivery. 31
Setting up the appliance 31
Familiarising yourself with your appliance. 31
Appliance 31
Symbols 32
Rotary switch 32
Programme buttons. 32
Safety systems 32
Before using for the first time..... 33
Cleaning the appliance and parts 33
Basic operation 33
Cable length 33
Recommended speeds 33
Using the blender to process food 33
Using instantaneous switching.....34
Using programmes. 34
Pushing down food for processing 34
Adding more ingredients. 34
Emptying the blender jug 35
Processing food using the To-Go blender jug 35
Closing the To-Go blender jug.....35
Cleaning and servicing 36
Dishwasher-safe components...... 36
Cleaning products 36
Cleaning the base unit 36
Cleaning the blender 36
Cleaning the To-Go blender jug and To-Go blade insert 37
Using the cleaning programme .... 37
Recipes 37
Overview of recipes 37
Troubleshooting 39
Malfunctions 39
Transportation, storage and disposal 41
Disposing of old appliance 41
Customer Service 41
Product number (E-Nr.) and production number (FD) 41
Warranty conditions. 41

Safety
Observe the following safety instructions.
General information
- Keep the instruction manual and the product information safe for future reference or for the next owner.
- Do not connect the appliance if it has been damaged in transit.
Intended use
Only use this appliance:
- With genuine parts.
for blending and puréeing. - for making pancake batter, sorbets, spreads, sauces and ice cream.
For crushing ice cubes.
Under supervision. - In private households and in enclosed spaces in a domestic environment at room temperature.
- for normal processing quantities and for normal processing times for domestic use.
Up to an altitude of max. 2000 m above sea level.
Disconnect the appliance from the power supply when:
are not using the appliance.
the appliance is unattended.
assembling the appliance.
taking the appliance apart.
- cleaning the appliance.
approaching rotating parts.
confronted with a fault.
Restriction on user group
This appliance can be used by persons with reduced physical, sensory or mental capabilities or a lack of experience and/or knowledge if they have been given supervision or instruction concerning use of the appliance in a safe way and if they understand the hazards involved.
Children must not play with the appliance.
Cleaning and user maintenance must not be performed by children.
The appliance must not be used by children. Keep children away from the appliance and power cable.
Safety instructions
Observe the safety instructions.
WARNING - Risk of electric shock!
If the appliance or the power cord is damaged, this is dangerous.
-
Never operate a damaged appliance.
-
Never operate an appliance with a cracked or fractured surface.
-
Never pull on the power cord to unplug the appliance. Always unplug the appliance at the mains.
-
If the appliance or the power cord is damaged, immediately unplug the power cord or switch off the fuse in the fuse box.
"Call customer services." Page 41
-
Improper installation is dangerous.
-
Connect and operate the appliance only in accordance with the specifications on the rating plate.
Incorrect repairs are dangerous.
-
Repairs to the appliance should only be carried out by trained specialist staff.
-
Only use genuine spare parts when repairing the appliance.
-
If the power cord of this appliance is damaged, it must be replaced by the manufacturer, the manufacturer's Customer Service or a similarly qualified person in order to prevent any risk.
An ingress of moisture can cause an electric shock.
- Never immerse the appliance or the power cord in water or clean in the dishwasher.
- Only use the appliance in enclosed spaces.
- Never expose the appliance to intense heat or humidity.
- Do not use steam- or high-pressure cleaners to clean the appliance.
If the insulation of the power cord is damaged, this is dangerous.
- Never let the power cord come into contact with hot appliance parts or heat sources.
- Never let the power cord come into contact with sharp points or edges.
Never kink, crush or modify the power cord.
WARNING - Risk of fire!
Intense heat may cause the appliance and other parts to catch fire.
- Never place the appliance on or near hot surfaces.
WARNING - Risk of scalding!
Hot food may splash out during processing and steam can escape from the lid.
- Add a maximum of 1000 ml of hot or frothing food.
Process hot food carefully.
Do not lean over the appliance.
Do not process food that is hotter than 50^ in the To-Go blender jug.
WARNING - Risk of injury!
-
Operating the appliance with damaged parts may result in injury.
-
Parts which show cracks or other damage or do not fit correctly must be replaced with genuine spare parts.
en Safety
-
Improper use may cause injuries.
-
Only use the appliance once it is fully assembled.
WARNING - Risk of cutting!
The blender knife has sharp blades.
- When cleaning and emptying the blender jug, watch out for the sharp blades.
- Never touch the edges of the blades with bare hands.
WARNING - Risk of suffocation!
-
Children may put packaging material over their heads or wrap themselves up in it and suffocate.
-
Keep packaging material away from children.
Do not let children play with packaging material. -
Children may breathe in or swallow small parts, causing them to suffocate.
-
Keep small parts away from children.
Do not let children play with small parts.
WARNING - Risk of harm to health!
Soiling on surfaces may be harmful to health.
Follow the cleaning instructions.
Clean surfaces which come in contact with food before each use.
Avoiding material damage
ATTENTION!
Improper use may cause material damage.
- Do not operate the appliance at no-load.
Observe the maximum processing quantities. - Never use the blender jug in the microwave or oven.
Do not use the blender jug to store objects which do not belong to it.
Environmental protection and saving energy
Disposing of packaging
The packaging materials are environmentally compatible and can be recycled.
- Sort the individual components by type and dispose of them separately.
Unpacking and checking
Find out here what you need to note when unpacking the appliance.
Unpacking the appliance and parts
- Take the appliance out of the packaging.
- Take all other parts and the accompanying documents out of the packaging and place them to hand.
-
Remove any packaging material.
-
Remove any stickers or film.
Scope of delivery
After unpacking all parts, check for any damage in transit and completeness of the delivery.
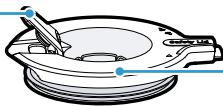
Fig. 1
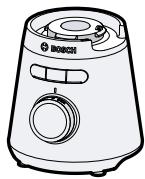
| A | Base unit |
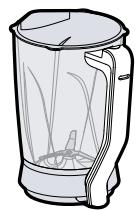
| B | Blender jug with EasyClick blade in-sert |
| C | Lid and measuring cup |
| D | Pusher |
| E | To-Go blender jug with blade insert1 |
| F | Lid with seal and closablemouthpiece1 |
| G | Instruction manual |
1 Depending on the appliance specifications
Setting up the appliance
- Place the appliance on a stable, level, clean and flat work surface.
- Pull the power cable out to the required length.
"Cable length", Page 33
Do not insert the mains plug.
Familiarising yourself with your appliance
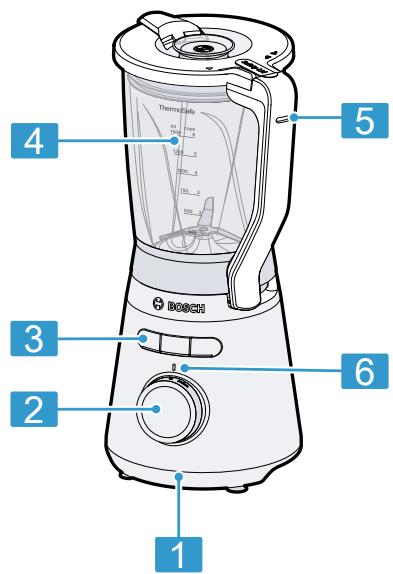
Appliance
You can find an overview of the parts of your appliance here.
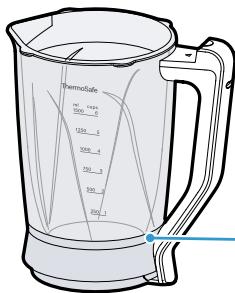
Fig. 2
| 1 | Base unit |
| 2 | Rotary switch |
1 Depending on the appliance specifications
| 3 | Programme buttons with LEDs |
| 4 | Scale |
| 5 | Lock indicator for the lid |
| 6 | Status display (LED) |
| 7 | Spout |
| 8 | Measuring cup |
| 9 | Lid with filling opening |
| 10 | Blender jug |
| 11 | EasyClick blade insert |
| 12 | Retaining bracket |
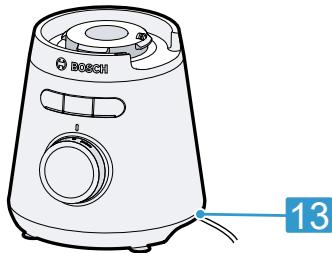
| 13 | Power cord storage compartment |
| 14 | To-Go blade insert¹ |
| 15 | To-Go blender jug¹ |
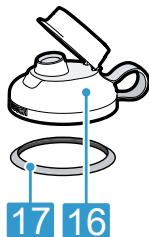
| 16 | Lid with seal and closable mouthpiece¹ |
| 17 | Seal |
| 18 | Pusher |
1 Depending on the appliance specifications
Symbols
You can find an overview of the symbols used on your appliance here.
| Symbol | Explanation |
| ▲▼ | Position markings |
| <6 | Open locking mechanism. |
| > | Close locking mechanism. |
Rotary switch
The rotary switch is used to start and stop processing and select the speed.
| Symbol | Function |
| 0 | Stop processing. |
| Symbol | Function |
| on | Switch on the appliance. |
| min | Process ingredients at low speed. |
| max | Process ingredients at maximum speed. |
| pulse | Process ingredients briefly at maximum speed. |
Tip: You can adjust the speed steplessly between min and max.
Programme buttons
You can use the programme buttons to start the programmes for specific use cases or precleaning. Each programme button has a corresponding LED, which shows the operating status.
Note: When the To-Go blender jug is attached, only use the Smoothie programme. The Ice Crush and Clean programmes are not suitable for the To-Go blender jug.
| Programme button | Function |
| Clean | Cleaning programme for precleaning when food residue has dried in |
| Smoothie | Programme for preparing smoothies |
| Ice Crush | Programme for crushing ice cubes |
Safety systems
You can find an overview of your appliance's safety systems here.
Start lock-out
Start lock-out prevents your appliance from being switched on accidentally.
You can switch on and operate the appliance once the blender jug has been correctly positioned and the lid is locked.
Overload protection
The overload protection system prevents the motor and other components from being damaged through being overloaded.
Before using for the first time
Configure the basic settings. Clean the appliance and accessories.
Cleaning the appliance and parts
- Clean all parts that come into contact with food before using for the first time.
"Cleaning and servicing", Page 36 - Put the cleaned and dried parts out ready for use.
Basic operation
Cable length
Adjust the length of the power cable to your needs.
Adjusting cable length via cable storage compartment
- Pull the power cable out to the required length.
- To shorten the cable, push it into the cable storage compartment.
Recommended speeds
You can find out here which speeds you can use to achieve optimal results.
| Setting | Use |
| pulse | Briefly blending food with in-stantaneous switching at max-imum speed. |
| max | Blending, puréeing, emulsifying, frothing and cutting up food. |
| min | Blending food that should not be cut up too small. |
Tip: Please use our recipe suggestions to gain experience with your new appliance.
"Overview of recipes", Page 37
Using the blender to process food
WARNING Risk of injury!
Improper use may cause injuries.
-
Only use the appliance once it is fully assembled.
-
Prepare the food.
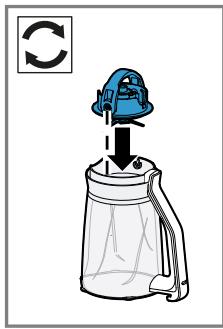
For example, cut up large items of food. - Turn the blender jug upside down.
- Open the retaining bracket. Fig. 3
- Align the EasyClick blade insert with the tap in the blender jug.
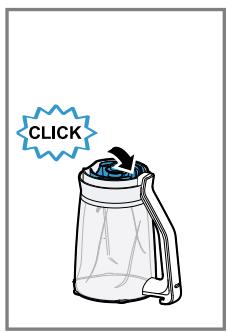
- Push the EasyClick blade insert into the blender jug and close the retaining bracket until it clicks into place.
Fig. 3
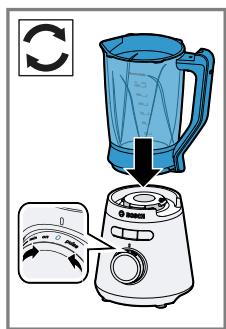
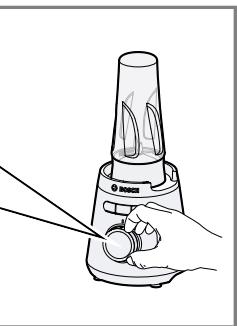
- Set the rotary switch to 0.
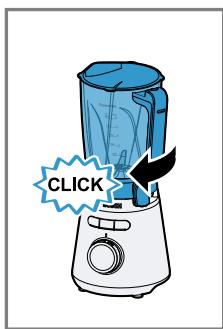
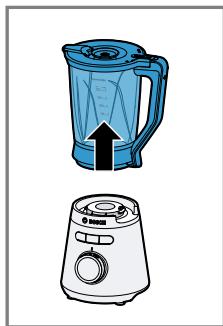
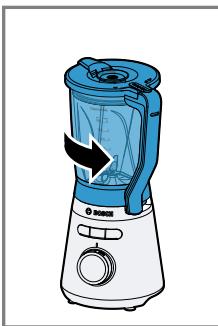
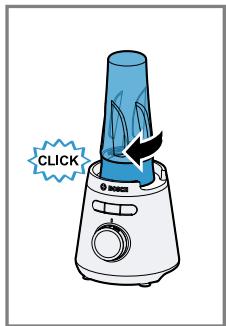
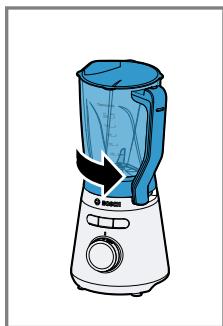
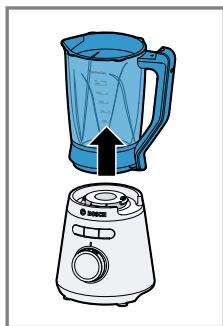
- Place the blender jug onto the base unit and rotate in a clockwise direction until it locks into place.
Fig. 4
en Basic operation
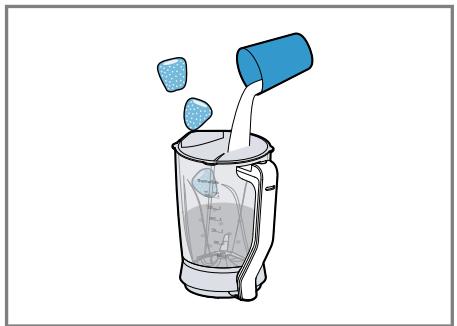
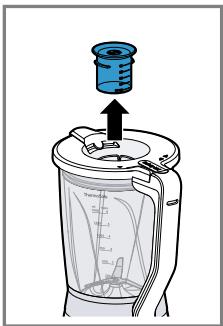
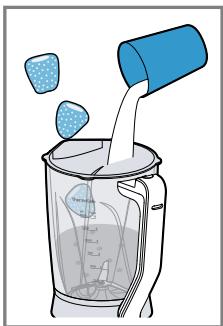
- Add the food to the blender jug. Fig. 5
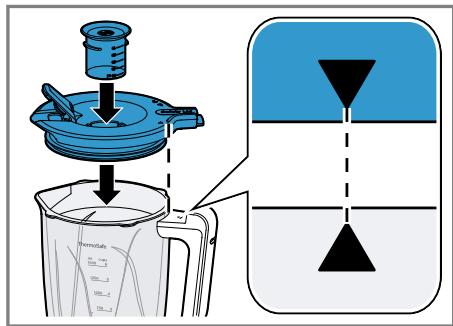
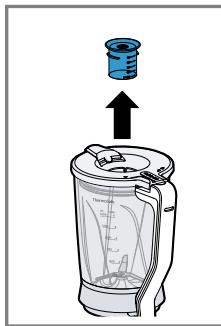
Observe the minimum and maximum processing quantities. "Overview of recipes", Page 37 - Insert the measuring jug in the lid and place the lid on the blender jug.
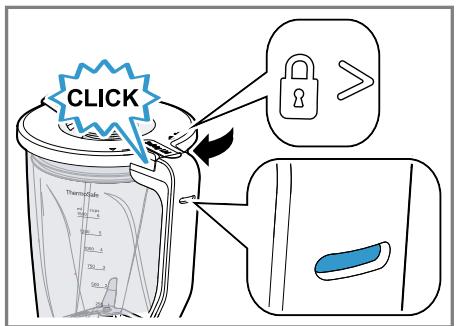
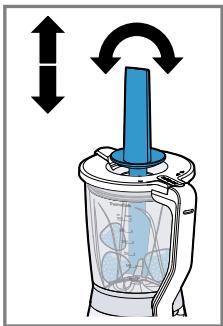
Fig. 6 The and markings must match up. - Turn the lid in the direction a > until it clicks into place.
Fig. 7
The lid must be completely closed. - The colour of the lock indicator for the lid changes from red to green.
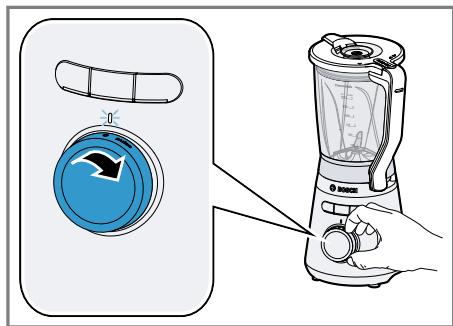
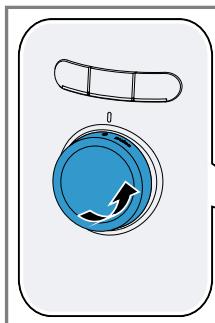
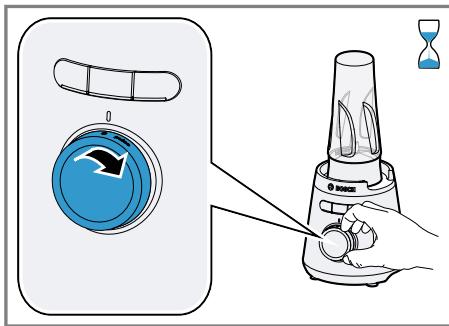
11.Insert the mains plug. - Set the rotary switch to on.
Fig. 8 - The status display (LED) on the rotary switch lights up.
- Set the rotary switch to the recommended speed.
Fig. 9 - Process the ingredients until you achieve the required result.
- To end the operation, set the rotary switch to 0.
Using instantaneous switching
- Set the rotary switch to pulse and hold it there.
Fig. 10 - The ingredients are processed at maximum speed.
- Release the rotary switch.
The rotary switch jumps to 0.
Processing stops.
Using programmes
Requirements
The blade insert is installed.
The blender jug has been attached and locked.
- The blender jug is filled with the food or ice cubes.
The lid is attached and locked.
The rotary switch is set to 0.
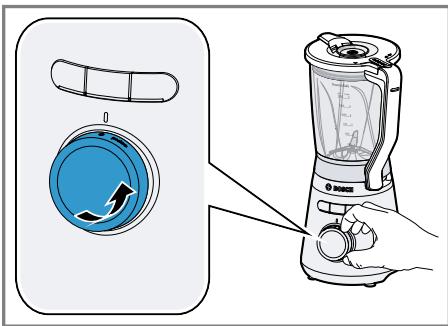
- Set the rotary switch to on. Fig. 8
The status display (LED) on the rotary switch lights up.
2. Press the Smoothie or Ice Crush programme button.
Fig. 11
While the programme is running, the LED for the selected programme lights up and the status display (LED) goes out.
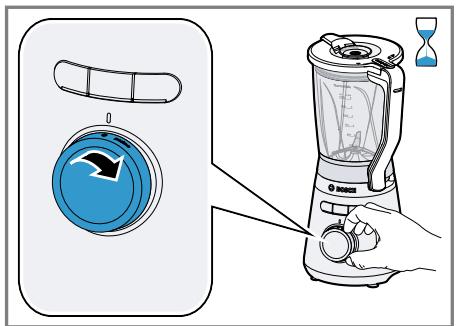
3. Wait until the appliance stops.
4. Set the rotary switch to 0.
Fig. 12
Tip: To prematurely stop the programme, set the rotary switch to 0.
- "Empty the blender jug."
Page 35
Pushing down food for processing
- Remove the measuring jug and insert the pusher into the filling opening.
Fig. 13 - Push down the food from the sides of the blender jug.
Fig. 13
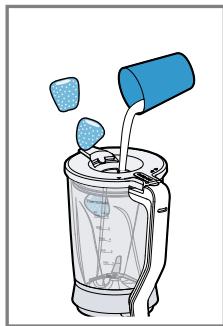
Adding more ingredients
-
During processing, remove the measuring jug and add the ingredients through the opening in the lid. Fig. 14
-
To add larger quantities, set the rotary switch to 0.
- Wait until the appliance stops.
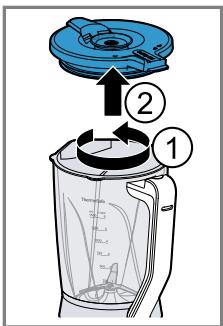
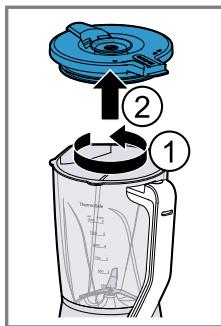
- Turn the lid in the direction < 6> and remove it. Fig. 15
- Add the ingredients. Fig. 15
- Place the lid on the blender jug again and continue to process the ingredients.
Emptying the blender jug
Requirement: The appliance has stopped.
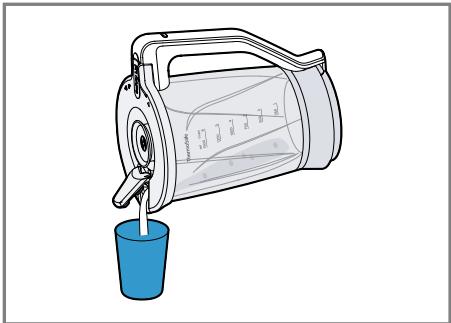
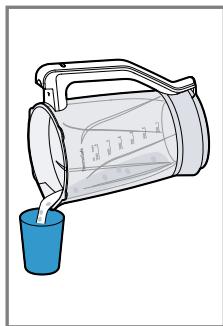
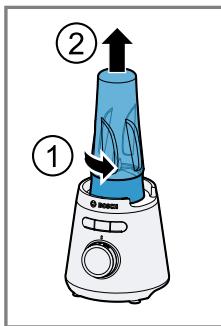
- Turn the blender jug anti-clockwise and remove it from the base unit. Fig. 16
-
To pour out just a portion of the processed food, use the spout.
-
Open the spout.
-
Place the processed food in a suitable container or serve immediately.
-
Close the spout.
Fig. 17 -
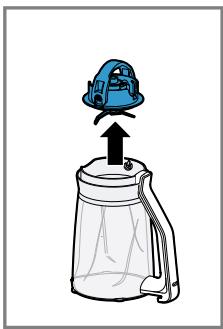
To pour out all of the processed food, remove the lid.
Fig. 18
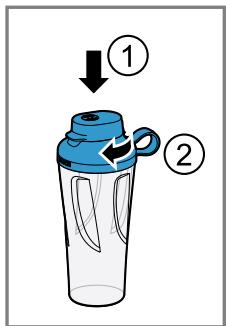
Processing food using the To-Go blender jug
- Prepare the food.
For example, cut up large items of food.
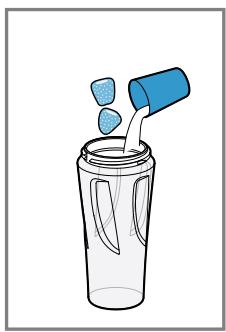
- Add the food to the To-Go blender jug.
Fig. 19
Observe the minimum and maximum processing quantities.
"Overview of recipes", Page 37
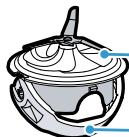
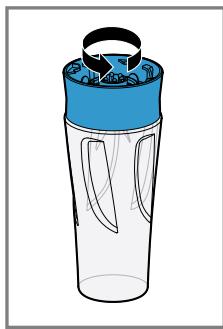
- Place the To-Go blade insert on the To-Go blender jug.
Fig. 19
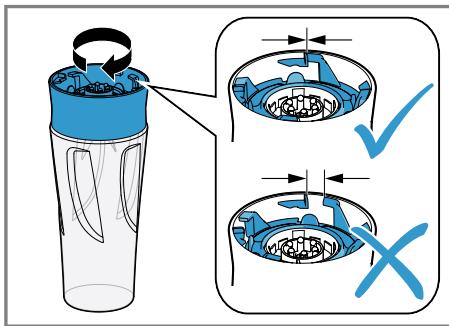
- Screw the To-Go blade insert and the To-Go blender jug in tightly. Fig. 20
The To-Go blade insert can only be connected to the base unit when the To-Go blender jug is fully screwed on.
- Set the rotary switch to 0.
- Turn the To-Go blender jug upside down.
Fig. 21
- Place the To-Go blade insert on the base unit and rotate in a clockwise direction until it locks into place.
Fig. 21 - Set the rotary switch to the recommended speed.
Fig. 22
Tip: We recommend pausing operation several times when preparing smaller quantities of baby food in the To-Go blender jug.
Processing can also take place with instantaneous switching.
"Using instantaneous switching", Page 34
- Process the ingredients until you achieve the required result.
- To end the operation, set the rotary switch to 0.
Fig. 23
Closing the To-Go blender jug
Requirement: The appliance has stopped.
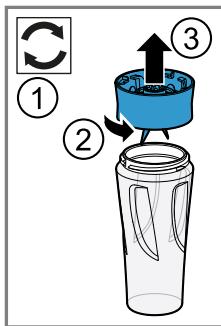
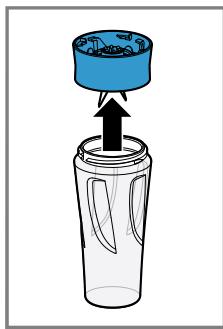
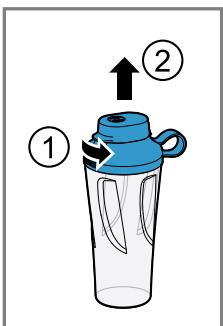
- Turn the To-Go blender jug anticlockwise and remove it from the base unit.
Fig. 24 - Turn the To-Go blender jug and unscrew the To-Go blade insert.
Fig. 24
en Cleaning and servicing
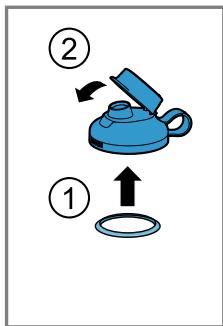
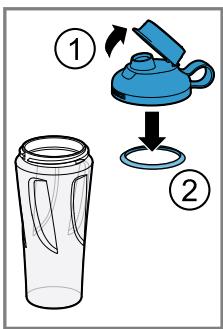
- Insert the seal for the lid.
Fig. 25 - Close the mouthpiece on the lid.
Fig. 25 - Screw the lid and the To-Go blender jug in tightly.
Fig. 25
Cleaning and servicing
To keep your appliance working efficiently for a long time, it is important to clean and maintain it carefully.
Dishwasher-safe components
Find out here which components can be put in the dishwasher.
ATTENTION!
Some parts may be damaged if they are put in a dishwasher.
- Only put dishwasher-safe parts in the dishwasher.
- Only use programmes that do not heat the water above 60^ C .
- Do not wedge plastic parts in the dishwasher.
This overview describes the cleaning process for the components.
Fig. 26
Cleaning products
Find out here which cleaning products are suitable for your appliance.
ATTENTION!
Using unsuitable cleaning agents or incorrect cleaning may damage the appliance.
- Do not use cleaning agents containing alcohol or spirits.
-
Do not use sharp, pointed or metal objects.
-
Do not use abrasive cloths or cleaning agents.
Cleaning the base unit
WARNING
Risk of electric shock!
An ingress of moisture can cause an electric shock.
- Never immerse the appliance or the power cord in water or clean in the dishwasher.
- Do not use steam- or high-pressure cleaners to clean the appliance.
Wipe down the base unit with a soft, damp cloth.
Cleaning the blender
WARNING
Risk of cutting!
The blender knife has sharp blades.
- When cleaning and emptying the blender jug, watch out for the sharp blades.
- Never touch the edges of the blades with bare hands.
ATTENTION!
The blender knife has sharp blades. Improper handling may damage the blades or the surface.
-
Never set the blade insert down with the blade facing downwards.
-
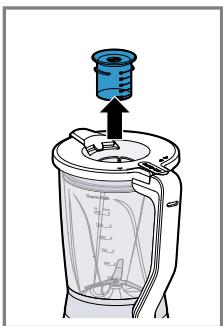
Remove the measuring jug.
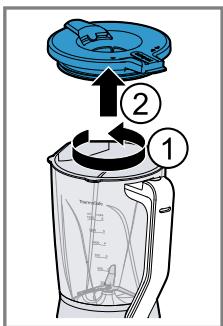
Fig. 27 - Remove the lid.
Fig. 27 - Turn the blender jug anti-clockwise and remove it from the base unit.
Fig. 28 - Turn the blender jug upside down.
-
Open the retaining bracket.
Fig. 29 -
Remove the EasyClick blade insert from the blender jug. Fig. 29
- Clean the components.
Cleaning the To-Go blender jug and To-Go blade insert
ATTENTION!
The blender knife has sharp blades. Improper handling may damage the blades or the surface.
-
Never set the blade insert down with the blade facing downwards.
-
Turn the To-Go blade insert anticlockwise and remove it from the To-Go blender jug. Fig. 30
- Turn the lid anti-clockwise and remove it from the To-Go blender jug. Fig. 31
- Open the mouthpiece on the lid. Fig. 31
- Remove the seal. Fig. 31
- Clean the components.
Using the cleaning programme
You can use the cleaning programme to preclean the blender jug and the blade insert.
Requirements
The blade insert is installed.
The blender jug has been attached and locked.
- The blender jug is filled with cleaning fluid (700 g water + 1 drops of washing-up liquid).
The lid is attached and locked.
The rotary switch is set to 0.
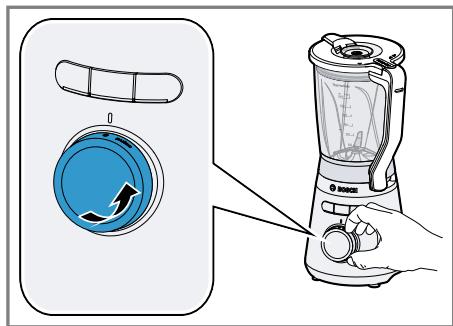
- Set the rotary switch to on. Fig. 8
The status display (LED) on the rotary switch lights up. - Press the programme button Clean. Fig. 11
While the programme is running, the LED for Clean lights up and the status display (LED) goes out. - Wait until the appliance stops.
- Set the rotary switch to 0.
- Turn the blender attachment anticlockwise and remove it from the base unit. Fig. 16
- Turn the lid in the direction < and remove it. Fig.32
-
Dispose of the cleaning fluid.
-
The most stubborn food residues are removed.
- Clean the components.
Recipes
You can find a selection of recipes specially developed for your appliance here.
Overview of recipes
This overview lists the ingredients and processing steps for various recipes.
Fig. 33
For the recipes labelled with (^*) in the recipe table, leave the appliance to cool to room temperature after three operating cycles.
| Recipe | Ingredients | Processing |
| Sports drink | 250 g Honey (cold, 7-9 °C)5 g Cinnamon200 g Milk (warm, 65 °C) | Add the honey and cinnamon to the blender.Blend the ingredients for 5 seconds at level max.Add the milk.Blend the ingredients for 5 seconds at level max. |
ATTENTION!
Using unsuitable food may damage the appliance.
- Do not process food that is hotter than 50^ C in the To-Go blender jug.
- Do not process food that is hotter than 70^ C in the blender jug.
Note
Limitations for processing:
- Do not use it to chop ingredients like almonds, onions, parsley and meat.
It is only possible to mix spreads, such as peanut butter, coconut butter or nut spreads, with a suitable Bosch pusher. - The blender cannot be used to make mayonnaise.
Use enough liquid when mixing solid food. - Mix powdered food with sufficient liquid before blending, or dissolve it entirely in liquid. Examples of powdered food include icing sugar, cocoa powder, roasted soybeans, flour, protein powder.
Troubleshooting
You can rectify minor faults on your appliance yourself. Read the troubleshooting information before contacting after-sales service. This will avoid unnecessary costs.

WARNING
Risk of electric shock!
Incorrect repairs are dangerous.
Repairs to the appliance should only be carried out by trained specialist staff.
- Only use genuine spare parts when repairing the appliance.
- If the power cord of this appliance is damaged, it must be replaced by the manufacturer, the manufacturer's Customer Service or a similarly qualified person in order to prevent any risk.
Malfunctions
| Fault | Cause | Troubleshooting |
| The appliance is not work-ing. | The mains plug of the power cord is not plugged in. | Connect the appliance to the power supply. |
| The circuit breaker is faulty. | Check the circuit breaker in the fuse box. | |
| There has been a power cut. | Check whether the lighting in your kitchen or other appliances are working. | |
| The status display (LED) flashes. | The lid or blender jug are not locked. | Set the rotary switch to on. 1. Place the blender jug onto the base unit and rotate in a clockwise direction until it locks into place. 2. Turn the lid in the direction ↑> until it clicks into place. √ The colour of the lock indicator for the lid changes from red to green. 3. If required, select this option: - Place the To-Go blender jug with the To-Go blade insert onto the base unit and rotate in a clockwise direction until it locks into place. |
| Programme was cancelled using the rotary switch. | Set the rotary switch to on. |
en Troubleshooting
| Fault | Cause | Troubleshooting |
| Appliance has a humming sound. | The blade is blocked or stiff. | ▶ Set the rotary switch to on. ▶ Remove the blockage. |
| Appliance switches off dur ing use. | Processing quantity is too great or processing time was too long. | ▶ Set the rotary switch to on. ▶ Reduce the processing quantity. ▶ Allow the appliance to cool down to room temperature. |
| The programme does not start. | The rotary switch is not set to on. | ▶ Set the rotary switch to on. |
| The programme has been cancelled using the pro- gramme button. | 1. Set the rotary switch to on. 2. Press the programme button for the required programme. | |
| The To-Go blade insert can-not be connected to the base unit. | Outlet protection is active. | ▶ Screw the To-Go blade insert and the To-Go blender jug in by turning them in a clockwise direction. ▶ The To-Go blender jug and To-Go blade insert are fully and tightly screwed in. |
| To-Go blender jug is leaking. | Seal is missing from the lid. | ▶ Insert the seal. |
Transportation, storage and disposal
Disposing of old appliance
Valuable raw materials can be reused by recycling.
- Unplug the appliance from the mains.
- Cut through the power cord.
- Dispose of the appliance in an environmentally friendly manner.
Information about current disposal methods are available from your specialist dealer or local authority.

This appliance is labelled in accordance with European Directive 2012/19/EU concerning used electrical and electronic appliances (waste electrical and electronic equipment - WEEE). The guideline determines the framework for the return and recycling of used appliances as applicable throughout the EU.
Customer Service
If you have any queries, are unable to rectify faults on the appliance yourself or if your appliance needs to be repaired, contact Customer Service. Function-relevant genuine spare parts according to the corresponding Ecodesign Order can be obtained from Customer Service for a period of at least 7 years from the date on which your appliance was placed on the market within the European Economic Area.
Note: Under the terms of the manufacturer's warranty the use of Customer Service is free of charge.
Detailed information on the warranty period and terms of warranty in your country is available from our after-sales service, your retailer or on our website.
If you contact Customer Service, you will require the product number (E-Nr.) and the production number (FD) of your appliance.
The contact details for Customer Service can be found in the Customer Service directory at the end of the manual or on our website.
Product number (E-Nr.) and production number (FD)
You can find the product number (E-Nr.) and the production number (FD) on the appliance's rating plate.
Make a note of your appliance's details and the Customer Service telephone number to find them again quickly.
Warranty conditions
You can make warranty claims for your appliance under the following conditions.
The guarantee conditions for this appliance are as defined by our representative in the country in which it is sold. Details regarding these conditions can be obtained from the dealer from whom the appliance was purchased. The bill of sale or receipt must be produced when making any claim under the terms of this guarantee.
Table des matieres
Sécurité 43
Indications generales 43
Sécurité anti-surcharge
WAARSCHUWING - Kans op letsel!
WAARSCHUWING - Kans op verstikking!
WAARSCHUWING Kans op letsel!
ADVARSEL - Brandfare!
HpaKaeio-Kpntns.....Aewp.Eovikc Avioiaoeo23&Kaala71306Hpakieio
Kunpo.. Apx. Makapiou 39.2407Eykwun Aekwoiia, KuTporc
www.bosch-home.com/tr
www.bosch-yetkiliservisi.com
Faks :0216.528.91.88
E-posta :
E-posta :.boschcgrimerkezi@bshg.com
UcTaHOBLeHnI npilaNy. 261
3HaHOMCTBO 261
Ppila.. 261
CIMBOJIN 262
Поворотни поемпа ..... 262
KhoNkN Bn6Opy npoPram 262
CnCTeMn 6e3neKn 263
PiIroTOBka npOdykTIB 3 nepeHocHOU yAWeIO 6JIeHepa.265
3aKpmbanHnpepeHoCoi yaSi 6JIeHepa 266
UHHeHH Ta DOrJaD 266
PnIaTHICTb DO MNTTBA NOCyO-MnHiMaunH.. 266
YnctnIbHi 3ac06n. 267
Ouichienhra OCHOBHOro 6loka.....267
OuHHeHH 6JIeHdepa 267
OuHHeHHI nepeHoCHOi qaWi 6JIeHdepa Ta nepeHoCHOi pIXy- yoi BCTaBKn. 267
BukopnstaHH nporpaMn ouHennn 268
PeCNTn 268
OrnpeuentiB 268
UcyHeHH HeCnPaBHOCTeI 270
HecnpaBHOCTI Bpo6oTI 270
TpaHcnpTyBaHHa,36epirAHnHa 272
Ytuliziai cnapix npnilaib 272
CepBicHi ceHTpn 272
He nepereiHaIte, He nepetncKaIte I He nepeoblaHnyTe Ka6eIb KINBLeHHa.
YBAG! - He6e3peHa noJeki!
Bid BncoKoi Tempepatyp npnila i Ioro Detani Mojkytb 3aropitncra.
YxOJHOMy pa3i He cTaBTe npIaI Ha rApuI NOBepXHi a6o nO6n3y HIX.
YBAG! - He6e3neKa oniky!
BukopncToBvIe npnlaTtIbKn B NOBHiCtIO 3i6paHomy CTaHI.
YBAG! - He6e3neKa nopizIB!
B hoxa 6IeHepa roctpi Ie3a.
- YnctTayi cnpoXHIOUOn yaSy 6JeHepa, 3BaJkaIte Ha roCTpi Ie3a.
Hikon He TopkaTecn le3 roIpyu.
YBAG! - He6e3neka ydyuweHnra!
-ДiTи можуть натугп nakувалы mATEPIaII n CObi Ha rOIoBy a6o 3aIopHyTnCЯ B Hnx i 3aIINxHyTnCЯ.
Bepexitb nakyBaIbHi MaTepiAni BId iTei.
He Do3BOLaITe dITaTm rpaTnca 3 NaKyBaJIbHIM MaTepiaJOM.
-ДiTи можуть удixнгутчп прokob'tHyтNi дpiби Deетаи yhacli-DOK zuBOrO 3aДИxHHTnCЯ.
BepexkiTb diioHi deTaIi BiD iTei.
He Do3BOLIyTe IITaM rpaTnca 3 DiPi6HIMN DeTaIaYMaN.
YBAΓA! - He6e3neKa shkoДn 3dopOB'U!
Бруд на поверхн exhaust може诫и Hebe3neuHni Для 3dopOB'Я.
BnKohyTe Bka3iBKn 3 uNueHHa.
Поверхни, як KOHTaKTyIOTb 3 xapuOBIMn npOdyKTamN, слдчNTTNпered KOKHIM KOpNUCTyBaHHaM.
Як ун��н��и MaTepi-aIbHnx 3ОntКiB
YBAGA!
HehaIeJHKe KOpNCTyBaHHr MoKe cnPnUHHnMaTepiAJIbHy IKoNy.
3a6opOHeHO BmKaTn IopoXHi npIlaI.
He nepeBnUyIte MaKcImMaIbHy KJIbKicTb npOdyKTiB.
Hikon He HarpiBaIte yauy 6JIeHepa B MIKPOXBnIbOBI neu i aboDyXOBci.
He 36epiraTe B uaii 6JeHepa JxOJnHex ppeDmetiB.
Oxopoha IOBkijnna OojaJINBe KOpNCtYBaHHa
Ytulizua ynaKOBKN
PakyBaIbHi MaTepiAIn ekOJorIuHO 6e3neUHi I MOKBytB BnKOpNCTOByBaTn- CnOBTOpHo.
- Okpei CklaHnKi nOtpiHO po3-cOpTyBaTu N yTnJI3yBaTu po3-diIbHO.
Po3naKOByBaHnI nepeBipka
Tyt Bn Di3HaTeC, Rkux npaBnI CJIiD OToPmYBaTnC, Po3NaKOByOuN PrnlaI.
Po3naKOByBaHnI npHJaNy IeTaJIeI
- BnIMiTb npuJaD 3 ynaKOBKn.
-
BnMItb 3 ynpaKOBKn NiIgroTyuTe Bci DoJaTkoBi DeTaIi N CynpoBIDHy DOKyMeHTaCiIO.
-
3HIMITb HABBnI NaKyBaJIbHn MaTepiAn.
- 3HimiTb HaBHi HakJeIKN Ta NIIbKn.
O6cI NOCTaayHn
3axnCT BiD yBIMKHeHHa 3aNo6irae He baxKaHOMy BBIMKHeHHIO npuJaNy.
Akuo yaHa 6JeHepa npaBnIbHO BCTaHOBLeHa, a KpuShka 3a- 6JOKOBaHa, npuJaM MOxHa yBIMKHyTu Ta BnKOpNCTOByBaTu.
3axnCT BiI nepeBaHTaXeHHA
3axnCT BiD nepeBaHTaKeHH 3anObi-rae NoWKoJxKeHHIO DBNrHyNa iHUnx UactIN Hepe3 3aBnCOke HabaHTaKeHH.
IodabaHn iHrpeJeHtIB
1.Пд уac пidroTOBKN BnIMiTb MIPHy cKJIaHky TaДОаIte iHrpeDiEHTn uepe3 OTBip y KpnsuCi. →MaJ. 14
2. Σοδ Σο3aBaHTaXHTn Bεlnkγ KI- IhKicTb iHrpeiEHTIB, NOBepHiTb Iepemkkay y no3uio 0.
3. 3auekaIte, nOKn npnilaI 3yHINHbCra.
4.Поверніть кршky у Наразмку <6 Ta 3HiMiTb. → Man. 15
5. 3aBaHTaXTe iHrpeJeHtN. → Man. 15
- 3HOBy BCTaBTe KpNlKu Ha chaSu y 6JIeHnIepa Ta IpoIOBkUyIe Obpo6- Ky iHrpeDiEHTIB.
CnpokHeHHaushi 6neHepa
Bmora: Pnpiaad 3yynHnBCa.
- Поверніт b чашу щileндара пpoТи ГдИннИКОВоі CTPIДКи Та ВИМiTь II 3 OCHOBHorO БLOky ппlaу. →MaJ. 16
-
Ilio dbicatn Iiue yacntHy o6po6JIeHIX npOdyKTiB, BkOpNCTOByIte BxixHn OTBip.
-
BiДкриТe BuxiДни OТВiP.
-Перемicitьоброблени пpoДуктNi Do NiДхОДиоI ПOCу- ДИни a6o BiДpa3y ПОДaВaIte Ha стiI. -ЗakриTe BuxiДиN OТВiP. →MaJI.17 -
Μύος πίστατη γις σόβος ἔπούγκτη, 3ΗΠΙΜΙΤό κρήψικυ. → Maλ. 18
Пид�товна пюдуктв 3 поенихочашеньдара
1.ПдготунTe npoДукт.
Hanpikla, nopixte Belenki npdykTN Ha uMaTkn.
2.ПомICTIb npOdyKTIN B npeHocHy
aAuy 6JIeHepa. MaI.19
3BaxkaIte Ha Heo6xIHy
MiHIMaIbHy Ta MaKcImaIbHy Ki-
IbKICTB npOdyKTiB. "OrIyPeueENTIB",CTop.268
3. BCTaHOBITb nepeHocHy pIXyUy BCTaBky Ha nepeHocHy yAùy 6Ie-Hdepa. → Man. 19
- ⅢiNbHo 3aRbHHTiB nepeHOChy pI
kyyu BCTaBky Ta nepeHOChy yaUy
6JeHepa.
→MaI.20
IpeEHOCHy pIXkUy BCTaBky MOKHa
PnIEdHaTNo OCHOBHO 6JIOKY
PpINaNy IInSe 3 NOBHicTIO
3aRbHNueHOIO nepeHOCHOU YaIeIO
6JeHepa. - ПовернiTь перемикayу позицio 0.
- Поверніт bперенocу чшу相关内容 → Мал. 241
- BctaHOBIb nepeHocHy pIXkyu BCTaBky Ha oCHOBHm 6IOK npIla- dy Ta NOBepHiTb 3a rOINHHNKOBIO CTpiIKOIO do fikcaii. Man. 21
- Bn6epiTb peKOMeHIOBaHy ⅢBnI-KICTb 3a IOnOMOTOI NOBOPOTHOI OpeMnKaaya. → Man. 22
Iopapa: MnpekomeHnyeMo 3po6nti Kijbka nepepb nid yac nprirotybaHHn HebeNkoi KjBkoCTi dInTAYO xapUbaHHn B nepeHochi qaSi 6JIeHepa. O6p6kMy MoKHa TaKoK 3diIChIO-BaTI 3 MOMeHTaJIbHIM BUMKHeH- HAM. "3aCTOCyBaHHM MOMeHTaJIbHO rOBBIMKHeHHA", CToP.264
- 06po6IaIte iHrpeIeHTn, IOKn He 6ynde IOcraHyTo baxaHoro pe3yIbTaTy.
10.Для завершени ржиму BCTaHOBIt bперemNKay y no3nucio 0. →MaJI.23
3aKpNbBaHnI nepeHoCHOi yashi 6JIeHepa
Bmora: Pnpiaad 3ynnHBCa.
YcyHeHHa HeCnPaBHOCTeH
He3NaHHi HeCnpaBHOCTI npnlaNy moKHa yCyBaTn BlnachOpyu. Nepu HiX 3BeptaTnca Do cepBicHOi Cnyk6n, CKOpNCtaTecr BiIOMOCTAmN IpO yCyHeHHr HeCnpaBHOCTe. TaK MOKHa yHNKHyTN 3aIBNX BNtpaT.
YBATA!
He6e3neKa ypaXeHH eIeKTpHuHm cTpyMOM!
PemOHTHi pOBoTn, BnKoHaHl HeHaJIeXHHm YInHOM, MoXyTb CTaHOBHTn He6e3IeKy IIN KOpNCTyBaUa.
PemOHtYBaTn npuIaN Do3BOJeHO tIbKn faxIBaM.
Для ремоHTу пиlaу Do3BOJIЯETbCЯ BVKOPNCTOByBaTи Лшe opnirHaJIbHi 3anuactHnI.
yHnKHyTN He6e3neK, y pa3i nOuKoJKeHHKa6eJIIO KINBHeHHa bOTo npIaNy Ioro 3amHy MaE BnKOHyBaTn BnPo6HnK, cepBicHn CHTp a60 ocOba 3 BiIDNoBIDHOU KBaJIiΦiKauiCiI.
HecnpaBHOCTI BPO6OTi
| Hecnpabnictb | ПричINA | Усунениян Нес丐разностey |
| Пробад не пацюe. | He bctablenii shtekepe me- pexknogo kaobelno . | Пдклочь пралад до[elektrompe- pexi. |
| Запбжни вишов i3 la- ду. | Перевір'te заобіжни на[elektropи- chomу уnti. | |
| Зник stprum. | Перевір'te, чи пацюе освітlenessни и lnii пралад в пиміценhi. | |
| Иndikatop stahу (cВiTNo- diodium) 6blmae. | Кршka a60 chaupa 6lne- ndepa He 3a6lokobanHi. | Встановіт b nobоротний перемпачу поэцю on.1. Bystanovitb chaUpy 6lneDEpa Ha ochOBHni 6lOK праладу ta Поверніт 3a ГоДиНиКOBОJO CTPIKOO JO DO φiKcaJIi.2. Поверніт b кршky y habрамку >do φiKcaJIi.✓ Kolip iNDiKaTopa 6lOkuBaHnЯ кршки 3mIHIOCTbCJ 3чERBOHOrO Na ZeileHni.3a Notpe6b o6eptb zuo onuio: -Встановіт b nepenocny chaUpy 6lneDEpa 3перehocnojo pi- kychoyU BCTABKOJO Ha ochOBHni 6lOK праладу ta Поверніт 3a ГоДиНиКOBОJO CTPIKOO JO DO φiKcaJIi. |
| Hecnprabhnicb | Причеса | Усунениян Heсрравносяи |
| Иndikatop.stanu(cbvItno-dioiDni)блmae. | Прогама скасовановорOTим поемпачем. | Встановыnot nobорOTи поемпачу позichiо on. |
| Пробдуde. | Hixzazbokobahmab0zaстяг. | Встановыnot nobорOTи поемпачу позichiо on. |
| Усунtle sblokybaHHa. | ||
| Пробд ВIMNKa€tbcpiДчСВИКОРИSTAHЯ. | Завелка кльбic'tьпожктiv abo naIDTo doVBraТрИВалICTb обрбкn. | Встановыnot nobорOTи поемпачу позichiо on. |
| Зменшte кльбic'tьобpoБLOванх поемкTiB. | ||
| Даite рpriladny oxolohytndo ki-MNHathоi Tempepatури. | ||
| Прогама не зауска€tbcя. | Проготнй ВIMNKaчHe StOitb on. | Встановыnot nobорOTи поемпачу позichiо on. |
| Прогама скасовано Кнок-Кою порразм. | 1.Встановыnot nobорOTи поемпачу позichiо on.2.Нат检ить Кноку порразмЮ обраhalоi порразм. | |
| Переконca piЖуча Вствka He приеднуettingсддО ochOBHoro 6blokу. | Зхись вд потikань akTINBнii. | 3aRbNHTiB поекosity piЖучВствку та поекosity чашу blende, nobepHyBш 3a rodiHnKOBOJO STpIKOJO. |
| Переконca piЖуча Вствку та поекosity чашу blende, nobepHyBш 3a rodiHnKOBHOTU TAUJIbHO 3aRbNCHeHi. | ||
| Переконca чаша blendepeha He terpmetnucha. | У крши с BiDcyTNHe yuzlbeHneHHa. | Вставе ушлени. Y cRbSbTe YuzlBeHneHHa. |
TpaHcnpTyBaHHa, 36epi- rAHnHa yTuJI3auCi
Hnkorda He cTaBbTe npnbop Ha rOpayne NOBepxHOCTn Hnn pADOM C HIMN.
IPEdUYPExKDEHNE - Onachocb ownapnbHnA!
Topnye npOdykTbI Moryt pa36pbI3rHbATbcra npn nepepa60Te, a H3-IOd KpbIuKN MoKeT BbIXoNDt Nap.
KolnueCTBO ropuNX nIN peHnCTbIX npOdyKTOB He DoJHKHO ppeBbIaTb 1000 mI.
Co6IIOJaTe ocToPoJxHocTb npi nepepaOte roPrynx npoDyKTOB.
He NaKIOHnITeCb HaI npIbOpom.
He nepepa6aTbIbai Te npOyKtbl, TempepaTypa KOToPbIX Bbl- 50 ^ C B cTaKaHe To-Go.
IPEДУПЕЖДЕHNE-ОпасноctьТраВМИрованя!
- Θкплуатуця пибopa с повpeжденич acтамн может стать пичний ТраВМ.
Yactn npnbopa c TpeuHaMn nI IN dpyHmN NOBpeJdeHnA Mn, a TaKKe C HeJIOTHOINOCaIKoN DOJXHbI 6bITb 3aMeHeHbOpnHnHaJIbHbIMN YAcTAMN. - HeKOMnTeHTHOe IcNoJIb3OBAHne MOXeT CtAe TpUHNO TpaBM.
-
Пибор можно Исплььтв Тольк В полостьс собраном вд.
PPEyPExKDEHNE - OnachocTb nope3a!
Y HoxKeI 6JIeHepa ocTpble Je3BnI.
- Пи чьке и onopожнен CTаКаHa 6JIeHepa 6epeRITecb OCTpbIX JIe3Bn.
He TporaTe Je3BnI rOJIbIMn pyKaMn.
PPEyIpyKDEHNE-Onacnoctb ydysb!
- DeTN MOryT 3aBepHyTbCBy B yIpaKOBOUHbI MaTePnaJI nII NHaDeTb erO ce6e Ha rOIOBy n 3aDOxHyTbCra.
He noDnyscaIte DeTeK yynakoBOvHOMy MaTePnaIy.
He nO3BOJIte DeTm IrgaTb C yNaKOBOHbIM MaTePnAJIOM.
- DeTN MOryT BdoXHyTb NII INI pOriToTb MeJIKe IeTaJIH, B pe3yIbTaTe ueo 3aDOxHyTbcra.
He noDnyscKaIte DeTeK MeIknM DeTaIaM.
He nO3BOLJIte DeTAM INrpaTb C MeIKNIMn DeTaJIaMn.
IPEyPExEHE - Pnck HaHeceHnaBpeJa 3OpOBbIO!
3aŋra3HeHnHa nOBepxHOCTaX MOγT ppeCTaBJIaTb ONaCHOCTb DnA 3DOpOBb.
Co6nIpaIte yka3aHnno oucnTke.
IOBepxHocTH, KOHTaKTnpyUoIne C npOdyKTamN pHTaHnA, cJeDy-et Ouyuatab nepei KaJdbIM NcNoJIb3OBaHnEm.
Пре dioTbpaueHne MaTePnaJIb-Horo yuep6a
BHIMAHNE!
HeKOMnTeHTHoe HcNoJIb3OBAHne MoKET npINBeCTN K MaTePnaJIbHOMy UIepe6y.
HnkOrda He BkIouaTe npnbop BxOIoCTyIO.
Co6IIOdaIte MaKcIMaJIbHoe nepepa-6aTbIbAeMOe KOJIueCTBO npOdyKTOB.
3aIpeuEHO nCnOJIb3OBA Tb cTaKaH 6JIeHepa B MmKpOBONHOBOn Neu IIN dYXOBOM uKaΦy.
He xpaHnTe B uAaSe 6IeHnepa HnKaKne nocToPOHHne IpeDMetbl.
OxpaHa OkpykaHOUeI cpebln 3KOHOMNIA
YTNIN3aunynaKOBKN
YnakoBouHbIe MaTePnaJIbI 3KOJOrUHeeCKN 6e3OpaChbl N MOrTy IcNoJIb3ObaTbcra IOBTOpHO.
- YtIIN3npyTe OTdIeNbHbIe yacTn, npEiBapNTeIbHO paccOpTuPoBaB uX.
PacnaKOBbIbAHne I KOHTpoJIb
3decb npBODNTc HΦopMaun, KOtopyu Heo6xoJIMO yueCTb npn pacnaKOBbIa-HH.
PacnaKOBbIbAHne npH6opa n ero yacteI
- BbInbTe npn6op n3 ynaKOBKn.
- BCE octaIbHbIe yacTn I cOpBoOAnITeIbHyIO DOKyMeHTaUIO BbIbTe N3 yNaKOBKn I NOLOXKeITe PraOM.
-
YdaJIInTe HMeEOUcNcra YpaKOBouHbIMaTePnAn.
-
YdaJIte HMeIOUneCn HaKJIeIKN I PJIeHKn.
KOMnJIeKT NOCTaBKn
Iocne paacnakOBKn npOBepbTe Bce DeTaHn Ha oTCyTCTBHe TpaHCnOpThbIX NOBpeKdEHH N KOMPJIeKTHOcTb NocTaBKn.
→Pnc.1
He BCTaBnIe BNkCy ceTeBOrO shHypa Bpo3eTKy.
O3HaKOMJIeHHe C npH6Opom
Pn6op
3decb npBBeDeH 63Op coCTaBbIX qacte np6opa.
→Pnc. 2
Co6IIOdaIte MHNIMaJIbHoe I MaKcNMaJIbHoe KOJIuYeCTBO Nepepa6aTbIBaEMbIX nPoIyKTOB.
"O63op peueenTob", CtpaHua 287
- BCTaBbTe HOKeByO BcTaBky To-Go B cTaKaH To-Go.
Pnc. 19
- Hadejxho 3aФИКСИРУТЕ HOXeByU OCTaBky To-Go u ctaKaHe To-Go.
PnC. 20
HoxeBa BCTaBka To-Go MoXeT 6bITb NOKJIIOUeHa K 6JOKy DnIraTeNr TOnbKO CNONHOCTbIO 3aKpyeHHbIM CTaKaHOM To-Go.
He nepepaBbIaIe npOdyKTbl, TemepaTypa KOTOpbIX BblIe 50^ bctaKaHe To-Go.
He nepepa6aTbIbAte npOdyKtbl, TeMnepaTypa KOToPbIX Bblwe 70^ BcaWe 6JeHdepa.
3aMetka
PpOdykTbI, He pOxOaHne dIJI nepepa6oTKn:
He n3MeIbUaIe TaKHe IpoIyKtBi, KaK MmHdaJIb, LyK, NetpyuKa N MRCO.
ПригOTOBленe СпpeДов,ТакИХ КАК apaxиcoBoe MacILO, KOKOCBOe MacIIO Или opexOble NaCTbl, HeBO3MOxH0 6e3 TOJKATeJI.
Бленьдер He npedHa3Hauen Дя пiro-tOBJIeHЯ MaHOHe3a.
IobabTe K TBepdbIM npOyKtAm DoCTaTOUHOE KOJIuYeCTBOM JNkIOCTH.
CmeuTe npoKoo6pa3HbIe npOyK TbICIOCTaTOUHbIM KOINueCTBOM KNDKOCTn IIN NOLHOCTbIO pactBOpHTe B JNIDKOcTn.KnpoWkoO6pa3HbIM npOdyKTAM OTHOCNTcH,HaNPIMep, caxapHaIpyda, KaKaO-NopoWOk, JapeHbIE coEBIe 606bl, Myka, npToENHObI INoPoiok.
YctpaHHe HeHcnpaBHOCTe
Bb moke camocToIeHbHo ycTaPahntb He3HaHTeIbHbIe HeNCnPaBHocTH BaIeO np6o pa. BocnoJIb3yIteCb HfOpMaIeH nI rIaBbl «YcTaPaeHne HeNCnPabHocTeH"peEo6paueHem B cepBnCHyIO cnyK6y. 3To I03BoNt N36eKaTb DoOnJHnTeIbHbIX pacxOIOB.

PPEyPPEKdEHN
Onachoctb nopaxeHn 3JekTpneckm TOKOM!
Pn HeKbAInΦuIPOBaHHOM pEmoHTe PpH6Op MOxET CTaTb HCTOuyHKOM ONaCHOCTN.
PemOHnpoBaTb np6Op pa3peWaaetc ToIbKO KBaIIHnIuPoBaHHbIM CneuaJIInCTaM.
ДлгpeMOHTa npH6opa MoKHO ICNoJIb3OBAtToIbKO OpINHaJIbHbIe 3aIyactN.
Bo n36eXaHHe onacHocTe 3aMeHa NOBpeJdeHHoro cTeBOro Ka6eI daHHoro np60pa MoKet 6bITb BbIOnJIHeHa TOnbKO pON3BOdnteJeM IIN aBTopn3OBaHHo IM cepBcHoi cnJx6oB JIn6O liuO, MeIOUIM aHaIOrnHyK bAlinΦNkaUIO.
C6oH Bpa6oTe
Pa3pa6oTaHOdIAJxN3HN
HΦopMaunO 6bIToBouTexnKe, IpOn3BeDeEHoN IOJ KOHTPOJeM KOHepeHa BCX XaycrepeTe Tm6X,Kapn-Bepn-IIItp.34,81739 MHOxH, TepMaHn B COOTBeTCTBnC Tpe6oBaHNMy 3aKoHOdaTeJIbCTBa O TexHueCKOM peYInPobAHnn N 3aKoHOdaTeJIbCTBa O 3aUnTe IpaB IOTpe6nteNei PocsnckoΦedepaunn
Ipoodykun: Mrcopy6kn, cokOBbIXMamKn, 6neHdepbl
ToBapHbI 3HaK:Bosch
BH/MAHHEI ACCoPrrnENT npDxuynr nocSTHO HOOBaTcER. TeXuehNcKHe XApaeRcTCHN pNDyUkHN, yMnCtHne 3eNEpR0d4eKTHBNOCT, NOCTHOH COOpeJIbETBCOTJ. PNDyUKNPEpyrNPOxOIOEoB O6TeBtAEHNOI NPOyDUEpOyIOI NOPTBeBDEKHNCOOT BTOBZdEHN COTOBETCBNA COTBOHdEYOUIE MAY KAOHDATBCTBY. VNDpOAMALIO u o KEbIMHTAkyAteBbIXbckcTeBnDCBtIKoBDTOOB COOTBETCBNA cPcOKX kEiDeTBN, HINpOFAMALIO bO6AtyBbHMOC APPTEMNTEOEPODQYMO MANKHO NOnyHbV y ORPAH3AU, BbONNHOUsOePHKUNNHOINOCPTABHONO HsTePRTNNIOH aTeepRTNIOHN PoCCsKKnKΦeAepAMIOOO BbToBcE TPiPoBf6). 198515, CaNt-TePeBpByg, r TePePROD, yn. Kapna CmMeHa, d 1 nHTA, Fmnnan B. MockBa, 119071, Yrn. Manaa KaKkKa, d 15, teneofo (495) 737-2777, facc (495) 737-2789.
KoHAnaHOO 00C ECKBtBorpePnIbopr,198515,CanHK-TepeBpyr, r. TepePropr, yk. Kapna CImHeMa, n I JTHA Bm. MoCBA, 199071, Ym. ManaKanyKcck, d. 15, tetepoh (495) 737-2777, fakc (495) 737-2798 oucjeeCTeR eCBIO DEETbHOCTBO COOTETCBTHPOyDcIKUONMTOHNPO3BDHTENH aEINOH TAMOKEHIN TEPRTOPIN EBPEBKO KEOHOMNCEQCO O3Oa B COOTETCBTH C dEIEYBCOIMCH TEXNHYCEQEM PemTAMENTAM, B KAECHTEYQNHOHMeHHORIOBTOBHTENEM NIIa, a TAKOE BYINONHRE TPE6OBAHIN, npEDCMOTHE B3AKOHOPF Np184-ФЗФТСЕКСМОгургдзИТСТВСТВСТВСТВСТВСТВСТВСТВСТВСТВСТВСТВСТВСТВСТВСТВСТВСТВСТВСТВСТВСТВСТВСТВCST
Hmnpotopm B PoocnKnyo Fedeapauu npodkyu, cepntduuipoeaannB K aeneCTbe cepniho npomBaDMn, rernrTcO OOC bIroBle Pnp6p19, 198515, CaHt-Tepebpyr, r. Tepepro, yn. Kapna Cmmehca, d.1 nT.A, finnan B r. Mockba, 119071, yn. Manar Kanyckra d.15, TeneoD (495) 737-2777.
Oprnnaauiy, yka3bAeMaHn ha npDyKun B cienRn IeHTNpKaun npDyKun N ocUcIeTENrueH nePbMvHoe pBaMeuHne npDyKun Ha bpeBek Ebpnecko coKOna, aenrTea PoepBe Bou Xaycrepe Tm6X Kapn-BepM-UItp. 34, 81739 Mioxhen, FepMaHra (Robert Bosch Hausgerate GmbH, Car-Weny-Str 34, 81739 München, Germany).
OpHINHECKHM NIOOM (N3GTOBHTENEM), OCUJCTBNIPOUMM OT CBOEOR IMEHNI ISGTOBTEHNE PNDyKIM N OTBETCTBEHBM 3a ee COOTBETBE Tpe6oBAHnR nPmEHHbex TEKYNeCCx pemaTMOB, BANrTeBC XCI XAYcrePeTc PMX, KApN-Bepn-1tTp. 34,81739 MoHXen, FepMaHNs (BSH Hauserge GmbH, Car-Wery-Str. 34, 81739 Munchen, Germany).
Pnpepebe3e, nopr3y3e, paa3py3e X npaeknnn pnodukcn cneJeET pykoBocTcBoBaTbCn. NMOHIO IIOKoeHHbX B INHCTpykuiN NO 3KCNPIYATAUIN, CneIyoDmMn Tpe6oBAHIMM
3Aaepaeaae nopeepaBn npDyckn CyueCTBENHbM MEXAHueeCKn HAPyKcM, KOToPbe MOYr pNBeCtN K NOpeEKENIO npOdykNm ININHN HApueHneo ee nyakOBKn.
HeoOIOHO 36erabHnonadHnHaynakOBky npOyKuIN B0dy IN dpYnx KIOKCTe.
Pepede nepebockn Iiny npnepeaen Hxpaehene h Bkcnnyataunnpn Opnduknn npn Otnpntelhno Tmnepatype Heo6xdoHMO y6edntbCA BOTCytncBnBnOyD.
PpOyDnHn PpIeAaHnHa H KONHOBANHO BcNOBHr TEmpeATpybI bBy Ie OoCTC N OTHOCHTENBHO BPAHOCTN, He npEbIaoue 93%
PpeHd HAnOM kCNPTyAtaunn PpOyDnHn DNNITHeBPOB HAKOnuBHe CPOB HAKOnuBHe CPOB HAKOnuBHe OTOHcTBeTNM TEmpeATpybI, HeoIOxIDMO Bb-
DeKpTaBbE By CynOBHKn COMHANTHO TEmpeATpybI HeckOnkBo YacOB.
PpAaBnApean3aAun npDyKnn npDeynTcnpDnPrTHmP03HnYOH TPOeBN B COOTBeTCTBN C TepeoBaHnM N DEICTBIOeTOA 3koHO- dntbCTBA.
Yk3a1n no ytni3aun npdoykun codepkata B hNCTpykun no 3knnyataun Moryf 6bIyTOxHebl MyHNIplanBbK opraHOB nCNOHNttenbONBAACTN.
InpnpoDyuknn,peannoBauHHHmNtOToBHTenm B TceHne CPOK DcETBTHCnTOTcHnKAT cOBTOCTBTHN,STOT cTeHNKAT CEENTCHNTENP nEe OncBaTeK, npOaKe I NcONpLbOAHIN (npmHeHn) B TceHne CPOK CNYKbSbYcTAHOENHORo BCOOTERTCBNco CTatB 18 SakohAp0 z aazhnte npabr noptBeTteney. Cpok cnkybHa npoDyuknU yka3ah npOn3BDOHTENM BnIOCTBoE VnHOpMAJn H3TOBHTEN o rapaHTNHOMn e cepBHONOC6nYkBHANu).
PMDKMTbHnHnHmOBaHO mnoeHbHOMy 0cbnHHeHHIO (nonE-Nr.) anpOaHnHOMy TNIy (nonE-Type) nTOBAPHOMY 3Anky Bosch, HaeNcHbHmHa npOyHKnI (hnc) cOdpeAuaXCR B KcTpytaaMOHNbXo kOyMeHTak. B COOTBeTCTBM C BYHTpeHHM CTaHApTOM hroToEETENBA bOraBaTeckNkIA aNDtHnHnPvETCNO cIeDyouke CxEMe.
E-Nr.
MaeepnabHb Hmopoe npctcbnntobcfo6ykbeneHO-undpbooe 0o3oahene npoduyuyn ninooh He 6one 10 cmbonB, hcnno3yEmoe npnp opaake (HmeyEMOe moDbeHb mOo3oahenem imn moDbe bboToboro np6opa) troporb o mapKn Bosch. MepnabHb Hmep (Moeb) kya3baetcR Mekdy KdoobbIcmOB e-NrN Kocok cepcr /".
VHekcBepCnCHnCnyKbI-Dy3HaHOeUdpoBOeO603aHHeNIE,prncBaNABaEMoeEINHcpePOdyuHN BPOcEeCpON3BOCTBAHcNtB3ye- MoecBepCnCHnCnyKbI.
3KcnnyaatoaHnHbIckOyMeHtBpAbaPbBaBcTcB yHnHdUipoBauHohΦOpmeJnIeN WIOPOKO aocOPTMHTe pOyoKyIM, NOOTMOYKTOTBEENPE npdyCMTOpeyHoAahne TOpROBO bOooAHenn HnpoBBA BcKCNpyaTOOHbIK DOKYMHTAX KAK NOnHOCTbO, TAK N cactWInO, PNYCNOBM, VTO 3NoONBETN pPnHApNekHOCTbD aHHORO 3KcnnyaTOAHTHOH OdoKHYMeK b KStBOrO mOpybID, cponOBQDAOMeM 3TNM 3KcnnyaTOaALOHBB MOKyHMTM. YCTaHOBeHHe B nPpOceE iHeTHfAikuAM CoOTBETCTB XapakTePcTbIK bKSTBOrO pNObPAoB hONKHEAM CQEDKPAHMC R pNpTaAraAbeB k Hemy CkCNpyaTOAHbIK DOKYMHTAX, pOBoDTICrTIVTEM AHNHTA HINOPMAFIM, INKHOENOH B CNKPTAYALOOHHb DOOKYMHTAX
E cObat 3KcNpyaTALOHbXbDOKyMHTOB, npcyuOTMOHbEXHbIOTOBETOBEM ENpIPOyKUIN, MGYB XDHITb HCTOABIaHnFOPMALIA, INCHCTPYKII (pykoBcDtBO) no cKcNpyaTALAH, IHOPOMAJIaXbOcYbONBIXRapTaHNIHOrO h CepBbHOrO6bCNyKBHBAHN.
MapKpOBaBHne npOyUkUMN OCUJSECTBnTETCR NIGTOTOBHTENEM HA TNIPOOB TABINWKE PNPbOba, HA yNAKOBOYH NIKKETNE, HENOPCECTBENHO HA yNAKOBKe pnpobpa, a tako MEKOT npm3BODINTBCnHbMM NcOcO6AMM, oecneHbAIOOcMM IOCTYPHOE nHaIANTHOpePCTABENHE INHFOPMaUMo pnpobbe B MeCTAX pnpdAK.

PpOyKUN, KOTOPA pOPIWA npOLODpyo NpOeBpeDEHn COOTBETCTBN CoNtACHO TpeOBaHNrT EINHcYckHxpeMAmHToB TAMOKEHNOco30a HNTXeHHcCKPeMAMHToB EApBmCKORO 3KOHMOChECKoCko30a, MapKpyETc EDHbIMhAkm OboaepHnPOpOyHn H aPbIeBOocdAPrCHyehoTAMKeHHoCko30a (EApBmCKORO 3KOHMOChECKoCko30a).
PpOdyKnA COOTBETCTByET cIeDyIOUIM TEXHnueckm perNaMeHTam TaMOKeHHORo coHO3a:
TPTC020/2011 3neKtpomarHHTaOBMECTMIOCTbTexHHuecIX CpeCDTB
- TP TC 004/2011 O 6e3oNaChocTn Hn3KOBONbTHOrO o6OpyOBAHn
-TPEA3C037/2016 06 orpaHneHH npMHeHH onachbX BeueCTB H3dEeNx 3NeKtpoTeHXNKn paDnO3neKtpoHNK
KCNPLAHTIOHNEI DOKMnBtI Hn PNOyIKIN BbONIHOTCRa N yCPCKOM bIe. KcNPLAHTIOHNI BIE DOKMnBtI Hn ROCAPCTBEHNbIX bYkBaIXOCyADCPCTBNEHOEBPZAHNCKORO 3KOHOMNHCKORO COKOA, OTWNUHbE TpCYCKo, nHANHIN COOTERTBQUHXs TPE6OBAHN B3KHOJATENBCTBE MOKHO 63E03GME3HIO NOYUTy h YTOPOHcR oprrAnhA-PEbXeHDA TCOBTETCBYKOJIe rOcoYdAPCTBA-YHHeEA EBpArNCHMKKO 3KHOIMMNEKCO COKOA.
NfOpma 0 kOmneKtAmpn npOyBn pncTeaHbna T OTOBbX 3anax,MOKET sbIbT aonpoeHa no Teneofoy BocnathnofTopnnei
| Toproboe obso3nueHnne | Алоб acquинь ТП | Серг.НOMER | Стра- Из�OTOBITEL | H'U, B | HH** , Γι | HMT*** ,Вt | ||
| Per. homor | Дата Велич. | Дetectует do | ||||||
| Мсорубки | ||||||||
| MFW2500W | CNFW4 | C-DE A946 B 06079/19 | 18.07.2019 | 17.07.2024 | Китай | 50/60 | 220-240 | 350 |
| MFW2510W | CNFW4 | C-DE A946 B 06079/19 | 18.07.2019 | 17.07.2024 | Китай | 50/60 | 220-240 | 350 |
| MFW2514W | CNFW4 | C-DE A946 B 06079/19 | 18.07.2019 | 17.07.2024 | Китай | 50/60 | 220-240 | 350 |
| MFW2515W | CNFW4 | C-DE A946 B 06079/19 | 18.07.2019 | 17.07.2024 | Китай | 50/60 | 220-240 | 350 |
| MFW2517W | CNFW4 | C-DE A946 B 06079/19 | 18.07.2019 | 17.07.2024 | Китай | 50/60 | 220-240 | 350 |
| MFW2520W | CNFW4 | C-DE A946 B 06079/19 | 18.07.2019 | 17.07.2024 | Китай | 50/60 | 220-240 | 350 |
| MFW3520G | CNFW3A | C-DE A946 B 82954 | 24.11.2017 | 23.11.2022 | Пльsha | 50/60 | 220-240 | 500 |
| MFW3520W | CNFW3A | C-DE A946 B 82954 | 24.11.2017 | 23.11.2022 | Пльsha | 50/60 | 220-240 | 500 |
| MFW3540W | CNFW3A | C-DE A946 B 82954 | 24.11.2017 | 23.11.2022 | Пльsha | 50/60 | 220-240 | 500 |
| MFW3600W | CNFW3A | C-DE A946 B 82954 | 24.11.2017 | 23.11.2022 | Пльsha | 50/60 | 220-240 | 500 |
| MFW3630A | CNFW3B | C-DE A946 B 82954 | 24.11.2017 | 23.11.2022 | Пльsha | 50/60 | 220-230 | 500 |
| MFW3630I | CNFW3B | C-DE A946 B 82954 | 24.11.2017 | 23.11.2022 | Пльsha | 50/60 | 220-230 | 500 |
| MFW3640A | CNFW3B | C-DE A946 B 82954 | 24.11.2017 | 23.11.2022 | Пльsha | 50/60 | 220-230 | 500 |
| MFW3710B | CNFW3A | C-DE A946 B 82954 | 24.11.2017 | 23.11.2022 | Пльsha | 50/60 | 220-240 | 500 |
| MFW3850B | CNFW3B | C-DE A946 B 82954 | 24.11.2017 | 23.11.2022 | Пльsha | 50/60 | 220-230 | 500 |
| MFW3910W | CNFW3A | C-DE A946 B 82954 | 24.11.2017 | 23.11.2022 | Пльsha | 50/60 | 220-240 | 500 |
| MFW3X10B | CNFW3B | C-DE A946 B 82954 | 24.11.2017 | 23.11.2022 | Пльsha | 50/60 | 220-230 | 500 |
| MFW3X10W | CNFW3B | C-DE A946 B 82954 | 24.11.2017 | 23.11.2022 | Пльsha | 50/60 | 220-230 | 500 |
| MFW3X13W | CNFW3B | C-DE A946 B 82954 | 24.11.2017 | 23.11.2022 | Пльsha | 50/60 | 220-230 | 500 |
| MFW3X14B | CNFW3B | C-DE A946 B 82954 | 24.11.2017 | 23.11.2022 | Пльsha | 50/60 | 220-230 | 500 |
| MFW3X14W | CNFW3B | C-DE A946 B 82954 | 24.11.2017 | 23.11.2022 | Пльsha | 50/60 | 220-230 | 500 |
| MFW3X18B | CNFW3B | C-DE A946 B 82954 | 24.11.2017 | 23.11.2022 | Пльsha | 50/60 | 220-230 | 500 |
| MFW3X18W | CNFW3B | C-DE A946 B 82954 | 24.11.2017 | 23.11.2022 | Пльsha | 50/60 | 220-230 | 500 |
| MFW45000 | CNFW5 | C-DE A946 B 06079/19 | 18.07.2019 | 17.07.2024 | Китай | 50/60 | 220-240 | 500 |
| MFW45020 | CNFW5 | C-DE A946 B 06079/19 | 18.07.2019 | 17.07.2024 | Китай | 50/60 | 220-240 | 500 |
| MFW45120 | CNFW5 | C-DE A946 B 06079/19 | 18.07.2019 | 17.07.2024 | Китай | 50/60 | 220-240 | 500 |
| MFW66020 | CNFW6 | C-DE A946 B 06079/19 | 18.07.2019 | 17.07.2024 | Китай | 50/60 | 220-240 | 600 |
| MFW67440 | CNFW7 | C-DE A946 B 06079/19 | 18.07.2019 | 17.07.2024 | Китай | 50/60 | 220-240 | 700 |
| MFW67450 | CNFW7 | C-DE A946 B 06079/19 | 18.07.2019 | 17.07.2024 | Китай | 50/60 | 220-240 | 700 |
| MFW67600 | CNFW7 | C-DE A946 B 06079/19 | 18.07.2019 | 17.07.2024 | Китай | 50/60 | 220-240 | 700 |
| MFW68100 | CNFW6 | C-DE A946 B 06079/19 | 18.07.2019 | 17.07.2024 | Китай | 50/60 | 220-240 | 600 |
| MFW68640 | CNFW8 | C-DE A946 B 06079/19 | 18.07.2019 | 17.07.2024 | Китай | 50/60 | 220-240 | 800 |
| MFW68660 | CNFW8 | C-DE A946 B 06079/19 | 18.07.2019 | 17.07.2024 | Китай | 50/60 | 220-240 | 800 |
| MFW68680 | CNFW8 | C-DE A946 B 06079/19 | 18.07.2019 | 17.07.2024 | Китай | 50/60 | 220-240 | 800 |
| Соювхималки | ||||||||
| MCP300ON | CNZP3 | C-DE A946 B 00250/18 | 19.12.2018 | 18.12.2023 | Босни И Геровinhа | 50/60 | 220-240 | 25 |
| MCP350ON | CNZP3 | C-DE A946 B 00250/18 | 19.12.2018 | 18.12.2023 | Босни И Геровinhа | 50/60 | 220-240 | 25 |
| MCP72GPB | CNZP4 | C-DE A946 B 82955 | 24.11.2017 | 23.11.2022 | Китай | 50/60 | 220-240 | 40 |
| MES25A0 | CNCJ03 | C-DE A946 B 73451 | 08.02.2016 | 07.02.2021 | Китай | 50/60 | 220-240 | 700 |
| MES3500 | CNCJ03 | C-DE A946 B 73451 | 08.02.2016 | 07.02.2021 | Китай | 50/60 | 220-240 | 700 |
| MES4010 | CNCJ05 | C-DE A946 B 73451 | 08.02.2016 | 07.02.2021 | Китай | 50/60 | 220-240 | 1200 |
| MES500W | CNSJ01 | C-DE A946 B 80092 | 24.05.2017 | 23.05.2022 | Китай | 50/60 | 220-240 | 150 |
| MESM731M | CNSJ01 | C-DE A946 B 80092 | 24.05.2017 | 23.05.2022 | Китай | 50/60 | 220-240 | 150 |
| Беленьеу | ||||||||
| MMB21P0R | CNSM10 | C-DE A946 B 84228 | 27.02.2018 | 26.02.2023 | Китай | 50/60 | 220-240 | 500 |
| MMB21P1W | CNSM10 | C-DE A946 B 84228 | 27.02.2018 | 26.02.2023 | Китай | 50/60 | 220-240 | 500 |
| MMB42GGB | CNSM11 | C-DE A946 B 84228 | 27.02.2018 | 26.02.2023 | Китай | 50/60 | 220-240 | 700 |
| MMB42GIB | CNSM11 | C-DE A946 B 84228 | 27.02.2018 | 26.02.2023 | Китай | 50/60 | 220-240 | 700 |
| MMB43G2B | CNSM12 | C-DE A946 B 84228 | 27.02.2018 | 26.02.2023 | Китай | 50/60 | 220-240 | 700 |
| MMB65G5M | CNSM13 | C-DE A946 B 84228 | 27.02.2018 | 26.02.2023 | Китай | 50/60 | 220-240 | 800 |
| MMB66G5M | CNSM15 | C-DE A946 B 84228 | 27.02.2018 | 26.02.2023 | Китай | 50/60 | 220-240 | 900 |
| MMB66G7M | CNSM15 | C-DE A946 B 84228 | 27.02.2018 | 26.02.2023 | Китай | 50/60 | 220-240 | 900 |
| MMBH6P6B | CNSM16 | C-DE A946 B 82171 | 22.09.2017 | 21.09.2022 | Китай | 50/60 | 220-240 | 1600 |
| MMBM401W | CNSM14 | C-DE A946 B 80114 | 25.05.2017 | 24.05.2022 | Китай | 50 | 220-240 | 350 |
| MMBM4G6K | CNSM14 | C-DE A946 B 80114 | 25.05.2017 | 24.05.2022 | Китай | 50 | 220-240 | 350 |
| MMBM7G2M | CNSM14 | C-DE A946 B 80114 | 25.05.2017 | 24.05.2022 | Китай | 50 | 220-240 | 350 |
| MMBM7G3M | CNSM14 | C-DE A946 B 80114 | 25.05.2017 | 24.05.2022 | Китай | 50 | 220-240 | 350 |
| MMBP1000 | CNSM14 | C-DE A946 B 80114 | 25.05.2017 | 24.05.2022 | Китай | 50 | 220-230 | 350 |
| MMBV621M | CNSM18 | C-DE A946 B 00388/18 | 20.12.2018 | 19.12.2023 | Китай | 50/60 | 220-240 | 1000 |
| MMBV625M | CNSM18 | C-DE A946 B 00388/18 | 20.12.2018 | 19.12.2023 | Китай | 50/60 | 220-240 | 1000 |
HHY-HOMINAHBHAaYacTota HnI dHaanaoHOMHHaBbX YacTOT nepemehoro ToKa nHaioue ceN B Fepua
** HH-HOMHHaHbHOe HaprKeHHe Nn dHaON HOmHHaHbHO r HaprKeHn B BoJIbTx
** HM-HOMHANbHnA NOpeBnREMaM MOUHOCTb IIN DnAna3OH HOMHAnbHbIX NOpeBnREmBix MOUHOCTe B BaTtAX
FB5965 / abryct 2019
UgI J
p|dssuLy aJlJdJl slgll
305 .To-Go 12
306 .........To-Go bJI Ic g (g)
306
306 ....uLwueaWlio
306
306
307
To-Go b)JlI sIg aIbii
307 .........To-Go jkuwll acgog
307 1
308
308 .........
309 1
309
312 .......g jjIg JJI
312 1jll jll jll
312
gJg (E-Nr.) g
312 (FD)
312
297
297 .aolc U|d
297 .......LaIJIUJUJIUJIUJIUJIUJI
298 1
298 1oJlUd
301 1
301 1gIg aulla
301 .........
301
jgo joo jg jol
301
301 ...
301
301
301
302 .
302
302 1Jj
302 .
303 1
303 ...
303
303
303
oIaIwU aI I aI I gOJI J
303
304 1
304 1JU
304 ...dJldJdJgJdJlJlaSswI
305
305
U

.
dolc Uslwj
gI gD I p| dsswKl JrJgI I I I I I I I I I I
L L 1111 1111 1111
aoc aai jolg g 1j j
.
L
:JlJeJ1 pSaaJ 2
.
WJgbl
aIg aIg dI galg Iyulg JlbpJc
.
.111 100
. |j |
j jaii 10000000000000000000000000000000000000000000
.aaJl oJd J
J 1 J
. J jioJ
2000 1
lo sic jjJJJ JJJJ Joo jIJI
jIqJl pAaiuJ 2
jIgJU UgJ2
jU
jIqJUul
jIgJI Ubi
.ogJlajUjoo
. lo |jbsd|g
Jssssssssssssssssssssssssssssssssssssssssssssssssssssssssssssssssssssssssssssssssssssssssssssssssssssssssss
n n nn nn nn nn nn nn nn nn nn nn nn nn nn nn nn nn nn nn nn nn nn nn nn nn nn nn nn nn nn nn nn nn nn nn nn nn nn nn nn nn nn nn nn nn nn nn nn nn nn nn nn nn nn nn nn nn nn nn nn nn nn nn nn nn nn nn nn nn nn nn nn nn nn nn nn nn nn nn nn nn nn nn nn nn nn nn nn nn nn nn nn nn nn nn nn nn nn nn nn nn.
JlKlUlsLj
.10Jl 1sJj oI J 1d
JUJI JIJI IJI JIJI JIJI -J
JbUgWgUgI JgI
.12000000000000000000
.
g 1111 1111
.aaolooJSLoI GgX! jglnnpssuWx
.1J 1
cjjgjg jlll bdoojjpss
jIJI I 1
JbUgW UJc
Jg 20 uwool g g d k wll dl o g g g loo
.aaJgJSLaogglqJlnoaiaLw
JiIg o g g g g g g g g
.oolaolgagla
.aaJgKlaaKuWl aLg g Jg Gw gI jw
!gUgWJp-
Jg jg Jg Jg Jg Jg
.1io ujJgI jalw bW Uc I JlqJL 4
!UgSly aLx1jbs-
aI 131 J aia Iwll aia Ie Igol g
1bJ 1o jL y Jw g
aigssgaiiswll gajlgsj1000
.ogcJU
JdaiuI dI JgJI
.jgJlglcjj8
50 Lc IgjIa aiaiaw aiI sIgo joo
To-Go bJl Lc g 0
la 1j-
.
g o joo g a j o f g a gaw gag g q a y
.duoljucgbaLgJsuWl,auoJScuJojuC
.1yI 1J I Jg jn Jksswllj pds
JoljI jJ ic JlJ 1
!gJb -
.0la u|jaw l bla juSw
.
$$ . \left| \begin{array}{l} \hat {1} ^ {\prime} \end{array} \right| \hat {1} ^ {\prime} \hat {1} ^ {\prime} \hat {1} ^ {\prime} \hat {1} ^ {\prime} \hat {1} ^ {\prime} \hat {1} ^ {\prime} \hat {1} ^ {\prime} \hat {1} ^ {\prime} \hat {1} ^ {\prime} \hat {1} ^ {\prime} \hat {1} ^ {\prime} \hat {1} ^ {\prime} $$
!g liassj- j dA lgshn g 1eogg j g g f cldlsl slgo Jabal y bJ ksa
$$ . l g o i j i \dot {s} g l a l s $$
.1JbUgIoo nC uJbUd JgD 1JgUuJbUd UgO uJgUeU
nog lglg jzjLl jbJ 1abJ qw w n k
$$ \therefore \dot {g} \ddot {a} \ddot {u} \ddot {\Delta} $$
UgIgIooJcOJooJI J
$$ . \ddot {o} \dot {o} \dot {o} \dot {o} \dot {o} \dot {o} \dot {o} \dot {o} \dot {o} \dot {o} \dot {o} \dot {o} \dot {o} \dot {o} \dot {o} \dot {o} \dot {o} \dot {o} \dot {o} \dot {o} \dot {o} \dots $$
iJg -
aI 1jb jw wJn Js oBwB aJg
. 111111111111111111111111111111
e iJguc Ugso
LgolcI Joo gboaI aGlc aJdS
pOc9 Uoill Jor oogls Jo Sli
. Lgio 1Jooi
1UkWl
| الله��IK | A |
| الله��IK | B |
| EasyKlick | C |
| الله��IK | D |
| الله��IK | E |
| 1To-Go | F |
| الله��IK | G |
jIJI jqJ qWw
jIJI uai
- 2.
#
JL
UgSo Lc aolc 0jbl liu jIq2 2 UkWl
1
jIJI jqJ qWw
aJlJI JrJ 1
JJJ JJJJJJJJJJJJJJJJJJJJJJJJJJJJJJJJJJJJJJJJJJJJJJJJJJJJJJJJJJJJJJJJJJJJJJJJJJJJJJJJJJJJJJJJJJJJJJJJJJJJJJJJJJJJJJJJJJJJJJJJJJJJJJJJJJJJJJJJJJJJJJJJJJJJJJJJJJJJJJJJJJJJJJJJJJJJJJJJJJJJJJJJJJJJJJJJJJJJJJJJJJJJJJJJ
oljll pssw ljc jai: abdo bJl Ic g u k J Smo hie c Clean g Ice Crush oJull .To-Go .To-Go bJl Ic gJ aW li
.1uJI Uc To-Go bUJU 1cg jU J.6
21
Uc To-Go uJswJI acgao 7
oljI LgJgLwIj
jaiw jia clwll Jloc aJ
LqiLo
21
bI I I I gI gI aI bIu I I I S Oa 2oI J pI dawI jSswI agaoog .OJIUI
LbblJI
. ≤ j j≤ s w l l acgao
. JooJooog 5oJo bJolc g
10 700) 68
(uull o1o u 1+
.bdJ1 sLc9
.
.0Lc bguo jlg Jl alia
. on Lc Jlg JJ e liaoJI bdu .1
8 _i = 1^n1i!
(LED aJ) aUJI JU Lg UJI alaJI
Clean 2
11
Clean 念 luU LED aJ
Ulgb(LED) aUJI Uu jcbig .oluiU Jooj
.jlgJU Uoggu JuaBul 3
.0 Lc jg Jj elaoJbfo 4
bJ 1
jai
!gabJI jba
.0sUJowLbJlJusw
LdOJU|JdU|du
aDjagbLlIgcoB
J 1
!
a. ola ujaw la jLsw
jIgjIgogogglJrJoo
JUULJUc UuswKsI Jn
laui juSswI aegao glaui
Jawaggo Jawll
. 山 山 山 山 山 1
27 S -
12 2
27
aSj oJl Jusc bJLg jJ 3
jIJI Jc aUaI aclwU Jlac .LW
28
LJI Lc bJL 1c9 g 4
.15
29
EasyKlick uSwJ acgoo wJ 6
.bdJI 1c9 no
29
.1j8i 2bui j0.7
To-Go bJU | Lcg aji
To-Go ≤ I aegao
!duu
a.oJUjawLbJALJuSaw
jLkJxgogg
JUULJUc UuswU 1
loai jSswI aegao gla i
. Jaw8 aaggo 1Jawll
.ubiiuljluo jolaij.7
aJlssJgajIjI J
即 10 < j < 50
jai jbiu 8
oljI juSc bJlJl aegso J5.5
jolalai aclwll jlac sJ
wJlQJI
16 _i = 1^n1i!
dolg<olj| 6
32
U
.0jla jo laa caa, lao g no agly lim s
Uolgll lcl doljbj
aJyjuaI I aagjj Jsi
jJl, lloogll Ugds oJlgll (^*)
a0jll oJl aJd jLqJl
1jg3
UgSall aolal jbiI O
.àoliao 一 已 歌 日 aIlealulgbag
33
gLSJI gagawu,ngabolll
gJgUaalUgUg
.1gJgJU Lgawog
!
Jgall jglal
.aaWliaJI uC aJl JJI
aissw qulsc slgo jaoj
50 Lc JjJd
To-Go bJU Lcg
aiisw auii sglgo jaoa paa
0°70 Lc JjJd
b2dJ1 Lc9
ab
:dddallglc
jglu o, ligso guboo pai 2
aUlg uugduIg UuIg
| ### |
| ### |
| ### |
| ### |
| ### |
| ### |
| ### |
| ### |
| ### |
| ### |
| ### |
| ### |
| ### |
| ### |
| ### |
| ### |
| ### |
| ### |
| ### |
| ### |
| ### |
| ### |
| ### |
| ### |
| ### |
| ### |
aaggl
| الإستعمال الحرفية | الإستعمال | الإستعمال |
| .سيلة الحرفية باء جلبي الحرفية | .سيلة الحرفية باء جلبي الحرفية | .سيلة الحرفية |
| .فَجْرْ وَعَدْ لَمُّهِ وَعَدْ لَمُّهِ وَعَدْ لَمُّهِ وَعَدْ لَمُّهِ وَعَدْ لَمُّهِ وَعَدْ لَمُّهِ وَعَدْ لَمُّهِ وَعَدْ لَمُّهِ وَعَدْ لَسَّور | .سيلة الحرفية | .سILA |
| .سيلة الحرفية باء جلبي الحرفية | .سILA | .سILA |
| .فَجْرْ وَعَدْ لَمُّهِ وَعَدْ لَمُّهِ وَعَدْ لَمُّهِ وَعَدْ لَمُّهِ وَعَدْ لَسَّور | .سILA | .سILA |
| .سILA | .سILA | .سILA |
| .فَجْرْ وَعَدْ لَمُّهِ وَعَدْ لَمُّهِ وَعَدْ لَمُّهِ وَعَدْ لَسَّور | .سILA | .سILA |
| .سILA | .سILA | .سILA |
| . on lgl jlg大全ف��IAL | . | . |
| . jlg大全f��IAL | . | . |
| . jlg大全f��IAL | . | . |
| . jlg大全f��IAL | . | . |
| . jlg大全f��IAL | . | . |
| . jlg大全f��IAL | . | . |
| . jlg大全f��IAL | . | . |
| . jlg大全f��IAL | . | . |
| . jlg大全f��IA | . | . |
| . jlg大全f��IA | . | . |
| . jlg大全f��IA | . | . |
| . jlg大全f��IA | . | . |
| . jlg大全f��IA | . | . |
| . jlg大全f��IA | . | . |
| . jlg大全f��IA | . | . |
| . jlg大全f��IA | . . | . |
| . jlg大全f��IA | . | . |
| . jlg大全f��IA | . | . |
| . jlg大全f��IA | . | . |
| . jlg大全f��IA | . | . |
| . jlg大全f��IA | . | . |
| . jlg大全f��IA | . | . |
| . jlg大全f��IA | . . | . |
| . jlg大全f��IA | . | . |
| . jlg大全f��IA | . | . |
| . jlg大全f��IA | . | . |
| . jlg大全f��IA | . | . |
| . jlg大全f��IA | . | . |
| . jlg大全f��IA | . | . |
| . jlg大全f��IA | . | |
| . jlg大全f��IA | . | |
| . jlg大全f��IA | . | |
| . jlg大全f��IA | . | |
| . jlg大全f��IA | . | |
| . jlg大全f��IA | . | |
| . jlg大全f��IA | . | |
| . jlg大全f��IA | . | |
| . jlg大全f��IA | . |
and electronic equipment .(- WEEE
aagolg 0 gglal jLb
UgJgaaLgSmu
gag yjg jla jai aaoa ojeo 1
LjIolwI oJlcIg

slojdo
1jLg jS g alwI yLJ CILs 1s lwaai jlaI I lo JcI Lc sio jJgJlAolI sIc Jssy gl .LaI aOJ LijSjo Iaagill
Ic glc. sannll 1o o
Lc lai jlaaJIbgaJ Sj eJ s
g. liu jg<doJI Ujui yI ggo
JauI aag g aoaoj pJUgAUX
Iaai. Jlaal Iggy aillbll sic
. 1
Service worldwide
Central Service Contacts
AE United Arab Emirates,
Al
BSH Home Appliances FZE
Round About 13, Plot Nr MO-0532A
Jebel Ali Free Zone -Dubai
Tel.:048814401*
mailto:service.uae@bshq.com
www.bosch-home.com/ae
*Sun-Thu 8am to 5pm (exclude public hol
idays)
AM AM Armenia, Ruwuunuwu
ZIG ZAG LLC
Charenci str. 25
Yerevan 375025
Tel.: 010 55 60 10
mailto:service@zigzag.am
www.zigzag.am
GB Great Britain
BSH Home Appliances Ltd.
Grand Union House, Old Wolverton Road, Wolverton
Milton Keynes MK12 5PT
To arrange an engineer visit, to order spare parts and accessories or for product advice please visit www.bosch-home.co.uk Or call Tel.: 0344 892 8979
Calls are charged at the basic rate, please check with your telephone service provider for exact charges.
GR Greece, Eλας
BSH Iikiakes Siskeves A.B.E.
Central Branch Service
17 km E.O. Athinon-Lamias & Potamou
20
14564 Kifisia
Tηλέφωνο: 210 4277 500, -701
mailto: nkf-CustomerService@bshg.com
www.bosch-home.gr
IE Republic of Ireland BSH Home Appliances Ltd. M50 Business Park, Ballymount Road Upper, Walkinstown Dublin 12 To arrange an engineer visit, to order spare parts and accessories or for product advice please call Tel.: 01450 2655* www.bosch-home.ie *Calls are charged at the basic rate, please check with your telephone service provider for exact charges
IS Iceland Smith & Norland hf. Noatuni 4 105 Reykjavik Tel.: 0520 3000 www.sminor.is
IT Italia, Italy BSH Elettrodomestici S.p.A. Via.M.Nizzoli 1 20147 Milano (MI) Tel.02412678 100 mailto:info.it@bosch-home.com www.bosch-home.com/it
JO Jordan,
Diab Qawasmi & Sons Co.
Khaled Ben Al-Waleed Street, Jabal Al Hussein (11121)
P.O. Box 212292, Amman
Tel.: 06 465 8505, -2650
Tel.: 79 110 3430
mailto:boschjo@yahoo.com
LB Lebanon, Lebanon
Teheni, Hana & Co.
Boulevard Dora 4043 Beyrouth, P.O. Box 90449
Jdeideh 1202 2040
Tel.: 01 255 211
mailt:info@teheni-Hana.com
LU Luxembourg
BSH elektronagers S.A.
13-15, ZI Breedweues
1259 Senningerberg
Tel.: 26349 811
Reparaturen: lux-repair@bshg.com
Ersatzteile: lux-spare@bshg.com
www.bosch-home.com/lu
MT Malta
Oxford House Ltd.
Notable Road
Mriehel BKR 14
Tel.: 021 442 334
www.oxfordhouse.com mt
NL Nederland, Netherlands
BSH Huishoudapparaten B.V.
Taurusavenue 36
2132 LS Hoofdorp
Storingsmelding/Onderdelenverkoop:
Tel.: 088 424 4010
mailto:bosch-contactcenter@bshg.com
mailto:bosch-onderdelen@bshg.com
www.bosch-home.nl
NO Norge, Norway
BSH Husholdningsapparater A/S
Grensesvingen 9
0661 Oslo
Tel.: 22 66 05 54
mailto:Bosch-Service-NO@bshg.com
www.bosch-home.no
NZ New Zealand
BSH Home Appliances Ltd.
Level 3, Air NZ Building, Smales Farm
Business Park, 74 Taharoto Road, Takapuna
Auckland 0622
Tel.: 0800 245 700
mailto: aftersales.nz@bshg.com
www.bosch-home.co.nz
Mon-Fri 8:30am to 5pm (exclude public holidays)
PL Polska, Poland
BSH Sprzeg Gospodarstwa Domowego
Sp. z o.o.
Al. Jerozolimskie 183
02-222 Warszawa
Tel.: +48 42 271 5555
mailto: Serwis.Fabryczny@bshg.com
www.bosch-home.pl
PT Portugal
BSHP Electrodométricos, Sociedade
Unipessoal Lda.
Rua Alto do Montijo, n° 15
2790-012 Carnaxide
Tel.: 214 250 730
mailto:bosch.electrodométricos.pt@bshg.com
www.bosch-home.pt
RU Russia, Pocemn OOO «БСС Битовные Пиборы» Cepвс ot prono3bOdTeTne Mana KaJyckcaJ, 15 119071 MockBa Tel.:8 (800)2002961 mailto:hotlineru@bshg.com www.bosch-home.com
SA Kingdom Saudi Arabia, a
d
Abdul Latif Jameel Electronics and Airconditioning Co. Ltd.
BOSCH Service centre, Kilo 5 Old
Makkah Road (Next to Toyota), Jamiah
Dist.,P.O.Box 7997
Jeddah 21472
Tel.:8001279999
mailto:ALJECC@ALJ.COM
www.aljelectronics.com.sa
*Sat-Thu 8am to 11pm (exclude public holidays)
SE Sverige, Sweden
BSH Home Appliances AB
Landsvagen 32
169 29 Solna
Tel.: 0771 197 000
mailto:Bosch-Service-SE@bshg.com
www.bosch-home.se
SG Singapore,新加坡
BSH Home Appliances Pte. Ltd.
38C Jalan Pemimpin, #01-01
Singapore 577180
Tel.: 6751 5000
mailto:bshsgp.service@bshg.com
www.bosch-home.com.sg
Mon-Fri 9am to 6pm, Sat: 9am to 1pm (exclude public holidays)
TR Türkiye, Turkey
BSH Ev Aletleri Sanayi ve Ticaret A.S.
Fatih Sultan Mehmet Mahallesci, Balkan
Caddesi No: 51
34771 Umrianiye, Istanbul
Tel.: 0 216 444 6333
mailto:careline turkey@bshg.com
www.bosch-home.com/tr
Cagrın merkezini sabit hatlardan aramanin bedelişehir icı ücretendirme, Cep
telefonlarindan ise kullanlan tarifeye
gore degiskenlik göstermektedir
UA Ukraine, YkpaHa TOB "5CXIoobyroTaTexhika" Tel.:0800300152* mailto:BSH-serviceua@bshg.com www.bosch-home.com.ua *Be3koTobHa IHfo-JIIHja IIN-ITr 39.00 10 18.00
ZA South Africa
BSH Home Appliances (Pty) Ltd.
96 Fifteenth Road, Randjespark
1685 Midrand - Johannesburg
Tel.: 086 002 6724
mailto: bsh@iopen.co.za
mailto:appliednesserviceza@bshg.com
www.bosch-home.com/za

Thank you for buying a Bosch Home Appliance!
Register your new device on MyBosch now and profit directly from:
- Expert tips & tricks for your appliance
- Warranty extension options
- Discounts for accessories & spare-parts
- Digital manual and all appliance data at hand
- Easy access to Bosch Home Appliances Service
Free and easy registration – also on mobile phones: www.bosch-home.com/welcome

Looking for help? You'll find it here.
Expert advice for your Bosch home appliances, help with problems or a repair from Bosch experts.
Find out everything about the many ways Bosch can support you: www.bosch-home.com/service
Contact data of all countries are listed in the attached service directory.