
LATTICIA ONE TOUCH - Coffee machine MELITTA - Free user manual and instructions
Find the device manual for free LATTICIA ONE TOUCH MELITTA in PDF.
| Product type | Automatic coffee machine |
| Brand | Melitta |
| Model | LATTICIA ONE TOUCH |
| Dimensions (W × H × D) | 255 mm × 340 mm × 470 mm |
| Weight (empty) | 9.25 kg |
| Power supply | 220–240 V, 50 Hz, max. 1 400 W |
| Pump pressure | Max. 15 bar (static) |
| Water tank capacity | 1.8 L |
| Bean hopper capacity | 2 × 135 g |
| Main functions | Espresso, long coffee, cappuccino, latte macchiato, milk froth, hot milk, hot water |
| Double bean hopper | Yes, with Bean Select |
| Dispensing spout | Height adjustable, cup lighting, coffee, milk and hot water spouts |
| Control panel | Touch with rotary dial and display |
| Personal profiles | Up to 4 My Coffee profiles |
| Maintenance programs | Easy Cleaning, milk cleaning cycle, coffee cleaning cycle, descaling |
| Water filter | Included, screw-in type in tank |
| Automatic shut-off | Yes, adjustable (up to 8 h max.) |
| Energy saving mode | Yes, adjustable activation after inactivity |
| Safety | Automatic shut-off, burn protection, electrical safety (shuts off in case of fault) |
| Cleaning | Removable brewing unit, detachable milk unit, dishwasher-safe parts (plastic milk container) |
| Repairability | Melitta after-sales service, spare parts available |
Frequently Asked Questions - LATTICIA ONE TOUCH MELITTA
User questions about LATTICIA ONE TOUCH MELITTA
0 question about this device. Answer the ones you know or ask your own.
Ask a new question about this device
Download the instructions for your Coffee machine in PDF format for free! Find your manual LATTICIA ONE TOUCH - MELITTA and take your electronic device back in hand. On this page are published all the documents necessary for the use of your device. LATTICIA ONE TOUCH by MELITTA.
USER MANUAL LATTICIA ONE TOUCH MELITTA
1 Overview of the appliance 31
1.1 The appliance at a glance 31
1.2 The control panel at a glance 32
2 For your safety 33
2.1 Proper use 33
2.2 Danger from electric current 33
2.3 Risk of burns and scalds 33
2.4 General safety 34
3 First steps. 34
3.1 Unpacking the appliance 34
3.2 Checking the delivery contents 34
3.3 Installing the appliance.. 34
3.4 Connecting the appliance.. 35
3.5 Switching on the appliance for the first time 35
4 Basic operation 35
4.1 Switching the appliance on and off 35
4.2 Using the control panel 36
4.3 Navigating in the menu 36
4.4 Filling with coffee beans and using Bean Select.. 37
4.5 Using ground coffee 37
4.6 Filling with water 38
4.7 Adjusting the outlet 38
4.8 Using milk 38
4.9 Emptying the drip tray and coffee grounds container 38
5 Preparing beverages 39
5.1 Preparing espresso and caffe crème 39
5.2 Preparing cappuccino and latte macchiato 40
5.3 Preparing milk froth and warm milk 40
5.4 Preparing hot water 40
5.5 Preparing beverages with recipes 40
5.6 Changing beverage settings before and during preparation 40
5.7 Stopping beverage preparation 41
5.8 Preparing two beverages simultaneously 41
6 Permanently changing beverage settings 41
6.1 Changing default settings 41
7 Personal settings - "My Coffee" 42
7.1 Editing personal user profiles 42
7.2 Selecting/changing personal settings 42
7.3 Preparing beverages with personal settings 42
8 Changing basic settings 43
8.1 Setting the language 43
8.2 Setting the time 43
8.3 Setting energy save mode 43
8.4 Setting Auto OFF 43
8.5 Activating/deactivating rinsing 44
8.6 Resetting the appliance to the factory settings 44
8.7 Statistics and System menu 44
8.8 Setting the grinding fineness 45
9 Care and maintenance 45
9.1 General cleaning 45
9.2 Rinsing the coffee system 45
9.3 Cleaning the brewing unit 46
9.4 "Easy Cleaning" programme 46
9.5 "Cleaning milk system" programme 47
9.6 "Cleaning coffee system" programme 48
9.7 "Dscaling"programme 48
9.8 Setting the water hardness 49
9.9 Using a water filter 49
10 Transport, storage and disposal 50
10.1 Venting the appliance 50
10.2 Transporting the appliance 51
10.3 Disposing of the appliance 51
11 Technical data 51
12 Troubleshooting 52
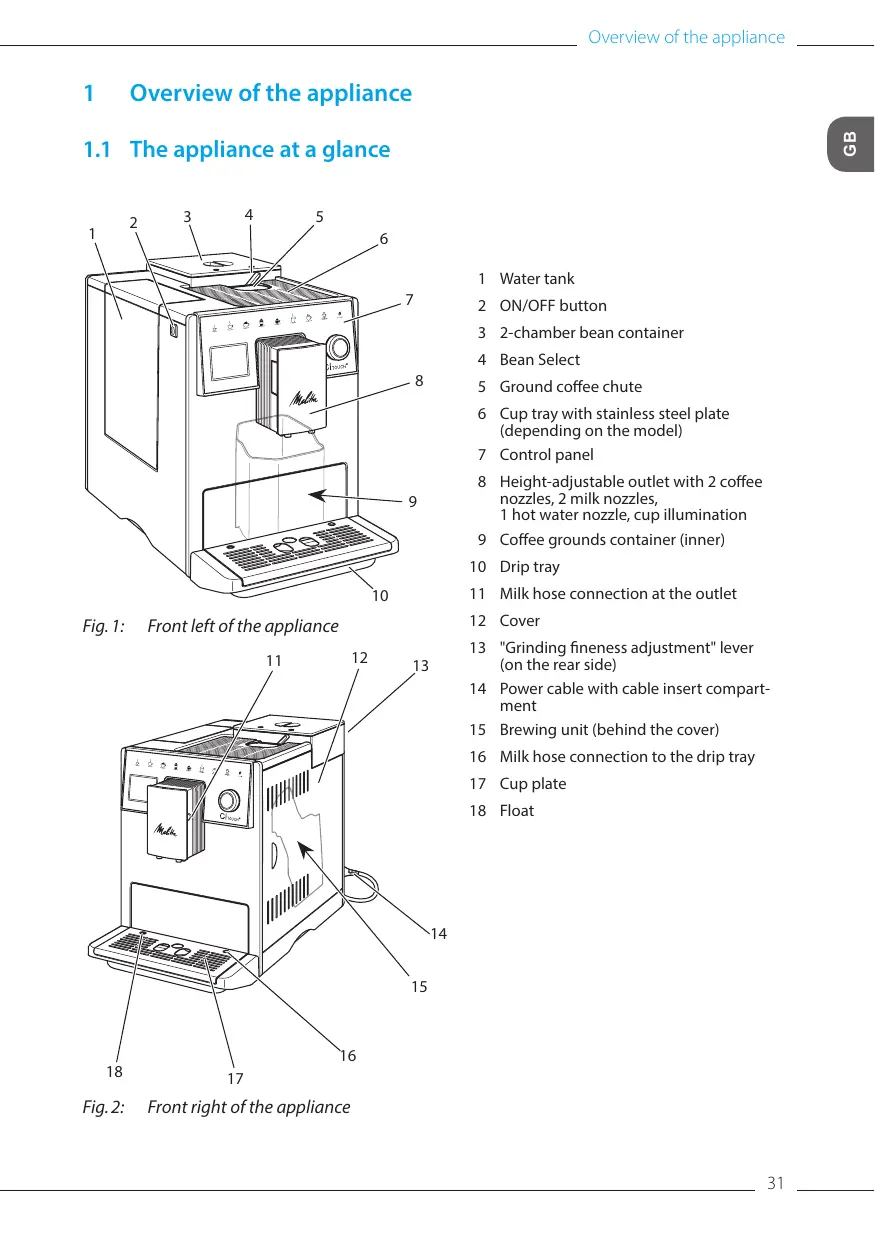
1 Overview of the appliance
1.1 The appliance at a glance
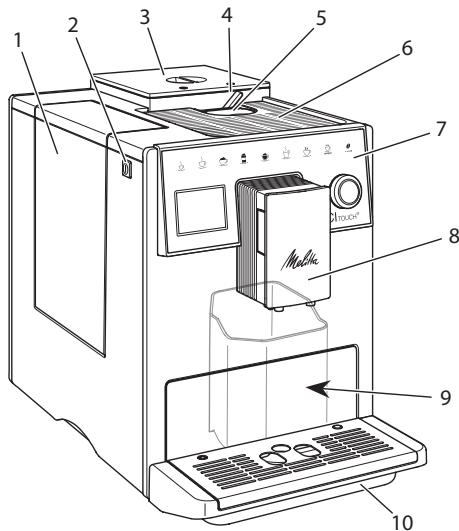
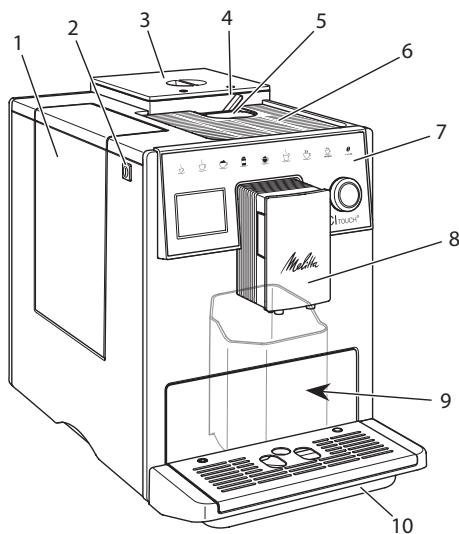
Fig. 1: Front left of the appliance
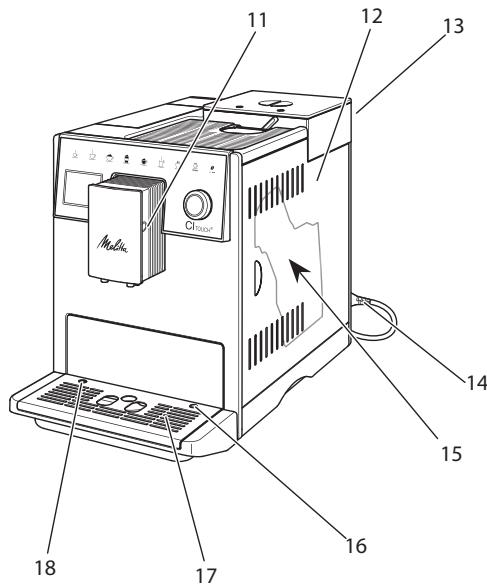
Fig.2: Front right of the appliance
1 Water tank
2 ON/OFF button
3 2-chamber bean container
4 Bean Select
5 Ground coffee chute
6 Cup tray with stainless steel plate (depending on the model)
7 Control panel
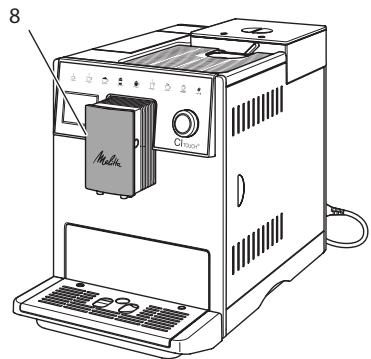
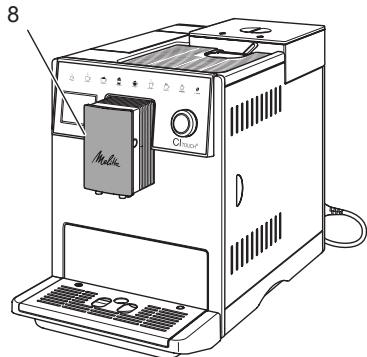
8 Height-adjustable outlet with 2 coffee nozzles, 2 milk nozzles, 1 hot water nozzle, cup illumination
9 Coffee grounds container (inner)
10 Drip tray
11 Milk hose connection at the outlet
12 Cover
13 "Grinding fineness adjustment" lever (on the rear side)
14 Power cable with cable insert compartment
15 Brewing unit (behind the cover)
16 Milk hose connection to the drip tray
17 Cup plate
18 Float
1.2 The control panel at a glance
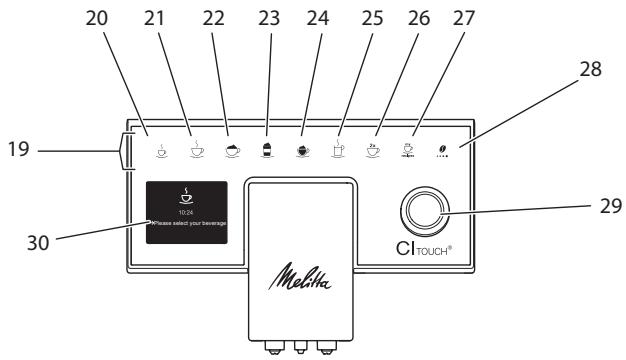
Fig.3: Control panel
| Item | Designation | Function |
| 19 | Direct keys | Preparing beverages |
| 20 | Espresso | Preparing espresso |
| 21 | Café crème | Preparing café crème |
| 22 | Cappuccino | Preparing cappuccino |
| 23 | Latte macchiato | Preparing latte macchiato |
| 24 | Milk froth/Warm milk | Preparing milk froth or warm milk |
| 25 | Hot water | Preparing hot water |
| 26 | 2 cups | Two-cup dispensing |
| 27 | my recipes | Selecting personal settings for beverages or preparing beverages with recipes |
| 28 | Coffee strength | Setting the coffee strength |
| 29 | Rotary switch | Calling up the menu or confirming inputs. Navigating up and down in the menu or set the STANDARD coffee flavour. |
| 30 | Display | Display of current menus and messages Example: Ready symbol |
Dear Customer,
Thank you for purchasing the CI Touch® fully automatic coffee maker.
The operating instructions will help you discover the diverse options offered by the appliance and enjoy your coffee to the full.
Read through the operating instructions carefully. This helps avoid personal injury and material damage. Store the operating instructions carefully. If you pass on the appliance, include the operating instructions with it.
Melitta accepts no liability for damage caused by failure to observe the operating instructions.
If you require further information or have any questions on the appliance, contact Melitta or visit our website at:
www.international.melitta.de/
We hope you enjoy using your appliance.
2 For your safety
The appliance conforms to the relevant European directives and has been manufactured using the latest technology. Nevertheless, some residual dangers remain.
Observe the safety instructions to avoid dangers. Melitta accepts no liability for damage caused by failure to observe the safety instructions.
2.1 Proper use
The appliance is used to prepare coffee beverages made from coffee beans or ground coffee, and to heat milk and water.
The appliance is intended for use in private households.
Any other use is regarded as improper and may lead to personal injury and material damage.
2.2 Danger from electric current
If the appliance or the power cable is damaged, there is a risk of fatal electric shock.
To avoid danger from electric current:
- Do not use a damaged power cable.
- A damaged power cable may only be replaced by the manufacturer or its customer service or service partner.
- Do not open any covers firmly screwed onto the appliance housing.
- Only use the appliance when it is in a technically flawless condition.
- A defective appliance may only be repaired by an authorised workshop. Do not repair the appliance yourself.
- Do not make any changes to the appliance, its components or its accessories.
- Do not immerse the appliance in water.
- Do not let the power cable come into contact with water.
2.3 Risk of burns and scalds
Escaping fluids and steam may be very hot. Parts of the appliance can also become very hot.
To avoid scalds and burns:
- Avoid escaping fluids and steam coming into contact with the skin.
- Do not touch any nozzles on the outlet during operation.
2.4 General safety
To avoid personal injury and material damage:
- Do not operate the appliance in a cabinet or similar.
- Do not reach into the interior of the appliance during operation.
- Keep the appliance and its power cable out of the reach of children under 8 years of age.
- This appliance may be used by children over 8 years of age and by persons with reduced physical, sensory or mental capabilities or a lack of experience and knowledge if they are supervised or have been instructed in using the appliance safely and understand the resulting risks.
- Children must not play with the appliance. Cleaning and maintenance must not be undertaken by children younger than 8 years of age. Children over 8 years of age must be supervised during cleaning and maintenance.
- Disconnect the appliance from the power supply when left unsupervised for a long time.
- The appliance must not be operated at altitudes over 2000m .
- Please observe the instructions in the corresponding section when cleaning the appliance and its components („Care and maintenance“ on page 45).
3 First steps
This chapter describes how to prepare your appliance for use.
3.1 Unpacking the appliance
- Unpack the appliance. Remove the packaging material, the adhesive strips and the protective films from the appliance.
- Keep the packaging material for transport and any return shipments.
Information
The appliance may contain traces of coffee and water. The appliance has been tested in the factory to ensure that it functions perfectly.
3.2 Checking the delivery contents
Check the completeness of delivery using the following list. If parts are missing, contact your retailer.
- Coffee spoon with screw-in aid for the water filter
- Plastic milk container or thermal milk container each with milk hose
Water filter - Test strip for determining the water hardness.
3.3 Installing the appliance
Observe the following instructions:
- Do not install the appliance in damp rooms.
Install the appliance on a stable, flat and dry surface. - Do not install the appliance in the vicinity of sinks or the like.
- Do not install the appliance on hot surfaces.
Install the appliance at a sufficient distance (approx. 10cm ) from the wall
and other objects. The space above the appliance should be at least 20 cm.
- Route the power cable so it cannot be damaged by edges or hot surfaces.
3.4 Connecting the appliance
Observe the following instructions:
- Check that the supply voltage matches the operating voltage specified in the technical data (see section 11, page 51).
- Only connect the appliance to a properly installed earthing contact socket. If in doubt, consult a specialist electrician.
- The socket must have a fuse of at least 10 A.
3.5 Switching on the appliance for the first time
During initial start-up, the language, the time and the water hardness can be set. The settings can be changed at a later point in time (see chapter 8, page 43 and section 9.8, page 49).
Use the enclosed test strip to determine the water hardness. Observe the instructions on the test strip packaging and the table in section 11, page 51.
Information
We recommend pouring away the first two cups of coffee after initial start-up.
Requirement: The appliance has been installed and connected.
- Place a vessel beneath the outlet.
- Switch on the appliance with the ON/OFF button.
The welcome display appears on the appliance.
The request to carry out setup appears on the display: Please set up the machine.
- Confirm setup with the "rotary switch".
The Language menu appears.
- Select your language with the "rotary switch". Confirm your selection.
The Clock menu appears.
- Select the hour and the minutes with the "rotary switch". Confirm your settings.
The Water hardness menu appears.
- Select the determined water hardness range with the "rotary switch" or confirm the default value.
The request Please refill and insert water tank appears.
- Remove the water tank. Rinse out the water tank with clean water. Insert the new water filter (see section „Switching on the appliance" on page 36).
Fill the water tank with fresh water and insert it.
The appliance heats up and performs automatic rinsing.
The ready symbol and the request Fill beans appear on the display.
- Fill coffee beans into the bean container. To do this, read section 4.4, page 37.
4 Basic operation
This chapter describes basic operating steps for using the appliance on a daily basis.
4.1 Switching the appliance on and off
Before switching on after starting up the appliance for the first time, read section 3.5.
Information
- When switched on and off, the appliance performs automatic rinsing.
During rinsing, rinsing water is also conducted into the drip tray. - The automatic switch-off rinsing can be switched on or off in the Settings menu.
Switching on the appliance
- Place a vessel beneath the outlet.
- Press the ON/OFF button.
The welcome display appears on the appliance.
The appliance heats up and performs automatic rinsing.
The appliance is ready for operation.
Switching off the appliance
- Place a vessel beneath the outlet.
- Press the ON/OFF button for 1-2 seconds.
If switch-off rinsing is activated, the appliance performs automatic rinsing.
The appliance switches off.
Information
- The appliance switches off automatically when it is not operated for a long time. Automatic rinsing is also carried out in this case.
- The off time can be set in the Auto OFF menu, see section 8.4, page 43.
If no beverage has been prepared since switching on or if the water tank is empty, no rinsing takes place.
4.2 Using the control panel
The essential functions can be accessed using the control panel and the "rotary switch".
Press the button with a fingertip. The control panel does not react when touched with a pen or other objects.
Only those buttons that can be used in the appliance's current status light up.
4.3 Navigating in the menu
To set individual beverages or for maintenance and care, the appliance must display the ready symbol. You must then call up the corresponding menu and navigate in it.
On successful completion of all processes, the ready symbol is shown on the display.
Observe the instructions on the display.
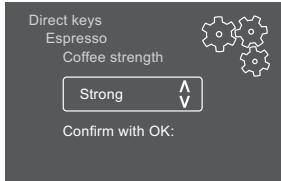
Fig.6: Example: display
Use the following options to navigate in the menu:
Calling up the menu and confirming the selection
Press the "rotary switch" for longer than 2 seconds to call up the menu.
Press the "rotary switch" briefly to confirm your selection.
Navigating in the menu
Turn the "rotary switch" to navigate down or up in the menu.
Exiting a menu
Select the Exit command with the "rotary switch" and confirm your selection to exit a menu.
Exit submenus that only display information and where no settings are made by pressing briefly.
Calling up submenus
Some of the appliance's functions are reached by calling up several submenus in succession.
Submenus are always called up in a similar way. Navigation to the Descaling programme is described here as an example.
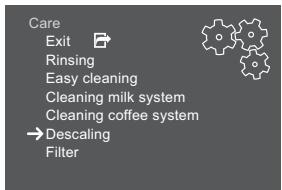
Fig. 7: Navigating to the Descaling programme
- Press the "rotary switch" for 2 seconds.
The menu appears on the display.
- Select the Care menu by turning the "rotary switch" and confirm your selection.
- Select the Descaling menu by turning the "rotary switch" and confirm your selection.
The selection of functions is always shown in shortened form in these operating instructions:
- Navigate to the Care > Descalging menu.
4.4 Filling with coffee beans and using Bean Select
Roasted coffee beans lose their aroma. Only fill the bean container with as many coffee beans as will be consumed over the next 3-4 days.
CAUTION
When switching bean chambers, a residual amount of coffee beans remains in the grinder. The first two coffee beverages after switching to decaffeinated beans may still contain caffeinated coffee. This may affect the health of people with caffeine intolerance.
- Persons with caffeine intolerance should only consume the third coffee beverage after switching over.
ATTENTION
The use of unsuitable types of coffee can lead to clogging of the grinder.
-
Do not use freeze-dried or caramelised coffee beans.
-
Do not pour ground coffee into the bean container.
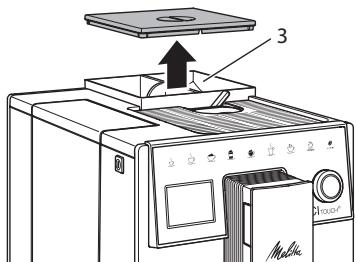
Fig.8: 2-chamber bean container
The 2-chamber bean container (3) enables the use of two different types of coffee. For example, fill one chamber with espresso beans and the other with café crème beans.
- Open the lid of the 2-chamber bean container.
- Fill coffee beans into the bean chambers.
- Close the lid of the 2-chamber bean container.
4.5 Using ground coffee
Ground coffee may also be used to prepare coffee beverages.
ATTENTION
The use of unsuitable types of coffee can lead to clogging of the brewing unit.
- Do not use any instant products.
-
Fill a maximum of one coffee spoon of ground coffee into the ground coffee chute.
-
Open the lid of the ground coffee chute.
- Use the enclosed coffee spoon for dosing.
Fill a maximum of one coffee spoon of ground coffee into the ground coffee chute.
- Close the lid of the ground coffee chute.
- Proceed as described in sections 5 to 7.
Information
Two-cup dispensing is not possible when using ground coffee.
- If no coffee is prepared within 3 minutes of opening the ground coffee chute, the appliance switches to operation with coffee beans and the ground coffee is discharged into the coffee grounds container.
4.6 Filling with water
Only use fresh, cold water without carbon dioxide for optimum coffee enjoyment. Change the water daily.
Information
The quality of the water largely determines the flavour of the coffee. Therefore, use a water filter (see section 9.8, page 49 and section 9.9, page 49).
- Open the lid of the water tank and pull the water tank upwards out of the appliance by the handle.
- Fill the water tank with water. Note the maximum capacity of 1.8 litres.
- Insert the water tank into the appliance from above and close the lid.
4.7 Adjusting the outlet
The spout is height-adjustable. Set the greatest possible distance between the outlet and the vessel. Depending on the vessel, push the outlet up or down.
4.8 Using milk
Use cooled milk for optimum coffee enjoyment.
Depending on the model, the enclosed milk container or the milk hose and conventional milk packs can be used.
Connecting the milk container
Only fill as much milk into the milk container as will be used immediately.
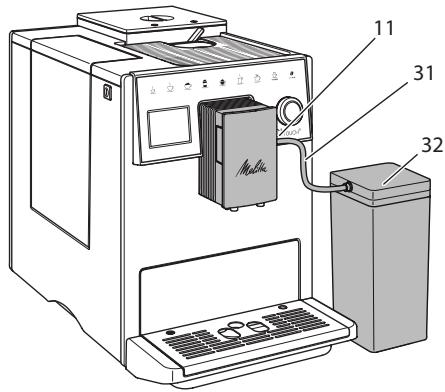
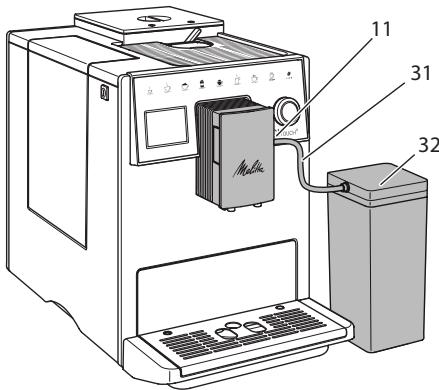
Fig.9: Connecting the milk container to the appliance
- Fill the desired amount of milk into the milk container (32).
- Connect the milk hose (31) to the milk container and the connection (11) at the spout or insert the milk hose into a conventional milk pack.
Information
Store the filled milk container in the refrigerator.
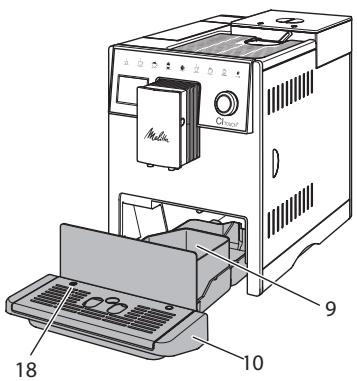
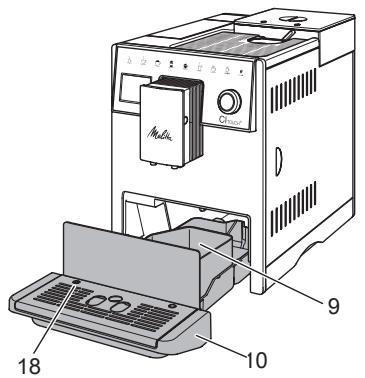
4.9 Emptying the drip tray and coffee grounds container
When the drip tray (10) and the coffee grounds container (9) are full, the appliance requests you to empty them. The projecting float (18) also indicates that the drip tray is full. Always empty both containers.
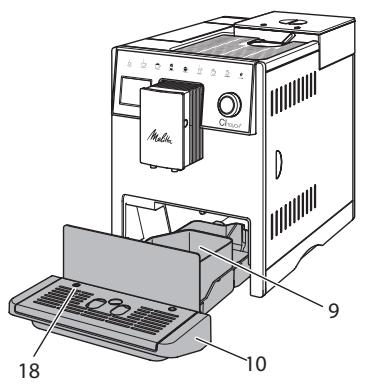
Fig. 10: Drip tray, coffee grounds container and float
- Pull the drip tray (10) forwards out of the appliance.
- Remove the coffee grounds container (9) and empty it.
- Empty the drip tray.
- Insert the coffee grounds container.
- Push the drip tray into the appliance up to the stop.
Information
The appliance requests you to empty the drip tray and the coffee grounds container after a defined number of beverages have been dispensed. If the containers are emptied while the appliance is switched off, it does not register this process. Therefore, it is possible that you are requested to empty the containers although the drip tray and the coffee grounds container are not yet full.
5 Preparing beverages
There are three options for preparing beverages:
Standard dispensing with direct keys and beverage preparation with recipes as described below
Preparation with modified beverage settings (see chapter 6, page 41)
Use of personal settings with the My Coffee function (see section 7, page 42).
Standard dispensing is described in this section.
Please note:
- The storage containers should contain sufficient amounts of coffee and water. If the filling level is too low, the appliance requests you to refill it.
The appliance does not indicate a lack of milk. - When selecting a beverage with milk, connect the milk container or a commercially available milk pack.
- The vessels for the beverages should be sufficiently large.
- For beverage preparation, the display must show the ready for use display.
- Beverage dispensing is ended automatically.
After beverage preparation with milk, the appliance automatically outputs a prompt for the Easy Cleaning programme.
5.1 Preparing espresso and café crème

- Place a vessel beneath the outlet.
- Press the "Espresso" or "Café Crème" button.
Beverage dispensing is carried out and ends automatically.
- Remove the vessel.
5.2 Preparing cappuccino and latte macchiato


Requirement: Milk is connected.
- Place a vessel beneath the outlet.
- Press the "Cappuccino" or "Latte Macchiato" button.
Beverage dispensing is carried out and ends automatically.
» Easy Cleaning? appears on the display.
- Remove the vessel.
- Run the Easy Cleaning programme or prepare further beverages and run the Easy Cleaning programme later, see section 9.4.
5.3 Preparing milk froth and warm milk
The preparation of milk froth and warm milk is similar.

Requirement: Milk is connected.
-
Place a vessel beneath the outlet.
-
Press the "Milk froth/milk" button.
a) Milk froth = briefly press button
b) Warm milk = press the button for longer (2 seconds)
Milk dispensing is carried out and is ended automatically. - Remove the vessel.
» Easy Cleaning? appears on the display. - Run the Easy Cleaning programme or prepare further beverages and run the Easy Cleaning programme later, see section 9.4.
5.4 Preparing hot water

- Place a vessel beneath the outlet.
- Press the "Hot water" button.
Hot water dispensing is carried out and is ended automatically.
3. Remove the vessel.
5.5 Preparing beverages with recipes
In addition to standard dispensing, you can select further beverage specialities in the Recipes menu.

Information
When selecting a recipe with milk, connect the milk container or a commercially available milk pack (depending on the model).

- Place a vessel beneath the outlet.
- Press the "rotary switch" and navigate to the Recipes menu or press the "my recipes" button for a long time.
The recipe selection appears on the display.
- Select a beverage recipe and confirm your selection.
Beverage dispensing is carried out and ends automatically.
- Remove the vessel.
5.6 Changing beverage settings before and during preparation
Beverage settings can be changed before and during beverage preparation.

Information
These settings only apply to current beverage preparation.
Changing beverage settings before preparation
The bean type can be changed before selecting a beverage.
Before selecting a beverage, set the desired bean chamber with the "BEAN SELECT" slider.
The selected bean type is used to prepare the beverage.
Changing beverage settings during preparation
The beverage quantity and the coffee strength can be changed during beverage preparation.
Requirement: The appliance is ready for operation.

During beverage dispensing (coffee or milk), use the "rotary switch" to e respective beverage quantity.

During the grinding process, use the "Coffee strength" button to set the wire strength.
5.7 Stopping beverage preparation
To stop beverage preparation prematurely, press the selected direct key again.
5.8 Preparing two beverages simultaneously

The "2 cups" button is used to prepare two beverages.
Information
Two-cup dispensing is not possible for beverages mixed with hot water (americano), for milk froth, warm milk or hot water.
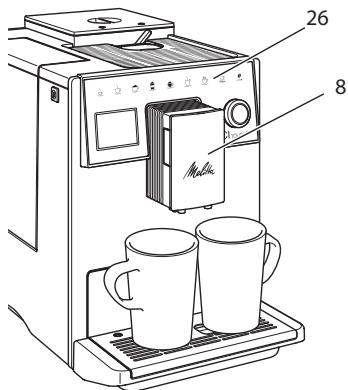
Fig.11: Two-cup dispensing
- Place two vessels beneath the outlet (8).
- Press the "2 cups" button (26).
- Continue as described for the relevant beverage preparation.
Information
- This setting only applies to the next beverage preparation.
If a beverage is not prepared within 1 minute, the appliance switches to single-cup dispensing.
6 Permanently changing beverage settings
The appliance offers further options for preparing coffee specialities.
6.1 Changing default settings
Depending on the beverage, the following default settings can be changed: Coffee amount, amount of froth, milk amount, hot water amount, coffee strength and temperature.
Changing the beverage settings is similar for all beverages. Changing the coffee strength for an Espresso is described here as an example.
- Press the "rotary switch" for 2 seconds.
The menu appears on the display.
- Navigate to the Direct keys > Espresso > Coffee strength menu.
- Select the desired coffee strength and confirm your selection.
- Select the Exit command to exit the menu.
The selected coffee strength is used the next time an espresso is prepared.
Information
The default settings remain valid until they are changed again.
7 Personal settings - "My Coffee"
The "My Coffee" function lets you to save personal beverage settings and assign them to a user.
7.1 Editing personal user profiles
Up to four user profiles can be used.
Changing the name of a user profile
The names of the user profiles can be changed.
- Press the "rotary switch" for 2 seconds.
The menu appears on the display.
- Navigate to the My Coffee menu.
- Select a user and confirm your selection.
- Select Change name and confirm your selection.
The menu for selecting individual characters appears.
- Select individual characters by turning the "rotary switch" and confirm each of them.
- Repeatedly select the Exit command to exit the menu.
Activating/deactivating a user profile
Only users whose profile is activated can be used.
Requirement: The appliance is ready for operation.
- Press the "rotary switch" for 2 seconds.
The menu appears on the display.
- Navigate to the My Coffee menu.
- Select a user and confirm your selection.
- Select Enabled/disabled and confirm your selection.
- Select Enabled or Disabled and confirm your selection again.
- Select the Exit command to exit the menu.
7.2 Selecting/changing personal settings
Depending on the beverage, the following settings can be assigned to a user:
Recipes, coffee amount, amount of froth, milk amount, hot water amount, coffee strength and temperature.
The assignment of personal settings to a user is always similar. Setting the coffee amount for a Cappuccino is described here as an example.
- Press the "rotary switch" for 2 seconds.
The menu appears on the display.
- Navigate to the My Coffee menu.
- Select a user and confirm your selection.
- Navigate to the Cappuccino > Coffee amount menu.
- Select an amount and confirm your selection.
- Select the Exit command to exit the menu.
The next time a cappuccino is prepared by the user, the selected amount of coffee is used.
7.3 Preparing beverages with personal settings

The preparation of beverages using the "My Coffee" function is similar beverages. The preparation of a capno is described here as an example.
- Place a vessel beneath the outlet.
- Press the "my recipes" button until the desired user is shown on the display.
- Press the "Cappuccino" button.
Beverage dispensing is carried out and ends automatically.
- Remove the vessel.
» Easy Cleaning? appears on the display. (Press rotary switch to start). - Run the Easy Cleaning programme or prepare further beverages and run the Easy Cleaning programme later, see section 9.4.
Information
- To exit the My Coffee function, press the "my recipes" button until the ready symbol appears.
If a beverage is not prepared within 3 minutes, the appliance automatically switches to the ready symbol.
8 Changing basic settings
Operating steps that change the appliance's basic settings are described in this chapter.
8.1 Setting the language
The display text language can be set.
Requirement: The appliance is ready for operation.
- Press the "rotary switch" for 2 seconds.
The menu appears on the display.
- Navigate to the Language menu.
- Select a language and confirm your selection.
- Exit the menu with the Exit command.
8.2 Setting the time
The time shown on the display can be set.
Requirement: The appliance is ready for operation.
- Press the "rotary switch" for 2 seconds.
The menu appears on the display.
- Navigate to the Clock menu.
- Select the hour and the minutes. Confirm each of your settings.
- Exit the menu with the Exit command.
Information
To prevent the time being shown on the display, set the time to 00:00.
8.3 Setting energy save mode
Energy save mode lowers the heating temperature and switches off the illumination on the control panel.
If the appliance is not operated for a long time, it automatically switches to energy save mode after a specified time. The period of time until energy save mode is activated is set in the Energy save mode menu.
Requirement: The appliance is ready for operation.
- Press the "rotary switch" for 2 seconds.
The menu appears on the display.
- Navigate to the Energy save mode menu.
- Select a period of time and confirm your selection.
- Exit the menu with the Exit command.
Information
- Energy save mode cannot be deactivated completely. After 4 hours without being operated at the latest, the appliance switches to energy save mode.
8.4 Setting Auto OFF
If the appliance is not operated for a long time, it switches off automatically after a specified time. Set the duration until the appliance switches off in the Auto OFF menu. A specific point in time can also be defined.
Information
If the duration and point in time are activated simultaneously, the appliance switches off after the event that occurs first.
Setting the duration for Auto OFF
Requirement: The appliance is ready for operation.
- Press the "rotary switch" for 2 seconds.
The menu appears on the display.
- Navigate to the Auto OFF > OFF after... menu.
- Select a time and confirm your selection.
- Repeatedly select the Exit command to exit the menu.
Information
Auto OFF cannot be deactivated completely. After 8 hours without being operated at the latest, the appliance switches off.
Setting the point in time for Auto OFF
The OFF time point is deactivated as default in the factory.
Requirement: The appliance is ready for operation.
- Press the "rotary switch" for 2 seconds.
The menu appears on the display.
- Navigate to the Auto OFF > OFF at... menu.
- Select the hours and the minutes. Confirm each of your settings.
- Repeatedly select the Exit command to exit the menu.
Information
To deactivate Auto OFF, set the OFF time point to 00:00.
8.5 Activating/deactivating rinsing
Rinsing is always carried out immediately after switching on the coffee system. Only the Off rinsing can be activated/deactivated. If this is activated, rinsing is carried out after switching off the coffee system.
Permanent deactivation is not recommended.
Activating/deactivating switch-off rinsing
Requirement: The appliance is ready for operation.
- Press the "rotary switch" for 2 seconds.
The menu appears on the display.
- Navigate to the Settings >Switch-off rinsing menu.
- Select Enabled or Disabled and confirm your selection.
- Select the Exit command to exit the menu.
The appliance is ready for operation.
8.6 Resetting the appliance to the factory settings
The appliance can be reset to the factory settings.
Information
If the appliance is reset to the factory settings, all personal settings are lost, including the settings in the My Coffee menu.
Requirement: The appliance is ready for operation.
- Press the "rotary switch" for 2 seconds.
The menu appears on the display.
- Navigate to the Settings > Factory settings menu.
- Select Reset and confirm your selection.
- Select the Exit command to exit the menu.
8.7 Statistics and System menu
Statistics
The Statistics menu provides information on the number of beverages dispensed and for maintenance.
System
The System menu provides information on the software version and access to the venting function, see section 10.1, page 50.
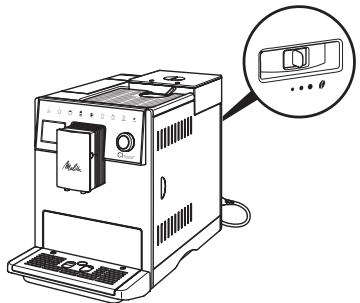
8.8 Setting the grinding fineness
The grinding fineness of the coffee beans influences the flavour of the coffee. The grinding fineness has been optimally set prior to delivery.

Fig.12: Grinding fineness setting
Use the lever on the rear side to set the grinding fineness.
-
Move the lever:
-
To the right = grinding fineness coarser
- To the left = grinding fineness finer
Information
If the grinding fineness is set finer, the coffee flavour is stronger.
- The grinding fineness is optimally set when the coffee flows evenly out of the outlet and a fine, dense crema appears.
9 Care and maintenance
Regular cleaning and maintenance ensure the consistent high quality of your beverages.
9.1 General cleaning
Clean the appliance regularly. Immediately remove external soiling caused by milk and coffee.
ATTENTION
The use of unsuitable cleaning agents can lead to scratched surfaces.
- Do not use any abrasive cloths, sponges or cleaning agents.
Requirement: The appliance is switched off.
Clean the outside of the appliance with a soft, damp cloth and normal washing-up liquid.
- Rinse the drip tray and the coffee grounds container with a soft, damp cloth and normal washing-up liquid.
Clean the bean container with a soft, dry cloth.
9.2 Rinsing the coffee system
During rinsing, the nozzles at the outlet and the internal parts of the coffee system are rinsed. As a result, rinsing water from the interior enters the drip tray.
If switch-off rinsing is not deactivated, the appliance rinses the coffee system when switching on and off.
Rinsing can also be carried out manually.
Requirement: The appliance is ready for operation.
- Place a vessel beneath the outlet.
- Press the "rotary switch" for 2 seconds.
The menu appears on the display.
- Navigate to the Care > Rinsing menu.
- Select Start and confirm your selection.
The coffee system is rinsed.
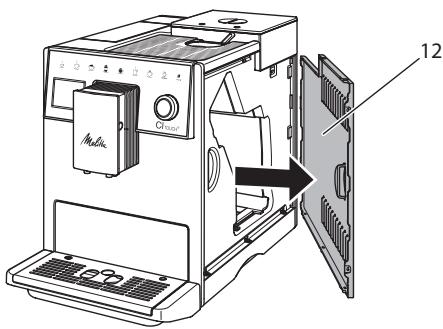
9.3 Cleaning the brewing unit
To avoid damage to the appliance, we recommend cleaning the brewing unit once a week.
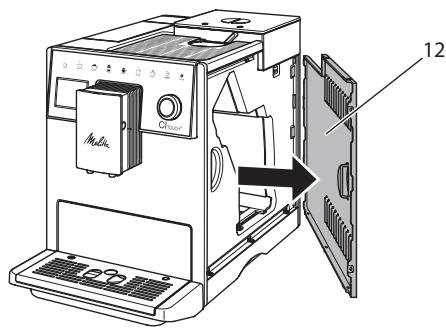
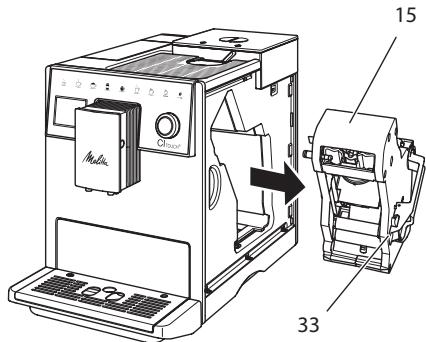
Fig. 13: Removing the side panel
Fig. 14: Removing the brewing unit
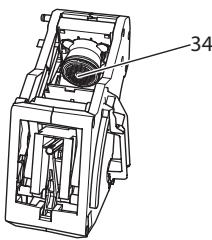
Fig. 15: Cleaning the brewing unit
Requirement: The appliance is switched off.
- Open the cover (12). To do this, reach into the recess on the right of the appliance and pull the cover off sideways.
- Press and hold the red lever (33) on the brewing unit handle (15) and turn the handle clockwise until it engages at the stop.
- Pull the brewing unit out of the appliance by the handle.
- Rinse the entire brewing unit thoroughly from all sides under running water. In particular, make sure that coffee residues are removed from the sieve (34).
- Allow the brewing unit to drip dry.
- Use a soft, dry cloth to remove coffee residues from the surfaces inside the appliance.
- Insert the brewing unit into the appliance. Press and hold the red lever on the handle of the brewing unit and turn the handle counter anticlockwise until it engages at the stop.
- To do this, insert the cover sideways until it engages.
9.4 "Easy Cleaning" programme
The milk system is rinsed using the Easy Cleaning programme.
Each time after a beverage has been prepared with milk, the appliance requests you to run the Easy Cleaning programme.
The Easy Cleaning programme can also be run manually.
Requirement: The appliance is ready for operation.
- Place a vessel beneath the outlet.
- Press the "rotary switch" for 2 seconds.
The menu appears on the display.
- Navigate to the Care > Easy Cleaning menu.
- Select Start and confirm your selection.
- Follow the further instructions on the display up to the end of the Easy Cleaning programme.
9.5 "Cleaning milk system" programme
This programme is used to clean the milk system with the aid of a milk system cleaning agent.
To maintain hygiene and avoid damage to the appliance, we recommend carrying out the cleaning programme once a week.
The cleaning programme takes approximately 3 minutes and should not be interrupted.
ATTENTION
The use of unsuitable milk system cleaning agents can damage the appliance.
- Only use Melitta® PERFECT CLEAN milk system cleaning agent for fully automatic coffee makers.
- Observe the processing instructions on the packaging of the milk system cleaning agent.
Requirement: The appliance is ready for operation.
- Place a container (0.7 l) beneath the coffee spout (e.g. the coffee grounds container).
- Press the "rotary switch" for 2 seconds.
The menu appears on the display.
- Navigate to the Care > Cleaning milk system menu.
- Select Start and confirm your selection.
- Follow the further instructions on the display up to the end of the Cleaning milk system programme.
Cleaning the milk unit
In addition, we recommend cleaning the milk unit, the milk hose and the milk container regularly.
Information
- The plastic milk container, without lid and riser pipe, is dishwasher-safe.
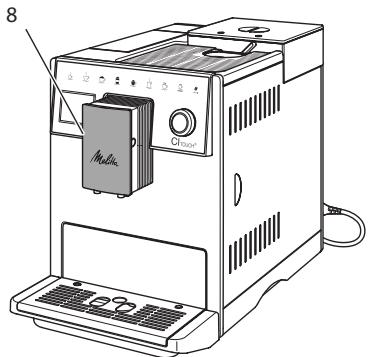
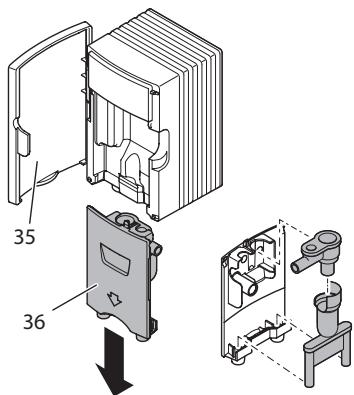
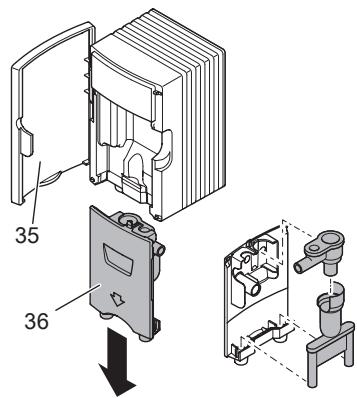
Fig. 16: Access to the milk unit
Fig. 17: Removing the milk unit
- Pull the milk hose off the appliance.
- Open the door of the spout (8).
- Pull the milk unit (36) off downwards.
- Clean the individual parts with warm water. Use a soft, damp cloth and normal washing up liquid for this.
Installation is carried out as described in reverse order.
Information
Make sure that the milk unit is pushed upwards to the end stop.
9.6 "Cleaning coffee system" programme
This cleaning programme is used to remove residues and coffee oil residues with the aid of coffee machine cleaning agents.
To avoid damage to the appliance, we recommend carrying out the cleaning programme every 2 months or as requested by the appliance.
Before starting the cleaning programme, clean the brewing unit and the interior (see section 9.3, page 46).
The cleaning programme takes approximately 15 minutes and should not be interrupted.
CAUTION
Contact with coffee machine cleaning agent may lead to eye and skin irritation.
- Observe the processing instructions on the packaging of the coffee machine cleaning agent.
ATTENTION
The use of unsuitable coffee machine cleaning agents can damage the appliance.
- Only use Melitta® PERFECT CLEAN cleaning tabs for fully automatic coffee makers.
Requirement: The appliance is ready for operation.
- Press the "rotary switch" for 2 seconds.
The menu appears on the display.
- Navigate to the Care > Cleaning coffee system menu.
- Select Start and confirm your selection.
- Follow the further instructions on the display up to the end of the cleaning programme.
9.7 "Dscaling" programme
The descending programme is used to remove limescale deposits in the interior of the appliance with coffee machine descending agents.
To avoid damage to the appliance, we recommend carrying out the descending programme every 3 months if a water filter is not used. On use of a water filter, perform descending only when requested by the appliance.
The descending programme takes approximately 25 minutes and should not be interrupted.
CAUTION
Contact with descending agent may lead to eye and skin irritation.
- Observe the processing instructions on the packaging of the descaling agent.
ATTENTION
Use of unsuitable descending agent may damage the appliance.
Only use Melitta® ANTI CALC liquid descaling agent for fully automatic coffee makers.
- Observe the processing instructions on the packaging of the descaling agent.
ATTENTION
A water filter may be damaged if it is screwed in during the descending programme.
- Remove the water filter when the appliance requests you to do so (see Fig. 18).
- Place the water filter into a vessel filled with tap water during the descaling programme.
- The water filter can be reinserted and reused when the descending programme is complete.
Requirements:
- The appliance is ready for operation.
-
A container (0.7 l) is placed beneath the spout.
-
Press the "rotary switch" for 2 seconds.
The menu appears on the display.
- Navigate to the Care > Dscaling menu.
- Select Start and confirm your selection.
- Follow the further instructions on the display up to the end of the descaling programme.
9.8 Setting the water hardness
The set water hardness influences the frequency of descending. The harder the water, the more frequently the appliance has to be descaled.
Information
The water hardness cannot be set if you use a water filter.
Determine the water hardness with the enclosed test strip. Observe the instructions on the test strip packaging and table 11, page 51.
Requirement: The appliance is ready for operation.
- Press the "rotary switch" for 2 seconds.
The menu appears on the display. - Navigate to the
Settings > Water hardness menu.
- Select the water hardness range and confirm your selection.
9.9 Using a water filter
The use of a water filter extends the service life of the appliance and the appliance has to be descaled less frequently. The water filter contained in the scope of delivery filters calcium and other pollutants out of the water.
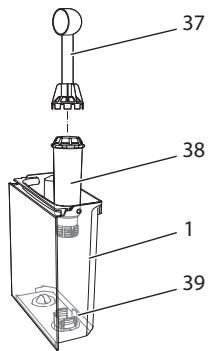
Fig. 18: Screwing/unscrewing the water filter
The water filter (38) is screwed into and unscrewed from the thread (37) on the base of the water tank (39) using the screwing aid at the end of the enclosed coffee spoon (1).
Inserting the water filter
Information
Place the water filter into a vessel filled with fresh tap water for a few minutes before inserting it.
Requirements:
- The appliance is ready for operation.
-
A container (0.7 l) is placed beneath the spout.
-
Press the "rotary switch" for 2 seconds.
The menu appears on the display.
- Navigate to the Care > Filter > Insert filter menu.
- Select Start and confirm your selection.
- Follow the further instructions on the display.
The water hardness is automatically adjusted on the water filter by the appliance.
The appliance is ready for operation.
Changing the water filter
Change the water filter when the appliance requests you to do so.
Requirement:
- The appliance is ready for operation.
-
A container (0.7 l) is placed beneath the spout.
-
Press the "rotary switch" for 2 seconds.
The menu appears on the display.
- Navigate to the Care > Filter > Change filter menu.
- Select Start and confirm your selection.
- Follow the further instructions on the display.
Removing the water filter
The water filter should not be left standing dry for a long period of time. When it is not used for a long time, we recommend storing the water filter in a vessel filled with tap water in the refrigerator.
Requirement: The appliance is ready for operation.
- Press the "rotary switch" for 2 seconds.
The menu appears on the display.
- Navigate to the Care > Filter > Remove filter menu.
- Select Start and confirm your selection.
- Follow the further instructions on the display.
The water hardness is automatically reset to the previous setting.
The appliance is ready for operation.
10 Transport, storage and disposal
10.1 Venting the appliance
We recommend venting the appliance when it is not used for a long period, prior to transport and when there is a risk of frost.
During venting, residual water is removed from the appliance.
Requirements:
-
The water filter is removed.
The appliance is ready for operation. -
Place a vessel beneath the outlet.
- Press the "rotary switch" for 2 seconds.
The menu appears on the display.
- Navigate to the System > Venting menu.
- Select Start and confirm your selection.
- Follow the further instructions on the display.
The appliance heats up.
The appliance is vented and then switches off completely.
10.2 Transporting the appliance
ATTENTION
Freezing residual water can damage the appliance.
Prevent the appliance from being exposed to temperatures below 0^ C .
Information
Transport the appliance in the original packaging. This avoids damage in transit.
Before transporting the appliance, carry out the following activities:
- Vent the appliance (see section 10.1, page 50).
- Empty the drip tray and the coffee grounds container.
- Empty the water tank.
- Empty the bean container.
- Clean the appliance (see section 9.1, page 45).
- Secure loose parts (cup plate, etc.) with suitable adhesive tape.
- Package the appliance.
10.3 Disposing of the appliance
Appliances marked with this symbol are subject to the European Directive 2002/96/EC for WEEE (Waste Electrical and Electronic Equipment).
Electrical appliances do not
belong in domestic waste.
- Dispose of the appliance in an environmentally friendly manner via suitable collection systems.
11 Technical data
| Technical data | |
| Operating voltage | 220 V to 240 V, 50 Hz |
| Power consumption | Max. 1400 W |
| Pump pressure | Static, max. 15 bar |
| Dimensions | |
| Width | 255 mm |
| Height | 340 mm |
| Depth | 470 mm |
| Capacity | |
| Bean container | 2×135 g |
| Water tank | 1.8 l |
| Weight (empty) | 9.25 kg |
| Ambient conditions | |
| Temperature | 10 °C to 32 °C |
| Relative humidity | 30 % to 80 % (non-condensing) |
| Water hardness range | °d | °e | °f |
| Soft | 0 to 10 | 0 to 13 | 0 to 18 |
| Medium | 10 to 15 | 13 to 19 | 18 to 27 |
| Hard | 15 to 20 | 19 to 25 | 27 to 36 |
| Very hard | >20 | >25 | >36 |
12 Troubleshooting
If the actions listed below fail to rectify the problems or other problems not listed here occur, contact our hotline (local rate).
The service number can be found on the lid of the water tank or in the Service area of our website.
| Problem | Cause | Action |
| Coffee only emerges from the outlet in drips. | Grinding fineness too fine. | • Set a coarser grinding fineness (see section 8.8). |
| Appliance soiled. | • Clean the brewing unit (see section 9.3).• Run the cleaning programme (see section 9.6). | |
| Appliance is covered inside with limescale. | • Descale the appliance (see section 9.7). | |
| Coffee does not flow through. | Water tank not filled or inserted incorrectly. | • Fill the water tank and ensure it is positioned correctly (see section 4.6). |
| Brewing unit clogged. | • Clean the brewing unit (see section 9.3). | |
| Grinder does not grind coffee beans. | • Beans do not drop into the grinder.• Tilt lever is positioned vertically.• Coffee beans too oily.• Foreign object in the grinder. | • Tap lightly on the bean container.• Clean the bean container.• Move the tilt lever to the left or right.• Use different coffee beans.• Contact the hotline. |
| Fill beans display flashes although the bean container is full. | Beans do not drop into the grinder. Insufficient ground beans in the brewing chamber. | • Press button for cup dispensing. |
| Loud grinder noise. | Foreign object in the grinder. | • Contact the hotline. |
| Brewing unit cannot be inserted after removing. | Brewing unit is not correctly locked. | • Check that the handle for the brewing unit locking mechanism is correctly engaged (see section 9.3). |
| Drive is not in the correct position. | • Press and hold the "Coffee strength" button. Also press the ON/OFF button. The appliance initialises. Release the buttons again. | |
| System error appears on the display. | Display software problem. | • Switch the appliance off and on again (see section 4.1).• Contact the hotline. |
Sommaire
www.melitta.nl of www.melitta.be
8.5 Spoeling activeren/deactiveren
Fig.3: Panel de control
9.4 Programa "Easy Cleaning"
10.2 Transportar laquina
PRECAUCION
Abning af undermenuer
10.2 Transport of maskinen
OBS
Frossent restvand kan medfore skader pa maskinen.
9.4 Programmet "Easy Cleaning"
Med programmet Easy Cleaning spolas mjolksystemet.
9.5 Program "Rengjoring melkesystem"
Sette inn vannfilter
Informasjon
Unngå a utsette apparater for temperaturer under 0^
i Informasjon
Transporter apparatet i originaleballasjen. Dermed unngar du transportskader.
Electrical and Electronic Equipment).
HanoJIHnTe KOHTeHep CBexKe BDOJ n BCTaBbTe Ha MeCTO.
» Annapat harpeetcaи BbIOnHnT abTOMaTnueckyIO npombyBky.
Ha nncnnee noBntca nHnukatop roTOBHOCTn n 3anpoc 3acbinamb 3epHa.
- 3acbIbTe KoΦeHbIe 3epHa B COOTBETCTBvUOuN KOHTeHep. DOnoJHnTeJbHyU INΦOpMauNcM. B rIabe 4.4, cTp 260.
4 OchoBhIe npHcHnbl ynpaBHeHna
B daHHo rnaBe OINcBiBaIOTcO cHOBhIe 3TaIbI ynpaBJIeHn, HeO6XoJIMbIe IJa IIOBceIHeBHOrO INCNoJIb3OBaHnA aIIpaT.
OuCTka KoedeHOB CnCTeMSI
→ydaeneHnHaKnn
ΦnNbTp
Puc.7: IepexoK npo2pamme ouucmku om hakunu
- Haxmnte NOBOPOTbI HaxmHOnI nepeKJIouaTeIb Ha 2 cekyHdbI.
Ha nucnnee noarBntc meHIO.
2.Врашеним NOBOPOTьн HaxIMHOn пеклочаеля ВьбepиTe MeHIO Yxod и поТВердИТе CBОY BvI6Op. - BpaueHnem NOBOpOTbI HaxmHOn nepeKIOUoTaTeI BbI6epNTe MeHIO YdaJeHue HAKUNu IPOITBepDnte CBOI Bbl6Op.
B daHHOM pyKOBODCTBE NO 3KcNpyaTauNN Bb6Op fynKcN BcERda OTo6paXkaETcR B COKpaueHHOM BVNe:
- Перашист К мени Ухod >Уданеоне накunju
4.4 HanolneHne KofoeHbIMn 3epHaMn u NCNoIb3O- BaHne nepeKluoyaTeIa Bby6op 3epen
O6xapenHbIe K0feHbIe 3epHa TepaOT CBOI apOMaT. 3acBInbTe B pe3epByap CTolbKO K0feHbIX 3peH, CKoJIbKO CMoJKeTe ynOtpe6ntb 3a 6JnxJaIne 3-4 dHa.
OCTOPOXHO
Pn peeknlouehen KamepbI Jn3epeh HeKOtopoe KOJNUcTeBTO KofoeHbIX 3epen octaetc B Kofoemolke. PEPBbIe DBe npucnn KofoeHoro HAnUTka, npuROTOBLeHHbIe NocIe nepeKIOUeHnHa 3epHa 6ez Kofoeha, Moryr coepkatab npimecb Kofoe C KofoehHom. 3To MoKeT cTaB pnuHoiy UxydWeHnCaMoO cyBCTBn y IInC henepeHocmOcTBIO Kofoeha.
Iицam c HenepeHocmocTbIO KofoenHa CneJyET OTka3aTbCra OT yNOpTe6JIeHnI nePbBix DByx NOpzI KOfo nOcJIe nepeKJIouChnI KaMep IJa 3epeH.
BHUMAHVE
Ucnolb3ObaHne HenoXoJxuNX COPTOB KOeMOKTeIpNBecTu K 3acopeHIO KOeMOLKn.
He nCnoIb3yIte KofoeHbIe 3epHa, BbICyuIeHHbIe MeToIOM cy6IImaIu, IIN KApAmeJIIN3OBAHHbIe 3epHa.
He hanoJIHnIe KOHTeHep IJRA KOFei-HbIX 3epeH MOJToBIM KOfe.

Puc.8: 8yXkAmepHbI KOhmeuHep dЯ KoΦeUHBIX 3epeH
Puc.9: IodKIOUeHue emKocmu dna MoIoka K annapamy
- HanoJIHInTe eMKoCTb Heo6XoUIMbIM o6bemOM MoJOKa (32).
- CoeINHInTe Tpy6ky IJIA MOJOKa (31) C EMKOCtBIO IJIA MOJOKa IN pa3beMOM (11) HA BbIyNcKHom OTBepCTIN IIN BCTaBbTe Tpy6ky IJIA MOJOKa B CTaHdApTHyO yNAKOKBy MOJOKa.
UHΦopMaunu
XpaHInTe emKoCTb dIy MoIOKa B XOJIO- dNJIbHNKe.
4.9 Ounstka noДоHA ДЯ c6opa Kapeьи EMKoCTN ДЯ KoфeHOrO XMbIXa
Ecnno nnDnIg c6opa KaneIb (10) nEMKoCTb IJI KOeHOrO KMbIXa (9) 3aONHeHbI, aNnapa BbIaCT 3aPoc Ha ouNCTky DaHHbIX EMKOCTe. YpOBeHb HAnONHeHn NOpDOnA IJIg c6opa KaIeIb TaKxMe MoJHO ONpeDeIITb NO NIOJOKeHIO nonJaBka (18). Bcerda Ounuaate o6e EMKOCTn.
Puc.10: Pndopn dna c6opa kaneIb, emKocmbdna KofouHOz KMbIXa unnonlaeok
1.ИЗБLEКITE NOДОн (10)иЗ annapata,notянв erо BnepeД.
2. CHIMNTe emKoCTbДЯ KoΦeHOrO XMbIXa (9)и удаJInte XMbIX.
- CneIte JnkOcTb n3 pOДоHa dIa c6opakaneB.
- BctaBte emKoCTb dIra KoeHoro XMbIXa Ha MeCTO.
- 3aBnHbTe noDIOH B aannapat do ynpa.
UHΦopMaunu
AnnapaT BvIaet 3anpoc Ha ounctky noDoHa dJa c6opa Kaenb I emKoctn dJa KoFeHoro KMbIXa Nocne Onpede- leHHoro KOJIueCTBa ZIKIOB PnIroTOBLeHnaHNTKB. Ppi ouNCTke annapata B BvIKIoUeHHOM COCToRHN annapat He pernictpnpyET daHnoe JeIcTBne. PoTOMy 3anpoc Ha ouNCTky MoKeT BvIDaBaTbcra HeCMOTpr Ha To, UTo nOdoH dJa c6opa Kaenb I eMKoCTb dJa KoFeHoro KMbIXa eJe He 3aONHeHbl.
5 PnPuroToBJeHneHaHNTKOB
Heo6xoJnMoe ycNoBne:
PnUCOEiHHeHa EMKoCTb C MOJOKOM.
1.ПодстаБтЕ EMKOCТь ПОД BыИСКhoe OTВерстпe.
2. Haxmnte Ha KhoNky "KanyuHNo" nnn "Jatte MaKNaTTo".
》 BbIOnJIHЯETcI NOJaUHa HaNITka, KOtOpaJ 3aKaHcNBAeTcA ABTomAtn-ueCKn.
Ha nucnnee noaBntcJekar oucmka?
- CHIMITE EMKOCTB C NOCTABKN.
- BbIOnHnTe npOrpAmMy JeKaA Oucmka nnn nprirotOBte pyrne HAnNTkn N BbIOnHnTe npOrpAmMy JeKaOuCmKa nO3dHee, cm. r..9.4.
5.3 Пи���TOBHeHne MOJOnHNoI NeHbI N TeJILOrO MoJOKa
ПригOTOBЛЕнHe MOLOчHо Ппьи TeNLOrO MOLOKa BbIOnHЯТСВ aHaJIoTnHOM NOPdKe.

Heo6xoJnMoe ycNoBne: npCooEnHeHa EMKOCTb CMJOKOM.
1.Подстаьтеб EMKOCt b ПОД BblnyCKHoe OTBepCTne.
2. Haxmnte Ha KhoNky "Molouhna neHa/MOJOKO".
a) MOnOuHaЯпeHa = HaXmIte Ha KHOPIKy
b) Teŋlloe MoJOKO = PpOДоЛЖиТьHо
HaxMnte Ha KHOПКу (2 ceKyHnbl)
» Bынолняетс пода молoka, Которя закайи加快建设 в ВТОМатиеске.
- CHIMITE eMKoCTb C NOCTaBKn.
» Ha dinçnPJIe neoRbntcJIeKaj OUHCTka? - BbIOnHInTe npOrpamMy Je2ka OucmKa nn nprirotobte dpyrne HauNTkn N BbIOnHInTe npOrpamMy Je2ka OucmKa nO3dHee, cm. r..9.4.
5.4 Пи���нгелене ripayeBODbl

1.Подстаьтеб EMKOCТь NOД BblNYCKHoe OTBepCTne.
2. Haxmnte Ha KhoNkCy "Topraa Boda".
》BbIpOnHЯETcnoJaCyropaey BoDbI,KOTOpaJ3aKaHnBaETcayABToMaTnueckn.
3. CHIMMITE eMKoCTb c NOdCTaBKn.
Heo6xOaHMoE yCIOBne:HaIINcPiee OTo6paKaetcNHNkAtoP rTOOBHOCTN.
B npocece noaun HauNTka (kofo nnn MoJoka) c nOmoIbIO NOBOPOTHO haxmHoro nepeKIOuateJe NaCTpoTe HxKbI Obem HauNTka.
B npocce nmoJhaHcTpoIte c nmoOuKHOJIKN "KpeNoctb KoOe" KpeNoctb KoOe.
5.7 Otmeha npuROTOBNeHnHaHNTka
B cnyahe Heo6xOaHmOcTn OTMeHbI npiroTOBLeHnHaNtKa NOBTOpHO HaXMITE HaKHONKy NOdauN.
Heo6xoDnMooe yCNoBne:HaIncJIee OTO- 6paKaTaTcN HndNKaTOp rOToBHOCTN.
- Haxmnte NOBOPOTbI HaXIMHOI nepeKlIOuATEJIb Ha 2 cekyHdbI.
Ha dncnnee noBNTc MeHIO.
- IpeepiTeB MeHIO Mo Kofoe.
- Bb6epnte noJIb3OBeTJIa n IOJTBep- dIte cBOB bI6Op.
- BbI6epnTe onuIO AkmubHbI/Heak mUBhI u n oTBePdnte cBOB bI6Op.
- Bb6epnte onuAkmuBn uHn HeakmuBtu n noTOpHo nOaTBePdTe CBOB b6op.
- BbI6epnte KOMaHny BbIXO, yTo6bl BbIITN 13 MEHIO.
7.2 BbI6Op/ɪnʒMeHeHne nepcoHaJIbHbIX HaCTpOeK
B 3aBucmocToN OHaNTka MoxHo Ha3Ha- uTb IJr OJHOro POJIb3OBeJIg CJeDyIOuIe NaCTPOJKn:
peuNTbI, KOINueCTBO KOe, KOINueCTBO NEnbI, KOINueCTBO MOJOKa, KOINueCTBO Ropaye BODby, KpENoCTb KOe n TempepaTypa.
Ha3haeHne nepcoHaJIbHbIX HAcTpoEOKDHomy POJIb3OBAteIIO BCErDa BbIOnJIHcETcOINHaKOBbIM O6pa3OM. HanpImep,3JeCb ONcBIAeTc HAcTpoKa O6bemaKOfeIg OndHoi NOpCmN KanyuHNO.
- Haxmnte NOBOPOTbI HaxmHOnI nepeKlIOuATEnb Ha 2 cekyHdbI.
Ha dncnnee noBNTcMeHIO.
2.Перейд范围内 Мени Мокобe. - BbI6epnte noJIb3OBAteTЯ nNoDTBep- dIte cBOB bI6Op.
- Перейдente в мени Кamyшио >Обем кфe.
- BbIepeTe HxKhBIO6bEm N IOdTBepeDITe CBOI BbI6Op.
- BbI6epnte KOMaHny BbIXO, yTo6bl BbIITN 13 MEHIO.
》Ppi npriroTOBLeHnO ndoHOnnopCnn KaanyuHNO dIa ONpeJeHHO rNoIb3OBaTeJI NcNoJIb3yETc Bbl6paHHa NaCTpOJa o6bema.
7.3 ПиuroTOBJIeHne HaNTKOB CперсоHaJIbHbIMN HabTpoiKaMn
my
recipes
ПигOTOBLEHne HaNTKOB Cфунк
циемМой кофe БылONHЯETСаHa-
laTOnuHbIM ДЯ BCex HaNTKOB Oбpa3OM.
HanpIMep,Здсь ONICbIBaetc NOряДOK
пригOTOBLEHnI NOPсИКанунHO.
1.ПОДСТАБТЕ EMKOCTь ПОД BыИУСКHOЕ OTВЕРСТИE.
2. HaximMaTe Ha KhoNky "Mon pecenTbI" Do Tex nop, Poka He OTo6pa3ntc HxHbI NpIb3OBAteJb.
3. HaxMMTe Ha KhoNkU "KanyuHNO".
》BbIOnJIHЯETcI NOdaUHa HauNTka, KOToPAa 3aKaHcNBAeTcA ABTomAtn-ueCKn.
- CHIMITE eMKoCTb C NOCTaBKn.
Ha ncipee noBtca Jeka ouucmka? (dnynca haxamb noobopomHbI HaxumHou nepeKliouyamenb). - BbIOnHInTe npOrpAmMy Je2ka OucmKa nn nprirotobte dpyrne HauNTkn N BbIOnHInTe npOrpAmMy Je2ka OucmKa nO3dHee, cm. rN..9.4.
UHΦopMaun
YTO6bI OTKNIOHTb FyHKUIO "MoJ KOfe", HAKIMaIte Ha KHOJky "Mon peCenTbI" Do Tex NOp, NOKa He NOBNTcA INHINKATOP TOTOBHOCTN.
- EcIn B TeueHne 3 MInHyT He BbIIOJIHnIeTcI npIrTOBJIeHne HaNITKa, annapat NepeKJIIOUaETcRa Na INDINKaUNIg rOTOBHOCTN.
8 ɪʒmehehne OCHOBHbIX Hactpoek
B cneyuioe rnaBe OncsbIaIOCTc 3TaIbI ynpabIeHn, Heo6xoImble Iny n3MeHnOCHOBhIX HAcTpoEk annapata.
8.1 Hac trokka J3bika
Moxho NaCTponTb y3bIK OTo6paXeHnRA TEKCTOB Ha DInCpIee.
Heo6xoDnMoE yCNoBne:HaIncJIe OTO-6paKaTaTcN HNDNKaTOP rOTOBHOCTN.
- Haxmnte NOBOPOTbI HaXMMHOI nepeKJIouaTeJIb Ha 2 cekyHdJI. >Ha dncnlee NoaBITcMaMeHIO.
- IpeenDITe B MeHIO Ra3bIK.
- Bbl6epnte y3bIK npoTBepeNTe cB0i Bbl6op.
- BbIaTe n3 MeHIO c PnOMOaBIO KOMaHdbI BbIXoD
8.2 Hac tropona BpemeHn ha yacax
Moxho Hacptb Bpem, KOtOpoe OTO6paKaetcHa DnCnnee.
Heo6xoDmOe ycNoBne:HaIncJIee OTO- 6paKaTcN HndNKaTOP rOTOBHOctn.
- Haxmnte NOBOPOTbI HaXMMHOI nepeKIOUaTeJIb Ha 2 cekyHdI. >Ha dncnnee NoaBITcMHeIO.
- Перейд范围内 Мени Время.
- BbIbepnTe yac n MmHyTbI. KaKdbI pa3 noITBepxJaIte CBOH HAcTpoKNi.
- BbIyInTe n3 MeHIO C NOMOuBIO KOMaHnDbI BbIXoD
UHΦopMaun
YtO6bI Ha DnCpIe He OTo6paXaIocb BpeM, yCTaHOBInTe NOKa3aHnBpeMeHn Ha 00:00.
8.3 Hac tropoika pexima 3koHoomn 3Heprnn
B pexime 3koHOMn 3Heprn CNxKaetc TEmpepaTpa HarpeBa N OTKIIOuAeTc nODCBTka NaHeJI.
B cnyae npoJoJxIeJIbHOrO npocToa no nCTeueHm 3aDaHnHO BpeMeHN aHnpaAT abTomatueckn nepeKJIouHTcB pexMm 3koHOMm 3Heprn. B MeHIO Pexum 3KOHOMuU 3Hep2uu 3aJaTc BpeMra, KOTOpoe dIoJXHO npoITn Do MOMeHTa nepexOda aHnpaTa B pexMm 3KOHOMm 3Heprn.
Heo6xoDmOe yCNoBne:HaIncJIee OTO-6paKaTaTcN HnDnKaTOp rOTOBHOCTN.
- Haxmnte NOBOPOTbI HaxmHOnI nepeKlIOuATEJIb Ha 2 cKeYHdI. >Ha dncnlee NoaBtCra MeHIO.
- Перейдente в MeHIO Pekum экohomuu энрцu.
- BbI6epnte dIITeNbHOCTb I IOdTBep- dIte CBOB BbI6Op.
- BbIaTe n3 MeHIO c PnOMOaBIO KOMaHDbI BbIXoD
UHΦopMaζηa
- Pexim 3KOHOMN 3Heprn HeIb3a DeakTbnpoBaTb POJIHOCTbIO. He 60JIeem qpe3 4 Yaca npocToA annapat nepeKJIIOHTcB Pexim 3KOHOMN 3Heprn.
8.4 HactpoJa aBtOMaTnueCKOTO BbIKJIOUeHnA
AnnapaT abTOMaTnueeCKN BbIKHouNTcno nCTeueHnY cTaHOBLeHHORo BpeMeHN B cLyuae npOdoJXnteIbHoro npocToH. MeHIO ABoMboKIIIOueHue 3aJaTe Bpemr, IIO nCTeueHnKOTOpOro 6yEd T bIIOJIneHo aBTOMaTnueeCKoe OTKIIIOueHne. Bbl TaKxe MoKeTe YcTAHOBnTb TOnHOe BpeMn.
UHΦopMaunu
EcnOJHOBpeMeHNO aKTbBnPoBaTb npoJIOJIKHTeNbHOCTb N TOUHO BpeM, annapa T bIKIQUHTcN IO NCTeueHn 60lee KopoTKoro OTpe3Ka BpeMeHn n3 yctaHOBJIeHHblX.
Hactpoika npodoljxnteIbHoctn BpeMeHN dIa ABtOMaTnueCKORO OTKIIOUeHnA
Heo6xoDmOe ycNoBne:HaIncJIee OTO-6paKaTaCn HNDKATOP rOTOBHOCTN.
- Haxmnte NOBOPOTbI HaxmHOnI nepeKJIouaTeIb Ha 2 cekyHdbI. Ha dncnlee NoBUTcMeHIO.
- Перейд范围内 Вмену Альперькючец >Быкючumь чеша...
- Bb6epnte BpeMa n noTBePnTe cB0n Bbl6op.
- BbIepeHte noBTOpHO KOMaHny BbyXoD, yTo6bI BbItnu 3 MeHIO.
UHΦopMaζηa
ABTomuChecko OTKHoueHne HnB3a DeakTNBnPOBaT NOJIHOCTbIO. Annapat aBTOMaTuCeCKN OTKLIouHTcNo INCteueHn He 6oJee 8 yacOB.
Hactpoika Tochoro BpeMeHN dIa ABTOMATUeCKOro OTKLIUeHnI
ToUHoe BpEma OTKJIIOUeHnI DeaAKTINBnPOBaHO B COOTBeTCTBnC 3aBOJCKNIMNaCTPoiKaMn.
Heo6xoDnMoe yCNoBne:HaIncJIee OTO-6paKaTcN HndNKaTOP rOToBHOCTN.
- Haxmnte NOBOPOTbI HaxmHOnI nepeKJIouaTeIb Ha 2 cekyHdbI. Ha dncnlee NoarNTcMeHIO.
- Перейд范围内 Вмену Альштейчесу >Быклочьб...
- BbI6epuTe yacBn mHyTbI. KaJdbI pa3 noTBePxJaTe CBOH HAcTpoiKn.
- BbI6epnte noBTOpHOn KOMaHny BbIXoD, UTo6bl BbIITN I3 MEHIO.
UHΦopMaζηa
При НEOбхдимоctи DeakTиBaци n abTomaTичeCKOTOKJIIOUeHnYcTAHOBITeВремОТКЛIOUeHnHa 00:00.
8.5 AKTINBaCnJa/DeaKTNBaCnJa npOMbIBKn
Bcerda cpa3y je nocle BKlouceHnna BblIOJIHReTc npOMbIBKa KofoHoi CnCTeMbI. MoXHO aKTbUnpoBaTb/DeaKTNBbUPOBaTb TObKO IpombIKy pN bblKIOUeHN. Ecn OHa aKTbUnpoBaHa, To npBblKIOUeHN BblIOJIHReTc npOMbIBKa KofoHoi CnCTeMbI.
IeakTnBaunHa IInTeJbHoe BpeMa HpeKoMeHdyetc.
AKTINBaIa/DeaKTIbAciN IpOMbIKn PnBvIKJIIOUeHm
Heo6xoDnMoe ycNoBne:HaIncJIee OTO-6paKaTcN HndNKaTOP rOToBHOCTN.
- Haxmnte NOBOPOTbI HaxmHOnI nepeKJIouaTeIb Ha 2 cekyHdbI. Ha dncnlee NoBHTcM MeHIO.
- Перейд范围内 Менин Хашийу >Помьвка npu вiklioуehuu.
- Bb6epnte onuH AkmubHbI uHn Heak mubHbI n noTBePnTe CBOB Bb6Op.
- BbI6epNTe KOMaHny BbIXoD, YTO6bl BbIITN I3 MeHIO.
Ha nucnlee noBntc uHdkaTop roTOBHOCTN.
8.6 BocstahOBJIeHne 3aBODcKnx yCTaHOBOK annapaTa
Moxho BOCCTaHOBnTb 3aBOJcKne yCTaHOBKn annapaTa.
UHΦopMaζηa
B cnyaae BOCCTaHOBJIeHn 3aBOdcknx yCTaHOBOK annapapa TepaOTcBce nepcoHaJIbHbIe HAcTPOJKn, B TOM YNCNe HAcTPOJKN B MeHIO MoJ KoFe.
Heo6xoJnMooe yCIOBne:HaIncJIeE OTO- 6paKaTcN HndNKaTOP rOToBHOCTN.
- Haxmnte NOBOPOTbI HaxmHOnI nepeKJIouaTeIb Ha 2 cekyHdbI. Ha dncnlee NoarBtCra MeHIO.
2.Перейд范围内 Менин Hacmpouku >3abodckue ycmahOBku. - BbI6epnte C6poc n noqTBePnTe cB0B Bbl6op.
- BbI6epNTe KOMaHdY BbIXoD, YTO6bl BblITN 13 MEHIO.
8.7 MeHIO Cmamucmuka n Cucmema
Cmamucmuka
B MeHIO Cmamucmu Ka npNBOuNTcra HOpMaunr O KOJIueCTBe NOnyueHHbIX HaHNTKOB U 06 yXoJe.
Cucmema
B MeHIO Cucmema npuBoaNTc nHΦOpMaZIa O BepCNI npoRpaMMHOrO o6ecneue
HnI nOCTyne K fynKcunn BbInapuBaHne, cm. rI. 10.1, cTp 275.
8.8 HactpoJaToHkoCTn NOMOJa
ToHKoCTb NOMOJa KoFeuHbIX 3epeh BnIaReT Ha BKyc KoFe. Annapat NoctabJraTeC C ONTImaJIbHOH HAcTPOuKOJ ToHKoCTN NOMOJa.
Puc. 12: Hacmpouka monkocmu nomola
HaCTpoIte pbyaROM, paCNoJIOxeHHbIM Ha 3aHHei CTOpOHe, TOHKOCTb IOMOJa.
1.Перемецпгьuar:
BnpaBo = 60one KpynHbI nOmoI
- BnEBo = 60nee MeIkn IOMoN
UHΦopMaun
- EcInn Hactponb 60nee MeJkn nomOn, To Bkyc Kofoe cTaHET Kpenye.
Признak ONТИмальНои HabТрОй TOHKOCTI NOMOla - paBHomepHoe NOCTUПЕнUE KOф e I3 BbIyCKHOrO OTBepCTIЯ И ПОЛУЧЕпЕ ЛERKOrO rYcTOrO KpeMa.
9 UxOДи TeXHnueeCKoe 06cnyKnBaHne
PergyapHoe BbINOpHeHne YnCTKn I TexHnueckOrO 06cnyJnBaHnI N03BOJNT O6eCneuHTb HEn3MeHHo BbICOKOE KaueCTBO BaXnx HaNtKOB.
9.1 Μυσαηςινεικτα
Perynphno npoBOnTe nuCTky annapata. Be30TnaraTeIbHo ydaIy Te BHeuHne 3aqr3NeHnB BVJe PAnTe HMOJOKa N Kofoe.
BHIMMAHVE
IcnoJIb3OBAHHe HenoXoJaux YnCTaX CpeDCTB MoKET CTaTB pNUnHOI NOABJIeHna ZapaanH Ha NOBepxHOCTax.
He nCnoIb3yIte a6pa3nHBbIe TkaHIn, rY6Kn uNCTaJIne CpeIcTBA.
Heo6xoJnMoE yCNoBne: annapaT BbIKJIuOyeh.
BbIOnHnYe HapxKyu nCTky annapata npi NOMOUs MrgKo, BlaJXHO TkaHN i CTaHApTHbIX CpeDcTB dJa MbITbY NOCyDbI.
- PpomblbKa nOdoHa dIy c6opa kaneBbIIOJIHReTc C NOMOu bIy MArKOi, BnaJxHO TkaHn I CTaHdApTHOro cpeCTBa dIy MbITbY NOCyDbl.
Дячstки контейнера дя заеген Истовьштмягку,суху ТkaHB.
Heo6xoJnMooe yCIOBne:HaIINcJIeE OTO- 6paKaTcN HnDnKaTOP rOToBHOCTN.
- Повстаьтеб EMKOCь по ВынсКhoe OTВерсп.e.
-
Haxmnte NOBOPOTbI HaXMMHOn nepeKJIouaTeIb Ha 2 cekyHdbI. Ha dncnlee NoaBITcMaMeHIO.
-
Перейдуне К мени Ухо > Промькова.
- Bbl6epnte Iyck n IpoTBepeNTe cBoi Bbl6op.
Byet BbIOnJIHeHa npOMbIBKa KoFeiHOH CNTeMbI.
9.3 YnCTka 6JLOKa 3aBapuBaHnA
Bo n36ekanHe NOBpekJeHnna aannapaTa peKOMeHnyETcBAIIOJIHrTb YNCTky 6Ioka 3aBaPUNBaHnO OIN pa3 B HeJeJIO.

Puc.13:Демонмжбokовошшькu
Puc.14:Демонмжблoka 3abapueaHua

Puc.15:Yucmka6noka3a8apu8aHua
Heo6xoImoe ycNoBne: annapaT BbIKIO-ueH.
- OtkpoTe KoKyx (12).ДЯЗTORO BO3bMNTecb 3a yIy6JIeHnE C npaBOI CTOpOHbl aIppapTa I NOTraHnTE KoKyx B CTOpOHy.
- Haxmnte u yedejxnbaiTe hkaTbIM KpaChbI pyuag (33)Ha puYe 6noka 3aBapnbAHn (15), nobepHnte pyko- Tky no yacoboi cTpeJIke do ynpo a co ueJyKOM.
- BbItaunTe 6NoK 3aBapuBaHn8 3a pyUky n3 aannapaTa.
4.OchOBaTeIbHO npOMoIte 6IOK 3aBapINBaHnIeJIKOM IOI npOTouHoi BOIo co BCex CTOpOH. B nepByIO oupeIb CJIeITe 3a TEM, YTO6bI B CNTe (34) He 6blIO OCTaTKOB KOfe. - Пождпг, пoka с SFOKa 3abapubahnЯ CTeueT BDA.
- C NOMOUI MOYKoI cyXoTkaHUYaJIIne OCTaTKN KOe C NOBepxHOCTeBNyTPn aannapaTa.
- BctaBte 6IOK 3aBapuBaHnB aannpaT. HaxMnte u ydepXuBaIte HaxaTbIM KpaChbl pyUar Ha puYke 6Ioka 3aBapuBaHn, NOBepHnTe puKy npOTnB YacOBo CTpeJKN Do yNopa co ⅢeJIYKOM.
- BctabbTe kOxUx B annapat n nepeme- cTnte ero B CTOpOHy Do xapaKtepHoro ⅢeJIka.
Heo6xoDnMoe yCNoBne:HaIncJIee OTO-6paKaTcN HndNKaTOp rOTOBHOCTN.
1.ПодстаБтЕ EMKOCТь ПОД BыИСКhoe OTВерстNe.
2. Haxmte NOBOPOTbI HaXMHOn nepeKluOaTeJIb Ha 2 CeKYndbl. Ha dncnnee NoaBntcMeHIO.
3. Перейдente в мени Ухod > Лezкая усмka.
4. Bbl6epnte Iyck n noqTbepeNTe cB0n Bbl6op.
5. Cnéduynte daIbHeuIIM uHCTpyKUINMa Na dncnlee do 3aBepseHna pO- rpaMMbl Je2Ka yucmka.
9.5 Порогамma,Чистka MOJOUHо CnCTeMbI"
Heo6xoDnMoe yCNoBne:HaIncJIee OTO-6paKaTcN HndNKaTOP rOToBHOCTN.
1.ПОДСТАББТЕпиемнHyю EMKOCTb(0,7л) NOД ВыlnуСКhoe OTВерСТи(HAnPIMepe, EMKOCTbДЯ KOFeHOrOЖMbIXa).
2. HaxMMTe NOBOPOTbI HaxMMHoi nepeKJIouaTeIb Ha 2 cekyHdI. >Ha dncnlee NoaBITcMHeIO.
3. Перейдente К мени Ухod >Усмкa MОЛочно CUCmemebl.
4. Bbl6epnte Iyck n noDTBepnTe cBoi Bbl6op.
5. Cnéduynde daIbHeuIM nHCTpyKUmaHa duCnJIe eo 3aBepSeHnna pOrpaMMbl YcMka MoJouHo cUcMeMbI.
UcNTka MOJIoUHOn CnCTeMbI
Дононтелhoe pekomehdyetcpeyIЯрно пювODичNTky MONOунoi CnCTembl, Tpy6kn И EMKoCTn Дя MONOKa.
iHΦopMaun
-Пл actMaCCOBUу EMKoCTbДЯ MONOKa, 6e3 KpbIuKn IHaNoPHOr Tpy6Kn, MOxHObMbITbBIOcYdOMoeuHOI MaunHe.
Puc.16:Дocmyn KMOnOuHou cuCmeme

Puc.17:Демонмax MONOунч cucmembi
- BbItaunTe Tpy6ky dIy MOnoka n3 annapapa.
- OtkpoIte IBepuy BbInyckHOrO OTBepCTn8.
3.ИЗВЕКИТе молочую систему (36) Уретз HN3. - BbIOnHnTe YnCTKy OTdIbHbIX DeTaNen TeNIOB BOIO.NcNoJIb3yIte MrgKyIO, BnaJxHyO caIΦeTKy I cTaHApTHOe CpeIcTBO DnI MbITbY NocyDbl.
YCTaHOBkA CNTeMbI BbIIOJIHReTcB O6paTHOM IopRdKe.
UHΦopMaζηa
y6eHNTecbBTOM,TOMOLOUHaCnCTema npxkaTdoynopaBBepx.
Heo6xoDnMoe yCIOBne:HaIINcJIeE OTO-6paKaTcN HINdNKaTOP rOTOBHOCTN.
- Haxmnte NOBOPOTbHn HaxmHOn nepekIouaTeJIb Ha 2 cekyHdbI. Ha dinCpnee NoBUTcMeHIO.
2.ПерейдenteКMeHIOуxoδ>UcMka KofoeHuOu cucmembl. - BbI6epNTe Iyck n IOaTBePdTe cBOI Bbl6Op.
- CneyuTe daIbHeuIMnHCTpyKcIaM Ha dncPiee do 3aBepSeHna pO- rpaMMbl YNCTKn.
9.7 Порогамma „Удалене накпп"
KoHTaKT CO CpeDCTBAMn Dnry ydaJeHnna HAKINN MOKeT BbI3BaTb pa3dpaJxHeNc cIn3nCTOJ 6oIoQKn rna3 n KoxHbIX NOKPOBOB
Co6JIoudaIte INHCTpyKUnI NO npIMHeHnIO,yka3aHHbIe Ha ynaKOBKe cpeIcTBa dIy ydaJIeHnHaKInII.
BHUMAHVE
IcnoIb3ObaHne HenoXoJxuX cpeCTB dnyyaJeHnHaKInm MoKeT CtaTb npuHNo NOBpeXeHn annapata.
IcnoJIb3yIteToJIbKOJxNkOeCpeIcTBo IyUdaJIeHnHaKINB KoΦeHbIX aBTOMataxMelitta ANTI CALC.
Co6jIoJaIte HNCTpyKUnn PnpMeHEnIO,yKa3aHHbIe Ha yNaKOBKe cpeCDtBa dIyUdaJIeHnHaKnII.
BHUMAHVE
3aBnHcennbI pNbTp dIy BODbl B npOecce BbINOJIHeHn IpOpaMMbl NO ydaIeHIO HAKnIM MoKET cTaTb IpNCHoI NOBpeXdEHHaannapata.
- ChnMnte ΦnIbTp ДЯ ВОbl пи потулпелен coOTBETCTByUoцero 3anpoca ot annapata (cM. Puc. 18).
B npouece BbIIOJIHeHn IporpamMbI NO ydaJIeHnIO HauKINI NOMeCTuTe 0IInbTp DJIa BOJbI B EMKOCTb C BOIOnpoBOJHOI BOJoi.
Iocne 3aBepseHnI npOrpAmMbIO ydaJIeHnIO hauKINMOxHO CHOBA BCTaBbTb fNlbTp IJRA BObl NcNOlb3OBaTb ero daJIbWe.
UcIOBIA:
Ha niscnlee oTo6paKaetcHnDnKaTOp roTOBHOCTN.
IoiBbInyckHbIMOTBepCTnem yctaHOBJIeHa npneMHra emKoCTb (0,7π).
1. Haxmte NOBOPHTbI HaxmHoi nepeKJIouaTeNb Ha 2 cekyHdbI.
Ha ducnnee noBNTcMeHIO.
- Перейдente К мени Ухod >Удалесун. Hakunu.
- BbI6epNTe Iyck n IpoTBePdTe CBOI Bbl6Op.
- Cnéduynte daIbHeuIM nHCTpyKUmaHa dncnlee do 3aBepseHn npo-rgpamMbI NO ydaJeHNU HaKnIN.
9.8 Hac troponka XeCTKoCTN BOdBi
OT HactpoiKn JceKTKOCTN BObl 3aBNCNT TO, HACKoJIbKO YacTo HeO6XoJIMo 6ydet ydaIb TaHKnIb. Yem JecTye BOJa, Tem qaSe aannapat HyxdaetcB ydaJeHNn HauKNII.
UHΦopMaζηa
EcnncnOJb3yeTcAunIbTp dIy BObl,TO HeIb3ra HAcTpOnTb JEcTKoCTb BObl.
Heo6xoDnMooe yCNoBne:HaIncJIee OTO- 6paKaTaTcN HndNKaTOP rOToBHOCTN.
- Haxmnte NOBOPOTbI HaxmHOnI nepeKJIouaTeIb Ha 2 cekyHdbI.
Ha dncnnee noBNTc meHIO.
2.ПерейдenteВ менин Hacmpoукu >Жecмковсь boы. - BbI6epnte dnaa3OH JecTkoCTN BObl I NOITBcPNTe CBOI BB6Op.
Heo6xoDnMooe yCNoBne:HaIncPiee OTO-6paKaTcN HndNKaTOP rOToBHOCTN.
- Haxmnte NOBOPOTbI HaXMHOnI nepeKlIOuATEJIb Ha 2 cekyHdbI.
Ha dincpnlee noBHTcMeHIO.
2.ПершдenteКМениухoδ>ФuIbmp>ИЗБлесьфuIbmp. - Bbl6epnte Iyck n noDTBepdTe cBOI Bbl6op.
- Cnéун Te dαльнши m nHCTpyKuzn m Na duçnlee.
》 ByntabTomatnueckn BOCCTaHOBNeHa NCXoHna HaCTpOJa XecTkoCTN BObl.
Ha nucnlee noBntc HndkaTOp roTOBHOCTN.
10 TpaHcnpTnpoBka, xpaHeHne n yTuIn3aZna
10.1 BbInapuBaHne annapaTa
B cnyae npoDoJxIeJIbHOrO npocToI peKOMeHdyTeTcB bIInapNTb aInpaT nepeI tpaHCnOpTnpOBkO, a TaKxe npu BepoTHOCTN 3aMeP3aHnI BO Bpem XpaHeHn Ipn Hn3KnX TempeaTypax.
PnBbInapBaHm n3 annpaTa ydaJyTOCTC OCTaTKN BObl.
UcIOBIA:
ΦnIbTpДЯВOБыуdaineH.
- Ha dincpiee oTo6paXaetcNnDnKaTOp rTOOBHOCTN.
- Повстаьтеб EMKOCь по ВынсКhoe OTВерсп.
- Доступаьд
- Доступаьд
- Доступаьд
- Доступаьд
- Достotypical
- Достotypical
- Достotypical
- Достotypical
- Достotypical
- Достotypical
- Дostical
- Дostical
- Дostical
- Дostical
- Дostical
- Дostical
- Дostical
- Дostical
- Дostical
- Дostical
- Дostical
- Дostical
- Дostical
- Дostical
- Дostical
- Дostical
- Дostical
- Дostical
- Дostical
- Дostical
- Дostical
- Дostical
- Дostical
- Дostical
- Дostical
- Дostical
- Дostical
- Дostical
- Дostical
- Дostical
- Дostical
- Дostical
- Дostical
- Дostical
- Дostical
- Дostical
- Дostical
- Дostical
- Дostical
- Дostical
- Дostical
- Дostical
- Дostical
- Дostical
- Дostical
- Дostical
- Дostical
- Дostical
- Дostical
- Дostical
- Дostical
- Дostical
- Дostical
- Дostical
- Дostical
- Дostical
- Дostical
- Дostical
- Дostical
- Дostical
- Дostical
- Дostical
- Дostical
- Дostical
- Дostical
- Дostical
- Дostical
- Дostical
- Дostical
- DOSTAL
- HaxmTe NOBOpOTbI HaXMHOn IpeeklOuateJIb Ha 2 CeKyHdbl.
Ha ducnlee noBHTcMeHIO.
- Перашист В мени Сухима >Быразраханue.
- Bbl6epnte Iyck n IOdTbepdTe cBOI Bbl6op.
- Cnédynte dānbHeiHm nHctpyKzma Hà duçnlee.
Annapat HarpeBaetc.
》AnnapaT BbIcapuBaetc, nocJe yero PONHOCTbIO BbIKJIOUaETc.
10.2 TpaHcnpTnpoBka annapaTa
BHIMMAHVE
3aMep3aHHe OCTaTKOB BOdI B aPnapeMoKTe PpNBecT N NOBpeKdeHIO annapata.
He octablaIte annapat npu tempe-type nHexe 0^
UHΦopMaζηa
TpaHcnpOpTyPe annapaT B opunHaJIbHoN ynapokBe. 3To nomoxet npedotBpaTntb nobpejdeHne annpaTa BO Bpemr TpaHCnpOpTnPOBKn.
IpepeTem kak TpaHcnpOpTuPoBaTb annapat, BbINOHInTe cneDyUOuNe DeiCTBn:
- BbInapnte annapat (cm. rnaBy 10.1, ctp 275).
- Cneite KeNkOcTb n3 NpDoHa dIra c6opa KaIeIb n EMcKoCTb dIra KoFei-HORO XMbIXa.
- Cneite Boody n3 KOHTeHepa dIy BoDbI.
- OuHCTnTe KOHTeHep dJa KofoeHbIX 3epen.
- Почисту anecdapat (см. га-by 9.1,стp 269).
- 3aФИКСИРУТЕ He3aKpeNIIeHbIe DeTAlI (ПОДСТАВКУ ПОД YaшКи I T.Д.) C NOMOБЮ NOxOДЯБЕй KJIeIKOJ IeHTbl.
- YnakyuTe annapaT.
10.3 Ytulnizacna annapata
Дяг OTмeueHHbIX DaHHbIM CUMBOJOM annapaTob ДиeCTByetЕрonei- ckая ДиpeKtNbA 2002/96/EG дя WEEE (otpa6oTaHHe OJIeKtpnYe- ckoe И оЛeКТpoHHe OбОpydoba-
Hne).
3JNeKtpoPnp6OpblyTuNIm3npyUOTcO TDeJIbHOOT 6bIToBbIX OTOxOIOB.
Ytunn3npynte annapat 6e3oNaChbIM dny Okpykaioe Cpebl o6pa3OM c nOMOBcneuaNbHbIX cnCTem c6opa.
11 TexHnueckne xapaKTePunctuKN
OTHCINTeBHaB BnAaXHOCTb
OT 30 %do 80% (He KOHDeHC.)
B03nyxa
| Диапазон јecktко- STN BODы | °d | °e | °f |
| Мягков | ot 0 до 10 | ot 0 до 13 | ot 0 до 18 |
| Сре徳нay | ot 10 до 15 | ot 13 до 19 | ot 18 до 27 |
| Жecktкay | ot 15 до 20 | ot 19 до 25 | ot 27 до 36 |
| Очerb јecktкay | >20 | >25 | >36 |
12 HeucnpabHocTn
Ecn He ydaetc yctpaHnTb HeNCpabHocTc n NOMOsbU HxKepeuNCeHHbx ININ INhIX, He yka3aHHbx 3decb MEP, o6paNTteCb 3a NOMOsbU K CpeuaJIncTaM HaWeI rOpayeJInHN (MeCTHbI TaPnΦ).
Homep cepBnchoi cnjx6bl yka3an Ha KpbliKe KOHTeHepa IJI BA ODbI N Ha Hauem caTe B pa3dene "O6cnyXuBaHne".
9.4 "Easy Cleaning" programi
Easy Cleaning programiyla sut sistemi yikanir.
Pav.1: Irenginys is kaires puses, is priekio

Pav.2: Irenginys is de'sines pusés, i's priekio
1 Vandens talpykla
2 Pagrindinis jungiklis
3 2 kameru pupeliu talpykla
4 „Bean Select"
5 Maltos kavos detuve
6 Puodeliu padéklas su nerúdujáncijo plieno skarda (priklausomai nuo modelio)
7 Valdymo laukas
8 Reguliuojamo auksicio piltuvelis su 2 kavos antigaliais, 2 piano antigaliais, 1 karsto vandens antigaliu, puodeliu apsvietimu
9 Kavos tiršciu talpykla (viduje)
10 Laśu surinktuvas
11 Pieno Žarneles jungtis prie piltuvelio
12 Gaubtas
13 Malimo smulkumo reguliavimo svirtelé (nugarléje)
14 Maitinimo kabelis su kabelio sleptuve
15 Plikymo blokas (po gaubtu)
16 Pieno Žarnelems jungtis prie laśq surink-tuvo
17 Puodeliu padeklas
18 Pludé
The People's Republic of China released a regulation called „Management Methods for the Restriction of the Use of Hazardous Substances in Electrical and Electronic Products" or commonly referred to as China RoHS. All products which are produced and sold for China market have to meet this regulation.
名称和产品中有害物质的含量
Name and content of harzardous substances in products
| 组件名称 Component Name | 有害物质 Hazardous substance | |||||
| 铅 Lead (Pb) | 汞 Mercury (Hg) | 镉 Cadmium (Cd) | 六价铬 Hexavalent chromium (Cr (VI)) | 多溴联苯 Polybrominated biphenyls (PBB) | 多溴二苯醚 Polybrominated diphenyl ethers (PBDE) | |
| 塑料外壳和底盘 Plastic enclosure and chassis | O | O | O | O | O | O |
| 印刷电路板组装 Printed Circuit Board Assembly | X | O | O | O | O | O |
| 电机、阀门 Motors, valves | X | O | O | O | O | O |
| 电缆和电线 Cable and wiring | X | O | O | O | O | O |
| 金属零件 Metal parts | X | O | O | O | O | O |
| 此表编制SJ/T 11364年规定。 This table is prepared in accordance with the provisions of SJ/T 11364. O:中所有均质材料中的这类组件这种有害物质的含量是下文要求GB/T 26572的极限值。 O:The content of such hazardous substance in all homogeneous materials of such component is below the limit required by GB/T 26572. X:这种有害物质在某些均质材料中这种组件的内容是超出GB/T 26572要求的极限值。 X:The content of such hazardous substance in a certain homogeneous material of such component is beyond the limit required by GB/T 26572. | ||||||
此产品的环境友好使用期是:
The Environment Friendly Using Period for this product is:

号
1 449
JaenEeJHJiJiJiJiJiJiJiJiJiJiJiJiJiJiJiJiJiJiJiJi:
- "RoTrrIs StWit"ro Siai and bai to 1
TrleI(10)WJFJWJG(9)WJQJ
JcUeJeNnEiJIiJ (18)T
TrleIJaJnJnJnJnJ.
樂樂門樂樂樂樂樂樂樂樂樂樂樂樂樂樂樂樂樂樂樂樂樂樂樂樂樂樂樂樂樂樂樂樂樂樂樂樂樂樂樂樂樂樂樂樂樂樂樂樂樂樂樂樂樂樂樂樂樂樂
SAHJFJFJFJFJFJFJFJFJFJFJFJFJFJFJFJFJFJFJFJFJFJFJFJFJFJFJFJFJFJFJFJFJFJFJFJFJFJFJFJFJFJFJFJFJFJFJFJFJF
9.4 "Easy Cleaning" フROMGOPLAM
Easy Cleaning 扦로그름乗用일본 사sts
<|im_start|>assistant Easy Cleaning 扦로그름乗用일본 사sts
<|im_start|>assistant Easy Cleaning 扦로그름乗用일본 사sts
奉之爲奴役,奴役之君,奴役之君,奴役之君,奴役之君,奴役之君,奴役之君,奴役之君,奴役之君,奴役之君,奴役之君,奴役之君,奴役之君,奴役之君,奴役之君,奴役之君,奴役之君,奴役之君,奴役之君,奴役之君,奴役之君,奴役之
上三
- 凯勒和多世的相将到的和普拉斯,
上.16:日3U
L.17: 1
- DiSt晋法IgJiJiJiJiJiJiJiJiJiJiJiJiJiJiJiJiJiJiJiJiJiJiJiJiJiJiJiJiJiJiJiJi
-
择焉必能(0.7LER))加普鲁阿拉里 有
-
"RoTIRISwWt" 2EJnAnNupRsi
》DissspReIiHcHepEeNnHaeNnHi.
- [F] 1 > 12 = 12 + 1 > 12 = 12 1 F/ E/ F
- /'J/ to 1000
- DiS晋LREI首E印S尼是NJ时T 阿
定数序列的性质
Division Household Products
Ringstr. 99
D-32427 Minden
Germany
www.melitta.de
Editorial department:
ZINDEL AG
www.zindel.de
- Personal settings - "My Coffee" 42
- Changing basic settings 43
- Care and maintenance 45
- Transport, storage and disposal 50
- Technical data 51
- Troubleshooting 52
- Overview of the appliance
- The appliance at a glance
- The control panel at a glance
- Dear Customer,
- For your safety
- Proper use
- Danger from electric current
- Risk of burns and scalds
- General safety
- First steps
- Unpacking the appliance
- Information
- Checking the delivery contents
- Installing the appliance
- Connecting the appliance
- Switching on the appliance for the first time
- Basic operation
- Switching the appliance on and off
- Switching on the appliance
- Switching off the appliance
- Using the control panel
- Navigating in the menu
- Calling up the menu and confirming the selection
- Navigating in the menu
- Exiting a menu
- Calling up submenus
- Filling with coffee beans and using Bean Select
- CAUTION
- ATTENTION
- Using ground coffee
- Filling with water
- Adjusting the outlet
- Using milk
- Connecting the milk container
- Emptying the drip tray and coffee grounds container
- Preparing beverages
- Please note:
- Preparing espresso and café crème
- Preparing cappuccino and latte macchiato
- Preparing milk froth and warm milk
- Preparing hot water
- Preparing beverages with recipes
- Changing beverage settings before and during preparation
- Changing beverage settings before preparation
- Changing beverage settings during preparation
- Stopping beverage preparation
- Preparing two beverages simultaneously
- Permanently changing beverage settings
- Changing default settings
- Personal settings - "My Coffee"
- Editing personal user profiles
- Changing the name of a user profile
- Activating/deactivating a user profile
- Selecting/changing personal settings
- Preparing beverages with personal settings
- Changing basic settings
- Setting the language
- Setting the time
- Setting energy save mode
- Setting Auto OFF
- Setting the duration for Auto OFF
- Setting the point in time for Auto OFF
- Activating/deactivating rinsing
- Activating/deactivating switch-off rinsing
- Resetting the appliance to the factory settings
- Statistics and System menu
- Statistics
- System
- Setting the grinding fineness
- Care and maintenance
- General cleaning
- Rinsing the coffee system
- Cleaning the brewing unit
- "Easy Cleaning" programme
- "Cleaning milk system" programme
- The use of unsuitable milk system cleaning agents can damage the appliance.
- Requirement: The appliance is ready for operation.
- Cleaning the milk unit
- "Cleaning coffee system" programme
- "Dscaling" programme
- Requirements:
- Setting the water hardness
- Using a water filter
- Inserting the water filter
- Changing the water filter
- Requirement:
- Removing the water filter
- Transport, storage and disposal
- Venting the appliance
- Transporting the appliance
- Disposing of the appliance
- Technical data
- Troubleshooting
- Sommaire
- Spoeling activeren/deactiveren
- Fig.3: Panel de control
- Programa "Easy Cleaning"
- Transportar laquina
- Abning af undermenuer
- Transport of maskinen
- OBS
- Frossent restvand kan medfore skader pa maskinen.
- Programmet "Easy Cleaning"
- Program "Rengjoring melkesystem"
- Sette inn vannfilter
- Informasjon
- i Informasjon
- OchoBhIe npHcHnbl ynpaBHeHna
- Puc.7: IepexoK npo2pamme ouucmku om hakunu
- HanolneHne KofoeHbIMn 3epHaMn u NCNoIb3O- BaHne nepeKluoyaTeIa Bby6op 3epen
- OCTOPOXHO
- BHUMAHVE
- Ucnolb3ObaHne HenoXoJxuNX COPTOB KOeMOKTeIpNBecTu K 3acopeHIO KOeMOLKn.
- UHΦopMaunu
- Ounstka noДоHA ДЯ c6opa Kapeьи EMKoCTN ДЯ KoфeHOrO XMbIXa
- PnPuroToBJeHneHaHNTKOB
- Heo6xoJnMoe ycNoBne:
- Пи���TOBHeHne MOJOnHNoI NeHbI N TeJILOrO MoJOKa
- Пи���нгелене ripayeBODbl
- Otmeha npuROTOBNeHnHaHNTka
- BbI6Op/ɪnʒMeHeHne nepcoHaJIbHbIX HaCTpOeK
- ПиuroTOBJIeHne HaNTKOB CперсоHaJIbHbIMN HabTpoiKaMn
- UHΦopMaun
- ɪʒmehehne OCHOBHbIX Hactpoek
- Hac trokka J3bika
- Hac tropona BpemeHn ha yacax
- Hac tropoika pexima 3koHoomn 3Heprnn
- UHΦopMaζηa
- HactpoJa aBtOMaTnueCKOTO BbIKJIOUeHnA
- Hactpoika npodoljxnteIbHoctn BpeMeHN dIa ABtOMaTnueCKORO OTKIIOUeHnA
- Hactpoika Tochoro BpeMeHN dIa ABTOMATUeCKOro OTKLIUeHnI
- AKTINBaCnJa/DeaKTNBaCnJa npOMbIBKn
- AKTINBaIa/DeaKTIbAciN IpOMbIKn PnBvIKJIIOUeHm
- BocstahOBJIeHne 3aBODcKnx yCTaHOBOK annapaTa
- MeHIO Cmamucmuka n Cucmema
- Cmamucmuka
- Cucmema
- HactpoJaToHkoCTn NOMOJa
- UxOДи TeXHnueeCKoe 06cnyKnBaHne
- Μυσαηςινεικτα
- BHIMMAHVE
- YnCTka 6JLOKa 3aBapuBaHnA
- Порогамma,Чистka MOJOUHо CnCTeMbI"
- UcNTka MOJIoUHOn CnCTeMbI
- iHΦopMaun
- Порогамma „Удалене накпп"
- KoHTaKT CO CpeDCTBAMn Dnry ydaJeHnna HAKINN MOKeT BbI3BaTb pa3dpaJxHeNc cIn3nCTOJ 6oIoQKn rna3 n KoxHbIX NOKPOBOB
- IcnoIb3ObaHne HenoXoJxuX cpeCTB dnyyaJeHnHaKInm MoKeT CtaTb npuHNo NOBpeXeHn annapata.
- 3aBnHcennbI pNbTp dIy BODbl B npOecce BbINOJIHeHn IpOpaMMbl NO ydaIeHIO HAKnIM MoKET cTaTb IpNCHoI NOBpeXdEHHaannapata.
- UcIOBIA:
- Hac troponka XeCTKoCTN BOdBi
- Heo6xoDnMooe yCNoBne:HaIncJIee OTO- 6paKaTaTcN HndNKaTOP rOToBHOCTN.
- TpaHcnpTnpoBka, xpaHeHne n yTuIn3aZna
- BbInapuBaHne annapaTa
- TpaHcnpTnpoBka annapaTa
- 3aMep3aHHe OCTaTKOB BOdI B aPnapeMoKTe PpNBecT N NOBpeKdeHIO annapata.
- Ytulnizacna annapata
- TexHnueckne xapaKTePunctuKN
- HeucnpabHocTn
- "Easy Cleaning" programi
- 名称和产品中有害物质的含量
- 号
- 449
- 樂樂門樂樂樂樂樂樂樂樂樂樂樂樂樂樂樂樂樂樂樂樂樂樂樂樂樂樂樂樂樂樂樂樂樂樂樂樂樂樂樂樂樂樂樂樂樂樂樂樂樂樂樂樂樂樂樂樂樂樂
- "Easy Cleaning" フROMGOPLAM
- 上三
- 定数序列的性质
Brand : MELITTA
Model : LATTICIA ONE TOUCH
Category : Coffee machine