USER MANUAL REEF ISLAND IX/A/90X60 ELICA
Closely follow the instructions set out in this manual. All responsibility for any eventual inconveniences, damages, or fires caused by not complying with the instructions in this manual is declined. This appliance is intended to be used in household and similar applications such as: - staff kitchen areas in shops, offices, and other working environments; - farm houses; - by clients in hotels, motels, and other residential type environments; - bed and breakfast type environments.
The hood can look different from that illustrated in the drawings in this booklet. The instructions for use, maintenance, and installation, however, remain the same.
It is important to conserve this booklet for consultation at any moment. In the case of sale, cession, or move, make sure it is together with the product. - Read the instructions carefully: there is important information about installation, use, and safety. - Do not carry out electrical or mechanical variations on the product or on the discharge conduits. - Before proceeding with the installation of the appliance, verify that there are no damaged components. Otherwise, contact your dealer and do not proceed with the installation.
Note: The parts marked with the symbol "*" are optional accessories supplied only with some models or otherwise not supplied, but available for purchase.
Caution
- Before any cleaning or maintenance operation, disconnect the hood from the mains by removing the plug or disconnecting the mains electrical supply.
- Always wear work gloves for all installation and maintenance operations.
- This appliance can be used by children aged from 8 years and above and persons with reduced physical, sensory, or mental capabilities or lack of experience and knowledge if they have been given supervision or instruction concerning use of the appliance in a safe way and understand the hazards involved.
- Children shall not be allowed to tamper with the controls or play with the appliance.
- Cleaning and user maintenance shall not be made by children without supervision.
- The premises where the appliance is
installed must be sufficiently ventilated when the kitchen hood is used together with other gas combustion devices or other fuels.
- The hood must be regularly cleaned on both the inside and outside (AT LEAST ONCE A MONTH).
- This must be completed in accordance with the maintenance instructions provided. Failure to follow the instructions provided regarding the cleaning of the hood and filters will lead to the risk of fires.
- Do not flambe under the range hood.
- For lamp replacement use only lamp type indicated in the Maintenance/Replacing lamps section of this manual.
The use of exposed flames is detrimental to the filters and may cause a fire risk, and must therefore be avoided in all circumstances.
Any frying must be done with care in order to make sure that the oil does not overheat and ignite.
CAUTION: Accessible parts of the hood may become hot when used with cooking appliances.
- Do not connect the appliance to the mains until the installation is fully complete.
- With regards to the technical and safety measures to be adopted for fume discharging it is important to closely follow the regulations provided by the local authorities.
- The air must not be discharged into a flue that is used for exhausting fumes from appliance burning gas or other fuels.
- Do not use or leave the hood without the lamp correctly mounted due to the possible risk of electric shocks.
- Never use the hood without effectively mounted grids.
- The hood must NEVER be used as a support surface unless specifically indicated.
- Use only the fixing screws supplied with the product for installation or, if not supplied, purchase the correct screws type.
- Use the correct length for the screws which are identified in the Installation Guide.
- In case of doubt, consult an authorized service assistance center or similar qualified person.
WARNING!
- Failure to install the screws or fixing device in accordance with these instructions may result in electrical hazards.
- Do not use with a programmer, timer, separate remote control system or any other device that switches on automatically.
- This appliance is marked according to the European directive 2012/19/EC on Waste Electrical and Electronic Equipment (WEEE).
- By ensuring this product is disposed of correctly, you will help prevent potential negative consequences for the environment and human health, which could otherwise be caused by inappropriate waste handling of this product.

- The symbol on the product, or on the documents accompanying the product, indicates that this appliance may not be treated as household waste. Instead it should be taken to the appropriate collection point for the recycling of electrical and electronic equipment. Disposal must be carried out in accordance with local environmental regulations for waste disposal.
- For further detailed information regarding the process, collection and recycling of this product, please contact the appropriate department of your local authorities or the local department for household waste or the shop where you purchased this product.
Appliance designed, tested and manufactured according to:
- Safety: EN/IEC 60335-1; EN/IEC 60335-2-31, EN/IEC 62233. Performance: EN/IEC 61591; ISO 5167-1; ISO 5167-3; ISO 5168; EN/IEC 60704-1; EN/IEC 60704-2-13; EN/IEC 60704-3; ISO 3741; EN 50564; IEC 62301.
- EMC: EN 55014-1; CISPR 14-1; EN 55014-2; CISPR 14-2; EN/IEC 61000-3-2; EN/IEC 61000-3-3. Suggestions for a correct use in order to reduce the environmental impact: Switch ON the hood at minimum speed when you start cooking and keep it running for a few minutes after cooking is finished. Increase the speed only in case of large amount of smoke and vapor and use boost speed(s) only in extreme situations. Replace the charcoal filter(s) when necessary to maintain a good odor reduction efficiency. Clean the grease filter(s) when necessary to maintain a good grease filter efficiency. Use the maximum diameter of the ducting system indicated in this manual to optimize efficiency and minimize noise.
Use
The hood is designed to be used either for exhausting or filter version.

In this case the fumes are conveyed outside of the building by
means of a special pipe connected with the connection ring located on top of the hood.
CAUTION!
The exhausting pipe is not supplied and must be purchased separately.
The diameter of the exhausting pipe must be equal to that of the connection ring.
CAUTION!
If the hood is supplied with an active charcoal filter, then it must be removed.
Connect the hood and discharge holes on the walls with a diameter equivalent to the air outlet (connection flange).
Using tubes and discharge holes on walls with smaller dimensions will cause a reduction in suction performance and a drastic increase in noise.
Any responsibility in this matter is therefore declined.
Use a duct of the minimum indispensable length. Use a duct with as few elbows as possible (maximum elbow angle: 90°). Avoid drastic changes in the duct cross-section.

Filtration version
The aspirated air will be degreased and deodorised before being fed back into the room.
In order to use the hood in this version, you have to install a system of additional filtering based on activated charcoal.
Installation
The minimum distance between the supporting surface for the cooking equipment on the hob and the lowest part of the range hood must be not less than 45 cm from electric cookers and 50 cm from gas or mixed cookers.
If the installation instructions for the gas hob specify a greater distance, this must be adhered to.

Electrical connection
The mains power supply must correspond to the rating indicated on the plate situated inside the hood. If provided with a plug, connect the hood to a socket in compliance with current regulations and positioned in an accessible area after installation. If it is not fitted with a plug (direct mains connection) or if the plug is not located in an accessible area after installation, apply a double pole switch in accordance with standards which assures the complete disconnection of the mains under conditions relating to over-current category III, in accordance with installation instructions.
WARNING!
Before re-connecting the hood circuit to the mains supply and checking the efficient function, always check that the mains cable is correctly assembled.
The hood is provided with a special power cable; if the cable is damaged, request a new one from Technical Service.
Mounting
Before beginning installation:
- Check that the product purchased is of a suitable size for the chosen installation area.
- Remove the charcoal (*) filter(s) if supplied (see also relative paragraph). This/these is/are to be mounted only if you want to use the hood in the filtering version.
- Check (for transport reasons) that there is no other supplied material inside the hood (e.g. packets with screws, guarantees, etc.), eventually removing them and keeping them.
Expansion wall plugs are provided to secure the hood to most types of walls/ceilings. However, a qualified technician must verify suitability of the materials in accordance with the type of wall/ceiling. The wall/ceiling must be strong enough to take the weight of the hood.
Do not tile, grout or silicone this appliance to the wall. Surface mounting only.
Operation
To select the functions of the hood just touch the commands.

Light key ON/OFF

Intensive speed selection key (suction power) - duration 5 minutes: the hood sets this power and at the end of the 5 minutes returns to the previous setting.

High-speed selection key (suction power).

Medium-speed selection key (suction power) - when flashing it indicates the need to wash or replace the carbon filter. This signal is normally deactivated. To activate the alarm, disable the electronic by pressing the 0 button for 3 seconds.
Next, simultaneously press buttons 1 and 2 for 3 seconds; at first, only button 1 will flash, then both buttons 1 and 2 will flash to indicate activation. Repeat the procedure to deactivate the alarm; at first buttons 1 and 2 will flash and subsequently only button 1 to indicate deactivation.

Low-speed selection key (suction power) - when flashing it indicates the need to wash the
fats filter.

Motor key OFF (stand by) - excludes the electronics - reset wash/replace filters signals. MOTOR OFF
Press briefly to switch the motor off. RESET FILTERS SIGNALS
In functioning mode, after carrying out filter maintenance, press the key until hearing the sound signal. The flashing LED 1 (grease filter) or 2 (carbon filter) stops flashing.
EXCLUDING THE ELECTRONICS
Press the key for 3 seconds. The hood command electronics will be excluded.
This function can be useful during the product cleaning operations.
Just repeat the operation to reinsert the electronics.
If the hood fails to operate correctly, briefly disconnect it from the mains power supply for almost 5 sec. by pulling out the plug. Then plug it in again and try once more before contacting the Technical Assistance Service.
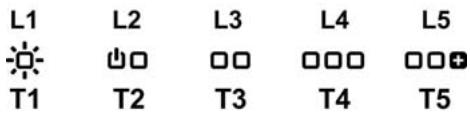
T1. Button ON/OFF lights (Led L1 lit) T2. Button OFF - Selection button suction speed (power) 1 (Led L2 lit) T3. Selection button suction speed (power) 2 (Led L2+L3 lit) T4. Selection button suction speed (power) 3 (Led L2+L3+L4 lit) T5. Selection button intensive suction speed (power) (Led L2+L3+L4 lit + Led L5 flashing) - duration 5 minutes - after which the hood automatically sets suction speed (power) 2.
Delayed switch-off of the hood (flashing LEDs):
It is possible to set the delayed hood switch-off by pressing again for more than 2 seconds the button of the suction speed (power) active at that time.
The available delayed switch-off options are:
Suction speed (power) 1: 20 minutes
Suction speed (power) 2: 15 minutes
Suction speed (power) 3: 10 minutes
Intensive suction speed (power): 5 minutes
Filter saturation indicator
The hood is equipped with a function that warns the user, at regular time intervals, when the filters are saturated and it is necessary to perform their maintenance.
Grease filter saturation indicator: With the hood off (OFF) all suction speed (power) LEDs light up with steady light for 40 seconds.
Activated charcoal filter saturation indicator: With the hood off (OFF) all suction speed (power) LEDs flash for 40 seconds.
Activation of the active charcoal filter saturation signal: normally, this function is disabled; to activate it, switch off the hood (OFF) and simultaneously press buttons T3 and T5 for more than 3 seconds. LEDs L3 and L5 will start flashing.
To disable repeat the operation: LEDs L3 and L5 light up with steady light.
Resetting the filters' saturation indicator:
With the hood on (ON), press button T2 for more than 2 seconds; all LEDs will light up briefly.
Note: if necessary, repeat the operation in case both indicators (grease filter and activated charcoal filter) are active.
Maintenance
Cleaning
Clean using ONLY a cloth dampened with neutral liquid detergent. DO NOT CLEAN WITH TOOLS OR INSTRUMENTS. Do not use abrasive products. DO NOT USE ALCOHOL!
Grease filter
Fig. 10a-20
Traps cooking grease particles.
This must be cleaned once a month (or when the filter saturation indication system - if envisaged on the model in possession - indicates this necessity) using non aggressive detergents, either by hand or in the dishwasher, which must be set to a low temperature and a short cycle.
When washed in a dishwasher, the grease filter may discolor slightly, but this does not affect its filtering capacity.
To remove the grease filter, pull the spring release handle.
Charcoal filter (filter version only)
Fig. 19
It absorbs unpleasant odors caused by cooking.
The saturation of the charcoal filter occurs after more or less prolonged use, depending on the type of cooking and the regularity of cleaning of the grease filter.
In any case it is necessary to replace the cartridge at least every four months (or when the filter saturation indication system - if envisaged on the model in possession - indicates this necessity). The charcoal filter may NOT be washed or regenerated.
Circular charcoal filter
Apply one on each side as cover to both the shield grids of the motor impeller, then turn clockwise.
For the disassembly, turn counter-clockwise.
Replacing lamps
Fig. 22
The hood is equipped with a lighting system based on LED technology.
The LEDs guarantee an optimum lighting, a duration up to 10 times as long as the traditional lamps and allow to save 90% electrical energy.
To replace lights, contact authorised spare part center.
Reset filter saturation indicator:
Before starting installation:
Control panel with 6 buttons
- European Directive 2012/19/EC
- Waste Electrical and Electronic Equipment (WEEE).
The manufacturer declines all responsibility for any damage caused by improper use of the appliance.

The symbol on the product or its packaging indicates that this product must not be treated as household waste. Instead, it must be handed over to the applicable collection point for the recycling of electrical and electronic equipment. Please contact your local authorities, waste disposal services, or the store where you purchased the product for more information on recycling.
The product has been designed, tested, and manufactured in
accordance with:
- Safety: EN/IEC 60335-1; EN/IEC 60335-2-31, EN/IEC 62233.
- Performance characteristics: EN/IEC 61591; ISO 5167-1; ISO 5167-3; ISO 5168; EN/IEC 60704-1; EN/IEC 60704-2-13; EN/IEC 60704-3; ISO 3741; EN 50564; IEC 62301.
- EMC - Electromagnetic compatibility: EN 55014-1; CISPR 14-1; EN 55014-2; CISPR 14-2; EN/IEC 61000-3-2; EN/IEC 61000-3-3.
Suggestions for correct use to minimize the impact on the environment: Turn on the extractor at minimum speed when you start cooking and leave it running for a few minutes after cooking is finished. Increase the speed only in case of large amounts of fumes and use the boost speed only in extreme situations. Replace the charcoal filter when necessary to maintain good odor absorption efficiency. Clean the grease filters when necessary to maintain good grease filter efficiency. Use the maximum diameter of the air exhaust system, as indicated in this manual, to optimize efficiency and minimize noise.
Use
The extractor has a specific purpose: to suck and expel the air filtered through the filters, while simultaneously purifying it.

Extractor with exhaust
The appliance expels the air through an exhaust pipe connected to the flue.
WARNING!
The exhaust pipe is not included with the appliance and must be purchased separately.
The diameter of the exhaust pipe must match the diameter of the flue connection.
The extractor hoods fitted with an active carbon filter must be installed so that the filter can be removed.
Connect the extractor to the exhaust air duct and the vent. The diameter of the duct must correspond to the diameter of the connection ring for air extraction.
Connecting to the exhaust air duct and the vent with the help of a small diameter reduces the suction capacity and significantly increases the operating time.
In these cases, the manufacturer accepts no responsibility.
Use the duct with the necessary care. Use the duct with the smallest possible number of bends (maximum bend angle: 90°). Do not sharply bend the duct!
The extracted air is drawn in and filtered before being returned to the room. To use the extractor in this mode of operation, you must install an additional filter system on the base for the active carbon filter.
Installation
The minimum distance between the surface on which the cooking appliances are placed and the lowest part of the kitchen extractor must be not less than 45 cm in the case of electric cookers and not less than 50 cm in the case of gas or mixed-fuel cookers.
If the instructions for the gas cooking appliance specify a greater distance, this must be taken into account.

Electrical connection
The voltage in the electrical network must correspond to the voltage indicated on the rating plate of the extractor, located on its inner side. If it is fitted with a plug, connect the extractor to a socket that complies with the applicable regulations and is accessible after installation. If it is not fitted with a plug (direct connection to the network), use a double-pole switch that complies with the regulations, ensuring that the network is disconnected in the event of overvoltage category III, in accordance with the installation rules.

ATTENTION!
Before connecting the extractor to the network and checking that it functions correctly, check that the cable is installed as it should be.
The extractor hoods are fitted with a special power cable; if the cable is damaged, contact the after-sales service to obtain a new one.
MOHTAX
Ppei Da npntbnte KbM MONTaKa:
- Ybepete ce, ye 3akyenmjt Ot Bac npodykT oTrobapn no pa3mepn Ha n36paHoTo MCTO 3a HnCTanipahe.
- OtrctpaHete fIINbpa/IFInTPnTe c aKTHBEN BByIeN (pa3bnpa ce, aKo 136bpAnrT Ot Bac moen pa3noIarac TaB). 3a da n3BbPnITE TOBa npocIeTe onepaunite B Cb0tBeTHnaparpa. MoTHnPauTe fIINTPnTE OTHOBc mao B cnuyah, ye Xe Jenaete da m3nOJI3BaTe acnnpaTopa BbB BapnAHT Ha fIINTPnPaUa BEpcN.
- YBepete ce, ye no Bpeme Ha TpaHcnpTa BBb BtpeuHaT aCHT Ha acnPaTopa He ca NonaHajn Ipe6Hn npEmedn, KaTo HapMpIe PIIKCheta C BNHTObe, rapaHcOHHN KaprN n Dp.; ako HamePte TaKINBa OTCPAHETe mN m 3ana3eTe.
PnBce ToBa, Bn npenopbUbame Da ce nocbBetBaTe C
KbAINHΦnIpuanTexnIK,3a Da CTE CNyprH,Ye DoCTABeHNTe akCEcoapn Ca nOxODaIz 3a CEJIa. CTeHata, CbOTBeTHo TABAHbT, Tp8Ba Da 6bDat DOCTaTBuHO CTaBUNH 3a Da N3DbPjAt Ha HATOBAPBaHETO.
Haun Ha ynoTpe6a
KohtpOen nahan c 66yToHa
3a da n36epete keenahnrt ot Bac pekim Ha pa6ota e doctaTbUHO da hatcHete neko cbOTBeTHn6 bytoh.

Bytoh ON/OFF 3a oCBTeTneHne

Bytoh 3a n3bnpahe Ha pexma Ha pa6oTa (cteneH Ha acnpaun - HHTeH3NBHa) - BpeMeTpaene - 5 MNHyTu: acnparTopbT 3aedCTBa Ta3N MouHcT N CLeD n3TuHaHe Ha 5-Te MNHyTu Ce BpbUa KbM PpeDuHaTa MouHcT.

Bytoh 3a n3bnpahe Ha pexima Ha pa6ota (ctenenHa acnnpaunia-Bvcoka)

Bytoh 3a n3bnpaHe Ha cpeHa ckopocT (MOUHOCT Ha acnnpaHe) - KORATO npemrBaO3Hauaba, Ye FInIITbPbT C aKTINBEN BByIeH Tp6Ba Da ce H3Mne HIN NODMeH. IIO npinHtua Ta3N CNIHAN3aun e De3akTbnpaHa. 3a da y aKTINbpuTe, N3KIIIOyete eNEKTPoHnKaTa KATO HAtNCHeTe Bytoh O n3aIbpxHte B pOdoJIxKeHHe Ha 3CEkyHd.
CneT TOBA HATINCHETe EHNOBPemHeHO 6yToHn 1 n 2 n 3aDpBkTe B npOdbIpxHe Ha 3 cekHyd, TpbBO Oe 3aOnOHe da npEMrBa cAmo 6yToH 1, a CneT TOBA EHNOBPemHeHO 6yToHn 1 2, KoTo E03NaHauBa, Ye FyHKuYraTe e AKTNBIPAHa. 3a Da De3aKTHBnPaTe CNrHaJIIN3aUNa, NOBTOpe TonePAunrTa. TpbBO Oe 3aNoOHat Da npEMrBaT 6yToHn 1 n 2, a CneT TOBA CMO 6yToH 1, KoTo O3NaHauBa, Ye FyHKUryAe DE3aKTHBnPaHa.

Press button 3 to set the operating mode (degree of suction). When the indicator lights up, it is necessary to clean the filter for the oil.

Button OFF motor (stand by) - switching off the electronics - resetting the filter saturation signal. OFF MOTORE
Press briefly to switch off the motor.
RESETTING THE FILTER SATURATION SIGNAL
When the aspirator is switched off and you have cleaned the filter surface, press the button and hold it until you hear a sound signal. The flashing light 1 (oil filter) and 2 (active carbon filter) will stop flashing.
SWITCHING OFF THE ELECTRONICS
Press and hold the button for 3 seconds, after which the command electronics of the aspirator will be switched off.
This function can be useful when cleaning the hob.
To activate the electronics again, repeat the procedure.
If you notice malfunctions during operation, disconnect the cable from the socket, wait at least 5 seconds and plug it back in. If this does not solve the problem, we recommend that you contact an authorized service center.
Control panel with buttons
T1. ON/OFF button for lighting (indicator L1 is on) T2. OFF button - button for selecting the speed (power) of suction 1 (indicator L2 is on) T3. Button for selecting the speed (power) of suction 2 (indicators L2+L3 are on) T4. Button for selecting the speed (power) of suction 3 (indicators L2+L3+L4 are on) T5. Button for selecting the intensive speed (power) of suction (indicators L2+L3+L4 are on + indicator L5 flashes) - timer 5 minutes - after which the aspirator automatically switches to the second (2) speed (power) of suction.
Delayed switching off of the aspirator (indicators flash):
It is possible to program the delayed switching off of the aspirator (OFF) by pressing and holding the button for more than 2 seconds at the moment of the active speed (power) of suction. The delayed switching off is with the following timer: 1st speed (power) of suction: 20 minutes 2nd speed (power) of suction: 15 minutes 3rd speed (power) of suction: 10 minutes
Intensive speed (power) of suction: 5 minutes
The filter is clogged when, at the time of switching on, the signal is given and the filter is clogged and it is necessary to perform maintenance.
Filter clogging signal for oil filter: when the aspirator is switched off (OFF), all speed (power) indicator lights of the aspirator remain on and the operation lasts 40 seconds.
Filter clogging signal with active carbon filter: when the aspirator is switched off (OFF), all speed (power) indicator lights of the aspirator flash for 40 seconds.
Activating the clogging signal for the filter with active carbon: the signal activation principle is the same as the activation of the oil filter signal. To activate it, switch off the aspirator (OFF) and press buttons T3 and T5 simultaneously and hold for at least 3 seconds. The indicator lights L3 and L5 start to flash.
To deactivate the signal again, repeat the operation. The indicator lights L3 and L5 turn on with a constant light.
Resetting the clogging signal for the filter:
When the aspirator is switched on (ON), press button T2 and hold for at least 2 seconds. All indicator lights turn on briefly.
Note: if both signals (the oil filter one and the active carbon filter one) are activated, repeat the operation.
Maintenance
Cleaning
For cleaning, use ONLY a cloth dampened with neutral cleaning agents. DO NOT USE INSTRUMENTS OR SHARP OBJECTS FOR CLEANING!
Use agents that do not contain abrasive particles. DO NOT USE ALCOHOL!
Oil filter
Fig.10a-20
Clean the parts, dry them after washing.
If the filter has a clogging indicator, it will show when the filter needs cleaning (if the model you purchased is equipped with such an indicator).
Use mild detergents and rinse thoroughly with clean water, but at low temperature and with a short washing cycle.
It is possible to clean the filter in the washing machine, but this in no way replaces its filtering capability.
To remove the filter for cleaning, pull the handle with the spring mechanism.
The filter with activated carbon (only for filtering versions)
Fig. 19
Replace the gaskets that are removed during disassembly.
The filter with activated carbon should be replaced regularly depending on the method of use and how often you clean the filter.
In any case, it is necessary to replace the filter with activated carbon every four months or when the clogging indicators (if your model has them) show that it is necessary.
Do not reuse it.
Filter with activated carbon
Place the filter on the side so that it covers the opening of the working chamber of the motor, then turn it clockwise.
When disassembling, turn it counterclockwise.
Length of the hook.
Fig. 22
The extractor is a system with lighting.
The lighting guarantees optimal illumination, up to 10 times more than traditional lamps and allows 90% savings on electricity.
To replace the lamps, contact the after-sales service for spare parts.
The device is designed, tested and manufactured in accordance with:
- Safety: EN/IEC 60335-1; EN/IEC 60335-2-31, EN/IEC 62233.
- Operational characteristics: EN/IEC 61591; ISO 5167-1; ISO 5167-3; ISO 5168; EN/IEC 60704-1; EN/IEC 60704-2-13; EN/IEC 60704-3; ISO 3741; EN 50564; IEC 62301. EMC: EN55014-1; CISPR 14-1; EN55014-2; CISPR 14-2; EN/IEC61000-3-2; EN/IEC61000-3-3. Recommendations for correct use to reduce environmental impact: Turn on the extractor at minimum speed when you start cooking and leave it running for a few minutes after you finish cooking. Increase the speed only in case of a large amount of smoke and steam, and use the higher speeds only in extreme situations. Replace the charcoal filter(s) when necessary to maintain good odor removal efficiency. Clean the grease filter(s) when necessary to maintain good grease filtration efficiency. Use the maximum duct diameter indicated in this manual to optimize efficiency and minimize noise levels.
Use
The hood is designed for use in extraction mode or in air recirculation mode.

Using the extraction mode
In this mode, the vapors are discharged outside through the flexible duct, connected to the connecting ring.
ATTENTION!
The exhaust pipe is not included and must be purchased separately.
The diameter of the exhaust pipe must match the diameter of the connecting ring.
ATTENTION!
The hood is made of combustible material. Keep it away from the burner.
Connect the hood to the exhaust pipe with a diameter corresponding to the air outlet opening (connecting flange).
Installing pipes with a smaller diameter will reduce the suction power of the air and sharply increase the noise level.
The manufacturer declines all responsibility for the above.
Use a pipe with the minimum necessary length. Use a pipe with the fewest bends (maximum bend angle: 90°). Avoid abrupt changes in the pipe direction.
Air
The air must be used from the room where the hood is installed. The extracted air is degreased and deodorized by the filter, then it is returned to the room through the upper grille.
Installation
The distance between the lower edge of the hood and the support surface of the cooktop must be at least 45 cm for electric cooktops, and at least 50 cm for gas or combination cooktops.
If the installation instructions for the gas cooktop specify a greater distance, take that into account.

Electrical connection
The mains voltage must correspond to the voltage indicated on the data plate located inside the appliance. If the hood is equipped with a plug, connect it to a suitable socket. It must comply with current regulations and be placed in an accessible location. It can be plugged in after installation. If the hood is not equipped with a plug (direct connection to the mains), and the socket is not in an accessible location after installation, use a two-pole switch that ensures complete disconnection from the mains in case of overvoltage category III, in accordance with installation instructions.

WARNING!
Before connecting the electrical system of the hood to the power supply and checking its correct functioning, make sure that the power cable is correctly installed.
The hood has a special power cable; in case of damage, it must be ordered from the technical service.
Installation
Before starting installation:
Excluding electronic components
Suction speed (power) 2: 15 minutes
Suction speed (power) 3: 10 minutes
Suction speed (power) intensive: 5 minutes
Filter saturation indicator
The suction unit is equipped with a device that, at regular intervals, alerts the user when the filters need to be cleaned.
Filter saturation indicator: The suction unit (SU) is equipped with a device that alerts the user when the filters need to be cleaned.
Filter saturation indicator for grease filters: When the suction unit (SU) is switched off, all suction speed (power) LEDs flash with a fixed light for 40 seconds.
Filter saturation indicator for activated carbon filters: When the suction unit (SU) is switched off, all suction speed (power) LEDs flash for 40 seconds.
Activating the filter saturation indicator for activated carbon filters: The filter saturation indicator is deactivated to activate it, switch off the suction unit (SU) and press buttons T3 and T5 simultaneously for more than 3 seconds, all LEDs L3 and L5 flash.
To deactivate, repeat the operation: LEDs L3 and L5 flash with a fixed light.
Return to the initial position of the saturation indicator
With the suction unit (SU) switched on (ON), press button T2 for more than 2 seconds, all LEDs flash for a short time.
IMPORTANT: If necessary, repeat both operations in the case of two active signals (delay filter and activated carbon filter).
Care
Cleaning
For cleaning, use only a special cloth moistened with a neutral liquid detergent. Do not use any tools for cleaning. Do not use abrasive materials. Do not use alcohol!
Contact your local competent authorities.
The hood must not be connected to the flue pipe used for exhausting fumes from appliances burning gas or other fuels. Do not use or connect the hood without correctly installed lamps, risk of electric shock. Never use the hood without correctly installed grille! The hood must never be used on a surface unless specified. Use the screws for installation provided in the kit, if not included, use screws of the correct type. Use the correct length of screws as indicated in the installation instructions. - In case of doubt, consult an authorized service center or qualified personnel.
WARNING!
Improper installation of the screws or fixing devices may result in electrical hazards. Do not use with a programmer, timer, separate remote control or any other device that switches on automatically.
This product is marked in accordance with European Directive 2012/19/EC on waste electrical and electronic equipment (WEEE). By ensuring this product is disposed of correctly, you will help prevent potential negative consequences for the environment and human health, which could otherwise be caused by inappropriate waste handling.

The symbol on the product or on its packaging indicates that this product shall not be treated as household waste. Instead it shall be handed over to the applicable collection point for the recycling of electrical and electronic equipment. Disposal must be carried out in accordance with local environmental regulations for waste disposal. For more detailed information about treatment, recovery and recycling of this product, please contact your local city office, your household waste disposal service or the shop where you purchased the product.
The appliance has been designed, manufactured and produced in accordance with:
- Safety: EN/IEC 60335-1; EN/IEC 60335-2-31, EN/IEC 62233.
- Performance: EN/IEC 61591; ISO 5167-1; ISO 5167-3; ISO 5168; EN/IEC 60704-1; EN/IEC 60704-2-13; EN/IEC 60704-3; ISO 3741; EN 50564; IEC 62301.
- EMC: EN 55014-1; CISPR 14-1; EN 55014-2; CISPR 14-2;
EN/IEC 61000-3-2; EN/IEC 61000-3-3. The device is designed for continuous operation. To ensure proper functioning, turn the device on to the minimum fan speed and let it run for a few minutes after turning it on. Increase the fan speed only in case of high dust and steam load, and use the fan at maximum speed in extreme cases. For normal efficiency of the device, if necessary, perform a cleaning of the carbon filter(s). For high efficiency of the HEPA filter, if necessary, perform a cleaning of the HEPA filter(s). Use the maximum diameter of the air duct system, as indicated in the instructions, to optimize efficiency and minimize
Usage
The device is designed for operation in recirculation mode, with air intake from the room or in exhaust mode with air recirculation.

Installation variant
When connecting the exhaust pipe to the exhaust outlet, the connection must be sealed.
WARNING!
The exhaust pipe is not supplied and must be purchased separately.
The diameter of the exhaust pipe must match the diameter of the exhaust ring.
WARNING!
If the hood has carbon filters, they must be removed.
Connect the exhaust pipe to the exhaust outlet with the same diameter as the air inlet (connection sealed).
Using exhaust pipes and outlets with a smaller diameter will reduce the efficiency of operation and significantly increase the noise level.
Therefore, we disclaim any liability for the above-mentioned.
! Use the shortest exhaust duct. ! Use the exhaust duct with the fewest bends (maximum bend angle: 90°). ! Avoid sharp changes in the cross-section of the exhaust duct.

Variant with recirculation
Before reusing the hood, it must be thoroughly cleaned. To use the hood in any mode, it is necessary to install a filter system with activated carbon.
Installation
The distance between the lower part of the hood and the cooking surface must be at least 45 cm for electric hobs, and 50 cm for gas or combined hobs.
It is necessary to take into account the distances specified in the installation instructions for the main hood.

The voltage in the electrical network must correspond to the characteristics indicated on the plate located inside the hood. If the hood is equipped with a plug for connecting to the electrical network, connect the plug to a socket that complies with current standards and is accessible, so that the plug can be disconnected after installation. If the plug is not included in the kit (fixed connection to the electrical network) or the socket is not accessible, also after installation, it is necessary to install a reliable disconnection device, which ensures complete disconnection from the network under conditions of overvoltage category III, in full compliance with installation rules.

WARNING!
Before reconnecting the hood to the electrical network, check the correctness of the work, making sure that the network cable has been installed correctly.
The hood plug must have a special device for protecting the cable from accidental disconnection, which is provided in the technical service.
Installation
Before installation:
- Check the dimensions of the product you have purchased to ensure they fit the chosen installation location. Remove the filters if they are present (see also the relevant section). The filters will be reinstalled if you want to use the hood in recirculation mode.
- Check that the inside of the hood has not been damaged by foreign objects, packaging materials (e.g., bags with screws, warranty cards, etc.) during transport. If they are present, remove them and keep them.
The hood kit includes screws for fixing to walls or ceilings, designed for most types of walls/ceilings. However, it is necessary to contact a qualified technician to check the suitability of the materials depending on the type of wall or ceiling. The wall/ceiling must be strong enough to support the weight of the hood.
Functioning
Control panel with buttons
To select hood functions, simply press the command buttons.

ON/OFF light button

Button for switching to intensive mode (maximum power consumption) - lasts 5 minutes: the hood is set to maximum power and after 5 minutes it returns to the previous setting.

Button for switching to high speed (maximum power consumption)

Button for switching to medium speed (power consumption) - indicates the need for cleaning or replacing the filter.
The signaling is enabled by default. To disable the signaling, it is necessary to turn off the electronics by pressing and holding button 0 for 3 seconds. Then, press buttons 1 and 2 simultaneously for 3 seconds, first pressing button 1, then buttons 1 and 2, indicating the disabling of the signaling. To repeat the operation for enabling the signaling, first press buttons 1 and 2, then release button 1, indicating the enabling of the signaling.

Button for switching to low speed (power consumption) - indicates the need for cleaning the grease filter.

Motor OFF button (stand by) - turning off the electronics - resetting the filter signaling - OFF MOTOR
Press briefly to turn off the motor.
Reset filter signaling
To reset the filter signaling after cleaning the filters, press the button and hold it until an audible signal is heard. The indicator light 1 (grease filter) and 2 (charcoal filter) will stop flashing.
Turning on the electronics
Press and hold the button for 3 seconds to turn on the hood electronics.
This operation can be useful during the test run.
Then, after the specified time, the device will turn off automatically.
If the device is not used, it will return to standby mode after 5 seconds. To turn it on again, press the power button and then turn it on again. If the device is not used, it will return to standby mode.
Model with 5 buttons
T1. Power button (LED L1 on) T2. Button for selecting speed (suction) for vacuuming air 1 (LED L2 on) T3. Button for selecting speed (suction) for vacuuming air 2 (LED L2+L3 on) T4. Button for selecting speed (suction) for vacuuming air 3 (LED L2+L3+L4 on) T5. Button for selecting speed (suction) for intensive vacuuming (LED L2+L3+L4 on + LED L5 flashing) - lasts 5 minutes - after that, the speed (suction) automatically returns to 2.
Long press to turn on (LED flashing):
It is possible to set a long press on (on), by holding for more than 2 minutes the speed (suction) button, which is in that moment. In the long press mode, the following times apply: speed (suction) 1: 20 minutes, speed (suction) 2: 15 minutes, speed (suction) 3: 10 minutes, intensive speed (suction): 5 minutes.
Filter cleaning reminder
The device is equipped with a function that periodically reminds the user when the filters are dirty and need to be cleaned.
Filter cleaning reminder for dust: When the device is on (on), all speed (suction) LEDs will flash with a fixed light for 40 seconds.
Filter cleaning reminder activated by button:
When the device is on (on), all speed (suction) LEDs will flash for 40 seconds.
To activate the filter cleaning reminder, the reminder is deactivated, so to activate it, turn on the device (on) and
Press the T3 and T5 buttons simultaneously for more than 3 seconds, LEDs L3 and L5 will start flashing.
To deactivate, repeat the operation; LEDs L3 and L5 will turn on with a fixed light.
They are called version
MaHbIH 7aMaHaTbIC Kbl3bIN HeMece XaHbIn KeTneyiH KaMTaMaCbI3 eTy yuH, TaMaKTbI a6aJnAn KybIpyKaKeT.
CAK BOJbIHbI3: CopfbltbiH KOJIKeTImDi 6eJIkTepi TaMaK DaIbIHday Kypblfblnapbl NaJaIaHaBbINFaH Ke3De KbI3bIN KeTyI MymKiH.
- Ophaty Tobilbik aayktaJMaBihwa KpypbIJIbIHbI 3JIeKTp JxeliciHe KocpHaB13.
- BydbH 乌fhyHa Kapcbl KondaHbIaTbH texnKaBik KHe Kayinci3ik WapanapbH eckeOtbpIn, JepriJikTi BuNik OpraHdpb6ekITKepepekelepi MyKnT opbHday MaHb3bl. OcbI KpyblfblHbIH TyIK apKbIbI 6aftTay JyueciH ra3 Hemece 6acka OTbIbI XaraTbH KpyblfblnapdAn ShlkKaan 6bynapDbI Shlifapy CmRkTbI 6bacKa da MaKaCATTapDa naJaTaHaBnTaBn Ke3 KeIreH KOndaHbCTarbl XeJeTeY JyueciHe XaNlay KaKxt. 3NeKtp TorblHbIN cory Kaynihe BaJNaHbICTbl 7AmbI Dpybc BEkITINMereH COPfblWtBl naindaHaBbI3 XeHE KaNdbIpMaHbI3. TopnapbTnictTyprde6eKitImereH copfbltbeuKaWan naDaanHaBb3.
- Aphaы kepcetimmeHHse, copfbltby EILKAUAH TIpeK 6eTI petiHne naIdaIaHaBbI3.
- Tek opnaty yuin Ehimmen bipre bepiireh 6ekitybpaHdaIapbIn naIaIahbIb3, erep bepiimee,6paHdaHbTHticti TypiH catbIn anlbHb3. BypaHdaIapdbIH opHaTy HcKaybIfbIHda. KepceTinReH dypbic y3bHdIfbHnaiDaNaHbHbI3. KymHdHaCahB3, 0kiJETti Kbi3MeT KepeTy 6oBbIHwa XepDem KepeCy optaIbIFbHa HemeCe Tnicti MaMaHaHaFah TyIraFa xa6apnaCbIH3.
ECKEPTY!
-Бураздаларды Hemece Беку Крьлфсibиocbl Hyckaynapra caikec opHaTnay3neKtpniK Kayintepre ekenyi MymKiH. - BaIapIamaiaybIIme, TaImepeMeH, 6JIek KaIbIKTaH backapy KJYecimeh Hemece ABTomaTTbI TypJe KOCbIaNbIH Ke3 KeJIreH backa KypblfBIme KOJaHaHoBaHbI3.
3JNeKtpnik JxHe 3JNeKtpOnHbIK acnTapdb KaTaNandaFa acbpy XeHiNderi 2012/19/EC EbponaBbIK DnpeKtNbke (WEEE) caiKeC bepinre Him TaHbanaHbl.
BepinreH eHIMdi dypbic kaTaNaida acbipydbI
KamTaMaCCbI3 eTymEn, C3 KopUshaFAn optFa xHe aDAM DeHcayNbIfbHa Kepi AecpiH Tnir3y Di 6oJIbIpMayra KEmeKTececi3.

Acnantarbl Hemece KOndaMa KpKaTarl TaHbAcbl 6epiReh acnantbl KaTaNdaF aCbpyda eDeTeri TypMbICTbIK KaNbIK peTIHe nItepYre BoImaTbHbIN KepCteJI. ObIH opNbHa 3IeKTPlK XaHE 3IeKTPoHDbIK acnantarpbl KaTa Ta naDabry acbpyra apHaJIFaH Ka6BJdAynHKTIHe tancbpy Kepek.
Бутfa tancbyp acnantb KaTaNaDara acbipy XeHInderi xepriniKti epexenre cKeC mbifrapIybl Tnic.
Before starting any installation or repair work, disconnect the appliance from the power supply. All installation and repair work must be carried out by qualified personnel in accordance with current regulations.
The following safety instructions must be observed:
Safety: EN/IEC 60335-1; EN/IEC 60335-2-31, EN/IEC 62233. - Performance: EN/IEC 61591; ISO 5167-1; ISO 5167-3; ISO 5168; EN/IEC 60704-1; EN/IEC 60704-2-13; EN/IEC 60704-3; ISO 3741; EN 50564; IEC 62301. EMC: EN 55014-1; CISPR 14-1; EN 55014-2; CISPR 14-2; EN/IEC 61000-3-2; EN/IEC 61000-3-3.
Instructions for proper disposal of the appliance:
Before cleaning, ensure the appliance is switched off and unplugged. Wait at least 30 minutes after use. Do not use steam cleaners or high-pressure cleaners. Use a soft cloth dampened with mild detergent. Rinse with clean water and dry thoroughly. Do not use abrasive cleaners or solvents.
Installation
The hood is designed to be installed above a cooking surface, either for recirculation or extraction mode.

Hood installation
This hood is designed for installation on a wall.
The hood must be installed at the recommended height.

WARNING!
The hood's duct diameter must not be smaller than the outlet diameter.

WARNING!
The hood must be connected to the duct system using a suitable adapter.
When connecting the hood to the duct, use a duct of the same diameter as the outlet (connection flange).
Check the cable types for compatibility with the device's technical data before starting work, follow the instructions, and use the correct tools.
! Minimum bending radius of the cable. ! Maximum bending radius: 90°. ! Do not apply tension to the cable during installation.

Water connection
The water connection must be made by qualified personnel, and it should be connected to the water supply.
The water inlet hose must be connected to the water supply with a suitable fitting, and it must be checked for leaks.
Connection
The device's power supply must be connected to a properly grounded electrical outlet, with a distance of at least 45 cm from the device.
For gas or combined appliances, the distance must be at least 50 cm.
If the power supply cord is damaged, it must be replaced by the manufacturer.

Electrical connections
The installation must be carried out by qualified personnel in accordance with the manufacturer's instructions.
If the device is not working properly, do not attempt to repair it yourself; contact a qualified technician. If the device is not working properly (e.g., it does not turn on), or if it does not work properly after repair, contact the manufacturer's service center for assistance.

WARNING!
Before connecting the device to the electrical supply, ensure that the power cord is properly grounded.
The water inlet hose must be connected to the water supply with a suitable fitting. If the hose is damaged, contact the manufacturer for a replacement.
Bekity
Ophatydbb6actayandbHda:
- ΘΗΜΗΙΝ ΕΑΙΣΕΜΙ ΜρΗΤΑ ΜρΗβι ΜχΙΝ ἀνρυίς ἐκεΗΠ ἀντεύμει έλεγειδε.
- BeIceHdi Kemip cy3ric(HepiH) (KaMTbIJFaH 60nca) (6aca kepdi kapaHbI3) anblHbI3. KaKNaKTbIH cy3ri HcCKacbIH naJaHaHfBbI3 KeNce, OHbl/OlapDbI any KepeK. IwHne bpaHdnap, KeninDik KapTacbl, T.6. cnKTBbap cemKeJep cnKTBb KaNak iHnderi Kocalkb Kypandapp (coHa ona Hac TaMaJday yuiH opHaNaCTbipbInraH) TeKcePi3. Onapbl aBIn, KayinciOpbIHda caKaTaHbI3.
Cy3ri KeNTeren Ka6bIPfA/Te6e TypIepiHe caikec Kenetin 6ekITKlIeTpEme (fHKcatOpnapMe) kAMTamaBIsdAnDbIPbnFa. AnaJa, MaTePnAnIap 6epinre Ka6bIPfa/Te6e Typei CaKeCTirHe Ke3 JeKti3y yuH BinikTi MAmahFxaKOJIbIbHb3.Cy3ri CanMaftbHKeTepe anatbIHda Ka6bIPfA/Te6e JeKtIKiKiMbIKTb BoJybl Kepek.
PaiDanaHy
6 Tymeci 6ap 6ackapny naHeni
Cv3HdiHHyHKnIaPbIH TaNday yuH caikeciHwe 6atbIpMaFa bacy kTJIkti.

KapbIKTb6atbipmacbl
ON/OFF(KOCY./CΘH.)

KapKbIHbI XblIaMblkTbI TaHday 6aTbIPmacbl (copy Kyyu) -y3aKTbIFb5 MnHyT -5 MNHT OTKEHHEN KeIH CopFbII 6yraH DeiH opHaTBINFaXblaMbIK TApTiBiHe opanaBl.

Kofapbl XbIJaAMbIKTbTaHday 6aTbIpMacbl (copy Kyuui)

OpTaWbIJaDMyIKbTaHday 6aTbIpMacbi (copy Kywi) - KblnbIbIKtan TypFaKe3e KEMipni cy3iwi Tyy Hemece aybCTbpy KaKcETTirirn KepeTei. Byn
CnHaHn3aJna 3eTe DeakTbuaJnAhnFaH. CnHaHn3aJnHb AKTbuaJnay yuHIN 0 6BaTbIpMaCbHa 3 CeKHy d iUHDe 6acBn OTbIPbIN, 3NeKTPoHHKaHb CenDipy KepeK. Oan HKeiH 3 CeKHy d iUHDe 1 XeHe 2 6BaTbIpMaNapbHa 6ipyAkBTta 6acy KepeK, anDbimEn TeK 1 6BaTbPMA fana XbInblbIKtAn TypaBbI, Oan HKeiH 1 XeHe 2 Eki 6BaTbPMA da XbInblkTaN 6actaNb, 6yn AKTbuaJnAHaFaNDbfBh 6inDipeDi. CnHaHn3aJnHb CenDipy YuHn OepaJnBb KaiTanay Kepe, anDbimEn 1 XeHe 2 6BaTbPMAnap XbInblbIKTaIdbI, Oan H KeiH TeK 1 6BaTbPMA fana, 6yn deakTbuaJnAHaFaHdbIbH 6inDipeDi.

TeMeH XbIaMbIKtB TaHday 6aTbIPmacbl (copy Kywi) - XbIbJIbIKTan TpyfAH Ke3Ne MaIIapDbIH cy3riiIN Kyy KaKETtinirH Kepcetei.

Contact switches (dry contacts) - electronic sensor analysis setup. Contact sensor
Short circuit to ground contact sensor. Analysis setup
If the sensor is in a dirty state, before technical maintenance, the analysis must be started. The cleaning cycle (with sensor) or 2 (with sensor) must be stopped.
Electronic sensor
Press and hold for 3 seconds, then release the sensor's electronic sensor. This function can be used for cleaning and maintenance. To disconnect the electronic sensor, an operator's key is required.
When the device is in operation, before maintenance, after disconnecting the power, wait at least 5 seconds, then remove the cover, and then disconnect it for maintenance. If the device is in operation, it must be disconnected before maintenance.
5 function buttons
T1. ON/OFF button (L1 indicator) T2. OFF button - 1st level (dry) detection button (L2 indicator) T3. 2-5 level (dry) detection button (L2+L3 indicators) T4. 3-5 level (dry) detection button (L2+L3+L4 indicators) T5. Critical level (dry) detection button (L2+L3+L4 critical indicators + L5 critical indicator) - active for 5 minutes, then after 2-11 level (dry) automatic mode.
Cleaning cycle (indicator lights):
After the cleaning cycle, the sensor's dry level detection button can be pressed for more than 2 seconds.
Cleaning cycle durations are as follows:
1st level (dry): 20 minutes 2nd level (dry): 15 minutes 3rd level (dry): 10 minutes Critical level (dry): 5 minutes
Sensor status indicators
The sensor is clean, it has been tested for technical maintenance requirements.
Main sensor status indicators: Cleaning (OFF) is active, all level indicators are off for 40 seconds, then the indicators are updated.
Before connecting the device to the mains, check the indicators: the switch must be in the OFF position, and the voltage selector must be set to the appropriate voltage for at least 40 seconds.
Before connecting the device to the mains, check the voltage selector switch: set the switch to the OFF position, then set the T3 and T5 switches to the required voltage for at least 3 seconds.
For the correct voltage setting: the T3 and T5 switches must be set to the required voltage.
To check the voltage indicators: set the switch to the ON position, then press the T2 button for 2 seconds; all indicators should light up.
Expert: If necessary, the indicators (low voltage and high voltage) should be checked and the correct voltage set.
Technical maintenance
Cleaning
For cleaning, use only a dry cloth.
Do not use any solvents.
Cleaning or maintenance tools
WARNING! Do not use abrasive materials.
Do not use any cleaning agents. Use only a dry cloth.
WARNING!
Low voltage
10a-20-suret
AcdaihndaydaBImaH6JIweKTePiYctanKaIaDbI.
The filter must be replaced with a new one after the specified period of time (or the filter clogging indicator, if your model is equipped with it, indicates that replacement is needed).
The small cleaning filter can be cleaned with the washing machine. However, the cleaning method is different.
To remove the filter, pull the handle.
Insert the filter (in the form of a filter-sponge)
Figure 19
Do not install the filter in the wrong position.
The filter clogging, the type of dirt and the filter replacement interval depend on the operating conditions. In any case, replace the filter at least every 4 years (or when the filter clogging indicator, if your model is equipped with it, indicates that replacement is needed).
The filter can be cleaned with water or air.
Replacing the filter
To replace the filter, remove the old one and insert a new one.
For this, follow the instructions in the manual.
Cleaning the device
Figure 22
The housing is made of high-quality plastic based on modern technology.
Capable of reducing electricity consumption by up to 90% and extending the service life of lamps by 10 times.
For lamps to operate, they must be connected to a rotating mechanism.
i.

5-2

1
Therefore, a + b = 12
LJI 1
p10. Aiiuall Caij 4
blal 11 2b2 2cglgolgolgo
y
Therefore, combining z 1z 2 = 1
b【】
Joo
iiluiu uus 100000000000000000000000000000000000000000
Jdall
1 1
yllly y
Therefore, S ΔOBC = S ΔCOD + S ΔBOC - S ΔBOC
J 1
( a + b) ( a2 - ab + b2) = a3 + b3
... + 10 + 1 = 19 + 1
ai a j = f( x)
Therefore, bj = cj