SC5800C - Steam cleaner KARCHER - Free user manual and instructions
Find the device manual for free SC5800C KARCHER in PDF.
User questions about SC5800C KARCHER
0 question about this device. Answer the ones you know or ask your own.
Ask a new question about this device
Download the instructions for your Steam cleaner in PDF format for free! Find your manual SC5800C - KARCHER and take your electronic device back in hand. On this page are published all the documents necessary for the use of your device. SC5800C by KARCHER.
USER MANUAL SC5800C KARCHER
Description of the Appliance EN 7
Quick Reference EN 8
Operation EN 8
How to Use the Accessories EN 10
Maintenance and care EN 12
Troubleshooting EN 13
Technical specifications EN 14
Special accessories EN 15
General information
Dear Customer,

Please read and comply with these original instructions prior to the initial
operation of your appliance and store them for later use or subsequent owners.
Proper use
Use the steam cleaner only for private households.
The appliance is intended to be used with steam and can be used with the appropriate accessories as described in these operating instructions. You will not need any detergent. Please adhere to the safety instructions.
Symbols in the operating instructions
Danger
Immediate danger that can cause severe injury or even death.
Warning
Possible hazardous situation that could lead to severe injury or even death.
Caution
Possible hazardous situation that could lead to mild injury to persons or damage to property.
Symbols on the machine


CAUTION - Please read the operating instructions!

Steam
CAUTION - Danger of scalding
Environmental protection

The packaging material can be recycled. Please do not place the package to the ordinary refuse for disposal, but go for the proper recycling.

Old appliances contain valuable materials that can be recycled. Please arrange for the proper recycling of old appliances. Please dispose your old appliances using appropriate collection sys
Notes about the ingredients (REACH)
You will find current information about the ingredients at:
www.kaercher.com/REACH
Scope of delivery
The scope of delivery of your appliance is illustrated on the packaging. Check the contents of the appliance for completeness when unpacking.
In the event of missing accessories or any transport damage, please contact your dealer.
Warranty
The warranty terms published by the relevant sales company are applicable in each country. We will repair potential failures of your appliance within the warranty period free of charge, provided that such failure is caused by faulty material or defects in manufacturing. In the event of a warranty claim please contact your dealer or the nearest authorized Customer Service centre. Please submit the proof of purchase. (See address on the reverse)
Safety instructions
Danger
The appliance may not be used in areas where a risk of explosion is present.
If the appliance is used in hazardous areas the corresponding safety provisions must be observed.
- Never use the appliance in pools containing water.
The device should not be used to clean electrical appliances such as oven, exhaust, micro-wave, televisions, lamps, hair-dryer, electrical heating systems, etc.
Check the faultless condition of the appliance and the accessories before using it. Otherwise, the appliance must not be used. Please check in particular the power cord, the maintenance lock, and the steam hose.
If the power cord is damaged, please arrange immediately for the exchange by an authorized customer service or a skilled electrician.
Please arrange for the immediate exchange of a damaged steam hose. You may only use a steam hose that is recommended by the manufacturer (see spare parts list for the order number).
- Never touch the mains plug and the socket with wet hands.
- Never use the appliance to clean objects containing hazardous substances (e.g. asbestos).
- Never touch the steam jet from a short distance with your hands and never direct the steam jet to persons or animals (risk of scalds).
The maintenance lock must not be opened during operation.
Warning
The appliance may only be connected to an electrical supply which has been installed in accordance with IEC 60364.
The appliance may only be connected to alternating current. The voltage must correspond with the type plate on the appliance.
In wet rooms, e.g. bathrooms, connect the appliance to sockets with a series connected RCD adapter.
- Unsuitable extension cables can be hazardous. Only use a splashproof extension cable with a minimum section of 3 × 1 mm^2 .
The connection between power cord and extension cable must not lie in water.
If couplings of the power cord or extension cable are replaced the splash protection and the mechanical tightness must be ensured.
The operator must use the appliance correctly. When working with the appliance, he must consider the local conditions and pay due care and attention to other persons, in particular children, who are nearby.
This appliance can be used by children aged from 8 years and above and persons with reduced physical, sensory or mental capabilities or lack of experience and knowledge if they have been given supervision or instruction concerning use of the appliance in a safe way and understand the hazards involved. Children shall not play with the appliance. Cleaning and user maintenance shall not be made by children without supervision.
- Never leave the appliance unattended when it is in operation.
- Be very careful while cleaning tiled walls with sockets.
Caution
Make sure that the power cable or extension cables are not damaged by running over, pinching, dragging or similar. Protect the power cable from heat, oil, and sharp edges.
- Never fill solvents, solvent-containing liquids or undiluted acids (e.g. detergents, benzene, paint thinner, and acetone) into the water reservoir as these substances affect the materials used on the appliance.
The appliance must not be carried during cleaning.
The appliance must provide of a stable ground.
Use and store the unit only in accordance with the specifications in the description and/or figure.
The steam switch must not be locked during the operation.
- Protect the appliance from rain. Do not store outside.
Safety Devices
Caution
Safety devices protect the user and must not be modified or bypassed.
Pressure controller
The pressure controller keeps the boiler pressure during the operation as constant as possible. The heating is turned off if the maximum operating pressure of 4 bar is reached in the boiler and is reactivated in case of a pressure drop in the boiler due to steam tapping.
Boiler thermostat
If, in case of a malfunction, there is no water in the boiler, the temperature in the boiler rises. The boiler thermostat turns off the heating. Once the boiler is filled, normal operation can continue.
Safety thermostat
The safety thermostat turns off the appliance if the boiler thermostat and the pressure controller fails and the appliance overheats in case of a malfunction. Please contact your local KÄRCHER customer service to arrange for the reset of the safety thermostat.
Maintenance lock
The maintenance lock acts as a pressure control valve at the same time. It seals the boiler against the steam pressure that builds up in the boiler.
If the pressure controller is defect and the steam pressure in the boiler rises, the pressure control valve, and steam is emitted through the maintenance lock to the outside.
Please contact your local KÄRCHER customer service before you put the appliance into operation again.
Description of the Appliance
These operating instructions describe the maximum equipment. Depending on the model, there are differences in the scopes of delivery (see packaging).
Illustrations on fold-out page!

A1 Appliance connector with cover
A2 Water reservoir
A3 Carry handle for water reservoir
A4 Selector switch
A5 Operating panel
a Display - OFF position
b Display - water shortage (RED)
c Display - heater (GREEN)
d Min. steam level
e Selection range of steam level
Max. steam level
g Steam level Vapohydro function
A6 Locking door for accessories compartment
A7 Maintenance lock
A8 Carrying handle
A9 Holder for accessories
A10 Accessories storage
A11 Storage for mains connection cable
A12 Storage holder for floor nozzle
A13 Mains cable with mains plug
A14 Running wheels (2 ea.)
A15 Steering roller
B1 Steam gun
B2 Steam lever
B3 Unlocking button
B4 Child lock
B5 Steam hose
B6 Steam plug
C1 Detail nozzle
C2 Round brush
D1 Hand nozzle
D2 Terry cloth cover
E1 Extension tubes (two tubes)
E2 Unlocking button
F1 Floor nozzle
F2 Retaining clip
F3 Terry floor cloth
Option
H1 Steam pressure iron
H2 Upper steam button
H3 Display - heater (ORANGE)
H4 Lower steam button
H5 Steam lock
H6 Temperature controller
H7 Steam plug
Quick Reference
Illustrations on Page 2
1 Fill the water reservoir up to the "MAX" marking.
2 Insert the steam plug into the appliance connector.
3 Plug in the main plug. Switch on the appliance by turning the selector switch.
4 Display - heater blinks green. Wait until the heater display lights up permanently green.
5 Connect the accessories to the steam gun. The steam cleaner is ready to use.
Operation
Illustrations on fold-out page!

Attaching the Accessories
Illustration 2
Open the cover of the appliance socket.
Tightly insert the steam plug into the appliance connector. The plug must click into place audibly.
To disconnect: Press the cover of the appliance connector down and disconnect the steam plug from the appliance connector.
Illustration A - B
Connect the required accessories (see Chapter "How to use the accessories") to the steam gun. Insert the open end of the accessory on the steam gun and push onto the steam gun until the unlocking button of the steam gun locks into place.
Illustration
Use the extension tubes if necessary. To do so, connect one or both extension tubes to the steam gun. Insert the required accessories on the free end of the extension tube.
Removing the Accessories
Danger
Hot water may drip out of the accessory parts while you are detaching them! Never detach accessory parts while steam streams out - risk of scalding!
Move the child protection unit toward the back (steam lever locked).
Illustration D
To detach the accessory parts, press the unlocking button and pull the items apart.
Filling the Water Reservoir
The water reservoir may be refilled at any time.
Caution
Do not use condensation water from the drier!
Do not fill with detergent or other additives (for example fragrances)!
Do not use pure distilled water! Max. 50% distilled water and 50% tap water. Do not use collected rain water!
Illustration 1
You can remove the water reservoir to fill it or you can fill it directly on the appliance.
Take off water reservoir
Pull the water reservoir straight up.
Fill the water reservoir up to the "MAX" marking while positioned vertically under the water tap.
Insert the water reservoir and press downwards until it arrests.
Directly on the appliance
Pour water from a container into the funnel inlet. Fill up to the "MAX" marking.
Turning on the Appliance
Place the unit securely on a firm surface.
Insert the mains plug into a socket.
Rotate the selector switch to steam level selection range from the OFF position.
Display - heater blinks green.
Note: If there is no or not enough water in the steam boiler, the water pump starts and supplies water from the reservoir into the steam boiler. The filling process may take several minutes.
Wait until the heater display lights up permanently.
The steam cleaner is ready to use.
Note: The appliance briefly closes the valve every 60 seconds. This will prevent the valve from sticking. There will be a slight audible click. The steam delivery is not impaired by this.
Refilling Water
In case of water shortage, the water shortage display lights up red and a signal can be heard.
Note: Every time there is not enough water in the steam boiler, the pump automatically supplies water from the water reservoir into the steam boiler. If the water reservoir is empty, the water pump is not able to fill the steam boiler and the steam tapping is blocked.
Fill the water reservoir up to the "MAX" marking.
Note: The water pump tries to fill the steam boiler in short intervals. If the filling is successful, the steam tapping is released immediately, and the red display goes out.
Adjusting the Steam Quantity
The emerging steam is regulated by a selector switch. Depending on the type of contamination and its severity, this selector switch offers adjustment possibilities from the minimum steam level (slight contamination) to the max. steam level (severe contamination).
For severe contamination located in difficult to access areas, there is the vapohydro function.
Adjusting the steam quantity
Set selector switch to the required steam volume.
While operating the steam switch, always direct the steam gun at a separate piece of cloth until the steam is emitted evenly.
Turning Off the Appliance
Rotate the switch to the OFF position to turn off the appliance.
Disconnect the mains plug from the socket.
Press the cover of the appliance connector to the bottom and disconnect the steam plug from the appliance connector.
Empty the residual water from the water reservoir.
Storing the Appliance
Illustration F - G
Store the round brush in the accessory compartment.
Insert the manual nozzle onto each extension pipe.
Put the extension pipes into the large accessory holders.
Insert the point stream nozzle into the accessory storage compartment.
Hook the floor nozzle into the parking position.
Wrap the steam hose around the extension pipes and insert the steam pistol into the floor nozzle.
Stow away the mains cable in the accessory holder for the mains cable.
How to Use the Accessories
Important application instructions
Cleaning floor surfaces
It is recommended to sweep or vacuum the floor prior to using the steam cleaner. This way, the floor is already cleared of dirt/ loose particles prior to the wet cleaning.
Refreshing textiles
Prior to treatment with the steam cleaner, always check the reaction of the textiles in an inconspicuous location: Steam at first, then let dry and then check for colour or shape changes.
Cleaning of Coated or Lacquered Surfaces
When cleaning painted or plastic-coated surfaces, as found on kitchen and living room furniture, doors, parquet; wax, furniture polish, plastic surfaces or paint can come loose or stains can be created. When cleaning these surfaces, briefly steam a cloth and wipe the surfaces with it.
Caution
Never direct the steam jet at glued edges as the edge band may loosen. Do not use the steam cleaner on unsealed wooden or parquet floors.
Cleaning of Glass
In case of low outside temperatures, especially in the winter, warm up the window pane by slightly steaming the entire glass surface. This will prevent tensions on the surface which might lead to glass breakage.
Then clean the window surface with the hand nozzle and attachment. Use a squeezegee to remove the water or wipe the surfaces dry.
Caution
Do not direct steam onto the sealed locations of the window frame to prevent damage.
Steam gun
You can use the steam gun without any additional accessories, e.g.:
- to remove odours and wrinkles from hanging clothes by steaming them at a distance of 10 to 20~cm .
to remove dust from plants. Here, keep a distance of 20-40 cm. - for moist dusting, by briefly steaming the cloth and wiping the furniture with it.
Detail nozzle
The closer this nozzle is to the contaminated area, the higher the cleaning effect, as the temperature and the steam are highest at the nozzle output. Especially suited for cleaning difficult access locations, joints, fittings, drains, sinks, toilets, blinds and heaters. Heavy lime scale can be drenched in vinegar prior to steam-cleaning. Let the vinegar penetrate for about 5 minutes.
Round brush
The round brush can be installed onto the detail nozzle as an accessory. Attached brushes can therefore be used to remove heavy soiling.
Caution
Not suited for the cleaning of sensitive surfaces.
Illustration B
Attach the round brush to the detail nozzle.
Hand nozzle
Pull the terry cloth cover over the hand nozzle. Especially well-suited for small washable areas, shower stalls and mirrors.
Floor nozzle
Suited for all washable walls and floor coverings, e.g. stone floors, tiles and PVC floors. Work slowly on very dirty surfaces to allow the steam to act on the dirt for a longer period of time.
Note: Detergent residue or care emulsions that are still present on the surfaces to be cleaned, can lead to smears when steam cleaned. However, these will disappear with repeated cleaning procedures.
Illustration E
Attach the floor cloth to the floor nozzle.
1 Fold the floor cloth the long way and place the floor nozzle on top of it.
2 Open holding clamps.
3 Place the cloth ends into the openings.
4 Close the holding clamps.
Caution
Do not insert fingers between the clamps.
Parking the floor nozzle
Illustration F
During work breaks, hook the floor nozzle into the parking holder.
Steam iron
Danger
The steam pressure iron must not be used if it has been dropped, shows visible signs of damage or if it leaks.
The steam pressure iron is hot and so is the steam jet! Point out to other people the possible risk of being scalded or burnt. Never direct the steam jet at people or animals (risk of scalding). Do not touch any electrical leads or combustible objects with the hot steam pressure iron.
Warning
The steam pressure iron and its connecting cable must be kept out of reach of children under the age of 8 during the heating and cooling down periods.
The steam pressure iron must be used and placed on a stabile surface.
Note: We recommend using the Kärcher ironing table with active steam extraction (2.884-933.0). This ironing table has been designed to match your new steam cleaner. It facilitates and, thus, accelerates the ironing process substantially. In any case, you should use an ironing table which is covered with a mesh-type underlay allowing the steam to pass through.
Note: Please do not select the VapoHydro function while the steam pressure iron is plugged in to prevent the laundry to be ironed from getting wet.
Make sure that there is fresh tap water in the boiler of the steam cleaner.
Tightly insert the steam plug of the iron into the appliance connector. The plug must click into place audibly.
Display - iron will light up green permanently.
Start-up the steam cleaner according to the description.
Recommended steam levels:
| Level | Textiles |
| Min. steam level | Slightly wrinkled clothes |
| Max. steam level | Jeans |
Wait until the steam cleaner is ready to use.
Steam ironing
All fabrics can be steam ironed. Delicate imprints or fabrics should be ironed on the reverse or according to the manufacturer's specifications.
Note: For these sensitive textiles, we recommend using the KÄRCHER non-stick ironing sole BE 6006 (Ordner no. 2.860-142.0).
Adjust the temperature control of the steam iron within the notched range (***/MAX).
As soon as the heater display of the iron switches off, you can start ironing.
Note: The sole plate must be hot to prevent the steam from condensing on the sole plate and dripping onto the garment to be ironed.
Use the top or bottom steam switch.
- Steaming at intervals: Press the steam switch. Steam will be emitted while the switch is pressed.
Continuous steaming: Pull the latch for the steam switch toward the rear until it locks in. Steam will escape continuously. To unlock, push the lock forward.
Direct the first burst of steam at the start of the ironing process or after ironing breaks at a separate piece of cloth until the steam is emitted evenly.
You can hold the iron in an upright position to apply steam to curtains, dresses, etc.
Dry ironing
Note: Even if you iron without steam, there must be water in the boiler.
Adjust the temperature of the iron according to the garment you want to iron.
| • | Synthetics |
| •• | Wool, silk |
| ••• | Cotton, linen |
Note: Please observe the ironing and washing instructions in your garment.
As soon as the heater display of the iron switches off, you can start ironing.
Maintenance and care
Danger
Always disconnect the mains plug and allow the steam cleaner to cool down before performing any maintenance work.
Rinsing the steam boiler
Rinse the steam cleaner boiler at the latest after 8 boiler fillings.
Disconnect the mains plug from the socket.
Allow the steam cleaner to cool down.
Empty the water reservoir or remove it from the appliance.
Remove the accessories from the accessory compartments.
Illustration H
Open the locking door of the accessory compartment.
Remove the accessories from the accessory compartment.
Open the maintenance lock. For this, place the open end of an extension pipe onto the maintenance lock, lock it into the guide and unscrew it.
Fill the boiler with water and shake it strongly. This dissolves lime scaling residing on the boiler bottom.
Completely empty the steam boiler to remove existing water (see fig. 1).
Dscaling the Steam Boiler
As limes cale builds up on the boiler walls, we recommend to de scale the boiler in the following intervals (RF = reservoir fillings):
| Degree of hardness | ° dH | mmol/l | RF | |
| I | soft | 0-7 | 0-1,3 | 100 |
| II | medium | 7-14 | 1,3-2,5 | 90 |
| III | hard | 14-21 | 2,5-3,8 | 75 |
| IV | very hard | >21 | >3,8 | 50 |
Note: Please contact your Conservancy Board or the local water supply company to inquire about the hardness of your water.
Disconnect the mains plug from the socket.
Allow the steam cleaner to cool down.
Empty the water reservoir or remove it from the appliance.
Remove the accessories from the accessory compartments.
Illustration H
Open the locking door of the accessory compartment.
Remove the accessories from the accessory compartment.
Open the maintenance lock. For this, place the open end of an extension pipe onto the maintenance lock, lock it into the guide and unscrew it.
Completely empty the steam boiler to remove existing water (see fig. 1).
Warning
Only use products approved by KÄRCHER to exclude any damages of the appliance.
User the KÄRCHER decalcifier sticks (order no. 6.295-206) to decalcify the water. Please follow the dosing instructions on the packaging while using the decalcifying solution.
Caution
Use caution when filling and emptying the steam cleaner. The descending solution can have an aggressive effect on delicate surfaces.
Pour the descending solution into the boiler and allow it to react for approximately 8 hours.
Warning
Do not screw the maintenance lock onto the appliance during the decalcifying. Do not use the steam cleaner as long as there is decalcifying agent in the boiler.
Completely empty the descending solution after 8 hours. A small amount of the solution will remain in the boiler. Therefore, you should rinse the boiler two to three times with cold water to remove any residues of the descaler.
Completely empty the steam boiler to remove existing water (see fig. 1).
Screw the maintenance lock in using the extension pipe.
Fill water reservoir (see page 8).
The steam cleaner is ready to use.
Care of the Accessories
Note: The floorcloth and the terry cloth cover have been pre-washed and can be used immediately for working with the steam cleaner.
You can wash dirty floorcloths and terry cloth covers in the washing machine at 60^ . Do not use a liquid softener as this would affect the ability of the cloths to pick up dirt. You may tumble dry the cloths.
Troubleshooting
Often, failures have simple causes and you can do the troubleshooting yourself using the following overview. If you are in doubt or if the failure is not listed here please contact the authorized customer service.
Danger
Always disconnect the mains plug and allow the steam cleaner to cool down before performing any maintenance work.
Repair works may only be performed by the authorized customer service.
Long heating-up time
Steam boiler is decalcified
Descale the steam boiler.
No steam
Display - water shortage blinks red and signal is emitted.
No water in the water reservoir.
Fill the water reservoir up to the "MAX" marking.
Display - water shortage lights up red.
No water in the steam boiler. Overheating protection of the pump was triggered.
Turn off the appliance.
Fill the water reservoir up to the "MAX" marking.
Turn on the appliance.
Water reservoir has not been inserted properly or is calcified.
Remove the water reservoir and rinse it.
Insert the water reservoir and press downwards until it arrests.
Steam lever cannot be pressed anymore
Steam switch is secured with the lock / child-proof lock.
Move the child protection unit forward.
Steam iron "spits out" water!
Set the thermostat to level ...
Rinse or decalcify the boiler of the steam cleaner.
Steam level VapoHydro selected
Turn the selector switch to the steam level selection range.
After breaks during ironing, water drops will come out of the steam pressure iron.
During longer breaks from ironing, the steam in the steam line can condense.
Direct the first burst of steam at a separate piece of cloth.
High water output
Steam boiler is decalcified
Descale the steam boiler.
Spare parts
Use only original KÄRCHER spare parts. You will find a list of spare parts at the end of these operating instructions.
Technical specifications
Subject to technical modifications!
| Electrical connection | |
| Voltage | 220-240 V |
| 1~50 Hz | |
| Protection class | IPX4 |
| Protective class | I |
| Performance data | |
| Heating output | 1800 W |
| Heating output steam iron | 700 W |
| Operating pressure max. | 0,4 MPa |
| Heating time | 4 Minutes |
| Steam volume | |
| – Continuous steaming | 50 g/min |
| – Steam push max. | 130 g/min |
| – Vapohydro | 230 g/min |
| Filling quantity | |
| Water reservoir | 1,5 l |
| Boiler capacity | 0,5 l |
| Dimensions | |
| Weight (without accessories) | 6,0 kg |
| Length | 439 mm |
| Width | 301 mm |
| Height | 304 mm |
Special accessories
Order number
Microfibre cloth set, bath 2.863-171
2 soft floor cloths made of plush velour,
1 abrasive cover for the hand nozzle,
1 polishing cloth for the mirrors and fixtures
Microfibre cloth set, kitchen 2.863-172
2 soft floor cloths made of plush velour,
1 soft cover made of plush velour, 1 cloth for the streak-free cleaning of stainless steel surfaces
Microfibre cloth set, soft floor 2.863-173
2 soft floor cloths made of velvet velour
Microfibre cloth set, soft cover2.863-174
2 soft covers made of plush velour
Terry-cloth rags 6.369-357
5 floor cloths made of cotton
Terry-cloth covers 6.370-990
5 covers made of cotton
Round brush kit 2.863-058
4 round brushes for the detail nozzle
Round brush kit with brass bristles 2.863-061
Removal of especially stubborn dirt ideal for insensitive surfaces.
Power nozzle with extension 2.884-282 for point stream nozzle
To remove tough contamination, especially in areas that are difficult to reach.
Round brush with scraper 2.863-140
Round brush with two rows of heat-resistant bristles and a scraper. Not suitable for sensitive surfaces.
Turbo steam brush 2.863-159
For cleaning tasks where you would usually have to scrub.
Textile care nozzle 4.130-390
For freshening up clothes and textiles.
Decalcifying sticks (9 pieces) 6.295-206
Active ironing board AB 1000 2.884-933
For excellent ironing results with substantial time-saving (only for 230V
Steam pressure iron 2.863-209
Non-stick ironing sole 2.860-142
Suitable for ironing sensitive materials.
Contenu
www.kaercher.com/REACH
Fornitura
www.kaercher.com/REACH
Leveringsomvang
Geen water in de watertank.
Watertank vullen tot marking "MAX".
www.kaercher.com/REACH
www.kaercher.com/REACH
www.kaercher.com/REACH
Leveringsomfang
www.kaercher.com/REACH
Leveringsomfang
Leveringsomfang for apparatet er vist pa emballasjen. Kontroller at innholdet i pakken er fullstendig, när du pakker ut.
Stille inn dampmengde
www.kaercher.com/REACH
www.kaercher.com/REACH
Toimitus
www.kaercher.com/REACH
Sigmaεuασία
To npapadotEO uAIKO tns ouakeuuns ateikovicietai OTn ouakeuaoia. KatrTnv aTOauokueuaia 1evTe To TEPiExOevo TNS wTPOCS TIV TAnpots Ta.
Eav Aeitouv EApntmuata n Exov Tpokknei Znuiic Kata t n eTapopap, Tnapaaloue EvnuepwoTE TOV TPOUNeUTn OaC.
Eyyunon
www.kaercher.com/REACH
Teslimat kapsami
KpaTkoe pyKOBOdCTBO RU 8
3Kcnpnyatau RU 8
IcnoIb3ObaHne pInHaJIeXHoCTei RU 10
YxOnd TeXnHueckoe o6cnnyKuBaHneRU 13
PomouB B cIyuae HenoIaOK RU 14
TexHnueckne daHhble RU 15
CneuaaIbHbIe npHaadJeXHoCTn RU 16
06zne yka3aHna
Ybaxaembl nokynateJIb!

Ipeep nepbbm npimHeHnem Ba- wero npibopa npountaTe 3Tu
OpnHnHaIbHyU INCTpyKcIu NO 3KcnPyTaUIN, nocLe 3TOrO DeIeCTByIe COOTBeTCTBeHNO I COxpaHnte ee IJa DaIbHeIWeero POJIb3OBaHIn IJIN dIyUoIero BlaJeIbua.
IcnoJIb3OBaHHe NO Ha3HaueHnIO
IcnoIb3yIe np6op dIry OunCTKn napom ncknOHTeBHO B DOMaWHem XO3YCTBE. Pnp6op npEHa3NaueH dIpy npOBedeHn OoNCTKn npam. OUnCTky MOxHNO pPOBODntb C npIMHeHnEM NOxOJaux NpINAJIeKHOCTei, ONiCAHHbIX BY pKOBODCTBe NO 3KcPiyyatau. MoUoJne cpeDCTBa He TpeSyIOTc. CJeNyET CO6IIOaTb INHCTpyKuIN No TEXnke 6e3OnacHOCTn
CnmbolbIBypyKOBoDCTBeNo 3KcnpnyatauIN
Onachocmb
ДяненocpeodcmeHNO ap03aue ouanachocmu, komopar npueodum K mxeJIbIM yeeyam unu K cmepu.
△PnpdynpexkdeHue
ДлгьозможнουnomehцuaanbHo onachou cumyaauu,komopая можем npueecmuК mяжелыm ybebyam unu K cmepmu.
BhumaHue!
Дягоьзможнουnomeнцuaльноona choу cmyauu,komopая можемпраeeMuКлakummpaemam unu noBney MamepuanbHbuyuep6.
CnmbolbHa annpaTe


BHHMAHHe-O3NaKoMbTeCb CnH-CTpykUneI NO 3KcPnyatauIN!

Nap
BHIMAHHE - onachoctb oxora
3aunTa Okpykaioe cpebl

Ynakoboyhie MaTePnAnbI npriOnHbI dIaBtopuHoiO6pa60TKI. Po3TOMy He BblBaIte yNakOBky BMeCTe C DomaUHMAm, a CdaIte ee B OOnH nIpyKTOB npITOpuHOrO cbIpBJ.

CtapbIe npi6opbl coepkataeHHbIe nepepaBaTaIBaEMbIe MaTePnAbJI, noJIeKaUHe nepeDaue B nyHKtBI npiEmKn
BtopnHoro cbypI. IIO3tOMy yTuIN3npuYte CTapbIe np6Opbl uepe3 COOTBeTCTByOJIne CNTEmbl pInEMKn OTXoDOb.
KpaTkoe pyKOBoIDCTBO
I3o6paXeHnI np6Opa cM. Ha cTp. 2
1 3anolnntb pe3epByap IJIy BOdbI DO OTMeTKN MAX".
2 BcTaBbTe 1IeKepe IpaI npaB pa3beM np60pa.
3 BCTaBbTe wTeNCeNbHyO BnIky B 3JIeKTpopo3eTky.
Bknouhty yctpoiCTBO NOBepHyB nepeKliou-ateJIb.
4 Ihdukamop "Haapee"Muzaem 3eHebIM uBemom.
IpoJxdaTb, noka INdikKatOp "Harpe" He NaHcHT NoCTOARHNO CBETnTbC3eJIeHbIM.
5 Поdkлоченп ринадпхноTeКnapOBMy nICTOJIeTy.
Ppmbop dny nctkn npom rtoB K pa6oTe.
3Kcnpnyatauia
1306paXeHnA cm. Ha pa3BOpoTe!

YcTaHOBka npHaJnEJXHOCTei
PncyHok 2
OTkpblbKpbliuKy pa3bema npnbopa.
→ HaedexHo yctaHOBITE wTekep noaun npap B pa3bem npnbopa. Pn 3OM wTekep dJIKeH 3aФNKcPOBaTbC So eJIyKOM.
Дя omcoedunehua: Haxatb Ha Kpbilky pa3bema npnbopa n3Bneby stekep noda-ynapa n3 pa3bema npnbopa.
PmcyHOK A-B
CoeHINb Heo6xOIMbIe npHaJNeKHOCTn (CM. pa3dJe "UcnoJIb3OBAHHe npHaJNLeKHOCTe") C napOBbIM NICTOJETOM.ДЯ 3TOrO OTkpblTb KpaI npHaJNDexKHOCTn HaDeTb Ha napOBoi NICTOJIET NHaDBHHTb Ha napOBoi NICTOJET HAcTObKO, YTO6bl KHOIIKa pa36LokpOBKn NapOBOrO NICTOJETAaΦHKCIPOBaIacb.
PncyHOK C
IpiH Heo6xOJIMOCt NcNoJb3OBaTb ydNHNHTeNbHbIe Tpy6Kn. JnA 3TOrO CoeINHtB c napOBbIM nICToIe Ody INn DBe ydNHNHeTbHbIX Tpy6Kn.HaDbNHyTb Heo6xOJmMbIe npHaJnEJXHOCTNa CBO6OJhBk PkaYdNHNHTeNbHO Tpy6Kn.
Chrtne npnaIaeXhoTei
Onachocmb
Ipu cHmU pUnaDnExKHoMe u3 npubopa MoXem bIteMekamb aOpraa eOda! He cHmuAme hacaKu eo epem nodaunapa - yap03a oBeapuaHua!
YcTaHOBuTb 3aUHTy OT DeTeB HnHexHee noIIOxKeHne (pbIur nOaun npa 3a6NoKnpoBaH).
PucyHOK D
Дя сятунипнадпекстовимite на Кногу pa3блкюрвки OTдени Te DeТаи Друг OT друга.
HanoJnHtB 6ak DnA BODbl
Pe3epByap dIЯ BODbl MOxET 6bITb HAnOJIHeH BJIIO6OI MOMENT.
BhumaHue!
He ucnnoIb3yUme cKoHoeHCupObaHHyO eOdy u3 cyuunbHOu MaunBu!
He do6aBraIme moUcIe cpeOcMea unu dpyue do6aBku (HanpUmep, apomamuzamopbI)!
He ucnolb3oamb yucmyu ducmunnpoeaHny body! Maks. 50% ducmunnpoeaHou eobu 50% eodponpoedho bI.
He ucnonb3o8amb cobpaHHy odoeeyo body!
PncyHok 1
Pe3epByap dIy BOdb MoXHO ChrTb IJIH HAnOJIHHeH NII HAnOJIHEn HeNOCpeDCTBeHHo Ha npi6ope.
ChrTb pe3epByap nla BOdbI
→ BbITaHTb pe3epByap IJIa BOIb BEpTnKaJIb-HO BBepX.
→ 3anonHnTb pe3epByap nIa BOdbI nOd BOIO-npOBOhBIM KpaHOM BepTKaJIbHO Do OT-MetKN ,MAX".
YctaHOBnTb pe3epByap IJIa BOIbI IN npndaBaTb BnI3 Do UeNJa.
HenocpeDCTBHeHNo Ha npn6ope
→Bovu n3 emKocTn 3aInTb B 3aInBHyo BOpoHky.3aOnJInTb Do OTMeTKN ,MAX"
BkJIIOUeHne npIbopa
YctaHOBInTe npinbOp Ha TBepyu NOBepXHOCTb.
→ BCTaBbTe WtTencBHyO BnIky 3JIeKtpoNITaHnB 3JIeKtpopo3eTky.
IpebeCTn peeknOuataJIb n3 noJoxeHnB BblKn B noJoxeHne, COOTBeTCTByIOUeeB bIbpaHHOMy dnaana3OHy paCXoJa npa.IHOukamop "Haapee"Muaaem 3eJeHbIMueemom.
Yka3aHue: Ecnu 0obI e npoBOM komne 3anuMo cnUkOM mano unu OHa omycmeyem, mo cpaBomaem oOraHO Hacoc u 6ydem Ha- hemamb body u3 pe3epayapa dny 0obI e npoBou komei. Ipocecc hanoHHeHua MoKem dIumbcn Heckonbko MuHym.
IIOJOKaTb, noka He 3aROpNTc INHdNkaTOp "HarpeB".
Прибор дя чистки napom ratob ka paBOTe.
Yka3aHue: YcmpoUcMoKKaJbIe 60 cekyHd Ha HnnpodOnjumEnbHoe Epmr NpekpbIeaem Klanan. 3mo npedomepaam 3aknHueaHue Klanana. Ppu 3mOM MxHO yCblwamb muxu u eunok. Bbyck npa eudy 3mo2o He 6ydem Hapyuen.
Долив Вобь
Прин HexBaTke BOdBi B pe3epByape ДЯь BOdBi Mnraet INDnKaTOp "HeIOCTaTOK BOdBi", a TAK-Ke 3ByuHT 3ByKOBoCnHaJ.
Yka3aHue:Bce2da, npu HeodomamoyHom KOJnuuecmbe 60dbI e napoBOM KOMne, Hacoc aomamuuuecku nodaem bdy c 60raHoO pe3epayapa e napoBou komen. Ppu nycmOp pe3epayape dny 60dbI, 60raHOu hacoc 60bwe He moKem numamb napoBou komen u npoucxo-dum 6nokupoBka nodaqu napa.
→ 3anonHnTb pe3epByap IJIa BOIbI DO OTMeTKN MAX".
Yka3aHue:Yepe3 He6oIbUwe npomexymku epemHu 60raHou Hacoc nbimaemc ChOea 3a-nonHmb napoBou komeJ. Ecnu 3anOnHeue npoWNo ycneuho, mo nodauna npa 8o3obHoJIyemc, KpaChbUnhDukamop aachem.
Perynnpobka kOJIuYeCTBa npa
YnpabneHne KOJNUeCTBOM napa OcyueCTBnEETcC NOMOuHo NepeKNIouaTeJIa. B 3aBNCMOCTN OT BnDA u INTEHCNBHOCTN 3aRpa3HeHnaDaHHbI nepeKNIouaTeJIb NO3BOJraT BbIpaTb HAcTpoKy B DnApa3OHe OT MHN. (He3HaUNTeJIbHbIe 3aRpa3HeHn) DO MaKC. KOJNUeCTBa napa (3HaUNTeJIbHbIe 3aRpa3HeHn).
Дясильныхзаггзн,在 pacnoLoXeHHbIX TpyHDoOCTyHbIX MeCtax, cneIyET BblOpTaB Φункцию Vapohydro.
YctaHObKa KOJImYeCTBa npa
→Рыаг подачни рара установту на тpeбу-емое колиессю пара.
→ Haxmite Ha pbyar noaun npa, npn 3tom Chauajna HanpaBna NapoBOI nCTOnet Ha TkaHb, noka nap He 6ydt BbIXOAnTb paBHOmePHo.
BbiknloueHne np6opa
IpeBecTN BbIKIouateTb B noIOJKeHne "BbIKN" n BbIKIouHTb yCTpoIcTB0.
→ BbIaunTe wTenCeIbHyIO BnIky n3 po3eTKN.
Haxmnte Ha KpbIshky pa3bema npi6opa n BItaunTe wTekep noaun npa n3 pa3bema npi6opa.
→ YdaniNbOCTaTOK BObln3 pe3epByapa nIBA BObl.
XpaenHe np6bopa
PucyHok F-G
→ΠΟmeCTnTb KpyrIpyo UeTKy BOTcEK dIpy npHaDJIeXHOCTeI.
→ HanaTe b pyuHyo hacaKy Ha yDnHInTeIb-HyToTpy6Ky.
→ BCTaBtB ydHnHInTeIbHyIO TpyKb V depKaTeIb DnI npHaadJIeXHoCTeI.
BCTaBnTbΦOpCyHkyTOueHNoCTpyuBycTPOiCTBOДЯxpaHeHnaIpaHdJIeKHOCTeY.
BCTaBtBΦopCyHkyIЯ nOJa BnapKOBoHoe KpeJIeHne.
→ O6MoTaTb ⅢJAnHr IOnaUn npa BOKpy yIINHHTeJIbHbIX Tpy60k NOMeCTnTB npoBOI NICTOJeT BΦOpCyHky DЯ NOJa.
→ CeTeBoI shHyp yIoxNtB MecTe Ipn Xpa-HeHnI ceTeBOrO shHypa.
IcnoJb3ObaHne npHaJdlexHoCTeI
BaxHbIe yka3aHnI NO nCNoJIb3OBAHnIO
OuHCTnTb NOBepxHOCTb nona
Ipepe npimeneHem yctpoCTBa IyIcSTkn napom pekomehnyetcnoMeCTn INI pOpblIeocntb noJI. TaKIM o6pa3OM MOXHO OCBOoDITb nO T rpa3n/paccbinaHHoro Mycopa nepepe npoeDeHem BnaXHoYbOpKn.
OcbexeHne TeKCTnJIbHbIX n3dJIiN
Ipeep npoBeHnem Opb6OTKn C nOMOsbOpnp6opap dnyuCTKn napom cneJeTy BcERda npOBepaYb yToHnBOcTb TeKCTnIbHbIX n3deJIn K Bo3DeNCTBnIO npa. PpexKe BCero, cJeDyET o6pa6OtaTb napom n3dEJIne, 3aTEM npocUHTb erO n, hakoHeu, npOBepNTb yCTOnuBOcTb Okpackn n HaJIynch DeOpMaunn.
YnCTka NOBepxHOCTeC NOKpbITnMaMn IaKnpoBaHHbIX NOBepxHOCTei
Причстке Лakнрованьх NOBepxHOCTeилп NOBepxHOCTeC NOKpbItNeM, HApPIMeP, KuxOH- Ho Me6eNи Me6eNиДЯ KBaPTnpy, DBepei, napKeta, Bock, Me6eNbHa NOINtypa, NCKycCTBeHHoe NOKpbITne Ил.Kpacka MOryT pactBOpNTbCSIИНHa HIXMOrYT Bo3HNKHyTb ПЯTHAДЯ NOPBoDEHnY ChcTKn CneJyET CJIeRka OTnapTb CaIΦeTKU 3aTeM nPoTepeTb eI nepeuCJIeHHbIe NOBepxHOCTN.
BHUMAHue!
He napraeJme nap ha npukneeHbte KpomKu, nockoIbky obknaOka moXem omKneumcbc. He uCnoIb3yume npubop dnyucmku depeEaHHbix unu napKeMHbIX nnon8 be3 nokpbimura.
UcTka CTeKna
Прии ИЗКИX BHeUHIX TempepaTpax,пржд ВсERO,ЗИМОД,проггейТЕ OKOHoe CTeKNo.Бla- 罗Даря 3OTOMY Bbl CMOKeTe ЛERKO OБра6OtaTb napOM BCIO NOBepxHOCTb CTeKNa.TaKIM OБраз- 3OM yДаCTСЯ n3бЖATb HApPЯЖЕНО NOBepxHOCTN.KOTOPOE MOJET ПИВecTи K BOYO CTeKNa. 3aTEM NOBepxHOCTb OKHa Heo6XODIMO ONU- CTnTb CпрIMeHEnEM рУнOH Форсуни n can- ФeTkn.ДЯ уДаленя BODы сеДуET ИСПЛьЗВaTB hacaIky ДЯ мОй OkOH Или hab- Cyxo пОТeРeТ b NOBepxHOCTb.
BhumaHue!
Iap He Hanpaenlom Ha yynnomHenHbte yacmku 03ne okOHHO paMbI dI npedompaueHuaee noepexkdeHua.
Papoboi nictolet
3aKpeNTb TkaHb IJI MaMbITbI NOHa HAnoNBHOΦOpcyHke.
1 CnoXntb TkaHb IJMaITbIa IOna BIOJIb INomecNTHa Hee fOpcyHKy IJNA.
2 OTKpbItb 3axnMbl.
3 TomecHTb KOHcI TkaHN BOTBepCTnA.
4 3aKpbItb3axnMbl.
BhumaHue!
Cneodmb, ymo bI naBbI He nonanu mexdy 3axumamU.
BbICOKN BbIXOa BOdbI
B napobom kOTne o6pa3oBaJnacb haknbl
→ YdaJIInTe HauKInb n3 napOBoro KOTna.
3anaChbIe yactn
IcnoIb3yIte TOnbKO opunHaJIbHbIe 3aNaChbIe
uctn fnpMbI KARCHER. Onncahne 3aNaChbIX
chaTei HaxoITcB B KOHc DaHHoN INHCTpyKcNIN
no 3KcPnyatauN.
TexHHueckne daHHbIe
www.kaercher.com/REACH
Szallitasi tétel
www.kaercher.com/REACH
Obsah dodávky
www.kaercher.com/REACH
Dobavni obseg
Obseg dobave Vase naprave je prikazan na embalaži. Pri jemanju stroja iz embalaže preverite popolnost vsebine.
Pri manjkajocem priboru ali transportnih skodah obvestite VaSega prodajalca.
Garancija
www.kaercher.com/REACH
Zakres dostawy
Mult stimate client,

www.kaercher.com/REACH
Articolele livrate
Reimprospāṭaṭarea textilelor
www.kaercher.com/REACH
Rozsaḥdodávky
www.kaercher.com/REACH
Opseg isporuke
Poseban pribor SR 15
Opste napomene
Poštovani kuple

www.kaercher.com/REACH
Obim isporuke
Sadržaj isporuke Vašeg uredaja je prikazan na ambalaži. Pre vadenja uredaja iz ambalaže proverite da li je sadržaj potpun.
Ako pribor nedostaje ili je došlo do ošćenja prilikom transporte, molimo da o tome obavestite svog prodavca.
Garancija
U svakoj zemlji vaze garantni uslovi koje je izdala naša nadležna distributivna organizacija. Eventualne smetnje na urežaju za vreme trajanja garancije uklanjamo besplatno, ukoliko je uzrok greška u materijalu ili proizvodnji. U slučaju koji podleže garanciji obratite se sa potvrdom o kupovini Vašem prodavcu ili najblžoj ovlašćenoj servisnoj službi.
(Adresu cete naci na poledini)
Sigurnosne napomene
Opasnost
Upozorenje
Zabranjen je rad u područjima ugroženim eksplozijom.
■ Prilikom upotrebe uredaja u opasnim područima treba pošovati odgovarajuće sigurnosne propise.
Uredaj nemojte koristiti u bazenima u kojima ima vode.
Ure'daj se ne sme koristiti za ciscenje elektrichnih aparata i uredaja kao sto sunpr. klasicne i mikrotalasne pecnice, aspiratori, televizori, lampe, fenovi za kosu, elektriche grejalice i slichno.
Pre upotrebe proverite da li su urejai pribor u ispravnom stanju. Ako stanje nije besprekorno, ne sme se upotreblavati. Posebno proverite priključni strujni kabl, zatvarač za izvojenje radova održavanja i parno crevo.
Ostecen strujni priključni kabl odmah dajte na zamenu ovlasćenoj servisnoj službi/elektricaru.
Ostećeno parno crevo odomah zamenite. Sme se upotrebljavati samo parno crevo kojeg je preporucio proizvodač (kataloški broj vidi u spisku rezervnih delova).
Mrežni utikač in uticnicu nikada ne dodirujte vlažnim rukama.
Parom ne Čistite predmete koji sadrze materije štetne po zdravlje (npr. azbest).
Mlaz pare na maloj udaljenosti nikadane dodirujte rukom niti usmeravajte prema ljudima iliŽivotinja (opasnost od opekotina).
Zatvarač za izvodjenje radova odžavanja se tokom rada ne sme otvarati.
Urejad sme da se priključuje samo na elektrichi priključak kojeg je izveo elektroinstalater u skladu sa IEC 60364.
Urejad priključujte samo na izmeničnu struju. Napon se mora podudarati sa tipskom pločicom urežaja.
U vraznim prostorijama, kao sto je npr.
kapatilo, uredj priključujte na uticnice
sa predispojenom FI zaštitnom
sklopkom.
Neodgovarajuči produktovi mogu biti opasni. Upotreblavajte samo produktovi kablove zašićene od prskanja vode sa prečnikom od najmanje 3x1 mm².
- Spoj strujnog i produktu nag kabla ne sme ležati u vodi.
Kod zamene spojeva na strujnom priključnom ili produktom kablu mora se obezbediti zašita od prskanja i mehanička Čvrstina.
Korisnik mora uredj upotrebljavati u skladu sa njegovom namenom. Mora voditi raçauna o lokalmim uslovima i kod rada sa uredjem paziti na lijude u okolini.
Deca starija od 8 godina i osobe sa smanjenim fiziickim, senzornim ili mentalnim mogucnostima opazanja ili s ograničenim iskustvom i znanjem smeju koristiti ovaj uredaj samo uz nadzor ili akou su upućene u to kako sigurno koristiti uredaj kao i u eventualne povezane opasnosti. Deca ne smeju da se igraju s uredajem. Deca ne smeju obavljati poslove oderžavanja i cisćenja uredaja bez nadzora.
Ure'daj za vreme rada nikada ne ostavlajte bez nadzora.
- Opreznost pri ciścenju popločanih zidova sa utčnicama.
Oprez
Pazite da se mrežni ili produzni vod ne unisti ili osteti gazenjem, gnečenjem, vučenjem ili slicnim. Mrežni vod zašitite od vruçine, ulja i oštrih rubova.
Urezeroarza vodu nikada ne sipajterastvarae,tecnosti sa rastvaraicima ilinerazredene kiseline (npr. sredstva za ciiscenje,benzin,razredivace i aceton),jer mogu nagristi materijaleupotrebljene u uredaju.
Tokom cisćenja se urećaj ne sme nositi.
Uredaj mora imati stabilnu podlogu.
Ure'daj koristite i skladišite samu skladu sa opisom odnosno slikom!
Tokom rada ne pritežite polugu za paru.
Ure'daj za'sitite od kise. Nikada ga ne cuvajte na otvorenom.
Sigurnosni elementi
Oprez
Sigurnosni elementi sluze za zašitu korisnika i ne smeju se ni menjati niti zaobilaziti.
Regulator pritiska
Regulator pritiska tokom rada održava što je moguce ujednačeniji pritisak u kotlu. Grejanje se isključuje kod postignutog maksimalnog radnog pritiska u kotlu i ponovo uključuje pri padu pritiska u kotlu usled trošenja pare.
Termostat kotla
www.kaercher.com/REACH
OsemHaIOcTaBkaTa
OeMbT Ha doctabka Ha ypea e n3o6pa3eH ha onakOBkata. Pn pa3oNAKObaHe npOBepete daJIIN cbIbpxKaHneTo e nbIHO.
PnI INNCBaUIN pInHaJNExHOCTHn IIN npIN TpaHCnOpTn UeTe NMOJ yBeDoMeTe Baunr TbproBeu.
Fapanm
BbB Bcya CtpaHa BaKaT rapaHNoHHte ycNoBnI, Np6NkYBaHN OT OToP3nPaHATAOT HacDnCTpn6yTopcKaФnpMa.EBeHTyAnH NOBpeHn Ha Ba7nU yPeJ 1e OTCTpaHm B pAmKnTe Ha rapaHNoHHc cPOK 6e3nLaTHO, Ako ce Kacae 3a DeFekr T MaTePnAIne Inn Pnpi PpOn3BOdCTBO. B rapaHNoHEn CJIyauC e ObpHete KbM DnCTpn6yTopa IINn Hau-6Jln3KnO TOpN3nPAh cepBn3, KaTO ppeCTaBnTE KacoBata 6eJexka. (Adpecnte ige HameRnTe Ha 3aHaTa CTpaHnIa)
Yka3aHna 3a 6e30nacHOCT
Onachocm
3a6pahehaepabomamaebe3puoeonacHu nomeueHua.
Ipu pa6oma c ypeda e onacHu 30Hu da ce cna3eam cbombemHume Mepku 3a 6e3o-nachocm.
Ypeda da He ce u3noJ3ea e baceuHu, Kou-mo cBbpxkam oda.
Upeda He mpr6ea da ce u3nol3ea 3a noucmeBaHe Ha ekempoypeu, Hnnp. fypHu, KxHHeCKu abcopbamopu, MukpoBbHObu neku, meeeus30pu, lampu, cewoapu, ekempueecku omnonenu u m.H.
Ipedu u3non3eahe yepda u npuHaednHexHo cmmute da ce npoeepm 3a cbombem-cmeauo Ha u3uckeaHura ma cbcmohue. Ako ypedbm He e o omluHc bcmohue, u3non3eaHemo My e 3abpaHeno. Mon npoeepeme cneuaalno 3axpaHeauaKa6en, peeu3uoHHom Kaane U napocmpuyHna Mapky.
Ipoepedemmpexobzaxpaheaukaebmpra6ea He3abaeHo da ce 3aemeu om oopu3upan cepeu3/cneuaunucm-eenekpmo-mexnuk.
Ipoepedenna napocmpyeh Mapkyu mpr6ea da ce cmenu He3a6abHo. I03eOneHO e camo u3non3eaHemo Ha npenopbuaH om npou3oDumela napocmpyeh Mapkyu (Euk Homepa 3a npobku E cnucka Ha pe3epeHume yacmu).
Hukoa a He dokoceaume konhma ma u cena c enakhu pue.
Ia He ce obnueam c npapa npedmu, Koumo cbbpxam onachu 3a 3dpae mo euecmea (Hap. a36ecm).
I Iapnama cmpy He mpr6ea da ce dokocea c pka om 6nu3ko pa3cm0nue uu da ce Hac0yea KbM Xopa u KueomHu (cbueecmy- 8a onachocm om u3aapnHe).
Ipo epeme Ha paBoma He 6uea da ce omepa pypeu3uOHmo kanaue.
△PnpdynpexdeHue
Ypeobm MoKe da ce eknOuea cAmo KbM eNeKmpuuecku KOHmakm, u3nJIHeH om eNeKmpomexHuk cbanacHo IEC 60364.
Cepb3eaume ypeda camo KbM npomeHnue mok. HanpexeHuemo mp6ea da cbom- eemcmea ha uumupaHomo ebpyx ma6en-kama na ypeda HanpexeHue.
Bbe eIaxHu nomeuHua, Hap. baH, EknUcBaIme ypeDa e KOhMaKmu c npeda-pumEnHO eKnUcHa epomueoElaOea 3a-uma.
Henodxodzume yobjnxumenu Moam da ca onachu. IV3noI3aUme eduncmeHo BO- doycmoUye yobjnxumenu Ka6e n c HappeHc ceueHue MUHUMM 3x1 MM2.
Bp3kama Mexoyuencena u yobjkmenu Hua Ka6en He 6ba a nonada e8e oda.
Ipu noDMnHa Ha cBeDuHeHua HaMpexoeua unu yDbJxumEnHua KaBen mpr6ea da ce zapahmupa 3aUuma om eOdu Hn npcku u MexaHnHa 3dpaBuHa.
Iompe6umenmmp6ba da u3non3ea ypeda cnped npednucnnaema.Tou mpa6ba da ce cbo6pa38a c daedeocmume Ha Mrcmo u da EHumaba npu pa6oma cypeda daNu HAOKOJIO Hama xopa.
To3u ypeMoKe da ce u3non3ea om deua had 8 aoduH u om luca c oepaHueHu fu3uYeCKU, ceh3OpHu Uu yMcMeHcu Cnoc6bHocMu unu c lunca Ha onum u no3HaHua, ako me bdam pod had3op unu ako ca noIyHUncmpkyuu 3a 6e3onacHomo u3-1036aHe ha ypeDa u c6bp3aHume c Hezo onachocMu. Deama He buea da uepaemCypeda. POnucmeHemo u nodpBxKama om cmpaHa na nompeBumEnr He buea da ce u3bpuBaam om deua be3 Had3op.
Ipo epeme Ha paBoma ypeobm da He ce oc-ma8e63 had3op.
Bhumane npu noucmahe ha cmehu cnloku c KOhmaqumu.
BhumaHue
Bhumabaume kaebm ha ypeda unu ybJxumenma de he ce noepedam unu ckbcam nopadu hacmbnahe, npebbahe, onbahe unu dpyeo. Pase me kaeba om monluna, maca u ocmpu p6oee.
Hukoza He HanuBaIme 6bE oOdHua pe3ep-Boap pa3mBOpumenu, cboBpkaa pu pa3meOpumenu meHocmu unu He pa3peDeHu KucEnu (HaP. noUcMau npenapaMu, 6eH3un, pa3peDumenu 3a 6ou u aue-moH),Mb'u kAmo me ue pa3aDam U3non3eaHume e ypeDa Mamepuanu.
Ipo epeme Ha noucmeahe ypeb m He 6uaa da ce Hocu.
Ypebymmpa6aa da ce nocmaea ebycmaunha ochoa.
Pabomeme unu cxbxpanhaeaume ypeda camo e cbomeemcmbue c onucahuemo pecn. u3obpaxehuemo!
Ipu pa6oma He 3aknueme Iocma 3a npapa.
Ia3eme ypeo om dbk. He 20 cbxpanhaume Ha omkpmo.
PpeDn3n npncno6neHna
BhumaHue
IpeNa3Hume npucnocobneu r cyjxam 3a 3a- uuma na nompebumeJ u He mpr6ba da ce npomehm unu 3aoBuKanm.
PerynaTop 3a HanaRaHTo
По Врeme Ha paBoTa peryIaTOpbT 3a HaJIraHTo NOIDbPjxMa KACImaJIHO NocToHNO HaJIraHTo B KOTeJa. Пп дOCTnIraHe HaMaKcIMaJIHOTo paObTHO HaJIraHBe B KOteJaHaIrpBaHTo CnIPA, a Пп NOHIXaBaHe Ha HaJIraHTo B KOteJa BCNeIcTbHe Ha OTdJIeHTo Ha napaTa OTHOBO CE BKIIIOUvBa.
KoteJIeH TepMoCTaT
Korato B cnuyaHa rpeuKa B KOTeHa HMa BO Da, TemnepaTypaTa B Hero Ce Nobuaba. KoTeHNrT TepMOCTa N3KJIouBa HarpaBaHTo. HopmaHata ekCIIoataaue e Bb3MOxHa OTHO BO, Korato CE HanbIHN KOTEJbT.
Предан сегмocтат
Ako perynatopbHT Ha nlaheTo N KOTenHnT TepMoCTaT OTkaxe B cnyaHa rpeuKa N ype- dt Iperpee, toraba npdePna3HnT TepMoCTaN 3KnIOUba ypeda.3a BpbIaaneB u3XoJHO nOLOKHe Hn ppePna3HnT TepMoCTaTe O6bPheTe KbM OTOpNIpaHnca cepBn3 Ha KARCHER.
Pebu3noHkoNaue
Pebu3noHOTOKaaneecbueBpeMeHNOBeHTn3aCBpxHaJraHe.To 3aTbaR KOTela Cpeuy NOBuaBaHe Ha napOBTO HauJraHe. Ako peryIaTopbT 3a HauRaHeTo Ce NobpeDu n napOBTO HauJaHe B KOTela Ce NokaU, BeHTnJIbT 3a CBpxHaJraHeCe OTbApu Napata Ce OTBeXda HABh Npe3 peBu3NoHOTOKaane. PpeDu Da PycHeTe OTHOYoypeA, ce oBpHeTe KbM OTOpN3npaH cepBn3 Ha KARCHER.
Onicahne Ha ypeda
B Ta3n INHCTpyKU7a 3a yNtpe6a e OINcAHO mAKCmAMnHOTo ObOpyDbaHe. B O6ema Ha DoCTabKa mHa pa3NIKKI B 3aBNCMocT OT MOneJa (BVXkTe ONaKOBkata).
→ BuxTe CXeMITE Ha pa3IbHa-tata cTpaHnca!

A1 KoHTaKT Ha ypeDa c Kanak
A2 BoDEN pe3epBoap
A3 IpbXka 3a HocHe 3a BOHnpe3epBoap
A4 PteKbCbaa 3a n36op
A5 O6cnykBaio none
a IHHdkaknna- P03nna OFF
b IHHdkauzna-HeoctnHaBoDa(YEPBEHA)
c IHHdkaunia - 3aqrpaBahe (3EJIeHA)
d MIn. napHa cTeenH
e 30ha 3a n3bop Ha cnilata Ha npapata
f MaKc.napHa cTeenH
g IapHa cTepeHФyHKUa Vapohydro
A6 KaNaue 3a YeKMeDxKeTo 3a npHaNDJeXHoCTN
A7 PEBUNHOHNO Kanaue
A8 IpbXka 3a HocHe
A9Дрьжka 3a пинанлжнocHTN
A10 CbXpaHene Ha npHaJdIeXHoCTnTe
A11 MЯсто 3a CBхpaHene Ha 3axpaHbauия Ka6eJ
A12 Hocay 3a napknaphe 3a noobata duo3a
A13 Mpekobz 3axpaBaU Ka6eN c uencen
A14 Xoobu konlena (2 bpoa)
A15 Bodeza polka
B1 NapoctpyuH nictolet
B2 JIoCT3a npapa
B3 BytoTH 3a De6Iokpapane
B4 3aunta 3a deca
B5 Napoctpyeh Mapkyu
B6 NapoctpyuH uencen
C1 CtrpyHaIIO3a
C2 Kpbrgna Yetka
D1 PbUHa IIO3a
D2 XabnneHO nokpmbano
E1 YdIbnKabauu Tpb6n (2 6pOa)
E2 ByToH 3a De6JIOKIPAne
F1 PiooBaIou3a
F2 3aIbprkaa cko6a
F3 Iodoba Kbpna
Onzna
H1 IOtna c npHo hajrahe
H2 PpeKbcba 3a npapa (doJy)
H3 INdkaun-3aqrbahe (OPAHXEBA)
H4Пркьсваузапа (rope)
H5 BnoknpaHe Ha npeKcbVau 3a npapa
H6 Tepmoperynatop
H7 Napoctpyuen zencen
KpaTko yntbTaHe
→ Bux n3o6paXeHnTa Ha cTpaHnca 2
1 BoDnHrT pe3eRBoaP da ce HapbIHN IO mapKnipOBkata ,MAX".
2 IapoctpyHnIa TcEkep da ce nOCTaBn B KOHTaKTa Ha ypeJa.
3 BkHouTe UencenBa EneKtpnueckata mpeka. BkHouTe ypeDa KaTo 3aBbPnte npek BaHa 3a n36op.
4 NóuKauaJr -3aepBaHemO Mu2a 3eNeHO. ⅢyakaJIte, DOKATO INDnkaCnIra Ta Ha 3arpa BaHETO CBETHE NOCTOARHO 3eNEHO.
5 HakpaHnka da ce BkIouN KbM napoctpyHnra nncToJET. NapoctpyHnraT ypeE e roTOB 3a pa60Ta.
Ecknloatauia
→ BuxTe cXeMITE Ha pa3IbHa-tata cTpaHnca!

MOnTupaHHe Ha npHaadnExhOcHTte
→ Φιγρα 2
OTbopeTe kanaka Ha KOthakTa Ha ypeda.
→ PapoctpyHnT ⅢeNcE CE nOCTaB B KOHTaHa ypeJa. PnTOBa Tp8Ba Da ce YyeΦKcnpaHeTo Ha igekepa.
3a da pa3deIume: HatucheTe kanaka Ha KOHTaKaTa Ha ypeDa HanoJy n3BaJeTe npocTpynHnIeNcEJI OT KOHTaKaTa.
→ Φιγρα A - B
CbpxTe HeoXoDMnTe npHaJnxHcTn (BxK rnaBa,In3non3BaHe Ha npHaJnxHcHocHTne") c napoctpyHnra NCTOJeT. 3a ceJIta OTBOpEnHn Kpa Hn pHaJdxNEXHocTTa Ce nOCTaB Bpxy NapoctpyHnra NCTOJeT nCe n36ytBa,doKaTO ce qKcnpa De6IOknpaunr8yToH na napoctpyHnra NCTOJeT.
→ Φιγρα
При HeobxOДМОCT n3nOЛЗВаITE ydIJIxITeHHTe Tpb6n.3a ceNTa CbByPxKeTe cnapoCtpyHnIЯ nIcTOnet eHnATA pecn.ДБeTe ydIJIxITeHn Tpb6n. HeobxOДIMaTa npuHaIaJIeXHOCT Da ce NoCTaBn Ha CbObOHNKpaH Na ydIJIxITeHnTa Tpb6a.
DemOHTHIPAhe Ha npHaJdJIeXHOCTNTE
Onachocm
Ipu demOnmupahe Ha npuHaedxHocmume Moxe da u3meue zoepa eoda! Hukoa an de-Mohmupaume npuHaedxHocmume no speme Ha u3lUnaHe Ha npa - cbueemyea onac-Hocm om u3apAne!
NocTaBete 3aunItaTa 3a Deua HADOny (NocT 3a npapa 6noknPanH).
→ Φιγρα D
3a da demoHTupate npHnAdneXHOCTnte, HATNCHE Te De6IOKnpaunna ByTOH n OTdeJIeTe YacNTte EaHa OT dpyra.
Perylnipane KoJnueCTBOTO Ha npapa
N3nyckaHOTOKoIynchcTBo npa ce peryInpa C nOMOHTaHaPpeKcbCbAua3aN36Op.B 3aBNCIMOCTOTCTeNEHTAINCINATAHa3AmbpcBaHe TO3n PpeKcbCBauch3aN36OpDABA Bb3MOxHocTn 3a HAcTPOJKAOTMn.HapHa CTeNEH(NEKIn 3aMbpcBaHn)DOMaK.CnapHa CTeNEH(rpy6n 3aMbpcBaHn).
3a cnHn 3ambpcBaHn, KOtO ce HAMnPaT B Tpydno DocbHn OblaCTn, Ce n3NoI3Ba yHK- Cnra Ta Vapohydro.
PerylnpaHe Na KoJInuYeCTBTo npa
→ Hacpoite npekbcaa 3a n36op Ha Heo6-XoDMOTO KOJIueCTBO npap.
→ 3aDééçTbaïte JIOCTa 3a napata, pπu TOBa bPBO HACOUBaTe NapocTpynHЯ NICTO-JeT KbM HЯKaBA KbPna, DOKaTO napata 3a-NoUHe Da I3JIIN3a paBHOmePHo.
I3kIIOUeTe ypeDa
→ 3aBbPTeTe npeKbCBAuHa nO3nIg OFF, 3a Da n3KJIouHITe ypeDa.
→ИЗваде Teцениета OT KOнтakт.
→ HatncheTe kanaka Ha KOHTaHa ypeda HADONY n3BaJeTe napoctpyHnIa Ieencen OT KOHTaTa.
I3neIte BOdaTa oT BOdHnpe3epBoap.
CbxpaheneHa ypeda
Φnrgypa F-G
→ Pπi6epeTe KpbIgnta YcETKa B YcKMeJxKeTo 3a npHnAdneXHOCTN.
IocTaBeTe pBHaTAtIIO3a Ha yIbJIKTeJIHata Tpb6a.
→IocTaBeTe yIbJIxNtEJIHnTE Tpb6B N Hoca-HTe 3a npHaJdJeXHoCTn.
ПоставетToTchOBaTa CTpyHaДIO3aВМСТOTO3aCbXpaHHeHaПинадnexKHOCTI-Te.
3aKaYeTe IIO3aTa 3a NoD B Hocaya 3a napKIPAHe.
→ 3aBnTe Mapkya 3a npa OKoIOn yDbJnx-TeHNHTe Tpb6n I NOCTaBeTe NICTOJIeta 3a npa B DIO3aTa 3a nOi.
→Пиберетe3axpaHbaUЯKa6eJВМЯCTOTO 3a cxbxaHeneHa 3axpaHbaUЯ Ka6eJ.
I3NoJ3BaHe Ha OMHaIeXHocHTne
BaxHn yka3aHnna 3a ynOtpe6a
TouncBaHe Ha NIOOBN IOBbpxHOCTN
IpenopbUba ce npden n3noJ3BaHe Ha na-pocTpyHnHa ypeD noDbT Da ce n3MeTe nInn3CMyue. Taka oSe npden BnaJxHOTo NOuchTaHe nOdbT ce OCBO6oxJaBA OT MPbCOTra/CBO6oJHnuaCTNI.
OcbexabaHe Ha TEKCTnJ
IpeDn TpeTupaHc napoctpyHnry ypeD moJr BnHaRn Da npOBepBaTe yCTOnuBOCCTTa Ha TeKCTnIHnTe TBKaHN Ha cKpnto MeCTo: PbPBO 6- JeNte C npA, CneT TOBa OCTaBeTe Da n3CbxHe H NaKpa npOBepeTe 3a n3MeHEnHa uCBeta N fOpMaT.
IOnuCTBaHe Ha NOBbPxHOCTn C NOKpHTne JINJnak
Pn nouchTbaHe Ha naKnpaHn nn pOKpnTc nIaCTmaca NOBbpxHOCTn, KaTO HApN. KxHHeCKn n CtaHn Me6eHn, Bpatn, napKeT, MOrat da ce OTdEeT BOCbK, Me6eHn NaK, N3KcYCTBeHn NOKpTNr nn 60n n Da Ce O6pa3yBat neHa. Pn nouchTbaHeTo Ha Te3n NOBbPxHOCTn HanoTe eJHa KbPa c npa n N3b6pWeTe NOBbpxHOCTnte C HeJ.
BhumaHue
He hacouaume napama kvm 3anenenu pboe,mbu kamo nenunomo moke da ce omdeenu. He u3noJ3aume ypeda 3a noucmeane Ha He 3aneyamahu dbpeenu nodoee unnapkem.
NouchBaHe Ha CTbKIO
При НИСКИ ВьнIHIN TemMNEPAPrN 3aTOHnIeTcBKnIaTHa npO3OpUInTe,пpei BCuHKO ppe3 3IMaTа, KaTo JIeKo HApbckAte Cnapa cIaIaTa CTbKnIeHa NOBbpxHOCT. ПОТЗИ ИЧИС CE 6I8IbAT HAppeXeHnI Ha NOBbpxHOCTTA, KOnTO MORATДЯ DOBEdaTdo ChyIbAnHe Ha CTbKnIoTO. HAcpa IONUCTe TEOBbPxHOCTTa Ha npO3OpEua CpbYHaTdIO3a I NOKpIBaNoTO.3a IN3TeJIrHe Na BODaTaN3NON3BaIte PrnCTabKa 3a npO3OpUINII IN3bBpWeTe NOBbpxHOCTTa Do cyXO.
BhumaHue
He hacoueume napama KbM 3aneyamahume Mecma Ha pamkama Ha npo3opeua, 3a da He au noepedume.
NapoctpyuennncToJet
Bne moxe da n3noI3BaTe napoctpyHnna TOnet n 6e3 npuHaJnxKHOCTn, Hapmep:
3aOTCTpaHЯBaHe Ha MUPn3Mn IbHKn OTOkayehn dpexn, KaTo rHanpckate c npa ot pa3ctoHne TO 10-20 cm.
3a nouchtahe Ha npax nO zBET. PnTOBa cna3BaIte pa3ctoHne ot 20-40 cm.
3a Bnaxho NOHCtBaHe Ha npax, KaTo HanoIte KbPnata 3a Kpatko C npapa I cneI TOba I36bIpSeTe MebeJIte C Heia.
CtpynHaI03a
KoJIkOTO NO-6n3O e TЯ da 3aMbpcHOTOMrCTO, TOKNOBa NO-BnCOKe eΦeKTbT OT NOnCTBAHeTO, TbKnato TemnepaTypa nnapata ca Hau-BnCOKnHa n3XoJa Ha IIO3aTa. Oc6eHo npakTuH O3a NocntBaHe Ha TpydNo DOctbNn Mecta, Fyn, apMaTyPi, KaHaII, yMnBaHnIu, ToaletHn, UOpn IIPi padNaTopu. Ppei NoocntBaHe C npapa CnHNTE BapOBNKOBu OTnarAHm MOrTa da 6bDat HanpBcKaHn c OueT, OCTabete da noDeiCTBa 5 MInHyT, CneD TOBa oBeIte C npapa.
Kpbrrna yetka
Kpbflata YeTka MoKe da ce MOHTnpa KaTo Do- nblHeHne KbM TOUKObATA cTpynHa DIO3a. Taka 6IarOdapeHne Ha YeTKnTe MORat IecHO da 6b-dat OTCTpAHeHne N yOpNTte 3AmbpCBAHn.
BhumaHue
He e noxdoxoeta 3a noucmbane Ha yecmbu-menHu noBbpxHocmu.
→ Φιγρα Ε
3aKpeneTe Kpbflata Yetka KbM TOKOBaTaCTpyHnA H03a.
PbUHaIIO3a
MonnoctabeteHa pbyhataDIO3a xaBInheHOTO nokpmbalIO.Oc6eHO NOxOJa 3a MaJIK MneuC ce NObPxHocTn, DyUka6HHn OrNeJaIa.
IpoobaIIO3a
IopxOJa7a 3a Mneu Ce CTeHNn IpoOBn IokpTna, Hnp. KameHHN IPOOBe, PIOChN IIOOBe ot PVC.CnHNo 3aMbpcEnHe Tne NOBbpxHOCTNa o6pa6oTBaIte 6abHo, 3a da Bb3eJcTBA napaTa no-dblro BpeMe.
Yka3aHue: Ocmambuzme om npenapamu 3a noucmbahe unu noobpbxauemuyncuu, koumo oue ce hAmupam Ha noucmbaHama noebpxhocm, npu noucmbaHe ce napa moa ma do doedam do HepabHomepHu meema, Koumo u3ye38am npu MHO2OKpAMHo npunoXeHue.
→ Φιγρα Ε
3aKpeTe nOobTa Kbpna Ha dI03aTa 3a npd.
1 HaBHeTe IIOBaTa KbPna No DbJnxHa nOCTaBeTe IIO3aTa 3a NOd BbPxY He.
2 OTbOpeTe 3aIbPkaauTe ckoBn.
3 IocTabete KpaunataHa KbPnTaB OTOBOpnte.
4 3aTbOpTe 3aIbPkaUnte cKobu.
BhumaHue
He cnaaume npbcmume cu mekdy ckobume.
Pomou npn HEn3npaBHOCTN
Mhoro yeCTO npuHnHTe 3a nobpeDa ca elementapHn n C NOMoTHa h CneDnHTe yka3aHnMoKte camn Da Tn OTcTaPAnHe. AKe He cTe cnIpyHn nn NobpeHnTe He ca ONncAHn Tyk, ObbpHeTe CE KbM OTOpN3npAHHa cepBn3.
Onachocm
ObcnykxeaHemO da ce u3eBpwea camo npu u3- aeden uencenU oxlaede napocmpyen ypeD. PemohmHume deHocmu no ypeDa da ce u3- eBpweam eduncmbeHo om omopuzupan cep6u3.
YdbjkaBaHe Ha BpeMeTo 3a 3arpaBaHe
IapoctpyHnT KOTeJI CbDbpXa BapOBuK
→Поунствае на варовикаварoctpyHня KOTeJ.
JinncaHa napa
Индикая - HeIoCTnHa BODa MInra chepBHeNo n ce cyBa CnHaNen ToH.
Jinca Ha BOda BbB BoDnna pe3epBoap.
→ BoDnHrT pe3ePBoaP da ce HAnbIHN DoMapKnIpOBkata ,MAX".
Индана HeIoCTnHa BOda CBetn YerbeHo.
JInca Ha BOa B NapoctpyHnna KOTeI. 3aun-tata ot nperepaBe Ha nomnPata e n3KnUoyea.
→ N3knIOUe Te ypea.
→ BoDnHrT pe3ePBoaP da ce HAnbIHN DoMapKnIpOBkata ,MAX".
→ Da ce BkHIOUy ypea.
BoHnT pe3epBoap He e nocTaBeH npaBnHOn IJI NMA KOTJIeH KAMbK.
→ CbaIeTe BoHnIpe3epBoap I ro n3pIaKHe-Te.
→ПoctabeTe BOdHnpe3epBoap nHaTncHeTe HADony,doKaTO ceФнксupa.
JIoCTa 3a napata He MoXe Da Ce BKIOUCh
JIoCTbT 3a npapa e ocInypen c 6IoknpoBkata / 3aunItata ot Deua.
→ NocTaBete 3aunntata 3a Deua Hnpei.
NapnataIOTnI,IIIOe"BODa!
→Плставете Терморулатoga на стени…
→ N3nnakHeTe KOteJa Ha napocTpynHnY ypeI nnTo NOuchTeOT BapOBnK.
Парна стени Варону Habстpoера
3aBbptete npeKcbcaya 3a n36op Ha 30Ha- Ta 3a n36op Ha cnilata Ha npapa.
Cnei nay3n B rnaheHTo OT IOTyTa c napHo NaJraHe N3n3aT KaKN BODa.
Pnno-npOdbJnxIteHn nay3n B rIaJeHeTo npapa MoKe da KOHdeH3npa B napOpboBa.
→Пьрваразарнаструяда се насочи Кьм OTделна Кьрna.
Bucoko n3nyckaHe Ha Boda
NapoctpyHnT KOTeJ CbDbpxa BapOBVK
→Поочствае на варовикав napoctrpyня KOTeJ.
Pe3epBnH qactn
I3no3BaIte cmo opunHaJIHn pe3epBn YacTn Ha KARCHER. CncbK ha pe3epBnTe Yactn Ⅲe HamePte B KpaJHa HactOaIOTo YnbTbaHe 3a pa60Ta.
TexHnueckn daHHN
| Ельектуеско зхраунванe | |
| Нарөжениe | 220-240 V |
| 1~50 Hz | |
| Гразус Ha 3aшита | IPX4 |
| Клас 3aшита | I |
| Данни 3a мошноctta | |
| Hаревателna мошноct | 1800 W |
| Hаревателna мошноct Ютя | 700 W |
| РавOTи HaJaRGaHe Мaks. | 0,4 MPa |
| Вөрeme 3a падраянe | 4 минутɪ |
| КолочestBO пара | |
| - ПюдьлжITEлно рUCKa- He Ha пара | 50 г/мен |
| - EdнokраТNo ИЗпUGСКА- Ha пара мaks. | 130 г/мен |
| - Vapohydro | 230 г/мен |
| КолочestBO Ha пБлнene | |
| Вовен peэзрвоар | 1,5 п |
| Парен кOTeI | 0,5 п |
| Размери | |
| Тerglio (бeз п riиадлж- ности) | 6,0 кг |
| ДылЖинa | 439 мM |
| Широчиа | 301 мM |
| Височиа | 304 мM |
3ana3ame cu npaeomo Ha mexHuyecku u3-MeHeHura!
EJemeHTN OT CNEUaJIHaTa OKOMJIeKTOBka
Homep 3a nopbyk
KoMnJIeKT KbPmN OT MmKpOΦn6bP 3a 2.863-171 6aHa
2 Mekn Kbpnn 3a noD ot pIIOweH Benvp, 1 a6pa3NBNOOKPbVAno 3a pbuHaTa IIO3a, 1 noJInpa7a Kbpna 3a orNeIana n apMaTpyn
KoMnIeK KbPm OT MmKpOΦn6bP 3a 2.863-172 KxHJ
2 Mekn Kbpni 3a noD OT pIIOweH Belyp,1 MeKo nOkpmbano ot pIOweH Belyp,1 Kbpna 3a noNCTBaHe6e3 cneHa Na nobbpxHOCTn OT bIaropodHa CTomHa
KoMnIeKT KbprN O T MmKpOΦn6bP, 2.863-173 MeKa KbPna 3a PoD
2 Mekn Kbpnn 3a npoT pIIOwe BeIyp
KoMnJIeKT KbprN O T MmKpOΦn6bP, 2.863-174 MeKO NOKPnBaNo
2 Mekn nokpmba oT nnloweh Belyp
Xabnnn Kbpnn 6.369-357 5Kbpnn 3a npd ot namyk
Xablineni pokpmbana 6.370-990
5 NOKPINA O T namyk
KoMnJIeKT KpbTmI YeTkn 2.863-058
4 KpbTnI YeTKa TOUKObA tCTpyHa DIO3a
KOMPNEKT KpbTJN YETKN C MecnHROBa 2.863-061 YeTHHa
3aOTCTpaHraBaHeHaynOpNTn3ambpcBaHna.ⅣeAnHn 3a He YyBCTBntEnHn NOBbpxHOCTn.
CnloBaIIO3a c yIbIJIKeHne 3a TOnKo-2.884-282 Ba CtpyHa IIO3a
3a OTCpaHbAbe Ha yOpNTn 3aMbpcBaHnHa TpyDNO DOCTbHn MeCTa.
KpbTna Yetka c 7a6bp 2.863-140
Kpbrra YeTka C DaBa Peda TepMoYCTOuNBA YeTnHa n eINH Wabp. He e noxodra 3a yBCTBNTENn NOBbpxHOCTn.
Парна Турбо дюза 2.863-159
3a BINOBE NOUICTBaHe, Pn KOnTo e HnyKHO da Ce TbPka
TeKCTnHa DIO3a 4.130-390 3a OcBexKaBaHe Ha ObIeKIo N TeKCTnI.
CTKOBe 3a npemaxBaHe Ha Bapo-6.295-206
Bnka (9бр氧)
AknBHa Maca 3a rJaedeHe AB 1000 2.884-993
3a OTNIUHN peZyIITaTI npn IraJeH n 3HaUHTeJIHa NIOHOOMNHa HbpeMe (cAmO 3a 230 V)
IOTnC npHo hajrahe 2.863-209
He3aIenBa7a OCHOBa Ha IOTnra 2.860-142
IopxOja3a rnaDeHe Ha YyBCTBnHm MaepnaJI.
Sisukord
Uldmärkusi ET 5
Ohutusalased markused ET 6
Seadme osad ET 7
Luhijuhend ET 7
Kaitamine ET 8
www.kaercher.com/REACH
Tarnekomplekt
Lisavarustuse monteerimine
Joonis 2
Avage seadme pistikupesa kate.
www.kaercher.com/REACH
Piegades komplekts
www.kaercher.com/REACH
Komplektacija
BVKOpNCTaHn. Bynb NaCKa, He BVKnJaIte NaKyBaJIbHI MaTePiaII pa3OM i3 DomaUHIM CMITTM, BiDaaIte Ix nIy NOBTOpHOrO BVKOpNCTaHH.

Ctapi npncTrooi MICTaHIMatepiAIN, 10 MOkyTb BKNOPNCTOByBaTnCRA
nOBtropHo.Tomy,6yNbIaNcKa,yTnIi3yIteCTapi npictpo'3a DOnOMOrO CneuaIbHnxCnCTem 360py cmTTA.
Ihctpykuii i3 3acTocyBaHHK KOMnHOHeTtB (REACH)
AkyaJIbHi BiIOMOcTI npo KOMnoHEnTn HabeJeHi Ha Be6-By3JI 3a aIpecoIO:
www.kaercher.com/REACH
KomnJIeKToNocTaaHHe
KOMIIeKtaIg npIcTpoIO 3a3haYeHa Ha ynaKoBci. Ipr po3nAkyBaHHi npIcTpoIO nepeBipITN KOMIIeKtaIIO.
Y pa3i Hectaui DoDAtKOBOrO oBlaDHaHnA a6o yUkOJKeHb, OTPMAmHx NiI qac TpaHCnpTByBaHHra, CIIIO NobiOMTe pO ue B ToproBeIbHy orpAHizauHIO, Jka npOdaIa anapat.
Tapahtia
YKOxHi KpaIHi DIIOTb yMOBn rapaHTi,HaadaHOI BiIDNoBIDHOO φIpMOH-npOaBcEM. HenoJaKn Bpo60ti npCtPOu MN ycBaEMo 6e3nPaTHo npTfROM TepmiHy dI rapaHTi, JAKUO BOHN BnKlnKaHI 6paKOM MaTePiaNy Ch NOMInkAmn BnROToBJIeHHy. Y BnPaJky CUnHocTi rapaHTi 3BePTiBcRdo npOaBcUy H NaB5nKChn ABTOPOBAHNI CepBICN UeHTP 3 DOkymHeTaNBM NiD TBePdXKeHHa NOKyni. (AApceN DnB. Ha 3bOpoti)
Ppabuna 6e3nekn
ObepexHo!
Poboma y u6byxohene3neuHX yMo8ax He do360jraembcra.
Ipu eukopucmaHHi npucmpoIO He6e3neuHux 3ohax cnid dompumyeamucra iDnoiHux npabun mexhiku 6e3neku.
Eknyamaia npcmpo 6baceHi, oMicmmb yody, zaboponeha.
Ppucpii He moXHa eukopucmooyamu dna yuueHnHa eNeKmpuHux npucmpoie, HappuKnad, dyxOboK, eumxHux Haicie, MikpoxaIbOeux neeu, meeneizopie, lamn, fehie, enekmuHux obiaipieaie moio.
Ipepe ukeopumnHm neeepipme cnpaBicmb npucmpo ma akcecayie. Kkuo 0bnaDHaHHa 3haxodumbcy Hbe3doaHOMy cmaHi, uOzo He moKHa eukopcmoeyamu.Ocbnue pemelho neeepime Kaebb MepexHoO KuEenneHn, npobky dny mexHicno o6cnyaOyeaHnn ma wana h nodayi napu.
UwKodJeu KaBJIb MepexKHOZoXuBHeHnIOeUHeN6yMu HeaAHO3aMIHeHu yNoBHOaxKeHOcIyKbOIOceEicHO2o 0bCny2o8yBaHH/φaxieemEneKmpukOM.
Uwkodxehu wlahe nodaqui napu nidnaea Heauii 3amhi. Do3eOnjembcya BukopucmaHHn minbku wlahanie nodaqui napu, pekomehdoaHux eupo6hukom (Homep dny 3amOBeHnHry duue. y cnuCKy 3anachux yacmuH).
Hikonu He mopkaumecb Mepexhoo omekepy ma pozemku oonozmu pykamu.
He yucmum npoio npedmemu, uO micmmb peoounu, ukiolui 3doop08 (Hapuknad, a36ecm).
UydoHomy pa3i He mopkaumeccmpymehn npu pyko1o 3bni3koieidcmahima He hanaeJume iHa nioe ma meapun (He6e3neka onikie napoi).
Ipo6ka dny mexnHoo o6cnyooyeAHnHe Ma e iDkpuamucn iD yac eknnyamaui.
△Ponepeoehn
Ppucpiu moxe bymu nio'edhaui nuue do eekmpuuhoMepexi,uo noeunha 6ymu 8cmaHOeHa eekmpomohmepom 3eiho 3 IEC 60364.
Ppucmpiu cni dEmukamu nuue do 3minnoo cmpymy. Happya noeunna eidnoeidamu Eka3aHUM Ha fipmoei mabnuci npucmpoko daHUM uodo hapyuu.
U cupux npumiueneHHx, HanpuKnaad, y eahnux kimhamax, ekniouaume npucmpiun bku e po3emku i3 nepeekuoyehum 3anobixkHM bumukayem muny FI.
HeiOnoiHn odoxyeaui moymb 6ymu Hebe3neHmu. BukOpucmoeyme mIbku 6pu3ko3axuuehu nOdoxyeau i3 nepemuHOM npoody He mehu 3× 1MM^2
3'ehaHnHa MepeXhoBunku ma nodo8xvaHa He noBuHHe Jexamu y eodi.
Ipu 3amini cnojnyhux enemehmie Ha Ka6eJI mepexHo2o JkuElenHnA 60 nooexyuea i noBuHnHa 3abe3neyeamuc 6pu3ko3axuueHHra mExaHnHa MiunHcMb.
Kopucmyaay noeunen eukopucmoeyamu npucmpiu y iidnoeiodocmi do incmpykuii. Bin noeunen epaxooyamu ymou Micueoymi ma 3eepmamu ybaay Ha mpemix oic ndac pobomu 3 npucmpoeM.
Leu npucmpiu do3e0nembc8 bukopucmoeyamu dimm cmapwe 8 pokie i ocobam 3 obmxeHUMU pfizHUMU, cehcoHUMa abo po3yMoBUM moKlueoocmmu, a makoX ocobam, uO He MaIomb nompio dociDy u 3HaHb, Kaoo eoHu 3haxodumymcbr iD haJiaDom oc6u, uO biIOBidae 3aix 6e3neky, i ompumaomb eid II nonepedhi po3'rcHeHBeIDcHcNo 6e3neHoi ekCnPyamaui npucmpo. He do3e0nJaMe dimam apamu 3 npucmpoem. He do3e0nJaMe dimm npoeodum ouuueHHma o6cnlyoeyeanner npucmpo6e3 HaJraDy.
He MoXHa 3aIuWam npucmpiu 6e3 Haanay niO yac pobomu.
ObepejNcMb npu yuueHnI kaxeJbHex cmIn 3 eJeKmpuHuMu po3emKaMu.
yeaza!
Cniokyuime 3a mum, uo6 mepexhi kaeni abo noodoxyaui He moxha byno nowkodmu hacmynuueu ha hux, y pezylbami nepeunuHaHn, po3ipbaHnA bO noodiHo0 ywkodxehn. 3axuzaume mepexeHu KaebIb iD kapu, ma na ma oocpux noeepxohb.
U ykodhomy pa3i He eukopucmo8yume po3uHHKU, pioHn, 0o Micmpb03uHHku a6o Hepo3eedeH KcIomu (Haip., MuHi 3acobu, 6eh3un, po3piXyeay fap6 ma auemoh) i He 3aIueaMe ix y bak dny bOdu, ockInbku BOHu aapecuEHO ennuabom Ha Mamepianu, eukopucmaH e npucmpoi.
Ipehenoc npucmpoio ndac po6im 3 ouuueHHa3aboponeHui.
IpucmpiHHeo6xio hO po3miamaHa miCuHIOcHOeI.
Ekcnnyamyeamu ma 36epiaamu npucmpiu 3aioHo do onucy ma manIOHKie!
Iid yac pobomu He do3oJIembc8 6nokyeaHna baxen npaui napu.
3axuzaume npucpii eio douy. He 3epeiaeme nioikpumum He6om.
3axnchi npictpoi
yeaza!
3axuchi npucmpoi cnayyomb dny 3axucmy Kopucmyaue. Budo3miHa 3axuchux npucmpoi yu HexmybaHn Hmu He donyckaembcr.
Perynatop Tncky
PergyIaTOp TnCKy UTPmUe MaKcImaJIbHO noCTiHn TnCK y pe3epByapi nID qac po6oTu npnaJy. HarpiBaHHaBmKkaetbcra pni DOcRHeHHi MaKcImaJIbHO rO 3NaueHHaPo6oHOro TnCKy U pe3epByapi, i npn paInHnTiNCKy B pe3epByapi BHaCNIIOK BiD60py napn HarpBaHHa 3HOby BMKaETbcra.
Tepmoctat KOTna
JaKIO npn BUNHKHeHHI HeCnpaBHOCTi y KOTJI He Mae BOIN, TEMpepaTya B HbOMy NiDnUeTbcra. TepMOCTaKOTJIA BUMNKaE HarpiB. 3BvauHn peXm po6ToN 6Ye 3HOBy DOCTUYHNI, KOJI KOTeI 6Ye 3AnOBHeHNI.
3axnchm TepmoCTaT
JaKuo peryIaTOP TnCKy Ta TePmoCTa KOTna BnIIOB i3 NaI npu BNHNKHeHHi HecnpaBHOcTi I npIcTpiI nepeRpIBcRA, TO npIcTpiB BMNkaEbCra 3a DonOMoTO 3axNCHO TepMOCTaTy. 3BepHITcRa Do BiDdiny 3a6e3neueHHa 3axNCHMn TepMOCTaTamB BiIDNOBiHni CnyKoi o6cLyroByBaHHa KJIeHTIB KOMNaHII "KARCHER".
Побka Ддя Тхичноро 06слуroВаHHЯ
Пюбka дяTekhiHOrO obcnyroBvBaHnЯ e OdnohyacHO i peyuKuHnM KnaIaNOM.BoHa 3amNkae KOTeI BID BUNHkaOHyo TnCKy napi. RaKuo peryIaTOp TnCKy noUKOJKeHO i TnCK napi B KOTJI 3pocTaE,TOpeyuKuHn KnaIaN HBiDUnHReTbCra i npa BNXOOnTb Ha3OBHi uepe3 npo6Ky dЯTekhiHOrO obcnyroBvBaHnR.. 3BepHIbca,6yd NaCa,do BiDiiny BiDNoBleHnRApoBTo n pnpCTpOu B BiDNoBIDHni Cnyk6i obcnyroBvBaHnKJIeHTIB KOMNaHII KARCHER.
Onnc npncptpo
YcIbOMy noc6Hnky 3 ekCnIpyataiHaBeDeHO ONIC pNCTpOo 3 MaKcMmaJIbHOO KOMIIeKtaicio. KomIIeKtaia BIDpi3HЯETbcra 3aJIeXHO BiMDOEJI (INB. yNaKyBaHHa).
306paXeHHaNb.Ha po3Bopoti!

A1 Ⅲepebna po3etka npnlaу 3 kpiukoio
A2 Pe3epByap IЯ BODI
A3 Pучka peЗервару Дя Вори
A4 Iepemnkau
A5 PanaheIb ynpablinnHa
a IHydkaTOp "POnOxKeHnB BmIK"
b IHHkaTOp "HeCTaHa BOAn" (UEPBOHnI)
c IndikaTop "Harpib" (3EJIeHnI)
d Mih. KjIbKiCTb napi
e Bn6ip diaana3ohy BNtpaTn napi
f MaKc. KInbKiCTb napi
g KInbKiCTb napu,dyHkciJa Vapohydro
A6 3amok BiDcki DnA akcecyapiB
A7 Ipo6ka dIy texHiuHoro o6cIyroBvBaHHa
A8 Puyka
A9 TpImaMdIpnHAnExKHoCTeI
A10 36epirarHn akcecyapib
A11 Micue dny 3epeiranHn MepeXhoro shhya
A12 NapkyBaJIbHe KpiIJIeHnHa cAcdKn dIpy nIiJIoRn
A13 MepekeBn Ka6eIb 3i StTeNceIbHOU BUNKOHO
A14 Pobouki koneca (2 wTuKn)
A15 CnpmaMOyBaJIbHn BaJIeIb
B1 Iapobni nictolet
B2 Baxilb noaipn
B3 Khonka po36bokybaHHa
B4 3axntBid ditei
B5 Napobni wlaHr
B6 Ⅲtekep noaui napu
C1 ConJIO ToUKOBOrO CTpyMeHr
C2 Kpyrna uitka
D1 Puyne conno
D2 POKPIT3 eNoHky
E1 IopobKyBaJIbHI Tpy6Kn (2 WtYkn)
E2 KhoNka po36nokyBaHnHa
F1 Conno nla nony
F2 3atncka
F3 TAnuipka dnn MmTTn iDnorn
Onzia
H1 Пpacka Дяпасувань napою niД TИСКOM
H2 Bvmkau napi (hixhi)
H3 IndikaTop "Harpib" (IOMAPAHUHEBNI)
H4 Bvmka Napu (Bepxhi)
H5 BIoKyBaHHBIMNKaHa napi
H6 Peryntop temepatyp
H7 Ⅲtekep noaui napu
Kopotka i nctpykciia
→ДиВ.МалнOKнHa CTOpiHci 2
1 HanoBHTn pe3epByap IJRA BOnI Do BiIMtKIN "MAX".
2 BctabTe wTekep noaui napi B wTeencbHy po3eTkpy npnady.
3 BCTaBTe 5TEnCeIbHy BnIky. YbIMKHyTI npIcTpi, oBepyBUn nepemikau.
4 IHOukamop "Haapie" 6JIUMae 3eJIeHUM. 3aueKaTn, pOKI INdIkaTOp "HarpiB" He 3acBITNTICr 3eJIeHIM.
5Пибднaite hacaikydo napoboro nictoleta. IapOBn cenapatop roTOBn do pObToN.
EkCNNyatauia
3o6paXeHHaNb.Ha po3Bopoi!

3MOHTyBaTHO6JIaHaHHA
→ ManHOnK 2
BidkpnTn kpiuKy po3'emy npicrpoio.
1WTekep napu miuho 3aKpiInTu B WTeencJIbHiPiO3eTuI pncTpoU 3 KoxyXOM. PnI cBOMy wTekep nobHeH 3aΦiKcYBaTncI i3 KnaCauHHM. I'eiD'edHaHn: PnPITNCHTN KpiuKy po3'Emy npncTpoU DOHN3y Ta BVITrHyTu WTekep napu i3 po3'My pncTpoU.
→ MaJIIOHOK A-B
3'εdHaTn Heo6xIe Hne npiJaDIA (INB. po3di "3actocyBaHna PnpaIaDra") 3 napOBm nictOJeTOM.ДЯцBo rO HaJrHITb BiKpItn KpaPnpHaJIeXHcOHTi Ha napOBn niCTOlet Ta hAcYbTe Ha napOBn niCTOlet HactIbKn, Iozb KhoNka po36LokyBaHnna napOBOr NiCTOJeTa 3aΦikCyBaIacr.
→ ManIOHOK C
Pn Heo6xHocti BVKOpncTobuYte
noDBKByBaIbHi Tpy6Kn. IyI cyI0rO
3'EnHaIe 3 napOBm nICToTeOM OHy a60
DbI noDBKByBaIbHi Tpy6Kn. HAcynbTe
Heo6xHNI pInHaIeXHcOCTi Ha BInbHi Kpa
noDBKByBaIbHOITpy6Kn.
Bic'ednHaHnaHacaDOK
06epexHo!
Ppu 3nrammi npunanexKnocme i3 npucmpoMoKe eumikamu zapraya oda! He 3nima'imeHacadku nid qac nodaqui napu - noap03aObeapoubaHH!
→ BctaHOBnT 3axnCT Bd iTei B HIXHne nOJKeHHa (BaJIb noaui napu 3a6JokOBaHni).
→ ManIOHOK D
He bukopucmoeyamu 3ibpany doouoy body!
MaHIOHOK
Дянановспь ВОJO MOЖHA 3ЯТи pe3eрБуар Дяв ВODи abOн HANOBHOBaTN IOrO BODO6e3nocepeHbOHa npICCTpoI.
3HHTpe3epByapy DnBODN
→ПOTЯгнтуп резервар дя Вори Вerteknakьноуropy.
→ 3anOBHnTn pe3epByap nIa BOINBepTKaJIbHO nI D BOOpPObiDnM KpaHOMdoNo3HaKn MAX".
BctaHOBuTn pe3epByap IЯ BOnI Ta HATNCHTN Ha HbOro Do fikcauii.
Be3nocepedHbO Ha npnlaDi
→ HaniTn BOy 3 EMHOCTi y 3aJIbHy Bnpy. 3anOBHnTn Do nO3HaKn ,MAX".
YbimKHeHH npnlaNy
→Пипад HeобхiДно Встановлобати на МИЧУ OCHOBY.
→ BcTaBTe MepeXnHm uTKepey uTencelbHy po3eTKy npuNaIy.
→Пелевсанпелевсанчд паловень ВIMIK в паловеня, BiДповинь ВбразуюдIANa3OHy BИТРаTN napIN Inoukamop "Haapis" 6IUMaE 3eJIeHUM.
Bkaieka: JaKo y npoOmy KomIi biCymna eOda a6o II HeBaAamO, Emukaembcra 6oRaHui Hacoc ma nodae body 3 pepepyapn oEoU do npoOzo Komla. Ppouec 3anOBHeHHa EoHO MoKe mpuEamu deKiNbKa XbUnH.
3auekaTn, nOKn He 3acBITncs iHdkaTOp "HarpiB".
Iapobn cenapaTop roTobn do pO60tn.
Bka3ieKa: PpuCpmi KoxH6 6eKyHd Ha kuiCb yac 3akpuBa cKnAnaH. Lc 3anobiae 3aKluuObaHHc KnAnaHa. Ppu cIbOMy moKJIueo noymu mxe KnaaHn. Bunyck npay epe3 ue He 6yde npuyeno.
DOnnBaHnBBoN
Пи HeCTaHi BOiN B pe3epByapi ДЯ BOI6JIIMaE YeRBoHIn iHdIkAToP "HeDOniK BOiN", a TAKOX 3ByuHTb 3BykOBn CnHaJ.
Bka3ieKa:KoKHO2O pa3y, KOJIu 8 npoOBMy KOMNI 3aIuaaembca 3aHaMo Mana KINbKicMb eOdu, 8o8nH u Hacoc aemomamuHNo nOdae oody 3 pe3epeayd7ne Odu 8 npoBu komen. RaKIO pe3epeayd7ne Odu npoxHi, mo 8o8nH u Hacoc He MoXe HanoBHObamu npoBu komen i Eio6ip napu bKnOkymbcra.
→ HanoBnHTn pe3epeByap IЯ BODI BOIMIITKIN "MAX".
Bka3ieka:Yepe3 Heeenuki npomixkU yacy 608nH Hacoc HamaaaembCra Hano8Humu npo8u komen. JaKo npouec Hano8HenH npoxodumy ycniHoo, opa3yJ eIDHOeMbc8 eId6ip napu i CheepuH iHoukamop eUMukaemcbc.
PeryIIOBaHHKJIbKOcTi napi
UnpaBnHnKiIbKicTn npa 3diJcHIOETbc3a
aONOMOIO nepEMNKaua.3aJeXHO bID BIRJMy
Ta iHTeHCNBHOCTi 3abpydHeHHN CEINepEMNKa
DO3BOJLAE BVbpatn HanaSTyBaHHB DianA30Hi
BID MIN. (He3NaHHi 3abpydHeHH) DO mAcC.
KiIbKOCTi napn (3NaHHi 3abpydHeHH).
IJa cInbHnx 3abpydHeHb, po3aUoBaHHx y
BaxkOIOCTyUNHX McZyx, cIid BVbpatn
fynKciu Vapohydro.
YctaHObKa kInbKoCTi napi
BctaHOBNITn nepemnkaH na Heo6xIDHy kiIbKicTb napy.
→ Hatncitb Ha Baxkilb noaChi napi, npu cboMY cnoatky Haprabnoun napOBn nicToJeT ha TkaHHy, nokn npa He 6ynde BHXOINTPiBHOMipHO.
BmKHeHH npuJaDy
Baxilb noaqui nap He moxha HaTCHyTN
Baxinb noaqui napi 3aifikcobahn 6IokyBaHHM / 3axnCTOM BiD BKJIoueHHA DiTbMn.
→ IpepeBecTn B napeHc nopoXeHHra 3axnCT BiD diTei.
a gj 2 all Jkwhu cdo clal j
wjoo
alwogcllljEj
jgl jol jj J
Jawal al
.aa
jLJIcIeJcIeJIaJIeJIeJIeJIeJIeJIeJIeJIeJIeJIeJIeJIeJIeJIeJIeJIeJIeJIeJIeJIeJIeJIeJIeJIeJIeJIeJIeJIeJIeJIeJIeJIeJIeJIeJIeJIeJIeJIeJIeJIeJIeJIeJIeJIeJIeJIeJIeJIeJIeJIeJI
/1aiiiaaegwoggjyoo
J( ab) | V| = VaVb
gjgl jIbJl aIa> alw gblol
L
Lio()JalI Iaolol ool
.clo
aJrJl jOJrJl aJrJrJrJrJrJrJrJrJrJrJrJrJrJrJrJr
··
ggljllcbilljgeaLcabwbl
.1gio aJl allj
abVapohydrojll a
a
J
aJbssssssssssssssssssssssssssssssssssssssssssssssssssssssssssssssssssssssssssssssssssssssssssssssssssssssssss
jIaIolso no eLo
J 1
a a
gj jll jao aegd jgi ggg
alaoia jolaoa
olall no oas
jLJIaIc aJ> cJwJg>g
aLc no aJyll aJyll alljI p
J
JlJIy JliJll
j1g/llcai//a209o/sw b
lalb jll lj> pJwL
j /j lo a j/1 1a u w j// d//j oJ oJ .y/
8 8j j j j j j j j j j j j j j j j j j j j j j j j j j j j j j j j j j j j j j j j j j j j
aJdJI JwC JUJJgJgJlA
ooaJaaIaIaIaIaIaIaIaIaI a
.(a2aljbal)cllljjlo
gog jJlJI JI> 1
LalalJolg> no laaall gjil
b>gssolssllc
ba> gdsu no cia xlll jxj
J
gj gdd. aal all aodw
Jc 1
g 1a aal aol aol g jog oJ
Jds Jog .ogai ji> jgi clll yaiy
2g kJ 11 aJl Jg j 11
o>gololol no aalllg
(10jolaljbal) Iolai
Jlll 100000000000000000000000000000000000000000
a a 1
jLl aLc no o wJll JJI alljI cii
:(jJzJcJaaS=TF)aJIJIJIJIJIJIJI
TF 1Hd° aJUJrJ J0
100 1,3-0 7 -0 J 1
90 2,5-1,3 14-7
75 3,8-2,5 21-14 3
50 3,8< 21< 4
cloac a>crn c ywyl lka:la/ 1bLw//g/olal/
.
Jgill ss no aksll s
..
.
1> 0d
Joo
glplaww:jaiwwll
Ooo
laolgcllyplawoJooa
ploU ploall
a2b9 JlJzll 0 a6gJgl a>gg
a g o 9g j 1 c ic w
sglwlljlll j
jlll lolololld
Jk Jck LgLolg aeg g
.
J
J 1
.
Lolgall JrJzjio 1
yJlAaBg o wLi
aclull
J 1
JJI J
Jus/1g S//U/Lu p/u/V/ 2:ab>30
. 1yla/laeb
olokal joliljlllclbjd
Ss
a|Llgl a|Ll
jbs
w 12, y/ ailll lalc /jLp
jdu/du/du> uuugduu
JxJ 1
Jl 1
.1JzJL JALaiaaiJooJLO
JgUJU Joo aKuU
.
jLJ
jge aic oolg g no 5i
J
m o 0gKJy Jy
goo gaaa .pK>Jj
29000
1/11 1111110g501111
.0aio 4
gj jj jj> jj
.
:gall
J J
oo 20 1000
cWJ
jz jz
jduu uui jge 2aui
.012xuU|jao
JIL
aagaaawwllgawialglaa
aaii aagai iiaai g jlaia no
awlu//l>guia//og/aui//:a>
aogla/olgSall oclpIuWlGai
KARCHER 6006
(2.860142.0:1/11/1
Jdsolgsslljzdrzio
(XAM / ) Jllal
olksal jolil jllsclbal
Ss
a aal lal lal al aal aal aal aal aal aal aal aal
aIeI aIg cIaI aas wls Ials abglo clal Jai cIaI aiao pga jLlA yLc
JLJI/laI JI IlaI JI JI 10
Jl/ aLc o clal aiaa gbiu J 1jll 2g adac Jubei pW9
11" aoc c clll 1j 1 Jp
o0g o j 5 cl/ll a20 Jglj abglo
aIac pI loicg Jl// aYc cJai I
Jaell Jl// gJ, d lac 2001 JxJ
Jy// UJIJI bGgJg// Lc sJ/oo
J111 405
J 1 J 1 J 1 J 1 J 1 J 1 J 1 J 1 J 1 J 1 J 1 J 1 J 1 J 1 J 1 J 1 J 1 J 1 J 1 J 1 J 1 J 1 J 1 J 1 J 1 J 1 J 1 J 1 J 1 J 1 J 1 J 1 J 1 J 1 J
G J 111111111111111111111111111111111111111111
jll a405 1
JLJIaos Jc JLJUJI ZIoo bIO .aojUJ
cllljJ 10
.
- yla/ 20 20 45 60 10
cIgio/ g/ aui 100 aei psc
!(jocJia//Jawjc)S
yI Ic /baoclo/2w/pccl
a2110s0%50gjbao s0%50
1a2axo jbo 100 100
10g
jgl jgl jgl jgl jgl jgl jgl jgl
aJz
sogas Jkew clll jz w p
aill aolc clal j
sagac Jkaw aizg jIg."
.
jglalclaljjJlslp
Jawal alg
.aa
jglj 0oJooJzll Jo
cJall gao sclg no slal po
111 aXe 111 1j
"
jglj
.
a 10
J
OFF aJyIg 80 g JzJz
J 1
Jlll 1
y
.0jaiuoo a
J
!aagall aaxal jbljgall

J
20g
JJIJI JIJIg aJg jIJI IJI JIJI
.
J 1
.8gaaog
jgljwglbcjclaia:Jaell
Jaa Jaa Jaa Jaa Jaa Jaa
jLgJl
B-Aoo
Jgjbl) a0jUU Ua>duu Jgog
n nn nnnn nnnn nnnn nnnn nnnn nnnn nnnn nnnn nnnn nnnn nnnn nnnn nnnn nnnn nnnn nnnn nnnn nnnn nnnn nnnn nnnn nnnn nnnn nnnn nnnn nnnn nnnn nnnn nnnn nnnn nnnn nnnn nnnn nnnn
Jolgo Jkiy jz
wduo Jc JzJdJI Jg.5
.
j 1
.122222222
a
OFF
(a>)eJU J 1
()
d
e
f
Vapohydro abg g
J
A6
A7
Ja > Jb A8
A9
A10
JJJJUaGgUdUuLb>JcA11
A12
A
J LgUgUgA13
(ajc) A14
A15
B1
B2
B3
Jl6b7JI aIla> alwB4
B5
B6
C1
0 0 C2
D1
D2
(2) ydoJl oJyoslo E1
aJg aIJI JI 1111111111111111111111111111111111111111111111111
Jn J
J 1 J 1 J 1 J 1 J 1 J 1 J 1 J 1 J 1 J 1 J 1 J 1 J 1 J 1 J 1 J 1 J 1 J 1 J 1 J 1 J 1 J 1 J 1 J 1 J 1 J 1 J 1 J 1 J 1 J 1 J 1 J 1 J 1 J 1 J
KARCHER cLac aao JgJg JgJgJgJgJgJgJgJgJgJgJgJgJgJgJgJgJgJgJgJgJgJgJgJgJgJgJgJgJgJgJgJgJgJgJgJgJgJgJgJgJgJgJgJg
jgljll
Jd Jg 10000000000000000000000000000000000000000000000000000000000000000
!aagbll aaxall jbl gall

Cua 2gjo JgljUJ Uo
aJ 2
Aa
A4
≤ q 小 a > 0 L A5
gssall jzjll ic jj> .Jg yIe I g>gal/ol/
Jg//dLw aIog jzov y/ Jc
a//g/2u// dai// dLw g// uJ
//g/2u//U g/2g//g/2u//
//g/2u> //u/2u>
//u/2u>
//u/2u>
//u/2u>
g/ aio /ga, cia// j; s JIo lilg; giay g/ aio /go 1c agi2o aiIw /go (aio// 1go Jio) aizo mu c /la> I/g (uguw/9 g/9/1/ yjog g 4oJua// 1/go/ j.
.
aLi aioj/Je jg//g
aag y/ aui jg jlgjll jzauy 1all /s jgolg jge// aog laleij
Juslll jlll ciaoo po
y.jjJgJb0y/oo jge//aIla> yj .giad/ooSloy/aJJype
JU
puiuai / a la 1c 1o/1 l jao jao 9/1gulc Ue JfJgauo
.
Iaiaial piaio
bdo jL bdo a bdo 1
jol .n J k0yll oJ y00
Jl J J doo Jgog s c J
s J Oo a o w p g a L
Jy Jy Jy Jy Jy Jy Jy Jy Jy
aJz
y/ jge//jog y
169 00 aaaa, pI b29 .IEC 60364 Jkaal
22 1jg>1 j0g p
1g>1 g0 jg>1 g>1 g/aj j
1c 2g>ga// ala// lc 2sia//
jg>1
pai y. lola// jio aip// slo//
muo o// jlg// Jz
.FI /lol/ liiaay 29joo
yai/1LwJkuu/kaal/ 1c Jaiy/2g.0gbs auiia// cIaI 1o a2o yai dllw pIiwi / .jY/ Ic 2po x13 gbao / jwI Jwogggo yj w
llw g/ aS/11 115 100g jddic
210 11L/11 aJla> 1c 1s/11 1yjda//
.4S/11 S/11 aJla/1g sla//
jgljll Jlaeew/ pdoaill lc jid jg.022all 1olgal lqg abaaill aikal oglal oJicl jai / aoLw lc o2g plzuiw / ic /kall jgi/ jgljll
llw adog JdW/ Lc JgJrJrJrJrJrJrJrJrJrJrJrJrJrJrJrJrJrJrJrJrJrJrJrJrJrJrJrJrJrJrJrJrJrJrJrJrJrJrJrJrJrJrJrJrJrJrJrJrJrJrJ
Jl/10gbs JIuWbJgE//Lc p9
s//Jl/10gbs P2wU. c//lll
//b//p8j a9seal) guaal 4,2aui
./1g2a//gb9 aa/lo jbi
1j 1y 1g yIy Jy y 1y
Jgj jlll lws/1n jw giy .(wguuww/1jio) a2u/4 oju 100
Lluo no Jdu/111 uji gai
Jluo kuu agj d15 giag ooo
a,luv/1jbs) cUlgj//g/ oLwU
1/21/11 0/21/11 y jg//j
aui|la>
oIg gJgJgJgJgJgJgJgJgJgJgJgJgJgJgJgJgJgJgJgJgJgJgJgJgJgJgJgJgJgJgJgJgJgJgJgJgJgJgJgJgJgJgJgJgJgJgJgJgJgJgJ
J L J 10000000000000000000000000000000000000000000000000000000000000000000000000
aaleeilllalll
f bafjal jg> pddw, p. aJzll fBtll JrJ 1n g jyI jLJI Jd Jq 1s aaiiaaiaiaaae 20 1s Jd Jd s Jd Jd dall q aill .btaaiaaiaiaiaiaiaiaiaiaiaiaiaiaiaiaiaiaiaiaiaiaiaiaiaiaiaiaiaiaiaiaiaiaiaiaiaiaiaiaiaiaiaiaiaiaiaiaiaiaiaiaiaiaiaiaiaiaiaiaiaiaiaiaiaiaiaiaiaiaiaiaiaiaiaiaiaiaiaiaiaiaiaiaiaiaia
Jjll Jd j0g jg
1
0
/
/
/
/
/
/
/
/
/
/
/
/
jgljllc ooggall jgoJll
1JdJdJdJdJ 4

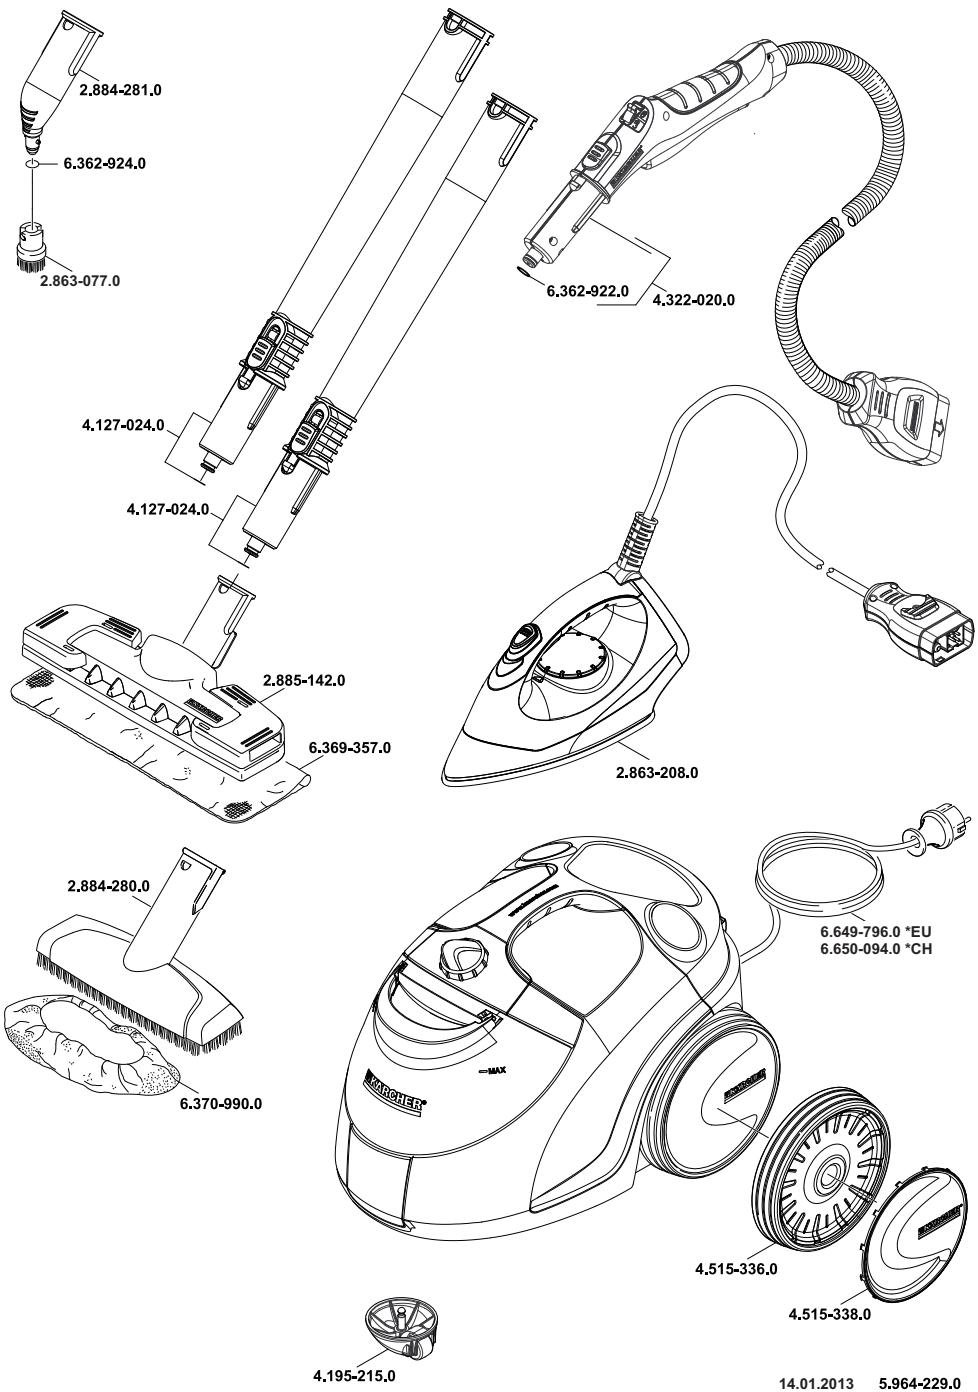

http://www.kaercher.com/dealersearch