
ASP 11 N - Log splitter ATIKA - Free user manual and instructions
Find the device manual for free ASP 11 N ATIKA in PDF.
User questions about ASP 11 N ATIKA
0 question about this device. Answer the ones you know or ask your own.
Ask a new question about this device
Download the instructions for your Log splitter in PDF format for free! Find your manual ASP 11 N - ATIKA and take your electronic device back in hand. On this page are published all the documents necessary for the use of your device. ASP 11 N by ATIKA.
USER MANUAL ASP 11 N ATIKA
Original instructions - Safety instructions - Spare parts

Page 37
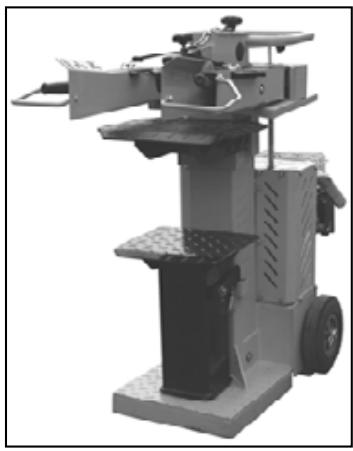
GB Extend of delivery
After unpacking, check the contents of the box
That it is complete
Check for possible transport damage
Report any damage or missing items to your dealer, supplier or the manufacturer immediately. Complaints made at a later date will not be acknowledged.
| ■ 1 ready mounted machine unit | ■ 1 axle | ■ 1 control arm, right | ■ 1 operating manual |
| ■ 1 table plate | ■ 1 bag of accessories | ■ 1 control arm, left | ■ 2 wheels |
Furniture
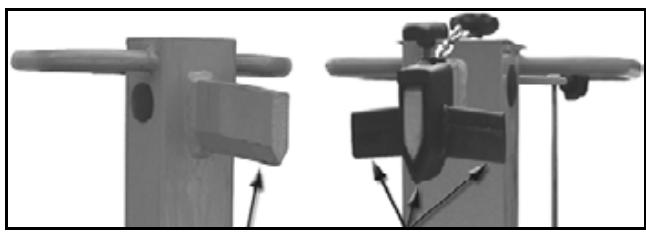
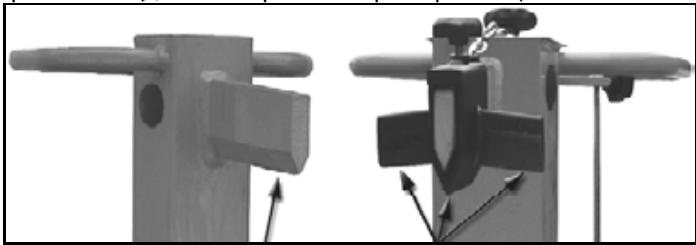
Insert control arms and insert pipe in recess of cross connection.
- Locking bolt is available in the installation position.
- Fit the table into the appropriate mounting angles.
- Pay attention that the locking bolt is engaged.
F
Do not operate machine before having read the operating instructions, understood all the notes and assembly the machine as described here.
Keep the instructions in a safe place for future use.
Contents
| Declaration of Conformity | 1 |
| Spare parts / Description of device | 3 |
| Extent of delivery | 6 |
| Assembly | 9 |
| Symbols | 25 |
| Proper use | 26 |
| Residual risks | 26 |
| Safe working | 26 |
| Transport instructions | 27 |
| Positioning | 27 |
| Before the first start-up | 27 |
| Fuelling | 28 |
| Start-up | 28 |
| Working with the log splitter | 29 |
| Care and maintenance | 31 |
| Maintenance schedule | 34 |
| Storage | 34 |
| Possible problems | 35 |
| Technical data | 36 |
| Guarantee | 36 |
Symbols machine

Read the operating and safety instructions thoroughly before commissioning the machine.

Caution!
Before starting any repair, maintenance or cleaning work, always switch off the motor and remove the spark plug connector.
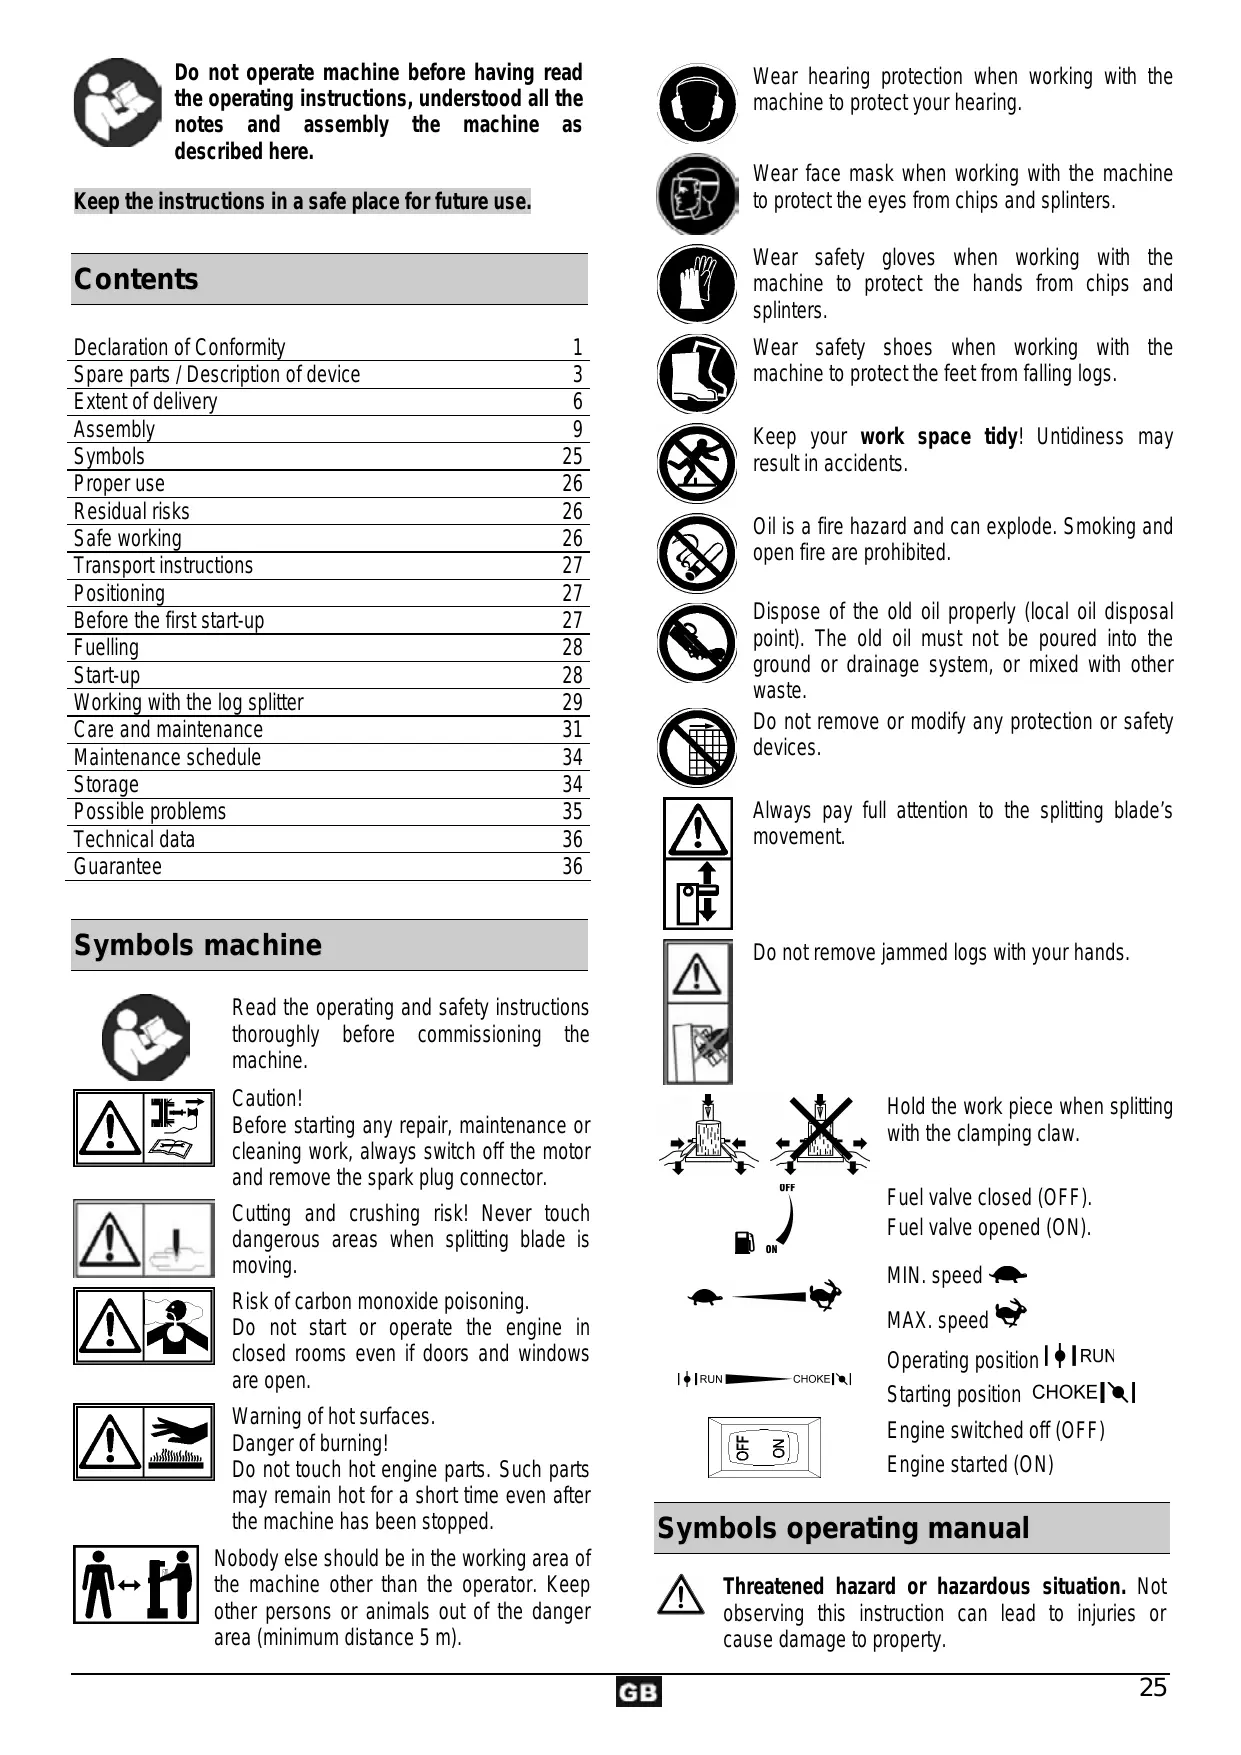
Cutting and crushing risk! Never touch dangerous areas when splitting blade is moving.
Risk of carbon monoxide poisoning.
Do not start or operate the engine in closed rooms even if doors and windows are open.

Warning of hot surfaces.
Danger of burning!
Do not touch hot engine parts. Such parts may remain hot for a short time even after the machine has been stopped.
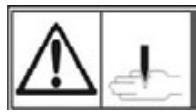
Nobody else should be in the working area of the machine other than the operator. Keep other persons or animals out of the danger area (minimum distance 5 m).

Wear hearing protection when working with the machine to protect your hearing.

Wear face mask when working with the machine to protect the eyes from chips and splinters.

Wear safety gloves when working with the machine to protect the hands from chips and splinters.

Wear safety shoes when working with the machine to protect the feet from falling logs.

Keep your work space tidy! Untidiness may result in accidents.

Oil is a fire hazard and can explode. Smoking and open fire are prohibited.

Dispose of the old oil properly (local oil disposal point). The old oil must not be poured into the ground or drainage system, or mixed with other waste.
Do not remove or modify any protection or safety devices.

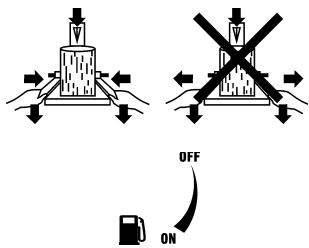
Always pay full attention to the splitting blade's movement.
Do not remove jammed logs with your hands.

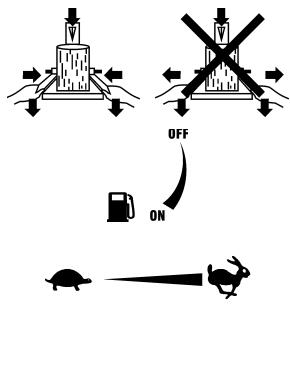


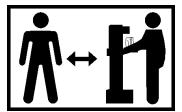
Hold the work piece when splitting with the clamping claw.
Fuel valve closed (OFF).
Fuel valve opened (ON).
MIN.speed
MAX.speed

Operating position

Starting position CHOKE
Engine switched off (OFF)
Engine started (ON)
Symbols operating manual

Threatened hazard or hazardous situation. Not observing this instruction can lead to injuries or cause damage to property.

Important information on proper handling. Not observing this instruction can lead to faults.

User information. This information helps you to use all the functions optimally.

Assembly, operation and servicing. Here you are explained exactly what to do.
1 2
Number of figure associated to the text.
3 1
Proper use
The log splitter must only be used for splitting logs.
- Only straight-cut logs are suitable for use with the log splitter.
- Foreign bodies (nails, wire, concrete etc.) must always be removed from the wood before it is split.
- The intended usage also includes compliance with the operating, servicing and repair conditions prescribed by the manufacturer and following the safety instructions included in the instructions.
- Any other use is deemed not to be use as prescribed. The manufacturer is not liable for any type of damage resulting from this: the user bears the sole risk.
- Unauthorised modifications on the log splitter exclude a liability of the manufacturer for damages of any kind resulting from it.
- Only persons who are familiarised with the device and informed about possible risks are allowed to prepare, operate and service this device. Repair works may only be carried out by us or by a customer service agent nominated by us.
Residual risks

Even if used properly, residual risks can exist even if relevant safety regulations are complied with due to the in determined by the intended purpose.
Residual risks can be minimised if the "Safe working" and the "Proper use" as well as the whole of the operating instructions are observed.
Observing these instructions, and taking proper care, will reduce the risk of personal injury or damage to the equipment.
- Failure to observe the safety precautions can lead to injury to the operator or damage to property.
- Carelessness, failure to comply with the safety regulations and incorrect use can result in injuries to your hands and fingers when the splitting blade is moving.
Electric shock when touching the spark plug connector while the engine runs. - Burning when touching hot parts.
- Carbon monoxide poisoning when using the device in closed or poorly ventilated rooms.
- Impairment of hearing when working on the machine for longer periods of time without ear protection.
In addition, in spite of all the precautionary measures taken, non-obvious residual risks can still exist.
Safe working
Before commissioning this product, read and keep to the following advice. Also observe the preventive regulations of your professional association and the safety provisions applicable in the respective country, in rder to protect yourself and others from possible injury.

Pass the safety instructions on to all persons who work with the machine.

Keep these safety instructions in a safe place.
- Be observant. Attend to what you do. Start working with rationality. Do not use the device when you are tired or under the influence of drugs, alcohol or medicaments. One moment of carelessness when using the device can result in serious injuries.
- Make yourself familiar with the equipment before using it, by reading and understanding the operating instructions.
- Do not use the machine for unsuitable purposes (see "Proper use" and "Working with the log splitter").
- Ensure that you have stand in a secure standing position and maintain your balance at all times.
- Take up a working position which is close to the controls.
- Never stand on top of the machine.
-
When working with the machine, always wear
-
face mask
- safety gloves
hearing protection - safety shoes with steel toe-caps
Wear suitable work clothing:
-
do not wear any loose-fitting clothing or jewellery, since these may be caught or trapped by moving parts
-
Within his area of work the operator is responsible for third parties.
- The machine may not be operated by children or young people under the age of 18.
- Keep children away from machine.
- Never operate the machine if other persons are in the immediate vicinity.
- Never leave the machine unattended.
- Keep your workplace in an orderly condition! Untidiness can result in accidents.
- Do not overload the machine! You work better and safer in the given performance range.
- Only operate the machine with complete and correctly attached safety equipment and do not alter anything on the machine that could impair the safety.
- Do not modify the machine or parts of it.
- Do not spray machine with water.
-
Do not leave the machine standing in the rain or use when raining.
-
Store the unused machine in a dry locked place away from the reach of children.
-
Switch the machine off and remove the spark plug connector when
-
carrying out repair works
- maintenance and cleaning work
- checking connecting lines, whether these are knotted or damaged
- removing faults
- transporting
-
leaving unattended (even during short interruptions)
-
Check the machine for possible damage
-
Before continuing to use the machine, the protective devices must be inspected to ensure that they work perfectly and with their intended function
- Check whether the movable parts function perfectly and do not stick or whether the parts are damaged. All parts must be correctly installed and fulfil all conditions to ensure perfect operation of the machine.
- Damaged guards and parts must be properly repaired or exchanged by a recognized, specialist workshop; insofar as nothing else is stated in the instructions for use.
- Damaged or illegible safety warning labels should be replaced immediately.

Repairs to other parts of the machine must be carried out by the manufacturer or one of his customer service points.

Use only original spare parts. Accidents can arise for the user through the use of other spare parts. The manufacturer is not liable for any damage or injury resulting from such action.
Safe handling with fuels

Fuels and fuel vapours are inflammable and may cause serious injury on the skin or when inhaled. Therefore be careful and provide sufficient ventilation when handling with fuels.
- Stop the engine and allow the device to cool down before fuelling it.
- Do not smoke and avoid open flames when fuelling.
- Wear gloves when fuelling.
- Do not fuel in closed rooms (risk of explosion).
- Avoid spilling of fuel or oil. Clean the device immediately when you have spilled fuel or oil. Change your clothes immediately when you have spilled fuel or oil on them.
Make sure that no fuel can come into the soil. - Carefully close the tank cap after fuelling and check that it does not get loose during operation.
- Check that there is no leakage on the tank cap and fuel lines. If there are leaks this device may not be started.
- Only transport and store fuels in containers approved and identified for this.
- Keep children away from fuels.

- Do not handle and store fuels close to combustible and highly inflammable materials as well as sparks and open flames.
- Go away at least three metres from the fuelling place to start the device.
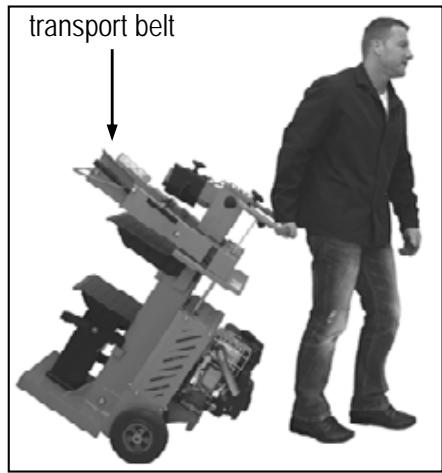
Transport Instructions

Move the splitting blade right down every time before a chine is transported or change to another work place .
To transport the machine, grasp the handle and tilt the log splitter slightly towards you. The log splitter can be easily transported in this position.
Make sure that the oil tank cap is securely tightened to prevent oil from leaking during transport.
Before each change to another work place
Stop the engine, disconnect the spark plug connector and close the fuel valve.
Before each transport:
Stop the engine, disconnect the spark plug connector, close the fuel valve and allow the engine to cool down.
Drain the fuel tank to prevent fuel spilling.
Secure the machine within or on the vehicle against getting out of place.
Positioning
Ensure that the working area meets the following conditions:
- no danger of slipping
level - free of obstacles
- sufficiently well lit

Do not operate the machine in the direct vicinity of or petrol pipes or containers, or any other easily unifiable materials.
Before the first start-up
The motor of the machine is supplied without petrol and oil in it. Fuel the device as described under "Fuelling".
Fuelling
Oil
Use high-quality oil of the classes SF, SG, SH SJ or better.
Together with the recommended oil no other specific additives are needed.
Do not mix the oil with petrol.
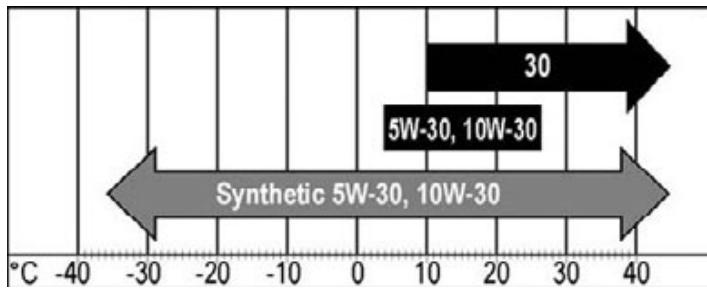
Air-cooled engines operate with higher temperatures than vehicle engines. When using non-synthetic multigrade oil types (5W-30, 10W-30, etc.) at temperatures above 4^ a higher than normal oil consumption occurs. The oil level needs to be checked more frequently.
When using the engine at temperatures under 4^ synthetic oil must be used. Otherwise the engine may be damaged.
When using SAE 30 oil at temperatures under 10^ it is hard to start the engine and the motor may be damaged due to insufficient lubrication.
Oil capacity: 0.6 l
Oil filling 1
- Remove the oil filling plug (33). 1
- Slowly pour oil into the hole.
- Tighten the oil filling plug.
- Wipe off oil residues/spilling.
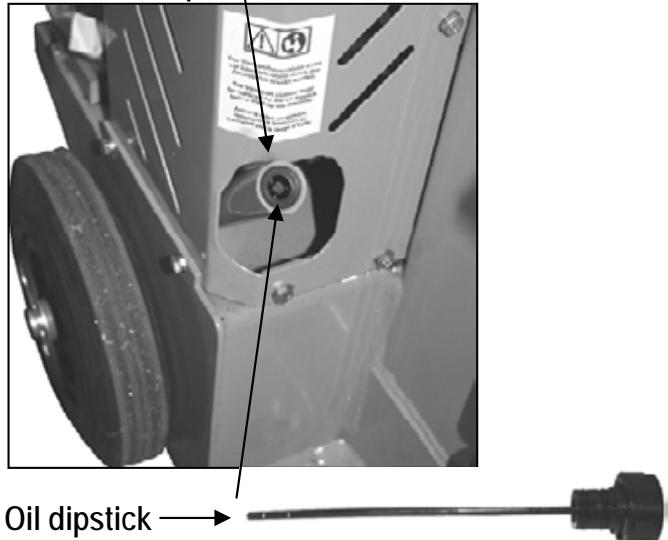
Oil level checking 1
Remove the oil filling plug (33) and check the oil level.
Petrol

Utmost care is required when handling fuel. Keep away Keep away smoke and open flames (risk of explosion).smoke and open flames (risk of explosion).
Clean fresh non-leaded petrol having an octane number of 85 as a minimum.
Do not fill in leaded petrol, diesel or other non-approved fuels.
Do not use petrol having a smaller octane number than 85 ROZ. This may lead to severe engine damages.
If you frequently operate the device at high speeds, you should use petrol with a higher octane number.
The use of unleaded petrol is recommended for environment protection reasons.
Storing fuel (petrol)
Fuels have only a limited shelf-life, they are subject to ageing. Outdated fuels and fuel mixtures may result in starting problems. Therefore, store only that quantity of fuel which you can use within a month.
Only store fuels in containers approved and identified for this. Keep fuel containers in a dry and safe area.
Make sure that fuel containers are kept out of the reach for children.
Fuelling the log splitter
- Stop the engine and allow it to cool down.
- Wear protective gloves.
- Avoid eye and skin contact.
-
Strictly follow the instructions under "Safe handling with fuels".
-
Only fuel the machine outdoors or in sufficiently ventilated rooms.
- Clean the area around the filler neck. Contamination in the tank may result in malfunction.
- Carefully open the tank cap (32) to allow possible overpressure to relax. 2
- Carefully pour fuel into the filler neck until it is approx. 4 cm below the neck's edge to allow the fuel space for expansion.
- If contaminated, clean the fuel filling filter (40). 2
- Close the tank cap. Check that the tank cap is tight.
- Clean the tank cap and the area around it.
- Check the tank and the fuel lines for leaks.
Before starting the engine take the machine and go away at least three metres from the fuelling place.
Start-up
-
Check that the machine is completely and correctly assembled.
Before using the log splitter, make sure each time that -
there are no damages at the machine
all screws are tight - check the hydraulic system for any possible leaks
the oil level
The transport closure must be replaced by the oil dipstick before start up the machine.
Transportclosure
① If the hydraulic system is not vented, the trapped air will damage the seals and cause permanent damage to the log splitter.
i Hydraulics
- Never operate the machine in the event of any possible danger from hydraulic fluid.
- Ensure that the machine and working area are clean and free of oil. Danger of slippage or fire!
- Check the hydraulic reservoir regularly to ensure that it contains enough hydraulic oil (see "Care and maintenance").
Capacity: approx. 5.5 litres
Before starting the engine 3
Check the oil and fuel level (refill if required).
Put the choke lever (28) to the position CHOKE
Put the throttle (31) to the position
Put the fuel valve (22) to the positi
Put the ignition switch (5) to the position
3
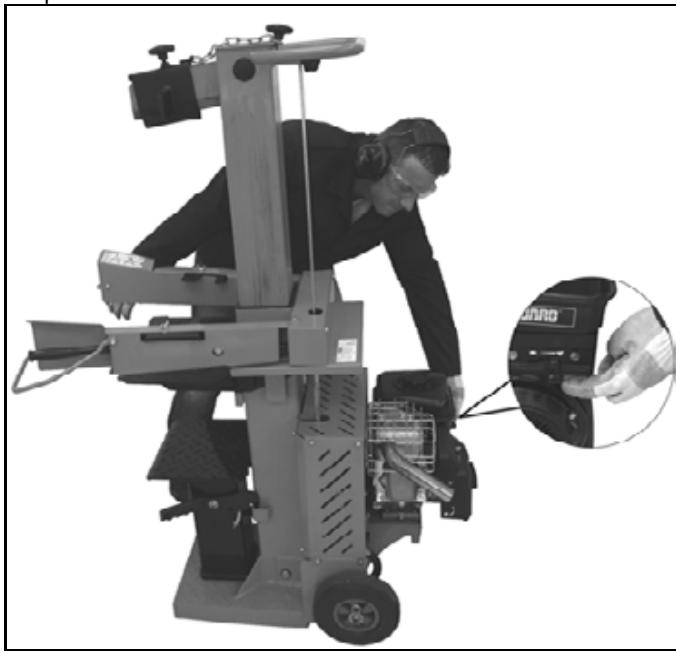
Starting the engine 4
- Grasp and slowly pull the cranking rope handle (30) until you feel a resistance.
- Pull the cranking rope quickly and then guide it back slowly.
Do not fully pull out the cranking rope and do not allow that the rope handle strikes against the engine.
- Put the choke lever (28) to the position RUN when the engine has started.
If the engine does not start after the first pulling operation, put the choke lever (28) to the position RUN and repeat the step until the engine starts.
Stopping the engine 5
- Put the throttle lever (31) to the position
- Put the ignition switch (5) to the position
- Put the fuel valve (22) to the position

1 Do NOT put the choke lever (28) to the position CHOKEL to stop the engine. This may result in backfire or engine damages
Working with the log splitter


Nicht vergessen!
Additional SAFETY INSTRUCTIONS
The log splitter may only be operated by a single person.
- The machine may only be operated by persons over the age of 18 years, and who have read and understood these operating instructions.
- Wear protective equipment (safety goggles/mask, gloves, safety shoes) to protect yourself from possible injury.
- Never try to split logs containing nails, wire or other similar objects.
- Already split wood and wood chips create a dangerous working area. The operator may stumble, slip or fall. Always keep the working area neat and tidy.
- Never place the hands on or near any moving parts of the machine when it is switched on. Maintain a safe distance from the log, the ram and the wedge in order to protect your hands from injury.
- The machine should only be used for splitting logs with a maximum length of 1300 ~mm .
- Check before splitting if the splitting column has been sufficiently lubricated to allow its trouble-free retraction and extension.
What type of logs can I split?
Size of logs
Length: max. 1300 ~mm
Diameter: min. 120 - max. 400 mm
The log diameter is a recommended guideline figure, because:
- thin logs can be difficult to split if they contain knots or if the fibres are too strong.
- logs with a diameter of over 0.400 ~mm can be split if the fibres are smooth and open.
Do not try to split green logs. Dry logs are much easier to split, and do not cause jams as often as green (damp) wood.

Operation
Two-hand operation
Never operate the log splitter with two people.
4 Never block the control handles (clamping claws).
1. Start the motor. Wait a few moments until the motor has reached its operating revolutions and the required pressure has been built up in the hydraulic pump.
(1) At temperatures below -5^ C , let the log splitter run for at least 15 ~min . In neutral to heat up the oil.
2. Place the log on the log splitter table.
1 Only split the logs in the direction of the wood fibres.
3. Hold the log tight with the clamping claws.
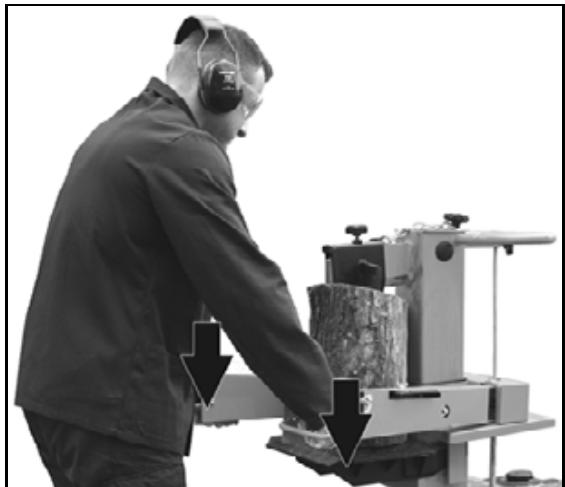
- Press both operating handles down simultaneously:
→ The splitting blade falls down and splits the log. - Release the two control handles, the splitting blade returns to its initial position.
① If you only release one control handle, then the splitting blade remains where it is.
Special instructions for splitting logs:
Preparations:
The logs to be split should be cut to the maximum dimensions. Ensure also that the logs are cut straight and square.
Place the log properly on the log splitter, so as not to cause any risk of stumbling or falling to the operator.
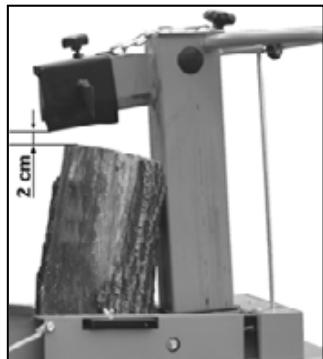
- Adjusting the stroke height
In case of shorter wood pieces the efficiency can be increased by shortening the return of the splitting cutter.
- Place the log on the splitting table and press the two control handles to bring the splitting blade down to approx. 2 cm above the log.
- Release one control handle so that the blade stays in this position.
- Release the second control handle.
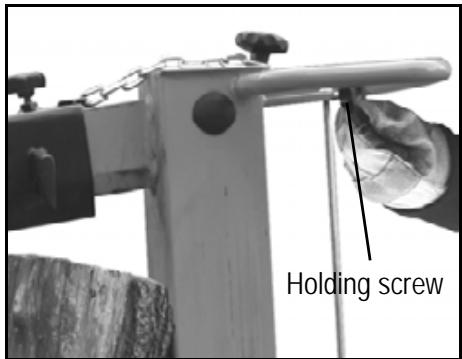
- Shorten the return path at the rod fitted to the side by fixing the holding screw at the necessary height.
Adjusting the table height
Upper table plate position for logs up to 590~mm
Middle table position for logs up to 900mm
Lower base position for logs up to 1325 cm.
- Split logs up to 590mm on the table plate.
Secure the table plate using the locking bolt.
(The locking bolt engages in the table plate hole.)
- Split logs up to 900mm on the table. Pull out the table plate.
- Split logs up to 1325mm on the base. Press the locking lever down and swing aside the table.

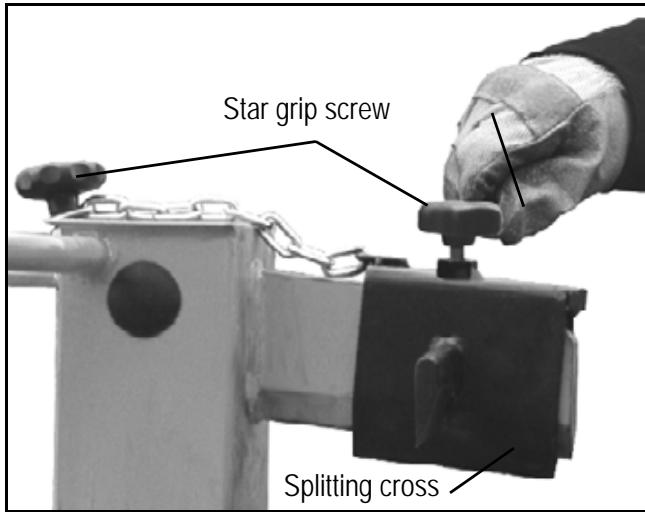
Adjusting the splitting cross:
- Loosen star grip screw.
- Move the splitting cross to the correct position (The star grip screw is beyond the borehole in the splitting blade).
- Mount star grip screw.
- Mount the chain with the second star grip screw on splitting column.
- Fix star grip screw.
- Splitting short wood:
- Upper position of table plate.
- Place the log on the splitter's table plate.
① Only split the logs in the direction of the wood fibres.
- Hold the log tight with the clamping claws.
- Splitting long wood:
- Middle position of table or low position of base.
- Remove the splitting cross.
- Place the log on the splitter's table or base.

Possible malfunction when cleaving logs: The log to be cleaved is not cleaved right through, jams on the cleaving blade and is pulled up during the blade's return movement. In this case, proceed as follows:
- Switch off the device.
- Depending on the log still to be cleaved fix the table plate in the upper or the table in the middle position.
- Switch on the device and continue the splitting operation.
Never try to split two logs at once.
! Never try to remove or replace the log during the splitting process.
Never try to force the splitting of the log by maintaining the pressure for several seconds. This can lead to damage to the machine.
Position the log on the table again and repeat the splitting phase, or put the log on one side.
How to release a jammed log?
There is a risk of knotted logs getting stuck during the splitting process.
- Switch machine off and remove the spark plug connector.
- Do not remove jammed logs with your hands.

- Carefully move the stuck log with a crowbar backwards and forwards to loosen it. Don't damage the splitting pillar.
Never hammer on the stuck log.
Never use a saw to cut the stuck log out of the machine.
Do not enlist the aid of a second person - this is a one-man job.
Finishing work:
Bring the splitting blade to the lower position (run-in state).
Release one of the control handles.
Switch the machine off and disconnect the power.
Follow the care and maintenance instructions.
Care and maintenance

Before each maintenance and cleaning work
- Stop the engine.
- Remove the spark plug connector.

Do not carry out maintenance work close to open flames. Risk of fire.
For maintaining and cleaning, removed security devices must unconditionally be mounted properly and proved again.
Use only original parts. Other parts can result in unexpected damages and injuries.

Wear protective gloves in order to avoid injury to the hands.
Be sure to have removed any tools from the machine after completion of service work.
Maintenance and repair work other than those described in this chapter is only allowed to be carried out by service staff.
To guarantee a long and reliable usage of the product carry out the following maintenance works regularly.
Observe the following in order to keep the log splitter in good working order:
- Clean the machine thoroughly after you have finished using it.
-
Loose fastening elements.
Worn out or damaged parts.
Leaks from the fuel tank cap or fuel lines. -
Remove any resin remains on the machine.
- Lubricate the splitting column regularly or oil it using environmentally friendly spray oil.
- Check hydraulic hoses and hose connections regularly for any leaks and firm fitting.
- Correct assembly and faultless covers and protective devices.
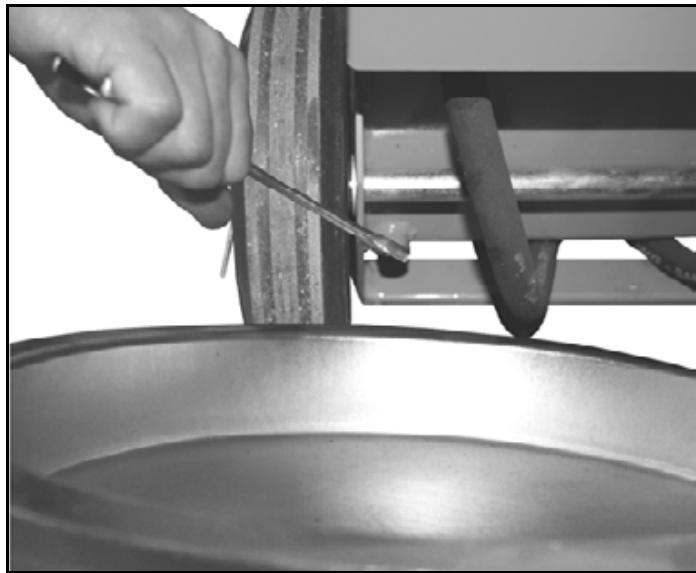
Sharpening the splitting blade
After longer operating periods, for reduced splitting performance or slight deformation of the cutting edge, grind the splitting blade or sharpen it with a fine file (remove burrs).
Sharpen wedges

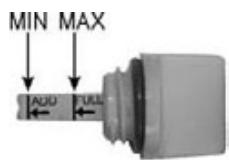
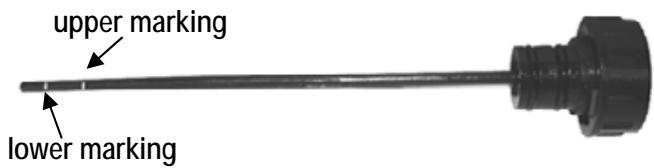
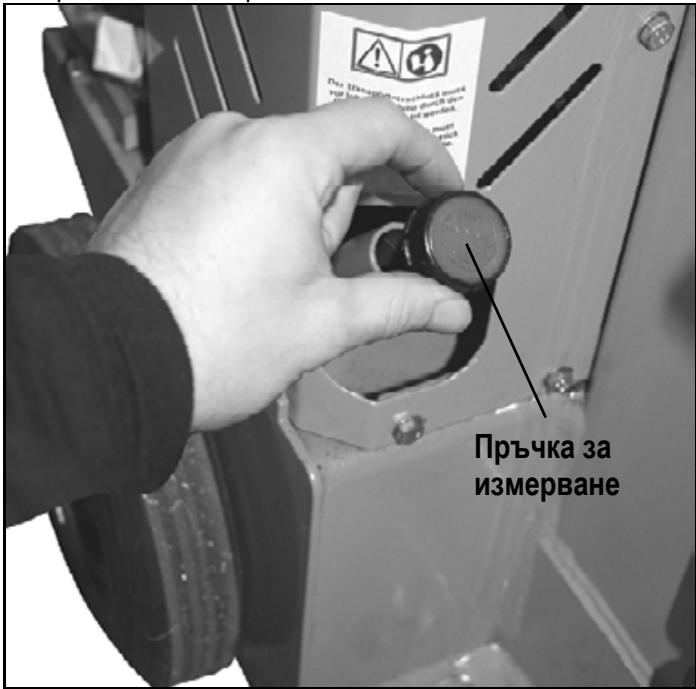
How do I check the oil level?
- The splitting column must be in run-in state. Now remove the dipstick.
- Clean the dipstick and the oil seal.
- Replace the dipstick fully into the oil reservoir.
- Now remove the dipstick again and read off the oil level.
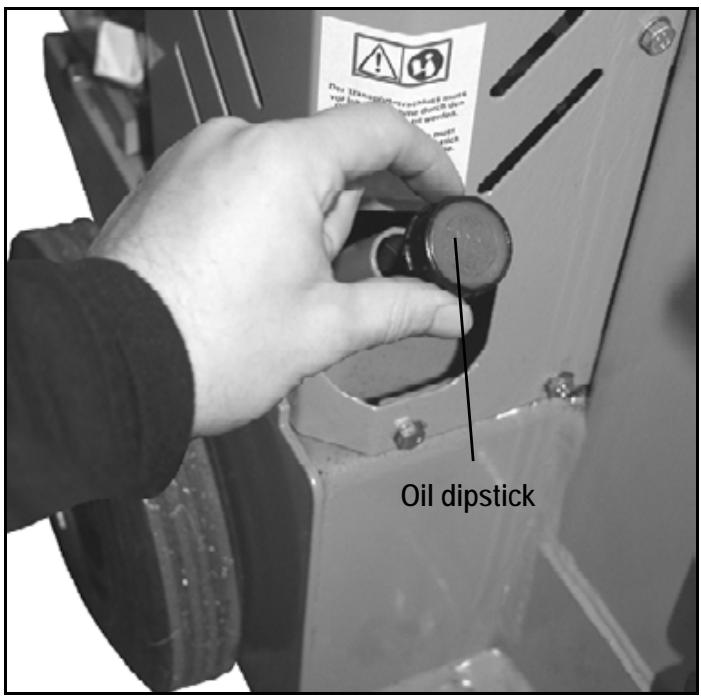
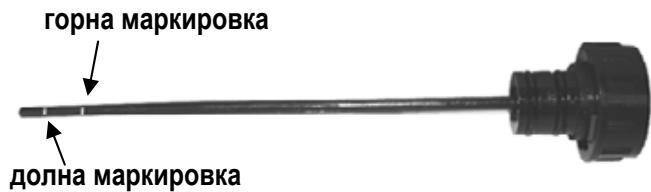
If the oil level is between the two marking on the oil dipstick, there is sufficient oil in the reservoir.
If the oil level is below the lower marking, more oil should be added with the aid of a clean funnel.
- Check the oil seal and replace it if it is damaged in any way.
- Replace the dipstick into the oil reservoir.

When should I change the oil?
The first oil change should be carried out after 50 operating hours, and then every 500 operating hours.

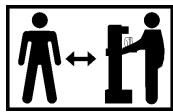
Two persons are required for this.
Changing the oil:
- The splitting column must be in run-in state.
-
Now remove the dipstick.
-
Place a container under the log splitter to catch the old oil. The container should have a capacity of at least 10 litres.
- Screw off the drain plug to allow the oil to flow out.
- Insert the seal and drain plug again.
- Pour in the new hydraulic oil (approx. 5.5 litres) using a clean funnel.
- Clean the dipstick and the oil seal.
- Check the oil seal and replace it if it is damaged in any way.
- Replace the dipstick.

Dispose of the old oil properly (local oil disposal point). The old oil must not be poured into the ground or drainage system, or mixed with other waste.

Hydraulic oil
We recommend the following hydraulic oils for the hydraulic cylinder:
Shell Tellus T 22
Aral Vitam Gf 22
BP Energol HLP 22
Mobil DTE 11
or equivalent
Do not use any other types of oil. The use of any other type of oil will adversely affect the operation of the hydraulic cylinder.
Cleaning / replacing the air filter (36) 6
Clean the air filter from dust and dirt on a regular basis to prevent
- starting problems,
loss of output,
too high fuel consumption.
Clean the air filter every 25 operating hours, or more frequently in dusty environments.
- Loosen the screw and remove the cover (29). 6
- Remove the holding clamp (37) and the foam air filter (36) from the cover.
- Clean holding clamp, cover and air filter plate (37).
- Wash the foam air filter using water and liquid cleaner.
- Squeeze the air filter in a dry and clean cloth.
- Allow the air filter to dry well.
- Install the air filter and the holding clamp in the cover.
- Re-mount the cover.
Replace the air filter on a regular basis.
Damaged air filters must be replaced without delay.
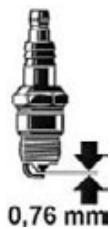
Checking / replacing the spark plug (38) 8
Do not touch the spark plug or the spark plug connector while the engine is running. High voltage!
Risk of burning on the hot engine. Wear protective gloves.
Check the spark plug and the spark gap on a regular basis.
For this proceed as follows:
- Allow the engine to cool down.
- Remove the air filter cover (29). 6
- Pull the spark plug connector (35) from the spark plug. 8
- Remove the spark plug using the supplied spark plug wrench (39). 9
- Clean the spark plug when it is contaminated.
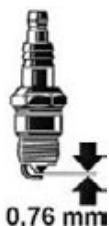
- The electrode gap must be 0.76mm
- Install the spark plug in reverse order.
Do not overtighten the spark plug.
Replace the spark plug:
- every 100 hours or each season (whichever case comes first)
- when the insulating body is damaged,
- when the electrodes show excessive erosion,
- when the electrodes show excessive dirt or oil.
Use the following spark plug type:
- Champion RC12YC
or equivalent types
Checking the ignition spark
- Allow the engine to cool down.
- Remove the air filter cover (29). 6
- Pull the spark plug connector (35) from the spark plug (38). 8
- Remove the spark plug using the supplied spark plug socket spanner (39).
- Firmly connect the spark plug connector.
- Adjust the engine as described in "Before starting the engine".
- Use an insulated pair of tongs to press the spark plug against the engine body (away from the spark plug hole).
- Firmly pull the cranking rope on the cranking handle.
A spark between the electrodes is a sign of proper functioning
Silencer / exhaust outlet 11
Check the silencer regularly.
Clean the exhaust outlet (27) on a regular basis.
Oil change
Change the oil as long as the engine is still warm.
The oil must be changed after the first 5 operating hours. Then, only every 100 operating hours or once in a season.
Two persons are required.
- Loosen the oil drain plug (34). [10]
- First person:
Hold a container with a capacity of at least 0.6 litres below the oil drain plug. 11
Second person:
Tilt the machine to allow the oil to flow out. 11
- Thoroughly clean the area around the oil outlet.
- Retighten the oil drain plug.
- Remove the oil filling plug (33). 1
- Slowly pour 0.6 litres of new oil (for oil type see "Fuelling") into the hole.
- Tighten the oil filling plug (33). 1
- Wipe off oil residues/spilling.
Care
Clean the machine thoroughly after each application so that the faultless function is kept. To maintain their efficiency and a long life, observe the following:
- Keep vent slits clean and free from obstructions.
- Check the locking screws (tighten where necessary).
Clean the device after shredding.
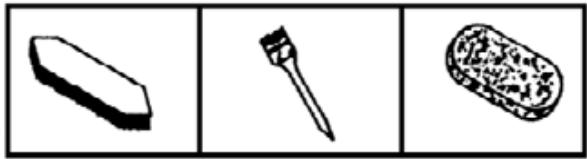
To clean your product only use a warm moist cloth and a soft brush.
Never use cleaning agents or solvents. Otherwise the device may be damaged irreversibly. Plastic parts may be corroded by chemicals.
- Do not clean the machine with running water or high-pressure cleaners.
- After each operation treat bare metal parts with an environment-compatible biodegradable spray oil to protect them against corrosion.
Maintenance schedule
| Maintenance work | Before each use | After each use | After the first 5 hours | Every 25 hours | Every 50 hours | Every 100 hours | If required | Each season |
| Check fuel and oil level | ■ | |||||||
| Oil change | ■ | ■ | ■ | |||||
| Change fuel | ■ | |||||||
| Clean fuel filling filter | ■ | |||||||
| Change fuel filling filter | ■ | |||||||
| Cleaning the air filter | ■ | |||||||
| Replace air filter | ■ | |||||||
| Check the spark plug and the spark plug connector | ■ | ■ | ||||||
| Replace the spark plug | ■ | |||||||
| Check the machine | ■ | |||||||
| Clean the machine | ■ |
Storage
- Keep unused machines in a dry and closed area out of the reach of children. Do not store them close to a cooker, oven or hot-water apparatus with permanent flame or other spark-generating devices.
- Allow the engine to cool down before storing the machine.
| Fault | Possible cause | Remedy |
| Engine does not start. | Engine cold. Choke lever put to IRUN. | Put choke lever to CHOKELI. |
| Throttle lever put to . | Put throttle lever to . | |
| Ignition switch put to OFF. | Put ignition switch to ON. | |
| Fuel valve put to OFF. | Put fuel valve to ON. | |
| No fuel supply | Check the fuel quantity | |
| Fuel old or contaminated. | Drain the fuel into a container outdoors. Fill the tank with fresh and clean fuel. | |
| Fault in the fuel line | Check the fuel line for kinks or damages | |
| Spark plug connector not placed on. | Place on the spark plug connector. | |
| No ignition spark. | a) Clean or replace the spark plug. b) Check the ignition cable. c) Fault cannot be eliminated? Get the manufacturer or authorised service staff to check the ignition system. | |
| Engine flooded. | Screw off, clean and dry the spark plug. Then pull the cranking rope several times and reinstall the spark plug. | |
| Carburettor defective | Contact the manufacturer or the responsible customer service respectively. | |
| Engine defective. | Replace the engine. | |
| Internal fault. | Contact the manufacturer or the responsible customer service respectively. | |
| Engine is sputtering. (runs erratically) | Choke lever put to CHOKELI. | Put choke lever to I IRUN. |
| Spark plug connector not firmly placed on. | Firmly place on the spark plug connector. | |
| Vent in the tank cap blocked. | Clean the tank cap and the vent. | |
| Fuel old or contaminated. | Drain the fuel into a container outdoors. Fill the tank with fresh and clean fuel. | |
| Incorrect carburetor adjustment. | Have the caburetor adjusted correctly. (customer service) | |
| Decreasing engine power. | Machine overloaded. | a) Reduce material feeding. b) Do not exceed the max. branch diameter. |
| Machine is blocked. | Thoroughly clean inside the machine. | |
| Logs are not being split properly (insufficient splitting performance). | →The log is not positioned correctly. →The log exceeds the maximum dimensions or the wood is too hard for the performance of the machine. →Splitting blade does not split log. →Hydraulic pressure too low. →Release rods bent (hydraulic tappet not quite pressed in). | →Reposition the log correctly. →Cut the log to the required dimensions. →Sharpen splitting blade, check for burrs or notches. →Check the oil level and add more oil if necessary. If the problem cannot be rectified, refer to the manufacturer or other approved service centre. →Arrange for manufacturer or authorised company to adjust the rods. |
| Splitting column moves unsteadily or with strong vibrations. | →Air in the circuit. →Splitting column not sufficiently lubricated or oiled. | →Check the oil level and add more oil if necessary. →Lubricate splitting column or oil with environmentally friendly spray oil. If the problem cannot be rectified, refer to the manufacturer or other approved service centre. |
| Splitting column does not move in. | →Hydraulic pump defective. | →To correct the problem, refer to the manufacturer or other approved service centre. |
Technical data
| ASP | |
| Type | 11 N |
| Splitting force | 110 kN (11 t) ± 10 % |
| Log length | max. 1300 mm |
| Log diameter | min. 120 mm – max. 400 mm |
| Stroke | ≈ 515 mm |
| Feed speed | approx. 0.05 m/sek. |
| Return speed | approx. 0.17 m/sek. |
| Hydraulic oil (max.) | 10 l |
| Hydraulic pressure | 21,4 MPa (214 bar) |
| Motor | 4-stroke petrol motor |
| Power supply | 4.8 kW (6.5 HP) |
| max. engine speed n0 | 3600 min-1 |
| Dimensions | length 1050 x width 580 x height 1530 mm |
| Weight | approx. 178 kg |
| Fuel | Petrol (unleaded) |
| Oil | Classification SF, SG, SH, SJ or better |
| Oil tank capacity | 0,6 l |
Guarantee
Please observe the enclosed terms of guarantee.

Onachoct ot otpaBHe C BbIepoDeH MOHOKCnI.
He cIapTnpaTe nIIN pUCKaIte DBrIaTeJIa da paBOTn B 3aTBopeHn NOMEuEHHN, DOpN aKO BpaNTe IIN npO3OpuTe ca OTBOpEHN.
Ipeynpexdene 3a HaropeeHnOBbpxHOCTN.
Опасноct оизраян.
He nnpaTe HaropeSeHnte Yactn Ha dBnTaTeJI. Te octBat 3a Kpatko ropeuN cIeN N3KJIouYBaHe Ha MaunHaTata.
B pa60thata 6nact Ha MaunHata MoKe Da cTOn cAmO eNo 6cIyKBaUo JInCe. Nua, KOnTo He B3mAt yuactne, KaKTo I Domaun H IN ONe3HN XINBOTN Tp6Ba Da 6bDat DbpXaHn DaJIeY OT Onachata 6nact (MHHMaJIHO pa3CTOJHne 5 m).


Hocete ouina nJIIPC 3a cnyxa.

Pp npabota da ce Hocn npedna3eH Bn3bOp, 3a da ce npedna3Ba IInceto O TcbprotHHN N TpeKn.

Ipn pa6ota da ce hocay npedna3n pbkaa, 3a da ce npedna3BaT dJaHnte OT cTbprotHH n Tpeckn.

Ipn pa6oTa Da ce HocrT npedna3Hn ObyBkn, 3a da ce npedna3Ba CTbnaIOTO OT naaun CTBOJIOBE.

IopnbpxaTe peB pa6oTHnC n yacTbK! IIncata Ha peD MOKe Da IOBeDe Do 3JonoJyKn.

MacnoTo e noxapoonacho n MOxe da eknpoDnpa. NpueheTo n OTKpntnT ObH ca 3a6paHeH.

I3xbpneTe HndIeXHO OTPa6oTeHOTo MacNo (c6opEn nyKt 3a OTPa6oTeHn Macna Ha MrcTo). 3a6paHeHo e OTPa6oTeHOTo MacNo Da ce N3nycka B 3emrTa IIN Da CE CMEcBA C OTNaDbUnte.

3a6paheNo e da ce OTcTaHraBt IIn Da ce npomehr npedna3Hn npncnoc6JIeHn npncnoc6JIeHn 3a 6e3oNaChOCT.

Binharn da ce BHIMaba 3a DBNXKeHneTo Ha nJb3raya Ha CTBOJIOBete.

Ja He ce OTCpaHra Ba HNKora c pIe CTe6JIO, KOETO e3aceHaJIO B KJIHa.
IIO Bpeme Ha zeneheTo DpbXTe DetaIIa 3dpabo CBc 3atraunte Iann.
KpaH 3a 6eH3nHa 3aTbOpeH OFF
Kpan 3a 6eH3nHa OTBOpEn ON

CKOPoCT MIN.

CKopoCT MAX.

Pa6oTHO nOIOXeHne I RUN

IonoJKeHne
Pn
nyckaHe
CHOKE
Дигагелнзлочен OFF
Дигагел Bкюец ON
СимboлврьковдTGOTO 3a o6слухванe

Ipo3a onachoc nnn onacha cntyaun. Hecnna3baheTo Ha Te3n yka3aHnM MoKe da DoBeDe do HapaHbAHn IIN MaTePnAInn UeTn.

Baxn yka3aHna 3a npabNJha pa6ota. Hecna3BaHeTo Ha Te3n yka3aHnMoKe da DoBeDe do Heu3npaBHOCTN.

Yka3aHna 3a noJ3BaTeJIa. Te3n yka3aHna Ie Bn NOMoHaT Da n3noJ3BaTe ONTImaJIHO BCNUKn FOyHKUIN.

MONTAX, obcnyxbaHe n TexHnuecka noDpBxka. Tyk ce o6rchra KaKBO TOUHO Tp6Ba da HaprabTe.

MOnB3eMeTe PpNIOXeHOTo pKOBODCTBO 3a MOHTaJ N O6cnykBaHe KATO NOMOuHO CpeDCTBO, KOrATo B TeKCTa IMa yKa3aHHe KbM HOpema Ha QnIpyata.
Bb3MOxHa NOBpeHa npu ceniHe Ha DbJIIn DbPBA: DpbTO He ce pa3cENBa, 3aJka Ha HOxa 3a ceniHe n Ce BdIra Harope pnp o6paTHnXoI.
BTo3n CnyuaH HanpaBeTe CneHTo:
- N3knHouTe ypeJa.
- Cnopei IbIxHata Ha IbPBoTo 3a Zeene He 3akpenTe IIOta Ha Macata B rOpHo NIOJoxHe Hm Macata BCpeHNO NIOJoxHe.
- BkIIOUeTe UpeDa n npOdbJnxTe ceneHeTo.
Hnkora He ueeneTe DBe IbPba HabeNbK.
Hnkora He doabayTe nIcMeHai Te IbPbA no BpeMe Ha pa6ota.
1 Da He Ce Ipeu3BnKBa HnKora HaueenBaHe Ha CTBOI nocpeiCTBOM NODlbpxKaHe Ha NtB3raHTo B npOdbJxKeHne Ha HrkOJIKO cekyHdi. ToBa MoKe Da DoBeDe Do nobpeHn Ha MaunHaT.
Harlapete CTBOLA OTHOBO Bbpxy rnaBnata pAMKn n Nobtopete npouceca Ha NaeIbaHe N OCTaBeTe CTBOLA Hactpan.
Kakceocbo6oxdaBa3akneuilo ce cTe6no?
Ima onachoct Ibpbata C KIOHn Da 3aJaT Pnp cenehe.
- ɪzʌkʌŋʊte ypeə nɪzʌbɒpnaɪte uεncejə.
-
He oTcpaHraBte IbPbata c pBaCe.
-
BnHmATEJIHo pa3dBnKTe 3aJnOTo DbPBO C uAnra Hnpei-Ha3aI, 3a Da MoKTe Da ro OCBo6oJte. He NobpejdaIte KOJOnHaTa 3a UenHe!
Ipiocbo6oxdaabaHTo HNKora He noyKbaTe Bbpy 3akneueHOTo Cte6No IHe cnaaTe pbcTe 6n3o do CTBOJa.
Hnkora He n3BaXdaIte 3aINoTo DbPBO qpe3 p3aHe.
He monete BtoPo nue 3a nodkpena.
KpaHn pa6oTaTa:
Пoctabete Hoxa 3a ZeneHe B DoJHo NOJoxeHne (cnychat).
Пусhteе edHaTaДрБЖka 3a obcIpyKBAhe.
I3KIIouye ypea n I3IbpaIte IeIceIa.
Da ce cna3BaT yka3aHnra 3a noDnpbXka n rpnXn.
TexHnuecka nOdprbXka

IpeNi BcraKa TexHnuecka NOpDpBxKa N NOuNCTBaHe
- Na ce N3KNoUdBnRaTeJIaT
- da ce n3dpbna ounceBbT

He n3BbPwBaIe DeHocTn No noDpBkKaTa B6JIn3OCT do OTKpNT pIaMbK. OnaCHOCT OT noXkap!
3aunTHnTe npncnoc6bneHna, KOHTO ca cBaJIeHc ceI n3BbprBaHe Ha TexHnuecka NODpBXKa I NOUcTBAHe, Tpa6Ba Da 6bDaT OTHOBn HADJIeXHO MOHTnpaHn I npOBepen.
HaToUbaHe Ha KJIInHa
Cnei npoJxHnTeHa ekcnoataa nnn npn Hamaen KaanaTet Ha haucenBaHe da ce n3nnn pa3npnH KInn C fHa nla (da ce otctpaHrOCTpnte pb6obe).
HaToUbaHe Ha pB6a

Kak da npOBepn HbOTo Ha macnot?
- Kolonata 3a utenehe Tp8Ba da e np6paHa.
- Pa3BnHTeTe npbYkata 3a N3MepBaHe Ha MacIOTO.
3.Почстete npьчкata 3a Измерване на MacIoTOm ynplbTHeHnETo 3a MacIOTO. - NocTabete npbukata 3a n3MepBaHe OTHOBO OTBopaDo ynop.
5.ИЗВадеTe OTHOBО прьчкata 3a ИЗМерванe

B cnya, ye HnBOTo Ha macNoTo e MeJdy DBeTe MapKnPOBKn, To B pe3epBoapa IMa DoCTaTbUHO YacNo.
B cnyuai, ye HnBOTo Ha macIIOTo e eoD oJHaTa MapKnpoBka Tp6Ba da 6bJe DOnbJIHeHO MacNo B nOMoUta Ha YnCTa fynia.
- Поберете улътэнeto 3a macIoTO.To trябва дбъдсмeho пи NOBpeNi.
- 3aBnHTe OTHOBo npbUkata 3a nImepBaHe Ha MacNoTo.

Kora da cmeha macnoto?
Pbpa CmraHa Ma MacnoTo cne50 yaca ekcnloataa, cned TOBa Ha BCEKN 250 yaca ekcnloataa.

Heo6xoDnMn ca DBaMa dUsh.
CmHa:
- KoJIoHaTa 3a ueHe TpIeBa da e npIeBaPaHa.
- Pa3BnHTeTe npbKaTa 3a n3MepBaHe Ha MacNoTo.
- Пoctabete pe3epBoap, KoITo MOxe Da MoEme MInHmAnHo 10 Jntpa MacNo, Pod ypeDa 3a HauePbAHe Na DpbBecnHa.
- Pa3Bbptete KanaukaTa 3a n3nyckaHe, 3a da MoKe MacJIoTO Da n3Teue.
- NocTaBete OTHOBO ynIbTHeHneTo n KaNaUKaTa 3a n3nyCKaHe.
- HanbIhHe TEOHOBOTo XnIpaBlinuHo MaCNo (5,5 IInTp) c NOMOHTa Ha YnCTa cyHnY.
- Почистете пьчkaда 3a Измерваенту маслOTO и улът themselves 3a Macloto.
- Почистете ултыненeto 3a macnoto. Рп порди то Трабва за Быдс смehedo.
- 3abntete OTHOBO npbkaTa 3a n3MepBaHeto Ha MACJOTO.
OTCTpaHЯBaIte OTPa6OTeHOTo MacNo B CbOTBcTcTBne Cpena (ceHTbp 3a Cb6npaHe Ha OTPa6OTeH MacNo Ha
MrcTo).3a6paheNo e, da ce n3cunBa OTPa6oTeHOTo MacNo B NOuBaTa Nn Da ce CmecBa C 60klyka.
i XnDpaBnHmacNo
3a ypeia 3a haueBaHe Ha IbpbBecnHa Hne npenopbBaMe CJeHInTe XnPaBnHyMaCJa:
Shell Tellus T 22
Aral Vitam Gf 22
BP Energol HLP 22 Порькa-№. 400142 (1 Liter)
Mobil DTE 11
nJn paBHOToH0
Да He ce n3noJ3BaT dpyrBn BnIOBe MacNo. N3noJ3BaHeTo Ha dpyrBn BnIOBe MacNo OKa3Ba BInJHne Ha yHKuYraHa ypeJ 3a HauenBaHe Ha nbpBa.
IOnucTbaTe peoBHO Bb3dyuHnIaФnITbp OT npax 3ampbcaBaHnI, 3a Da npeDoTbpaTInTe
- Tpydnoctnte npn cTaptnpaHeTo,
HamaJIyBaHeTo Ha MOUHOCTTa - npekaJIeHO BvCOKnI pa3XoH Na rOpINBO
IounCTBaIte Bb3dUshnna pnnTbp npn6n3ntenHO Ha BCEkn
25 pa60THn Yaca, a npi NOBNIeHo 3aPaaBaHahe - No-YeCTO.
- Pa3bptete BnHTa n Maxhete Kanaka (29). 6
- Maxhe TcnpaTeHnHaTa Cko6a (37) n Bb3dyuHnna fnnTbp (36) ot neHomatepnaJ ot kanaka. 7
3.Почирете сирраелна скоба,kanakaи пл actина淘汰вьзdyшни Фнгтbp(37).
4.ИЗМИТЕВБ3ДУSHNЯФЛТьрOTпEHOMATEPINAc BOДa N TeUeH NOuHCTBaU npenapat.
5.ИЗТССКАТЕВБЗДУSHINЯФИNTьРВСУХA,ЧИСТаКьрпа. - Octabete Bb3duhna qnntbp da n3cbxhe do6pe.
- Пoctabete Вьздушни Фнлтbpи спраелна тскоба вkanaka.
- OTHOBO 3aterHeTe kanaka.
CmeHnTepeoBHO Bb3dyuHnA qnIbP.
I IOBpeHHeTe Bb3dUshn FInTPn Tp6Ba Da ce CMeHr BeHaHa.
PpOBePKa n CmHa Ha 3anaJInteJIHnTe CBeuN
(38)
(1)

He nnpaTe 3anaJInteJIHaTa CBeU, nIu IueKepa Ha 3anaJInteJIHaTa CBeU, DOKATO dBnraTeJIr pa6OTn. Bncoko HanpexEHe!
Onachoct ot n3rapaHe npn HaropeueH dBVaTeJ. Hocete 3auHTn pKaBn!
IpoBepaBte peoBHO 3anaHnTeJHaTa CBeu pa3ctOHNTo MeKdy eNKeTPOdTe.
3a ceIta npoceDnpaTe no cJeDnHaunH:
- Octabete Dbratela da ce oxlaan.
- Maxhete kanaka (29) Ha Bb3dyuHnY φnTTbp. 6
3.Дрьн electe uekepa Ha 3anaNTenHaTa Cbeu (35)
OT 3anaJIInTeJIHaTa CBeU. 8
- Pa3bTpTeTe 3aapaniteJIHaTa CBeUc c IOCTaBeHnKJIIOU 3a 3anaIITeJIHn CBeUu (39). 9
- Iounctete 3anaIteJHnHaTcBeeu, aKe e 3ambpcena.
- Pa3CToHHeTo MexKdy eJekTpOJaTe Tp8Ba Da 6bJe 0,76 mm.
- MoHTnpaIte 3anaJInteJIHaTa CBeue B O6paTHa Nocoka.

He 3ataraite npekaeneo Mhoro 3anaJInteHaTa CBeu.
CmeHnTe 3anaJInteJIHaTc CBeu:
- Na BCEKn 100 yaca nIIIN BCEKn Ce3OH (B 3aBcIMoCT OTOBa, KOI cnUyA hAcTbI IN NO-HaPeI)
KOrato N3OJnpaUTo TAnO e NOBpeDeHO - npn cnJIeH harap Ha eJneKtpoInte
- npn CNIHO 3aMbpcHeH NJI OMacIeH eJKeKtpoDn
I3no3BaIte cIeHNITE 3aIaIHTeHn CBeu:
Transport-instructions

- Champion RC12YC
- sau echivalent