
780 CORDLESS - Cordless rotary tools DREMEL - Free user manual and instructions
Find the device manual for free 780 CORDLESS DREMEL in PDF.
| Brand | DREMEL |
| Model | 780 CORDLESS |
| Product Type | Cordless Rotary Tool |
| Power Supply | Rechargeable 7.2V Battery (pack 785) |
| Charger Included | Charger 786, 3-hour charging time |
| Speed Range | 5,000 to 25,000 rpm (10 positions) |
| Variable Speed | Yes, adjustment wheel |
| Shaft Lock | Yes, for accessory change |
| Collet | Included, with collet wrench |
| Compatible Accessories | Max shank 3.2 mm, max disc 32 mm |
| Handle | Ergonomic, three grip positions |
| Noise Level | 65 dB(A) (pressure), >85 dB(A) in operation |
| Vibration | 5.1 m/s² (hand-arm) |
| Storage Temperature | 0 to 40°C |
| Charging Temperature | 0 to 40°C |
| Warranty | 2 years (Basic 1 year) |
| Maintenance | Clean with a dry cloth, check carbon brushes |
| Repairs | Entrust to a Dremel approved service center |
| Country of Origin | EU (manufactured by Dremel Europe) |
Frequently Asked Questions - 780 CORDLESS DREMEL
User questions about 780 CORDLESS DREMEL
0 question about this device. Answer the ones you know or ask your own.
Ask a new question about this device
Download the instructions for your Cordless rotary tools in PDF format for free! Find your manual 780 CORDLESS - DREMEL and take your electronic device back in hand. On this page are published all the documents necessary for the use of your device. 780 CORDLESS by DREMEL.
USER MANUAL 780 CORDLESS DREMEL
Dremel European Sales Office - The Netherlands
05/01 2610913804

F3
A
B
D
C
F1
1

2
| J | 780 |
| K | 9,6 V --- |
| L | 5000 - 25000 |
| M | 0,8 - 3,2 mm |
| N | 0,418 Kg |
| J | 786 |
| K | 230-240 V, 50-60 Hz |
| O | 230 mA |
| P | 3 hr. |
| J | K | L | M | N | O | P | |
| GB | Model | Input | No Load Speed R.P.M. | Collet Capacity | Weight | Amperage Rating | Charging Time |
| D | Modell | Leistungsaufnahme | Drehzahl unbelastet U/Min. | Spannkapazität | Gewicht | Strom-aufnahme | Ladedauer |
| F | Type | Puisance absorbée | Vitesse à vide tr./min | Capacité pince | Poids | Ampérage | Durée de chargement |
| NL | Model | Opgenomen vermogen | Toerental onbelast o.p.min. | Kapaciteit spantang | Gewicht | nominale stroomwaarde | oplaadtijd |
| S | Modell | Ingängseffekt | Hastigeh obelastad varv/min. | Kapacitet spannhylsa | Vikt | Amperetal | Laddningstid |
| N | Modell | Watt | Tomgangshastigkeit o./min. | Kapasitet chuck | Vekt | Amperetall | Ladetid |
| FIN | Malli | Teho | Kuormittamaton nopeus r/min | Hylsyn koko | Paino | Ampeeriluku | Latausaika |
| DK | Model | Effekt | Hastighed ubels/min. | Kapacitet tang | Vægt | Ampereveärdi | Ladetid |
| I | Modello | Potenza assorbita | Velocità a vuoto giri/min. | Capacità pinza | Peso | Assorbimento di corrente | Tempo di carica |
| E | Modelo | Potencia | Velocidad en vacio r.p.min. | Capacidad de la boquilla de sujeción | Peso | Régimen de amperaje | Tiempo de carga |
| P | Modelo | Potência | Velocidade RPM | Capacidade da pinça | Peso | Intensidade de corrente nominal | Tempo de carga |
| GR | Movrélo | Ioçúnç κινητρα | Táχúŋtα χωρίς φορτίο/στρ. avá | Ytioδόχή σφίγκτήρα | Báρος | Túmè ἐνταούς ρεμματος | Xóvoos φόρτης |
| H | Modell | Telijesitményfélvétel | Terheletten fordulatszám/perc | Feszítési métret | Súly | Áraramósség | Tóltési idô |
| CZ | Typ | Přikon | Otáčky naprázdno ot./min. | Max. prùmér pro upnuti | Hmotnost | Napěti | Doba nabijení |
| PL | Model | Pobór mocy | Prędkość obrotowa w biegu luzem | Średnica mocowania uchwyytu | Cieżar | Amperaž | Czas ludOWANIA |
| TR | Model | Giris güü | Boşakti devir sayisi, dev/dak | Germe kapasitesi | Ağürlügi | Akim Değeri | Şar etme süresi |
| RU | Modélb | Плтравлиема мошноctь | Сторость вразessenя бezи nagузки, об/MIN | Диаметратрona | Massa | Номинальnam сILA тoka | Вермя заюки |
3
GB Mounting Accessories (text page 16)
Montieren des Zubehors (Textsite 20)
F Montage des accessoires (page texte 25)
NL Aanbrengen van accessoires (tekstpagina 30)
S Montering av tillbehör (se sidan 35)
N Montering av utstyr (tekst side 40)
FIN Tarvikkeiden asennus (tekstisivu 45)
DK Pasaetning af tilbehor (tekst side 49)
Montaggio degli accessori (pagina di testo 53)
E Montaje de los accesos (texto en la page 57)
P Montagem de acessórios (págnina 62)
(GR)Pioc va toTOnoTeHnOeTe Ta E5aptnmuTa (oeAlda Kevou 67)
H A tortozékok felszerelése (szöveg oldal 72)
CZ Upinaciprislusenstvi (text na strane 76)
PLMocowanienarzędzi roboczych wuchwycie (tekst, strona 80)
TR Akesesuarin takilmasi (metin sayfasi 85)
RU yCTaHOBka akceccyyapOB (CM. TEKCT Ha ctp. 89)
4
GB Mandrel assembly
D Dorn
F Ensemble mandrin
NL Montage opspandoom
S Satta fast spindeln
N Montering av spindel
(FIN)Karan kokoaminen
DK) Tilbehør til spindler
Gruppo perno
E Conjunto del mandril
P Conjunto de mandris
GR SuvaipmoIoynon Tou Biodtou otEloxous
H Szerszamtortszaregysseg
CZ Montáz trnu
PL Montaž trzpienia
TR Mandren Grubu
RU UCTaHOBKa OnpaBKn

5
GBGripping styles (text page 16)
D Halten des Gerats (Textseite 20)
F Modes de prise en main (page texte 25)
NL Manieren van vasthouden (tekstpage 30)
Grepp (se sidan 35)
N Fastspenningsmater (tekst side 40)
(FIN)Otteet (tekstisivu 45)
DKGrebstyper (tekst side 49)
Possibilità di impugnatura (pagina di testo 53)
E Formas de agarre (textarea en la page 57)
Formas de pegar (pagina 62)
GR TpOiaaβnC (αeIδa Kεμévou 67)
H Befogasi modok (szöveg oldal 72)
CZ Zpusobyuchopeni (text na strane 76)
PL Rylce zaciskowe (tekst, strona 80)
TR Tutma Tarzlari (metin sayfasi 85)
TU Tnbl axbata (CM.TKCT HA ctp.89)

GB-Speed
F-Vitesse
CE DECLARATION OF CONFORMITY
We declare under our sole responsibility that this product is in conformity with the following standards or standardized documents: EN 50 260, EN 60 335, EN 55 014, in accordance with the regulations 73/23/EEC, 89/336/EEC, 98/37/EEC.

01 DREMELE Europe J.P. Houben


CE TODISTUS STANDARDNIMUKAISUUDESTA
Todastamine tijan jastvammeen yksi sitt, etta taniu teute alaalaleutten standarden ja standardomasiakssirajong voatstemultukmen EN 5020,EN 60 233,EN 55 014,seruavien saittenjou makuaseiti 73/23/EGW,89/336/EGW,99/37/EGW.

01 DREJ.P.


CE MINOSEGI TANUSITVANY
Teljes feleldogünkudtabatud kienlajtijk, yogen jiekemaremekovkezSZsabynokvarky vag kteleketz hotsagi eliraksokm megfel: EN 50 260,EN 60 33,EN 55 014, a 73/23/EWG,89/33/EWG,98/37/EWG eliraksokm megfeliden.

01 DRE
MEL Europe
Houben

INFORMATION ON NOISE/VIBRATION
The noise level when working can exceed 85 dB(A). Wear ear protection!
Measured in accordance with EN 50 260 the sound pressure level of this tool is 65dB(A) and the vibration 5.1~m / s^ (hand-arm method).
MELU-/TARINATIETO
CE STRVZUJICI PROHLASENI
Povzutjeme na opodvadhot, zto tento vrobek obok podvida nadeujcimn normalne nober nominalp podladan: EN 50 260, EN 60 335, EN 55 014, odate ustanovni smelnic 73/2/8EW, 89/338/8EW, 98/37/8EW

01 DREMELE Europe

GERAUSCH-/VIBRATIONSINFORMATION
CE DÉCLARATION DE CONFORMITÉ
CE KONFORMITETSFÖRKLARING
Viinyar og相对较ve for, at增添ndaivos vensstansmern med foljande. 1973/23/36/8W, 14/15/36/8W, 14/16/36/8W, 14/17/36/8W, 14/18/36/8W, 14/19/36/8W, 14/20/36/8W, 14/21/36/8W, 14/22/36/8W, 14/23/36/8W, 14/24/36/8W, 14/25/36/8W, 14/26/36/8W, 14/27/36/8W, 14/28/36/8W, 14/29/36/8W, 14/30/36/8W, 14/31/36/8W, 14/32/36/8W, 14/33/36/8W, 14/34/36/8W, 14/35/36/8W, 14/36/36/8W, 14/37/36/8W, 14/38/36/8W, 14/39/36/8W, 14/40/36/8W, 14/41/36/8W, 14/42/36/8W, 14/43/36/8W, 14/44/36/8W, 14/45/36/8W, 14/46/36/8W, 14/47/36/8W, 14/48/36/8W, 14/49/36/8W, 14/50/36/8W, 14/51/36/8W, 14/52/36/8W, 14/53/36/8W, 14/54/36/8W, 14/55/36/8W, 14/56/36/8W, 14/57/36/8W, 14/58/36/8W, 14/59/36/8W, 14/60/36/8W, 14

01 DREMELO Europe J.P.Hoben


CE DECLARACAO DE CONFIRMIDADE
3ARBJIeHNE O COOTBETCTBNI
Mu NnOHOI TERTBCTHEHNOHTO 3AEBRIMRE, 3TOY ITHIO EOR COBTETBETY CNEI DYOKUOMI CTANDAPTM HIN CTADAPTHIO KOJDMHAM; EN 50260, EN 63355, EN 55014, B COOTTEH INKTYPOUMIKI 73/23/EEC,89/336/EEC,98/37/EEC.

01 DREMELE Europe
J.P.Houben

LJUD-VIBRATIONSDATA
Ljudnivan vid arbarekanoverskria 85 dB(A). Anvind hongalukdvi
Anvand horlseryd: Liutankovipin.com
Electrolytes/antibiotics: Immunophenotype E. coli 50-260 at pa denitrificans, 1000-1000000000000000000000000000000000000000000000000000000000000000000000
INFORMAÇÉS SOBRE RUIDO E VIBRAÇÉS
INHΦOPMALURO WUMHOCTN BNBPAU
Pnabo80yeo8bHJyMaMOKTePneBua80dB(A)OBeaJIteHaYUH3aHTNHbIePncNc6BHeHHa
Pirne HEMEHPB 6 BoCTBETTHC CTO cHAPENTON EN 502 280 pycbene.
Pirne HEMEPHEP B 10 CHTBETTHC CTO cHAPENTON EN 502 280 pycbene.
Pirne HEMEPHEP B 5-1 MCTC (no MTGNTy dpy PBC)

CE SAMSVARSEKLAERING
| Contents of Kit | 7800VA |
| Collet | + |
| Chuck | + |
| Wrench | + |
| Literature Pack | + |
| Carrying Case | + |
| Accessories (diagram 7) | 25 |
General Operating Tips:
SAFETY INSTRUCTIONS
When using electric tools, the following basic safety precautions should always be followed to reduce the risk of fire, electric shock, and personal injury. Read all these instructions before attempting to operate this product. Save these instructions.
- Check voltage indicated on nameplate
- Keep work area clean. Cluttered areas and benches invite injuries
- Consider work area environment. Do not expose power tools to rain. Do not use power tools in damp or wet locations. Keep work area well lit. Do not use power tools in presence of flammable liquids or gasses.
- Guard against electric shock. Avoid body contact with earthed surfaces (e.g. pipes, radiators, ranges, refrigerators).
- Keep children away. Do not let visitors contact tool or cord; they should be kept away from work area.
- Store idle tools. When not in use, tools should be stored in a dry and locked-up place, out of the reach of children.
- Do not force the tool. It will do the job better and safer at the rate for which it was intended.
- Use the right tool. Do not force small tools or attachments to do the job of a heavy-duty tool. Do not use tools for purposes not intended (e.g. do not use a circular saw for cutting tree limbs or logs).
- Dress properly. Do not wear loose clothing or jewelry; they can be caught in moving parts. Rubber gloves and non-skid footwear are recommended when working outdoors. Wear protective hair covering to contain long hair.
- Use safety glasses. Also use face or dust mask, if cutting operation is dusty.
- Connect dust extraction equipment. If devices are provided for the connection of dust extraction and collection facilities, ensure these are connected and properly used.
- Do not abuse the cord. Never carry the tool by the cord, never yank the cord to disconnect it from the socket, and keep the cord away from heat, oil and sharp edges.
- Secure work. Use clamps or a vise to hold the work; it is safer than using your hand and it frees both hands to operate the tool.
- Do not overreach. Keep proper footing and balance at all times.
- Maintain tools with care. Keep tools sharp and clean for better and safer performance. Follow instructions for maintenance and changing accessories. Inspect tool cords and plugs periodically and if damaged, have them repaired by a qualified person. Inspect extension cords periodically and replace them, if damaged. Keep handles dry, clean and free from oil and grease.
- Disconnect tools. Disconnect tool when not in use, before servicing or when changing accessories such as blades, bits and cutters.
- Remove tool keys. Form the habit of checking to see that keys and adjusting wrenched are removed from the tool before turning it on.
- Avoid unintentional starting. Do not carry a plugged-in tool with a finger on the switch. Be sure the switch is off when plugging it in.
- Outdoor use extension cords. When tool is used outdoors, use only extension cords intended for use outdoors and so marked.
- Stay alert. Watch what you are doing, use common sense and do not operate tool when you are tired.
- Check damaged parts. Before you use the tool, always carefully check the guarding and other parts to determine that they will operate properly and perform their intended functions. Check for alignment of moving parts, binding of moving parts and breakage of parts. Check for proper mounting of all parts and any other conditions that may affect their operation. A guard, switch, or other part that is damaged or defective should be properly repaired or replaced by a qualified person. Do not use tool, if switch does not turn it on and off.
- Warning! Use the tool and its accessories in accordance with these safety instructions and in the manner intended for the particular tool, taking into account the working conditions and the work to be performed. Use of the tool for operations, different from those normally expected to be performed by the particular tool, could result in a hazardous situation.
- Have the tool repaired by a qualified person. This electric tool is in accordance with the relevant safety rules. Repairs should only be carried out by qualified persons using original spare parts, otherwise this may result in considerable danger for the user.
DREMEL TOOL SAFETY

- Read and save this instruction manual and the enclosed safety instructions
- When you put away the tool, switch off the motor and ensure that all moving parts have come to a complete standstill
In case of electrical or mechanical malfunction, immediately switch off the tool or disconnect charger
Only use the original DREMEL accessories which can be obtained from your DREMEL dealer. - Before using accessories always compare the maximum allowed r.p.m. of that specific accessory with the r.p.m. of the tool
This tool should not be used by people under the age of 16 years - Never use grinding wheels over 114 (32 mm)
- Never use drill bits over 1/8'' (3.2 mm)
- Never use shaft lock while tool is running
- Store tool in locations where temperature will not exceed 40^
- Ensure that the collet size corresponds with the shaft size of the accessory
- Keep the air vent openings clean and uncovered
- Handle and store grinding/cutting discs carefully to avoid chipping and cracking
-
Do not use damaged, deformed or vibrating grinding/cutting discs
For mounting/using non-Dremel accessories observe the instructions of the manufacturer concerned
Before using the tool -
ensure that accessory is correctly mounted and firmly tightened
- check if accessory runs freely by turning it by hand
- test-run tool for at least 30 seconds at highest no-load speed in a safe position
-
stop immediately in case of considerable vibration or other defects and check tool to determine the cause
-
! Never use a cutting disc for side grinding
- When grinding metal, sparks are generated; keep other persons and combustible material from work area
- Wear protective glasses and gloves, hearing protection, a dust mask, and sturdy shoes; when necessary also wear an apron
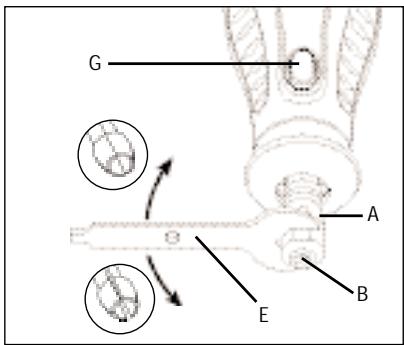
Apply wire of bristle brush lightly to the work as only the tips of the wire/bristles do the work. - ! The accessory continues to rotate for a short time after the tool has been switched off
DREMEL CORDLESS TOOL SAFETY
- A battery operated tool with a separate battery pack must be recharged only with the specified charger for the battery.
- Use battery operated tool only with the specifically designated battery pack. Use of any other batteries may create a risk of fire.
- Avoid accidental starting. Be sure switch is in the off position before inserting the battery pack.
- Disconnect battery pack from tool or place the switch in the off position before making any adjustments, changing accessories, or storing the tool.
- When the battery pack is not in use, keep it away from other metal objects like: paper clips, coins, keys, nails, screws, or other small metal objects that can make a connection from one terminal to another.
Always hold the tool firmly in your hands during the start-up.
BATTERY / CHARGER SAFETY
- Before using the battery charger, read all instructions and cautionary markings on the 786 battery charger, 785 battery pack, and 780 product using battery.
- Use only the charger which accompanied your product or direct replacement as listed in the catalog or this manual.
- Do not disassemble charger or operate the charger if it has received a sharp blow, been dropped or otherwise damaged in any way.
- Do not recharge battery in damp or wet environment. Do not expose charger to rain or snow. If battery case is cracked or otherwise damaged, do not insert into charger.
Charge only Dremel No. 785 rechargeable batteries with charger 786. - Charge battery pack in temperatures above 0^ and below 40^ . Store tool and battery pack in locations where temperatures will not exceed 40^ or drop below 0^ .
- When damaged and under extreme usage and temperature conditions, batteries in battery pack may start to leak. If liquid comes into contact with the skin, wash quickly with soap and water, then with lemon juice or vinegar. If liquid gets into eyes, flush eyes with clean water for a minimum of 10 minutes and seek immediate medical attention.
- Place charger on flat, non-flammable surfaces and away from flammable materials when recharging battery pack.
GB

Use of an attachment not recommended or sold by Dremel may result in risk of fire, electric shock or injury to persons.
- Never charge battery pack outdoors.
BATTERY DISPOSAL
- Do not attempt to disassemble the battery or remove any component projecting from the battery terminals
- At the end of the battery's useful life, do not throw out the battery. Please bring your battery to a proper battery disposal location or return your batteries to one of the DREMEL service stations (address are listed on the service diagram supplied with the tool)
USE
-
On/Off Button "C" (diagram 1)
-
Switch on the tool and select speed by pushing the dial to the desired speed range.
Speed from 5,000 - 25,000 R.P.M.'s -
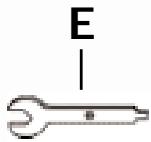
Mounting Accessories (diagram 3)

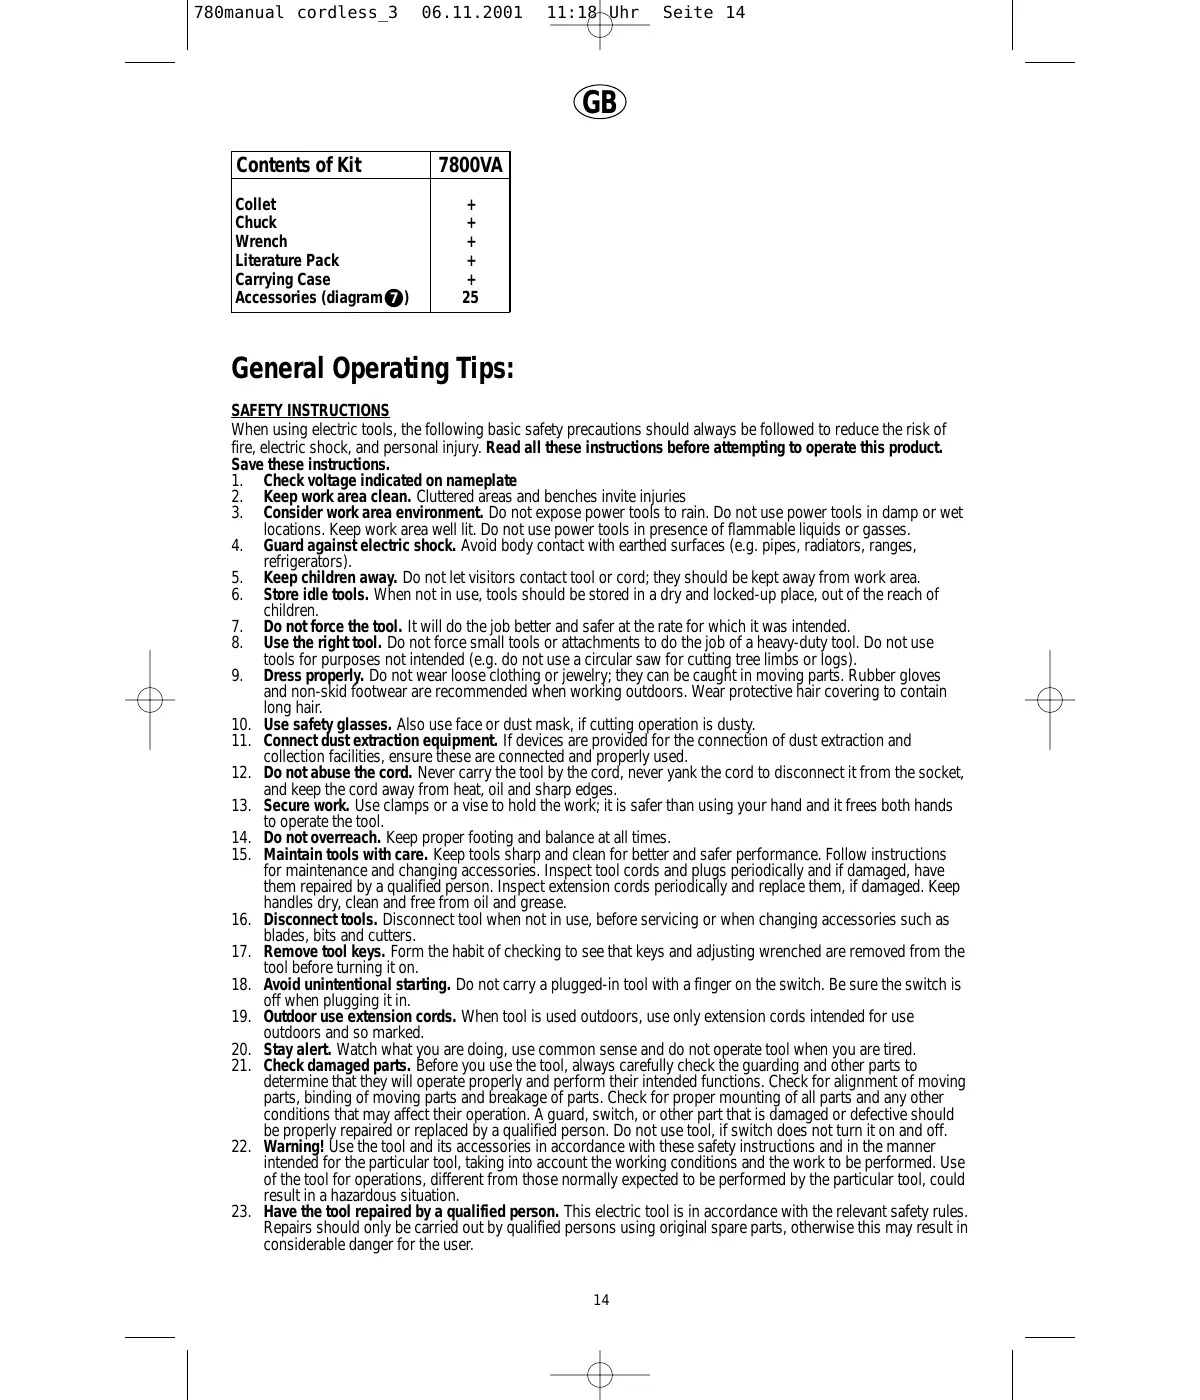
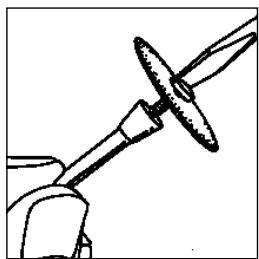
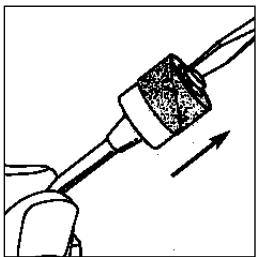
To Loosen, push Shaft Lock button "D" and hold it, while turning the Collet Nut "A" (or chuck) by hand until the shaft locks preventing further rotation. If necessary use the Wrench, "E" to loosen the Collet Nut "A"
- Change accessories by inserting an accessory into the Collet "B" (or chuck) as far possible to minimize run out and unbalance

- With Shaft Lock button "D" engaged, tighten the Collet Nut "A"(or chuck) by hand until the accessory shank is gripped by the Collet "B". If necessary use the Wrench "E" to tighten the Collet Nut "A".
-
Avoid excessive tightening of the Collet Nut "A".
-
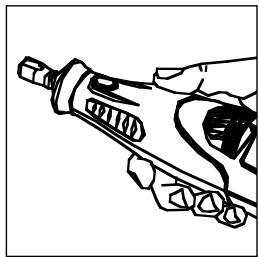
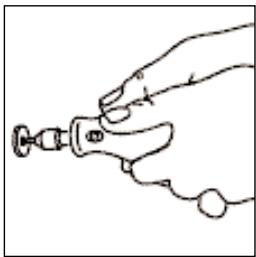
Holding and guiding the tool (see diagram ⑤)
-
pencil grip for precision work (engraving)
- sparing knife hand grip for rough work (grinding)
-
2 hand golf grip ideal for when you need to keep the tool parallel to the work surface, i.e. using a cut-off wheel
-
Charging the tool
-
The cordless rotary tool is not fully charged. The tool is equipped with a removable battery pack. Be sure to charge the battery pack prior to initial use. For best results on first charge, charge battery pack overnight.
-
To charge the battery pack "H" (see diagram 1)
-
Put the switch "C" in the "OFF" position.
- Squeeze release tabs "I" on both sides of battery pack"H", and remove battery pack "H" from back of tool as shown on page 2.
- Align marks "F2" on battery pack with marks "F3" on charger and insert battery pack "H" into charger "G".
- Plug charger "G" into the power source. The green L.E.D. light indicates connection has been made and the battery pack "H" is charging. Under normal usage the battery pack "H" requires 3 hours charging time to reach full capacity.
- When charging is complete remove battery pack "H" from charger "G".
-
Align marks "F2" on battery pack with marks "F1" on the housing of tool. Squeeze release tabs "I", insert battery pack "H" into back of tool, and release pressure on tabs "I" so it locks in place.
-
Important charging notes
-
The battery pack accepts only about 80% of its maximum capacity with its first few charge cycles. However, after the first few charge cycles, the battery will charge to full capacity.
- The charger was designed to fast charge the battery only when the battery temperature is between 0^ and 40^ .
- A substantial drop in operating time per charge may mean that the battery pack is nearing the end of its life and should be replaced.
- If you anticipate long periods (i.e. a month or more) of non-use of your tool, it's best to run your tool down until it is fully discharged before storing your battery pack. After a long period of storage, the capacity at first recharge will be lower. Normal capacity will be restored in 2 or 3 charge / discharge cycles. Remember to unplug charger during storage period.
-
If battery pack does not charge properly:
-
Check for voltage at outlet by plugging in some other electrical device.
- Check to see if outlet is connected to a light switch which turns power "off" when lights are turned off.
- Check battery pack terminals for dirt. Clean with cotton swab and alcohol if necessary.
GB
- If you still do not get a proper charging, take or send tool, battery pack, and charger to a Dremel Service Station for repair (address are listed on the service diagram supplied with the tool).
Note: Use of chargers or battery packs not sold by Dremel may void warranty
APPLICATION ADVICE
- Always practice on a piece of scrap material first to choose the right accessory and determine the optimum working speed
- Do not apply to much pressure on the tool; let the speed do the work for you
- Use only accessories that are recommended by the manufacturer for your model.
SPEED
Your Cordless Rotary Tool is equipped with a variable speed control dial. To turn the tool ON, rotate dial to desired number to select the operating speed needed from 5.000 - 25.000 RPM. To turn tool OFF, rotate dial to the "0" OFF position. You can refer to the charts on page 4, 5, and 6 to determine the proper speed, based on the material being worked and the type of cutter or other accessory being used. These charts enable you to select both the correct accessory and the optimum speed at a glance.
The Settings for Approximate Revolutions Per Minute Cordless Rotary Tool Variable Speed Model 780
| Switch Setting | Speed Range |
| 0 | Off Position |
| 2 | 1,000 - 5,000 RPM |
| 4 | 6,000 - 10,000 RPM |
| 6 | 11,000 - 15,000 RPM |
| 8 | 16,000 - 20,000 RPM |
| 10 | 21,000 - 25,000 RPM |
The speed of the rotary tool is controlled by setting this indicator on the housing.
Some rules of thumb in regard to speed:
- Plastic and materials that melt at low temperatures should be cut at low speeds.
- Polishing, buffing, and cleaning with a wire brush must be done at speeds below 15,000 RPM to prevent damage to the brush.
- Wood should be cut at high speed.
- Iron or steel should be cut at top speed if using tungsten carbide accessory, but at lower speeds if using high speed steel cutters. If a high speed steel cutter starts to chatter this normally means it is running to slow.
- Aluminum, copper alloys, lead alloys, zinc alloys and tin may be cut at various speeds, depending on the type of cutting being done. Use paraffin or other suitable lubricant on the cutter to prevent the cut material from adhering to the cutter teeth.
To aid you in determining the optimum operational speed for different materials and different accessories, we have constructed a series of tables that appear on diagram 6. By referring to these tables, you can discover the recommended speeds for each type of accessory. Look these tables over and become familiar with them.
Ultimately, the best way to determine the correct speed for work on any material is to practice for a few minutes on a piece of scrap, even after referring to the chart. You can quickly learn that a slower or faster speed is more effective just by observing what happens as you make a pass or two at different speeds. When working with plastic, for example, start at a slow rate of speed and increase the speed until you observe that the plastic is melting at the point of contact. Then reduce the speed slightly to get the optimum working speed.
Increasing the pressure on the tool is not the answer when it is not cutting as you think it should. Perhaps you should be using a different cutter, and perhaps an adjustment in speed would solve the problem. But leaning on the tool seldom helps.
MAINTENANCE AND REPAIR
- Keep tool, battery pack and charger clean (some household cleaning products and solvents can damage plastic parts; these products include among others benzine, trichloroethelene, chloride, ammonium
- Excessive sparking mostly indicates worn-out carbon brushes, therefor your tool should be brought to a service station.
- In case of an electrical or mechanical defect, hand in tool at one the DREMEL Service Stations for repair (addresses are listed on the service diagram supplied with the tool)
VEDLIKEHOLD/REPARASJON
MANUTENÇA/OREPARACAO
This DREMEL product has been carefully inspected before leaving the factory and carries a guarantee of 2 years ("BASIC": 1 year) from the date of purchase during which period any defect caused by faulty material or manufacture will be corrected without charge. Damage due to normal wear and tear, overload or improper handling will be excluded from the guarantee. In case of a complaint, please, send the tool undismantled together with proof of purchase to the nearest DREML Service Station, postal charges prepaid. DREML reserves the right to decline responsibility in case of repairs made by persons other than DREML service staff. In no event compensation can be claimed in case of damage to the workpiece or injury to the tool user. This guarantee does not affect your statutory rights (UK only). Information on guarantee in instruction manual herewith expires.