14545-56RH - Electric iron RUSSELL HOBBS - Free user manual and instructions
Find the device manual for free 14545-56RH RUSSELL HOBBS in PDF.

User questions about 14545-56RH RUSSELL HOBBS
0 question about this device. Answer the ones you know or ask your own.
Ask a new question about this device
Download the instructions for your Electric iron in PDF format for free! Find your manual 14545-56RH - RUSSELL HOBBS and take your electronic device back in hand. On this page are published all the documents necessary for the use of your device. 14545-56RH by RUSSELL HOBBS.
USER MANUAL 14545-56RH RUSSELL HOBBS
HHCTpyKcnn (bIrapckn) 86
Read the instructions, keep them safe, pass them on if you pass the appliance on.
Remove all packaging before use.

IMPORTANT SAFEGUARDS
Follow basic safety precautions, including:
1 This appliance must only be used by or under the supervision of a responsible adult. Use and store the appliance out of reach of children.
2 Don't put the appliance in liquid, don't use it in a bathroom, near water, or outdoors.
3 Don't iron clothing while it's being worn - you'll injure the wearer.
4 Don't touch the soleplate, and keep away from the steam it emits.
5 Don't use the iron in the vicinity of children.
6 Use the iron, or set it on its heel, on a stable, level, heat-resistant surface, preferably an ironing board.
7 Don't leave the iron unattended while plugged in, or while it's standing on the ironing board.
8 Unplug the iron before filling, before cleaning, and after use.
9 Sit the iron upright when you're not ironing.
10 Don't fill the iron directly from the tap, use the jug.
11 Don't use accessories or attachments other than those we supply.
12 Don't use the appliance for any purpose other than those described in these instructions.
13 Don't scratch the soleplate - avoid buttons, zips, etc.
14 The appliance has a protective thermal fuse, which will blow if it overheats. If this happens, the appliance will stop working, and must be returned for repair.
15 Don't operate the appliance if it's dropped or damaged, or if it malfunctions or leaks.
16 If the cable is damaged, it must be replaced by the manufacturer, its service agent, or someone similarly qualified, in order to avoid hazard.
household use only

BEFORE USING FOR THE FIRST TIME
- Remove any labels, stickers or packaging from the iron and soleplate.
- Don't worry if the iron smokes a bit at first, it'll stop as the element cures.
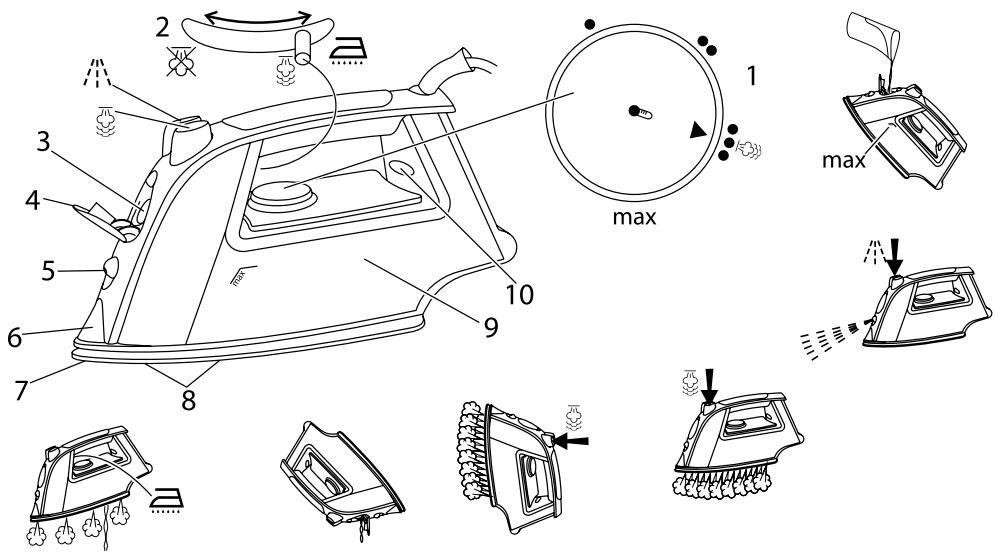
diagrams
1 temperature control
2 steam control
3 water inlet
4 water inlet cover
5 spray nozzle
6 glow tip
7 soleplate
8 steam vents
9 reservoir
10 auto shut-off light
- Iron an old piece of cotton fabric, to clean the soleplate.
- Press the 串 and 串 buttons 3 or 4 times, to check them.
AUTO SHUT-OFF
- If the iron is motionless, it will switch off after about 30 seconds with the soleplate down, or about 8 minutes if it's upright.
- The auto shut-off light will flash, and keep on flashing till you move the iron.
- To switch on again, lift it up, tilt it forward, then sit it upright to return to operating temperature.
- No settings are lost during auto shut-off.
PREPARATION
1 Check for textile care symbols (Aa).
2 Iron fabrics needing low temperatures first, then those that need medium temperatures and finish with those needing high temperatures.
temperature setting guide
label marking
temperature setting
cool - nylon, acrylics, polyester
warm - wool, polyester mixtures
hot-cotton,linen
do not iron
If the instructions on the fabric label differ from this guide, follow the instructions on the label.
FILLING
3 The iron may be used with tap-water, but if you live in a hard-water area, you should use distilled water (not chemically descaled water).
4 If you buy distilled water, check that it is marketed as suitable for irons.
5 Don't add anything to the water - you'll damage the iron.
6 Unplug the appliance.
7 Set the temperature control to. .Set the steam control to
8 Open the water inlet cover.
9 Tilt the iron till the water inlet cover is vertical.
10 Pour water from the jug into the water inlet.
11 Pour slowly, to allow the air in the reservoir to escape, and avoid an airlock.
12 Don't fill past the max mark on the reservoir, or water will escape in use.
13 Close the water inlet cover.
14 Wipe up any spillage.
SWITCH ON
15 Set the temperature control to. Set the steam control to
16 Sit the iron on its heel.
17 Put the plug into the power socket.
18 Turn the temperature control to bring the setting you want (see the guide below) next to the mark.
19 The tip will flash while heating or cooling, then glow steadily when it's at the set temperature.
20 The colour of the tip will change to match the colour of your chosen setting.
21 The colours are:
orange = cold
blue =
green =
pink = ● ●
red = max
22 Wait till the tip glows steadily, then start ironing.

STEAM IRONING
23 If you intend to use steam, the temperature setting must be or higher.
24 If you don't, you'll get water on your clothes, not steam.
25 Set the steam control to the setting you want ( = no steam, = high) .
26 Wait till the tip glows steadily, then start ironing.

SPRAY
Water spotting affects some fabrics. Test this on a hidden part of the fabric.
27 This function works with dry or steam ironing, as long as there is water in the reservoir.
28 Lift the iron off the fabric.
29 Aim the spray nozzle at the fabric.
30 Press the button.
31 You may have to press it 2 or 3 times to pump water through the system.

SHOT OF STEAM
32 This function works with dry or steam ironing, as long as there is water in the reservoir.
33 If you intend to use steam, the temperature setting must be or higher.
34 Lift the iron off the fabric.
35 Press the button.
36 You may have to press it 2 or 3 times to pump water through the system.
37 Leave 4 seconds between shots, to let the steam build up.

DRY IRONING
If you're going to be dry ironing for 20 minutes or more, empty the reservoir first, to avoid spontaneous bursts of steam.
38 Set the steam control to
39 Wait till the tip glows steadily, then start ironing.

VERTICAL STEAMING
40 Remove wrinkles from hanging clothes, hanging curtains, and furnishing fabrics.
41 Check that there is adequate ventilation behind the fabric, otherwise moisture may build up, causing mildew.
42 Check that there is nothing behind the fabric that may be damaged by the steam.
43 Check that pockets, turn-ups, and cuffs are empty.
44 Check that there is water in the reservoir.
45 Set the temperature control to max. Set the steam control to
46 Lift the iron off the fabric.
47 Press the button.
48 You may have to press it 2 or 3 times to pump water through the system.
49 Leave 4 seconds between shots, to let the steam build up.

AFTER USE
50 Set the temperature control to. Set the steam control to
51 Unplug the appliance.
52 Open the water inlet cover.
53 Hold it over a sink, turn it upside down, and drain the water from the reservoir, via the water inlet.
54 Close the water inlet cover.
55 Sit the iron on its heel.
56 Leave it to cool down completely.
57 When it's cold, wipe off any moisture, and wind the cable round the heel.
58 Store the iron on its heel, to avoid corrosion and damage to the soleplate.

SELF CLEAN
59 To prevent scale building up, use the self clean function at least monthly in normal water areas, more often in hard water areas.
* Products returned under guarantee with faults due to scale will be subject to a repair charge.
60 You'll need a basin or a large bowl to catch the water coming out of the soleplate.
61 Fill the reservoir to the max mark.
62 Sit the iron on its heel.
63 Put the plug into the power socket.
64 Set the temperature control to max. Set the steam control to
65 The tip will flash till it reaches the set temperature, then it'll glow steadily.
66 Hold the iron over the basin or bowl, with the soleplate down.
67 Move the steam control past 忍 to 三 and hold it there.
68 Gently move the iron to and fro.
69 Water and steam will wash scale and dust through the soleplate.
Keep clear of the escaping water and steam.
70 Carry on till the reservoir is empty.
71 Set the steam control to
72 Unplug the iron, and sit it on its heel to cool.
73 When it's cold, wipe off any moisture, and wind the cable round the heel.
74 Store the iron on its heel, to avoid corrosion and damage to the soleplate.

CLEANING
75 Unplug the iron, and sit it on its heel to cool.
76 Clean the outside surfaces of the appliance with a damp cloth.
77 Remove spots from the soleplate with a little vinegar.
78 Store the iron on its heel, to avoid corrosion and damage to the soleplate.

ANTI-SCALE
79 The anti-scale agent incorporated in the iron helps prevent the build-up of scale.
80 Don't use a descending solution, or you'll destroy the anti-scale agent.

ENVIRONMENTAL PROTECTION
To avoid environmental and health problems due to hazardous substances in electrical and electronic goods, appliances marked with this symbol mustn't be disposed of with unsorted municipal waste, but recovered, reused, or recycled.

FONCTION ANTI-CALCAIRE
UeRBeHo = max (MaKcImaJIHO)
22 I3yakaIte BbpxbT da 3acBETn HnpeKbCHaTo, npdei da 3anOuHHeTe da IlaIte.

TJIADHECIIAPA
23 Ako cmaTaTe da n3noJ3BaTe npa, hacTroPoiKaTa 3a TempePaTpa Tp86Ba da 6bJe nnI NO-BVcOKa.
24 Ako He taka, Bbpxu dpexnte Bn ige nonaIHe BOa, He npa.
25 HacptpoTe KOHTpOHa Na npaTa Ha HacTpoKaTa, KOaTo NcKaTe ( = 6e3 npa, = BVCOKO)
26 N3aKaITe BbPbT da 3acBcTu HnpeKbChATo, npedn da 3anoHte da rnaTe.

ПВБСКАНЕ
Пиняков плaitobe ce noявоват netha OT BOdata. Поберете TOba Ha ckpnta Yaact OT плata.
27 Ta3n ΦyHKZnpa6OTn CbC cyXo rJaHe nIi rJaHe c npa, CTnRa da Ima B0da B pe3epBoapa.
28 NobdHnHeTe IOTnTa OT nPaT.
29 Hacoute du3aTa 3a npbckaHe KbM nlaTa.
30 Hatnche6ytoh
31 Moxe da se haIooJn da haTncHeTe 2 nIIIN 3 nbTN, 3a da nI3NOMnITe BOJa npEe cnCTeMaTa.

YDAPHA NAPA
32 Ta3n ΦyHKZnpa6OTn CbC cyXo rJaHe nIi rJaHe c npa, CTnRa da Ima B0da B pe3epBoapa.
33 Ako cmaTaTe da n3noJI3BaTe npa, HacTpoIkaTa 3a TempePaTypa TpI6Ba da 6bJe nnI INo-BnCOKa.
34 NOBUNHHeTe IOTnTa OT nIaTa.
35 HaTnCHTe 6yToH
36 Moze da ce haIoxn da HaTncheTe 2 nnn 3 nbTn, 3a da n3nOMnTe BOda npe3 cnCTeMaTa.
37ИЗакайтЕсекунди мжуnpьсканята,зда може да се обраэва napa.

CYXO TIIAIDEHE
Ako ige npabnte cyxo rnaedehe 3a noBce ot 20 mHyTu, nbpBO n3npa3Hepe3epBoapa, 3a da n36erHeTe cnoHTaHHn pbcKn OT npa.
38 HaCTpoTe KOHTpONa Ha npaTa Ha
39 N3yakaIte BbpxbT da 3acBET HepeKbCHaTo, npedn da 3anoHete da rlaIte.

BEPTIKAJIHA IAPA
40 OTrpaHbaiTe TbHKn OT Okaehn dpexn, Bncsui 3abecu n TaHnce np Ha Me6einn.
41 Поберете дали有很大а щдковая вентлиаця за д палта, в потувен слун може на се натура влага, корто д пошини песен.
42 Праверета Няма Ницо залда, Кося сбдп повешende от napа.T.
43 PpOBepe TaI N DxKo6ObTe, MaHSeTnTe n pKbAbeNITe ca npa3Hn.
44 Поверете дали за вора в розервoga.
45 HacptpoTe KOHTpONa Ha TemnepaTypaHa max. HacptpoTe KOHTpONa Ha napata Ha
46 NOBUNHHeTe IOTnTa OT nIaTa.
47 HatncheTe 6yToH
48 Moxe da se haIooJn da haTncHeTe 2 nIIIN 3 nbTN, 3a da nI3NOMnITe BOJa npEe CnCTeMaTa.
49ИЗакайтЕ 4секунди мжду пьсканята, за д соже да се образува napa.

CNEIyNOTPEBA
50 HacptpoTe KOHTpOHa Ha TempepaTypaTa Ha .HacptpoTe KOHTpOHa npapaTa Ha
51 N3KJIIOUeTe ypeDa OT 3axpaHbAHeTo.
52 Otbopete kanaeTo 3a BodaTa.
53ДрьжTe ro hab MNBka,обьрнete ro obpaTHOи n3TOUeTe BOdaTа OT pe3epBoapa npesOTbopa 3a BOda.
54 3aTbopeTe kanaueTo 3a BOData.
55 NocTaBete IOTnTaN3npaBeHa.
56 OctaBeTe ro da n3CTnHe HAnbIHO.
57 Korato e ctyeH, n36bpeTe BnaraTa n Habnite Ka6ena OKoNo DoJHaTa qaCT Ha IOTnraTa.
58 CbxaHbBaIte IOTnTa n3npaBeHa, 3a Da n36eHHeTe KOpO3nI uIeTn IO pNo pNoata.
CAMOIOYUCTBAHE
59 3a Да п dedOTьразиTe HaTpynBaHTo Ho KOTJIeN KaMbK, ИЗПОЛЗВaIte ФунКцЯТа 3a CamOnOчИСТВaHе ПОHe BeДнБЖ МeceЧNO B paJOHи C HopMaJIHa BOДa И NO-YeCTO B paJOHи C TBbРДa BOДa.
們 IpoIyKTI noI rapaHcIa, BbPHaTc NOBpeDN B pe3yIITaT OT HaTpynBaHe Ha KOTJIeH KaMbK, IOJLeXaT Ha TAKCa 3a peMOHT.
60 5e Bn 6bJe Heo6xoJIM IereH nnI rOJaMa Kypa 3a Cb6bpAHe Ha BOdaTa, KOrTO n3JIIN3a OT nIOuata.
61 HanbIHeTe pe3epBoapa Do MaKcImaJIHaTa MapKnIpOBKa.
62 NocTaBete IOTnIa Tn3npaBeHa.
63 BkIoue TcEeB 3axpaHbuaa KOnTaKT.
64 HacptpoTe KOHTpOJa Ha TemnepaTypata Ha max. HacptpoTe KOHTpOJa Ha napata Ha
65 BbpxbT ue mra,doKaTo He doCTnHe 3aJaDeHaTa TempepaTpya, cNeI KOeTo ue CBeTI.
66ДрьхтЕЮТЯТанадлereHaИиКупа,TПLOЧKaТаНадoly..
67 3aBbptTe KOHTpOHa Ha npaTa CneI DIO n FO dpbXte TaM.
68 BhimataHno pa3dBnKeTe IOTnTa Happei-Ha3aI.
69 Bɔdata n npapata Ⅲmny KOTneHnKaMbK n 3aMbpcBaHnTa npe3 nnoata.
卡 Na3eTe ce ot n3nnaaata Boga napa.
70 PpOdbIjKeTe,doKaTo pe3epBoapbT ce n3npa3Hn.
71 HacptpoTe KOHTpOHa Ha npaTaHa
72 N3KJIIOUeTe IOTnIa OT 3axpaHBAHeTo IЯ OCTaBeTe I3npaBeHa, 3aДЯИЗТиHe.
73 Korato e ctyeHa, n36bpeTe BnaraTa u 3aBnTe Ka6eJa OKoNo DoJHaTa qAcT Ha IOTyraTa.
74 CbxaHbAaTe IOTnTa n3npaBeHa, 3a da n36erHeTe Kopo3nI uIeTn no pIoouata.
IOYNUCTBAHE
75 N3KJIIOUeTe IOTnIaT O 3axpaHbAHeTo IЯ OCTaBeTe N3PpAbEHa, 3a Da N3CTInHe.
76 NoyuCTe Te BbHnHInTe NOBbPxHOCTn Ha ypeDa C BlaXHa Kbpna.
77 OTePraHbAte nEHTaOTnIOuTaC MaJIko OcET.
78 CbxaHbBaIe IOTnTa n3npaBeHa, 3a da n36erHeTe KOpO3nI n 1eTu n oIIOuata.
AHTN-KOTJIEN KAMbK
79 ПpenapabT npOTnB KOTJIeH KaMbK, BrpaIeH B IOTnTa, CNOMaRa 3a npEIOTBpaTBAHe Ha HacNoRABaHETo Ha KOTJIeH KaMbK.
80 He n3noJIbBaIe pa3TBOp npOTnB KOTJIeH KaMbK, B npOTnBEn ClyuAe yHnIOJXIT npenapata.
OIIA3BAHE HA OKOIHATA CPEIa
3a da ce n36eHaT ekoloruHn 3dpabHn npo6IeMn nopadn HauNue Ha onaChn cy6ctanuB eeneKtpnueecknte n eeneKtpoHn cToKn, ypeJnte, o6o3naeHn C To3n CmB0J, He Tpa6Ba da ce N3xBpIaT 3aeHNO C HecOpTnpaHn O6uHnCKn OTNaDbu, a CneJaDa ce BbPHaT 6paTHO, da ce n3No13BaT 0THOBo IIN peuNKIpaT.