
Auto-Fix Fast - Car seat CHICCO - Free user manual and instructions
Find the device manual for free Auto-Fix Fast CHICCO in PDF.


| Product Type | Car seat group 1/2/3 (9-36 kg) |
| Brand | Chicco |
| Model | Auto-Fix Fast |
| Dimensions (L x W x H) | 440 x 440 x 660 mm |
| Weight | 5.8 kg |
| Shell Material | Reinforced polypropylene |
| Cover | Removable washable fabric |
| Installation | Isofix system + top tether or seat belt |
| Child Weight | 9 to 36 kg |
| Recommended Age | Approx. 9 months to 12 years |
| Orientation | Forward-facing |
| Restraint System | 5-point harness (up to 18 kg) then vehicle seat belt |
| Headrest | Height adjustable (9 positions) |
| Reclining Backrest | Yes, recline positions |
| Side Protection | Integrated side reinforcements |
| Safety Standard | ECE R44/04 or R129 (i-Size) depending on version |
| Care and Cleaning | Cover machine washable at 30°C, do not use bleach |
| Spare Parts | Available from Chicco customer service |
| Warranty | 2 years |
| Country of Manufacture | Italy |
Frequently Asked Questions - Auto-Fix Fast CHICCO
User questions about Auto-Fix Fast CHICCO
0 question about this device. Answer the ones you know or ask your own.
Ask a new question about this device
Download the instructions for your Car seat in PDF format for free! Find your manual Auto-Fix Fast - CHICCO and take your electronic device back in hand. On this page are published all the documents necessary for the use of your device. Auto-Fix Fast by CHICCO.
USER MANUAL Auto-Fix Fast CHICCO
natural_image
Illustration of a baby car seat with a red button, no text or symbols present- Istruzioni d'uso
- Instructions for use
- Mode d'emploi
- Gebrauchsanleitung
- Instrucciones de uso
- Instruções de utilização
- Gebruiksaanwijzing
• Οδηγίες χρήσης - Brugsanvisning
- Käitöohjeet
• Návod K Použití -
Bruksanvisning
-
Instrukcja sposobu użycia
- Használati Utasítás
• Upute Za Uporabu - Инструкция по использованию
• Návod K Použitiu
• Navodila Za Uporabo - Kullanım bilgileri
- Instructiuni de folosire
- Инструкции за употреба
• Інструкція з використання - Instruções de utilização



natural_image
Line drawing of a car seatbelt with a blue band, no text or symbols present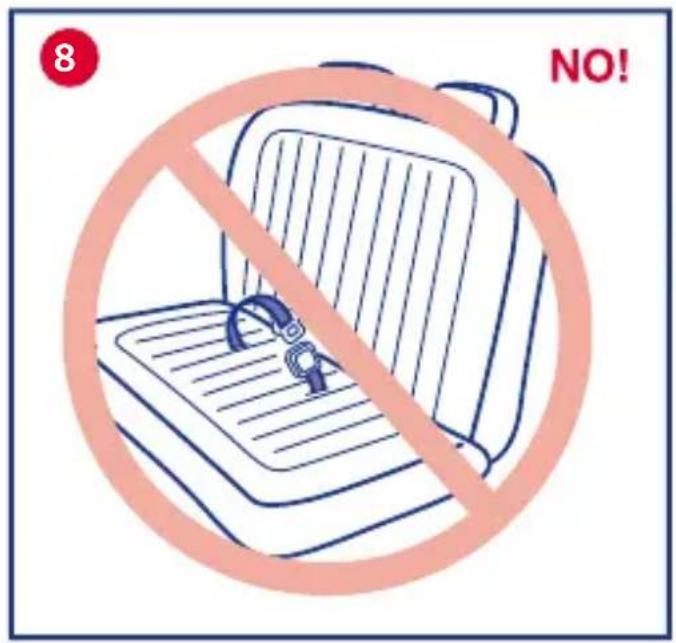


natural_image
Illustration of a baby car seat with red arrows indicating adjustment or movement (no text or symbols)
natural_image
Illustration of a blue athletic shoe resting on a slatted floor, enclosed in a white rectangular frame (no text or symbols)


natural_image
Illustration of a baby car seat with red arrows indicating motion or movement, no text or symbols present



natural_image
Illustration of a medical procedure showing a hand inserting a device into a patient's arm (no text or symbols present)
natural_image
Illustration of a child in a space suit sitting inside a seat, with a red arrow indicating the seatbelt (no text or symbols present)
natural_image
Illustration of a child wearing a medical device with open arms, sitting on a chair, against a purple background (no text or symbols)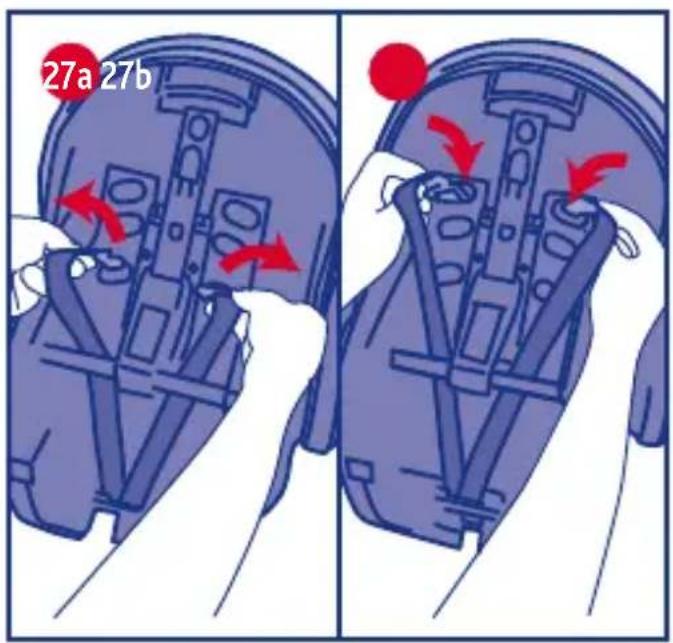

natural_image
Illustration of a baby car seat with a hand adjusting the handle (no text or symbols)
natural_image
Illustration of a hand inserting a device into a car seat, with red arrows indicating the process (no text or symbols present)
CHICCO AUTO-FIX FAST GR. 0+ (0-13kg)
ISTRUZIONI D'USO
INDICE:
1. INTRODUZIONE
1.1 AVVERTENZE
1.2 CARATTERISTICHE DEL PRODOTTO
1.3 DESCRIZIONE COMPONENTI
1.4 POSIZIONI DEL MANIGLIONE
1.5 LIMITAZIONI E REQUISITI D'USO RELA-
TIVI AL PRODOTTO E AL SEDILE AUTO
Noneporen, lapheroniura
1.2 PRODUCT FEATURES
1.3 DESCRIPTION OF THE PARTS
1.4 POSITIONS OF THE HANDLE
1.5 RESTRICTIONS AND REQUISITES REGARDING THE USE OF THE PRODUCT AND CAR SEAT
2. CAR INSTALLATION
2.2 INSTALLATION WITH THE BASE
2.3 INSTALLATION WITHOUT THE BASE
3. OTHER OPERATIONS
3.1 SEATING THE CHILD IN THE CAR SEAT
3.2 ADJUSTING THE POSITION OF THE HARNESS STRAPS
3.3 FIXED OR ROCKING POSITION OF THE CAR SEAT (ROCKER CHAIR MODE)
3.4 USE WITH THE STROLLER
3.5 CLEANING AND STORAGE
1. INTRODUCTION
1.1 WARNINGS
VERY IMPORTANT: TO BE READ IMMEDIATELY
- KEEP THIS MANUAL FOR FUTURE REFERENCE.
- Read these instructions carefully before fi tting and installing the product. The product must not be used by anybody who has not read these instructions.
WARNING Acclogaccident
statistics, the rear seats of a vehicle are generally safer than the front seat: it is therefore recommended to fit the child car seat into the rear seats of the car. In particular, the central rear seat is the safest, when fitted with a 3-point safety strap.
WARNERSROUDANCERNearue
this child car seat fi tted on front vehicle seats fi tted with front airbags. The child car seat can only be installed on a front vehicle seat if the front airbag has been disabled: check with the car manufacturer or the relative user manual for instructions on how to disable the airbag. It is always recommended to slide the vehicle seat as far back as possible, according to whether passengers are travelling in the back.
- It is recommended to ensure that all passengers know how to release the child from the car seat in the case of an emergency.
- Pay close attention on how to fit the child car seat inside the vehicle, to prevent a loose seat or car door from interfering with it.
- No child car seat can guarantee the total safety of your child in the event of an accident, but the use of this product reduces the risk of serious injuries or death.
- The risk of serious injuries to the child increases, not only in the case of accidents, but also in other circumstances (e.g. sudden braking, etc.) if the instructions provided in this manual are not followed carefully: always check that the child car seat is fitted correctly onto the vehicle seat.
- If the child car seat is damaged, deformed or worn out, it must be replaced, as its original safety features may have been compromised.
- This product must not be modified in any way, unless the modification is approved by the manufacturer.
- Do not install accessories, spare parts, or any component not supplied by the manufacturer.
- Never leave your child unattended in the car seat.
Neopached blastorachite
seat without fastening it securely in place; it could hurt or injure other passengers in the car.
- Never place anything except an approved accessory between the vehicle seat and the child car seat or between the child car seat and the child: in the event of an accident, the child car seat may not operate correctly.
recommendedovertherbar
seat if the vehicle is left exposed to direct sunlight.
• After an accident, even a minor one, the child seat incurs damage, even if it is not visible to the naked eye. It must therefore be replaced.
- Do not use second hand child car seats: they may have suffered structural damage which is not visible to the naked eye but however compromise the safety of the product.
- The seat fabric must only be replaced with another approved by the manufacturer as it constitutes an integral part of the child car seat. To ensure the safety of the child car seat, never use it without its fabric cover.
- Check that the harness straps are not twisted and try to prevent them, or any other part of the car seat from getting trapped in the car door or rubbing against sharp objects. Should the belt be slashed or frayed it must be replaced.
Dordianpotboxounsed
objects or baggage on the back shelf of the vehicle: in the event, of an accident or sudden braking, they may injure the passengers.
- Ensure that all the car passengers fasten their seat belts, for their own safety and because, during the journey, they may injure the child in the event of an accident or sudden braking of the car.
- On long journeys make frequent stops. Children tire easily. Never, for any reason, remove your child from the child car seat whilst the car is moving. If your child needs attention, find a safe place and pull over.
Prematurebabiesborbefethe37th
week of pregnancy can be at risk if placed in a child car seat. These newborn babies may encounter breathing problems when sat in a child car seat. We therefore recommend you contact your doctor or hospital staff, before leaving the hospital, so they can evaluate your baby properly and recommend the most suitable type of child car seat.
- Artsana declines all responsibility in cases of incorrect use of this product.
1.2 PRODUCT FEATURES
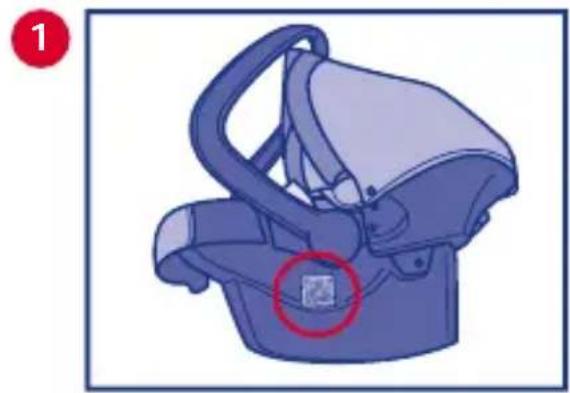
- This child car seat is approved for “Group 0+”, for the transport of babies from birth up to 13 Kg in weight (from 0 to 10/12 months approximately), and conforms to European Standard ECE R 44/04.
•This approval University Withmens
that the child car seat can be used on all types of vehicles. WARNING! "Universal" means that it is compatible with most, but not all car seats.
IMPORTANT INFORMATION
- This is a "Universal" child restraint device. It is approved to ECE Regulation No. 44.04, and it will fit most, but not all car seats.
- A correct fit is likely if the vehicle manufacturer has declared that the vehicle is capable of accepting a “Universal” child restraint device for this age group.
- This child restraint device has been classified as "Universal" under more stringent conditions than those that were applied to earlier designs that do not display this notice.
- It is only suitable if the vehicle is fitted with a 3-point static or 3-point retractor safety belts approved to UN/ECE Regulation No.16, or other equivalent standards.
- If in doubt, consult either the child restraint device manufacturer or your retailer.
1.3 DESCRIPTION OF THE PARTS
Diag. 1 (3/4)
A. Carry Handle
B. Sun hood
C. Fabric lining
D. Booster cushion (*)
E. Base ( ^** )
Diag. 2 (Front)
F. Belt threading slots
G. Child car seat restraint harness
H. Shoulder pads (*)
I. Restraint harness adjustment button (under the fabric fl ap)
J. Restraint harness adjustment strap
Diag. 3 (Profi le)
K. Abdominal car safety belt slot on the child car seat
L. Abdominal car safety belt slot on the base
M. Buttons to rotate the carry handle
N. Clik Clak pins (to fasten it to the stroller)
Diag. 4 (Back)
O. Release handle (from the base and the stroller)
P. Diagonal car safety belt slot
Q. Belt threading slots
R. Slot elements for the child car seat harness straps
S. Stabiliser block
(*) Shape and model can differ according to the child car seat version being used.
(**) Optional
1.4 POSITIONS OF THE HANDLE
The child car seat carry handle can be adjusted to 4 positions (Diag. 5)
A. Position when travelling by car (WARNING: this is the only position allowed when travelling by car).
B. Position when carried by hand.
C. Rocker chair mode position or when you need to fasten it to an appropriate Chicco stroller.
D. Fixed rocker chair position.
To adjust the position, press both buttons (M) on the handle bar together and rotate it to the desired position until you hear it click into place.
1.5 RESTRICTIONS AND REQUISITES REGARDING THE USE OF THE PRODUCT AND CAR SEAT
WARNING! Read these restrictions and requisites carefully to ensure the product and car seat are used safely: if you don't, the safety levels cannot be guaranteed.
- The child car seat can be fitted onto the front passenger seat or any other back seats. In any case the vehicle seat must be facing forwards. Never use this child car seat on vehicle seats which are facing sideways or facing rearwards (diag. 6)
- The vehicle seat must be fitted with a 3-point static or 3-point retractor safety belts approved to UN/ECE Regulation
No.16, or other equivalent standards (Diag. 7).
- WARNING! Never fit the child car seat to a vehicle seat that is only equipped with a 2-point safety belt (Diag. 8)
- Never use the booster cushion if the child weighs more than 6 kg.
- Make sure that the buckle seat belt is not too high (Diag 13-19). Otherwise, try to install the car seat for your child on another car seat in the car.
2. CAR INSTALLATION
The child car seat can be installed with or without the base (optional). In both cases, the child car seat must always be installed facing rearwards.
The child car seat is fitted with 2 different types of shoulder straps (A and B) according to the version being used. Before using the child car seat, assemble the shoulder straps as follows:
ShubestapvesinADig9A9B
and 9C): thread the harness straps through the slots in the fabric cover (not through the seat structure below) so that they are visible on the seat. Thread the harness buckle through the crotch pad.
ShoulstepvesorBDeg0And
10B): thread the harness straps though the two shoulder pads. Thread the harness buckle through the crotch pad.
2.2 INSTALLATION WITH THE BASE
To install the child car seat with base on the vehicle seat, proceed as follows:
- Remove the child car seat from the base by pulling the release lever behind the backrest whilst using the carry handle to lift it upwards (Diag. 11).
- Position the base on the chosen vehicle seat, position it as seen in Diag. 12 so that it touches the vehicle seat backrest.
- Pull the vehicle safety belt and connect it to the relative buckle, threading the abdominal belt through the two slots (L) indicated by the light blue arrows; pull it as tight as possible (Diag. 13).
- Before attaching the child car seat onto
the base, check that the stabiliser block is closed (Diag. 14).
- Attach the child car seat onto the base (in a rear facing position) and push it downwards until you hear it click into place (Diag. 15).
- Check that the child car seat is correctly fitted to the base by lifting the front and rear sections.
- Pull the diagonal car safety belt and thread it through the relative slot (O) on the back of the child car seat backrest (Diag. 16) WARNING! When travelling by car, this diagonal safety belt must ALWAYS threaded through this slot.
- Pull the belt as tight as possible, without leaving any slack and making sure it is not twisted.
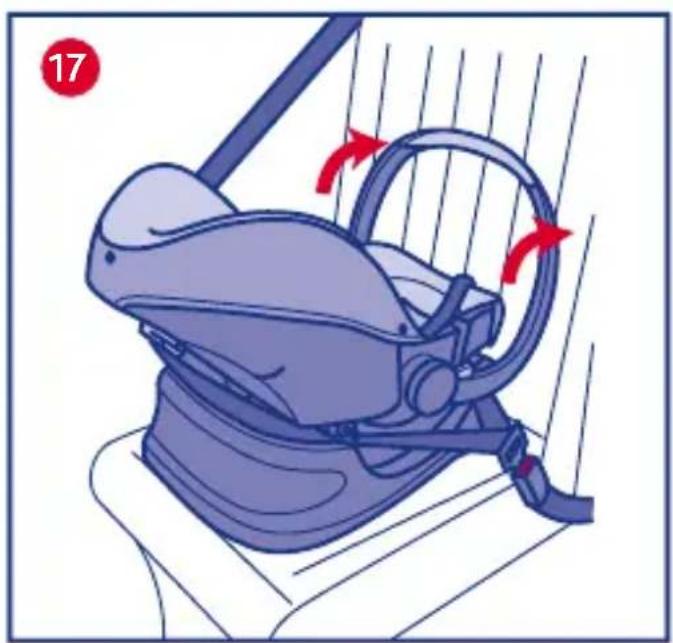
- Turn the carry handle to position A checking it rests against the vehicle seat (Diag. 17).
WARNING!
After installing the child car seat, ALWAYS check that the vehicle safety belt is tightened properly along the entire length of the belt and no parts are twisted. NEVER fit the car safety belt in any way other than that indicated in these instructions.
To remove the child car seat leaving the base on the vehicle seat:
- Unthread the diagonal belt through the slots in the backrest without removing it from the buckle.
- Bring the handle bar into a vertical position (Diag. 5).
- Remove the child car seat as illustrated above (Diag. 5).
2.3 INSTALLATION WITHOUT THE BASE
To install the child car seat without the base, proceed as follows:
- Fold out the stabiliser block and position the child car seat on the desired vehicle seat (Diag. 18).
- Pull the vehicle safety belt and connect it to the relative buckle, threading the horizontal abdominal belt through the two slots (K) indicated by the light blue arrows (Diag. 19).
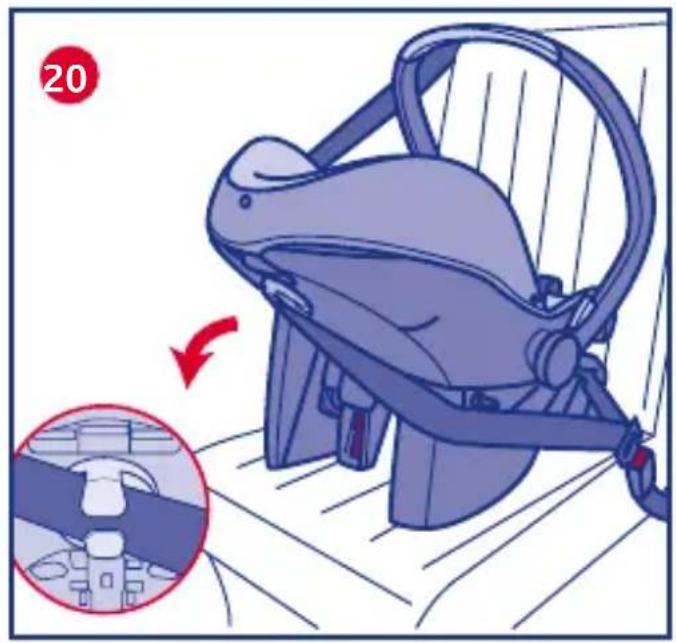
- Take the diagonal car safety belt and
thread it through the relative slot (O) on the back of the child car seat backrest (Diag. 20) WARNING! When travelling by car, this diagonal safety belt n ALWAYS be threaded through this slot.
- Pull the belt as tight as possible, without leaving any slack and making sure it is not twisted.
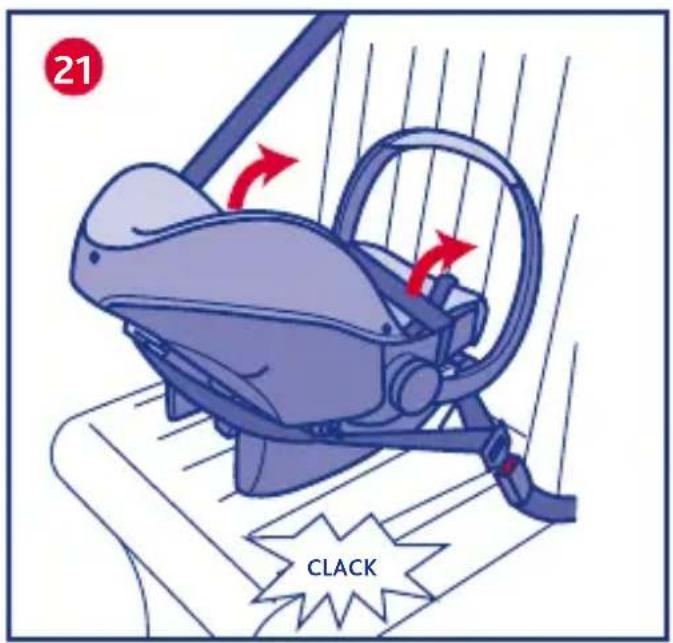
- Turn the carry handle to position A checking it rests against the vehicle seat (Diag. 21).
To remove the child car seat:
be1. Release the car safety belt by pressing the buckle.
- Bring the carry handle into a vertical position (B).
- Unthread the belt through the diagonal and horizontal slots.
2.4 INSTALLATION WITH THE ISOFOX BASE
(supplied or purchased separately)
For installation with the ISOFIX base, please refer to the related instructions provided with the product.
For use with the ISOFIX SEMI-UNIVERSAL system, it is absolutely necessary to read the vehicle manual before fi tting the child car seat. The manual will show which cars seats are compatible with the child car seat size class.
The Chicco ISOFIX BASE is “SEMI-UNIVERSAL” approved and is therefore NOT compatible with all car models, but only with those specified in the “Approved vehicle list” booklet provided with the product.
3. OTHER OPERATIONS
3.1 SEATING THE CHILD IN THE CAR SEAT
- Raise the fabric fl ap, whilst pressing the adjuster button and pull the child car seat harness straps to loosen them (Diag. 22).
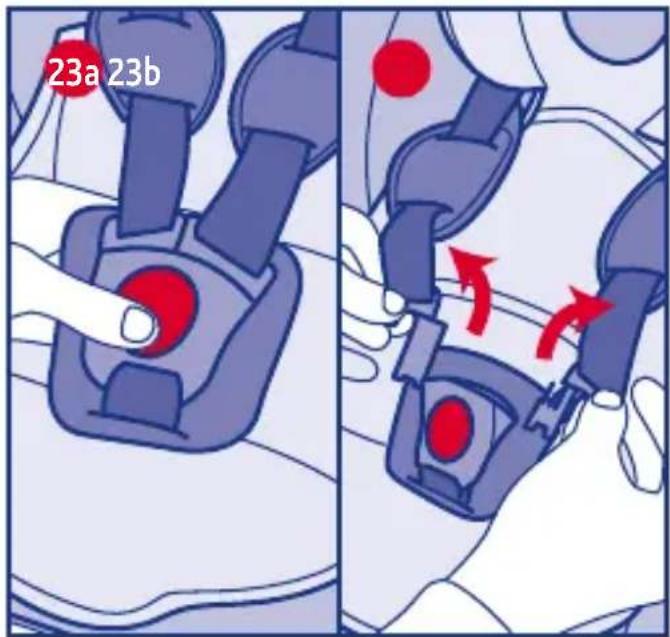
- Press the red button to open the buckle and release the harness straps (Diag. 23).
- Sit the baby inside.
- Overlap the two ends of the harness straps, insert them together inside the buckle until you hear them click into place
(Diag. 24) WARNING! Never insert just one end of the harness into the buckle and do not insert them one at a time.
- Tighten the safety harness by pulling the adjuster strap (Diag. 25)
3.2 ADJUSTING THE POSITION OF THE HARNESS STRAPS
WARNING! The harness straps must always be adjusted to adapt to the child's growth phase. Before installing the child car seat inside the vehicle, adjust the harness straps to the right height.
To adjust them correctly, the harness straps must come out from the backrest at the height of the child's shoulders (Diag. 26) The child car seat straps can be adjusted to 3 height positions.
To adjust the harness straps, proceed as follows:
- Remove the shoulder pads by unthreading them through the slots in the fabric cover.
- Press the red button to open the harness buckle.
- Slide the harness straps out from behind the backrest and thread them though the slot which is most suitable for the child's height (Diag. 27A and 27B).
WARNING! Make sure that the harness straps are always threaded between the slot element (R) and the shell.
WARNING! The booster cushion guarantees correct containment and the ideal position for the neck and back of babies from when they are born until they weigh about 6 Kg.
3.3 FIXED OR ROCKING POSITION OF THE CHILD SEAT (ROCKER CHAIR MODE)
When the child car seat is not used inside the vehicle, it can be used as a rocking or static chair.
To allow it to rock, close the stabiliser block (Diag. 14) and move the carry handle to position B (Diag. 5).
To use it in fixed mode, fold out the stabiliser block and move the handle bar to position D (Diag. 5).
Only place the child seat on stable horizontal surfaces.
WARNING! Before carrying the child car seat, always bring the carry handle into a vertical position (B).
WARNING! Never leave your child unattended.
WARNING! Always use the restraint harness.
WARNING! Using the child car seat on raised surfaces such as tables, chairs etc can be very dangerous.
WARNING! This child car seat is not designed for long periods of sleep.
^e WARNING! Do not use the seat when the child is able to sit up on his own.
This child car seat is not a replacement for a bed or cot. If the child needs to sleep, they should be moved to a bed or a cot.
Do not use the child seat if some of its parts are broken or missing.
3.4 USE WITH THE STROLLER
WARNING! The Auto-Fix car seat can be fitted to Chicco strollers equipped with the specific fi xing system as standard or a fi tting adaptor system can be purchased separately.
WARNING! Please read the Stroller instruction manual when using the child car seat on the stroller. The CHICCO strollers, which use the CLIK CLAK system, have armrests with special devices that allow you to fasten the child seat to the stroller frame without any need for additional fi xtures.
Before fi xing the car seat, remove the arm covers completely.
To install the child seat on the stroller, proceed as follows:
- Bring the carry handle into a vertical position (Diag. 28).
- Attach the two Clik Clak fi xing hooks of the Car seat (N) to the armrests of the stroller or to the fi xing system purchased separately, making sure that they are correctly fi xed on both sides. A click will be heard confirming fixing (fig. 29).
WARNING!
Before use, ensure that all the child seat-fastening devices are correctly fitted in place.
To remove the child seat from the stroller:
- Bring the carry handle into a vertical position (B).
- Pull the rear release handle.
- Remove and place the child seat on a flat, stable surface.
WARNING: The child seat can be fastened and unfastened with the baby inside; these procedures could prove to be more difficult due to the weight of the baby. Be very careful when performing the above-indicated procedures.
3.5 CLEANING AND STORAGE
HOW TO CLEAN THE FABRIC COVER
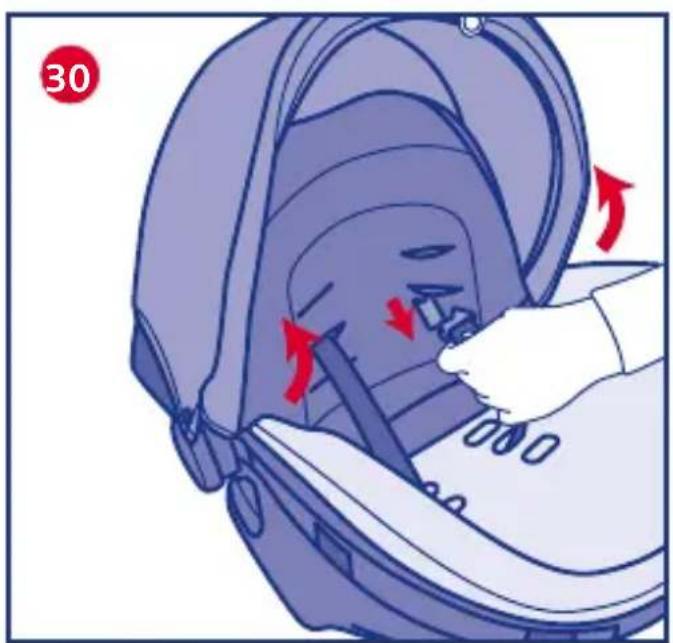
The child seat's fabric cover can be removed and cleaned by hand or in a washing machine at 30^ .
To wash it, undo the harness straps, un-thread the two straps and buckle through the relative slots and then remove the fabric cover (Diag. 30).
Please refer to the cleaning instructions on the fabric label, which illustrates the following washing symbols:

Machine washable at 30°
Do not bleach
Do not spin dry
Do not iron
Do not dry clean
Never use abrasive detergents or solvents.
Do not spin dry the fabric cover; let it dry without wringing it.
HOW TO CLEAN THE PLASTIC OR METAL PARTS
Clean the plastic and coated metal parts with a damp cloth only. Never use abrasive detergents or solvents.
The movable parts of the child car seat must not be lubricated.
CHECKING THE CONDITION OF THE COMPONENTS
It is recommended to regularly check the condition of the following components to ensure that they are not damaged or worn out:
Fabriced check that the padding goes
not come out from the seams. Check the condition of the seams: they must always be intact and undamaged.
- Harness straps: check that the fabric weft is not frayed or the harness strap worn out in the parts corresponding to the adjustment strap, crotch, shoulders and harness adjustment plate.
- Plastic parts: check that the plastic parts are not worn out, damaged or faded.
WARNING! If the child car seat is deformed or worn out, it must be replaced: it may no longer comply with the original safety standards.
STORING THE PRODUCT
When it is not fitted into the car, it is recommended to store the child car seat in a dry place, away from sources of heat and to protect it from dust, humidity and direct sunlight.
DISPOSING OF THE PRODUCT
When the child car seat no longer complies with the original safety standards, stop using it and dispose of it at an appropriate collection point. Dispose of the product as laid down in the environmental regulations in force in the country of use.

CHICCO AUTO-FIX FAST GR. 0+ (0-13kg)
MODE D'EMPLOI
1.2 CARACTÉRISTIQUES DU PRODUIT
2.2 INSTALLATION AVEC LA BASE
CONSERVATION DU PRODUIT
ÉLIMINATION DU PRODUIT
Notanpotageschämerterlapate
No further aligned dose
Nehumacadiautpodganf
Voglinstudesoodemontagende
2.2 INSTALLATIE MET BASIS
Baeckslavereudyemedenslop
PASPÄMonteabigautsodermeden
OPBEVARING AF PRODUKTET
1.4 HANDGREPPETS LÄGEN
3.5 RENGÖRING OCH FÖRVARING
RENGÖRING AV FODRET
FÖRVARING AV PRODUKTEN
Nalackives PRs10A10Bprebicyc
3.3 FIKSNI ILI LJULAJUĆI POLOŽAJ SJEDALA (UPORABA U LEŽEĆEM POLOŽAJU)
Kada se ne koristi u automobilu, Sjedalica se može isto tako koristiti za ljuljanje ili ležanje. Kako bi se mogla ljuljati, zatvoriti element za blokiranje i stabiliziranje (Slika 14) podesiti ručku u položaj C (Slika 5).
Kako biste koristili Sjedalicu u fi ksnom položaju, izvući element za blokiranje i stabilizaciju te postaviti ručku u položaj D (slika 5).
Postaviti samo na stabilnim i vodoravnim površinama.
3.4 UPORABA S KOLICIMA
ELIMINAREA PRODUSULUI
ARTSANA UK Ltd. Prospect Close - Lowmoor Road Business Park Kirkby In Ashfi eld Nottinghamshire - Ng17 7Lf England U.K. 01623 750870 (offi ce hours) www.chicco.co.uk

ARTSANA SPAIN S.A.U. C/Industria 10 Pol. Industrial Urtinsa Apartado De Correos 212 - E 28923 Alcorcon (Madrid)-Spain 902 117 093 www.chicco.es

ARTSANA PORTUGAL S.A. Rua Humberto Madeira, 9 2730-097 Queluz De Baixo Barcarena Portugal 21 434 78 00 800 20 19 77 www.chicco.pt

ARTSANA BELGIUM N.V. Temselaan 5 B-1853 Strombeek - Bever Belgium +32 23008240 www.chicco.be

ARTSANA BRASIL LTDA.
Rua Major Paladino, N° 128,
Galpão 18
Dec V. Ruben Dario 1015
Colonia Lomas De Providencia 44647
Guadalajara, Jalisco-Mexico
01800 702 8983
www.chicco.com.mx

ARTSANA ARGENTINA S.A.
Uruguay 4501
Victoria Cp(1644)
San Fernando- Buenos Aires-Argentina
0810-888-2442
www.chicco.com.ar

ARTSANA INDIA PRIVATE LIMITED,
7Th Floor, Tower B, Paras Twin Towers,
Golf Course Road, Sector 54
Gurgaon - 122002
Haryana, India
(+91)(124)(4964500)
www.chicco.in

ARTSANA S.p.A.
22070 Grandate (CO) - Italy
Tel. (+39) 031 382 111
Fax (+39) 031 382 400
www.chicco.com
NOTE:
NOTE:


natural_image
Illustration of a baby car seat with a red circle highlighting the seat area (no text or symbols present)
natural_image
Illustration of a person using a smartphone to interact with a car (no text or symbols visible)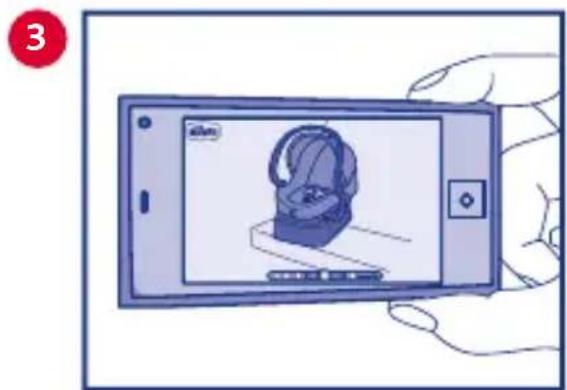
natural_image
Illustration of a hand holding a smartphone displaying a laptop with headphones (no text or symbols visible)- CHICCO AUTO-FIX FAST GR. 0+ (0-13kg)
- ISTRUZIONI D'USO
- INDICE:
- INTRODUZIONE
- Noneporen, lapheroniura
- CAR INSTALLATION
- OTHER OPERATIONS
- INTRODUCTION
- WARNINGS
- WARNING Acclogaccident
- WARNERSROUDANCERNearue
- Neopached blastorachite
- recommendedovertherbar
- Dordianpotboxounsed
- Prematurebabiesborbefethe37th
- PRODUCT FEATURES
- •This approval University Withmens
- IMPORTANT INFORMATION
- DESCRIPTION OF THE PARTS
- Diag. 1 (3/4)
- Diag. 2 (Front)
- Diag. 3 (Profi le)
- Diag. 4 (Back)
- POSITIONS OF THE HANDLE
- RESTRICTIONS AND REQUISITES REGARDING THE USE OF THE PRODUCT AND CAR SEAT
- ShubestapvesinADig9A9B
- ShoulstepvesorBDeg0And
- INSTALLATION WITH THE BASE
- WARNING!
- INSTALLATION WITHOUT THE BASE
- INSTALLATION WITH THE ISOFOX BASE
- SEATING THE CHILD IN THE CAR SEAT
- ADJUSTING THE POSITION OF THE HARNESS STRAPS
- FIXED OR ROCKING POSITION OF THE CHILD SEAT (ROCKER CHAIR MODE)
- USE WITH THE STROLLER
- CLEANING AND STORAGE
- HOW TO CLEAN THE FABRIC COVER
- HOW TO CLEAN THE PLASTIC OR METAL PARTS
- CHECKING THE CONDITION OF THE COMPONENTS
- Fabriced check that the padding goes
- STORING THE PRODUCT
- DISPOSING OF THE PRODUCT
- MODE D'EMPLOI
- CARACTÉRISTIQUES DU PRODUIT
- INSTALLATION AVEC LA BASE
- CONSERVATION DU PRODUIT
- ÉLIMINATION DU PRODUIT
- Notanpotageschämerterlapate
- No further aligned dose
- Nehumacadiautpodganf
- Voglinstudesoodemontagende
- INSTALLATIE MET BASIS
- Baeckslavereudyemedenslop
- PASPÄMonteabigautsodermeden
- OPBEVARING AF PRODUKTET
- HANDGREPPETS LÄGEN
- RENGÖRING OCH FÖRVARING
- RENGÖRING AV FODRET
- FÖRVARING AV PRODUKTEN
- Nalackives PRs10A10Bprebicyc
- FIKSNI ILI LJULAJUĆI POLOŽAJ SJEDALA (UPORABA U LEŽEĆEM POLOŽAJU)
- UPORABA S KOLICIMA
- ELIMINAREA PRODUSULUI
- NOTE:
Brand : CHICCO
Model : Auto-Fix Fast
Category : Car seat