
0 607 595 100 - Slicer BOSCH - Free user manual and instructions
Find the device manual for free 0 607 595 100 BOSCH in PDF.

 FR
FR
 BG
BG
 CS
CS
 DA
DA
 DE
DE
 EL
EL
 EN
EN
 ES
ES
 ET
ET
 FI
FI
 HU
HU
 ID
ID
 IT
IT
 KK
KK
 KO
KO
 LT
LT
 LV
LV
 MK
MK
 NL
NL
 NO
NO
 PL
PL
 PT
PT
 RO
RO
 RU
RU
 SK
SK
 SL
SL
 SV
SV
 TR
TR
 UK
UK
 VI
VI
 ZH
ZH
| Product type | Professional ham slicer |
| Brand | Bosch |
| Model | 0 607 595 100 |
| Dimensions (L x W x H) | Approx. 500 x 400 x 450 mm |
| Weight | Approx. 15 kg |
| Power supply | 230 V / 50 Hz |
| Motor power | 200 W |
| Blade type | Stainless steel circular blade |
| Blade diameter | 250 mm |
| Slice thickness | Adjustable from 0 to 20 mm |
| Cutting capacity | Up to 200 mm width |
| Body material | Die-cast aluminum |
| Main functions | Slicing meat, cheese, vegetables; continuous thickness adjustment; tilting cutting guide |
| Maintenance and cleaning | Removable blade and carriage for cleaning; smooth surface easy to wipe |
| Safety | Emergency stop, blade guard, double safety switch |
| Spare parts and repairability | Replacement blade, belt, fuses available; repairable by authorized service |
| General information | Professional use, CE compliant |
Frequently Asked Questions - 0 607 595 100 BOSCH
User questions about 0 607 595 100 BOSCH
0 question about this device. Answer the ones you know or ask your own.
Ask a new question about this device
Download the instructions for your Slicer in PDF format for free! Find your manual 0 607 595 100 - BOSCH and take your electronic device back in hand. On this page are published all the documents necessary for the use of your device. 0 607 595 100 by BOSCH.
USER MANUAL 0 607 595 100 BOSCH
OBJ_BUCH-2097-002.book Page 1 Friday, December 9, 2016 3:00 PM

natural_image
Illustration of a precision soldering iron with a stand (no text or symbols)Robert Bosch Power Tools GmbH
70538 Stuttgart
GERMANY
www.bosch-pt.com
1609 92A 37X (2014.01) AS / 223 UNI

1 609 92A 37X
0607595100

BOSCH
The following table is in English:
OBJ_BUCH-2097-002.hook Page 2 Friday, December 9, 2016 3:10 PM


21
Deutsch.... Seite 5
English Page 11
Français Page 17
OBJ_BUCH-2097-002.hook Page 3 Friday, December 9, 2016 3:00 PM


3



1 609 92A 37X | (9.12.16) Bosch Power Tools


OBJ_BUCH-2097-002.book Page 4 Friday, December 9, 2016 3:00 PM


4


1609 92A 37X | (9.12.16) Bosch Power Tools


Deutsch | 5
Deutsch
Sicherheitshinweise
Henk Becker Executive Vice President Engineering Helmut Heinzelmann Head of Product Certification PT/ECS

i.v. k-m
Robert Bosch Power Tools GmbH
70538 Stuttgart, GERMANY
Stuttgart, 01.01.2017
Deutsch|9
Montage
▶ Protect the hoses from kinks, restrictions, solvents, and sharp edges. Keep the hoses away from heat, oil, and rotating parts. Immediately replace a damaged hose. A defective air supply line may result in a wild compressed-air hose and can cause personal injury. Raised dust or chips may cause serious eye injury.
▶ Make sure that hose clamps are always tightened firmly. Loose or damaged hose clamps may result in uncontrolled air escape.
Personal safety
Stay alert, watch what you are doing, and use common sense when operating a pneumatic tool. Do not use a pneumatic tool while tired or under the influence of drugs, alcohol, or medication. A moment of inattention while operating a pneumatic tool may result in personal injury.
Use personal protective equipment. Always wear eye protection. Wearing personal protective equipment – such as a respirator, non-skid safety shoes, hard hat or hearing protection – according to the instructions of your employer or as required by the provisions for work and health protection, reduces the risk of personal injury.
▶ Prevent unintentional starting. Make sure that the pneumatic tool is switched off before connecting it to the air supply, picking it up or carrying it. When your finger is on the On/Off switch while carrying the pneumatic tool or when connecting the pneumatic tool to the air supply while it is switched on, accidents can occur.
Remove any adjustment tools before switching on the pneumatic tool. A wrench or key left attached to a rotating part of a pneumatic tool may result in personal injury.
▶ Do not overreach. Keep proper footing and balance at all times. This enables better control of the pneumatic tool in unexpected situations.
▶ Dress properly. Do not wear loose clothing or jewellery. Keep your hair, clothing and gloves away from moving parts. Loose clothes, jewellery or long hair can be caught in moving parts.
If devices are provided for the connection of dust extraction and collection facilities, ensure these are connected and properly used. Use of dust collection can reduce dust-related hazards.
Do not directly inhale the exhaust air. Avoid exposing the eyes to exhaust air. The pneumatic tool's exhaust air can contain water, oil, metal particles and debris from the compressor. This can cause damage to one's health.
Pneumatic tool use and care
▶ Use the clamping devices or a vice to secure and support the workpiece. Holding the workpiece by hand or against your body will not allow for safe operation of the pneumatic tool.
▶ Do not overload the pneumatic tool. Use the pneumatic tool intended for your work. The correct pneumatic tool will do the job better and safer at the rate for which it is designed.
English
Safety Notes
General Safety Rules for Pneumatic Tools
WARNING
Before installing, operating, repairing, maintaining and replacing accessories
as well as prior to working near by the pneumatic tool, please read and observe all instructions. Failure to follow the following safety warnings may result in serious injury.
Save all safety warnings and instructions for future reference, and make them available to the operator.
Work area safety
Pay attention to surfaces that may have become slippery from using the machine, and to tripping hazards from the pneumatic or hydraulic hose. Slipping, tripping and falling are main reasons for workplace injuries.
Do not operate the pneumatic tool in explosive atmospheres, such as in the presence of flammable liquids, gases or dusts. While working the workpiece, sparks can be created which may ignite the dust or fumes.
Keep children and bystanders away from your workplace while operating the pneumatic tool. Distractions from other persons can cause you to lose control over the pneumatic tool.
Pneumatic tool safety
▶ Never direct the airflow against yourself or other persons close by, and conduct cold air away from your hands. Compressed air can lead to serious injuries.
▶ Check the connections and the air supply lines. All maintenance units, couplers, and hoses should conform to the product specifications in terms of pressure and air volume. Too low pressure impairs the function of the pneumatic tool; too high pressure can result in material damage and personal injury.

12 | English
Do not use a pneumatic tool that has a defective On/Off switch. A pneumatic tool that cannot be controlled with the switch is dangerous and must be repaired.
▶ Disconnect the air supply before making any adjustments, changing accessories, or when not using for extended periods. This safety measure prevents accidental starting of the pneumatic tool.
▶ Store idle pneumatic tools out of the reach of children. Do not allow persons unfamiliar with the pneumatic tool or these instructions to operate the device. Pneumatic tools are dangerous in the hands of untrained users.
Maintain the pneumatic tool with care. Check for misalignment or binding of moving parts, breakage of parts and any other condition that may affect the pneumatic tool's operation. Have damaged parts repaired before using the pneumatic tool. Many accidents are caused by poorly maintained pneumatic tools.
- Keep cutting tools sharp and clean. Properly maintained cutting tools with sharp cutting edges are less likely to bind and are easier to control.
▶ Use the pneumatic tool, accessories, application tools, etc. according to these instructions. Take into consideration the working conditions and the activities to be carried out. This reduces the development of dust, vibrations and noise to the greatest extent.
The pneumatic tool should be set up, adjusted or used exclusively by qualified and trained operators.
The pneumatic tool may not be modified in any way. Modifications can reduce the effectivity of the safety measures and increase the risks for the operator.
Service
▶ Have your pneumatic tool repaired only through a qualified repair person and only using original replacement parts. This will ensure that the safety of the pneumatic tool is maintained.
Safety Warnings for Pneumatic Jigsaws
▶ Check if the type plate can be read. If required, provide for replacement from the manufacturer.
In case of breakage of the workpiece or an accessory, or even of the pneumatic tool itself, parts can be thrown about at high speed.
During operation, repairs or maintenance, and when replacing accessories on the pneumatic tool, always wear shock-resistant eye protection. The degree of the required protection should be separately evaluated for each individual application.
▶ Working certain materials can produce sparks and metal chips which pose a danger.
▶ Ensure that the application tool is fitted correctly and securely.
▶ Never place your hand near the moving application tool. You may be injured.
▶ Caution! Application tools can become hot during prolonged operation of the pneumatic tool. Wear protective gloves.
▶ Wear close-fitting gloves. The flow of compressed air makes the handles of pneumatic tools cold. Warm hands are less sensitive to vibrations. Loose fitting gloves can be caught by rotating parts.
The operators and the maintenance personnel must be physically capable to handle the size, weight and power of the pneumatic tool.
Be prepared for unexpected movements of the pneumatic tool that can develop owing to reaction forces or breakage of the application tool. Maintain a firm grip on the pneumatic tool and position your body and arms to allow you to resist such movements. These precautions can prevent injuries.
When working with this pneumatic tool, assume a comfortable stance, hold the tool securely and avoid unfavourable positions or such positions, where it is difficult to keep your balance. For prolonged work, the operator should change the stance or posture, which can help avoid discomfort and fatigue.
In case of an interruption of the air supply or reduced operating pressure, switch the pneumatic tool off. Check the operating pressure and start again when the operating pressure is optimal.
▶ Use only the lubricants recommended by Bosch.
▶ When using the pneumatic tool for the performance of work-related activities, the operator may experience unpleasant sensations in the hands, arms, shoulders, neck area or other body parts.
Should the operator perceive symptoms such as persistent nausea, discomfort, throbbing, pain, tingling, numbness, burning or stiffness, these warning signs should not be ignored. The operator should notify his employer about the symptoms and consult a qualified physician.
Do not use a damaged application tool. Before every use, check application tools for chips and cracks, abrasion or excessive wear. If the pneumatic tool or the application tool falls, check whether it is damaged or use an undamaged application tool. When you have checked and inserted the application tool, keep yourself and bystanders away from the vicinity of the moving application tool and leave the power tool to run for a minute at maximum speed. Damaged application tools will normally break apart during this test time.
▶ Use appropriate detectors to determine if utility lines are hidden in the work area or call the local utility company for assistance. Contact with electric lines can lead to fire and electric shock. Damaging a gas line can lead to explosion. Penetrating a water line causes property damage.
- Avoid contact with "live" conductors. The pneumatic tool is not insulated; contact with a "live" conductor can lead to an electric shock.
WARNING
The dust developing during sanding, sawing, grinding, drilling and similar
operations can act carcinogenic, teratogenic or mutagenic. Some of the substances contained in these dusts are:
- Lead in lead-based paints and varnishes;
- Crystalline silica in bricks, cement and other masonry work;
- Arsenic and chromate in chemically treated wood.


English|13
The risk of disease depends on how often you are exposed to these substances. To reduce the risk, you should work only in well ventilated rooms with appropriate protective equipment (e.g. with specially designed respirators that filter out even the smallest dust particles).
By working with certain materials, dusts and vapours can form, which can create an explosive atmosphere. By working with pneumatic tools, sparks can be produced, which can ignite the dust or the vapours.
When working on the workpiece, additional noise can develop, which can be avoided through appropriate measures (e.g. by using damping materials on occurrence of ringing noise from the workpiece).
- When the pneumatic tool is equipped with a silencer, always ensure that it is available and in proper working condition when operating the pneumatic tool.
▶ Vibration effects may cause damage to the nerves and blood circulation disorders in the hands and arms.
▶ If you notice that the skin of your fingers or hands becomes numb, tingles, hurts or turns white, stop working with the pneumatic tool, notify your employer and consult a physician.
▶ Hold the pneumatic tool with a not too firm yet secure grip, compliant with the required hand-reaction forces. The vibrations can be intensified the firmer you hold the tool.
When universal rotary couplings (bayonet couplings) are being used, retaining pins are required. Use Whip-check hose restraints to protect against failed hose connections or the connection between hose and pneumatic tool.
▶ Never carry the pneumatic tool by the hose.
Symbols
The following symbols could have a meaning for the use of your pneumatic tool. Please take note of the symbols and their meaning. The correct interpretation of the symbols will help you to use the pneumatic tool in a better and safer manner.
Symbol Meaning

Before installing, operating, repairing, maintaining and replacing accessories as well as prior to working near by the pneumatic tool, please read and observe all instructions. Failure to follow the following safety warnings and instructions may result in serious injury.

▶ Wear safety goggles.
| W | W | a | t | t | P | o |
| Nm Newton metre | Unit of energy (torque) | |||||
| Symbol Meaning | ||
| kg | Kilogram | Mass, weight |
| Ibs | Pounds | |
| mm Millimetre Length | ||
| min | Minutes | Time period, duration |
| s | Seconds | |
| min^-1 | Revolutions or motions per minute | No-load speed |
| bar | bar | Air pressure |
| psi | pounds per square inch | |
| l/s | Litres per second | Air consumption |
| cfm | cubic feet/minute | |
| dB Decibel | Unit of relative loudness | |
| G | Whitworth thread | Connecting thread |
| NPT | National pipe thread | |
Product Description and Specifications

Read all safety warnings and all instructions. Failure to follow the warnings and instructions may result in electric shock, fire and/or serious injury.
While reading the operating instructions, unfold the fold-out page with the illustration of the pneumatic tool and leave it open.
Intended Use
The pneumatic tool is intended for cutting foam plastics, foam rubber and similar materials.
Product Features
The numbering of the product features refers to the illustration of the pneumatic tool on the graphics page.
1 Hose fitting
2 On/Off switch (lever)
3 Saw blade guide*
4 Base plate
5 Saw blade pair*
6 Knurled screw
7 Cover plate
8 Screw
9 Tensioning screw for base plate
10 Connection socket at air intake
11 Hose clamp
12 Supply-air hose
*Accessories shown or described are not part of the standard delivery scope of the product. A complete overview of accessories can be found in our accessories program.
p u t
Bosch Power Tools 1 609 92A 37X | (9.12.16)


14| English
Technical Data
| Pneumatic jigsaw | ||
| Article number 0 607 595 100 | ||
| Output power | W | 120 |
| No-load stroke rate | min^-1 | 3800 |
| Stroke | mm 20 | |
| Cutting depth, max. | mm 300 | |
| Max. working pressure for tool | bar | 6.3 |
| psi | 91 | |
| Thread size of hose connection | G 1/4 | |
| Inner diameter of hose | mm 10 | |
| Air consumption at no-load | l/s | 7 |
| cfm | 14.8 | |
| Weight according to EPTA-Procedure 01:2014 | kg | 1.2 |
| lbs | 2.6 | |
Noise/Vibration Information
Measured sound values determined according to EN ISO 15744.
Typically the A-weighted sound pressure level of the pneumatic tool is 75 dB(A). Uncertainty K=1.0 dB. The noise level when working can exceed 80 dB(A).
Wear hearing protection!
Vibration total values a_h (triax vector sum) and uncertainty K determined according to EN 28927:
a_0<2.5m/sK=1.5m/s
The vibration emission level given in this information sheet has been measured in accordance with a standardised test given in EN ISO 11148 and may be used to compare one pneumatic tool with another. It may be used for a preliminary assessment of exposure.
The declared vibration emission level represents the main applications of the pneumatic tool. However if the pneumatic tool is used for different applications, with different accessories or insertion tools or is poorly maintained, the vibration emission may differ. This may significantly increase the exposure level over the total working period.
An exact estimation of the level of exposure to vibration should also take into account the times when the pneumatic tool is switched off or when it is running but not actually doing the job. This may significantly reduce the exposure level over the total working period.
Identify additional safety measures to protect the operator from the effects of vibration such as: maintaining the pneumatic tool and the accessories, keeping the hands warm, organisation of work patterns.
Declaration of Conformity

We declare under our sole responsibility that the product described under "Technical Data" is in conformity with the following standards or standardization documents:
EN ISO 11148 according to the provisions of the directive 2006/42/EC.
Technical file (2006/42/EC) at:
Robert Bosch Power Tools GmbH, PT/ECS,
70538 Stuttgart, GERMANY
Henk Becker
Executive Vice President
Engineering
Helmut Heinzelmann
Head of Product Certification
PT/ECS

i.v. h·w—
Robert Bosch Power Tools GmbH
70538 Stuttgart, GERMANY
Stuttgart, 01.01.2017
Assembly
Mounting Individual Components
The saw blades and the saw blade guide have to be ordered individually. The pneumatic tool is supplied unassembled and has to be assembled on site.
Depending on the material thickness to be worked, various saw blade guides and the corresponding saw blades can be used. See the Accessories Overview for more details.
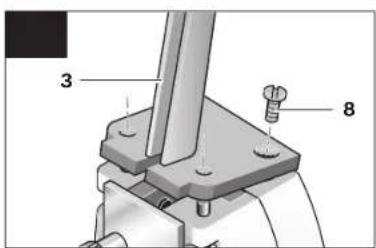
Mounting the Saw Blade Guide (see figures A1 - A2)
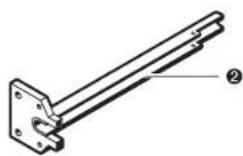
- Remove the screws 8 from the housing. Attach the saw blade guide 3 onto the housing in such a manner that the mounting pins engage into the corresponding holes and secure with the screws 8.
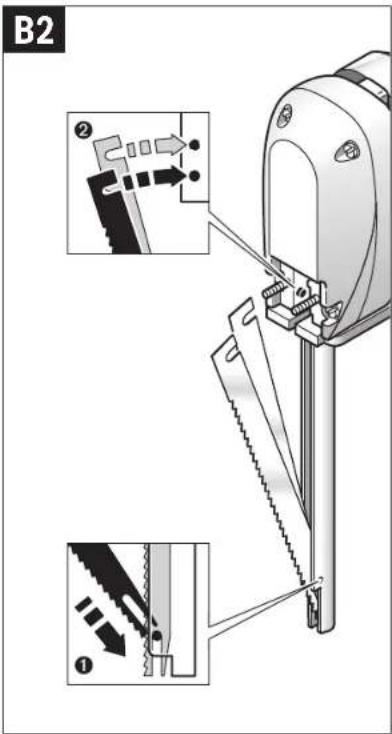
Inserting/Replacing Saw Blades (see figures B1 - B2)
▶ When mounting the saw blade, wear protective gloves. Danger of injury when touching the saw blade.
- Loosen and remove the knurled screws 6 together with the spring washers and the cover plate 7.
① Firstly, insert the saw blade pair 5 into the bottom of the saw blade guide 3, paying attention that the longitudinal grooves of the saw blades engage into the guide pin of the saw blade guide.
Secondly, locate the top of the saw blade pair 5 onto the drive tappets, ensuring that the saw blades are properly seated in the saw blade guide.
- Place the cover plate 7 onto the set screws on the housing and secure them with the knurled screws 6, ensuring that the spring washers have also been mounted.
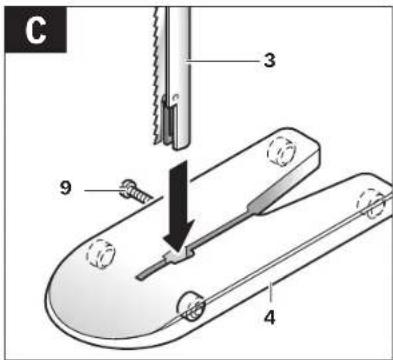
Mounting the Base Plate (see figure C)
- Insert the saw blade guide 3 into the corresponding notch on the base plate 4. Tighten the tensioning screw 9.
Connecting the Air Supply
▶ Ensure that the air pressure is not lower than 6.3 bar (91 psi) because the pneumatic tool is designed for this operating pressure.
For maximum performance, the values for the inner hose diameter as well as the connection threads must be adhered to as listed in the "Technical Data" Table. To maintain the full performance, only use hoses with a maximum length of 4 m.
English|15
The compressed air supplied should be free of foreign material and moisture to protect the tool from damage, contamination, and the formation of rust.
Note: The use of a compressed-air maintenance unit is necessary. This ensures proper function of the pneumatic tools.
Observe the operating instructions of the maintenance unit. All fittings, connecting lines and hoses must be dimensioned for the pressure and the required air volume.
Avoid restrictions in the air supply, e.g., from pinching, kinking, or stretching!
When in doubt, check the pressure at the air inlet with a pressure gauge with the pneumatic tool switched on.
- Screw hose fitting 1 into the connection socket at air inlet 10.
To avoid damage to interior valve components of the pneumatic tool when screwing hose fitting 1 in or out, it is recommended to counter-hold the projecting connection socket of air intake 10 with an open-end wrench (size 22 mm).
- Loosen hose clamp 11 of supply-air hose 12, mount the supply-air hose to hose fitting 1 and retighten the hose clamp.
Note: Always mount the supply-air hose to the pneumatic tool first, then to the maintenance unit.
Operation
Starting Operation
The pneumatic tool works optimally at a working pressure of 6.3 bar (91 psi), measured at the air inlet when the ic tool is switched on.
To save energy, only switch the pneumatic tool on when you are using it.
Switching On and Off
- To switch on the pneumatic tool, press lever 2 and keep it pressed during the working procedure.
- To switch off the pneumatic tool, release the lever 2.
Working Advice
Sudden loads cause a sharp drop in speed or a complete stop, yet do not cause damage to the motor.
Base Plate
The foam rubber cutter can be used with or without the base plate. The base plate is equipped with rollers, and allows for easy and right-angled guidance of the cutter.
For cutting random forms and for cutouts, it is recommended to work without the base plate.
Cutting Foam
For precise cuts, especially with soft foams and similar materials, work only with moderate feed. To not press the material together or squeeze it apart too excessively while working.
Dismount the base plate for smaller cutouts. Puncture the material using a knife or a pair of scissors, then insert the saw blade guide into the opening and work the cutout.
To perform larger cutouts, make the opening so large that the saw blade guide with the mounted base plate can be inserted through it. Ensure that there are no obstacles in the surface underneath. Guide the pneumatic tool with moderate pressure along the cutout line.
Maintenance and Service
Maintenance and Cleaning
▶ Have maintenance and repair work carried out only through qualified persons. This will ensure that the safety of the pneumatic tool is maintained.
After each service, check the speed with a speed-measuring device and check the pneumatic tool for increased vibrations. An authorized Bosch after-sales service agent will carry out this work quickly and reliably.
Use only original Bosch spare parts.
Regular Cleaning
- Regularly clean the saw blade guide and the saw blades, i.e. approx. every 8 hours of operation. To do so, remove the saw blades from the pneumatic tool and clean them, ideally with a cleaning solvent. If necessary, use a scraper to clean the saw blade guide. Lightly oil the saw blade guide before installing new or sharpened saw blades.
- Clean the sieve at the air intake of the pneumatic tool regularly. For this, unscrew the hose fitting 1 and remove any dust and debris from the sieve. Afterwards, retighten the hose fitting again.
- Water and debris particles in the compressed air cause dust and lead to wear of plates, valves etc. To prevent this, fill several drops of engine oil into the air intake 10. Reconnect the pneumatic tool to the air supply (see "Connecting the Air Supply", page 15) and run it for 5 - 10 seconds, while catching/picking up the escaping oil with a cloth. Always carry out this procedure when not using the pneumatic tool for a longer period of time.
Scheduled Maintenance
- Clean the gearbox after the first 150 running hours using a mild solvent. Follow the solvent manufacturers directions for use and disposal. Lubricate the gearbox using Bosch gearbox lube. Repeat the lubrication procedure every 300 hours after the initial gearbox service.
Special gearbox grease (225 ml) Article number 3 605 430 009
- The motor plates should be checked regularly by specialised personnel and replaced, if required.
Lubrication of Pneumatic Tools that do not belong to the CLEAN Product Line
For all Bosch pneumatic tools that do not belong to the CLEAN product line (these have a special type of compressed-air motor that functions with oil-free compressed air), oil mist should be added continuously to the flowing-through compressed air. The compressed-air oiler required for this is included in the compressed-air service unit on the line side of the pneumatic tool (for more details, please refer to the compressor manufacturer).
16| English
For direct lubrication of the pneumatic tool or admixtures to the service unit, use SAE 10 or SAE 20 engine oil.
After-sales Service and Application Service
In all correspondence and spare parts orders, please always include the 10-digit article number given on the type plate of the pneumatic tool.
Our after-sales service responds to your questions concerning maintenance and repair of your product as well as spare parts. Exploded views and information on spare parts can also be found under:
www.bosch-pt.com
Bosch's application service team will gladly answer questions concerning our products and their accessories.
Great Britain
Robert Bosch Ltd. (B.S.C.)
P.O. Box 98
Broadwater Park
North Orbital Road
Denham
Uxbridge
UB 9 5HJ
At www.bosch-pt.co.uk you can order spare parts or arrange
the collection of a product in need of servicing or repair.
Tel. Service: (0844) 7360109
E-Mail: boschservicecentre@bosch.com
Ireland
Origo Ltd.
Unit 23 Magna Drive
Magna Business Park
City West
Dublin 24
Tel. Service: (01) 4666700
Fax:(01)4666888
Australia, New Zealand and Pacific Islands
Robert Bosch Australia Pty. Ltd.
Power Tools
Locked Bag 66
Clayton South VIC 3169
Customer Contact Center
Inside Australia:
Phone: (01300) 307044
Fax: (01300) 307045
Inside New Zealand:
Phone: (0800) 543353
Fax: (0800) 428570
Outside AU and NZ:
Phone: +61 3 95415555
www.bosch.com.au
Republic of South Africa
Customer service
Hotline: (011) 6519600
Gauteng - BSC Service Centre
35 Roper Street, New Centre
Johannesburg
Tel.: (011) 4939375
Fax: (011) 4930126
E-Mail: bsctools@icon.co.za
KZN - BSC Service Centre
Unit E, Almar Centre
143 Crompton Street
Pinetown
Tel.: (031) 7012120
Fax: (031) 7012446
E-Mail: bsc.dur@za.bosch.com
Western Cape - BSC Service Centre
Democracy Way, Prosperity Park
Milnerton
Tel.: (021) 5512577
Fax:(021)5513223
E-Mail: bsc@zsd.co.za
Bosch Headquarters
Midrand, Gauteng
Tel.: (011) 6519600
Fax:(011)6519880
E-Mail: rbsa-hq.pts@za.bosch.com
People's Republic of China
China Mainland
Bosch Power Tools (China) Co., Ltd.
- Bin Kang Road
Bin Jiang District 310052
Hangzhou, P.R.China
Service Hotline: 4008268484
Fax: (0571) 87774502
E-Mail: contact.ptcn@cn.bosch.com
www.bosch-pt.com.cn
HK and Macau Special Administrative Regions
Robert Bosch Hong Kong Co. Ltd.
21st Floor, 625 King's Road
North Point, Hong Kong
Customer Service Hotline: +852 2101 0235
Fax: +852 2590 9762
E-Mail: info@hk.bosch.com
www.bosch-pt.com.hk
Indonesia
PT. Multi Mayaka
Kawasan Industri Pulogadung
Jalan Rawa Gelam III No. 2
Jakarta 13930
Indonesia
Tel.: (021) 46832522
Fax: (021) 46828645/6823
E-Mail: sales@multimayaka.co.id
www.bosch-pt.co.id


Philippines
Robert Bosch, Inc.
28th Floor Fort Legend Towers, 3rd Avenue corner 31st Street.
Fort Bonifacio Global City,
1634 Taguig City, Philippines
Tel.: (02) 8703871
Fax:(02)8703870
matheus.contiero@ph.bosch.com www.bosch-pt.com.ph
Bosch Service Center:
9725-27 Kamagong Street
San Antonio Village
Makati City, Philippines
Tel.: (02) 8999091
Fax: (02) 8976432
rosalie.dagdagan@ph.bosch.com
Malaysia
Robert Bosch (S.E.A.) Sdn. Bhd.
No. 8A, Jalan 13/6
G.P.O. Box 10818
46200 Petaling Jaya
Selangor, Malaysia
Tel.: (03) 79663194
Fax:(03)79583838
cheehoe.on@my.bosch.com
Toll-Free: 1800 880188
www.bosch-pt.com.my
Thailand
Robert Bosch Ltd.
Liberty Square Building
No. 287, 11 Floor
Silom Road, Bangrak
Bangkok 10500
Tel.: 02 6393111, 02 6393118
Fax: 02 2384783
Robert Bosch Ltd., P. O. Box 2054
Bangkok 10501, Thailand
www.bosch.co.th
Bosch Service - Training Centre
La Salle Tower Ground Floor Unit No.2
10/11 La Salle Moo 16
Srinakharin Road
Bangkaew, Bang Plee
Samutprakarn 10540
Thailand
Tel.: 02 7587555
Fax: 02 7587525
Singapore
Robert Bosch (SEA) Pte. Ltd.
11 Bishan Street 21
Singapore 573943
Tel.: 6571 2772
Fax: 6350 5315
leongheng.leow@sg.bosch.com
Toll-Free: 1800 3338333
www.bosch-pt.com.sg
Vietnam
Robert Bosch Vietnam Co. Ltd
10/F, 194 Golden Building
473 Dien Bien Phu Street
Ward 25, Binh Thanh District
84 Ho Chi Minh City
Vietnam
Tel.: (08) 6258 3690 ext. 413
Fax: (08) 6258 3692
hieu.lagia@vn.bosch.com
www.bosch-pt.com
Disposal
The pneumatic tool, accessories and packaging should be sorted for environmental-friendly recycling.
▶ Observe all applicable environmental regulations when disposing of old grease and solvents.
▶ Dispose of motor plates according to regulations! Motor plates contain Teflon. Do not heat them beyond 400 °C, otherwise vapours hazardous to one's health can develop.
If your pneumatic tool can no longer be used, deliver it to a recycling centre or return it to a dealer – for example, an authorized Bosch after-sales service agent.
Subject to change without notice.
Français
Executive Vice President
Engineering
Helmut Heinzelmann
Head of Product Certification
PT/ECS
funk Seo i.v. h.m.
Robert Bosch Power Tools GmbH
70538 Stuttgart, GERMANY
Stuttgart, 01.01.2017
Montage
Robert Bosch (France) S.A.S.
Executive Vice President
Engineering
Helmut Heinzelmann
Head of Product Certification
PT/ECS
i.v. k-m
Robert Bosch Power Tools GmbH
70538 Stuttgart, GERMANY
Stuttgart, 01.01.2017
Montaje
Executive Vice President Engineering
Helmut Heinzelmann
Head of Product Certification PT/ECS
Robert Bosch Power Tools GmbH 70538 Stuttgart, GERMANY Stuttgart, 01.01.2017
Montagem
Executive Vice President
Engineering
Helmut Heinzelmann
Head of Product Certification
PT/ECS

i.v. h·w
Robert Bosch Power Tools GmbH
70538 Stuttgart, GERMANY
Stuttgart, 01.01.2017
Montaggio
Henk Becker Executive Vice President Engineering
Helmut Heinzelmann Head of Product Certification PT/ECS

Robert Bosch Power Tools GmbH 70538 Stuttgart, GERMANY Stuttgart, 01.01.2017
Montage
Executive Vice President
Engineering
Helmut Heinzelmann
Head of Product Certification
PT/ECS

i.v. k.m.
Robert Bosch Power Tools GmbH
70538 Stuttgart, GERMANY
Stuttgart, 01.01.2017
Montering
Montering af enkelte dele
Bosch Service Center
Telegrafvej 3
2750 Ballerup
Pä www.bosch-pt.dk kan der online bestilles reservedele eller oprettes en reparations ordre.
Tlf. Service Center: 44898855
Fax: 44898755
E-Mail: vaerktoej@dk.bosch.com
Bortskaffelse
Executive Vice President
Engineering
Helmut Heinzelmann
Head of Product Certification
PT/ECS
A## B## i.v. H.W.C
Robert Bosch Power Tools GmbH
70538 Stuttgart, GERMANY
Stuttgart, 01.01.2017
Montage
Bosch Service Center
Telegrafvej 3
2750 Ballerup
Danmark
Tel.: (08) 7501820 (inom Sverige)
Fax: (011) 187691
Avfallshantering
National pipe thread
Tilkoplingsgjenger
9 Spennskrue for fotplate
Executive Vice President
Engineering
Helmut Heinzelmann
Head of Product Certification
PT/ECS

i.v. k-m
Robert Bosch Power Tools GmbH
70538 Stuttgart, GERMANY
Stuttgart, 01.01.2017
Montering
Executive Vice President Engineering
Helmut Heinzelmann
Head of Product Certification PT/ECS
i.v. h·w
Robert Bosch Power Tools GmbH
70538 Stuttgart, GERMANY
Stuttgart, 01.01.2017
Asennus
Henk Becker Executive Vice President Engineering
Helmut Heinzelmann Head of Product Certification PT/ECS

i.v. h=w
Robert Bosch Power Tools GmbH 70538 Stuttgart, GERMANY Stuttgart, 01.01.2017
Συναρμολόγηση
Executive Vice President
Engineering
Helmut Heinzelmann
Head of Product Certification
PT/ECS


Robert Bosch Power Tools GmbH
70538 Stuttgart, GERMANY
Stuttgart, 01.01.2017
Montaj
Parçaların montajı
Bosch San. ve Tic. A.S.
Ahi Evran Cad. No:1 Kat:22
Polaris Plaza
80670 Maslak/Istanbul
Bosch Uzman Ekibi +90 (0212) 367 18 88
Isiklar LTD.STI
Kizilay Cad. No: 16/C Seyhan
Adana
Tel.: 0322 3599710
Tel.: 0322 3591379
The Ground Truth image displays a single, solid horizontal line. According to Rule 2 (UNDERSCORE & LINE RULES), this is a stylistic or background line, not a placeholder underscore. Therefore, the OCR result must ignore it and output nothing or only meaningful text. The provided OCR content is "____", which consists of four underscores. This is an incorrect interpretation of the line as a placeholder, violating the rule that stylistic lines must be ignored. The OCR has hallucinated placeholder underscores where none exist in the GT. Hence, the result is inconsistent with the Ground Truth.
-
m = 311
The Ground Truth image displays a single, solid horizontal line. According to Rule 2 (UNDERSCORE & LINE RULES), this is a stylistic or background line, not a placeholder underscore. Therefore, the OCR result must ignore it and output nothing or only meaningful text. The provided OCR content is "____", which consists of four underscores. This is an incorrect interpretation of the line as a placeholder, violating the rule that stylistic lines must be ignored. The OCR has hallucinated placeholder underscores where none exist in the GT. Hence, the OCR result is inconsistent with the Ground Truth.
[Non-Text]
[Non-Text]
[Non-Text]
[Non-Text]
[Non-Text]
[Non-Text]
[Non-Text]
[Non-Text]
[Non-Text]
[Non-Text]
[Non-Text]
[Non-Text]
[Non-Text]
[Non-Text]
[Non-Text]
[Non-Text]
[Non-Text]
[Non-Text]
[Non-Text]
[Non-Text]
[Non-Text]
[Non-Text]
[Non-Text]
[Non-Text]
[Non-Text]
[Non-Text]
[Non-Text]
[Non-Text]
[Non-Text]
[Non-Text]
[Non-Text]
[Non-Text]
[Non-Text]
[Non-Text]
[Non-Text]
[Non-Text]
[Non-Text]
[Non-Text]
[Non-Text]
[Non-Text]
[Non-Text]
[Non-Text]
[Non-Text]
[Non-Text]
[Non-Text]
[Non-Text]
[Non-Text]
[Non-Text]
m = 311
-
m = 311
[Non-Text]
[Non-Text]
[Non-Text]
[Non-Text]
[Non-Text]
[Non-Text]
[Non-Text]
[Non-Text]
[Non-Text]
[Non-Text]
[Non-Text]
[Non-Text]
[Non-Text]
[Non-Text]
[Non-Text]
[Non-Text]
[Non-Text]
[Non-Text]
[Non-Text]
[Non-Text]
[Non-Text]
[Non-Text]
[Non-Text]
[Non-Text]
[Non-Text]
[Non-Text]
[Non-Text]
[Non-Text]
[Non-Text]
[Non-Text]
[Non-Text]
[Non-Text]
[Non-Text]
[Non-Text]
[Non-Text]
[Non-Text]
[Non-Text]
[Non-Text]
[Non-Text]
[Non-Text]
[Non-Text]
[Non-Text]
[Non-Text]
[Non-Text]
[Non-Text]
[Non-Text]
[Non-Text]
[Non-Text]
[Non-Text]
[Non-Text]
[Non-Text]
[Non-Text]
[Non-Text]
[Non-Text]
[Non-Text]
[Non-Text]
[Non-Text]
[Non-Text]
[Non-Text]
[Non-Text]
[Non-Text]
[Non-Text]
[Non-Text]
[Non-Text]


82 | Polski
Executive Vice President
Engineering
Helmut Heinzelmann
Head of Product Certification
PT/ECS

i.v. k-m
Robert Bosch Power Tools GmbH
70538 Stuttgart, GERMANY
Stuttgart, 01.01.2017
Polski | 85
Montaż
Executive Vice President Engineering
Helmut Heinzelmann
Head of Product Certification PT/ECS

i.v. h·w—
Robert Bosch Power Tools GmbH
70538 Stuttgart, GERMANY
Stuttgart, 01.01.2017
Montáž
Bosch Service Center PT
K Vápence 1621/16
692 01 Mikulov
Executive Vice President Engineering
Helmut Heinzelmann
Head of Product Certification PT/ECS

Robert Bosch Power Tools GmbH
70538 Stuttgart, GERMANY Stuttgart, 01.01.2017
Montáž
Executive Vice President Engineering
Helmut Heinzelmann
Head of Product Certification PT/ECS
jus 3e0 i.v. h:m
Robert Bosch Power Tools GmbH
70538 Stuttgart, GERMANY
Stuttgart, 01.01.2017
Összeszerelés
Executive Vice President
Engineering
Helmut Heinzelmann
Head of Product Certification
PT/ECS

i.v. k=m
Robert Bosch Power Tools GmbH
70538 Stuttgart, GERMANY
Stuttgart, 01.01.2017
Сборка
Executive Vice President Engineering
Head of Product Certification PT/ECS
i.v. k-m
Robert Bosch Power Tools GmbH 70538 Stuttgart, GERMANY
Stuttgart, 01.01.2017
Монтаж
Executive Vice President Engineering
Head of Product Certification PT/ECS

Robert Bosch Power Tools GmbH
70538 Stuttgart, GERMANY
Stuttgart, 01.01.2017
Жинау
Бөліктерін орнату
Ара полотнолары мен ара полотносының,
Henk Becker Executive Vice President Engineering
Helmut Heinzelmann Head of Product Certification PT/ECS

Robert Bosch Power Tools GmbH 70538 Stuttgart, GERMANY Stuttgart, 01.01.2017
Montare
Montarea pieselor componente
Tel. service scule electrice: (021) 4057540
Fax:(021)4057566
E-Mail: infoBSC@ro.bosch.com
Executive Vice President
Head of Product Certification
Engineering
PT/ECS

i.v. h·w
Robert Bosch Power Tools GmbH
70538 Stuttgart, GERMANY Stuttgart 01 01 2017
Stuttgart, 01.01.2017
Монтиране
Executive Vice President Engineering
Helmut Heinzelmann
Head of Product Certification PT/ECS

i.v. h=mc
Robert Bosch Power Tools GmbH
70538 Stuttgart, GERMANY
Stuttgart, 01.01.2017
Монтажа
Henk Becker Executive Vice President Engineering
Helmut Heinzelmann Head of Product Certification PT/ECS

i.v. h=mc
Robert Bosch Power Tools GmbH 70538 Stuttgart, GERMANY Stuttgart, 01.01.2017
Montaža
Executive Vice President
Engineering
Helmut Heinzelmann
Head of Product Certification
PT/ECS

Robert Bosch Power Tools GmbH
70538 Stuttgart, GERMANY
Stuttgart, 01.01.2017
Montaža
Henk Becker Executive Vice President Engineering
Helmut Heinzelmann Head of Product Certification PT/ECS

Robert Bosch Power Tools GmbH 70538 Stuttgart, GERMANY Stuttgart, 01.01.2017
Montaža
Henk Becker Executive Vice President Engineering
Helmut Heinzelmann Head of Product Certification PT/ECS


Robert Bosch Power Tools GmbH 70538 Stuttgart, GERMANY Stuttgart, 01.01.2017
Montaaž
Executive Vice President
Engineering
Helmut Heinzelmann
Head of Product Certification
PT/ECS

i.v. h=mc
Robert Bosch Power Tools GmbH
70538 Stuttgart, GERMANY
Stuttgart, 01.01.2017
Montāža
Executive Vice President
Engineering
Helmut Heinzelmann
Head of Product Certification
PT/ECS


Robert Bosch Power Tools GmbH
70538 Stuttgart, GERMANY
Stuttgart, 01.01.2017
Montavimas
Executive Vice President
Engineering
Helmut Heinzelmann
Head of Product Certification
PT/ECS

Robert Bosch Power Tools GmbH
70538 Stuttgart, GERMANY
Stuttgart, 01.01.2017
安装
组合各部件
Executive Vice President
Head of Product Certification
Engineering
PT/ECS


Robert Bosch Power Tools GmbH
70538 Stuttgart, GERMANY
Stuttgart, 01.01.2017
安装
組合各部件
Executive Vice President Head of Product Certification
Engineering PT/ECS

Robert Bosch Power Tools GmbH
70538 Stuttgart, GERMANY
Stuttgart. 01.01.2017
조립
각 부품 조립하기
Henk Becker Executive Vice President Engineering
Helmut Heinzelmann Head of Product Certification PT/ECS

Robert Bosch Power Tools GmbH 70538 Stuttgart, GERMANY Stuttgart, 01.01.2017
การประกอบ
- provides an internet address 3. For coming from the government, it is also a phone to access 4. It is also a phone to access 9.
Henk Becker Executive Vice President Engineering
Helmut Heinzelmann Head of Product Certification PT/ECS

i.v. h:m
Robert Bosch Power Tools GmbH 70538 Stuttgart, GERMANY Stuttgart, 01.01.2017
Cara memasang
Memasang komponen-komponen
Jalan Rawa Gelam III No. 2
Jakarta 13930
Indonesia
Tel.: (021) 46832522
Fax: (021) 46828645/6823
E-Mail: sales@multimayaka.co.id
www.bosch-pt.co.id
Cara membuang
Executive Vice President
Engineering
Helmut Heinzelmann
Head of Product Certification
PT/ECS
i.v. k-m
Robert Bosch Power Tools GmbH
70538 Stuttgart, GERMANY
Stuttgart, 01.01.2017


Tiếng Việt|207
Sự lắp vào
Tâng 10,194 Golden Building
473 Điện Biên Phù
OBJ_BUCH-2097-002.book Page 209 Friday, December 9, 2016 3:00 PM
Tiếng Việt|209
Senior Vice President Head of Product Certification
Engineering PT/ECS
Robert Bosch Power Tools GmbH,
70538 Stuttgart, GERMANY
Stuttgart, 01.01.2017
التركيب
Henk Becker Senior Vice President Engineering
Helmut Heinzelmann Head of Product Certification PT/ECS

i.v. h=m
Robert Bosch Power Tools GmbH, 70538 Stuttgart, GERMANY Stuttgart, 01.01.2017
نصب
OBJ_BUCH-2097-002.book Page 222 Friday, December 9, 2016 3:11 PM


|222

natural_image
Technical diagram showing two mechanical components with a dimension label 'd' and a numbered annotation (1), no readable text or symbols present.① 2 607 018 013 (d<70 mm)
② 2 608 135 023
① 2 607 018 010 (d<130 mm)
② 2 608 135 020
① 2 607 018 011 (d<200 mm)
② 2 608 135 021
① 2 607 018 012 (d<300 mm)
② 2 608 135 022
1 609 200 265

Bosch Power Tools 1 609 92A.37X | (9.12.16)





- 21
- Deutsch
- Sicherheitshinweise
- Deutsch|9
- Montage
- Personal safety
- Pneumatic tool use and care
- English
- Safety Notes
- General Safety Rules for Pneumatic Tools
- WARNING
- Work area safety
- Pneumatic tool safety
- | English
- Service
- Safety Warnings for Pneumatic Jigsaws
- Symbols
- Symbol Meaning
- ▶ Wear safety goggles.
- Product Description and Specifications
- Intended Use
- Product Features
- 14| English
- Noise/Vibration Information
- Wear hearing protection!
- Declaration of Conformity
- Assembly
- Mounting Individual Components
- Mounting the Saw Blade Guide (see figures A1 - A2)
- Inserting/Replacing Saw Blades (see figures B1 - B2)
- Mounting the Base Plate (see figure C)
- Connecting the Air Supply
- English|15
- Operation
- Starting Operation
- Switching On and Off
- Working Advice
- Base Plate
- Cutting Foam
- Maintenance and Service
- Maintenance and Cleaning
- Regular Cleaning
- Scheduled Maintenance
- Lubrication of Pneumatic Tools that do not belong to the CLEAN Product Line
- 16| English
- After-sales Service and Application Service
- www.bosch-pt.com
- Great Britain
- Ireland
- Australia, New Zealand and Pacific Islands
- Republic of South Africa
- Customer service
- Gauteng - BSC Service Centre
- KZN - BSC Service Centre
- Western Cape - BSC Service Centre
- Bosch Headquarters
- People's Republic of China
- China Mainland
- HK and Macau Special Administrative Regions
- Indonesia
- Philippines
- Malaysia
- Thailand
- Singapore
- Vietnam
- Disposal
- Français
- Montaje
- Montagem
- Montaggio
- Montering
- Montering af enkelte dele
- Bortskaffelse
- Avfallshantering
- Asennus
- Συναρμολόγηση
- Montaj
- Parçaların montajı
- | Polski
- Polski | 85
- Montaż
- Montáž
- Összeszerelés
- Сборка
- Монтаж
- Жинау
- Бөліктерін орнату
- Montare
- Montarea pieselor componente
- Монтиране
- Монтажа
- Montaža
- Montaaž
- Montāža
- Montavimas
- 安装
- 组合各部件
- 組合各部件
- 조립
- 각 부품 조립하기
- การประกอบ
- Cara memasang
- Memasang komponen-komponen
- Cara membuang
- Tiếng Việt|207
- Sự lắp vào
- التركيب
- نصب
Brand : BOSCH
Model : 0 607 595 100
Category : Slicer