
MX-FR12U - Printer Accessory SHARP - Free user manual and instructions
Find the device manual for free MX-FR12U SHARP in PDF.
| Product type | Data Security Kit for SHARP Color Digital Multifunction Device |
| Dimensions (approx.) | 50 x 30 x 20 mm (USB key) |
| Weight (approx.) | 20 g |
| Power supply | Via printer (USB) |
| Main function | Encryption and automatic deletion of image data after each job |
| Secondary function | Document control: printing of anti-copy/fax pattern |
| Complementary function | Print retention with password, memory erasure (full or partial) |
| Compatibility | SHARP Color Digital Multifunction Devices |
| Activation | Requires product key entered in system settings (administrator) |
| Security | Compliant with Canada NMB-003 standard (Class A) |
| Password protection | Lockout for 5 minutes after 3 incorrect attempts (admin, user, files) |
| Automatic deletion | Data deleted after each job (copy, print, scan, fax) |
| Manual deletion | Delete entire memory, retention data, job list, directory |
| Number of deletion repetitions | Configurable from 1 to 7 passes |
| Document control | 5 patterns available, black/cyan/yellow colors, print on all pages |
| Supported modes for document control | Copy, print, fax/fax internet reception, list |
| Storage | USB key to keep for recovery in case of failure |
| Maintenance | Store in a dry and safe place |
| Repairability | Non-repairable part, contact SHARP support in case of failure |
| Manual | User manual available for download (PDF, 500 pages) |
Frequently Asked Questions - MX-FR12U SHARP
User questions about MX-FR12U SHARP
0 question about this device. Answer the ones you know or ask your own.
Ask a new question about this device
Download the instructions for your Printer Accessory in PDF format for free! Find your manual MX-FR12U - SHARP and take your electronic device back in hand. On this page are published all the documents necessary for the use of your device. MX-FR12U by SHARP.
USER MANUAL MX-FR12U SHARP
This manual contains very important information. Please keep the manual in a safe place where it will not be lost.
MX-FR12U
APPLICATION NUMBER
natural_image
Empty white rectangle with black border (no text or symbols)MACHINE SERIAL NUMBER

PRODUCT KEY
| DATA SECURITY KIT | ENGLISH |
| KIT DE SEGURIDAD DE DATOS | ESPAÑOL |
| KIT DE SECURITE DES DONNEES | FRANÇAIS |
| DATEN-SICHERHEITSPAKET | DEUTSCH |
| KIT DI PROTEZIONE DEI DATI | ITALIANO |
| GEGEVENSBEVEILIGINGSKIT | NEDERLANDS |
| DATASÄKERHETSPROGRAM | SVENSKA |
| DATASIKKERHETSPROGRAM | NORSK |
| TIETOTURVAMODUULI | SUOMI |
| DATA SIKKERHEDSKIT | DANSK |
| KIT ΑΣΦΑΛΕΙΑΣ ΔΕΔΟΜΕΝΩΝ | ΕΛΛΗΝΙΚΗ |
| MODUŁ OCHRONY DANYCH | POLSKI |
| ADATBIZTONSÁGI KÉSZLET | MAGYAR |
| SADA OCHRANY DAT | ČEŠTINA |
| KOMΠLEKT ΒΕЗОПАСНОСТИ ДАННЫХ | РУССКИЙ |
| BEZPEČNOSTNÁ SADA ÚDAJOV | SLOVENSKY |
| VERİ GÜVENLİK KİTİ | TÜRKÇE |
| KIT DE SEGURANÇA DE DADOS | PORTUGUÊS |
| KIT DE SECURITATE A DATELOR | ROMÂNÃ |
For users in the USA
This device complies with Part 15 of the FCC Rules. Operation is subject to the following two conditions: (1) This device may not cause harmful interference, and (2) this device must accept any interference received, including interference that may cause undesired operation.
WARNING:
FCC Regulations state that any unauthorized changes or modifications to this equipment not expressly approved by the manufacturer could void the user's authority to operate this equipment.
NOTE:
This equipment has been tested and found to comply with the limits for a Class A digital device, pursuant to Part 15 of the FCC Rules. These limits are designed to provide reasonable protection against harmful interference when the equipment is operated in a commercial environment. This equipment generates, uses, and can radiate radio frequency energy and, if not installed and used in accordance with the instruction manual, may cause harmful interference to radio communications. Operation of this equipment in a residential area is likely to cause harmful interference in which case the user will be required to correct the interference at his own expense.
For users in Canada
This Class A digital apparatus complies with Canadian ICES-003.
While every effort has been made to make this document as accurate and helpful as possible, SHARP Corporation makes no warranty of any kind with regard to its content. All information included herein is subject to change without notice. SHARP is not responsible for any loss or damages, direct or indirect, arising from or related to the use of this operation manual.
© Copyright SHARP Corporation 2009. All rights reserved. Reproduction, adaptation or translation without prior written permission is prohibited, except as allowed under copyright laws.
Note:
"System Settings (Administrator)" in this manual refers to the system settings that require logging in with administrator rights, and "System Settings (General)" refers to the system settings that can be configured by general users (including the administrator).
Icons used in the manuals
The icons in this manual indicate the following types of information:
| This provides a supplemental explanation of a function or procedure. | |
| This explains how to cancel or correct an operation. |
| The display screens, messages, and key names shown in the manual may differ from those on the actual machine due to product improvements and modifications. |
Contents
Introduction 2
When the data security kit is installed....4
- System settings of the data security kit .... 4
- Document control function....4
- Print hold .... 4
● Authority group registration screen....5
● Protecting passwords ....5
● Security Settings in the Web pages....7
● Transferring copied data....8
System settings....9
● Using the System Settings (Administrator)......9
● System settings for security....9
● Data Clearance Settings....11
● Enable/Disable Settings .... 16
● Jobs Completed List Display Setting .... 17
● Job Status Display Setting....18
- Release Lock on Print-Hold Data Manipulation....18
● Product Key ....18
Document Control Setting....19
● Document control .... 19
- Modes to which the document control function can be added....20
● Enabling the document control function ....20
● Using the document control function ......23
Introduction
The MX-FR12U adds a security function to the SHARP Digital Full Color Multifunctional System.
When the copy function, printer function, network scanner function, or fax function of a SHARP Digital Full Color Multifunctional System with the security function is used, the image data that is generated for the job is encrypted, and when the job is finished, the encrypted data is immediately erased from memory and the hard disk.
Note:
To ensure that the data security function of the machine provides maximum security, observe the following:
- The administrator plays an important role in maintaining security. Exercise appropriate care in selecting the person that will assume the job of administrator.
- Be sure to change the administrator password immediately each time a new person takes over as administrator.
- Change the administrator password on a regular basis (at least once every 60 days).
- Do not select a password that can be easily guessed for the administrator password.
- The system settings (administrator) are very important for security management. If you leave the machine when using the system settings (administrator), be sure to press the [Logout] key (✗) to quit the system settings (administrator). The administrator of the machine should inform users that they are not to access the system settings (administrator) without permission.
- The customer bears responsibility for control of copies of documents made on the machine and faxes received on the machine.
- Even when the data security kit is installed, note that fax data in the polling memory box used by the fax function can be read.
■ Backing up and clearing data stored with the print hold function
When the data security kit is installed, data previously stored in the machine with the print hold function is cleared. For this reason, any data that you need to keep is copied to a computer before the data security kit is installed, and then returned to the machine after installation and clearing of the previous data. (This work is normally performed at the time of installation of the data security kit.)
Only confidential files can be used to return data from a computer to the machine after installation of the data security kit. For the procedure for storing data on a computer and returning data from a computer to the machine, see help in the Web pages of the machine.
■ About passwords for the Web page
If an incorrect "users" or "admin" password is entered 3 times in a row when attempting to access the Web pages of a machine that has the data security kit installed, access to pages that require entry of the "users" or "admin" password will be prohibited for 5 minutes.

Some of the procedures for operating the machine change when the data security kit is installed. The manuals for the machine ( 🔒 "OPERATION MANUALS AND HOW TO USE THEM" in the Quick Start Guide) explain the procedures for operating the machine when data security kit is not installed. This manual explains the changes to those procedures when the data security kit is installed.
■ Export restrictions
The USB memory contains software to which export restrictions apply. The license for the software is stated below. By using this software, you agree to comply with the contents of this license.
- This software (and associated technical data) is subject to regulations based on U.S. and Japanese laws related to export control, including the Foreign Exchange and Foreign Trade Control Law and U.S. Export Administration Regulations. The software and technical data may also be subject to export and import regulations of other countries. The user agrees to strictly obey all applicable regulations and to obtain related licenses prior to export, re-export, or import of the software. Export, re-export, or downloading of this software to Cuba, Iran, North Korea, Sudan, Syria, or other countries subject to export restriction by the U.S.A, or to the citizens and residents of those countries, is prohibited. In addition, export or re-export of this software to persons appearing in export prohibition lists published by the governments of Japan, the U.S, and other countries is prohibited.
■ USB memory storage
This USB memory may be necessary for recovery in the event that the machine fails. Store the USB memory in a safe location.
1 When the data security kit is installed
When the data security kit is installed, the icon appears on the display. When the data security kit is installed, data remaining in the machine is automatically erased after each job.
When data clearing begins, the following message appears for 6 seconds ^* .

Data is being cleared.
* The duration of the message display can be changed with "Message Time Setting" in the system settings (administrator).
(→ Web page (Administrator) > "Operation Settings" > "Message Time Setting")

If the machine power is turned off while image data is being cleared from the hard disk drive or before a job is finished, the data may not be completely erased. If you do not wish to leave partially cleared data when the power is turned off, it is recommended that you use the program "Clear All Memory" (page 11 of this manual), to complete data clearing before turning off the power.
System settings of the data security kit
When the data security kit is installed, settings to enhance security can be added to the system settings (administrator) of the machine. See "System settings" (page 9 of this manual) for details.
Document control function
The document control function is used to embed a document control pattern on the paper when print jobs, copies, and received faxes are printed.
The embedded document control pattern prevents secondary copying, faxing and other operations of a printed document. For more information, see "Document Control Setting" (page 19 of this manual).
Print hold
To use the print hold function to store jobs in the machine when the data security kit is installed, enter a password in the printer driver settings (when the factory default setting is in effect).
Files whose property is set to "Sharing" cannot be stored.
Authority group registration screen
When the data security kit is installed, [Security] is added to the "Authority Group Registration" menu screen in the Web page (administrator). This screen is displayed by selecting "User Control" > "Authority Group List".
When this item is selected, the following screen appears.

● Print Hold Approval Setting
When storing an authority group for user authentication, select whether or not print hold is allowed.
To enable a filing mode, select the checkbox of the mode.
● Print Jobs Other than Print Hold Job
When [Allowed] is selected, print jobs other than hold jobs are allowed in authority group registration when user authentication is enabled.

Print hold must be allowed in the following settings.
By default, print hold is only allowed in confidential mode.
- Allow print hold in authority group registration (this setting)
- Setting for Print-Hold Disabling in the system settings (page 16 of this manual)
Protecting passwords
When the data security kit is installed, passwords entered from the operation panel of the machine or the Web pages can be protected.
■ Administrator Password/User Password
When the data security kit is installed, password entry will be locked for 5 minutes if an incorrect administrator password is entered 3 times in a row when the user authentication function is not enabled, or if an incorrect user password is entered 3 times in a row when the user authentication function is enabled.
■ Confidential files of the print hold function
If an incorrect password is entered 3 times in a row for a specific confidential file, the file will be locked. To unlock the file, use "Release Lock on Print-Hold Data Manipulation" (page 18 of this manual).

- All files with the same user name and password can be printed at once using the Batch Print feature of the print hold function ( Operation Guide "BATCH PRINTING" in "3. PRINTER".)
Files that have a password different from the password that was entered at the time of the search will be treated as files for which an incorrect password was entered. For this reason, it is recommended that you avoid executing searches using [All Users] and [User Unknown] as much as possible.
- When the use of a file is prohibited, the following will apply when the print hold function is used:
- When batch print is performed, a prohibited file will not be printed even if it matches the search conditions.
■ File search screen of print hold
When the data security kit is installed, the password entry setting will not appear in the print hold search screen.
■ Encrypt PDF
When a job is printed by encrypted PDF direct printing (when the PS3 expansion kit is installed), the job will appear in the spool queue of the job status screen and a password must be entered to begin printing.
If an incorrect password is entered 3 times in a row when the data security kit installed, the message "Operation is disabled. Please see your administrator for your assistance." will be displayed for 6 seconds and printing will be locked.
If you select a file in the spool screen for which an incorrect password was entered 3 times, the following screen will appear.

- Select the [Yes] key to delete the print job.
- Select the [No] key to cancel deletion of the job.
To unlock the print job, use "Release Lock on Print-Hold Data Manipulation" (page 18 of this manual).
■ FTP Pull Print
When the FTP Pull Print function is used to directly print a file on an FTP server, a "User Name" and "Password" must be entered when the FTP server is selected. When the data security kit is installed, entry will be locked for 5 minutes if an incorrect "User Name" or "Password" is entered 3 times in a row.
■ Login when user authentication is enabled
When "User Authentication Settings" in the Web page (administrator) ( "USER AUTHENTICATION" in the Quick Start Guide) is enabled, login is required in the login screen before the machine can be used. When "A Warning when Login Fails" is enabled in the Web page (administrator), the machine will lock for 5 minutes if login fails 3 times in a row.
The "A Warning when Login Fails" setting is always enabled when the data security kit installed.
Security Settings in the Web pages
When the machine is used as a network printer and the FTP Pull Print function is used, the data security kit enables authentication of the user by means of a "User Name" and "Password" for the FTP server. (The Pull Print function allows a file on a previously stored FTP server to be printed directly from the operation panel of the machine without using the printer driver; see Operation Guide "DIRECTLY PRINTING A FILE ON AN FTP SERVER" in "3. PRINTER".)
User authentication is enabled by selecting the [Enable User Authentication] checkbox on the machine's Web page for configuring FTP Pull Print settings. This checkbox appears when the data security kit is installed, and is initially selected (a checkmark appears). System requirements and the procedure for accessing the Web pages are explained in "ACCESSING THE WEB SERVER IN THE MACHINE" in the Quick Start Guide.
■ Procedure for directly printing a file on an FTP server (when user authentication is enabled)
Your user name and password must be entered following selection of the FTP server that contains the file to be printed from the display of the machine.
When the FTP server is selected in step 2 of "DIRECTLY PRINTING A FILE ON AN FTP SERVER" in "3. PRINTER" in the Operation Guide, a screen will appear prompting you to enter your user name and password for the FTP server.
Select the [User Name] key to enter your user name and the [Password] key to enter your password. A letter entry screen will appear in each case.
When you have finished entering your user name/password, select the [OK] key. After entering your user name and password, continue from step 3 of "DIRECTLY PRINTING A FILE ON AN FTP SERVER" in "3. PRINTER" in the Operation Guide.
Transferring copied data
When the data security kit is installed and the Web pages are used to copy data stored with the print hold function to a computer, the copied data can only be transferred back to the original machine from which it was copied.
The data cannot be transferred to another machine even if the machine conditions are the same.
This section explains system settings that are related to the security function.

The following explanations assume that the machine has the printer, fax, and network scanner functions.
Using the System Settings (Administrator)
Follow the procedure in "SYSTEM SETTINGS (ADMINISTRATOR)" in "6. SYSTEM SETTINGS" of the Operation Guide to configure the settings in the system settings (administrator).
For explanations of each of the settings, see the following pages.

If an incorrect administrator password is entered 3 times in a row on a machine that has the data security kit installed, entry of the administrator password will be locked for 5 minutes.
System settings for security
When the data security kit is installed, settings related to security (with the exception of [SSL Settings]) are added to the settings that appear when the [Security Settings] key is selected.
| Setting | Page | Explanation |
| Data Clearance Settings | ||
| Clear All Memory*1 | 11 | |
| Clear Print Hold Data*1 | 12 | |
| Clear All Data in Jobs Completed List*1 | 12 | |
| Clear Address Book and Registered Data*1 | 13 | Select data clear items and the number of data clear times. Use this to manually clear stored data from each area of the machine's memory and hard drive. |
| Power Up Auto Clear*1 | 14 | |
| Clearance Time Settings | 15 | |
| ●Number of Times Data Clear is Repeated*1 | 15 | |
| ●Number of Times Power Up Auto Clear Program is Repeated*1 | 15 | |
| ●Number of Times Auto Clear at Job End Program is Repeated*1 | 15 | |
System settings
| Setting | Page | Explanation |
| Enable/Disable Settings | ||
| Setting for Print-Hold Disabling | 16 | Set the items that you wish to disable. Use this to disable specific operations to prevent the output of sensitive document data. |
| Disabling of List Print | 16 | |
| Disabling of Print Jobs Other Than Print Hold Job | 17 | |
| Jobs Completed List Display Setting | 17 | Use this to select whether or not the job status completed job screen is displayed. |
| Job Status Display Setting | 18 | Use this to select whether or not filenames of print jobs and destination names of image send jobs are displayed in the job status screen. |
| Release Lock on Print-Hold Data Manipulation | 18 | Use this to release locked files. |
| Product Key*2 | 18 | Register the product key. |
*1 When user authentication is enabled, a user cannot configure this setting even when the authority group gives the user the authority to configure security settings.
(This operation can only be performed by an administrator.)
*2 This will not appear when the product key is entered and the security function is enabled.


- The above system settings can also be configured in the Web page of the machine. However, the product key for the data security kit cannot be entered in the Web page. Use the display of the machine to enter the product key.
- When the data security kit is installed, the "IP Address Setting" does not appear in the system settings.
Data Clearance Settings
■ Clear All Memory
This program is used to manually clear all data from the memory and hard disk of the machine.
Note, however, that the certain types of data are not cleared with this setting. Use "Clear Address Book and Registered Data" (page 13 of this manual) to clear the following types of data.
- User Information
● Individual/Group/Program/Relay Broadcast Memory Box ^* /Forward Information - Polling Memory/Confidential Memory Box*
- Sender Data
- Allow/Reject Reception Setting Data (including polling passcode number)
* Image data stored in a memory box is cleared by executing "Clear All Memory".

In the event that the data security kit or a machine with the data security kit installed will be disposed of or ownership will change, the administrator should be sure to execute this function. When executing the function, the administrator should not leave the machine until it has been verified that data clearing has been completed.
When the [Clear All Memory] key is selected, a confirmation screen will appear as shown below.
[Clear screen 1]
The confirmation message "Clear all memory. (Exclusive of address book/user list data.)" will appear.
● To return to the previous menu screen, select the [No] key.
- To clear all memory, select the [Yes] key. "Please wait." appears, and then the following screen is displayed.
![SHARP MX-FR12U - [Clear screen 1] - 1](/content/2024/12/122210/images/a61e45a838f96d2231faec393247563eaa570d4a8286a085157a6771d02358f0.jpg)
If a print job is in progress when "Clear All Memory" is executed, the print job will be canceled. Print jobs in progress and in the job queue are also erased.
[Clear screen 2]
The message "Clearing all memory." will appear.
- During clearing, progress will be shown as a percentage together with the number of repetitions.
- When clearing is completed, the following screen will appear for confirmation.
![SHARP MX-FR12U - [Clear screen 2] - 1](/content/2024/12/122210/images/3eab862b664458a5948cd807b89c1eae6f9c6371a417ce2c48cdf77ad2a8ff15.jpg)
If you wish to cancel data clearing...
Select the [Cancel] key. The administrator password entry screen will appear. Enter the administrator password. As soon as the correct password is entered, data clearing will stop and the power will turn off briefly and then turn back on automatically. Note that any data cleared prior to entry of the password will not be restored.
[Clear screen 3]
The confirmation message "Clearing memory has been completed. Reboot is implemented." will appear.
Select the [OK] key to restart the machine.
■ Clear Print Hold Data
This function is used to clear data stored using the print hold function. Data whose property is set to "Protect" or "Confidential" is also cleared.
Step 1: Select the [Clear] key.
A confirmation message prompting you to select "Yes" or "No" will appear.
Step 2: Select the [Yes] key.
The selected data is cleared.
(Operation during clearing is the same as when "Clear All Memory" (page 11 of this manual) is performed.)
■ Clear All Data in Jobs Completed List
Use this when you wish to clear all data of the items below, which appear in the Job Status/Jobs Completed screen.
(The Job Status/Jobs Completed screen appears when the [Complete] key (job status screen selector key) of the job status screen is selected.)
● Printer user names
● Image send destinations
- Senders of faxes that are received
Step 1: Select the [Clear All Data in Jobs Completed List] key.
A confirmation message prompting you to select "Yes" or "No" will appear.
Step 2: Select the [Yes] key.
Data clearing is executed.
(Operation during clearing is the same as "Clear All Memory" (page 11 of this manual).
However, it is not possible to cancel during clearing.)
■ Clear Address Book and Registered Data
This function is used to clear the items indicated below, which cannot be cleared or initialized using "Clear All Memory" (page 11 of this manual) or "Restore Factory Defaults" ( System Settings (Administrator) > "Storing/Calling of System Settings" > "Restore Factory Defaults").
![Clear Address Book and Registered Data Back Clear Select the data to be cleared and press [Clear]. User Information Individual/Group/Program/Relay Broadcast Memory Box/ Forward Information/Metadata Set Polling Memory/Confidential Memory Box Sender Data Allow/Reject Reception Setting Data(Including polling passcode number) Forward Information](/content/2024/12/122210/images/0b18d8cd0fa16fd097bb5e4cf886f61f4152da9cfba63ee4285286bf3be7a35f.jpg)
- User Information
- Individual/Group/Program/Relay Broadcast Memory Box/Forward Information/Metadata Set ^*1
- Polling Memory/Confidential Memory Box ^2
- Sender Data
- Allow/Reject Reception Setting Data (including polling passcode number) ^1,3
- Forward Information ^*4
*1 The name may vary depending on the options that are installed.
^*2 Can only be selected when the fax function is enabled.
*3 Can be selected when either the fax function or the Internet fax function is in use. ("including polling passcode number" is displayed only when the fax function is enabled.)
*4 Select this when you only wish to erase stored forwarding information.
Step 1: Select the checkbox of each item that you wish to clear.
Step 2: Select the [Clear] key.
A confirmation message prompting you to select "Yes" or "No" will appear.
Step 3: Select the [Yes] key.
The selected data is cleared.
(Operation during clearing is the same as "Clear All Memory" (page 11 of this manual). However, it is not possible to cancel during clearing.)
■ Power Up Auto Clear
This function is used to automatically clear all data in the machine when the power switch is turned on.
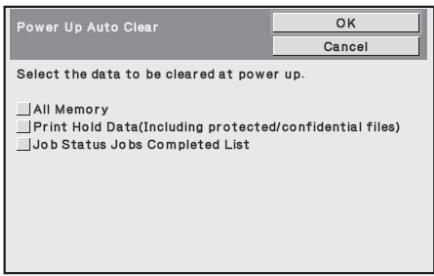
The following types of data can be cleared.
● All Memory
● Print Hold Data(Including protected/confidential files)
● Job Status Jobs Completed List
Select the checkboxes of the data to be automatically cleared when the power switch is switched on. When you have finished selecting the checkboxes, select the [OK] key. No checkboxes are initially selected.

When there is a stored image send job (fax, network scanning, or Internet fax job) ^ , "Power Up Auto Clear" will not take place when the power is turned on. ^ This includes received faxes and Internet faxes that have not yet been printed; however, it does not include data in a fax memory box (except confidential memory box).

If you wish to cancel data clearing...
See the explanations in "Clear screen 2" and "If you wish to cancel data clearing..." in "Clear All Memory" on page 12 of this manual.
■ Clearance Time Settings
To further strengthen the security settings, you can have data clearing repeated a set number of times in each area.
Select the select box ▼ of each item and select the number of times that you wish data clearing to be repeated. When finished, select the [OK] key.

● Number of Times Data Clear is Repeated
The number of times data clearing is repeated when "Clear All Memory", "Clear Print Hold Data", "Clear All Data in Jobs Completed List", or "Clear Address Book and Registered Data" is executed can be set to any number from 1 to 7. The factory setting is 1.
● Number of Times Power Up Auto Clear Program is Repeated
The number of times "Power Up Auto Clear" is repeated can be set to any number from 1 to 7. The factory setting is 1.

This setting is only enabled when the [Power Up Auto Clear] checkbox is selected.
● Number of Times Auto Clear at Job End Program is Repeated
The number of times auto clear is repeated after each job is completed can be set to any number from 1 to 7. The factory setting is 1.
About the repeat setting
When the repeat setting (number of repetitions) is increased to enhance the security function, the time required for data clearing increases.
It is recommended that you select repeat settings for "Number of Times Data Clear is Repeated", "Number of Times Power Up Auto Clear Program is Repeated", and "Number of Times Auto Clear at Job End Program is Repeated" that are suitable for your security needs and conditions of use.
Enable/Disable Settings
■ Setting for Print-Hold Disabling
This program is used to restrict the filing modes of the print hold function.
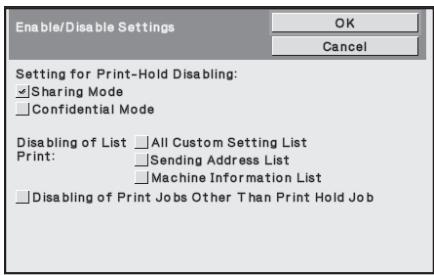
- Select the checkboxes of filing modes that you wish to disable. When you have finished selecting the checkboxes, select the [OK] key.
- The property of a file that is already stored cannot be changed to a disabled filing mode in the Web page.

If a certain property is disabled in "Disabling of Print Hold" and a file exists that was previously stored with this property, the property of the stored file can be changed to another property.
When printing with the printer function, even formats for storing files that have been disabled with this program will appear in the Job Handling screen of the printer driver (Operation Guide "SAVING PRINT FILES (Retention)" in "3. PRINTER"). However, if a disabled file format is selected when printing a file, the file will not be stored (only printing will take place).
■ Disabling of List Print
This program is used to disable printing of any of the following lists that are printed using "List Print (User)" in the system settings (general).
"All Custom Setting List", "Sending Address List", "Machine Information List" Select the checkboxes of the lists for which you wish to disable printing. After selecting the desired checkboxes, select the [OK] key.
■ Disabling of Print Jobs Other Than Print Hold Job
Printing in print mode other than from the operation panel of the machine can be prohibited. This setting can be used to prevent sensitive documents left on the output tray from being taken by a third party, which could result in the leaking of sensitive information.
- To prohibit printing other than from the operation panel, select the checkbox. To print when the prohibit setting has been selected, follow the steps below.
Step 1: Set the "Retention" setting in the printer driver to [Hold Only] and select the print command.
The print job will appear on the operation panel of the machine.
Step 2: Select your print job and execute printing. ( Operation Guide "PRINTING A STORED FILE" in "3. PRINTER")
If "Hold After Print" or "Sample Print" is selected before the print command is executed, printing will not take place. However, the job will be held in the machine and can be printed from the operation panel using the print hold function in the same way as a "Hold Only" job.
Jobs Completed List Display Setting
You can select whether or not the Job Status/Jobs Completed screen (job status screen selector key) is displayed.
If you prefer not to have the information (print mode user names, image send destinations, senders of faxes that are received, etc.) that is stored and shown in the job status completed jobs screen be displayed for security reasons, use this setting to hide the screen.

- To hide the Job Status/Jobs Completed screen, select the checkbox of each mode ([Print], [Scan], [Fax], and [Internet Fax]) to remove the checkmarks. When finished, select the [OK] key.
Job Status Display Setting
You can select whether or not filenames of print jobs and destination names of image send jobs are displayed in the job status screen of the display. If you do not want to display this information, select the appropriate checkboxes.
Release Lock on Print-Hold Data Manipulation
This function is used to release print hold files and encrypted PDF files, that are locked due to the entry of an incorrect password.
Select the [Release Lock on Print-Hold Data Manipulation] key and then the [Release] key to release all locked items. After this is done, the items can be manipulated. When no items are locked, the [Release Lock on Print-Hold Data Manipulation] key is grayed out.
Product Key
To initially enable the security function, you must use system settings (administrator) to enter the product key (password). The name of the system setting used for this purpose is "DATA SECURITY KIT". Please ask your dealer for the product key.
To register the product key, select the inside of the frame below the data security kit display, press the numeric keys to enter the product key number, and select the [Submit] key.
- If an incorrect number is entered...
A message will appear instructing you to check the product key number again.
- If the correct number is entered...
A message will appear instructing you to turn the power off and then on. Select the [OK] key when you have finished reading the message.
Turn off the power key first and then turn off the main power switch. The security function will be enabled when the power is turned on again.
Once the security function is enabled, the "Data Security Kit" will no longer appear in the product key entry screen.
After the product key is entered, it will not be possible to perform the following operations until the machine is restarted.
● All access from the network or fax line is prohibited.
● Keys that change the screen display such as the [CLEAR ALL] key cannot be used.
- The [Back] key of [Product Key] in the system settings will be grayed out to prevent switching to other screens.
Document control
The document control function is used to embed a document control pattern on the paper when a copy, print job, or received fax is printed.
If a person attempts to scan a document with an embedded document control pattern on a SHARP machine that has the document control function enabled, the message "Document control pattern is detected. This job is canceled." will appear and an e-mail will be sent to the administrator.
This prevents secondary copying and faxing of sensitive documents.

Document control may not be effective when certain original sizes or types, certain paper sizes or types, or certain settings are used.
To enable effective operation of the document control function, observe the following points.
● Original
- The function may not operate correctly if the original consists of large proportion of photographs.
- The document control function is intended to protect text data, and thus it may not operate correctly if used to protect graphic data.
● Color of document control pattern
- Select a color in a color family that is different from the paper color.
● Paper on which the document control pattern is printed
- To allow selection of the colors black, cyan, and yellow, use Sharp recommended paper.
- White paper is recommended. If paper other than white paper is used, the document control pattern may not be detected and the function may not operate correctly.
- Use B5 or larger size paper.
The following paper sizes can be used:
A4, B5, 8-1/2" x 11", 7-1/4" x 10-1/2" R, 8K, 16K
(When the paper size is A4 or smaller, the paper can be used in both the horizontal and vertical orientations.)
Disclaimer
Sharp does not guarantee that the document control function will always operate effectively. There may be some instances in which the document control function does not operate effectively.
Modes to which the document control function can be added
The document control function can be used to print with an embedded document control pattern in the following modes:
● Copy (color / black and white)
● Print (color / black and white)
● Internet Fax Receive (black and white only)
● Fax Receive (black and white only)
● List Print (black and white only)
Enabling the document control function
To enable the document control function, follow these steps.
Press the [SYSTEM SETTINGS] key, then select the [Security Settings] key, and the [Document Control Setting] key to display the document control settings screen, and configure the settings. When finished, select the [OK] key.
Document control setting screen
Slide scroll bar up or down to change the screen.
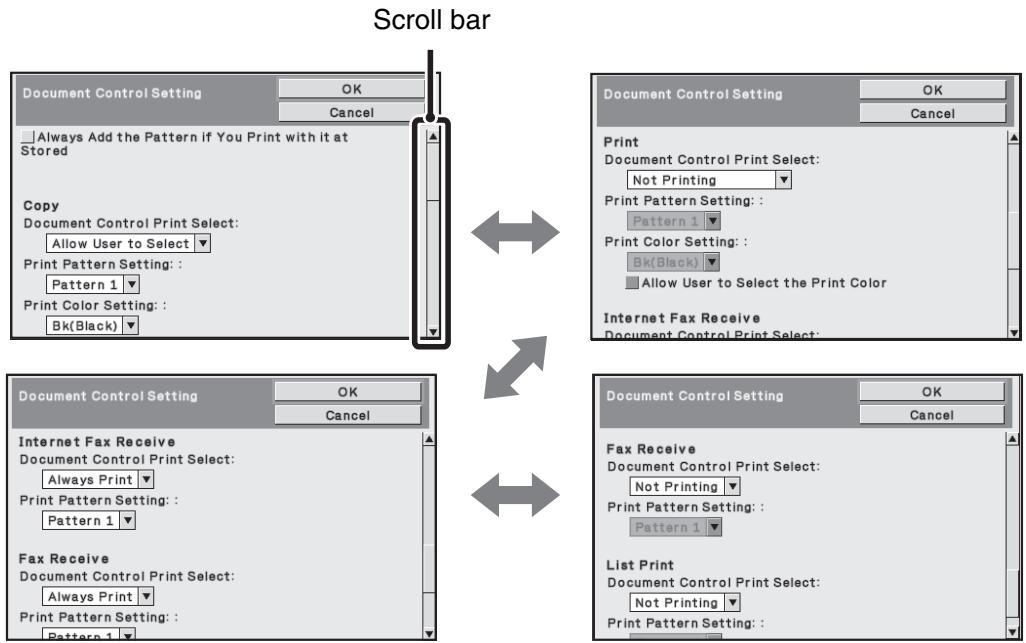
■ Settings for printing files stored by print hold
These settings are for printing the data that have been stored on the machine's hard drive using the print hold function. To have a document control pattern always printed when a stored file is printed if a document control pattern was printed when the job was originally executed, select the [Always Add the Pattern if You Print with it at Stored] checkbox √.
■ Settings related to Copy/Print
Settings related to copy and print modes can be configured in the "Copy" and "Print" fields of the document control setting screen.


● Document Control Print Select (Select the printing method)
Select the select box ▼ to display the list of items, and then select one of the items.
Not Printing:
The document control pattern is not printed.
Always Print:
The document control pattern is always printed.
Allow User to Select:
The user can select whether or not the document control pattern is printed each time the user sets up a print job.
● Print Pattern Setting (Select the pattern to be printed)
"Always Print" or "Allow User to Select" can be selected in "Document Control Print Select" to select a pattern setting.
To select one of patterns 1 to 5, select the select box ▼. Select one of the items.
If you find that the document control function cannot be used for a particular printed image, try changing the pattern setting (patterns 1 to 5). (Factory default setting: Pattern 1)
● Print Color Setting (Select the color)
"Always Print" or "Allow User to Select" can be selected in "Document Control Print Select" to select print color settings.
To select the print color, select the select box ▼. Select one of the items.
[Bk(Black)] :
The document control pattern is always printed in black.
[C(Cyan)]:
The document control pattern is always printed in cyan (Only when color mode is selected).
[Y(Yellow)]:
The document control pattern is always printed in yellow (Only when color mode is selected).
[Allow User to Select the Print Color] checkbox:
When this checkbox is selected (☑), the color selected here will be the initially selected default color for the document control pattern. The user can change the color each time the user executes a print job.
■ Settings related to Internet Fax Receive/Fax Receive/List Print modes
Settings related to Internet fax reception, fax reception, and list print modes can be configured in the "Internet Fax Receive", "Fax Receive", and "List Print" fields of the document control setting screen.


● Document Control Print Select (Select the printing method)
Select the select box ▼ to display the list of items, and then select one of the items.
Not Printing:
The document control pattern is not printed.
Always Print:
The document control pattern is always printed.

If "Always Print" is selected for Internet fax reception / fax reception mode, it is recommended that the forwarding functions of each be disabled. (See "4. FACSIMILE" in the Operation Guide for details.)
● Print Pattern Setting (Select the pattern to be printed)
If "Always Print" is selected in "Document Control Print Select", a pattern setting can be selected.
To select one of patterns 1 to 5, select the select box ▼. Select one of the items. If you find that the document control function cannot be used for a particular printed image, try changing the pattern setting (patterns 1 to 5). (Factory default setting: Pattern 1)
Using the document control function
When the document control function is used, a document control pattern is printed on the paper on which copies, print jobs, and received faxes are printed.
■ Pages on which a document control pattern is printed (all modes)
● The document control pattern is printed on all pages output by a Sharp machine that has the document control function, including the back side of pages printed by 2-sided printing.
- When a blank page is output because an odd number of pages were printed by 2-sided printing, a document control pattern will not be printed on the blank page.
After enabling the document control function in the system settings, follow these steps to use the function.
■ Using document control in copy mode
Select the [Special Modes] key in copy mode and go to the last screen. (See "2. COPIER" in the Operation Guide for details.)
Step 1: Select the [Doc. Control] key.
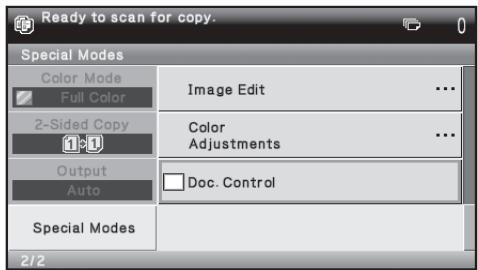

The display of the [Document Control] key and the steps that follow vary depending on the settings configured for the document control function in the system settings.
| Settings for the document control function in the system settings. | Special Modes screen | ||
| Document Control Print Select (Copy) setting | State of the Print Color Settings (copy) checkbox | [Document Control] key display | Following steps |
| [Not Printing] | - | Grayed out | Not available |
| [Always Print] |  | Highlighted | Go to step 2 |
 | Highlighted | When the key is selected, a beep sounds to indicate that the key is not available. | |
| [Allow User to Select] |  | Normal display | Go to step 2 |
 | Normal display | When selected, the key is highlighted and the function is enabled. | |
Step 2: Select the [Bk(Black)] key, [C(Cyan)] key or [Y(Yellow)] key.
The key of the color set in the print color setting of the system settings is initially highlighted. After selecting one of the keys, select the lower [OK] key to return to the special modes menu screen.
Step 3: Select settings as desired from the special modes menu screen and then press the [COLOR START] key or the [BLACK & WHITE START] key.
![SHARP MX-FR12U - Step 3: Select settings as desired from the special modes menu screen and then press the [COLOR START] key or the [BLACK & WHITE START] key. - 1](/content/2024/12/122210/images/59440a3d04758577fc90171345fcd92788e98bf0b69365c84a57fb1c4c71290f.jpg)
- If either the [C(Cyan)] key or the [Y(Yellow)] key is selected in step 2, the [BLACK & WHITE START] key cannot be pressed.
When the color mode is set to any mode other than full color, the [COLOR START] key cannot be pressed. - When the color mode is single color, document control pattern printing is not possible.
Combining the document control function with other functions
| Function combined with document control | Operation of document control pattern printing |
| Exposure | The pattern is always printed at the same exposure regardless of the exposure setting. |
| Copy Ratio | The pattern is always printed at the same ratio regardless of the ratio setting. |
| Duplex | The pattern is printed on the back side as well as the front side when 2-sided copy is performed. (The orientation of the original, tablet or book, is not taken into account.) |
| Rotation Copy setting | The pattern does not change when rotation copy is used. (The orientation of the pattern depends on the orientation of the paper in the tray.) |
| Margin Shift | The position of the pattern does not change when margin shift is used. (The margin width does not affect the position of the pattern.) |
| Erase | The pattern is printed normally on the edge that is erased. |
| Pamphlet Copy | Printed based on the paper used for pamphlet copy. |
| Job Build | The pattern is printed normally. |
| 2in1 | Printed based on the paper. The pattern is printed normally on the sheet of paper. |
| Card Shot | The pattern is printed once each time the front side and the back side of the original are scanned. |
| Stamp | If the pattern and the stamp item overlap, the pattern is given priority. |
| Photo Repeat | The pattern is printed once for one scan of a photo. |
| Mirror Image | The pattern is printed in the normal orientation without being inverted. |
| Centering | The pattern is printed normally. |
| B/W Reverse | Patterns are printed normally without black/white inversion. |
| Bus. Card Scan | The pattern is printed normally. |
| Other functions | The pattern is printed normally when RGB Adjust, Sharpness, Suppress Background, Color Balance, Brightness and/or Intensity settings are used. |
■ Using the document control function in printer mode
- When [Always Print] is enabled in [Document Control Print Select] in the system settings, a document control pattern is always printed.
- If [Allow User to Select] is enabled, follow the procedure below to print a document control pattern.
Step 1: Select the [Data Security Kit] checkbox in the initial settings screen (properties screen) of the printer driver.
See the Software Setup Guide for detailed information on the initial settings of the printer driver.
Step 2: Before executing printing, click the [Advanced] tab of the printer driver properties window and click the [Document Control] button.
See "3. Printer" in the Operation Guide for detailed information on printing.
Step 3: Select the [Document Control] checkbox and select [Black], [Cyan], or [Yellow] from [Print Color].
■ Using the document control function in Internet Fax Receive/Fax Receive/List Print modes
No special operation is required. When printing takes place, a black and white document control pattern is embedded according to the document control function settings in the system settings.
■ Body text commands for E-mail Direct Print
The command below can be entered in the body text of a direct print e-mail to specify whether or not a document control pattern is to be printed.
| Function | Command name | Value | Entry example |
| Pattern printing ON/OFF | DOCUMENTCONTROL | ON OFF | DOCUMENTCONTROL=ON |
Warning
This is a Class A product. In a domestic environment this product may cause radio interference in which case the user may be required to take adequate measures.
Garantía
A4, B5, 8-1/2" x 11", 7-1/4" x 10-1/2" R, 8K, 16K
A4, B5, 8-1/2" x 11", 7-1/4" x 10-1/2" R, 8K, 16K
A4, B5, 8-1/2" x 11", 7-1/4" x 10-1/2" R, 8K, 16K
Volg de procedure in "SYSTEEMINSTELLINGEN (BEHEERDER)" in
A4, B5, 8-1/2" x 11", 7-1/4" x 10-1/2" R, 8K, 16K
A4, B5, 8-1/2" x 11", 7-1/4" x 10-1/2" R, 8K, 16K
Systeminnstillinger 9
(→ Web-side (Administrator) > "Drifts-Innstillinger" > "Tidsoppsett For Melding")

Bruke Systeminnstillingene (Administrator)
Følg fremgangsmåten i "SYSTEMINNSTILLINGER (ADMINISTRATOR)" i "6. SYSTEMINNSTILLINGER" i driftshåndboken for å konfigurere innstillingene i systeminnstillinger (administrator).
Innstillinger for datasletting
■ Slett Alt Minne
A4, B5, 8-1/2" x 11", 7-1/4" x 10-1/2" R, 8K, 16K
(Når papirstørrelsen er A4 eller mindre, kan papiret anbringes både horisontalt og vertikalt.)
Ansvarsfraskrivelse

A4, B5, 8-1/2" x 11", 7-1/4" x 10-1/2" R, 8K, 16K
A4, B5, 8-1/2" x 11", 7-1/4" x 10-1/2" R, 8K, 16K
A4, B5, 8-1/2" x 11", 7-1/4" x 10-1/2" R, 8K, 16K
Notice for Users in Europe
SHARP ELECTRONICS (Europe) GmbH
- MX-FR12U
- For users in the USA
- WARNING:
- NOTE:
- For users in Canada
- Icons used in the manuals
- Contents
- Introduction
- ■ Backing up and clearing data stored with the print hold function
- ■ About passwords for the Web page
- ■ Export restrictions
- ■ USB memory storage
- When the data security kit is installed
- System settings of the data security kit
- Document control function
- Print hold
- Authority group registration screen
- Protecting passwords
- ■ Administrator Password/User Password
- ■ Confidential files of the print hold function
- ■ File search screen of print hold
- ■ Encrypt PDF
- ■ FTP Pull Print
- ■ Login when user authentication is enabled
- Security Settings in the Web pages
- ■ Procedure for directly printing a file on an FTP server (when user authentication is enabled)
- Transferring copied data
- Using the System Settings (Administrator)
- System settings for security
- Data Clearance Settings
- ■ Clear All Memory
- [Clear screen 1]
- [Clear screen 2]
- If you wish to cancel data clearing...
- ■ Clear Print Hold Data
- ■ Clear All Data in Jobs Completed List
- ■ Clear Address Book and Registered Data
- Step 1: Select the checkbox of each item that you wish to clear.
- Step 2: Select the [Clear] key.
- Step 3: Select the [Yes] key.
- ■ Power Up Auto Clear
- ■ Clearance Time Settings
- About the repeat setting
- Enable/Disable Settings
- ■ Setting for Print-Hold Disabling
- ■ Disabling of List Print
- ■ Disabling of Print Jobs Other Than Print Hold Job
- Step 1: Set the "Retention" setting in the printer driver to [Hold Only] and select the print command.
- Step 2: Select your print job and execute printing. ( Operation Guide "PRINTING A STORED FILE" in "3. PRINTER")
- Jobs Completed List Display Setting
- Job Status Display Setting
- Release Lock on Print-Hold Data Manipulation
- Product Key
- Document control
- Disclaimer
- Modes to which the document control function can be added
- Enabling the document control function
- Document control setting screen
- ■ Settings for printing files stored by print hold
- ■ Settings related to Copy/Print
- ● Document Control Print Select (Select the printing method)
- ● Print Pattern Setting (Select the pattern to be printed)
- ● Print Color Setting (Select the color)
- ■ Settings related to Internet Fax Receive/Fax Receive/List Print modes
- Using the document control function
- ■ Pages on which a document control pattern is printed (all modes)
- ■ Using document control in copy mode
- Step 2: Select the [Bk(Black)] key, [C(Cyan)] key or [Y(Yellow)] key.
- Step 3: Select settings as desired from the special modes menu screen and then press the [COLOR START] key or the [BLACK & WHITE START] key.
- ■ Using the document control function in printer mode
- Step 1: Select the [Data Security Kit] checkbox in the initial settings screen (properties screen) of the printer driver.
- Step 2: Before executing printing, click the [Advanced] tab of the printer driver properties window and click the [Document Control] button.
- Step 3: Select the [Document Control] checkbox and select [Black], [Cyan], or [Yellow] from [Print Color].
- ■ Using the document control function in Internet Fax Receive/Fax Receive/List Print modes
- ■ Body text commands for E-mail Direct Print
- Warning
- Garantía
- Bruke Systeminnstillingene (Administrator)
- Innstillinger for datasletting
- ■ Slett Alt Minne
- Ansvarsfraskrivelse
- Notice for Users in Europe
- SHARP ELECTRONICS (Europe) GmbH
Brand : SHARP
Model : MX-FR12U
Category : Printer Accessory