
RHT600R - Hedge trimmers RYOBI - Free user manual and instructions
Find the device manual for free RHT600R RYOBI in PDF.

| Product Type | Corded Electric Hedge Trimmer |
| Brand | RYOBI |
| Model | RHT600R |
| Power Supply | 220-240 V~, 50 Hz |
| Power | 700 W |
| No-load Speed | 1500 min⁻¹ |
| Max Cutting Capacity | 27 mm |
| Blade Length | 550 mm |
| Braking Time | < 1 second |
| Weight (without cord) | 4.2 kg |
| Sound Pressure Level (LpA) | 90 dB(A) |
| Sound Power Level (LwA) | 103 dB(A) |
| Vibration Level | 1.9 m/s² |
| Insulation Type | Double Insulation (Class II) |
| Swiveling Rear Handle | 5 positions (straight, 45° R/L, 90° R/L) |
| Start System | Dual Switch (two hands) |
| Anti-Kickback Protection | Yes |
| Voltage Indicator | Yes (blue light) |
| Extension Cord Hook | Yes |
| Blade Sheath | Included |
| Blade Maintenance | Lubricate after each use |
| Warranty | 24 months |
| Intended Use | Cutting and trimming hedges, bushes, shrubs (private use) |
Frequently Asked Questions - RHT600R RYOBI
User questions about RHT600R RYOBI
0 question about this device. Answer the ones you know or ask your own.
Ask a new question about this device
Download the instructions for your Hedge trimmers in PDF format for free! Find your manual RHT600R - RYOBI and take your electronic device back in hand. On this page are published all the documents necessary for the use of your device. RHT600R by RYOBI.
USER MANUAL RHT600R RYOBI
natural_image
Line drawing of a hair clip with serrated edge and headband (no text or symbols)CE 回
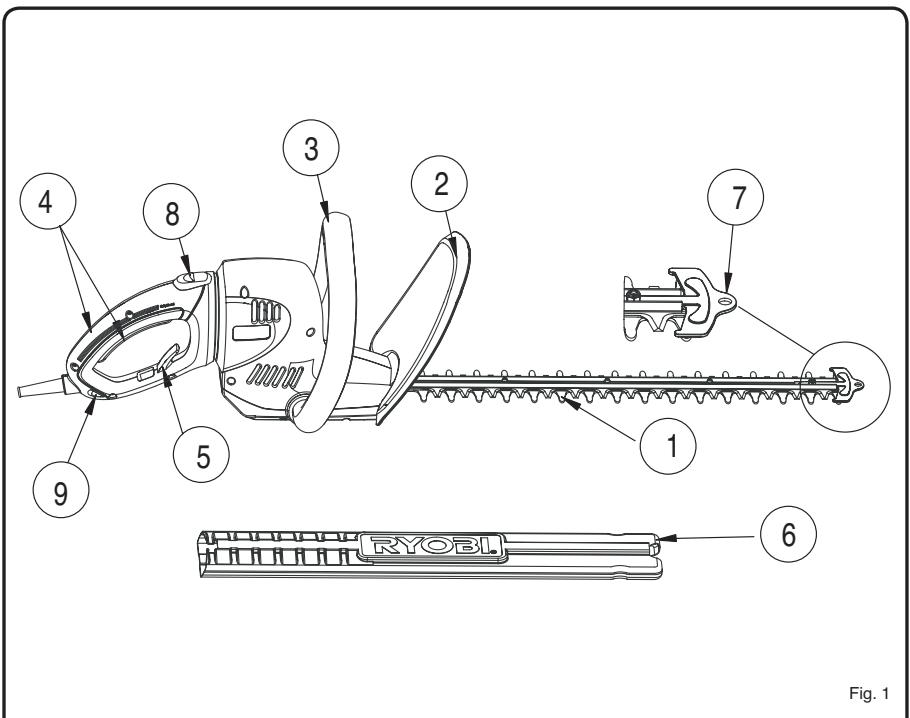
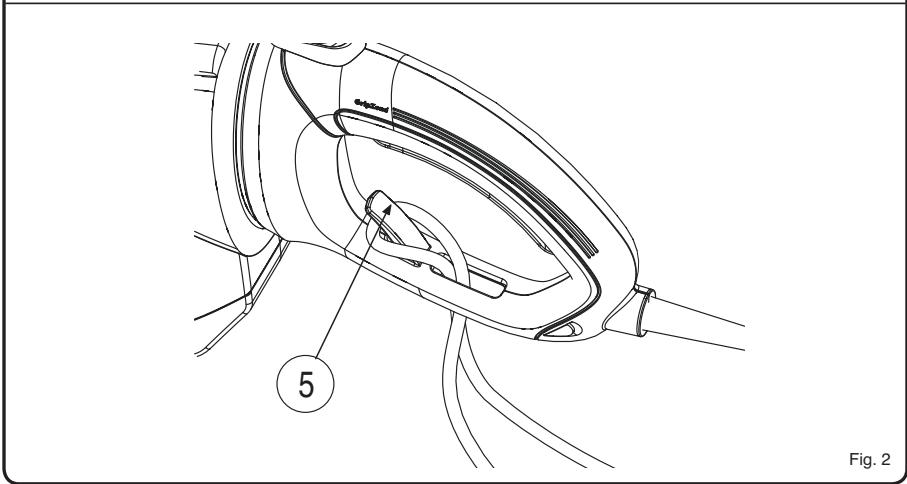
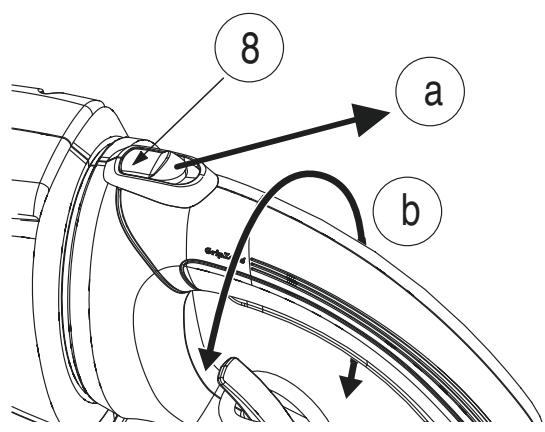
Fig. 3a
| Attention ! | Il est indispensable que vous lisiez les instructions contenues dans ce manuel avant le montage et la mise en service de l'appareil. |
| Important! | It is essential that you read the instructions in this manual before mounting and operating this machine. |
| Achtung! | Bitte lesen Sie unbedingt vor Montage und Inbetriebnahme die Hinweise dieser Bedienungsanleitung. |
| ¡Atención! | Es imprescindible que lea las instrucciones de este manual antes del montaje y de la puesta en servicio. |
| Attenzione! | Prima di procedere al montaggio e alla messa in funzione, è indispensabile leggere attentamente le istruzioni del presente manuale. |
| Atenção! | É indispensável ler as instruções deste manual antes de montar e pôr em serviço. |
| Let op ! | Het is absoluut noodzakelijk vóór montage en inbedrijfstelling de aanwijzingen in deze handleiding te lezen. |
| Observera! | Det är nödvändigt att läsa instruktionerna i denna bruksanvisning före montering och driftsättning. |
| OBS! | Denne brugsanvisning skal læses igennem inden montering og ibrugtagning. |
| Advarsel! | Vennligst les instruksjonene i denne bruksanvisningen før du monterer og tar i bruk maskinen. |
| Huomio! | On ehdottoman välttämätöntä lukea tässä käyttöohjeessa annetut ohjeet ennen asennusta ja käyttöönottoa. |
| Προσοχή! | Eïvai απαραίτητο να διαβάσετε τις συστάσεις των οδηγιών αυτών πριν τη συναρμολόγηση και τη θέση σε λειτουργία |
| Figyelem! | Feltétlenül fontos, hogy a jelen használati útmutatóban foglalt előírásokat az összeszerelés és az üzembe helyezés ellőt elolvassa! |
| Dûležité upozornění! | Před montáží nářadí a uvedením do provozu je nutné si přečíst následující pokyny. |
| Внимание! | Перед сборкой и запуском инструмента необходимо прочесть инструкции из настоящего руководства. |
| Atentie! | Este indispensabil să citiți instrucțiunile conținute în acest mod de utilizare încainte de montaj și de punerea în funcțiune. |
| Uwaga! | Przed montowaniem i uruchomieniem, koniecznie musicie się Państwo zapoznać z zaleceniami zawartymi w niniejszym sposobie użycia. |
| Pomembno! | Zelo pomembno je, da pred namestitvijo in prvo uporabo te naprave preberete navodila v tem priročniku. |
| Upozorenje! | Važno je da upute u ovom Korisničkom priručniku pročitate prije postavljanja i uporabe ovog alata. |
| Dikkat! | Montajdan ve aletin kullanımina başlamadan bu kılavuzda bulunan talimatları okumanız gerekmektedir. |
| Tähtis! | Lugege enne seadme kokkupanekut ja kasutamist kindlasti läbi selles juhendis sisalduvad eeskirjad ja juhised! |
| Dèmesio! | Prieš surinkdami ir paleisdami aparatą į darba, reikia, kad jūs perskaitytumète šiame vadove esančias instrukcijas. |
| Uzmanību! | Ir loti būtiski, lai jūs izlasītu norādījumus, kas sniegti šajā rokasgrāmatā, pirms keraties pie ierīces montēšanas un iedarbināšanas! |
| Upzornenie! | Je dôležité, aby ste si pred montážou a spustením zariadenia prečítali pokyny, ktoré sa nachádzajú v tomto návode. |
| Внимание! | Преди сглобяване и пускане на машината е важно да прочетете инструкциите в ръководството за употреба. |
Sous réserve de modifications techniques / Subject to technical modifications / Technische Änderungen vorbehalten / Bajo reserva de modificaciones técnicas / Con riserva di eventuali modifiche tecniche / Com reserva de modificações técnicas / Technische wijzigingen voorbehouden / Med förbehåll för tekniska ändringar / Med forbehold for tekniske ændringer / Med forbehold om tekniske endringer / Tekniset muutokset varataan / Упó түн επιφύλαξη τεχνικών τροποποιήσεων / A műszaki módosítás jogát fenntartjuk / Změny technických údajů vyhrazeny / Могут быть внесены технические изменения / Sub rezerva modificațiilor tehnice / Z zastrzeženiem modyfikacji technicznych / Tehnične spremembe dopuščene Podložno tehničkim promjenama / Teknik düzeltmeler hakkі saklıdır / Tehnilised muudatused võimalikud / Pasiliekant teisę daryti techninius pakeitimus / Paturam tiesības mainīt tehniskos raksturlielumus / Technické zmeny vyhradenė / Подлежи на технически модификации
Français
CONSIGNES DE SÉCURITÉ GÉNÉRALES

AVERTISSEMENT
MISE EN MARCHE/ARRÊT
natural_image
Symbol of a trash bin crossed out by two diagonal lines (no text or numbers present)
When using electric gardening appliances, basic safety precautions should always be followed to reduce the risk of fire, electric shock and personal injury, including the following:
READ ALL INSTRUCTIONS.
■ Be familiar with the controls and proper use of the product.
- Clear the work area before each use. Remove all objects, such as rocks, broken glass, nails, wire or string that can lead to accidents.
■ Wear heavy, long trousers, boots and gloves. Do not wear loose fitting clothing, short or go bare foot. Do not wear jewelry of any kind.
■ Secure hair above shoulder level to prevent entanglement in moving parts.
■ Do not allow children or untrained individuals to use this product.
- Keep all bystanders, especially children and domestic animals, at least 15 m from the operating area. Stop this tool immediately if someone arrives in the working area.
■ Do not operate this product when you are tired, ill or under the influence of alcohol, drugs or medication.
■ Do not operate in poor lighting. Use the unit only in daylight or good artificial light.
- Keep firm footing and balance. Do not overreach. Overreaching can result in loss of balance or exposure to hazards.
- Keep all parts of your body away from moving parts. Inspect the product before use. Have any damaged parts replaced by your nearest Authorised Ryobi Service Centre before use.
■ Do not operate the product in damp or wet locations. Do not use the product in the rain.
■ Wear safety glasses or goggles when operating this product.
■ Use the right product. Use the product for the intended purpose only.
■ Do not handle the product with wet hands.
■ Do not use the product if the switch does not turn the product on or off. A product that cannot be controlled with the switch is dangerous and must be repaired.
■ Avoid accidental starting.
■ Stay alert and pay attention to what you are doing. Use common sense when using this product.
■ Do not force the product. It will do a better job with less likelihood of a risk of injury when you operate it at the rate for which it was designed.
■ Pull the plug out immediately if the mains or extension lead is damaged or severed.
■ Disconnect the product from the power supply when it is not in use, before carrying out any adjustments, servicing or maintenance.
SPECIFIC SAFETY RULES
SPECIFIC TRIMMER SAFETY RULES
■ Never operate the product without the safety guard in place and in good condition.
- Keep the working area free from wires, nails, metallic cable, glass, stones and debris.
■ Do not cut against hard objects, this could cause injury or damage the trimmer.
■ Do not cross roads or gravel paths with the trimmer still running. As equipment user, you are responsible for third parties in the working area.
■ While operating the tool, always hold it firmly with both hands by the two handles and ensure a firm footing, especially if steps or ladders are used.
■ Do not touch the blades! Make sure you hold the tool firmly with both handles and that you are well balanced with your weight evenly distributed on both feet.
- Keep the cutting system below level of your waist.
- Keep your fingers and other body parts away from the cutting blade.

CAUTION
Certain parts of the machine may become hot in use.
■ Familiarise yourself with your surroundings and be on the alert for possible hazards which you may not notice because on the noise from the machine.
■ Never grasp the tool by the blade.
■ Large variation in temperature can lead to condensation inside the tool. Before use, give the machine time to adjust to the temperature of work area.
■ Let the tool work at its own pace. Do not overload.
■ Never attempt to use an incomplete machine or one fitted with an unauthorised modification.
■ When transporting, disconnect the plug from the mains. Carry the trimmer by the handles provided and keep hands away from the blade.
English
SPECIFIC SAFETY RULES
■ During transport or storage, always cover the blade with the blade sheath (6).

WARNING
NEVER USE THE TOOL WITHOUT THE SAFETY GUARD.
LET THE TOOL WORK AT ITS OWN PACE. DO NOT OVERLOAD.
ELECTRICAL SAFETY RULES
■ Make sure the cord is located so that it will not be stepped on, tripped over or otherwise subjected to damage or stress.
■ Connect the power lead to the mains only when no one is handling the tool.
- Do not abuse the power cord. Never carry the product by the cord. Never pull the plug out of the power point by the cord. Keep the cord away from heat, oil and sharp edges.
■ For outdoor work use only suitable rain-water proof approved extension cables.
- Secure the extension cable by hanging it in the pull relief (5) (Fig. 2).
■ Make sure there are no cuts, cracks or signs of deterioration in the power cable. If any defects appear, have the power cord replaced by an Authorized Ryobi Service Centre.
- A nameplate on the product indicates the unit's voltage. Never connect the product to an AC voltage that differs from this voltage.
■ If the power cord or extension cable becomes damaged during use, disconnect the cord from the supply immediately. DO NOT TOUCH THE CORD BEFORE DISCONNECTING THE SUPPLY.
■ Adopt protective measures against electrical shock. Avoid bodily contact with earthed parts such as metal pipes, radiators, cooking ranges, refrigerators and the like.
■ Electrical power should be supplied via a Residual Current Device (RCD) with a tripping current of not more than 30 mA.
MAINTENANCE RULES
■ Unplug the product before making adjustments or repairs.
- Do not use the product if parts have been damaged. Check the product regularly to make sure that it will operate properly and perform the intended function. Any part that is damaged should be properly repaired or replaced by an Authorised Ryobi Service Centre.
■ Never douse or squirt the product with water or any other liquid. Do not use detergents or solvents. Wipe down housing with a damp cloth only, then dry fully and make sure there is no debris remaining in the blade or working parts.
■ Remove plug from socket before adjusting or maintaining tool.
■ Always keep vent slits free of obstruction.
■ After each use, carefully clean the blade, rub over with an oily cloth or treat with an environmentally friendly lubricant.

WARNING
Before carrying out any maintenance operations, cut off the electric power supply by disconnecting the plug from the mains.
SERVICE RULES
■ Service on this product must be performed by qualified repair personnel only. Service or maintenance performed by unqualified personnel could result in injury to the user and/or damage to the product. Such service may also void your warranty.
■ Use only identical replacement parts when servicing the product. Follow the instructions in the Maintenance section of this manual. Use of unauthorized parts or failure to follow maintenance instructions may create a risk of shock, serious injury to the user and/or damage to the product. Such use may also void your warranty.
■ When replacing the blade, the whole blade assembly should be changed.
STORAGE AND TRANSPORTATION RULES
■ Stop the motor when you are waiting to cut or when you are walking from one cutting location to another. Store the product inside a dry place.
■ When transporting, disconnect the plug from the mains. Carry the trimmer by the handles provided and keep hans away from the cutting blade.
- During transport or storage, always cover the blade with the blade sheath, so that the blades aren't accessible.
■ The knock-on protector can, if required, also serve as a wall-mounted holder.
English
SPECIFIC SAFETY RULES
Store the product up high or lock it up to prevent unauthorized use or damage. Keep the product out of the reach of children.
■ Secure the product when transporting it.
■ Save these instructions. Refer to them frequently and use them to instruct others who may use this product. If you loan someone this product, loan these instructions also.
SYMBOLS
Some of the following symbols may be used on your tool. Please study them and learn their meaning. Proper interpretation of these symbols will allow you to operate the tool more safely and effectively.
| SYMBOL | NAME | EXPLANATION |
| [5z3T] | Safety Alert | Precautions that involve your safety. |
 | Ricochet | Thrown objects can cause severe injury. Wear protective clothing and boots. |
 | Eye Protection | Always wear safety goggles and safety glasses with side shields or a full face shield when operating this product. |
 | Keep Bystanders Away | Keep all bystanders at least 15 m away. |
 | Class II Construction | Double-insulated construction. |
 | Wet Conditions Alert | Do not expose to rain or use in damp locations. |
 | Read Operator's Manual | To reduce the risk of injury, user must read and understand operator's manual before using this product. |
 | Electric Shock Precaution | Remove plug from the mains immediately if cable is damaged or cut. |
 | Sound Power Level | RHT-600R sound power level is 103 dB. |
 | Sound Power Level | RHT-700R sound power level is 104 dB. |
English
SYMBOLS
The following signal words and meanings are intended to explain the levels of risk associated with this product.
| SYMBOL | SIGNAL | MEANING |
 | DANGER | Indicates an imminently hazardous situation, which, if not avoided, will result in death or serious injury. |
 | WARNING | Indicates a potentially hazardous situation, which, if not avoided, could result in serious injury. |
 | CAUTION | Indicates a potentially hazardous situation, which, if not avoided, may result in minor or moderate injury. |
| CAUTION | (Without Safety Alert Symbol) Indicates a situation that may result in property damage. |
SERVICE
Servicing requires extreme care and knowledge and should be performed only by a qualified service technician. For service we suggest you return the product to your nearest AUTHORISED SERVICE CENTRE for repair. When servicing, use only identical replacement parts.

WARNING
Observe all normal safety precautions related to avoiding electrical shock.

WARNING
To avoid serious personal injury, do not attempt to use this product until you read thoroughly and understand completely the operator's manual. Save this operator's manual and review frequently for continuing safe operation and instructing others who may use this product.

WARNING
The operation of any power tool can result in foreign objects being thrown into your eyes, which can result in severe eye damage. Before beginning power tool operation, always wear safety goggles or safety glasses with side shields and a full face shield when needed. We recommend Wide Vision Safety Mask for use over eyeglasses or standard safety glasses with side shields. Always use eye protection.
SAVE THESE INSTRUCTIONS.
DESCRIPTION
- Blade
- Safety guard
- Bow-grip with On/Off switch
- Rotational handle with On/Off switch
- Pull relief for cord
- Blade sheath
- Knock on protector
- Lock button, rotational handle
(a) & (b) Pull backward and rotate the handle. - Live tool indicator
TECHNICAL DATA
| RHT-600R | RHT-700R | |
| Rated voltage | 220-240 V~/50 Hz | 220-240 V~/50 Hz |
| Power rating | 600 W | 700 W |
| Rated no-load speed | 1500 min ^-1 | 1500 min ^-1 |
| Cutting capacity | 27 mm | 27 mm |
| Blade length | 550 mm | 650 mm |
| Braking time | <1 s | <1 s |
| Weight (without cable) | 4.2 kg | 4.3 kg |
| LpA (noise) | 90 dB(A) | 90 dB(A) |
| LwA (sounding power) | 103 dB(A) | 104 dB(A) |
| Vibration level | 1.9 m/s ^2 | 1.9 m/s ^2 |
OPERATION
POWER CONNECTION
■ The mains voltage must conform to the specifications on the rating plate.
English
OPERATION
■ Connect the tool plug to an approved extension lead (if required) and protect the plug connection with the pull-relief (5) (Fig. 2).
■ Once plugged to electric supply, the live tool indicator (9) shows a blue light, which means this tool is ready for use.
RANGE OF USE
Cutting and trimming of hedges, bushes and ornamental shrubs in the domestic sector only. All other uses are expressly excluded.
SWITCHING ON AND OFF
This tool is equipped with a two-hands safety switching system. This system prevents starting the tool inadvertently and will only allow operation while holding the tool with both hands.
■ To switch on: Press the bow grip On/Off switch (3) and the On/Off switch at rotational handle (4) with both hands at the same time.
■ To switch off: Release On/Off switch (3) and/or rotational handle switch (4).
■ The brake control will stop the blade within one second.
Note: The sparking (flashing) resulting in the area of the vent slits / top of the main enclosure is normal and will not damage the tool.
■ When you stop your equipment, be sure that the cutting system comes to complete stop before proceeding further.
Note: This tool cannot be started if the lock switch (8) is pulled backward and/or the rotational handle (4) is being turned.
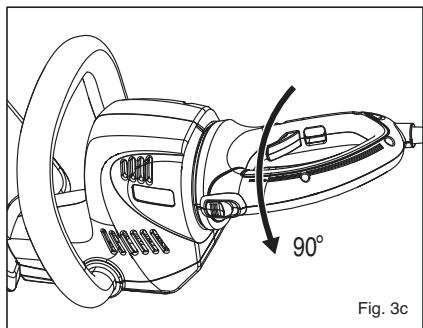
ADJUSTING THE TURNING HANDLE
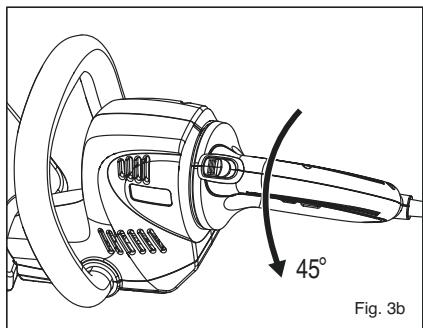
To facilitate your work, the hedge trimmer is equipped with a turning rear handle that can be set in 5 different positions (Normal, +/-45 and +/-90 degrees). This mechanism provides ergonomically comfortable positions when cutting vertical or angled planes, avoiding early fatigue experienced with other hedge trimmers.
Follow below steps to change the position of the handle:
■ Release the On/Off switch (4), pull the lock button (8) backward (Fig. 3a). The rotational handle is now unlocked and can be turned to the desired position (Fig. 3b & 3c).
■ In the desired end position, release the lock button (8) back into place to secure the handle position.
Please bear in mind that the lock button (8) can only be pulled back when the On/Off switch (4) is not activated. Make sure that the lock button fully engages into the housing again after repositioning the turning handle. Only then can this tool be activated.
CUTTING HEDGES
■ Clean up the cutting area before starting. Take away stones, glass pieces, nails, metallic cable and any objects that can be projected or get caught during the cutting.
■ Using pruning shears, first prune out branches of a diameter greater than 27 mm.
■ Young buds can be trimmed easily with a scythe movement; older and bigger hedges can be trimmed easily with a sawing movement.
■ The knock-on protector (7) prevents unpleasant backlash from contact with walls, fences, etc.
■ If hard objects become jammed in the cutter blade, switch off the tool immediately, pull out plug first and only then remove the objects.
■ Metal objects such as wire fences and plant supports can damage the blade. Do not let the cutting blades come in contact with materials that can not be trimmed, such as stones or metal.
■ Always lay the lead away from the working area. Always work away from the power socket. For this reason, decide on the direction of cut before beginning work.
DISPOSAL
natural_image
Symbol of a trash bin crossed out by two diagonal lines (no text or numbers present)
Waste electrical products should not be disposed of together with household waste. Please recycle where facilities exist. Check with your local authority or retailer for recycling advice.
Deutsch
natural_image
Symbol of a trash bin crossed out by two diagonal lines (no text or numbers present)natural_image
Symbol of a trash bin crossed out by two diagonal lines (no text or numbers present)natural_image
Symbol of a trash bin crossed out by two diagonal lines (no text or numbers present)
natural_image
Symbol of a trash bin crossed out by two diagonal lines (no text or numbers present)natural_image
Symbol of a trash bin crossed out by two diagonal lines (no text or numbers present)FÖRVARING OCH TRANSPORT
natural_image
Symbol of a trash bin crossed out by two diagonal lines (no text or numbers present)natural_image
Symbol of a trash bin crossed out by two diagonal lines (no text or numbers present)natural_image
Symbol of a trash bin crossed out by two diagonal lines (no text or numbers present)natural_image
Symbol of a trash bin crossed out by two diagonal lines (no text or numbers present)
natural_image
Symbol of a trash bin crossed out by two diagonal lines (no text or numbers present)natural_image
Symbol of a trash bin crossed out by two diagonal lines (no text or numbers present)natural_image
Symbol of a trash bin crossed out by two diagonal lines (no text or numbers present)natural_image
Symbol of a trash bin crossed out by two crossed lines (no text or numbers present)CITIȚI TOATE INSTRUCTIUNILE.
natural_image
Symbol of a trash bin crossed out by two diagonal lines (no text or numbers present)natural_image
Symbol of a trash bin crossed out by two diagonal lines (no text or numbers present)natural_image
Symbol of a trash bin crossed out by two diagonal lines (no text or numbers present)natural_image
Symbol of a trash bin crossed out by two diagonal lines (no text or numbers present)natural_image
Symbol of a trash bin crossed out by two diagonal lines (no text or numbers present)
HOIDKE NEED JUHISED ALLES!
KIRJELDUS
natural_image
Symbol of a trash bin crossed out by two diagonal lines (no text or numbers present)
natural_image
Symbol of a trash bin crossed out by two diagonal lines (no text or numbers present)PIEVIENOŠANA STRĀVAS TĪKLAM
natural_image
Symbol of a trash bin crossed with a diagonal line, representing no waste or discharge (no text or labels)natural_image
Symbol of a trash bin crossed out by two diagonal lines (no text or numbers present)
natural_image
Symbol of a trash bin crossed out by two diagonal lines (no text or numbers present)
GARANTIE - CONDITIONS
All Ryobi products are guaranteed against manufacturing defects and defective parts for a period of twenty four (24) months from the date stated on the original invoice drawn up by the retailer and given to the end user. Deterioration caused by normal wear and tear, unauthorised or improper use or maintenance, or overload are excluded from this guarantee as are accessories such as battery packs, light bulbs, blades, fittings, bags, etc. In the event of malfunction during the warranty period, please take the NON-DISMANTLED product, along with the proof of purchase, to your retailer or nearest Authorised Ryobi Service Centre.
This warranty in no way affects your legal rights concerning defective products.

GARANTIE - BEDINGUNGEN
GARANTIJAS NOSACĪJUMI
DÉCLARATION DE CONFORMITÉ CE
Fabricant : Techtronic Appliances (HK), Ltd. 18/F, CDW Building, 388 Castle Peak Road, Tsuen Wan, Hong Kong.
GB
CE DECLARATION OF CONFORMITY
We declare under our sole responsibility that this product is in conformity with the following standards or standardized documents: EN50144-1, EN50144-2-15, EN61000 according to the provisions of the regulations 98/37/CEE, 73/23/CEE, 89/336/CEE, 2000/14/CEE (Annex V).
Technical documents are kept by the Quality Assurance Department - Regulatory team, Techtronic Appliances Factory, Sam Tuen Management Zone, Hou Jie Town, Dongguan City, Guangdong 523941, China.
Manufacturer name: Techtronic Appliances (HK), Ltd. 18/F, CDW Building, 388 Castle Peak Road, Tsuen Wan, Hong Kong.
D
Hersteller: Techtronic Appliances (HK), Ltd. 18/F, CDW Building, 388 Castle Peak Road, Tsuen Wan, Hong Kong.
E
Fabricante: Techtronic Appliances (HK), Ltd. 18/F/CDW Building, 388 Castle Peak Road, Tsuen Wan, Hong Kong.
I
Produttore: Techtronic Appliances (HK), Ltd. 18/F, CDW Building, 388 Castle Peak Road, Tsuen Wan, Hong Kong.
P
Fabricante: Techtronic Appliances (HK), Ltd. 18/F, CDW Building, 388 Castle Peak Road, Tsuen Wan, Hong Kong.
NL
CONFORMITEITSVERKLARING EG
Fabrikant: Techtronic Appliances (HK), Ltd. 18/F, CDW Building, 388 Castle Peak Road, Tsuen Wan, Hongkong.
s
FÖRSÄKRAN OM EG-ÖVERENSSTÄMMELSE
Tillverkare: Techtronic Appliances (HK), Ltd. 18/F, CDW Building, 388 Castle Peak Road, Tsuen Wan, Hong Kong.
DK
CE-OVERENSSTEMMELSESERKLÆRING
Vi erklærer på eget ansvar, at dette produkt er i overensstemmelse med følgende standarder eller standardiseringsdokumenter: EN50144-1, EN50144-2-15, EN61000 i henhold til forskrifterne i standard 98/37/CEE, 73/23/CEE, 89/336/CEE, 2000/14/CEE (Bilag V).
Det tekniske dokumenter opbevares i Kvalitetsstyringsafdelingen - standardiseringsstab, Techtronic Appliances Factory, Sam Tuen Management Zone, Hou Jie Town, Dongguan City, Guangdong 523941, Kina.
Fabrikant: Techtronic Appliances (HK), Ltd. 18/F, CDW Building, 388 Castle Peak Road, Tsuen Wan, Hong Kong.
N
EF SAMSVARSERKLÆRING
Produsent: Techtronic Appliances (HK), CDW Building, 388 Castle Peak Road, Tsuen Wan, Hong Kong.
FIN
CE VAATIMUSTENMUKAISUUSILMOITUS
Producător: Techtronic Appliances (HK), Ltd. 18/F, CDW Building, 388 Castle Peak Road, Tsuen Wan, Hong Kong.
PL
DEKLARACJA ZGODNOŚCI CE
Producent: Techtronic Appliances (HK), Ltd. 18/F, CDW Building, 388 Castle Peak Road, Tsuen Wan, Hong Kong.
SLO
IZJAVA ES O SKLADNOSTI
Ime proizvajalca: Techtronic Appliances (HK), Ltd. 18/F, CDW Building, 388 Castle Peak Road, Tsuen Wan, Hong Kong.
HR
DEKLARACIJA O USKLAĐENOSTI CE
Odgovorno izjavljujemo da je ovaj proizvod u skladu sa sljedećim normama ili normiranim dokumentima: EN50144-1, EN50144-2-15, EN61000 u skladu s normama 98/37/CEE, 73/23/CEE, 89/336/CEE, 2000/14/CEE (Aneks V).
Tehničku dokumentaciju čuva Odjel za osiguranje kvalitete - ekipa za normizaciju, Techtronic Appliances Factory, Sam Tuen Management Zone, Hou Jie Town, Dongguan City, Guangdong 523941, Kina.
Proizvođač: Techtronic Appliances (HK), Ltd. 18/F, CDW Building, 388 Castle Peak Road, Tsuen Wan, Hong Kong.
TR
CE UYGUNLUK BEYANNAMESİ
Üretici: Techtronic Appliances (HK), Ltd. 18/F, CDW Building, 388 Castle Peak Road, Tsuen Wan, Hong Kong.
VASTAVUSDEKLARATSIOON
Tootja nimi: Techtronic Appliances (HK) Ltd. 18/F, CDW Building, 388 Castle Peak Road, Tsuen Wan, Hong Kong.
LT
EB ATITIKTIES DEKLARACIJA
Ražotājuznēmums: “TechTronics Appliances (HK) Ltd.”, adrese: 18/F, CDW Building, 388 Castle Peak Road, Tsuen Wan, Hong Kong (Cuenvaṇa, Honkonga).
PREHLÁSENIE O KONFORMITE CE
Производител: Techtronic Appliances (HK), Ltd. 18/F, CDW Building, 388 Castle Peak Road, Tsuen Wan, Hong Kong.
Machine: ELECTRIC HEDGE TRIMMER
| Name of company:Address: | Ryobi Technologies (UK) Limited.ANVIL HOUSE, TUNS LANE,HENLEY-ON-THAMES,OXFORDSHIRE, RG9 1SAUNITED KINGDOMTel: +44-1491-848700 Fax: +44-1491-848701 |
| Name of company:Address: | Ryobi Technologies FRANCE S.A.Z.I. PARIS NORD II209, RUE DE LA BELLE ÉTOILE95700 ROISSY EN FRANCEFRANCETel: +33-1-49 90 14 14 Fax: +33-1-49 90 14 29 |
| Name of company:Address: | Ryobi Technologies GmbhITTERPARK 7D-40724 HILDENGERMANYTel: +49-2103-29580 Fax: +49-2103-295829 |
Type: RHT-600R / RHT-700R
| Name/Title: | Mark PearsonManaging Director |
| Signature: | |
| Name/Title: | Michel ViolleauPrésident/Directeur Général |
| Signature: | |
| Name/Title: | Walter Martin EichingerGeneral Manager |
| Signature: |
- Français
- CONSIGNES DE SÉCURITÉ GÉNÉRALES
- AVERTISSEMENT
- MISE EN MARCHE/ARRÊT
- READ ALL INSTRUCTIONS.
- SPECIFIC SAFETY RULES
- SPECIFIC TRIMMER SAFETY RULES
- CAUTION
- English
- WARNING
- ELECTRICAL SAFETY RULES
- MAINTENANCE RULES
- SERVICE RULES
- STORAGE AND TRANSPORTATION RULES
- SYMBOLS
- SERVICE
- DESCRIPTION
- OPERATION
- POWER CONNECTION
- RANGE OF USE
- SWITCHING ON AND OFF
- ADJUSTING THE TURNING HANDLE
- CUTTING HEDGES
- Deutsch
- FÖRVARING OCH TRANSPORT
- CITIȚI TOATE INSTRUCTIUNILE.
- KIRJELDUS
- PIEVIENOŠANA STRĀVAS TĪKLAM
- GARANTIE - CONDITIONS
- GARANTIE - BEDINGUNGEN
- GARANTIJAS NOSACĪJUMI
- DÉCLARATION DE CONFORMITÉ CE
- GB
- CE DECLARATION OF CONFORMITY
- D
- E
- I
- P
- NL
- CONFORMITEITSVERKLARING EG
- s
- FÖRSÄKRAN OM EG-ÖVERENSSTÄMMELSE
- DK
- CE-OVERENSSTEMMELSESERKLÆRING
- N
- EF SAMSVARSERKLÆRING
- FIN
- CE VAATIMUSTENMUKAISUUSILMOITUS
- PL
- DEKLARACJA ZGODNOŚCI CE
- SLO
- IZJAVA ES O SKLADNOSTI
- HR
- DEKLARACIJA O USKLAĐENOSTI CE
- TR
- CE UYGUNLUK BEYANNAMESİ
- VASTAVUSDEKLARATSIOON
- LT
- EB ATITIKTIES DEKLARACIJA
- PREHLÁSENIE O KONFORMITE CE
Brand : RYOBI
Model : RHT600R
Category : Hedge trimmers