
RCS-3540C - Electric garden tools RYOBI - Free user manual and instructions
Find the device manual for free RCS-3540C RYOBI in PDF.


| Product type | Petrol chainsaw |
| Brand | RYOBI |
| Model | RCS-3540C |
| Displacement | 35 cm³ |
| Rated power | 1.6 kW (2.2 hp) |
| Rated speed | 12,000 rpm |
| Idle speed | 2,700 - 3,100 rpm |
| Weight (without guide bar, chain, fuel or oil) | 4.4 kg |
| Guide bar length | 40 cm |
| Chain pitch | 9.53 mm |
| Chain gauge | 1.27 mm |
| Chain type | Low kickback chain |
| Drive sprocket | 6 teeth |
| Fuel tank capacity | 310 cm³ |
| Oil tank capacity | 210 cm³ |
| Fuel type | Mixture of unleaded petrol (87 octane) and synthetic 2-stroke oil (ratio 50:1) |
| Chain brake | Yes, integrated chain brake with hand guard |
| Sound pressure level (LpA) | 100 dB(A) |
| Measured sound power level (LWA) | 110 dB(A) |
| Vibration level (front handle) | 4.5 m/s² |
| Vibration level (rear handle) | 7.3 m/s² |
| Warranty | 24 months |
Frequently Asked Questions - RCS-3540C RYOBI
User questions about RCS-3540C RYOBI
0 question about this device. Answer the ones you know or ask your own.
Ask a new question about this device
Download the instructions for your Electric garden tools in PDF format for free! Find your manual RCS-3540C - RYOBI and take your electronic device back in hand. On this page are published all the documents necessary for the use of your device. RCS-3540C by RYOBI.
USER MANUAL RCS-3540C RYOBI
RCS-3540C / 4046C / 4450C
F TRONCONNEUSE THERMIQUE MANUEL D'UTILISATION 1 GB PETROL CHAIN SAW USER'S MANUAL 20 D BENZIN-KETTENSÄGE BEDIENUNGSANLEITUNG 37 E MOTOSIERRA TÉRMICA MANUAL DE UTILIZACION 57 I MOTOSEGA A SCOPPIO MANUALE D'USO 76 P SERRA DE CORRENTE COM MOTOR A GASOLINA MANUAL DE UTILIZACAO 96 NL MOTORKETTINGZAAG GEBRUIKERSHANDLEIDING 115 S BENSINDRIVEN KEDJESAG INSTRUKTIONSBOK 135 DK BENZINDREVEN MOTORSAV BRUGERVEJLEDNING 152 N MOTORDEVET KJEDESAG BRUKSANVISING 169 (FIN) BENSIINIMOOTTORISAHA KAYTTAJAN KASIKIRJA 186 GR BENZINOKINHTO AAYZOPIIONO OAHIGE XPHSE 203 HU BENZINMOTOROS LANCFURESZ HASZNÁLATI UTMUTATO 224 CZ RETÉZOVÁ PILA S BENZINOVYM MOTOREM NÁVOD K OBSLUZE 241 RU CEIIHAR 6EH30IINJA PYKOBODCTBO IIO 3KCIJYATAIIN 259 RO FERASTRAU TERMIC CU LANT MANUAL DE UTILIZARE 276 PL SPALINOWA PILARKA LANCUCHOWA INSTRUKCJA OBSLUGI 293 SLO MOTORNA VERIZNA ZAGA UPORABNIISKI PRIROČNIK 311 HR BENZINSKA MOTORNA PILA KORISNICKI PRIRUCNIK 327 (TR) TERMIK HALKALI TESTERE KULLANMA KILAVUZU 343 EST BENSIINIGA TÖTAV KETTSAAG KASUTAJAUHEND 360 (LT) BENZININIS GRANDININIS MEDZIO PJUKLAS NAUDOJIMO VADOVAS 376 LV MOTORZAGIS LIETOTAJAROKASGRAMATA 393 SK BENZINOVA RETAZOVÁ PÍLA NÁVOD NA POUŽITIE 410 BG BEPHKEN TPNOH C BEH3HHOB IBHNTATEJI PbKOBOCTBO 3A YIOTPE6A 427
CE

ДЛ02

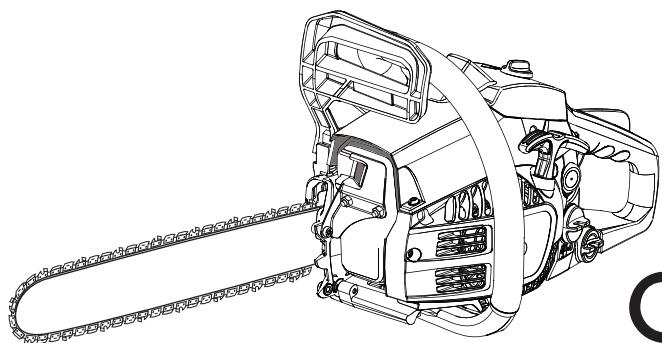
Fig. 1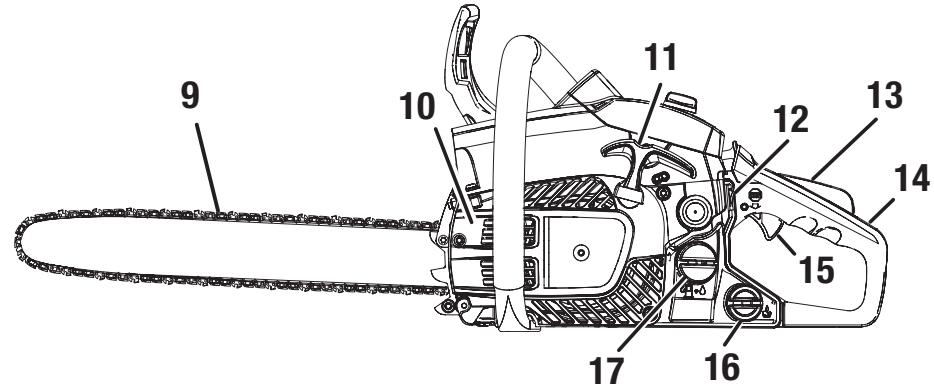
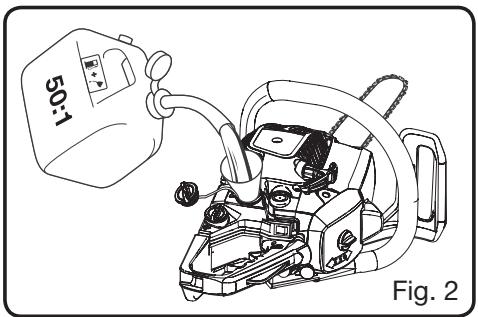
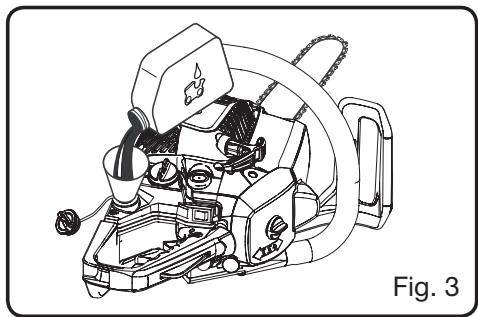
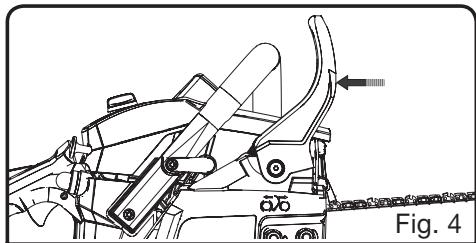
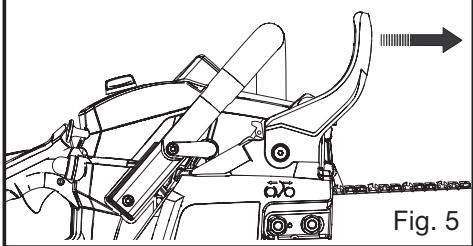
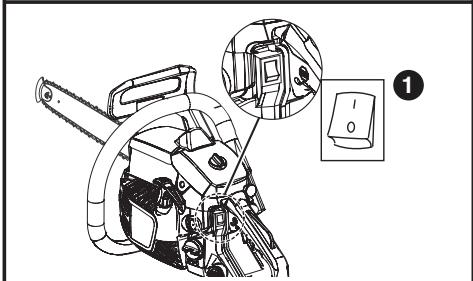
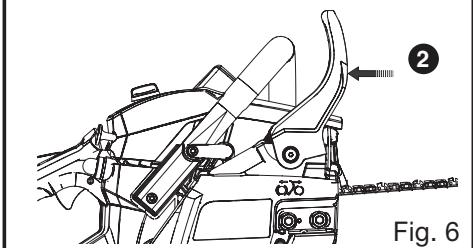
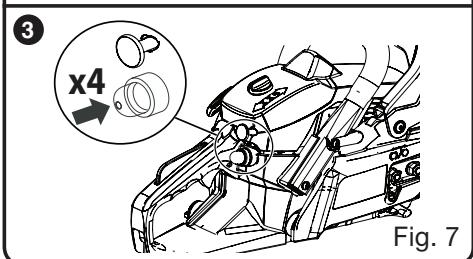
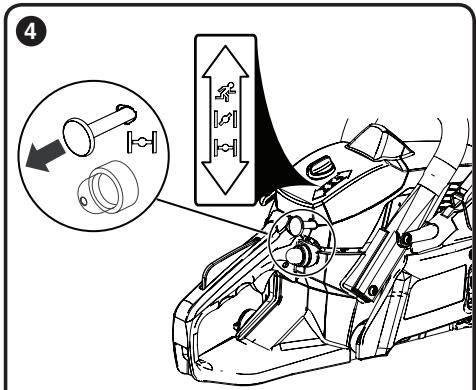
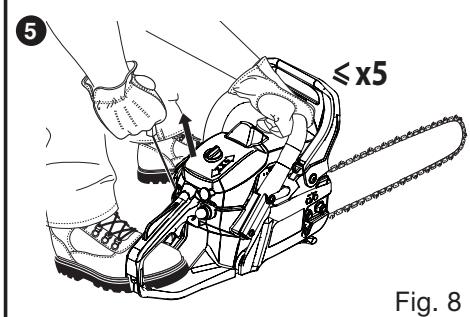
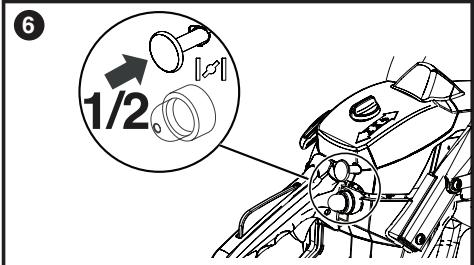
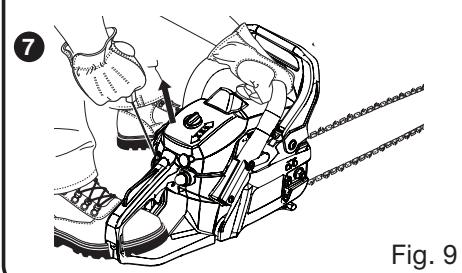
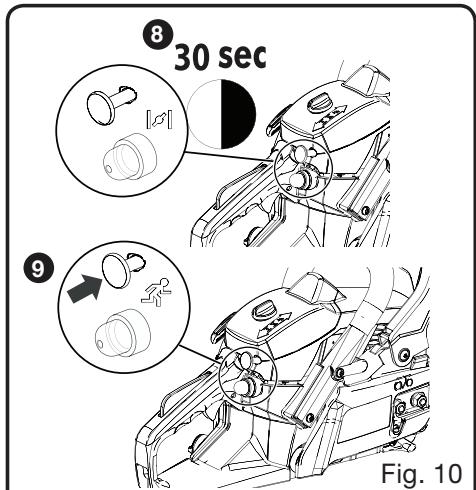
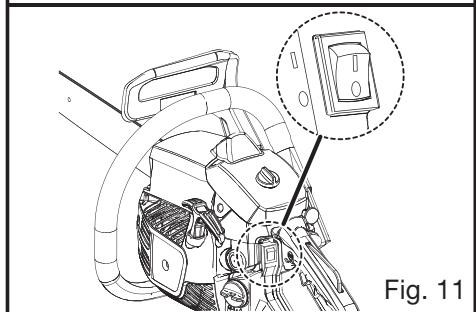
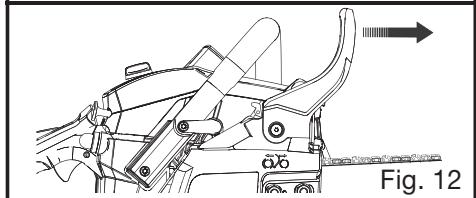
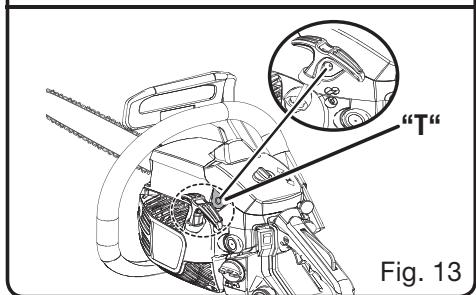
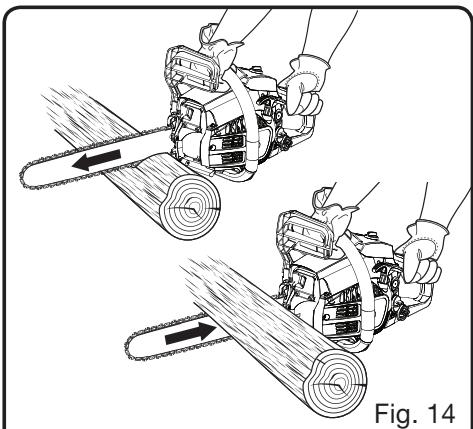
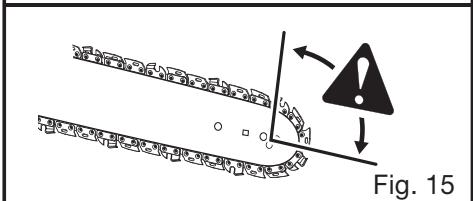
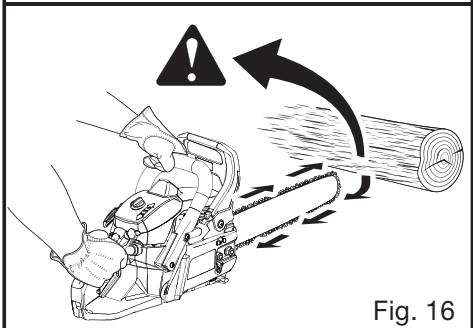
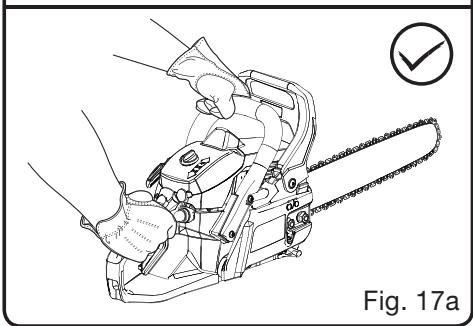
Fig. 17b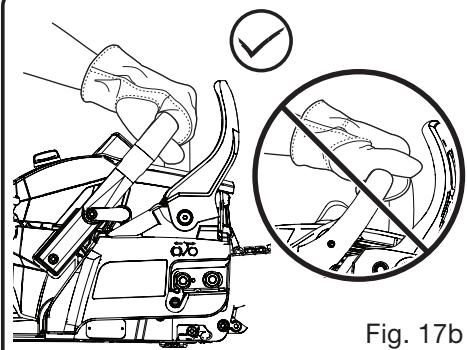
Fig. 18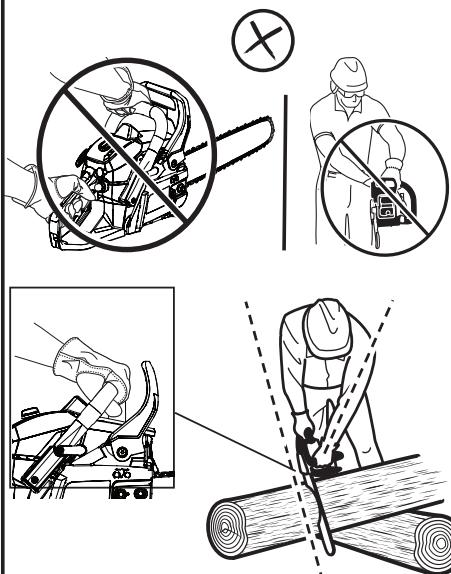
Fig. 19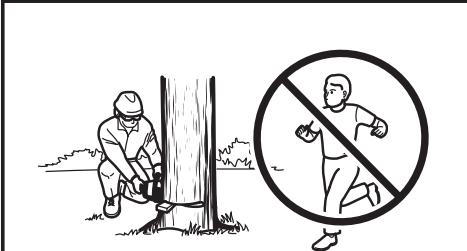
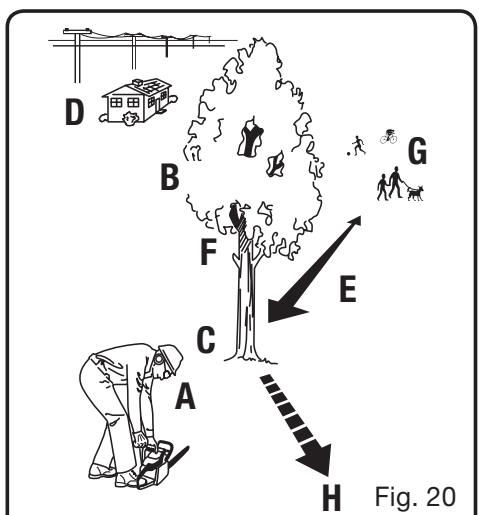
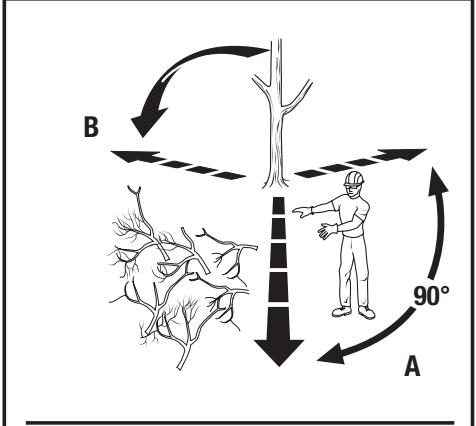
Fig. 21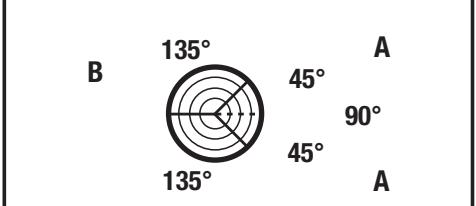
Fig. 22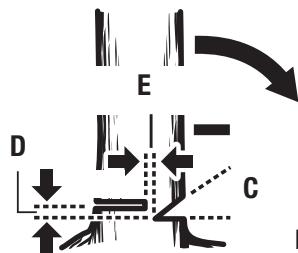
E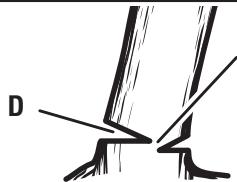
Fig. 23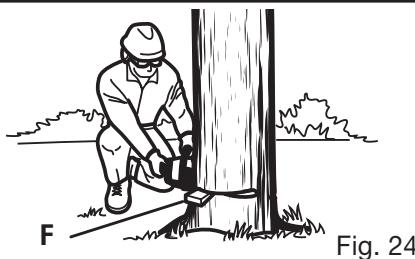
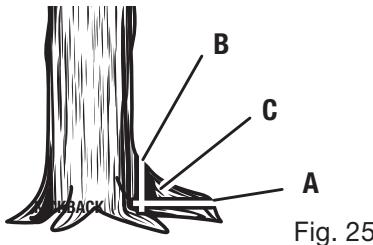
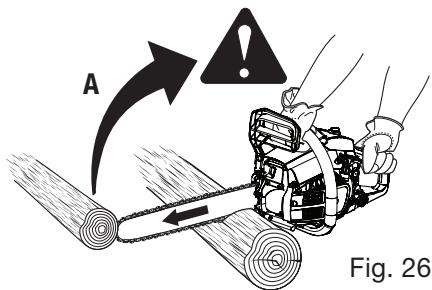
Fig. 27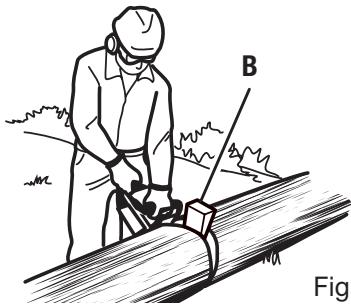
C D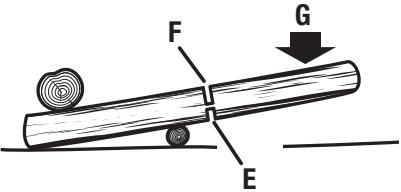
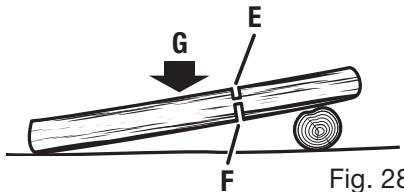
Fig. 29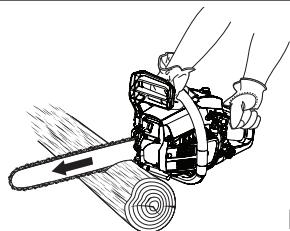
Fig. 30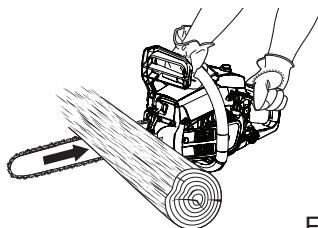
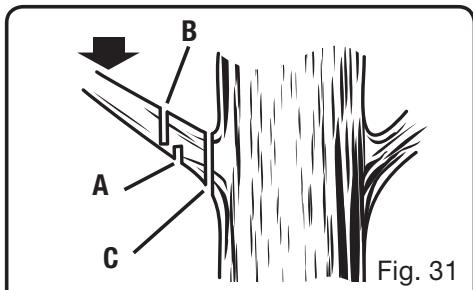
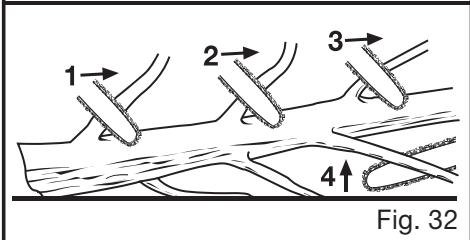
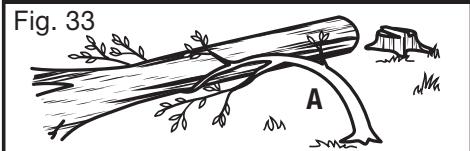
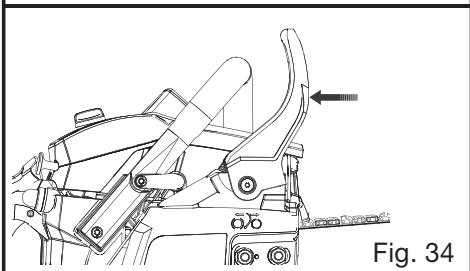
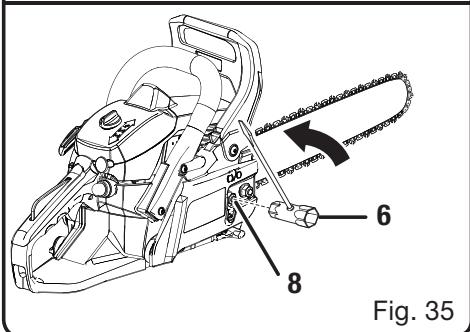
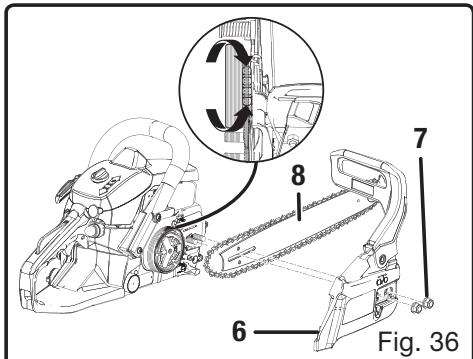
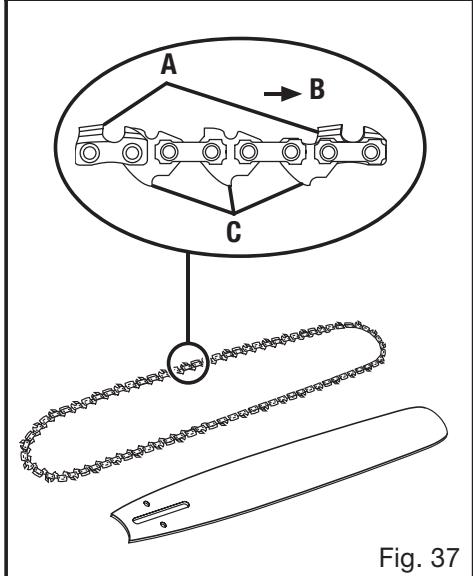
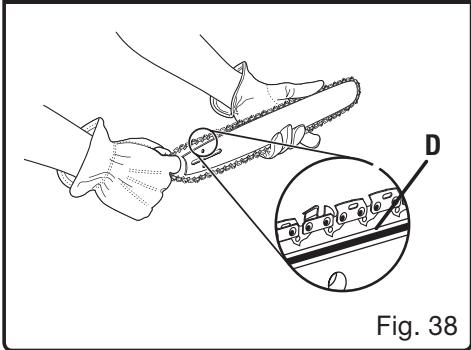
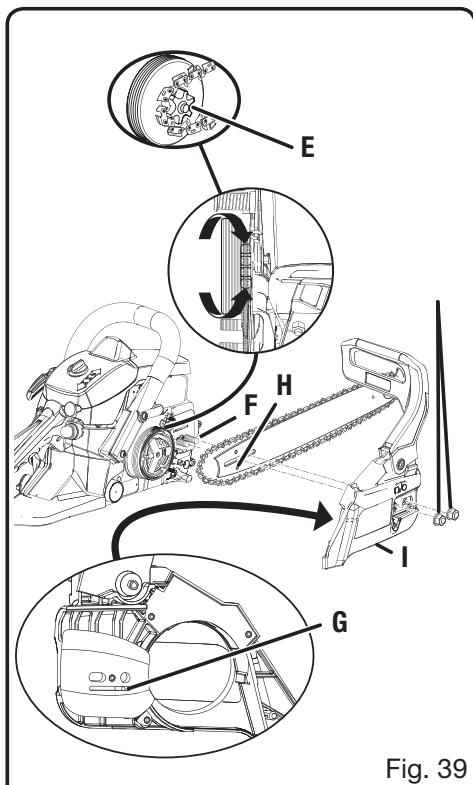
Fig. 39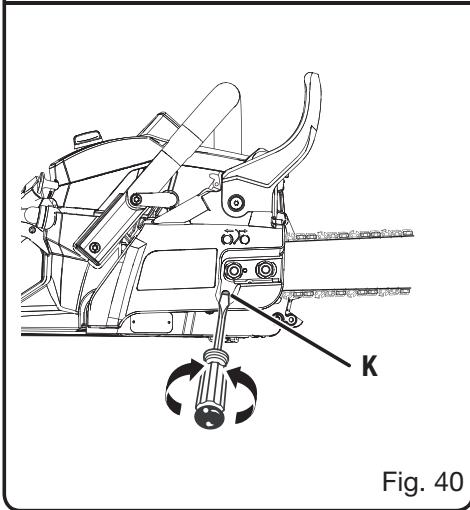
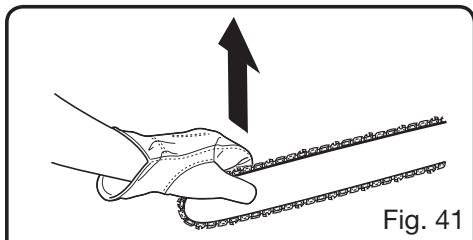
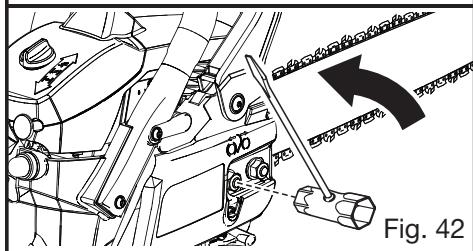
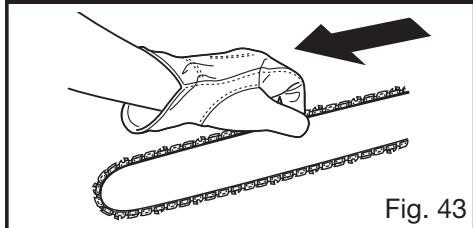
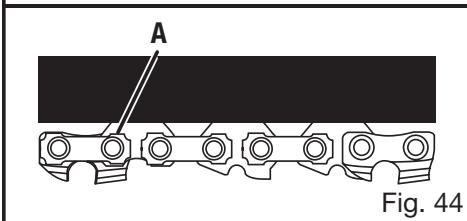
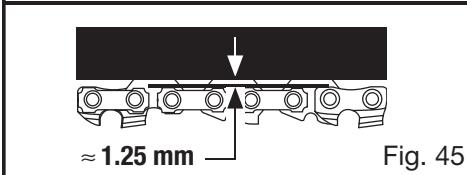
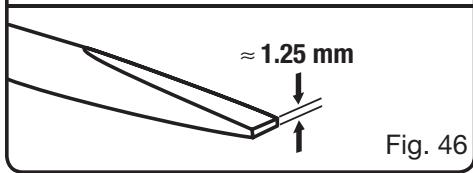
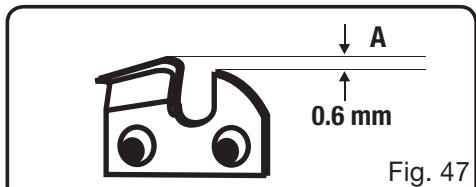
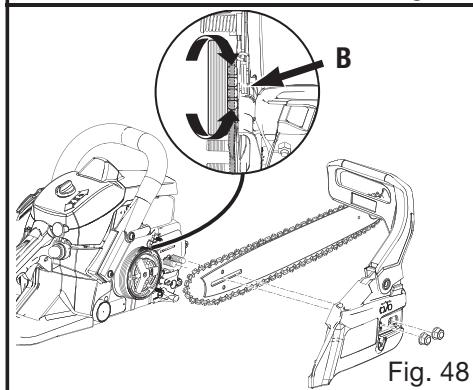
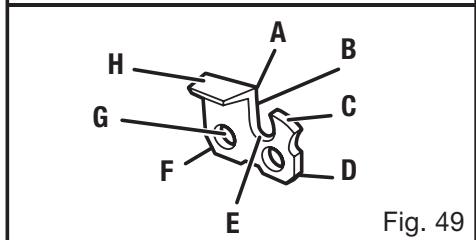
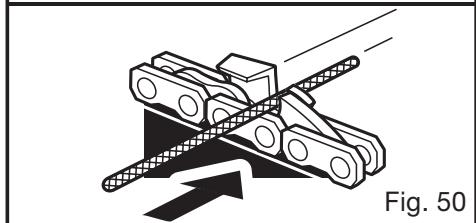
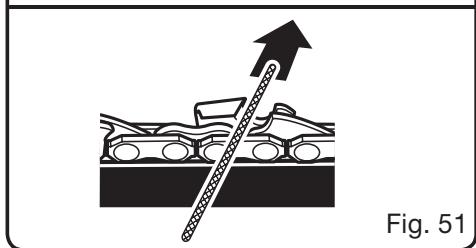
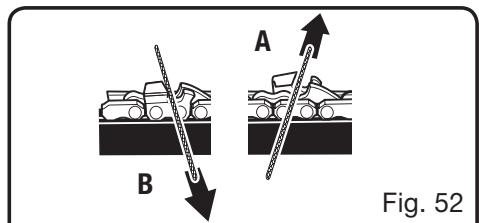
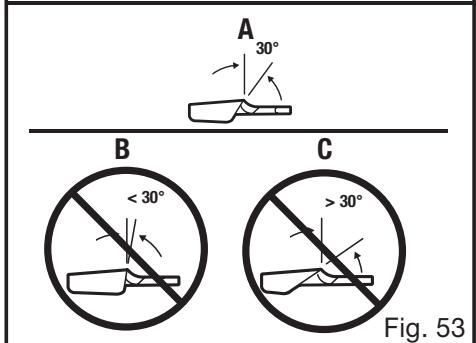

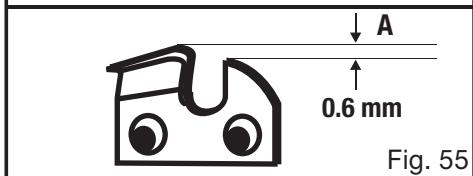
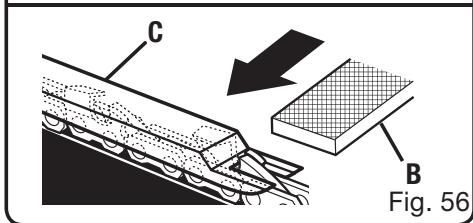
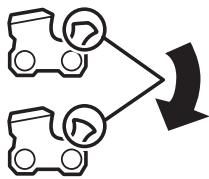
Fig. 57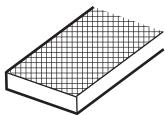
Fig. 58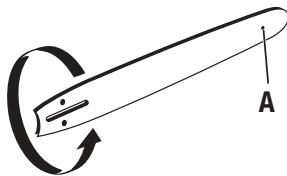
Fig. 59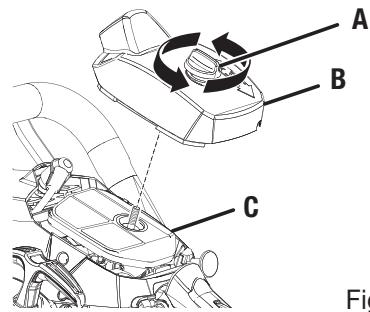
Fig. 60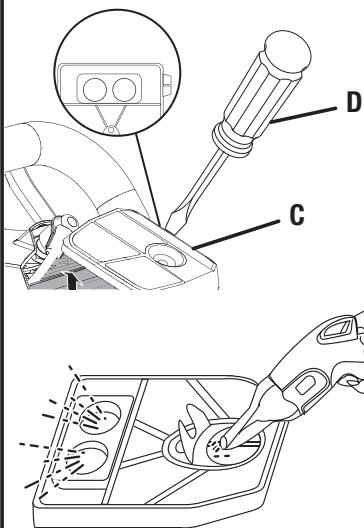
Fig. 61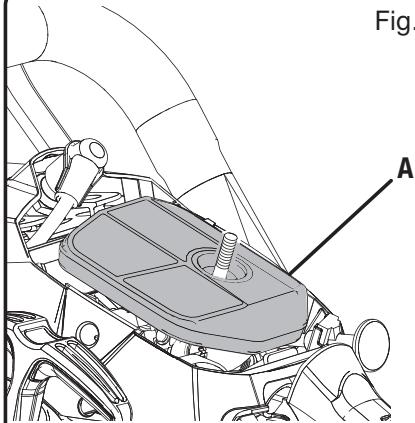
Fig. 62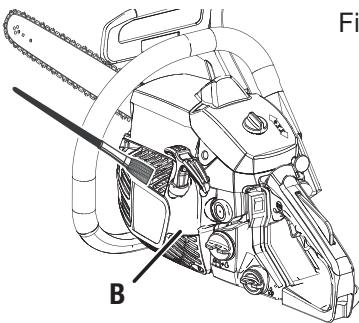
Fig. 63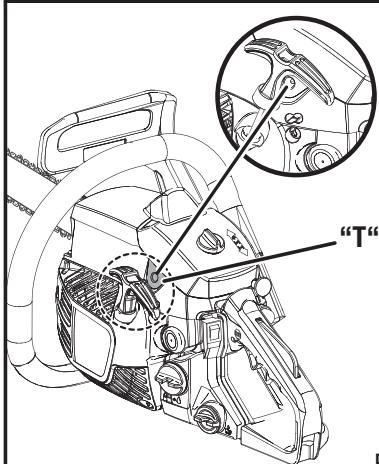
| Attention! | Il est indispensable que vous lisiez les instructions contenues dans ce manuel avant le montage et la mise en service de l'appareil. |
| Important! | It is essential that you read the instructions in this manual before mounting and operating this machine. |
| Achtung! | Bitte lessen Sie unbedingt vor Montage und Inbetriebnahme die Hinweise dieser Bedienungsanleitung. |
| ÀTección! | Es imprescindible que lea las instrucciones de este manual antes del montaje y de la puesta en servicios. |
| Attenzione! | Prima di procedere al montaggio e alla messa in funzione, è indispensable leggere attendamente le struzioni del presente manuale. |
| Atençao! | É indispensable ver la asstruções deste manual ante des montar e pòr em服务于. |
| Let op! | Het is absolut noodzakelijk vór montage en inbedrijfstelling de aanwijzingen in deze處理 te lezen. |
| Observera! | Det ā nödvändigt att lása instruktionerna ienna bruksanvisning fère montering och driftsättnig. |
| OBS! | Denne brugsanvising skal læses igennem inden montering og ibrugtagning. |
| Advarel! | Vennligst les instruktjone ienna bruksanvisingen for du monterer og tar i bruk maskinen. |
| Huomio! | On ehdtottom välttämätontä lukea tassä kāyttöhjeessa annetut ohejt ennen asennusta ja kāyttöönottoa. |
| Προσχή! | Εναι απαραίτητον διαβάσετε τις συστάσεις των Μθηγών αὐτύν πριν τη συναρμολόγηση και τη θέση σε λειουργία |
| Figyelem! | Feltétlenül fontos, hogy a jelen hasznalati utmutatóban foglalt elóirásokat az összeszerelés és az üzembe helyezés ellöt elolvassa! |
| Duležité upozorněni! | Před montáží nářadi a uvedením do provozu je nutné si prěcîst následujíci pouny. |
| Bnunamue! | Πέρει σcbρκοῦ ἀπυκόΜ ΘνεκτρυμέNTA ΚεόxbασμΟ προυčétν Ινεκτρυκήν Θ3 háctōniierto rykoboydctba. |
| Atentie! | Este indispensable sā citi instruetiónile continute in acest mod de utilizesire incinte de montcj.si de punerea in functiune. |
| Uwaga! | Przed montowaniem i uruchomieniem, koniecznie musie sie Państwo zapoznać z zaleceniami zawartymi w ninejszym sposobie uzycia. |
| Pomembno! | Zelo pomembno je, da pred namestitvjo in prvo uporabo te naprave preberete navodila v tem priročniku. |
| Upozorenje! | Važno je da upute u ovom Korisničkom priručniku pročitate prise postavljanja i uporabe ovog alata. |
| Dikkat! | Montajdan ve aletin kullanimina böslamadan bu kilavuzda bulunan talimatlari okumaniz gerekmektedir. |
| Tähtis! | Lugee enne seadme kokkupanekut ja kasutamist kindlasti LABI selles juhendis sisalduvad eeskirjad ja juhised! |
| Démesio! | Priëš surinkdami ir paleisdami aparataj darba, reikia, kad jūs perskaitytumète šiame vadove esancías instrukcjas. |
| Uzmanibul! | Ir Joti būtiski, lui jūs izlasitu norādījumus, kas snegti šajā rokasgrāmatā, pirms keraties pie ierices montēsanas un iedarbināsanas! |
| Pozor! | Je nutné, aby ste si prečitali poukynу, ktoré sa nachádzajú v tejto priručke pred montážou a spustením pristroja. |
| Bnunamue! | Πρεπι στροδVBANEи пьскaine на машината в вожно щлочутеше Иструкшпіte в ръковоството за улочтба. |
Subject to technical modifications
French
Thank you for buying a Ryobi chainsaw.
Your new chainsaw has been engineered and manufactured to Ryobi's high standard for dependability, ease of operation, and operator safety. Properly cared for, it will give you years of rugged, trouble-free performance.

WARNING
To reduce the risk of injury, the user must read and understand the operator's manual.

IMPORTANT
Servicing requires extreme care and knowledge and should be performed only by a qualified service technician. When servicing, use only identical Ryobi replacement parts. For safe operation, read and understand all instructions before using the chainsaw. Follow all safety instructions. Failure to follow all safety instructions listed below may result in serious personal injury.

WARNING
Carefully read through this entire operator's manual before using your new saw. Pay close attention to the Safety Rules and all Safety Alert Symbols including Danger, Warning, and Caution. These safety rules are for your safety and to prevent possible serious injury. If you use your saw properly and only for what it is intended,
you will enjoy years of safe, reliable service.

WARNING
Look for this symbol to point out important safety precautions. It means attention!!! Your safety is involved.

WARNING
The operation of any tool can result in foreign objects being thrown into your eyes which may result in severe eye damage. Before beginning tool operation, always wear safety goggles or safety glasses with side shields and a full face shield when needed. We recommend Wide Vision Safety Mask for use over spectacles or standard safety glasses with side shields.
Always wear eye protection.
READ ALL INSTRUCTIONS.
GENERAL SAFETY RULES

WARNING
The warnings, labels, and instructions found in this section of the operator's manual are for your safety. Failure to follow all instructions may result in serious personal injury. Safe operation of this tool requires that you read and understand this operator's manual and all labels affixed to the tool. Safety is a combination of using common sense, staying alert, and knowing how your saw works.
- KNOW YOUR TOOL. Read the operator's manual carefully. Learn the saw's applications and limitations as well as the specific potential hazards related to this tool. CHAINSAWS are designed for cutting wood only.
- Kick-back may occur when the nose of the guide bar touches an object or when the wood closes in and pinches the saw chain in the cut. The nose of guide bar contact in some cases may cause a lightning-fast reverse reaction kicking the guide bar up and back toward the operator. Pinching the saw chain along the top of the guide bar may push the guide bar rapidly back toward the operator. Either of these reactions may cause you to lose control of the saw which could result in serious personal injury. DO NOT rely exclusively upon the safety devices built into your saw. As a chainsaw user, you should take several steps to keep your cutting jobs free from accident or injury.
- With a basic understanding of kick-back, you can reduce or eliminate the element of surprise. Sudden surprise contributes to accidents.
- Keep a good firm grip on the saw with both hands when the engine is running. Place your right hand on the rear handle and your left hand on the front handle with your thumbs and fingers encircling the chainsaw handles. A firm grip together with a stiff left arm will help you maintain control of the saw if kick-back occurs.
- Make sure that the area in which you are cutting is free from obstructions. DO NOT let the nose of the guide bar contact a log, branch, fence, or any other obstruction that could be hit while you are operating the saw.
- Cut at high engine speeds. Always cut with the engine running at full speed. Fully squeeze the throttle trigger and maintain a steady cutting speed.
- Do not overreach or cut above chest height.
- Follow the manufacturer's sharpening and maintenance instructions for the saw chain.
GENERAL SAFETY RULES
- Use only replacement bars and chains specified by the manufacturer or the equivalent.
DO NOT OPERATE A CHAINSAW WITH ONE HAND. Serious injury to the operator, helpers, and/or bystanders may result from one-handed operation. A chainsaw is intended for two-handed use. DO NOT OPERATE A CHAINSAW WHEN YOU ARE FATIGUED. Never operate a chainsaw when you are tired or under the influence of medication, drugs, or alcohol. USE SAFETY FOOTWEAR. Wear snug-fitting clothing, protective gloves, and eye, hearing, and head protection devices. DO NOT STAND ON ANY UNSTABLE SURFACE while using your chainsaw: that includes ladders, scaffolds, trees, etc. USE CAUTION WHEN HANDLING FUEL. Move the chainsaw at least 50 feet (15 m) from the refuelling point before starting the engine. DO NOT ALLOW OTHER PERSONS to be near the chainsaw when starting or cutting with the chainsaw. Keep bystanders and animals out of the work area. DO NOT START CUTTING until you have a clear work area, secure footing, and a planned retreat path from the falling tree. KEEP ALL PARTS OF YOUR BODY away from the saw chain when the engine is running. ALWAYS CARRY THE CHAINSAW WITH THE ENGINE STOPPED AND THE BRAKE ENGAGED, the guide bar and saw chain to the rear, and the silencer away from your body. When transporting the chainsaw, use the appropriate guide bar scabbard. DO NOT OPERATE A CHAINSAW THAT IS DAMAGED, improperly adjusted, or not completely and securely assembled. Be sure that the saw chain stops moving when the throttle control trigger is released. TURN OFF THE ENGINE before putting the chainsaw down. DO NOT leave the engine running unattended. As an additional safety precaution, apply the chain brake before putting down the saw. USE EXTREME CAUTION when cutting small-size brush and saplings because slender material may catch the saw chain and be whipped toward you or pull you off balance. WHEN CUTTING A LIMB under tension, be alert for spring-back so that you will not be struck when the tension in the wood fibres is released.
- KEEP THE HANDLES dry, clean, and free of oil or fuel mixture. OPERATE THE CHAINSAW ONLY in well-ventilated areas. DO NOT OPERATE A CHAINSAW IN A TREE unless you have been specifically trained to do so. ALWAYS HAVE A FIRE EXTINGUISHER AVAILABLE WHEN USING CHAIN SAW. FOLLOW THE SHARPENING and maintenance instructions for the saw chain. USE ONLY THE REPLACEMENT GUIDE BARS and low kick-back chains specified for your saw. DO NOT adapt your powerhead to a bow guide or use it to power any attachments or devices not listed for your saw. SAVE THESE INSTRUCTIONS. Refer to them frequently and use to instruct other users. If you lend someone this tool, lend them these instructions also.
SPECIFIC SAFETY RULES

WARNING
The warnings, labels, and instructions found in this section of the operator's manual are for your safety. Failure to follow all instructions may result in serious personal injury.
GENERAL PRECAUTIONS
DO NOT CUT VINES and/or small undergrowth (less than 76 mm (3 in.) in diameter). MUFFLER SURFACES ARE VERY HOT during and after operation of the chainsaw; keep all body parts away from the muffler. Serious burns may occur if contact is made with the muffler. ALWAYS HOLD THE CHAINSAW WITH BOTH HANDS when the engine is running. Use a firm grip with thumbs and fingers encircling the chainsaw handles. NEVER LET ANYONE USE YOUR CHAINSAW who has not received adequate instructions in its proper use. This applies to rentals as well as privately owned saws. BEFORE YOU START THE ENGINE, make sure the saw chain is not contacting any object. OPERATE THE CHAINSAW only in well ventilated areas.
SPECIFIC SAFETY RULES
PROPER CLOTHING FOR SAFETY
- Wear close-fitting clothing. Always wear heavy, long trousers, boots, and gloves. Do not wear jewellery, shorts, sandals, or go barefoot. Do not wear loose-fitting clothing, which could be drawn into the engine or catch the chain or undergrowth. Wear overalls, jeans, or leggings made of cut-resistant material or ones that contain cut-resistant inserts. Secure hair so that it is above shoulder level. Wear non-slip safety footwear and heavy-duty gloves to improve your grip and to protect your hands. Wear eye, hearing, and head protection when operating this equipment.
REFUELLING (DO NOT SMOKE!)
To reduce the risk of fire and burn injury, handle fuel with care. It is highly flammable. - Mix and store fuel in a container approved for petrol. - Mix fuel outdoors where there are no sparks or flames. - Select bare ground, stop the engine, and allow it to cool before refuelling. - Loosen the fuel cap slowly to release pressure and to keep fuel from escaping around the cap. - Tighten the fuel cap securely after refuelling. Wipe spilled fuel from the unit. Move 15 m (50 ft.) away from refuelling site before starting engine. - Never attempt to burn off spilled fuel under any circumstances.
BASIC PRECAUTIONS IN THE CUTTING/WORK AREA
Do not operate a chainsaw in a tree. - Do not cut from a ladder: this is extremely dangerous. - Keep bystanders and animals out of the work area. Do not allow other persons to be nearby during starting or cutting with the chainsaw.
NOTE: The size of the work area depends on the job being performed as well as the size tree or workpiece involved. For example, felling a tree requires a larger work area than making other cuts, i.e. bucking cuts etc.
PUSH AND PULL
The reaction force is always opposite to the direction the chain is moving. Thus, the operator must be ready to control the PULL when cutting on the bottom edge of the bar and the PUSH when cutting along the top edge.
NOTE: Your chainsaw has been fully factory tested.
It is normal to find some slight oil residue on the saw.
MAINTENANCE PRECAUTIONS
Never operate a chainsaw that is damaged, improperly adjusted, or is not completely and securely assembled.
Be sure that the saw chain stops moving when the throttle control trigger is released. If the saw chain moves at idling speed, the carburettor may need adjusting. Refer to "Operation - Adjusting Idling Speed" later in this manual.
If the saw chain still moves at idling speed after adjustment has been made, contact a Homelite service dealer for adjustment and discontinue use until the repair is made.

WARNING
All chainsaw service, other than items in the operator's manual maintenance instructions, should be performed by competent chainsaw service personnel. If improper tools are used to remove the flywheel or clutch, or if an improper tool is used to hold the flywheel in order to remove the clutch, structural damage to the flywheel could occur which could subsequently cause the flywheel to burst and serious injury could result.
KICK-BACK
Kick-back is a dangerous reaction that can lead to serious injury. Do not rely only on the safety devices provided with your saw. As a chainsaw user, you must take special safety precautions to help keep your cutting jobs free from accident or injury.
NOTE: Refer to "Operation" later in this manual for added information on kick-back and how to avoid serious personal injury.
SAVE THIS MANUAL FOR FUTURE REFERENCE.
English
SYMBOLS
Some of the following symbols may be used on this tool. Please study them and learn their meaning. Proper interpretation of these symbols will allow you to operate the tool better and safer.
| SYMBOL | NAME | DESIGNATION / EXPLANATION |
| Safety Alert | Precautions that involve your safety. | |
| Read The Operator's Manual | To reduce the risk of injury, user must read and understand operator's manual before using this product. | |
| Wear Eye, Hearing, and Head Protection | Wear eye, hearing and head protection when operating this equipment. | |
| No Smoking | No smoking, sparks, or open flame. | |
| Operate With Two Hands | Hold and operate the saw properly with both hands. | |
| One Handed | Do not operate the saw using only one hand. | |
| Carbon Monoxide | Engines produce carbon monoxide which is an odorless, deadly poison. Do not operate in an enclosed area. | |
| Kickback | DANGER! Beware of kickback. | |
| Bar Nose Contact | Avoid bar nose contact. | |
| Wear Gloves | Wear non-slip, heavy-duty protective gloves when handling the chain saw. | |
| Petrol and Oil | Use unleaded petrol intended for motor vehicle use with an octane rating of 87 [(R + M)/2] or higher. This product is powered by 2-stroke cycle engine and requires pre-mixing petrol and 2-stoke oil. | |
| Keep Bystanders Away | Keep all bystanders and animals at least 15m away. |
English
SPECIFICATIONS
| 35 cc | 40 cc | 44 cc | |
| Weight - No bar, chain, fuel or oil | 4.4 kg | 4.4 kg | 4.4 kg |
| Fuel tank capacity | 310 cm3 | 310 cm3 | 310 cm3 |
| Oil tank capacity | 210 cm3 | 210 cm3 | 210 cm3 |
| Bar lengths | 40 cm | 46 cm | 50 cm |
| Chain pitch | 9.53 mm | 9.53 mm | 8.26 mm |
| Chain gauge | 1.27 mm | 1.27 mm | 1.27 mm |
| Chain type | Low profile, low kickback | Low profile, low kickback | Low profile, low kickback |
| Drive sprocket | 6-tooth | 6-tooth | 7-tooth |
| Engine displacement | 35 cm3 | 40 cm3 | 44 cm3 |
| Rated power | 1.6 kW | 1.8 kW | 2.0 kW |
| Rated speed | 12000 min-1 | 12000 min-1 | 12000 min-1 |
| Idling engine speed | 2700 - 3100 min-1 | 2700 - 3100 min-1 | 2700 - 3100 min-1 |
| Sound pressure level(ISO22868) | 100 dB(A) | 100 dB(A) | 100 dB(A) |
| Sound power level (ISO22868) | 110 dB(A) | 110 dB(A) | 110 dB(A) |
| Vibration (ISO22867) | |||
| - Front Handle | 4.5 m/s2 | 4.5 m/s2 | 4.5 m/s2 |
| - Rear Handle | 7.3 m/s2 | 7.3 m/s2 | 7.3 m/s2 |
DESCRIPTION (Fig. 1)
- Front hand guard / Chain Brake
- Front handle
- Cylinder cover
- Primer bulb
- Choke knob
- Clutch cover
- Bar mounting nuts
- Guide bar
- Low kickback saw chain
- Starter / fan housing
- Starter grip
- Ignition switch
- Trigger release
- Rear handle
- Throttle trigger
- Chain oil cap
- Fuel cap
ASSEMBLY

WARNING
If any parts are damaged or missing do not operate this tool until the parts are replaced. Failure to heed this warning could result in serious personal injury.

WARNING
Do not attempt to modify this tool or create accessories not recommended for use with this tool. Any such alteration or modification is misuse and could result in a hazardous condition leading to possible serious personal injury.
NOTE: The chain saw has been fully factory tested. It is normal to find some slight oil residue on the saw. Read and remove all hang tags and store with the Operator's Manual.
See Figure 34-43.
Read the replacing the guide bar and chain section later in this manual.
English
OPERATION

WARNING
Do not allow familiarity with tools to make you careless. Remember that a careless fraction of a second is sufficient to inflict serious injury.

WARNING
Always wear safety goggles or safety glasses with side shields when operating this tool. Failure to do so could result in objects being thrown into your eyes resulting in possible serious injury.

WARNING
Do not use any attachments or accessories not recommended by the manufacturer of this tool. The use of attachments or accessories not recommended can result in serious personal injury.
APPLICATIONS
You may use this tool for the purposes listed below:
Basic limbing, felling, and woodcutting Removing buttress roots
FUEL AND REFUELING
HANDLING THE FUEL SAFELY

WARNING
Always shut off engine before fueling. Never add fuel to a machine with a running or hot engine. Move at least 9 m. from refueling site before starting the engine. DO NOT SMOKE! Failure to heed this warning can result in possible personal injury.

WARNING
Check for fuel leaks. If any are found, correct them before using the saw to prevent fire or burn injury.
Always handle fuel with care; it is highly flammable. Always refuel outdoors where there are no sparks and flames. Do not inhale fuel vapour. - Do not let petrol or oil come in contact with skin. - Keep petrol and oil away from the eyes. If petrol or oil comes in contact with the eyes, wash them immediately with clean water. If irritation is still present, see a doctor immediately. Clean up spilled fuel immediately.
MIXING THE FUEL
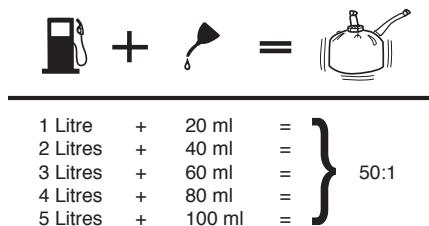
This product is powered by a 2-stroke engine and requires pre-mixing petrol and synthetic 2-stroke oil. Pre-mix unleaded petrol and synthetic 2-stroke engine oil in a clean container approved for petrol. This engine is certified to operate on unleaded petrol intended for motor vehicle use with an octane rating of 87 [(R + M) / 2] or higher. Do not use any type of pre-mixed petrol/oil from fuel service stations. This includes the pre-mixed petrol/oil intended for use in mopeds, motorcycles, etc. Use synthetic 2-stroke oil only. Mix 2% oil into the petrol. This is a 50:1 ratio. Mix the fuel thoroughly and also each time before refueling. Mix in small quantities. Do not mix quantities larger than usable in a 30 day period. A synthetic 2-stroke oil containing a fuel stabilizer is recommended.
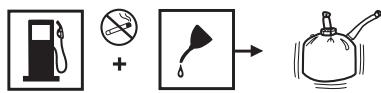
FILLING THE FUEL TANK (Fig. 2)
Clean surface around fuel cap to prevent contamination. Loosen the fuel cap slowly to release pressure and to keep fuel from escaping around the cap. Carefully pour the fuel mixture into the tank. Avoid spillage. Prior to replacing the fuel cap, clean and inspect the o-ring. Immediately replace the fuel cap and hand tighten. Wipe up any fuel spillage. Move 9 m (30 ft) away from refueling site before starting engine.
NOTE: It is normal for the engine to emit smoke during and after the first use.
OPERATION
ADDING BAR AND CHAIN OIL (Fig. 3)
Use Ryobi Bar and Chain Oil. It is designed for chains and chain oilers, and is formulated to perform over a wide temperature range with no dilution required. Chain saw should use approximately one tank of oil per tank of fuel.
NOTE: Do not use dirty, used, or otherwise contaminated oils. Damage may occur to the oil pump, bar, or chain.
Carefully pour the bar and chain oil into the oil tank. Fill the oil tank every time you fuel the engine.
Check the operating condition of the chain brake prior to each use.
Using the back of your left hand, engage the chain brake by pushing the chain brake lever/hand guard toward the bar while the chain is rotating rapidly. Reset the chain brake back into the RUN position by grasping the top of the chain brake lever/hand guard and pulling toward the front handle until you hear a click.

WARNING
If the chain brake does not stop the chain immediately, or if the chain brake will not stay in the run position without assistance, take the saw to an authorized service center for repair prior to use.
STARTING THE ENGINE (Fig. 6-10)
The starting method differs depending on whether the engine is cold or warm.

WARNING
Keep your body to the left of the chain line. Never straddle the saw or chain, or lean over past the chain line.
- Place the chain saw on level ground and ensure that no objects or obstructions are in the immediate vicinity that could come in contact with the bar and chain. To prevent rapid dulling of the chain, do not allow the bar and chain to contact dirt on the ground. Hold the front handle firmly with your left hand and put your right foot onto the base of the rear handle.
To Start a Cold Engine:
Set the ignition switch to the RUN (1) position. Make sure the chain brake is in the run position by pulling back on the lever/hand guard. Fully press and release the primer bulb 4 times. Pull choke knob all the way out to FULL CHOKE (|+|) position. Pull the starter grip until the engine attempts to start, but no more than 5 times. Push choke knob to HALF CHOKE (1-1) position. Pull starter grip until engine runs.
NOTE: Allow the saw to run in this position 15-30 seconds, depending upon the temperature. Push the choke knob in to the RUN (R) position.

CAUTION
Failure to release partial throttle when chain brake lever is in the brake position will result in serious damage to the unit. Never squeeze and hold the throttle trigger while the chain brake is in the brake position.
To Start a Warm Engine:
Set the ignition switch to the RUN (1) position. Make sure the chain brake is in the run position by pulling back on the lever/hand guard. Fully press and release the primer bulb 4 times. Pull starter grip until engine runs.
STOPPING THE ENGINE (FIG. 11-12)
Release the throttle trigger and let the engine return to idle. To stop the engine, move the ignition switch to the STOP (m) position. Do not put the chain saw on the ground when the chain is still moving. For additional safety, set the chain brake when the saw is not in use.
In the event that the ignition switch will not stop the saw, pull the choke knob out to the fully extended position (FULL CHOKE/|+|) and engage chain brake to stop the engine. If the ignition switch will not stop the saw when set to the STOP position, have the ignition switch repaired before using the chain saw again to prevent unsafe conditions or serious injury.
NOTE: When you are finished using the saw, always relieve tank pressure by loosening, then retightening, the chain oil and fuel mix caps. Allow the engine to cool before storing.
OPERATION
ADJUSTING IDLE SPEED (Fig. 13)
If the engine starts, runs, and accelerates, but will not idle, turn the idle speed screw "T" clockwise to increase idle speed. If the chain turns at idle, turn the idle speed screw "T" counterclockwise to reduce the idle RPM and stop the chain movement. If the saw chain still moves at idle speed, contact an authorized service center for adjustment and discontinue use until the repair is made.

WARNING
THE SAW CHAIN SHOULD NEVER TURN AT IDLE. Turn the idle speed screw "T" counterclockwise to reduce the idle RPM and stop the chain, or contact an authorized service center for adjustment and discontinue use until the repair is made. Serious personal injury may result from the saw chain turning at idle.
PULL AND PUSH (Fig. 14)
The reaction force of the saw is always opposite to the direction the chain is moving. Thus, the operator must be ready to control the PULL when cutting on the bottom edge of the bar and the PUSH when cutting along the top edge.
NOTE: The chain saw has been fully factory tested. It is normal to find some slight oil residue on the saw.
KICKBACK PRECAUTIONS (Fig. 15-16)

WARNING
KICKBACK occurs when the moving chain contacts an object at the upper portion of the tip of the guide bar or when the wood closes in and pinches the saw chain in the cut. Contact at the upper portion of the tip of the guide bar can cause the chain to dig into the object and stop the chain for an instant. The result is a lightning-fast reverse reaction which kicks the guide bar up and back toward the operator. If the saw chain is pinched along the top of the guide bar, the guide bar can be driven rapidly back toward the operator. Either of these reactions can cause loss of saw control, which can result in serious injury.
Do not rely exclusively upon the safety devices built into the saw. As a chain saw user, you should take steps to keep your cutting jobs free from accident or injury. See General Safety Rules for more details.
PREPARING FOR CUTTING
PROPER GRIP ON HANDLES (Fig. 17)

WARNING
Never use a left-handed (cross-handed) grip or any stance that would place your body or arm across the chain line.

WARNING
DO NOT operate the throttle trigger with your left hand and hold the front handle with your right hand. Never allow any part of your body to be in the chain line while operating a saw.
PROPER CUTTING STANCE (Fig. 18)
Balance your weight with both feet on solid ground. - Keep left arm with elbow locked in a "straight arm" position to withstand any kickback force. - Keep your body to the left of the chain line. - Keep your thumb on underside of handlebar.
WORK AREA PRECAUTIONS (Fig. 19)
Cut only wood or materials made from wood; no sheet metal, no plastics, no masonry, no non-wood building materials. - Never allow children to operate the saw. Allow no person to use this chain saw who has not read this operator's manual or received adequate instructions for the safe and proper use of this chain saw. - Keep everyone - helpers, bystanders, children, and animals, a SAFE DISTANCE from the cutting area. During felling operations, the safe distance should be a least twice the height of the largest trees in the felling area. During bucking operations, keep a minimum distance of 4.5 m between workers. Always cut with both feet on solid ground to prevent being pulled off balance. - Do not cut above chest height as a saw held higher is difficult to control against kickback forces. - Do not fell trees near electrical wires or buildings. Leave this operation for professionals. Cut only when visibility and light are adequate for you to see clearly.
English
OPERATION
BASIC OPERATING/CUTTING PROCEDURES
Practice cutting a few small logs using the following technique to get the "feel" of using the saw before you begin a major sawing operation.
Take the proper stance in front of the wood with the saw idling. - Accelerate the engine to full throttle just before entering the cut by squeezing the throttle trigger. Begin cutting with the saw against the log. - Keep the engine at full throttle the entire time you are cutting. - Allow the chain to cut for you; exert only light downward pressure. Forcing the cut could result in damage to the bar, chain, or engine. - Release the throttle trigger as soon as the cut is completed allowing the engine to idle. Running the saw at full throttle without a cutting load can result in unnecessary wear to the chain, bar, and engine. - Do not put pressure on the saw at the end of the cut.
FELLING TREES - HAZARDOUS CONDITIONS (Fig. 20)

WARNING
Do not fell trees during periods of high wind or heavy precipitation. Wait until the hazardous weather has ended.
When felling a tree, it is important that you heed the following warnings to prevent possible serious injury.
- Wear eye, hearing, and head protection (A) when operating this equipment.
- Do not cut down trees having an extreme lean or large trees with rotten or dead limbs, loose bark, or hollow trunks. Have these trees pushed or dragged down with heavy equipment, then cut them up. Consider the distribution and weight of heavy limbs (B). Clear out the undergrowth around the tree to be felled (C).
- Do not cut trees near electrical wires or buildings (D). Consider the direction in which the tree leans (E).
- Check the tree for damaged or dead branches which could fall and hit you during felling (F).
Periodically glance at the top of the tree during the back-cut to assure the tree is going to fall in the desired direction. - Keep all bystanders at a safe distance (G) (at least twice the height of the tree).
Prepare a path of safe retreat (H).
If the tree starts to fall in the wrong direction, or if the saw gets caught or hung up during the fall, leave the saw and save yourself! Consider the wind direction before felling a tree. - Do not fell trees near power lines or near buildings which could be struck by falling limbs or the tree itself. The chainsaw operator should keep on the uphill side of the terrain as the tree is likely to roll or slide downhill after it is felled. - Remove dirt, stones, loose bark, nails, staples, and wire from the tree where felling cuts are to be made.

WARNING
Do NOT fell trees near power lines or near buildings which could be struck by falling limbs or the tree itself.
PROPER PROCEDURE FOR TREE FELLING (Fig. 21 - 24)
- Pick your escape route (or routes in case the intended route is blocked). Clear the immediate area around the tree and make sure there are no obstructions in your planned path of retreat. Clear the path of safe retreat approximately 135° from the planned line of fall (A).
- Consider the force and direction of the wind, the lean and balance of the tree, and the location of large limbs. These things influence the direction in which the tree will fall. Do not try to fell a tree along a line different from its natural line of fall (B).
- Cut a notch about 1/3 the diameter of the trunk in the side of the tree (C). Make the notch cuts so they intersect at right angles to the line of fall. This notch should be cleaned out to leave a straight line.
To keep the weight of the wood off the saw, always make the lower cut of the notch before the upper cut.
- Make the back-cut (D) level and horizontal, and at a minimum of 5 cm above the horizontal cut of the notch.
OPERATION
NOTE: Never cut through to the notch. Always leave a band of wood between the notch and back cut (approximately 5 cm or 1/10 the diameter of the tree). This is called a "hinge" or "hingewood" (E).
It controls the fall of the tree and prevents slipping or twisting or shoot-back of the tree off the stump.
On large diameter trees, stop the back cut before it is deep enough for the tree to either fall or settle back on the stump. Then insert soft wooden or plastic wedges (F) into the cut so they do not touch the chain. Drive wedges in, little by little, to help jack the tree over.
- As tree starts to fall, stop the chainsaw and put it down immediately. Retreat along the cleared path, but watch the action in case something falls your way.

WARNING
Never cut through to the notch when making a back cut. The hinge controls the fall of the tree: this is the section of wood between the notch and back-cut.
REMOVING BUTTRESS ROOTS (Fig. 25)
A buttress root is a large root extending from the trunk of the tree above the ground. Remove large buttress roots prior to felling. Make the horizontal cut (A) into the buttress first, followed by the vertical cut (B). Remove the resulting loose section (C) from the work area. Follow the correct tree felling procedure after you have removed the large buttress roots. Refer to "Operation - Proper Procedure for Tree Felling" earlier in this manual.
BUCKING (Fig. 26)
Bucking is the term used for cutting a fallen tree to the desired log length.
Cut only one log at a time. Support small logs on a sawing stand or another log while bucking. Keep a clear cutting area. Make sure that no objects can contact the guide bar nose and chain during cutting: this can cause kick-back (A). During bucking operations, stand on the uphill side so that the cut-off section of the log cannot roll over you. Sometimes it is impossible to avoid pinching (with just standard cutting techniques) or difficult to predict which way a log will settle when cut.
BUCKING WITH A WEDGE (Fig. 27)
If the wood diameter is large enough for you to insert a soft bucking wedge (B) without touching the chain, you should use the wedge to hold the cut open to prevent pinching.
BUCKING LOGS UNDER STRESS (Fig. 28) (C) LOG SUPPORTED AT ONE END.
(D) LOG SUPPORTED AT BOTH ENDS.
Make the first bucking cut (E) 1/3 of the way through the log and finish with a 2/3 cut (F) on the opposite side.
As you cut the log, it will tend to bend. The saw can become pinched or hung in the log if you make the first cut deeper than 1/3 of the diameter of the log.
Give special attention to logs under stress (G) to prevent the bar and chain from pinching.
OVERBUCKING (Fig. 29)
Begin on the top side of the log with the bottom of the saw against the log; exert light pressure downward. Note that the saw will tend to pull away from you.
UNDERBUCKING (Fig. 30)
Begin on the under side of the log with the top of the saw against the log; exert light pressure upward.
During underbucking, the saw will tend to push back at you. Be prepared for this reaction and hold the saw firmly to maintain control.
LIMBING AND PRUNING (Fig. 31 - 32)
Work slowly, keeping both hands on the saw with a firm grip. Maintain secure footing and balance. Keep the tree between you and the chain while limbing. Cut from the side of the tree opposite the branch you are cutting. Do not cut from a ladder: this is extremely dangerous. Leave this operation for professionals. Do not cut above chest height as a saw held higher is difficult to control against kick-back.

WARNING
Never climb into a tree to limb or prune. Do not stand on ladders, platforms, a log, or in any position which may cause you to lose your balance or control of the saw.
English
OPERATION
- When pruning trees it is important not to make the flush cut next to the main limb or trunk until you have cut off the limb further out to reduce the weight.
This prevents stripping the bark from the main member.
- Underbuck the branch 1/3 through for your first cut (A).
- Overbuck the branch to drop it (B).
- Finish by cutting smoothly and neatly against the main member (C) so the bark will grow back to seal the wound.

WARNING
If the limbs to be pruned are above chest height, hire a professional to perform the pruning.
CUTTING SPRING POLES (Fig. 33)
A spring pole (A) is any log, branch, rooted stump, or sapling which is bent under tension by other wood so that it springs back if the wood holding it is cut or removed. On a fallen tree, a rooted stump has a high potential of springing back to the upright position during the bucking cut to separate the log from the stump.
Watch out for spring-poles; they are dangerous.

WARNING
Spring poles are dangerous and could strike the operator causing the operator to lose control of the chainsaw. This could result in severe or fatal injury to the operator.
MAINTENANCE

WARNING
When servicing, use only identical Ryobi replacement parts. Use of any other parts may create a hazard or cause product damage.

WARNING
Always wear safety goggles or safety glasses with side shields during power tool operation or when blowing dust. If operation is dusty, also wear a dust mask.
GENERAL MAINTENANCE
Avoid using solvents when cleaning plastic parts. Most plastics are susceptible to damage from various types of commercial solvents and may be damaged by their use. Use clean cloths to remove dirt, dust, oil, grease, etc.

WARNING
Do not at any time let brake fluids, petrol, petroleum-based products, penetrating oils, etc., come in contact with plastic parts. Chemicals can damage, weaken or destroy plastic which may result in serious personal injury.
LUBRICATION
All of the bearings in this tool are lubricated with a sufficient amount of high grade lubricant for the life of the unit under normal operating conditions. Therefore, no further lubrication is required.
REPLACING THE GUIDE BAR AND CHAIN (Fig. 34 - 43)

DANGER
Never start the engine before installing the guide bar, chain, drivecase cover, and clutch drum. Without all these parts in place, the clutch can fly off or explode, exposing the user to possible serious injury.

WARNING
To avoid serious personal injury, read and understand all the safety instructions in this section.
Always place the switch in the STOP position before you work on the saw. Make sure the chain brake is not set by pulling the chain brake lever/hand guard towards the front handle to the run position.
NOTE: When replacing the guide bar and chain, always use the specified bar and chain.
Wear gloves when handling the chain and bar. These components are sharp and may contain burrs. - Remove the bar mounting nuts using the combination wrench provided. Remove the clutch cover. - Remove the bar and chain from the mounting surface. Remove the old chain from the bar. - Lay out the new saw chain in a loop and straighten any kinks. The cutters (A) should face in the direction of chain rotation (B). If they face backwards, turn the loop over. - Place the chain drive links (C) into the bar groove (D) as shown.
English
MAINTENANCE
Position the chain so there is a loop at the back of the bar. Hold the chain in position on the bar and place the loop around the sprocket (E). Fit the bar flush against the mounting surface so that the bar studs are in the long slot of the bar.
NOTE: When placing the bar on the bar studs (F), ensure that the adjusting pin (G) is in the chain tension pin hole (H).
- Replace the clutch cover (I) and bar mounting nuts (J).
- Finger-tighten the bar mounting nuts. The bar must be free to move for tension adjustment.
- Remove all slack from the chain by turning the chain tensioning screw (K) clockwise until the chain seats snugly against the bar with the drive links in the bar groove. Lift the tip of the guide bar up to check for sag.
- Release the tip of the guide bar and turn the chain tensioning screw 1/2 turn clockwise. Repeat this process until sag does not exist. Hold the tip of the guide bar up and tighten the bar mounting nuts securely.
The chain is correctly tensioned when there is no sag on the underside of the guide bar, the chain is snug, but it can be turned by hand without binding. Ensure that the chain brake is not set.
NOTE: If chain is too tight, it will not rotate. Loosen the bar nuts slightly and turn the tension adjuster 1/4 turn counterclockwise. Lift the tip of the guide bar up and retighten the bar nuts securely. Ensure that the chain will rotate without binding.
ADJUSTING THE CHAIN TENSION (Fig. 44 - 46)

WARNING
Never touch or adjust the chain while the motor is running. The saw chain is very sharp. Always wear protective gloves when performing maintenance on the chain.
- Stop the engine before setting the chain tension. Make sure the bar mounting nuts are loosened to finger tight. Turn the chain tensioning screw clockwise to tension the chain.
NOTE: A cold chain is correctly tensioned when there
is no slack on the underside of the guide bar, the chain is snug, and it can be turned by hand without binding.
- Retension the chain whenever the flats on the drive links (A) hang out of the bar groove.
NOTE: During normal saw operation, the temperature of the chain increases. The drive links of a correctly tensioned warm chain will hang approximately 1.25 mm out of the bar groove. The tip of the combination wrench can be used as a guide to help determine the correct warm chain tension.
NOTE: New chains tend to stretch; check the chain tension frequently and tension as required.

CAUTION
A chain tensioned while warm may be too tight upon cooling. Check the "cold tension" before next use.
CHAIN MAINTENANCE (Fig. 47 - 48)

CAUTION
Check that the switch is in the STOP "STOP" position before you work on the saw.
Use only a low-kickback chain on this saw. This fast-cutting chain provides kickback reduction when properly maintained.
For smooth and fast cutting, maintain the chain properly.
The chain requires sharpening when the wood chips are small and powdery, the chain must be forced through the wood during cutting, or the chain cuts to one side. During maintenance of the chain, consider the following:
- Improper filing angle of the side plate can increase the risk of severe kickback. Raker (depth gauge) clearance (A).
- Too low increases the potential for kickback.
- Not low enough decreases cutting ability.
If the cutter teeth hit hard objects such as nails and stones, or are abraded by mud or sand on the wood, have an authorized service center sharpen the chain.
NOTE: Inspect the drive sprocket (B) for wear or damage when replacing the chain. If signs of wear or damage are present in the areas indicated, have the drive sprocket replaced by an authorized service center.
NOTE: If you do not fully understand the correct procedure for sharpening the chain after reading the instructions that follow, have the saw chain sharpened by an authorized service center or replace with a recommended low-kickback chain.
MAINTENANCE
SHARPENING THE CUTTERS (Fig. 49 - 52)
Parts of a cutter:
(A) Cutting corner
(B) Side plate
(C) Depth gauge
(D) Toe
(E) Gullet
(F) Heel
(G) Rivet hole
(H) Top plate
Be careful to file all cutters to the specified angles and to the same length, as fast cutting can only be obtained when all cutters are uniform.

WARNING
The saw chain is very sharp. Always wear protective gloves when performing maintenance to the chain to prevent serious personal injury.
Tension the chain prior to sharpening. Refer to Adjusting The Chain Tension. Use a 1.6 mm diameter round file and holder (not provided). Do all of your filing at the midpoint of the bar. - Keep the file level with the top plate of the tooth. Do not let the file dip or rock. Using light but firm pressure. Stroke towards the front corner of the tooth. - Lift the file away from the steel on each return stroke. Put a few firm strokes on every tooth. File all left hand cutters (A) in one direction. Then move to the other side and file the right hand cutters (B) in the opposite direction. Remove filings from the file with a wire brush.

CAUTION
A dull or improperly sharpened chain can cause excessive engine speed during cutting, which may result in severe engine damage.

WARNING
Improper chain sharpening increases the potential of kickback.

WARNING
Failure to replace or repair a damaged chain can cause serious injury.
TOP PLATE FILING ANGLE (Fig. 53)
(A) CORRECT 30° - file holders are marked with guide marks to align file properly to produce correct top plate angle. (B) LESS THAN 30° - for cross cutting. (C) MORE THAN 30° - feathered edge dulls quickly.
SIDE PLATE ANGLE (Fig. 54)
(D) CORRECT 80° - Produced automatically if you use the correct diameter file in the file holder. (E) HOOK – “Grabs” and dulls quickly; increases the potential of KICKBACK. Results from using a file with a diameter too small or a file held too low. (F) BACKWARD SLOPE - Needs too much feed pressure; causes excessive wear to the bar and chain. Results from using a file with a diameter too large or file held too high.
MAINTAINING DEPTH GAUGE CLEARANCE (Fig. 55 - 57)
- Maintain the depth gauge at a clearance of 0.6 mm . Use a depth gauge tool for checking the depth gauge clearances (A). Every time the chain is filed, check the depth gauge clearance. Use a flat file (B)(not provided) and a depth gauge jointer (C)(not provided) to lower all gauges uniformly. Use a 0.6mm depth gauge jointer. After lowering each depth gauge, restore original shape by rounding the front. Be careful not to damage adjoining drive links with the edge of the file.
- Depth gauges must be adjusted with the flat file in the same direction the adjoining cutter was filed with the round file. Use care not to contact cutter face with flat file when adjusting depth gauges.
MAINTAINING THE GUIDE BAR (Fig. 58)

CAUTION
Make sure the chain has stopped before you do any work on the saw.
Every week of use, reverse the guide bar on the saw to distribute the wear for maximum bar life. The bar should be cleaned every day of use and checked for wear and damage.
Feathering or burring of the bar rails is a normal process of bar wear. Such faults should be smoothed with a file as soon as they occur.
English
MAINTENANCE
A bar with any of the following faults should be replaced:
Wear inside the bar rails which permits the chain to lie over sideways; Bent guide bar; - Cracked or broken rails; Spread rails.
In addition, lubricate guide bars (with a sprocket at their tip) weekly. Using a grease syringe, lubricate weekly in the lubricating hole. Turn the guide bar and check that the lubrication holes (A) and chain groove are free from impurities.
CLEANING THE AIR CLEANER (Fig. 59 - 60)

CAUTION
Make sure the air cleaner is correctly placed in the air filter cover before reassembly. Never run the engine without the air filter, serious damage could result.
ADJUSTING THE CARBURETOR (Fig. 61 - 63) Before adjusting the carburetor:
Use a brush or compressed air to clean the starter cover vents. Clean the air cleaner (A). Refer to Cleaning the Air Cleaner in the Maintenance section of this manual. - Allow the engine to warm up prior to adjustment of engine idle speed.

WARNING
Weather conditions and altitude may affect carburetion. Do not allow bystanders close to the chain saw while adjusting the carburetor.
Idle Speed Adjustment
The idle speed adjustment controls how much the throttle valve stays open when the throttle trigger is released. To adjust:
- Turn idle speed screw "T" clockwise to increase idle speed. Turn idle speed screw "T" counterclockwise to decrease idle speed. Make a test cut, then adjust the H needle for best cutting power, not for maximum speed. The H needle is restricted to 1/4 turn.

WARNING
THE SAW CHAIN SHOULD NEVER TURN AT IDLE. Serious personal injury may result from the saw chain turning at idle.
CLEANING THE STARTER UNIT (Fig. 62)
Use a brush or compressed air to keep the cooling vents (B) of the starter assembly free and clean of debris.
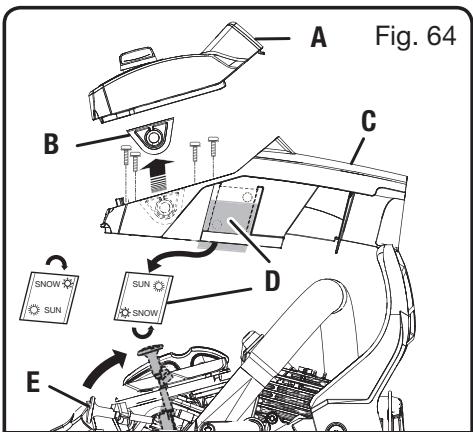
CARBURETOR ANTI-FREEZE MECHANISM (Fig. 64-65)
The chain saw is designed with a ventilation hatch on the right side of the cylinder cover which allows warm air to be supplied from the engine to the carburetor to help prevent icing under colder operating conditions. Operating the chain saw in temperatures from 32°F to 41°F (0°C to 5°C) at times of high humidity may result in ice forming within the carburetor. This can cause the output power of the engine to be reduced and/or the engine to fail to operate smoothly. When operating under these circumstances, the chain saw should be placed in anti-freeze mode before use.
To switch to anti-freeze mode:
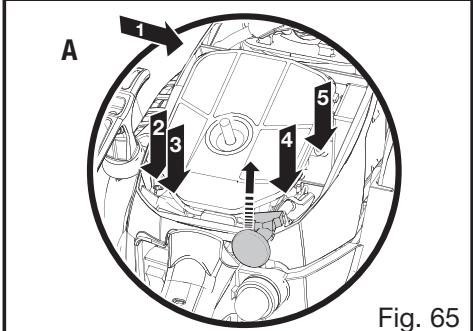
Place the ignition switch in the OFF (stop) position. Remove the air cleaner cover (A). Remove the air cleaner. - Lift choke knob (E) up to remove from the cylinder cover (C). - Loosen the five screws holding the cylinder cover in place. Remove the cylinder cover. - Remove the icing cap (D) located on the right-hand side of the cylinder cover by pressing down on it with your finger. - Adjust the icing cap so that the "snow" mark faces upward, then return it to its original position in the cylinder cover. - Replace the cylinder cover and reinstall screws to secure. - Replace choke knob, air cleaner, and air cleaner cover.

WARNING
Always return the unit to normal operating mode if there is no danger of icing occurring. Continuing to use the chain saw in anti-freeze mode when temperatures have risen and returned to normal may result in the engine failing to start properly or in the engine failing to operate at its normal speed.
MAINTENANCE
CLEANING THE ENGINE (Fig. 66-67)
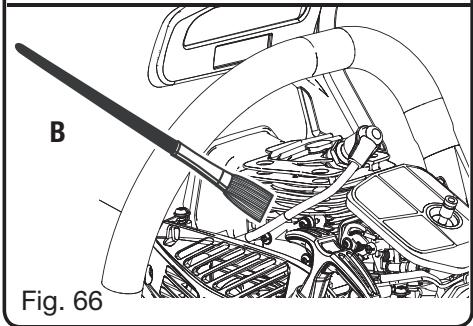
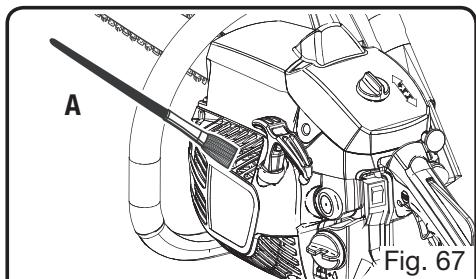
Clean the cylinder fins (B) and flywheel fins (A) with compressed air or a brush periodically. Dangerous overheating of the engine may occur due to impurities on the cylinder.

WARNING
Never run the saw without all the parts, including the drivecase cover and starter housing, securely in place.
Because parts can fracture and pose a danger of thrown objects, leave repairs of the flywheel and clutch to factory trained authorized service center personnel.
NOTE: If you notice a power loss with the gas-powered tool, the exhaust port and muffler may be blocked with carbon deposits. These deposits may need to be removed to restore performance.
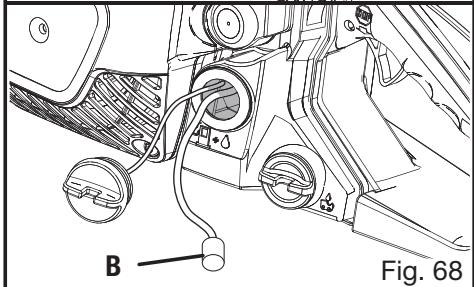
CHECKING THE FUEL FILTER (Fig. 68)
Check the fuel filter (B) periodically. Replace it if contaminated or damaged.
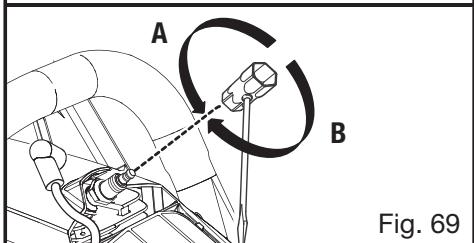
REPLACING THE SPARK PLUG (Fig. 69)
This engine uses a Champion RZ7C or NGK CMR7H spark plug with 0.64 mm electrode gap. Use an exact replacement and replace every 50 hours or more frequently, if necessary.
Loosen the spark plug by turning it counterclockwise with a wrench (A). Remove the spark plug. - Hand thread the new spark plug, turning it clockwise. Tighten securely with wrench (B).
NOTE: Be careful not to cross-thread the spark plug. Cross-threading will seriously damage the cylinder.
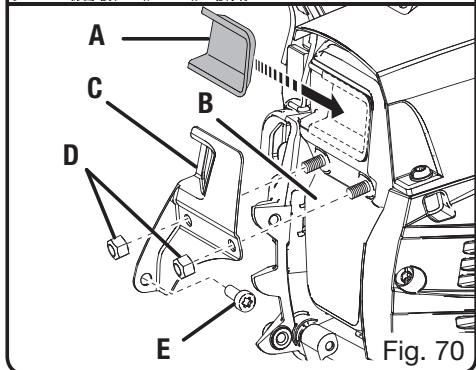
INSPECTING/CLEANING THE SPARK ARRESTOR SCREEN AND MUFFLER EXHAUST PORT (Fig. 70)
The muffler is equipped with a spark arrestor screen. A faulty spark arrestor screen can create a fire hazard. Through normal use the screen can become dirty and should be inspected weekly and cleaned as required. Always keep the muffler and spark arrestor on the saw in good condition.

WARNING
Muffler surfaces are very hot during and after operation of the chain saw. To avoid serious personal injury, keep all body parts away from the muffler.
- Allow the muffler to cool.
- Remove torx screw (E) and 8 mm. nuts (D) holding the muffler cover in place; remove muffler cover (C) and spark screen (A). If dirty, clean the spark arrester screen with a small wire brush. Replace the screen if it is cracked or otherwise deteriorated. Remove the muffler (B). Insert a flat blade screwdriver into the muffler exhaust vent to remove any carbon deposits. Wipe away any carbon buildup on the muffler exhaust vent and the cylinder exhaust port at the same time. Reinstall muffler, spark screen, and muffler cover. Reinstall torx screw and nuts to secure.
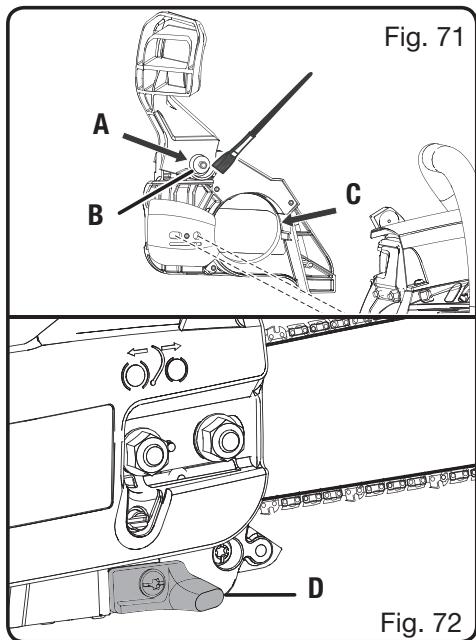
INSPECTING AND CLEANING CHAIN BRAKE (Fig. 71-72)
- Remove the clutch cover and clean the chain brake components (A). Check wear on the brake band (C) and replace if worn or deformed. The band thickness should not be less than 0.6 mm, or worn halfway through. Always keep the chain brake mechanism clean and lightly lubricate the linkage (B). Always test the chain brake performance after servicing or cleaning. Refer to Operating Chain Brake for additional information. Check the chain catcher (D) and replace if damaged.

WARNING
Even with daily cleaning of the mechanism, the dependability of a chain brake to perform under field conditions cannot be certified. Use proper cutting techniques.
STORING THE CHAIN SAW (1 MONTH OR LONGER)
- Drain all fuel from tank into a container approved for gasoline. Run the engine until it stops. This will remove all fuel-oil mix that could become stale and leave varnish and gum in the fuel system.
- Squeeze primer bulb several times to purge fuel from carburetor.
MAINTENANCE
Drain all bar and chain oil from tank into a container approved for oil. Clean all foreign material from the saw. Store it in a well-ventilated place that is inaccessible to children.
NOTE: Keep away from corrosive agents such as garden chemicals and de-icing salts.
Abide by local regulations for the safe storage and handling of gasoline. Excess fuel should be used in other 2-cycle engine powered equipment.
TROUBLESHOOTING
| Problem | Possible Cause | Solution |
| Engine will not start. [Make sure ignition switch is in the RUN (1) position.] | No spark. Engine is flooded. | Check spark. Remove air filter cover. Remove spark plug from cylinder. Reattach the spark plug wire and lay spark plug on top of cylinder with the metal part of plug touching the cylinder. Pull the starter grip and watch for spark at spark plug tip. If there is no spark, repeat test with a new spark plug. With the ignition switch OFF, remove spark plug. Move choke knob to RUN position (pushed in completely) and pull starter grip 15 to 20 times. This will clear excess fuel from engine. Clean and reinstall spark plug. Set ignition switch to RUN (1) position. Push and fully release primer bulb 4 times. Pull starter three times with choke knob at RUN. If engine does not start, move choke knob to HALF CHoke and repeat normal starting procedure. If engine still fails to start, repeat procedure with a new spark plug. |
| Engine starts but will not accelerate properly. | Carburetor requires “L” (Low Jet) adjustment. | Contact an authorized service center for carburetor adjustment. |
| Engine starts, then dies. | Carburetor requires “L” (Low Jet) adjustment. | Contact an authorized service center for carburetor adjustment. |
| Engine starts but will not run properly at high speed. | Carburetor requires “H” (High Jet) adjustment. | Contact an authorized service center for carburetor adjustment. |
| Engine does not reach full speed and/or emits excessive smoke. | Oil/fuel mixture incorrect. Air filter is dirty. Spark arrester screen is dirty. Carburetor requires “H” (High Jet) adjustment. | Use fresh fuel and the correct 2-stroke oil mix ratio. Clean air filter. Refer to Cleaning the Air Cleaner in the Maintenance section of this manual. Clean spark arrester screen. Refer to Cleaning the Spark Arresting Screen in the Maintenance section of this manual. Contact an authorized service center for carburetor adjustment. |
TROUBLESHOOTING
| Problem | Possible Cause | Solution |
| Engine starts, runs, and accelerates but will not idle. | Carburetor requires adjustment to idle speed. | Turn idle speed screw “T” clockwise to increase idle speed. Refer to Adjusting the Carburetor in the Maintenance section of this manual. |
| Chain turns at idle. | Carburetor requires adjustment to idle speed. | Turn idle speed screw “T” counterclockwise to decrease speed. Refer to Adjusting the Carburetor in the Maintenance section of this manual. |
| Air leak in the intake system. | Contact an authorized service center for a rebuild kit. | |
| Bar and chain running hot and smoking. | Chain oil tank empty. | Oil tank should be filled every time fuel tank is filled. |
| Chain tension is too tight. | Tension chain per instructions in Adjusting the Chain Tension in the Maintenance section of this manual. | |
| Oiler is not functioning. | Run at half throttle 30 to 45 seconds. Stop saw and check for oil dripping from guide bar. If oil is present, the chain may be dull or bar may be damaged. | |
| Clogged oil passages. | Remove the clutch cover and guide bar plate and clean oil passages with a stiff-bristle brush. | |
| Engine starts and runs, but chain is not rotating. | Chain brake is engaged. | Release chain brake. Refer to Operating the Chain Brake in the Operation section of this manual. |
| Chain tension is too tight. | Tension chain per instructions in Adjusting the Chain Tension in the Maintenance section of this manual. | |
| Guide bar and chain assembled incorrectly. | Refer to Replacing the Guide Bar and Chain in the Maintenance section of this manual | |
| Guide bar and/or chain are damaged. | Inspect guide bar and chain for damage. | |
| Drive sprocket teeth damaged | Contact an authorized service center for drive sprocket replacement. |
MIX THE FUEL
(E) Notch (F) Chassis
(G) Rivet hole
(H) Top plate
BASIC SAFETY PRECAUTIONS FOR YOUR WORK AREA
HAND PLACEMENT (fig. 17)

WARNING
1 liter + 20 ml = 2 liters + 40 ml = 3 liters + 60 ml = 50:1 4 liters + 80 ml = 5 liters + 100 ml =
LUBRICATING THE CHAIN AND BAR (Fig. 3)
REFUELING (NEVER SMOKE!)
KEEP THIS INSTRUCTION MANUAL FOR FUTURE REFERENCE.
Danish
SYMBOLS
oil or fuel.
■ USE THE CHAINSAW ONLY IN WELL-VENTILATED AREAS. ■ Do not use the chainsaw while standing IN a tree, unless you are specifically trained for that job. ALWAYS HAVE A FIRE EXTINGUISHER NEARBY WHEN USING THE CHAINSAW. FOLLOW THE INSTRUCTIONS REGARDING FILING AND MAINTENANCE OF THE SHARP CHAIN. ■ USE ONLY BAR AND LOW-KICKBACK CHAINS RECOMMENDED BY THE MANUFACTURER FOR THIS CHAINSAW. DO NOT MOUNT a curved bar on the power unit and do not use any accessory that is not recommended for this chainsaw. KEEP THESE REGULATIONS. Refer to them regularly and use them to inform other users. If you lend this tool, you should also lend the accompanying instruction manual.
SPECIAL SAFETY REGULATIONS FOR CHAINSAWS

WARNING
MAINTENANCE PRECAUTIONS
Never use a chainsaw that is damaged, incorrectly adjusted, or not completely and securely assembled.
THE CHAIN SHOULD NEVER RUN AT IDLE SPEED.
CHAIN MAINTENANCE (Fig. 47-48)

CAUTION
Make sure the on/off switch is in the STOP position before performing any work on the chainsaw.
Use this chainsaw only with a low-kickback chain. If properly maintained, this fast-cutting chain reduces the risk of kickback.
Do not use a chainsaw that is damaged, incorrectly adjusted, or not completely and securely assembled.
Make sure the chain is not rotating when you release the throttle. If the chain rotates at idle, the idle speed may need to be adjusted. Refer to the idle speed adjustment section in the operator's manual.
If the chain continues to rotate at idle after your adjustments, contact a Ryobi authorized service center and have your chainsaw serviced before further use.

All maintenance and repair operations not described in the maintenance instructions must be performed by qualified technical personnel. The use of suitable tools for removing the sprocket of the engine or the drive wheel, in order to keep the engine sprocket in place while removing the drive wheel, may cause damage to the engine sprocket and lead to its failure, which is a fact.
ENGINE STARTING (fig. 6-10)
Starting the tool is not possible if the engine is cold or hot.

PREPARATION
GENERAL SAFETY INSTRUCTIONS

WARNING
PROBLEMS AND THEIR SOLUTIONS
PROBLEMS AND THEIR SOLUTIONS
REFUELING THE FUEL TANK (DO NOT SMOKE!)
Fuel is highly flammable and can cause fire or explosion. Store and mix fuel in special containers. Mix and pour fuel outdoors, away from sparks and flames. Choose a free area, stop the engine and let it cool before refueling. Slowly loosen the fuel tank cap to release pressure and prevent fuel from spilling. After refueling, tighten the fuel tank cap securely. If fuel spills, wipe it up with a cloth. After refueling, move at least 15 meters away from the refueling area before starting the engine. Never ignite spilled fuel.
WORK AREA / OPERATIONS: BASIC PRECAUTIONS
Do not work with a chainsaw on a ladder. - Do not work with a chainsaw on a ladder: this is dangerous. Do not allow bystanders or animals near the work area. During engine start-up or operation, do not allow anyone to be nearby.
Note: The size of the work area depends on the type of work and the size of the tree. For example, when felling trees, the work area will be larger than when limbing branches.
RETURN AND RECEIVING TRA
The saw chain must be installed in the opposite direction of the chain's rotation. When working with the lower side of the bar,
keep the saw chain sharp, and when working with the upper side, keep it away from the saw.
Note: The saw chain has been fully checked at the factory. Some lubricant may remain on it.
SAFETY PRECAUTIONS FOR MAINTENANCE
Never work with a saw chain that is damaged, not tensioned, not fully or incorrectly assembled.
After releasing the throttle trigger, make sure that the chain stops completely. If the chain continues to rotate, adjust the carburetor. See the section "Operation - Adjusting the idle speed."
If the chain continues to rotate at idle speed after adjustment, contact the Ryobi service center and do not use the saw until the necessary repair is made.

WARNING
All repair work, except for those described in this manual, must be performed by a qualified specialist. Using unsuitable tools or turning the flywheel or turning the motor flywheel may damage the flywheel, and the motor may explode, causing serious injury.
KICKBACK
Kickback of the saw chain can cause serious injury. Do not rely only on the protective devices of the saw itself. To avoid accidents and injuries, take the necessary precautions.
Note: For more information about kickback and saw chain safety, see the section "Operation".
KEEP THIS MANUAL FOR FUTURE REFERENCE.
Russian
SYMBOLS
The following symbols are used in this manual. Remember what they mean. Correct interpretation of these symbols will ensure safe and adequate operation of the tool.
TECHNICAL CHARACTERISTICS
SPEED ADJUSTMENT (Fig. 13)
If the motor starts, runs and accelerates, but does not hold low speeds, turn the low speed screw "T" to the right to increase the speed. If it continues to rotate at low speeds, turn the screw "T" to the left to reduce the speed and stop the blade. If after adjustment the blade continues to rotate at low speeds, contact the technical service center to make the necessary adjustments, and do not use the tool until they are made.

WARNING
The blade may rotate at low speeds. Turn the screw T to the left to reduce the speed and stop the blade, and contact the technical service center for necessary adjustments. Do not use the tool until it is repaired. A blade rotating at low speeds can cause serious injury.
RECIPROCATING BLADE (Fig. 14)
The cutting force is always opposite to the direction of the blade teeth. When working with the lower side of the blade, pull it towards you, and when working with the upper side, push it away from you.
Russian
OPERATION
Note: The saw was fully checked at the factory. Some traces may remain on it.
WARNING ABOUT KICKBACK (Fig. 15-16)

WARNING
Kickback occurs when the rotating blade touches an object in the upper part of the saw blade or when the wood pinches the blade during cutting. When the upper part of the saw blade touches the wood, the wood pinches the blade and stops it for a moment. At this, the saw is sharply thrown upward and back towards the user. Also, if the saw blade pinches the wood after the blade, the saw is sharply thrown to the side of the user. In both cases, you can lose control of the tool and get serious injury.
Do not rely only on the safety devices of the tool itself. To avoid accidents and injuries, it is necessary to take various precautions. Follow the information given in the section "General Safety Rules" of this manual.
HOLDING THE SAW (Fig. 17)

WARNING
Never hold the saw as described (do not hold the front handle with your left hand and the rear handle with your right) and avoid standing in the path of the chain.

WARNING
Do not press the chain accelerator trigger with your left hand while holding the rear handle with your right. Never stand in the path of the chain during operation.
WORKING POSITION (Fig. 18)
Stand firmly on your feet on a solid surface. Hold the front handle with your left hand in case of kickback. Stand to the left of the saw. Keep your thumbs wrapped around the handles from below.
WORKING AREA (Fig. 19)
The chainsaw is intended only for cutting wood and wooden materials. Do not cut metal, stones, or other materials. Do not allow anyone to use the chainsaw without
having read this manual and the safety rules.
-Keep bystanders (helpers, visitors, children) and animals at a safe distance from the work area. When felling trees, the safe distance must be at least twice the height of the tallest trees in the work area. When cutting, the distance between workers must be at least 4.5 m. - To avoid losing balance during operation, stand firmly on your feet on a stable surface. Do not operate the chainsaw at heights; it will be difficult to control. Do not work near power lines. Entrust such work to professionals. Operate the chainsaw in sufficient lighting to clearly see the results of your work.
BASIC WORK TECHNIQUES
Before starting serious work, practice the cutting techniques on small logs.
Take the correct position, stand opposite the workpiece, and start the chainsaw at low speed. Press the trigger until the engine reaches maximum speed before starting the cut. Begin cutting the logs. The engine must run at full speed during the entire cut. Gently press the saw, letting the chain do the cutting. Forcing the saw may cause damage or engine failure. After finishing the cut, release the trigger and let the engine idle. When working at idle or low speed, the chain and engine may wear out prematurely. Do not press the chainsaw at the end of the cut.
FELLING TREES - HAZARDOUS CONDITIONS (Fig. 20)

Remove all loose bark and branches. Place the saw on the ground.
To avoid serious injury while felling trees, it is necessary to follow the following rules.
- When working, use a helmet (A) and hearing and eye protection. Do not fell trees that are heavily leaning, larger than the saw's capacity, or with high branches, or trees with hollow trunks. Before cutting them down, plan the escape route and the fall direction.
Russian
WORK
Watch the position and weight of large branches (B). Clear brush around the tree (C). Do not fell trees near power lines and structures (D). Consider the direction the tree is leaning (E). Check that there are no broken or dry branches that could fall during felling (F). During felling, watch the top of the tree to ensure it falls in the desired direction. Keep bystanders at a safe distance (G) (at least twice the height of the tree). Calculate which way to retreat when the tree starts to fall (H). If the tree falls in the wrong direction or you are in danger during the fall, drop the saw and run! Before felling, check the wind direction. Do not fell trees near power lines or structures, so that neither branches nor the tree itself fall on them. Be careful on slopes, as after falling the tree may roll downhill. Clear the work area of obstacles such as stumps, stones, bark, nails, staples, and wire.

WARNING
Do not fell trees near power lines or structures, so that neither branches nor the tree itself fall on them.
TREE FELLING TECHNIQUE p.21-24
- Calculate which way to retreat when the tree starts to fall (several directions, in case the planned one is blocked). Clear the immediate vicinity of the tree and check that the escape path is free of obstacles. Clear the area at 135° around the planned fall direction of the tree (A).
- Consider the force and direction of the wind, the lean and balance of the tree, as well as the position of large branches. These factors can affect the direction of the fall. Do not attempt to fell a tree in a direction it cannot fall naturally (B).
- Cut a notch on 1/3 of the trunk diameter on the side where the tree should fall (C). The notch cuts must be perpendicular to the fall line of the tree. The notch must be cut out of the trunk to allow a horizontal cut without obstruction. To prevent the tree from binding the saw, always start with the lower cut.
- Mark the straight horizontal felling line (D)
At least 5 cm above the horizontal cut of the notch.
Note: Do not insert the wedge all the way to the hinge. Leave a part of the trunk between the hinge line and the wedge (about 5 cm or 1/10 of the trunk diameter). This part is called the "hinge" (E). It controls the fall of the tree and prevents the trunk from leaning, sliding, or slipping.
When felling trees of larger diameter, leave the hinge line earlier, before the tree falls. Then insert wooden or plastic wedges (F) into the hinge line so that they do not touch the hinge. Drive them in with a sledgehammer so that they act as a lever.
- When the tree starts to fall, stop the chainsaw immediately and place it on the ground. Move away in the planned direction, checking that the tree does not fall in your direction.

WARNING
The hinge line must never go beyond the wedge. The hinge controls the fall of the tree: it is the part of the trunk that remains unbroken between the wedge and the hinge line.
CUTTING ROOT BUTTRESSES (Fig. 25)
Root buttresses are large roots that extend from the trunk to the ground. Cut the large roots before felling the tree. First make a horizontal cut (A) in the root, then a vertical cut (B) perpendicular to it. Remove the resulting wedge-shaped piece (C) from the work area. After removing the root buttresses, proceed with the felling of the tree. See the section "Felling Technique".
BUCKING (Fig. 26)
CUTTING SPRINGBOARDS (Fig. 33)
A springboard (A) is a branch, root, or sapling that is bent under the weight of another tree. A springboard can spring back suddenly if the tree holding it is cut. The tension is released and the springboard returns to its vertical position when the trunk is cut from it to the end. Be careful! Springboards are dangerous.

WARNING
Springboards can hit the worker or cause the chainsaw to be thrown out of control, which can lead to serious or even fatal injury.
MAINTENANCE

WARNING
For repairs, use only original spare parts. The use of other spare parts may pose a hazard or damage the tool.

When working with or removing dust using compressed air, always use protective goggles with side shields. During dusty work, also use a protective respirator.
GENERAL MAINTENANCE
Never use solvents to clean plastic parts. Most plastics can be damaged by certain solvents. For cleaning dirt, oil, grease, dust, etc., use a clean cloth.

WARNING
Plastic parts must never come into contact with brake fluid, gasoline, petroleum products, or similar oils. These chemicals contain substances that can damage, soften, or destroy plastic.
LUBRICATION
All tool bearings were lubricated at the factory with high-quality grease for the entire service life of the tool under normal operating conditions. The tool does not require additional lubrication.
REPLACING THE AIR FILTER ELEMENT (Fig. 34-43)
Russian
MAINTENANCE

DANGER
Never start the motor without installing the air filter element, the motor cover, or the crankcase cover. If any of these parts are not installed, the cover may fly off or explode and cause serious injury.

WARNING
To avoid serious injury, carefully and attentively read and understand all safety rules described in this section.
Set the switch to the “O” position. Pull the chain brake / protective guard towards you to release the chain brake.
Note: The figures are for illustration only and are used solely with the spare parts recommended by the manufacturer.
When handling the chain or the saw, always wear gloves. These parts are very sharp. Using the combination wrench from the kit, loosen the bar nuts. Remove the sprocket cover. Remove the chain and bar. Remove the old chain from the bar. Lay out the new chain and arrange it in loops. The teeth (A) must face the direction of rotation of the chain (B). If they face the opposite direction, turn the chain over. Install the drive links (C) into the bar groove (D) as shown in Fig. 38. The chain must be seated correctly. Pull the chain around the bar and fit it onto the drive sprocket (E). Adjust the chain so that it fits properly into the groove at the center of the bar.
Sharpening angle from the top edge (Fig. 53)
(A) 30° CORRECT SHARPENING - The depth gauges have marks for correct setting of the sharpening angle relative to the top edge. (B) LESS THAN 30° - For softwood cutting. (C) MORE THAN 30° - The cutting edge becomes dull quickly.
Sharpening angle from the side edge (Fig. 54)
(D) 80° CORRECT - This angle is achieved when the depth gauge is set correctly for the bar diameter. (E) HOOK - Bites into the wood and dulls quickly, increasing the risk of kickback. This occurs when using a bar of small diameter or when the depth gauge is set too low. (F) BLUNT ANGLE - Requires too much force for cutting, leading to premature wear of the bar and chain. This occurs when using a bar of large diameter or when the depth gauge is set too high.
DEPTH GAUGE LIMITERS (Fig. 55-57)
Depth gauge clearance (A): 0.6 mm. Use the depth gauge checking tool. Check the depth gauge clearance after every sharpening. Use a flat file (B) (not supplied) and a depth gauge tool (C) (not supplied) to level all the depth gauges.
Russian
MAINTENANCE
Use a flat file to file down to 0.6 mm. After leveling all the depth gauges, restore their original shape, i.e., round them off at the front. Do not damage the drive links with the edge of the file.
The depth gauges must be leveled with a flat file in the direction that the adjacent teeth point. When leveling the depth gauges with a flat file, do not touch the teeth.
CHAIN MAINTENANCE (Fig. 58)

WARNING
Before stopping the engine, make sure the fuel valve is completely closed.
Turn the engine over slowly to distribute the oil evenly on both sides and extend its service life. After each use, check the engine oil level and condition.
Unevenness on the cylinder surface is a result of normal wear. These irregularities should be protected with a cover as soon as they appear.
The engine should be replaced:
if the cylinder wear does not allow the piston to be held on it; if it is bent; if the cylinder is cracked or broken; if the cylinder has come apart.
Lubricate the engine every week through the specially provided oil hole. Turn the engine and check that there is no dirt in the holes (A) and on the cylinder.
CLEANING THE AIR FILTER (Fig. 59-60)

WARNING
Before installing all parts in place, check that the air filter is correctly installed in its place. Never start the motor without the air filter, as it may be damaged.
CARBURETOR ADJUSTMENT (Fig. 61-63)
Before cleaning the carburetor:
Clean the ventilation holes and the starter cover with compressed air. Clean the air filter. See section "Cleaning the Air Filter". Before adjusting the idle speed, let the motor run for a few seconds.

WARNING
Mountainous and geographical conditions can affect the operation of the carburetor. During carburetor adjustment, do not allow strangers near the engine.
Adjusting the idle speed
The carburetor adjustment allows changing the throttle opening angle with the accelerator pedal released.
Adjustment:
To increase the idle speed, turn the idle speed screw "T" to the right. To decrease the idle speed, turn the screw "T" to the left. After making the adjustment, then adjust the high speed screw "H" for maximum performance (but not for maximum speed). The high speed screw must not be turned more than a quarter of a turn.

WARNING
The engine must not run at idle speeds. If the engine runs at idle, it may overheat.
AIR FILTER CLEANING (Fig. 62)
Clean the ventilation slots of the starter housing with compressed air.
CARBURETOR HEATING MECHANISM
(Fig. 64-65)
The housing has a ventilation duct to the right of the cylinder block, which supplies warm air to the carburetor to prevent icing when operating in cold conditions. When operating at air temperatures from 0°C to 5°C and high humidity, ice may form in the carburetor. This can lead to engine stalling. When operating in such conditions, select the carburetor heating mode.
Selecting the carburetor heating mode:
Set the switch to the "O" position. Remove the cover of the air filter housing (A). Remove the air filter. Lift the throttle (E) to remove the cylinder cover (C). Unscrew the screws holding the cylinder. Remove the cylinder cover. Remove the plug (D) on the right side of the cylinder block by pressing on it. Turn the plug so that the inscription "Snow" is on top and install it in place. Install the cylinder cover and tighten the screws holding it.
Russian
MAINTENANCE
Install the throttle and the air filter cover in place.

Before checking the freezing point, always place the tool in the normal position ("Sun"). If you use the tool without preheating the carburetor in cold weather, the engine may run irregularly.
ENGINE CLEANING (Fig. 66-67)
Adjust the idle speed of the carburetor (B) and the engine flywheel (A) with compressed air or a brush. Dirt on the carburetor can cause dangerous engine overheating.

WARNING
Never start the engine without the tool, if any part is not installed. In particular, do not start it without the engine covers and the starter. Parts may break and fly out of the engine. Repair the flywheel and the clutch only at an authorized service center.
Note: If you notice a loss of engine power, the exhaust port may be clogged with carbon. Clean the exhaust of carbon so that it works with its former power.
CHECKING THE CONDITION OF THE FUEL FILTER (Fig. 68)
Regularly check the fuel filter (B). If it is clogged or damaged, replace it.
CHANGING THE SPARK PLUG (Fig. 69)
The engine runs on a Champion RZ7C or NGK CMR7H spark plug with an electrode gap of 0.64 mm. Change the spark plug every 50 hours of operation and, if necessary, more often with a spark plug of the same type.
Remove the spark plug with a wrench, turning it to the left (A). Remove the spark plug. Insert a new spark plug into the hole and tighten it to the right by hand. Then tighten it firmly with the wrench (B).
Note: make sure not to short-circuit the spark plug contacts: this could seriously damage the tool.
CHECKING/CLEANING THE SPARK ARRESTER SCREEN (Fig. 70)
The muffler has a spark arrester screen. A worn spark arrester screen can cause a fire. Even with normal use of the tool, the screen can become clogged. Check it regularly and clean it if necessary. Keep the muffler clean.
The device is in working order.

WARNING
The surface of the heater becomes hot during operation. To avoid injury, do not touch the heater.
Remove the heater. Remove the protective layer (E) from the new one (D), then attach the heater. Remove the cover (C) of the spark plug. If the spark plug is dirty, clean it with a metal brush. If the spark plug is damaged or worn, replace it. Remove the muffler (B). Clean the carbon deposits through the ventilation slots. Remove the carbon deposits from the ventilation slots of the muffler and the exhaust outlet. Install the muffler, the spark plug, and the cover. Tighten the screws with a screwdriver and a wrench.
INSPECTION AND CLEANING OF THE BRAKE OF THE CHAIN (Fig. 71-72)
Remove the clutch cover and clean the chain brake parts (A). Check the degree of wear of the brake band (C) and, if it is heavily worn or deformed, replace it. The thickness of the brake band must be at least 0.6 mm, i.e., it must not be worn more than half. Lubricate the brake lever pivot (B). After cleaning or repair, always check the operation of the brake. See the additional information in the section "Operation of the chain brake." Check the condition of the chain catcher (D) and replace it if it is damaged.

WARNING
Even with daily cleaning of the mechanism, it is impossible to guarantee the effectiveness of the brake in operation. Follow the instructions for adjustment.
STORAGE OF THE SAW (WINTER PERIOD)
Drain all fuel from the tank into a gasoline canister. Let the engine run until it stops by itself. This will allow the remaining fuel to be completely consumed, so that it does not leave a sticky residue in the system. Press the primer bulb several times to remove the remaining fuel from the carburetor.
Russian
MAINTENANCE
Drain all oil from the chain and bar into an oil canister. Carefully clean the saw. Store it in a dry, ventilated room, out of the reach of children.
Note: Do not store the saw near flammable substances, such as solvents or kerosene.
Follow the ISO standards and local regulations for storage. The drained fuel can be used in other two-stroke engine tools.
SELF-REPAIR
| Helenia | Возможнaya поочness | Устaneous |
| MOTOR NO 3aIIyckaeTc. [Поверьт.чTo6bI bblkIIOUATEJI cTOnJI B IaIOJoxeHHN BKJI.“I”] | HET NcKpbI. Motop "3axJIe6hUlcI". | Поверьт coSTоЯнne сБч.СиHMITE крblIky Bo3dIuHOrO ФИльТра. ВыИBERHITe сБч ИЗ rolOBKNIцлIHДра.НадЕпг leproODЯ на сБч.YИ ПОLOJIXte ee Ha roIOLBKYцлIHДра,ПресIoHIV K为其ИнжHINЗ зIeKTPoIcSBч.ПOTЯнITE Stapert er И поМOTRHTe,есь ЛIMеЖДZIeKTPoIaMn CBeCHNcKpa.Есл Искры.net,ПрodeLaiTe Tу ще опeраunno C noboiCBeChoi.Поставы Te bblIOUOATeJI B IaIOJoxeHHNE CTONI“O"И bblERHITe cБч.ЗaIbIbIte ДО КОИЗДРОССЕЛ И deprHITe 15 -20 pa3 3a Stapert.ЭTO ocB6OJIHT MOTOP OT LInHIErTO TOpJIbIA.ПочИСТHITe cБч.YCSTaHOBHITe ee Na MeCTO.Поставы bblIOUOATeJI B IaIOJoxeHHNE BKJI (I).ПдКачайte ПОДСOC 4 pa3.ДeрHITe TrI pAsa Stapert c ПОJOHOCSTbO 3aIBNHytBMДPocCEJIeM.Есл MOTOR He 3aIOJINTCY,поставы ДОССЕЛ BсpeДHeE IaIOJoxeHHNE,ИЗaIcYsKaIte MOTOR KAK OБИHNo.Eсл И пОсLEЭТО MOTOR He 3aBeJIcI,ПОТOPHITe BCErNt Oпeрaunn C noboi CBeChoi. |
| MOTOR 3aBOJNTcno He no He pa3roHЯETc. | ВИNT "L"(maIbIe obOpOTb) Tre6byet peryIINPOBKN. | Образнелсь в Фирмень的大 БИнtr texHnueckGrOо obSclJxHBANHry,ЧТБы ТЕХИКТОТРБОВАЛ Kap6HOPATOp. |
| MOTOR 3aBOJNTcno I rLoXHET. | ВИNT "L"(maIbIe obOpOTb) Tre6byet peryIINPOBKN. | Оьразнелсь в Фирmень的大 БИнtr texHnueckGrOо obSclJxHBANHry,ЧТБы ТЕХИКТОТРБОВАЛ Kap6HOPATOp. |
| MOTOR 3aBOJNTcno Ho IIIOXO pa6OtaeHa nIpoIHOckOstn. | ВИNT "H"(6OJIbIe obOpOTb) Tre6byet peryIINPOBKN. | Оьразнелсь в ФирmENь的大БИнtr texHnueckGrOо obSclJxHBANHry,ЧТБы ТЕХИКТОТРБОВАЛ Kap6HOPATOp. |
| MOTOR Ne p3aROHЯETcdoII IOIINOH cKpOCTNs,IиИЗ HeTO IIndT MHOto IbIMa. | HénpaIBIbIbIaN pIopOPIuIg MAcIa IбeIbIbIbN ToTlIbHn CMeIbI.Bo3dIbIbIbIbIbIcZacOPIIcIc. Cetka HsKpOuIbOVBITEJIzacOPIIaIcB.ВИNT "H"(6OJIbIe obOpOTb) Tre6byet peryIINPOBKN. | ИспOLьзУte HOBUYO cMEcB c IpravHbIbN OIIpOPIuIeN cIHIteTNUeCKGrO MaIcIa IДуВXTakTHbIbDvHrAteJIeIe.Празнелсь ВОЗdIbIbIbIbIbIbIcФИьTp.Сm.pa3dIe"‘IcHcTKa BO3dIbIbIbIbIbIa".Празнелсь сETKунSCKpOToPraJxAteJIa.Сm.pa3dIe"‘IpOBepka/obSclJxHBANHc cIeKHTOgTAPeJIaIe IqIyIbIte".Оьразнелсь в ФирмENь的大БИнtr texHnueckGrOо obSclJxHBANHry,ЧТБы ТЕХИКТОТPAP6HOPATOp. |
| MOTOR 3aBOJNTcno I pa3roHЯETcno, И не ДерЖIT ржим MaJIbIX o6OporToB.IIeB bVpIaETcnaHa maJIbIX o6OporToX. | СлdeуET OTEpyIINPOBATB BnHT MaJIbIX obOpOTB KAp6HOPatOpA.СлdeуET OTEpyIINPOBATB BnHT MaJIbIX obOpOTB KAp6HOPatOpA.В снctemу пroxOДIT bo3dIyX. | ЧТБы уевлuchпь scKopOCTь в ржHMe мaJIbIX obOpOTOB,пОBERHITe BnHT зAMeIeHIN "T"ВпарBO.Cm.pa3dIe"‘PeryIINPOBKa Kap6HOPatOpA”.ЧТБы сokратпь scKopOCTь в ржHMe мaJIbIX obOpOTOB,пОBERHITe BnHT зAMeIeHIN "T"Влево.Cm.pa3dIe"‘PeryIINPOBKa Kap6HOPatOpA”.Оьразнелсь в ФирмENь的大БИнtr texHnueckGrOо obSclJxHBANHryДдяЗamEHы DeфeKTHOсстЕмы. |
SELF-REPAIR
FOLLOW THE INSTRUCTIONS.
GENERAL SAFETY MEASURES

WARNING
- Front handle
- Main handle
35 cm
4.4 kg
310 cm³
210 cm³
40 cm
9.53 mm
1.27 mm
end if with tendency
reduced recoil
6 teeth
35 cm³
1.6 kW (2.2 hp)
12000 rpm
2700-3100 rpm
100 dB(A)
110 dB(A)
4.5 m/s²
4.5 m/s²
40 cc
4.4 kg
310 cm³
210 cm3
46 cm
9.53 mm
1.27 mm
low recoil
reduced recoil
6 teeth
40 cm3
1.8 kW (2.4 hp)
12000 rpm
2700-3100 rpm
100 dB(A)
110 dB(A)
4.5 m/s²
7.3 m/s²
44 cm³
4.4 kg
310 cm³
210 cm³
50 cm
8.26 mm
1.27 mm
fine, with tendency
reduced recoil
7 teeth
44 cm³
2.0 kW (2.7 hp)
12000 rpm
2700-3100 rpm
100 dB(A)
110 dB(A)
4.5 m/s²
7.3 m/s²
DESCRIPTION (Fig. 1)
(B) Side edge
CARBURETOR ADJUSTMENT (Figures 61-63)
Before adjusting the carburetor:
CUTTING ATTACHMENT COVER (58th fig.)

WARNING
READ ALL INSTRUCTIONS.
GENERAL SAFETY INSTRUCTIONS

CAUTION
Chain saw parts:
(A) Cutting angle
(B) Side edge
(C) Limiting tooth
(D) Front end
(E) Tooth groove
(F) Rear end
(G) Rivet hole
(H) Top edge
Do not forget to sharpen all chain links to the prescribed angles and equal length, because fast cutting can only be achieved if all chain links are the same.

WARNING
The chain is very sharp. Always wear gloves when servicing the chain to prevent serious injury.
Before sharpening, tension the chain. See the section on adjusting chain tension. Use a round file with a diameter of 1.6 mm and a holder (not included). Sharpen all teeth in the center of the bar. Hold the file level with the top edge of the cutting link. The file must not be tilted or swayed to the sides. Apply light but firm pressure when sharpening. Pull the file toward the front tip of the chain link. Lift the file on the return stroke. Grind each chain link with several firm strokes. File all chain links on the left side (A) in one direction. Then move to the other side and file the chain links on the right side (B) in the opposite direction. ■ Clean the file with a wire brush.

WARNING

The warnings and instructions in this section provide guidance for your safety. Failure to follow these instructions may result in personal injury.
GENERAL SAFETY PRECAUTIONS
CHAIN SAW SAFETY WARNINGS. Keep all parts of the body away from the saw chain when the engine is running. Before starting the saw, make sure the chain is not contacting anything. Carry the saw with the engine stopped, guide bar and chain to the rear, and with the muffler away from your body. When the engine is running, keep the saw firmly with both hands. Do not overreach. Keep proper footing and balance at all times. Do not operate a chain saw that is damaged, improperly adjusted, or not completely and securely assembled. Be sure that the saw chain stops moving when the throttle is released. Use only replacement parts recommended by the manufacturer. Never operate the saw while in a tree, on a ladder, or on any unstable surface. Use extreme caution when cutting small size brush and saplings because slender material may catch the saw chain and be whipped toward you or pull you off balance. When cutting a limb that is under tension, be alert for springback so that you will not be struck by the limb or saw when the tension is released. Do not operate the saw with one hand. Serious injury to the operator, helpers, or bystanders may result from one-handed operation. Keep the saw chain sharp and properly tensioned. Check tension frequently. Keep the handles dry, clean, and free of oil and grease. Do not operate the saw in the vicinity of flammable materials or fumes. Do not cut any material that contains asbestos. Do not operate the saw unless you have been properly trained in its use.
Bulgarian
SPECIFIC SAFETY RULES FOR CHAIN SAW OPERATION
Wear protective equipment. Do not wear loose clothing. Wear safety goggles, hearing protection, and a hard hat. Do not wear jewelry. If you have long hair, tie it back. Wear non-slip safety shoes and heavy-duty gloves for a secure grip on the tool and for protection. When operating this tool, wear a dust mask and safety glasses.
FUEL SAFETY (DO NOT REFUEL)!
To reduce the risk of fire and burns, handle fuel with care. It is highly flammable. Mix and store fuel in a container approved for fuel. Mix and pour fuel outdoors, away from sparks and flames. Choose a clean area, stop the engine, and let it cool before refueling. Tighten the fuel cap securely. Wipe up any fuel spills. Start the engine at least 15 feet from the refueling location. Never attempt to burn off spilled fuel.
CUTTING ZONE/WORK AREA: BASIC SAFETY PRECAUTIONS
Do not operate the chain saw with one hand. Never operate the chain saw with one hand. This is extremely dangerous. All operators and bystanders must be outside the work area. Do not allow anyone to approach the saw while it is running or while you are cutting.
Note: The size of the work area depends on the job being performed, such as the height of the tree or the diameter of the log being cut. For example, felling a tree requires a larger work area than other tasks like limbing.
ENGLISH
In accordance with the instructions, pay attention to the force when you cut with the upper part of the blade, and the pressure you apply with the lower part of the blade.
Note: The blade is small and has been factory tested. It is possible that there may be traces of oil on it.
SAFETY PRECAUTIONS
Never work with a blade that is damaged, bent, or partially or incorrectly sharpened.
Make sure the blade is spinning freely when you release the throttle. If the blade spins at idle speed, it may be due to a carburetor adjustment. See the "Idle Speed Adjustment" section in this manual.
If after adjustment the blade still spins at idle speed, contact your authorized Ryobi service center and do not work with the blade until the repair is completed.

WARNING
All repairs to the blade, except for those described in the maintenance section of the operator's manual, must be performed by qualified technicians. If you use unsuitable tools to remove the flywheel or blade while the clutch is engaged, this could damage the flywheel and cause it to break, resulting in serious personal injury.
KICKBACK
Kickback is a dangerous reaction that can cause serious personal injury. Do not rely solely on the safety mechanism of the blade. At the same time, you must take specific safety measures to avoid the danger of misuse and accidents.
Note: See the "Operating Instructions" section of the manual for more information on kickback and ways to prevent it and avoid personal injury.
READ THIS OPERATOR'S MANUAL BEFORE USING THE PRODUCT. KEEP IT FOR FUTURE REFERENCE.
SYMBOLS
Some of the following symbols may appear on the product. Learn and remember their meanings. By remembering the symbols correctly, you will be able to use the product more safely and effectively.
| СИМBOЛ | HA3BAHNE | ОБОЗHAUCHЕНИ / OБЯСHECHNE |
| Прешистенье | Овознaya воредиемерки, сбърastsим с вишата бezоноанoc't. | |
| Прешистенье воредиемерпьковodstvoуз улотpeба | За ѳибетене орадостта от телесни по breasti, подени ekсллогаatinga Травба ѳи_PREшиете и разунite рьковodstvoуз улотpeба. | |
| Носete прешистенье oчILA, прешистенье срedingва за уштeted и каса | Когато рабочITE с таши машина, посete прешистенье срedingва за очITE и уштeted, касTo и каса. | |
| Пушисту Забра themselves | Забра themselves e за се пши и за се рабOTи В SFIN3OCT до Искри пши otkrpнТ Пламьк. | |
| Зават с дve рыze | Дръжte и рабочITE с труноа с дve-te си рыze. | |
| Забраныа с рабOTа с седа рьka | He рабOTe c trPOnHa, kaTo go nbpJxHite сamo c седа рьka. | |
| ВълегODEн okсиг | ДвигATELEITE ИЗПUCSAT вълегODEн okсIGI - ra3 6e3 Миризma, ковTO можe на e сMbrtOHOCeH. He pabOTe c verhЖня тprOH IN 3aTbOpeH nomeшени. | |
| ОTKAT | ОПАСHOCT! ПадETe ce ot OKAT. | |
| Контakт с ШинATERA | ВнIMавайе краят на ШинATERA на He BIL3a B KO的手AKTc ПпeДмETH. | |
| Виаги Нoscete рьkanii | Пи ВеMuHa на рабOTa с труноа срedingузп рбOTи рьkanii, КонTO He ce xЛьЗгAT. | |
| БehзIH N И масLO | ИзIOЛЗвайе БeЗЮВЕн БeЗИЗN 3a ABTomOBиLH, с OKТАНОВЧИСJO 87 ([R+M]/2) Или п-ВИСКО. МашинATERA в рабOTи с ДуВТАТВ ДВИГАТЕЛ, пRI KОДТРЯБАДе с СМСЕТБЕН И CINTHETUHNO MASCLO ЗАДУТАТВДИГАТЕЛ (В сьOTHОSEHNE 2%). | |
| Дръжte стравочITE Лиca надалоч | ВсИЧКИ стравочITE Лиca и КХВOTNH TPRЯБАДе CTоYIT Na pa3STOJHne най-малko 15 M OT рабOTи YuaCTbK. |
Bulgarian
TECHNICAL INFORMATION
LUBRICATING THE CHAIN AND BAR (Fig. 3)
Use Ryobi chain and bar oil, designed for chains and bar lubrication. This formulation allows efficient work without splashing at high temperatures. The oil tank capacity is approximately equal to the fuel tank capacity.
Warning: Do not use old, used, or contaminated oils. This can damage the oil pump, the bar, or the chain.
Carefully fill the chain and bar oil into the oil tank. Fill the oil tank every time you refuel the fuel tank.
USING THE CHAIN BRAKE (Fig. 4-5)
Before each use, check that the chain brake is working properly.
With the front part of your left hand, engage the chain brake by pushing the front guard/chain brake forward until the chain stops at maximum speed. Release the chain brake by pulling the front guard/chain brake back until you feel it disengage.

WARNING
If the chain brake does not stop the chain immediately or if the chain brake does not stay in the released position, take the saw to an authorized service center for repair before continuing use.
STARTING THE ENGINE (Fig. 6-10)
The machine can be started in different ways depending on whether the engine is cold or warm.

WARNING
Keep away from the guide bar. Never start the engine with the chain brake engaged; do not hold the saw by the chain when starting.
Before operating the machine, make sure there are no objects or people in the vicinity that could come into contact with the cutting blade and the chain. To avoid premature chain wear, make sure the chain is not touching the ground. Hold the front handle firmly with your left hand and the rear handle with your right hand, keeping your feet firmly on the ground.
Starting the engine:
Set the switch to the START position (I). Make sure the chain brake is not engaged by pulling the front guard/chain brake towards you. Press and release the primer bulb 5 times. Set the choke lever to the closed position (1+1). Pull the starter handle until the engine tries to start, but no more than 5 pulls. Set the choke lever to the half-open position (1). Pull the starter handle until the engine starts.
Note: Let the engine warm up with the choke lever in this position for about 15-30 seconds, depending on the temperature.
Then press the choke lever to the START position (2).

WARNING
If you do not release the trigger so that the engine can run at idle speed with the chain brake engaged, you risk damaging the engine. Never hold the trigger while the chain brake is engaged.
Starting the engine (continued):
Set the switch to the START position (I). Make sure the chain brake is not engaged by pulling the front guard/chain brake towards you. Press and release the primer bulb 5 times. Pull the starter handle until the engine starts.
STOPPING THE ENGINE (fig. 11-12)
Release the throttle trigger and set the engine to idle speed. To stop the engine, set the switch to the STOP position "O". Do not place the machine on the ground while the chain is still moving. For greater safety, engage the chain brake when not using the machine.
If the switch does not stop the machine, pull the choke lever (closed/1) and engage the chain brake to stop the engine. If the switch does not stop the machine when set to the STOP position "O", it must be repaired before using the machine again, to avoid working in dangerous conditions and risking injury.
Note: When you have finished working with the machine, remove the fuel cap and carefully tighten the fuel and oil caps. Let the engine cool down before storing the machine.
WORKING PROCEDURE
ADJUSTING THE SPEED (Fig.13)
If the blade moves too fast during idle running, turn screw "T" clockwise to reduce the idle speed. If the blade turns during idle running, turn screw "T" counterclockwise to reduce the speed of the blade's rotation. If the blade still tends to turn during idle running, contact an authorized service center to make the necessary adjustments, and do not use the tool until it is repaired.

WARNING
THE BLADE MUST NOT TURN DURING IDLE RUNNING. Turn the idle speed screw "T" counterclockwise to reduce the idle speed and stop the blade, or contact an authorized service center to make the necessary adjustments. Do not use the machine until it is corrected. A blade that turns during idle running can cause serious injury.
THRUST AND FEED (Fig.14)
The counterforce thrust force is directed opposite to the blade rotation. Therefore, you must be careful with the thrust force when cutting with the lower part of the blade, and with the feed force when cutting with the upper part.
Note: The tool is a single-speed tool. It is possible that there is residual oil.
PRECISION CUTTING (Fig.15-16)

WARNING
Kickback can occur when the blade is pinched in the cut at the upper part of the blade and the blade stops suddenly. When the upper part of the blade enters the cut, the blade can jump up and stop for a moment. This can cause a strong upward kick of the blade and a sudden push towards the operator. Similarly, if the blade is pinched at the lower part of the blade, the blade can kick back towards the operator. In such cases, it is possible to lose control of the tool and suffer serious injury.
Do not rely only on the safety mechanisms with which the machine is equipped. You must also take various measures to avoid the risk of injury.
For more information, see "General Safety Rules".
PREPARATION FOR CUTTING
PLACING THE BLADE (Fig.17)

WARNING
Never discard the attachment on the saw, described in this manual (not supplied). The blade guard must be positioned above the workpiece. The lower guard must be positioned above the workpiece.

WARNING
Do not press the speed trigger with your left hand and do not hold the front handle with your right hand. Be careful not to place your hand on the saw blade path when working with the chainsaw.
WORKING POSITION (fig.18)
Stand firmly on a solid surface. Your left hand should be on the front handle, ready to control the kickback. Stand upright. Keep your fingers on the handles to maintain control of the saw.
WORKING AREA (fig.19)
Cut only wood or wood-based materials. Do not cut metal, plastic, masonry, or other construction materials. ■ Never leave the chainsaw unattended. Do not let other people use the chainsaw without first giving them this manual for use and providing them with the necessary instructions for safe operation of the chainsaw. All other persons (helpers, bystanders, etc.) must stay at a safe distance from the working area. When felling a tree, the safe distance is at least two times the height of the tallest tree in the working area. When limbing, a minimum distance of 4.5 m must be maintained between all workers. Always maintain a stable position and stand firmly on the ground to avoid losing balance during work. Do not jump over the chainsaw or the log, as it will be difficult to control it during kickback. Do not cut branches that are under tension, as they may spring back and hit you. This is especially important when working near power lines. This requires special training and appropriate equipment.
Bulgarian
WORKING METHODS
Operate the chainsaw only when there is sufficient lighting and good visibility, so that you can see clearly what you are cutting.
BASIC WORKING TECHNIQUES/CUTTING
Before starting with the chainsaw, make sure you have practiced cutting small pieces, using different techniques, before tackling more demanding tasks. Position the saw correctly relative to the workpiece and the saw blade. Before you start cutting, engage the maximum speed by pressing the trigger fully. Start cutting by bringing the saw blade into contact with the wood. During the entire time you are cutting, the motor must operate at full power. Let the saw do the work and simply apply light pressure. With excessive pressure, there is a risk of damaging the chain, the bar, and the motor. Release the trigger when you finish cutting, and let the motor idle. If you leave the saw running at maximum speed without cutting, there is a risk of premature wear of the bar, chain, and motor. Do not apply pressure to the saw at the end of the cut.
FELLING TREES - SAFETY CONDITIONS (Fig.20)

WARNING
Do not cut down trees or branches that are within the danger zone. Always work in safe climatic conditions.
IMPORTANT: It is very important to follow the instructions to avoid the risks of serious bodily injury.
When working with this instrument, wear protective equipment for the eyes and, if necessary, a helmet (A). Wear non-slip footwear or boots with steel toes, with a non-slip sole or with a rough tread. These shoes must be removed or replaced on the ground at the work site, as required. Pay attention to the distribution and the body of the large branches (B). Remove the small branches around the first one you will cut (C). Do not cut branches that are directed towards electrical conductors or towards people (D). Pay attention to the direction in which the branch is leaning.
PROOF (E).
Make sure that the first branch has no cuts or broken branches that could fall and hit you while you are working (F). During the first cut, be on the side of the branch, so that you can avoid the branch falling in the intended direction. All other people must stand at a safe distance (G) (at least two times the height of the tree). Determine in which direction the branch will fall when the first cut is made (H). If the branch starts to fall in the wrong direction or if it gets stuck or caught during the fall, stop cutting and move away! Before you start cutting, pay attention to the direction of the branch. Do not cut branches that are near electrical conductors or people, as they could be hit by the branch during the fall. If you are working on a slope or on uneven ground, be careful and stand firmly, because there is a risk of slipping or falling when the branch falls. Remove from the area all obstacles, stones, pieces of bark, branches, twigs, or anything else that could cause you to trip.

WARNING
Do not cut branches near electrical conductors or people, as they could be hit by the branch during the fall.
TECHNIQUE FOR FELLING TREES (Fig. 21-24)
- Determine in which direction the tree will fall (or in which direction it will fall, in case the tree is leaning). Clear the area in the immediate vicinity of the tree and make sure there are no obstacles in the direction in which you intend to fell it. Clear this area at an angle of about 135° from the intended direction of fall (A).
- Pay attention to the force and direction of the wind, the verticality of the tree, as well as the arrangement of the large branches. All these factors can influence the direction of the fall. Do not attempt to fell the tree in a direction different from its natural direction of fall (B).
- Make the first cut about 1/3 of the diameter of the trunk on the side of the fall direction (C). Make the cut so that it intersects the line of fall at a right angle. The cut must be clean, so that the hinge can break horizontally. Be careful not to make a cut that is too deep, so that the hinge is not weakened by the weight of the tree.
Bulgarian
METHOD OF WORK
- Make a horizontal cut (D) at least 5 cm above the horizontal cut.
Caution: Never cut through the notch. Always leave a part of the wood between the cuts (about 5 cm or 1/10 of the diameter). This is called a "hinge" (E). It controls the fall of the tree and prevents slipping, twisting, or breaking towards the stump. The hinge must be of uniform thickness. Follow the cuts and insert wedges (F) as needed. Be careful not to cut the hinge completely. 5. When the tree starts to fall, remove the saw and step back. Pull in the intended direction, being careful that the tree does not fall towards you.

WARNING
The notch cut must not reach the horizontal cut. The "hinge" determines the fall of the tree: it is the part of the wood between the notch and the horizontal cut.
CUTTING LARGE ROOTS (Fig. 25)
These are large roots that protrude from the trunk above the ground. Before felling the tree, remove the large roots. First make a horizontal cut (A) in the root, then a vertical one (B) perpendicular to it. Remove the cut part (C) from the root section. After removing the large roots, proceed to fell the tree. See the section "Felling Techniques" in this manual.
FELLING (FELLING OF TREES) (Fig. 26)
The term "felling" means the cutting down of a tree in the desired direction.
Precautions. Place the small wedges on the workbench or on another wedge to secure them. The work area must be clear. Make sure that no one can come into contact with the saw chain or the tree during cutting: this can cause injury (A). During felling, stand on the uphill side of the terrain, so that the tree cannot roll towards you. It is impossible to avoid the pinching of the tree (see the standard cutting techniques) and it is difficult to predict the direction of the fall of the tree.
FELLING WITH WEDGES (Fig. 27)
If the tree is large and the saw allows it, you can insert wedges (B) without touching the tree, using the technique to open the cut and avoid pinching the tree.
FELLING WITH A FELLING LEVER (Fig. 28)
(C) Tree with a lever from one side (D) Tree with a lever from both sides
Make the first cut (E) at 1/3 of the diameter, then a second cut at 2/3 (F) from the other side. When cutting, the tree will fall. The lever can be inserted or placed in the cut, if the first cut is at least one third of the diameter.
Pay special attention to the tree when using a felling lever (G), to avoid pinching the saw chain.
FRONT HANDLE (FIG. 29)
Fill the front handle with the first, as shown in the figure. It works with light pressure. Be careful, the trigger is marked on the side.
FRONT HANDLE (FIG. 30)
Fill the front handle with the first, as shown in the figure. It works with light pressure.
The triggers are high towards you. Be prepared for such movement and press the trigger properly, to save the contact.
CUTTING OF BRANCHES AND CASTING (FIG. 31-32)
Work slowly and press the trigger with two fingers. Attention must be paid to balance. Stand at a distance from the branch, as you cut. When you cut, stand on the opposite side of the trunk. Do not work with the top of the column, that is absolutely dangerous. This operation requires a professional. Do not press the trigger high or in a hurry, because it will be difficult to control it.

WARNING
Never swing on the first, to cut or cast branches. Do not work with the trigger, when you are on a ladder, platform, branch, or other unstable position, where you risk losing balance and/or control of the trigger.
When casting the first, it is important first to cut the branch end, to find the body, and then to direct the final cut along the trunk or on the main branch. This way the bark of the trunk will not be damaged.
Bulgarian
WORKING METHODS
1. First make a cut at 1/3 of the diameter (A). 2. Then make a second cut, to remove the branch (B). 3. Make the final cut along the trunk (C), moving the saw slowly, so that the cut is smooth. In this way the bark can be restored.

WARNING
If the branches, which must be cut, are located higher than the shoulder, the cutting must be done by a professional.
REMOVING THE CUTTING KNIFE (Fig. 33)
The cutting element (A) can be removed with a knife, partially worn or damaged, which is removed from the device, as well as sharply when you pull it or press the harder one that has caught it. There is a risk of the worn part of the cut piece being released and getting into the regular position of the device, to be separated from the trunk. Be careful - removing the knife is dangerous.

WARNING
Removing the knife is dangerous, because it can injure you and you may lose control of the device, which could result in serious or fatal injury.
SUPPORT

WARNING
Use only original Ryobi spare parts. If you use other parts, this may cause danger or damage to the product.

WARNING
Wear protective glasses or a face shield with side shields when working with electrical equipment or when cleaning with compressed air. If dust is generated during work, wear a dust mask.
SUPPORT
Do not clean plastic parts with solvents. Most plastic parts can be damaged by solvents available in the market. Remove dirt, dust, oil, grease, etc. with a dry cloth.

WARNING
Never allow plastic parts to come into contact with brake fluid, gasoline, petroleum-based products, penetrating oils, etc. These chemical products contain substances that can damage, weaken, or destroy the plastic.
LUBRICATION
The product's bearings are lubricated with a sufficient amount of high-quality lubricant for the machine's lifetime under normal operating conditions. Therefore, the machine does not need additional lubrication.
WARNING: ROTATING PARTS AND BELTS (Fig. 34-43)

DANGER
Never insert your hands into the belts, pulleys, or sprockets while the machine is running. If any of these parts are installed, the gear mechanism may be pulled in or caught, which could lead to serious personal injury.

WARNING
To avoid the risk of serious personal injury, read carefully and understand all safety rules described in this section.
Before doing anything with the machine, always place the switch in the "STOP" position. Make sure the belt is not engaged, by first pulling the clutch/brake lever.
CAUTION: When adjusting the belts, always use the manufacturer's recommended belts.
When working with the belt and the machine, wear gloves. These parts are sharp and may have sharp edges. Attach the mounting bolts of the machine with the provided combination wrench. Attach the speed pulley. Attach the machine and the belt. Remove the old belt from the machine. Install the new belt on the pulley and adjust any loose elements. Ensure (A) the teeth are facing the top of the belt (B). If they are facing the opposite direction, turn the belt around. Place the locking rings (C) in the grooves of the machine (D), as shown in Fig. 38. The belt should form a loop in the lower part of the machine.
Bulgarian
MAINTENANCE
Place the belt on the machine and pull the pulley until the locking gear (E) engages. Adjust the machine so that the pins fit into the holes.
CAUTION: When installing the machine on the pulleys (F), make sure the belt guide (G) is properly aligned with the belt (H).
Place the belt cover (I) and the mounting bolts (J) on the machine. Tighten the mounting bolts with a wrench. The machine should be able to slide to adjust the belt tension. - Tighten the belt by turning the belt tension bolt (K) clockwise until the belt is snug against the machine, and the belt rings are properly aligned with the machine. Repeat the adjustment to ensure the belt does not slip. If there is slack between the belt and the machine, loosen the machine's lock nut and tighten the belt tension bolt counterclockwise. Repeat this procedure until the slack is eliminated. Hold the machine's lock nut and tighten the mounting bolts.
The belt is properly tensioned when there is slack or the belt is loose. When adjusting, it can be tightened by hand without forcing. Make sure the clutch/brake lever is not engaged.
CAUTION: If the belt is too tight, it may break. Loosen the bolts on the machine and turn the belt tension bolt counterclockwise. Hold the machine's lock nut and tighten the mounting bolts. Make sure the belt turns without forcing.
ADJUSTING THE CHAIN (FIG. 44-46)

WARNING
Do not adjust or regulate the chain while it is in motion. The chain is very sharp. When you jump over the chain, be careful not to cut yourself.
Stop the engine and then adjust the chain. Make sure you can turn the tensioning screws on the chain. Turn the adjusting screw for the chain tension according to the arrow on the cover, to tighten the chain.
Note: In cold conditions, the chain is correctly tensioned when there is a slight slack on the underside of the guide bar and when it is adjusted, but you can only turn it by hand without it binding.
Tighten the chain every time you refuel the machine.
Note: The chain temperature rises during operation. Tighten the chain when it is warm, which is correctly tensioned, with a gap of about 1.25 mm in the guide bar groove. To determine the correct tension when the chain is warm, you can use the gauge and a combination wrench.
Note: New chains stretch. Check the chain tension regularly and adjust it when necessary.

WARNING
When you tighten the chain while it is warm, it may become too tight when it cools down. Check the "cold tension" before the next use.
CHAIN SUPPORT (FIG. 47-48)

WARNING
Before you do anything with the chain, check that it is in the "STOP" position.
Use the chain only with the guide bar inclined towards the cut. When making a plunge cut, the risk of kickback is limited by the chain brake.
Keep the chain well sharpened so that it cuts cleanly and quickly.
The blade must be sharpened when the teeth are small and dust-like, if you need to increase the cutting pressure or if it cuts only on one side. When sharpening the blade, pay attention to the following:
If the blade is sharpened too much, the risk of kickback increases. The height of the depth limiters (A):
The deeper the depth limiters are, the higher the risk of kickback. Conversely, if you set insufficient depth, the cutting quality will be poor.
If you hit hard objects such as stones or bricks, or if you cut through dirt and sand, the blade must be sharpened at an authorized service center.
Note: When you reinstall the blade, check that the locking washer (B) is not worn or damaged. If there are signs of wear or damage, it must be replaced at an authorized service center.
Bulgarian
MAINTENANCE
Note: If you have not fully understood the sharpening procedure described above, the blade must be sharpened at an authorized service center or replaced with a new blade with the correct angle of attack.
SHARPENING THE TEETH (Fig.49-52)
Description of the teeth:
(A) Cutting tooth (B) Side plate (C) Depth limiter (D) Gullet (E) Tooth gap (F) Heel (G) Tip (H) Top plate
Make sure that all teeth are sharpened at the same angle and to the same height, because only with even teeth will you get a fast cut.

WARNING
The blade is very sharp. When handling it, always wear protective gloves. This will prevent injuries from cuts.
- Sharpen the blade before it becomes dull. For more information, see the section "Replacing the worn blade". Use a round file with a diameter of 4 mm and a file holder (sold separately). Sharpen the teeth along the center of the chain. Place the file on the top plate of the cutting tooth. Do not let the file tilt or rotate. Follow the correct sharpening angle. Raise the file slightly. File each tooth with smooth strokes. File all teeth (A) in one direction. Then move to the other side and file the teeth (B) in the opposite direction. Clean the filings from the plate with a metal brush.

The blade can be adjusted to a high cutting speed, which is achieved by means of the adjusting screw.

WARNING
Adjusting the blade incorrectly can cause a risk of kickback.

WARNING
If you do not replace or repair a damaged blade, you are at risk of serious personal injury.
BLADE ADJUSTMENT (Fig. 53)
(A) For angles less than 30° - the adjusting screws have marks for correct adjustment so that you can set the correct angle relative to the blade. (B) For angles less than 30° - for narrow cuts (C) For angles greater than 30° - the blade is tilted and wears out quickly.
ADJUSTING THE SIDE FENCE (Fig. 54)
(D) For angles equal to 80° - the blade, which is formed when you place the blade with the correct diameter in the adjusting screw. (E) Hook - "set" the first tooth and it wears out quickly, increasing the risk of kickback. It occurs when the blade has a small diameter and is positioned too high. (F) Wide angle - requires a strong force when moving forward, which leads to premature wear of the blade and the bearing. It occurs when the blade has a large diameter and is positioned too high.
ADJUSTING THE DEPTH STOP (Fig. 55-57)
The depth stop is limited to a depth of 0.6 mm (A). The depth stop must be determined with a depth gauge. Before adjusting the blade, check the depth stop and the depth. Use the stop (B) (sold separately) and the depth gauge (C) (sold separately) to set all depth stops equally. Use the depth gauge of 0.6 mm. After setting all depth stops to the depth, adjust them to the correct height, by turning them from the front. Be careful not to damage the cutting teeth with the blade. You must set the depth stops with a flat blade in the flat position, where the cutting teeth are set with the curved blade. Be careful that the flat blade does not come into contact with the cutting side of the teeth while you are adjusting the depth stops.
BLADE SUPPORT (Fig. 58)

WARNING
Make sure the blade is correctly tensioned before performing any cutting operation, and that the blade is properly supported along its length.
Each working session should be checked regularly so that it can be detected in time from all sides and the maximum adjustment is made. Each user should check the belt for damage.
Bulgarian
SUPPORT
The teeth of the belt on the pulley of the machine are a natural result of wear. These teeth are worn down and the belt is slipping.
The belt must be replaced in the following cases:
If the teeth of the belt are worn to such an extent that the belt starts to slip; if the belt is cracked or torn; if the belt is delaminated.
Also, each time you replace the belt, check the belt by inserting a screwdriver in the opening for it. Turn the belt and make sure that the opening (A) and the belt channel are not clogged.
CLEANING THE AIR FILTER (Fig. 59-60)

WARNING
Before turning other parts, make sure that the air filter is correctly placed in its seat. Never run the engine without the air filter, this may damage the engine.
CARBURETOR ADJUSTMENT (Fig. 61-63)
Before adjusting the carburetor:
1. Clean the ventilation openings of the carburetor cover of the starter with a brush or with compressed air. Clean the air filter (A). See section "Cleaning the air filter". ■ Before adjusting the carburetor, leave the engine to cool down.

WARNING
Climatic conditions and altitude may affect the operation of the carburetor. Do not allow the engine to run at high speed when adjusting the carburetor.
PerJax:
Turn the idle speed screw “T” clockwise to increase the idle speed. Turn the idle speed screw “T” counterclockwise to decrease the idle speed.
Test the carburetor, then adjust the high speed needle to obtain the power at maximum (not to adjust the maximum speed). The high speed needle can only be turned a quarter turn.

WARNING
THE BELT MUST NOT BE TURNED WHEN THE ENGINE IS RUNNING. A belt that is turned while the engine is running may cause serious personal injury.
CLEANING THE STARTER (fig. 62)
The ventilation openings (B) on the starter housing should be cleaned with a brush or with compressed air.
ANTI-FREEZE MECHANISM FOR THE CARBURETOR (fig. 64-65)
The throttle body has a ventilation opening located on the left side of the carburetor housing, through which air is drawn from the air filter to the carburetor, to prevent the risk of freezing when working in cold conditions. If you use the throttle at temperatures between 0°C and 5°C and at high humidity, there is a risk of icing in the carburetor. This could reduce the power of the engine and/or impair its functioning. When you need to use the throttle in such conditions, select the anti-freeze mode by adjusting the lever.
GARANTIE - CONDITIONS
All Ryobi products are guaranteed against manufacturing defects and defective parts for a period of twenty-four (24) months from the date stated on the original invoice drawn up by the retailer and given to the end user.
Deterioration caused by normal wear and tear, unauthorised or improper use or maintenance, or overload are excluded from this guarantee as are accessories such as battery packs, light bulbs, blades, fittings, bags, etc. In the event of malfunction during the warranty period, please take the NON-DISMANTLED product, along with the proof of purchase, to your retailer or nearest Authorised Ryobi Service Centre.
This warranty in no way affects your legal rights concerning defective products.

CE DECLARATION OF CONFORMITY
We declare in sole responsibility that the product: - to which this certificate applies, conforms to the basic health and safety requirements of the Machinery Directive 98/37/EC and other relevant directives, like EMC Directive 89/336/EEC and Outdoor Directive 2000/14/EC and Gas Emission Directive 97/68/EC, 2002/88/EC and 2004/26/EC.
To effect correct application of the health and safety requirements stated in the EEC directives, the following European and/or national standards and/or technical specifications were consulted: EN 292-1/1991 / EN 292-1/1991+A1/1995 / EN 608-1994 / ISO 6533:2001 / ISO 6534:1992 / ISO 6535:1991 / ISO 7293:1997 / ISO 7914:2002 / ISO 7915:1991 / ISO 6531:1999 / ISO 8334:1985 / ISO 9518:1998 / ISO 10726:1992 / EN ISO 14982:1998 / EN ISO 3744:1995 / EN ISO 4871:1996 / ISO 9207:1995 / ISO 7182:1984 / ISO 7505:1986
We declare this product complies to the requirements of the Out Door Directive. 2000/14/EC.
| Measured Sound Power Level | 35 cc | 40 cc | 44 cc |
| 110 dB (A) | 110 dB (A) | 110 dB (A) | |
| Guaranteed Sound Power Level | 112 dB (A) | 112 dB (A) | 112 dB (A) |
| Date of Issuance | 1 / 2007 |
This product has been assessed to conform to the Outdoor Directive 2000/14/EC by means of unit verification by SLG PRUEF-UND ZERTIFIZIERUNGS GMBH. BURGSTAEDTER STRASSE 20, D-09232, HARTMANNSDORF, GERMANY.
Technical documents are kept by Homelite Far East Co., Ltd. 24/F, 388 Castle Peak Road, Tsuen Wan, N.T., Hong Kong.
Declared in Sep 2006 by Homelite Far East Co., Ltd.

Technical documents are kept by Homelite Far East Co., Ltd. 24/F, 388 Castle Peak Road, Tsuen Wan, N.T., Hong Kong.
Technical documents are kept by Homelite Far East Co., Ltd. 24/F, 388 Castle Peak Road, Tsuen Wan, N.T., Hong Kong.
Declared in September 2006 by Homelite Far East Co., Ltd.
DECLARATION OF CONFORMITY
We declare on our own responsibility that this product is in conformity with the health and safety requirements laid down in the Machinery Directive 98/37/EC and other applicable directives such as the EMC Directive 89/336/EEC, the Outdoor Directive 2000/14/EC regarding noise emissions, the Gas Emission Directive 97/68/EC, Directive 2002/88/EC and 2004/26/EC.
The following European and/or national standards and/or technical specifications have been consulted to apply the health and safety requirements set out in the Community directives: EN 292-1:1991/EN 292-1:1991+A1:1995/EN 608:1994/ISO 6533:2001/ISO 6534:1992/ISO 6535:1991/ISO 7293:1997/ISO 7914:2002/ISO 7915:1991/ISO 6531:1999/ISO 8334:1985/ISO 9518:1998/ISO 10726:1992/EN ISO 14982:1998/EN ISO 3744:1995/EN ISO 4871:1996/ISO 9207:1995/ISO 7182:1984/ISO 7505:1986
Technical documents are kept by Homelite Far East Co., Ltd. 24/F, 388 Castle Peak Road, Tsuen Wan, N.T., Hong Kong.
Declared in September 2006 by Homelite Far East Ltd., Com.
Machine: PETROL CHAIN SAW
Name of company: Homelite Far East Co., Ltd. Address: 24/F, CDE Building,
Tsuen Wan Hong Kong.
Type: RCS-3540C / 4046C / 4450C
Name/Title: Andrew Eyre
Engineering Director
Signature:

11-Jan-2007
- RCS-3540C / 4046C / 4450C
- FRENCH
- THANK YOU FOR BUYING A RYOBI CHAINSAW
- WARNING
- IMPORTANT
- READ ALL INSTRUCTIONS
- GENERAL SAFETY RULES
- SPECIFIC SAFETY RULES
- GENERAL PRECAUTIONS
- PROPER CLOTHING FOR SAFETY
- REFUELLING (DO NOT SMOKE!)
- BASIC PRECAUTIONS IN THE CUTTING/WORK AREA
- PUSH AND PULL
- MAINTENANCE PRECAUTIONS
- KICK-BACK
- SAVE THIS MANUAL FOR FUTURE REFERENCE
- ENGLISH
- SYMBOLS
- SPECIFICATIONS
- DESCRIPTION (FIG. 1)
- ASSEMBLY
- SEE FIGURE
- OPERATION
- APPLICATIONS
- FUEL AND REFUELING
- HANDLING THE FUEL SAFELY
- MIXING THE FUEL
- FILLING THE FUEL TANK (FIG. 2)
- ADDING BAR AND CHAIN OIL (FIG. 3)
- STARTING THE ENGINE (FIG. 6-10)
- TO START A COLD ENGINE
- CAUTION
- TO START A WARM ENGINE
- STOPPING THE ENGINE (FIG. 11-12)
- ADJUSTING IDLE SPEED (FIG. 13)
- PULL AND PUSH (FIG. 14)
- KICKBACK PRECAUTIONS (FIG. 15-16)
- PREPARING FOR CUTTING
- PROPER GRIP ON HANDLES (FIG. 17)
- PROPER CUTTING STANCE (FIG. 18)
- WORK AREA PRECAUTIONS (FIG. 19)
- BASIC OPERATING/CUTTING PROCEDURES
- FELLING TREES - HAZARDOUS CONDITIONS (FIG. 20)
- PROPER PROCEDURE FOR TREE FELLING (FIG. 21 - 24)
- REMOVING BUTTRESS ROOTS (FIG. 25)
- BUCKING (FIG. 26)
- BUCKING WITH A WEDGE (FIG. 27)
- BUCKING LOGS UNDER STRESS (FIG. 28) (C) LOG SUPPORTED AT ONE END
- LOG SUPPORTED AT BOTH ENDS
- OVERBUCKING (FIG. 29)
- UNDERBUCKING (FIG. 30)
- LIMBING AND PRUNING (FIG. 31 - 32)
- CUTTING SPRING POLES (FIG. 33)
- MAINTENANCE
- GENERAL MAINTENANCE
- LUBRICATION
- REPLACING THE GUIDE BAR AND CHAIN (FIG. 34 - 43)
- DANGER
- ADJUSTING THE CHAIN TENSION (FIG. 44 - 46)
- CHAIN MAINTENANCE (FIG. 47 - 48)
- SHARPENING THE CUTTERS (FIG. 49 - 52)
- PARTS OF A CUTTER
- TOP PLATE FILING ANGLE (FIG. 53)
- SIDE PLATE ANGLE (FIG. 54)
- MAINTAINING DEPTH GAUGE CLEARANCE (FIG. 55 - 57)
- MAINTAINING THE GUIDE BAR (FIG. 58)
- CLEANING THE AIR CLEANER (FIG. 59 - 60)
- ADJUSTING THE CARBURETOR (FIG. 61 - 63) BEFORE ADJUSTING THE CARBURETOR
- IDLE SPEED ADJUSTMENT
- CLEANING THE STARTER UNIT (FIG. 62)
- CARBURETOR ANTI-FREEZE MECHANISM (FIG. 64-65)
- TO SWITCH TO ANTI-FREEZE MODE
- CLEANING THE ENGINE (FIG. 66-67)
- CHECKING THE FUEL FILTER (FIG. 68)
- REPLACING THE SPARK PLUG (FIG. 69)
- INSPECTING/CLEANING THE SPARK ARRESTOR SCREEN AND MUFFLER EXHAUST PORT (FIG. 70)
- INSPECTING AND CLEANING CHAIN BRAKE (FIG. 71-72)
- STORING THE CHAIN SAW (1 MONTH OR LONGER)
- MIX THE FUEL
- BASIC SAFETY PRECAUTIONS FOR YOUR WORK AREA
- HAND PLACEMENT (FIG. 17)
- LUBRICATING THE CHAIN AND BAR (FIG. 3)
- REFUELING (NEVER SMOKE!)
- DANISH
- SPECIAL SAFETY REGULATIONS FOR CHAINSAWS
- CHAIN MAINTENANCE (FIG. 47-48)
- ENGINE STARTING (FIG. 6-10)
- PREPARATION
- GENERAL SAFETY INSTRUCTIONS
- PROBLEMS AND THEIR SOLUTIONS
- REFUELING THE FUEL TANK (DO NOT SMOKE!)
- WORK AREA / OPERATIONS: BASIC PRECAUTIONS
- RETURN AND RECEIVING TRA
- SAFETY PRECAUTIONS FOR MAINTENANCE
- KICKBACK
- KEEP THIS MANUAL FOR FUTURE REFERENCE
- RUSSIAN
- TECHNICAL CHARACTERISTICS
- SPEED ADJUSTMENT (FIG. 13)
- RECIPROCATING BLADE (FIG. 14)
- WARNING ABOUT KICKBACK (FIG. 15-16)
- HOLDING THE SAW (FIG. 17)
- WORKING POSITION (FIG. 18)
- WORKING AREA (FIG. 19)
- BASIC WORK TECHNIQUES
- WORK
- TREE FELLING TECHNIQUE P
- CUTTING ROOT BUTTRESSES (FIG. 25)
- CUTTING SPRINGBOARDS (FIG. 33)
- REPLACING THE AIR FILTER ELEMENT (FIG. 34-43)
- SHARPENING ANGLE FROM THE TOP EDGE (FIG. 53)
- SHARPENING ANGLE FROM THE SIDE EDGE (FIG. 54)
- DEPTH GAUGE LIMITERS (FIG. 55-57)
- CHAIN MAINTENANCE (FIG. 58)
- CLEANING THE AIR FILTER (FIG. 59-60)
- CARBURETOR ADJUSTMENT (FIG. 61-63)
- BEFORE CLEANING THE CARBURETOR
- ADJUSTING THE IDLE SPEED
- ADJUSTMENT
- AIR FILTER CLEANING (FIG. 62)
- CARBURETOR HEATING MECHANISM
- (FIG. 64-65)
- SELECTING THE CARBURETOR HEATING MODE
- ENGINE CLEANING (FIG. 66-67)
- CHECKING THE CONDITION OF THE FUEL FILTER (FIG. 68)
- CHANGING THE SPARK PLUG (FIG. 69)
- CHECKING/CLEANING THE SPARK ARRESTER SCREEN (FIG. 70)
- INSPECTION AND CLEANING OF THE BRAKE OF THE CHAIN (FIG. 71-72)
- STORAGE OF THE SAW (WINTER PERIOD)
- SELF-REPAIR
- FOLLOW THE INSTRUCTIONS
- GENERAL SAFETY MEASURES
- CARBURETOR ADJUSTMENT (FIGURES 61-63)
- BEFORE ADJUSTING THE CARBURETOR
- CUTTING ATTACHMENT COVER (58TH FIG.)
- CHAIN SAW PARTS
- GENERAL SAFETY PRECAUTIONS
- BULGARIAN
- SPECIFIC SAFETY RULES FOR CHAIN SAW OPERATION
- FUEL SAFETY (DO NOT REFUEL)
- CUTTING ZONE/WORK AREA: BASIC SAFETY PRECAUTIONS
- SAFETY PRECAUTIONS
- READ THIS OPERATOR'S MANUAL BEFORE USING THE PRODUCT. KEEP IT FOR FUTURE REFERENCE
- TECHNICAL INFORMATION
- USING THE CHAIN BRAKE (FIG. 4-5)
- STARTING THE ENGINE
- STARTING THE ENGINE (CONTINUED)
- WORKING PROCEDURE
- ADJUSTING THE SPEED (FIG.13)
- THRUST AND FEED (FIG.14)
- PRECISION CUTTING (FIG.15-16)
- PREPARATION FOR CUTTING
- PLACING THE BLADE (FIG.17)
- WORKING POSITION (FIG.18)
- WORKING AREA (FIG.19)
- WORKING METHODS
- BASIC WORKING TECHNIQUES/CUTTING
- FELLING TREES - SAFETY CONDITIONS (FIG.20)
- TECHNIQUE FOR FELLING TREES (FIG. 21-24)
- METHOD OF WORK
- CUTTING LARGE ROOTS (FIG. 25)
- FELLING (FELLING OF TREES) (FIG. 26)
- FELLING WITH WEDGES (FIG. 27)
- FELLING WITH A FELLING LEVER (FIG. 28)
- TREE WITH A LEVER FROM ONE SIDE (D) TREE WITH A LEVER FROM BOTH SIDES
- FRONT HANDLE (FIG. 29)
- FRONT HANDLE (FIG. 30)
- CUTTING OF BRANCHES AND CASTING (FIG. 31-32)
- REMOVING THE CUTTING KNIFE (FIG. 33)
- SUPPORT
- WARNING: ROTATING PARTS AND BELTS (FIG. 34-43)
- ADJUSTING THE CHAIN (FIG. 44-46)
- CHAIN SUPPORT (FIG. 47-48)
- SHARPENING THE TEETH (FIG.49-52)
- DESCRIPTION OF THE TEETH
- BLADE ADJUSTMENT (FIG. 53)
- ADJUSTING THE SIDE FENCE (FIG. 54)
- ADJUSTING THE DEPTH STOP (FIG. 55-57)
- BLADE SUPPORT (FIG. 58)
- PERJAX
- CLEANING THE STARTER (FIG. 62)
- ANTI-FREEZE MECHANISM FOR THE CARBURETOR (FIG. 64-65)
- GARANTIE - CONDITIONS
- CE DECLARATION OF CONFORMITY
- DECLARATION OF CONFORMITY
- MACHINE: PETROL CHAIN SAW
Brand : RYOBI
Model : RCS-3540C
Category : Electric garden tools