82C6 - Battery Cramer - Free user manual and instructions
Find the device manual for free 82C6 Cramer in PDF.

User questions about 82C6 Cramer
0 question about this device. Answer the ones you know or ask your own.
Ask a new question about this device
Download the instructions for your Battery in PDF format for free! Find your manual 82C6 - Cramer and take your electronic device back in hand. On this page are published all the documents necessary for the use of your device. 82C6 by Cramer.
USER MANUAL 82C6 Cramer
LT | LV | ET | MK | SR
natural_image
Line drawing of a wheeled utility vehicle with wheels and handlebars (no text or symbols)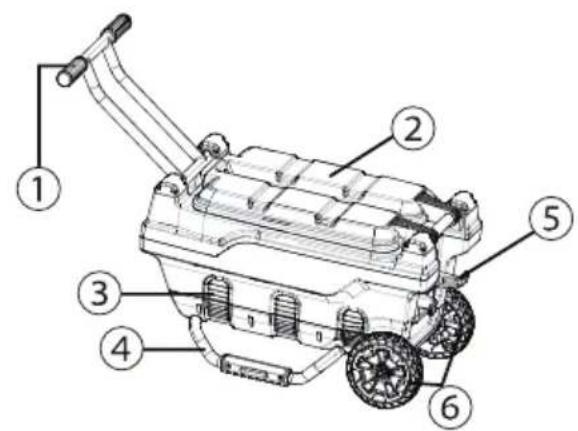
text_image
Technical diagram of a mechanical device with numbered parts labeled 1 through 6Fig.1 Fig.2
text_image
Technical diagram of a mobile game controller with numbered parts for identification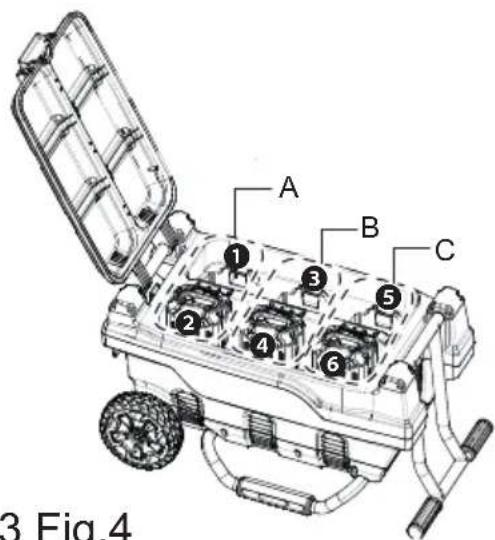
text_image
A B C 1 2 3 4 5 6 3 Fig.4Fig.3 Fig.4

natural_image
Technical line drawing of a mechanical device with labeled parts (no text or symbols present)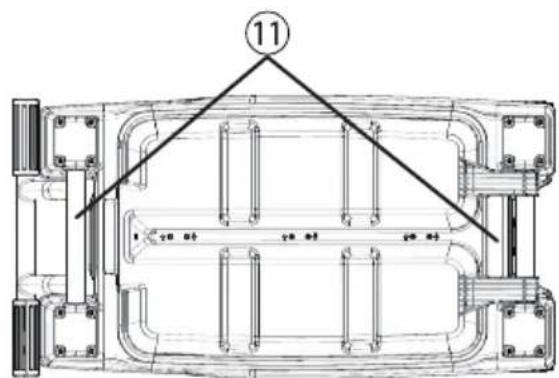
text_image
11Fig.5 Fig.6
natural_image
Technical line drawings of a vehicle chassis and its internal components (no text or symbols)English
EN
1 Description......4
1.1 Overview.... 4
2 General safety warnings...... 4
3 Special rules for charger......4
4 Symbols on the machine...... 5
5 Risk levels......5
6 Recycle....5
7 Operation.... 5
7.1 Charge procedure....5
7.2 Charging tip.... 6
7.3 Examine the charger.... 6
8 Maintenance......6
8.1 Clean the machine.... 6
9 Transportation and storage......6
9.1 Move the machine.... 6
9.2 Store the machine....6
10 Troubleshooting......6
11 Technical data....7
12 Technical data (Battery pack)...... 7
1 DESCRIPTION
1.1 OVERVIEW
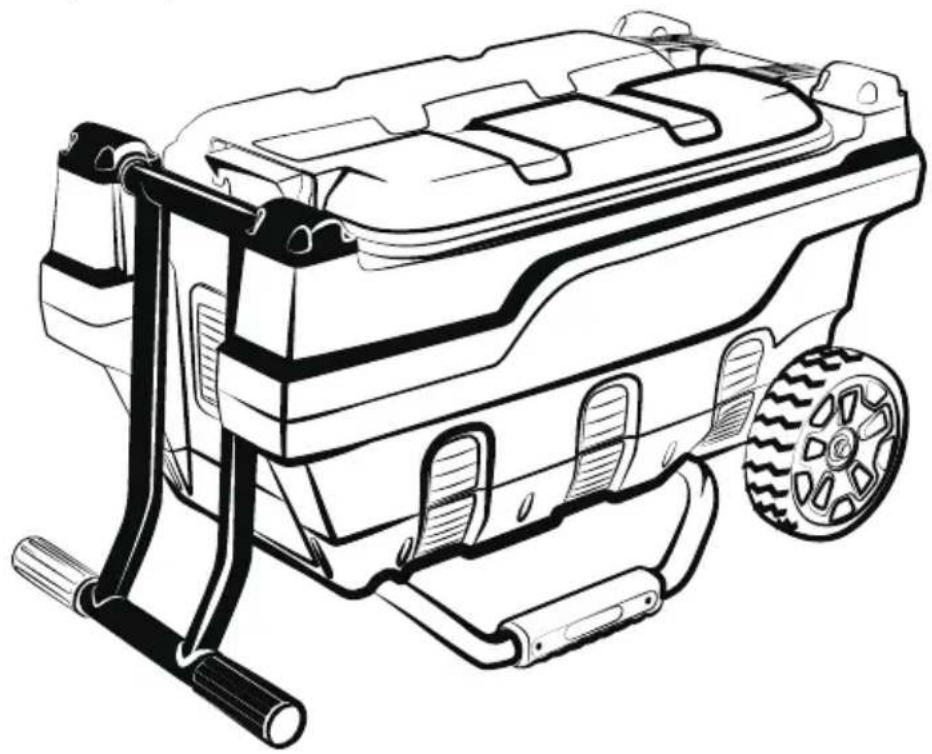
See Figure 1-6.
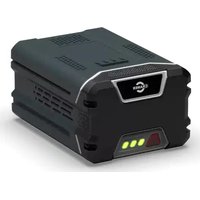
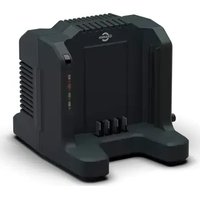
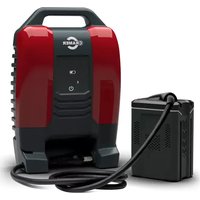
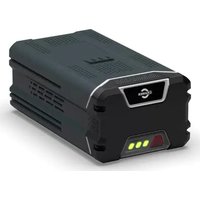
| 1 | Handle | 7 | LED light |
| 2 | Battery cover | 8 | Cover release button |
| 3 | Air vents | 9 | Battery |
| 4 | Lower frame | 10 | Battery release button |
| 5 | Cord retainer | 11 | Handle grip |
| 6 | Wheels |
2 GENERAL SAFETY WARNINGS
WARNING
TO REDUCE RISK OF FIRE OR ELECTRICAL SHOCK, CAREFULLY OBEY THESE INSTRUCTIONS.
- Do not cover the ventilation slots on the top of the charger. Do not set the charger on a soft surface i.e. blanket, pillow. Keep the ventilation slots of the charger clear.
- Confirm the voltage availability at each country location before using the charger.
- If the shape of the plug does not fit the power outlet, use an attachment plug adaptor of the proper configuration for the power outlet.
- DO NOT allow liquid inside the charger.
- DO NOT try to use the charger for any other purpose than what is presented in this manual.
- Unplug the charger and remove the battery pack before cleaning.
- Do not try to connect two chargers together.
- Do not use the charger in the circumstances that the output polarity does not match the load polarity.
- For indoor use only.
- Do not place the battery pack in the sun or in a warm environment. Keep at normal room temperature between 6^ and 40^ .
- Do not allow small metal items or material such as steel wool, aluminum foil, or other foreign particles into the charger cavity.
- Do not attempt to recharge non-rechargeable batteries with the charger.
- SAVE THESE INSTRUCTIONS – This manual contains important safety and operating instructions for battery charger Model 82C6.
- Before using battery charger, read all instructions and cautionary markings on battery charger, battery, and product using battery.
-
CAUTION – To reduce risk of injury, use only 82V180 or Cramer 82V series approved replacement batteries. Other types of batteries may burst causing personal injury and damage.
-
This appliance can be used by children 8 years of age and older. Individuals with reduced physical, sensory or mental capabilities or lack of experience and knowledge, should only use this appliance with supervision, and/or proper instruction concerning the use of this appliance in a safe way and understand all hazards. Children shall not play with the appliance. Cleaning and user maintenance shall not be made by children without supervision.
- If the cord set is damaged, it must be replaced by a special cord set available form the manufacturer or its service agent.
WARNING
To avoid risk of fire, electrical shock, or electrocution:
- Do not use a damp cloth or detergent on the battery or battery charger.
- Battery should be no where near a water source
- Always remove the battery pack before cleaning, inspecting, or performing any maintenance on the tool.
3 SPECIAL RULES FOR CHARGER
This device complies with Part 15 of the FCC Rules.
Operation is subject to the following two conditions:
- Appliance shall not emit harmful radiation or present a toxic or similar hazard due to their operation in normal use.
- This device must accept any interference received, including interference that may cause undesired operation.
CAUTION
Changes or modifications not expressly approved by the party responsible for compliance could void the user's authority to operate the equipment.
i NOTE
This equipment has been tested and found to comply with the limits for a Class B digital device, pursuant to Part 15 of the FCC Rules.
These limits are designed to provide reasonable protection against harmful interference in a residential installation. This equipment generates, uses and can radiate radio frequency energy, and if not installed and used in accordance with the instructions, may cause harmful interference to radio or television reception. The reception can be determined by turning the equipment off and on. The user is encouraged to try to correct the interference by one or more of the following measures:
- Reorient or relocate the receiving antenna.
- Increase the separation between the equipment and the receiver.
- Connect the equipment into an outlet on a circuit different from that to which the receiver is connected.
- Consult the dealer or an experienced radio/TV technician for help.
4 SYMBOLS ON THE MACHINE
You can use below symbols on the machine. Please study them and learn their definitions. Correct interpretation of these symbols let you operate the tool better and safer.
| Symbol Explanation | |
 | Class II |
 | Before charging, read the instructions |
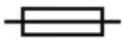 | Fuse |
| IPX IPX4 | |
5 RISK LEVELS
The following signal words and meanings are intended to explain the levels of risk associated with this product.
| SYMBOL | SIGNAL MEANING |
 | DANGER Indicates an imminently hazardous situation, which, if not avoided, will result in death or serious injury. |
 | WARNING Indicates a potentially hazardous situation, which, if not avoided, could result in death or serious injury. |
| SYMBOL | SIGNAL MEANING |
 | CAUTION Indicates a potentially hazardous situation, which, if not avoided, may result in minor or moderate injury. |
| CAUTION (Without Safety Alert Symbol) Indicates a situation that may result in property damage. |
6 RECYCLE


Separate collection. You must not discard with usual household waste. If it is necessary to replace the machine, or if it is no more use to you, do not discard it with household waste.
Separate collection of used machine and packaging let you recycle materials and use them again. Use of the recycled materials helps prevent environmental pollution and decreases the requirements for raw materials.
At the end of their useful life, discard batteries with a precaution for our environment. The battery contains material that is dangerous to you and the environment. You must remove and discard these materials separately at a location that accepts lithium-ion batteries.
7 OPERATION
7.1 CHARGE PROCEDURE
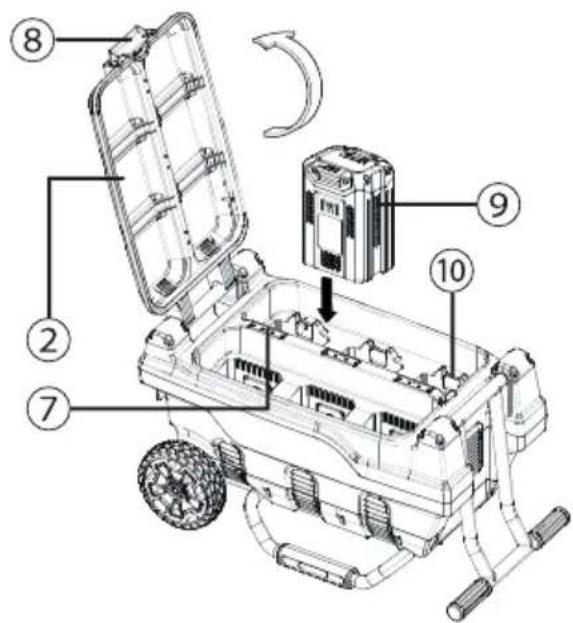
See Figure 2.
i NOTE
Before use charge the battery pack fully to make sure that the battery pack can get the maximum run time. This battery pack does not have a memory. You can charge it all the time.
- Connect the plug of charger to an AC power outlet.
- Lift the battery cover (2) by pushing the cover release button (8).
- Put the battery pack (9) (not included) into the charger.
i NOTE
Push the battery release button (10) to take out the battery.
This is a diagnostic charger. The Charger LED Light (7) illuminates in a specified order to show the current battery status. They are as follows:
| CHARGING PROCEDURE (LED INDICATOR) | |
| BATTERY IS CHARGING |  |
| FULLY CHARGED |  |
| BATTERY IS TOO WARM (RE-MOVE FOR APPROX. 30 MINUTES TO ALLOW TO COOL) |  |
| DEFECTIVE BATTERY (REMOVE AND REPLACE WITH A NEW BATTERY) |  |
Incorrect Defect Note:
- Put the battery pack into the charger.
- If the status LED blinks RED, remove the battery pack from the charger for 1 minute.
- Put the battery pack into the charger again.
- If the status LED blinks GREEN, the battery pack is good.
- If the status LED stays blinking RED, remove the battery pack and disconnect the charger.
- Wait for 1 minute and put the battery pack into the charger again.
- If the status LED shows blinks GREEN, the battery pack is good.
- If the status LED stays blinking RED, the battery pack is defective and it is necessary to replace the battery pack.
7.2 CHARGING TIP
See Figure 3.
When charging 3 batteries or less, place them on one side for fastest charging.
7.3 EXAMINE THE CHARGER
If the battery pack does not charge correctly:
- Examine the current of the power outlet with different machines. Make sure that the outlet works.
- Examine that the charger contacts are not short-circuited.
- If the charger is not under usual room temperature, move the charger and battery pack to a location where the temperature is between 6^ C to 40^ C ( 42.8^ F to 104^ F).
WARNING
If you attempt to charge the battery pack in a warm or hot environment, and the charger LED light is red, remove the battery pack and let the battery cool for approximately 30 minutes.
8 MAINTENANCE
8.1 CLEAN THE MACHINE
i NOTE
Keep the air vent free of blockage, saw dust, and wood dust. Do not spray, wash, or submerge in water.
- Clear the unwanted material out of the air vent with a vacuum.
- Clean housing and the plastic components with a soft, dry cloth.
i IMPORTANT
Do not use strong solvents or detergents on the plastic housing or components.
9 TRANSPORTATION AND STORAGE
9.1 MOVE THE MACHINE
See Figure 4-5.
- Move forward by the handle (1), or lift up the charger by two handle grips (11).
9.2 STORE THE MACHINE
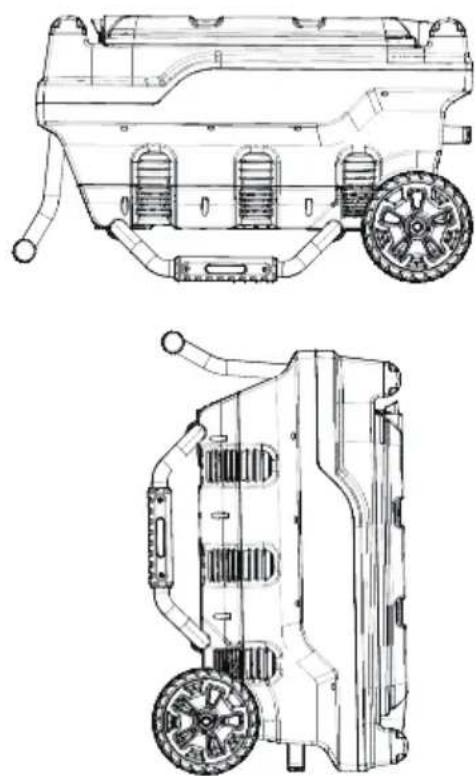
See Figure 6.
WARNING
Remove the battery pack before you store the charger or disconnect the charger.
You can store the wheel charger horizontally or vertically.
10 TROUBLESHOOTING
| PROBLEM POSSIBLE CAUSE | SOLUTION | |
| Charger doesn't work. Charger shows defective mode. (LED flashes Red) | Battery pack or charger is defective or there is a bad connection between the battery pack and charger. | Try to remove and reinsert the battery pack in the charger. |
| Try charging a different battery pack. | ||
| Unplug the charger and wait until the red LED goes out, then reconnect the plug to the power supply. | ||
English
EN
| PROBLEM POSSIBLE CAUSE | SOLUTION | |
| Charger doesn't work. Charger shows evaluation mode (LED indicates Red solid ON). | Battery pack is either too hot, or too cold. | Allow the battery pack to reach normal temperature. Charging will begin when the battery pack returns to 3°C-47°C (37°F-117°F). |
11 TECHNICAL DATA
| Model 82C6 | ||
| Voltage 82 V | ||
| Input 220-240V AC | 50-60Hz, 15A Max | |
| Output 82 V ; Max. | 8.0A=3 | |
| i NOTE | ||
| A=1+2 8 A max | ||
| B=3+4 8 A max | ||
| C=5+6 8 A max | ||
| See Figure 3. | ||
i NOTE
6 Recycling...... 10
7 Bedienung......10
7.1 Ladeverfahren....10
7.2 Ladespitze.... 11
9.1 DÉPLACEMENT DE LA MACHINE
Voir figure 4-5.
VEILIGHEIDSWAARSCHUWIN GEN VOOR HANDGEREEDSCHAP
NL
WAARSCHUWING
OM HET RISICO OP BRAND OF EEN ELEKTRISCHE SCHOK TE BEPERKEN, MOET U DEZE INSTRUCTIES STRIKT OPVOLGEN.
9.1 HET APPARAAT VERPLAATSEN
Zie afbeelding 4-5.
9.2 OPSLAG VAN HET APPARAAT
Zie afbeelding 6.
WAARSCHUWING
10 PROBLEEMOPLOSSING
12 TEKNISET TIEDOT (AKKU)
9 TRANSPORT OCH FÖRVARING
9.1 FLYTTA MASKINEN
Se Figur 4-5.
.הכלההוּרָהוּרָהוּרָהוּרָהוּרָהוּרָהוּרָהוּרָהוּרָהוּרָהוּרָהוּרָהוּרָהוּרָהוּרָה
The image contains no legible text or symbols.
12 TECHNINIAI DUOMENYS (BATERIJA)
12 Tehniskie dati (Akumulators)......133
Latviešu
1 APRAKSTS
1.1 PĀRSKATS
Skatīt 1-6. attēlu.