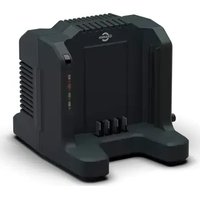
82C2G - Battery Cramer - Free user manual and instructions
Find the device manual for free 82C2G Cramer in PDF.


| Product Type | Battery Charger |
| Brand | Cramer |
| Model | 82C2G |
| Input Voltage | 230 V ~ 50/60 Hz, 2.5 A |
| Output Voltage | 82 V |
| Output Current | 4 A |
| Compatible Battery Type | Li-ion 82 V (models: 82V220G, 82V430G, 82V220, 82V290, 82V430, 82V580, 82VH860, 82V860, 82VH1000, 82VH1150, 82V1150) |
| Number of Charging Ports | 2 |
| LED Indicator | Yes (flashing green = charging, steady green = charged, steady red = overheating, flashing red = fault) |
| Thermal Protection | Yes |
| Short Circuit Protection | Yes |
| Overvoltage Protection | Yes |
| Use | Indoor use only |
| Insulation Class | Class II |
| Fuse | Yes |
| Removable Power Cord | Yes |
| Recommended Charging Temperature | 7 °C to 40 °C |
| Certifications | CE (EN 60335-2-29, EN 55014-1, etc.) |
| Maintenance | Clean with a soft, dry cloth |
Frequently Asked Questions - 82C2G Cramer
User questions about 82C2G Cramer
0 question about this device. Answer the ones you know or ask your own.
Ask a new question about this device
Download the instructions for your Battery in PDF format for free! Find your manual 82C2G - Cramer and take your electronic device back in hand. On this page are published all the documents necessary for the use of your device. 82C2G by Cramer.
USER MANUAL 82C2G Cramer


cramer.eu
Product Overview
Your machine has been engineered and manufactured to high standard for dependability, ease of operation, and operator safety. When properly cared for, it will give you years of trouble-free performance.
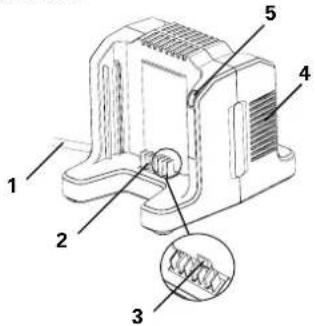
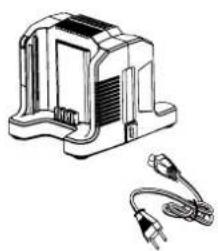
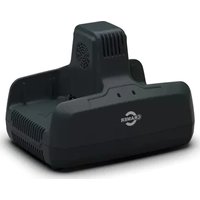
Know Your Charger
1 Power Cord
4 Cooling Air Port
2 Electrical Contacts
5 Charger LED Light
3 Safety Lock-out Button
Safety Precautions
Carefully read all the safety warnings and instructions in this manual before operating these machines. Save this operator's manual for future reference.
CE These machines conforms to CE safety standards and directives concerning electromagnetic compatibility, machines and low voltage.
! WARNING!
Read all safety warnings and all instructions. Failure to follow the warnings and instructions may result in electric shock, fire and/or serious injury.
General Charger Safety Warnings
• DO NOT probe the charger with conductive materials.
• DO NOT allow liquid inside the charger.
- DO NOT try to use the charger for any other purpose than what is presented in this manual.
- Unplug the charger before cleaning and when there is no battery pack in the charger.
• Do not try to connect two chargers together.
- Do not use the charger in the circumstances that the output
Polarity does not match the load polarity.
• For indoor use only.
- The cover may under no circumstances be opened. If the cover is damaged, then the charger may no longer be used.
- Do not recharge non-rechargeable batteries.

WARNING!
To avoid risk of fire, electric shock, or electrocution:
- Do not use a damp cloth or detergent on the battery or battery charger.
• Always remove the battery pack before cleaning, inspecting, or performing any maintenance on the tool.

WARNING!
This appliance can be used by children aged from 8 years and above and persons with reduced physical, sensory or mental capabilities or lack of experience and knowledge if they have been given supervision or instruction concerning use of the appliance in a safe way and understand the hazards involved.
• Children shall not play with the appliance.
- Cleaning and user maintenance should not be made by children without supervision.
- If the supply cord is damaged, it must be replaced by manufacturer, its service agent or similarly qualified persons in order to avoid a hazard.
- Do not cover the ventilation slots on the top of the charger. Do not set the charger on a soft surface i.e. blanket, pillow. Keep the ventilation slots of the charger clear.
- Do not allow small metal items or material such as steel wool, aluminum foil, or other foreign particles into the charger cavity.
- Use only 82V220G/ 82V430G/ 82V220/ 82V290/ 82V430/ 82V580/ 82VH860/ 82V860/ 82VH1000/ 82VH1150/ 82V1150 rechargeable Li-ion batteries.
Important Safety Instructions
- SAVE THESE INSTRUCTIONS - DANGER: TO REDUCE RISK OF FIRE OR ELECTRIC SHOCK CAREFULLY FOLLOW THESE INSTRUCTIONS.
- Confirm the voltage available at each country location before using the charger.
- If the shape of the plug does not fit the power outlet, use an attachment plug adaptor of the proper configuration for the power outlet.
Disposal

Separate collection. This product must not be disposed of with normal household waste. Should you find one day that your product needs replacement, or if it is no further use to you, do not dispose of it with household waste. Make this product available for separate collection.

Separate collection of used products and packaging allows materials to be recycled and used again. Re-use of recycled materials helps prevent environmental pollution and reduces the demand for raw materials.

At the end of their useful life, discard batteries with due care for our environment. The battery contains material which is hazardous to you and the environment. It must be removed and disposed of separately at a facility that accepts lithium-ion batteries.
Symbol
Some of the following symbols may be used on this product. Please study them and learn their meaning. Proper interpretation of these symbols will allow you to operate the product better and safer.
| SYMBOL DESCRIPTION/EXPLANATION | |
| Class II | |
| For indoor use only | |
| Before charging, read the instructions | |
| F8A | Fuse |
The following signal words and meanings are intended to explain the levels of risk associated with this product.
| SYMBOL SIGNAL MEANING | ||
| DANGER Indicates an imminently hazardous situation, which, if not avoided, will result in death or serious injury. | ||
| WARNING Indicates a potentially hazardous situation, which, if not avoided, could result in death or serious injury. | ||
Operation
Charging Procedure
NOTE: The battery is not shipped fully charged. It is recommended to fully charge before use to ensure that maximum run time can be achieved. This lithium-ion battery will not develop a memory and may be charged at any time.
1 Charge one battery:
• Plug the charger (1) into an AC power outlet.
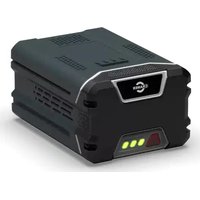
- Insert the battery pack (2) into the charger (1).
2 Charge two batteries:
• Plug the charger (1) into an AC power outlet.
- Insert two battery packs (2) into the charger (1).
When charging two battery packs, the two batteries are charged separately. The charger will charge one battery first. After one battery is
fully charged, it will charge the other battery.
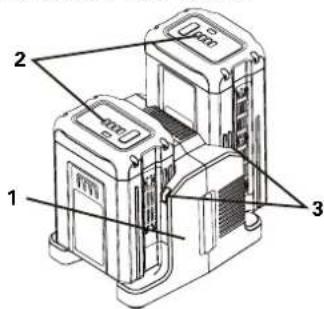
This is a diagnostic charger. The Charger LED Lights (3) will illuminate in specific order to communicate the current battery status. They are as follows:
LED STATUS DESCRIPTION
| Blinking Green Charging | |
| Solid Green Fully Charged | |
| Solid Red Over Temperature | |
| Blinking Red Charging Fault |
False defect note:
When the battery is inserted into the charger and the status LED blinks RED, remove the battery from the charger for 1 minute, then reinsert. If the status LED blinks GREEN, then the battery is properly charging. If the status LED is still blinking RED, remove the battery and unplug the
charger for 1 minute. After 1 minute, plug in the charger and reinsert the battery. If the status LED blinks GREEN, then the battery is properly charging. If the status LED is still blinking RED, the battery is defective and needs to be replaced.

WARNING!
If the battery is inserted into the charger when warm or hot, the CHARGING LED indicator light on the charger may switch on and illuminate RED. If this occurs allow the battery to cool outside of the charger for approximately 30 minutes.
Checking The Charger
If the battery pack does not charge properly:
- Check the current at the power outlet with another tool. Make sure that the outlet is not turned off.
- Check that the charger contacts have not been shorted by debris or foreign material.
- If the surrounding air temperature is not normal room temperature, move the charger and battery pack to a location where the temperature is between 7 °C and 40°C.
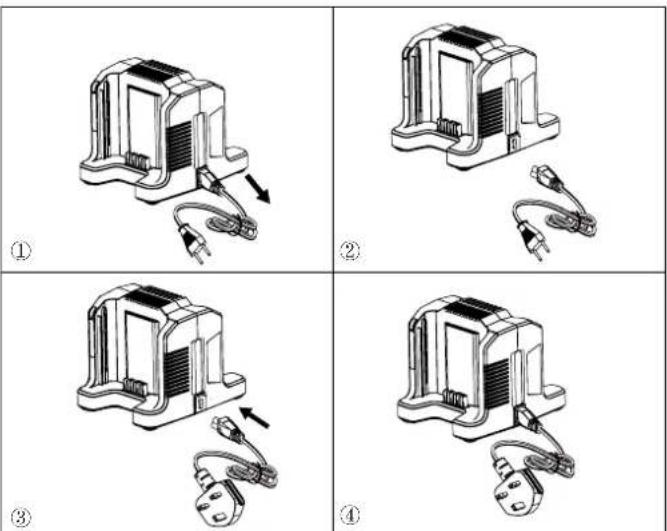
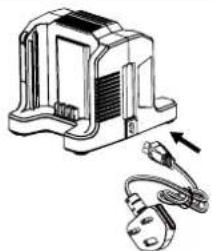
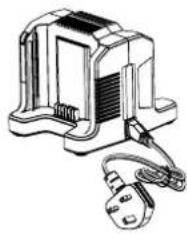
Detachable Power Cord
The power cords of the charger are detachable. They can be removed from the charger and used interchangeably. (See the figure below)
③
Maintenance

WARNING!
Do not at any time let brake fluids, gasoline, petroleum based products, penetrating oils, etc. come in contact with plastic parts. They contain chemicals that can damage, weaken or destroy plastic.

WARNING!
To avoid serious personal injury, always remove the battery pack from the tool when cleaning or performing any maintenance.
Cleaning
Wipe the outside of the charger with a dry, soft cloth. Do not hose down or wash with water.
Storage
Always remove the battery pack before storing the charger or any time the charger is unplugged.
Troubleshooting
| PROBLEM POSSIBLE CAUSE SOLUTION | ||
| Charger doesn't work. Charger shows defective mode (LED flashes Red). | Battery pack or charger is defective or bad connection between the battery pack and charger. | Try to remove and reconnect the battery pack and the charger. |
| Try charging a different battery pack. | ||
| Unplug the charger and wait until the red LED goes out, then reconnect the plug to the power supply. | ||
| PROBLEM POSSIBLE CAUSE SOLUTION | ||
| Charger doesn't work. Charger shows evaluation mode (LED indicates Red solid ON). | Battery pack is too hot or too cold. | Allow the battery pack to reach normal temperature. Charging will begin when battery pack returns to 3°C-47°C (37°F-117°F). |
Technical Data
| PROPERTY VALUE | |
| Model 82C2 | |
| Charger 82V charger | |
| Input | 230V ~50/60Hz, 2.5A |
| Output 82V 4A | == |
EC Declaration of Conformity
Manufacturer: Changzhou Globe Co., Ltd.
Address: No.65 Xinggang Road Zhonglou Zone Changzhou, Jiangsu 213000 P.R.China
Name and address of the person authorised to compile the technical file:
Name: Peter Söderström
Address: Propellergatan 1
211 15 Malmö
Sweden
WE HEREBY DECLARE UNDER OUR OWN RESPONSIBILITY THE MACHINE
| Original Instruciotn | |
| Type 82V charger | |
| Brand Cramer | |
| Model 82C2 | |
| Serial No See product rating label | |
Has been manufactured in accordance with the standards or regulatory documents:
European harmonised standards
EN 60335-2-29, EN 60335-1, EN 62233, EN 55014-1, EN 55014-2, EN 61000-3-2, EN 61000-3-3
And conforms to the essential requirements of the following directives:
Low voltage directive 2014/35/EU
EMC directive 2014/30/EU
Ted Qu
Ted Qu Haichao
Quality Director
Changzhou, 22/07/2017
Produktüberblick
At the end of their useful life, discard batteries with due care for our environment. The battery contains material which is hazardous to you and the environment. It must be removed and disposed of separately at a facility that accepts lithium-ion batteries.
Símbolo
Safety Precautions
Safety Precautions

Endereço: No.65 Xinggang Road Zhonglou Zone Changzhou, Jiangsu 213000 P.R.China
Turvallisuusohjeet

SYMBOL MERKKI MERKITYS

Address: Propellergatan 1
211 15 Malmö
Sweden
Address: Propellergatan 1
211 15 Malmö
Sweden
VI ERKLÆRER HERMED UNDER ENEANSVAR, AT MASKINEN
| Original Instruciotn | |
| Type 82V oplader | |
| Brand Cramer | |
| Model 82C2 | |
| Serienummer Se produktets klassificeringsetiket | |
Address: Propellergatan 1
211 15 Malmö
Sweden
NINIEJSZYM, NA WŁASNĄ ODPOWIEDZIALNOŚĆ, DEKLARUJEMY, ŻE MASZYNA
Varnostni ukrepi

OMEMBNA VARNOSTNA NAVODILA
البيانات الفنية
| nnn82V charger | ||
| nnnCramer | 82C2 | |
| nnn82C2 | ||
| ~ |
Drošības Pasākumi
Adrese: No.65 Xinggang Road Zhonglou Zone Changzhou, Jiangsu 213000 P.R.China
Ohutusabinõud

Laadija Üldised Ohutusjuhised

- PRODUCT OVERVIEW
- KNOW YOUR CHARGER
- SAFETY PRECAUTIONS
- WARNING
- GENERAL CHARGER SAFETY WARNINGS
- IMPORTANT SAFETY INSTRUCTIONS
- DISPOSAL
- SYMBOL
- OPERATION
- CHARGING PROCEDURE
- CHECKING THE CHARGER
- DETACHABLE POWER CORD
- MAINTENANCE
- CLEANING
- STORAGE
- EC DECLARATION OF CONFORMITY
- PRODUKTÜBERBLICK
- SÍMBOLO
- TURVALLISUUSOHJEET
- SYMBOL MERKKI MERKITYS
- VARNOSTNI UKREPI
- OMEMBNA VARNOSTNA NAVODILA
- DROŠĪBAS PASĀKUMI
- OHUTUSABINÕUD
- LAADIJA ÜLDISED OHUTUSJUHISED
Brand : Cramer
Model : 82C2G
Category : Battery