
ASPIRE V5-571PG-53334G75MAK - Laptop ACER - Free user manual and instructions
Find the device manual for free ASPIRE V5-571PG-53334G75MAK ACER in PDF.
| Product type | Laptop |
| Brand | ACER |
| Model | ASPIRE V5-571PG-53334G75MAK |
| Dimensions (approx.) | 38.2 x 25.3 x 2.8 cm |
| Weight (approx.) | 2.5 kg |
| Power supply | AC adapter 100-240V AC, rechargeable lithium-ion battery |
| Screen | 15.6-inch touchscreen, LED backlight |
| Processor | Intel Core i5-3337U (1.8 GHz, Turbo up to 2.7 GHz) |
| RAM memory | 4 GB DDR3 (expandable, accessible compartment) |
| Hard drive | 750 GB SATA |
| Optical drive | DVD Super Multi burner |
| Connectivity | Wi-Fi 802.11a/b/g/n, Bluetooth 4.0, Gigabit Ethernet |
| Ports | 2x USB 3.0, 1x USB 2.0, HDMI, VGA combo, headphone/microphone jack, SD/MMC card reader |
| Webcam | HD webcam with integrated microphone |
| Keyboard | Backlit AZERTY, integrated numeric keypad |
| Touchpad | Multi-touch, supports Windows 8 gestures |
| Operating system | Windows 8 (pre-installed) |
| Battery | Lithium-ion, 4 cells, battery life up to 4 hours |
| Security | Kensington lock slot, BIOS passwords |
| Maintenance | Clean with a soft, slightly damp cloth; do not block ventilation openings |
| Spare parts | Battery and RAM are user-replaceable |
| Repairability | Accessible memory compartment; removable battery |
Frequently Asked Questions - ASPIRE V5-571PG-53334G75MAK ACER
User questions about ASPIRE V5-571PG-53334G75MAK ACER
0 question about this device. Answer the ones you know or ask your own.
Ask a new question about this device
Download the instructions for your Laptop in PDF format for free! Find your manual ASPIRE V5-571PG-53334G75MAK - ACER and take your electronic device back in hand. On this page are published all the documents necessary for the use of your device. ASPIRE V5-571PG-53334G75MAK by ACER.
USER MANUAL ASPIRE V5-571PG-53334G75MAK ACER
© 2012 All Rights Reserved.
Aspire V5-571P User's Manual
This revision: 11/2012
Model number:
Serial number:
Date of purchase:
Place of purchase:
TABLE OF CONTENTS
Table of contents 3
Safety and comfort 5
First things first 16
Your guides 16
Basic care and tips for using your computer 16
Turning your computer on and off. 16
Taking care of your computer 17
Taking care of your AC adapter. 18
Taking care of your battery pack. 18
Cleaning and servicing. 19
Your Acer notebook tour 20
Screen view. 21
Keyboard view 23
Left view 25
Information on USB 3.0 26
Right view 26
Base view 28
Using the keyboard 29
Lock keys and embedded numeric keypad..... 29
Hotkeys 30
Windows keys 32
Touchpad 33
Touchpad basics 33
Touchpad gestures 34
Acer Backup Manager 35
Recovery 38
Creating a recovery backup 38
Creating a drivers and applications backup..... 41
Recovering your system 44
Reinstalling drivers and applications. 45
Returning to an earlier system snapshot 48
Returning your system to its factory condition 49
Recovering from Windows 50
Recovering from a recovery backup 54
Acer clear.fi 58
Navigating media and photos 58
Shared files 59
Which devices are compatible? 59
Playing to another device 60
Power management 61
Saving power 61
Battery pack 64
Battery pack characteristics 64
Charging the battery 64
Optimizing battery life 66
Checking the battery level 67
Battery-low warning 67
Installing and removing the battery pack 68
Traveling with your computer 70
Disconnecting from the desktop 70
Moving around 70
Preparing the computer. 71
What to bring to meetings 71
Taking the computer home 72
Preparing the computer. 72
What to take with you. 72
Special considerations 72
Setting up a home office 73
Traveling with the computer 73
Preparing the computer 73
What to take with you. 74
Special considerations 74
Traveling internationally with the computer..... 74
Preparing the computer 74
What to bring with you 74
Special considerations 75
Securing your computer 76
Using a computer security lock 76
Using passwords. 76
Entering passwords 77
Wireless networks 78
Connecting to the Internet 78
Wireless networks 78
Using a Bluetooth connection 80
Enabling and disabling Bluetooth 80
Adding a Bluetooth device 82
HDMI 86
Universal Serial Bus (USB) 87
BIOS utility 88
Boot sequence 88
Setting passwords 88
Frequently asked questions 89
Requesting service 91
Tips and hints for using Windows 8. 93
Three concepts you might want to keep in mind 93
How do I access the charms? 93
How do I get to Start? 93
How do I jump between apps? 94
How do I turn off my computer? 94
Why is there a new interface? 94
How do I unlock my computer? 94
How do I personalize my computer? 95
I want to use Windows in the way that I'm used to - give me my desktop back! 96
Where are my apps? 96
What is a Microsoft ID (account)? 98
How do I add a favorite to Internet Explorer? 98
How do I check for Windows
How do I check for Windows updates? 99
Where can I get more information? 99
bleashing. 100
Troubleshooting tips 100
Error messages 100
Regulations and safety notices 102
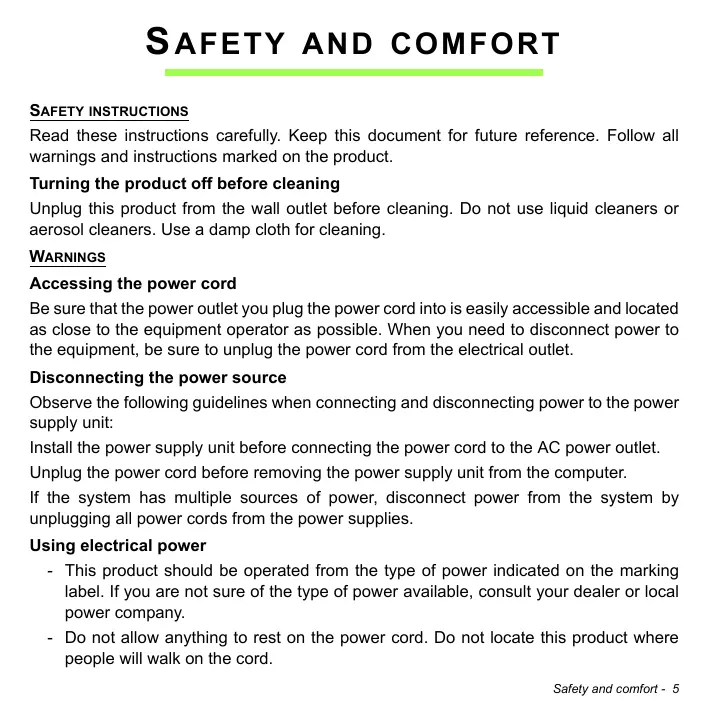
SAFETY AND COMFORT
SAFETY INSTRUCTIONS
Read these instructions carefully. Keep this document for future reference. Follow all warnings and instructions marked on the product.
Turning the product off before cleaning
Unplug this product from the wall outlet before cleaning. Do not use liquid cleaners or aerosol cleaners. Use a damp cloth for cleaning.
WARNING
Accessing the power cord
Be sure that the power outlet you plug the power cord into is easily accessible and located as close to the equipment operator as possible. When you need to disconnect power to the equipment, be sure to unplug the power cord from the electrical outlet.
Disconnecting the power source
Observe the following guidelines when connecting and disconnecting power to the power supply unit:
Install the power supply unit before connecting the power cord to the AC power outlet.
Unplug the power cord before removing the power supply unit from the computer.
If the system has multiple sources of power, disconnect power from the system by unplugging all power cords from the power supplies.
Using electrical power
- This product should be operated from the type of power indicated on the marking label. If you are not sure of the type of power available, consult your dealer or local power company.
-
Do not allow anything to rest on the power cord. Do not locate this product where people will walk on the cord.
-
If an extension cord is used with this product, make sure that the total ampere rating of the equipment plugged into the extension cord does not exceed the extension cord ampere rating. Also, make sure that the total rating of all products plugged into the wall outlet does not exceed the fuse rating.
-
Do not overload a power outlet, strip or receptacle by plugging in too many devices. The overall system load must not exceed 80% of the branch circuit rating. If power strips are used, the load should not exceed 80% of the power strip's input rating.
-
This product's AC adapter is equipped with a three-wire grounded plug. The plug only fits in a grounded power outlet. Make sure the power outlet is properly grounded before inserting the AC adapter plug. Do not insert the plug into a non-grounded power outlet. Contact your electrician for details.
-
Warning! The grounding pin is a safety feature. Using a power outlet that is not properly grounded may result in electric shock and/or injury.
-
Note: The grounding pin also provides good protection from unexpected noise produced by other nearby electrical devices that may interfere with the performance of this product.
-
The system can be powered using a wide range of voltages; 100 to 120 or 220 to 240 V AC. The power cord included with the system meets the requirements for use in the country/region where the system was purchased. Power cords for use in other countries/regions must meet the requirements for that country/region. For more information on power cord requirements, contact an authorized reseller or service provider.
Bundled dummy cards
- Note: Information in this section may not apply to your computer.
Your computer shipped with plastic dummies installed in the card slots. Dummies protect unused slots from dust, metal objects or other particles. Save the dummies for use when no cards are in the slots.
General
-
Do not use this product near water.
-
Do not place this product on an unstable cart, stand or table. If the product falls, it could be seriously damaged.
- Slots and openings are provided for ventilation to ensure reliable operation of the product and to protect it from overheating. These openings must not be blocked or covered. The openings should never be blocked by placing the product on a bed, sofa, rug or other similar surface. This product should never be placed near or over a radiator or heat register, or in a built-in installation unless proper ventilation is provided.
- Never push objects of any kind into this product through cabinet slots as they may touch dangerous voltage points or short-out parts that could result in a fire or electric shock. Never spill liquid of any kind onto or into the product.
- To avoid damage of internal components and to prevent battery leakage, do not place the product on a vibrating surface.
- Never use it under sporting, exercising, or any vibrating environment which will probably cause unexpected short current or damage rotor devices, HDD, Optical drive, and even exposure risk from lithium battery pack.
- The bottom surface, areas around ventilation openings and AC adapter may get hot. To avoid injury, ensure they do not come in contact with your skin or body.
- Your device and its enhancements may contain small parts. Keep them out of the reach of small children.
- The surface temperature of the base will rise during normal operation, particularly when AC power is present. Allowing sustained contact with exposed skin can cause discomfort or burn.
Product servicing
Do not attempt to service this product yourself, as opening or removing covers may expose you to dangerous voltage points or other risks. Refer all servicing to qualified service personnel.
Unplug this product from the wall outlet and refer servicing to qualified service personnel when:
-
The power cord or plug is damaged, cut or frayed.
-
Liquid was spilled into the product.
- The product was exposed to rain or water.
- The product has been dropped or the case has been damaged.
- The product exhibits a distinct change in performance, indicating a need for service.
- The product does not operate normally after following the operating instructions.
- Note: Adjust only those controls that are covered by the operating instructions, since improper adjustment of other controls may result in damage and will often require extensive work by a qualified technician to restore the product to normal condition.
Guidelines for safe battery usage
This computer uses a Lithium-ion battery. Do not use it in a humid, wet or corrosive environment. Do not put, store or leave your product in or near a heat source, in a high temperature location, in strong direct sunlight, in a microwave oven or in a pressurized container, and do not expose it to temperatures over 60^ C (140°F). Failure to follow these guidelines may cause the battery to leak acid, become hot, explode or ignite and cause injury and/or damage.
Do not pierce, open or disassemble the battery. If the battery leaks and you come into contact with the leaked fluids, rinse thoroughly with water and seek medical attention immediately.
For safety reasons, and to prolong the lifetime of the battery, charging will not occur at temperatures below 0^ C (32^ F) or above 40^ C (104^ F).
The full performance of a new battery is achieved only after two or three complete charge and discharge cycles. The battery can be charged and discharged hundreds of times, but it will eventually wear out. When the operation time becomes noticeably shorter than normal, buy a new battery. Use only the approved batteries, and recharge your battery only with the approved chargers designated for this device.
Use the battery only for its intended purpose. Never use any charger or battery that is damaged. Do not short-circuit the battery. Accidental short-circuiting can occur when a metallic object such as a coin, clip or pen causes direct connection of the positive (+) and
negative (-) terminals of the battery. (These look like metal strips on the battery.) This might happen, for example, when you carry a spare battery in your pocket or purse. Short-circuiting the terminals may damage the battery or the connecting object.
The capacity and lifetime of the battery will be reduced if the battery is left in hot or cold places, such as in a closed car in summer or winter. Always try to keep the battery between 15^ and 25^ (59°F and 77°F). A device with a hot or cold battery may not work temporarily, even when the battery is fully charged. Battery performance is especially limited in temperatures well below freezing.
Do not dispose of batteries in a fire as they may explode. Batteries may also explode if damaged. Dispose of batteries according to local regulations. Please recycle when possible. Do not dispose as household waste.
- Note: Please refer to www.acer.com for battery shipping documents.
Replacing the battery pack
The computer uses lithium batteries. Replace the battery with the same type as that which came bundled with your product. Use of another battery may present a risk of fire or explosion.
- Warning! Batteries may explode if not handled properly. Do not disassemble or dispose of them in fire. Keep them away from children. Follow local regulations when disposing of used batteries.
- Warning! For safety reasons, turn off all wireless or radio transmitting devices when using your laptop under the following conditions. These devices may include, but are not limited to: wireless LAN (WLAN), Bluetooth and/or 3G.
Remember to follow any special regulations in force in any area, and always switch off your device when its use is prohibited or when it may cause interference or danger. Use the device only in its normal operating positions. This device meets RF exposure guidelines when used normally. It should not contain metal and you should position the device the above-stated distance from your body. To successfully transmit data files or messages, this device requires a good quality connection to the network. In some cases,
transmission of data files or messages may be delayed until such a connection is available. Ensure that the above separation distance instructions are followed until the transmission is completed. Parts of the device are magnetic. Metallic materials may be attracted to the device, and persons with hearing aids should not hold the device to the ear with the hearing aid. Do not place credit cards or other magnetic storage media near the device, because information stored on them may be erased.
MEDICAL DEVICES
Operation of any radio transmitting equipment, including wireless phones, may interfere with the functionality of inadequately protected medical devices. Consult a physician or the manufacturer of the medical device to determine if they are adequately shielded from external RF energy or if you have any questions. Switch off your device in health care facilities when any regulations posted in these areas instruct you to do so. Hospitals or health care facilities may be using equipment that could be sensitive to external RF transmissions.
Pacemakers. Pacemaker manufacturers recommend that a minimum separation of 15.3 centimeters (6 inches) be maintained between wireless devices and a pacemaker to avoid potential interference with the pacemaker. These recommendations are consistent with the independent research by and recommendations of Wireless Technology Research. Persons with pacemakers should do the following:
- Always keep the device more than 15.3 centimeters (6 inches) from the pacemaker
- Not carry the device near your pacemaker when the device is switched on.
If you suspect interference, switch off your device, and move it.
Hearing aids. Some digital wireless devices may interfere with some hearing aids. If interference occurs, consult your service provider.
VEHICLES
RF signals may affect improperly installed or inadequately shielded electronic systems in motor vehicles such as electronic fuel injection systems, electronic anti-skid (anti-lock) braking systems, electronic speed control systems, and air bag systems. For more information, check with the manufacturer, or its representative, of your vehicle or any
equipment that has been added. Only qualified personnel should service the device, or install the device in a vehicle. Faulty installation or service may be dangerous and may invalidate any warranty that may apply to the device. Check regularly that all wireless equipment in your vehicle is mounted and operating properly. Do not store or carry flammable liquids, gases, or explosive materials in the same compartment as the device, its parts, or enhancements. For vehicles equipped with an air bag, remember that air bags inflate with great force. Do not place objects, including installed or portable wireless equipment in the area over the air bag or in the air bag deployment area. If in-vehicle wireless equipment is improperly installed, and the air bag inflates, serious injury could result. Using your device while flying in aircraft is prohibited. Switch off your device before boarding an aircraft. The use of wireless teledevices in an aircraft may be dangerous to the operation of the aircraft, disrupt the wireless telephone network, and may be illegal.
POTENTIALLY EXPLOSIVE ENVIRONMENTS
Switch off your device when in any area with a potentially explosive atmosphere and obey all signs and instructions. Potentially explosive atmospheres include areas where you would normally be advised to turn off your vehicle engine. Sparks in such areas could cause an explosion or fire resulting in bodily injury or even death. Switch off the device at refueling points such as near gas pumps at service stations. Observe restrictions on the use of radio equipment in fuel depots, storage, and distribution areas; chemical plants; or where blasting operations are in progress. Areas with a potentially explosive atmosphere are often, but not always, clearly marked. They include below deck on boats, chemical transfer or storage facilities, vehicles using liquefied petroleum gas (such as propane or butane), and areas where the air contains chemicals or particles such as grain, dust or metal powders. Do not switch the computer on when wireless phone use is prohibited or when it may cause interference or danger.
EMERGENCY CALLS
- Warning! You cannot make emergency calls through this device. To make an emergency call you shall dial out through your mobile phone or other telephone call system.
DISPOSAL INSTRUCTIONS
Do not throw this electronic device into the trash when discarding. To minimize pollution and ensure utmost protection of the global environment, please recycle. For more information on the Waste from Electrical and Electronics Equipment (WEEE) regulations, visit www.acer-group.com/public/Sustainability/sustainability01.htm
ENERGY STAR

Acer's ENERGY STAR qualified products save your money by reducing energy cost and protecting the environment without sacrificing features or performance. Acer is proud to offer our customers products with the ENERGY STAR mark.
What is ENERGY STAR?
Products that are ENERGY STAR qualified use less energy and prevent greenhouse gas emissions by meeting strict energy efficiency guidelines set by the U.S. Environmental Protection Agency. Acer is committed to offering products and services worldwide that help customers save money, conserve energy and improve the quality of our environment. The more energy we can save through higher energy efficiency, the more we reduce greenhouse gases and the risks of climate change. More information refers to www.energystar.gov or www.energystar.gov/powermanagement.
- Note: Information in this section may not apply to your computer.
Acer ENERGY STAR qualified products:
- produce less heat and reduce cooling loads in warmer climates.
- automatically go into "display Sleep" and "computer Sleep" mode after 10 and 30 minutes of inactivity, respectively.
- wake from "Sleep" mode if the keyboard is pressed or mouse is moved.
save more than 80% energy when in "Sleep" mode.
ENERGY STAR and the ENERGY STAR mark are registered U.S. marks.
TIPS AND INFORMATION FOR COMFORTABLE USE
Computer users may complain of eyestrain and headaches after prolonged use. Users are also at risk of physical injury after long hours of working in front of a computer. Long work periods, bad posture, poor work habits, stress, inadequate working conditions, personal health and other factors greatly increase the risk of physical injury.
Incorrect computer usage may lead to carpal tunnel syndrome, tendonitis, tenosynovitis or other musculoskeletal disorders. The following symptoms may appear in the hands, wrists, arms, shoulders, neck or back:
- Numbness, or a burning or tingling sensation.
- Aching, soreness or tenderness.
- Pain, swelling or throbbing.
- Stiffness or tightness.
- Coldness or weakness.
If you have these symptoms, or any other recurring or persistent discomfort and/or pain related to computer use, consult a physician immediately and inform your company's health and safety department.
The following section provides tips for more comfortable computer use.
Finding your comfort zone
Find your comfort zone by adjusting the viewing angle of the monitor, using a footrest, or raising your sitting height to achieve maximum comfort. Observe the following tips:
- Refrain from staying too long in one fixed posture.
- Avoid slouching forward and/or leaning backward.
- Stand up and walk around regularly to remove the strain on your leg muscles.
- Take short rests to relax your neck and shoulders.
- Avoid tensing your muscles or shrugging your shoulders.
-
Install the external display, keyboard and mouse properly and within comfortable reach.
-
If you view your monitor more than your documents, place the display at the center of your desk to minimize neck strain.
Taking care of your vision
Long viewing hours, wearing incorrect glasses or contact lenses, glare, excessive room lighting, poorly focused screens, very small typefaces and low-contrast displays could stress your eyes. The following sections provide suggestions on how to reduce eyestrain.
Eyes
- Rest your eyes frequently.
- Give your eyes regular breaks by looking away from the monitor and focusing on a distant point.
- Blink frequently to keep your eyes from drying out.
Display
- Keep your display clean.
- Keep your head at a higher level than the top edge of the display so your eyes point downward when looking at the middle of the display.
- Adjust the display brightness and/or contrast to a comfortable level for enhanced text readability and graphics clarity.
- Eliminate glare and reflections by:
- placing your display in such a way that the side faces the window or any light source, minimizing room light by using drapes, shades or blinds,
- using a task light,
- changing the display's viewing angle,
- using a glare-reduction filter,
- using a display visor, such as a piece of cardboard extended from the display's top front edge.
- Avoid adjusting your display to an awkward viewing angle.
- Avoid looking at bright light sources for extended periods of time.
Developing good work habits
The following work habits make computer use more relaxing and productive:
- Take short breaks regularly and often.
- Perform some stretching exercises.
- Breathe fresh air as often as possible.
Exercise regularly and maintain a healthy body. - Warning! We do not recommend using the computer on a couch or bed. If this is unavoidable, work for only short periods, take breaks regularly, and do some stretching exercises.
- Note: For more information, please refer to "Regulations and safety notices" on page 102.
FIRST THINGS FIRST
We would like to thank you for making an Acer notebook your choice for meeting your mobile computing needs.
Your guides
To help you use your Acer notebook, we have designed a set of guides:
First off, the setup poster helps you get started with setting up your computer.
The Quick Guide introduces you to the basic features and functions of your new computer. For more on how your computer can help you to be more productive, please refer to the User's Manual. This guide contains detailed information on such subjects as system utilities, data recovery, expansion options and troubleshooting. In addition it contains general regulations and safety notices for your notebook. It is available from Desktop; double-click the Help icon and click User's Manual in the menu that opens.
Basic care and tips for using your computer
Turning your computer on and off
To turn the power off, do any of the following:
- Use the Windows shutdown command: Press the Windows key +
, click Settings > Power then click Shut Down.
If you need to power down the computer for a short while, but don't want to completely shut it down, you can put it into Hibernate by pressing the power button.
You can also put the computer in sleep mode by pressing the sleep hotkey <Fn> + <F4> .
Note: If you cannot power off the computer normally, press and hold the power button for more than four seconds to shut down the computer. If you turn off the computer and want to turn it on again, wait at least two seconds before powering up.
Taking care of your computer
Your computer will serve you well if you take care of it.
- Do not expose the computer to direct sunlight. Do not place it near sources of heat, such as a radiator.
- Do not expose the computer to temperatures below 0^ ( 32^ ) or above 50^ ( 122^ ).
- Do not subject the computer to magnetic fields.
- Do not expose the computer to rain or moisture.
- Do not spill water or any liquid on the computer.
- Do not subject the computer to heavy shock or vibration.
- Do not expose the computer to dust or dirt.
- Never place objects on top of the computer.
- Do not slam the computer display when you close it.
- Never place the computer on uneven surfaces.
Taking care of your AC adapter
Here are some ways to take care of your AC adapter:
- Do not connect the adapter to any other device.
- Do not step on the power cord or place heavy objects on top of it. Carefully route the power cord and any cables away from foot traffic.
- When unplugging the power cord, do not pull on the cord itself but pull on the plug.
- The total ampere ratings of the equipment plugged in should not exceed the ampere rating of the cord if you are using an extension cord. Also, the total current rating of all equipment plugged into a single wall outlet should not exceed the fuse rating.
Taking care of your battery pack
Here are some ways to take care of your battery pack:
- Use only batteries of the same kind as replacements. Turn the power off before removing or replacing batteries.
- Do not tamper with batteries. Keep them away from children.
- Dispose of used batteries according to local regulations. Recycle if possible.
Cleaning and servicing
When cleaning the computer, follow these steps:
- Turn off the computer and remove the battery pack.
- Disconnect the AC adapter.
- Use a soft, moist cloth. Do not use liquid or aerosol cleaners.
If either of the following occurs:
- The computer has been dropped or the body has been damaged;
- The computer does not operate normally
Please refer to "Frequently asked questions" on page 89.
YOUR ACER NOTEBOOK TOUR
After setting up your computer as illustrated in the setup poster, let us show you around your new Acer notebook.
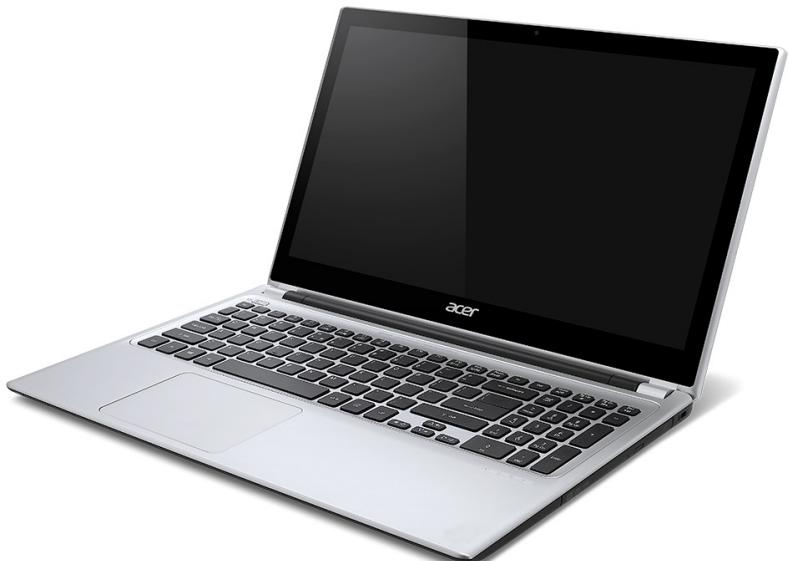
Aspire V5
Screen view
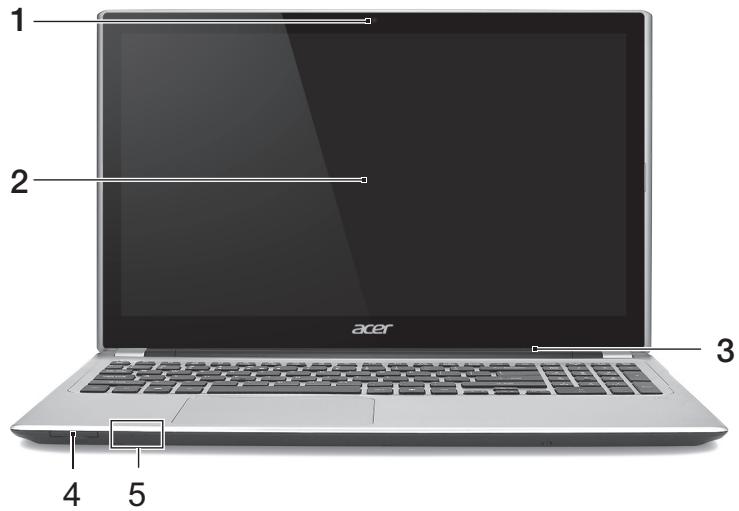
| # | Icon | Item | Description |
| 1 | Webcam | Web camera for video communication. A light next to the Webcam indicates that the webcam is active. | |
| 2 | Touchscreen | Displays computer output, supports multi-touch input. | |
| 3 | Microphone | Internal microphone for sound recording. | |
| 4 | IMMUMULTIMEDICRGID | 2-in-1 card reader | Accepts one Secure Digital (SD or SDHC) card or MultiMediaCard (MMC). Note: To remove the card, simply pull it from the slot. |
| 5 | Power indicator | Indicates the computer's power status. | |
| Battery indicator | Indicates battery status. Charging: The light is amber when the battery is charging. Fully charged: The light is blue. |
Keyboard view

| # | Icon | Item | Description |
| 1 | Power button | Turns the computer on and off. | |
| 2 | Keyboard | For entering data into your computer. See "Using the keyboard" on page 29. Caution: Do not use a keyboard protector or similar cover as the keyboard includes ventilation intakes for cooling. | |
| 3 | Touch-sensitive pointing device. The touchpad and selection buttons form a single surface. Press down firmly on the touchpad surface to perform a left click. Press down firmly on the lower right corner to perform a right click. See "Touchpad" on page 33. |
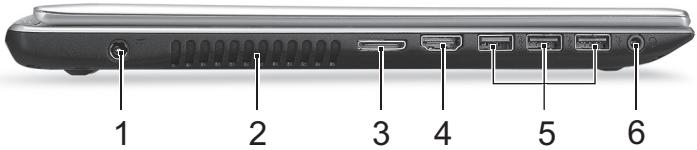
| # | Icon | Item | Description |
| 1 | DC-in jack | Connects to an AC adapter. | |
| 2 | Ventilation and cooling fan | Allows the computer to stay cool. Do not cover or obstruct the openings. | |
| 3 | LAN/VGA combo port | Makes it easy to get online and plug in an external display, from one place. The provided LAN/VGA combo cable is hot-swappable so you can plug it in and out even when the notebook is on. | |
| 4 | HDMI | HDMI port | Supports high-definition digital video connections. |
| 5 | USB ports | Connects to USB devices. If a port is black it is USB 2.0 compatible, if it is blue it is also USB 3.0 compatible (see below). | |
| 6 | Headset/speaker jack | Connects to audio devices (e.g., speakers, headphones) or a headset with microphone. |
Information on USB 3.0
- Compatible with USB 3.0 and earlier devices.
- For optimal performance, use USB 3.0-certified devices.
- Defined by the USB 3.0 specification (SuperSpeed USB).
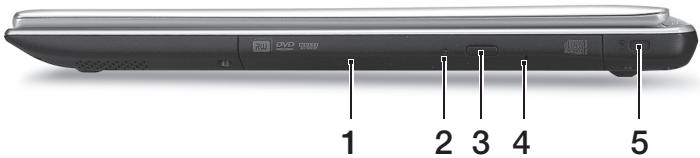
Right view
| # | Icon | Item | Description |
| 1 | Optical drive | Internal optical drive; accepts CDs or DVDs. | |
| 2 | Optical disk access indicator | Lights up when the optical drive is active. | |
| 3 | Optical drive eject button | Ejects the optical disk from the drive. | |
| 4 | Emergency eject hole | Ejects the optical drive tray when the computer is turned off. Carefully insert a straightened paper clip to eject the optical drive tray. | |
| 5 | K | Kensington lock slot | Connects to a Kensington-compatible computer security lock. Wrap the computer security lock cable around an immovable object such as a table or handle of a locked drawer. Insert the lock into the notch and turn the key to secure the lock. Keyless models are also available. |
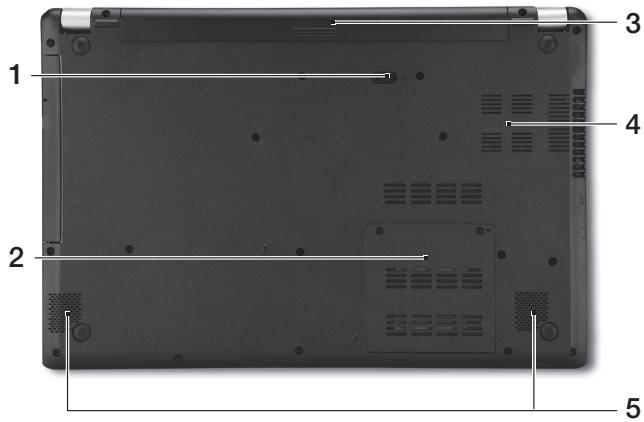
| # | Icon | Item | Description |
| 1 | Battery release latch | Releases the battery for removal. Insert a suitable tool and slide to release. | |
| 2 | Memory compartment | Houses the computer's main memory. | |
| 3 | Battery bay | Houses the computer's battery pack. | |
| 4 | Ventilation and cooling fan | Allows the computer to stay cool. Do not cover or obstruct the openings. | |
| 5 | Speakers | Deliver stereo audio output. |
USING THE KEYBOARD
The keyboard has full-sized keys and an embedded numeric keypad, separate cursor, lock, Windows, function and special keys.
Lock keys and embedded numeric keypad
Note: Information in this section may not apply to your computer. The keyboard has three lock keys which you can toggle on and off.
| Lock key | Description |
| Caps Lock | When Caps Lock is on, all alphabetic characters typed are in uppercase. |
| Num Lock+Fn> + <F11> | When Num Lock is on, the embedded keypad is in numeric mode. The keys function as a calculator (complete with the arithmetic operators +, -, *, and /). Use this mode when you need to do a lot of numeric data entry. A better solution would be to connect an external keypad. |
| Scroll Lock+Fn> + <F12> | When Scroll Lock is on, the screen moves one line up or down when you press the up or down arrow keys respectively. Scroll Lock does not work with some applications. |
The embedded numeric keypad functions like a desktop numeric keypad. It is indicated by small characters located on the upper right corner of the
keycaps. To simplify the keyboard legend, cursor-control key symbols are not printed on the keys.
| Desired access | Num Lock on | Num Lock off |
| Number keys on embedded keypad | Type numbers in a normal manner. | |
| Cursor-control keys on embedded keypad | Hold <Shift> while using cursor-control keys. | Hold <Fn> while using cursor-control keys. |
| Main keyboard keys | Hold <Fn> while typing letters on embedded keypad. | Type the letters in a normal manner. |
Hotkeys
The computer employs hotkeys or key combinations to access most of the computer's controls like screen brightness and volume output.
To activate hotkeys, press and hold the
| Hotkey | Icon | Function | Description |
| +Fn> + <F3> | ((z)) | Airplane mode | Turns on / off the computer's network devices. (Network devices vary by configuration.) |
| <Fn> + <F4> | Z² | Sleep | Puts the computer in Sleep mode. |
| +Fn> + <F5> | □□□ | Display toggle | Switches display output between the display screen, external monitor (if connected) and both. |
| <Fn> + <F6> | □□□ | Display off | Turns the display screen backlight off to save power. Press any key to return. |
| <Fn> + <F7> | □□□ | Touchpad toggle | Turns the built-in touchpad on and off. |
| <Fn> + <F8> | □□□ | Speaker toggle | Turns the speakers on and off. |
| <Fn> + <F9> | A | Keyboard backlight | Turns the keyboard backlight on and off. |
| <Fn> + <F11> | NumLk | Turns the embedded numeric keypad on or off. | |
| <Fn> + <□> | Brightness up | Increases the screen brightness. | |
| <Fn> + <▲> | Brightness down | Decreases the screen brightness. | |
| <Fn> + <△> | Volume up | Increases the sound volume. | |
| <Fn> + <▼> | Volume down | Decreases the sound volume. | |
| +Fn> + | ▶/II | Play/Pause | Play or pause a selected media file. |
| <Home> | |||
| +Fn> + | ■ | Stop | Stop playing the selected media file. |
| <Pg Up> | |||
| +Fn> + | ▲▲ | Previous | Return to the previous media file. |
| <Pg Dn> | |||
| +Fn> + | ▶▲ | Next | Jump to the next media file. |
Windows keys
The keyboard has two keys that perform Windows-specific functions.
| Key | Description |
| Windows key | Pressed alone it returns to the Start screen. It can also be used with other keys for special functions, please check Windows Help. |
| Application key | This key has the same effect as clicking the right mouse button; it opens the application's context menu. |
TOUCHPAD
Touchpad basics
The touchpad controls the arrow (or 'cursor') on the screen. As you slide your finger across the touchpad, the cursor will follow this movement.
Note: The touchpad is sensitive to finger movement; the lighter the touch, the better the response.
Please keep the touchpad and your fingers dry and clean.
The cursor is controlled by some basic gestures:
-
Single-finger slide: Slide a finger across the touchpad to move the cursor.
-
Single-finger press or tap: Press the touchpad down, or lightly tap the touchpad with your finger, to perform a 'click', which will select or start an item. Quickly repeat the tap to perform a double tap or 'double click'.
-
Single-finger press in the bottom-right corner: Press the bottom right corner of the touchpad to perform a 'right click'. In the Start screen, this will toggle the app commands, in most apps this will open a context menu related to the selected item.
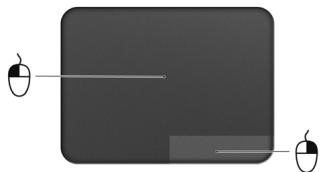
- Drag: Press and hold the bottom left corner of the touchpad, or tap twice anywhere on the touchtap, then slide a second finger across the touchpad to select all items in an area.
Touchpad gestures
Windows 8 and many applications support touchpad gestures that use one or more fingers.
Note: Support for touchpad gestures depends on the active application. This allows you to control applications with a few simple gestures, such as:
- Swipe in from edge: Access Windows tools by swiping into the center of the touchpad from the right, top or left.

- Swipe in from right edge: Toggle the charms.
- Swipe in from top edge: Toggle the app commands.
-
Swipe in from left edge: Switch to the previous app.
-
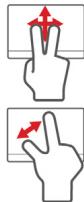
Two-finger slide: Swiftly scroll through web pages, documents and playlists by placing two fingers on the touchpad and moving both in any direction.
- Two-finger pinch: Zoom in and out of photos, maps and documents with a simple finger-and-thumb gesture.
ACER BACKUP MANAGER
Acer Backup Manager is a utility that enables you to do a variety of backup functions each accomplished in only three simple steps. You can even set these functions to automatically recur as often as your like.

Acer Backup Manager
?X
Welcome to Acer Backup Manager
Select one action below to start managing your data.
Back Up My Files
Pick and choose which files to back up or let the program find it all for you.
Image My Drive
Make a complete image backup of your drive.
Migrate My Files
Transfer your files from another computer to this computer.
Clear out / Restore Files
Remove seldom used files to free up space or restore files from your backup.

Launch My Backup Profiles
Back Up My Files
The file backup helps you create a complete backup of your documentation. Choose the file or folder for the backup and then select the destination for the backup. Once you have selected the destination, the final step is to schedule the backup. Click on the Backup My Files button to create a backup.

Directly enter "My Backup Profiles" next time

To start Acer Backup Manager in Windows 8, simply start typing "Backup Manager". Alternatively, in Desktop mode, select Acer Backup Manager. This opens the Welcome screen; from this screen you can select the type of backup you'd like to create.
- Back Up My Files: Select files to back up.
- Image My Drive: Create a backup file for the entire drive. You can burn this file to a DVD, save them to another drive on your computer*, or save them to removable media (i.e. a flash drive) to restore your computer at a later time.
- Migrate My Files: Allows you to copy files to a USB device so that you can migrate files from your old computer to your new one or any other computer with Acer Backup Manager.
- Clear out / Restore Files: Remove seldom used files to free up disk space or restore files from your backup.
Select the backup type you'd like to make and select the files or drive you want to back up, then follow the onscreen instructions:
- Select the content you want to back up. The less content you select, the quicker the process will be, but it will increase your risks of losing data.
- Select where you want the backup copies to be stored. Your options include removable media, a drive on your computer*, CD/DVD media, a remote PC, or the cloud using Microsoft SkyDrive.
- Select how often you want Acer Backup Manager to create backups.
Once you have finished these three steps, backups will be created according to the schedule.
*NOTE: You will need to select an external drive or your D: drive; Acer Backup Manager cannot store a backup on the source drive.
If you wish to change your settings at any time, go to the Acer Backup Manager profiles screen. To get there from the Acer Backup Manager welcome screen, click Launch My Backup Profiles.
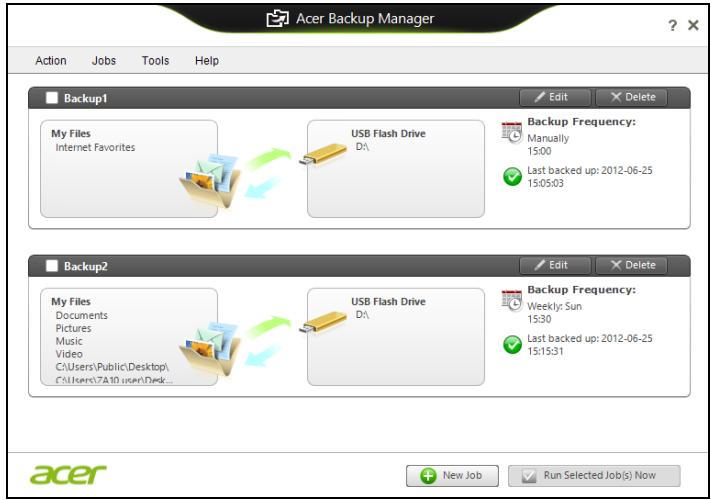
From here you can edit or delete existing backup profiles.
RECOVERY
If you are having trouble with your computer, and the frequently asked questions (see page 89) do not help, you can 'recover' your computer - i.e. return it to an earlier state.
This section describes the recovery tools available on your computer. Acer provides Acer Recovery Management, which allows you to create a recovery backup, a drivers and applications backup, and to start recovery options, either using Windows tools, or the recovery backup.
Note: Acer Recovery Management is only available with a preinstalled Windows operating system.
Important: We recommend that you create a Recovery Backup and Drivers and Applications Backup and as soon as possible. In certain situations a full recovery will require a USB recovery backup.
Creating a recovery backup
To reinstall from a USB storage drive, you must first create a recovery backup. The recovery backup includes the entire original contents of your computer's hard drive, including Windows and all factory-loaded software and drivers. Using this backup will restore your computer to the same state as when you purchased it, while giving you an option to retain all settings and personal data.
Note: Make sure you have a USB drive with a capacity of at least 16 GB.
- From Start, type 'Recovery' and then click Acer Recovery Management in the list of apps.

Acer Recovery Management
?X
Welcome to Acer Recovery Management
Acer Recovery Management enables you to restore your system. To begin, select the task you want to perform. Please DO NOT remove the USB device while proceeding.

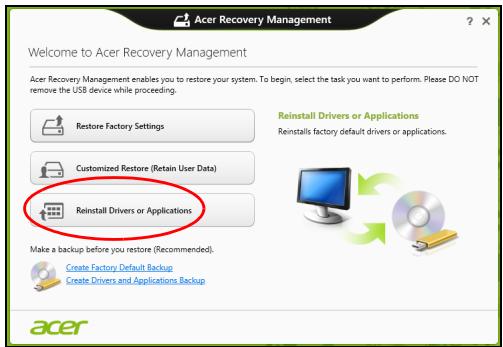
Reinstall Drivers or Applications
Reinstalls factory default drivers or applications.

Customized Restore (Retain User Data)

Reinstall Drivers or Applications

Make a back-up before you restore (Recommended).

Create Factory Default Backup
Create Drivers and Applications Backup
acer
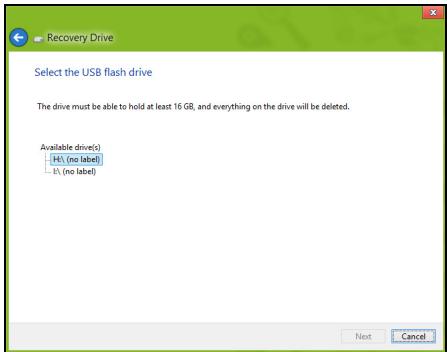
- Click Create Factory Default Backup. The Recovery Drive window opens.

Make sure Copy contents from the recovery partition to the recovery drive is selected. This provides the most complete and safest recovery backup.
-
Plug in the USB drive then click Next.
-
Make sure your USB drive has enough capacity before continuing. The recovery backup requires at least 16 GB of storage
- You will be shown the backup progress on the screen.
- Follow the process until it completes.
- After creating the recovery backup, you can choose to delete the recovery information on your computer. If you delete this information, you can only use the USB recovery backup to restore your computer, if you lose or erase the USB drive, you cannot restore your computer.

- Unplug the USB drive and label it clearly.
Important: Write a unique, descriptive label on the backup, such as 'Windows Recovery Backup'. Make sure you keep the backup in a safe place that you will remember.
Creating a drivers and applications backup
To create a Drivers and Applications Backup, that contains the factory-loaded software and drivers needed by your computer, you may use either a USB storage drive or, if your computer features a DVD recorder, one or more blank recordable DVDs.
- From Start, type 'Recovery' and then click Acer Recovery Management in the list of apps.

Acer Recovery Management
?X
Welcome to Acer Recovery Management
Acer Recovery Management enables you to restore your system. To begin, select the task you want to perform. Please DO NOT remove the USB device while proceeding.

Reinstall Drivers or Applications
Reinstalls factory default drivers or applications.

Customized Restore (Retain User Data)

Reinstall Drivers or Applications

Make a back-up before you restore (Recommended).

Create Factory Default Backup
Create Drivers and Applications Backup
acer
- Click Create Drivers and Applications Backup.
Plug in the USB drive or insert a blank DVD into the optical drive, then click Next.
- If you are using a USB drive, make sure your USB drive has enough capacity before continuing.

- If using DVDs, it will also show the number of blank, recordable discs you will need to complete the recovery discs. Make sure that you have the required number of identical, blank discs.
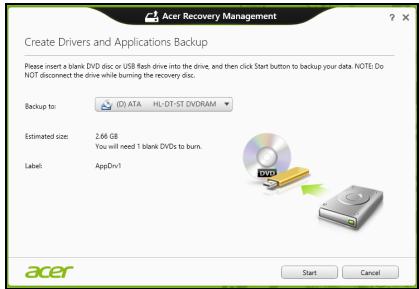
-
Click Start to copy files. You will be shown the backup progress on the screen.
-
Follow the process until it completes:
-
If you are using optical discs, the drive ejects each disc as it completes burning it. Remove the disc from the drive and mark it with a permanent marker.
If multiple discs are required, insert a new disc when prompted, then click OK. Continue until the process is complete.
- If you are using a USB drive, unplug the drive and label it clearly.
Important: Write a unique, descriptive label on each backup, such as 'Drivers and Applications Backup'. Make sure you keep the backup in a safe place that you will remember.
Recovering your system
To recover your system:
- Perform minor fixes.
If only one or two items of software or hardware have stopped working correctly, the problem may be solved by reinstalling the software or the device drivers.
To reinstall software and drivers that were pre-installed at the factory, see "Reinstalling drivers and applications" on page 45.
For instructions on reinstalling software and drivers that were not preinstalled, see that product's documentation or support Web site.
- Revert to a previous system condition.
If reinstalling software or drivers does not help, then the problem may be solved by returning your system to a previous state when everything was working correctly.
For instructions, see "Returning to an earlier system snapshot" on page 48.
- Reset your operating system.
If nothing else has solved the problem and you want to reset your system, but keep your user information, see "Returning your system to its factory condition" on page 49.
- Reset your system to its factory condition.
If nothing else has solved the problem and you want to reset your system to factory condition, see "Returning your system to its factory condition" on page 49.
Reinstalling drivers and applications
As a troubleshooting step, you may need to reinstall the applications and device drivers that came pre-installed on your computer from the factory. You can reinstall using either your hard drive or the backup you have created.
-
Other applications - If you need to reinstall software that did not come pre-installed on your computer, you need to follow that software's installation instructions.
-
New device drivers - If you need to reinstall device drivers that did not come pre-installed on your computer, follow the instructions provided with the device.
If you are reinstalling using Windows and the recovery information stored on your computer:
- From Start, type 'Recovery' and then click Acer Recovery Management in the list of apps.
-
Click Reinstall Drivers or Applications.
-
You should see the Contents section of the Acer Resource Center.

- Click the install icon for the item you want to install, then follow the onscreen instructions to complete the installation. Repeat this step for each item you want to reinstall.

If you are reinstalling from a Drivers and Applications Backup on a DVD or USB drive:
-
Insert the Drivers and Applications Backup into the disc drive or connect it to a free USB port.
-
If you inserted a DVD wait for Acer Resource Center to start.
- If Acer Resource Center does not start automatically, press the Windows key +
, then double-click on the optical drive icon. - If you are using a USB drive, press the Windows key +
, then double-click on the drive that contains the backup. Double-click on ResourceCenter.
2. You should see the Contents section of the Acer Resource Center.

- Click the install icon for the item you want to install, then follow the onscreen prompts to complete the installation. Repeat this step for each item you want to reinstall.

Returning to an earlier system snapshot
Microsoft System Restore periodically takes a 'snapshot' of your system settings and saves them as restore points. In most cases of hard-to-resolve software problems, you can return to one of these restore points to get your system running again.
Windows automatically creates an additional restore point each day, and also each time you install software or device drivers.
Note: For more information about using Microsoft System Restore, from Start, type 'Help' and then click Help and Support in the list of apps. Type 'Windows system restore' in the Search Help box, then press Enter.
Returning to a restore point
- From Start, type 'Control Panel' and then click Control Panel in the list of apps.
- Click System and Security > Action Center, then click Recovery at the bottom of the window.
- Click Open System Restore, then Next.
- Click the latest restore point (at a time when your system worked correctly), click Next, then Finish.
- A confirmation window appears; click Yes. Your system is restored using the restore point you specified. This process may take several minutes, and may restart your computer.
Returning your system to its factory condition
If your computer experiences problems that are not recoverable by other methods, you may need to reinstall everything to return your system to its factory condition. You can recover from either your hard drive or the recovery backup you have created.
-
If you can still run Windows and have not deleted the recovery partition, see "Recovering from Windows" on page 50.
-
If you cannot run Windows, your original hard drive has been completely re-formatted or you have installed a replacement hard drive, see "Recovering from a recovery backup" on page 54.
Recovering from Windows
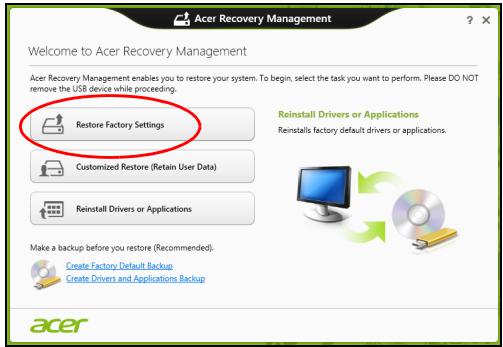
Start Acer Recovery Management:
- From Start, type 'Recovery' and then click Acer Recovery Management in the list of apps.
Two options are available, Restore Factory Settings (Reset my PC) or Customized Restore (Refresh my PC).
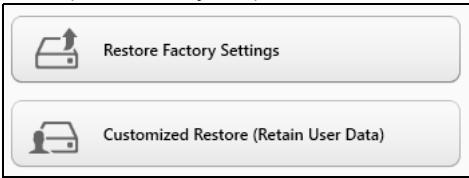
Restore Factory Settings deletes everything on your hard drive, then reinstalls Windows and all software and drivers that were pre-installed on your system. If you can access important files on your hard drive, back them up now. See "Restore Factory Settings with Acer Recovery Management" on page 51.
Customized Restore will attempt to retain your files (user data) but will reinstall all software and drivers. Software installed since you purchased your PC will be removed (except software installed from the Windows Store). See "Customized Restore with Acer Recovery Management" on page 53.
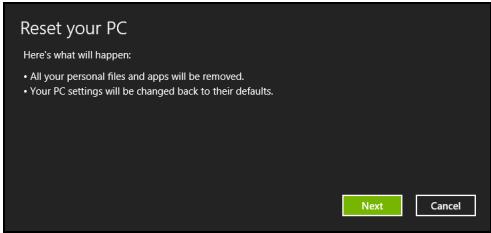
1. Click Restore Factory Settings.
Caution: 'Restore Factory Settings' will erase all files on your hard drive.
- If your computer is configured with two operating systems (only available on certain systems), a window opens with the option to restore either Windows 7 or Windows 8. If you choose Windows 7, your computer will restart and restore Windows 7. If you choose Windows 8, Reset your PC opens, as described below.
Note: To fully enjoy Windows 8 features after changing from Windows 7, enter the BIOS (press <F2> when starting your computer) and change Boot Mode to EFI. If you reinstall Windows 7, you must change Boot Mode back to Legacy before restarting your computer.
- The Reset your PC window opens.

Images for reference only.
- Click Next, then choose how to erase your files:
a. Just remove my files quickly erases all files before restoring your computer and takes about 30 minutes.
b. Fully clean the drive completely cleans the drive after each file is erased, so no files can be viewed after the recovery. Cleaning the drive takes much longer, up to 5 hours, but is much more secure as old files are completely removed.
- Click Reset.
- The recovery process begins by restarting your computer, then continues by copying files to your hard drive.
- After the recovery has finished, you can start using your computer by repeating the first-start process.
Customized Restore with Acer Recovery Management
1. Click Customized Restore (Retain User Data).

Acer Recovery Management
?X
Welcome to Acer Recovery Management
Acer Recovery Management enables you to restore your system. To begin, select the task you want to perform. Please DO NOT remove the USB device while proceeding.

Reinstall Drivers or Applications
Reinstalls factory default drivers or applications.

Customized Restore (Retain User Data)

Reinstall Drivers or Applications


Make a backup before you restore (Recommended).

Create Factory Default Backup
Create Drivers and Applications Backup

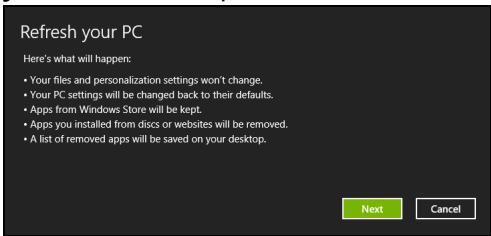
2. The Refresh your PC window opens.
Refresh your PC
Here's what will happen:
- Your files and personalization settings won't change.
- Your PC settings will be changed back to their defaults.
- Apps from Windows Store will be kept.
- Apps you installed from discs or websites will be removed.
- A list of removed apps will be saved on your desktop.
Next
Cancel
3. Click Next, then Refresh.
4. The recovery process begins by restarting your computer, then continues by copying files to your hard drive. This process takes about 30 minutes.
Recovering from a recovery backup
To recover from a recovery backup on a USB drive:
- Find your recovery backup.
- Plug in the USB drive and turn on your computer.
- If it is not already enabled, you must enable the F12 Boot Menu:
a. Press <F2> when starting your computer.
b. Use the left or right arrow keys to select the Main menu.
c. Press the down key until F12 Boot Menu is selected, press
d. Use the left or right arrow keys to select the Exit menu.
e. Depending on the type of BIOS your computer uses, select Save Changes and Exit or Exit Saving Changes and press Enter. Select OK or Yes to confirm.
f. Your computer will restart.
- During startup, press
to open the boot menu. The boot menu allows you to select which device to start from, select the USB drive.
a. Use your arrow keys to select USB Device, then press Enter.
b. Windows starts from the recovery backup instead of the normal startup process.
-
Select your keyboard type.
-
Select Troubleshooting and then choose the type of recovery to use:
a. Click Advanced then System Restore to start Microsoft System Restore:
Microsoft System Restore periodically takes a 'snapshot' of your system settings and saves them as restore points. In most cases of hard-to-resolve software problems, you can return to one of these restore points to get your system running again.
b. Click Reset your PC to start the reset process:
Reset your PC deletes everything on your hard drive, then reinstalls Windows and all software and drivers that were pre-installed on your system. If you can access important files on your hard drive, back them up now. See "Reset your PC from the recovery backup" on page 56.
c. Click Refresh your PC to start the refresh process:
Refresh your PC will attempt to retain your files (user data) but will reinstall all software and drivers. Software installed since you purchased your PC will be removed (except software installed from the Windows Store). See "Refresh your PC from the recovery backup" on page 57.
Reset your PC from the recovery backup
Caution: Reset your PC will erase all files on your hard drive.
1. The Reset your PC window opens.
Images for reference only.
2. Click Next.
- Select the operating system to recover (normally only one option is available).
- Choose to keep any changes to the hard drive:
a. If you have deleted the recovery partition or otherwise changed the partitions on the hard drive and want to keep these changes, select No.
b. To completely restore your computer to Factory Settings, select Yes.
5. Choose how to erase your files:
a. Just remove my files quickly erases all files before restoring your computer and takes about 30 minutes.
b. Fully clean the drive completely cleans the drive after each file is erased, so no files can be viewed after the recovery. Cleaning the drive takes much longer, up to 5 hours, but is much more secure as old files are completely removed.
- Click Reset.
- After the recovery has finished, you can start using your computer by repeating the first-start process.
Refresh your PC from the recovery backup
- The Refresh your PC window opens.
- Click Next.
- Select the operating system to recover (normally only one option is available).
- Click Refresh.
- The recovery process begins by restarting your computer, then continues by copying files to your hard drive. This process takes about 30 minutes.
ACER CLEAR.FI
Note: Only for certain models.
With Acer clear-fi, you can enjoy videos, photos and music. Stream media from, or to, other devices with Acer clear-fi installed.
Note: All devices must be connected to the same network.
To watch videos or listen to music open clear-fi Media, to browse photos open clear-fi Photo.
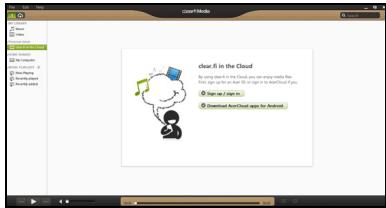
Important: When you first open a clear-fi application, Windows Firewall will ask for permission to allow clear-fi to access the network. Select Allow Access in each window.
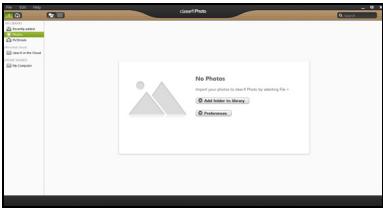
Navigating media and photos
The list in the left panel shows your computer ('My Library'), then other devices if any are connected to your network ('Home Shared').
To view files on your computer, select one of the categories under 'My Library', then browse the files and folder on the right.
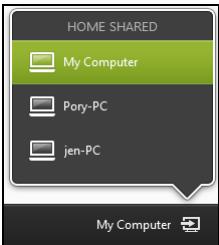
Shared files
Devices connected to your network are shown in the Home Shared section. Select a device, then the select the category to explore.
After a short delay, shared files and folders are shown on the right. Browse to the file you want to play, then double-click to start playback.
Use the media controls in the bar across the bottom of the screen to control playback. For example, when music is selected, you can play, pause or stop playback, and adjust the volume.

Note: You must activate sharing on the device that stores the files. Open clear.fi on the device that stores the files, select Edit then make sure Share my library on local network is active.

Which devices are compatible?
Certified Acer devices with clear-fi or DLNA software can be used with the clear-fi software. These include DLNA-compliant PCs, smartphones, and NAS (Network Attached Storage) devices.
Playing to another device
If you want to play the media on another device, you need to do the following:
- In the bottom right corner, select Play to.
- Select the remote device that will be used to play the file.
Note: Only devices optimised for playback are available in this list, certain PCs and storage devices will not appear. To add a Windows PC to this list, open Windows Media Player, select Stream and Allow remote control of my Player...
3. Select a file in the main window, then use the media controls in the bar across the bottom of the screen to control the remote device.
For more help, go to http://www.acer.com/clearfi/download/.
POWER MANAGEMENT
This computer has a built-in power management unit that monitors system activity. System activity refers to any activity involving one or more of the following devices: keyboard, mouse, hard disk, peripherals connected to the computer, and video memory. If no activity is detected for a period of time, the computer stops some or all of these devices in order to conserve energy.
Saving power
Disable Fast startup
Your computer uses Fast startup to start quickly, but also uses a small amount of power to check for signals to start. These checks will slowly drain your computer's battery.
If you prefer to reduce your computer's power requirements and environmental impact, turn off Fast startup:
Note: If Fast startup is off, your computer will take longer to start from Sleep. If your computer features Acer Instant On or Acer Always Connect, these will also be turned off.
Your computer will also not start if it receives an instruction to start over a network (Wake on LAN).
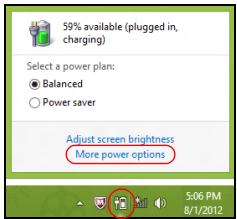
- Open the Desktop.
- Click Power Options in the Notification area.
- Select More Power Options.
- Select Choose what the power buttons do.
- To access Shutdown Settings, select Change settings that are currently unavailable.

6. Scroll down and disable Turn on fast startup.

7. Select Save changes.
BATTERY PACK
The computer uses a battery pack that gives you long use between charges.
Battery pack characteristics
The battery pack has the following characteristics:
- Employs current battery technology standards.
- Delivers a battery-low warning.
The battery is recharged whenever you connect the computer to the AC adapter. Your computer supports charge-in-use, enabling you to recharge the battery while you continue to operate the computer. However, recharging with the computer turned off results in a significantly faster charge time.
The battery will come in handy when you travel or during a power failure. It is advisable to have an extra fully charged battery pack available as backup. Contact your dealer for details on ordering a spare battery pack.
Charging the battery
To charge the battery, first make sure that it is correctly installed in the battery bay. Plug the AC adapter into the computer, and connect to a mains power outlet. You can continue to operate your computer on AC power while your battery is charging. However, charging the battery with the computer turned off results in a significantly faster charge time.
Note: You are advised to charge the battery before retiring for the day. Charging the battery overnight before traveling enables you to start the next day with a fully charged battery.
Conditioning a new battery pack
Before you use a battery pack for the first time, there is a conditioning process that you should follow:
- Insert the new battery without turning the computer on.
- Connect the AC adapter and fully charge the battery.
- Disconnect the AC adapter.
- Turn on the computer and operate using battery power.
- Fully deplete the battery until the battery-low warning appears.
- Reconnect the AC adapter and fully charge the battery again.
Follow these steps again until the battery has been charged and discharged three times.
Use this conditioning process for all new batteries, or if a battery hasn't been used for a long time. If the computer is to be stored for more than two weeks, you are advised to remove the battery pack from the unit.
Warning! Do not expose battery packs to temperatures below 0^ ( 32^ ) or above 45^ ( 113^ ). Extreme temperatures may adversely affect the battery pack.
By following the battery conditioning process you condition your battery to accept the maximum possible charge. Failure to follow this procedure will prevent you from obtaining the maximum battery charge, and will also shorten the effective lifespan of the battery.
In addition, the useful lifespan of the battery is adversely affected by the following usage patterns:
- Using the computer on constant AC power with the battery inserted. If you want to use constant AC power, you are advised to remove the battery pack after it is fully charged.
- Not discharging and recharging the battery to its extremes, as described above.
- Frequent use; the more you use the battery, the faster it will reach the end of its effective life. A standard computer battery has a life span of about 300 charges.
Optimizing battery life
Optimizing battery life helps you get the most out of battery operation, prolonging the charge/recharge cycle and improving recharging efficiency. You are advised to follow the suggestions set out below:
Purchase an extra battery pack.
- Use AC power whenever possible, reserving battery for on-the-go use.
- Eject a PC Card if it is not being used, as it will continue to draw power (for selected models).
- Store the battery pack in a cool, dry place. The recommended temperature is 10^ ( 50^ ) to 30^ ( 86^ ). Higher temperatures cause the battery to self-discharge faster.
- Excessive recharging decreases the battery life.
- Look after your AC adapter and battery.
Checking the battery level
The Windows power meter indicates the current battery level. Rest the cursor over the battery/power icon on the taskbar to see the battery's present charge level.
Battery-low warning
When using battery power pay attention to the Windows power meter.
Warning! Connect the AC adapter as soon as possible after the battery-low warning appears. Data will be lost if the battery to become fully depleted and the computer shuts down.
When the battery-low warning appears, the recommended course of action depends on your situation:
| Situation | Recommended Action |
| The AC adapter and a power outlet are available. | 1. Plug the AC adapter into the computer, and then connect to the mains power supply. 2. Save all necessary files. 3. Resume work. Turn off the computer if you want to recharge the battery rapidly. |
| An extra fully charged battery pack is available. | 1. Save all necessary files. 2. Close all applications. 3. Turn off the computer. 4. Replace the battery pack. 5. Turn on the computer and resume work. |
| The AC adapter or a power outlet is unavailable. You have no spare battery pack. | 1. Save all necessary files. 2. Close all applications. 3. Turn off the computer. |
Installing and removing the battery pack
Important: Before removing the battery from the unit, connect the AC adapter if you want to continue using your computer. Otherwise, turn off the computer first.
To install a battery pack:
- Align the battery with the open battery bay; make sure that the end with the contacts will enter first, and that the top surface of the battery is facing up.
- Slide the battery into the battery bay and gently push until the battery locks in place.
To remove a battery pack:
- Slide the battery release latch to release the battery.
- Pull the battery from the battery bay.
TRAVELING WITH YOUR COMPUTER
This section gives you tips and hints to consider when moving around or traveling with your computer.
Disconnecting from the desktop
Follow these steps to disconnect your computer from external accessories:
- Save any open files.
- Remove discs from optical drive(s).
- Shut down the computer.
- Close the display cover.
- Disconnect the cord from the AC adapter.
- Disconnect the keyboard, pointing device, printer, external monitor and other external devices.
- Disconnect the Kensington lock if you are using one to secure the computer.
Moving around
When you are just moving within short distances, for example, from your office desk to a meeting room.
Preparing the computer
Before moving the computer, close and latch the display cover to place it in Sleep mode. You can now safely take the computer anywhere you go within the building. To bring the computer out of Sleep mode, open the display; then press and release the power button.
If you are taking the computer to a client's office or a different building, you may choose to shut down the computer:
Press the Windows key +
You can put the computer in Sleep mode by pressing Fn + F4 . Then close the display.
When you are ready to use the computer again, open the display; then press and release the power button.
Note: The computer may enter Hibernation or Deep Sleep mode after being in Sleep mode for a period of time.
What to bring to meetings
If your meeting is relatively short, you probably do not need to bring anything with you other than your computer. If your meeting will be longer, or if your battery is not fully charged, you may want to bring the AC adapter with you to plug in your computer in the meeting room.
If the meeting room does not have an electrical outlet, reduce the drain on the battery by putting the computer in Sleep mode. Press <Fn> + <F4> or close the display cover whenever you are not actively using the computer.
Taking the computer home
When you are moving from your office to your home or vice versa.
Preparing the computer
After disconnecting the computer from your desktop, follow these steps to prepare the computer for the trip home:
- Check that you have removed all media and compact discs from the drive(s). Failure to remove the media can damage the drive head.
- Pack the computer in a protective case that can prevent the computer from sliding around and cushion it if it should fall.
Caution: Avoid packing items next to the top cover of the computer. Pressure against the top cover can damage the screen.
What to take with you
Unless you have some items at home, take the following items with you:
- AC adapter and power cord.
The printed setup poster.
Special considerations
Follow these guidelines to protect your computer while traveling to and from work:
- Minimize the effects of temperature changes by keeping the computer with you.
- If you need to stop for an extended period of time and cannot carry the computer with you, leave the computer in the trunk of the car to avoid exposing the computer to excessive heat.
- Changes in temperature and humidity can cause condensation. Allow the computer to return to room temperature, and inspect the screen for condensation before turning on the computer. If the temperature change is greater than 10^ ( 18^ ), allow the computer to come to room temperature slowly. If possible, leave the computer for 30 minutes in an environment with a temperature between outside and room temperature.
Setting up a home office
If you frequently work on your computer at home, you may want to purchase a second AC adapter for use at home. With a second AC adapter, you can avoid carrying the extra weight to and from home.
If you use your computer at home for significant periods of time, you might also want to add an external keyboard, monitor or mouse.
Traveling with the computer
When you are moving within a larger distance, for instance, from your office building to a client's office building or traveling locally.
Preparing the computer
Prepare the computer as if you were taking it home. Make sure that the battery in the computer is charged. Airport security may require you to turn on your computer when carrying it into the gate area.
What to take with you
Take the following items with you:
- AC adapter
- Spare, fully-charged battery pack(s)
Additional printer driver files if you plan to use another printer
Special considerations
In addition to the guidelines for taking the computer home, follow these guidelines to protect your computer while traveling:
Always take the computer as carry-on luggage.
- If possible, have the computer inspected by hand. Airport security X-ray machines are safe, but do not put the computer through a metal detector.
Traveling internationally with the computer
When you are moving from country to country.
Preparing the computer
Prepare the computer as you would normally prepare it for traveling.
What to bring with you
Bring the following items with you:
-
AC adapter.
-
Power cords that are appropriate for the country to which you are traveling.
- Spare, fully-charged battery packs.
Additional printer driver files if you plan to use another printer.
Proof of purchase, in case you need to show it to customs officials.
International Travelers Warranty passport.
Special considerations
Follow the same special considerations as when traveling with the computer.
In addition, these tips are useful when traveling internationally:
- When traveling in another country, check that the local AC voltage and the AC adapter power cord specifications are compatible. If not, purchase a power cord that is compatible with the local AC voltage. Do not use converter kits sold for appliances to power the computer.
- If you are using the modem, check if the modem and connector are compatible with the telecommunications system of the country you are traveling in.
SECURING YOUR COMPUTER
Your computer is a valuable investment that you need to take care of. Learn how to protect and take care of your computer.
Security features include hardware and software locks — a security notch and passwords.
Using a computer security lock
The computer comes with a Kensington-compatible security slot for a security lock.
Wrap a computer security lock cable around an immovable object such as a table or handle of a locked drawer. Insert the lock into the notch and turn the key to secure the lock. Some keyless models are also available.
Using passwords
Passwords protect your computer from unauthorized access. Setting these passwords creates several different levels of protection for your computer and data:
- Supervisor Password prevents unauthorized entry into the BIOS utility. Once set, you must enter this password to gain access to the BIOS utility. See "BIOS utility" on page 88.
-
User Password secures your computer against unauthorized use. Combine the use of this password with password checkpoints on boot-up and resume from Hibernation (if available) for maximum security.
-
Password on Boot secures your computer against unauthorized use. Combine the use of this password with password checkpoints on boot-up and resume from Hibernation (if available) for maximum security.
Important: Do not forget your Supervisor Password! If you forget your password, please get in touch with your dealer or an authorized service center.
Entering passwords
When a password is set, a password prompt appears in the center of the display screen.
- When the Supervisor Password is set, a prompt appears when you press <F2> to enter the BIOS utility at boot-up.
- Type the Supervisor Password and press
to access the BIOS utility. If you enter the password incorrectly, a warning message appears. Try again and press . - When the User Password is set and the password on boot parameter is enabled, a prompt appears at boot-up.
- Type the User Password and press
to use the computer. If you enter the password incorrectly, a warning message appears. Try again and press .
Important: You have three chances to enter a password. If you fail to enter the password correctly after three tries, the system halts. Press and hold the power button for four seconds to shut down the computer. Then turn on the computer again, and try again.
WIRELESS NETWORKS
Connecting to the Internet
Your computer's wireless connection is turned on by default.
Windows will detect and display a list of available networks during setup. Select your network and enter the password if required.
Otherwise, open Internet Explorer and follow the instructions.
Please refer to your ISP or router documentation.
Wireless networks
A wireless LAN or WLAN is a wireless local area network, which may link two or more computers without using wires. Setting up a wireless network is easy and allows you to share files, peripheral devices and an Internet connection.
What are benefits of a wireless network?
Mobility
Wireless LAN systems allow you and other users of your home network to share access to files and devices connected to the network, for example a printer or scanner.
Also you can share an internet connection with other computers in your home.
Installation speed and simplicity
Installing a wireless LAN system can be fast and easy and eliminates the need to pull cables through walls and ceilings.
Components of a wireless LAN
To set up your Wireless network at home you need to have the following:
Access point (router)
Access points (routers) are two-way transceivers that broadcast data into the surrounding environment. Access points act as a mediator between wired and wireless network. Most routers have a built-in DSL modem that will allow you access to a high speed DSL internet connection. The ISP (Internet Service Provider) you have chosen normally supplies a modem/rodter with the subscription to their services. Read carefully the documentation supplied with your Access point/rodter for detailed setup instructions.
USING A BLUETOOTH CONNECTION
Bluetooth is a technology enabling you to transfer data wirelessly over short distances between many different types of devices. Bluetooth-enabled devices include computers, cell phones, tablets, wireless headsets, and keyboards.
To use Bluetooth, you must ensure the following:
- Bluetooth is enabled on both devices.
- Your devices are "paired" (or connected).
Enabling and disabling Bluetooth
The Bluetooth adapter must be enabled on both devices. For your computer, this may be an external switch, a software setting, or a separate Bluetooth dongle plugged into the computer's USB port (if no internal Bluetooth adapter is available).
Note: Please check your devices owner's manual to determine how to turn on its Bluetooth adapter.
Then, from the notification area, click the Bluetooth icon, and select Open Settings.
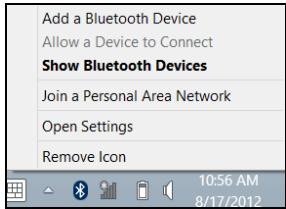
Select the Allow Bluetooth devices to find this computer check box, click Apply, and then click OK.
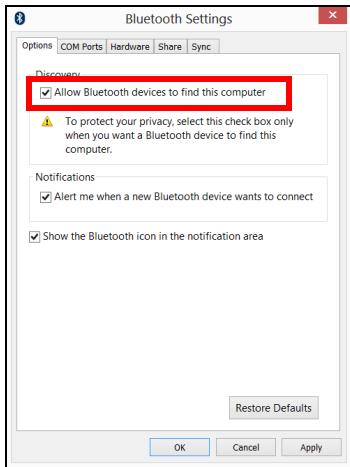
The Bluetooth adapter in your computer is now enabled and ready for you to add Bluetooth devices.
To disable your computer's Bluetooth adapter, do the following:
- Press the Windows key +
and then type Wireless. - In the results, click on Wireless.
- Click the toggle under Bluetooth to enable/disable it.
Adding a Bluetooth device
Every new device must first be "paired" with your computer's Bluetooth adapter. This means it must first be authenticated for security purposes. You only need to pair once. After that, simply turning on the Bluetooth adapter of both devices will connect them.
From the notification area, click the Bluetooth icon, and select Add a Bluetooth Device.
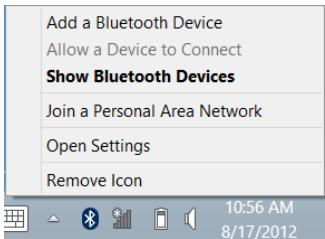
Click on the device you want to add.
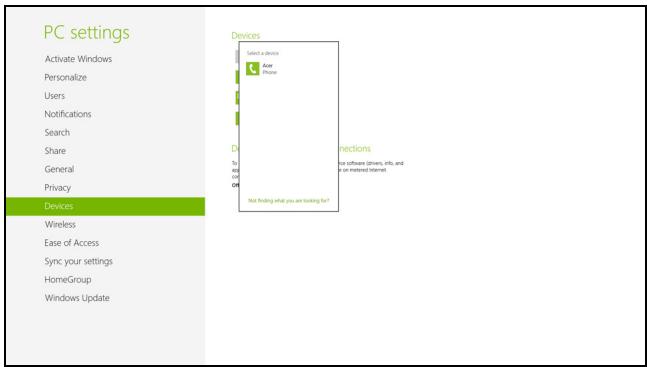
A code displays on your computer, which should match the code displayed on your device. Select Yes. Then, accept the pairing from your device.
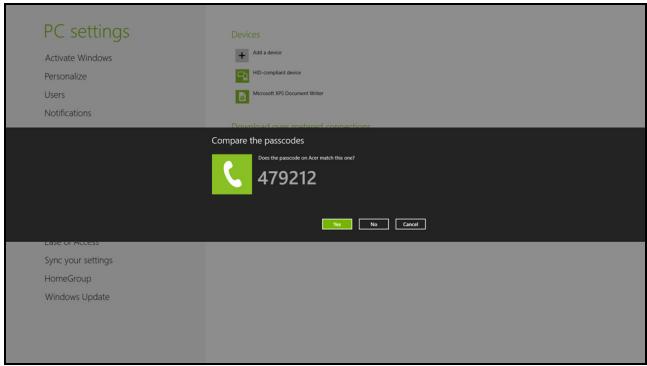
Note: Some devices using older versions of the Bluetooth technology require both devices to enter a PIN. In the case of one of the devices not having any inputs (as in a headset), the passcode is hardcoded into the device (usually "0000" or "1234"). Consult your device's user manual for more information.
Your device will show up in the list of devices if it was successfully paired. Open the Control Panel and under Hardware and Sound click on View devices and printers. Right click on your device and select Advanced Operations > Connect to operation window.
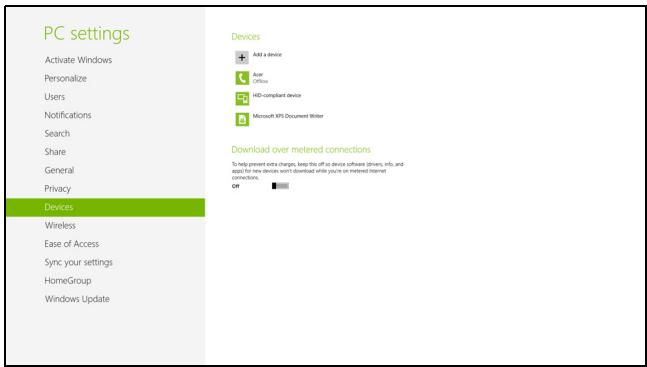
The operation window enables you to play music and audio from your device through your computer, send files to your device and change Bluetooth settings.

HDMI
HDMI (High-Definition Multimedia Interface) is an industry-supported, uncompressed, all-digital audio/video interface. HDMI provides an interface between any compatible digital audio/video source, such as a set-top box, DVD player, and A/V receiver and a compatible digital audio and/or video monitor, such as a digital television (DTV), over a single cable.
Use the HDMI port on your computer to connect with high-end audio and video equipment. Single cable implementation allows tidy setup and fast connection.
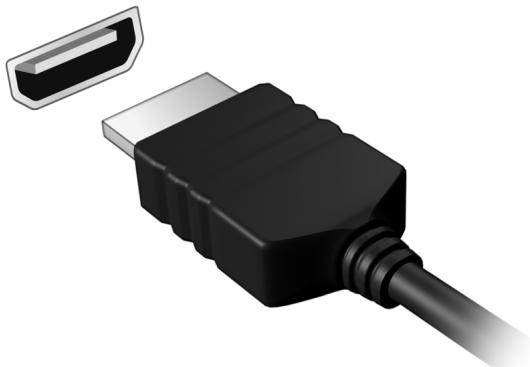
UNIVERSAL SERIAL BUS (USB)
The USB port is a high-speed serial bus which allows you to connect USB peripherals without taking up system resources.
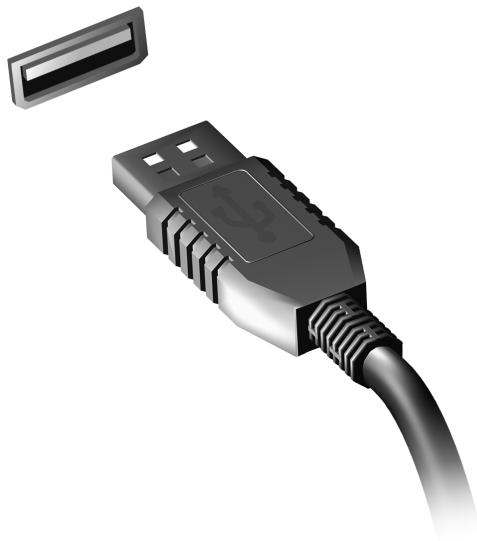
BIOS UTILITY
The BIOS utility is a hardware configuration program built into your computer's BIOS.
Your computer is already properly configured and optimized, and you do not need to run this utility. However, if you encounter configuration problems, you may need to run it.
To activate the BIOS utility, press <F2> during the POST while the computer logo is being displayed.
Boot sequence
To set the boot sequence in the BIOS utility, activate the BIOS utility, then select Boot from the categories listed at the top of the screen.
Setting passwords
To set a password on boot, activate the BIOS utility, then select Security from the categories listed at the top of the screen. Find Password on boot: and use the <F5> and <F6> keys to enable this feature.
Frequently Asked Questions
The following is a list of possible situations that may arise during the use of your computer. Easy solutions are provided for each one.
I turned on the power, but the computer does not start or boot up.
Look at the power indicator:
-
If it is not lit, no power is being supplied to the computer. Check the following:
-
If you are using on the battery, it may be low and unable to power the computer. Connect the AC adapter to recharge the battery pack.
- Make sure that the AC adapter is properly plugged into the computer and to the power outlet.
If it is lit, check the following:
- Is a disc in the optical drive? Remove it and press <Ctrl> + <Alt> + <Del> to restart the system.
- Do you have a USB storage device (USB disk or smartphone) plugged into your computer? Unplug it and press <Ctrl> + <Alt> + <Del> to restart the system.
Nothing appears on the screen.
The computer's power management system automatically blanks the screen to save power. Press any key to turn the display back on.
If pressing a key does not turn the display back on, three things might be the cause:
- The brightness level might be too low. Press <Fn> + <> (increase) to adjust the brightness level.
- The display device might be set to an external monitor. Press the display toggle hotkey to toggle the display back to the computer.
- If the Sleep indicator is lit, the computer is in Sleep mode. Press and release the power button to resume.
No audio is heard from the computer.
Check the following:
- The volume may be muted. In Windows, look at the volume control (speaker) icon on the taskbar. If it is crossed-out, click the icon and deselect the Mute all option.
- The volume level may be too low. In Windows, look at the volume control icon on the taskbar. You can also use the volume control buttons to adjust the volume.
- If headphones, earphones or external speakers are connected to the line-out port on the computer, the internal speakers automatically turn off.
I want to eject the optical drive tray without turning on the power
There is a mechanical eject hole on the optical drive. Simply insert the tip of a pen or paperclip into the hole and push to eject the tray.
The keyboard does not respond.
Try attaching an external keyboard to a USB port on the computer. If it works, contact your dealer or an authorized service center as the internal keyboard cable may be loose.
The printer does not work
Check the following:
- Make sure that the printer is connected to a power outlet and that it is turned on.
- Make sure that the printer cable is connected securely to a USB port and the corresponding port on the printer.
Requesting service
International Travelers Warranty (ITW)
Your computer is backed by an International Travelers Warranty (ITW) that gives you security and peace of mind when traveling. Our worldwide network of service centers are there to give you a helping hand.
An ITW passport comes with your computer. This passport contains all you need to know about the ITW program. A list of available, authorized service centers is in this handy booklet. Read this passport thoroughly.
Always have your ITW passport on hand, especially when you travel, to receive the benefits from our support centers. Place your proof-of-purchase in the flap located inside the front cover of the ITW passport.
If the country you are traveling in does not have an Acer-authorized ITW service site, you can still get in contact with our offices worldwide. Please visit www.acer.com.
Before you call
Please have the following information available when you call Acer for online service, and please be at your computer when you call. With your support, we can reduce the amount of time a call takes and help solve your problems efficiently. If there are error messages or beeps reported by your computer, write them down as they appear on the screen (or the number and sequence in the case of beeps).
You are required to provide the following information:
Name:
Address:
Telephone number:
Machine and model type:
Serial number:
Date of purchase:
Tips and hints for using Windows 8
We know this is a new operating system that will take some getting used to, so we've created a few pointers to help you get started.
Three concepts you might want to keep in mind
1. Start
The Start button is no longer available; you can launch apps from the Start screen.
2. Tiles
Live tiles are similar to thumbnails of the apps.
3. Charms
Charms allow you to perform useful functions, such as sharing content, turning off your PC or changing settings.
How do I access the charms?
Swipe the right-hand edge of the screen inwards.
How do I get to Start?
Press the Windows key; or swipe the right-hand edge of the screen inwards and tap the Start charm.
How do I jump between apps?
Swipe the left-hand edge of the screen inwards to cycle through apps that are currently running.
How do I turn off my computer?
Swipe the right-hand edge of the screen inwards, tap Settings > Power and select the action you'd like to take.
Why is there a new interface?
The new interface for Windows 8 is designed to work well with touch input. Windows Store apps will automatically use the whole screen and don't require closing in the traditional way. Windows Store apps will be displayed on Start using live-tiles.
What are 'live tiles?'
Live tiles are similar to thumbnails of the app that will be updated with new content whenever you're connected to the Internet. So, for example, you can view weather or stock updates without needing to open the app.
How do I unlock my computer?
Swipe the lock screen upwards and tap a user account icon to unlock the computer. If your account has a password set, you will need to enter the password to continue.
Tap and hold the preview icon to see the characters you've entered to ensure the password is correct.
How do I personalize my computer?
You can personalize Start with a different background image or by arranging the tiles to suit your personal needs.
To change the background, swipe the right-hand edge of the screen inwards and tap Settings > Change PC settings > Personalize. Tap Start screen at the top of the page and select a color and image.
How do I move tiles?
Tap and hold a tile to select it, then drag it to the place on Start that you want it to appear. Other tiles will be moved to accommodate the tile in its new location.
Can I make tiles bigger or smaller?
Tap and drag the tile downwards and release it. Select Smaller or Larger from the menu that appears at the bottom of the screen.
How do I personalize the Lock screen?
You can personalize the lock screen with a different image or to show you quick status and notifications to suit your personal needs.
To change the background, swipe the right-hand edge of the screen inwards and tap Settings > Change PC settings > Personalize. Tap Lock screen at the top of the page and select the image and apps you would like to see on the lock screen.
So, how do I close an app?
Swipe the window downwards from the top of the screen, and past the halfway point of the screen.
Can I change the screen resolution?
Swipe the right-hand edge of the screen inwards and tap Search, tap the text box to open the onscreen keyboard and start typing 'Control Panel' to display the results; tap Control Panel > Adjust screen resolution.
I want to use Windows in the way that I'm used to - give me my desktop back!
From Start tap the Desktop tile to see a traditional desktop. You can pin apps you frequently use to the taskbar to easily open them.
If you click a app that is not a Windows Store app, Windows will automatically open the app using Desktop.
Where are my apps?
Swipe the right-hand edge of the screen inwards and tap Search, type the name of the app you would like to open using the pop-up keyboard. Results will be displayed on the left-hand side of the screen.
To view the complete list of apps, swipe upwards from the bottom of the screen and tap All apps.
How do I make an app appear on Start?
If you're in All apps and you want to make a app appear on Start, tap and drag the app downwards and release it. Tap Pin to Start from the menu that appears at the bottom of the screen.
How do I remove a tile from Start?
Tap and drag the app downwards and release it. Tap Unpin from Start from the menu that appears at the bottom of the screen.
How do I make an app appear on my taskbar in Desktop?
If you're in All apps and you want to make a app appear on the taskbar in Desktop, tap and drag the app downwards and release it. Select Pin to taskbar from the menu that appears at the bottom of the screen.
How do I install apps?
You can download Windows Store apps from Store. You will need to have a Microsoft ID to purchase and download apps from Store.
I can't find apps like Notepad and Paint! Where are they?
Swipe the right-hand edge of the screen inwards and tap Search, type the name of the app you would like to open using the pop-up keyboard. Alternatively, open All apps and scroll to 'Windows Accessories' to see the list of legacy programs.
What is a Microsoft ID (account)?
A Microsoft account is an email address and password that you use to sign in to Windows. You can use any email address, but it is best if you choose the one you already use to communicate with friends and sign in to your favorite websites. When you sign in to your PC with a Microsoft account, you'll connect your PC to the people, files, and devices you care about.
Do I need one?
You do not need a Microsoft ID to use Windows 8, but it makes life easier because you can sync data across different machines you sign in to using a Microsoft ID.
How do I get one?
If you've already installed Windows 8 and didn't sign in with a Microsoft account or you don't have a Microsoft account and want to get one, swipe the right-hand edge of the screen inwards and tap Settings > Change PC settings > Users > Switch to a Microsoft account, and follow the onscreen instructions.
How do I add a favorite to Internet Explorer?
Internet Explorer 10 doesn't have traditional favorites, instead you can pin shortcuts to Start. Once you have the page open, swipe upwards from the bottom edge of the screen to open the menu at the bottom of the screen. Tap Pin to Start.
How do I check for Windows updates?
Swipe the right-hand edge of the screen inwards and tap Settings > Change PC settings > Windows Updates. Tap Check for updates now.
Where can I get more information?
For more information please visit the following pages:
- Windows 8 tutorials: www.acer.com/windows8-tutorial
- Support FAQs: www.acer.com/support
Troubleshooting
This chapter shows you how to deal with common system problems.
Read it before calling a technician if a problem occurs. Solutions to more serious problems require opening up the computer. Do not attempt to open the computer yourself; contact your dealer or authorized service center for assistance.
Troubleshooting tips
This computer incorporates an advanced design that delivers onscreen error message reports to help you solve problems.
If the system reports an error message or an error symptom occurs, see "Error messages" below. If the problem cannot be resolved, contact your dealer. See "Requesting service" on page 91.
Error messages
If you receive an error message, note the message and take the corrective action. The following table lists the error messages in alphabetical order together with the recommended course of action.
| Error messages | Corrective action |
| CMOS battery bad | Contact your dealer or an authorized service center. |
| CMOS checksum error | Contact your dealer or an authorized service center. |
| Disk boot failure | Insert a system (bootable) disk, then press <Enter> to reboot. |
| Equipment configuration error | Press <F2> (during POST) to enter the BIOS utility, then press Exit in the BIOS utility to reboot. |
| Hard disk 0 error | Contact your dealer or an authorized service center. |
| Hard disk 0 extended type error | Contact your dealer or an authorized service center. |
| I/O parity error | Contact your dealer or an authorized service center. |
| Keyboard error or no keyboard connected | Contact your dealer or an authorized service center. |
| Keyboard interface error | Contact your dealer or an authorized service center. |
| Memory size mismatch | Press <F2> (during POST) to enter the BIOS utility, then press Exit in the BIOS utility to reboot. |
If you still encounter problems after going through the corrective measures, please contact your dealer or an authorized service center for assistance.
REGULATIONS AND SAFETY NOTICES
FCC STATEMENT
This device has been tested and found to comply with the limits for a Class B digital device pursuant to Part 15 of the FCC rules. These limits are designed to provide reasonable protection against harmful interference in a residential installation. This device generates, uses, and can radiate radio frequency energy and, if not installed and used in accordance with the instructions, may cause harmful interference to radio communications.
However, there is no guarantee that interference will not occur in a particular installation. If this device does cause harmful interference to radio or television reception, which can be determined by turning the device off and on, the user is encouraged to try to correct the interference by one or more of the following measures:
- Reorient or relocate the receiving antenna.
- Increase the separation between the device and receiver.
- Connect the device into an outlet on a circuit different from that to which the receiver is connected.
- Consult the dealer or an experienced radio/television technician for help.
Notice: Shielded cables
All connections to other computing devices must be made using shielded cables to maintain compliance with FCC regulations.
NOTICE: PERIPHERAL DEVICES
Only peripherals (input/output devices, terminals, printers, etc.) certified to comply with the Class B limits may be attached to this equipment. Operation with non-certified peripherals is likely to result in interference to radio and TV reception.
Caution: Changes or modifications not expressly approved by the manufacturer could void the user's authority, which is granted by the Federal Communications Commission, to operate this computer.
NOTICE FOR CANADA
This Class B digital apparatus complies with Canadian ICES-003.
The LCD unit is produced with high-precision manufacturing techniques. Nevertheless, some pixels may occasionally misfire or appear as black or red dots. This has no effect on the recorded image and does not constitute a malfunction.
RADIO DEVICE REGULATORY NOTICES
Note: Below regulatory information is for models with wireless LAN and / or Bluetooth only.
To prevent radio interference to the licensed service, this device is intended to be operated indoors.
This product complies with the radio frequency and safety standards of any country or region in which it has been approved for wireless use. Depending on configurations, this product may or may not contain wireless radio devices (such as wireless LAN and/or Bluetooth modules). Below information is for products with such devices.
Declaration of Conformity for EU countries
Hereby, Acer, declares that this computer is in compliance with the essential requirements and other relevant provisions of Directive 1999/5/EC.
Wireless operation channels for different domains
N. America
2.412-2.462 GHz
Ch01 through Ch11
Japan
2.412-2.484 GHz
Ch01 through Ch14
Europe ETSI
2.412-2.472 GHz
Ch01 through Ch13
France: Restricted wireless frequency bands
Some areas of France have a restricted frequency band. The worst case maximum authorized power indoors is:
- 10 mW for the entire 2.4 GHz band (2400 MHz - 2483.5 MHz)
- 100 mW for frequencies between 2446.5 MHz and 2483.5 MHz
Note: Channels 10 through 13 inclusive operate in the band 2446.6 MHz to 2483.5 MHz.
There are few possibilities for outdoor use: On private property or on the private property of public persons, use is subject to a preliminary authorization procedure by the Ministry of Defense, with maximum authorized power of 100mW in the 2446.5 - 2483.5 MHz band. Use outdoors on public property is not permitted.
In the departments listed below, for the entire 2.4 GHz band:
Maximum authorized power indoors is 100mW
Maximum authorized power outdoors is 10mW
Departments in which the use of the 2400 - 2483.5 MHz band is permitted with an EIRP of less than 100mW indoors and less than 10mW outdoors:
| 01 Ain Orientales | 25 Doubs | 59 Nord | 71 Saone et Loire |
| 02 Aisne | 26 Drome | 60 Oise | 75 Paris |
| 03 Allier | 32 Gers | 61 Orne | 82 Tarn et Garonne |
| 05 Hautes Alpes | 36 Indre | 63 Puy Du Dome | 84 Vaucluse |
| 08 Ardennes | 37 Indre et Loire | 64 Pyrenees | 88 Vosges |
| 09 Ariege | 41 Loir et Cher | Atlantique | 89 Yonne |
| 11 Aude | 45 Loret | 66 Pyrenees | 90 Territoire de |
| 12 Aveyron | 50 Manche | 67 Bas Rhin | Belfort |
| 16 Charente | 55 Meuse | 68 Haut Rhin | 94 Val de Marne |
| 24 Dordogne | 58 Nievre | 70 Haute Saone |
This requirement is likely to change over time, allowing you to use your wireless LAN card in more areas within France.
Please check with ART for the latest information (www.artelecom.fr).
Note: Your WLAN Card transmits less than 100 mW, but more than 10 mW.
List of national codes
This equipment may be operated in the following countries:
| Country | ISO 3166 | Country | ISO 3166 |
| 2 letter code | 2 letter code | ||
| Austria | AT | Malta | MT |
| Belgium | BE | Netherlands | NT |
| Cyprus | CY | Poland | PL |
| Czech Republic | CZ | Portugal | PT |
| Denmark | DK | Slovakia | SK |
| Estonia | EE | Slovenia | SL |
| Finland | FI | Spain | ES |
| France | FR | Sweden | SE |
| Germany | DE | United Kingdom | GB |
| Greece | GR | Iceland | IS |
| Hungary | HU | Liechtenstein | LI |
| Ireland | IE | Norway | NO |
| Italy | IT | Switzerland | CH |
| Latvia | LV | Bulgaria | BG |
| Lithuania | LT | Romania | RO |
| Luxembourg | LU | Turkey | TR |
CANADA - LOW-POWER LICENSE-EXEMPT RADIO COMMUNICATION DEVICES (RSS-210)
Exposure of humans to RF fields (RSS-102)
The computer employs low gain integral antennas that do not emit RF field in excess of Health Canada limits for the general population; consult Safety Code 6, obtainable from Health Canada's website at www.hc-sc.gc.ca/rpb.
This device complies with RSS210 of Industry Canada.
This Class B digital apparatus complies with Canadian ICES-003, Issue 4, and RSS-210, No 4 (Dec 2000) and No 5 (Nov 2001).
"To prevent radio interference to the licensed service, this device is intended to be operated indoors and away from windows to provide maximum shielding. Equipment (or its transmit antenna) that is installed outdoors is subject to licensing."
Caution: When using IEEE 802.11a wireless LAN, this product is restricted to indoor use due to its operation in the 5.15- to 5.25-GHz frequency range. Industry Canada requires this product to be used indoors for the frequency range of 5.15 GHz to 5.25 GHz to reduce the potential for harmful interference to co-channel mobile satellite systems. High power radar is allocated as the primary user of the 5.25 to 5.35 GHz and 5.65 to 5.85-GHz bands. These radar stations can cause interference with and/or damage to this device.
The maximum allowed antenna gain for use with this device is 6 dBi in order to comply with the E.I.R.P limit for the 5.25- to 5.35 and 5.725 to 5.85 GHz frequency range in point-to-point operation.
The FCC RF safety requirement
The radiated output power of the wireless LAN Mini PCI Card and Bluetooth card is far below the FCC radio frequency exposure limits. Nevertheless, the computer shall be used in such a manner that the potential for human contact during normal operation is minimized as follows:
- Users are requested to follow the RF safety instructions on wireless option devices that are included in the user's manual of each RF option device.
Caution: To comply with FCC RF exposure compliance requirements, a separation distance of at least 20~cm (8 inches) must be maintained between the antenna for the integrated wireless LAN Mini PCI Card built in to the screen section and all persons.
Note: The wireless Mini PCI adapter implements a transmission diversity function. The function does not emit radio frequencies simultaneously from both antennas. One of the antennas is selected automatically or
manually (by users) to ensure good quality radiocommunication.
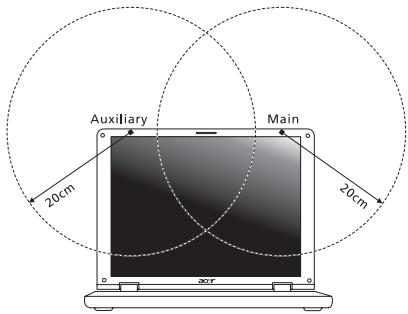
- This device is restricted to indoor use due to its operation in the 5.15 to 5.25 GHz frequency range. FCC requires this product to be used indoors for the frequency range 5.15 to 5.25 GHz to reduce the potential for harmful interference to co-channel Mobile Satellite systems.
-
High power radar is allocated as the primary user of the 5.25 to 5.35 GHz and 5.65 to 5.85 GHz bands. These radar stations can cause interference with and/or damage this device.
-
An improper installation or unauthorized use may cause harmful interference to radio communications. Also any tampering of the internal antenna will void the FCC certification and your warranty.
CANADA - LOW-POWER LICENSE-EXEMPT RADIO COMMUNICATION DEVICES (RSS-210)
Exposure of humans to RF fields (RSS-102)
The computer employs low gain integral antennas that do not emit RF field in excess of Health Canada limits for the general population; consult Safety Code 6, obtainable from Health Canada's website at www.hc-SC.gc.ca/rpb.
This device complies with RSS210 of Industry Canada.
This Class B digital apparatus complies with Canadian ICES-003, Issue 4, and RSS-210, No 4 (Dec 2000) and No 5 (Nov 2001).
"To prevent radio interference to the licensed service, this device is intended to be operated indoors and away from windows to provide maximum shielding. Equipment (or its transmit antenna) that is installed outdoors is subject to licensing."
Caution: When using IEEE 802.11a wireless LAN, this product is restricted to indoor use due to its operation in the 5.15- to 5.25-GHz frequency range. Industry Canada requires this product to be used indoors for the frequency range of 5.15 GHz to 5.25 GHz to reduce the potential for harmful interference to co-channel mobile satellite systems. High power radar is allocated as the primary user of the 5.25 to 5.35 GHz and 5.65 to 5.85-GHz bands. These radar stations can cause interference with and/or damage to this device.
The maximum allowed antenna gain for use with this device is 6 dBi in order to comply with the E.I.R.P limit for the 5.25- to 5.35 and 5.725 to 5.85 GHz frequency range in point-to-point operation.
Aspire V5-571P
Acer Backup Manager 39
Récupération 42
Considerations speciales 80
Considerations speciales 82
Cartes factices fournies
Welcome to Acer Backup Manager
Select one action below to start managing your data.
Back Up My Files
Pick and choose which files to back up or let the program find it all for you.
Back Up My Files
The file backup helps you create a complete backup of your documentation. Choose the file or folder for the backup and then select the destination for the backup. Once you have selected the destination, the final step is to schedule the backup. Click on the Backup My Files button to create a backup.
Image My Drive
Make a complete image backup of your drive.
Migrate My Files
Transfer your files from another computer to this computer.
Clear out / Restore Files
Remove seldom used files to free up space or restore files from your backup.

Launch My Backup Profiles
acer


Directly enter "My Backup Profiles" next time
Acer Recovery Management
?X
Welcome to Acer Recovery Management
Acer Recovery Management enables you to restore your system. To begin, select the task you want to perform. Please DO NOT remove the USB device while proceeding.

Reinstall Drivers or Applications
Reinstalls factory default drivers or applications.

Customized Restore (Retain User Data)

Reinstall Drivers or Applications
Make a backup before you restore (Recommended).

Create Factory Default Backup
Create Drivers and Applications Backup
acer

Here's what will happen:
- All your personal files and apps will be removed.
- Your PC settings will be changed back to their defaults.
Next
Cancel
Acer Recovery Management
?X
Welcome to Acer Recovery Management
Acer Recovery Management enables you to restore your system. To begin, select the task you want to perform. Please DO NOT remove the USB device while proceeding.

Customized Restore (Retain User Data)

Reinstall Drivers or Applications
Make a backup before you restore (Recommended).

Create Factory Default Backup
Create Drivers and Applications Backup
acer
Reinstall Drivers or Applications
Reinstalls factory default drivers or applications.

Here's what will happen:
- Your files and personalization settings won't change.
- Your PC settings will be changed back to their defaults.
- Apps from Windows Store will be kept.
- Apps you installed from discs or websites will be removed.
A list of removed apps will be saved on your desktop.
Next
Cancel
This Class B digital apparatus complies with Canadian ICES-003.
This Class B digital apparatus complies with Canadian ICES-003, Issue 4, and RSS-210, No 4 (Dec 2000) and No 5 (Nov 2001).
"To prevent radio interference to the licensed service, this device is intended to be operated indoors and away from windows to provide maximum shielding. Equipment (or its transmit antenna) that is installed outdoors is subject to licensing."
Acer Backup Manager 43
Welcome to Acer Backup Manager
Select one action below to start managing your data.
Back Up My Files
Pick and choose which files to back up or let the program find it all for you.
Back Up My Files
The file backup helps you create a complete backup of your documentation.
Choose the file or folder for the backup and then select the destination for
the backup. Once you have selected the destination, the final step is to
schedule the backup. Click on the Backup My Files button to create a backup.
Image My Drive
Make a complete image backup of your drive.
Migrate My Files
Transfer your files from another computer to this computer.
Clear out / Restore Files
Remove seldom used files to free up space or restore files from your backup.

Launch My Backup Profiles

acer

Directly enter "My Backup Profiles" next time
Eigene Sicherungsprofile startennot sure about translation of this string.

Acer Recovery Management
?X
Welcome to Acer Recovery Management
Acer Recovery Management enables you to restore your system. To begin, select the task you want to perform. Please DO NOT remove the USB device while proceeding.

Reinstall Drivers or Applications
Reinstalls factory default drivers or applications.

Customized Restore (Retain User Data)

Reinstall Drivers or Applications
Make a backup before you restore (Recommended).

Create Factory Default Backup
Create Drivers and Applications Backup
acer
Here's what will happen:
- All your personal files and apps will be removed.
- Your PC settings will be changed back to their defaults.
Next
Cancel
Acer Recovery Management
?X
Welcome to Acer Recovery Management
Acer Recovery Management enables you to restore your system. To begin, select the task you want to perform. Please DO NOT remove the USB device while proceeding.

Customized Restore (Retain User Data)

Reinstall Drivers or Applications
Make a backup before you restore (Recommended).

Create Factory Default Backup
Create Drivers and Applications Backup
acer
Reinstall Drivers or Applications
Reinstalls factory default drivers or applications.

Here's what will happen:
- Your files and personalization settings won't change.
- Your PC settings will be changed back to their defaults.
- Apps from Windows Store will be kept.
- Apps you installed from discs or websites will be removed.
A list of removed apps will be saved on your desktop.
Next
Cancel
Acer Backup Manager 38
Ripristino 41
visitare il site www.acer-group.com/public/Sustainability/sustainability01.htm.
ENERGY STAR

Here's what will happen:
- Your files and personalization settings won't change.
- Your PC settings will be changed back to their defaults.
- Apps from Windows Store will be kept.
- Apps you installed from discs or websites will be removed.
- A list of removed apps will be saved on your desktop.
Next
Cancel
ITW (International Traveler's Warranty)
Come arriv o a Start?
Acer Backup Manager 38
Recuperación 41
Acer Recovery Management
?X
Welcome to Acer Recovery Management
Acer Recovery Management enables you to restore your system. To begin, select the task you want to perform. Please DO NOT remove the USB device while proceeding.

Reinstall Drivers or Applications
Reinstalls factory default drivers or applications.

Customized Restore (Retain User Data)

Reinstall Drivers or Applications

Make a backup before you restore (Recommended).

Create Factory Default Backup
Create Drivers and Applications Backup
acer
Here's what will happen:
- Your files and personalization settings won't change.
- Your PC settings will be changed back to their defaults.
- Apps from Windows Store will be kept.
- Apps you installed from discs or websites will be removed.
- A list of removed apps will be saved on your desktop.
Next
Cancel
www.acer-group.com/public/Sustainability/sustainability01.htm.
ENERGY STAR

Welcome to Acer Backup Manager
Select one action below to start managing your data.
Back Up My Files
Pick and choose which files to back up or let the program find it all for you.
Back Up My Files
The file backup helps you create a complete backup of your documentation. Choose the file or folder for the backup and then select the destination for the backup. Once you have selected the destination, the final step is to schedule the backup. Click on the Backup My Files button to create a backup.
Image My Drive
Make a complete image backup of your drive.
Migrate My Files
Transfer your files from another computer to this computer.

Clear out / Restore Files
Remove seldom used files to free up space or restore files from your backup.

Launch My Backup Profiles
acer

Directly enter "My Backup Profiles" next time
Inicie AcerRecovery Management:
- A partir de Iniciar, introduza 'Recovery' e depuis clique em Acer Recovery Management na lista de aplicacoes.
Acer Recovery Management
?X
Welcome to Acer Recovery Management
Acer Recovery Management enables you to restore your system. To begin, select the task you want to perform. Please DO NOT remove the USB device while proceeding.

Reinstall Drivers or Applications
Reinstalls factory default drivers or applications.

Customized Restore (Retain User Data)

Reinstall Drivers or Applications
Make a backup before you restore (Recommended).

Create Factory Default Backup
Create Drivers and Applications Backup


Here's what will happen:
- All your personal files and apps will be removed.
- Your PC settings will be changed back to their defaults.
Next
Cancel
This Class B digital apparatus complies with Canadian ICES-003.
www.hc-sc.gc.ca/rpb.
Acer Backup Manager 39
Herstel 42
Start AcerRecovery Management
Acer Recovery Management
?X
Welcome to Acer Recovery Management
Acer Recovery Management enables you to restore your system. To begin, select the task you want to perform. Please DO NOT remove the USB device while proceeding.

Reinstall Drivers or Applications
Reinstalls factory default drivers or applications.

Customized Restore (Retain User Data)

Reinstall Drivers or Applications


Make a backup before you restore (Recommended).

Create Factory Default Backup
Create Drivers and Applications Backup

Here's what will happen:
- Your files and personalization settings won't change.
- Your PC settings will be changed back to their defaults.
- Apps from Windows Store will be kept.
- Apps you installed from discs or websites will be removed.
- A list of removed apps will be saved on your desktop.
Next
Cancel
ITW (International Travelers Warranty)
This Class B digital apparatus complies with Canadian ICES-003.
INNHOLDSFORTEGNESELL
Acer Backup Manager 35
Gjenopppretting 38
BEGYNNE MED BEGYNNELSEN
Vi vil gjerne takke deg for at du har valgt en Acer-notisbokmaskin til dine mobile databehandlingsbehov.
Dine veiledere
Welcome to Acer Backup Manager
Select one action below to start managing your data.
Back Up My Files
Pick and choose which files to back up or let the program find it all for you.
Image My Drive
Make a complete image backup of your drive.
Migrate My Files
Transfer your files from another computer to this computer.
Clear out / Restore Files
Remove seldom used files to free up space or restore files from your backup.

Launch My Backup Profiles
Back Up My Files
The file backup helps you create a complete backup of your documentation. Choose the file or folder for the backup and then select the destination for the backup. Once you have selected the destination, the final step is to schedule the backup. Click on the Backup My Files button to create a backup.

Directly enter "My Backup Profiles" next time

Når du skal starte Acer Backup Manager i Windows 8, starter du ganske enkelt med Å skrive "Backup Manager". Du kan ögså velge Acer Backup Manager i skrivebordsmodus. Dette vil Åpne velkomstskjermbildet. Fra dette skjermbildet kan du velge typen sikkerhetskopi du vil lage.
Start Acer Recovery Management:
Acer Recovery Management
?X
Welcome to Acer Recovery Management
Acer Recovery Management enables you to restore your system. To begin, select the task you want to perform. Please DO NOT remove the USB device while proceeding.

Reinstall Drivers or Applications

Customized Restore (Retain User Data)
Reinstalls factory default drivers or applications.

Reinstall Drivers or Applications

Make a backup before you restore (Recommended).

Create Factory Default Backup
Create Drivers and Applications Backup
acer
Acer Recovery Management
?X
Welcome to Acer Recovery Management
Acer Recovery Management enables you to restore your system. To begin, select the task you want to perform. Please DO NOT remove the USB device while proceeding.

Reinstall Drivers or Applications
Reinstalls factory default drivers or applications.

Customized Restore (Retain User Data)

Reinstall Drivers or Applications


Make a backup before you restore (Recommended).

Create Factory Default Backup
Create Drivers and Applications Backup
acer
Here's what will happen:
- Your files and personalization settings won't change.
- Your PC settings will be changed back to their defaults.
- Apps from Windows Store will be kept.
- Apps you installed from discs or websites will be removed.
- A list of removed apps will be saved on your desktop.
Next
Cancel
Deaktiver hurtigoppstart
International Travelers Warranty (ITW)
Datamaskinen er sikret med en garantiordning som kalles "International Travelers Warranty" (ITW), som gir deg trygghet og sjelefred nár du er på reise. Vårt verdensomspennende nettverk av servicesentre er der forå gi deg en hjelpende.Hand.
Et ITW-pass følger med datamaskinen. Dette passet inneholder alt du behov er vite om ITW-programmet. En liste over tilgengelige, autorisierte servicesentre finner du i dette praktiske heftet. Les grundig gjennom dette passet.
This Class B digital apparatus complies with Canadian ICES-003.
Acer Backup Manager 36
Gendannelse 39
www.acer-group.com/public/Sustainability/sustainability01.htm.
ENERGY STAR

ENERGY STAR
Start Acer Recovery Management:
- Fra Start indtaster du 'Recovery', hvorefter du klikker på AcerRecovery Management i listen over apps.
Acer Recovery Management
?X
Welcome to Acer Recovery Management
Acer Recovery Management enables you to restore your system. To begin, select the task you want to perform. Please DO NOT remove the USB device while proceeding.

Reinstall Drivers or Applications

Customized Restore (Retain User Data)
Reinstalls factory default drivers or applications.

Reinstall Drivers or Applications

Make a backup before you restore (Recommended).

Create Factory Default Backup
Create Drivers and Applications Backup
acer
This Class B digital apparatus complies with Canadian ICES-003.
Acer Backup Manager 37
Aterställning 40
Welcome to Acer Backup Manager
Select one action below to start managing your data.
Back Up My Files
Pick and choose which files to back up or let the program find it all for you.
Image My Drive
Make a complete image backup of your drive.
Migrate My Files
Transfer your files from another computer to this computer.
Clear out / Restore Files
Remove seldom used files to free up space or restore files from your backup.

Launch My Backup Profiles
Back Up My Files
The file backup helps you create a complete backup of your documentation. Choose the file or folder for the backup and then select the destination for the backup. Once you have selected the destination, the final step is to schedule the backup. Click on the Backup My Files button to create a backup.
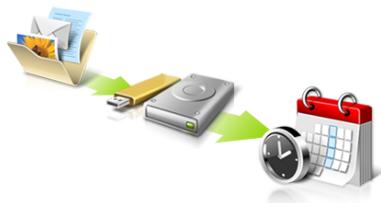
Directly enter "My Backup Profiles" next time
acer
Acer Recovery Management
?X
Welcome to Acer Recovery Management
Acer Recovery Management enables you to restore your system. To begin, select the task you want to perform. Please DO NOT remove the USB device while proceeding.

Reinstall Drivers or Applications
Reinstalls factory default drivers or applications.

Customized Restore (Retain User Data)


Reinstall Drivers or Applications
Make a back-up before you restore (Recommended).


Acer Recovery Management
?X
Welcome to Acer Recovery Management
Acer Recovery Management enables you to restore your system. To begin, select the task you want to perform. Please DO NOT remove the USB device while proceeding.

Reinstall Drivers or Applications
Reinstalls factory default drivers or applications.

Customized Restore (Retain User Data)

Reinstall Drivers or Applications
Make a back-up before you restore (Recommended).

Create Factory Default Backup
Create Drivers and Applications Backup

acer
Starta Acer Recovery Management:
Acer Recovery Management
?X
Welcome to Acer Recovery Management
Acer Recovery Management enables you to restore your system. To begin, select the task you want to perform. Please DO NOT remove the USB device while proceeding.

Reinstall Drivers or Applications

Customized Restore (Retain User Data)
Reinstalls factory default drivers or applications.

Reinstall Drivers or Applications

Make a backup before you restore (Recommended).

Create Factory Default Backup
Create Drivers and Applications Backup
acer
Acer Recovery Management
?X
Welcome to Acer Recovery Management
Acer Recovery Management enables you to restore your system. To begin, select the task you want to perform. Please DO NOT remove the USB device while proceeding.

Reinstall Drivers or Applications
Reinstalls factory default drivers or applications.

Customized Restore (Retain User Data)

Reinstall Drivers or Applications


Make a backup before you restore (Recommended).

Create Factory Default Backup
Create Drivers and Applications Backup

Here's what will happen:
- Your files and personalization settings won't change.
- Your PC settings will be changed back to their defaults.
- Apps from Windows Store will be kept.
- Apps you installed from discs or websites will be removed.
- A list of removed apps will be saved on your desktop.
Next
Cancel
Here's what will happen:
- Your files and personalization settings won't change.
- Your PC settings will be changed back to their defaults.
- Apps from Windows Store will be kept.
- Apps you installed from discs or websites will be removed.
A list of removed apps will be saved on your desktop.
Next
Cancel
This Class B digital apparatus complies with Canadian ICES-003.
Acer Backup Manager 38
Palauttaminen 41
Welcome to Acer Backup Manager
Select one action below to start managing your data.
Back Up My Files
Pick and choose which files to back up or let the program find it all for you.
Image My Drive
Make a complete image backup of your drive.
Migrate My Files
Transfer your files from another computer to this computer.
Clear out / Restore Files
Remove seldom used files to free up space or restore files from your backup.

Launch My Backup Profiles
Back Up My Files
The file backup helps you create a complete backup of your documentation. Choose the file or folder for the backup and then select the destination for the backup. Once you have selected the destination, the final step is to schedule the backup. Click on the Backup My Files button to create a backup.

Directly enter "My Backup Profiles" next time
Acer Recovery Management
?X
Welcome to Acer Recovery Management
Acer Recovery Management enables you to restore your system. To begin, select the task you want to perform. Please DO NOT remove the USB device while proceeding.

Reinstall Drivers or Applications
Reinstalls factory default drivers or applications.

Customized Restore (Retain User Data)

Reinstall Drivers or Applications

Make a back-up before you restore (Recommended).

Create Factory Default Backup
Create Drivers and Applications Backup
acer
Acer Recovery Management
?X
Welcome to Acer Recovery Management
Acer Recovery Management enables you to restore your system. To begin, select the task you want to perform. Please DO NOT remove the USB device while proceeding.

Reinstall Drivers or Applications
Reinstalls factory default drivers or applications.

Customized Restore (Retain User Data)

Reinstall Drivers or Applications

Make a back-up before you restore (Recommended).

Create Factory Default Backup
Create Drivers and Applications Backup
acer
Kännista Acer Recovery Management:
Acer Recovery Management
?X
Welcome to Acer Recovery Management
Acer Recovery Management enables you to restore your system. To begin, select the task you want to perform. Please DO NOT remove the USB device while proceeding.

Reinstall Drivers or Applications
Reinstalls factory default drivers or applications.

Customized Restore (Retain User Data)

Reinstall Drivers or Applications

Make a backup before you restore (Recommended).

Create Factory Default Backup
Create Drivers and Applications Backup
acer
PykoBoDCTBO NOIb3OBaTeJIa
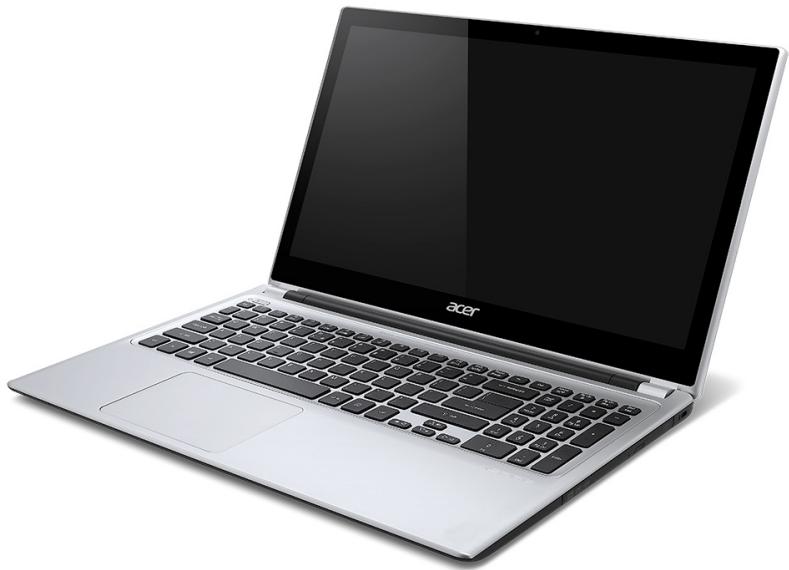
© 2012. Bce npaba 3aunuenebl.
PykoBODCTBO noJIb3OBATeIa KOMIbIbTepa Aspire V5-571P
3Ta peJaKuJy: 11/2012
Homep moedien:
CepnHbI HOpEp:
Даразokупк:
MecTo nokynk:
ÖçʌBJIΕΗΝΕ
Be3onacnoctb nydo6cTBo pa60tbl
BhauaJe O rnaBHOM 20
Baun pykoBocTba 20
OchOBHbIe cBeHEnI O6 yXoE 3a
KOMNbIOTepOM N COBeTbI NO paBote C Hm. 21
BkIIOueHne N BbIKIOueHne KOMnbIOTepa.21
YxO3a KOMnBIOTePOM 21
YxOa 3a aanTePOM nepemEnHOro ToKa... 22
Yxoid 3a akkymyIaTOPOM 23
YnCTka N TexHnueckoe OcbnyKuBaHne..... 23
3HaKOMCTBO C Hoy6yKom Acer 25
BvI Ha 3KpaH 26
BnKlaBnaTpybl 28
Bvnd cIeBa 30
CbeHnO6 nHTeppeCE USB 3.0 31
Bud cnpaba 32
Bud cH3y 34
Pa6oTa c KnaBnAtypoi 36
KnaBnIbNoKIpOBKn IBCTpoEHNa
Unpobary KnaBnata. 36
"Toprue" KnaBn.. 38
KlambuWindows 41
CehcopnaheIb 42
OchobblncnoIb3OBaHnnaCecHcOpHo nanei..42
KectbHa ceHcOpHo nane 43
Acer Backup Manager 45
BocctaHOBJIeHne 49
Co3dahne pe3epBHOI KOONN dJa
BOCCTaHOBJIeHn 50
Co3dAnHe pe3epBHOJ KOHn IpaBepOBu
npJIOKeHn 53
BocctaHOBHeHne CnCTembl 56
IpeyectahOBka dpaBepOBn
npiloxhen 57
Bo3BpaT K npeIbIyUzEmy
"MOMeHTaJIbHOMy CHIMKy" CNTeMbI 61
BocctaHOBJeHHe CNTEmbI Do
nepBoHaayaIbHoro coCTOaHnra 62
BocctaHOBJHHe n3 cAMoCNCTeMbI
Windows 63
BocctaHOBJHHe n3 pe3epBHOI KOIN
Для BOCCTaHOBJIeHnЯ 67
Acer clear-fi 72
Habiragno mo mednaqaiam n
ΦoToRaΦnA M 73
ObueoocTynHbI paHbl 73
KaKne yCToPOnCTBa COBMeCTnMbI? 74
Bocnpo3BeDHeHa npyroe
yctpoiCTBO 75
UnpaBneHne nHTaHnem 76
3HeprocbepexeHne 76
AkkymyIaTOp 79
XapakTeepntnAn aKymyIaTopa. 79
3apka akkymyItopa 79
OnTmM3auncaPcoka cnjx6bI
aKKyMylrTopa 81
Пюверka уровnia зараза
aKKymyTopa 82
PpeDynpexKeHne O Hn3KOM ypOBHe
3apya aKKyMylTopa. 82
YCTAHOBKA IN 3BJEUHME
aKymyIaTOPHO6aTapei 84
NyTeWeCTBnC KOMNbIOTepom
OTKJIIOUeHne OT pa6Oyero cToJa 85
IpeBnKeHn 85
IoiroTOBka KOMnbIOTepa. 86
Tu npHocntb Ha coBeeuHa.. 87
3a6npaem KOMbIOpTe p DOMoI 87
IoiroTOBka KOMnbIOTepa. 87
UTo 6paTb c coBoi. 88
Oco6bte coo6paekhen 88
UcTpaBAmDOMaunHnOΦnc. 89
IpyteeeCTBnC KOMnbTePOM 89
IoiroTOBka KOMnbIOTepa. 89
UTo 6paTb c co6oB 89
Ocoobie cooobpaxeHna 90
Be6-caTbI B 6pay3epe Internet
Explorer? 118
Kak npobepntb haJIynchne o6HOBHeHn
ДЯ Windows? 118
Tde MoXHo nOlyuHTb DOnoJIHnTeBHyU
HHΦopMaζHη? 118
UcTpaHHe HEnCnpaBHOCTeI 119
CobetbI no noncky uyctpaehnIO
HencnpabHocTei 119
CoobueHn o6 ouh6kax 120
COOTBETCTBNE HOPMaTUBHbIM
Tpe6oBaHnM n 3aMeHaHn no
6e3oNaChOCTN
122
Бezonaachoctb nydo6ctbo pa60tbl
PpabNlaTexnK6e3oNaChocTn
BhImateIbHo npOHTaTe cIeDyUoHne IHCTpyKuIN. CoxpaHnte 3TOT DOkymENT nIa IcNoIb3OBaHn B KaueCTBe cIpaBOUHOH INΦopMaUN B 6dyUeM. Co6IIOJaTe BCE IHCTpyKuIN nIpeDyIpEJXdEHN, HaHeceHHbIe Ha KOpNc 3TOr OYCTpOcTBA.
BbIKJIouHeHne ycTpoIcTBa nepeq YnCTKoI
Ipeed nctk0 3t0r oycpoiCTBa otKIOUHTe erO ot po3ETKn 3neKTPoNTaHn.Bo Bpemn cNCTKN He npIMeHnTe JxIDKHe IIN a3pO3OJbHbIe MOIOUne cpeDCTBA.ДЯ nCTKN mONb3yIe BVaNKHyIO TKAHb.
PpeDynpexkdeHn
DocTyn K wHpy nHTaHna
IocTyK p03eTke 3neKtpoNtAHnB, B KOTOpyU BCTabJIaERc TshyP nHTaHnA, He DOnJKeH 6bITb 3aTpYdHeH, a cama po3eTKa DOnJXHa HaxOJNTCB MaKcImaJIbHO 6bn3KO K nONb3OBaTeJIIO yCTpOJCTBa. PIn Heo6xOJIMOCtN OTKJIouHTb NITaHnE OobpyDoBAnH 063aTeJIbHO BbIHMaJIte 5hyp PtNTAHnI 3 p03eTKn 3neKtpoNtAHnA.
OTKJIIOUeHHe NCTOUYHka NITaHnA
Pn npokluoyehnn n OTkluoyehnn nntaHn oNcTochNka Hnprjxehn coBnOdaTe cIeMyUoune IHCTpyKznm:
UctaHOBtne IcToCHNK PnTahNIA, npexde Yem NODKJIyOaTb UHyp PNTAHNIG K po3eTKe CTeBOrO 3NeKTPoPITAHNIG.
ÖtknouaTe UHyp nHTAHNIEpeEd OTCOeINHeHEm NCTOCHNKA nHTAHNIA OT KOMNbIOTepa.
EcIn CnCTema 3aINbIbaeTcOr HeCKoJIbKHX NcTOUHKnOB PtNaTHN,To OTKJIOHTe PtTaHne OT CnCTembl,OTCOeIMHNB BCE UHypbl PtTaHnO T6LOKOB PtTaHn.
3neKtponntaHne
- UcTpoIcTBO HUxHNO IOnkIIOuOaTb K NcTOOHKy 3NeKTPoNITaHnI, COOTBeCTBvIoUeMyMapKnIpOBKe Ha ycTpoIcTBe. EcnB bI He yBepenbI B TOM, KaKoi TIN PNTaHnY BACNCNoJIb3yETcA, O6paTntEcB K npOdaBHy INI B 3HePrcObblTObyO KOMNaHIO.
- He nepekemai Te 3nHyp 3neKtpoNTaHnI NOcTOpOHmN INpeMTeAMn. He pa3MeuTe 3TO yCTPOCTBO B MeCTe, IHe Na 5hHyp nITaHn MOrY T HAcTyNtB.
-ПиИСПОЛБОВАHIMЗЕКРОДИНHTENJI CLENTe 3aTeM,ЧTOБысУМангСИlaToKa,Notpe6IЯEMORIO NOДКЛЮЧЕНБIMK HeMy yCTPOnIcTBAMn,He npeBbIaIa3HaYeHne,MakCImaJIbHO DOnyUcTmOe DnIy yDIIINHtENJI.TaKKe CLENTe 3aTeM,CHTOБысУМангСИla ToKa BCEx yCTPOnIcTB,NOДКЛЮЧЕНБIX K pO3eTke3JIeKTPoNITaHЯ,He npeBbIaIa HOMInHaJIbHyO CINy TOKa npeDoXpAHntEJIa. -
YTo6bI He npBbICnTb DoynCTmmyo Harpy3ky Ha po3eTKn CeTeBO 3JeKTPoNTaHnra, pa3BETBnteTI INN ISTeNCeJIbHbIe KOIOkN, He NOJKNIOuHaTE K NHM CINsKOM MHOrO yCtPOiCTB. O6UaHarpy3ka CnCTeMbI He DOJXHa npeBbIaTa 80% ot HOMHaJIbHOrO 3NaueHnRA pacnPedeJIteJIbHOBn CEHN. PnNcNoJIb3OBAHn pa3BETBnteTI INTAHn (yDInHHTeJI) Harpy3ka He DoJxHa npBbIaTa 80% ero HOMHaHaJa.
-у зтоу устюства щадпор посянно тока Имeel Трхконт ку вилку сзаимеленем. 3ту вилку можно рдкюат b Tolько K 3aemлелнblm Зелкторожетам.пөддүчem Bставлгь вилку сету вадпета посянно тока, убдntсь, чTO зелкторожета 3azemлileha надпекашim овразом. He Bставлгий Тьлky В незамеленhyо зелкторожету.ОрbatNTсь 3a справков К KBалифиц ninthobahHomу зелктору.
-Bhumaue! 3a3emnraouu KOhmakm cnykum dna 6e3onacnocmu. NcnoIb3o8aue HneKmpopo3emku, He 3a3emLeHHou Hadnexauum o6pa3om, MOKem npueecmu K npopaeHuo 3eKmpuyeckum mokom u/Unu KmpaMe. -
PpumeyaHue: 3a3eMnIauu KoHmakm maKke oecneueaem xopouyo 3aummy om HnpedeUdeHbIX nomex om dpyaux 3neKmpueeckux ycmpoucme, uCnoJb3yEmbIX no coceOcmey, komopbIe Moaym Meuamb paBome 3mo2o ycmpoucmea.
-Донуckaetca nHTaHne CnCTeMb ot cTeBOrO HanpJxHeH na3bIX HOMHaIIOB:100- 120 nII n 220-240 B nepem. Toka. PpInlaraeMbl uHyp nTtAHn OToBeaET Tpe6oBaHnM, npeBbYBnEMyB M TOI cTpaH/peRnoHE, rDe cNCTema 6blna npodaHa. lHnpbl nHTAHH NJI INCNoIb3OBAHnB B dpyrHx CTpaHax/pernohax DoJHKbl OTBeuAtb npeBbYBnEMyB B HIX Tpe6oBaHnM. DOnONHITeJIbHbIe CBeDEHnO Tpe6oBaHnX K UHypam nHTAHH MOxHO y3HaTb y aBTOPi3OBaHHORO npodaBuCA nII IN B cepBnCHOM ueHTpe.
3aunta cnyxa
-BhumaHue! DnumelbHoe npocnyuuaHue 36yaKe melefohe unu HayuHukax C ebICOKoApOMKocMb0 MoKem npueecmu K 6e3603epamHou nompe cnyuxa.

UTo6bI He NoBpeDntb Cnyx, Co6nHoaTne PnBBeDeHHbIe HnKe peKOMHeaCIM.
- YbelenuBaIe rPOMKoCTb Do HxHxOro yPoBnHa NoCTeNoHNO.
- He ybeiunuBaIte ypoBeHb rPOMKocTn nOcNe TOrO, KaK yUn K HEm npNBkHyT.
-He cnyuawTe My3bky Ha 6oJbwoI rpoMkoTn cInuKOM dOnro. - He yBénluHbai Te rPOMKocTb, YTo6bl IpeKePbIb Tb yM OkpyKaIoue i CpeIbI.
- YmehbIshTe rpoMkoCTb, ecn He cblIshTe roIoCa IIOJe, pa3roBapNBaOuXx pIOM C Bam.
Ppnilaraemble 3aynukn
- Ppumeyue: Cbeehu, npueeHHbIe 3mom pa3deIe, Moaym He omHocmbcK eauemy KOMblomepy.
B KOMnIeK T NoCTaBKn BaIeR O KombIoTepe BxOJrT PnAactNkoBle 3arLyuKn DnIg THe3d KapT. 3aunuK 3aunuauoT HeNCnONb3yEmbIe THe3da OT NOnaDaHn Ybln, MeTaNlMuecknx npedMeTOB IN dpyuNX noctOpOHnx qacTuC. CoXpaHnTe 3TN 3aIpyuKn, YTObI BCTabJIbTx B rHe3da, KOrJa He nCnONb3yeTe KapTbI.
Obune cBeedeHnra
- He nCnoJIb3yIte 3To yCTpoIcTBO pIaOM c BIoO.
- He cTaBbTe 3To yCtpoiCTBO Ha HeycToHmByU TeLeXKy, POncTbKy IIN CToI. PaJeHne yCtpoiCTBa MoKET npInBeCTn K erO cepbe3Hoi nONOMKe.
-Дя В entnlaци npedymotpehblc cneuaJIbHbIe na3bl n OTBepCTna, KOTOpble obecneuBAIoT hadexHyo paobTy yctpoiCTBa u 3aunIauH erO to neperpeBa. Ix HeIb3a 3aropaxIBaT bIIN 3akpbIbTaB. HeIb3a 3aropaxIBaT bIIN OTBepCTna, KlaJra YcTPOiCTBO Ha KpOBaTb, DInBaH, KObep IIN TOMy NIOObHbIe NOBepXHOCTN. HeIb3a KNaactb 3TO yCTpoiCTBO B6IImn 6batapeu OTOnnE HArpeBaTeIg IIN NaHIMn, a TAKke B HnSi NkaΦOB, ecIn B HnX He ObecneuBAeTcH NaIeKaIaqae BeHTnlaIzna. - Henb3a npotaanKnBaTb HnKaKne npedMeTb BHyTp b yCtpoCTBa uepe3 OTBepCTna B ero KOpnyce, TaK kAc OHN MOrTy KOCHyTcTOeK COnaChbIM HAnpJxHeHem NIN Bbl3BaTb KOpOTkoe 3AmbikaHne KOMNoHEHTOB, YTO, B CBOIO OuepeDb, MoXet npnbecTe K BoCnJaMaHeHIO NIN NopaxKeHHO 3NeKtpuYeckm Tokom. He donyckaIte IonoadaHn XnDkoCTNa HyCtpoCTBo NIN BHyTp b Hero.
- YTo6bI He NOBpeiNTb BHyTpeHnHe KOMNoHEtbl I NpeIoTBpaNTb yTeKy 3JIeKtpoiNTa n3 aKKyMynrTopa, He KJaIte yCTpoiCTBO Ha BVbOpiPyUoIne IOBepxHOcTn.
- Hikorda He nCnojIb3yIte KOMNbIOpTe Ha cNopTnBbIX TpeHaKepax IIN Ha BVbOprpyoUeien NobepxHocTn BO n36bexaHne CnyaHnHO KOPOTKOro 3ambKaHnna IIN NOBpeJedHnry yCTpOietCB BpaauIoUmmncs YacTAMn, JecTKOrO DnCKa, PnIBoDa ONtUeCKNX dNcKOB IN IIN ppeIoTbPaUeHnna OAnCHOCTn OblyeHnna OT JInTneBOrO aKKyMylTopa.
-Дише,учаскBNBOKpyr BeHTINJIaIIOHbIX OTBepCTN i aanTeP nepemeHHoro TOKa moryHarpeBaTbcra. He npKacaiTeCb K HmU, YTO6bl He nOlyuHTb OXOR IINTPaBMy.
-BBaWEm yctpoIcTBe I npHaIaIeXHocTEx K HeMy MoYr HaxOuITbCer MeJIKeMe DeTaJI.N. DepKInTe INx B MeCTax, HeIOCTyINbIX dIra MaIeHbKnx DeTei.
Texnueckoe 06cnykBaHne n3dennr
He nbTaIteCb npOBoHbO bc OcbnyKbAHne ycTpoiCTBa cAmocToTeBHO, TaK KaK OTkpblTne IIN CHrTne KOxyXa MOKeT NOBeprHyTB Bac ONaCHOCTn PpIKKOCHOBeHn K TOUkam COnaChbIM dIg JN3HN HAnpJxKeHem IIN INhBIM pNCAM. Bce BNbl TEXHueckoro 0cbnyKbAHn DOnJXbI npOBoHbTcNeuMaJIncTb cepBnCHOrO ueHTpa.
OtklnouHTe 3o yctpoiCTBO OT p03ETK 3JIeKTPoNTaHnI n o6paTntecb K cneuaJIncTy no TEXHHueCKOMy 06cLnyKuBaHnI, eCNI:
- Ka6eIb IIITaHnI NOBpeKdEh, O6OpBaH IINI IN3HOWeH;
-BnTypb yctpoiCtba nonaja Xnkocstb;
-
UcTpoIcTbO nonaIIO nD IOJkb IIN B BoY;
-
UcTpoIcTbO ynpIo nIIN noBpeKdEn erO Kopnyc;
BpaoboteyctpoiCTBaBnHbIyHBIeOTKIOHeHnO T HopMbI,CBNTeJIbCTByUoUne O Heo6xOaIMOCtTNexHnueCKOrOObcnykBaHNi;
-
YcTpoIcTbO He pa6oTaET HopMaIbHo npn co6HIOJeHmN INHcTpYKcI N O KcPJIyatauIN.
-
П汞мачанe: Дя реулupoьк monb3уimec monbko memu opaHaMu ynpaelenu, peaylupoьka komobix npedycmompena uhcmpkyuzmaMu no 3Kcnnyamaцu, meg kak HnpeaeunbHoe uCnOb3o6aHue dpyeux opaHOe ynpaelenu moxem npueecmu K noepexdeHIO u3dEnu u, ckopee ecezo, nompebyem om cneuaIucmoe cepueuchoao uehmpa boBux ycuiu dno bocsmahoehenu HopmaNbblx paobuyx napamempoe u3dEnu.
IpaBnla no 6e3oNaChOMy nCNoJIb3OBAHnIO aKkMyJrTOPOB
B 3TOM KOMNbIepe IcNoJIb3YeCTa IInTn-IHOHbIy AKKMyIyIaTOP. He Nolb3yIeTceB eY BycIOBIAx CbIOCTN, BbICOKO BnAIXHOCTN INN B MeCTax, CnOCo6CTByUOnx Kopp03IN. He NOMEuaTe, He XpaHInTe IN He OCTaBnIte HOyTOyK PraDM C nCTOCHNKOM TENII, B MeCTAX C BbICOKO TeMnepaTyPoI, IOn IprMaIM JLyuAMn COINHa, B MmKPOBOJHOBOI Neu INI B
KoHTeHepe noD daBneHnEM, He noDBepraTe erO Bo3deIcTBIO TeMnpaTpybI BblSe 60^ (140°F). HecobJIoDeHne 3tix npabIN MoKET npNBecTN K yTeueKe n3 akkymyIaTopa KICNToBt, ee nepeRpeBy, B3pBbY bNN BocPnAmEHeHIO, YTO MOKET npNBecTN K TpaBMam N/IN MaTePNaJIbHOMy uIepe6y.
He npotbkaite, He oKpbIbaIte n He pa3bIpaIte akkymIyIaTOp. EcIn n3 akkymIyIaTopa npOn3OuJa yTeUka JxNdkoCTn, n OHa nonaHa KaKoy, CMOte JxNdkoCTb BoDoi n HemeJeHNo 6bpatnteCb 3a MeDunHcko IIMOouI.
IIO COO6paXeHnM 6e3oNaChocTn u TToBb IpoDJIb CpOK cIyKbI aKKMyJrTopa er0 3apd He npOn3BOoNTc pnp TempePte Hnke 0^ (32^) n Bblse 40^ (104^)
IcnoIb3OBAHne nIHOH eMKoCTn HOBO rKkMyJrTopa DoCTnraeTcnaocIe DByx IIN TPex UKNIOB NOHORO 3apraJa n pa3praJa. AkkMyJrTOp MOXHO 3apjKaTb N pa3pJKAaTb COTHN pa3, Ondako npu 3tOM erO emKOCTb naaet. Ecn BPemra pabotb ot AkkMyJrTOp CAUeCTBeHHO COKpaTnIOCB IO cpABHeHIO C oblyHbIM COCTOHNEM, Heo6xoIMOn npNo6peCTn HObI aKKymJrTOp. CJeDyET IcNOJIb3OBAb TOnbKO peKOMeHNDoBaHHbIe AKkMyJrTOpbI IN 3apjKaTb IN TOIbKO 3apJdHbIM yCTPOiCTBOM, peKOMeHNDoAHbIM dIy 3TOI yCTPOiCTBa.
AkkymyIaTOp cIeJyET nCOnJIb3OBAbTo TLbKO nHa3HauChEnIO. HnKOrda He nCnONJIb3yIte NOBpeXdEHHoe 3apJdHoe yCTpoiCTBO IINn AKKymyIaTOp. He 3aMbKaIte KOHTAKTbI aKKymyIaTOpa. PIn COnpNkOcHObEHm MetaJIuIueCKNX pIepMeTOB, TAKNX KaK MOHeTI, CKPeKNn IINn ABTOpyUKN, C NOLOXKeIeJIbHbIM OTRpuCaTeJIbHbIM BByBOdAMn AKKymyIaTOpa, MOKet npOn3oITn KOPOTKe 3aMbIkaHne. (BbIBOduAkkymyIaTOpa BByIIraT kak MetaJInuIueCKNe IOnockn Ha erO KopPnyce.) 3To MokKet npOn3oITn npn nepeHOCKe 3apJxHeHHo AKKymyIaTOpa B KapMaHe IINn cyMke. KopOTKe 3aMbIkaHne KOHTAKTOB MOKet npInBeCTN K NOBpeXdEHHo AKKymyIaTOpB IINn ppeImTa, I3-3a KOTOPORO OHO npOn3oUJIO.
EMKOCbI cPcK cIyKbI aKKymJYATOPa CnIXKaHOTc Ipi XpAHeHH 6aTapeN B yCIOBnX BbICOKo HIN H3KO TEmpeaTybl, HApIMep B 3aKpbITOM ABTomO6JIe 3mOHN JIeTOM. CTpemntecb depKaTa b aKKymJYATOp B MeCTax C TeMnepaTypo1 15^ - 25^ (59°F-77°F). YcToPOCTBO, B KOTOpom UcTaHOBJen HarpeTbI INI XOnODHbI aKKymJYATOp,
MOKeT BpeMeHNO He pa6oTaB, DaJke ecJn AkKMyJrTop NOnHocbTo 3apJKeH. 3ΦΦeKtNBcHObTb pa6oTbI AkKMyJrTopo Oco6eHNo 3HaHTeNbHO nJaet npi TempepaTypax 3aHuTeNbHO HnKe HnyJ.
He 6pocai Te akkymyIaTOpbl B OOrOb - OOn MOrYB3pbIbTaBcA. OOn TaKKe MOrYB3OpBaTbCpiPi NOBpeXdEHH. AkkymyIaTOpbl CneJeTy TnIMN3IpOBAbTB COOTBeCTBmNC MeTbIMN npabJAMn. EcnN Bo3MOxHOb, CdaBaIte Nx Ha nepepaBcOtKy. He bIbpcabiTe akkymyIaTOpbl BmecTe C bItOBbIMN OTXdAmn.
- П汞сuaнue: coPobOodumelbHbIe doKymehmbI Ha aKKymyIamop cM. Ha caUme www.acer.com.
3aMeHa akkymyIyTopa
B 3TOM HOYt6yKe IcNoIb3yETcA JITn-IOHbI aKKyMylrTop.ДЯЗAMeHbI cNoIb3yIte aKKyMylrTop TAKORO Ke TnA, KAc y aKKyMylrTopa, KOtOpbI BXoIIT B KOMJIneKT NOCTaBkN BaIbero YcTpoIcTBa. IcNoIb3ObaHne aKKyMylrTopa dpyrTO TnPa MoKet 6bITb ONaCHO n3-3a PnCKa BO3rOpAHn nn B3pblBa.
-BHIMAHHe!Pn HEnpaBnIbHom ObaeHnn C aKKymJrTOpom OH MoKet B3OpBaTbc. HeIb3ra pa3bnpaTb aKKymJrTOpbl N 6pocat b IN B OROhB. Depxnte aKKymJrTOpbl B HeNoctyHm DnA DeTe MecTe. Pn yTuNlHaun OTpa6oTaHHoro aKKymJrTOpa Co5nOdaTe MeCThbIe npabuHa.
PaHnoOaCTOTbIe NOMEXN
-BHumahue! B ueJx 6e3onacHcM u bIKIouaume ece 6ecnpoeodhie unu paduonepepaouue ycmpoucme a npu uCnoB30aHuu Hoym6yka cneyuouux ycnoeuaRx. B uucNo maux ycmpoucme Mozym exodumb, 6e3 oapauueHya yka3aHbIM: adanmepbl 6ecnpoeodHou IokaIbHo cemu (WLAN), Bluetooth u/Unu ceme 3-2o nokolenu.
CobnoaTe Bce CneuaHbIe npabnla, DeiCTbyUoIne B BaWeI CTpaHe, N Bcerda BblkIOuHaTe yctpoictBO, KOrDa erO nCNoJIb3OBaHHe 3anpeIeHO IIN KOrDa OHO MOKeT Bbl3BaT NOMEXN IIN OAnchocTb. IcNoJIb3yIte yctpoictBO ToIbKO B HopMaJIbHbIX DnI He rO pa6OxN pONoxHENx. 3TO yCTpoictBO OTBeuAET Tpe6OBaHm HOpMaTbOB No PUYn3nyehnIO pIn HOpMaJIbHO hKcIIpyatau; OHO N erO aHTeHHa DoJXhbl HaxOOnTbcS He
6bnke 1,5 caHTmEtPOB ot BaWero TeNa. Ha BaWem TeNe He DoJnxo 6bIb MetaJIINueckn X npEdMeTob, a yCTpoiCTBO DoJnxHO hXoDInbCra He 6bnke yKa3aHNO Bo BIIe pacCTOHHa OT BaWero TeNa. Iyra YcneuHoi nepeDaun FaiIOB DaHbIX INN COO6UeHNI HxKHO oEocneHb BBICOKOKaueCTBeHHOE NOKLIQUeHne 3TOrO yCTpoiCTBa K CETN. B HEKOTOpbIX CnyauX npedAua FaiIOB daHbIX INN COO6UeHNI MOKET 6bIT 3aDePKaHaDo tex nop, noka He 6byet yCTaHOBNeHO tako NoKlUQHeHne. CoBLOdaIte npIBeDEHbIE BIIe yKa3aHHN IO MNHMaJIbHOMy pacCTOHHIO Do 3aBepSeHHa nepeDaun. DetaTI 3TOrO yCTpoiCTBa RblnoTc MaHNTHbIMN. UCTPOICTBO MOKET npITARINBaTb K Ce6e MetaJIINueckne npEdMeTb, IIO3OTMy IIODi, NcIOJIb3yUOUnce CnyXOBbe annapaTb, He DOJNXbI POdHOCInb 3TO yCTpoiCTBO K yxy, B KOtOpoe BCTaBIne CnyXOBn annapat. He KnaDInTE KpeDInTHbIE KAPTOCH NIN MArHNTHble HOCInTeIN DaHHbx PRAOM C yCTpoiCTBOM BO I36ExAHne PnCKa CTnpuHNA 3AnuCAHHo HA HNX INΦopMaUIN.
MeDnHcne yctpoNCTBa
3Kcnnyataa npadnonepeadaoio oobopyoBAnH, B TOM qncne 6ecnpoBOnhix TepeohOB, MoKeT bIbIbIbTa Iomexn B paOte He 3aunuien HbIX HaJIeXaIIM Opa3OM MeunHcknx yctpoCTb. IocobTeyIeCb CbaPOM nIN n3rTOBnteMe MeunHckoro yctpoCTBa, YTObIy3HaTb, HApExHO JIN OHO 3kpanipoBaoH N 3auNlueHO OT n3nyehn BheHne PCH-3Heprn. BblKnUohaiTe BaWe yctpoCTBO, KOrda HaxoDInTeCB MeunHcknx yupexdEHHx, rDe BblBeUeHb COOTBETCTBYUOine IHCTpyKcnn. B 60bnHuaX n MeunHcknx yupexdEHHx MOKeT nCNoIb3ObaTbc OobopyoBaanHe, yBCTBNTeJbHoe K BheHemy n3nyeHnIO PCH-3Heprn.
Kapdnoctmmyjatopbl.И3roTOBHTeNn KapdnoCTmmyJATOPOB peKOMHdyUOT, YTo6bI paCCToHHe MEXy KapdnoCTmmyJATOpOM n 6ecnpoBOHbIM yCTpOHTBOM 6blIO He MeHbIe 15,3 caHTmEeTPOB, BO n36exKaHne CO3aHnBa BO3MOXhblx NOMEx B pa60Te KapdnoCTmmyJATopAp. 3TN peKoMeHdaaun CoBnaDAHOT Cpe3yJIbTaTAMn He3aBNCMbIX NCCJeOBoAHn I peKoMeHdaaunMn OprAnH3aUnn Wireless Technology Research, npoBOJaue nccJeOBoAHn BecnpoBOhblx TexHOJOnr. JIoDn, nCNoIb3yUoiue KAPdNOCTmMyJATOpbl, DOJKNbIcobJIOdaTb CNeyUOUnne MEPbI ppeOCTOpOXHOCtN:
-BceIda IepKHTe yCTPOIcTBO Ha pacCTOHaH He MeHee 15,3 caHTmEtpOB OTKapDIOCTMMyJIaTopa
- He noDHOCHTe BKNIOUeHHOe yCTPOIcTBO K KApDIOCTMnIyTOpY.
При подзрени на ВОЗнКовене ПОмEX BыIKNoHTe yCTpoIcTBO И OTLOXINTEВ CTOPOHy.
Cnyxobbl annapaBtI. HeKOTOpbIe uDpOBbIe 6cnpoBOHbIe yCTpoiCTBa MOryt Bb3bIBaTb NOMEXI B paOte CnyxOBbIX annapaTOB. B clyuae Bo3HnKHOBeHnI NOMEx O6paTInTeCb 3a COBETOM K BaWemy NOCTaBUnky YcNylr.
ABTOMO6NJN
PCHINHbIbMOYrBnIaHa paBoTy HnnpabINbHO yCTahOBnEHbIX INn HnnpabINbHO 3KpaHnPOBaHbIX 3eKTPoHNbIX CnCTEM B ABTomO6JIyX, HnprImep, 3NeKTPoHNbIX CnCTEM BnpyICKa TOnJIbBA, TopMO3HbIX CnCTEM npoTINBOCKOLBJxHeHHN (npOTINBO3akLNINHBANH), nepeKNIouHenry nepeDau N ynpabLHeHHN BO3dyuShbIMN NOyUkAMN 6e3ONacHOCTN. DOnOIHNteJIbHbIE CBeDeHnRA MOKHO y3HaTb Y npEclTcABITeN 3aBODa-N3ROTOBtIELBaWero ABTomO6NJN IIN DpyrTO OOnONHtEJbHO UCTAHOBENHO B HEM OBOpUDOBANH. PpOBoINTb TexHnueckoe 0cbNyKXBAnHE yCTPOCTBA INI YCTAHABINBaTB ERO B ABTomO6NJNE DOJIKHbI TOJBKO KbaINΦmIPoBaNHbIe CneuNaIInctb. HenpabINbHNA YCTAHOBKa INN OBCnyKXBANHE MOrYT co3dAte b ONACHO tCdeNaTb HeJeCTBtELHO rapaHTIO HA 3TO yCTPOICTBO. PeryIparHO npOBepaIte npabINbHOCTM oMTaxa N paBOtB BCero pAdNOobOpUDOBANH B BaWeM ABTomO6NJE. He XpanTe N He nepeBO3NTe rOpUHe JxNDKoCTN, Ra3OBble 6aIINoHb INI B3pbIBOOanachBle MaTePaNJIb B ODHOM OTCeE C 3TN M yCTPOICTBOM, eO DeTaNMI INI DOnONHtEJIbHbIMN pInHaNDLeXHOCCTM K Hemy. EcIN BaAI ABTomO6NJB 06OpUDOBAN HO3dyuSHbIMN NOyUkAMN 6e3ONacHOCTN, TO NOMHNTe, QTO OHN packPbIBaOTc C Oeyh B OJbShoCinIo. He NOMEuaIte PpeDMetbl, B Tom cncIe CMOnTHpOBAHNBle INI NepeHoCHbIe paADIOyCtPOCTBA, NaD Bo3dyuShbIMN NOyUkAMN 6e3ONacHOCTN INI Ha PyTu INx packPbITN. B Cnyuae HnnpabINbHO uCTAHOBKN 6ecnPoBOJHOBO6OpUDOBANH B CaIOHe ABTomO6NJN PaACKpItNe B O3dyuSHoN IOyUkN 6e3ONacHOCTN MoKET PrnbEcT N K cepBe3HO TpaME. NcNoJIb3OBAHne DaHHO rYCTPOICTBA Ha 6opTy camOJeTa BO Bpemraonla ZanpeSeHO. BblKnUoyaTe BAwe HycTPOCTBO nepeNd nocadKo B camOJeT. NcNoJIb3OBAHne 6ecnpoBDhIX yCTPOICTB VcamOJe TMoKET BblBaTb ONChbIe NOMExn B paBoTe CnCTEm CamOJeTA, HapuyHTB paadinoteFooHHO CB43b N, Kpome Toro, MOKET 6bl 3anpeSeHO 3AKOHOM.
B3pbboonacHbIe ycIOBnA
Korda haxoindtecb B noteunabHo B3pbboonacbix cpeaX, BblKnUoyaTe Baue yctpoictBO n CobIIOaIte BCE 3nKn u Yka3aHnA. K B3pbboONACbIM MecTaM OTHOcTcB obnactn, rde mOryt nonpocntb BblKnOuyt b Dbratene ABTOMObHn. Bo3NknHObeHne NCKpbl B taknx MeCTax MOKeT npVBceTn K B3pbBy nIIN NOxApY, YTO MOKeT Bbl3BaTb TpaMbI nIIN dJaCe Cmeptb. BblKnIOaIte yctpoiCTBO Ha nyHKtax 3anpaBKn TOIIIBOM n PdAmC b6en3oHaococamn Ha ctaHzIAX o6cnyKbAHn. CobIOaIte OparHueHn HA NCNOB3OBAHne padioooBopdyOBAHn Ha ctaHzIAX 3anpaBKn I XpaHEnn, H TeppinTopm xIMNUecknx 3aBOOB n B MeCTax npOBedeHn B3pbIBbIX pa6ot. MeCTa, B KOTOpBX IMeETcraOnachOcTB B3pbIBa, qacto, Ho He Bcerda, o603NaueHbX xopoIo 3AMetbIMn ppeynpekDaIOUImn 3hakAmn. K Takim MeCTam OTHOcTc nOndaLy6hoe npoctpaHCTBO KOPa6Ne, MeCTa XpaHEnn i pacnPpeJeHn xIMNKaTOB, ABTOMObHn HA CxNkJehHom ra3e (npOAne IIn 6byTaHe), a TaKke OBlaCTn, rDe B 03dyXe CoepKATcR xIMNUeckne BeSeCTBa IIN qAcTuCbI, TaKne KAK MyKa, nbIb IIN MetaLIuYeCKaNyDpa. He BkIOuayte KOMlbIOTep B MeCTax, rde 3anpeSeHO IOJIb3OBaTcBcM O6NIbHBiIMN TelefoHAMn IIN IX NCNOB3OBAHne MOKeT Bbl3BaTb NOMExn IIN ONaCHyO CNTyaLIO.
3KCTpeHHBbE Bbl30Bbl
-Bhumaue! BbIIOJHeHue 3KcmpenHHbIX 6bI308Oc nOMoubIO 3mo20 ycmpoucmea Heo3MOxHO. 3KcmpenHHbIe 6bI308 HxHOb cde lamb C aawe20 MOubHo2o meJefoHa unu c NOMoubIO dpy2oi meJefoHHou cucmembI.
Hnctpykunnoytnn3aun
He Bb6paBbAte 3TO 3NEKtpoHnOe yCTpoIcTBO B Mycop. CdaIte OTCnykBWee yCTpoIcTBO Ha nepepa6OtKy, TTObI CBecTI K MINHMMy 3aqr3HeHne OkpyKaHOe cpebl. DOnOpHInTeNbHle CBedeHnO o PpaBnIax yTuIN3aun OTCnykBWeero 3NEKtpoTexHnueCKOrO n 3NEKtpoHnHO 0bOpyDobAHn (Waste from Electrical and Electronics Equipment, WEEE) MOxHo y3HaTb Ha Be6-CTpAnuCe www.acer-group.com/public/ Sustainability/sustainability01.htm.
4To Takoe ENERGY STAR?
CootBcTbUoIe cTaHdApTy ENERGY STAR n3deJnnaI NOtpe6JnOIT MehJSe 3JIeKTo3HeprnI IN pJeDToBpaAoiT BbIbPoCbI yRteKncIoro ra3a,OTBeuay CTpOrIM Tpe6OBAHNm, YcTaHOBLeHnBIM U.S. Environmental Protection Agency. KomnHaNn Acer cTePMMTC PPeDnArTb BO BcEx CToPAhX MIPA TaKne ycTpoiCTBa N yCJyRn, KOTOpBle NOMORAOT NOKyPiTeJMa 3KOHOOMHTb DeHbRn, BepeXHo paCXoIOBaTb 3HeprnIO uYJyUShNTb KaHeCTBO OOkjyaIOUeHac Cpebl. Yem BoJbSe 3HeprnM Mb1 CMOxKem C3KOHOOMTb PyTEM paZIOHaJIbHOrO ee IcNoJIb3OBAHnI, TeM BoJbSe Mbl CHN3IM BbIbPoCbl yRteKncIcNO r3a3 IN CokpaTIm PnCK n3MeHeHnK KInMaTa. IOnoJIHnteJIbHbIe CBeDeHn CM. Ha Be6-caiTax www.energystar.gov nn www.energystar.gov/ powermanagement.
- П汞сuaнue: CsedeHua, npueedeHbIe 8 3mOM pa3dene, moaym He omHocumbcr K eauemy KOMnbHomepy.
OTbeuohaa cTaNapTy ENERGY STAR npoDyKzmaKmpanHnAcer:
- BbIeJIyOT MeHbIe TeIJa I CHNkaIOT HaRpy3ky Ha BeHTINrTOpbl B MecTax C 60Jee TeJIbIM KINMaTOM.
- 3kpahи KOMMbIOTep aBtOMaTnueckn nepexoJr T bpeKIM "CoH" uee3 10 n 30 MnhyT 6e3dJeCTBnA COOTBeTCTBeHNO.
- BbIXoI n3 pexnma "CoH" npn HaxaTn KnaBnHn Ha KnaBnAType nn DnBXKeHmMbIuN.
B pexkme "Coh" ekOHOMITc8 60JIe 80% 3neprn.
ENERGY STAR n Cnmbon ENERGY STAR nBnnoTc3apeHnCTpnpoBaHHbIMn 3HaKaMn B CUSA.
CbeHnI cOBeTbI dny ydo6cTba pa6oTbI
HnOgda nOlb3oBATEIn, npOBDAIe MHOro BpeMeHN 3a KOMMbTOpeom, kAnyOTcHa
Upe3MepHoE HanpJxKHe NrAaN rOLOBHyO 60JIb. IOnb3oBaTeIN TaKxe qAcTo pNCkyOT
POnyHTb Fm3uYeCKyIO TpaBMy, ecIn BydUT MHOro YacOB POnpRd CnDEtB 3a
KOMMbTOtePOM. PpOdoJXnteJIbHO BpeMa paObToI, HeyDoBHna Po3a, HnPaBnJIbNa
OpraHn3aun paOohero MeCTa, CTpeC, HnOdoXoJIeYcNoBn paObTb, COCToHne
JIuHOrO 3DopOBByI dpyrIne PaKTOpbl 3HauchTeJIbHO yBeINuHBAOT pNck POnyueHn
Fm3uYeCKo TpaBMbl.
HenpaBnIbHa paBoTa 3a KOMNbIOTePOM MoKeT npBcETn K NOBHeHIO 3aIcTHOrO cyXoKnIbHorO CnHIpOMa, TeHNHHTy, BOCpAneHIO cyXoKnIIN M CnHOBnAIBHOm CyMkn IIN dpynx cKeNeTHO-MblIeUeHbIX 3abOJeBaHIn. B KInCTAx pyK, 3aIpcTbAx, PIIeaux, PpeDIIpeYbAx, Iee IN CNHMe MOrT NOBtBcR CnEduOuIe CmIMTOMbl:
- OHemehne, JxkeHne NJI NOKaJIbBAHNE;
- JOMOTA, 6OJIe3HeHHoe OuYueHne IJIN CJIa6ObtB;
- 60nb, onyXoNb nJn nyIbcaunjra;
- OuepeHeNoctb Nn HapxKeHne;
-cyXOCTbIINCna6OCTb
При наличим takinx CиМNTOMOB, NOВТоряошuxся ИлNoCTOЯньIx OушенихДИСКOMфОрта ИИпьболэзньIx OушенихПри paBoTe 3a KOMпьЮТеромHemeДпенHO obpaITeB 3a KOHCyЛытuaик Врачу n COOБцnte 6bTOM B OTdENTEXHKN 6e3OpanacHOCtN IN OxpaHb 3dOpOBь BaIeKOMпанIH.
B cneyuouem pa3dene npINBOaTc8 COBeTb, KaK cIeNaTb pa6Oty 3a KOMNbTePOM 6oJIe yIObHOH.
Bb6op ydo6Horo pa6oeryo nOJoxeHn
HaIynte IJIg Ce6MaKcImaJIbHo yOobHoe NIOJoxHeN 3a KOMNbHTepOM, MeHry yOrI O630pa MoHITOPa, IcNOJIb3yI NOCTABky IJIr HOr IIN pErynIPy BbICOTy Kpecna. BocNoJIb3yIteCb cIeDyUoIUMn COBETAM:
-
He cnDnte nOoJrBy B OdHoi nO3e;
-
He CKLOHnITeCb Hn3KO n HE OTKnDbIbAaTeCb daneKO Ha CnINKy Kpecla;
-периондуеск n BCTaba Te I npoxaknBaTecb, YTObI ChrTb HaprajkeHne B Myckynax Hor; - DeJaTe KOpOTKne nepepbIbbl, YTo6bl Ocna6nTb HapJxKeHne B Uee n PLeayax;
- He HanpraaTe MyckyIbI INe NoDHMaTe BbICOKO IIeU;
- yctahOBHTBHeHnI DnCnPeI, KnaBHaTpy I Mblb Ha paOohem MeCTe TaK, YTObI Do HIX 6blIO JERKO DOTaHyTbc;
- ecnBb CMOTPte Ha MOHITOp Yaue, YeM Ha DOKyMeHTbI, To pa3MeCTnTe DncPiE No cHTpy CToTa, YTObI She Haprranacb KAc MOKHO MehSe.
3a6oTa o 3peHm
EcInnoJIOJrhyCMOTpebHaMOHITOp,HOCHTbHeNPaBnIbHONoOobpaHHbE OCHNIN KOHTaKTHbIeJIIN3bl,NCIONb3OBaTbApKmCBETINpapOtaTB3aCTOnOMC6NeCTaIeINOBepxHOCTbIO,IIPOXOTpeRyIINPObaTbpe3KoCTb3kPaHa,NCIONb3OBaTbMeIKNIMpuΦT INM ManOKoHTpactThbDinCnIeNTo rna3a 6yUyt CnIbHo yctab. B CneDeuOunx pa3dEnax pnpBOJrTaCOBeTb,KakymeHbIHTbUpe3MeHoe HAnpJxKeHne rna3.
Tn3a
-ДаавайтгламчacтуOTдыX.
-Перионческ OTBODITE rna3a OT MOHITOPA И CMOTPINE Ha KaKoI-HNbYdbydaJIeHHb IpeDMeT.
- Yacto MmraIte, UTo6bl rla3a He 3acbixaJI.
Dinne
-ДерхиTe ДИСПЕВ B UHCTOTe.
- Bawa roJOnBa DoJnKHa hXoDntbcra BblIe HNXHei KpOMKn DInCnJIe, YTObI npI npocMTope I3O6paKeHnB U cHTpe DInCnJIe rna3a CMTopeN CBepx BVn3.
- Otperynpyte npKocTb n/nn KOnTpact dncnpe TaK, TTo6bl TeKCT 6blno IerKo YntaTb, a rpaФИKa OTobpaKaJanacb YeTko.
-Умени Te Мерцанne n OtpaxkeHne:
UctaHOBtE dncnneTak, YTObI erO bokobar KpOMKa 6blna obaeHa K OKHy nIN NCTOCHNky OCBeueHnA;
UmehblnteCBETB NOMEuHnN,NCNoJIb3yI NOPTbepbl,UITOpbI JINJXaJIIO3N;
BkIIOuayTe OcBeUeHne Ha paOohem MeCTe;
Otperynipyte yroI o630pa dncnpe;
IcnoJIb3yIte aHTn6NIKOBbI ΦJIbTp;
YcTaHOBInTe Ha BepXHeI KpOMKe DnCnJIe CoINHcEaUHTbI Ko3bIpeK, HApPIMep, KapToHHyIO NOnOCKy.
-He cmotpuTe Ha ducnIe n3 Heydo6Horo noJIOXKeHna.
- He cmotpuTe ndoIry Ha nctouHnK npkoro Cbeta.
Bbipapobotka npabnblhoro ctnla paobtbi
Cneyuoune npnBbUKN paobToI 3a KOMnbTOpeom N03BOJr MeHbJe yCTBaTb I paobTaB 6Oone npOdyKTNBHO:
-Дема Te KopoTKe YacTbe NpepeBbIbI B paBoTe.
-Дeпайт ekakne-Hibd ynpaKHeHnЯ dЯ pa3MnHKn.
- KaK MoXHO YaIe BbIXOJITe IOnBbIbTaT bYCTbIM, CBEXM BO3dYXOM.
- Perynapno DeaTe ΦnueckyU 3apIky, yKpeIyIoIy TeIO.
- Bhumhaue! He nonbyumeckb kombhomepom ha duaeane unu e nocmenu. Ecnu 3mo2o HeIb3a u36eXamb, mo pa6omaume monbo KOpomKmu nepuodamu, yacmo deJaume nepepbIbIu I eblonHnme ynpaxHeu dpa pa3MuHKu.
-П汞eанue:Дононumeьные сedehenусm. e pa3dene "Coomemcmeu Hopmamuehbl mpe6oehnurm u 3ameuahny no 6e0nacchocmu" ha cmp.122.
Bhauane o rnaBHom
Блардам Вас TO,ЧTo Дпpeшени CBONX MObHbIX BByHCNTeBHybIX 3aДач Вbl Bbl6paJn Hoyt6yK Acer.
He noDbBepraTe KOMNbIOTe B03deIcTBnIO TempeaTyp HnKe 0^ nnn BbIe 50^
He npdbepraTe KOMbIOTep BO3JeCTBnIO MaHHTbIX nOJIe.
He IONYcKaIte InonaDaHne KOMNbIOTepa IOd DOxDb IJIb BO BnAIXHyo atmocpepy.
He npoIbawTe BOyu IIN JNkIOCTn Ha KOMnbIOTeP.
He noDbepraTe KOMbIbTeP BO3JeCTBnIO CINbHbIX ydapOB INN Bn6paun.
- ObepeaIte KOMNbIbTeP oT nbJIIn I rpa3n.
- YTo6bI He NOBpeiNTb KOMNbIOTeP, HIKoRda He KlaaIte IpeiMeTbI Ha KOMNbIOTeP.
3aKpbIbA KOMNbIOTe, He XIONaIte KpbIuKOJ INcNJIeJ.
He KlaaIte KOMnbIoTe Ha HepOBHyIO NobepxHocTb.
YxOa 3a aanTePOM nepemEnHoro Toka
3ndeB npuBeNo HeckoIbKO peKOMeHdaun no yxOy 3a aanTePOM nepemEHoro Toka:
He npoknouaTe KaanTepy Hnkakne dpyrne yctpoicBa.
- He hactynaiTe Ha shHyp nHTaHnI H he cTaBbTe Ha Hero TjXeJIbe IpeJMeTbI. IpoTaNITE shHyp nHTaHnI KabeIi TaKIM o6pa3OM, YTO6bl Ha HIX 6blIO trpydHO hactyNITb.
- OtcoeHnY BnKy shHypa nHTAHnY n3 po3eTKn, TAHnTe 3a BnKy, a He 3a shHyp.
OCHOBBI NcNoJIb3OBaHnI CeHCOPHOI NaHeJI
Cencopna naneNb cnyknt IynpaBHeHn npemeueHnem Ctejkn (nn 'kycopa') no 3kpany. Pn npoBeHn nn naIbca no ceHCopHn naneN KypcOp NOBTopaET TpaekTopu npemeueHn naIbca.
Пи汞нг: CenHcHnA NaHEnb YUcSmEumEnbHa K DuxKeHuO NaBua; Yem Neuee KacaHue, mem moYHee peaku.
cne du me 3a mem, ymo bI cHcOpna HnB u Bauu nlaubu 6bInu cyxmu u yucmbimu.
YnpabTb Kypcopom MOxHObHeCKOJIbKIMM OCHOBHbIMN JeCTaMn:
CdBnOdHnMaIbIeM:ДЯперemeIeHnKypcopaDbIaIte PaIbIeM NO ceHCOPHOI paHeII.
Haxatne nIi Kacahne ODHIM naIbueM: HaxmTe ceHCOPHyo naneB Bn3 IINI CJIeKa KOCHITecB ee naiBcEM, yTO6bl "UeJyKOM" BbIbpaTb 3IeMeHT IINI 3aNyCTntb erO. IInr "DBOHOrO uEJIyKa"HyXHO bICTpo DBAxDbI KOChYtbcra CeHCOPHO naneJIN.
Haxkatae nn Kacahne Ondn m TaJIbceM B HxHem npabOM yIy: DnIMtauu "UeJUka npabO KnONKO MblIN" HaxmTe HxHnnpaBly yrOJI ceHCOPHO nanei. Ha 3KpaHe Pnyck 3TO deIcTBne nepeKJIIOHaET KOMaHDbI npNJIOKeHNA, a B 60JIbshNCHTBe npNJIOKeHNI OTKpbIbaET COOTBeTCTByIOoee BbIBpaHHOMy 3JeMeHTy.
- NepetacknBaHne: HaxMnte u ydepKNaBaiTe HxHnJIeBbI yroI ceHCOPHO nAHeJIu IIN DBAJkDbl KOCHTecb B JIObOM MecTe Ha Hei, 3aTeM, He OTPbIBaB a BTOPOI nAIEc OT CeHCOPHO nAHeJI, OBBeJITe oBlaactb N BblBepInTe BCE 3IeMeENTbl B Hei.
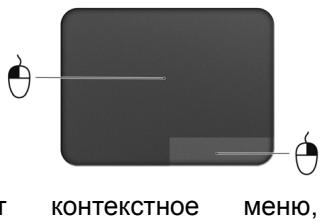
XecTbI Ha ceHcOpho NaHeJI
B Windows 8 n Bo MhOrnix npInIOxKeHnIX NOIdepKINBaIOTcR JKeCTbI ODNHM IJI N HeCKoJIbKIMN NaIbIaMn Ha CeHCOPHOI NaHeJN.
Ppumeyuue: Bo3moXHocmb uCOnb3o6aHua Jecm08 Ha ceHCOPou naHenu 3a6ucum om akmu6hO2o npunoKeHua.
3TO N03B0JAE T ynpaBJIbT b nporpaMMaMn C NOMOuH HeCKoJIbKnx IpoCTbIX JxecTOB, HapnmuMp:
Welcome to Acer Backup Manager
Select one action below to start managing your data.
Back Up My Files
Pick and choose which files to back up or let the program find it all for you.
Back Up My Files
The file backup helps you create a complete backup of your documentation.
Choose the file or folder for the backup and then select the destination for
the backup. Once you have selected the destination, the final step is to
schedule the backup. Click on the Backup My Files button to create a backup.
Image My Drive
Make a complete image backup of your drive.
Migrate My Files
Transfer your files from another computer to this computer.
Clear out / Restore Files
Remove seldom used files to free up space or restore files from your backup.

Launch My Backup Profiles

acer

Directly enter "My Backup Profiles" next time
YTo6bI 3anyCTnTb yTuInuTy Acer Backup Manager B Windows 8, NaHnTe BBOAnTb "Backup Manager".ДpyroN cnocob:В pexnme "Pa6oyn CToJ" Bbl6epnte Acer Backup Manager. B pe3yIbTaTe OTKpoetcI PnIBeTCTBeHHbI 3KpaH,Ha KOTOpOM MOxHO Bbl6paTb TIN pe3epBHO KOnHN, KOTOpBI Bbl XOTnTE CO3dA Tb.
ApxnbpoBaTb faJIb! Bbl6epnte faiJIbI IJpe3epBHOKOINPOBaHnI.
Co3daTb 06pa3 DnCKa: Co3daTe paJI pe3epBHO KOnN Bcero DnCKa. 3OT foAin MoXHo 3aInCaTb Ha DnCK DVD, coxpaHntb erO Ha dpyroN DnCK KOMNbIoTePa* IIN Ha CbeMhBn HAcONiTeB (HaPImEp, Ha flash-HakONiTeB), YTO6bl NOTOM pRn Heo6xoIMOCtN BOCCTaHOBNTb BaW KOMNbIoTeP.
- Переньтохлы: Розьогаят КОпровать Фальы на USВусточь, чебы при поюи ут笋ны Acer Backup Managerпегенocить Фальы с capоно кOMьгетера на Нов的基础上 Любий друтой komьгетер.
- CtepeTB / BocctaHOBtB paIbI: ydaJInte peIKO IcNoJIb3yEmblé paIbI, YTO6bl BBICBO6OJITb MeCTO Ha JecTKOM DnCKe, ININ BOCCTaHOBtE paIbI C CO3dAHHoB BamN pe3epBHOK OIIIN.
BbI6epnte TIN pe3epBHOJ KOHNN, KOtOpB JXOTNE CO3daTb, Bbl6epNTe 0aJIbI IIN DnCK IIN pe3epBHOJ KOHNPOBAHNI, 3aTeM BblONHInTe OTObpaKaemble Ha 3KpaHe INCTpyKcH:
-
BbI6epnte coDepknmoe dnn pe3epBnHO ro KOnIpOBaHnry. Yem MehJSe coDepknmoTo BbIbpaHo, Tem 6bIcTpee oCyUeCTBJIeTcra npOcecc KOnIpOBaHnry, HO TEM BblIe pNCK nOtePn DaHHbIX.
-
Bыберпе место Дляханеня pe3epBhIx кои. Бы можete Bыбрать takne ВарnaHTbl, Кak CBemHbI NaKoNTeIb,ДИСК KOMПьЮтepa*,ДИСК CD/DVD,ydaleHHbI ПК ИПОобlaчhoe xpanuIlne Microsoft SkyDrive.
-
BbI6epnte nepnoDnHocTb, c KToTopoi Acer Backup Manager 6yJeT COzdaBaTb pe3epBhble KOnmN.
IIO 3aBepHenn 3Tnx Tpex Waorpe3epBhble KOnnn 6ydyT c03daBaTbcra ABTomatUeCKn COrJaNcHO paCnncAHnIO.
*ПРIMEЧАНЕ: Помpeбуемсьibpbamь bheшнч duck unu duck D:- Acer Backup Manager He moxem xpaumb pezepehbie konuu ha ucxodHom ducke.
Ecπn 3axOTnte B lióboe Bpemn 13MeHntb HacTpoKn, TO nepenDnte B 3kpan npoΦnneyn yTuNTbAcer Backup Manager. YTo6bl npeenTnB hero n3 3kpaHa npuBeTCTBnyn yTuNTbAcer Backup Manager, haxMnte OTkpbItb npoΦnIn pe3epBHOKOnpoBaHn.
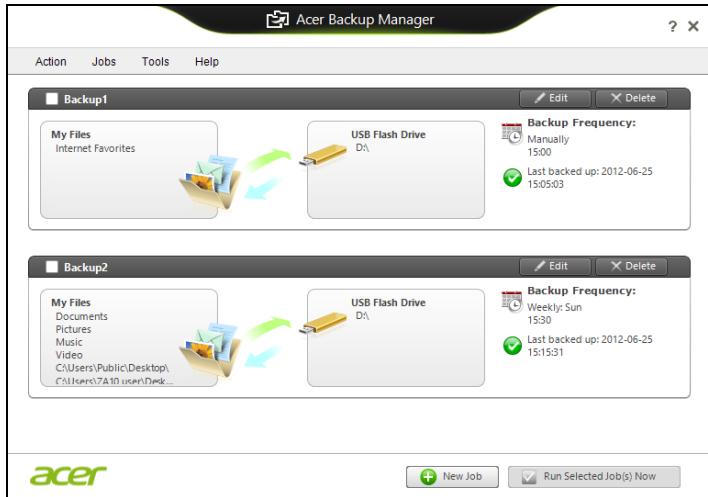
B OTKpbIbWcEMcR OKHe MoXHo N3MeHЯTb IJIu ydaJIaTb IMeIoUcIeCn npOfIIIN pe3epBHorO KOIpOBaHn.
BocstahOBJIeHne
B cnlyuae H enoJaOK B pa6oTe KOMnbIOTepa, KOra He NOMORAOT OTBeTbHa qacto 3aDaBaEMbIe BONpOcbl (CM. Ha cTp. 107), MOKHO "BOCCTaHOBnTB"KOMNbIOTep, To eCTb BOcCTaHOBnTB erO npEdbIyUyee COCTOHNHE.
В заим радени описьагостя Имени в Вашем комьштоpeс dedва BOCSTahOBlenia. Acer пedingaramet prinpoxe He Acer Recovery Management Дд соцдану pezeho konuu ду bocsmahoeHnue, pezeho konu dupaBepo u npunoKeu, a takke BbINOJIHHeNIA BOCCTAHOBlenia lo6C nOMOsbU INCTpyMeHTOB Windows, lo6 pe3epBHO KOnu DЯ BOCCTAHOBlenia.
Птумецане: Acer Пюразамma Recovery Management docmynha moьк e MODEЯx cпредусановленоонерацоннocuемои Windows.
Baxho! CoBeTyem kak MOxHo cKopee co3daTb Pe3epEHyo KOnuO dIe BocCmaHoeJeHua n Pe3epEHyo KOnuO dpauBepoe u npulokxeHu.
B HeKOTopbIX clyuayx dny IONHOrO BOCCTaHOBJIeHnI NOtpe6yEtCpe3epBHa KOnN y BOCCTaHOBJIeHnI, 3aIncAHHa Ha USB-hakonntene.
C03daHHe pe3epBHOJ KOHNДЯ BOCCTaHOBJIeHNA
Для nepeуctaHOBKc USB-нakоNTeJЯ hyxHo cHaayala co3daTb pe3epBHyU KOJIIO ДЯ BOCCTaHOBLeHry. Pe3epBHaJ KOJIЯ DЯ BOCCTaHOBLeHry CODEpXHT BCE φaIbI, ИЗнayaЛьно 3aПиСаНье Ha JxecTKI DnCK KOMlbIOTepa,В TOM YnCne Windows n BCE 3aПиСаНьeПри I3rTOBLeHnnpOrpAmMbI n DpaIbEpbI. 3Ta pe3epBHaJ KOJIЯ BOCCTaHOBt KOMlbIOTep Do COCTOЯHry HA MОмeHT NOKyPkN. При 3Tom y Bac 6ydeT Bo3MOxHocTb COxpaHnTb BCE HAcTpOЯКИ N IInuHbIe DaHHbIe DЯ BOCCTaHOBLeHry B DAJIbHeM.
Пи汞e: Поьерьм, чьбы Ha USB-нakонumene c8o6dH0zo Meema bIIO He MeHee 16 I6.
Acer Recovery Management
?X
Welcome to Acer Recovery Management
Acer Recovery Management enables you to restore your system. To begin, select the task you want to perform. Please DO NOT remove the USB device while proceeding.

Customized Restore (Retain User Data)

Reinstall Drivers or Applications
Make a back-up before you restore (Recommended).

Create Factory Default Backup
Create Drivers and Applications Backup
Reinstall Drivers or Applications
Reinstalls factory default drivers or applications.

acer
- HaxmTe Co3daTb pe3epBHyIO KOnHIO dpaBepOB IN npHIOXeHn.
Подкночи Te USB-нakоштел Ил Вставпч Chstbl DVD-Dnck B npINBOd ONTNueCKN X DnCKOBи HnAKMITE Danee.
- Ecπη nCποΠb3yete USB-haKoπnteNb, TTo πepeπpOdoJIkeHEm y6eInteCb, qTo Ha HEm dOCTaTOUHO CBO6OdHOrO MecTa.

- Ecnn nCnoNb3yTe DVD-DnCKn, To nporpaMa yKaJKeT, cKoJIbKO HUxHNO YnCTbIX 3aINCbIbAeMbIX DnCKOB IJIg 3aINcN DnCKOB BOCCTaHOBJIeHn. PnirTOBbTe INx nepeI hauaIOM npOeIybl.

-
Haxmnte Nyck, TTo6bl cKOnIpoBaTb faIbl. Ha 3kpAne 6yJeT OTo6paKaTbCxaO Bd BblONHeHnpe3epBHOr KOIpoBaHn.
-
BbInOpHnTe yka3aHnI dIy 3aBepSeHnI pOcecca:
-
Ecnn nCnOJIb3yTe ONTnueckne DnCKn,TO JIoTOK npINBOda 6yJeT OTKpbIBaTbcra Nocne 3aIncn KaJDoRo DnCKa. N3BLeKInTe DnCK N3 npINBOda NnomTe ero nepMaHeHThblm Mapkepom. Ecnn HuxH0 3aIncatb HeCKOnbKO DnCKOB,TO,yBnDeB npEKnOxKeHne Ha ekpaHe, BCTaBbTe CNeDyUoNIM DnCK n HaxMITE OK. PnpOJkaIte 3Tu DeIcTBn, NOKa npOcecc He 3abepuNTcra.
- Ecπn nCπoNβ3yeTe USB-haKoπnteJIb, To OTcoεdHηIte erO nHaHeCιTe Ha Hero YeTkyUo MapKnIpOBKy.
Baxho! HanuHnte Ha KaJdOM DnCKe NOHrTHbI TeKCT, HapnMpEep, "Pe3epBHaJa KOnN JaPaBepOB N npJIoXeHn". CoxpaHnte 3Ty pe3epBHyIO KOnHb B HaJeXHom MecTe n 3aONMHte 3TO MeCTO.
BocctaHOBJeHne cIcTeMbI
IopraOK BOCCTaHOBHeHnCnCTeMbI:
- UctpaHnTe MeIknKe npo6nEmbl.
EcnB03HnKHyT HEnOJaIKN B pa6Ote TOnbKO OndHO NIN DByX npOrpaMMhBIX NIN anNapaTHbIX KOMNoHErTOB, TO npo6JeMy MOxHo peuNTb nepeycTaHOBKO 3TNX npOrpAMM NIN dpaBepOB yCTpoiCTB. IopraDOK BOCCTaHOBJIeHNA PO i dpaBepOB, ppeyctaHOBJIeHHbIX Ha 3aBOJe-N3rOToBHTeNe, CM. B pa3dJeNE "PepeYcTaHOBKa dpaBepOB n npInloKeHn" Ha cTp. 57.
Bo38pam K moyke boccaMaHoEneHua
- Ha 3kpAne Pnyck BBeDnTe "PaHEnb ynpaBnEnnra" n 3aTeM B CnNcKe npInIOxHeHn HaxmTe PaHEnb ynpaBnEnnra.
- HaxmTe Cnctema n 6e30nacHocTb > LcHTp noDpeKKn, 3aTeM BHN3y OKHa HaxmTe BocCTaHOBJeHne.
-
HaxmTe 3anyck BOCCTaHOBJeHnC nCTeMbI, 3aTeM DaJee.
-
Haxmnte camyio nocJeHHIO TOky BOCCTaHOBJIeHnra (Ha TOT MOMENT, KOrda Ba7a CnCTema pa6oTana npabUNbHO), Haxmnte Danee n 3aTeM FToTOBO.
5.B OTPbIbIeMcR OKHe c 3aIpOcOM Ha NOITBepKJdHne HauKMnTe Da. Pocne 3tOro CnCTema 6yDet BOCCTaHOBNeHa C NcNoJIb3OBAHNem yka3aHHo BamN TOUKN BOCCTaHOBNeHn. 3TOT IpoceCC MoKeT 3aHrTb HeCKoJIbKO MmHyT INOTpe6OBaTb nepe3arpy3Kn KOMNbIOTepa.
BocctaHOBJIeHne cncTeMbI do nepBOHaayJbHoro COCTOHNIA
EcnB KOMNbItepe BO3HKnHyT Ipo6JIembl, KOToPbIe He ydaCTcayCTpaHnTb DpyrIMN CNOco6aMn, TO, BO3MOxHO, NOHaIO6bNTcAnepeyCTaHOBnTb CNCTEmy ZeNIKOM, YTO6bl BOCCTaHOBnTb eeN3HaayAbHoe COCToRHe. JIBy BOCCTaHOBNeHMy MOXHO NcNoJIb3OBAtB JIbO JeCTkn DnCK, JIbO CO3DaHHbIe Bamn pe3epBHbIe KOnm dJaBOCCTaHOBJIeHn.
- Ecni cnctema Windows eue 3aynckaetc, n BbI He ydaJIIN Ha JxecTKOM DnCKe pa3JeI BOCCTaHOBJIeHn, TO CM. pa3JeI "BocTaHOBJIeHne n3 camo cnCTembl Windows" Ha cTp. 63.
- Ecni cnctema Windows He 3anyckaetcra, a opinnaHbHbI JxecTkIn Dnck 6bl IOnHOCTbIO nepeopmatipobAH nIN 3aMeHeH, TO cm. pa3dJI "BOcTaHOBJeHne n3 pe3epBHOJ KOHN dJI BOCCTaHOBJeHn" Ha ctp. 67.
BocctaHOBHeHne n3 cAmO cnCTeMbI Windows
3anycntte npuioxene AcerRecovery Management:
- Ha захане Пусяк Вьадит e "Recovery" n 3aTeM B cπiNcke npNiIoxKeHnнжмite Acer Recovery Management.
IpeDyucMOTpeHo DbA cnoc6a - BocCTaHOBJIeHne 3aBOIDcKHX yCTaHOBOK (C6poc PIK) nIIn HAcTpaINBaEMoe BOCCTaHOBJIeHne (O6HOBNTb PIK).

Функция ВocstahOBJIeHne 3aObcknX yCTaHOBOK ydaJIIT BCE daHHbIe C JecTKOrO DnCKa, 3aTEM nepeyctaHOBNT Windows N BCE npdeYCTaHOBJIeHHbIe B KOMNbIOTepe nporpaMMbl I dpaiBepbl. Ecnu eue MoKHO OTKpbITb BaxKnble faiNbl Ha JecTKOM DnCKe, To npraMo ceUac CO3dAte INx pe3epBbIe KOIN. CM. pa3dJe "BocstahOBJIeHne 3aObcknX Hactpoek npri nomoun npniloxeHnAcer Recovery Management"Ha cTp.64.
Функця HabcTpaNbaEmoe BOCCTaHOBJIeHne NOIbITaeTcOxpaHHTb Baun paIbI (noIb30BaTeIbckn DaHHbIe), HO nepeyctaHOBNT BCE nporpamMbI n dpaIbEpbI. PporpamMbI, yCTaHOBJIeHHbIe Bamn NocJIe NOKynKII K, 6yDyT ydaJIeHbI (KpOME nporpamM, yCTaHOBJIeHHbIX C caYta Mara3HN Windows). CM. pa3dEn "HacTpaNbaEmoe BOCCTaHOBJIeHne npi nomoi npinloKeHna Acer Recovery Management" Ha cTp. 66.
1. Haxmnte BocctaHOBHTb 3aBOdckne HaCTpOKn.

Acer Recovery Management
?X
Welcome to Acer Recovery Management
Acer Recovery Management enables you to restore your system. To begin, select the task you want to perform. Please DO NOT remove the USB device while proceeding.

Reinstall Drivers or Applications
Reinstalls factory default drivers or applications.

Customized Restore (Retain User Data)

Reinstall Drivers or Applications
Make a backup before you restore (Recommended).

Create Factory Default Backup
Create Drivers and Applications Backup
acer

BHHMaHHe!ФункцЯ "BocctaHOBHTb 3aBOdCKne HacTPOiKN" cotpeT BCE paIJIbI Ha JxecTKOM DnCKe.
2. OTPpoeTc8 OKHO C6poc PIK.
Reset your PC
Here's what will happen:
- All your personal files and apps will be removed.
- Your PC settings will be changed back to their defaults.
Next
Cancel
Unnocmpaquu npueedehbl molko dner cnpaKa.
- Haxmnte Danee n BbIbepeTc cnooc ydaJIeHna qaiIOB:
a. YdaNTb TOnbKO MON faiJIbl - 6bICTpoe ydaJIeHne BCex faiIOB nepei BocCTaHOBJIeHnEM KOMNbIOTepa; TaKoe ydaJIeHne 3aHIMMaET OKJIO 30 MInHyT.
b.ПОЛHOCТьO OYNCTIbДNCK - NOJIHЯ OYNCTKa DnCKa NOCJe ydaJIeHnK KaxdOrO PhaIIa, YTO6bI NOCJIe BOCCTaHOBJIeHn Hn OdINH CTapbI ΦaII HeJIb3a 6bIIO npOuHTaTb. OYNCTKa DnCKa 3aHIMaET HamHoro 60nbIe BpemeHn (do 5 yacOB), Ho 3To HAMHoro 6oJee 6e3OnaChbI CnOCo6, TAK KaK CTapblc E PhaIIbI ydaJIaOTcR 6e3BO3BpaTHO.
4. Haxmnte C6poc.
5. B npocece BocctaHOBneHn CHaJaI npOn3OJTe npe3arpy3Ka KOMNbIOTepa, a 3aTeM NaHHeTcK OKnIpOBaHne faiIOB Ha JecTkN IINCK.
6. После заBERшеня BOCCTaHOBJIeHЯ Bbl CMOKeTe Hauatb pa60Tu c KOMNBIOTepOM, NOBTOpNB DeiCTBnR, BblIOJHReMbIe Ppi nepBOM 3anycke.
HacmpaueaeMoe 6occmahOeHue npu nmoou npuIoxeHua Acer Recovery Management
1. Haxmnte
HactpanBaemoe
BOCCTaHOBJIeHne
(coxpaHntb
N0JIb3OBaTeIbckNe daHHbIe).

Acer Recovery Management
?X
Welcome to Acer Recovery Management
Acer Recovery Management enables you to restore your system. To begin, select the task you want to perform. Please DO NOT remove the USB device while proceeding.

Customized Restore (Retain User Data)

Reinstall Drivers or Applications
Make a backup before you restore (Recommended).

Create Factory Default Backup
Create Drivers and Applications Backup

Reinstall Drivers or Applications
Reinstalls factory default drivers or applications.

2. OTKPOEcra OKHO O6HOBITb PIK.
Refresh your PC
Here's what will happen:
- Your files and personalization settings won't change.
- Your PC settings will be changed back to their defaults.
- Apps from Windows Store will be kept.
- Apps you installed from discs or websites will be removed.
A list of removed apps will be saved on your desktop.
Next
Cancel
3. Haxmnte Danee, 3aTeM 06HOBntb.
- B npocece BocctaHOBneHn CnauJa npOn3oJTe npe3arpy3Ka KOMNbIOTepa, a 3aTeM NaHHeTc KOInpOBAHne PaJIIOB Ha JeCTKn IINCK. 3ToT npocecc 3aHmMaET Okono 30 MInHyT.
BocctaHOBJIeHne n3 pe3epBHOJ KOHN dJa BOCCTaHOBJIeHnA
AkkymyJIaTOp 3apJxJaTeCn npi NODKJIIOUeHIn aIaNTepa ceTeBOrO nITaHnK KOMNbIbTepy. AkkymyJIaTOp MOxHO 3apJxHaTb, He IpepbIBaR pa60Ty c KOMNbIbTePOM dIy 3apJda aKKymyJIaTOpa. Tem He MeHee, npi BbIKNoUeHHOM KOMNbIbTepe aKKymyJIaTOp 3apJxJaTeCn 3HaunTeJBHo 6bICTpee.
AkkymyIaTOp nO3BOJIeT nCnOJIb3OBAtB KOMNbIOTep B nOE3dKe nII npn c6oax 3JeKTPoNITaHn. PekomeHdyETcR NMeTb B pe3epBe DOnONHInTeMbHyIO nONHOCTbIO 3apXKeHHyIO 6BaTapeIO. KyNTb pe3epBbI aKKymyIaTOp MOxHO B KOMNbIOTepHOM MaRa3INHe.
3apraika akkymyIaTopa
Ipeed 3apqdkoakkyMylToppa npOBepbTe npabnIbHocTbeero yctahOBKn BOTcKe. POKLIOUHTe aadTep cTeBOrO NITAHN K KOMNbIOpTepy IN K CteBoi po3etke.B npOecce 3apqdkn akkyMylToppa MOXHO npOJOnKAtb pa60Tu c KOMNbIOpEPM, NOyuaIOzIM NITaHne OT cETn.
Tem He MeHee, npB BbIKNIOeHHOM KOMNbIOTepe aKKyMyJrTOP 3apXkaETc3HaunTeJIbHO 6bICTpee.
Ipumeyue: Coememyem 3apjxamb akkymyarnop neped 6bixodom u3 doma. 3aprd bamapeu houby npedeh nayanom noe3dku no3oilon um ympom hauamb pa6omy c nonnoctb 3apjxehnou bamapeeu.
Iodaomoeka Hoso2o aKKyMnyamopa K UcnoJIb306aHuO
IpeNd Hauanom NcnoJIb3OBAHnH IOBOr aKKyMylTOpa COBetyem npOBecTN npocecc ero noJroTOBKn pa6Ote:
- BCTaBbTe HOBbI aKKyMylTOp B bYbIKHcyeHHbI KOMNbIbTeP.
2.ПодсоeДинITE aДaNTep cTeBOrO nITaHnI N nOJIHoCTbI O 3apAДnte aKKyMЛЯТOP. - OToeHNHe Te aanTep cTeBOro nItaHn.
- BkIIOHInTe KOMnBIOTe np pa6OtaTHe, nCNoJIb3yra 3JIeKTPoPntaHne OT aKKymJrTopa.
5.ИспόЛьзуйTe KOMпьЮТер До пОЛнOrO pa3рда 6атaperи И пОЯВлЕняnpeДуПрждени O Hn3KOM урOBHe 3apЯDA. - Choba noДcoeДиHInTe aДanTep ceTeBOrO nITaHnI eIe pa3 noJIHOCTbI O 3apJInTe aKKyMЛЯТOP.
B3rIyHnTe Ha nHdNkAtop Power (IITaHne):
-
Ecni OH He CBeTnTcra, NiTaHne Ha KOMNbIOTep He IoJaHO. ПрOBepbTe cIeNyUOuee:
-
Ecπi Bbl pa6oTaTe OT aKKymyIaTopa, 3TO MOKeT O3Haayb, yTO eRO 3apJn Hn3Km I HeCNoCo6eH nITaTB KOMbIbTe. POnkJIIOuHTe aadantep nepemehHoro TOKa, YTObIb 3apJnTb aKKymyIaTOp.
-
Поберъправиьhoeьи Наджhoeьи подюченя залтета пелемногToka K komblOTepу N к сеТбоВ розтke.
-
Ecπn ένικαTOp CBetntcπ, ποβεpbTe cπeúoüee:
-
EcTB Ли ДИСКВ РпИВОдЕ ONТИЧЕСКИХ ДИСКOB? ИЗВЛЕКИТЕ erо И НAZKMITE
+ + , Утобblеpe3aRpy3nITb CnCTeMy. - BCTabIeH JI B KOMNbIoTeP USB-NaKoNITeJIb (USB-DnIck nIIcMaprTfOH)? OToCoEiINHInTe erO n HaxMInTe
+ + , yTO6bl Ipepe3arpy3ntb cIcTeMy.
Hem u3o6paXeHua Ha 3KpaHe
CnCTema ynpabJIeHnI NITaHnEM KOMNbIOTepa aBTOMaTnueckN OTKJIIOHaET DIncPJIe IINr 3KOHOOMn 3JeKTPo3HepRn. HaxMnTe IIO6yU KnaBnUy, YTO6bI BkIIIOHTb DIncPJIe.
Ecnnaatne KnaBnHn He Bo3Bpaaet Dncnpe B pa6oyn peKIM, BO3MOXHbI DBe PnUHHbl:
- YpOBeHb JApKoCTn MoKet 6bIb CInuKOM Hn3Ok. HaxMnte
+ (yBEnuHTb), yTO6bI NOBbcITb ypOBeHb JApKoCTn.
B KaueCTBe ycTpoIcTBa OTo6paKeHnMa MoBbT BbIbpaH BHeuHm MOHTOp. YTO6bl CHOBA nepeKJIIOHTbcra Ha DInCpJIe KOMNbIoTepa, HaxMnte KNaBnUHyU KOmbHaUIO nepeKJIIOUeHnnaDInCpJIe Fn> +. - Ecπιν ropιτ ένηκατορ pεχμma cha (Sleep), to 3TO 3NaHT, ζΤΟ KOMπβιθερ Ḁλοδιπτῶν B pεχμme cha. Πλγ ΒO30δHOBπeΗρηρ aβοθβιν ΒΟ𝑏ινHOM pεχμme HαχΜΙTE Ι ΟΤΝΥΤΙΝΕ ΚΚΟΝΚ ΠΠΑΗΝΙ.
Kombiopeh He 8ocnpou3o0dum 3eyk
PpOBepeTcneDyUouee:
- PpOMKoCTb MoKET 6bITb OTKIIOUeHa. B Windows, IocMOTpnte Ha 3NaOH peYJrTOpa rpOMKOcTN (DINHAMK) B NaHEn 3aJaUc. EcIn OH nepeuepkHyT, To HaxMMTe 3NaOH n CHNMMte pJnAOK BblKn. BCE.
-
UpoBHeHb rPOMKoCTn MoXeT 6bITb CJIuKOM Hn3Ok. B Windows, PocMOTpIte Ha 3NaUOK peYJrTOpa rPOMKoCTn B paHeN 3aJaU. OtperyJInPoBaTb rPOMKoCTb MOxHOb TaKKe KHOJkAmn peYJInPoBKn rPOMKoCTn.
-
Ecπn rɔlOBhblte TeneΦoHbI, HayuHnKn nJIn BHeuHne DnHaMnKn PoiKJIIOUeHbI K pa3bemy IINHeNHO BoBIXOda nepeDHeN KOMNbIoTepa, TO BHyTpEHHne DnHaMnKn aBTOMaTUnCeCKN OTKJIIOUaIOTcR.
Ecnu 2oIosHbIe meIefoHbI. HayuHuku uu eHue Hue duHaMuku
NoDKIOUeHbI K pa3bemy luHeuHOo eblXoda nepeDHeu KOMlbIomepa,
mo 8HympenHue duHaMuku aemomamuecku omKIOUaIOMcra
Ha npINBOe ONTNUeCKNX DNCKOB eCTb OTBepCTne IJRA MEXAHUweCKORO n3BJIeueHnra DnCKa. YTO6bI BblDNHyTB JIOtOK, BCTaBtBe B 3TO OTBepCTne KOHcIK CTePjXHr ShapNKOBOn pyuKn INN KaHcJIepCkyo CKpeNky N HaxMNTe.
Knaaamypa He peaaupyem
Kak OTkpblb 3kpan Nyck?
Haxmnte KnaBnuy Windows nnn npotraHnte npabbK paay 3kpaHa K ceHTpy, 3aTeM Haxmnte 3Kcnpecc-KhONkny Pnyck.
Kak nepekeIIOUaTbcM MeKdI npJIIOKeHnA M?
IpoTaNHe IeBbI KpaI 3KpaHa K ceHTpy, YTO6bl ZIKNueCKn IpeKJIIOuAToBcA MExdy 3aNyUeHHbIMN CeYac PpNJIOXeHnMn.
Kak BbIKJIOuHTb KOMNbHOTep?
ПрOTЯнTe ПраВьй Край эКpaHa K ΚeHTpy, HαЖмITE HAcТpoIKN >ПиТаHne И ВБберпTe hyжhoe DeiCtBVE.
3aHem HxKeH HOBbI INHTepFeic?
Hobii INTEppeic nI Windows 8 pa3pa6oTaH cneuaJIbHO IJIa ceHCOPHOrO ynpabLeHn. PpiIOxKeHn I3 Mara3Ha Windows 6byT aBTOMaTHueCKn IcNoJIb3OBaTB BeCb 3KpaH, I INx He Hux HO 3aKpbIBaTB O6bIHyM cNOC6OM. PpiIOxKeHn I3 Mara3Ha Windows 6byT OTO6paKaTbCn Ha 3KpaHe PycB B VIne "DINHAMuecknx PIIITOK".
Umo makoe "duhamuueckue numku"?
"ДиHamnueckne nIITkn (Live tiles)" aHanoIurNHyI 3ckn3am npInIOxehn, OHI 6byUT oOBHbIaTbcra C HOBbIM cOdepKIMbIM KaJdbI pa3, KOrda Bbl IoKJIIOuHaTeCsb K INtepHeTy. IOnToMy Bbl cMOxete, HApPImep, IPOcMaTPnBaTb oHOBJIeHHbIe MeTeOCBOdKn IIN bIpXeBbIe KOtnpOBKn, He 3aIyckra COOTBeTCTByIOUme npInIOxehn.
Kak pa36JokpoBaTb KOMNbIOTep?
YTo6bl pa36IOKIpOBaTb KOMNbIOpTe, npOBeIte No 3kpaHy 6IokIpOBKn BBePx n HaxMnte yUeTHyU 3aNcB nOlb30BaTeJ. Ecn n IyueTHoI 3aIncn yCTaHOBJIeH napOl, TO nIpy npOdoJIKeHn HxKHO BBecTN 3TOT napOl.
Haxmnte u ydepkuaite 3naoy npocmnp, yTObI BnDeTb BBODMble CnMBObl I He OwBntbcp nBBOe napoJ.
Kak Hacptpontb KOMnbIOtep corlacho MOIM npednoTehnM?
Moxhno Hactpontb 3KpaH Pyck, yCTaHOBbBa3JIuHbIe FOHOBbIe N3O6paXeHnI, INy npoJIOUHTb PJIITKN B COOTBeTCTBn C BaIJIMN npedNoUTeHnAIMN.
UTo6bI N3MeHnTb 0HOBOE N3O6paXeHne, IPOTAHnTe IpaBbI KpaI 3KpaHa K ceHTpy N HaxMnTe HaCTpoiKn > N3MeHnTb HaCTpoiKn PIK > IepcoHaJIIN3nPoBaTb. HaxMnTe 3KpAn PycK BBePxy CTpaHnCbl N Bbl6epnte CBeT n N3O6paXeHne.
YcTpaHHeHne HeNCnPaBHOCTeI
3Ta rIaBa nOMOKeT Bam cnpaBntbC aHn6oJIe paCnpocTpahHeHHbIMn npo6JemAmu cnCTembl.
Ecni Bo3NikHET npo6Iema, To npoHTnte 3Ty rnaBy, npexJe yem o6paataBcB B cepBnchbI ueHrp. NcnpabIeHne 6Oone cepbe3hIx HeNoJadok Tpe6yET BCKpbITnKOMNbIOTepa. He nbTaNTEcb OTkpItb KOMNbIOTe camocToTJIbHO. O6paNTecb 3a NOMouK npOdaBuY nIN B aBTOpN3OBaHHbI cepBnC-ueHtp.
Cobetbl no noncky uyctpaehnno HeucnpabHocte
B 3TOM KOMNbIOTepe peaIN3OBAHbI COBpeMeHHbIe pa3pa6OTKn, IO3BOJIAHOUJIe BbIBoDnITb COO6UeHnI O6 OwN6Kax Ha 3KpaH dJa o6JIerueHnI noncKa HeNCnPabHocTn.
Ecn n cntema coo6aet o6 own6ke nn npOraBJIOTc rMMITOMbl Own6kn, cm. "Co06eHn8 o6 own6kax". Ecn n HeNoJaIka He MoKET 6bItb ycTpaHeHa, CByKInTeCb c npOdaBcOm. Cm. Pa3dEn "ObpaueHne 3a TexHnueckon noDepKkoJ" Ha cTp. 110.
Coo6eHnO oOn6kax
Ecni cncTeMa BbIaet coo6eHne 06 Own6ke, 3anuHte erO npunMe Mepbl dny UcTpaHeHn HEnCnpabHocTn. B cneDyUoSei TabInue nepeuNcJIeHbI COo6eHnO 6 Own6kax B aIΦaBHTOM nopJKe, a TaKKe peKomeHdyeMbI DeiCTBnIO INx UcTpaHeHnIO.
Pa3peeHbIe KaHaJIbI 6ecnpoBODHO CBa3n IJRA pa3NbIX CTpaH
Ceb. Ameprka 2,412-2,462 Tg KaHaJIb01-11
Jaonna 2,412-2,484 Tc Kaanb01-14
Ebnona ETSI 2,412-2,472 Tc Kaanbl01-13
"HopMbl 6e30nacHcOCTn 6" Ha Be6-caIte MmHncTePcTBA 3dpaBOoxpAnenr KaHaIbI www.hc-sc.gc.ca/rpb
3To yctpoiCTBO OTBeaet Tpe6oBaHnA m CtAndapTa RSS210 MmHnCTepcTba npomblIeHHocTn KaHaIbI.
3To uΦpOBoe yCTpoIcTBO KlaCca B OTBeuAeT Tpe6oBaHnI M KaHaIckOrO CTaHdApTa ICES-003, peI. 4, RSS-210 N4 (deKa6pb 2000) n N5 (HO6pb 2001).
Acer Backup Manager 40
Odzyskiwanie 44
Welcome to Acer Backup Manager
Select one action below to start managing your data.
Back Up My Files
Pick and choose which files to back up or let the program find it all for you.
Back Up My Files
The file backup helps you create a complete backup of your documentation.
Choose the file or folder for the backup and then select the destination for
the backup. Once you have selected the destination, the final step is to
schedule the backup. Click on the Backup My Files button to create a backup.
Image My Drive
Make a complete image backup of your drive.
Migrate My Files
Transfer your files from another computer to this computer.
Clear out / Restore Files
Remove seldom used files to free up space or restore files from your backup.

Launch My Backup Profiles

acer

Directly enter "My Backup Profiles" next time
Acer Recovery Management
?X
Welcome to Acer Recovery Management
Acer Recovery Management enables you to restore your system. To begin, select the task you want to perform. Please DO NOT remove the USB device while proceeding.

Reinstall Drivers or Applications
Reinstalls factory default drivers or applications.

Customized Restore (Retain User Data)

Reinstall Drivers or Applications
Make a backup before you restore (Recommended).

Create Factory Default Backup
Create Drivers and Applications Backup

acer
Here's what will happen:
- All your personal files and apps will be removed.
- Your PC settings will be changed back to their defaults.
Next
Cancel
Acer Backup Manager 39
Helyreallitas 43
Welcome to Acer Backup Manager
Select one action below to start managing your data.
Back Up My Files
Pick and choose which files to back up or let the program find it all for you.
Back Up My Files
The file backup helps you create a complete backup of your documentation.
Choose the file or folder for the backup and then select the destination for
the backup. Once you have selected the destination, the final step is to
schedule the backup. Click on the Backup My Files button to create a backup.
Image My Drive
Make a complete image backup of your drive.
Migrate My Files
Transfer your files from another computer to this computer.
Clear out / Restore Files
Remove seldom used files to free up space or restore files from your backup.

Launch My Backup Profiles

acer

Directly enter "My Backup Profiles" next time
Start Acer Recovery Management:
Acer Recovery Management
?X
Welcome to Acer Recovery Management
Acer Recovery Management enables you to restore your system. To begin, select the task you want to perform. Please DO NOT remove the USB device while proceeding.

Reinstall Drivers or Applications

Customized Restore (Retain User Data)
Reinstalls factory default drivers or applications.

Reinstall Drivers or Applications

Make a backup before you restore (Recommended).

Create Factory Default Backup
Create Drivers and Applications Backup
acer
Here's what will happen:
- Your files and personalization settings won't change.
- Your PC settings will be changed back to their defaults.
- Apps from Windows Store will be kept.
- Apps you installed from discs or websites will be removed.
A list of removed apps will be saved on your desktop.
Next
Cancel
Acer Backup Manager 37
Obnoveni 40
Acer Recovery Management
?X
Welcome to Acer Recovery Management
Acer Recovery Management enables you to restore your system. To begin, select the task you want to perform. Please DO NOT remove the USB device while proceeding.

Reinstall Drivers or Applications
Reinstalls factory default drivers or applications.

Customized Restore (Retain User Data)

Reinstall Drivers or Applications

Make a back-up before you restore (Recommended).

Create Factory Default Backup
Create Drivers and Applications Backup
acer
Acer Recovery Management
?X
Welcome to Acer Recovery Management
Acer Recovery Management enables you to restore your system. To begin, select the task you want to perform. Please DO NOT remove the USB device while proceeding.

Reinstall Drivers or Applications
Reinstalls factory default drivers or applications.

Customized Restore (Retain User Data)


Reinstall Drivers or Applications
Make a back-up before you restore (Recommended).

Create Factory Default Backup
Create Drivers and Applications Backup
acer
Acer Recovery Management
?X
Welcome to Acer Recovery Management
Acer Recovery Management enables you to restore your system. To begin, select the task you want to perform. Please DO NOT remove the USB device while proceeding.

Customized Restore (Retain User Data)

Reinstall Drivers or Applications
Make a backup before you restore (Recommended).

Create Factory Default Backup
Create Drivers and Applications Backup
acer
Reinstall Drivers or Applications
Reinstalls factory default drivers or applications.

Here's what will happen:
- Your files and personalization settings won't change.
- Your PC settings will be changed back to their defaults.
- Apps from Windows Store will be kept.
- Apps you installed from discs or websites will be removed.
A list of removed apps will be saved on your desktop.
Next
Cancel
Acer Backup Manager 39
Oprava 42
Spustite Acer Recovery Management:
- V Časti Štart napíste „Recovery“ a potom kliknite v zozname aplikácína Acer Recovery Management.
K dispozífii su dve možnosti: Obnovit' pôvodné nastavenia (Resetovat'moj PC) alebo Prispósobene obnovenie (Obnovit'moj PC).
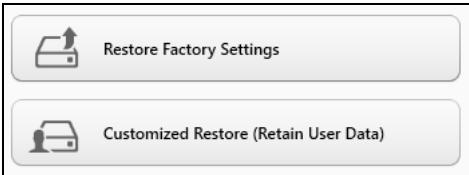
Acer Recovery Management
?X
Welcome to Acer Recovery Management
Acer Recovery Management enables you to restore your system. To begin, select the task you want to perform. Please DO NOT remove the USB device while proceeding.

Customized Restore (Retain User Data)

Reinstall Drivers or Applications
Make a backup before you restore (Recommended).

Create Factory Default Backup
Create Drivers and Applications Backup
Reinstall Drivers or Applications
Reinstalls factory default drivers or applications.


Here's what will happen:
- Your files and personalization settings won't change.
- Your PC settings will be changed back to their defaults.
- Apps from Windows Store will be kept.
- Apps you installed from discs or websites will be removed.
A list of removed apps will be saved on your desktop.
Next
Cancel
Acer Backup Manager 36
Obnovitev 39
Acer Recovery Management
?X
Welcome to Acer Recovery Management
Acer Recovery Management enables you to restore your system. To begin, select the task you want to perform. Please DO NOT remove the USB device while proceeding.

Reinstall Drivers or Applications
Reinstalls factory default drivers or applications.

Customized Restore (Retain User Data)

Reinstall Drivers or Applications

Make a back-up before you restore (recommended).

Create Factory Default Backup
Create Drivers and Applications Backup
acer
Acer Recovery Management
?X
Welcome to Acer Recovery Management
Acer Recovery Management enables you to restore your system. To begin, select the task you want to perform. Please DO NOT remove the USB device while proceeding.

Customized Restore (Retain User Data)

Reinstall Drivers or Applications
Make a back-up before you restore (Recommended).

Create Factory Default Backup
Create Drivers and Applications Backup
Reinstall Drivers or Applications
Reinstalls factory default drivers or applications.

acer
ZaZenite Acer Recovery Management:
Acer Recovery Management
?X
Welcome to Acer Recovery Management
Acer Recovery Management enables you to restore your system. To begin, select the task you want to perform. Please DO NOT remove the USB device while proceeding.

Reinstall Drivers or Applications
Reinstalls factory default drivers or applications.

Customized Restore (Retain User Data)

Reinstall Drivers or Applications

Make a backup before you restore (Recommended).

Create Factory Default Backup

Create Drivers and Applications Backup
Acer Recovery Management
?X
Welcome to Acer Recovery Management
Acer Recovery Management enables you to restore your system. To begin, select the task you want to perform. Please DO NOT remove the USB device while proceeding.

Reinstall Drivers or Applications
Reinstalls factory default drivers or applications.

Customized Restore (Retain User Data)

Reinstall Drivers or Applications


Make a backup before you restore (Recommended).

Create Factory Default Backup
Create Drivers and Applications Backup
acer
Here's what will happen:
- Your files and personalization settings won't change.
- Your PC settings will be changed back to their defaults.
- Apps from Windows Store will be kept.
- Apps you installed from discs or websites will be removed.
- A list of removed apps will be saved on your desktop.
Next
Cancel
- Kliknite Naprej in nato Osvezi.
- Postopek obnovitve se bo pričel s ponovnim zagonom računalnika in nadaljeval s kopiranjem datotek na trdi disk. Ta postopek traja priblžno 30 minut.
Acer Backup Manager 38
Oporavak 41
Stvaranje sigurnosne kopije za oporavak 41
Stvaranje sigurnosne kopije pogonskih programa i aplicacija 46
Oporavak sustava 48
Ponovna instalaciona upravlajckih programa i aplicacija 49
Povratak na prijašnju snimku sustava...... 52
Povrat sustava u stanje sa tvornickim postavkama. 53
Oporavak pomocu sustava Windows... 54
Oporavak sa sigurnosne kopije za oporavak 58
Acer clear-fi 62
Navigacion medijima i fotografijama 63
Welcome to Acer Backup Manager
Select one action below to start managing your data.
Back Up My Files
Pick and choose which files to back up or let the program find it all for you.
Back Up My Files
The file backup helps you create a complete backup of your documentation.
Choose the file or folder for the backup and then select the destination for
the backup. Once you have selected the destination, the final step is to
schedule the backup. Click on the Backup My Files button to create a backup.
Image My Drive
Make a complete image backup of your drive.
Migrate My Files
Transfer your files from another computer to this computer.
Clear out / Restore Files
Remove seldom used files to free up space or restore files from your backup.

Launch My Backup Profiles

acer

Directly enter "My Backup Profiles" next time
Acer Recovery Management
?X
Welcome to Acer Recovery Management
Acer Recovery Management enables you to restore your system. To begin, select the task you want to perform. Please DO NOT remove the USB device while proceeding.

Reinstall Drivers or Applications
Reinstalls factory default drivers or applications.

Customized Restore (Retain User Data)

Reinstall Drivers or Applications

Make a back-up before you restore (Recommended).

Create Factory Default Backup
Create Drivers and Applications Backup

- Kliknite na Stvori sigurnosnu kopiju tvornickih postavki. Otvorit ce se prozor Pogon za oporavak.
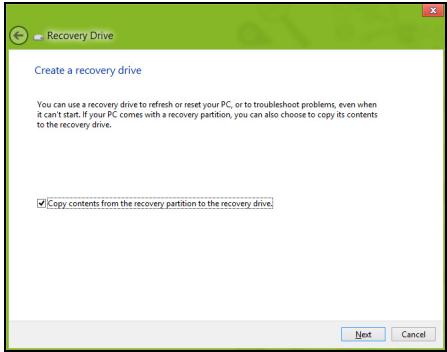
Provjerite je li označeno Kopiraj sadržaj particije za oporavak na pogon za oporavak. To osigurava njcvelovitiju sigurnosnu kopiju za oporavak.
-
Prikljucite USB pogon, a zatim kliknite na Dalje.
-
Osigurajte dovoljan kapacitet USB pogona prise nastavka postupka. Sigurnosna kopija za oporavak treba majmanje 16 GB memorije

- Na zaslonu ce bitiPokazan napredak postupka stvaranja sigurnosne kopije.
-
Slijedite postupak do zavrsetka.
-
Nakon stvaranja sigurnosne kopije za oporavak, akaŽelite možete izbrisati informaciye za oporavak na vašem računalu. Ako izbrišete te informaciye, za oporavak računala možete koristiti samo USB sigurnosnu kopiju za oporavak, a ako izgubite ili nehotić no izbrišete USB pogon, necete moçi oporaviti računalo.
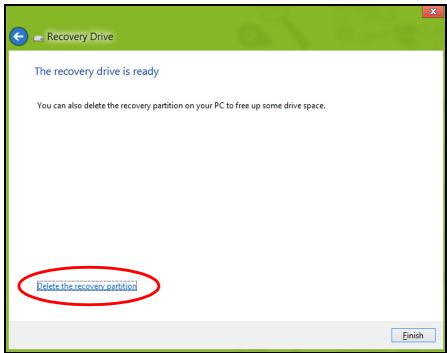
- Izvadite USB pogon i nedvosmisleno ga označite.
Vázno: Oznacite jeginstvenom, opisnom oznakom poput „Sigurnosna kopija za oporavak Windowsa". Sigurnosnu kopiju držite na sigurnom mestreu koje cete lako upamtiti.
Pokrenite Acer Recovery Management:
- U izborniku Početak, unesite "Recovery" i kliknite na Acer Recovery Management u popisu aplikacija.
Acer Recovery Management
?X
Welcome to Acer Recovery Management
Acer Recovery Management enables you to restore your system. To begin, select the task you want to perform. Please DO NOT remove the USB device while proceeding.

Reinstall Drivers or Applications

Customized Restore (Retain User Data)
Reinstalls factory default drivers or applications.

Reinstall Drivers or Applications

Make a backup before you restore (Recommended).

Create Factory Default Backup
Create Drivers and Applications Backup
acer
Acer Recovery Management
?X
Welcome to Acer Recovery Management
Acer Recovery Management enables you to restore your system. To begin, select the task you want to perform. Please DO NOT remove the USB device while proceeding.

Reinstall Drivers or Applications
Reinstalls factory default drivers or applications.

Customized Restore (Retain User Data)

Reinstall Drivers or Applications


Make a backup before you restore (Recommended).

Create Factory Default Backup
Create Drivers and Applications Backup

Here's what will happen:
- Your files and personalization settings won't change.
- Your PC settings will be changed back to their defaults.
- Apps from Windows Store will be kept.
- Apps you installed from discs or websites will be removed.
- A list of removed apps will be saved on your desktop.
Next
Cancel
- Kliknite na Dalje, a zatim na Osvježi.
- Postupak oporavka počinje ponovnimPokretanjem računala, a nastavlja se kopiranjem datoteka na tvrdi disk. Postupak traje oko 30 minuta.
International Travelers jamstvo (ITW)
Acer Backup Manager 40
Recuperare 43
Welcome to Acer Backup Manager
Select one action below to start managing your data.
Back Up My Files
Pick and choose which files to back up or let the program find it all for you.
Back Up My Files
The file backup helps you create a complete backup of your documentation. Choose the file or folder for the backup and then select the destination for the backup. Once you have selected the destination, the final step is to schedule the backup. Click on the Backup My Files button to create a backup.
Image My Drive
Make a complete image backup of your drive.
Migrate My Files
Transfer your files from another computer to this computer.
Clear out / Restore Files
Remove seldom used files to free up space or restore files from your backup.

Launch My Backup Profiles
acer


Directly enter "My Backup Profiles" next time
Acer Recovery Management
?X
Welcome to Acer Recovery Management
Acer Recovery Management enables you to restore your system. To begin, select the task you want to perform. Please DO NOT remove the USB device while proceeding.

Reinstall Drivers or Applications
Reinstalls factory default drivers or applications.

Customized Restore (Retain User Data)

Reinstall Drivers or Applications

Make a back-up before you restore (Recommended).

Create Factory Default Backup
Create Drivers and Applications Backup
acer
Lansati Acer Recovery Management:
- Din Start, tastati 'Recuperare'.si dati cli pe Acer Recovery Management in lista de aplicati.
Acer Recovery Management
?X
Welcome to Acer Recovery Management
Acer Recovery Management enables you to restore your system. To begin, select the task you want to perform. Please DO NOT remove the USB device while proceeding.

Reinstall Drivers or Applications
Reinstalls factory default drivers or applications.

Customized Restore (Retain User Data)

Reinstall Drivers or Applications
Make a backup before you restore (Recommended).

Create Factory Default Backup
Create Drivers and Applications Backup
acer

Atentie: „Restaurare la valorile implicite din fabrica" va sterge toate fisierele de pe hardisk.
2. Se deschide fereastra Resetare PC.
Reset your PC
Here's what will happen:
- All your personal files and apps will be removed.
- Your PC settings will be changed back to their defaults.
Next
Cancel
Acer Recovery Management
?X
Welcome to Acer Recovery Management
Acer Recovery Management enables you to restore your system. To begin, select the task you want to perform. Please DO NOT remove the USB device while proceeding.

Customized Restore (Retain User Data)

Reinstall Drivers or Applications
Make a backup before you restore (Recommended).

Create Factory Default Backup
Create Drivers and Applications Backup

Reinstall Drivers or Applications
Reinstalls factory default drivers or applications.

- Se deschide fereastra Reimprospātare PC.
Refresh your PC
Here's what will happen:
- Your files and personalization settings won't change.
- Your PC settings will be changed back to their defaults.
- Apps from Windows Store will be kept.
- Apps you installed from discs or websites will be removed.
A list of removed apps will be saved on your desktop.
Next
Cancel
Bateria are urmatoarele characteristic:
Acer Backup Manager 41
Bb3ctaHOBAHe 44
Cb3daBaHe Ha apxNB 3a Bb3CTaHOBBAHe .... 44
b3daBaHe Ha apxNB C dpaBepn I
πριλοχεην 49
Bb3ctaHOBAhe Ha cncTemata. 51
PpHnCTaJIpaHe Na dpaIbepn npJIOKeHn 52
Bpbuahe KbM no-paHen cTaTyc. 55
Bp7aHHe HaΦa6pHnHTe HAcTPOKn HA CNTeMaTa 57
Bb3TaHOBBAHeOTWindows 57
Bb3TaHOBBAHe OT apxNB 3a Bb3TaHOBBAHe 62
Acer clear.fi 67
PperneHaMyntmEdnIcnHMKn 68
CnoJeHn faiNoBe 68
KoynycTpoiCTBaCa cBMeCTmMn? 69
Bb3npo3Bexdahe Ha npyro yctpoiCTBO. 70
UnpaBJIeHne Ha 3axpaHbAHeTo 71
IkoHOMnHa eHepnna 71
BaTepeHmOyI 74
XapakTepeNCTnKNa 6aTeepHnMy Moyn.74
3apekdahe ha 6atepnaTa 74
OnTMMn3npaHe Ha XMBota Ha 6aTePnTa. 76
He npobuBaIte, He OTbapraIte n He pa3rno6BaIte 6aTepeyTa. Ako 6atepyTa npoteue n Ce DOKOChete Do n3TEKInTe TeHocTn, n3PnAknHeTe 6bnHO C BODa n He3abABHO nOTbpcTe MeDnCnHcKa nOMoU.
OT cboobpaqhenia 3a 6e30napocct, a n 3a da ce ydbJnx JnBota ha baTepeyra, Ta He ce 3apejda npi TeMpepatypn pod 0^ (32^) IINn HAD 40^ (104^)
Пьната eфektubnoct ha HOBATA 6atepye ce noctura yapc cneiДBa IINI Tprпьни ZIKbla ha 3apekdahe n pa3pekdahe.Бatepya mOke da ce 3apekda n pa3pekda CTOTnI PbTN, Ho hakpar ue ce n3tou. Korato BpeMeTo 3a pa6oTa cTaHe 3abeneKHTeHNO NO-KpATKO OT HopMaHnOTo, Kynete HOBA 6atepyra.ИЗнОЗВaTe cAmO OdoBPeHn 6atepyrN INpe3apekDAaTE 6atepyra cn cAmO C OdoBPeHnTe 3apAaHn UcTpoCTBa, npedHa3NaueHn 3a TOBa yCTpoiCTBO.
I3non3BaIte 6atepnaTa camo nnpedHa3NaHeH. HnKora He n3non3BaIte NOBpeDeHa 6atepna IIN 3apAINO yCTpoiCTBO.He npabete KbcO cbEduHeHc 6atepna.TMOke da ce NOny HeyMnUJIeHO KbCO cbEduHeHc, KOrATO MeTALEN PpeDMET KaTO MOHTa, KlaMep IIN XmIKaJIka Cb3daJe npKa Bp3ka MEXdy NIOXKTENHaTt (+) IN OTPucaTeHNata (-) KNeMa Ha 6atepna.T (Knemite n3rrJekDat Kato MeTAHN JENTBbpxy 6atepnaTa.) ToBa MoKe Da ce cnuyn Hapnimek Korato Hocnte pe3epBHa 6atepna Bdko6a IIN Yauhata cN. KbCOTO cbEduHeHc Ha KneMITE MoKe Da nobpeDn 6atepna Ta IIN CBbP3aJIIn rI ppeMeT.
KanaunTebTи JxNBoTbT ha 6aTepeRyta ige HamaJeT, ako 6aTepeRyta 6bIe ocTabeHa Ha ropeu nn cTydeHn MeCTa, HanpImep B 3aTboPeHa KOJa ppe3 IJrTO ToIi NmTaTa. BuHaRn TJIeJaIte Da IbPxIne 6aTepeRyta Ha Tempeatypa Mekdy 15^ n 25^ (59°F n 77^ ). YcTpoiNCTBO C ropeu ana cTydeHa 6aTepeRn MOKe BpeMeHNO da He npopabOTn, dOpn akO 6aTepeRyta e HAnbJIHo 3apeDeHa. Pa6oTata Ha 6aTepeRyta e oco6eH No HeeEkeTINBHa npri TeMnepaTpyn MHO IOd TOykata Ha 3ampb3BaHe.
He n3xBbpynte 6atepnnte B orbH, TbKato MOKe da ekcnIIOndpat. BatepnTe Morat da ekcnIIOndpat cbto take n ako ca nobpeHn. N3xBpbnyte n3noJ3BaHnTe 6atepnB CbOTBeTCTBne C MeCTHnte 3aKOHO B pa3npoe6n. MoJIra, peuNKIpauTe rN BuHaRn, KOrATO e Bb3MOxHo. He rN n3xBbpynTe c DomaknHcknte OTnabu.
- 3a6eIexka: Buxme www.acer.com 3a doKymenu 3a mpaHcnpmupahe Ha 6amepuma.
CmHaHa 6aTepeHHna naket
Hoyt6ykbT n3noJI3Ba IInIeBn 6aTePm. CMeHeTe 6aTePnra TcBc CbIuN BnD Kato Ta3N, KOaTO e DoUHa c npOdykTa OTHauNo. Ako n3noJI3BaTe dpyra 6aTePnra, cbIeCTByBa pNCK OT noKap nn EKcnIIO3nJ.
- PpeDynpexkdeHne! BaTePnTe MoRat Da ekCnNoDnPaT, aKO He 6opabnte c TEx npaBnHo. He rnaP3rno6BaIte n He rN 13XBbPnIe B orbN. DpBXTe rN daJeY ot Deca. Cb6JIoDaBaIte MeCTHnte 3aKoHOb n pa3nopeE6n, Korato n3XbPnTe n3non3BaHn 6aTePnN.
PapnoecToTHa mHTeppepeHnua
-BhumaHue! Om cboBopaxenu 3a 6e3onachocm, u3KnIOueaume ecuKu 6e3KUHu unu paduOpnpedAamEnHu ycmpoucmea, kOzamo u3noI3aeme Ianmona npu cneHume ycNoBu. Te3u ycNoBu 8KnIOueaM, Ho He ce o2panuHaaeam c: 6e3KUChEN LAN (WLAN), Bluetooth u/Unu 3G.
He 3a6paBraIte da cna3BaTe BcKaKBN CneuAhnpeyuaCnBnHa BCaKO MRCTO INBnHn I3KJIOUBAIte yCTPOICTBOTO, KORATO I3NON3BaHETo MY e 3a6paHeHO INN KORAto MOKe da npedIN3BnKA INTEppepeHnue INN ONaCHOT. IN3NON3BaIte yCTPOICTBOTo CAMBO H HopMaJIHNTe 3a paOta NIOJOKeHnE INO3NUm. TOba yCTPOICTBO n3lbYBa B pAMKnTe HA HopMATA 3a paINOChETOnHIne IbYeHnE, Korato ce n3NON3Ba HOpMaJIHo I TO IN HerOBaTa aHTeHa ca NaH-MaIKo Ha 1,5 CaHTImeTpA (5/8 INUa) O Ta BaTeTo TJIIo. He 6NuBa Da CbDbPka MetaI IN TpRb6Ba Da NOCTaBnTe yCTPOICTBOTo Ha rOPenOCOeHOTo PA3CTOAHNE OT TAnlOTo CN. 3a Da npedaba faiNoBe C daHNn INN CbOSeHnryCneuHO, yCTPOICTBOTo CE HyXdAe OT DoBpa, KaeeCTBeHa Bp3ka C mpeXata. B HnKo CnyuAn, npexBbPnHEnoHa faiNoBe C daHNn INN CbOSeHnnoMeJe Da Ce 3a6abN, DOkato He CE noRAbTakaba Bp3ka. YBepete Ce, Ye rOPenOCOeHIne Yka3AHHa 3a pa3CToHnETo CE cna3BaT, DOKato npexBbPnHEno He npiKIIouH. HnKo Uactn OT yCTPOICTBOTo Ca MaHTeTuHn. YCTPOICTBO To MOKe Da npinBnUca HnKo MetaIhN PpeDMetn, A xopa Cbc CnyxOBn anapatUeHa BnBa Da DbPxKAT yCTPOICTBOTo 6bn30 Do yXOTO, B KOEtO IMAt CnyxOB anapat. He noCTaBnIte KpeDTHN KapTN INN dpyrN MaHHTHn HocnteN 6bn30 Do yCTPOICTBOTo, TB KATO INHΦopMaunraTBApx TY XMOKe da 6bDe n3TPNTa.
MeiunHcN yctponCTBa
Pa6oTaTc BcKaKbVa paIIOIN3MbYBaTeHNO 06OpUdBaHe, BKNIOHTeHNO 6e3XuHn TepeOHN, MoKe Da IONPeu H a FyHKUHOHaHOCCTa Ha HeoOCTbUHO Do6pe 3aUInTeH MeDINHCN yCTPOICTBa. KOHCytnpaiTe Ce C nekap nn C npOn3BOIDTEH Na MeDINHCKOTO yCTPOICTBO, 3a Da pa36peTe DaI N To e HADNEKHO 3aUInTeHO OT BbHnHa paIIOueCTOTHa eHeprna NN aKO IMate DpyrBbIpocn, CbP3AH c Hero. N3KIOUHBAITE yCTPOCTBOTo CN B 3dpaBNH 3abeDeHn, KOrATo TAM NMa peryNaUN, KOINTO NCKAT TOBA OT Bac. BoIHNiTe NN 3dpabHNte 3abeHnma MoKe da N3NoJ3BaT O6OpUdBaHe, YCbTBnTEHNO KbM BbHsHn PaIIOueCTOTn TpaHCMnCn.
PneMcmKbpn.Ppon3BODNTeJIte Ha neMcmKbpn PpeOpbYBaT MHNMaHOPa3CTOJHHe ot 15,3 caHTmMeTp a (6 Hua) Mexdy neMcmKbpna BcKaKbN 63xuHnuycTroHCTBA, 3a da ce n36erHe BCaKaBA eBeHTyaIHa NHTepfepenCn C neCmKbpa. Te3n PpeOpbKn ca noDKpeHn OT He3aBNCIMTe n3CneDbAHn I npEopbKnte Ha INHCTUYta 3a n3CneDbaHe Ha 63xuHnTE texHOJrnn Wireless Technology Research. JInzata c neMcmKbpn TpRbBa da cna3BaT cNeHNte yka3AHn:
-BinHnI npbXte yctpoiCTBOTo Ha noHe 15,3 caHTmMeTpTa (6 HnHa) ot neiCmeKbpa
- He Дрьжт eустpoиctboto 6bln3o Do peimcmeKbpa, koraTo yctpoiCtBOTO e BkIIOUeHo.
Ako npednonarate, ye npabn cMyuenceHna3KlnOHeTe yctpoCTBOTo n ro npemecteTe.
Cnyxobn anapatn. HrKoN cHpOBn 6e3XuHn yCTpoiCTBa npeDn3BnKBBat INTepepeheny HrKoN CnyxOBn anapatn. PnTakbB cIyauCe CBpbjKeTe C doCTaBnKa Ha cIyxOBn anapat.
MotopHn npeBo3Hn cpeDCTBa
PaIIOueCTOTHnTe CnHaJI MoRat Da 3aceHrAT HenpaBUNHO IHCTaIIpaHNI IIN HENpABUNHO ppeIpa3eHN eEKeTPOHN CnCTeMn B MOTOPHI ppeBO3Hn CpeCTBa, KATO HAnpIMep, eEeKTPoHN CnCTeMn 3a BnpbckBaHe Ha rOpBOTO, eEeKTPoHN CnCTeMn IpnTIB 6bnokupane Ha CnIPAuKHTe, eEeKTPoHN CnCTeMn 3a KOHTpOHa cKOpocTTA IN CnCTeMn 3a Bb3dyuHN Bb3rIabHNu. NToIpcTe NoBce HNΦopMaun npI npOn3BOJnteI - IN HerOB ppeDCTabHTen - Ha BaWteO ppeBO3HO CpeDCTBO IN HA DoobabenHO To obOpyDaBe. Camo KBaIINPhiUpan nepcoHAI Tp8Ba Da o6CnyXba yctpoCTBO TO IN Da INcTaIpa YcTPOiCTBO TO B MOTOPHO ppeBO3HO CpeDCTBO. HENpABUNHtne IHCTaIauZna INI O6CnyXbaHe MOrat Da ca OnacHn I da aHyIparat rapaHuaTHa yctpoiCTBO.To. PeobHO npOBepraBaiTe dani BCNUKN Be3xNCHypeDN B MOTOPHO BN ppeBO3HO CpeDCTBO Ca MOHTPAHNI ΦyHKUONHPaT npABUNHO. He cbXpaHBAITE IN He ppeHacryMe 3aIaNIMn TeUHOCTN, ra3OBe INI EKCPI03NBm MaTePNAIn Bbn3O do yctpoiCTBO, HerOBtne UactN INI DOnbJIhEnH. Ppi MOTOPHI ppeBO3Hn CpeDCTBa C Bb3dyuHa Bb3rIabHNu - He 3a6paBMyTE, ye Bb3dyuHNTE Bb3rIabHNu CE NaYBuT C rIONa Cnla. He NoctabYte ppeMeTn, BKlIOHTeHNO
HCTaJInpaHO IINI pHeOcIMo 6e3KmUHO OObOpYBaHe, pN I3XoJa Ha Bb3DyUHnata Bb3rIaBHNuca IINI TAM, KbDeTo Ce pa3dYBaTЯ. AKO B MOTOPHO IpeBO3HO cpeCTBO IMa HEnpabUNHO IHCTaJInpaHO 6e3KmUHO OObOpYBaHe I Bb3DyUHnata Bb3rIaNbHnca Ce OTBOpN, MOKe Da ce NOnyat CepNo3Hn HapaHbAHn. I3NoJ3BaHEto Ha yCTpoiCTBOTO NO BpeMe Ha camoTeH nOJe t 3a6paHeNo. I3KnIOuBaIte YcTPOiCTBOTO, pPeDu Da ce KaCbATE Ha camoTe. I3NoJ3BaHeTo Ha 6e3KmUHN yCTpoiCTBA B camoTeM MoKe Da 3actpaWaba pa6oTaHa camoTe Ta IIN da CmyUaBa 6e3KmUHnata TelefoHn MaPexa, a CbIo Taka MoKe Da e He3aKOHHO.
B3pHBoonacha cpea
I3KIIIOUBAIte yCTPOIcTBOTo Cn BB BcRAKa 06NaCT, KOaTO Ima B3PNUBOONACHa atmocpepa, n CneDbAite BCNCHN 3HaaN u Yka3aHna. B3PNUBOONacHATA atmocpepa BKIOUBA MeCTa, KbDETo O6NKHOBeHO BV NHCHTpyTnpaT Da n3KNIIOHTe DIBrAteJHn HA ABTOMOBUNa Cn. NCKPITE Ha NOIO6HN MeCTa MOrAT d npuHnT EKCIN03n IIN NOxap, KOeTO Nk MoKe Da npEIN3BUNa TeneCN HapaHbAHn IIN DOpn CMBpT. N3KIOUBAIte yCTPOIcTBOTo Ha MeCTa 3a npEzapeXdaHe c rOpINO KAto HAnpIMep 6eHNHOCTAHm IN ra3CTAHm. CnA3BaTe ORpaHnueHnraTa 3a yNoTpe6a Ha padNOOBopyDbaHe B ropNBn CKNAIDObe, 3OHN 3a CBxpanEHn e Pa3npedEnHe; XMMUeCKN 3ABODn; IIN Ha MeCTa, KbDETo CE N3BbPbBAT B3PUBHn DeInocTH. MeCTata C B3PNUBOONACHa atmocpepa YeCtO, HO He BnHaN, Ca OTBeJ3AHn RaCHO. Te BKNIOUBat NOMeEHnTA pod naLybata Ha PIIABATEHN CbDObe, NOMeUeHn 3a CBxpanEHn IIN TpaHcFep Ha XIMIKaIIN, ppeBO3HN CpeCDtBA, KOINTO IN3NOJ3BAT BTEuHEr Ra3 (KAto npOnah ININ ByTaH), KAKTO IN MeCTa, KbDETo BB3dYbXbT CbDbPxka XIMIKaIN ININ YCAtNUcN KATO 3PbHua, INpax ININ MetaJIHn INpaunHKn. He BKNIOUBAIte KOMIOITbPa, KbDETo e 3abpaneha yNtpe6bata Ha 6e3KNUHn TeteOHHN ININ KbDETo MOKE Da npEIN3BUNa INTEppeHcnry ININ OnachOCT.
CneuH no6aXdHnA
- IpdeynpekdeHue: He moxeme da npaume cneuHn o6axdaHn ype3 moea ycmpoucmeo. 3a da hnpaume cneuHo o6axdaHne, mpa6ea da hapepe me om mobunHua cu melefoH unu dpyza cucmema 3a melefoHnu o6axdaHn.
Yka3aHnna 3a n3XbPnJaHe
He n3xBpIyTe TOBa eIeKTPoHNo yCTPOJcTBO B 60knyka. 3a da HamaJIte 3ambpcBaHTo I da ce nOprnKInTe 3a 3aunTaHa cBeTOBnAta npriOda, MoIra peuKnIpaIte. 3a nobEue INΦOpMaunr OTHOCHO pAnopeD6nte 3a OtnaDbUOn OT eIeKTPuYecko I eIeKTPoHNO obOpyDaBaHe (Waste from Electrical and Electronics Equipment, WEEE), nocetete www.acer-group.com/public/Sustainability/sustainability01.htm.
ENERGY STAR

Пюдуктinte Ha Acer, obo3начени c ENERGY STAR, Bn cпесяват napи, kato hamаляват eheprinHnite pa3xodin и 3aunTatabat OkonHata cpeda, b6e toBaJa eВ yuBp6 Ha Функцinte ИлnpoIN3BOДNTeHOCCTTa. Acer c ropdoct npednara Ha CBOnTe Notpe6nte nipóduktinte cn C noroto ENERGY STAR.
KakBo e ENERGY STAR?
IpoodykTN, KOINTO ca obo3haeHc ENERGY STAR, n3no13BAT no-MaIKO eheprrn y npedotbparatBaT emCINn napHKOBn ra3OBe, KATO OTROBAPrT Ha cTPIKTHNtHe HAcOKn 3a eheprnHa eFNIacHocT, ONpeJeJIeHn O T AReHcIra 3a 3aUHTa Ha OKOLNaTa CpeDa Ha CAU. Acer e obBbP3An c npednaHTo Ha npOdykTN u ycnyu n O qanCBrT, KOINTO da nomarat Ha notpe6nteJIte Da neCTaTn napn i eheprn N da nOIObprBaT KaueCTBOTo Ha hauata OKOLNa CpeDa. KoIKOTO nobEe eheprn MOxEM Da cneCTMm Upe3 NO-BICOKA eheprnHa eFekTINBHOCT, TOIKOBA nobEe MOxEM Da hAmALIM emCInTe Ha npHnikOBn ra3OBe n pRCKOBete 3a npOMraHa KJIIMMaTa. 3a nobEe INHΦopMaun BvKTe Ha www.energystar.gov nII Na Hw www.energystar.gov/powermanagement.
- 3a6eJekka:Инфорmaцуma e mo3u pa3deI对我 ce omHacr 3a BaUja KOMJIOMbP.
Пождукту на Acer с лороТЕ NERGY STAR:
-
pOIN3BExdT NO-MaJIKO TOJIInHa N HamaJIbAT HaTOBaPaHTo npI OXJaXdaHe B IIO-TOpbl KInMaT.
-
ABTOMATNUHNO pemeMHnabat B pEKIM "3acNBAhe Ha MOHITOPa" N "3acNBAhe Ha KOMNIOTbpa" npi JInca Ha AKTNBHOCT B IpOdbJIkeHne Ha cBoTBetHO 10 n 30 MInHyTu.
- ce c6b6yjdaT OT pexkIM "3acnVbaHe" npi HATNCKaHe Ha KJIaBnI Ha KJIaBnAtypata HII npemecTBaHe Ha MNUkata.
- HamaJIbAT KOHCymaIyra Ta h eHeprIc n oBee 80% B pexkIM "3acnBahe".
ENERGY STAR n Ioroto ENERGY STAR ca pernctpupaHn amepukaHcN TbproBckn Mapkn.
CbBETn HnHOpMaun3a yD06Ho n3nOJ3BaHe
KOMNIOBpHnTe NOTpe6bnteYcETo Ce ONlakBaT OT 60JIKN B OOnte N rIaBata CneI npOdbJNkTeHa yNoTpe6a. Te cIso Taka ca n3IOnKeHN Ha pNCK OT fN3UWeckn yBpeXdAnHcNe IdbIgTu YacObe pa6oTa npE KOMNIOBp. DblrTe pa6oTHu YacObe, loWAta CTOnKa, IooInTe pa6oTHu HABUn, CTpeCbT, HEnOxOJaUNTe pa6oTHu ycNoBn, IINHOTO 3dpabHO CbCToHHe N dpytn PaKTOpN CINHO NOBuaBat PnCKa OT fN3UWecko yBpeXdaHe.
HenpaHnHToI 3nOJI3BaHe Ha KOMNtBpa MoKe Da IOBeDe IIO CnHIpom Ha KapnaJIHHa TYHeI, TeHDoHNIT, TEHDOcHOBnT INI INpyr MyCKyIHO-CKeJIeTHN 3a60JIbAHnI. MoKe da IMate CNeIHNTE CmIMTNOM B pUcTe, KNTKIne, PameHete, Bpata INI rBp6a:
- ɪntrpɒnnaʊct nʌn napeəʊ nʌn rɒdɛnukəʊ yceəuhe.
-БолkaилчувстBNTeHOCT.
-BoJka,poDyBaHe nn nynCnpaHe.
BkooyaHeHOCTIINCTERHaTOCT. - CtydeHnHa nnn cna6oct.
Ako mATE Te3n CmPTOMN INI Dpyr NocToHEn DnCKOMΦoP T N/INI 6OJIka, Cbbp3aHa c N3NON3BaHeTO HA KOMnIOTp, He3a6abHO Ce CbpxKeTe C Jekap INHΦopMnpaTe 3dpaBnI OTDen Ha ΦnpMaTa CN.
CneHnT pa3dEbn Bn daBa CbBETn KaK no-yo6HO da N3no3BaTe KOMnIbTaPcN.
HamepeTe CBOrTa 3OHa Ha KOMΦoPT
Otkpinyte cboTa 30Ha Ha KOMfopt, KaTo npomHeTe bIbNa Ha IJIeJaHe Ha MOHITopa, H3NON3BaTe NODIOKka 3a KpaKa INI NOBnIrAte BInCOUHnATA Ha CTOna CN, DOKATO He NoCTINHETe ONTImaHnHO NOLOXeHne. Bb3NON3BaIte ce OcIeHNTE CbBETi:
-He cToIe TBbPpe Dblno B eEDHO n CbIoo CTaTnHNO nIOJoxKeHne
- ɪn36ərbaɪte āa ce ḤæbɛkdaTe Ḥaŋpeɪ nɪn Ha3aɪd.
- Cтавайе и ce pa3xoxkaйte peoOBHo, 3a Да obNeKuIte HanpeXeHneTo B MyckyIte Ha KpaKaTaN.
- B3eMaTe Cn KpaTkn NocuBKn N OTnyckaTne Bpata N paMeHeTe Cn.
- N368aBaiTe da cTgAte MyCKyIInTe cn nIi da CBuBaTe paMeHete cn.
-Инсталарп Te BbHnHЯ Дисплел,Клавиatype Na MIIskaТа npabINHO nHa ydo6No pa3ctOraHne.
-AkoIpeaTe MOHITopa NOBce,OTKoNkOTo DOKyMeHTn Ha XapTna,NoCTaBeTe DmCJIpeBa CEHTbpa Ha 6OpTO Cn,3a Da HAMaJIte HAnPexKeHneTO BbPxY Bpata Cn.
TpNxTeCe 3a 3peHnEto cn
IbIInTe yacObe nped MOHITopa, HocHeTo Ha HeNoDxOJaU OChnA NIN KOHTaKTHN IeU, OTbIcBtNe, pKealJeHO CnIHOTo OCBeTJIeHne B CTaTAt, 3JIe FOKyCnpaHIne ekpAH, TBbpDe Ipe6bHIne UprnΦTOBE N EkpaHIne C HNCbk KOHTpAcT NOdIraT OOnTe BN HA cTpec. CneJHInTe pa3dEiN Bn daBat npedIOXeHn Ka k Da hAmaiIne cTpeCa Bbpxy OUnTe CN.
OuN
- YecTo octabTne OHTe Cn da NOHBaT.
-ДавайтpeядOBи NOчВКи HA OчITE си,ΚΑΤΟ ΓΙνΕДATE HаСТраHи OT MOнТopa И СЕ Фokусирate Вьрху OTдалеуна Точka. - MiraTe YecTo, 3a Da He N3cbXBaT OuHrTe BN.
Dinne
- PaaTe ducnner uict.
-Дрьхтглава си на NO-BИСОКИНБО OT roрня Край на ДИСПЛЕТака, Ye OчITE Bnда Гпелдат HaDony, KORATO Гпелдате CpeДATA Na DИСПЛЕ.
- HactpoiteЯPkocTtuaNmKoHTpactaHaDnCnpeJDo yOboHnBO3aJecha YeTuBHOCT Ha TeKCTOBeteI YCHOTAHa rpaQnknte.
- Eлимнирaite BCЯкви OБлси no CneДнite NaHIN: NOCTaBeTe DInCnIe rTaKa, Ye npO3opeu a NII KAcBbTO n Da 6NIO dpyr CBetJIINHe H3TOUHk Ce HAMnpa OTcTpaHn, HAmaIeTe OCBtJIeHNeTo B CTaTAta Ype3 NepdTe a NII NcOpn, H3PON3BaIte pa60Tha JAmna, PpOMeHete 3pITeJIHnY bTbN Ha DInCnIeR, H3PON3BaIte FInTbp 3a HamaJIaRaBe He Na OTBJcUHTe, H3PON3BaIte CEHNK 3a DInCnIeR, pPIMepHO napYe KapTOH, pPINKPeHNo KbMROPnI pyedEN pb NaDCnIeR.
- 1368raBaiTe Da nocTabre Dnncnner Cn noD HeydoHn 3pntHn bTIn.
- He rIeJaTe KbM n3ToUHnCu Ha npKa CBeTInHa 3a Dblr nepNoD OT BpeMe.
Pa3BvBaHe Ha do6pn pa6OTn HABuCi
CneHnTe pa60THn HabuN ppaBt N3non3BaHeTo Ha KOMnHObpa No-peNaKcnpaIo n npOyKTNBHO:
- YecTo n peoBHO cn npaBeTe KpaTkn nouBKn.
- Праьerte упрахненья 3а pa3тягаhe.
-ДишайтейнICTВьздухКолкOTOceMOжно-чecTo. - Правerte уразхению рedingи и подьрkaite ТяпOTO сВ здравocноа Форma.
-Bhumaue! He npenopbyeame da u3noI3bame KOMnombpa Ha duean unu neano. Ako eu ce hana, pa6omeme camo 3a kpmku nepuodu om epeMe, pedoBHO cu noueaume u npaeme ynpaxHeHua 3a pa3mraane. - 3a6eJekka: Monja, 3a nooeue uHcpopmauca uuxme "YeedomneHua 3a pezynauu u 6e0nacnocm" Ha cmp. 117.
Преши всан积极作用
BkIIOUBaHe n 3KJIIOUBaHe
3a da n3kHouHTe KOMHOTbpa, HAnpaBeTe HrKoe OT CneHNHeIa:
- Изпоглбайт ekomанда tа u3ключвае ha Windows: Hаншete Windows knaeuwa +
, урakhte Вьрху Habсгочи > 3axpaнвае, след koeto Вьрху ИЗлочаhe.
Ako Tpr6Ba Da n3KJIIOHTe KOMnHObpa 3a n3BeCTHO BpeMe, HO He NCKaTe Da rO n3KJIIOUBAte HAnbJIHO, MOKeTe Da rO NOCTaBtE B peXIM Xu6epHaucu KaTo HATNCHeTe 6yToHa 3a BKNIOUBAhe n n3KJIIOUBAHe.
Moxete cIto TaKa Da BkapaTe KOMnIOTpba B peXm "3acnBaHe", KaTo HATNCHEte KnaBnHaTa KOM6nHaZn
3a6eIekka: B cnyau, ye He moKem e da u3KnIOUme KOMnIombpa 4pe3 HopMaIhume npoueDpyu, Hamuche m u 3adpbjXme 6ymoHa 3a 3axpaHbAne 3a noBee om yemupu cekyHou, 3a da u3KnIOUme KOMnIobpa npuHydumelNo. Ako cme u3KnIOUnu KOMnIobpa u Uckame da zo EknIOUme omHOo, u3yakaime na-MaIko dee cekyHou.
Гржа 3a компютва
BawnaykomnIObIp 1e Bn CnyKn DObpe, aKO ce rpnKInTe 3a Hero.
He n3laarate KOMNtBpa Ha npra Ka CbHueBa CBETnHa. He ro nocTabryTe 6n3o Do n3TOUHnHa Ha TOnnHa KaTo HapnpMepe padnaTopu.
He n3naraIte KOMnIOrTbpa Ha TeMnepaTypa noD 0^ (32^) nnHa 50°C (122°F).
- PanaTe KOMNIObpa O T MaHnTHn NOneTa.
- PanaTe KOMnIObpa O T IbXd NIN Bnara.
- He pa3JIbBaIte BOa IIN IpyrN TeuHOctn BbPxy KOMNIOtbpa.
- PanaTe KOMnIObpa OTCuINH yIaPn IJI INB6paCInN.
- Pa3eTe KOMnIObpa OT npax nIIN KaI.
- HnKora He nocTabaIte dpyrI npEdmTe Bbpxy KOMNIOTBpa.
- He trpbukaiTe KOMNtBpHnI DaIcPiIe, KOrato ro 3aTbaprTe.
- Hinkora He noctabraye KOMNIObpa Bbpxy HepaBn NOBbpxHOCTN.
Гржи 3a Baшя AC aanTep
ETo HnKoNk HoaHnHa da ce rpnXnTe 3a cBor AC aanTep:
- He cBbP3BaIe aIaIaTepa c HnKaKbN dpyu ycTpoiCtBa.
- He cTBnBaIte Bbpxy 3axpaHbAaJna Ka6eI n He NoCTabraIte TeKKn IpeIMeTn Bbpxy Hero. IocTabe 3axpaHbAaJna Ka6eI n BCraKaBn DpyrN Ka6eJI N HAcTpapan OT MeCTa, NO KOnTO CE MInHaba YecTo.
Korato otkaute 3axpaHbaunKa6en, He nbpnaTe camn Ka6en, a XBaauTe uenceJa.
B cnyuay, ye n3non3BaTe ydbJnxKeI, o6UaTa HOMnHaJIHa MoUHOC T ha BkJIIOueHOTo O6OpyDbaHe He 6bNA da HaXbPnA HOMnHaJIHaT a MOUHOCT Ha Ka6eNa. CbTo Taka O6UaTa HOMnHaJIHa MOUHOCT Ha BCNUKOTO O6OpyDbaHe, BkLIIOueHO B eINH IN CbUeN KOHTaKT Ha CTeHaTa, He 6bNA da HaXbPnA MOUHOCTTa Ha 6byOHa.
PnK3a naKeTa 6aTePN
ETo HApKoHaunHa da ce rpnXnTe 3a CBOA naket 6aTeepn:
- I3no3BaIe cAmo eHaKBr 6aTePn 3a 3aMaHa. N3KJIIOUcTe KOMNtBpa, npEi Da BaInte nIIN CMeHrTe 6aTePnIte.
He cn irpaaiTe c 6atepnnte. IpbjTe rnaIeuy ot deua. - ɪəxʌbɒpʌnɪteɪənɪənɪaʊnɪteɪəbɒpʌnɪBcɒtɒtCTBneCMeCThnte3aʊkɒhɒnɪpaɪəpɒeɪðn. Ako e Bɒb3mɒkHo -peɪŋkʌnɪpaɪət eɪn.
MOnIa, BnKTe "YeTo 3aDaBaHb N Bbnpocn" Ha cTp. 101.
Прееглед на Вашия Acer hoyтбук
Cne KaTo HacTpoTe KOMNtBpa Cn, KaKTo e NOKa3aHo Ha NIIaKaTa C NaCTPOKn, 3e Bn 3an03Haem C Baunr HOB HOYt6yK Acer.

Aspire V5
IzhneHa ekpaHa

| # | Икona | ЕLEMENT | Описиме |
| 1 | Уеб камера | Уеб камера 3a Видево КOMунkaци.С被告инец Иnd尼克атор близо до уеб камера пokedа, чь уеб камера e akтувна. | |
| 2 | Сенztорен ekран | Показа визменя сигнал на КOMПЮТьра, подьржа Мултуфуншоналино сенисторно Въбждан. | |
| 3 | Мыкpoфон | В相对较им крфоон за запис на звук. | |
| 4 | IIIIMM MULTIMEDICR&D S2 | Четец на.capт训 2В1 | Показа edna Secure Digital (SD ил SDHC) карто улл MultiMediaCard (MMC). Завелекka: 3a за Извашие Kapтata, посто яиздьрайе OT сnotа. |
| 5 | Инданатор на Зхранваhevо | Показа стауca на зхранваhev на Компютьра. | |
| Инданатор за Новоту на Баерияа | Показа сбстаянeto на баерияа. Завелдаме: Инданаторьт eжblт, ДOKATO баерияа с за佩жda. Налълно за佩една: Сvetлината e синя. |
IzhneHa KlaBnaTypaTa
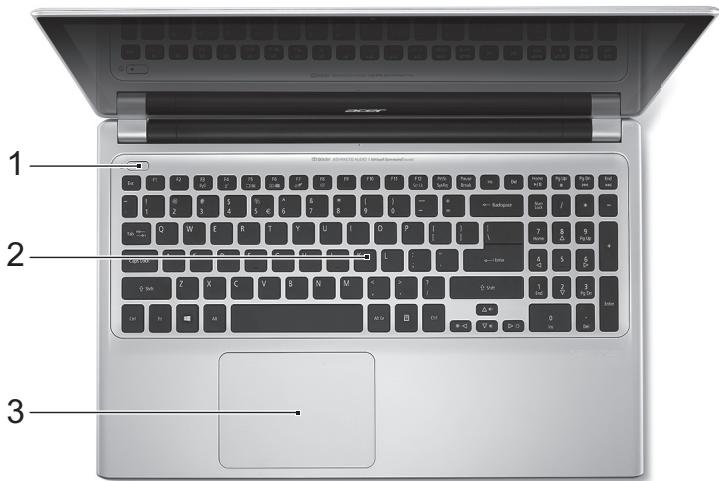
Lock KlaBnI N BrgaDeH cIΦpeH naI
3a6eIeKka: INhOpMaUma 8 mo3u pa3deI MoKe da He ce omHacr 3a Bauu KOMnIombP.
KnaBnAtypata nma Tprn lock KnaBnSha, KOINTO MOKeTe da npeBKnHouBaTe.
| Lock klabniz | Описиме |
| Caps Lock | Korato aktnibpurate Caps Lock, BCNUKи a36bUnи 3naци, konTO pniшete, са галви. |
| Num Lock <Fn> + <F11> | Korato ВклочITE Num Lock, Изponl3Вate Вгаденя пад В zuфрен рекIM. КлавишITE Фуннкционерат кATO kaIGNКуларot (Заедно с.apиNTметчесKite onepaTopи +, -, *, n/). Изponl3ВайтToЗи рекIM, korato Ви се налага дa вьБждATE MнOTO дaHиВЧИСпЕн ВИД. По-добьр Вариант e за CBьржete Вьнша Клавиatype. |
| Scroll Lock <Fn> + <F12> | Korato ВклочITE Scroll Lock, ekpaНьт се мecти с[einiH peДнагоре ии наюу, korato натусhevite CTpeПККаТа нагоре ии наюу. Scroll Lock He paБOTи ВьВ BCNUKи прилloxжени. |
BrpadeHnT cHpEN naI pa6Otn KaTO HopMaJIe HAcToJIe cHppe nIa. Ie ro pa3nUHTe no MaKInTe O3NaueHn B rOpHn DeceH bIbI Ha KJIaBnUHTe. 3a da Ce onPoCTn JereHdata Ha KJIaBnAtypata, CmMBOnITE Ha KJIaBnUHTe CbC CTpeJIKn He ca OTneuTaHn Bbpx KJIaBnUHTe.
Acer Recovery Management
?X
Welcome to Acer Recovery Management
Acer Recovery Management enables you to restore your system. To begin, select the task you want to perform. Please DO NOT remove the USB device while proceeding.

Reinstall Drivers or Applications
Reinstalls factory default drivers or applications.

Customized Restore (Retain User Data)

Reinstall Drivers or Applications
Make a back-up before you restore (Recommended).

Create Factory Default Backup
Create Drivers and Applications Backup
acer

2.ⅡpaKHeTe Bbpxy Cb3daBaHe Ha apxNB c pa6pnuHn HacTpoKn. IopBBA ce np03opeuT Ycmpoucmeo 3a 8b3cmaHO6BaHe.

YBepete ce, ye e n36paHa onuTaN KOnnpa CbIbXaHneTo OT Ja 3a Bb3CTaHOBBAHe Ha yCTpOcTBOTO 3a Bb3CTaHOBBAHe. Ta3n Oun npedlara Na-Plnna N ha-6e3Opacnna HauH 3a apxNBpaHe.
-
Bkniouhe Te USB yctpoiCTBOTo, cIeI KOeTo IpaKaHHeTe Bbpy Hanpei.
-
YBepete ce, ue USB yctpoiCTBOTO mMa DoCTaTbUHO nAmet npedn da npoDbIjXnTe. ApxNBbT 3a Bb3CTaHOBBAHe n3NCKBa Hai-MaIKO 16 GB namet

- Ⅲe BnDnte nporpeca Ha npoceca Ha apxnbipahe Ha ekpana.
-
CneBbAte npoceca, DOKaTo ToH ne npNKIOUH.
-
Cnéд КATO сьзддеTe apxINB 3a ВьЗСТАнOBЯВаHe, можete Да ИЗБерete Дa ИЗТриTe INHФОмацИЯТа, apxINBИраHA Na BaшЯ KOMПOTьр. Ako ИЗТриTe Ta3N ИнФОрмацИЯ, можete Дa ИЗПОЛЗВATE USB apxINB 3a ВьЗСТАнOBЯВаHe, само 3a Дa рecтApTnape T KOMПOTьpa Cn. Ako 3aRy6bITE nII N3TprIe TE USB yCtpoJCTBOTo, He можete Дa ВьЗСТАнOBИte KOMПOTьpa Cn.
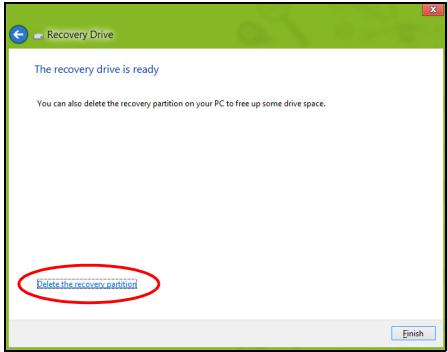
7.Изва对接 USBу comprьюипоста对接 сенет.
Baxho: Hanuhe Te yHkaleh, onncateJeH eTKeT 3a apxuBa, kaTo hAnpImep "Windows Recovery Backup". CbXpaHeTe apxuBa Ha 6e3oNaCHO n Jecho 3aIOMHraO ce MrcTo.
b3daBaHe Ha apxNB c dpaBepn I npNIOXeHna
3a da cb3daede ApxNB c dpaBepn npnloKeHn, pa6pnuHo 3apeHnT coftyeep n dpaiBepn, OT KOINTO KOMNtbpBbT Bn ce hJxdae, MOKTe Da n3PON3BaTe nJIN USB yCTpoiCtBO 3a cbXpaHeHne nJIn, aKO KOMNtbpBbT nMa DVD pekopdep, MOKTe Da n3PON3BaTe eDIn nJIn IOBeYe npa3HN DVD dincka.
- Ot Cmapm, Hanuwe Te "Recovery" u pakhe Te Bbpxy Acer Recovery Management B cnscbka c npiloxeHna.
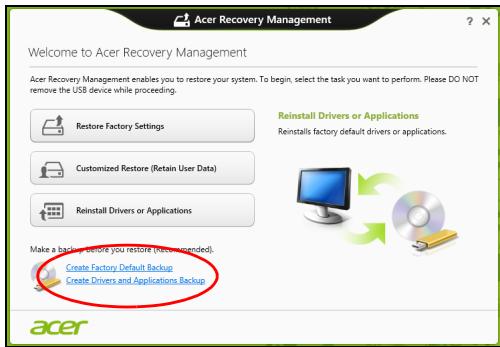
2.ⅡpakHeTe Bbpxy Cb3daBaHe Ha apxNB Ha dpaBepn npuIooKeHna.
BkHouTe USB yCTpoiCTBO nIIN NOCTaBeTe npa3eH DVD nIcK B ONTNUHOTO yCTPOiCTBO, CneI KOEt UpaKaHHe TBpX HAnpe.
- Ako n3noI3BaTe USB yctpoIcTBo, yBepeTe ce, ye USB yctpoIcTBOTo
- Ima doCTaTBuHO npocTpHaCtBO, ppei Da npoIbJxKeTe.
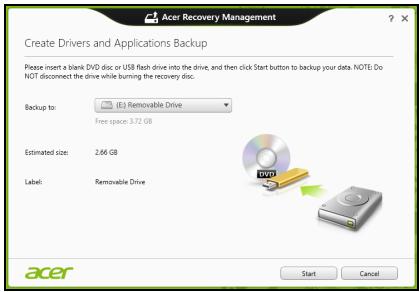
- Ako n3noJ3BaTe DVD dinCKObe, ue BnDnte KoJIKO npa3Hn, 3aIncBaun dinCKObe ue Bn 6bDat Heo6xOdImN, 3a da npNKIoUHTe c dinCKOBte 3a Bb3ctaHOBBAhe. YBepTe ce, ue pa3noJaTate c Heo6xOdImN 6pOu INeHTuHN ppa3Hn dinCKObe.
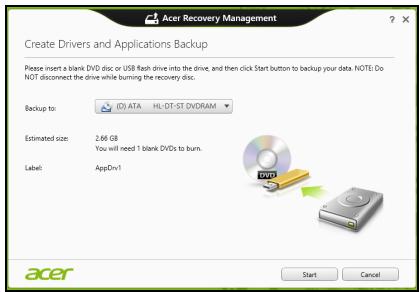
-
ΜιρακHeTe Bbpxy CTopt, 3a Da KOnnpaTe φaIIOBte. Με Bνιnte προρεca Na IpoUceCa no apxNbpuHa He ekpaHa.
-
CneBae Te npoeca, DOKaTo ToH He npNKluOuH:
-
Ako ИЗПОЛЗВATE ONТИЧИ ДИСКOBЕ, KORATO 3аПИСBAHETO Ha Даден ДИСК РИКПЮЧИ, усточьTO lore go I3BaДи. OTCTpaHETe ДИСКА OT ySTPOICTBOTO И Г МаркпайTe CперmaHENTe МарКер. Ako ca Heo6xODIMN HЯКOLKO ДИСКА, NOCTaBete HOB ДИСК, KORATO 6bДeTe NOДКANEHIN, слд КОЕ STРAKHETe Bbpxy OK. Прдьлжete, ДOKATO ПROUCEБТ He пИКПЮЧИ.
- Ako n3noJ3BaTe USB yctpoiCTBO, n3BaJeTe yctpoiCTBOTO nocTabeTe rceH etIKet.
Baxho: Hanuwe Te yHnKalehen, onncateJeH eTnKeT 3a apxNBa, kaTo Hnnpimep "ApxNB Ha dpaibepn n npJIOXeHna". CbXpaHeTe apxNBa Ha 6e3oNaCHO n IecHO 3anOMHnO ce MraCTO.
Bb3ctaHOBraBaHe Ha cncTeMaTa
Bb3ctaHOBBaHe Ha CnCTeMaTa:
- HanpaBete MaJIKN nonpaBKn.
Ako cmo einn nnn Dba enemeHTa Ha cooTyepa nn xapnyepa He paobotr npabnHNO, npoBneMbT MOKe da 6bJe peuhen KaTO npenHCTaJInpaTe cooTyepa nn dpaBepnte Ha ycTpoIcTBOTO.
3a da npenHctaInpaHe coOpTyep u dpaIbepn, KOInTo ca 6bnu PhapnuHo INCTaInpaHn, BIXTe "PpenHcTaInpaHe Ha dpauBepn npinloXeHna" Ha cTp. 52.
3a INHCTpykqnn OTHOCNo IpeHHCTaJInpaHe Ha coΦTyep n IpaIbepn, KOINTo He ca IpeDbapHTeJIHO INHCTaJInpaHI, BIXTe DOKyMeHTaUraTa HApOdyKTA uIN yE6 caTAta 3a NODpBjKka.
Bb3TaHOBBaHe ot Windows
CtapTupaTe Acer Recovery Management:
- Ot Cmapm, HanuweTe "Recovery"и урakheTe Bbypxy Acer Recovery Management B cnscbka c npniloxeHn.
IoctbHn ca DBe OOnuN, Bb3ctaHOBraHe Ha a6pnuHn HacTpoKn (Bb3cTaHOBv KOMnIObpa M) nI INepecoHaJIn3npaHO Bb3CTaHOBraHe (ObHOBBAHe Ha KOMnIObpa MN).

Bb3ctaHOBAHe Ha 66pHn HAcTPOKn N3TpNa BcNcKo Ha TBpDnI DnCK, CpeI KOeTO IpenHCTaIIpa Windows n BCuKN dpaBepn i coFtyeP, KOnTo ca 6nn IpeDbapntJHo IHCTaIIpaHn Ha BaWata CnCTema. Ako MoKeTe Da OTBOpHTe BaxHN 6aJIIOBe Ha TBpDnI DnCK, apXbUpaIte rCera. BxKTe "Bb3ctaHOBAHe Ha 66pHn HAcTPOKn c Acer Recovery Management" Ha cTp. 59.
Bb3cmaHO8BaHe Ha fbabpuHu Hacmpouku C Acer Recovery
Management
1.卍paKHeTe Bbpxy Bb3ctaHOBraHe Ha φa6pnuHnte HactpoiKn.

Acer Recovery Management
?X
Welcome to Acer Recovery Management
Acer Recovery Management enables you to restore your system. To begin, select the task you want to perform. Please DO NOT remove the USB device while proceeding.

Reinstall Drivers or Applications
Reinstalls factory default drivers or applications.

Customized Restore (Retain User Data)

Reinstall Drivers or Applications
Make a backup before you restore (Recommended).

Create Factory Default Backup
Create Drivers and Applications Backup
acer

BhImaHHe:"Bb3ctaHOBBAhe Ha a6pHuHnte HacTpoKn" ige n3Tpne BCNUKTe aJIOBe Ha Baunr TBbpD dNcK.
- O'TbaprCe npo3opeuT HynpaHc Ha Baunn KOMnIOTbP.
Reset your PC
Here's what will happen:
- All your personal files and apps will be removed.
- Your PC settings will be changed back to their defaults.
Next
Cancel
NIOcmpaumme ca camo cnpaKa.
Acer Recovery Management
?X
Welcome to Acer Recovery Management
Acer Recovery Management enables you to restore your system. To begin, select the task you want to perform. Please DO NOT remove the USB device while proceeding.

Reinstall Drivers or Applications
Reinstalls factory default drivers or applications.

Customized Restore (Retain User Data)

Reinstall Drivers or Applications
Make a backup before you restore (Recommended).

Create Factory Default Backup
Create Drivers and Applications Backup
acer

Here's what will happen:
- Your files and personalization settings won't change.
- Your PC settings will be changed back to their defaults.
- Apps from Windows Store will be kept.
- Apps you installed from discs or websites will be removed.
A list of removed apps will be saved on your desktop.
Next
Cancel
-
LpakHe Te Bbpy Hanpe, nocne Bbpy O6HOBahe.
-
Праз ecbт Ha Bb3ctaHOBraBaHe 3aNoUBa c pecTapTnpaHe Ha KOMnHObTa, CneI KOeTo PpOdbJxKaBa C KOnIpaHe Ha ФaJIIOBe Ha TBbpDnAДСК. To3n Праз ec OTHEMA OKOLO 30 MInHytN.
Bb3ctaHOBAHe OTe apXnB 3a Bb3CTaHOBAHe
3a Bb3CTaHOBBAHe OT apxNBa 3a Bb3CTaHOBBAHe Ha USB yCTpoiCTBOTO:
- HamepeTe CBOB apxNB 3a Bb3CTaHOBBAhe.
- BkHouTe USB yctpoiCTBOTO u BKHouTe KOMnIObTa pa cn.
- TpЯбba Да akтubираTe F12 Meню 3a 3apeхдаHe, ako To BCE Oшe He e akTubираHo:
a. HatncheTe < F2>, KOrato cTaptnapeKOMNIObpa cn.
b.ИЗПОЛЗВайтЕ ЛЯВаТа Или ДяСHаТа CTpeДКа,зa за ИЗБeрЕТe MeHHTO Main.
c. Hatnche Te CTpeNka HAnOly, DOKaTo He Ce MapKupa F12 Boot Menu, HATNCheTe < F5> , 3a Da npOMEHnTe Ta3n HaCTpoiKa Ha Enabled.
d.ИЗПОЛЗВайтЕ ЛЯВаТа Или ДяСHаТа CTpeДКа,зa за ИЗБeрЕТe MeHOTO Exit.
e. B 3aBnCmOcT OT Tnla Ha BIOS, KOITo I3NoJ3Ba KOMNtBpa Bn, I36epTe 3aIIu nn IpomEnTe n 3XoD nIu N3XoD cbc 3aNa3BaHe Ha npomEnTe n HaTnCHeTe Enter. I36epTe OK nIu Da, 3a da NOTBbPdntE.
f. KomnoTbPbT Bn ue ce pecTapTnpa.
- По врeme на стартуранe, натус悔e
, за ра OTвориTe MeHIOTo 3a зapекданe. MeHOTO 3a зapекданe Ви пзовлая за ИЗбИрате устюкTBOTO, оТ koeto за ce стартура системаТа, habример USВ устюкTBО.
a.Използвайтстpeлкит,3адаизберетe рета USB yctpoiCTBO, cneД Koeto HATNCHETe Enter.
b. Windows ce CTapTupa O T apxINBa 3a Bb3CTaHOBRAHe BMeCTO Upe3 HOpMaJIHHI pIouec Ha CTapTupaHe.
5.Изберетe Вида на КлаваТураза.T.
6.ИзберетеОтстаяньаганын HeH3npaBHOCTи Изберетe Тпа Н b3CTaHOBJBaHe:
a. UpaKHe T Bbpy Pa3upeHn, CneI KOeTo Bb3TaHOBaHe Ha CnCTeaT, 3a Da CTapTpate Bb3cTaHOBaHe Ha CnCTeMaTHa Microsoft: Bb3CTaHOBaHe Ha CnCTeMaTHa Microsoft nepnoDnH npaBn "ChIMKn" Ha BaUnTe CnCTeMHn HAcTpoiKn I n 3aNcBA KaTO TOkKn 3a Bb3CTaHOBaHe. B NOBeYeTo CnyauH Ha TpydHn 3a peUbaHe CoPTyepHn PpOblemM MoKeTe Da ce BbPHeTe Ha eHa OT Te3n TOkKn 3a Bb3CTaHOBaHe, 3a Da Hakapate BaWaTa CnCTeMa Da pa6OTn OTHBO.
b. UpaKHe T Bpxy HynipaHe Ha Baun KOMnOtbp, 3a Da CTapTnpate npoeca no HynipaHe: HynipaHe Ha Baun KOMnOtbp n3TpINBa BCNUKO Ha TBbpDnI dNCK, cNeI KoETo npEnHCTaIIpa Windows u BCNUKn dpaBepu n coΦTyep, KOINTO ca bNil npedBapnteNo IHCTaIIpaHn Ha BaWata cnCTema.
Ako MoKeTe Da OTBOpTe BaXHn FaiNoBe Ha TBbPdNr DnCK, apxNBpaTe rI cera. BIXe "HynpaHe Ha Baunr KomnIoTbp OApxNBa 3a Bb3CTaHOBRAHe" Ha cTp.64.
c. lpaKHe Te Bbpxy O6HOBaHe Ha Baunr KOMnHToBp, 3a da cTaptnape npoueca no o6HOBaHe:
06HOBRAHe Ha Baunn KOMNHTbp 1e ce ONTa Da 3aana3n BaunTe fainoBe (notpeBntenckn daHHn), Ho 1e npEnHCTanipa BCuKn coFtyepnnporpaMn uCToPcTBa. CoFtyep, HCTaJIpaH cNeI KaTO CTe 3akynlnn KOMNHTbpa, 1e 6bJe npemaxHaT (OCBeH coFtyep, INCTaIIpanOT Windows Store). BInKTe "06HOBAHe Ha Baunn KOMNHTbp ot apxNBa 3a Bb3ctaHOBAhe" Ha cTp. 66.
Hynupahe Ha Bawu KOMnIbOp om apxuea 3a 6b3cmaHO68aHe
BhImaHne: HynpaHe Ha Baunia KOMnIObP ige n3Tpne BnKn faiNoBe Ha BaWeTo TBbpD nCK.
- O'TbApCe npo3OpεtHT HynipaHe Ha Baunn KOMnIOTbP.

NIOcmpaUuMe ca cmo cnpaKa.
2.単pakheTe Bbpxy CJeDbau.
3.Изберете onepaционна TCCTema,3aДа ВьзТановITE (obNKHOBEHOMaHaJIuHa caMo eJHa OJIuЯ).
IperJeHa MyPTMMeiN I CHIMKIN
Share my library on local network
All files under My Library will be shared.

Change to folder view for remote devices.
OK
Cancel
Kon yctpoiCTBa ca cBMeCTUMn?
CeptnoIuPAnH Acer ycTpoiCTBa c clear.fi nn DLNA coQTyep Morat da 6bDat n3noI3BaHn CbC coQTyepa clear.fi. TaKnBa ycTpoiCTBa ca DLNAcBMeCTMn KOMnHTpn, CmApTfoHn i NAS ycTpoiCTBa (MpexKOBnu yctpoiCTBa 3a CbXpaHeHne).
Bb3npo13BexJaHe Ha npyro yctpoiCTBO
Ako nckaTe da Bb3npOn3BExkdaTe MyIITmEiHa npyTo ycTpoiCTBO, Tpa6Ba Da HappaBHTe CneHOTO:
- BdonHnIeDcEHNbI, n36peTe Bb3npOn3BexKaHa Ha.
2.ИзберетоТдалаченOTOусторCTBO,KoETOи3ПОЛ3ВaTe 3a Bb3PON3BExkdaHeHaФаJaIa.
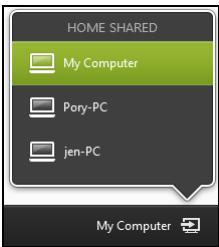
Camo ycmpoicmea, onmumuzupaHu 3a 6b3npou38eJdahe, ca hauHu 8 mo3u cnucbk, HkOU KOMnIompU u ycmpoicmea 3a cBxpaHeHue Hma da 6bdam noka3anu. 3a do6abAne Ha Windows PC kM mo3u cnucbk, omeopeme Windows Media Player, u36epeme Iomouho npedaahe u Pa3pewu ducmanuOHNo ynpaeJeHue Ha mo3 Player...
3.Изберeteфай OT OCHOBHЯпоЗорц, след TOВa n3ПОЛ3ВаиTe MyNTIMeINHnTE KOHTPOJN BДОнHaTаЧаТ ha ekpaHa, 3a Дa уравлвate OTdAneueHOTO yCTpoIcTBO.
3a noBuey e HnΦopMaζη, OTndeTe Ha http://www.acer.com/clearfi/download/.
Управлике на захсановeto
KOMNHTbpbT mma BrpaDeH 3axpaHbAa, 6JIOK, KOITO CJIeDN aKTNBHOCTTa Ha CNCTeMaT. AKTNBHOCTTa Ha CNCTeMaT Ce OTHACI DO BCJA DeHOCCT, BKIOUbaa eJHO IIN IOBeue OT CJIeHNITE yCTPOJCTBa: KNABnATypa, MIIUKa, TBbpD DnCK, nepupepna, CBbp3aHa C KOMNTObpa N BInDeo NaMeTTa. AKO He 6bJe YCTaHOBEHa DeHOCCT 3a ONPeDEHe NepnoD OT BpeMe, KOMNTObpbT cInpa HЯKOn IIN BCNUKN Te3N yCTPOJCTBa, 3a Da CNECTNe HEPrN.
Икономия на eнергия
3a6paHyaHe Ha 5bp3o 3apeKdaHe
BaunrKOMNtbp n3nON3Ba BbP3o 3apeXdahe, 3a da ce cTaptnpa 6bp30, Ho n npabN IKOHOMnHa eHepn r npOBepKa 3a cnHann 3a cTaptnpaHe. Te3n npOBepKn 6abHo ige n3ToUaT 6aTepeyraHa Baunr KOMNtbp.
Ako npednoHTaTe da HamaJIte eHeprHnHTe N3NCKBaHnK bM KOMNIObpa n BnnaHHeTo Bbpxy OkOJHaTa cpea, n3KnUoyTe Bbp3o 3apexKaHe:
3a6eIeKka: Ako Bb3o 3apexdane e u3Kn., Ha BaUra KOMnOmbp ue My e Heo6xodmo noeepe epeme 3a cmapupahe om pexum 3acnueane. Ako BaUraM Komnombp uma fynkuuume Acer Instant On unu Acer Always Connect, me ue 6bdam u3Knouenu.
Bawuym Komnombp cbio Hma da ce cmapupa, ako nonyu uHcmpkyuu da ce cmapupa no mpeka (Wake on LAN).
- Otbopete pa60THnI pIOT.
2.лракнete Вьрху Onци Na 3axpaHbaHeTo Bобл acta 3a yBeDOMJIeHnI.
3.ИзберетеОшоциHa3axpaHbAheTo.

4.Изберete Изберete Камвdo правгБутончte 3a 3axpaHbaHeTo.
5.3a DoctbN Do HacTpoKn 3a N3KnUOyBaHe, N36epTe PpomHa Ha HacTPOkN, KOnTO B MOMeHTa He Ca Ha pa3NoJoxEHe.
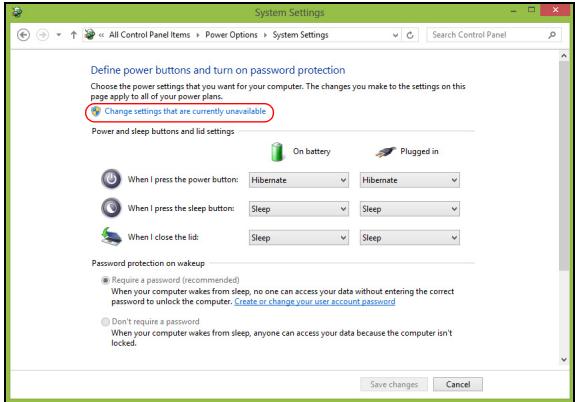
6.ИЗклочвае Или 3абраза Вклочete Бьрзостарпаhe.
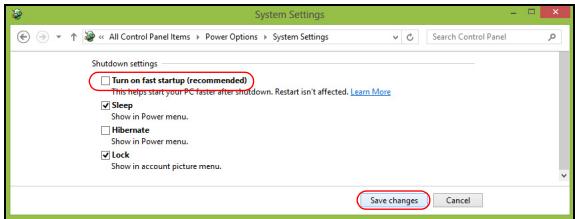
7.ИзберетеЗаиnpomehnte.
Батурень мodyн
KOMNHTbpbT n3nOJ3Ba 6aTepeH nakTe, KOITo BN IO3BOJRABa IbIro BpeMe 3a yIOTpe6a MeKdy OTdJIHnTE 3apeXdaHnI.
XapakTepncTNKn Ha 6aTepnHnMa MOnyI
BaTepeHnIaT MoUJI mMa cJIeHNHe xapaKTepeuCTNk:
- Пилага сбвременнITE стандарTNВ бастейнITE Тхнологи.
- PpeDynpexkdaBa, KOrato HnBOTO Ha 6aTepeRyTa HamaJIee.
BaTePnraTcpe3apeKdaBnHaN, KOraTo CbByPxKeTe KOMnIOTbpa c AC aDaItepa.BaShnT KOMnIOTbpNoDbPxKa 3apeXdane No Bpeme Ha yNoTpE6a,KoEtOBnO3BOJyBa Da 3apeXdate 6aTePnraTa n CbIeBpeMeHNO da pa6oTIne C KOMnIOTbpa.Bce naK,aKO 3apeXdane Prn I3KnIOueh KOMnIOTbp,BpeMeTO 3a 3apeXdane Ue 6bJe 3NaHTenHO no-KpaTko.
Батугаяе полега, koratoNBtУВATEилкoratoTOKbT cnpe. Cьветбаме вд раэпогагаTeСДОньНHTeеленHaNTbЛHо 3ape徳н БатугеляпakETза ВсЕКИ сLYчай. CBbpжete ce CBcCBОДИСТРИБутор, 3aда раэберete кад порьчate peЗерBehбатугелян мodyн.
3apeckahe Ha 6aTepeyra
3a da 3apeiTe 6atepna, pBpO ce yBepTe, ue e nocTaBeHa npabnHb B OTdeIeHneTo 3a 6atepna. BkInoute AC aanTepa B KOMNtbpa ITO CBpKTe KbM eJEnKtpuYeCKn KOHTaKT. MoKeTe da
IpoIbJIKNTe da pa6oITe C KOMNHObpa Ha npOMEHJINB TOK, DOKaTO 6aTepeYra Bn ce 3apeXka. Bce naK, aKO 3apeXdaTe npu N3KnIOueH KOMNHObP, BpeMeTo 3a 3apeXdaHe ue 6bJe 3NaUHTeJHo NO-KpATko.
3a6eJkKa: CbemBame Bu da 3apexdame bamepma, npdu da npuknoyume pa6oma 3a deH. 3apexdanemo Ha bamepma npes Hounma npdu nbmyBaHe bu no3eOJrea da 3anoHeme cneDeauu deH c HnblnHO 3apeDena bamepu.
Iodeom8aHe Ha Ho8 bamepuen nakem
Ipei Da n3no3BaTe daen 6aTepeH nakeT 3a npbB nbT, mAm onpeJelen npoec no "conditioning", KOHTe do6pe da cneBaTe:
1.ПoctabeTe HObata 6aTepeRn,6e3Да BkJIIOUBaTe KOMNIOTBpa.
2. CbpxeTe AC aanTepa n 3apeTe 6aTepyTa Hnblno.
3. Otkaute AC aanTepa.
4. BkHIOUeTe KOMNIObpa n paOToTe Ha TOK ot 6aTePnraTa.
5.ИЗTOUeTe 6aTePnIraHaNbIHo,ДOKaTO ce IOnBn IpeDyIpyKdEHNeTo 3a NaHaJa 6aTePnIa.
6. Cbpxte AC aanTepa n OTHOBo 3apeJeTe 6aepnra Hnblno.
Повторе Тети CTынки, ДOKATOбатерияа He e 3apeда и pa3peда на Трп ПьтИ.
N3PON3BaIte TO3n Ipouec 3a NODrOToBka Ha BCNUK HOBu BaTePN, ININbK Ako HAKo BAtePN DaJIro BpeMe He e 6nla IN3PON3BaHa. AKO Ue CbXpaHRABe KOMIOITbpa, 6e3 Da rO N0L3BaTe, IOBuee OT DBe CeDMnU, CbBETBaMe BN Da IN3BaDInTe BatePN Hnra NaKeT OT Hero.
Ipeynpexdene! He n3naaTe 6atepnHn naKeTu Ha TemnepaTpyn noD 0^ (32^) nIn nAd 45^ (113^) . EkctpeMHnte TemnepaTpyn MOrat Da nMaT HeraTnBeH eΦeKT Bbpxy 6atepnHnmaMouJ.
KaTo cIeDbate npoceca 3a noDrotBHe Ha 6aTepeyra, BVE naHacTpoBate Da npiema MaKcImaJIHHa Bb3MOxeh 3apJd. Ako He n3BbPUnTE TO3n npoec, Ta Hma Da npiema MaKcImaJIHHa Bb3MOxeh 3apJd, a NZe Ckbcnte efeKTUBHna XJBOT Ha 6aTepeyra.
BdoIbJIHeHne, JNBOITbT Ha 6aTeepnTa ce BJIRe HeRaTINBHO OT CpeHNTE NaHHn Ha yIpTe6a:
-ДаизпольбатКOMнOTьра постоннHa AC TOK,a bateяТа da e В Hero.Akoжелаete Дa ИЗПОЛБATE NOCTOЯнHo AC TOK, cBBeTBaMe Bn Da n3BaДИТе bateинna NaKeT, cIeД KaTO ce 3apeДи habJIHO.
- Да не паразецдати заразецдате баразецдату дokраи, КakTo e onicaHo no-rope.
- Пи чека уnotpe6a; колково по-очсTo ИЗпOLTВа te batepyta, толкова по-бьр30 щe CTINrHe Do Краз Ha eФeКТВHЯ CN XIMBOT. Стандартнata komПOTьрha batepyma XIMBOT OT OKOANO 300 3apexДаня.
OnTnMn3npaHe Ha JxNBoTa Ha 6aTepeyraTa
OnTmIm3npaHTo Ha XnBota Ha 6aTePnra Bn nomara da noCTnHete Bb3MOxHO Hau-MHOrO npn pa6oTa c 6aTePnra, yIbJIkaBa ZKbJa Ha 3apexKaHa/npe3apexKaHa n PNOobpRa eFNIKAChOCCTTa Ha
Ppe3apeKdHaHeTo. CbBcTBaMe Bn da cIeDbate npenopbKnTe, n3bpoEHn no-dony:
KynTe Cn DonbHnHTeNeh 6aTepeuH naket.
- ɪənənɪs baiTe AC 3axpaɪhBaɪe Bɪnʌrɪ, KɔrɑT O Mɔkete i nɪ na3eTe 6aTepeɪyra 3a paʊbTo, KɔrɑT O CTe B ἀνIxkeHne.
- I3BaTe PC KapTa, KOraTo HeЯ n3NoI3BaTe, TbN KaTo TnpoIbIjXaba Da Yepn 3axpaHbaHe (npn OnpeJeHn MoJEn).
CbxaHBAIte BaTePmHnna NaKet Ha cyxo n npoxlaJnHO MrcTo. PpenopbTuTeHnata Tempepatya e 10^ (50^) do 30^ (86^) . NobucOKnte TemepaTpa Kapat 6aTePnra Ta da ce camopapexda no6bp30.
- Ппекомерно пезарждане ськрацава живota на бастята.
- Погаайта AC садапера и бateрята си.
Поберка Н ИвOTO Н затура
I3mepntenrHa 3axpaHbaHeTo Ha Windows noka3Ba TekyuOTo HNBO Ha 6aTepeyra. 3aDpbkTe Kyccopa Hnd NkoHaTa 3a 6aTepeyra/3axpaHbaHe B IeHTata CbC 3aDaun, 3a Da BnDInTe TekyuOTo HNBO Ha 3apJaHa 6aTepeyra.
BkIIOUx 3axpaHeaHemo. Ho KOMIIOMbpbm He cmapupa Uu He 3apeXda
BnxTe uHdIkATopa3a 3axpaHbAhe:
-
Ako He cBeTu, KOMNIObPbT He noJyUaBa 3axpaHbaHe. IpoBepTe CJIeHNITe HeIa:
-
Ako pa6oTnTe Ha 6aTePn, MoKe Da e N3ToUeHa n Da He MoKe Da 3axpaHb KaMnIOTbPa. CbBpXeTe AC aDAnTepa, 3a Da npEzapeDInTe 6aTePnHnA naket.
-
YBepete ce, ye AC aanTepa e BKIOueH npabINHO B KOMIObpa I eNEKtpuyeCKn KoHTaKT.
-
Ako CBETn, npoBepTe cIeIHOTo:
-
Има Ли ДИСКВ OПТИЧНОTO yCTPOIСТВО? OТСТРане Го И наТИСHETe
+ + , 3a за рестаппате сиСтЕмatura. - KbM Baunia komnIOb np mma nBkIIOyeHa USB naMeT (USB nIck nIIcMaprTphiOH)? N3BaJeTe rHaTnCHeTe
+ + , 3a da pectapTpInape CnCTeMaTa.
Ha ekpaHa He ce Ioreya Huuo.
CnCTemata 3a ynpabJIeHne Ha 3axpaHbAHeTo Ha KOMIOTbpa ABTomatUHO n3KJIIOUba ekpHa, 3a Da neCTn eHeprna. HatncheTe npOn3BOJEN KNaBnS, 3a Da BkJIIOHTe DIncPJIe OTHOBO.
Ako He ycneete da ro BkIouHte ue3 npOu3BOJeH KJaBnU, IMa TpN Bb3MOxHN pRcHH:
- HNBOTo HaЯркocT MoKeДa e npeKaJIeHo HNcKo. HaTnCHeTe
+ (yBéJIuHuaBaHe), 3aДаHaCTpOHTe HNBOTo HaЯркocTTa.
-ДиспеленOTOусторьо можеда eHaflanceHoдаИЗПОЛ3Ва ВьншЕн монитор.Натиchedete ropeцяклавишза певКлочBaHe HaДиспел徳+ ,3a Да пеминete КБМДиспелЯн KMПOTbpa. - Ako INHДИКaTOPbT 3a „3acПиВаHe" e BKNIOUeH, TO KOMПЮТьрТ e В ржIM „3acПиВаHe". HATINCHTe n OTNPyCHete 6yTOHa 3a 3axpaHBAHe, 3a ДЯ npOДьЛЖИte pa6Ota.
He ce yya ayuo om Komnombba
PpOBepe cIeHNHea:
- Moxe 6n cTe cnpeiH 3Byka. B Windows, norgHeNHe uKoHKaTa 3a KOHTpOHa 3Byka (BvCOKOrOBOpuTeJUe) Ha JeHTaTa 3a 3aJaU. Ako e 3aDpaCKaHa, UpaKaHETe Bbpxy HeI MxAHHeOTMeTKaTa OT ONUrTa Be3 3Byk BCnUKn.
-
HnBOTO Ha 3Byka MoKeJa e npeKaJIeHO HnCKo. B Windows, noIeHete NkOHkata 3a KOHTpOHa 3Byka Ha JeHTaTa 3a 3aDauN. MoKeTe da NaCTPOBaTE CINaTa Ha 3Byka i C6bYToHInTe 3a KOHTpOHa 3Byka.
-
Ako KbM aydno-N3XoDnHЯ NOPT Ha KOMNHTbpa ca Cbbp3aHN cIyuaKN IJIN BbHUN KOLOHN, BbTpEshHte BNCOKOROBOpNTeJIn aBTOMaTHUHO Ce N3KJIIOYBaT.
Uckam da u3ea0ra noHocHa onmuHomo ycmpoUcm8o.6e3 da 6KJIIOyBAM KOMIIOMbpa
OnTnHOTO yCTPOIcTB0 IMa dynka 3a MexaHnHOb n3BaJdaHe. 3a da OTBOpHTe yCTPOIcTBOTO, IpocTo nbxHete Bbpxa Ha XmMkJIka IJI KJIaMeP B dynKaTa nHaTncHeTe.
Knaaumypama He peazupa
OnntaTe da npKaHTe BbHnHa KlaBnAtya KbM HraKo ot USB nopToBeTe Ha KOMNtBpa. Ako Ta pa6Otn, NtBpCeTe DnCTprbTyopa cn IN OToP3uPAh CepBn3eH ZeHTbp, TbK KaTO Ka6JIbT Ha BbTpEShHaTa KJIaBnAtya MoKe Da ce e pa3Xna6nI.
PpuHmepbM He pa6omu
Acer Backup Manager 38
Taaste 41
Welcome to Acer Backup Manager
Select one action below to start managing your data.
Back Up My Files
Pick and choose which files to back up or let the program find it all for you.
Back Up My Files
The file backup helps you create a complete backup of your documentation. Choose the file or folder for the backup and then select the destination for the backup. Once you have selected the destination, the final step is to schedule the backup. Click on the Backup My Files button to create a backup.
Image My Drive
Make a complete image backup of your drive.
Migrate My Files
Transfer your files from another computer to this computer.
Clear out / Restore Files
Remove seldom used files to free up space or restore files from your backup.

Launch My Backup Profiles
acer


Directly enter "My Backup Profiles" next time
Acer Recovery Management
?X
Welcome to Acer Recovery Management
Acer Recovery Management enables you to restore your system. To begin, select the task you want to perform. Please DO NOT remove the USB device while proceeding.

Reinstall Drivers or Applications
Reinstalls factory default drivers or applications.

Customized Restore (Retain User Data)

Reinstall Drivers or Applications

Make a back-up before you restore (Recommended).

Create Factory Default Backup
Create Drivers and Applications Backup
acer
- Klöpsake käsul Loo tehasesätetega varukoopia. Avaneb aken Taastedraiv.
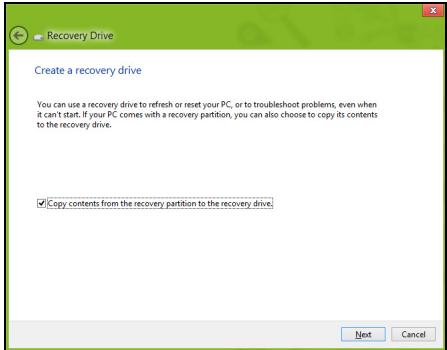
Acer Recovery Management
?X
Welcome to Acer Recovery Management
Acer Recovery Management enables you to restore your system. To begin, select the task you want to perform. Please DO NOT remove the USB device while proceeding.

Reinstall Drivers or Applications
Reinstalls factory default drivers or applications.

Customized Restore (Retain User Data)

Reinstall Drivers or Applications
Make a back-up before you restore (Recommended).

Create Factory Default Backup
Create Drivers and Applications Backup
acer
Acer Recovery Management
?X
Welcome to Acer Recovery Management
Acer Recovery Management enables you to restore your system. To begin, select the task you want to perform. Please DO NOT remove the USB device while proceeding.

Customized Restore (Retain User Data)

Reinstall Drivers or Applications
Make a backup before you restore (Recommended).

Create Factory Default Backup
Create Drivers and Applications Backup
acer
Reinstall Drivers or Applications
Reinstalls factory default drivers or applications.

Here's what will happen:
- Your files and personalization settings won't change.
- Your PC settings will be changed back to their defaults.
- Apps from Windows Store will be kept.
- Apps you installed from discs or websites will be removed.
A list of removed apps will be saved on your desktop.
Next
Cancel
Acer Backup Manager 37
Atkopšana 40
Atkopşanas dubljuma izveide 40
Draiveru un lietojumprogrammu
dubljumkopijas izveidošana 44
Sistemas atkopšana 46
Draiveru vai lietojumprogrammu
parinstalešana 47
Atgriesanas uz agraku sistemas
momentuznemumu 50
Sistemas agriesana uz tās rūpnīcas
stavokli 51
Atkopšana no Windows 52
Atkopşana no atkopşanas dubljuma 56
Acer clear.fi 60
Multivides un Fotoattelu navigacija 60
www.acer-group.com/public/Sustainability/sustainability01.htm.
ENERGY STAR

Acer ENERGY STAR kvalificetie produkti ietaupa jusu naudu, samazinot elektribas izmaksas un aizsargajot vidi, uz ta rekina neupurejot funkcjjas vai kvalitati. Acer ir leps piedavat saviem clientsiem produktus ar ENERGY STAR atzimi.
Kas ir ENERGY STAR?
Produkti, kas ir kvalificeti ENERGY STAR, izmanto mazak energijas un novere siltumnicas gazes izmešus, atbilstot stingrajam energijas efektivitates vadlinijam, ko noteikusi Savienoto Valstu Vides aizsardzibas agentura. Acer ir saistijies piedavat izstradajumus un pakalpojumus visa pasaule, kas palidz clientiem taupit naudu, energiju un uzlabot vides kvaliti. Jo vairak energijas mes varam ietaupit ar lielaku energoeftektivati, jo vairak mēs samazinam siltumnicas gazes un klimata izmainu risku. Lai iegutu vairak informacijas, skatiet www.energystar.gov vai www.energystar.gov/ powermanagement.
Welcome to Acer Backup Manager
Select one action below to start managing your data.
Back Up My Files
Pick and choose which files to back up or let the program find it all for you.
Image My Drive
Make a complete image backup of your drive.
Migrate My Files
Transfer your files from another computer to this computer.
Clear out / Restore Files
Remove seldom used files to free up space or restore files from your backup.

Launch My Backup Profiles
Back Up My Files
The file backup helps you create a complete backup of your documentation. Choose the file or folder for the backup and then select the destination for the backup. Once you have selected the destination, the final step is to schedule the backup. Click on the Backup My Files button to create a backup.
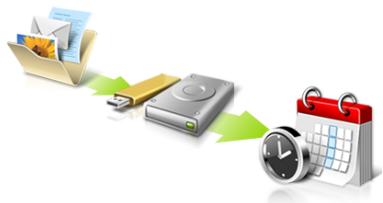
Directly enter "My Backup Profiles" next time
acer
Acer Recovery Management
?X
Welcome to Acer Recovery Management
Acer Recovery Management enables you to restore your system. To begin, select the task you want to perform. Please DO NOT remove the USB device while proceeding.

Reinstall Drivers or Applications
Reinstalls factory default drivers or applications.

Customized Restore (Retain User Data)

Reinstall Drivers or Applications

Make a back-up before you restore (Recommended).

Create Factory Default Backup
Create Drivers and Applications Backup
acer
- Noklikskinet uz Izveidot rupnicas noklusejumu dubljumu. Tiek atverts logs Atkopsanas disks.

Acer Recovery Management
?X
Welcome to Acer Recovery Management
Acer Recovery Management enables you to restore your system. To begin, select the task you want to perform. Please DO NOT remove the USB device while proceeding.

Customized Restore (Retain User Data)

Reinstall Drivers or Applications
Make a backup before you restore (Recommended).

Create Factory Default Backup
Create Drivers and Applications Backup
acer
Reinstall Drivers or Applications
Reinstalls factory default drivers or applications.

Here's what will happen:
- Your files and personalization settings won't change.
- Your PC settings will be changed back to their defaults.
- Apps from Windows Store will be kept.
- Apps you installed from discs or websites will be removed.
A list of removed apps will be saved on your desktop.
Next
Cancel
Acer Backup Manager 39
Atkūrimas 42
Welcome to Acer Backup Manager
Select one action below to start managing your data.
Back Up My Files
Pick and choose which files to back up or let the program find it all for you.
Back Up My Files
The file backup helps you create a complete backup of your documentation. Choose the file or folder for the backup and then select the destination for the backup. Once you have selected the destination, the final step is to schedule the backup. Click on the Backup My Files button to create a backup.
Image My Drive
Make a complete image backup of your drive.
Migrate My Files
Transfer your files from another computer to this computer.
Clear out / Restore Files
Remove seldom used files to free up space or restore files from your backup.

Launch My Backup Profiles
acer


Directly enter "My Backup Profiles" next time
Kad paleistumete „Acer Backup Manager“ operacinés sitemose „Windows 8“ aplinkoje, paprasčiausiali praděkite rasyti „Backup Manager“. Kitas budas - darbalaukio režimu parinkite Acer Backup Manager. Čia
Acer Recovery Management
?X
Welcome to Acer Recovery Management
Acer Recovery Management enables you to restore your system. To begin, select the task you want to perform. Please DO NOT remove the USB device while proceeding.

Reinstall Drivers or Applications
Reinstalls factory default drivers or applications.

Customized Restore (Retain User Data)

Reinstall Drivers or Applications

Make a back-up before you restore (Recommended).

Create Factory Default Backup
Create Drivers and Applications Backup
acer
Paleiskite Acer Recovery Management:
- Srityje Pradžia iveskite „Recovery" ir programu sąaše spustelékite Acer Recovery Management.
'International Travelers Warranty' (ITW) garantija
Jusu kompiuteriui taikoma tarptautine 'International Travelers Warranty' (ITW), kuri suteikia saugumo ir ramybès keliaujant. Musq pasaulinis aptarnavimo centru tinklas skirtas padeti Jums.
Acer Backup Manager 44
AToKataoTaon 48
Anmupyia avtipapou aqpaaleia via
eTavapopá 49
aTYPaPou aOaAeias TPOpypaMAtWv Obnynans kai εραρογων..... 53
Antokataoan Tou ouotnmuoc oac. 55
Etnaveykataotaon npoypaumatow onyong kai epapouoyw 57
Aoupuatadeltaia 97 T1 evai to qavvwoiTiko
Welcome to Acer Backup Manager
Select one action below to start managing your data.
Back Up My Files
Pick and choose which files to back up or let the program find it all for you.
Image My Drive
Make a complete image backup of your drive.
Migrate My Files
Transfer your files from another computer to this computer.
Clear out / Restore Files
Remove seldom used files to free up space or restore files from your backup.

Launch My Backup Profiles
Back Up My Files
The file backup helps you create a complete backup of your documentation. Choose the file or folder for the backup and then select the destination for the backup. Once you have selected the destination, the final step is to schedule the backup. Click on the Backup My Files button to create a backup.

Directly enter "My Backup Profiles" next time
acer
Tia evapn tou Acer Backup Manager oTa Windows 8, TAnkpoLoynoTe aTawc"Backup Manager".EvaalakTKa, ETIAECTe Acer Backup Manager otN LEIToupyia eTIPaVExiac epyaioac. Auto tha aoiei tvv oToovn utOdoxns. ATO autnv tvv oToovn mTopeite va eTIAEETe Tov tuTO Tou aTVIpyapou aOpaaleic TPO TEVAOnmuOpnyoTe.
Acer Recovery Management
?X
Welcome to Acer Recovery Management
Acer Recovery Management enables you to restore your system. To begin, select the task you want to perform. Please DO NOT remove the USB device while proceeding.

Reinstall Drivers or Applications
Reinstalls factory default drivers or applications.

Customized Restore (Retain User Data)

Reinstall Drivers or Applications

Make a back-up before you restore (Recommended).

Create Factory Default Backup
Create Drivers and Applications Backup
acer
- PpaayataoToioTe iikpOoiop0woeic.
Av exouv stapatnoe i va aeitoupyouv oomega ta olaic eva n duo otoixia loyioikou n ulikou, to pobma u tropei evoexoywvars ea tllutheta i e ETTAVeykataoan tou loyioikou n twpoypaumaw odynonc oukeuwv.
Tia eTaveykataoTaon Tou loyioikou kai twv Tpoypaumaw oyynonctou exouv TpoeykataoTaei Epyoostaiaka, avatpeTe OTnv Evotnta "Eeaveykaotaon Tpoypaumaw oyynonc kai epapuyov" Otn oEla 57.
Tia oyniec oxetikau Tnv ETTAVyKATaotaon loyioikou kai Tpoypaumaw oynonnc Tou dEv nTav TPOeYkATEOTnEva, avatpEgTe OTNV TEKnpiwn Tou PoiovTOC n OTo DIKTuKO tIO UTOOtNpIgNs.
Acer Recovery Management
?X
Welcome to Acer Recovery Management
Acer Recovery Management enables you to restore your system. To begin, select the task you want to perform. Please DO NOT remove the USB device while proceeding.

Reinstall Drivers or Applications
Reinstalls factory default drivers or applications.

Customized Restore (Retain User Data)

Reinstall Drivers or Applications

Make a backup before you restore (Recommended).

Create Factory Default Backup
Create Drivers and Applications Backup
acer
Kavte klik oTo EtnaveykataoTaon PpoypaMaTov obynoNc n eapouyov.
EkkivnoTe to Acer Recovery Management:
- ATo Evapx, TAnktpooynoTe 'AtokataoTaon' kai etakavte KAIK OTo Acer Recovery Management otN liota eapuoywv.
Acer Recovery Management
?X
Welcome to Acer Recovery Management
Acer Recovery Management enables you to restore your system. To begin, select the task you want to perform. Please DO NOT remove the USB device while proceeding.

Reinstall Drivers or Applications
Reinstalls factory default drivers or applications.

Customized Restore (Retain User Data)


Reinstall Drivers or Applications
Make a backup before you restore (Recommended).

Create Factory Default Backup
Create Drivers and Applications Backup
acer
Ppoox: H 'Etnavaopopaepyostaiaikwpu0ioeWv' 8a diaypaesioa ta apxeia aTTO kA npo bioko oac.
- Avoiyi To TnpaθuO Etnavapopα tou PC.

Oi EIKoVc Eivai mOvo yia avapopa.
Acer Recovery Management
?X
Welcome to Acer Recovery Management
Acer Recovery Management enables you to restore your system. To begin, select the task you want to perform. Please DO NOT remove the USB device while proceeding.

Customized Restore (Retain User Data)

Reinstall Drivers or Applications
Make a backup before you restore (Recommended).

Create Factory Default Backup
Create Drivers and Applications Backup
acer
Reinstall Drivers or Applications
Reinstalls factory default drivers or applications.

- Avoiye to Tnpa@uO Avavewon tou PC.
Refresh your PC
Here's what will happen:
- Your files and personalization settings won't change.
- Your PC settings will be changed back to their defaults.
- Apps from Windows Store will be kept.
- Apps you installed from discs or websites will be removed.
- A list of removed apps will be saved on your desktop.
Next
Cancel
-
KávTE KAIK OTO Eπóμεvo KAI μΕΤΑ ΘΟ Avavewon.
-
H δiādkaioia attokataoans ΕEKIVa με εΠαveKKivnon tou utloayiotn kai ouvexicetai με ανιypaΦn apxiewv σTO σKλnpó δiακο oac. H δiādkaioia autn diapkei πeipitou 30 λεπτa.
AnokataoTaon aTó avtivpapo oopaleia
Tia atokataoan aTo avtipapo aopaleia og ova dbiaokou USB:
Acer Backup Manager 38
Kurtarma 41
Welcome to Acer Backup Manager
Select one action below to start managing your data.
Back Up My Files
Pick and choose which files to back up or let the program find it all for you.
Image My Drive
Make a complete image backup of your drive.
Migrate My Files
Transfer your files from another computer to this computer.
Clear out / Restore Files
Remove seldom used files to free up space or restore files from your backup.

Launch My Backup Profiles
Back Up My Files
The file backup helps you create a complete backup of your documentation. Choose the file or folder for the backup and then select the destination for the backup. Once you have selected the destination, the final step is to schedule the backup. Click on the Backup My Files button to create a backup.

Directly enter "My Backup Profiles" next time
Acer Recovery Management
?X
Welcome to Acer Recovery Management
Acer Recovery Management enables you to restore your system. To begin, select the task you want to perform. Please DO NOT remove the USB device while proceeding.

Reinstall Drivers or Applications
Reinstalls factory default drivers or applications.

Customized Restore (Retain User Data)

Reinstall Drivers or Applications

Make a back-up before you restore (Recommended).

Create Factory Default Backup
Create Drivers and Applications Backup
acer
Acer Recovery Management
?X
Welcome to Acer Recovery Management
Acer Recovery Management enables you to restore your system. To begin, select the task you want to perform. Please DO NOT remove the USB device while proceeding.

Reinstall Drivers or Applications
Reinstalls factory default drivers or applications.

Customized Restore (Retain User Data)


Reinstall Drivers or Applications
Make a backup before you restore (Recommended).

Create Factory Default Backup
Create Drivers and Applications Backup

Here's what will happen:
- All your personal files and apps will be removed.
- Your PC settings will be changed back to their defaults.
Next
Cancel
Acer Backup Manager 35
# 38
38
DraaiBfJfJFJFJFJFJFJFJFJFJFJFJFJFJFJFJFJFJFJFJFJFJFJFJFJFJFJFJFJFJFJFJFJFJFJFJFJFJFJFJFJFJFJFJFJFJFJFJFJFJFJFJ
SisTeBKbQ 44
德拉伊専具興用元隆托羅其樂士
垣吉士毛皂土名义上以同.. 48
SisTeBgl 49
Windows 50
默书部部.. 54
Acer clear.fi 58
MIDIH及SAJINT
公同用的. 59
阿用 唯一 59
60
61
[1] … 61
BteRlK 64
Babrilikpiksek 64
Babrui 64
BateRi SuMg ChieJ 66
BabrLi SuJin 67
Babrili 67
Babrlik selit jnt 68
KunTeHJF 69
TeS3eTepF 69
孕版电 69
KunjTe TnB 70
70
71
KcuiTe TnB 71
71
高维变换 72
gacnepa 72
賊軒則,,.. 72
KcuiTe 73
73
KunTeBnHouGmJgJGJiJiJiJiJiJiJiJiJiJiJiJiJiJiJiJiJiJiJiJiJiJiJiJiJiJiJiJiJiJiJiJiJiJiJi
AMH 75
amho 76
77
77
77
Bluetooth 79
[BateRl] 15×C~25×C(59×F~77×F) [BateRl] (60×F~77×F) [BateRl] (60×F~77×F) [BateRl] (60×F~77×F) [BateRl] (60×F~77×F) [BateRl] (60×F~77×F) [BateRl] (60×F~77×F) [BateRl]
T,DaiTeBuk,HajgJiJiJiJiJiJiJiJiJiJiJiJiJiJiJiJiJiJiJiJiJiJiJiJiJiJiJiJiJiJiJiJiJiJiJiJiJiJiJiJiJiJiJiJiJiJiJiJiJiJiJ1.
賊賊賊則爲賊賊賊則爲賊賊賊則爲賊賊賊則爲賊賊賊則爲賊賊賊則爲賊賊賊則爲賊賊賊則爲賊賊賊則爲賊賊賊則爲賊賊賊則爲賊賊賊則爲賊賊賊則爲賊賭則爲賊賊賊則爲賊賊賊則爲賊賊賊則爲賊賊賊則爲賊賊賊則爲賊賊賊則爲賊賊賊則爲賊賊賊則爲賊賊賊則爲賊賊賊則爲賊賊賊則爲賊賊賊則爲賭賊賊則爲賭賊賊則爲賭賊賊則爲賭賊賊則爲賭賊賊則爲賭賊賊則爲賭賊賊則爲賭賊
Turi Tadaon is a good man.
卫:T日三德是的,动默自用,
TJIIJIDJ 1
Kerser是怎加机其本斯战成的海之者
:TtJrD 3sJrJrJrJrJrJrJrJrJrJrJrJrJrJrJrJrJrJrJrJrJrJrJrJrJrJrJrJrJrJrJrJrJrJrJrJrJrJrJrJrJrJrJrJrJrJrJrJrJrJrJ rJrJrJrJrJrJrJrJrJrJrJrJrJrJrJrJrJrJrJrJr
Welcome to Acer Backup Manager
Select one action below to start managing your data.
Back Up My Files
Pick and choose which files to back up or let the program find it all for you.
Image My Drive
Make a complete image backup of your drive.
Migrate My Files
Transfer your files from another computer to this computer.
Clear out / Restore Files
Remove seldom used files to free up space or restore files from your backup.

Launch My Backup Profiles
Back Up My Files
The file backup helps you create a complete backup of your documentation. Choose the file or folder for the backup and then select the destination for the backup. Once you have selected the destination, the final step is to schedule the backup. Click on the Backup My Files button to create a backup.
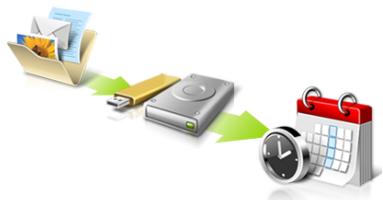

Directly enter "My Backup Profiles" next time
Acer Recovery Management
?X
Welcome to Acer Recovery Management
Acer Recovery Management enables you to restore your system. To begin, select the task you want to perform. Please DO NOT remove the USB device while proceeding.

Reinstall Drivers or Applications
Reinstalls factory default drivers or applications.

Customized Restore (Retain User Data)

Reinstall Drivers or Applications

Make a back-up before you restore (Recommended).

Create Factory Default Backup
Create Drivers and Applications Backup
acer
SosFTrWeynHaHsTReyHnHhHnHnHnHnHnHnHnHnHnHnHnHnHnHnHnHnHnHnHnHnHnHnHnHnHnHnHnHnHnHnHnHnHnHnHnHnHnHnHnHnHnHnHnHnHnHnHnHnHnHnHm, Ht#ng SosFTrWeynHaNt ChIeRiBt Bt##r #oR oR nR aR eR eR eR eR eR eR eR eR eR eR eR eR eR eR eR eR eR eR eR eR eR eR eR eR eR eR eR eR eR eR eR eR eR eR eR eR eR eR eR eR eR eR eR eR eR eR eR eR eR eR E R E R E R E R E R E R E R E R E R E R E R E R E R E R E R E R E R E R E R E R E R E R E R E R E R E R E R E R E R E R E R E R E R E R E R E R E R E R E R E R E R E R E R E R E R E R E R E R E R E R E
Acer Recovery Management
?X
Welcome to Acer Recovery Management
Acer Recovery Management enables you to restore your system. To begin, select the task you want to perform. Please DO NOT remove the USB device while proceeding.

Reinstall Drivers or Applications
Reinstalls factory default drivers or applications.

Customized Restore (Retain User Data)

Reinstall Drivers or Applications
Make a backup before you restore (Recommended).

Create Factory Default Backup
Create Drivers and Applications Backup
acer

DeutschereKnupTeRtoBnLHhHtDnHnHnHnHnHnHnHnHnHnHnHnHnHnHnHnHnHnHnHnHnHnHnHnHnHnHnHnHnHnHnHnHnHnHnHnHnHnHnHnHnHnHnHnHnHnHnHnHnHnHn H
부류서 힘사 썸이 쓸어 쓸만 쓸고 쓸고 쓸고 쓸고 쓸고 쓸고 쓸고 쓸고 쓸고 쓸고 쓸고 쓸고 쓸고 쓸고 쓸고 쓸고 쓸고 쓸고 쓸고 쓸고 쓸고 쓸고 쓸고 쓸고 쓸고 쓸ious 쓸고 쓸ious 쓸ious 쓸ious 쓸ious 쓸ious 쓸ious 쓸ious 쓸ious 쓸ious 쓸ious 쓸ious 쓸ious 쓸ious 쓸ious 쓸ious 쓸ious 쓸ious 쓸ious 쓸ious 쓸ious 쓸ious 쓸ious 쓸ious 쓸ious 쓸ious 쓸iosis 쓸iosis 쓸iosis 쓸iosis 쓸iosis 쓸iosis 쓸iosis 쓸iosis 쓸iosis 쓸iosis 쓸iosis 쓸iosis 쓸iosis 쓸iosis 쓸iosis 쓸iosis 쓸iosis 쓸iosis 쓸iosis 쓸iosis 쓸iosis 쓸iosis 쓸iosis 쓸iosis 쓸iosis 쓸ious 쓸ious 쓸ious 쓸ious 쓸ious 쓸ious 쓸ious 쓸ious 쓸ious 쓸ious 쓸ious 쓸ious 쓸ious 쓸ious 쓸ious 쓸ious 쓸ious 쓸ious 쓸ious 쓸ious 쓸ious 쓸ious 쓸ious
FAQ(简直就是和大佬)
Araeepenncnreepnreepnreepnreepnreepnreepnreepnreepnreepnreepnreepnreepnreepnreepnreepnreepnreepnreepnreepnreepnreepnreepnreepnreepnreepnreepnreepnreepnreepnreepnreepnreepnreepnreepnp
KETTEHJSEOODOgIeRJIaNcE
当在上行的命令中,使用“#”键即可。
ITW (International Travelers Warranty)
IeKuTnEeNtJHcHgUeHgUeHgUeHgUeHgUeHgUeHgUeHgUeHgUeHgUeHgUeHgUeHgUeHgUeHgUeHgUeHgUeHgUeHgUeHgUeHgUeHgUeHgUeHgUeHgUeHgU e HgUeHgUeHgUeHgUeHgUeHgUeHgUeHgUeHgUeHgUeHgUeHgUeHgUeHgUeHgUeHgUeHgUeHgUeHgUeHgUeHgUeHgUeHgUeHgUeHgUe HgUeHgUeHgUeHgUeHgUe Hg Ue Hg Ue Hg Ue Hg Ue Hg Ue Hg Ue Hg Ue Hg Ue Hg Ue Hg Ue Hg Ue Hg Ue Hg Ue Hg Ue Hg Ue Hg Ue Hg Ue Hg Ue Hg Ue Hg Ue Hg Ue Hg Ue Hg Ue Hg Ue Hg Ue Hg H g H g H g H g H g H g H g H g H g H g H g H g H g H g H g H g H g H g H g H g H g H g H g H g H g H g H g H g H g H g H g H g H g H g H g H g H g H g H g H g H g H g H g H g H g H g H g H g H g H g H h h h h h h h h h h h h h h h h h h h h h h h h h h h h h h h h h h h h h h h h h h h h h h h h h h h h h h h h h h h h h h h h h h h h h h h h h h h h h h h h h h h h h h h h h h h h h h h h h h h hh
哉函藻藻土藻藻藻藻藻藻藻藻藻藻藻藻藻藻藻藻藻藻藻藻藻藻藻藻藻藻藻藻藻藻藻藻藻藻藻藻藻藻藻藻藻藻藻藻藻藻藻藻藻藻藻藻藻藻藻藻藻藻
Acer Backup Manager 31
復原 34
建立復原備份 34
建立磁碟機和應用程式備份 37
復原您的系統 40
重新安裝驅動程式和應用程式 40
回到先前的系統快照 43
將系統回到出廠預設狀態 44
從Windows復原 44
從復原備份中復原 49
Acer clear.fi 52
瀏覽媒體與相片 52
分享的檔案 53
有哪些相容的装置? 53
播放至另一個裝置 54
電源管理 55
省電 55
電池組 58
電池組特性 58
為電池充電 58
最佳化電池使用壽命 60
檢查電池電量 60
低電量警告 60
安裝和移除電池組 62
攜帶筆記型電腦旅行 63
移除與其他裝置的連接 63
移動電腦 63
前置作業 63
帶著電腦參加會議 64
帶著電腦回家 64
前置作業 64
携带物品 65
特殊考量事項 65
設置家庭辦公室 65
帶著電腦出差 66
前置作業 66
携带物品 66
Welcome to Acer Backup Manager
Select one action below to start managing your data.
Back Up My Files
Pick and choose which files to back up or let the program find it all for you.
Image My Drive
Make a complete image backup of your drive.
Migrate My Files
Transfer your files from another computer to this computer.
Clear out / Restore Files
Remove seldom used files to free up space or restore files from your backup.

Launch My Backup Profiles
Back Up My Files
The file backup helps you create a complete backup of your documentation. Choose the file or folder for the backup and then select the destination for the backup. Once you have selected the destination, the final step is to schedule the backup. Click on the Backup My Files button to create a backup.

Directly enter "My Backup Profiles" next time
Acer Recovery Management
?X
Welcome to Acer Recovery Management
Acer Recovery Management enables you to restore your system. To begin, select the task you want to perform. Please DO NOT remove the USB device while proceeding.

Reinstall Drivers or Applications
Reinstalls factory default drivers or applications.

Customized Restore (Retain User Data)

Reinstall Drivers or Applications
Make a backup before you restore (Recommended).

Create Factory Default Backup
Create Drivers and Applications Backup
acer
Download over metered connections
To help prevent extra charges, keep off this device software (drivers, info, and app) for new devices won't download while you're on metered internet.


This Class B digital apparatus complies with Canadian ICES-003.
Acer Backup Manager 31
还原 34
Welcome to Acer Backup Manager
Select one action below to start managing your data.
Back Up My Files
Pick and choose which files to back up or let the program find it all for you.
Back Up My Files
The file backup helps you create a complete backup of your documentation. Choose the file or folder for the backup and then select the destination for the backup. Once you have selected the destination, the final step is to schedule the backup. Click on the Backup My Files button to create a backup.
Image My Drive
Make a complete image backup of your drive.
Migrate My Files
Transfer your files from another computer to this computer.
Clear out / Restore Files
Remove seldom used files to free up space or restore files from your backup.

Launch My Backup Profiles


Directly enter "My Backup Profiles" next time
Acer Recovery Management
?X
Welcome to Acer Recovery Management
Acer Recovery Management enables you to restore your system. To begin, select the task you want to perform. Please DO NOT remove the USB device while proceeding.

Reinstall Drivers or Applications
Reinstalls factory default drivers or applications.

Customized Restore (Retain User Data)

Reinstall Drivers or Applications

Make a back-up before you restore (Recommended).

Create Factory Default Backup
Create Drivers and Applications Backup
acer
2. 单击创建驱动程序和应用程序备份。
启动 Acer Recovery Management:
Download over metered connections
To help prevent extra charges, keep off this device software (drivers, info, and app) for new devices won't download while you're on metered internet.


Acer Backup Manager 38
Pemulihan 41
DAHULUKAN, HAL PERTAMA
Welcome to Acer Backup Manager
Select one action below to start managing your data.
Back Up My Files
Pick and choose which files to back up or let the program find it all for you.
Back Up My Files
The file backup helps you create a complete backup of your documentation.
Choose the file or folder for the backup and then select the destination for the backup. Once you have selected the destination, the final step is to schedule the backup. Click on the Backup My Files button to create a backup.
Image My Drive
Make a complete image backup of your drive.
Migrate My Files
Transfer your files from another computer to this computer.

Clear out / Restore Files
Remove seldom used files to free up space or restore files from your backup.

Launch My Backup Profiles

Directly enter "My Backup Profiles" next time
acer
Mulai Acer Recovery Management:
- Dari Mulai, ketik 'Pemulihan' lalu klik Acer Recovery Management di dalam.daftar aplikasi.
Tersedia duali pilihan, Pulihkan Setelan Pabrik (Reset PCuya) atau Pemulihan Disesuaikan (Segarkan PCuya).
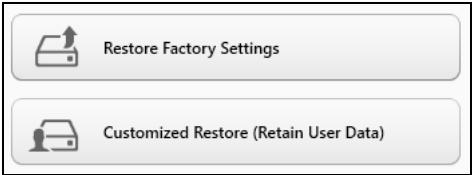
b. Klik Reset your PC until mulai proses reset:
c. Klik Refresh your PC until mulai proses segarkan:
LTW (International Travelers Warranty)
Acer Backup Manager 35
nun 38
nansanansanaaayaaanu 39
nntnntnntnntnntnntnntnntnntnntnntnntnntnntnntnntnntnntnntnntnntnntnntnntnntnntnntnntnntnntnntnntnntnntnntnntnntn
nntnnnnaaannnnnnaa 46
nssaaa aannnnnnnnnnnnnnn nnnnnnnnnnnnnnnnnnnnnnnnnnnnnnnnnnnnnnnnnnnnnnnnnnnnnnnnnnnnnnnnnnnnnnnnnnnnnnnnnnnnnnnnnnnnnnnnnnnnnnnnnnnnnnnnnnnnnnn
nntnnnnaaannnnn.. 50
n
1507u 51
nntnnnnnnn Windows. 52
nunnnnaaayaae
Jiwantunauuauu 56
Acer clear.fi 60
nntanrnnnnaaannn 60
Iwanniu 61
aunnnae nnne nnnnnae? 61
nssuaunnsaau 62
63
66
nssnnw . 63
66
n7y7y7y7y7y7y7y7y7y7y7y7y7y7y7y7y7y7y7y7y7y7y7y7y7y7y7y7y7y7y7y7y7y7y7y7y7y7y7y7y7y7y7y7y7y7y7y7y7y7y7. 66
nntnnnntnnnnnnnnnnaa 68
n75727a7y7w7y7u7u7u7u7u7u7u7u7u7u7u7u7u7u7u7u7u7u7u7u7u7u7u7u7u7u7u7u7u7u7u7u7u7u7u7u7u7u7u7u7u7u7u7u7u7u7u7u7u7u7
nntaaauuuaa 69
nraaanaanaaanaaanaa 70
71
71
Lunuon 71
n756guyuunwulao 72
72
73
73
73
74
n75n75n75n75n75n75n75n75n75n75n75n75n75n75n75n75n75n75n75n75n75n75n75n75n75n75n75n75n75n75n75n75n75n75. 74
nanaananaananaananaananaananaananaananaananaananaananaananaananaananaananaananaananaananaananaananaananaananaananaananaananaananaananaananaananaananaananaananaananaananaananaananaananaananaananaananaananaananaananaananaananaananaananaananaananaananaanana
- nnuuunnuuunnuuunnu, uviuui, uuaieiuu uunnuuauu
- 1
- 1
- wannnnaaennnnnnaananaananaananaananaananaananaananaananaananaananaananaananaananaananaananaananaananaananaananaananaananaananaananaananaananaananaananaananaananaananaananaananaananaananaananaananaananaananaananaananaananaananaananaananaananaananaananaananaananaananaanara
- nuiuunuaaunuunw, aaninunnu, wauunununununu uuuuununununu uuuuuuuuuuuuuuuuuuuuuuuuuuuuuuuuuuuuuuuuuuuuuuuuuuuuuuuuuuuuuuuuuuuuuuuuuuuuuuuuuuuuuuuuuuuuuuuuuuuuuuuuuuuuuuuuuuuuuuuuuuuuuuuuuuuuuuuuuuuuuuuuuuuuuuuuuuuuuuuuuuuuuuuuuuuuuuuuuuuuuuuuuuuuuuuuuuuuuuuuuUU
- 5w#n7u7, w##r#sa#a#y#u#y#u#u#u#u#AC #y#u#u#
- aunauuuaaauauauuuauauauauauauauauauauauauau
- aunuunwuuunuunuunuunuunuunuunuunuunuunuunuunuunuunuunuunuunuunuunuunuunuunuunuunuunuunuunuunuunuunuunuunuunuunuunu
nssaaunnuuau
nannnnnnnnnnnnnnnnnnnnnnnnnnnnnnnnnnnnnnnnnnnnnnnnnnnnnnnnnnnnnnnnnnnnnnnnnnnnnnnnnnnnnnnnnnnnnnnnnnnnnnnnnnnnnnnnnnnnnnnnnnnnnnnnnnnnnn
y
aannnnnnaeennnnneaaee nnnnnnne aen neaeey
- aunwaaenrnnnnaaennnnaeau
- トトトトトトトトトトトト
- mnnnnaaennnnnnnnnnnnnnnnnnnnnnnnnnnnnnnnnnnnnnnnnnnnnnnnnnnnnnnnnnnnnnnnnnnnnnnnnnnnnnnnnnnnnnnnnnnnnnnnnnnnnnnn
- waiuuiuuiuuiuuiuuiuuiuuiuuiuuiuuiuuiuui
- 155555555555555555555555555555555555555555555555555555555555555555
uunnnnns
nauu uauuauauauuuuauuauu, uuaaunuauu, uuaanuauauuuuuuuuuuuuuuuuuuuuuuuuuuuuuuuuuuuuuuuuuuuuuuuuuuuuuuuuuuuuuuuuuuuuuuuuuuuuuuuuuuuuuuuuuuuuuuuuuuuuuuuuuuuuuuuuuuuuuuuuuuuuuuuuuuuuuuuuuuuuuuuuuuuuuuuuuuuuuuuuuuuuuuuuuuuuuuuuuuuuuuuuuUU
nnaananaananaananaananaananaananaananaananaananaananaananaananaananaananaananaananaananaananaananaananaananaananaananaananaananaananaananaananaananaananaananaananaananaananaananaananaananaananaananaananaananaananaananaananaananaananaananaananaananaananaanaraannaa
aunnnnnaanannnnnnae annnnnne aannnnnnnnnnnnnnnnnnnnnnnnnnnnnnnnnnnnnnnnnnnnnnnnnnnnnnnnnnnnnnnnnnnnnnnnnnnnnnnnnnnnnnnnnnnnnnnnnnnnnn
104
y
uauuaaunauauauauauauauauauauauauauauauauauauauauauauauauauuuuuuuuuuuuuuuuuuuuuuuuuuuuuuuuuuuuuuuuuuuuuuuuuuuuuuuuuuuuuuuuuuuuuuuuuuuuuuuuuuuuuuuuuuuuuuuuuuuuuuuuuuuuuuuuuuuuuuuuuuuuuuuuuuuuuuuuuuuuuuuuuuuuuuuuuuuuuuuuuuuuuuuuuuuuuuuuuuuuuUU
aunnnnnaanannnnnnnnnnnnnne aenrnrnnnne
yauuunueunueunueunueunueunueunueunueunueunueunueunueunueunueunueunueunueunueunueunueunueun
yaaayaaeyaaayaaayaaayaa
aunnnnne
y
y
wwwnnnnnaeennnnnnaaannnnnnnnnnnnnnnnnnnnnnnnnnnnnnnnnnnnnnnnnnnnnnnnnnnnnnnnnnnnnnnnnnnnnnnnnnnnnnnnnnnnnnnnnnnnnnnnnnnnnnnnnnnnnnnnnnnn
1
Tnunu Tnuwnanauanuwnuunauan uuaaunnnnnaeannnnnne annn
15.3 150 (6 #)
y
Wireless Technology Research
vili liangxian xueyuanlian
- 15.3 uun (6 #)
- iwwwnatnssalnaaunrnnnrnnsrnnrnnrnnnnae nannnnae nnne nnnnne nnnnne nnnnne nnnnne nnnnne
Wu wu wu wu wu wu wu wu wu wu wu wu wu wu wu wu wu wu wu wu wu wu wu wu wu wu wu wu wu wu wu wu wu wu wu wu wu wu wu wu wu wu wu
ywnnnn
aannnnnnaananaananaananaananaananaananaananaananaananaananaananaananaananaananaananaananaananaananaananaananaananaananaananaananaananaananaananaananaananaananaananaananaananaananaananaananaananaananaananaananaananaananaananaananaananaananaananaananaananaananaanaraannnnaaa
155
aannnnnnaan anananaananaananaananaananaananaananaananaananaananaananaananaananaananaananaananaananaananaananaananaananaananaananaananaananaananaananaananaananaananaananaananaananaananaananaananaananaananaananaananaananaananaananaananaananaananaananaananaananaananaan ana aannnnaaannnnaaannnnaaannnnaaannnnaaannnnaaannnnaaannnnaaannnnaaannnnaaannnnaaannnnaaannnnaaannnnaaannnnaaannnnaaannnnaaannnnaaannnnaaannnnaaannnnaaannnnaaannnnaaannnnaaannnnaaannnnaaa
uuaaunnauuuuauu uauuauuuuuuuuuuuuuuuuuuuuuuuuuuuuuuuuuuuuuuuuuuuuuuuuuuuuuuuuuuuuuuuuuuuuuuuuuuuuuuuuuuuuuuuuuuuuuuuuuuuuuuuuuuuuuuuuuuuuuuuuuuuuuuuuuuuuuuuuuuuuuuuuuuuuuuuuuuuuuuuuuuuuuuuuuuuuuuuuuuuuuuuuuUU
nnaaunnnnnaanrnnnnae anananaananaananaananaananaananaananaananaananaananaananaananaananaananaananaananaananaananaananaananaananaananaananaananaananaananaananaananaananaananaananaananaananaananaananaananaananaananaananaananaananaananaananaananaananaananaananaananaananaananaan anaannnna
aannnnnnaananaananaananaananaananaananaananaananaananaananaananaananaananaananaananaananaananaananaananaananaananaananaananaananaananaananaananaananaananaananaananaananaananaananaananaananaananaananaananaananaananaananaananaananaananaananaananaananaananaananaanara aaa
InnnuuunnuuunnuuunnuuuuuuuuuuuuuuuuuuuuuuuuuuuuuuuuuuuuuuuuuuuuuuuuuuuuuuuuuuuuuuuuuuuuuuuuuuuuuuuuuuuuuuuuuuuuuuuuuuuuuuuuuuuuuuuuuuuuuuuuuuuuuuuuuuuuuuuuuuuuuuuuuuuuuuuuuuuuuuuuuuuuuuuuuuuuuuuuuuuuuuuuuuuuuuuuuuuuuuuuuUU
nnsanlau
ENERGY STAR uauuuaunu ENERGY STAR aauuuuunu uuuuuuuuuuuuu
waiyauunrnnnnaaunananaananaananaananaananaananaananaananaananaananaananaananaananaananaananaananaananaananaananaananaananaananaananaananaananaananaananaananaananaananaananaananaananaananaananaananaananaananaananaananaananaananaananaananaananaananaananaananaananaananaanaraannaa
nnaaannnnnnaaagaaananaananaananaananaananaananaananaananaananaananaananaananaananaananaananaananaananaananaananaananaananaananaananaananaananaananaananaananaananaananaananaananaananaananaananaananaananaananaananaananaananaananaananaananaananaananaananaananaananaananaanara
- jaiyunruiuuaaueuaueuaueua
nnuuunnuuunnuuunnuuuuuuuuuuuuuuuuuuuuuuuuuuuuuuuuuuuuuuuuuuuuuuuuuuuuuuuuuuuuuuuuuuuuuuuuuuuuuuuuuuuuuuuuuuuuuuuuuuuuuuuuuuuuuuuuuuuuuuuuuuuuuuuuuuuuuuuuuuuuuuuuuuuuuuuuuuuuuuuuuuuuuuuuuuuuuuuuuuuuuuuuuuuuuuuuuuuuuuuuuUU
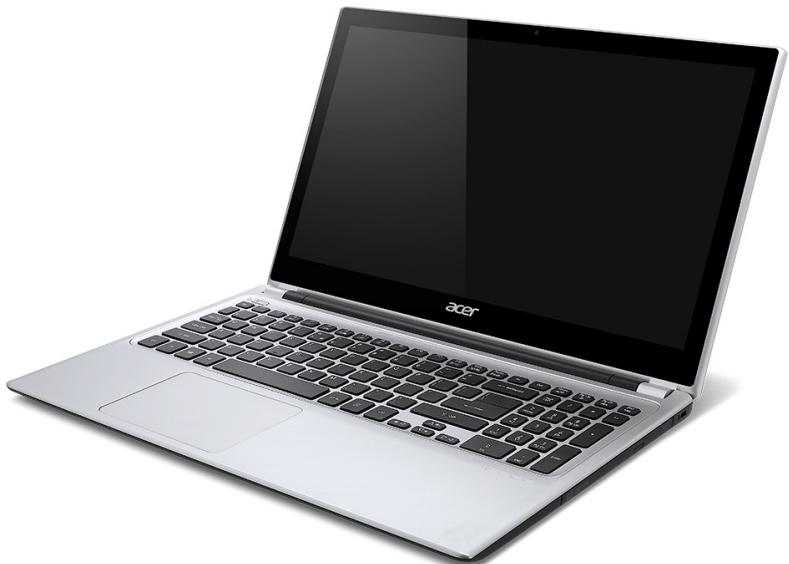
Aspire V5
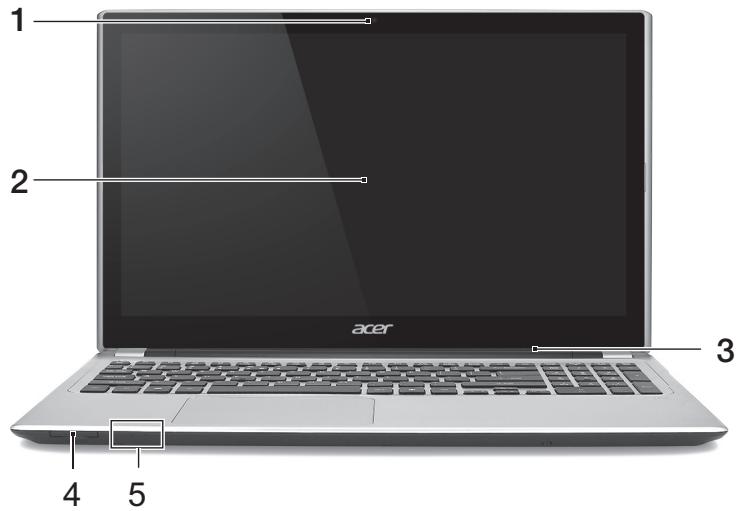
| # | jiangsu | jiangsu | jiangsu |
| 1 | jiangsu | jiangsu | jiangsu |
| 2 | jiangsu | jiangsu | jiangsu |
| 3 | jiangsu | jiangsu | jiangsu |
| # | ### | ### | ### |
| 4 | ### | ### | Secure Digital (SD
SDHC) ### MultiMediaCard(MMC) ###: ### |
| 5 |

| # | laanau | laanau | laanau |
| 1 | laonwaaawwnau | laonwaaawwnau | laonwaaawwnau CD DVD |
| 2 | lwwuauwunrataaauw lauauauauauau | lauauauwunrataaauw | lauauauauauauauauau |
| 3 | lauauauauauauauauauau | lauauauauauauauauauau | lauauauauauauauauau |
| 4 | lauauauauauauauauau | lauauauauauauauauau | lauauauauauauauau |
| 5 | K | K | K |
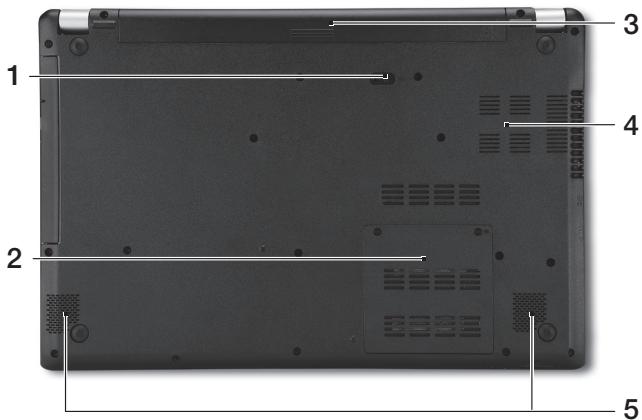
| # | jiangau | jiangsu | jiangtu |
| 1 | |||
| 2 | |||
| 3 | |||
| 4 | |||
| 5 |
n5vnuuua
WuTuWuuuuaaunauauauauauauauauauauauauauauauauauauauauauauauauauauauauauauauauauauauauauauauauauauauauauauauauauauau
山
Welcome to Acer Backup Manager
Select one action below to start managing your data.
Back Up My Files
Pick and choose which files to back up or let the program find it all for you.
Image My Drive
Make a complete image backup of your drive.
Migrate My Files
Transfer your files from another computer to this computer.
Clear out / Restore Files
Remove seldom used files to free up space or restore files from your backup.

Launch My Backup Profiles
Back Up My Files
The file backup helps you create a complete backup of your documentation. Choose the file or folder for the backup and then select the destination for the backup. Once you have selected the destination, the final step is to schedule the backup. Click on the Backup My Files button to create a backup.

Directly enter "My Backup Profiles" next time

Acer Backup Manager 5 Windows 8 "Backup Manager" wulu wunwau wau wau Acer Backup Manager
- トマリウマガウス:は州川水神国の国の
- wawu: wauwauwauwauwauwauwauwauwauwauwauwauwauwauwauwauwauwauwauwauwauwauwauwauwauwauwauwauwauwauwauwauwauwauwauwauwauwauwauwauwauwauwauwauwauwauwauwauwauwauwauwu
- wua: aunuunnuunnuunauanwauuauu USB wuaunuunnuunwauuunauuuauuuuuuuuuuuuuuuuuuuuuuuuuuuuuuuuuuuuuuuuuuuuuuuuuuuuuuuuuuuuuuuuuuuuuuuuuuuuuuuuuuuuuuuuuuuuuuuuuuuuuuuuuuuuuuuuuuuuuuuuuuuuuuuuuuuuuuuuuuuuuuuuuuuuuuuuuuuuuuuuuuuuuuuuuuuuuuuuuuuuuuuuuuuuuuuuuuuuuuuuuUU
- /nuiu: nuwunnuu wuwuwuwuwuwuwuwuwuwuwuwuwuwuwuwuwuwuwuwuwuwuwuwuwuwuwuwuwuwuwuwuwuwuwuwuwuwuwuwuwuwuwuwuwuwuwuwuwuwuwuwuwuwuwuwuwuwuwuwuwuwuwuwuwuwuwuwuwuwuwuwuwuwuwuwuwuwuwuwuwuwuwuwuwuwuwuwwuww
y
- 1
- 1
- 3.3.3.3.3.3.3.3.3.3.3.3.3.3.3.3.3.3.3.3.3.3.3.3.3.3.3.3.3.3.3.3.3.3.3.3.3.3.3.3.3.3.3.3.3.3.3.3.3.3.3
y
*wunu: qunravulan nwnnuanu naD: yauu Acer Backup Manager uunununurayauu uunu
nnaananaananaananaananaananaananaananaanana
wnnnnwwwAcer Backup Manager
wauuunauanunuaaauauauAcer Backup Manager uannn
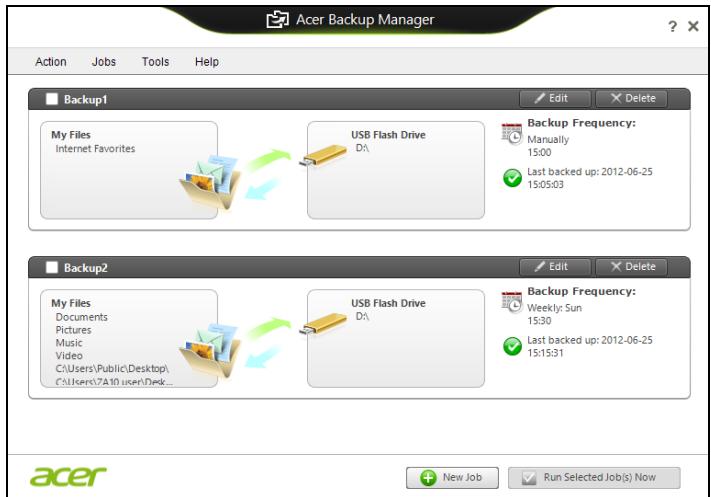
aannnnnnaanennnnnnnnnnnnnnnnnnnnnnnnnnnnnnnnnnnnnnnnnnnnnnnnnnnnnnnnnnnnnnnnnnnnnnnnnnnnnnnnnnnnnnnnnnnnnnnnnnnn
n751 5 u n
wnnunnnnnnnnnnnnnnnnnnnnnnnnnnnnnnnnnnnnnnnnnnnnnnnnnnnnnnnnnnnnnnnnnnnnnnnnnnnnnnnnnnnnnnnnnnnnnnnnnnnnnnnnnnnnnnnnnnnnnnnnnnnnnnnnnnnnnnnnnnnnnnn
yannnnae 1
Acer Recovery Management
77777777777777777777777777777777777777
uuaWauanannnunauuauauauauau Windows
vuaa
Acer Recovery Management
wnnnn nn nnnnnnnnnnnnnnnnnnnnnnnnnnnnnnnnnnnnnnnnnnnnnnnnnnnnnnnnnnnnnnnnnnnnnnnnnnnnnnnnnnnnnnnnnnnnnnnnn
NTTNTNNTNNTNNTNNTNNTNNTNNTNNTNNTNNTNNTNNTNNTNNTNNTNNTNNTNNTNNTNNTNNTNNTNNTNNTNNTNNTNNTNNTNNTNNTNNTNNTNNTNNTNNTNNTNNTNNTNNTNNTNNTNNTNNTNNTNNTNNTNNTNNTNNTNNT
n75v7v75v75v75v75u75u75u75u
Acer Recovery Management
?X
Welcome to Acer Recovery Management
Acer Recovery Management enables you to restore your system. To begin, select the task you want to perform. Please DO NOT remove the USB device while proceeding.

Reinstall Drivers or Applications
Reinstalls factory default drivers or applications.

Customized Restore (Retain User Data)

Reinstall Drivers or Applications
Make a back-up before you restore (Recommended).

Create Factory Default Backup
Create Drivers and Applications Backup
acer
2. nCreate Factory Default Backup wRecovery Drive

oprtaoaunuunuaunuunnauon Copy contents from the recovery partition to the recovery drive u
nunununununununun
3. 1542 W USB 1000 Next
- 45000000000000000000000000000000000000000000000000000000000000000000000000000000000
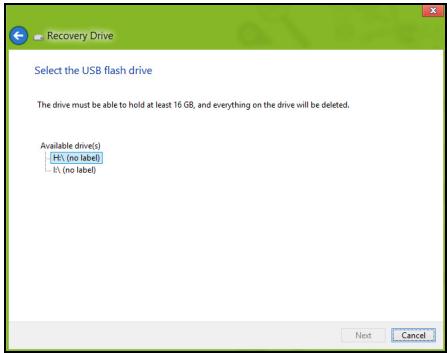
- 4
- vii.
- nnuuunnuuunnuuunnuuunnuu unuuunnuuunnuuunnuuunnuu unnuuunnuuunnuuunnuu unnuuuuuuuuuuuuuuuuuuuuuuuuuuuuuuuuuuuuuuuuuuuuuuuuuuuuuuuuuuuuuuuuuuuuuuuuuuuuuuuuuuuuuuuuuuuuuuuuuuuuuuuuuuuuuuuuuuuuuuuuuuuuuuuuuuuuuuuuuuuuuuuuuuuuuuuuuuuuuuuuuuuuuuuuuuuuuuuuuuuuuuuuuuuuuuuuuuuuuuuUU
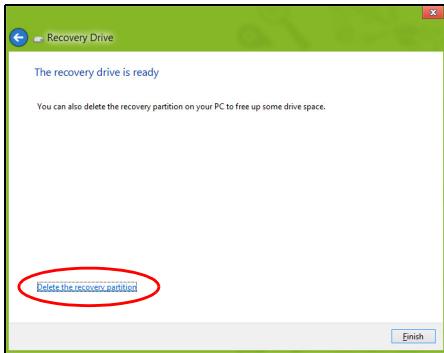
- nanaW USB uanuunnnnne
vyny: uunnwnuian
uauuuaa aauauauauauauauauuuu uuu 'Windows Recovery Backup'
aannnnnnaanennnnnnaananaan an
wnuuauuauuauuuuauuuuuuuuuuuuuuuuuuuuuuuuuuuuuuuuuuuuuuuuuuuuuuuuuuuuuuuuuuuuuuuuuuuuuuuuuuuuuuuuuuuuuuuuuuuuuuuuuuuuuuuuuuuuuuuuuuuuuuuuuuuuuuuuuuuuuuuuuuuuuuuuuuuuuuuuuuuuuuuuuuuuuuuuuuuuuuuUUUUUUUUUUUUUUUUUUUUUUUUUUUUUUUUUUUUUUUUUUUUUUUUUUUUUUUUUUUUUUUUUUUUUUUUUUUUUUUUUUUUUUUUUUUUUUUUUUUUUUUUUUUUUUUUUUUUUUUUUUUUUUUUUUUUUUUUUUUUUUUUUUUUUUUUUUUUUUUUUUUUUUUUUUUUUUUUUUUUUUUUUUUUUUUUUUUUUUUU
1. an Start 'Recovery' acer Recovery Management

Acer Recovery Management
?X
Welcome to Acer Recovery Management
Acer Recovery Management enables you to restore your system. To begin, select the task you want to perform. Please DO NOT remove the USB device while proceeding.

Reinstall Drivers or Applications
Reinstalls factory default drivers or applications.

Customized Restore (Retain User Data)

Reinstall Drivers or Applications

Make a back-up before you restore (Recommended).

Create Factory Default Backup
Create Drivers and Applications Backup
acer
2. nCreate Drivers and Applications Backup
USB wuaunuulululw DVD uonn Next
dvann: uunnnnnuuunnuu
uuuuvuaauuauuauuauuuuuuuuuuuuuuuuuuuuuuuuuuuuuuuuuuuuuuuuuuuuuuuuuuuuuuuuuuuuuuuuuuuuuuuuuuuuuuuuuuuuuuuuuuuuuuuuuuuuuuuuuuuuuuuuuuuuuuuuuuuuuuuuuuuuuuuuuuuuuuuuuuuuuuuuuuuuuuuuuuuuuuuuuuuuuuuuuuuuuuuuuuuuuuuuuuuuuuuuuUU
755yunnaunzuyuau
:
- vntnnaaennnnn
WnHuaWuTuWuTaWuTuWuTuWuTuWuTuWuTuWuTuWuTu
aunnnnnaeannnnnneennnnnnnnnnnnnnnnnnnnnnnnnnnnnnnnnnnnnnnnnnnnnnnnnnnnnnnnnnnnnnnnnnnnnnnnnnnnnn
()
"ntnnae nnnnnaaennnnaaannnnaaennnnn" 47
aunnnnunnnnnnnnnnnnnnnnnnnnnnnnnnnnnnnnnnnnnnnnnnnnnnnnnnnnnnnnnnnnnnnnnnnnnnnnnnnnnnnnnnnnnnn
nanaanrnnnnaaennnnnnae nnnnne nnnnne nnnnne
uuaanrnuayauyauyauyauyauyauy
wannnnaananaananaananaananaananaananaananaananaananaananaananaananaananaananaananaananaananaananaananaananaananaananaananaananaananaananaananaananaananaananaananaananaananaananaananaananaananaananaananaananaananaananaananaananaananaananaananaananaananaananaanaraa
-
Acer Recovery Management
?X
Welcome to Acer Recovery Management
Acer Recovery Management enables you to restore your system. To begin, select the task you want to perform. Please DO NOT remove the USB device while proceeding.

Reinstall Drivers or Applications
Reinstalls factory default drivers or applications.

Customized Restore (Retain User Data)

Reinstall Drivers or Applications

Make a backup before you restore (Recommended).

Create Factory Default Backup
Create Drivers and Applications Backup
acer
·n
- Contents 《 Acer Resource Center

- nannnnaa aannnnnnae annnnnnae ananennnne nnnee
1. 1
auiuulwuaiauaiaiunwau USB
- wunuudnu DVD lusraAcer Resource Center
- wwn Acer Resource Center http://www.aurora.com/ www.aurora.com
- wwnnauu uauw USB nauu Windows +
- uauu uauu uauu uauu w uauu uauu uauu ResourceCenter
2. Content Resource Center

Acer Recovery Management:
- Start 'Recovery' Acer Recovery Management
RustroanRestoFactory Settings (R) Customized Restore (
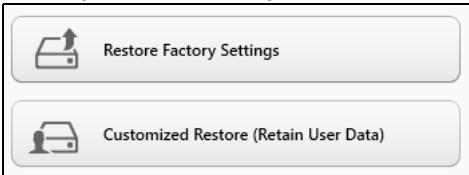
Acer Recovery Management
1. n Restore Factory Settings.

Acer Recovery Management
?X
Welcome to Acer Recovery Management
Acer Recovery Management enables you to restore your system. To begin, select the task you want to perform. Please DO NOT remove the USB device while proceeding.

Reinstall Drivers or Applications
Reinstalls factory default drivers or applications.

Customized Restore (Retain User Data)

Reinstall Drivers or Applications

Make a backup before you restore (Recommended).

Create Factory Default Backup
Create Drivers and Applications Backup

Za: 'Restore Factory Settings'
- wannanwunwunwunwunwunwunwunwunwunwun
(wnnnnnaaannnnnnnnnnnnn) aannnnnnnnnnnnnnnnnnn nWindows 7 Windows 8 nnnean Windows 7
wnwnnnnnaaannnnnnnnnnnnnnnnnnnnnnnnnnnnnnnnnnnnnnnnnnnnnnnnnnnnnnnnnnnnnnnnnnnnnnnnnnnnnnnnnnnnnnnnnnnnnnnnnnnnnnnnnnnnnnnnnnnnnnnnnnnnnnnnnnnnnnnnnnnnnnnnnn
wnu: Wauwauwauwauwauwauwau wau Windows 8
nuuauuuuauuauuauu Windows 7 uuuuBIOS (na
uauuuuuuuuuuuuuuuuuuuuuuuuuuuuuuuuuuuuuuuuuuuuuuuuuuuuuuuuuuuuuuuuuuuuuuuuuuuuuuuuuuuuuuuuuuuuuuuuuuuuuuuuuuuuuuuuuuuuuuuuuuuuuuuuuuuuuuuuuuuuuuuuuuuuuuuuuuuuuuuuuuuuuuuuuuuuuuuuuuuuuuuuuuuUU
- wuanyidaiwadayauan zuilou
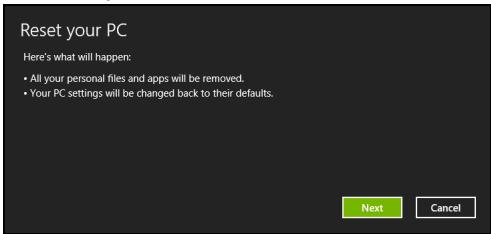
Jnwnwnnnnnaaovnnn
- Next Next
a. Just remove my files
b. Fully clean the drive
wauuuaaunuauuuuauuauuuuuuuuuuuuuuuuuuuuuuuuuuuuuuuuuuuuuuuuuuuuuuuuuuuuuuuuuuuuuuuuuuuuuuuuuuuuuuuuuuuuuuuuuuuuuuuuuuuuuuuuuuuuuuuuuuuuuuuuuuuuuuuuuuuuuuuuuuuuuuuuuuuuuuuuuuuuuuuuuuuuuuuuuuuuuuuuuuuuuuuuuuuuuuuuuUU
Acer Recovery Management
- n an 5yunauuuiuuiuueovn (yuyayay)

Acer Recovery Management
?X
Welcome to Acer Recovery Management
Acer Recovery Management enables you to restore your system. To begin, select the task you want to perform. Please DO NOT remove the USB device while proceeding.

Customized Restore (Retain User Data)

Reinstall Drivers or Applications
Make a backup before you restore (Recommended).

Create Factory Default Backup
Create Drivers and Applications Backup
Reinstall Drivers or Applications
Reinstalls factory default drivers or applications.


- wuanyiwuywuywuywuy
Refresh your PC
Here's what will happen:
- Your files and personalization settings won't change.
- Your PC settings will be changed back to their defaults.
- Apps from Windows Store will be kept.
- Apps you installed from discs or websites will be removed.
- A list of removed apps will be saved on your desktop.
Next
Cancel
- Next Refresh
a. Advanced Advanced System Restore Wawu wu Microsoft System Restore: Microsoft System Restore awwwnr 'auy'
nnae rnuwauwauwauwauwauwauwauwauwauwauwauwauwauwauwauwauwauwauwauwauwauwauwauwauwauwauwauwauwauwauwauwauwauwauwauwauwauwauwauwauwauwauwauwauwauwauwauwauwauwauwuu
b. nnnn nn nnnn nn nnnn nn nnnn nn nnnn:
nnnnnnnnnnnnnnnnnnnnnnnnnnnnnnnnnnnnnnnnnnnnnnnnnnnnnnnnnnnnnnnnnnnnnnnnnnnnnnnnnnnnnnnnnnnnnnnnnnnnnnnnnnnnnnnnnnnnnnnnnnnnnnnnnnnnnnnnnnnnnnnnnnnnnnnnnn nn nannn nn nannn nn nannn nn nannn nn nannn nn nannn nn nannn nn nannn nn nannn nn nannn nn nannn nn nannn nn nannn nn nannn nn nannn nn nannn nn nannn nn nannn nn nannn nn nannn nn nannn nn nannn nn nannn nn nannn nn nannn nn nennn nn nannn nn nannn nn nannn nn nannn nn nannn nn nannn nn nannn nn nannn nn nannn nn nannn nn nannn nn nannn nn nannn nn nannn nn nannn nn nannn nn nannn nn nannn nn nannn nn nannn nn nannn nn nannn nn nannn nn nannn nn n ann
- Next
- 1
- ianwunrnnnnaaannnnae
a. w7nauuuaaww7yduunrwnrnnrnu山
b. Fully clean the drive
Here's what will happen:
- Your files and personalization settings won't change.
- Your PC settings will be changed back to their defaults.
- Apps from Windows Store will be kept.
- Apps you installed from discs or websites will be removed.
- A list of removed apps will be saved on your desktop.
Next
Cancel
- Next
- 1
- nann Refresh
- nnuununununununununununununununununununununununun unu uuuu uuuuuuuuuuuuuuuuuuuuuuuuuuuuuuuuuuuuuuuuuuuuuuuuuuuuuuuuuuuuuuuuuuuuuuuuuuuuuuuuuuuuuuuuuuuuuuuuuuuuuuuuuuuuuuuuuuuuuuuuuuuuuuuuuuuuuuuuuuuuuuuuuuuuuuuuuuuuuuuuuuuuuuuuuuuUU
Acer clear-fi
HJ111: 1w7v7v7u7u
Acer clear.fi nauw waww uunu Acer clear.fi
WuTuWu: aunnuwuuwauwauwauwauwauwauwauwauwauwauwauwauwauwauwauwauwauwauwauwauwauwauwauwauwauwauwauwauwauwauwauwauwauwauwauwauwauwauwauwauwauwauwauwauwauwauwauwauwauwauw
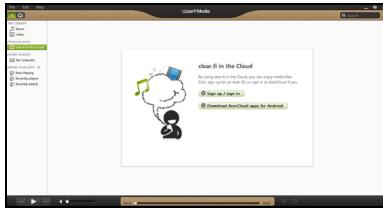

y: wauuauwauu clear.fi uunouwn Windows Firewall ayananaaynaaayn clear.fi uunauauuauuau
n75anunnnnaaann
aunauuun uauuuauuauuauuuuuuuuuuuuuuuuuuuuuuuuuuuuuuuuuuuuuuuuuuuuuuuuuuuuuuuuuuuuuuuuuuuuuuuuuuuuuuuuuuuuuuuuuuuuuuuuuuuuuuuuuuuuuuuuuuuuuuuuuuuuuuuuuuuuuuuuuuuuuuuuuuuuuuuuuuuuuuuuuuuuuuuuuuuuuuuuuuuuuuuuuUU
nwnnnnnae nwnnnnnae nnne nnnnne nnnnne nnnnne nnnnne nnnnne nnnnne nnnnne nnnnne nnnnne nnnnne nnnnne nnnnne nnnnne nnnnne nnnnne nnnnne nnnnne nnnnne nnnnne nnnnne nnnnne nnnnne nnnnne nnnnne nnnnne nnnnee
aunwauanuuaananaananaananaananaananaananaananaananaananaananaananaananaananaananaananaananaananaananaananaananaananaananaananaananaananaananaananaananaananaananaananaananaananaananaananaananaananaananaananaananaananaananaananaananaananaananaananaananaananaananaan
a
山
- 7500000000000000
AC
Aa: naananaananaananaananaananaananaananaananaananaananaananaananaananaananaananaananaananaananaananaananaananaananaananaananaananaananaananaananaananaananaananaananaananaananaananaananaananaananaananaananaananaananaananaananaananaananaananaananaananaananaanara
:
- 77uuaaiaaaaauuuuauuauuuauauauauau
- 7uuaaiaaa uauuauauuuuauauauauuuuuuuuuuuuuuuuuuuuuuuuuuuuuuuuuuuuuuuuuuuuuuuuuuuuuuuuuuuuuuuuuuuuuuuuuuuuuuuuuuuuuuuuuuuuuuuuuuuuuuuuuuuuuuuuuuuuuuuuuuuuuuuuuuuuuuuuuuuuuuuuuuuuuuuuuuuuuuuuuuuuuuuuuuuUU
:
- 1
- 女女的美
nunnuuunauwuaa a
uunnnnnaaannnnnnae nnnnnnnnnnnnnnnnnnnnnnnnnnnnnnnnnnnnnnnnnnnnnnnnnnnnnnnnnnnnnnnnnnnnnnnnnnnnnnnnnnnnnnnnnnnnnnnnnnn
unannnnaaannnnnna
yuaan:
- wuiinwaiyuaoywn
- wiaanaanwlaawaa
- 1
- 1777777777
- nanaananaananaacnAC
- nanaanana, aunnnaa, nanaanana, naananaananaan,
- naorssnKensington
山
nauuunnuuunuuuunuunuunuunu uuuu uuuuuuuuuuuuuuuuuuuuuuuuuuuuuuuuuuuuuuuuuuuuuuuuuuuuuuuuuuuuuuuuuuuuuuuuuuuuuuuuuuuuuuuuuuuuuuuuuuuuuuuuuuuuuuuuuuuuuuuuuuuuuuuuuuuuuuuuuuuuuuuuuuuuuuuuuuuuuuuuuuuuuuuuuuuuuuuuuuuuuuuuuuuuuuuuuuuuuuuuuUU
aannnnnnaananaananaananaananaananaananaananaananaananaananaananaananaananaananaananaananaananaananaananaananaananaananaananaananaananaananaananaananaananaananaananaananaananaananaananaananaananaananaananaananaananaananaananaananaananaananaananaananaananaananaanara
HJILHJ:
H 1000000000000000000000000000000000000000
aannnnnnae
wnnnnnsyauanrueaunrreannne
aannnnnnae annnnnne nnnnnnne aee
wnnnnnsnnnnnnnnnnnnnnnnnnnnnnnnnnnnnnnnnnnnnnnnnnnnnnnnnnnnnnnnnnnnnnnnnnnnnnnnnnnnnnnnnnnnnnnnnnnnnn
AC
1
wnnnaaunnnnnnnnn
nanaananaananaananaananaananaananaananaananaananaananaananaananaananaananaananaananaananaananaananaananaananaananaananaananaananaananaananaananaananaananaananaananaananaananaananaananaananaananaananaananaananaananaananaananaananaananaananaananaananaanana an
nnaaannnnnnae
nnaaannnnnnaananaananaananaananaananaananaananaananaananaananaananaananaananaananaananaananaananaananaananaananaananaananaananaananaananaananaananaananaananaananaananaananaananaananaananaananaananaananaananaananaananaananaananaananaananaananaananaananaananaananaanaraannnna
n752a7a7a7a7a7a7a7
nauu uauu uauu uauu uauu uauu uauu uauu Kensington
nlaiaaueeauananaananaananaananaananaananaaay:
- 5749777777777777777777777777777777777777777777777777777777777777777777777777777777777777777777777777
aunnnnna Hibernation (n) wannnnnaa
- 陳藥: 1
nlaan
y
- 1234567890123456789012345678901234567890123456789012345678901234567890123456789012345678901234567890123456789
Wuwwawwunwunwunwunwunwunwunwunwunwunwunwunwunwunwunwunwunwunwunwunwunwunwunwunwunwunwunwunwunwunwunwunwunwunwunwunwunwunwunwunwunwunwunw - 1
- WwWvWnWuWuWuWuWuWuWuWuWuWuWuWuWuWuWuWuWuWuWuWuWuWuWuWuWuWuWuWuWuWuWuWuWuWuWuWuWuWuWuWuWuWuWuWuWuWuWuWuWuWuWwUwUwUwUwUwUwUwUwUwUwUwUwUwUwUwUwUwUwUwUwUwUwUwUwUwUwUwUwUwUwUwUwUwUwUwUwUwUwUwUwUwUwUwUwUwUwUwUwUwUw
aavnay: nannanunrnnrnnnwnwauuauu uunnnnnae nnnuuue aennnne ne annnne eae
#
n5uunuaunnaun
1
Windows 2017-2018 Windows 2017-2018
Internet Explorer uauuunuaaunu
Tnaynnnnaananaaannnnaaunn nnnnnnnnnnnnnnnnnnnnnnnnnnnnnnnnnnnnnnnnnnnnnnnnnnnnnnnnnnnnnnnnnnnnnnnnnnnnnnnnnnnnnnnnnnnnnnnnnnnnnnnnnnnnnnnnnnn
#
LAN 577777WLAN 900000000000000000000000000000
17Vuaaunuauauauauauauauauuuuuuuuu
n75vwn75aunBluetooth
Bluetooth
n
aunlntnunwauauauuauauauauauauauauauauuuuuuuuuuuuu
wannnuuauauuauuauuauuauuuuauuuuuuuuuuuuuuuuuuuuuuuuuuuuuuuuuuuuuuuuuuuuuuuuuuuuuuuuuuuuuuuuuuuuuuuuuuuuuuuuuuuuuuuuuuuuuuuuuuuuuuuuuuuuuuuuuuuuuuuuuuuuuuuuuuuuuuuuuuuuuuuuuuuuuuuuuuuuuuuuuuuuuuuuuuuuuuuuuuuuuuuuuuuuuuuuuuuuuuuuuUU
- n 7/Windows +
uW Wireless - uanaunuaan nn
- nwnwanaanennnbluetooth waiia/lanrnnnu
nsswnsbluetooth
uunnnnne nnnnnae nnne ne nnnnne "nne" nnne nnne nne Bluetooth
yuaanwWnwnnnnna
aunrnnnnaeauuueauuueauuuuunrnnnneauu uuuuauuuuuuuuuuuuuuuuuuuuuuuuuuuuuuuuuuuuuuuuuuuuuuuuuuuuuuuuuuuuuuuuuuuuuuuuuuuuuuuuuuuuuuuuuuuuuuuuuuuuuuuuuuuuuuuuuuuuuuuuuuuuuuuuuuuuuuuuuuuuuuuuuuuuuuuuuuuuuuuuuuuuuuuuuuuuuuuuuuuuuuuuuuuuuuuuuuuuuuuuuUU

uanaananaananaananaananaananaananaananaananaananaananaananaananaananaananaananaananaananaananaananaananaananaananaananaananaananaananaananaananaananaananaananaananaananaananaananaananaananaananaananaananaananaananaananaananaananaananaananaananaananaanana anaaannnnaaannnnnnaaannnnnnaaannnnnnaaannnnnnaaannnnnnaaannnnnnaaannnnnnaaannnnnnaaannnnnnaaannnnnnaaannnnnnaaannnnnnaaannnnnnaaannnnnnaaannnnnnaaannnnnnaaannnnnnaaannnnnnaaannnnnnaaannnnnnaaann
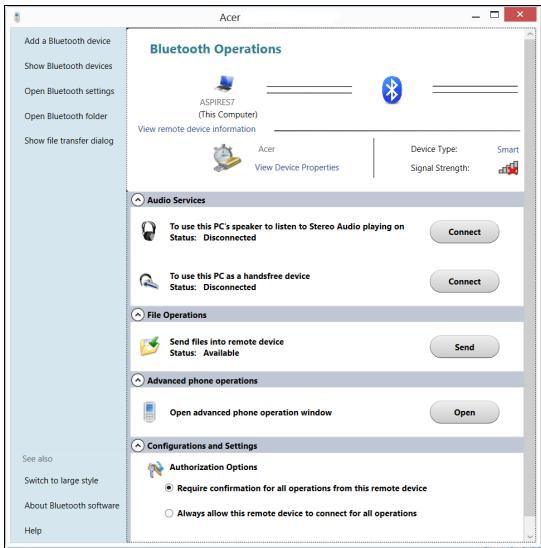
HDMI
HDMI (High-Definition Multimedia Interface)
anrssaunrnnn rannnnnnae annnnn,
HDMI
yannrnnnnaeannnnnnnnnnnnnnnnnnnnnnnnnnnnnnnnnnnnnnnnnnnnnnnnnnnnnnnnnnnnnnnnnnnnnnnnnnnnnnnnnnnnnnnnnnnnnnnnnn
Taaauuuaanannnnaaunnnnnaeunnnnnae, nanaeeau DVD
Security Security on boot:
nannnnaa
aannnnnnaanennnnnnnnnnnnnnnnnnnnnnnnnnnnnnnnnnnnnnnnnnnnnnnnnnnnnnnnnnnnnnnnnnnnnnnnnnnnnnnnnnnnnnnnnnnnnnnnnnnnnnnnnnnn
- leuay u Windows uauauauuauu (n) uunuunu unuunuunuunu uunuunuunuunuunuunuunu unuuuuuuuuuuuuuuuuuuuuuuuuuuuuuuuuuuuuuuuuuuuuuuuuuuuuuuuuuuuuuuuuuuuuuuuuuuuuuuuuuuuuuuuuuuuuuuuuuuuuuuuuuuuuuuuuuuuuuuuuuuuuuuuuuuuuuuuuuuuuuuuuuuuuuuuuuuuuuuuuuuuuuuuuuuuuuuuuuuuuuuuuuuuuuuuuuuuu uu
- 150000000000000000000000000000000000000000000000000000000
Wnwnwunwanaanwnnaaannwaaanwnnnnnaan
Juaan71007a7waaawaaan an 7uovvau
yaoan yanyun 100000000000000000000000000000
a a a a a a a a a a a a a a a a a a a a a a a a a a a a a a a a a a a a a
612007317217072
山
- 402191111111111111111111111111
- 452311111111111111111111111111111111111111111
752yuuny5y
n751/5sTu7uun7uovv15wn (ITW)
nWwWwWwWwWwWwWwWwWwWwWwWwWwWwWwWwWwWwWwWwWwWwWwWwWwWwWwWwWwWwWwWwWwWwWwWwWwWwWwWwWwWwWwWwWwWwWwWwWwWwW
nnaaannnnnnaananaananaananaananaananaananaananaananaananaananaananaananaananaananaananaananaananaananaananaananaananaananaananaananaananaananaananaananaananaananaananaananaananaananaananaananaananaananaananaananaananaananaananaananaananaananaananaananaananaananaanaraannnna
(w)
nanaananaananaananaananaananaananaananaananaananaananaananaananaananaananaananaananaananaananaananaananaananaananaananaananaananaananaananaananaananaananaananaananaananaananaananaananaananaananaananaananaananaananaananaananaananaananaananaananaananaanana an Control Panel > Adjust screenresolution
uavntWindowsuuuunauu- 1aennnnaaannnnnnaa
yauuuaanuunuauu uauuuuauuuuuuuuuuuuuuuuuuuuuuuuuuuuuuuuuuuuuuuuuuuuuuuuuuuuuuuuuuuuuuuuuuuuuuuuuuuuuuuuuuuuuuuuuuuuuuuuuuuuuuuuuuuuuuuuuuuuuuuuuuuuuuuuuuuuuuuuuuuuuuuuuuuuuuuuuuuuuuuuuuuuuuuuuuuuuuuuuuuuuuuuuuuUU
wnnnaan nuaawwwuauw uuuuawwwuWindowsStore 7uWindows uuaawwauuueu Desktop
uwwalaiauaaig 2aauaagjnu?
nnaaannnnnnaanennnnnnnnnnnnnnnnnnnnnnnnnnnnnnnnnnnnnnnnnnnnnnnnnnnnnnnnnnnnnnnnnnnnnnnnnnnnnnnnnnnnnnnnnnnnnnnnnnnnnnnnnnnnnnnnnnnnnnnnnnnnnnnnnnnnnnnnnnnnnnnnnnnnnnnnnnnnnnnnnnnn
Juaeviluuaawwauu17naguyu Start 1aiv?
Windows 8 uauaayuulauuauuauuauuauuauuauuauuauuauuauuauuuuauuuuauuuuuuuuuuuuuuuuuuuuuuuuuuuuuuuuuuuuuuuuuuuuuuuuuuuuuuuuuuuuuuuuuuuuuuuuuuuuuuuuuuuuuuuuuuuuuuuuuuuuuuuuuuuuuuuuuuuuuuuuuuuuuuuuuuuuuuuuuuuuuuuuuuuuuuuuuuuuuuuuuuuuuuuuuuuuuuuuuuuuuuuuuuuUU
Change PC settings > Users > Switch to a Microsoft account
Anewwwnnntnnnnaeau Internet Explorer 1
Internet Explorer 10
uauauauauauuuuuuuuuuuu uStartu
y
iunnnnnaaannnnnnaanennnnaanennnnaanennnnaanennnnaan
Pin to Start
Windows
aayaaayaaayaaayaaayaaayaaayaaayaaayaaayaaayaaayaaayaaayaaayaaayaaayaaayaaayaaayaaayaaayaaayaaayaaayaaayaaayaaayaaayaaayaaayaaayaaayaaayaaayaaayaaayaaayaaayaa
Windows 8: www.acer.com/windows8-tutorial
- FAQ nāyān yān: www.acer.com/support
nunuun
n Federal Communications Commission
nununununununun
Dunrnnnne nn Class B 11111111111111111111111111111111111111111111
uuaaanaaauuuaueaaauauuuuua

ME61
wauuuaaunuauuuuauuuuuuuuuuuuuuuuuuuuuuuuuuuuuuuuuuuuuuuuuuuuuuuuuuuuuuuuuuuuuuuuuuuuuuuuuuuuuuuuuuuuuuuuuuuuuuuuuuuuuuuuuuuuuuuuuuuuuuuuuuuuuuuuuuuuuuuuuuuuuuuuuuuuuuuuuuuuuuuuuuuuuuuuuuuuuuuuuuuuuuuuuuuuuuuuuuuuuuuuuUU
aannnnaanennnnnnnnnnnnnnnnnnnnnn
Acer aas
WuWuWuWuWuWuWuWuWuWuWuWuWuWuWuWuWuWuWuWuWuWuWuWuWuWuWuWuWuWuWuWuWuWuWuWuWuWuWuWuWuWuWuWuWuWuWuWuWuWuWw
aunna
2.412-2.462 GHz
vai 01 vii vai 11
yu
2.412-2.484 GHz
j01 j 14
ETSI
2.412-2.472 GHz
01 13
WJ: nssuunuunnunnnnnnnnnnn
- aayyannnnnnae 100 mW
- aayyannunanana 10 mW
wnnnnnae 2400-2483.5 MHz auynan EIRP nana 100 mW nana 10 mW nana:
| 01 Ain Orientales | 25 Doubs | 59 Nord | 71 Saone et Loire |
| 02 Aisne | 26 Drome | 60 Oise | 75 Paris |
| 03 Allier | 32 Gers | 61 Orne | 82 Tarn et Garonne |
| 05 Hautes Alpes | 36 Indre | 63 Puy Du Dome | 84 Vaucluse |
| 08 Ardennes | 37 Indre et Loire | 64 Pyrenees | 88 Vosges |
| 09 Ariege | 41 Loir et Cher | Atlantique | 89 Yonne |
| 11 Aude | 45 Loret | 66 Pyrenees | 90 Territoire de |
| 12 Aveyron | 50 Manche | 67 Bas Rhin | Belfort |
| 16 Charente | 55 Meuse | 68 Haut Rhin | 94 Val de Marne |
| 24 Dordogne | 58 Nievre | 70 Haute Saone |
yannnnnnaaannnnnnaaannnnnaanennnnnnnnnnnnnnnnnnnnnnnnnnnnnnnnnnnnnnnnnnnnnnnnnnnnnnnnnnnnnnnnnnnnnnnnnnnnnnnnnnnnnnnnnnnnnnnnnnnnnnnnnnnnnnnnnnnnnnnn
山藥藥藥藻藻藻藻藻藻藻藻藻藻藻藻藻藻藻藻藻藻藻藻藻藻藻藻藻藻藻藻藻藻藻藻藻藻藻藻藻藻藻藻藻藻藻藻藻藻藻藻藻藻藻藻藻藻藻藻藻藻藻藻藻藻藻藻藻藻藻藻藻
WU: WLAN 2000000000000000100 mW uuuuunn 10 mW
aunnnaanrnnnnae annnne nannnne aen
sunss
| ISO 3166 | ISO 3166 ISO 2 nana | ISO 3166 ISO 2 nana |
| AT | maaann | MT |
| BE | nuuuaunau | NT |
| CY | nuuuaan | PL |
| CZ | nuuuaun | PT |
| DK | nuuuaun | SK |
| EE | nuuuaun | SL |
| FI | auuu | ES |
| FR | nuuua | SE |
| DE | nuuuaunau | GB |
| GR | nuuuaun | IS |
| HU | nuuuaunau | LI |
| IE | nuuua | NO |
| IT | nuuuaunau | CH |
| LV | nuuuaun | BG |
| LT | nuuuaun | RO |
| LU | nuu | TR |
Nauw wae eauauauauauauauauauauauauauauauauauauauauauauauauauauauauauauauauauauauauauauauauauauauauauauauuuuuuuuuuuuuuuuuuuuuuuuuuuuuuuuuuuuuuuuuuuuuuuuuuuuuuuuuuuuuuuuuuuuuuuuuuuuuuuuuuuuuuuuuuuuuuuuuuuuuuuuuuuuuuuuuuuuuuuuuuuuuuuuuuuuuuuuuuuuuuuuuuuuuuuuuuuuuuuuuuuuuuuuuuuuuuuuuuuuuuuuuuuuuuuuuuuuuuuuuUUUUUUUUUUUUUUUUUUUUUUUUUUUUUUUUUUUUUUUUUUUUUUUUUUUUUUUUUUUUUUUUUUUUUUUUUUUUUUUUUUUUUUUUUUUUUUUUUUUUUUUUUUUUUUUUUUUUUUUUUUUUUUUUUUUUUUUUUUUUUUUUUUUUUUUUUUUUUUUUUUUUUUUUUUUUUUUUUUUUUUUUUUUUUUUUUUUUUUUU
sssssssssssssssssssssssssssssssssssssssssssssssssssssssssssssssssssssssssssssss
Jusnsnneaa Class B nnnnnnnnnnnnn with Canadian ICES-003, Issue 4, and RSS210, No 4 (Dec 2000) uar No 5 (Nov 2001)
Waiiaounrnnnnaeunneynnnnnaeennnnnnae
aunnnaanannnnnnaanennnnnnnnnnnnnnnnnnnnnnnnnnnnnnnnnnnnnnnnnnnnnnnnnnnnnnnnnnnnnnnnnnnnnnnnnnnnnnnnnnnnnnnnnnnnnnnnnnnnnnnnnnnnnnnnnnnnnnnnnnnnnnnnnnnnnn
Cet apparéil numérique de la classe B est conforme à la norme NMB-003, No. 4, et CNR-210, No 4 (Dec 2000) et No 5 (Nov 2001).
« Pour empêcher que cet apparéil cause du brouillage au service faisant l'objet d'une licence, il doit être utilisé à l'intérieur et devrait être place loin des fenêtes afin de fournir un écran de blindage maximal. Si le matériel (ou son antenne d'émission) est installé à l'extérieur, il doit faire l'objet d'une licence.
2022.10.25 17:43 PM LAN 802.11a
aunnunnnnunnuuunnuunnuunnuunnuunnuunnuunnuunnuunnuunnuunnuunnuunnuunnuunnuunnuunnuunnuunnuunnuunnuunnuunnuunnuunnuunnuunnuunnuunnuunnuunnuunnuunnuunnuunnuunnuunnu
Wanannnansunuunuaaunauuuunununununununununununununununununununununununununununununununununununununununununununununun
5.35 GHz uaz 5.65 fo 5.85 GHz aonuunnunnnnnnnnnnnnnnnnnnnnnnnnnnnnnnnnnnnnnnnnnnnnnnnnnnnnnnnnnnnnnnnnnnnnnnnnnnnnnnnnnnnnnnnnnnnnnnnnnnnnnnnnnnnnnnnnnnnnnnnnnnnnnnnnnnnnnnnnnnnnnnnnnnn
nnaa aannnnnnae 6 dBi nnnnnnnae E.I.R.P
FCC
wauuuaaanaanannnnnlan LAN 5a Mini PCI uas Bluetooth nna FCC
aauuuaauauauauauauuuuuuuuuuuuuuuuuuuuuuuuuuuuuuuuuuuuuuuuuuuuuuuuuuuuuuuuuuuuuuuuuuuuuuuuuuuuuuuuuuuuuuuuuuuuuuuuuuuuuuuuuuuuuuuuuuuuuuuuuuuuuuuuuuuuuuuuuuuuuuuuuuuuuuuuuuuuuuuuuuuuuuuuu:
- 1
202055556:
wuiuuiyuaiannuuauauau? un72aunnuFCC
LAN Mini PCI
Aunnaaannnnaaannnnnna 20 u.u. (8)
wunu: auunu Mini PCI
yannnnnna
Wnuaunnaaunnnnnaanannn
naanannnnaaennnnnnaan nanaananaananaananaan (naanannnnn)
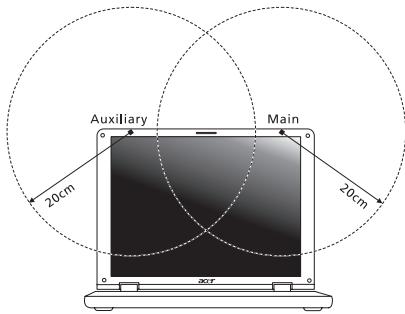
-
aunnnaaannnnn nnnnnnnnnnnnnnnnnnnnnnnnnnnnnnnnnnnnnnnnnnnnnnnnnnnnnnnnnnnnnnnnnnnnnnnnnnnnnnnnnnnnnnnnnnnnnnnnnnnnnnnnnnnnnnnnnnnnnnnnnnnnnnnnnnnnnnnnnnnnnnnnnnnnnnnnnn nn
-
5555555555555555555555555555555555555555555555555555555555555555555555555555555555555555555555555555
unun - 2aunutuaunuunssnun (RSS-210)
nuaunnaaunnuuauuu (RSS-102)
3. nnnnnae nnne ne nne ne nne ne nne ne nne ne nne ne nne ne nne ne nne ne nne ne nne ne nne ne nne ne nne ne nne ne nne ne nne ne nne ne nne ne nne ne nne ne nne ne nne ne nne ne nne ne nne ne nne ne nne ne nne ne nne ne nne ne nne ne nne ne nne ne nnee
Nanw waeauuauauauauauauauauuuuuuuuuuuuuuuuuuuuuuuuuuuuuuuuuuuuuuuuuuuuuuuuuuuuuuuuuuuuuuuuuuuuuuuuuuuuuuuuuuuuuuuuuuuuuuuuuuuuuuuuuuuuuuuuuuuuuuuuuuuuuuuuuuuuuuuuuuuuuuuuuuuuuuuuuuuuuuuuuuuuuuuuuuuuuuuuuuuuuuuuuuuuuuuuuuuuuuuuuUUUUUUUUUUUUUUUUUUUUUUUUUUUUUUUUUUUUUUUUUUUUUUUUUUUUUUUUUUUUUUUUUUUUUUUUUUUUUUUUUUUUUUUUUUUUUUUUUUUUUUUUUUUUUUUUUUUUUUUUUUUUUUUUUUUUUUUUUUUUUUUUUUUUUUUUUUUUUUUUUUUUUUUUUUUUUUUUUUUUUUUUUUUUUUUUUUUUUUUU
aunnnnne annnnnnnnae RSS210 aannnnnnnnnnnnnnnn
aunrnnnneannn Class B nnnnnnnnnnnnnnnnn with Canadian ICES-003, Issue 4, and RSS210, No 4 (Dec 2000) no 5 (Nov 2001)
wailaiunrnnnnaeunnuuunnuunnuunnuunnuunnu
aunnnaanannnnnnnnnnnnnnnnnnnnnnnnnnnnnnnnnnnnnnnnnnnnnnnnnnnnnnnnnnnnnnnnnnnnnnnnnnnnnnnnnnnnnnnnnnnnnnnnnnnnnnnnnnnnnnnnnnnnnnnnnnnnnnnnnnnnnnnnnnnn
Cet apparéil numérique de la classe B est conforme à la norme NMB-003, No. 4, et CNR-210, No 4 (Dec 2000) et No 5 (Nov 2001).
« Pour empêcher que cet apparéil cause du brouillage au service faisant l'objet d'une licence, il doit être utilisé à l'intérieur et devrait être place loin des fenêtres afin de fournir un écran de blindage maximal. Si le matériel (ou son antenne d'émission) est installé à l'extérieur, il doit faire l'objet d'une licence.
2007555:WJZUYU LAN 1987 IEEE 802.11a
qunununununununununununununununununununununununununununununununununununununununununununununununununununununununun
WaaanrannnnaaunuuaaunnnnnaunnuunnuunnuuuauuauuauuauuauuauuuuuuuuuuuuuuuuuuuuuuuuuuuuuuuuuuuuuuuuuuuuuuuuuuuuuuuuuuuuuuuuuuuuuuuuuuuuuuuuuuuuuuuuuuuuuuuuuuuuuuuuuuuuuuuuuuuuuuuuuuuuuuuuuuuuuuuuuuuuuuuuuuuuuuuuuuuuuuuuuuuuuuuuuuuuuuuuuuuuuuuuuuuuuuuuuuuuuUU
nnae nanae nanae nanae nanae nanae 6 dBi aee eae E.I.R.P 5.25-5.35 5.725 5.85 GHz