
URC-8620 - Universal remote ONE FOR ALL - Free user manual and instructions
Find the device manual for free URC-8620 ONE FOR ALL in PDF.
| Product Type | Universal infrared remote control |
| Brand | ONE FOR ALL |
| Model | URC-8620 (Xsight LITE / PLUS) |
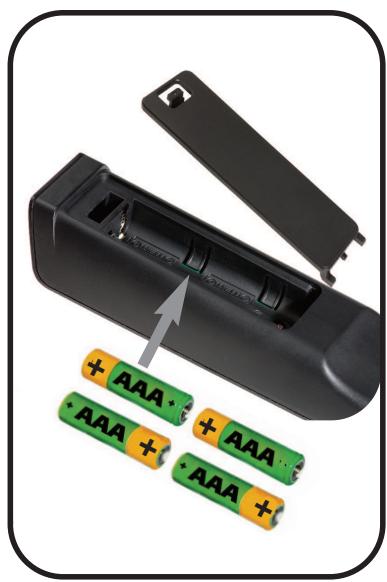
| Power source | 2 AAA batteries (not included) |
| Dimensions | Approximately 20 x 5 x 2 cm (estimate) |
| Weight | Approximately 120 g with batteries (estimate) |
| Screen | Backlit LCD touch screen |
| Infrared range | Up to 10 meters (estimate) |
| Number of controllable devices | Up to 8 devices (estimate) |
| Main functions | Control of TV, decoder, satellite, DVD, VCR, audio, etc.; code learning; activities; favorites; volume lock |
| Configuration | Standalone via touch screen or via PC (software included) |
| Memory | Retains settings without batteries (non-volatile) |
| Maintenance and cleaning | Wipe with a soft dry cloth. Do not use abrasive products or solvents. |
| Safety | Do not expose to moisture, extreme temperatures or shocks. Remove batteries if not used for extended periods. |
| Spare parts and repairability | Standard AAA batteries. No spare parts available. In case of failure, contact customer service. |
| General information | Manual available in multiple languages on the manufacturer's website. PC software compatible with Windows XP, 7, Vista. |
Frequently Asked Questions - URC-8620 ONE FOR ALL
User questions about URC-8620 ONE FOR ALL
0 question about this device. Answer the ones you know or ask your own.
Ask a new question about this device
Download the instructions for your Universal remote in PDF format for free! Find your manual URC-8620 - ONE FOR ALL and take your electronic device back in hand. On this page are published all the documents necessary for the use of your device. URC-8620 by ONE FOR ALL.
USER MANUAL URC-8620 ONE FOR ALL
Getting to Know Xsight 3
Unpacking and Setting Up Xsight 3
Using Xsight Keys 3
Keys Xsight Plus 4
Keys Xsight Lite 6
Initial Setup 8
Home Screen and Everyday Use 9
Devices 9
Activities 9
Favorites 9
Settings 10
Settings 11
Device Setup 11
Add Device 11
Delete Device 12
View Code 12
Learning 13
Volume 14
Contrast 15
Brightness 15
Timeout 16
Language 16
Tilt On/Off (Xsight LITE) 16
About 16
Reset 16
PC Setup 17

Quick Start Guide
USB Cable
CD Rom

SIGHT™
PLUS

Quick Start Guide
USB Cable
CD Rom
Getting to Know Xsight
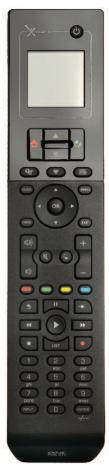
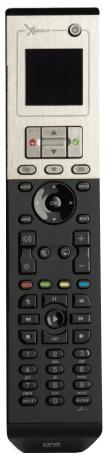
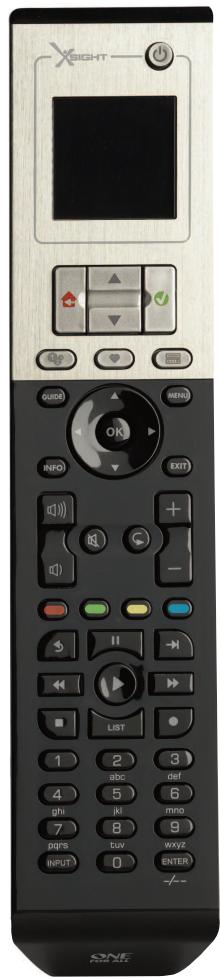
The Xsight LITE / Xsight PLUS is the latest fully-featured universal remote control from ONE FOR ALL. It offers full control of all your infra-red controlled Audio Video devices, as well as high-end features such as Learning, and Activity Control. You can set up your remote to control your devices by following the simple on-screen instructions on the remote, or connect to a PC for adding advanced features such as Activities and Favorites.
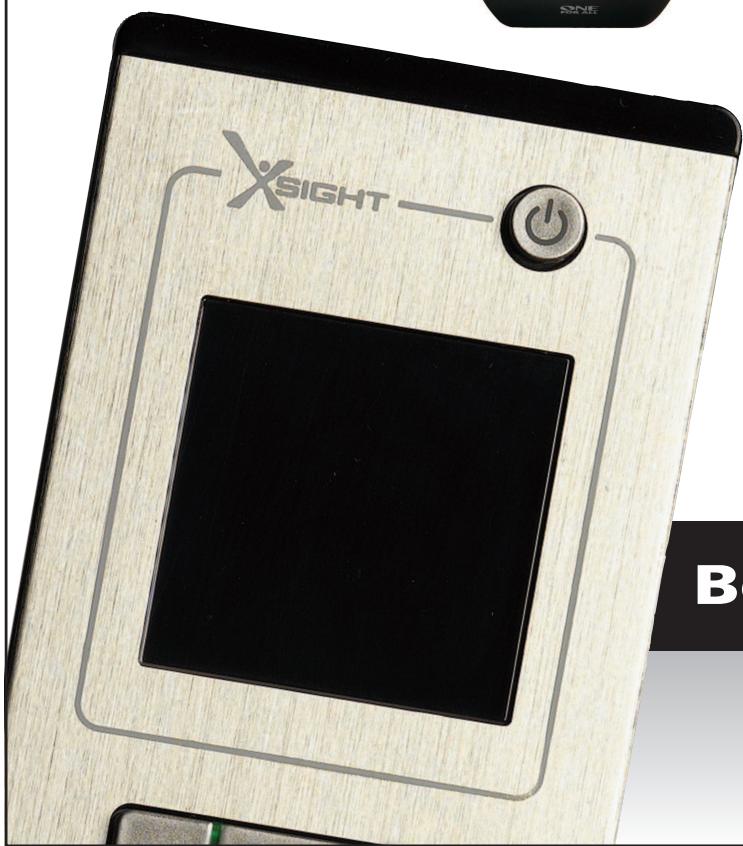
Unpacking and Setting Up "Xsight LITE" or "Xsight PLUS"
(See also the Xsight Quick Guide)
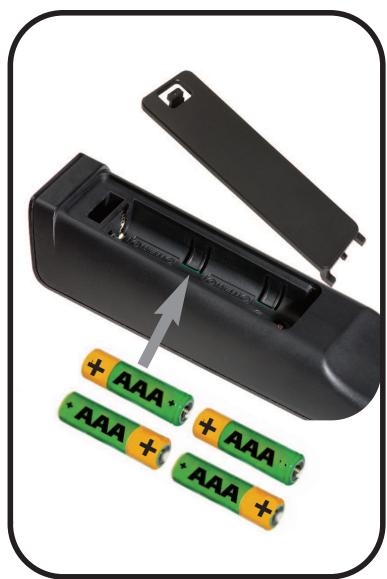
Inside the packaging you will find the following:
- Your "Xsight PLUS" or "Xsight LITE" Universal Remote Control
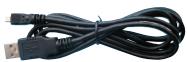
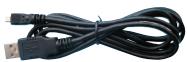
USB Cable - CD-ROM with remote software and User Manual
Quick Start Guide
Firstly, install 4 AAA batteries matching the contacts + and - to the illustrations in the battery compartment.
To begin setting up your Xsight you have two options:
1) Follow the on-screen instructions on the remote while in front of the devices you wish to control. This is the quickest method to set up the remote for basic control of your devices. For more advanced setup, you can connect the remote to your PC once it is operating all your devices correctly.
2) To use PC setup, including Activities (translation), Favorites etc, insert the CD-ROM into your PC and follow the install wizard. Connect the remote when prompted by the software using the included USB Cable.
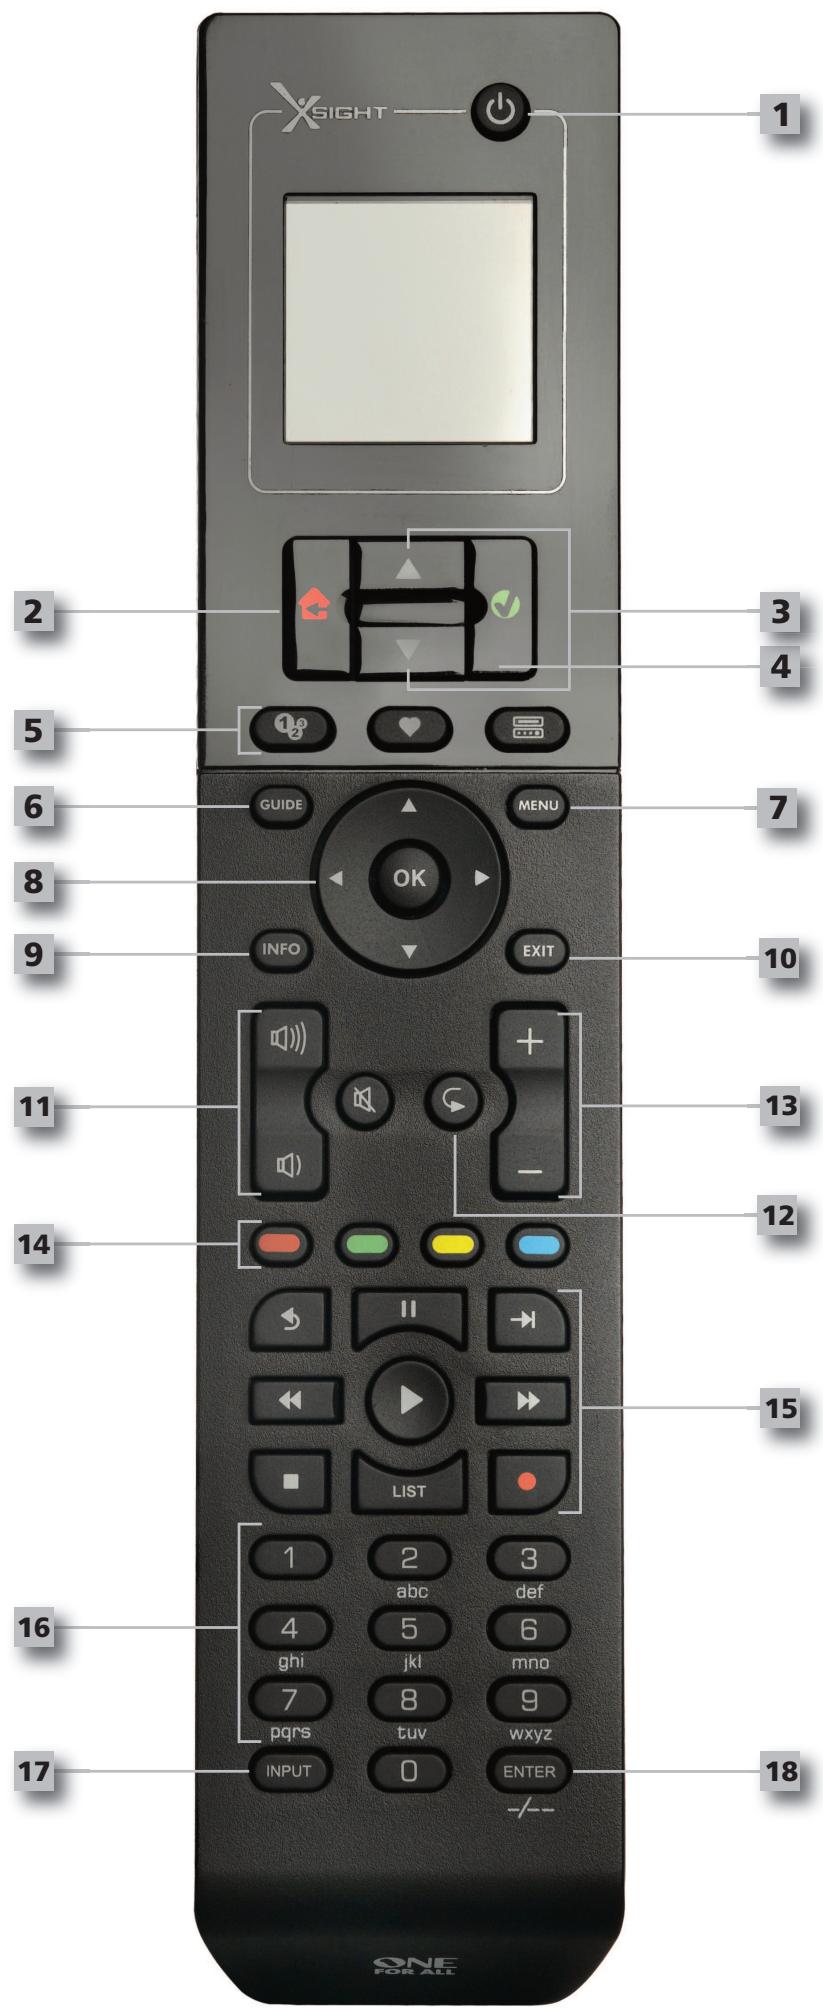
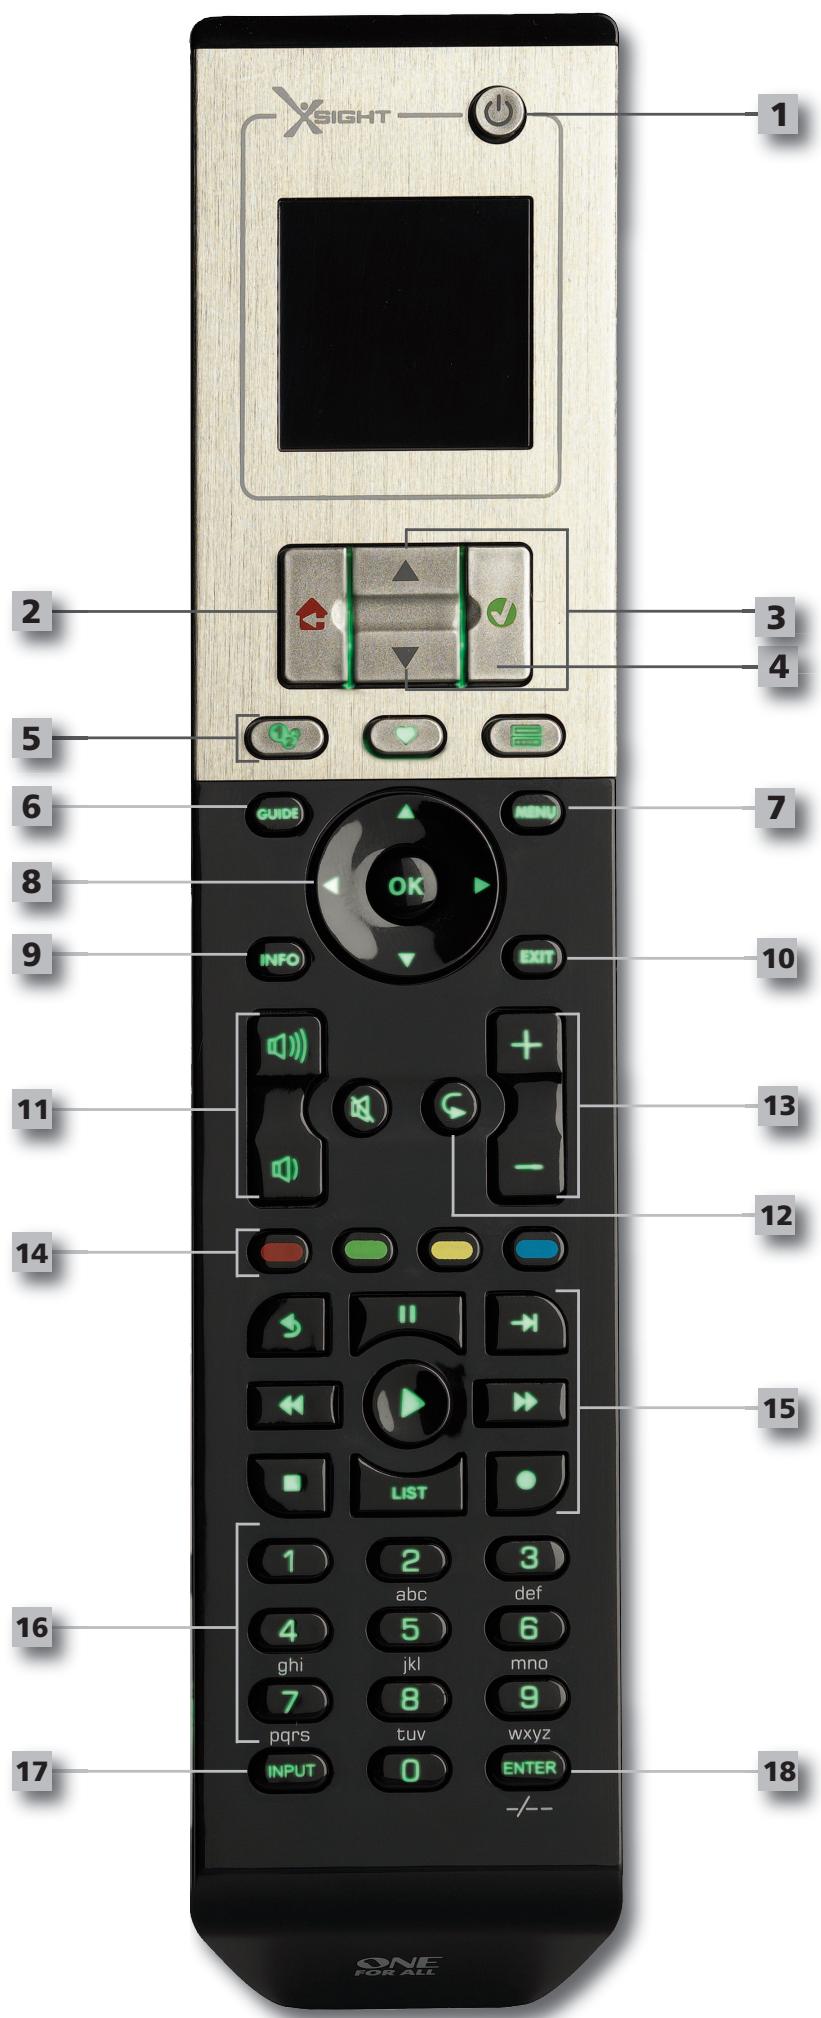
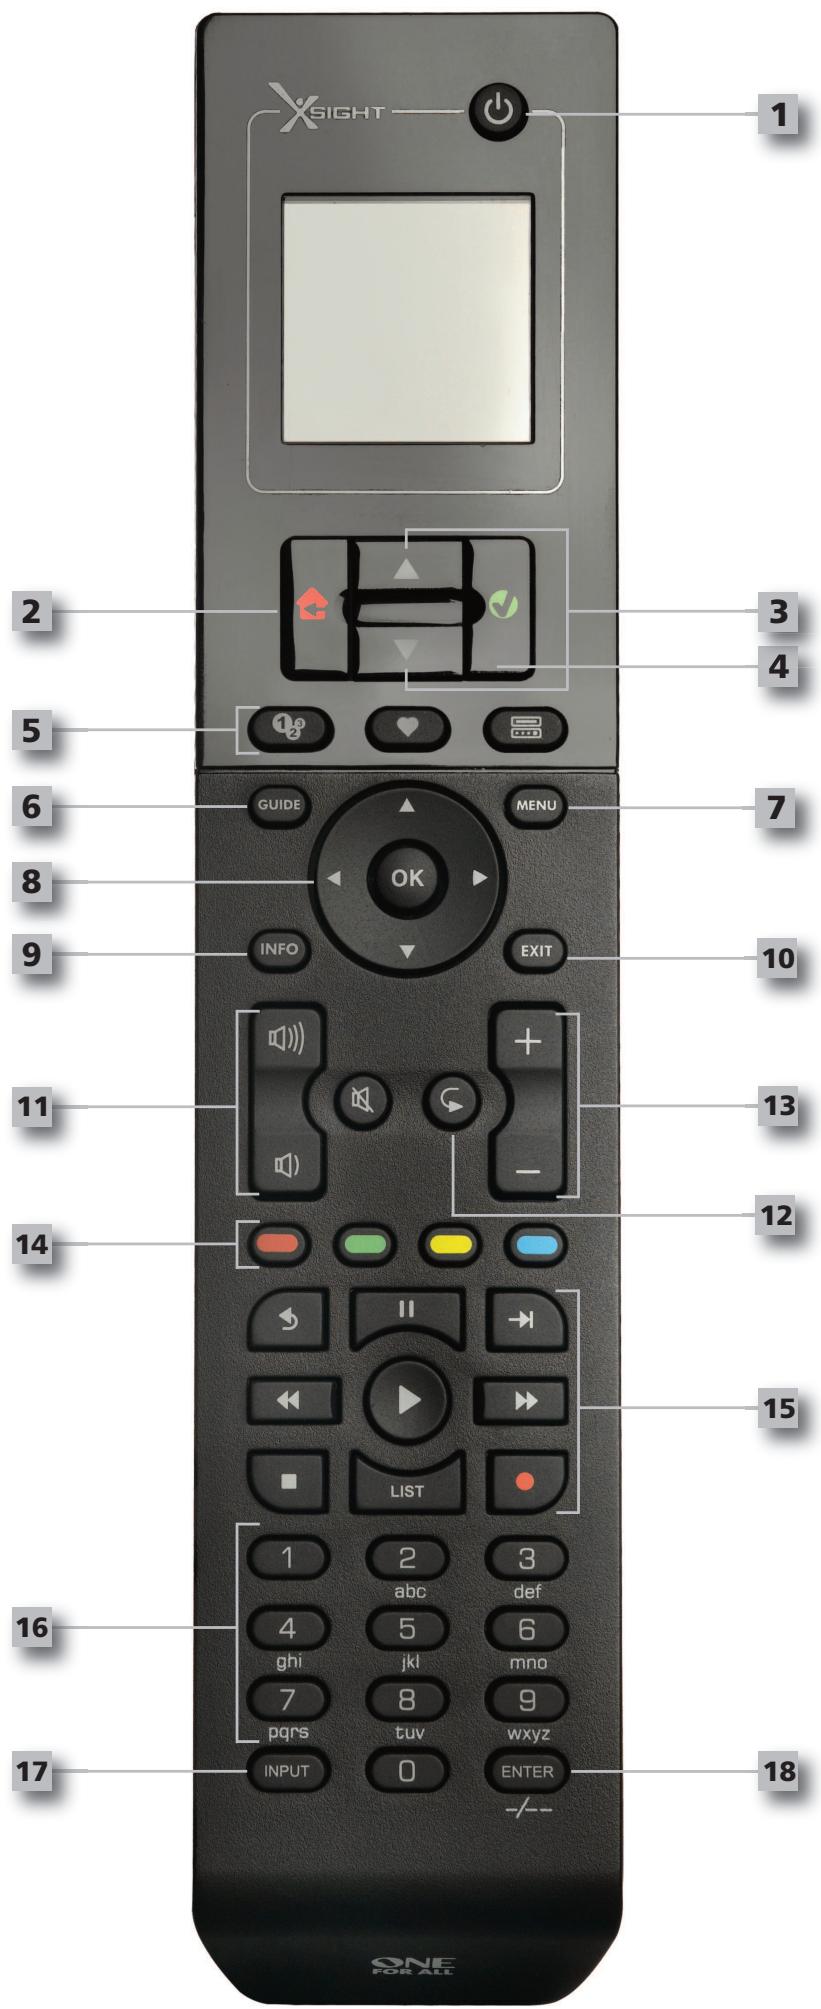
Keys Xsight PLUS

1
Power key
Turns device ON/OFF.
2
Home key
Shortcut key - One short press goes one back to the previous level in the Menu structure. Holding down for two seconds takes the remote to the home screen. Also used to select the text displayed in a red field (red choice selection).
3
Up/Down
Scrolls up/down within the set-up menu screen.
4
Confirm
Confirms your choice within the set-up menu screen. Also used to select the text displayed in a green field (green choice selection).
5
Activities
Shortcut key - In user mode accesses the Activities screen directly. Disabled in Setup mode.
Favorites
Shortcut key - In user mode accesses the Favorites screen directly. Disabled in Setup mode.
Devices
Shortcut key - In user mode accesses the Devices screen directly. Disabled in Setup mode.
6
Guide key
Brings up device guide if your original remote has guide.
7
Menu key
Brings up device menu if your original remote has menu. In DVD, it brings up disc menu.
8
Navigation keys / OK
Operates the navigation functions of your device if available.
9
Info
Displays information about your video or audio feed.
10
Exit
Exit guide and menu.
11
Volume keys
Controls volume and mute.
12
Previous channel (TV/Cable Box/Satellite Box/DVB-T/DVD - mode)
Repeat (Audio/Digital media - mode)
13
Channel keys
Operates channel up/down functions in video devices and preset up/down in audio devices.
14
Teletext keys
Accesses teletext functions if your device has text features.
Back (Cable Box/Satellite Box/DVB-T/DVD - mode)
15
Transport keys/OK
Operates DVR functions and performs traditional Play/Pause/Fast Forward/Rewind/Record on all other video and audio devices.
List (TV/Cable Box/Satellite Box/DVB-T/DVD - mode)
Shuffle/Random (Audio/Digital Media - mode)
16
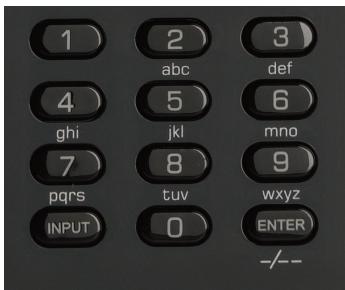
Digit 0-9
Direct digit entry or text entry for customizing labels.
17
Input
Selects input function of your device. E.g. TV/SAT, TV/DVD.
18
Enter/-/--
Operates channel enter and 10+ digit entry.
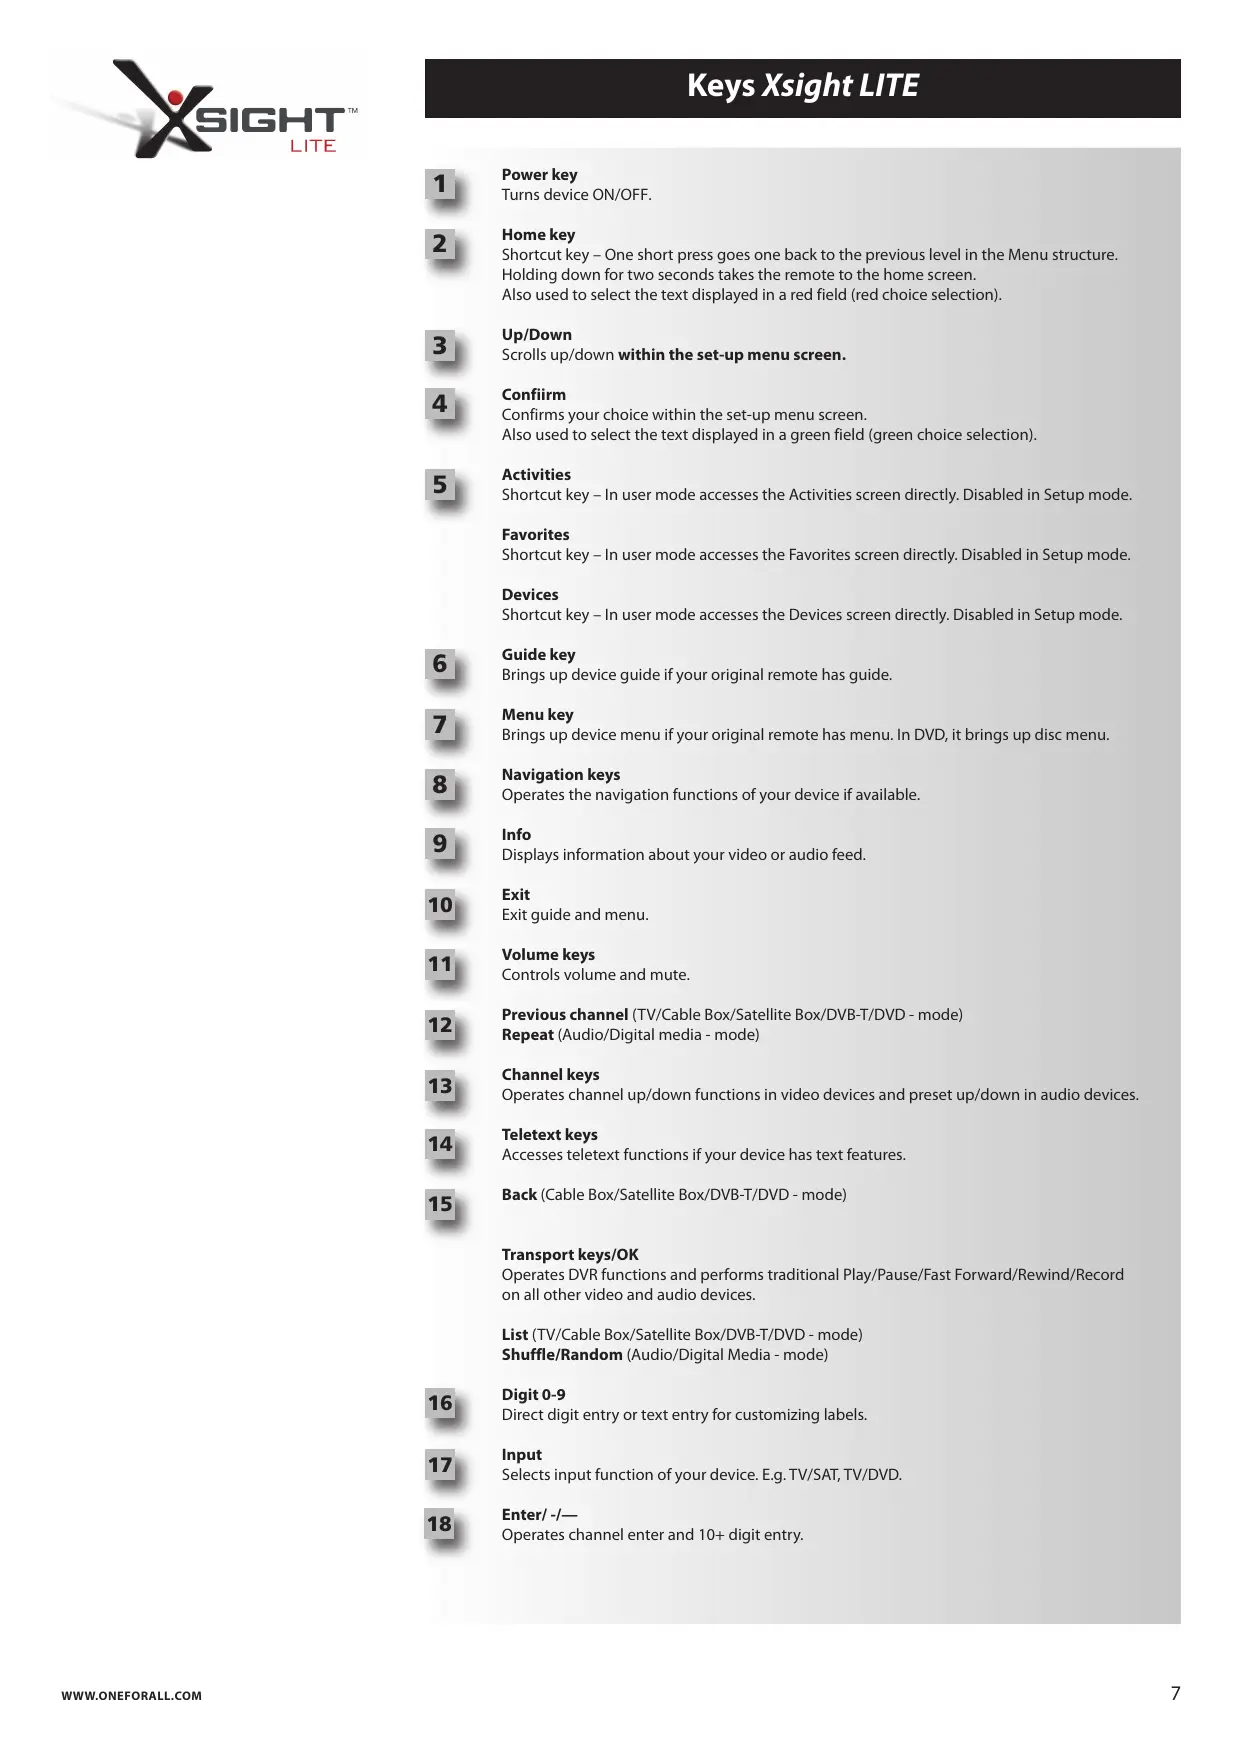
Keys Xsight LITE

Power key
Turns device ON/OFF.

Home key
Shortcut key - One short press goes one back to the previous level in the Menu structure. Holding down for two seconds takes the remote to the home screen. Also used to select the text displayed in a red field (red choice selection).

Up/Down
Scrolls up/down within the set-up menu screen.

Confirm
Confirms your choice within the set-up menu screen. Also used to select the text displayed in a green field (green choice selection).

Activities
Shortcut key - In user mode accesses the Activities screen directly. Disabled in Setup mode.
Favorites
Shortcut key - In user mode accesses the Favorites screen directly. Disabled in Setup mode.
Devices
Shortcut key - In user mode accesses the Devices screen directly. Disabled in Setup mode.

Guide key
Brings up device guide if your original remote has guide.

Menu key
Brings up device menu if your original remote has menu. In DVD, it brings up disc menu.

Navigation keys
Operates the navigation functions of your device if available.

Info
Displays information about your video or audio feed.

Exit
Exit guide and menu.

Volume keys
Controls volume and mute.

Previous channel (TV/Cable Box/Satellite Box/DVB-T/DVD - mode)
Repeat (Audio/Digital media - mode)

Channel keys
Operates channel up/down functions in video devices and preset up/down in audio devices.

Teletext keys
Accesses teletext functions if your device has text features.

Back (Cable Box/Satellite Box/DVB-T/DVD - mode)
Transport keys/OK
Operates DVR functions and performs traditional Play/Pause/Fast Forward/Rewind/Record on all other video and audio devices.
List (TV/Cable Box/Satellite Box/DVB-T/DVD - mode)
Shuffle/Random (Audio/Digital Media - mode)

Digit 0-9
Direct digit entry or text entry for customizing labels.

Input
Selects input function of your device. E.g. TV/SAT, TV/DVD.

Enter/-/--
Operates channel enter and 10+ digit entry.
Initial Setup
When you first power up your remote, it will enter Initial Setup Mode. In this mode, you will;
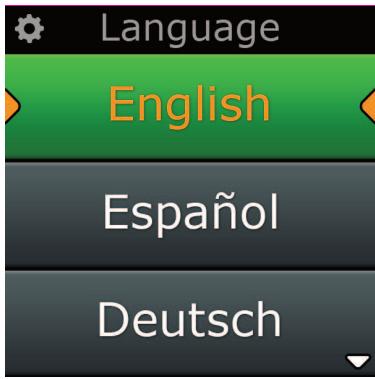
1) First choose which language you prefer to be displayed on the remote.
2) Once ready, press "Finish".
After this, a few Tutorial screens will be displayed in order to help you familiarize yourself with the remote. Once the tutorial is complete, the remote will lead you through the steps to set up all the devices you wish to control.
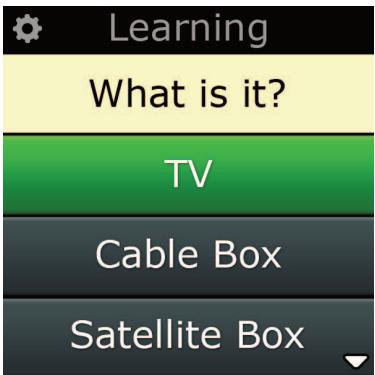
1) First, select the device type (e.g. TV) and then select the brand from the list of the top brands for the selected device in your region.
If a certain device type or brand is not listed, set up all of your other devices, and then use the PC Setup (see page 17) to add that particular device type or brand. If a PC connection is not available, you can also Learn a Device using the original remote. For Learning, see page 13.
2) Once the brand has been selected, you can then search through the available codes for that brand by trying keys on the remote. If the keys respond correctly, you can accept the current code by pressing "Works", or test the next code by pressing "Next". When the device has been set up, you will have the option to set up another device.
TIP: To quickly step through and test multiple codes, alternately press "Power" and "Next". Once the device responds to Power, stop and test other keys to confirm the code is correct.
Once you have set up the remote to control your devices, you will be asked if you wish to set a device as the Master Volume control. This feature is useful if you always change volume using the same device, say for example an AV Receiver.
Once Initial Setup has taken place, the remote will display the Home Screen.
Home Screen and Everyday Use
To access the Home Screen at any time, you can hold down the "Home\Back" key for 2 seconds. Pressing this key once will take you back one screen.
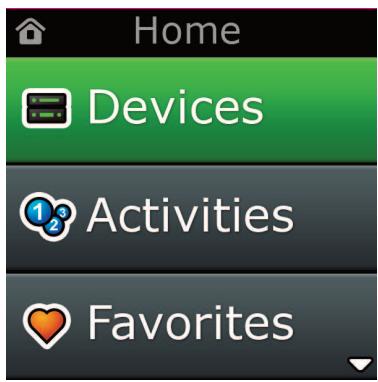
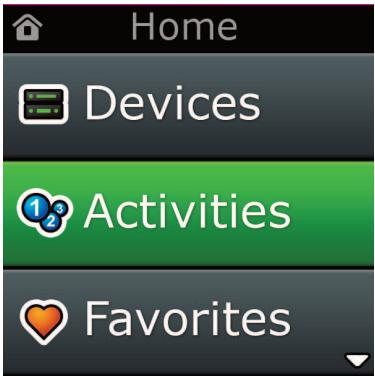
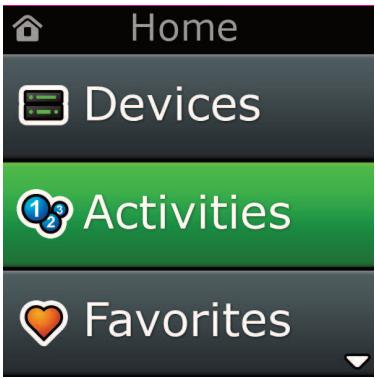
The Home Screen of the remote will display the following options:
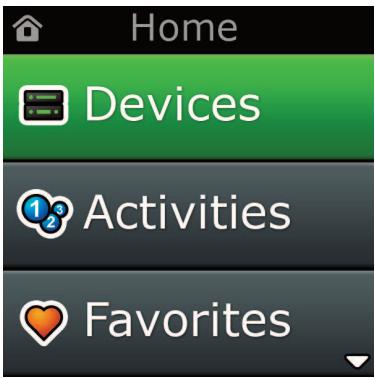
Devices
This key will give you direct access to all the devices that your remote is set up to control. Once pressed, you will see a list of devices to control (e.g. TV, Sat, Amp etc). Selecting a device will put the remote into the correct mode to control the device selected. So if you selected TV, the remote will now act just as your TV's remote did.
The screen will also display a selection of keys appropriate to the current device. Devices can be set up using the remote only (via Device Setup or Learning), or using PC Setup.
To access the Devices Screen at any time, you can press the "Devices" key underneath the screen.
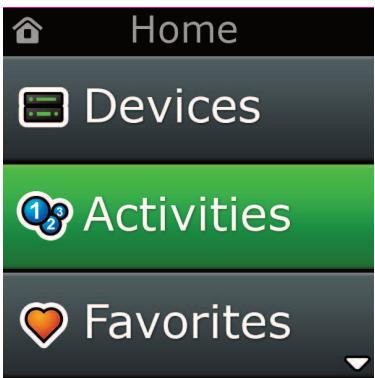
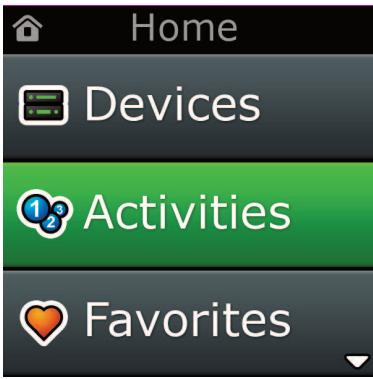
Activities
This key will give you access to all of your Activities.
An "Activity" is a special mode that your remote control can be set into, where groups of keys can address different devices to suit what you are doing at the moment. For example, if you create an Activity called "Watch DVD", you could set transport keys (Play, Stop etc) to control your DVD Player, but the Volume Keys to control your Surround Sound Amp.
When you have set up your Activity, it will appear as a key on your screen. When this key is pressed, as well as changing the function of the keys, the remote will send a series of commands to your AV Devices to make sure they are in the right state for your Activity. For example, it would turn on the TV, DVD Player and Surround Amp, and then select the correct input on the TV and Amp so the correct picture and sound are seen and heard. A series of commands such as this is called a Macro, and you can define this at the end of setting up an Activity.
"Activities" can be set up using PC Setup only.
To access the "Activities" Screen at any time, you can press the "Activities" key underneath the screen.
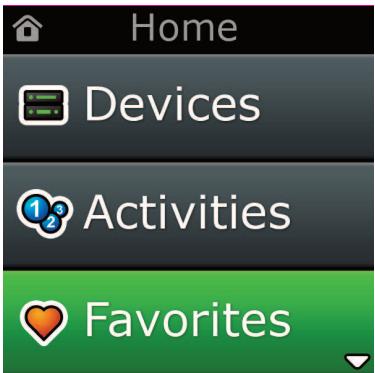
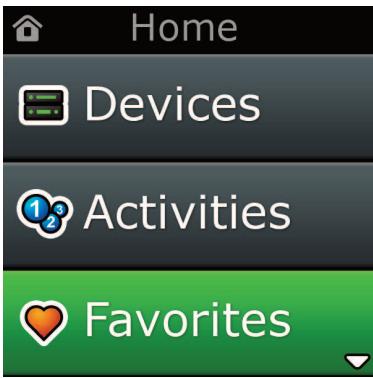
Favorite
This key will give you access to your Favorite Channels. Each channel will have a key of its own and be labeled with the name of the channel. It is also possible to customize the text yourself (e.g. BBC1). When pressed, the key will send the necessary commands to select the chosen channel on the device you use to select channels (for example it may send digit buttons 1, 2 and then 3 to your Cable box). It is possible to have up to 12 (LITE) / 24 (PLUS) Favorites set up on your remote. "Favorites" can be set up using PC Setup only.
To access the Favorites Screen at any time, you can press the "Favorites" key underneath the screen.
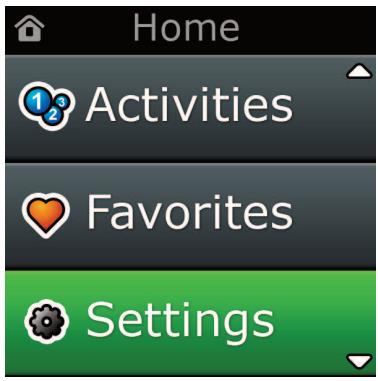
Home Screen and Everyday Use
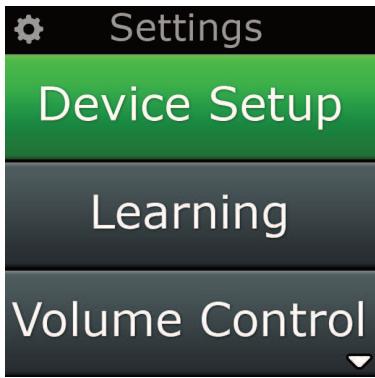
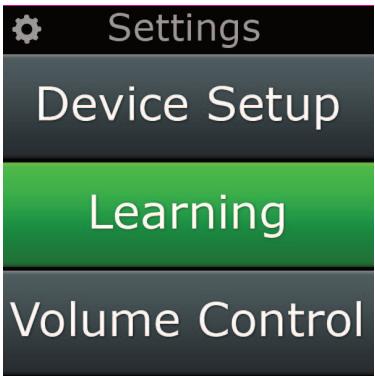
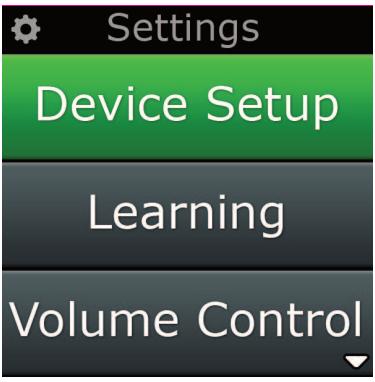
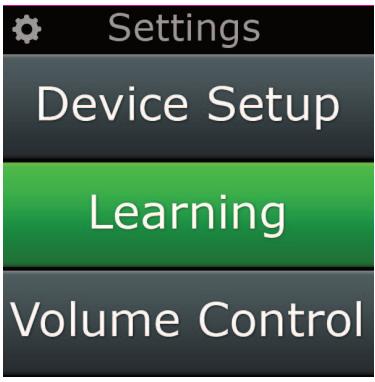
Settings
The "Settings" key will take you to a menu allowing you to change options on the remote, as well as adding or deleting devices, and learning commands from your original remote control(s). See the next section for more details.
Use the up/down keys to navigate to the corresponding screens
Settings
Device Set Up
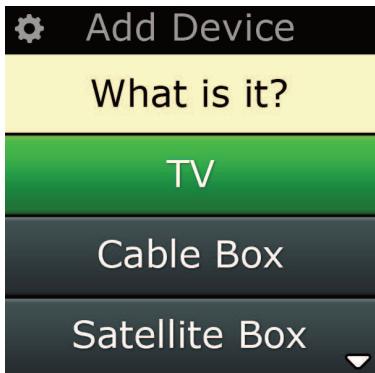
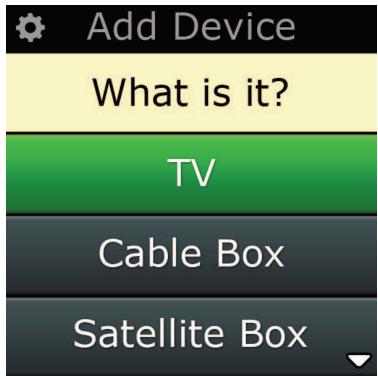
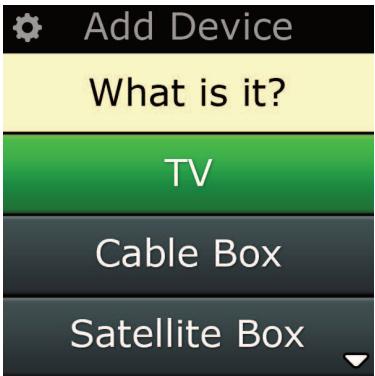
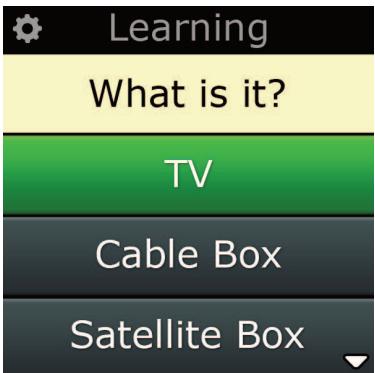
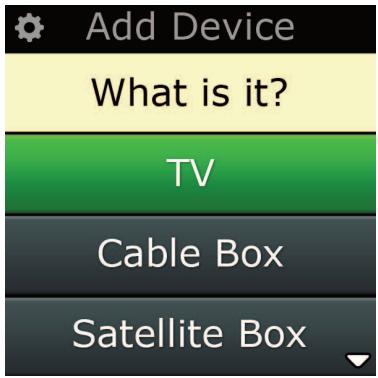
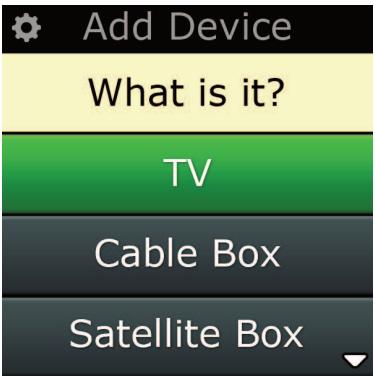
Add Device
What is it?
TV Television/HDTV/LCD/Plasma/Projector/Rear Projector
Cable Box Cable Converter / Set-Top-Box / IPTV / DVB-C
Satellite Box Satellite Receiver / Set-Top-Box / IPTV / DVB-S / SAT/HDD
DVB-T DVB-T / Freeview (UK) / TNT (F) / Digitonne (NL)
DVD Player / DVD-R / Blu-ray / DVD Home Cinema / DVD Combi / DVD/HDD
VCR Videorecorder
Audio Miscellaneous Audio, Amplifier / Active Speaker System Audio Receiver/Tuner/Amplifier / (DVD) Home Cinema
DVR DVD/HDD, SAT/HDD, CBL/HDD, DVB-T/HDD
CD Player CD Player
Digital Media Media Centre / i-Pod Docks / Games Consoles / HTPC
Combo Units TV/VCR /TV/DVD /VCR/DVD
Home Automation Home Automation / Light Control
If your device is not listed above, please set up your device through PC-Set Up see page 17.

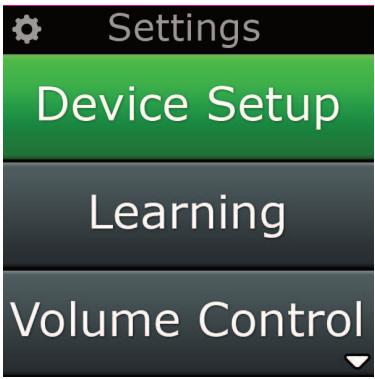
The Settings menu allows you to add or delete devices, learn functions from your original remote control, and adjust various options on your remote. The following section details each option in the Settings menu.
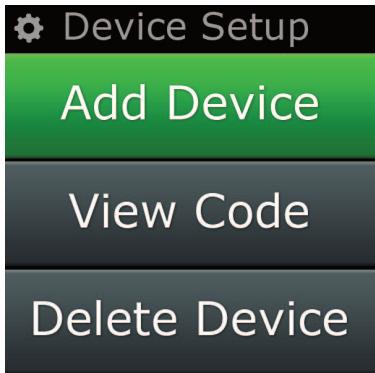
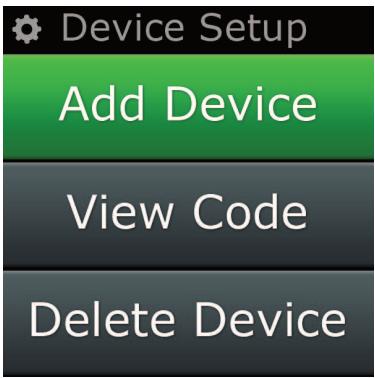
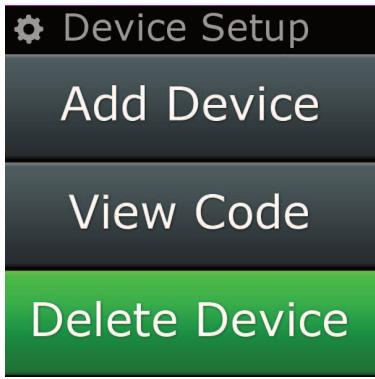
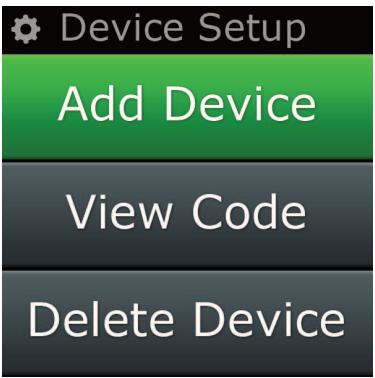
Device Setup
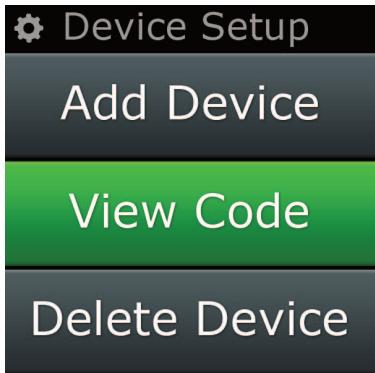
Once "Device Setup" is selected, you will be given the choice of adding or deleting a device, and also viewing the code the remote is using to operate your devices.
"Add Device"
If "Add Device" is selected, the procedure is similar to the initial setup. First, select the device type (e.g. TV) and then select the brand from the list of the top brands for the selected device (in your region). In the event that a device type or brand is not listed, set up all of your other devices, and then use the PC Setup (see page 17) to add the final devices. If a PC connection is not available, you can also Learn (see page 13) a Device using the original remote.
Once the brand has been selected, you can then search through the available codes for that brand by trying keys on the remote. If the keys respond correctly, you can accept the current code by pressing "Works", or test the next code by pressing "Next". When the device has been set up, you will have the option to set up another device.
1) Select "Device Setup" from the Settings menu.
2) Select "Add Device". The first page of devices is displayed.
3) Select the device type you are adding. After you select a device type, the available device brands are listed.
Note: If you do not see the device type you want to add, scroll through the pages to view more device types.
4) Select the device brand. The first code for the selected device is activated on the remote.
Note: If you do not see your device brand, scroll through the pages to view more brands. If your desired brand is not listed, you can use PC Setup to search for additional brands, or learn the device from your original remote
5) Take the remote to within range of the device and press any of the keys.
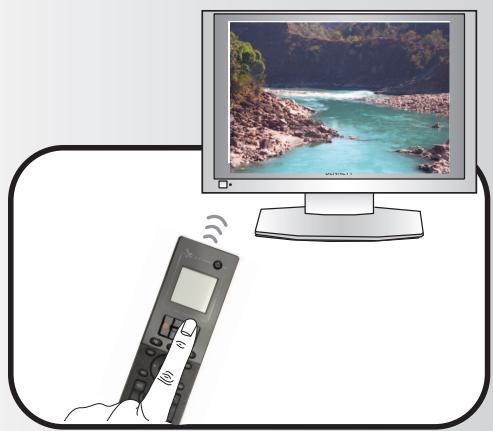
If the device responds as expected, press the function key labeled "Works!".
If the device does not respond, either try a different key or press the function key labeled "Next" to test the next device code.
Note: If you do not find a functioning code, you can use PC Setup to search for additional codes, or Learn the device from your original remote
Settings
"Delete Device"
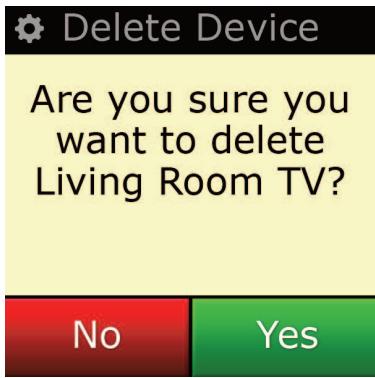
If "Delete Device" is selected, you will be asked to choose which device you would like to delete, followed by a confirmation screen. It is then possible to select another device to delete or to finish.
1) Select "Device Setup" from the Settings menu.
2) Select "Delete Device". The first page of devices is displayed.
Note: If you do not see the device you want to delete, scroll through the pages to view more devices.
3) Select the device you want to delete. A confirmation screen appears.
Note: If the device you are deleting is in use by one or more Activities or Favorites, the remote will display a warning message.
4) Select "Yes" to delete the device or "No" to exit without deleting the device.
View Code
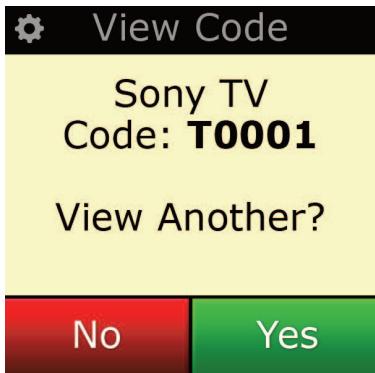
The "View Code" screen shows you which code the remote is using to control your device. This information can be used by Customer Service should you need to contact them. The code can be viewed by selecting the desired device from the list of currently set up devices.
1) Select "Device Setup" from the Settings menu.
2) Select "View Code". The first page of devices is displayed.
Note: If you do not see the device you want, scroll through the pages to view more devices.


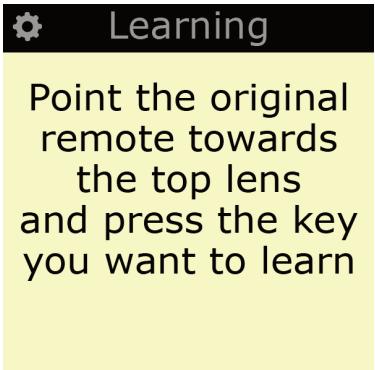
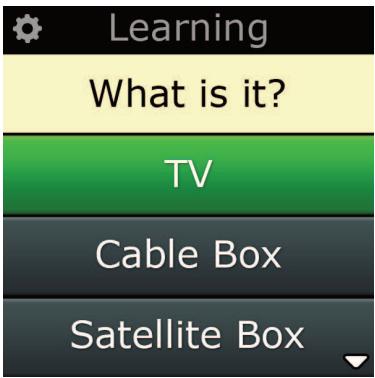
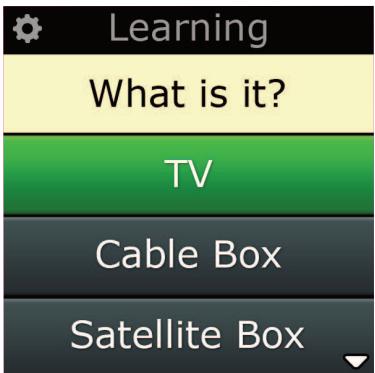
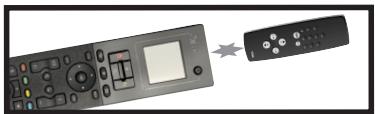
Learning
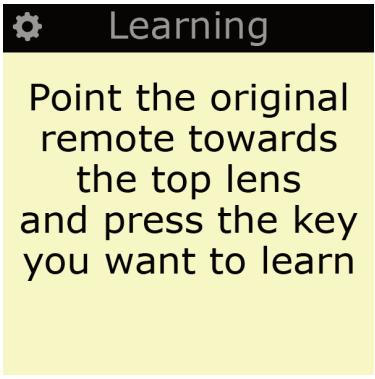
The Learning feature allows you to add functions from the original remote control(s) to the ONE FOR ALL remote. Your original remotes should still be in working order to perform this process. This process can be used to add missing keys or replace existing keys on devices that have already been set up, or even to add a complete new device to your remote. When the Learning option is selected, you will be asked if you want to learn a function or learn a new device. The next step is to select a key to learn onto, and to point the original remote towards the ONE FOR ALL remote and press the key on the original remote you wish to teach. Finally if the key is a screen key, you will have the opportunity to re-label it using the digit keys. The full procedure is:
1) Select "Learning" from the Settings menu.
2) For which device?
"New Device" or "Select the corresponding device"
Note: If you do not see the Device you want, scroll through the pages to view more.
3) If you are learning a function, select a key on the remote or press "On-Screen Keys" to choose a key on the screen to learn a function onto.
Note: You can Learn onto any key or On Screen key in any Device except for the Keys for Home, Favorites, Activities, and Devices.
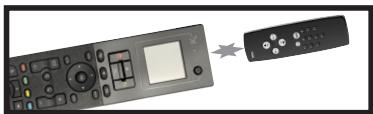
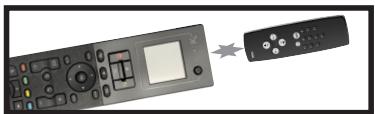
4) Locate the remote for the device you want to learn from. Align the source remote with the bottom end of the ONE FOR ALL, no further than 5 inches apart, preferably between 2in and 5in (5cm and 12cm):
5) On the remote you are learning from, press the key you want to learn.
a. If the function is not learned correctly, an error message is displayed. Select "Yes" to try learning again, or "No" to exit to the Settings menu.
b. If the key you are learning the function onto already has a function, you will be asked if you want to overwrite it
c. If a key function is learned correctly it is saved to the memory and you can proceed to learn another function.
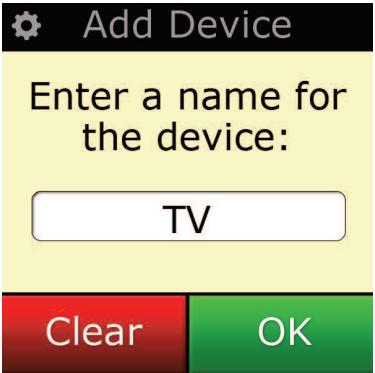
d. If a screen key function is learned correctly, the remote will prompt you to save a label.
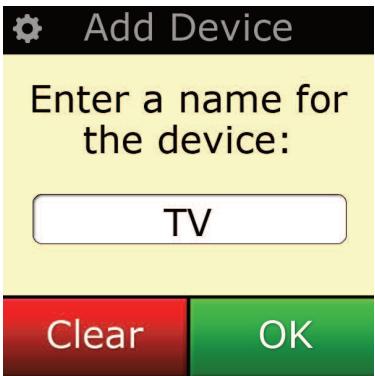
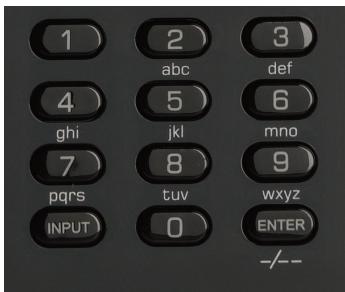
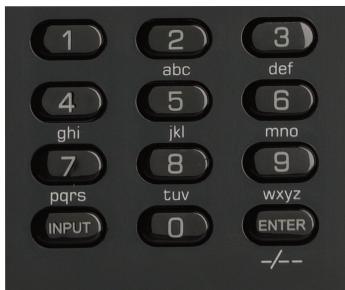
6) If the key learned is a Screen key, use the numeric keypad to enter a key label.
a. Enter letters using the numeric keypad. As with a standard phone, the keypad keys can represent letters and symbols. Press a key once to display the first letter or symbol associated with that key; repeatedly press the key to display the other letters or symbols associated with the key.
For example, to display the letter "J", press "5" on the numeric keypad; to display the letter "K", press "5" again.
To delete a letter, click "Clear".
7) Click "OK". The remote will save the new function.
Note: The remote will automatically place new on-screen keys in the first blank screen key space for the particular device.
Volume
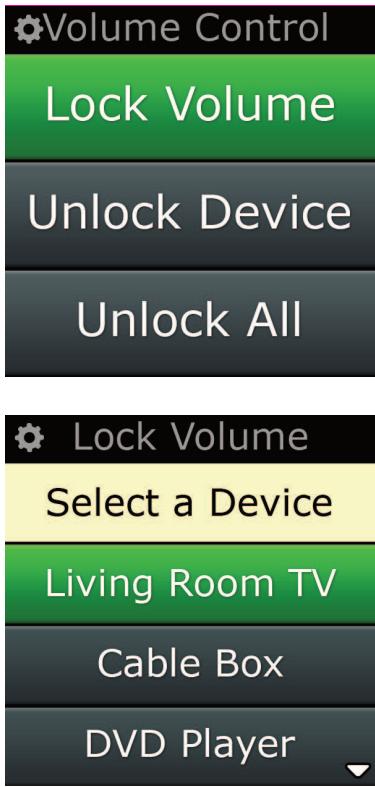
The Volume Control feature allows you to set one device to control the volume all the time, no matter which device the remote is currently controlling. For example, if you always watch TV using your AV Receiver, you would not want to alter the Television's volume when watch TV. In this case, you can set your ONE FOR ALL remote to always control the AV Receiver's volume, even when in TV Mode. In the Volume Control section you will be given the option to set the Master Volume device, to remove a device from this group (allowing it use its own volume), or to unlock the Volume completely, allowing the remote to control each device's volume individually.
Locking Volume to a device
1) Select "Volume Control" from the Settings menu.
2) Review the explanatory screens, then click "OK".
3) Select "Lock Volume". The first page of devices is displayed.
Note: If you do not see the device you want to assign volume to, scroll through the pages to view more devices.
4) Select the device you want to lock volume to. The remote will display a confirmation screen.
5) Click "Finish".
Removing a Device from Lock
1) Select "Volume Control" from the Settings menu.
2) Review the explanatory screens, then click "OK".
3) Select "Unlock Device". The remote removes the volume lock and displays a confirmation screen.
4) Click "Finish".
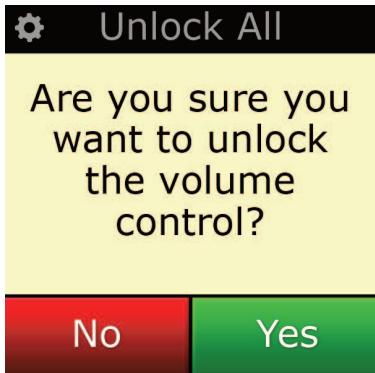
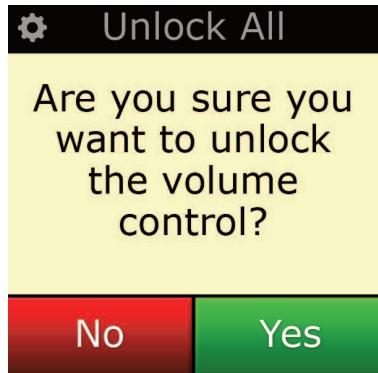
Unlocking All Volume
1) Select "Volume Control" from the Settings menu.
2) Review the explanatory screens, then click "OK".
3) Select "Unlock All". The remote unlocks the volume and displays a confirmation screen.
4) Click "Finish".


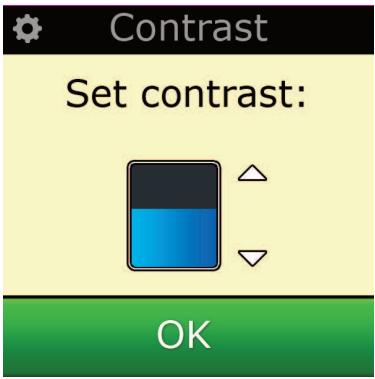
Contrast
This setting allows you to adjust the brightness of the screen on the remote.
1) Select "Contrast" from the Settings menu.
2) Select a contrast level. The screen will change to display the selected contrast. To view another contrast level, press ^ 喜 + ^ 喜 or - . The screen will change to display the new contrast level.
3) Select "OK" to save the selected contrast level.
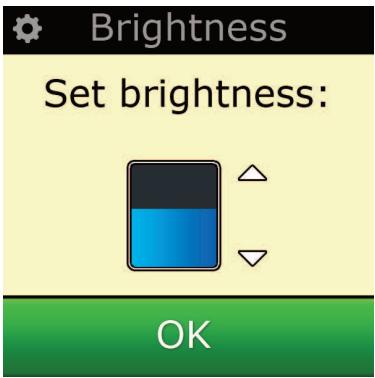
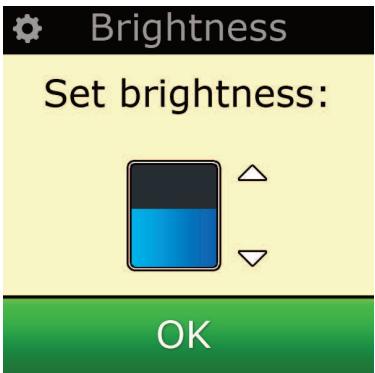
Brightness
This setting allows you to adjust the brightness of the screen on the remote.
1) Select "Brightness" from the Settings menu.
2) Select a brightness level. The screen will change to display the selected brightness. To view another brightness level, press ^ 喜 + ^ 喜 or - . The screen will change to display the new brightness level.
3) Select "OK" to save the selected brightness level.
Settings
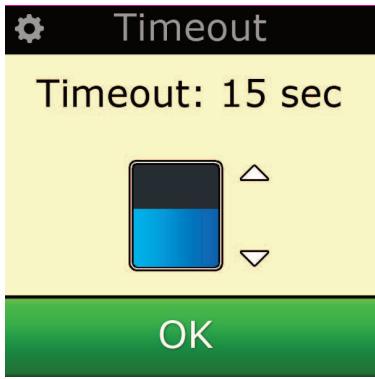
Timeout
To save battery power, the key backlight and LCD screen will automatically dim after a period of inactivity. The default period is 10 seconds. You can view and adjust the timing of this under the Timeout setting:
1) Select "Timeout" from the Settings menu.
2) The screen will change to display the current timeout length. The minimum timeout is 5 seconds and the maximum timeout is 30 seconds. To change the timeout, press "+" or "-" The screen will change to display the new timeout length.
Note: If you increase the timeout, the battery life will shorten.
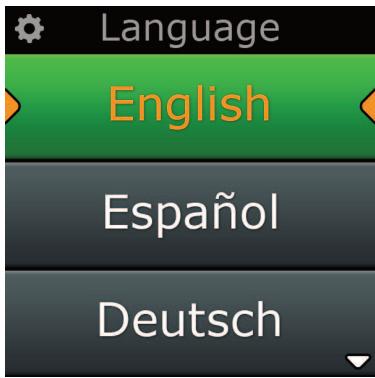
Language
This setting will allow you to change the Language that your remote displays. Once selected, all menus and instructions will be displayed in the language chosen.
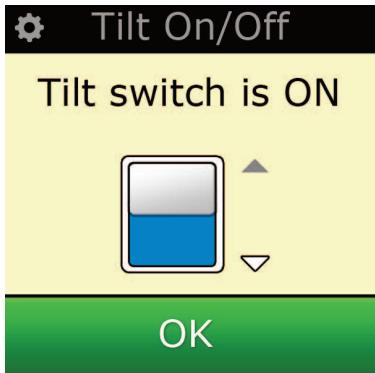
Tilt On/Off
Your Xsight PLUS comes with a "tilt switch" and will automatically switch ON as soon as you pick it up. If you wish you can switch this feature OFF.
1) Select "Tilt On/Off" from the Settings menu. Xsight displays the current status.
2) Select "ON" or "OFF" to switch the tilt switch ON or OFF.
3) Select "OK" to save the settings.
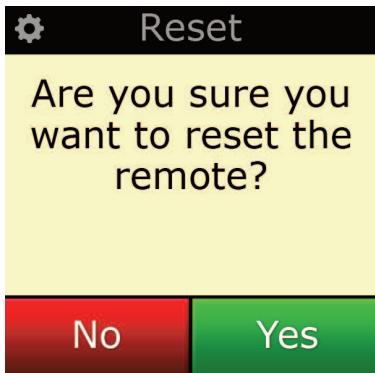
Reset
The reset screen will delete all learned functions and labels. Devices, Activities and Favorites you have added will remain in the remote menu.
1) Select "RESET" from the Settings menu. The remote will display the Reset Screen.
2) Click "RESET". All Learning and Labels will be deleted, and the screen will return to the Settings Screen.


PC Setup
As well as all of the features mentioned in this manual, it is also possible to set up your remote using a PC with Internet Access. This will allow you to use the following features:
"Activities" - Use your remote to control multiple devices as if they were one and to set all your device in the right state for Watch TV, Listen to Music, or any of your regular Home Entertainment Activities.
" Favorites" - Program up to 12 (LITE) / 24 (PLUS) screen keys to automatically select your favorite channels with one key press.
Also available are the following:
- Direct model number entry - the exact code for your devices can be found without having to search.
- Key Edit - keys can be moved, edited or added to your devices.
- Many more features!
Remember to check back for upgrades to your remote in the future!
To use PC setup, insert the CD-ROM supplied with this remote into any internet-connected PC running Windows XP, Vista or Windows 7, and follow the on-screen instructions.

SIGHT ™
LITE


SIGHT ™
PLUS
Bedienungsanleitung
Deutsch
Erste Schritte 3
Tilt On/Off (Tiltsensor)
| Device Setup |
| Add Device |
| View Code |
| Delete Device |
| Delete Device | |
| Are you sure you want to delete Living Room TV? | |
| No | Yes |
| Device Setup |
| Add Device |
| View Code |
| Delete Device |
| View Code | |
| Sony TV Code: T0001 | |
| View Another? | |
| No | Yes |


Apprentissage
Home Screen and Everyday Use
Configuración
| Device Setup |
| Add Device |
| View Code |
| Delete Device |
| Delete Device | |
| Are you sure you want to delete Living Room TV? | |
| No | Yes |
| Device Setup |
| Add Device |
| View Code |
| Delete Device |
| View Code | |
| Sony TV Code: T0001 | |
| View Another? | |
| No | Yes |


Aprendizaje
Unlocking All Volume
DVR :DVD/HDD, SAT/HDD, CBL/HDD, DVB-T/HDD
| Device Setup |
| Add Device |
| View Code |
| Delete Device |
| Delete Device | |
| Are you sure you want to delete Living Room TV? | |
| No | Yes |
| Device Setup |
| Add Device |
| View Code |
| Delete Device |
| View Code | |
| Sony TV Code: T0001 | |
| View Another? | |
| No | Yes |
Learning (Formação)
TV :television/HDTV/LCD/plasma/projector/rear projector
kabelbox : kabelconverter/decoder/IPTV/DVB-C
Satellietdecoder :satellietontvanger/decoder/IPTV/DVB-S/SAT/HDD
DVB-T : DVB-T/Freeview (VK)/TNT (F)/Digitenne (NL)
DVD : DVD-speler/DVD-R/Blu-Ray/DVD-thuisbioscoop/DVD Combi/DVD/HDD
VCR : videorecorder
| Device Setup |
| Add Device |
| View Code |
| Delete Device |
| Delete Device | |
| Are you sure you want to delete Living Room TV? | |
| No | Yes |
| Device Setup |
| Add Device |
| View Code |
| Delete Device |
| View Code | |
| Sony TV Code: T0001 | |
| View Another? | |
| No | Yes |


Brightness (Helderheid)
"Delete Device" (Usń urzadzenia) 12
View Code (Przegladanie kodu 12
Brightness (Jasnosc) 15
Combo Units :TV/OCR / TV/DVD / VCR/DVD
| Device Setup |
| Add Device |
| View Code |
| Delete Device |
| Delete Device | |
| Are you sure you want to delete Living Room TV? | |
| No | Yes |
| Device Setup |
| Add Device |
| View Code |
| Delete Device |
| View Code | |
| Sony TV Code: T0001 | |
| View Another? | |
| No | Yes |


Learning (Uczenie)
Delete Device (Odstranit zaízeni) 12
Teletext (Tlačitka sluzby Teletext)
Audio : Miscellaneous Audio, Amplifier / Active Speaker System Audio Receiver/Tuner/Amplifier / (DVD) Home Cinema
DVR :DVD/HDD,SAT/HDD,CBL/HDD,DVB-T/HDD
| Device Setup |
| Add Device |
| View Code |
| Delete Device |
| Delete Device | |
| Are you sure you want to delete Living Room TV? | |
| No | Yes |
| Device Setup |
| Add Device |
| View Code |
| Delete Device |
| View Code | |
| Sony TV Code: T0001 | |
| View Another? | |
| No | Yes |


Ovladani hlasitosti
DVR :DVD/HDD, SAT/HDD, CBL/HDD, DVB-T/HDD
CD Player :CD-lejatszo
| Device Setup |
| Add Device |
| View Code |
| Delete Device |
| Delete Device | |
| Are you sure you want to delete Living Room TV? | |
| No | Yes |
| Device Setup |
| Add Device |
| View Code |
| Delete Device |
| View Code | |
| Sony TV Code: T0001 | |
| View Another? | |
| No | Yes |


Learning (Tanulás)
Navigation taster / OK
Navigation taster / OK
Activities (aktiviter)
DVR :DVD/HDD, SAT/HDD, CBL/HDD, DVB-T/HDD
"Delete Device" (slet apparat)
| Device Setup |
| Add Device |
| View Code |
| Delete Device |
| Delete Device | |
| Are you sure you want to delete Living Room TV? | |
| No | Yes |
| Device Setup |
| Add Device |
| View Code |
| Delete Device |
| View Code | |
| Sony TV Code: T0001 | |
| View Another? | |
| No | Yes |


Learning (laering)
Favorites (Favorite)
Favorites (Favorite)
Favorites (Favorite)
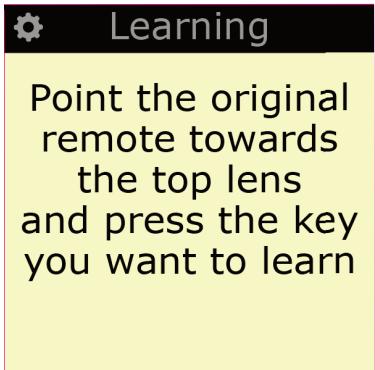
Point the original remote towards the top lens and press the key you want to learn

Learning (Læring)
Favorites (Favorite) 9
Device Setup (Installingnag enheter) 11
Add Device (Lagg till enhet) 11
Delete Device (Raderenhet) 12
View Code (Se kod) 12
Learning (Inlarning) 13
Volume Control (Volymkontroll) 14
Clock (Klocka) 15
Audio (Ljud) 15
Brightness (Lusstyrka) 15
Timeout 16
Language (Språk) 16
RF On/Off 16
Reset (Aterstall) 16
PC-installing 17


Quick Start Guide
USB Cable

CD Rom

SIGHT™
PLUS

Quick Start Guide

USB Cable

CD Rom

Direct digit entry or text entry for customizing labels.

Input-tangent
Väljer inmatningsfunktion für din enchet. T ex TV/SAT, TV/DVD.

Enter/-/--
Direct digit entry or text entry for customizing labels.

Input-tangent
Väljer inmatningsfunktion für din enchet. T ex TV/SAT, TV/DVD.

Enter/-/--
Favorites (Favorite)
DVR :DVD/HDD, SAT/HDD, CBL/HDD, DVB-T/HDD
Device Setup (Installing nving enheter)
"Delete Device" (Raderaenet)
"Select the corresponding device"
Delete Device (Poista laite) 12
DVR :DVD/HDD, SAT/HDD, CBL/HDD, DVB-T/HDD
Select the corresponding device (Valitse laite)
Settings (Puθμiσεις) 10
Settings (Puθμίσεις) 11
Device Setup 11
Add Device (PpooθnKn Σuokεunc) 11
RF On/Off (Paioouvotnta On/Off) 16
Settings (Puθμiεις) √
Device Set Up (Póθμiŋ σωκενις) √
Add Device (Ppooθnknσoukεuic)√
→ What is it? (Tεiaval;
| Device Setup |
| Add Device |
| View Code |
| Delete Device |
| Delete Device | |
| Are you sure you want to delete Living Room TV? | |
| No | Yes |
| Device Setup |
| Add Device |
| View Code |
| Delete Device |
| View Code | |
| Sony TV Code: T0001 | |
| View Another? | |
| No | Yes |


Favorites (U36paHHoe) 9
Settings (HacrpoKu) 10
Settings (Hacmpouku). 11
Device Setup (Hac troika yctroiCTB) 11
Add Device 11
Delete Device 12
View Code 12
Learning (Obuyenne). 13
Volume Control (UnpaBleHne rpoMkoCTbIO). 14
Clock (Yacbi). 15
Audio (Aydino). 15
Brightness (Rpkoctb) 15
Timeout(Bpemoxndn) 16
Language (R3bIK) 16
RF On/Off (BkI./BbIK.PU). 16
Reset (C6poc). 16
(Cm. TaKxpe pyKoBoDCTBO Xsight)
Bnytpn ynapobkn Bbl naide Te cneyuoiee:
- yHnBepcaIbIy nIyIbT dY «Xsight LITE» uIu «Xsight PLUS»;
ka6eIb USB;
KOMnKaT-DnCK C IO DnIy nIyIbTa DY n pyKOBoCTBO nIb3OBaTeJI;
KpaTKoe pyKOBOdCTBO NOIb3OBaTeJIa.
Cchayana, yctahOBIne 6aTapeiKn, COoTHOcR INx IIOJIaPHOCTb + n - C mApKnIPOBKO B 6aTapeHOM OTceke.
Hauatb hactpoyk Bawero npyla Xsight Bbl moKTe DByMa cnoc6amn:
1) CnéduyIte IHCTpykUmaH ha 3KpaHe npbTa, HnPaBLeHHoro Ha yctpoiCTBa, KOTOpbIMu Bbl xOTHTe ynpabTb. 3To Han60one 6bICTpbI MeTOd hactpoiKn pNbTa DY dla 6a3OBoro ynpabNeHn yctpoi CTbAMn.ДЯ paCUnpeHHO nAcTPOiKn PylbTa DY npn IpaBnHOM ynpabHeHn yCTpoiCTBaMn Bbl MOKeTe NOdkIIOUHTb erO K PK.
2) Дя Habсторьс с поюпг, Вклоча унлсйн Activities (Задань), Favorites (Избраимо) и.T.Д., Вставы Компак-диckв в PG и сеунупс доступа руcaховки.Еслв bblncрь 3уerte BCnomorateльhoe ПО, полочипупь DTс поюв BXODЯцEROВКOMПLEKТ Ka6eЯ USB.
Khoŋkn nylbTa Xsight PLUS

Khonka Power (Питунne)
BkIIOUeHnE N BbIKIOUeHne yCTpoNCTBa

Khonka Home (Bo3Bpat B nCxOJHoe noLoXeHne)
KlaBnIa 6bIcTporo Doctyna - OndHMM KOpOTKm HaxKaTneM ocUeCTBnIeTc npexOHa npE bIyIuIy uPoBeH B cTpykType MeHIO. UdepXnBaHNeM KlaBnIuN B TeueHne DByx CekYnD ocUeCTBnIeTc npexOHa IraBbIy eKpaH. TaKxe NcNoJIb3yEtc TnIy BblOpa TeKCTa B KpacHom nol (BblOp B KpacHom nol).

Up/Down
Activities (3aandaHna)
KlaBnua 6bIcTpRo BbIbOpa KOMaH - npMaO JocTy K MeHIO Activities (3aDaHna) B pexIme nolb3OBateJI. OTkIluOHeO B pexIme HAcTpoKn.
Favorites (U36paHHoe)
KlaBnua 6bIcTpRo Bbl6opa KOMaHД - npraMoI DoCTyN K MeHIO Favorites (U36paHHO) B pexIme nonb3OBateJI. OTkIIOueHO B peXIMe HaCTpoJKN.
Devices (YctpoCTBa)
KlaBnHa 6bIcTpRo BVbOpa KOMaHd - pIpMoN DoCTyn K MeHIO Devices (UcTpoiCtBa) B peXnme nolb3OBaTeJI. OTKLIuOHeNo B peXnme NaCTpoiKn.

Khonka Guide (PykoBoCTBO)
BbIOB pyKOBOCTBa nO nCnOJIb3OBaHnIO yCTpoiCTBa, eCnn OpiuHaJIbHbI pUblT Dy mMeet TaKOBoe.

Khonka Menu (MeHIO
BbI3OB MeHIO yCTPOiCtBa,ecnOpuHaJIbHbI pUbT Dy IMeET TaKOBoe.B DVD-yCTPOiCtBax Bbl3OB INCKOBOrO MeHIO.

Khonkn Navigation (Habiragur) / OK
UnpablenHe yHKzmaHn HabuRaun BaueRo UcTroNCTBa npn HauMn.

Info (Hhopmaun)
OTo6paXeHne INΦOpMaZnO 3aRpyXaembix BInDeo- NnI ayDIOHOHOCTeJIaX.

Exit(BvixoJ)
BbIXoI n3 pyKOBOdCTBaNoJIb3OBaTeIa I MeHIO.

KhoNknuVolume(ΓpOMKOCTb)
YnpaBnEHeI rPOMKoCTbIO NOTKJIIOUeHne 3Byka.

Khonk Channel (KaHaJIbI)
UnpaBJIeHne fYHKUIMn channel up/down (KaHaN BBePx/BHn3) B BVNeOyCTpoIcTBax n preset up/down (npEynCTaHOBka BBePx/BHn3) B ayDnOyCTpoIcTBax.

Khonk Teletext (Tenetekct)
IocTyKΦyHKzIyMaTTeNeTeKCTa npu HAIINuN TeKCTOBbIX ΦyHKzIy B yCtPoIcTBe.

Ha3aD (Cable Box/Satellite Box/DVB-T/DVD)
KhoNkn Transport (TpaHcnOpT)
UnpaBneHne yHKnmaDVR (uNpObaa BnDeo3aHncb, LCB3) n ocUeCTBneHne TpaNIOHbIX
yHKnPlay (BoCpOun3BeDeHne)/Pause (PaY3a)/Fast Forward (UckopeHna nepemOTka BpePepd)/Rewind (IpeMeOTka Ha3aJ)/Record (3aInCb) BO BCex dpyrnx BnDeo- u ayDnoocTpoctbax.
Cnncok (TV/Cable Box/Satellite Box/DVB-T/DVD)
Shuffle/CnyaHoeBocnpo3BeDene(Audio/Digital Media)

UuΦpb10-9
Bb6op BxodnHOro CnHana yctpoNCTBa. Hanpimep, TV/SAT, TV/DVD.

Enter/---(BbO/--)
UnpaBneHHe BBOdom HOMepa KaHaHa n BBoD uΦp 6OJbSe 10.
KhONKn nyIbTa Xsight LITE

Khonka Power (Питунne)
BkIIOueHnE N BbIKIOUeHne yCTpoNCTBa

Khonka Home (Bo3BpTaB uXcXoHoe noLoXeHne)
KlaBnIa 6bIcTpRo OocTyNa - OndHMM KOpOTKm HaxKaTneM ocUeCTBnIeTc npeXoHa npE bIyIuIy uPoBeH B cTpykType MeHIO. UdepKmbAHMeN KlaBnIu B TeueHne DByx CeKyHd OcyIeCTBnIeTc npeXoHa IraBbIy eKpaH. TaKxe NcNoJIb3yEtc TnIy BblOpa TeKCTa B KpacHom nol (BblOp B KpacHom nol).

Up/Down
Activities (3aandaHna)
KlaBnua 6bIcTpRo BbIbOpa KOMaH - npMaOn DoCTy n K MeHIO Activities (3aJaHna) B pexnme nolb3OBateJI. OTKlNoUeHO B pexnme NaCTpoJKN.
Favorites (U36paHHoe)
KlaBnua 6bIcTpRo Bbl6opa KOMaHД - npraMoI DoCTyN K MeHIO Favorites (U36paHHO) B pexIme nonb3OBateJI. OTkIIOueHO B peXIMe HaCTpoJKN.
Devices (YctpoCTBa)
KlaBnHa 6bIcTpRo BVbOpa KOMaHd - pIpMoN DoCTyn K MeHIO Devices (UcTpoiCtBa) B peXnme nolb3OBaTeJI. OTKLIuOHeNo B peXnme NaCTpoiKn.

Khonka Guide (PykoBoCTBO)
BbIOB pyKOBOCTBa nO nCNoJIb3OBaHnIO yCTpoiCTBa, eCnn OpiuHaJIbHbI pUblT Dy mMeet TaKOBoe.

Khonka Menu (MeHIO
BbI3OB MeHIO yCTPOiCtBa,ecnOpuHaJIbHbI pUbT Dy IMeET TaKOBoe.B DVD-ycTPOiCTbAX Bbl3OB INCKOBOrO MeHIO.

Khonkn Navigation (Habiragur) / OK
UnpablenHe yHKzIyMaHn HabuRaun BaIeO yCTpoiCtBa npnix HauMIn.

Info (Hhopmaun)
OTo6paXeHne INΦOpMaZnO 3aRpyXaembix BInDeo- NnI ayDIOHOHOCTeJIaX.

Exit(BvixoJ)
BbIXoI n3 pyKOBOdCTBaNoJIb3OBaTeIa I MeHIO.

KhoNknuVolume(ΓpOMKOCTb)
YnpaBnEHeI rPOMKoCTbIO NOTKJIIOUeHne 3Byka.

Khonk Channel (KaHaJIbI)
UnpaBJIeHne fYHKUIMn channel up/down (KaHaN BBePx/BHn3) B BVNeOyCTpoIcTBax n preset up/down (npEynCTaHOBka BBePx/BHn3) B ayDnOyCTpoIcTBax.

Khonk Teletext (Tenetekct)
IocTyKΦyHKzIyMaTTeNeTeKCTa npu HAIINuN TeKCTOBbIX ΦyHKzIy B yCtPoIcTBe.

Ha3aD (Cable Box/Satellite Box/DVB-T/DVD)
KhoNkn Transport (TpaHcnOpT)
UnpaBneHne yHKnmaDVR (uNpObaa BnDeo3aHncb, LCB3) n ocUeCTBneHne TpaNIOHbIX
yHKnPlay (BocPon3BeDeHne)/Pause (Pay3a)/Fast Forward (YckopeHna nepemOTka Bpe-Red/Rewind (IpeMOTka Ha3ad)/Record (3aNcb) BO BCex dpyrnx BnDeo-n aydnoocTpoctbax.
Cnncok (TV/Cable Box/Satellite Box/DVB-T/DVD)
Shuffle/CnyaHoeBocnpo3BeDene(Audio/Digital Media)

UuΦpb10-9
Празмо Ввд сифр Лбб TeKCTа Дл NOьБОВATEЛБСКОн HabТоюнярblIKOB.

Khonka AV (ayno/Bupeo)
Bb6op BxodnHoro cnHana ycTpoCTBa. Hanpimep, TV/SAT, TV/DVD.

Enter/--(Bboa/---)
UnpaBneHHe BBOdom HOMepa KaHaHa n BBoD uΦp 6OJbSe 10.
Исховая настюка
Devices (YctpoicTba)
3a Khonka npedocabnertnpaMoN doctyn KOB CEM yctpoiCTBaM,ynpaBnaembIM c Baawero npIbTa DY. Pn ee haxatm otKpoetc cnncok ynpaBnaembIX yctpoiCTB (Hapnimep, Tebeu3Op, cnTyTHNKOBaB npi-ctabKa,ycnnteB n T.d.).Pn Bbl6ope yctpoiCTBa NylbT DNepeKnouNTcB HxkHbI pexim dny npaBHeN Bbl6paHbIM yctpoiCTBOM.Pn Bbl6ope Tebeu3Opa NylbT Dy 6ydt pa6oTa b Ka k npIbTeLeBn3Opa.
B MeHIO OTO6pa3ntcHa6Op KHOJOK ynpaBHeHn TEkyuIm yCTpoiCTBOM. MoXHO HAcTpoNTb yCTpoiCTBa c NMOOsbIy IIN6 cAmO rO nyIbTa DY (B MeHIO Device Setup (HAcTpoJa yCTpoiCTBa) INIcNMOOsbIy FyHKcIMOnOByeHn), IN6o PNOKJIouHbWmCb K PIK.
Длд дocуп в мени усточьнхмite Конку (зачok-уka3ateь) "Devices" (Ustpoctba), pacnoLoKHeHHyIO IOД ЭкранOM.
Activities (Задань)
3a KhoNka npedocabIeT DOCTyN KO BcEM 3aHaHnM.
VCR :Videorecorder(BuJeomarHnTofoH)
Audio :Miscellaneous Audio (Прочee aydno-yctroiCTBa), Amplifier (YcnilteIb) / Active Speaker System (AknBnaJ akyctnuecka cnTeMa) Audio Receiver (Aydno pecuBep)/Tuner (Tiohep)/ Amplifier (YcnilteIb) / (DVD) Home Cinema (DomauHni KInHOteaTp)
DVR :DVD/HDD, SAT/HDD, CBL/HDD, DVB-T/HDD
CD Player (CD-npOunrpbBbATEIb) :CD Player (CD-npOnuRpbBaTeIb)
Digital Media (Lünφρobbie yctpoucTba) :Media Centre (MeDna-entp) / i-Pod Docks (Дok-staци дя iPod) / Games Consoles (Игробье консоли) / HTPC
(Kom6HnroBaHHbIe yctpoiCTBa :TV/VCR /TV/DVD /VCR/DVD
Home Automation (YMHbI JOM) :Home Automation (YMHbI JOM) / Light Control (UnpaBHeHne ocBeueHnem)
EcnBaue yctpoCTBO He BxOaT Cnncok npeuNCleHHbIX Bblie, HacptoTe eroc nomoBIO PC-Set Up (PK-HacptoKa), CM. ctp. 17.

Settings (Hac troйки)
MeHIO HAcTpoE KIO3BONAEI O6aBnAe bI IIN ydaIbYcTPOIcTBa, 06yauTb HOBbl NpIbT FyHKuIMOpIgHnHaIbHorO pIbTa I npOrpaMMIpOBA Tb pa3NUnHbIe HAcTPOKn Ha pIbTe. B cIeJ. pa3dene coepxntc TaetalbHoe oNtcaHHe kKaJdo FyHKUIM MeHIO Settings (HAcTPOKn).
Hactpoika yctpoicTba
MeHIO "Device Setup"(Hactpoika yctpoicTba) npedoctabniet Bo3MOXHOCTb do6aBHeHnI ydaHeHnY uCTPOiCTBa, a TAKKe npocMOTpa KOID, INcNoJIb3yEmbIX nyIbTom D'ny ynpaBHeHnY uCTpoiCTBaAMN.
"Delete Device" (ydauntb yctpoicTBO)
Пи Вьделени CTPOКИ "Delete Device" (YdaNTb yctpoiCTBO) Bam 6yET npedIoJxHe Na3HaHTb yctpoiCTBO ДЯ уdaLEHINI NOДТВЕРДNTB Bb6OB BCOOTBEcTByIOUeM MeHIO. 3aTeM MoJHO Ha3HaHTb dpyroE yctpoiCTBO ДЯ уdaLEHINI NII 3aBepuNTb pOceC.
1) BbI6epnte cTPOky "Device Setup"(HacTpoiKa ycTpoiCtBa) B MeHIO Settings (HacTpoiKn).
2) BbI6epuTe "Delete Device" (YdaIITb yCTpoiCTBO). OTo6paKaetc npBaJ CTpaHnua yCTpoiCTB.
Пл汞п.Есивснше omcymcmyem ycmpoicm80,komopoe bixomume ydaumb,npokpumme cmpaundu npocmompa dpyux ycmpoicmb.
3) BbI6epnte yctpoiCTBO, KOtOpoe Bbl XOTnTe ydaNTb. IoarBlaerTcMeHIO IOaTBePxJdeHna.
Ipumeyue. Ecu ycmpoucmb, npedha3nauenhoe dnyydaeneu, ucnonb3yemc oohou unu heckolkumu fyuHKUaMu Activities (3adHua) unu Favorites (N36paHnoe), na nyIbme Dy noaBnemc npedynpexdeHue.
4) BbIbepeTe "Yes" (Дa) ДЯ удаеленя устюства ил "No" (Het) ДЯ заBERшени поцessа 6e3 ydaelenya uystoicstba.
"View Code" (Отобрахкени Кoga)
B MeHIO "View Code" (ПрOCMOTr KoJa) OTO6paJauOTcK KoIbI, INCNoJIb3yEmIe NpIbTom Dy IyIynpaBHeNHa yCTpoiCTBOM. 3Ta INHΦopMaun MOpET 6bITb INCNoJIb3OBAHa CnyJXbOuN PoIdEpxKn B Cnyae BaUero Oba- uSeHnIy. OTO6paJeuHne KODOB OCUseCTBIAETc pyTeM Bbl6opa HxKHO rOy CTpoiCTBa n3 CNsCKa HAcTpoEHbIX B HAcToAun MOMENT yCTpoiCTB.
1) Bb6epnte cTPOky "Device Setup" (HacTpoJa ycTpoiCtBa) B MeHIO Settings (HaCToPiKn).
2) BbI6epnte cTPOky "View Code" (OTo6paXeHne kOIOB). OTo6paXaETc npBaY cTpaHnua yCTpoiCTB.
Пл汞и.Еспвснше omсчмьем hyжhoe ycmpoicmbgo, npokpymume cmpaunu bдя npo-cmopma dpyux ycmpoicmb.
| Device Setup |
| Add Device |
| View Code |
| Delete Device |
| Delete Device | |
| Are you sure you want to delete Living Room TV? | |
| No | Yes |
| Device Setup |
| Add Device |
| View Code |
| Delete Device |
| View Code | |
| Sony TV Code: T0001 | |
| View Another? | |
| No | Yes |


Point the original remote towards the top lens and press the key you want to learn

Learning (Овоченье)
Функцяо六年уеняпозьоггл корpoватунл оргнhalьногу пьы (пьт) ДУ в пьт ONE FOR ALL.ДЯ 3TORO BAWIООргнhalьпьпьы ДУdoJXHbIOTB6bTВРабчem COCTORHIM.3TOT pOeCC MoKET nCnOLb3OBaTbCSДЯ Do6abNeHry OTCyTCTBYUOx KnaBnI,ЗAMeHb cyuSceCTBYUOxKHOJOKHa yJYE NaCTPOEHHbIX yCTpoiCTbAX,ЛБОДЯ Do6abNeHry a6conHTo HOBOr yCTpoiCTBaВ pNt DPy.Пи ВБIope Функци Learnng (O6uyehne) BamпpeLarapetcBb6paTb,6yTe JIN OHA npimHeYbCkФункци ИПИНOBOMY yCTpoiCTbY.CleDyUOJIш WAr -3TO BvblOp KhoNKn,Ha KOTOpUy nporpamMnyepTcKoPnoBaiHne.DaJIe HnyKHO HanpaBHTb OprunHailbHy nIpyTb DYNa NpIyt ONE FOR ALL I NaKaTb Ha OprunHailbHom nIbTe TY KONKBy, KOTOpU bI XOTITE cKOnIPoBaTb Ha YHNBepCaIbHy nIpyT. EclnKHOKA YBJIeTcR KhoNIOm MeHIO,ee MoxHo 6yTe nepenMeHOBaTb,ncNoJIby zuΦpoBly KhoNKn.ПOnHOCTbIpoUeDypa BvIgIaIIT TaK:
1) BbIepeNTe cTPOky "Learning"(06UeyHne) B MeHIO Settings (HaCTpoKn).
2) For which device? (Для кakoro устpoctва?)
"New Device"(HOboeyctpoiCTBO")
NAN
"Select the corresponding device" ("BbI6epnte coOTBeTCTByuOue yctpoiCTBO")
IpumueaHue. EcnE cnucke omycmcbeyem hynHoe ycmpoucmbo, npokpymume cmpauu bI npoCmoppa 6bIwe20 kouuecmba ycmpoucme.
3) Пи КОПИРОВАИМ ФУнКЦИ ВБЕРITE KНОПКУ И пьтЕ ДУ пьбо НAZMITE ceHcOрпье KНОПКИ
На ЗКране ДЯ ВБЕРОТToI, И кOTOPYЮ пограммИPyETСКОПИPyeMaФУнКЦИ.
IpumueaHue. MoxHo 3anpo2pammuobamb yhkuuHa IIO6yU KhoNy, paononoKeHHyU Ha naHenu lybma lu6o Ha 3kpane IIO6O zo ycmpoucmba, 3a UcknoyeHem KhoNOK, coombemcmyoUx yHKUaM Home (Pa6oou cmon), Favorites (U36paHnoe), Activities (3aDaHua) u Devices (Ycmpoucmba).
4) HanpaBbTe npIbT ha yCtpoiCTBO, c KOTOPORO npOn3BOJNTc o6UeHne. PaCnOJoxKe TnybT-nc TouHnk Ha paCSToHnn He daaee, Yem 5 DIOJMOB, OT HIXJHrero TOPca NpIbTa ONE FOR ALL. Peko MeHdyETc co6JIIOdaTb paCSToHne ot 2 Do 5 DIOJMOB (5-12 cm).
5) Ha nyIbTe, c KOtOpOro npOn3BODnITcra 06UeHHe, haxMnte Ty KHOIpKy, KOtOpYIO Bbl XOTnTECKONIPoBaTb.
a. EcniФункця ckОирOBaHa HenpaBnIbHo, NOBJIeTc coO6eHne 6O oUH6Ke. Bbl6epnte "Yes" (Да) ДЯ NOВTOpeHЯ ПONbITkn IIN "No" (HET) ДЯ BblXoJa n3 MeHIO Settings (Ha CTpoiKn).
b. Ecn KHOJka, Ha KOtopyIO Bbl nporpamMpye ToKOpnyo fHyHKUIO, yXe npBraHa K fHyHKUIN, Bam 6yET npednojKeHO nepe3anncatb nocneHIOIO.
c. Ecnf yHKZnK HONKn CkONnpoBaHa npaBnIbHo, OHa coXpaHReTcB namrTb. Daane MoxHO KOINPOBaT bDpyruO fYHKZnHO.
d. Ecn yHKnue HcCOPHO KNONK cKOnnpoBaHa npaBnIbHo, Bam 6ydt npednoxeH coxa HNTb Jpblk.
6) EcnKoNpIpyemaj KHONKa YBJIeTcA ceHCOPHO, INCNoJIb3yJTe CnΦpOByIO KNaBnAtypy IJa BBOda npIbka.
a. BBeJInTe 6yKbI, nCNoJIb3yI cIΦpOByIO KJIaBnATpy. KaN I B CTaNdApTOM TeNeΦOHe, Ha KHONkax KJIaBnATpyb I N3o6paJxehb I 6yKbI I cIΦpbl. HAXMITE KONKy OINH pa3 I Jn OTO6pa JxHnIePBOI 6yKbI I INI cIΦpBl B pRy CmBOJOB, PnB83aHHbIX K 3ToI KONKe. IpoDOn JxaiTe HaxIMaTb KONKy I JnO TO6paXeHnOCTaJIbHbIX 6yKB I INI cIΦp B pRy D CmBOJOB, PnB83aHHbIX K 3ToI KONKe.
Hanpimep,ДЯ ВьзОва 6yKbbl "J" HaxMITE KHOПКу "5" HaцифpoВй KnaBnAtype.Дя Bь3OBA 6yKbbl "K" CHOBa HaxMITE KHOПКу "5".
Длу удалениькынжмпe "Clear"(C6poc).
7) Haxmnte "OK".IyIbT Iy coxpaHnT HOByo yHKUIO.
IpumueaHue. Nylb m Iy aBmamuuecku pa3Mecmum HOBbIe cHcOpHbIe KHONku Ha cBo6oHOM npocmpaHcmbe 3KpaHa, npdeHa3NaueHemOd JI KOHKpmHOZ ycmpoucmba.
Locking Volume to a device
1) BbI6epnte cTPOky "Volume Control" (UnpaBHeHne rpoMkoctbH) B MeHIO Settings (HaCtpoKn).
2) O3haKOMbTeCb c pa3bJcHHTeJIbHbIM MeHIO, 3aTeM haXMMte "OK".
3) BbI6epnte cTPOky "LockVolume" (PpOrpaMMnPoBaHne rPOMKocTn). OTo6paJxAetc npBba CTpa Hnua yCTpoiCTB.
Ipumeuue. Ecn cnuke omycmeyem ycmpoucmbo,Ha komopom bixomume zanpozpaMMupobamb ZpOMKocmb, npokymume cmpaunbdo nnpomoma dpyzux ycmpoucmb.
4) Bb6epnte yctpoiCTBO,Ha KOTOpOM Bbl XOTnTE 3anporpamMPOBaTb rPOMKocTb. Ha ekpahe nyIbTa DY noBHTcMeHIO nOITBePjXdEHHJ.
5) HaxmTe "Finish"(TotoBO).
ydaenhe ycTpoiCTBa n3 cnncka nporpaMMnpyembIX
1) Bb6epnte cTPOky "Volume Control" (UnpaBneHne rpoKocTbO) B MeHIO Settings (HaCtpoKn).
2) O3haKOMbTeCb c pa3bJcHHTeJIbHbIM MeHIO, 3aTeM haXMMte "OK".
3) Bb6epnte ctpoky "Unlock Device" (OTMeHnTb nporpammpoBaHne yctpoCTba). NylbT dU ydaJare nporpammpoBaHne rpomKoCTN. BbIODITcmeHIO NOtBpeKdEHHa.
4) HaxmTe "Finish"(TotoBO).
OTmeHa nporpaMMnpOBaHn rPOMKoCTn dJa BcEx yCTpOiCTB
1) BbI6epnte cTPOky "Volume Control"(UnpaBHeHne rpoMkoctbH) B MeHIO Settings (HaCtpoNk).
2) O3haKOMbTeCb cpa3bJcHHTeJIbHbIM MeHIO, 3aTeM haxMMte "OK".
3) BbI6epnte cTpOky "Unlock All" (OTMeHnItb npOrpaMMnpOBaHne ycTpoiCTBa).IyIbT dY ydaJIaER TnpOrpaMMnpOBaHne rPOMKoCTn. BbIbOHTcMHeIO nOITbeXKeHnI.
4) HaxmTe "Finish"(TotoBO).
Settings (HacrtpoiKn)
Contrast (KoHTpact)
3a NahtpoKa nO3B0JeaTepyIINPOBaTb npKoCTb ekpaHa c npIbTa D.
1) BébepuTE "Contrast" B MeHIO "Settings".
2) BbI6epnte ypoBeHb KOHTpaCTHOCTn. KoHTpaCTHOCTb 3KpHa H3MeHNTcB COOTBeTCTBnC Bbl6paHHbIM yPOBhem. YTO6bI npocMOTpeTb DpyroYyPOBEH KoHTpaCTHOCTn, HaxMMTe " + " IIN " -". KOnTpactHOCTb 3KpHa H3MeHNTcB COOTBeTCTBn C HOBBIM yPOBhem.
3) Bb6epnte "OK" nIy coxpaHEny Bb6paHHOrO ypOBn KoHTpaCTHOCTN.
3Ta NaCTPOKa NO3BOJnAET peryIINPOBaTb pyKoCTb 3KpaHa nylbTa DY.
1) BbI6epnte cTPOky "Brightness"(RpkocTB) B MeHIO Settings (HaCtpoKn).
2) Bb6epnte ypoBeH npKocTn. RpKocTb 3kpaHa n3MeHITcB C COOTBETCTBn C Bbl6paHHbIM ypoBhem. TTo6bl npocMOTpeT bpyroyn ypoBeH npKocTn, Haxmnte " + " nlin " -". RpKocTb 3kpaHa n3MeHITcB C COOTBETCTBn C HOBBm ypoBhem.
3) Bb6epnte "OK" Pnybt Dy coxpaHnT Bb6paHnb ypoBeH npKocTn.
Timeout(Bpemeoxnndnna)
Длээхонногорacxoobahnna nitaHnO rAkkymyIaTopa noCDCBtKa KhoNOK uKK-ekpaHa aBtOMaTneCCKN OTKJIouaetcnoCte TOrO, KaONH 6bln He AKTNBbI B TeueHne KaKOrTo TO BpeMeHn. 3TOr nepNo nO yMOnUaHnIO coCTabJIeT 10 cekuHd. Bbl moKeTe y3HaTb dInTeJbHOctb nepNoa n OTperynipoBaTb ee B MeHIO hAcTpoEk Timeout (BpeMa oXndaHn).
1) Bb6epnte ctpoky "Timeout" (Bpem oxndnna) B MeHIO Settings (HaCtpoiKn).
2) Ha 3kpaHe oTo6pa3ntc4 TekyaA npOdoJXnTeJbHocTb OxNJaHn. MnHmAbJbHoe BpeMa OxNJaHn5 cekyH, MaKcImaJIbHoe - 30 cekyHd. UTo6bl N3MeHnTb BpeMa OxNJaHn, HaxMnTe " + " nIin" -". Ha 3kpaHe 6ydet OTo6paJxeHO HOOE BpeMa OxNJaHn.
PpumueaHne. Ipu ybeuueenu nepuoda epemehu oxudanua cspk cnky6bakkymnyamopa cokpaauemca.
Language (ЯзвíК)
3Ta NaCTPOnKa N03BOJnAeT N3MeHArT b3bIK, Ha KOTOPOM OcyIeCTBlaeTcra pa6Ota C pynbTom Dv. BCE MeHIO IN HCTpyKcun 6dyT OTo6paXaTbCra Ha Bbl6paHOM 3bIke.
Tilt On/Off (Haçloh BkI./BbɪkI.)
Iyblxight PLUS nocabnepc co BCTpoehbim DaTNUKOM yrna HaKLOHa n aBtOMaTueCKN BKIOUaETC npn noHn. PnJxenaHnn 3Ty fynkunmoXHO OTKIOHTb.
1) Bb6epuTe "Tilt On/Off" B MeHIO "Settings". Xsigt oTo6pa3NT TeKyuIcn cTaTyc.
2) Bb6epnte "ON" (BkI.) nII "OFF" (BbIK). uTo6bl BkIOuHTb nII bBkIOuHTb daTnK yrna HaKIOHa.
3) Bb6epnte"OK",HTO6blcoxpaHnTBHaCTpOKN.
Reset (C6poc)
B MeHIO c6pOca ydaIaIyOTcBce cKoINpOBaHNbIe yHKcNn I npblIK.
B nyIbte D'Y octaHcyr Bce do6abneHHbe Bamn ycTpoNCTBa, 3aHaHnN u N36paHhBe NaCTPOKn.
1) BbI6epeTe cTPOky "RESET" (C6P0C) B MeHIO Settings (HaCTpoiKn). Ha 3KpaHe pIyTa DY oTo6pa 3ITcra MeHIO c6pOca.
2) Haxmnte "RESET" (C6P0C). Bce ckonnpoBaHHbIe fynKcNn npblkN ydaJIOTc. PpOncxOaNT BO3BpaT B MeHIO HaCTpoEK.


Hac troponka uepe3 PK
Kak n B cnyae BCEx yHKuN, ONncaHHbIX BaDHOM pyKOBOdCTBe, nyIb T y MoXHO hAcTPOITb, NcPOnlb-3y4 NK cDocTyON M INThepHeT. 3To no3BOJNT Bam nCNoJIb3OBAt b CneDuOUIne yHKUIN.
"Activities"(3aandaHna)
IcnoIb3yIte npIbT DnI ynpaBneHn HeckoIbKIMn ycToPoiCTBaMn, Ka6 6yIto 3TO eINHOe cJeOe, n HAcTpaNbaTe BaWe ycToPoiCTBO B φOpMaTe IJnI pOcMoTpa TeNeBn3Opa, IpocLyuWbAHn My3bIK NII JIO6bIX INbIX 3aHrTNI 3 pa3praDo MaunHx pa3BLeueHn.
" Favorites" (Избразноe)
Kombo Birimler :TV/VCR / TV/DVD / VCR/DVD
"Delete Device" (Cihaz Sil)
View Code (Kodu Göster)
| Device Setup |
| Add Device |
| View Code |
| Delete Device |
| Delete Device | |
| Are you sure you want to delete Living Room TV? | |
| No | Yes |
| Device Setup |
| Add Device |
| View Code |
| Delete Device |
| View Code | |
| Sony TV Code: T0001 | |
| View Another? | |
| No | Yes |


Learning (Ögrenme)

- Getting to Know Xsight 3
- Home Screen and Everyday Use 9
- Settings 11
- PC Setup 17
- Getting to Know Xsight
- Unpacking and Setting Up "Xsight LITE" or "Xsight PLUS"
- To begin setting up your Xsight you have two options:
- Keys Xsight PLUS
- Power key
- Home key
- Up/Down
- Confirm
- Activities
- Favorites
- Devices
- Guide key
- Menu key
- Navigation keys / OK
- Info
- Exit
- Volume keys
- Channel keys
- Teletext keys
- Transport keys/OK
- Digit 0-9
- Input
- Enter/-/--
- Keys Xsight LITE
- Navigation keys
- Initial Setup
- Home Screen and Everyday Use
- Favorite
- Settings
- Device Setup
- "Add Device"
- "Delete Device"
- View Code
- Learning
- Volume
- Locking Volume to a device
- Removing a Device from Lock
- Unlocking All Volume
- Contrast
- Brightness
- Timeout
- Language
- Tilt On/Off
- Reset
- PC Setup
- Erste Schritte 3
- Tilt On/Off (Tiltsensor)
- Apprentissage
- Configuración
- Aprendizaje
- Learning (Formação)
- Brightness (Helderheid)
- Learning (Uczenie)
- Teletext (Tlačitka sluzby Teletext)
- Ovladani hlasitosti
- Learning (Tanulás)
- Navigation taster / OK
- Activities (aktiviter)
- "Delete Device" (slet apparat)
- Learning (laering)
- Favorites (Favorite)
- Learning (Læring)
- PC-installing 17
- Input-tangent
- Device Setup (Installing nving enheter)
- "Delete Device" (Raderaenet)
- Settings (Puθμίσεις) 11
- Settings (Hacmpouku). 11
- Hauatb hactpoyk Bawero npyla Xsight Bbl moKTe DByMa cnoc6amn:
- Khoŋkn nylbTa Xsight PLUS
- Khonka Power (Питунne)
- Khonka Home (Bo3Bpat B nCxOJHoe noLoXeHne)
- Activities (3aandaHna)
- Favorites (U36paHHoe)
- Devices (YctpoCTBa)
- Khonka Guide (PykoBoCTBO)
- Khonka Menu (MeHIO
- Khonkn Navigation (Habiragur) / OK
- Info (Hhopmaun)
- Exit(BvixoJ)
- KhoNknuVolume(ΓpOMKOCTb)
- Khonk Channel (KaHaJIbI)
- Khonk Teletext (Tenetekct)
- KhoNkn Transport (TpaHcnOpT)
- UuΦpb10-9
- Enter/---(BbO/--)
- KhONKn nyIbTa Xsight LITE
- Khonka Home (Bo3BpTaB uXcXoHoe noLoXeHne)
- Khonka AV (ayno/Bupeo)
- Enter/--(Bboa/---)
- Исховая настюка
- Devices (YctpoicTba)
- Activities (Задань)
- Settings (Hac troйки)
- Hactpoika yctpoicTba
- "Delete Device" (ydauntb yctpoicTBO)
- "View Code" (Отобрахкени Кoga)
- Learning (Овоченье)
- ydaenhe ycTpoiCTBa n3 cnncka nporpaMMnpyembIX
- OTmeHa nporpaMMnpOBaHn rPOMKoCTn dJa BcEx yCTpOiCTB
- Settings (HacrtpoiKn)
- Contrast (KoHTpact)
- Timeout(Bpemeoxnndnna)
- Language (ЯзвíК)
- Tilt On/Off (Haçloh BkI./BbɪkI.)
- Reset (C6poc)
- Hac troponka uepe3 PK
- "Activities"(3aandaHna)
- " Favorites" (Избразноe)
- "Delete Device" (Cihaz Sil)
- View Code (Kodu Göster)
- Learning (Ögrenme)
Brand : ONE FOR ALL
Model : URC-8620
Category : Universal remote