
TREND LINE - Universal remote ONE FOR ALL - Free user manual and instructions
Find the device manual for free TREND LINE ONE FOR ALL in PDF.
| Product Type | Universal Remote Control |
| Brand | ONE FOR ALL |
| Model | TREND LINE (URC-2560) |
| Power Supply | 2 AAA / LR03 batteries (alkaline recommended) |
| Controllable Devices | 3 devices: TV, VCR, second TV or VCR (AUX) |
| Main Functions | Power/Standby, volume, program, mute, numeric keys, scan, teletext, sleep timer, color/brightness settings, automatic code search, code lock |
| Infrared Range | Approximately 10 meters (estimated) |
| Approximate Dimensions | 20 cm × 5 cm × 2.5 cm |
| Approximate Weight | 100 g (with batteries) |
| Care and Cleaning | Clean with a soft, dry cloth. Do not use liquid or abrasive products. |
| Safety | Do not expose to moisture, excessive heat, or shocks. Do not use rechargeable batteries. |
| Spare Parts and Repairability | Not user-serviceable. Only batteries replaceable. |
| General Information | Conforms to CE standards. Manufactured by Universal Electronics Inc. 90-day warranty. |
Frequently Asked Questions - TREND LINE ONE FOR ALL
User questions about TREND LINE ONE FOR ALL
0 question about this device. Answer the ones you know or ask your own.
Ask a new question about this device
Download the instructions for your Universal remote in PDF format for free! Find your manual TREND LINE - ONE FOR ALL and take your electronic device back in hand. On this page are published all the documents necessary for the use of your device. TREND LINE by ONE FOR ALL.
USER MANUAL TREND LINE ONE FOR ALL
About Your LITTLE EASY 3
Features and Functions 3
Installing the Batteries 6
Setting Up Your Device 7
The AUX Key: Setting Up a Second Television or Video 8
The Search Method 10
Getting Codes from the LITTLE EASY 11
Changing the Device Keys 12
The Scan Key 13
Colour & Brightness 14
Punch-Through (Control Across Device Types) ... 14
More On Teletext 15
Sleeptimer 16
Preventing Accidental Code Changes 19
Trouble-Shooting 20
Consumer Help-Line 21
Quik Code Reference 22
Set-Up Codes Set-Up Codes For Televisions 23
Set-Up Codes For Video Recorders 28
Note: If you're having problems operating all the functions of your device, don't worry, your ONE FOR ALL may just need customising for your model type. Just call our consumer help-line and we'll get you on the right track.

About Your LITTLE EASY
Your LITTLE EASY Package contains:
Your LITTLE EASY Remote
Your LITTLE EASY Manual
Your manual is divided into two parts: set-up instrc-tions and device codes. You will need your manual to set up your new LITTLE EASY so please be sure to keep it.
Your LITTLE EASY needs two new AAA/LR03 alkaline batteries.
Your LITTLE EASY can operate three devices: a Television, a Video and a Second Television or Video Recorder.
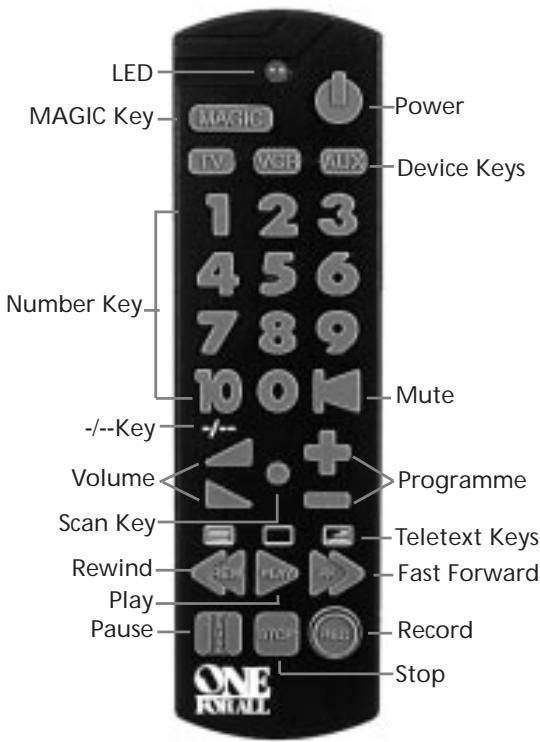
Features and Functions
Key
Function
LED
The LED (Light Emitting Diode) flashes red to show the remote is working.

Power
The Power key controls the same function as it did on your original remote.

MAGIC Key
The MAGIC key is used to set up your LITTLE EASY and to access special functions.

Device Keys

The TV, VCR and AUX keys select the home entertainment device to be controlled. For example pressing the TV key allows the remote to control the functions of your Television, after pressing VCR you can operate your Video Cassette Recorder and the AUX key operates a second Television or Video Recorder.


Number Keys
The Number keys (0-9, 10) provide functions just like your original remote, such as direct access programme selection. If your original remote uses one/two digit input switching (-/- symbol), this function can be obtained by pressing the -key, which is the same as the 10 key.

Volume,Programme
The Volume and Programme keys control the most frequently used functions of your Television. They operate just as those on your original remote.

Scan
The Scan key allows you to easily browse through the programmes on your Television and Video Recorder. See page 13 for more information.

Mute
The Mute key operates the same function as it did on your original remote.

Video Recorder Keys
After pressing the VCR key, the Video Recorder keys operate the functions of your
Video Recorder. To prevent accidental recording, the Record key must be pressed twice to start recording.

Teletext Keys
After pressing the TV key, the top row of the Video Recorder keys are used to operate the main teletext functions.

The symbols above the keys are for teletext. The Text keys are used to access the teletext functions of your Television. Of course, your Television must be teletext capable. For an explanation of the teletext symbols, please refer to page 15 of this manual. For a detailed explanation on how teletext works, please refer to the manual of your television set.


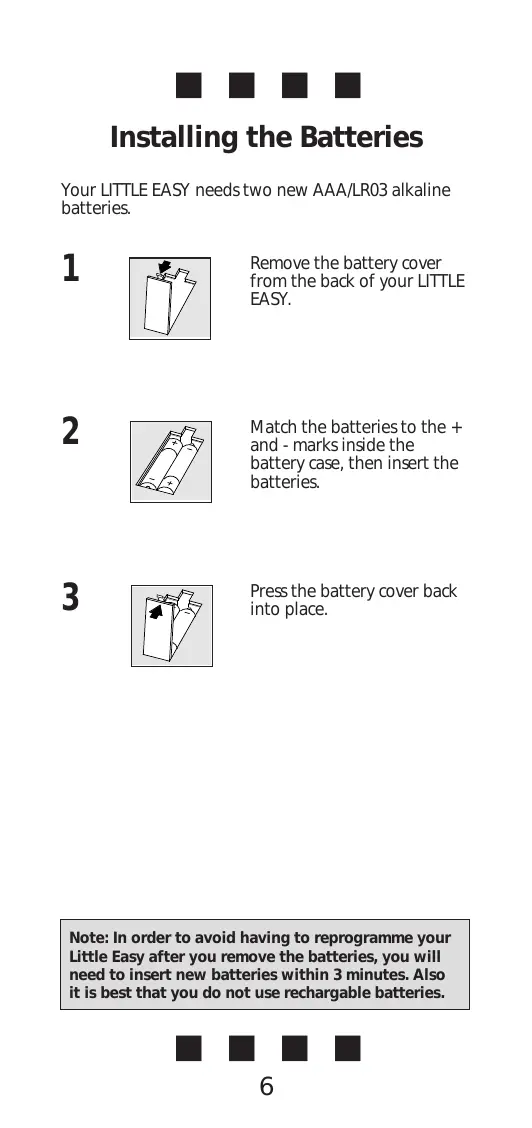
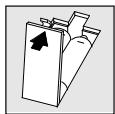
Installing the Batteries
Your LITTLE EASY needs two new AAA/LR03 alkaline batteries.
1
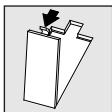
Remove the battery cover from the back of your LITTLE EASY.
2
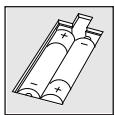
Match the batteries to the + and - marks inside the battery case, then insert the batteries.
3
Press the battery cover back into place.
Note: In order to avoid having to reprogramme your Little Easy after you remove the batteries, you will need to insert new batteries within 3 minutes. Also it is best that you do not use rechargeable batteries.

Setting Up Your Device
To set up the LITTLE EASY for your Television:
1
ONE FOR ALL
Admiral 087 093 264
163
Agazi 264
ACP 975
A&B 813
Alko 216
Akai 208351037
191 163 284
009 Akiba 218
Find your Television code in the Set-Up Code section (starting on page 23). Codes are listed by brand name. The most popular code is listed first. Make sure your Television is switched on.
2
TV
MAGIC
Press and release your LITTLE EASY's TV key. Then press and hold down the MAGIC key until the LITTLE EASY's red light blinks twice. (The light will blink once and then twice.)
3
123
Enter your three-digit TV code using the number keys. The red light will blink twice.
4

Now, aim your LITTLE EASY at your Television and press POWER. If your Television switches off, your LITTLE EASY is ready to run your Television.
Write your code in the three boxes on page 22, for quick, easy reference.
To control your Television, press TV first.
Important notes:
-
To set up your Video Recorder, follow the same instructions above, only press the VCR key during step 2.
-
If your Video's original remote control does not have a power key, press PLAY instead of POWER.
-
If your Device does not respond, follow steps 1-4 with each code listed for your brand. If none of the codes listed for your brand operate your Device, then try the search method described on page 10, even if your brand is not listed at all.

The AUX Key: Setting Up a Second Television or Video
The AUX key on your LITTLE EASY can be used to control a second Television or Video Recorder.
To set up the AUX key to control a second TV:
1

Press and hold down the MAGIC key until the red light blinks twice. (The light will blink once and then twice.)
2
992
Press 9 9 2 TV AUX.

3

Find your Television code in the Set-Up Code section (starting on page 23). Codes are listed by brand name. The most popular code is listed first. Make sure your Television is switched on.
4

Press and release your LITTLE EASY's AUX key. Then press and hold down the MAGIC key until the LITTLE EASY's red light blinks twice.

(continued)

5
123
Enter your three-digit TVcode using the number keys. The red light will blink twice.
6

Now, aim your LITTLE EASY at your Television and press POWER. If your Television switches off, your LITTLE EASY is ready to run your Television.
Write your code in the three boxes on page 22, for quick, easy reference.
Important notes:
- To set up your Video Recorder, follow the same instructions above, only press the VCR key during step 2.
- If your Video's original remote control does not have a power key, press PLAY instead of POWER.
- If your Device does not respond, follow steps 3-6 with each code listed for your brand. If none of the codes listed for your brand operate your Device, then try the search method described on page 10, even if your brand is not listed at all.

The Search Method
If your Television or Video Recorder does not respond to the LITTLE EASY after you have tried all the codes listed for your brand, try the Search Method. The Search Method may also work if your brand is not listed at all.
Let's say you cannot get your LITTLE EASY to control your Television:
1 Switch your Television on.
2 TV Press the TV key on your LITTLE EASY.
3 MAGIC 991 Aim your LITTLE EASY at your Television. Press and hold down MAGIC until the LITTLE EASY's red light blinks twice. Then, press 991. The red light will blink twice.
4 TV Now, alternate between TV and POWER, over and over, until your Television turns off. You may have to press these keys many times, so please be patient. It could take up to 5 minutes. Remember to keep pointing your LITTLE EASY at your Television when you press the POWER and TV keys.
5 MAGIC When your Television turns off, press MAGIC. Don't forget, press MAGIC as soon as your
Television turns off. Now your LITTLE EASY is ready to run your Television.
To search for the code for your Video Recorder, follow the instructions above, only press the VCR key during steps 2 and 4.
Note: If your Video's original remote control does not have a power key, press PLAY instead of POWER when searching for your code.


Getting Codes from the LITTLE EASY
Even if you have used the Search Method, it is handy to know your Television or Video code for future reference. It's easy to get your code after you have set up the Little Easy with your Television or Video.
To get your Television code:
1 TV Press TV.
2 MAGIC Press and hold MAGIC until the LITTLE EASY's red light blinks twice. Press 990 The red light will blink twice.
3 1
For the first digit of your three-digit code, press 1 and count the red blinks. If there are no blinks, the digit is "0".
4 For the second digit, press 2 and count the red blinks.
5 3 For the third digit, press 3 and count the red blinks. Now you have your three-digit code.
For your Video, follow the same steps above, only press VCR instead of TV.
Make sure you write your Television code in the three boxes on page 22.


Changing the Device Keys
If you want, you can change any of the device keys (TV, VCR or AUX) to operate another type of device. The chart below lists how to change the keys and to set up that device:
| To Change: | Press: |
| TV to VCR | MAGIC* 992 VCR TV then TV MAGIC* Code |
| VCR to TV | MAGIC* 992 TV VCR then VCR MAGIC* Code |
| AUX to TV | MAGIC* 992 TV AUX then AUX MAGIC* Code |
| AUX to VCR | MAGIC* 992 VCR AUX then AUX MAGIC* Code |
- Hold down the MAGIC key until the red light blinks twice. (The light will blink once and then twice.)
To reset a device to its original function, press:
| TV | MAGIC* | 992 | TV | TV |
| VCR | MAGIC* | 992 | VCR | VCR |
| AUX | MAGIC* | 992 | AUX | AUX |
- Hold down the MAGIC key until the red light blinks twice. (The light will blink once and then twice.)

The Scan Key
Your LITTLE EASY comes with a special Scan key which lets you go through every programme available on your Television or Video Recorder.
For example, to scan through the programmes on your Television:

Aim the LITTLE EASY at your Television and press TV, then Scan. You will automatically move through all the programmes available on your Television stopping at each programme for about three seconds. Remember, the LITTLE EASY must remain aimed at your Television the entire time you are using Scan.
2 When you find a programme that you would like to watch, simply press the Scan key again to stop the Scan feature.
To use Scan with your Video Recorder, simply press VCR then Scan. To use Scan with the AUX key, press AUX then Scan.
Note: Scan may not function with devices that did not have a programme +/- key on the original remote.

Colour & Brightness
Depending on the functions of your original remote control, the LITTLE EASY can operate the colour and brightness settings of your Television.
To adjust the colour:

Press MAGIC followed by Volume+ (for colour up) or Volume- (for colour down).
To adjust the brightness:


Press MAGIC followed by Programme+ (for brightness up) or Programme- (for brightness down).
Punch-Through
You may be able to use some features of your Television and Video Recorder at the same time. If you're watching a programme on your Video, you can adjust the volume (a TV function) without first pressing the TV key. The chart below lists some of the possibilities:
Last Key Pressed:
You Can Control:
VCR
TV volume up and down, mute
AUX
TV volume up and down, mute


More on Teletext
The LITTLE EASY is designed to operate the basic functions of teletext (text on, text off and mix).
| Symbol | Title | Description |
| TEXT | Puts the Television in the teletext mode | |
| TV | Switches the Television back to regular viewing mode. On some Televisions, this may be done by pressing the TEXT key several times. | |
| MIX | Shows both teletext and regular Television simultaneously. Also used for subtitling. On some Televisions this function is accessed by pressing the TEXT key twice. |
Note: For a more detailed explanation of teletext, please refer to the manual of your Television. Remember, different Televisions control teletext features in different ways. Not all of the teletext functions may be available for your particular model.


Sleeptimer
Sleeptimer is a feature which comes built into many TVs. It allows you to set your device to turn off within a certain amount of time. This feature comes in handy if, for example, you enjoy falling asleep with your television on.
With the ONE FOR ALL, there are two ways to use the sleptimer. If your TV came with this feature built in, follow the instructions "Device Sleeptimer" below. If your device did not come with this feature, follow the instructions "ONE FOR ALL Sleeptimer".
Device Sleeptimer
If your TV has a "Sleeptimer" function built in, you can access this function with your ONE FOR ALL remote. To do so:
1 Make sure your TV is switched on.
2 TV Press the TV key.
3 Point the ONE FOR ALL at your TV and press and release MAGIC then press POWER. MAGIC You should see the Sleeptimer activate on your TV screen. To increase the
timer, simply press MAGIC then POWER until the timer gets to the desired time.
To deactivate the Sleeptimer, repeat steps 1-3 above. During step 3, continue pressing Magic then Power until the timer indicates zero minutes.
Note: Remember, your device must have its own Sleeptimer function in order for the above instructions to operate. If your device does not have its own Sleeptimer, follow the instructions outlined below.
The ONE FOR ALL Sleeptimer
Your ONE FOR ALL remote comes with an internal Sleeptimer function for those devices which did not come standard with this function. To use the ONE FOR ALL Sleeptimer:
Making your ONE FOR ALL ready for Sleeptimer:
1 TV Press the TV key.
2 MAGIC Then, press and hold MAGIC until the red light blinks twice. Press 970. The red light will blink twice again. It is only necessary to perform steps 1 and 2 once. Now to set the timer, continue with the steps below.
Setting the ONE FOR ALL Sleeptimer:
It is possible to set the timer for 15, 30, 45 or 60 minutes. To do this, first make sure your TV is switched on. Then,


(15)
Press and release MAGIC then POWER. The red light will blink once which indicates the timer is set for 15 minutes. To increase the timer, simply press POWER again (this must be done within 5 seconds.). The light will blink twice indicating the timer is set for 30 minutes (2x 15). You can press POWER a maximum of four times which will set the timer to 60 minutes.


Once you have set the timer to the desired time, set your ONE FOR ALL remote down, pointing it at your device. When the programmed amount of time has elapsed, the ONE FOR ALL will send the command for Power, hence turning off your device.
Notes:
- The red light on the ONE FOR ALL will blink every 15 seconds indicating that the remote is in Sleeptimer mode.
-To deactivate the Sleeptimer, simply press any key on the ONE FOR ALL remote.
-It is only necessary to follow steps 1 and 2 above one time. For subsequent use of the Sleeptimer, simply begin with "Setting the Sleeptimer".
-Remember, when using the ONE FOR ALL Sleeptimer, you must set the remote so it is pointing to your device.
Preventing Accidental Code Changes
To prevent the accidental changing of codes in the LITTLE EASY (for instance by young children), it is possible to lock in the code you have set up:
Please remember, this is an optional feature and should only be used after you have found all the code(s) which operate your device(s) correctly and have set up your LITTLE EASY exactly the way you want it.
| To lock in your: | Press: | ||
| TV code | TV | MAGIC | * 9 8 2 |
| VCR code | VCR | MAGIC | * 9 8 2 |
| AUX code | AUX | MAGIC | * 9 8 2 |
- Hold down the MAGIC key until the red light blinks twice. (The light will blink once and then twice.)
To release the lock, simply repeat the same steps.
Note: Once you have locked in a code, you will not be able to enter a new code until the lock is released.
Trouble-Shooting
| Red light does not blink when you press a key? | Replace batteries with 2 fresh, new AAA/LRO3 alkaline batteries. |
| The ONE FOR ALL does not respond after pressing a key? | Make sure you are using new batteries and are aiming the ONE FOR ALL at your device. |
| The ONE FOR ALL does not operate your device(s)? | A) Try all the codes listed for your brand B) Try the search method on page 10. |
| Your brand is not listed in the ONE FOR ALL code section? | Try the search method on page 10. |
| When following the set-up instructions, the red light on the ONE FOR ALL only blinks once instead of twice after you enter a three-digit code? | Did you use the Code Lock feature? You must first unlock the code before entering a new code. Follow the instructions on page 19 to do this. |
| The ONE FOR ALL is not preforming commands properly? | You may be using the wrong code. Start the search method over again to locate the proper code. |
| Press a key but get the wrong result? | Hold MAGIC until the red light blinks twice, then press 992 and the device key twice. You will need to set-up your device again. Try the codes for brand or the search method on page 10. |
| You cannot control the volume feature of your Satellite, Cable Converter or TV/Video combination OR you cannot control the volume of the TV set up on the AUX key? | Hold MAGIC until red light blinks twice Then press 993 and VOL+. To set the volume control back to TV (Punch-Through), hold Magic until the red light blinks twice, then press 993 TV. |
| Problems changing channels? | Enter the programme number exactly as you would on your original remote. |
| Video not recording? | As a safety feature on your ONE FOR ALL, you must press the Record key twice. |
| Scan does not work on your device? | Make sure your original remote had a programme +/- key. |

Consumer Help-Line
If you have any questions about the operation of your new ONE FOR ALL Universal Remote Control, you may call our consumer help-line for assistance. Before calling, please read this manual carefully to find the answer to your question. If you cannot find a solution in this manual, please complete the information below on all your equipment before calling. This way we can better serve you.
In the UK: phone: 0800 966 194
fax: +31 53 432 9816
e-mail: ofahelp@ueic.com
Mon-Fri: 11:00-7:00
In Ireland: phone: 1-800 553 118
fax: +31 53 432 9816
e-mail: ofahelp@ueic.com
Mon-Fri: 10:00-20:00
Sat: 10:00-16:00
In Australia: phone: 1-800 064 472
e-mail: ofahelp@ueic.com
Your ONE FOR ALL model number: URC-2560
Date of purchase:
/ day/month/year
Your device:
(The first row is an example of how to complete this table)
TYPE BRAND MODEL NR. REMOTE
TV Sony KVX-2950B RMT-V131B


Quick Code Reference
The following pages list the codes for your equipment. The most popular codes for each brand are listed first.
If your device does not respond to the LITTLE EASY after you have tried all the codes for your brand, try the search method (page 10).
Write down the codes for your devices in the boxes below, for quick and easy reference.
Device Type
Code
1.

2.

3.


Little Easy Code List
Televisions
| Acura | 009 |
| Admiral | 087 093 418 |
| 213 264 | |
| Adyson | 217 |
| Agazi | 264 |
| AGB | 516 |
| Aiko | 216 009 037 |
| 371 035 072 | |
| 361 191 | |
| Aim | 037 274 |
| Akai | 208 361 371 |
| 037 191 035 | |
| 009 072 218 | |
| 163 | |
| Akiba | 218 282 455 |
| 037 | |
| Akura | 218 282 276 |
| 009 412 264 | |
| 037 | |
| Alba | 218 235 009 |
| 418 370 355 | |
| 371 037 216 | |
| 247 431 | |
| Alcyon | 076 |
| Allorgan | 206 294 217 |
| Allstar | 037 |
| Amplivision | 217 400 320 |
| Amstrad | 177 009 516 |
| 264 218 371 | |
| 362 412 037 | |
| Anglo | 009 264 |
| Anitech | 009 068 076 |
| 264 | |
| Ansonic | 370 102 009 |
| 037 374 163 | |
| 323 411 259 | |
| 247 012 428 | |
| Arc en Ciel | 399 501 196 |
| 109 568 | |
| Arcam | 216 399 217 |
| Aristona | 037 556 012 |
| Arthur Martin | 400 |
| ASA | 105 346 070 |
| 104 087 | |
| Asberg | 037 076 |
| Asuka | 218 264 216 |
| 282 217 | |
| Atlantic | 037 216 206 |
| 320 | |
| Atori | 009 |
| Audiosonic | 037 109 217 |
| 370 337 264 | |
| 218 | |
| Audioton | 217 |
| Ausind | 076 |
| Autovox | 087 237 076 |
| 217 247 |
| Ayomi | 238 |
| Baird | 109 193 343 |
| 190 192 072 | |
| Bang & Olufsen | 087 565 |
| Basic Line | 218 009 374 |
| 037 282 | |
| Bastide | 217 |
| Baur | 303 535 512 |
| 554 361 505 | |
| 010 037 | |
| Bazin | 217 |
| Beko | 370 |
| Beon | 037 |
| Best | 337 370 421 |
| Bestar | 037 370 374 |
| Binatone | 217 |
| Black Star | 247 |
| Blacktron | 282 |
| Blackway | 282 |
| Blaupunkt | 554 535 191 |
| 195 200 213 | |
| 327 328 | |
| Blue Sky | 218 282 455 |
| 037 | |
| Blue Star | 282 |
| Bondtec | 247 |
| Boots | 217 |
| BPL | 282 |
| Brandt | 501 399 237 |
| 333 196 198 | |
| 287 335 568 | |
| Brinkmann | 418 |
| Brionvega | 037 087 |
| Britannia | 216 217 |
| Bruns | 087 |
| BSR | 294 |
| BTC | 218 |
| Bush | 218 235 009 |
| 036 282 037 | |
| 355 371 374 | |
| 519 | |
| Capsonic | 264 |
| Carena | 455 037 |
| Carrefour | 036 070 |
| Cathay | 037 |
| Centurion | 037 |
| Century | 087 213 247 |
| CGE | 074 084 076 |
| 247 276 418 | |
| 370 | |
| Cimline | 009 235 218 |
| City | 009 |
| Clatronic | 218 264 370 |
| 371 217 076 | |
| 037 009 | |
| Clayton | 385 |
| Concorde | 009 |
| Condor | 216 247 282 | Ferguson | 073 287 192 |
| 320 037 370 | 190 335 238 | ||
| 009 102 | 193 109 | ||
| Contec | 216 009 157 | Fidelity | 193 216 371 |
| 011 036 | Finlandia | 208 346 359 | |
| Continental Edison | 501 237 196 | 105 104 037 | |
| 198 399 333 | 346 217 072 | ||
| 287 487 568 | 076 516 070 | ||
| 087 102 | |||
| Cosmel | 009 337 | First Line | 294 321 216 |
| Crezar | 213 | 037 374 385 | |
| Crosley | 087 247 074 | 247 009 217 | |
| 084 076 213 | Fisher | 104 087 217 | |
| Crown | 009 370 076 | 036 208 370 | |
| 421 037 359 | 087 157 361 | ||
| Crystal | 431 | 303 072 | |
| CS Electronics | 247 216 218 | Flint | 037 455 |
| CTC | 247 | Forgestone | 193 |
| Cybertron | 218 | Formenti | 087 213 216 |
| Daewoo | 009 037 216 | 320 076 | |
| 374 218 217 | Fortress | 093 087 | |
| Fraba | 370 037 | ||
| Dainichi | 218 | 247 264 431 | |
| Dansai | 037 264 | Frontech | 217 009 |
| Dawa | 037 | 206 072 217 | |
| Daytron | 009 374 | Fujitsu | 264 294 |
| Decca | 072 516 037 | Funai | 370 418 037 |
| 249 217 | Galaxis | 213 009 | |
| DeGraaf | 208 | GBC | 043 072 361 |
| Desmet | 320 037 | GEC | 516 037 217 |
| Dixi | 009 037 | 072 349 | |
| Domland | 394 | ||
| DTS | 009 | Geloso | 213 009 374 |
| Dual | 217 343 259 | General | |
| 399 519 | Technic | 009 | |
| Dual-Tec | 217 259 | Genexxa | 218 037 412 |
| Dumont | 087 104 102 | Germanvox | 213 |
| 213 217 070 | Goldline | 337 | |
| Dynatron | 037 | Goldstar | 037 370 290 |
| Elbe | 435 238 259 | 009 377 217 | |
| 362 292 370 | 247 216 431 | ||
| 163 037 218 | Goodmans | 036 072 037 | |
| 191 411 | 009 264 516 | ||
| Elcit | 087 247 516 | 290 374 371 | |
| 102 | Gorenje | 370 421 | |
| Elekta | 264 282 | GPM | 218 |
| Elin | 216 037 105 | Granada | 037 226 356 |
| 104 | 359 012 072 | ||
| Elite | 218 037 | 108 208 217 | |
| Elman | 102 | 076 036 339 | |
| Elta | 009 | 516 | |
| Emerson | 177 213 087 | Grandin | 282 218 400 |
| 247 | 037 009 320 | ||
| Emperor | 282 | 455 | |
| Erres | 037 012 | Grundig | 535 195 191 |
| Etron | 037 009 | 554 487 070 | |
| Euro-Feel | 264 | 076 237 037 | |
| Euromann | 216 264 037 | Halifax | 264 216 217 |
| 217 421 370 | Hampton | 216 217 | |
| Europhon | 037 516 102 | Hanseatic | 037 292 282 |
| 213 217 247 | 361 394 213 | ||
| Expert | 206 400 | 320 428 009 | |
| Fenner | 374 009 | 294 217 519 | |
| Hantarex | 009 213 037 | Kaisui | 009 217 218 |
| 296 | 282 037 216 | ||
| HCM | 264 009 282 | 455 | |
| 412 217 218 | Kamp | 216 | |
| 037 | Kapsch | 206 163 361 | |
| Hema | 217 009 | Karcher | 037 421 282 |
| Hifivox | 501 196 399 | Kendo | 362 235 247 |
| 568 | 102 037 477 | ||
| HiLine | 264 037 | 411 428 | |
| Hinari | 208 036 037 | Kennedy | 206 213 435 |
| 218 009 163 | Kingsley | 216 | |
| Hisawa | 282 218 400 | Kneissel | 435 259 292 |
| 455 | Kolster | 037 | |
| Hitachi | 225 036 349 | Konka | 218 371 |
| 356 473 043 | Korpel | 037 | |
| 343 196 198 | Korting | 087 421 320 | |
| 217 | Kyoto | 385 | |
| Hoshai | 218 | Lenco | 009 104 |
| Hygashi | 217 216 | Lenoir | 009 |
| Hornyphon | 037 | Lesa | 247 |
| Hyper | 009 216 217 | Leyco | 264 072 037 |
| 247 | 294 | ||
| Hypersonic | 361 | Lifetec | 009 264 519 |
| Hypson | 037 264 217 | Lloyds | 009 |
| 282 455 400 | Loewe | 512 087 037 | |
| ICE | 264 217 037 | Logik | 011 |
| 371 218 216 | Luma | 206 037 | |
| 009 | Lux May | 037 | |
| Imperial | 037 247 370 | Luxor | 237 290 357 |
| 418 074 084 | 361 356 | ||
| 076 349 | M Electronic | 346 037 109 | |
| Indesit | 237 213 | 343 247 105 | |
| Indiana | 037 | 104 374 009 | |
| Ingersol | 009 | 217 068 480 | |
| Inno Hit | 009 072 037 | 492 216 | |
| 218 290 217 | Magnadyne | 087 247 516 | |
| 516 247 | 102 | ||
| Interbuy | 009 264 247 | Magnafon | 516 213 076 |
| 068 | 102 216 | ||
| Interfunk | 037 012 087 | Mandor | 264 |
| 512 275 327 | Manesth | 037 235 217 | |
| 163 361 370 | 264 320 276 | ||
| 501 568 | 035 | ||
| Intervention | 282 217 455 | Marantz | 037 |
| 068 037 394 | Marelli | 087 | |
| 218 102 264 | Mark | 037 | |
| 247 431 | Matsui | 235 177 009 | |
| Irradio | 009 037 218 | 355 011 072 | |
| 247 290 076 | 036 037 487 | ||
| Isukai | 218 037 282 | 217 294 371 | |
| ITC | 217 | 443 | |
| ITS | 037 371 218 | McMichael | 043 |
| 282 264 216 | Mediator | 037 556 012 | |
| ITT | 163 480 349 | Memorex | 009 |
| 361 473 361 | Memphis | 337 072 009 | |
| 339 208 | Mercury | 037 | |
| JEC | 035 | Metz | 087 195 535 |
| JVC | 053 094 190 | 447 239 213 | |
| 036 192 193 | 554 275 367 | ||
| 371 218 | Minerva | 487 535 070 | |
| 076 554 237 | |||
| Minoka | 412 037 359 | ||
| Mitsubishi | 108 150 512 | Panasonic | 226 250 126 |
| 087 036 237 | 274 213 361 | ||
| Mivar | 292 290 291 | 237 367 037 | |
| 370 216 | Panavision | 037 | |
| Motion | 076 | Pathe Cinema | 238 216 400 |
| MTC | 370 349 | 320 292 | |
| Multi standard | 102 | 213 501 196 | |
| Multitech | 217 009 216 | 198 333 399 | |
| 247 102 | Pausa | 009 | |
| Murphy | 104 216 | Perdio | 072 320 |
| National | 237 | Perfekt | 037 |
| NEC | 036 320 | Philco | 087 084 074 |
| Neckermann | 037 191 370 | 418 076 213 | |
| 505 200 554 | 247 370 | ||
| 556 327 349 | Philharmonic | 217 | |
| 087 213 217 | Philips | 037 556 012 | |
| 411 | 323 554 191 | ||
| NEI | 037 337 431 | 043 087 193 | |
| Nesco | 247 | Phoenix | 037 087 320 |
| Newtech | 037 009 556 | 385 | |
| 343 | Phonola | 037 012 087 | |
| New World | 218 | 193 216 | |
| Nicamagic | 216 | Pioneer | 037 343 428 |
| Nikkai | 072 218 037 | Plantron | 037 264 |
| 217 264 035 | Policom | 568 | |
| 337 216 009 | Poppy | 009 | |
| Nobliko | 102 076 070 | ||
| 216 | Prandoni-Prince | 247 516 361 | |
| Nogamatic | 399 501 196 | 213 076 | |
| 568 | Precision | 217 | |
| Nokia | 163 480 349 | Prima | 009 264 |
| 359 473 361 | Prinz | 072 | |
| 339 208 | Profex | 009 | |
| Nordmende | 109 501 287 | Profi-Tronic | 037 |
| 399 196 343 | Proline | 321 072 037 | |
| 198 213 568 | 012 | ||
| Oceanic | 163 400 361 | Prosonic | 037 216 370 |
| 294 563 | 374 | ||
| Okano | 370 | Protech | 037 217 009 |
| Onwa | 371 | 247 349 102 | |
| Opera | 037 | 264 431 337 | |
| Orbit | 037 | Pye | 037 556 012 |
| Orion | 235 294 177 | Pymi | 009 |
| 320 355 011 | Quasar | 247 | |
| 037 009 321 | Quelle | 037 010 011 | |
| Osaki | 072 218 217 | 501 512 535 | |
| 264 276 | 554 361 036 | ||
| Oso | 218 | 217 247 074 | |
| Osume | 157 072 | 084 | |
| Otto Versand | 010 505 036 | Questa | 036 |
| 093 512 037 | Radialva | 109 | |
| 556 535 195 | R-Line | 037 | |
| 349 554 191 | Radiola | 037 556 012 | |
| 361 235 109 | 323 | ||
| 213 294 | Radiomarelli | 087 516 247 | |
| Pael | 216 | Radiotone | 009 037 428 |
| Palladium | 370 037 191 | Rank | 070 |
| 505 200 554 | Rediffusion | 361 | |
| 556 327 349 | Revox | 037 370 | |
| 087 213 217 | Rex | 206 411 259 | |
| Panama | 009 217 264 | RFT | 087 292 428 |
| 216 037 | 072 | ||
| Roadstar | 009 264 218 | Sonoko | 037 009 264 |
| Robotron | 087 | 282 217 | |
| Royal Lux | 421 | Sonolor | 208 163 400 |
| RTF | 087 | Sontec | 037 370 294 |
| Saba | 287 213 087 | Sony | 010 505 011 |
| 399 163 109 | 036 | ||
| 501 516 343 | Sound & Vision | 102 218 374 | |
| 361 498 196 | |||
| 198 335 | Soundwave | 037 320 418 | |
| Sagem | 455 | Standard | 218 009 217 |
| Saisho | 235 516 177 | 320 037 | |
| 009 011 217 | Star Lite | 037 | |
| 264 | Stenway | 282 218 | |
| Salora | 290 349 356 | Stern | 206 259 |
| 359 361 516 | Sunkai | 294 355 321 | |
| Sambers | 213 516 102 | 455 218 235 | |
| Samsung | 037 556 009 | Sunwood | 037 009 |
| 217 370 264 | Superla | 516 216 | |
| 090 216 290 | Supertech | 009 037 | |
| 072 208 | Supra | 374 009 | |
| Sandra | 216 217 | Sutron | 009 |
| Sansui | 037 | Sydney | 216 217 |
| Sanyo | 208 157 292 | Tandy | 218 072 217 |
| 036 011 370 | 247 276 093 | ||
| 072 216 217 | Tashiko | 036 043 217 | |
| 104 213 339 | 216 | ||
| SBR | 037 556 012 | Tatung | 037 072 516 |
| Schaub Lorenz | 349 | 217 249 011 | |
| Schneider | 037 012 217 | TEC | 217 276 009 |
| 303 519 394 | 247 471 335 | ||
| 259 323 343 | Technema | 320 | |
| 247 371 218 | Teleavia | 109 501 196 | |
| 361 | 399 333 568 | ||
| SEG | 217 264 009 | Telecor | 037 163 218 |
| 036 102 362 | 217 259 | ||
| 037 | Telefanken | 109 501 498 | |
| SEI | 087 102 010 | 471 399 287 | |
| 516 213 294 | 074 084 101 | ||
| 296 206 037 | 335 262 073 | ||
| Seleco | 206 226 362 | 343 037 | |
| 259 411 | Telegazi | 037 163 259 | |
| Sencora | 009 | 218 264 | |
| Sentra | 276 035 218 | Telemeister | 320 |
| Sharp | 093 157 036 | Telesonic | 037 |
| 294 | Teletech | 009 247 337 | |
| Shorai | 294 | Teleton | 217 275 206 |
| Siarem | 087 102 213 | 349 | |
| Siemens | 191 535 554 | Televeidon | 320 216 |
| 157 195 200 | Temco | 294 | |
| 213 327 328 | Tensai | 104 218 037 | |
| Sierra | 037 556 012 | 217 294 320 | |
| Siesta | 370 | 009 105 374 | |
| Silva | 216 | 371 377 | |
| Silver | 036 361 | Texet | 217 |
| Singer | 087 102 400 | Thomson | 287 399 109 |
| Sinudyne | 177 087 235 | 501 333 471 | |
| 102 213 294 | 335 196 198 | ||
| 296 361 | 237 343 037 | ||
| Skantic | 357 356 | 568 | |
| Sogera | 320 | Thorn | 193 190 238 |
| Solavox | 361 072 | 073 192 074 | |
| Sonitron | 208 370 339 | 084 104 |
Tokai 072037337 163
Tokyo 216035
Tomashi 282
Toshiba 035508036
070 102
Towada 349102
Trans Continens 217
Trident 516217
Triumph 177516346 556
Uher 076 037 206
320 303 374
418
Ultravox 087102374
216 213 037
Universum 346 105 535
473 361 200
011512294
036157070
370492480
247
Univox 337087037
Vestel 037217
Vexa 009 037
Videologique 216 218 217
VideoSystem 037
Videotechnic 216320
Visiola 216
Vision 037 320
Vistar 276 206
Vortec 037
Voxson 087 076 037 418
Waltham 217 276 356 418 287 385 037
Watson 037 320 218 213
Watt Radio 213 102 216
Wega 213036087 037
Weltblick 037320
White West-tinghouse 320 216 037 337
Yamashi 282455218 037
Yoko 217037218 264009431
Yorx 218
Zanussi 206 217
VCRs
Aiwa 307 000 041
209 352 037
Akai 106315053 041020
Akiba 072
Akura 072 041
Alba 278 072 333
334 209 352
192 020 295
Allorgan 240
Allstar 322
Ambassador 020
Amstrad 000325332
Anitech 072322 ASA 037081
Asuka 072 037 081 000
Audiosonic 278
Baird 106278104 107041000
Bang & Olufsen 499
Basic Line 278 209 020 072
Bestar 278020
Black Panther Line 278
Blaupunkt 226 154 227
162 081 006
195 403
Bondstec 020 Bosch 154
Brandt 041 187 206 320 493
Brionvega 344 Bush 072 278 315 333 334 209 352
Carena 209 081
Carrefour 045
Catron 020
CGE 041 000
Climline 072 209
Clatronic 020
Combitech 352 Condor 020 278
Crown 278072020
322
Daewoo 278020045
Dansai 072
Daytron 278
Decca 000 041 081
008 067
DeGraaf 042 166 081
104 048
Dual 041 081 Dumont 000 081 105
ESC 278240
Elcatech 072
Elin 240
Elta 072
| Emerson | 072 | ITV | 278 037 |
| Etzuko | 072 | JVC | 041 067 008 |
| Europhon | 020 | 206 384 | |
| Ferguson | 107 041 320 | Kaisui | 072 |
| 053 493 | Kendo | 106 209 315 | |
| Fidelity | 000 072 | 053 | |
| Finlandia | 104 081 042 | Kenwood | 041 |
| 166 000 048 | Korpel | 072 | |
| Finlux | 000 081 104 | Kuba | 047 |
| 042 105 | Leyco | 072 | |
| First Line | 072 209 043 | Loewe Opta | 081 006 037 |
| 037 045 042 | 105 004 | ||
| Fisher | 047 104 046 | Logik | 004 240 072 |
| Flint | 209 | 106 209 | |
| Frontech | 020 322 | Luxor | 106 046 043 |
| Fujitsu | 000 | 072 104 | |
| Funai | 000 | M Electronic | 000 037 |
| Galaxy | 000 | Manesth | 072 045 081 |
| GBC | 020 | 209 | |
| GEC | 081 | Marantz | 081 006 295 |
| General | 020 | 209 | |
| Goldhand | 072 | Matsui | 209 004 192 |
| Goldstar | 037 000 | 295 037 208 | |
| Goodmans | 000 072 240 | 240 352 332 | |
| 278 037 020 | Mediator | 081 | |
| 081 209 | Memorex | 104 000 046 | |
| Graetz | 041 104 240 | 037 048 047 | |
| 344 | Memphis | 072 | |
| Granada | 104 046 048 | Metz | 195 347 081 |
| 081 006 240 | 162 227 226 | ||
| 037 226 042 | 006 | ||
| 000 | Migros | 000 | |
| Grandin | 072 037 020 | Minerva | 195 |
| 000 278 | Mitsubishi | 043 067 081 | |
| Grundig | 007 195 081 | Multitech | 000 072 020 |
| 347 226 006 | 104 | ||
| 403 320 | Murphy | 000 | |
| Hanseatic | 037 209 | National | 226 162 |
| Hantor | 020 | NEC | 041 067 040 |
| HCM | 072 | Neckermann | 041 208 006 |
| Hinari | 004 072 208 | 081 344 | |
| 209 352 041 | Nesco | 072 | |
| 322 | Nikkai | 020 072 278 | |
| Hisawa | 209 352 | Nokia | 104 106 041 |
| Hitachi | 042 105 166 | 278 046 344 | |
| 041 000 240 | 240 048 042 | ||
| 081 004 104 | 081 | ||
| Hypson | 072 209 278 | Nordmende | 041 384 320 |
| Impego | 020 | 187 494 | |
| Imperial | 000 240 | Oceanic | 000 048 106 |
| Ingersol | 004 | 081 104 041 | |
| Inno Hit | 020 240 278 | 046 | |
| 322 | Okano | 315 209 072 | |
| Interbuy | 037 072 | 322 | |
| Interfunk | 081 104 | Orion | 209 004 208 |
| Intervision | 000 278 037 | 352 295 333 | |
| Irradio | 072 037 | 334 | |
| ITT | 106 041 046 | Orson | 000 |
| 344 384 104 | Osaki | 000 037 072 | |
| 240 | Otto Versand | 081 |
Palladium 072315037 041006209
Panasonic 226227162 225
Pathe Cinema 004 043
Pathe Marconi041
Perdio 000
Philco 072
Philips 081 006 403
Phonola 081
Pioneer 067081042
Portland 020 278
Prinz 000
Profex 322
Profi-Tronic 081240
Proline 000
Prosonic 209
Provision 278
Pye 081
Quelle 006208081 344
Radialva 037 072 081 048
Radiola 081
Rex 041384
RFT 020403072
Roadstar 240 072 037 278
Royal 322072
Saba 041 187 206
320 384 494
White West-tinghouse 344
Yamashi 072 278
Yokan 072
Yoko 037 072 020 240
Guarantee
UNIVERSAL ELECTRONICS INC./ONE FOR ALL warrants to the original purchaser that this product will be free from defects in materials and workmanship under normal use for a period of ninety (90) days from the date of the original purchase. Product will be replaced free of charge if it has been proven to be defective within the 90-day period when said product is returned at customer expense within the warranty period. THIS WARRANTY DOES NOT COVER ANY EXPENSES INCurred IN THE REMOVAL AND REINSTALLATION OF THIS PRODUCT.
This warranty does not cover damage or failures caused by products or services not supplied by ONE FOR ALL, or which result from accident, misuse, abuse, neglect, mishandling, misapplication, faulty installation, set-up adjustment, improper maintenance, alteration, maladjustment of consumer controls, modifications, commercial use, fire, water, lightning or other acts of God. This warranty does not cover cartons, carrying cases, batteries, broken or marred cabinets, or any other items used in connection with the product.
There are no express warranties except as listed above. ONE FOR ALL SHALL NOT BE LIABLE FOR INCIDENTAL OR CONSEQUENTIAL DAMAGES RESULTING FROM THE USE OF THIS PRODUCT OR ARISING OUT OF ANY BREACH OF WARRANTY. ALL EXPRESS AND IMPLIED WARRANTYINGS, INCLUDING THE WARRANTYES OF MERCHANTABILITY AND FITNESS FOR A PARTICULAR PURPOSE, ARE LIMITED TO THE WARRANTY PERIOD SET FORTH ABOVE. Some countries do not allow the exclusion or limitation of incidental or consequential damages, or limitation on how long an implied warranty lasts, so the above exclusions or limitations may not apply to you. This warranty gives you specific legal rights and you may also have other rights which vary from country to country.
To obtain warranty service during the warranty period, please carefully pack the product and send it prepaid and adequately insured to the address below, together with your purchase receipt or other proof of the date of original purchase.
In UK:
ONE FOR ALL
P.O.Box 197
Yateley, GU46 6ZR
In Ireland:
Sherlane Agencies Ltd./OFA
Rockford Works
Deansgrange Rd.
Blackrock, County Dublin
In Australia:
Kenmark Industrial (A)
Co.PTY.LTD.
106 Mitchell Street,
Maidstone VIC 3012
AUSTRALIA
IMPORTANT:
IF THE UNIT IS RETURNED WITHIN THE WARRANTY PERIOD, YOU MUST INCLUDE YOUR PURCHASE RECEIPT so that we may establish
your eligibility for service and can replace your unit without cost. It would be helpful if you included a note detailing the problem. IF THE UNIT IS RETURNED FOR SERVICE OUTSIDE THE WARRANTY PERIOD, please include a cheque to cover the cost of replacement, handling and return postage. (Prices may differ per model. Please contact ONE FOR ALL customer service in your country for exact amount.)
NOTHING IN THIS GUARANTEE AFFECTS YOUR STATUTORY RIGHTS.
ONE FOR ALL and the ONE FOR ALL 3 "Little Easy" are trademarks of Universal Electronics Inc.
Copyright 1996, 1997, 1998 by Universal Electronics Inc. All rights are reserved. No part of this publication may be reproduced, transmitted, transcribed, stored in any retrieval system, or translated to any language or computer language, in any form or by any means, electronic, mechanical, or otherwise, without the prior written permission of Universal Electronics Inc.
URC-2560
700521
UK
SdL 0698

Printed on Recycled Paper