Praktika 99556 - Pan ELO - Free user manual and instructions
Find the device manual for free Praktika 99556 ELO in PDF.


| Product type | Wood stove |
| Brand | ELO |
| Model | Praktika 99556 |
| Dimensions (H x W x D) | 850 x 500 x 500 mm |
| Weight | 50 kg |
| Rated power | 8 kW |
| Energy efficiency | 80 % |
| Fuel type | Wood logs (max length 33 cm) |
| Main functions | Auxiliary heating, primary and secondary air control, self-cleaning glass |
| Maintenance and cleaning | Weekly cleaning of firebox and ash pan, mandatory annual chimney sweeping |
| Safety | High-temperature ceramic glass, cool handle, anti-overheat safety |
| Spare parts and repairability | Available through ELO after-sales service (grates, glass, seals) |
| General information | Compliant with CE standards, energy class A+, 2-year warranty |
Frequently Asked Questions - Praktika 99556 ELO
User questions about Praktika 99556 ELO
0 question about this device. Answer the ones you know or ask your own.
Ask a new question about this device
Download the instructions for your Pan in PDF format for free! Find your manual Praktika 99556 - ELO and take your electronic device back in hand. On this page are published all the documents necessary for the use of your device. Praktika 99556 by ELO.
USER MANUAL Praktika 99556 ELO
natural_image
Diagram showing light rays converging through a lens or aperture (no text or symbols)natural_image
Diagram of a pot with a handle and yellow component, showing a curved arrow indicating motion (no text or symbols)natural_image
Illustration of a hand using a water dispenser to lift liquid into a pot, with no text or symbols present.Congratulations on purchasing a new Praktika pressure cooker. With two advanced design features: an encapsulated sandwich base and modern closing system, your new pressure cooker is the ideal way of preparing meals. Despite the reduced cooking time, pressure cooking preserves all vitamins, minerals and flavors in food.
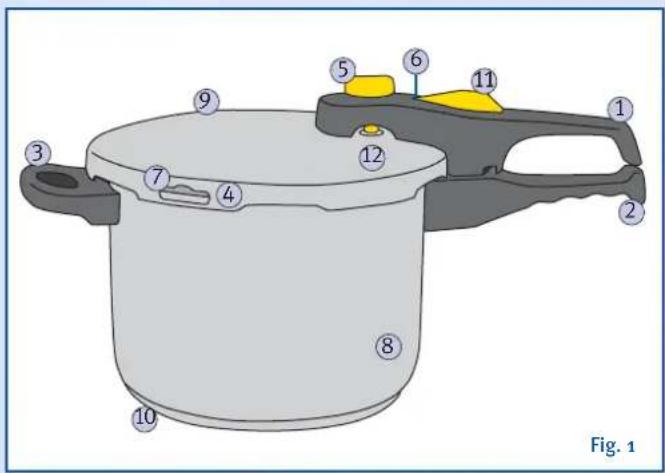
① Lid handle ⑦ Safety opening
② Cooker handle ⑧ Cooking pot
③ Small handle ⑨ Lid
④ Rubber gasket ⑩ Sandwich base
⑤ Pressure regulating valve11 Opening button
⑥ Safety vent ⑫ Silicon seal
12
SAFETY
The pressure cooker system is very safe. Care should be taken to ensure that the lid closes properly so that the system can function as intended.
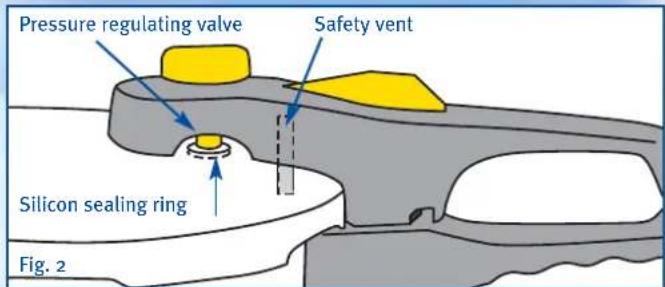
The pressure cooker has a two-level pressure regulator which regulates the pressure you have selected as well as a built-in safety vent (see fig. 2) in the lid handle.
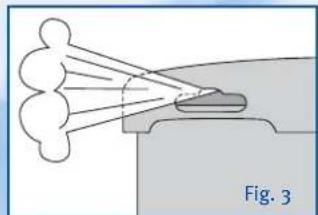
If the pressure increases too much, the rubber gasket is pushed out through an opening in the edge of the lid (fig. 1, no. ⑦), so that the pressure can escape (see fig. 3).
natural_image
Diagram of a spray nozzle emitting particles from a nozzle, labeled Fig. 3 (no text or symbols on diagram itself)All the items marked on the diagrams (except nos. ⑦ and ⑩) are available as spare parts.
13
INSTRUCTIONS FOR USE
Before you use your pressure cooker for the first time, wash and rinse it thoroughly in hot water and dry immediately.
We recommend lubricating the rubber gasket with a little cooking oil to make opening and closing the lid easier.
To ensure that the correct pressure to speed up the cooking process is produced in the cooker, the pot must contain a minimum quantity of liquid (water, stock, etc.).
If you are preparing a dish which creates a lot of froth, the pot must not be more than half full.
If you are making a puree, casserole or soup, etc., we recommend shaking the pot gently before opening.
CLOSING THE PRESSURE COOKER:
Please check the safety devices before closing the pressure cooker.
The pressure regulating valve opening (see fig. 4) must be clean and the safety vent must not be jammed. You can check this by pressing your finger on the safety vent stopper (see fig. 4).
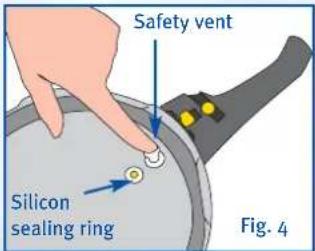
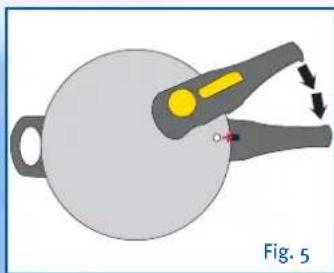
If you are able to press the stopper in, the safety vent is working properly. If the stopper does not respond to the pressure and is jammed, it must be loosened and cleaned, as described on page 17. Place the lid on the cooking pot in such a way that the markings on the cooker handle are
aligned with the circle on the lid (see fig. 5). Then press the lid down slightly and turn it until both handles are on top of one another.
The pressure cooker is now properly closed.
Now set the pressure you require on the pressure regulating valve (see fig. 6).
natural_image
Diagram of a pot with a handle and yellow component, labeled Fig. 5 (no text or symbols on the diagram itself)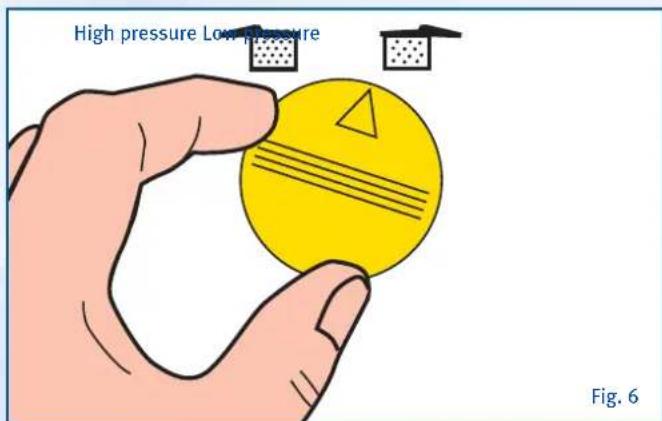
15
STARTING COOKING
When you start cooking, we recommend turning up the heat source to the highest setting so that the required pressure is reached as quickly as possible in the pot.
The safety vent will be pressed upwards by the pressure created in the pot and will block the opening button. When the pressure cooker is under pressure it cannot be opened.
As soon as steam comes out of the pressure regulating valve, this means that there is sufficient pressure in the pressure cooker. You can now turn down the heat so that the pressure is maintained but not too much steam escapes. Timing starts from this point onwards.
OPENING THE PRESSURE COOKER
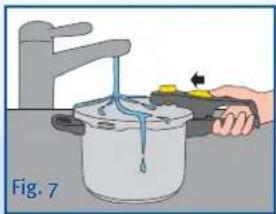
Hold the pressure cooker under cold water (see fig. 7) until no more steam is coming out. When the pressure has dropped in the pot, the safety vent releases the opening button. When the button is released, the remaining steam escapes and by pressing the opening button, you can turn and open the lid.
NEVER USE FORCE TO OPEN THE LID!
natural_image
Illustration of a hand pouring liquid into a pot with a water dispenser (no text or symbols)CARE AND MAINTENANCE
After use, wash your pressure cooker with hot water and a non-abrasive washing-up liquid. The lid and rubber gasket cannot be washed in a dishwasher.
The rubber gasket must not be washed with washing-up liquid. After washing, the pot and the lid should be dried thoroughly and stored with the lid facing upwards. It is not a good idea to put the cooker away with the lid closed, as this will cause the rubber to deteriorate more quickly.
CLEANING THE SAFETY VENT
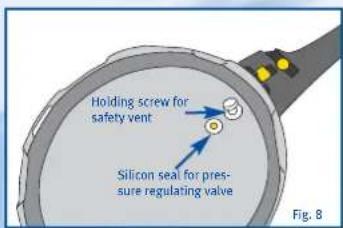
To clean the safety vent, first loosen the holding screw (see fig. 8). You can then lift the safety vent out and clean it thoroughly.
The safety vent may not be divided!
WHAT TO DO IF
... steam is escaping between the lid and the pot ?
This means either that the rubber gasket is defective or the pot is not properly closed. If the rubber gasket is just dirty, it should be washed.
... no steam is coming out of the pressure regulating valve?
This means that the pot is not correctly sealed and this should be checked. If the pressure regulating valve is dirty, the valve should be cleaned as described on page 24. Check also whether there is sufficient liquid in the pot. If the rubber gasket is dirty or defective, clean or replace it. The rubber gasket will need replacing once a year.
... too much steam is escaping from the pressure valve?
The heat source is probably turned up too high and should be turned down. It could also mean that the pressure regulating valve is dirty.
TABLE OF COOKING TIMES
The times given below are only approximate, as they naturally depend on the quality and condition of the food to be cooked. You will very quickly learn from experience and know exactly how long each dish will take to cook. It is not necessary to defrost frozen vegetables or fish before pressure cooking, just increase the cooking time slightly.
| Soups | High pressure | Low pressure | Cooking time in minutes |
| Bean soup • 20 | |||
| Pea or lentil soup (pre-soaked) • 12-15 | |||
| Vegetable soup • 5-8 | |||
| Goulash soup • 15-20 | |||
| Chicken soup • 15-20 | |||
| Potato soup • 6-8 | |||
| Meat stock • 20-25 | |||
| Rice soup • | 8 | ||
| Beef soup • | • 25-45 |
VEGETABLES
High
ressure
Low pressure
Cooking time in minutes
Added water
| Beans • | 8-11 | 200 ml | |
| Cauliflower | • | 3-5 | 200 ml |
| Unpeeled potatoes | • | 6-10 | 150 ml |
| Peeled potatoes | • | 4-5 | 200 ml |
| Cabbage | 8-10 | 100 ml | |
| Kohlrabi | 4-5 | 150 ml | |
| Peppers | 3-4 | 100 ml | |
| Red cabbage | • | 8-10 | 100 ml |
| Pickled cabbage | • | 10-15 | 200-300 ml |
| Celeriac | • | 10-12 | 200 ml |
| Asparagus • | 5-10 | 500 ml | |
| Spinach | 3 | 100 ml |
Added water
MEAT
High pressure
Cooking time in minutes
| Beef olives | 10-12 100 ml | |
| Diced meat | 5-8 | 100 ml |
| Goulash | 15-25 100 ml | |
| Meat loaf | 10-15 150 ml | |
| Mince | 6-10 100 ml | |
| Veal joint | 25-30 150 ml | |
| Leg of veal | 28-32 | 150 ml |
| Veal cutlet | 8-10 | 100 ml |
MEAT
High pressure
Cooking time in minutes

Veal stew • 15-23 100-200 ml
Tongue of veal • 10-15 Cover with water
Lamb joint • 25-30 100-150 ml
Stewing beef • 35-45 To taste
Beef joint • 35-45 200 ml
Beef cutlet • 10-15 100 ml
Tongue of beef • 45-55 Cover with water
| Rolled ham | 15-20 | Cover with water |
| Pork (salted) | 14-16 | Cover with water |
| Pork (cured) | 17-19 | Cover with water |
| Pork joint | 20-30 100-150 ml | |
| Pork cutlet | 10-12 | Cover with water |
| Leg of pork | 30 | 200 ml |
| Chicken | 20-30 | Cover with water |
| Hare | 15-20 100-150 ml | |
| Venison medallions | 5-10 | 100 ml |
| Partridge | 12-20 100 ml | |
| Jugged venison / hare / boar | 15-18 | |
| Haunch of venison | 30 | 150-200 ml |
| Venison cutlet | 5-10 | 100 ml |
INTRODUCTION
natural_image
Diagram showing spray or spray process with droplets and a container, labeled Fig. 3 (no text or symbols on diagram itself)natural_image
Diagram of a pot with a handle and yellow component, labeled Fig. 5 (no text or symbols on the diagram itself)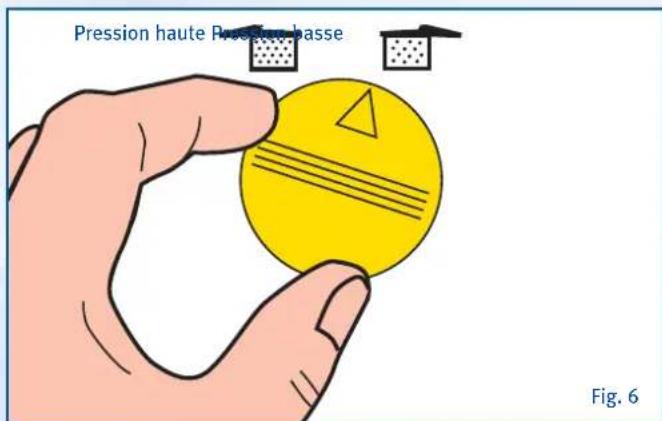
25
DÉBUT DE LA CUISSON
natural_image
Illustration of a hand using a tool to lift liquid into a pot, with a water tank in the background (no text or symbols)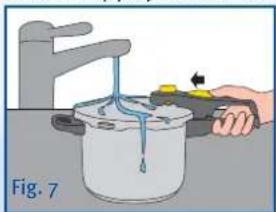
natural_image
Illustration of a hand using a tool to lift liquid into a pot, with a water tank in the background (no text or symbols)
ENTRETIEN ET MAINTENANCE
natural_image
Diagram showing light rays reflecting off a surface, labeled Fig. 3 (no text or symbols on the diagram itself)natural_image
Diagram of a pot with a handle and yellow component, labeled Fig. 5 (no text or symbols on the diagram itself)natural_image
Illustration of a hand pouring liquid into a pot with a water dispenser (no text or symbols)MANUTENZIONE
natural_image
Diagram showing light rays reflecting off a surface, labeled 'Eik. 3' (no other text or symbols)natural_image
Diagram of a pot with a handle and yellow component, showing directional arrows (no text or symbols)natural_image
Illustration of a hand pouring liquid into a cooking pot with a water dispenser (no text or symbols)natural_image
Diagram showing light rays reflecting off a surface, labeled 'Illustr. 3' (no text or symbols on diagram itself)natural_image
Illustration of a pot with a handle and yellow component, no text or symbols present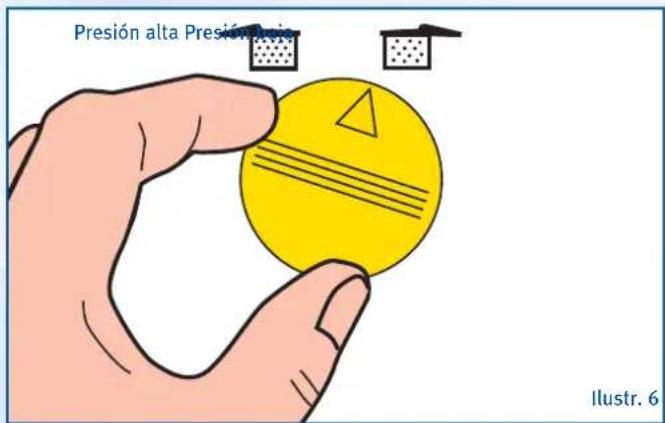
natural_image
Illustration of a hand pouring liquid into a pot with a water dispenser, no text or symbols presentnatural_image
Diagram showing light rays reflecting off a surface, labeled Fig. 3 (no text or symbols on the diagram itself)natural_image
Diagram of a pot with a handle and yellow component, labeled Fig. 5 (no text or symbols on the diagram itself)natural_image
Illustration of a hand pouring liquid into a pot with a valve, labeled Fig. 7 (no text or symbols on the diagram itself)natural_image
Diagram showing light rays reflecting off a surface with label 'rys. 3' (no other text or symbols)natural_image
Diagram of a kitchen pot with handle and tool, labeled 'rys. 5' (no text or symbols on diagram itself)natural_image
Illustration of a hand pouring liquid into a cooking pot with a water dispenser (no text or symbols)PIELÉGNACJA I KONSERWACJA
natural_image
Diagram showing light rays projecting onto a surface, labeled 'Imag. 3' (no other text or symbols)natural_image
Diagram of a pot with a handle and yellow object, showing a red arrow indicating direction (no text or symbols)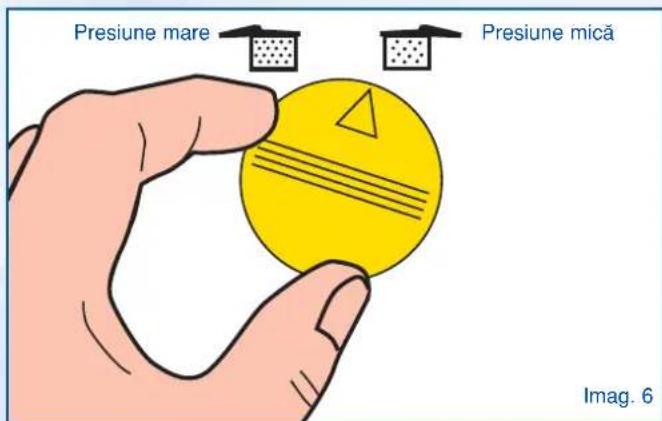
natural_image
Illustration of a hand using a water dispenser to lift liquid into a pot, with no text or symbols present.natural_image
Diagram showing light rays reflecting off a surface, labeled 'Zobr. 3' (no other text or symbols)natural_image
Diagram of a pot with a handle and yellow component, labeled 'Zobr. 5' (no text or symbols on the diagram itself)natural_image
Illustration of a hand pouring liquid into a cooking pot with a water dispenser (no text or symbols)PÉČE A ÚDRŽBA
natural_image
Diagram of a pot with a handle and yellow component, labeled 'obr. 5' (no text or symbols on the diagram itself)natural_image
Illustration of a hand pouring liquid into a pot with a water dispenser (no text or symbols)natural_image
Diagram of a pot with a handle and yellow component, labeled '5. ábra' (no text or symbols on diagram itself)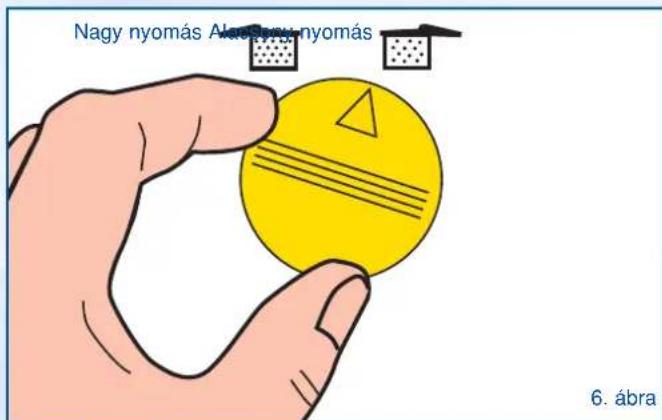
natural_image
Illustration of a pot with a handle and yellow component, showing a curved arrow indicating rotation or movement (no text or symbols)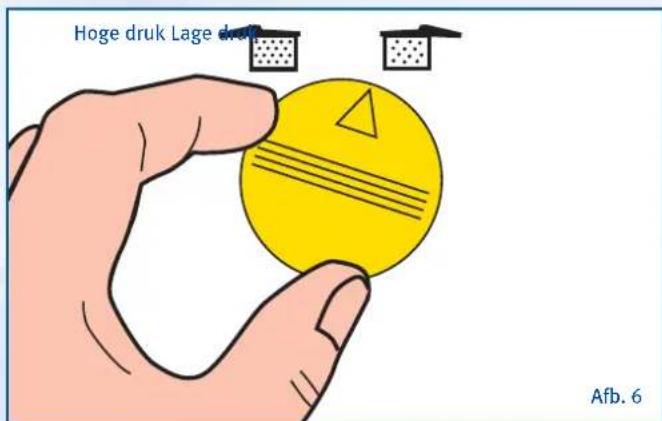
125
Afb. 6
BEGIN VAN HET KOOKPROCES
natural_image
Illustration of a hand pouring liquid into a pot with a valve, labeled 'Afb. 7' (no text or symbols on the diagram itself)ONDERHOUD EN INSTANDHOUDING
natural_image
Diagram showing light rays reflecting off a surface, labeled 'Illustr. 3' (no text or symbols on diagram itself)natural_image
Illustration of a pot with a handle and yellow component, showing a curved arrow indicating rotation (no text or symbols)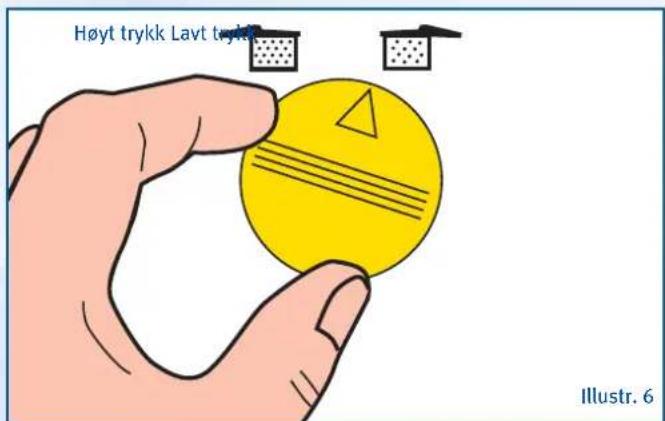
natural_image
Illustration of a hand using a tool to lift liquid into a pot, with no text or symbols present.PLEIE OG ISTANDHOLDELSE
natural_image
Diagram showing light rays reflecting off a surface, labeled Fig 3 (no text or symbols on the diagram itself)natural_image
Diagram of a pot with a handle and yellow component, labeled Fig 5 (no text or symbols on the diagram itself)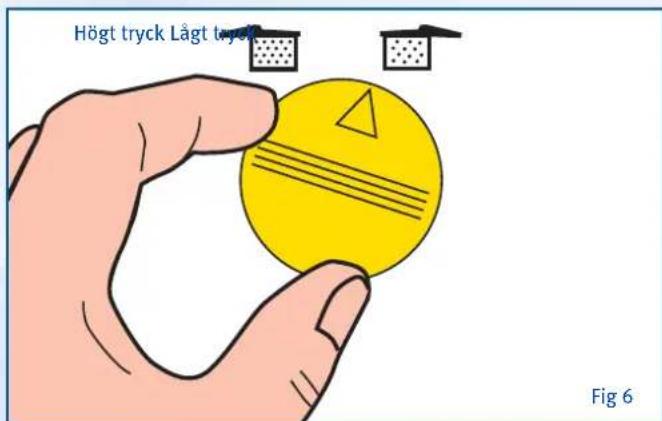
natural_image
Illustration of a hand using a tool to lift liquid into a pot, with a water dispenser on top (no text or symbols)SKÖTSEL OCH REPARATIONER
natural_image
Illustration of a cooking pot with a handle and yellow tool, labeled 'Kuva 5' (no text or symbols on the diagram itself)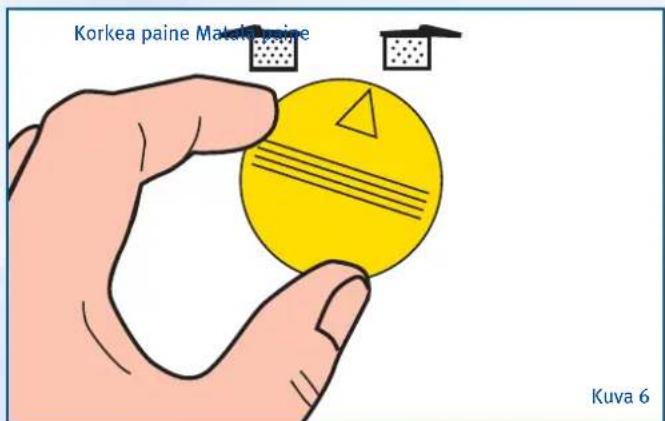
natural_image
Illustration of a hand using a tool to lift liquid into a pot, with a faucet and label 'Kuva 7' (no text on diagram itself)Hoito JA HUOLTAMINEN
- SAFETY
- INSTRUCTIONS FOR USE
- CLOSING THE PRESSURE COOKER:
- STARTING COOKING
- OPENING THE PRESSURE COOKER
- CARE AND MAINTENANCE
- CLEANING THE SAFETY VENT
- WHAT TO DO IF
- TABLE OF COOKING TIMES
- MEAT
- INTRODUCTION
- DÉBUT DE LA CUISSON
- ENTRETIEN ET MAINTENANCE
- MANUTENZIONE
- PIELÉGNACJA I KONSERWACJA
- PÉČE A ÚDRŽBA
- BEGIN VAN HET KOOKPROCES
- ONDERHOUD EN INSTANDHOUDING
- PLEIE OG ISTANDHOLDELSE
- SKÖTSEL OCH REPARATIONER
- Hoito JA HUOLTAMINEN
Brand : ELO
Model : Praktika 99556
Category : Pan