
R9 DUAL - Caméra auto Navitel - Free user manual and instructions
Find the device manual for free R9 DUAL Navitel in PDF.


| Product Type | Dashcam / Car DVR |
| Brand | Navitel |
| Model | R9 DUAL |
| Processor | MSTAR 8339 |
| Display | 2.7" IPS, 320x240 |
| Front Camera Sensor | SONY 307 (night vision) |
| Front Video Resolution | Full HD 1920x1080 |
| Rear Camera Sensor | GC2053 |
| Rear Video Resolution | Full HD 1920x1080 |
| View Angle | 170° |
| Lens | 6-layer glass |
| Storage | MicroSD card (max 64 GB, Class U3 or above) |
| Power Input | 5V, 2.5A via USB-C |
| Battery | 500 mAh (increased capacity) |
| Wi-Fi | Yes |
| GPS | Yes, built-in GPS chipset and antenna |
| Recording Format | MOV |
| Image Format | JPG |
| Loop Recording | Yes |
| G-sensor | Yes, automatically locks video on impact |
| Parking Monitor | Yes, detects vibration and starts recording |
| App Support | Navitel DVR Center (iOS/Android) |
| Languages | Czech, English, French, German, Hungarian, Italian, Polish, Romanian, Russian, Slovak, Spanish, Ukrainian |
| Cleaning | Keep lens clean; do not use chemicals or detergents |
| Safety | Use only original charger; do not disassemble; avoid fire sources |
| Reparability | Do not repair yourself; contact service center |
Frequently Asked Questions - R9 DUAL Navitel
User questions about R9 DUAL Navitel
0 question about this device. Answer the ones you know or ask your own.
Ask a new question about this device
Download the instructions for your Caméra auto in PDF format for free! Find your manual R9 DUAL - Navitel and take your electronic device back in hand. On this page are published all the documents necessary for the use of your device. R9 DUAL by Navitel.
USER MANUAL R9 DUAL Navitel
cz Tlačítka
natural_image
Diagram of a device with a speaker emitting sound waves, connected to a screen and a pencil (no text or symbols)Hinweise
natural_image
Simple line drawing of a handheld device with a screen and antenna, no text or symbols present.Ettevaatusabinõud
Thank you for purchasing this NAVITEL® product.
NAVITEL R9 DUAL is a multifunctional high-definition DVR with many functions and features that are described in this User Manual. Please read the manual carefully before using the device and keep it for future reference.
Device layout
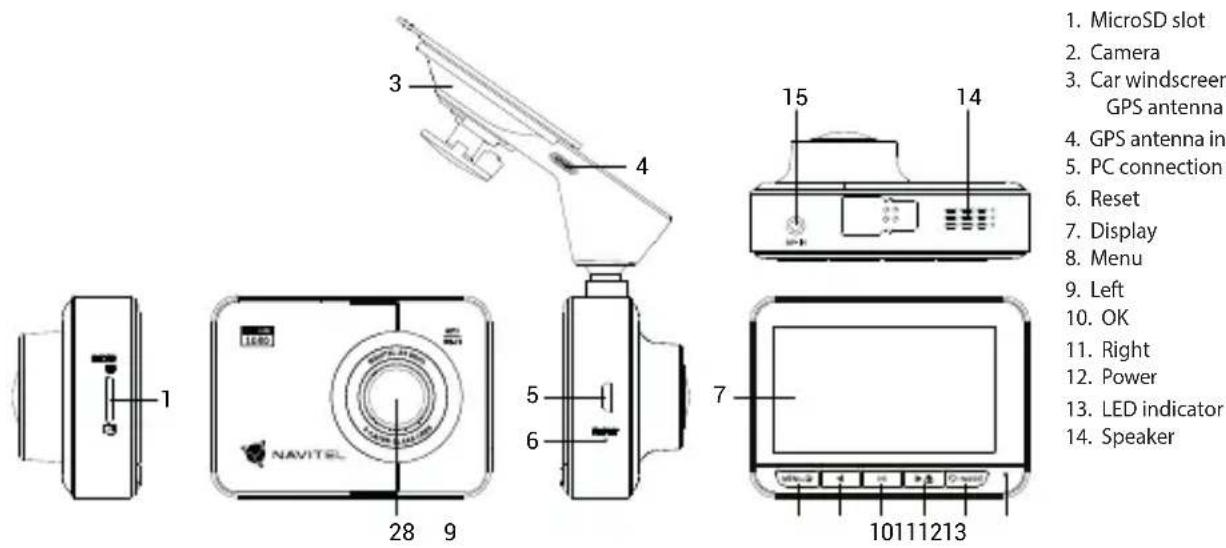
- MicroSD slot
- Camera
- Car windscreen holder with GPS antenna
- GPS antenna input (USB-C)
- PC connection port
- Reset
- Display
- Menu
- Left
- OK
- Right
- Power
- LED indicator
- Speaker
Specifications
| Processor MSTAR 8339 | |
| Display 2.7", 320×240, IPS | |
| Front camera SONY 307 (night vision) | |
| Front camera video resolution Full HD (1920×1080) | |
| Rear camera GC2053 | |
| Rear camera video resolution Full HD (1920×1080) | |
| Image format JPG | |
| Recording format MOV | |
| View angle 170° | |
| Lens 6-layer glass | |
| Storage MicroSD card | |
| MicroSD card capacity Max. 64 GB | |
| Charging port USB-C | |
| Battery | 500 mAh(capacity increased) |
| Power 5 V, 2.5 A | |
| Wi-fi | Yes |
| GPS-alert | cameras / warnings / speed |
| Language | Czech, English,French, German,Hungarian, Italian,Polish, Romanian,Russian, Slovak,Spanish, Ukrainian |
Note: the package, appearance, specifications that do not change the overall functionality of the device may be changed by the manufacturer without prior notice.
Installation
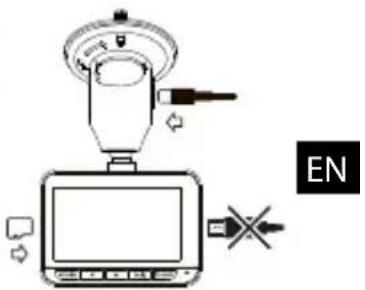
- Put the microSD card into the DVR. Use a high-speed SD card (Class U3 or above); capacity should be within 8-64 GB.

- To avoid malfunctions of the DVR and / or SD-card, don't insert and remove SD-card during DVR operation. - Before using a microSD card, please format it inside the DVR to avoid data errors. For formatting the SD-card in Menu mode select Format SD-card and confirm it.
-
Secure the DVR on the windshield with the mount.
-
Connect the car charger to the cigarette lighter socket.
-
Connect the car charger to the GPS antenna input (USB-C). The micro-USB port on the body of the device is for transferring files to a PC using a micro-USB to USB-A cable.
-
Adjust the DVR position.
-
Turn the power on; check whether the DVR is installed correctly. If the DVR is installed correctly, the indicator will glow red; the DVR will start up and begin recording (indicated by flashing blue light).
Precautions
- Use only the original charger adapter. Using another adapter may negatively affect the device's battery. Use accessories only approved by manufacturer.
- Permissible ambient temperature in operating mode: 0 to +35 °C. Storage temperature: +5 to +45 °C. Relative humidity: 5% to 90% without condensation (25 °C).
- Put the device away from fire sources to avoid explosion or fire.
- Do not expose the device to physical impacts.
- Avoid contacting the device with sources of electromagnetic radiation.
- Keep the lens clean. Do not use chemicals or detergents to clean the product; always turn off the device before cleaning.
- Strictly follow the laws and regulatory acts of the region where the device is used. This device can not be used for illegal purposes.
- Do not disassemble or repair device by yourself. In case of device failure, contact the service center.
Buttons
| Button Functions | |
| Power | Press shortly to turn the device on.Press and hold for 2 seconds to turn the device off.Press to switch between Record (STBY), Capture, Video and Photo modes.In Record mode (REC), press to lock / unlock a file (protected file cannot be deleted or overwritten).In Menu, press to exit any menu or list of functions. |
| Menu | Press to enter Menu mode.In Menu, press to exit any menu or list of functions. |
| Left / Right | In Record mode, press Right to turn the microphone on / off.In Video / Photo mode, press to select the previous / next file.In Menu, press to select the previous / next menu item. |
| OK | In Record mode (STBY), press to start recording.In Record mode (REC), press shortly to stop recording.In Record mode (REC), press and hold for 2 seconds to take a picture.In Capture mode, press to take a picture.In Video mode, press to select a file, or pause / resume video.In Photo mode, press to select a file.In Menu, press to select a menu item. |
| Reset If the device is not responding, press to reset. | |
Note: the built-in battery is designed only for recording an emergency event in parking mode and turning off the device correctly when the power is turned off; for the full operation of the device in any mode, a constant power connection is required.
Device functions
| Format SD-card | Formatting a microSD card in the DVR is necessary for the correct operation of the device. Before using a microSD card or in case of data error, please format the microSD card. For formatting the SD-card in Menu mode select Format SD-card and confirm it. |
| Record | Connect the device to an external power supply and it will start recording automatically. Press the OK button to stop recording. Press OK again to record another video. Each video will be saved automatically. |
| Capture | In Record mode (STBY), press the Power button to enter Capture mode, press the OK button to take a photo (it will be saved automatically). |
| Video | In Record mode (STBY), press the Power button twice to enter Video mode; press the Left / Right buttons to select a file; press the OK button to play a file. During playback, press OK to pause / unpause; press the Left / Right buttons to fast forward / rewind. You can switch between files from the front / rear camera by holding down the Menu button for 2 seconds. The letter in the file name indicates the camera: F - front, R - rear. |
| Photo | In Capture mode, press the Power button twice to enter Photo mode; press the Left / Right buttons to select a file; press the OK button to play a file. You can switch between files from the front / rear camera by holding down the Menu button for 2 seconds. The letter in the file name indicates the camera: F - front, R - rear. |
| Lock file | In Record mode (REC), press the Power button to protect the current recording. A lock symbol will appear at the bottom of the screen. In Video / Photo mode, select a file, press Menu and select Protect, then Lock Current or Lock All. Protected files cannot be deleted or overwritten. Select Unlock Current / Unlock All to remove protection. |
| Loop recording | This feature allows you to save a video as a set of files given in the duration menu. If the memory card runs out of space, the unprotected files will be overwritten in the order in which they were created. |
| Record audio Record | video with or without sound. |
| Stamp This function adds date stamp to the record. | |
| LCD OFF | The device can automatically shut off the screen to reduce power consumption; time interval can be set in the Screen Saver menu. |
| G-sensor If the vehicle is hit by something, the DVR will automatically lock the current video. | |
| Parking monitor | In shutdown state, if vibration is detected, the device will turn on automatically and start recording. The file will be protected (locked). |
| GPS location | Device supports built-in GPS chipset and GPS antenna, it can show longitude, latitude and other information on your current location. Press GPS Status to check GPS dates. Press On in the GPS Stamp menu to add GPS information to your files. |
| APP support | You can see and share your videos and photos, taken by DVR, in your mobile phone through special app. The app is connecting via Wi-Fi network and should be installed on your mobile phone. |
| Battery | Red indicator lights up when the device is plugged into an external power supply; as the battery is charging, the red light will gradually dim; the red light going out means the battery is full. |
| USB-connection * | When connecting the device to a PC using a USB cable, two connection options will appear:1) Mass Storage: play, copy and delete files.2) Record: standard mode. |
| Perm.excess | Select an overspeed permission in the settings in the range from -5 to +25 km/h in increments of 5 km/h. If you exceed the set non-fined threshold, you will hear a sound notification. |
Navitel DVR Center app installation
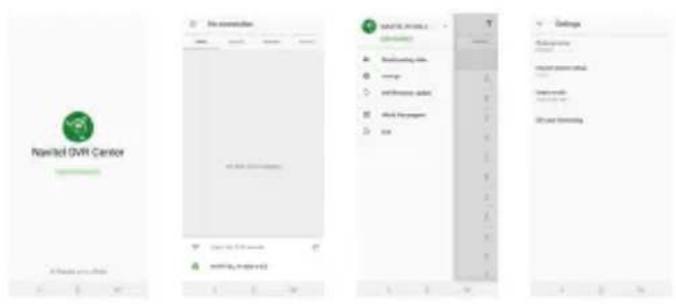
- Download and install Navitel DVR Center to your cell phone or tablet, follow your mobile device instructions. You can download application by scanning QR code in DVR's Menu (App QR Code) with your cell phone. Choose Wifi in Settings menu, press On.
- Turn on a Wi-Fi in DVR's Menu (Wi-Fi) and in your mobile device settings.
- Run the app. Choose your DVR in the list. The DVR's information is in DVR's Menu (Wi-Fi Navitel)..
- Connect your mobile device to the DVR through Wi-Fi. If necessary use the password. You can change it in DVR's Menu (Wi-Fi password).
-
Using the Navitel DVR Center you can:
-
update DVR's firmware;
• control DVR functions in Settings menu: configure parking mode, impact sensor, video mode and format your SD card; - save, view, delete and send videos and photos as well as watch DVR's video in real time on the mobile device screen.
Digital Speed & Camera Info
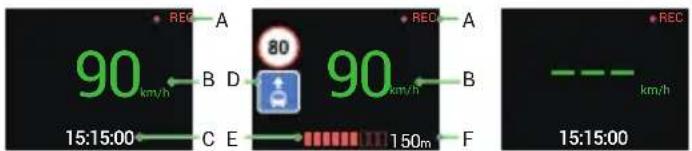
The Digital speed feature is used to display time and vehicle speed calculated with the help of GPS signal [1]. Modes:
- Speed – current speed is displayed constantly [B],
- Speed + time - current speed [B] and time [C] are displayed.
The Camera info feature notifies the driver about cameras and warnings (hereinafter – Cameras) along the way. When you turn on the Camera info, the current speed and time are displayed. With the approach to the nearest camera the following information is displayed [2]:
- current speed [B],
- camera icon [D],
• dynamic progress bar indicating approach to the nearest camera [E],
• distance to the camera [F].
All information is displayed on a black screen.
In Record mode (REC), ●REC or ● are displayed [A].
If the vehicle is still, 0 is displayed.
If there is no GPS-signal, --- [3] is displayed.
Note. A weak GPS signal may be caused by bad weather conditions and other external factors. Please consult your vehicle speedometer.
[1]
[2] [3]
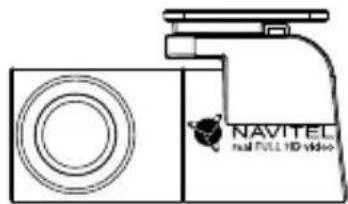
Rear camera
With the help of rear camera you can get a high-resolution image behind your car for safe parking or recording while driving. Modern double recording technology allows saving recordings both in front and behind the car for fixing any unforeseen situation.
EN
Rear camera installation
There are two options of using rear camera.
Option 1. DVR camera for getting view behind the car. Install the camera on the rear window with a sticker, put the wire through the cabin, connect the wire to the rear camera port.
Option 2. Combination of DVR camera and rear camera for back view when parking. Install the camera on the rear window inside the car. In this case, it is required to apply +12 V when driving backwards. This will allow the device to automatically switch the image from the front to the rear camera in the parking mode.
Note: It is strongly recommended that works on installing the camera and connecting +12 V should be done by qualified personnel with the necessary skills. Cable routing may require special tools or attachments. Make sure these works are safe.
natural_image
Line drawing of a Navitel digital camera module (no text or symbols)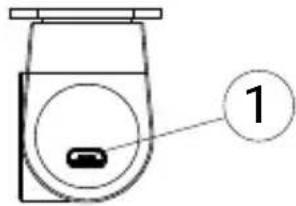
- Video cable port

The camera is not waterproof.
NAVITEL s.r.o. hereby declares that the device NAVITEL R9 DUAL is compatible with the European directive RED 2014/53/EU. The full text of Declaration of conformity is available at the following internet address: www.navitel.cz/en/declaration_of_conformity/r9dual
Bevezetés
Tisztelt Ügyfelünk!
natural_image
Line drawing of a camera with a labeled component (no text or symbols beyond the label)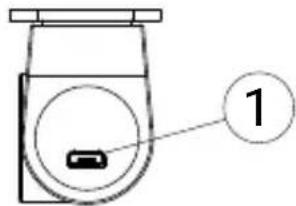
- Videó kábel port
natural_image
Diagram of a handheld device with a screen and antenna, no text or symbols presentLT
Atsargumo priemonės
natural_image
Diagram of a device with a sensor and control panel, no text or symbols presentnatural_image
Line drawing of a Navitel digital camera module (no text or symbols on the device itself)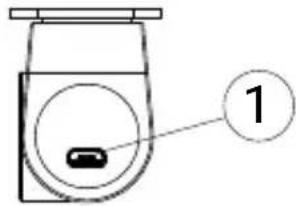
- Video kabeli ports

Aizmugures kamera nav üdensizturīga.
natural_image
Diagram of a device with a screen, antenna, and screwdriver (no text or symbols)natural_image
Diagram of a device with a dial indicator and a screen, showing no text or symbolsAtentie
natural_image
Simple line drawing of a device with a speaker, antenna, and screen (no text or symbols)natural_image
Line drawing of a Navitel 3.0F Ultra HD video camera with no text or symbols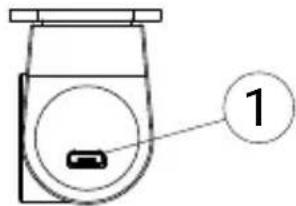
natural_image
Diagram of a device with a sensor and control panel, no text or symbols presentnatural_image
Simple line drawing of a device with a lamp, screen, and screwdriver (no text or symbols)Запобіжні заходи
natural_image
Line drawing of a Navitel camera module (no text or symbols on body)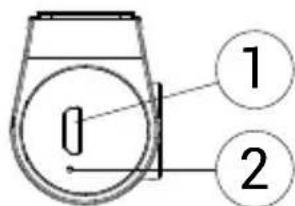


Brand : Navitel
Model : R9 DUAL
Category : Caméra auto