
VN-750 - Dictaphone OLYMPUS - Free user manual and instructions
Find the device manual for free VN-750 OLYMPUS in PDF.

| Product type | Digital voice recorder |
| Brand | OLYMPUS |
| Model | VN-750 |
| Dimensions (L x W x H) | 104 mm x 37 mm x 19.1 mm |
| Power supply | 2 AAA batteries (LR03) |
| Internal memory | 1 GB |
| Recording modes | SP (standard) and LP (long duration) |
| Maximum recording time | SP: approx. 100 h / LP: approx. 573 h |
| Frequency response (general) | SP: 300 Hz – 4.7 kHz / LP: 300 Hz – 2.9 kHz |
| Built-in speaker | Round dynamic speaker Ø28 mm |
| External microphone jack | 3.5 mm mini-jack, impedance 2 kΩ |
| Earphone jack | 3.5 mm mini-jack, impedance ≥ 8 Ω |
| Maximum earphone output | 3 mW (per channel into 8 Ω) |
| Main functions | Recording, playback, erase, playback speed adjustment, HOLD mode, A-B repeat, LCD screen |
| Adjustable playback speed | From 0.5x to 2.0x in 0.1 steps |
| Maximum number of files | 200 files |
| Battery life (recording) | SP: approx. 86 h / LP: approx. 57 h |
| Battery life (speaker playback) | SP: approx. 21 h / LP: approx. 21 h |
| Battery life (earphone playback) | SP: approx. 53 h / LP: approx. 57 h |
| Care and cleaning | Do not use solvents. Clean with a dry cloth. Avoid moisture and dust. |
| Safety | Do not expose to extreme temperatures, magnetic fields, or moisture. Keep out of reach of children. |
| Optional accessories | ME32, ME52W, ME15 microphones; TP7 telephone pickup; KA333 connection cable |
| Repairability | Do not disassemble. Contact Olympus customer support or an authorized service center. |
Frequently Asked Questions - VN-750 OLYMPUS
User questions about VN-750 OLYMPUS
0 question about this device. Answer the ones you know or ask your own.
Ask a new question about this device
Download the instructions for your Dictaphone in PDF format for free! Find your manual VN-750 - OLYMPUS and take your electronic device back in hand. On this page are published all the documents necessary for the use of your device. VN-750 by OLYMPUS.
USER MANUAL VN-750 OLYMPUS
Thank you for purchasing an Olympus Digital Voice Recorder. Please read these instructions for information about using the product correctly and safely. Keep the instructions handy for future reference. To ensure successful recordings, we recommend that you test the record function and volume before use.
- The contents of this document may be changed in the future without advanced notice. Contact our Customer Support Center for the latest information relating to product names and model numbers.
- The illustration of the screen and the recorder shown in this manual may differ from the actual product. The utmost care has been taken to ensure the integrity of this document but if you find a questionable item, error or omission, please contact our Customer Support Center.
- Any liability for passive damages or damage of any kind occurred due to data loss incurred by a defect of the product, repair performed by the third party other than Olympus or an Olympus authorized service station, or any other reason is excluded.
Safety precautions
Before using your new recorder, read this manual carefully to ensure that you know how to operate it safely and correctly. Keep this manual in an easily accessible location for future reference.
- The warning symbols indicate important safety related information. To protect yourself and others from personal injury or damage to property, it is essential that you always read the warnings and information provided.
Danger
If the product is used without observing the information given under this symbol, serious injury or death may result.
Warning
If the product is used without observing the information given under this symbol, injury or death may result.
Caution
If the product is used without observing the information given under this symbol, minor personal injury, damage to the equipment, or loss of valuable data may result.
Caution for usage environment
To protect the high-precision technology contained in this product, never leave the recorder in the places listed below, no matter if in use or storage:
- Places where temperatures and/or humidity are high or go through extreme changes. Direct sunlight, beaches, locked cars, or near other heat sources (stove, radiator, etc.) or humidifiers.
- In sandy or dusty environments.
Near flammable items or explosives. - In wet places, such as bathrooms or in the rain. When using products with weatherproof designs, read their manuals as well.
In places prone to strong vibrations. - Never drop the recorder or subject it to severe shocks or vibrations.
-
The recorder may malfunction if it is used in a location where it is subject to a magnetic/electromagnetic field, radio waves, or high voltage, such as near a TV set, microwave, video game, loud speakers, large monitor unit, TV/radio tower, or transmission towers. In such cases, turn the recorder off and on again before further operation.
-
Avoid recording or playing back near cellular phones or other wireless equipment, as they may cause interference and noise. If you experience noise, move to another place, or move the recorder further away from such equipment.
- Do not use organic solvents such as alcohol and lacquer thinner to clean the unit.
Warning regarding data loss:
- Recorded content in memory may be destroyed or erased by operating mistakes, unit malfunction, or during repair work.
- For important recorded content, we recommend you to make a note of it before erasing the file.
- Any liability for passive damages or damage of any kind occurred due to data loss incurred by a defect of the product, repair performed by the third party other than Olympus or an Olympus authorized service station, or any other reasons is excluded from the Olympus' liability.
Handling the recorder
Warning:
- Do not use the recorder near flammable or explosive gases.
- Keep young children and infants away from the recorder.
Always use and store the recorder out of the reach of young children and infants to prevent the following dangerous situations, which could cause serious injury:
① Becoming entangled in the recorder strap, causing strangulation.
② Accidentally swallowing the battery, cards or other small parts.
③ Accidentally being injured by the moving parts of the recorder.
- Do not use or store the recorder in dusty or humid places.
- Do not disassemble, repair or modify the unit yourself.
- Do not operate the unit while operating a vehicle (such as a bicycle, motorcycle, or car).

Caution:
- Stop using the recorder immediately if you notice any unusual odors, noise, or smoke around it.
Never remove the batteries with bare hands, which may cause a fire or burn your hands.
- Be careful with the strap.
- Be careful with the strap when you carry the recorder. It could easily catch on stray objects and cause serious damage.
-
Handle the recorder with care to avoid getting a low-temperature burn.
-
When the recorder contains metal parts, overheating can result in a low-temperature burn. Pay attention to the following:
- When used for a long period, the recorder will get hot. If you hold on to the recorder in this state, a low-temperature burn may be caused.
- In places subject to extremely cold temperatures, the temperature of the recorder's body may be lower than the environmental temperature. If possible, wear gloves when handling the recorder in cold temperatures.
Battery handling precautions
Follow these important guidelines to prevent batteries from leaking, overheating, burning, exploding, or causing electrical shocks or burns.

Danger:
- Batteries should never be exposed to flame, heated, short-circuited or disassembled.
- Never heat or incinerate batteries.
Take precautions when carrying or storing batteries to prevent them from coming into contact with any metal objects such as jewelry, pins, fasteners, etc. -
Never store batteries where they will be exposed to direct sunlight, or subjected to high temperatures in a hot vehicle, near a heat source, etc.
-
To prevent causing battery leaks or damaging their terminals, carefully follow all instructions regarding the use of batteries. Never attempt to disassemble a battery or modify it in any way, solder, etc.
- If a battery fluid gets into your eyes, flush your eyes immediately with clear, cold running water and seek medical attention immediately.

Warning:
- Keep batteries dry at all times.
- Do not use a battery if it is cracked or broken.
- Never subject batteries to strong shocks or continuous vibration.
- If a battery leaks, becomes discolored or deformed, or becomes abnormal in any other way during operation, stop using the recorder.
If a battery leaks fluid onto your clothing or skin, remove the clothing and flush the affected area with clean, running cold water immediately. If the fluid burns your skin, seek medical attention immediately. - Keep battery out of the reach of children.
If you notice anything unusual when using this product such as abnormal noise, heat, smoke, or a burning odor:
① remove the battery immediately while being careful not to burn yourself, and;
② call your dealer or local Olympus representative for service.

Caution:
- Please recycle batteries to help save our planet's resources. When you throw away dead batteries, be sure to cover their terminals and always observe local laws and regulations.
Getting started
Remove the screen protector on the display.

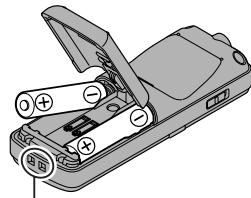
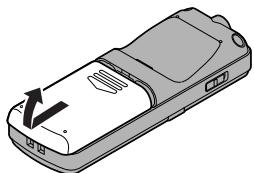
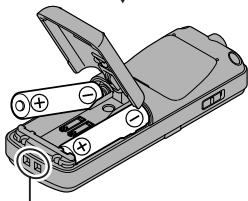
Inserting batteries
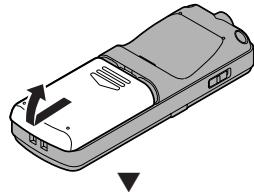
Strap hole (Strap is not supplied.)
When [d] appears on the display, replace the batteries as soon as possible. When the batteries are too weak, [d], [LO] and [bATT] appears on the display and the recorder shuts down.

- Remove the batteries if you are not going to use the recorder for an extended period of time.
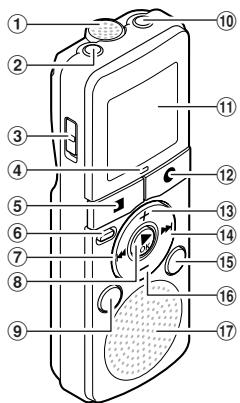
Identification of parts

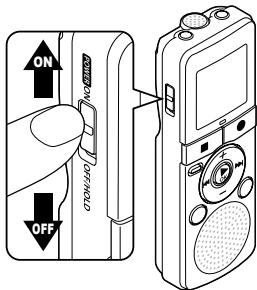
Turning on the power
Slide the POWER switch to the [ON] position.
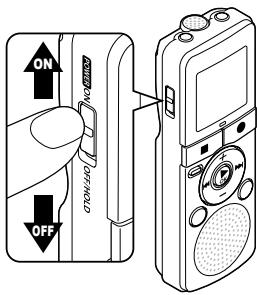
Turning off the power:
While the recorder is in stop mode, slide the POWER switch to the [OFF/HOLD] position.
Power save mode:
If the recorder is on and stops for 5 minutes or longer, the display shuts off and it goes into power save mode. To exit power save mode, press any button.
HOLD:
If you slide the POWER switch to the [OFF/HOLD] position, the current conditions will be preserved, and all buttons will be disabled.
Setting time and date
If you set the time and date beforehand, the information will be stored automatically when the file is recorded. This function enables easier file management.
When you install batteries for the first time or each time you replace the batteries, the "hour" indicator will flash. When the "hour" is flashing, conduct the setup from step 1.
1 Press the + or - button to change the setting.
2 Press the OK or button to set.
- Repeat step 1 and 2 to set "minute", "year", "month" and "day". After the "day" has been set, the recorder's clock will start working.
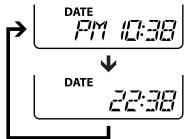
- You can select between 12 and 24 hours display by pressing the DISPLAY button while setting the hour and minute.
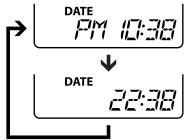
Example: 10:38 P.M
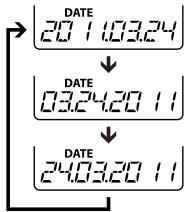
- You can select the order of the "month", "day" and "year" by pressing the DISPLAY button while setting them.
Example: March 24, 2011
3 Press the or button to set the beep sound.
① Built-in microphone
② MIC (Microphone) jack
③ POWER switch
④ Recording indicator light (LED)
⑤ STOP(■)button
⑥ ERASE button
⑦按钮
(8) OK button
⑨ MODE button
⑩ EAR (Earphone) jack
⑪ Display (LCD panel)
⑫ REC (●) (Record) button
13 + button
14▶I button
15 DISPLAY button
16 - button
⑦ Built-in speaker
- The recorder beeps to alert you of button operations or warn you of errors.
[ON]: Enables the beep function.
[OFF]: Disables this function.
4 Press the OK button to complete the setting.

- When you change the setting for the time and date or beep sound, remove the battery and then repeat the above steps 1 through 4.
Recording
1 Press the MODE button to select the desired recording mode.
SP: Standard recording.
LP: Long-term recording.
To record a meeting or a lecture clearly, select SP.
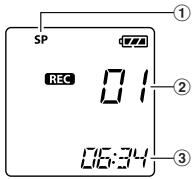
2 Press the REC () button to start recording.
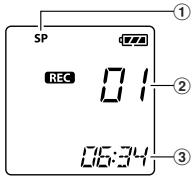
① Recording mode
② File number
③ Elapsed recording time
The recording indicator light will turn on.
- Turn the microphone in the direction of the source to be recorded.
3 Press the STOP (■) button to stop recording.
- Newly recorded audio will be saved as the last file.
Pause:
If the recorder is in recording mode and the REC () button is pressed, recording pauses. If the REC () button is pressed again, recording resumes.

To ensure recording from the beginning, start recording after you see the display and the recording indicator light turning on.
- If the number of files inside the recorder reached 200 or the memory becomes full, you will not be able to record any further, and [FULL] will be displayed. Delete any unnecessary file before recording.
- When the remaining recording time is less than 60 seconds, the recording indicator light starts flashing. When the recording time is decreasing to 30 or 10 seconds, the light flashes faster.
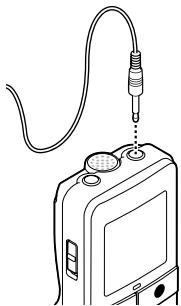
Recording from external microphones or other devices:
External microphones and other devices can be connected and the sound can be recorded. Microphones supported by plug-in power can also be used.

- Do not plug and unplug devices into the recorder's jack while it is recording.
- The built-in microphone will become inoperable when an external microphone is plugged into the recorder's MIC jack.
Playback
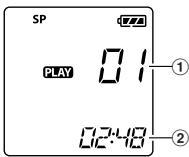
1 Press the or button to select the file.
2 Press the OK button to start playback.
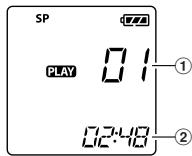
① File number
② Elapsed playback time
3 Press the + or - button to adjust to a comfortable listening volume.
- The volume can be adjusted within a range from [00] to [30].
4 Press the STOP (■) button at any point to stop playback.
Playback through earphone:
Anearphone can be connected to the EAR jack of the recorder for listening.

- To avoid ear irritation, insert the microphone after turning down the volume level. When you listen with the microphone during playback, do not raise the volume too much. It may cause hearing impairment and a decrease in hearing ability.
Forwarding and rewinding:
While the recorder is during playback mode, press and hold the or button.
- When you release the button the recorder will resume normal playback.
Locating the beginning of a file:
While the recorder is during stop mode or playback mode, press the button.
- The recorder skips to the beginning of the next file.
While the recorder is during playback mode, press the button. - The recorder skips to the beginning of the current file.
While the recorder is during stop mode, press the button. - The recorder skips to the beginning of the previous file. If the recorder is in the middle of a file, it will return to the beginning of the file.
While the recorder is during playback mode, press the 口 button twice. - The recorder skips to the beginning of the previous file.
Changing the playback speed
1 Press the OK button to start playback.
2 Press the OK button again to open the playback speed adjustment display.
3 Press the + or - button to adjust the playback speed.
[1.0 PLAY]:Playback at normal speed.
[0.5 PLAY] - [0.9 PLAY]:Playback speed slows down.
[1,1 PLAY] - [2,0 PLAY]:Playback speed becomes faster.
4 Press the OK button to complete the setting.
If you leave the recorder for 3 seconds, the setting will be applied and the recorder will return back to the original screen.
!
Even if playback is stopped, the changed playback speed will be retained. The next playback will be at that speed.
Erasing
1 Select the file you want to erase.
2 While the recorder is during stop mode, press the ERASE button.
- File number and [NO] will flash on the display.
3 Press the button to select [YES].
4 Press the OK button.
- Erasing begins and [ERASE] flashes on the display.
Erasing all files:
1 While the recorder is during stop mode, press the ERASE button.
2 Press the ERASE button again.
- [ALL] and [NO] will flash on the display.
3 Press the button to select [YES].
4 Press the OK button.
- Erasing begins and [ERASE] flashes on the display.
#
- If an action is not selected within 8 seconds, the recorder will return to stop mode.
- It may take over 10 seconds to complete processing. Never remove batteries during this time because data may be corrupted. In addition, carefully check the remaining battery level in order to ensure that the battery will not run out while processing.
LCD display information
While the recorder is during stop mode, pressing and holding the STOP (■) button will make the display switch information in the following order:
① Current date
② Current time
③ Remaining recording time
While the recorder is during recording mode, pressing the DISPLAY button will make the display switch information in the following order:
① Elapsed recording time
② Remaining recording time
While the recorder is during stop mode or playback mode, pressing the DISPLAY button will make the display switch information in the following order:
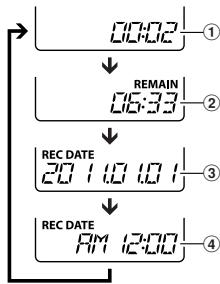
① Count up
② Count down
③ Recording date
④ Recording time
Troubleshooting
Q1: The power cannot be turned on.
A1: The batteries may be depleted.
- The batteries may be inserted incorrectly.
Check and before inserting new batteries. - Are the terminals of the batteries soiled?
If so, clean them with a dry cloth.
Q2: Nothing happens when a button is pressed.
A2: The POWER switch may be set to the [OFF/HOLD] position. Slide the POWER switch to the [ON] position.
Q3: No sound or quiet sound is heard from the speaker while playing back.
A3: The耳机 plug may be plugged into the recorder. The volume may be set to the minimum level.
Q4: Recording is not possible.
A4: By pressing the REC () button:
- Check if the display shows [FULL].
Delete any unnecessary file before recording any further. A maximum of 200 files can be recorded.
Q5: The playback speed is too fast (slow).
A5: The recorder may be set to fast (slow) playback.
Playback speed is set to [1.0 PLAY].
Specifications
Recording medium:
Built-in flash memory (1 GB)
Input level: -70 dBv
Maximum microphone output: 3 mW (at load of 8 Ω)
Speaker:
Built-in 28mm round dynamic speaker
MIC jack:
0 3.5 mm mini-jack, impedance 2 kΩ
EAR jack:
0.35 mm mini-jack, impedance 8 Ω or more
Maximum working output: 190 mW (8 Ω speaker)
Overall frequency response:
SP mode: 300 Hz to 4.7 kHz
LP mode: 300 Hz to 2.9 kHz
Guide to recording times:
SP mode: Approx. 100 h.
LP mode: Approx. 573 h.
Input power requirement:
Two power (LRO3) batteries
Guide to battery life:
During recording mode
(Built-in microphone)
SP mode: Approx. 86 h.
LP mode: Approx. 57 h.
During playback mode
(Built-in speakers)
SP mode: Approx. 21 h.
LP mode: Approx. 21 h.
(Earphone) SP mode:Approx.53 h. LP mode:Approx.57 h.
External dimensions:
104 (L) mm x 37 (W) mm x 19.1 (T) mm (without protrusions)
Weight:
66 g (including battery)
Operating temperature:
0^ - 42^
Available recording time may be shorter if many short recordings are made.
- Battery life is measured by Olympus. It varies greatly according to the type of batteries used and the conditions of use.
- Your recorded contents are for your personal use or pleasure only. It is prohibited to record copyrighted material without permission of the copyright holders according to copyright law.
- Specifications and design are subject to change without notice for improvement of performance.
Accessories (optional)
- Compact zoom microphone (unidirectional): ME32
Highly sensitive noise-cancellation monaural microphone (unidirectional):MES2W - Tie clip microphone (omni-directional): ME15
- Telephone pickup: TP7
Connecting cord: KA333

"CE" mark indicates that this product complies with the European
requirements for safety, health, environment and customer protection.

This symbol [crossed-out wheeled bin WEEE Annex IV] indicates separate collection of waste electrical and electronic equipment in the EU
countries. Please do not throw the equipment into the domestic refuse. Please use the return and collection systems available in your country for the disposal of this product. Applicable Product: VN-750

This symbol [crossed-out wheeled bin Directive 2006/66/EC Annex II] indicates separate
collection of waste batteries in the EU countries. Please do not throw the batteries into the domestic refuse. Please use the return and collection systems available in your country for the disposal of the waste batteries.
Uvod
66 g (Piles comprises)
Temperature d'utilisation: 0^ - 42^
Modalita SP: circa 53 oE Modalita LP: circa 57 oE
Dimensioni esterne:
104 (L) mm x 37 (A) mm x 19, (P) mm (escluse the sporogense)
Peso:
66 g (battery alkaline comprese)
Temperatura di esercizio: 0^ - 42^
(excluding saliencies)
Peso:
06paueHne DnKTofoHOM
OctopoXHO:
Hem3aNcNbON3OBaBdNKTOFOH pAOM cTROPUHMn B3pbIOONaChbIMn Ra3AMn.
He abaatae nkttofoh detam m mnaedumc. Bcerla icnpo3yute n xpahtne ndttofoh Bhe ptepeonobociraaemocTmI MaenebKIXn detet m naedehce BO u36keJahme Cneuyuoo cityauo, B KOTOPbix OHN MOrTy NOnyUHT cbepB3HbIe TaPbMbI:
1 PeB6EHOK MOKET ZAHTaTbCTBa B pEmeWke JNKTOΦHα, YTO pRnBPeD9 K YduyUeHHIO.
② Pe6eHOK MOXkET CnyauHNO
PnOFTOTNb AkKymyTOp, KApTb NAMrTN INI npYtne MeKnE DETAnL.
3)Pe6EHOKMOKETNONYUHTB TpABMYOTDBNNUyUxCRA DeTaeJeI NIKTOPOHA.
- Hénb3x xpaHbTb NkTOPOH B IVbIbHbIX INN BnAkhBix NOMeEHJHX.
- He pa3bnpaIte, He cnHHTe N he BNOCTe MoDnHKaunB IN DKKTOFOH CAMCOTERTJIbHO.
He nolb3ytecb dIKTOfoHOM, KOrda ynpabnene TpahcnOpTHbIM cpeDCTBOM (takIMK kAK bENOCnPeI, ABOMObn).
Ipydunpexkdenne:
HemelndenHo npekpatnte
mncnlo3b0anhe nduKTOho npn
noBnENHM Heo6bIhOro 3anaXa,
yma u mdbma.
He poraiate kkyMnyTOp roJIbIMu
pykam - Bby Moketee o6kebCra.
CneJte 3a pemeuKOM. Ha KOTOPM BWCNT DIKTOFOH. OH MOKET JNEKO 3aENITbCe 3a paJIINHbIe BByCTNaIOUme PneMeTbI cTaTb npuHNO cepE3HO TpaBMbI.
BoIa6eKaJHMe NHkOteMnepatpyhBx OOKoRb, 06auiaiTebc CdkKTOphiOMO octopoxHo.
Поскоблку Димтофон сорержпmetаллеснійдэлі, erge neperpeгов может ривсетиКнзотemnetратуньmOKогам.Примпite BO ВHMмане cne'dyuоee:
Пи радогджгельбнOMNcIb3OBaHIMnDINOKTOHARpeBaETc.ДерждAnIOToΦOBOH TEMCOTcONHHM,MOxHOJNOJYtB NIKOTEMEMPATyPHINOKOr
Пи Крайн ИЗКИN Tempepatypax Okpykaошей.cpebl KoPnyc DiKtOfoHa можетОнлдьТьСД Дуtemпepatypiy NHIke Okpykaошей.Пи ИЗКИN Tempepatypax, no BO3MOxHOCTn, degKHTe DmKTOfoH B nepvatkA.
Mepbipedeopctoepokhctcnprnncnobnob2abahnakkymylatora
Bo 366ekhanne potekyen, neperpeba, B03ropahnna IINB3bpyBa AKKYMUNTOpa, NOPaHexeH3NeKtpnueeckmTOKOMI npuChIny HN OXOB npi erO nCnONsOBAHnM, CndyuePnpBeDeHNbHM NHXE INCHPTyKUAM.
Onacho:
HnKorda He noDeBpeTAE 6atapeKmIO B03eJIN BOHrI INOgARHeBaHNO IINI KOpOTKOMY 3aMbKaHNIO, He pa3bIpauTe IIN.
Hembzna HarperebA kkyMnyTOpB1 nnn 60pcabTxN B OBOH.
Пи Икпolyзовани Илихаший Батарс сбладаутeme Мергь р dedосторжости истду,Чтосы они Касалсьmetаллочскьн р dedметовВрodeювирьху урашени,Бунавok,стдуЕКИТ.
Hembla xpanhltb 6atapem Bmectax, rge OHMOYRT NOBBepratbCBA BO3dEeCTBnIO npMbbs coJIneHcyuey, BbICOKs TMenPATEp y ABOTMOBxN, pRDMc C uOHTNKAAMM TenaIa nTn.
Bo n36ekhanme npotekahan 8atapen nn NOBPexdHn IN BbIOBOB, Tuaetnelho Cneynyte INNCTpyKUaYmnn OKeCNlyatauian 8atapen. HkOrda ne bIytae pa36napb 8atapen nn DopabatbnaH INNaTbN T.N.
Ecnn JxKoCTb 63 Gatapeu nponaB rHa3a, HEmeJHEnHO npomOte rna3a YcStO, xOJHOH pTOUCHN BOO IN cspOnO b6pTaTbc K bpVa.
OctopoXHO:
- Постоганно лесхшто сатарецсухима.
IeNcbnlaByAekkMymyTbot, eCNI OH TpeChyn nnn COnMAH.
He noBpeBaTae kAkyMynAToptbI Bo3eCTBnO yadopB nII npOdoJXTeNBJHnBnBnBnBnBn
EcnBIO BVPMAcNpOb3OBaHnA
AKKymyTApOp NTpePn HOPMaBHyO Okpacky,
deOpMnPOBaCNi npNo6bp dpyrNe anOpMaBhne
ocBeHeNoCTn, npekpatnte
NCNpONb3o4b NkTOphoN.
Ecnn XJIOKCTb, BYteKUaH N3
aKKymyIaTOpA, nonana Ha oJeJy
nNn KOny, HEMEDNEHO CHMmTE
3aRpa3HNHeYIO oJeQyN u pOmoTe
pOaxKeHHbYuACTOK UcHToN,
XoJNOH npTOouHNO BODi. Ecnn OJHXKOtN To KOne octanC kOkr,
cPOnHO o6pTaITcB K Brvy. - Āmpitke 6tatapénni B Mecte, hedocytynHOM dny detei.
EcnBn B3aMeTITe 7TO-1N60 Heo6bHNoe npn Hcnpb3ObaHNn DInKTOfoHa, HanpIMeP, Heo6bHNoy UWM, BydJeLHeNe Tena,dbm nn 3anax RopEno: ① HEmeIeHNO BbHtSe BatapeKn
-6ydbteoctopokhbl,TOb6bHe 06kBeCb8;
②no3BOHHTe DnIepy IIN MeCTHOMY npEctabTHeIOOlympusIaIepcBvHCHOro6CJxNbXHAny.
!PnpdynpckdneHc:
UynmnyaekKymnarytopsb, Bbl nomoraTe c6pehebcpcpyb Hauen nnahetb. Bbi6paibrae Opatabotanee akkymunrtope, He 3abydtbe zakpbbyix KOTAKTbIbe bVbOblc. Berca o6bnoiadte MechtbIe 3aOKHbI npBvAIa.
Hauano pa6otbi
CHMIMITE 3aunTHyIPO nENKY C cnINPNJ.

UctahOBka 6aTaapeek
Pnope3bI dIyPeMUSA (PeMeuK He BXOJIT C BOMNIKNT NCTOBANK).
KordaHaNDCnIeNEPOBITCT3HAK [[],3aMeHnTE6batapeiKm KAKMOKCHKOpeE.EcNI3ap3d B6aTeepcknIMUHKo,Ha3kPaeH OTO6pa3HTCCoOObHeN[[],L0] n[BATT],nDkTTOFOHOTKJIOHTC
!
BbHbTe 6aTapeKn, cEn bN bHe co6bnaTeEcNb cNoIb3ObaTb dNKTOFOH dNtJIeBHO BPEM.
Ha3BaHncaOcTaBbIX yactei
① BCTpoEHbIMMkPofoh
② THe3do MIC(BHeuHnMkPoΦOH)
③Пелеклочатуль POWER
④ Mndkatop3anncn(LED)
⑤ KhonKa STOP
⑥ KhoNka ERASE
⑦ Khonka
⑧ Khonka OK
⑨ KhonKa MODE
10 The3do EAR (hauuHnkn)
⑪ Ducnnei(XK-ekpan)
⑫ Khonka REC (●) (3aɪnscb)
13 Khonka+
14 Khonka
15 KhoNka DISPLAY
16 Khonka
⑦ BCTpoeHbIy DnHaMnK
BklioueHne nHTaHn
Пелевинтыpeнекл optentь POWERB nonojenee [ON].
BbIKIOUeHHe NITAHNA:
KoJda dNtOToH hXaDITcB E
pEXMHcOCTaOBHNb, nepeDBnHbTe
nepeKnIOUATEbIPOWER B
NOJONKeHf [OFF/HOLD].
Pexn m3neproc6pekeHnA:
KoJdA NIKTODOH KBNIOUEN H OCTaETCBA B PEXMIME OCTAOHBK B T ECHUYE 5 MNHTY N BOEE, NPOCXOXIDIT OKNIOUENHE IIN CIPLNEI YUCTOPICTBO NEPEXOXIDIT B PEXMIMHEPROSCBEXEHNI.OTb6I BYNTI M3PEXMIAHEPROSCBEXEHNI, HAXMITEIOBOYIOHNOKY.
HOLD:
EcnBnBpeDHHenetepeKHeHouTEnPOWER8nolooHenE[OFF/HOLD],TekyueeecoCTOHNbEyET3aKmCscPuroBaHO bCkNHOyDytOTKnOHye.
YcTaHOBKa BpeMeHH
aTbl
EcnBvYtcaHOBTe BPEMAI nDatay zapaHee, INHΦOPmauO u HIXABOMATNUeCKN COXPANETcBO BPEMAI ZAKDOAaHa.3TaФyHKUaONoBuNEJeaTyrYPaNBeNeMaaJIaAMn.
HnDnKATOP "cac" Mmraet npn CTaYOBKe 3eMEnTOB nTAnHnB a nepbBy kAs mnpKaJdO hZamHe 3eMEnTOB nTAnHO. KOrDa mrrAet cac", BbONHnTe yCTAHOBky, HauNHaC sWara 1.
1 HauktaHem KhoNKn+ Hnn- DnpeNeHmK nHyNKtY, KOtOpby BbXoHTe yctaHOBt.
2IaYtcaHOBKIN HAKMITEKNKNY 2OKNnn>>1.
- NIOBOTOPNE shan 1 n,2Tb6bU yCTAHOBHTB "MHNYtBu"TOD," MeCAU "n"DeH."Nocse TOrO kau YCTAHOBJIEN"DeH."Cauch iNkTOFOH hAUYTpAOBtA.
- Bbl Mokjete BbipaTb 12-niN 24-chaCoboyu CISTemy HkaJatemn KhoKNI DISPLAY BO Bpemy yctahOBKu chaOBMmHNT.
Птумер: 10:38 P.M.
SP:CTaHapTHa 3aNcB.
- EcnB bblXOTNTe NOLNYtB pa36OpNbYbO 3aIcNb BCTpeu nnNeKunn, Bbl6BePnte SP.
2 Hakmatte KHOKY REC ( ) n noTrogotobbctc B 3annn.
① Pekim 3aIncn
②HomepTekyuerofoaina
③ IcTeKwee BpeM 3aIncn
3aHbC BcHueHMO NmKpOoHa HnDpyHXyCTPOCTCB
Moryt 6bTb NodcoeMHne BWEHNI MKNpOoHnIu npTyHe UcTPOBCTBA, C nOMOzU bKOTOpBX Moket 6bTb 3aNcAn 3Byk. MoxHO TAKKe IcNObl3OaTB MKNpOoHbC pNTAHenOT pA3BeMa.
#
He noCDoeHnHne Hne OTOeDnHnE HnKAcYcTPOCTB K rHE3dy nKTOFOHa BO BVpEma3nCm.
Korda K rHe3dy MIC dNtOfoHa
NDkJNOHn BHeuNHm MInkoPhOH,
BCTPOeHHM NkPoPhO
OTKnIOaETc.
Bocnpoun3BeDneHne
1 HαKMITE KHOKNKy▶I mnn I<ДЯ Bb6opa φaɪna.
2 HaxMMTE KHONKY 一 O K 1076b1 NaHATbBOCPNP3EBeHEne
①Homep Tekyuero faaHa
② ICTeKweeB EpreM BOCNP0N3BDEHNA
3 HaKaHMeTKeKHOky+Hnn-HTO6bI 3a4aTb yPoBeHb rPoMkOCTn npocnyuBHaAH.
- ERO moKHO 3adTb B mAna3OHe or[00] do [30].
4 HaxMMTE KhoNkY STOP (■), YTO6bI OCTaHOBmTb BcOspn3BeDeHne B IIO60 MOMEHT.
PpocnyuBaanueepe3 haynkn:
HayunHKMOyTbblncoeineHeBlyIpnocnyuBaHNAKrHe3dyEAR.

#
Q1:Питане He BKIOUOaEeTcR.
A1:·B03MOKHO,pa3RdIINCb nEMeHTbI pTnAHAA.
- BoMzMOHNo, HnepAInbNo BCTaBHeNo 3nEMeNTbI nTtAnHa. BCTaBn HObBe 6BaTeApKei, nPoBPbEeNo pAnHOpCtB n.
- He zaprechenbI li KHTaKtbl 6atapeek?
Ecnla zarpnnehbe, ouchntte HX CUXO TKAHbo.
Q2:Приинакатий Конлки Нчero He pmonxOcNDI.
A2: -П配电КИОчATEь POWER MOKHONGYCTAHOBITВ NIOJOKHEN【OFF/HOLD】.
PerebnhtnepeknohtbEPower B noxonoehe [ON].
Q3:BOBEMA BOCNPOH3EBAENJPRGMOKOBOPHTIELB OBCNPOH3BDAITN HNKAKINGRPMKNX JIJI NTKXIS 3BYKOB.
A3: B03MOxKHO, BДNTOKФОH BCTABNEI STUKEPH HAYUHNIKOB. B03MOxHO, rPOMKOCbYCTAHOBNeHA MHHIMANbHM OYPBDE
Q4: 3aɪnCB HeB03MoXHa.
A4: Hanjab KHONky REC (●):
• Pnpoberte, he otobpaKaetaeTn Ha nucnPnee [FULL].
Pnekde Yem 3aIncbBaTb UTo-To eue, daJnte HeNyXhBe foJInb. MoKHO 3aIncatb He 60Je 200 foJInOB.
Q5: CkOoCTb BocPOnI3BENHeN LcHJKOM b6IcTpaR (MeJIeNHeHa).
A5: B03MOXHO, ДдИКТОФОЕ
уctановлип реким
УСКОРЕHORO (Замедлени)
ВOCПОНБЕDEнHA.
Для СКОРСТИ ВOCПОНБЕDEнHA
ВьБОраза уст��ы [1.0 PLAY].
Cneunfkaum
Hocntel 3annc:
BcTpoeHHaФJ3U-NamrTaB(1Γb)
YpOBeHb Ha BxOnde:
-70 dBv
MakcimmaBnaMoouHoctha BybIXe RoJIOBbIX TeIeOHOHOB 3MBT (npriHarpy3ke 8OM)
DnHAMNK:
BCTpoHHbIKpyrblmDnAmetp 28 MM
THe3Do MIC:
03,5MM,COPOTNBHeHne 2 KOM
THe3doEAR:
03,5MM,conpoTINBNEHME8OMIMI6Bolbe
MaKc. MoUHOCTb Ha BbIXOe:
190 MBT (Динамнк Ha 8 OM)
HaCTOTHbIy Dnana3OH:
PexnM SP:OT 300 Tg do 4,7 Kt
Pexim LP:OT 300 Tg do 2,9 K
PamrKa nO BpeMeHn 3aHcN:
PexkIM SP: npn67.100 u.
Pexim LP: npn6n. 573 q.
Tpe6obAHnK nHTaHnIO:
(BcTpoEHnBn DnHaMnK)
PexnM SP: npn6n. 21 u.
Pexm LP: npn6n.21 u.
(uepe3HayuHnKn)
PexnM SP: npn6n. 53 u.
PexnL: npn6n.57u.
Pa3mepbl:
104 MM (dɪnɪha) × 37 MM (ʌpɪnɪha) × 19,1
MM (tɒnɪuəla) (Bez bɪctynaɪoʊx iæt haet)
Macca:
66 r (c yeTOM 6aTaapeek)
Pa6o7a TemnepaTya:
0^ - 42^
- ΜΥΝΤΟς ΠΒΕΜΑ ΑΓΙΝΙΝΑ ΜΚΟΥΕ ΒθΙΤΑ ΜΜΕύΠΑ, εἰπηλαΝΑΗ ΜΗΟΓΟ ΚΚΟΡΤΚΟ ΦλήνΟβ.
Вретам работы ол лименту патани мөсмөн О кмпанэн Olympics.Оно зач苗木ьх 3авицг.TOTINAИСПONьЗУМбx llimentobNT pahuaN y cNoBn I KcKpIyataaun.
3aHaCaHNoe CoedepKIMoE npedna3nauHEn NCKNUHTeBHO 4nIuHOrO nOb3oBaHOB. Cornapcho 3Akyo6 ABtOPCkXn npabax 3aPeezaTeCTa 3aNcBbTaBmatepnaJIb, 3aunieHHe bAtOPCKM npABOM, 6ez pa3peSeHHn BlaedeBceB atOPCKOro npBA.
CneuФикuaииКонстчукuaMoryt bjtIbI MNeHemBuIbe8yDcOMHEnaIc C cIeIbIO yUJyUHeNHaIPOB3OBdIeJIbHOCTn.
Akkceccyapbl(onzounnhe)
KOMaTkHbIy 3ym-MnKPOfoH (hnpAbeHeHH) : ME32
BbKOcOyUBCTBtEnbHbMyoHOΦOHweckNMIKPOΦCHcNoabJeHnemWMOy (hanpaBHeHH):ME52W
Мікpopodно вібDUБУВАКи дія
rantуka (BCEhanpaNBHnKи) ME15
YCTOBCTPO nPiEMA BOXUHxIN TENEΦOHHNBIX 3BOKNOB:TP7
CoeHNHTeNbHbI uHyp:KA333

3Nak“C"YkazbtaBaeT, YTO daHHn npOyKT COOTBECTBYE
ebponeckmTpe6oBaHnMIO 6beonacOCTN,Opahe3dOpOBbB, OKyka0auei cpebln 3aunite ntope6bn

ТOTСИВОЛ [пенистун] МUCOPHIB 6Кан KOLECSKIN,ДИЕKTINBA EC 6O tXodax WEEE, pnpINOZHOENI IV) yka3bBaet
Ha pa3dBelHb Coo Mycopa Ida
aekTpueeckEroI aNekTPOHHo
OOBpyoBaHmB CtpaHax EC.
PoKaanyCtba, He BbOpaBcBbAte 3To
ycTOPcTB0 BMeCTe C b6bTOBBMn
OTxODAMn. PoKaanyctA, da
yTuINMaau DAnHOrpo PNDyKta
noJb3yTeCe dyEChTByuOpmmn B Bauee
ctpae cIcStemaMn BO3BpTa n c6cb
dyaYtuINMaau.
Приимен immoe n3dJIne: VN-750

3OTCIMBONI TepepepkHytmycOpNb6aKaKoJIeCKnAka, INePckTbA EC06OToxDax 2006/66/EC
npilnojokheimIy kka3bBaet ha
pa3dBelhBc6OpnCnONB0aBHnX
3NEMOTB NtTAHCTB CTPaHAX EC.
IOxanyiNCTA, He Bb6PacBbAte
3NEMETbNtTAHNA BMECTe
6bITOBbIMN OTXoAMnI. POxanyiNCTa,
4JIyTNb3AunCnIONb3OBAHbHX
3NEMOTB NtTAHN OINb3yIYTeBc
DeCTByOuZMMM B BAwei CTPaHE
CInCTeMaMn BO3BpTa n C6oPa Iy
TynlTHzauin.
Introduktion
2006/66/EC Tillagg II
KeyMed House, Stock Road, Southend-on-Sea, Essex, SS2 5QH, UK Phone (switchboard): +49(0)800 111 4777 http://www.olympus.com
OLYMPUS CZECH GROUP S.R.O.
OLYMPUS HUNGARY KFT.
1382 Budapest 62, Pf. 838 Tel.: +36 1 250 9377
Polyphoto S.p.A.
Via Cesare Pavese 11/13 - 20090 Opera (MI) info.microregistrario@olympus.it www.olympus.it
OLYMPUS NEDERLAND B.V.
Industrieweg 44,2382 NW Zoeterwoude Tel.:0031 (0)71-5821888 http://www.olympus.nl
OLYMPUS BELGIUM N.V.
Boomsestenweg 77, 2630 Aartselaar Tel.: (03) 870 99 99
OLYMPUS POLSKA SP. Z O.O. - BIURO
Olympus Polska sp. z o.o., ul.Suwak 3,02-676 Warszawa Tel.: (22) 366 00 77, Faks: (22) 831 04 53
NAPRAWA PRODUKTÓW OLYMPUS
OLYMPUS EUROPA HOLDING GMBH
(Premises/Goods delivery) Wendenstrasse 14-18, 20097 Hamburg, Germany. Tel. +49 (0)40-237730 (Letters) Postfach 10 49 08. 20034 Hamburg, Germany.
http://www.olympus-europa.com
E1-BS0751-02
AP1104