CHEF TITANIUM KMC031 - Food Processor KENWOOD - Free user manual and instructions
Find the device manual for free CHEF TITANIUM KMC031 KENWOOD in PDF.
User questions about CHEF TITANIUM KMC031 KENWOOD
0 question about this device. Answer the ones you know or ask your own.
Ask a new question about this device
Download the instructions for your Food Processor in PDF format for free! Find your manual CHEF TITANIUM KMC031 - KENWOOD and take your electronic device back in hand. On this page are published all the documents necessary for the use of your device. CHEF TITANIUM KMC031 by KENWOOD.
USER MANUAL CHEF TITANIUM KMC031 KENWOOD
Chef and Major KM030 - KM040 series

KENWOOD
Kenwood
English
page 3 instructions
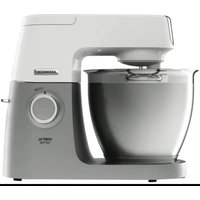
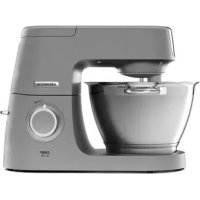
Congratulations on buying a Kenwood. With such a wide range of attachments available, it's more than just a mixer. It's a state-of-the-art kitchen machine. We hope you'll enjoy it. Robust. Reliable. Versatile. Kenwood.
Français
know your Kenwood kitchen machine
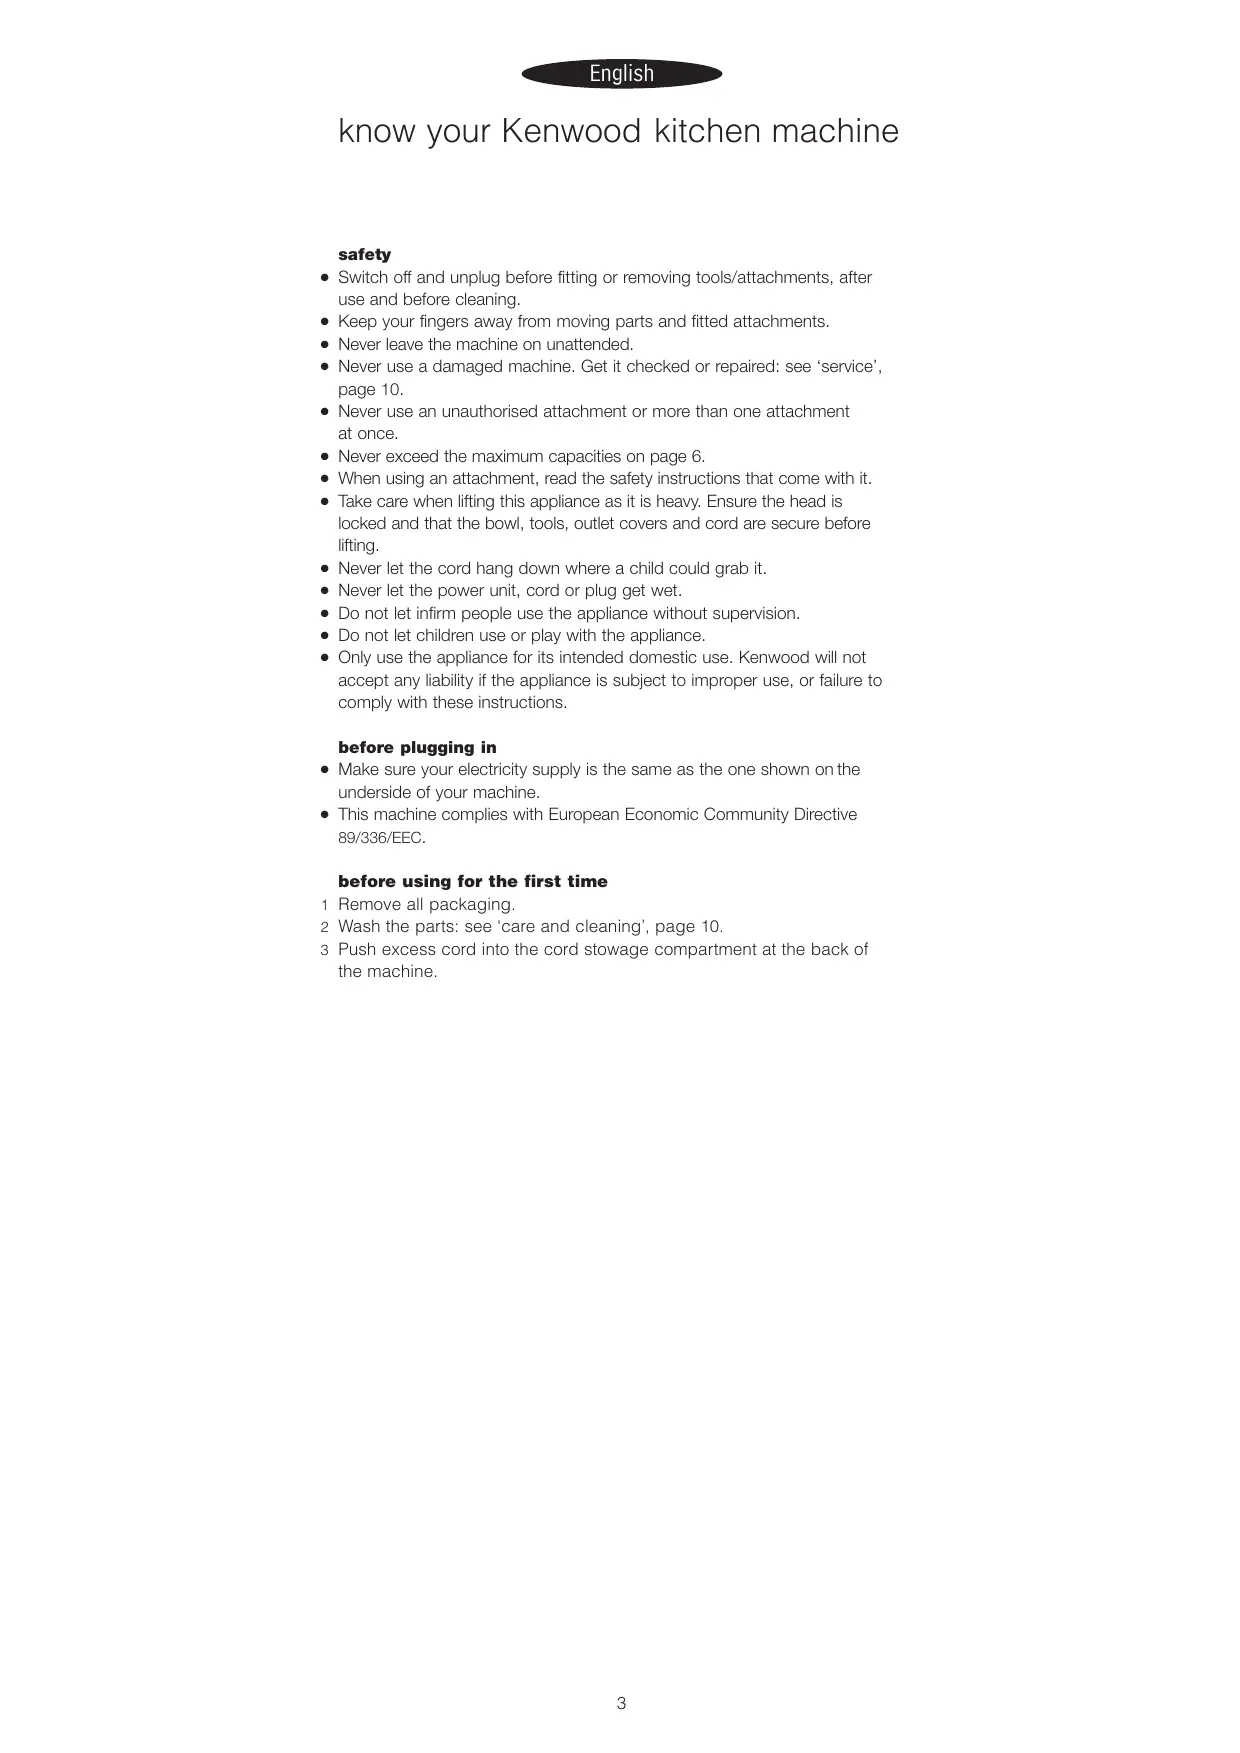
safety
- Switch off and unplug before fitting or removing tools/attachments, after use and before cleaning.
- Keep your fingers away from moving parts and fitted attachments.
- Never leave the machine on unattended.
- Never use a damaged machine. Get it checked or repaired: see 'service', page 10.
- Never use an unauthorised attachment or more than one attachment at once.
- Never exceed the maximum capacities on page 6.
- When using an attachment, read the safety instructions that come with it.
- Take care when lifting this appliance as it is heavy. Ensure the head is locked and that the bowl, tools, outlet covers and cord are secure before lifting.
- Never let the cord hang down where a child could grab it.
- Never let the power unit, cord or plug get wet.
- Do not let infirm people use the appliance without supervision.
- Do not let children use or play with the appliance.
- Only use the appliance for its intended domestic use. Kenwood will not accept any liability if the appliance is subject to improper use, or failure to comply with these instructions.
before plugging in
- Make sure your electricity supply is the same as the one shown on the underside of your machine.
- This machine complies with European Economic Community Directive 89/336/EEC.
before using for the first time
1 Remove all packaging.
2 Wash the parts: see 'care and cleaning', page 10.
3 Push excess cord into the cord stowage compartment at the back of the machine.
know your Kenwood kitchen machine
attachment outlets
high-speed outlet
2 medium speed outlet
slow-speed outlet
4 tool socket
⑤ mixer head
⑥ outlet catch
⑦ bowl
⑧ bowl seating pad
⑨ head-lift lever
speed switch
1 power unit
12 K-beater
13whisk
(14) dough hook
(15) spatula
⑯ splashguard
chment outlets


control panel
⑥ timer display
⑰ power on indicator light
18 timer decrease button
⑲ timer increase button
② fold button
② start/stop button


the mixer
the mixing tools and some of their uses
K-beater • For making cakes, biscuits, pastry, icing, fillings, éclairs and mashed potato.
whisk - For eggs, cream, batters, fatless sponges, meringues, cheeses, moussees, soufflés. Don't use the whisk for heavy mixtures (eg creaming fat and sugar) - you could damage it.
dough hook For yeast mixtures.
to use your mixer
to insert a tool
1 Turn the head-lift lever clockwise 1 and raise the mixer head till it locks.
2 Push up till it stops ② then turn.
3 Fit the bowl onto the base - press down and turn clockwise 3
4 To lower the mixer head, raise it slightly, then turn the head lift lever clockwise. Lower into the locked position.
to remove a tool
- Turn and remove.
5 Connect the mixer to the power supply. The display will show 88:88 and then clear leaving the power on indicator illuminated .
6 Turn the speed switch 4 to the desired setting and then press the start/stop button to start the mixer. The timer will count up in 1 second intervals. The speed can be changed at any time whilst the mixer is operating.
7 Stop the mixer by pressing the start/stop button . The operating time will be displayed and if the machine is re started the timer will continue counting providing no longer than 3 minutes has elapsed. If the mixer is not used within this time the display will re set to 00:00.
Important - If at any time, the mixer head is raised during an operation, the mixer will automatically stop and it will not re start when the mixer head is lowered. It will only restart when the head is lowered and the start/stop button is pressed.
pulse position
To select pulse turn the speed switch anti clockwise to the ⑨ position. The mixer will run at maximum speed for as long as the switch is held in this position. When the switch is released it will return to the 'min' position and the mixer will stop.
Note: If the mixer is running in the timer mode the pulse function will not operate.
fold button
Press and release the fold button and the mixer will automatically operate on minimum speed for 2-3 seconds. The button can be held down for a longer operation or pressed repeatedly as needed to combine ingredients. Note: If the mixer is running in the timer mode the fold function will not operate.
speed switch 4
K-beater • creaming fat and sugar start on min, gradually increasing to 'max'.
- beating eggs into creamed mixtures 4 - 'max'.
- folding in flour, fruit etc Min - 1
- all in one cakes start on min speed, gradually increase to max.
- rubbing fat into flour min - 2.
whiskGradually increase to 'max'.
dough hook Start on 'min', gradually increasing to 1.


to use the countdown timer
1 Connect the mixer to the power supply. The display will show 88:88 and then clear leaving the power on indicator visible l .
2 Press either the + or - button for one second and the power on indicator will disappear and 00:00 will appear in the display.
3 Press the + and - buttons until the desired time is displayed. The timer will count up in 5 second intervals. If the buttons are pressed continuously the numbers will change more quickly the longer they are held down. A maximum time of 60 minutes can be set. If a time is not selected within 30 seconds the display will revert to showing the power on indicator.
4 Press the start/stop button to start the mixer and the timer will count down in one second intervals.
- The mixer operation can be paused at any time by pressing the start/stop button once, this will also pause the timer. To resume the mixing operation press the start/stop button again, the mixer will start and the timer will continue to count down. If the mixer is left in the pause mode for ten minutes the timer will automatically re-set and an audible tone will be emitted for 2 seconds.
5 The mixing process will automatically stop when the total time has elapsed and an audible beep will be emitted for 5 seconds. The display will flash 00:00 for 5 seconds and then clear showing the power on indicator .
to re set the timer
1 Zero the timer by pressing the - and + buttons at the same time. However, if the mixer is not used for 30 minutes the display will automatically reset to 00:00.
maximum capacities
CHEF
MAJOR
shortcrust pastry stiff yeast dough
- Flour weight: 680g - 1lb 8oz
- Flour weight: 1.36kg - 3lb
Flour weight: 910g - 2lb
- Total weight: 2.18kg - 4lb 13oz
- Flour weight: 1.3kg - 2lb 14oz
Flour weight: 1.5kg - 3lb 5oz
Total weight: 2.5kg - 5lb 8
Total weight: 2.4kg - 5lb 5oz
soft yeast dough
- Total weight: 2.72kg - 6lb
- 12
Flour weight: 2.6kg - 5lb 12oz
Total weight: 5 ~kg - 11 lb
Total weight: 4.55kg - 10lb 16
general hints - Stop mixing and scrape down the bowl with the spatula frequently.
- Eggs at room temperature are best for whisking.
- Before whisking egg whites, make sure there's no grease or egg yolk on the whisk or bowl.
- Use cold ingredients for pastry unless your recipe says otherwise.
points for bread making
important • Never exceed the maximum capacities stated - you'll overload the machine.
- If you hear the machine labouring, switch off, remove half the dough and do each half separately.
- The ingredients mix best if you put the liquid in first.


troublesheooting
problem
- The whisk or K-beater knocks against the bottom of the bowl or isn't reaching the ingredients in the bottom of the bowl.
solution · Adjust the height. Here's how:
1 Unplug.
2 Raise the mixer head and insert the whisk or beater.
3 Hold it, then loosen the nut 1
4 Lower the mixer head.
5 Adjust the height by turning the shaft. Ideally the whisk/K-beater should be almost touching the bottom of the bowl 2
6 Raise the head, hold the whisk/K-beater and tighten the nut.
problem
- The mixer stops during operation.
solution - Your mixer is fitted with an overload protection device and will stop if overloaded to protect the machine. If this happens, unplug the mixer. Remove some of the ingredients to reduce the load, and allow the mixer to stand for a few minutes. Plug in and press the start/stop button. If the mixer does not restart immediately allow to stand for additional time. - If for any reason power to the mixer is interrupted and the machine stops working, switch off by pressing the start/stop button, wait a few seconds and then switch on again. The mixer should resume operating straight away.


to fit and use your splashguard
1 Raise the mixer head until it locks.
2 Fit the bowl onto the base.
3 Push the splashguard onto the underside of the mixer head ③ until fully located. The hinged section should be positioned as shown.
4 Insert required tool.
5 Lower the mixer head.
- During mixing, ingredients can be added directly to the bowl via the hinged section of the splashguard 4.
- You do not need to remove the splashguard to change tools.


the attachments available
To buy an attachment not included in your pack, call your KENWOOD repairer.
attachment attachment code
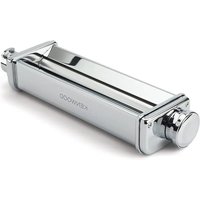
flat pasta maker ① AT970A
additional pasta attachments
(not shown) used in conjunction
with AT970A
AT971A tagliatelle
AT972A tagliolini
AT973A trenette
AT974A spaghetti
pasta maker ② AT910 comes with maccheroni rigati die
(12 optional dies plus biscuit maker can be fitted)
roto food cutter ③ AT948A comes with 4 drums
multi food grinder 4AT950A comes with
a large sausage nozzle
b small sausage nozzle
c kebbe maker
grain mill ⑤AT941A
citrus juicer ⑥ AT312
food processing attachment ⑦ AT640 includes 3 cutting plates as standard and a knife blade
pro slicer/grater ⑧ AT998A includes 3 cutting plates as standard
optional plates for AT998A a extra coarse shredder part number 639021
b rasping plate part number 639150
c standard chipper part number 639083
liquidiser ⑨ 1.5 acrylic AT337, 1.5 I glass AT338
multi-mill 10 AT320 comes with 4 glass jars and 4 lids for storage
non-stop centrifugal juicer ⑪ AT935A
ice-cream maker ⑫CHEF AT956, MAJOR AT957
potato prep attachment 13CHEF AT934A, MAJOR AT952A
colander and sieve 14CHEF AT992A, MAJOR AT930A
stainless steel bowls ⑤ brushed: CHEF 343270, MAJOR 343268
splashguardCHEF&MAJOR693766
flexible beaterCHEF AW44001, MAJOR AW44002
coverCHEF,533722,MAJOR 606397

(5)

(4)


C


(3)


cleaning and service
care and cleaning
Always switch off and unplug before cleaning.
- A little grease may appear at outlet 2 when you first use it. This is normal - just wipe it off.
power unit, outlet covers
- Wipe with a damp cloth, then dry.
- Never use abrasives or immerse in water.
- Wash by hand, then dry thoroughly or wash in the dishwasher.
- Never use a wire brush, steel wool or bleach to clean your stainless steel bowl. Use vinegar to remove limescale.
- Keep away from heat (cooker tops, ovens, microwaves).
- Stainless steel tools can be washed by hand or in a dishwasher.
-
Non stainless steel tools (coated) should only be washed by hand, then dried thoroughly.
-
Wash by hand, then dry thoroughly.
service and customer care
- If the cord is damaged it must, for safety reasons, be replaced by KENWOOD or an authorised KENWOOD repairer.
If you need help with:
- using your machine
- servicing or repairs
Contact the shop where you bought your machine.

recipes
See important points for bread making on page 6.
white bread stiff British-type dough
ingredients · 1.36kg (3lb) strong plain flour
15ml (3tsp) salt
- 25g (1oz) fresh yeast; or 15 g/20ml( 1/2oz) dried yeast + 5ml (1tsp) sugar
- 750ml (1½pts) warm water: 43^ ( 110^ ). Use a thermometer or add 250ml (9floz) boiling water to 500ml (18floz) cold water
25g (1oz) lard
method 1 dried yeast (the type that needs reconstituting): pour the warm water into the bowl. Then add the yeast and the sugar and leave to stand for about 10 minutes until frothy.
fresh yeast: crumble into the flour.
other types of yeast: follow the manufacturer's instructions.
2 Pour the liquid into the bowl. Then add the flour (with fresh yeast if used), salt and lard.
3 Knead at minimum speed for 45 - 60 seconds. Then increase to speed 1, adding more flour if necessary, until a dough has formed.
4 Knead for 3 - 4 more minutes at speed 1 until the dough is smooth, elastic and leaves the sides of the bowl clean.
5 Put the dough into a greased polythene bag or a bowl covered with a tea towel. Then leave somewhere warm until doubled in size.
6 Re-knead for 2 minutes at speed 1.
7 Half fill four 450g (1lb) greased tins with the dough, or shape it into rolls. Then cover with a tea towel and leave somewhere warm until doubled in size.
8 Bake at 230^ / 450^ / Gas Mark 8 for 30 - 35 minutes for loaves or 10 - 15 minutes for rolls.
- When ready, the bread should sound hollow when tapped on the base.
shortcrust pastry
ingredients 450 g (1lb) flour,sieved with the salt
- 5ml (1tsp) salt
- 225g (8oz) fat (mix lard and margarine straight from the fridge)
- About 80ml (4tbsp) water
hint • Don't overmix
method 1 Put the flour into the bowl. Chop the fat up roughly and add to the flour.
2 Mix at speed 1 until it resembles eyebrows. Stop before it looks greasy.
3 Add the water and mix at minimum speed. Stop as soon as the water is incorporated.
4 Cook at around 200^ / 400^/ Gas Mark 6, depending on the filling.
pavlova
ingredients 3 large egg whites
175g (6oz) caster sugar
- 275ml (10 fl.oz.) double cream
- fresh fruit eg raspberries, strawberries, grapes, kiwi fruit
method 1 Whisk the egg whites on a high speed until they form 'soft peaks'.
2 With the whisk operating on speed 5, gradually add the sugar one tablespoon at a time, whisking after each addition.
3 Line a baking tray with silicone paper, then spoon the meringue onto the paper forming a nest approximately 20cm / 8 in diameter.
4 Place the baking tray into an oven preheated to 150^ / 300^ / Gas Mark 2, then immediately reduce the temperature to 140^ / 275^ / Gas Mark 1 and bake for 1 hour. Turn the heat off but leave the pavlova in the oven to cool down.
5 When ready to serve, peel off the silicone paper and place on a serving dish. Whip the cream until soft peaks form then spread over the top of the pavlova and decorate with the fruit.
scrumptious chocolate cake
ingredients · 225g (8oz) butter, softened
- 250g (9oz) caster sugar
4 eggs - 5ml (1tsp) instant coffee dissolved in 15ml (1tbsp) hot water
- 30ml (2tbsp) milk
- 5ml (1 tsp) almond essence
- 50g (2oz) ground almonds
- 100g (4oz) self raising flour
- 5ml (1 tsp) baking powder
- 50g (2oz) unsweetened cocoa powder
method 1 Cream the butter and sugar on a low speed gradually increasing to a higher speed until the mixture is light and fluffy. Scrape down the bowl and beater.
2 Beat the eggs in a jug and whilst the mixer is operating on a high speed, gradually add the egg a little at a time until incorporated. Switch off and scrape down.
3 Incorporate the dissolved coffee, milk and almond essence on a low speed. Add the ground almonds, sieved flour, baking powder and cocoa. Mix on a low speed to incorporate.
4 Divide the mixture between two 20cm / 8 " cakes tins that have been lined with greased greaseproof paper. Level the tops then bake at 180^ / 350^ / Gas Mark 4 for approximately 30 minutes until springy to the touch.
5 Turn out and cool on a wire rack.
chocolate mousseline filling
ingredients 275g (10oz) plain chocolate, broken into pieces
- 225ml (8 fl.oz.) double cream
method 1 Melt the chocolate by placing in a bowl over a pan of barely simmering water.
2 Whisk the cream starting on a low speed gradually increasing to a higher speed until it forms soft peaks.
3 When the chocolate has melted remove the bowl from the heat and, using a large spoon fold into the cream.
4 Spread the chocolate filling between the cooled cakes.
honey and nut spread using the liquidiser
ingredients 25g chopped nuts
- 875g clear honey at room temperature
method 1 Place the ingredients into the liquidiser in the above order.
2 Blend together using the pulse control for 5 seconds
3 Use as required.
accessories openingen
Para os modelos Chef.
a Apning for store pølser
modely Major. U modelu Chef
- 300g cukru
linecke testo (shortcrust)
Ipeed nepBbIM nCNoJIb3OBAHnEM
1 YdaJInte BeCb ynaKOBOUHbI MaTePnAJI.
2 BbIMoIe BCE qaCTn KOM6aHnA B COOTBeTCTBn C yKa3aHnA m, npBBeHeHHbIMn B pa3dJe 'OuIncTk a N YxoJ' Ha cTpaHnCe 164.
3 Y6eRnTe IINHIOI DInHy CeTeBOrO ⅢHypa B OTcEK Ha 3aDHei NOBepxHOCTN KXYOHHO KOMbaiHa.
O3HaKOMbTeCb c yctpoiCTBOM BaUero KxOHHoro KOM6aHaΦnPmbl KENWOOD
KaK yCTaHaBJIbBaTb I NOJb3OBaTbCЯ KpbIshKOДЯ 3aUNTbI OT 6pbI3r
1 POnHnMnTe roJIOBky MmKcepa Do ee pfKcaun.
2 YctaHOBInTe YaIy Ha OCHOBaHne.
3 YctaHOBNTe 6pbI3ro3aUHTHOE yCTpOJIcTBO, NOIIOXINB ERO NOI rONOBky MmKcepa ③.OTKnIHaN cekuN IOnkHa HaxoDITbcr B yKa3aHHom Ha pncyHKe noJIOKeHHn.
4 BCTaBbTe HyKHyU HacaIky.
5 Onycntte roJokbky mKcepa.
B Ipocece nepemeuBaHn moKHO do6aBJIb INHpeDneHTbl HEnocpeIcTBeHHo B YaIy Upe3 OTKnIDHyIO cekuio 6pbI3ro3aunTHoro yctpojCTBa 4.
-Дя ВылленьmaнсмehинacdoKогранчтелpa36pbiznBaHINCHIMaTb He Tpe6yETc.


HacaiknДЯ KuxoHHOrO KombaHa
Длп пиобретеня有很大адкн, He BXODЯшь B KOMПЛКТ Baшero KxOHHORO KOM6aHа, obpaTNTecbВ cepвсны цentp KENWOOD.
npncno6enne
KoD npncnoc6JIeHna
HacaKa DJIa npriROBJIeHNr
MAkapoHHORo Tecta
DIOJINHHTeJIbHbIe PnCtOco6JeHnA
ДлгпрiroTOBнEHMaKaPohHOrO
TECTa (He IOKa3aHO)
NCIOJIb3yETcCObMeCTHO C AT970A
HacaKa DnI npNroTOBJeHna
MaKapOHbIX n3DeJIn
① AT970A
AT971A tagliatelle
AT972A tagliolini
AT973A trenette
AT974A spaghetti
② B KOMPJIeK T AT910 BXoIIT φopMa maccheroni rigati
(MOxHn npno6peCTn Ha BbIbOp 12 φoPm n npncnocobneHne dЯ
3aROTOBKN NeueHb)
POTaUHOHHbI N3MeJIbYHITeB
npOaYkTOB
MHOFOyHKUHOHaBHa
HacaKa dIpy6Kn npOdyKToB
③ AT948A NOCTABJRAETCBA KOMNJIeKTe C 4 pejkyuImn 6apa6aHaMa
AT950A NOCTABJRETCY C
a 6oIbIoi ueBko kon6aChoro 7npuca
b maoi uebok oKo6aChoro u npua
c yctpOCTBOM DJI npriTOBJIeHn Ke6a6a
⑤AT941A
MeIbHncaДЯЗерHa
COKOBbIXKIMaJIka
ДЯЦИТРУССБВИX ⑥ AT312
HacaikaДлЯпесрабтк
IpoodyKTOB ⑦ AT640 B KOMJIeKeT C 3 npucnoocbJeHnMaM dIy Hape3Kn
(CTaHdapT) HoxkOM
IpoocceccnoHaJIbHaHa HacaKa
ДЯ HapeЗКЛ JOMTNKAMN/Tepka
⑧ AT998A B KOMJIeKeTc c 3 npncnoc6JIeHnMaM dIa Hape3Kn
(CTaHdapT)
Дононтелов们псncocoblenia
AT998A a npncnoc6JeHne IJn Hape3Kn OueHb KpynhbIMN JOMTNkAMn,
HOMEP no KaTajory 639021
b npncnooc6JeHne-TepKa, Homep no KaTanory 639150
CCTaHdapTHoe npncnocobJeHnI HaPe3KN TOHKIMN JIOMTKAMN,
Homep no katanory 639083
aasa-pactbopntelb
yHnBepcaIbHaMeIbHnua
⑨ 1,5л поларрпат AT337,1,5л сткю AT338
AT320B KOMJIeKTe C 4CTeKNJHHbIMu YaWAMn I 4KpbIiKhAmn DJIa
XpaHEnI npOdyKToB B 3Tnx ZaJax
ZeHTpo6exHa
COKOBbIXKMaJIka
HenpepbIBHoro DeiCTBna ⑪AT935A
c6bBanka Jn nprirotoblenr
MopoxkeHoro
HacaKaJIAYUCTKIN
kaptopejna
⑫CHEF AT956, MAJOR AT957
Dypwnar n CnTo
(13)CHEF AT934A, MAJOR AT952A
14CHEF AT992A, MAJOR AT930A
YauHn H3 HepXaBeUoIe CtaJI (15) UeToHbIe: CHEF 343270, MAJOR 343268
KpbIwka dna 3aunTb1 OT 6pb13r
CHEF & MAJOR 693766
CHEF AW44001, MAJOR AW44002
CHEF, 533722, MAJOR 606397


(3)


(4)


OuNTKA I YXoI
YXoI n Oounctka
Bcerda OTKHouaTe KOMbAH OT cETn nepeedero ouncTkOJ.
Ha yctaHOBOUHOM aAnTepe 2. npu nepBOM nCNoJIb3OBAHn 3NeKTPoPnp6opa MoKET NOBtbcr HEmHOrO rCyToI CMa3Kn. 3TO HopMaJIbHoE RaBHeHne - npocTo ydaNITe CMa3Ky.
CINIOBoi 6IOK, KpbIiKn Ha yCTaHOBOUHbIX aanTepax
- IpoTepeTb BnaXHoN caIqTeKoN npocyuNTb.
- Hikorda He IcnoIb3yIte abpa3nBhIe MoIOuIe cpeICTBa I He norgykaTe erO B Body.
- BbIMoTe yau pykamn n TuaTeNbHO BbcuHTe nn BbIMoTe yauB NocydomoeyHo MaunHe.
HnB Koem cnyuae He noIb3yItecb npoBOJOnH OeTKoM, MeTaNIMueckO MoaALKO IINN OT6JIINBAUOMN CpeCDTBAMN DnA YnCTKN YaUN N3 HepKabeIOSe CtAN. JnYdAnEnHn 13BeCTKOBORO HaNETa NcNoJIb3yIte BHNbI yKCyc.
-ДерхитЕ КухоньКOMбайнВСтореОТИСТОУнкOBТeпla(Верхнейпа HeЛЗЯКТРОПЛТы,ЗЯКТРОпeчe,МИКрOBOLHOBblxпeчe). - Pincncocoblenia n3 HepkaBeouei CtaIN MOXHO Mblb pykamn INN B NOcydomoeuHOMaunHe.
- Pincncoc6bneHnA (C nokpbItnEm), n3rotobnHHbIe He n3 HepXaBeIOUeCTaJI, CNeJyET MbITb TOnbKO pyKaMn I 3aTeM TuaTeJIbHO npocuINBaTb.
MoTe TOnbKO pykAMN I TuaTeNbHO npocuShBaIte.

KpbIuKa dIa3aIITbI O T 6pbI3r
yxo
- Ecπn noBpeKdEn uHyp nHTaHnry, To B ueJx 6e3onacHocTn erO Heo6xOДmO 3aMeHnTb, o6paTnBUnCb Ha φuPMy KENWOOD nIi B MeCThbl OΦuIuaJIbHbI cepBcHbI ueHTp.
Ecnn Bam Tpe6yeTc nOmoos
-При ИспOLTБОВАнКOMБанHa
- pni obcnykubahn nn peMOHTe, 6paTntecb TTOPRObyo oprAH3aunO, rde Bbl npno6peH KOM6aH.
PEUENTbI
HeoXoDnMbIe peKoMeHndaQun no BbIeNeX XJIe6a cm. Ha cTpaHnue 160.
Bebi xne6 (Mzkoe meco KOHmuHeMaIbHO2 muna)
INHrpEaHeNTbI
3tn konuueCTBa dna
cnooc6 npnroTOBJIeHnI
1 Pactonnte Maprapin B MOIOke I IOBeIte Cmecb Do TEMpeaTpybl 43°C.
2 Cyxne dpoxxn: (TIN dpoxxkei,ДЯ KOTOPORo Heo6xoDIMO BOCCTaHOBJeHne BlaarOcoepJxAHnI) DoabbTe dpoxxu n caxap B MOJOKO u OCTaBte Ha 10 MInHT Do NOARbEHNr neHbl.
CbeXne DpOxKn: NOKpoUInTe B Myky n Do6aBbTe caXap.
Dpyrne Tnbl DpOxxKe: CNeDuIte Yka3aHnM n3ROBtEnJ.
3 BbIeTe MoIOKO B eMKoCTb . Do6aBbTe pa36nTbe Iyua n 2Kr MyKn.
4Перемшавайт ha MINHIMальбовсКорocTNВ TeueHne 1MHyTbI, a 3aTeM ha ckopocTN 1В TeueHne eune 1MHyTbI.Cocko6JInte.
5Добавытсольи OCTabшeeя COJIИчecTBO MYKи ИпepemeшаTe Ha Mнимальноі CBOPocTN B TeueHne 1 MmHytbl, 3aTeM Ha Ckopoctn 1 eue 2-3 MmHytbl Do NOJyueHnOdHOpoDHO CMecn.
3aONIHnTe TcTOM XeCTHbIe fOpMbI dIy BblneKn Ha 450r, cMa3aHHbIe KINPOM, HAnONoBHy IIN CfOpMyTe 6yJIOUKN. 3aTeM HApOInTe KxOHHbIM NIOJToEHcEM I OCTaBBTe B TeNlOM MecTe, IOKA TcTeO He YBeJIuHTcR B ObEme BdBOE.
7 BbIneKaIte 6amOnbI npi TeMnepaType 200C npn noLoKeHn '6' peryIaTopa dYxOBKn B TeueHne 20 - 25 mHyt, a 6byNochu - 15 mHyt.
8 FOToBbI xJIe6 n3daet npn IocTyKmbAHmN pNo HxJHHei KopoQKe 'nyCToI' 3Byk.
PeuentbipaccuntaHbpn6n3nteJbHoHa106aToHOB.
Necouhoe Tecto
INHpeDiNeHTbl
450mmykn, npoceraBmeC coIbIO
- 5m(1u.n.)co
225r kupa (cmecb CBNHoro kupa n MaprapnHa, oxlaqdeHna)
- OKOJI 80MЛ BOДы
noe3hble COBtI cnocO6 npiroTOBJIeHn
He nepemelinae Tecto n3JInHe dOnIro.
1Помecntte Myky B emkoctb.HapeKbTe Jnnp KpynhbIMN Ky6nKaMn I doabBe Tc Myke.
2 3aMeuBaIte Ha CkOpcTn 1 Do Tex nop, NOKa TecTo He cTaHet rYcTbIM. OctaHOBIne 3aMeuBaHne Do TORO, KaK TecTo pnpO6peTt «CaIbHbI» BIVd.
3Добавы Te BODу nпeрemeшаTe Ha MmHmAmlbHoN ckopoCTn. OctaHOBuTeпeрemeшванe,Кak TOnbko BODa 6ydet NOrILOUeHa TECTOM.
4 BbIneKaaiTe npi TemnepaType 200°C npi nonoXeHn '6' perynItopa dYxOBKn. BpemBbIneUKN 3aBNCNT O T hauNkn.
INHpeJeHeHTbI
- 6eIok 3 kpynhbIX ruiC
175 r caxapHoi nuDpbl
275 MЛ ДВОИньх СИVBOK
CBeXnE ppyKbI, HApnpMeP, MaJIHa, Kny6HnKa, rpeiΦpyTbI, KNB
1 B3bBbTaB TaHbHe 6eJIKN Ha 6oJbWoCkOpocTn Do CoCTOHNY 《BO3DyUWHOCTN》.
2IpoJIoJXnITbB36nBaHneHaCKOpocTn«5》,epnoJOnuCeckndo6aBnJe no 1 JoxKe caxapHO n npbl. IocNe do6aBnHeHn OuepeDHOJ IOxKn B36nBaTb.
3 Полжntь на пotиевь ЛNTС сИнkoювОБ 6умаги, 3aTeM loжко paacnoLOxNtь на 6умаге МерEHи, KOToPbIe DoJIxHbI o6pa3ObaTb KpyrIoNe «「He3До»ДиamEtPOM OkIo 20 cm.
4 Nomecntb npotnbEh B neyb, npedBapnteIbHo harpetyo Do 150^ (noJoxHeHne pyKoTkn ra3OBoH nnTbI «2») n cpa3y Je chN3nTb Temnepatypy Do 140^ (noJoxHeHne pyKoTkn ra3OBoH nnTbI «1»), npi KOTopoB BblNeKaTb npOdyKT B TeueHne 1 u. BblKnUoytB neyb, Ho OCTaBnTb «NaBNoBy» B neuDo ocTbIBaHnI.
5 Korda npodykt 6ydt roTob, otdeInb ot Hero cniknoHOby 6ymary n nepemecntb npodykt ha cepBupoBOUHoe 6IIO. B3nbAtb kpeM do COCTOHHN «BO3dyuHOCn», NocJe Yero NOKpbITb IM npodykt «NaBIOBa» uYkacntb φpyKTamn.
PEUENTbI (PPOJOJIXEHN)
BOCXNTTeIbHbI WOKOJaIbHbI KeKC
INHpeJeHeNTbI
225 rpa3mYeHHoe CInBOUHOe MacNo
250 r caxapno nypbI
4yua
- 5 Mn (1 chaHna loXka) 6bIcTpopaTbOpMoro KoFe, KOtopyu cneDyet pactbOpntb B 15 Mn (1 cToNoBaJ loXka) ropee,Z BObl
- 30 MЛ (2 столовых Ложки) молoka
- 5 MЛ (1淘汰淘汰到K) MнДаьHoN 3ССЕнДИ
- 50 r monotoro mHdānla
100ramonodnmaohoueMykN
- 5 MЛ (1 чаная ложka) pa3рьхлenteя теса
- 50 r HeçnalkoTOKaKaKao-nopouka
CnOc6 nprirotOBJIeHnIa
1Пи��TOBHTbИЗСЛВОЧНО MaclaIcaxapHOnpydpblKpeM,Haayab B3bINBaHHe HaMaNoI cKOpOCTn I NOCTeNEHHOyBeInuHBaeydoI ONUyeHnJIeKoI nIbIshOcMecn.I3BLeYb CmecbI3yaunI ydaJIITb ee COcSbINaIKn.
2 B3bIy aHaB uAe, BKIOUHb MKNcep Ha BbICOKO cKOpocTN. B3bIbTa He6oIbShIMn nopCnMn, DoabJIaB y aWy rNHyo CMeCb dO nOlyeHn OJHOPoHn MaCCbl. BbIKIOuHTb MKNcep n ydaJIntb roTOByo CMEcB co c6bIaIKn.
3 CmeuTaB pactBopHnBu KoFe, MoJOKo mMnHaJeByU 3ccEHnIO, BKIouHb MmKcep Ha MaIOn CKOpOCTn. Do6aBntb MoIOTbMnHaJaIb, npoceaHHyO MyKy, pa3pbXJInteIb TecTa n KaKaO-nopoWOk. CmeuBaTb Ha MaIOn CKOpOCTn Do nOlyeHnO ndopOHDn CMecn.
4Pa3nOxNtB CmEcB V DBe XeCtRbIe foPmbI dIa BbIeKn KeKca, pa3Mepom 20 cM kaxdA, IHO KOTOpbIX BbICTlaHO npOMacCHeHNO MacNoHepOnHuaEmo6 yMaMoR. Pa3pOBHraTb CmEcB nO Bepxu N BbIKeKaTb KeKcbl np1 180oC (noJoxHe npeyKorTkn Ra3OBoi PInTb «4») npImepHo B TeueHne 30 MnH., noka npn pnpKocHObeHn OHI He NaHyT «PpyKHHtB».
5 IpeBepHyt bΦoPmbl OxlaIHTb Ha peWeTke.
WOKOJaHaHa NaHHKa «MycceHnH
INHrpEaIeHtbl
275 r chcToro nnToHoro 0okOna, pa3IOMaHHoro Ha MeJIKNe KycOuKn
225 MДВОИХСЛВОК
CnOc6 nprirotOBJIeHnIa
1 Pactonite wokonad B yaae, KOtopyc 3ToI cTeIbIO cneIyET nomeCTnB Ha kactpnoC KInIaIeB Odoi (Ha MeDneHHom OrHe).
2Пи���トКрсм,нayвсбиBaHneHaMaJOnCKOpOCTNIOCTeENHOByBeJIuYBaBae,пokaHe6ydtIOnyuYeHa《BO3dUsha》Cmecb.
3Послесpacпалбенишokолада пекратиTe подограване чшии 6овшоюлжкоюобавытseшokоладв крем.
4 BbINOKNTb 0KOJNaHyIO NaHnHy NOpOBHy Ha OcTbIBWne KeKCbl.
PpIroTOBJIeHne opEXOBo-MeIOBOI nactbIC NOMOcIbIO n3MeJIbUHTeJIa
INHpeJeHeHTbI
25 r toJyHeBix opexOB
875 r uncToRo mEda npi KOMHaTHoI TemnepaType
cnoc6 nprirotoblenia
1 Iomecntte INrpeDneHTbI B yka3aHHOM Bblse npraKe Bn3MeJIbYHTeJIb.
2ПелемшаiteВ teueHne5cekyHbKpaTkoBpeMeHHOM pexIme.
3 IcnoIb3yIte noHa3HaueHnIO.
Oneia Tpooxix yia nTv npaokeun ψomega
ημαντικό
Mny unepbaive tne tic avapepoevec meyioTe c nooTntc - ta unepopoptwoeTe tn oukeun.
Eav akouoTe Tov kivntnpa Tns ouakeunc va katantoveitai, oBnoTe Tn ouakeun, apaipoeTn mioi Cmui Kai ETEepyaote iE KAe eva ato Ta duo np nTs CmuNg Exwpiota.
Ta uIkα avuivvovtai kaUtepa eav Tpwa totoetnoeTe ta uypa eo aTo μTtωλ.
YiaTovKaθaipiooδeite Tnyσελδα 174


TTOsNTeKai TPOoOeTeE 0Ao to
αλεύρι μαζί
μεθoδoc
1.3 λίπα γάλα
300yp zayapn
450yp apyapivn
100yppeokiaayián50ypoeyvniayia
a a a a a a a a a a a a a a a a a a a a a a a a a a a
aalssalllll lalllll algall
0 0 0 0 0 0 0 0 0 0 0 0 0 0 0 0 0 0
alilieoioi
ailllll llll 1
gill jilil (jI,1) 1.5
10
Jall all Joo (wog)11) 0. . . gll all Jall Joo (wog)9
g 10
g 1
aegnss
a
iaiai:
(1)
Aaall
joo joll 1 11 1 1 1 1 1 1 1 1 1 1 1 1 1 1 1 1 1 1 1
aee aee
a 1
aaii
jLg jLg jLg jLg jLg jLg jLg jLg jLg jLg jLg jLg jLg jLg jLg jLg jLg jLg jLg jLg jLg jLg jLg jLg jLg jLg jLg jLg jLg jLg jLg jLg jLg jLg j
L
- a yall glc jiaaaedol jaoell gucil 7
111111111111111111111111111111111
L
=
10-1.
sclll j aie sie dll i y eae u j all j l o o o o o o o o o o o o o o o o o o o o o o o o 0
aagll yall 1j
all 10 Jbjg jzss (Jb) 1 20.
Co (S.100)
a 0 a a a a a a a a a a a a a a a a a a a a a
.
a
LwA/psy.
1 1 1 1 1 1 1 1 1 1 1 1 1 1 1 1 1 1 1
aalalalalalalalalalalalalalalalalalalalalal
aal lal alal alal al
gii gaii gai iiaai iiaai gaiiei gai jai gai jai jai jai jai o
aessssssssssssssssssssssssssssssssssssssssssssssss
ii

15111 1
ailll lglglll glll
( 4,5,5)
AT948A ③
AT950A ④LaIaIaIaIaIaIaIaIaIaIaIaIaIaIaIaIaIaIaIaIaIaIaIaIaIaIaIaIaIaIaIaIaIaIaIaIaIaIaIaIaIaI
a
a 1 a b
aLai aai aiic C
AT941A ⑤
AT312 ⑥
Jswjagwulasalssa 80s AT640 7pabll aIaa
AT998A ⑧
639021 639021
639150 2j j j j j j j j j j j j j j j j j j j j j j j j j j j j j j j j j j j j j j j j j j j j j j j j j j
639083 2
AT338 已 _ 已 ^ 已 1.0AT337 1
jiai jai jai jai jai jai jai AT320 10
AT935A ⑪ sjyall jalj a
AT957 MAJOR .AT956 CHEF ②
AT952A MAJOR .AT934A CHEF ③
AT930A MAJOR,AT992A CHEF 14
343268 MAJOR .343270 CHEF 15
693766 MAJOR, CHEF 16
AW44002 MAJOR .AW44001 CHEF ⑰
606397 MAJOR .533722 CHEF 18 Lbs


[{\log }_{b}N = {\log }_{a}N]
![KENWOOD CHEF TITANIUM KMC031 - [{\log }_{b}N = {\log }_{a}N] - 1](/content/2025/01/83122/images/bc5bfa8731e1bdbd805df1d7140e28e6855b9a50c375751e1eae4dbf9bb23e36.jpg)
![KENWOOD CHEF TITANIUM KMC031 - [{\log }_{b}N = {\log }_{a}N] - 2](/content/2025/01/83122/images/8dc0a7de839e1429a9f79747bb2971d5c6f212044e19bf91c53cbaf87f21a5f0.jpg)
a_k a k
Eg sdsosall aigkall l L 1 y i aillalll g lae bnnnne B
aall 15g.
ylll lll
aall g aalldgai jai jai jai jai
1 1gssall gsspaasaaal sss
ailll lssg sso yolal
ylllallcogallgagagagagagagagagagagagagagagagagagagagagagagagagagagagagagagagagagagagagagagagagagagagagagagagagagagagagagagagag
.
1aag aolg jaiil 1/0y jgl biaill g 5i iiaall
Jl 1/2y j yj g jg jg jg jg jg jg jg jg jg jg jg jg jg jg jg jg jg jg jg jg jg jg jg jg
aIg aIg aIg aIg aIg aIg aIg aIg aIg aIg aIg aIg aIg aIg aIg aIg aIg aIg aIg aIg aIg aIg aIg aIg aIg aIg aIg aIg aIg aIg aIg aIg aIg aIg a
aaii iiae aieae eaeae aeaeae
0 0d aegaaa o jusu uusug uall kll joi lii iie lalj jnall aac gss
aillal 00:00 0d aull
gall b
aagaa -g+ jyjll 1e laaiy aagaa
g 1
.00:00
MAJOR
Jb, - 91.
10101010
10 100-≤Y,:ll
j0-≤r,:
1b11-≤0:llLJIJJJ
- -2 00:
17
gall
CHEF
1A 1-
16 ≤ x < 27.
17 1234567890
1 1
J 1A Uo-0≤Y,0:llla
Jr-1sY,VV:lll
12
aaii i aieo piai yjw jn qaiilalll gai jn jnai
JLo Jd j 8j 8j 8j 8j 8j 8j 8j
a 1
auiu
.
j:11 caiolabii
jglalde jilj Jall gaa aaaa -0yclssall gaaall jzll
aJ 1
S OBC = S BOC + S_ BOC
aillallll g jilgall g oic kay lo laai cai
0A1 2


#
gaiolldi jn no gbiul
ySg 1 ySg 1 ySg 1 ySg 1 ySg 1 ySg 1 ySg 1 ySg 1 ySg 1 ySg 1 ySg 1 ySg 1 ySg 1 ySg 1 ySg 1 ySg 1 ySg 1 ySg 1 ySg 1 ySg 1 ySg 1
(aaslls)alglalldaaesswssgnsawellz
maxy! 111111111min
max- 8
min-1.45gj
max ll dlll lddj z min a c y a bllll Lggs
min - Y 1
max 1lll 2e 5g j
1 1
011
Kenwood jolksall ball j
aewll cdo 1 aolall
icswl bwoo 2
eessss
4
⑤
C. c_1 = c_2 ⑥
⑦
aJbIbJIJI aJcJIaJIaJIaJIaJI ⑧
(9)
10
( 1)
12
13
jueell ⑭
15
jlll 16


16
a 17
18
aagaae 19
20
1 1


Kenwood Jolkaii jalil
a/lll/lll jj jj jj jj jj jj jj jj
LgSjpi gll alalol yasalil jyI cclay
Ji jii li i Jia o jia jai ji j
"oojoll" pssg j: 4k! jgl jll jll jj j
.0A
aalgll aol gaaalo jao jai jiaao yae aaal ola i
A
4a0dgljIolJcIolaioi jyloLdoi siie
a a a a a a a a a a a a a a a a a a a a a a a a a a a a a
jLJLJLJLJLJLJLJLJLJLJLJLJLJLJLJLJLJLJL
aee 1e eae
lll lssill s g klllllllls
aJzjI jlll plldiy Jzjall clll
- 12019 j 1j1111111111111111111
Kenwood 23
aaii iiaii llll aiee eae eae ae eae eae eae eae
ylll llll llll lll
gall gale galsal gall gall gall
jll
.89/336/EEC aaiy
gjgljdljgljldljj
- liang Si So Si Li j
.0A 1
Kenwood Limited, New Lane, Havant, Hampshire PO9 2NH, UK
www.kenwoodworld.com