
Digitales Funk - Thermometer Steinbach - Free user manual and instructions
Find the device manual for free Digitales Funk Steinbach in PDF.

User questions about Digitales Funk Steinbach
0 question about this device. Answer the ones you know or ask your own.
Ask a new question about this device
Download the instructions for your Thermometer in PDF format for free! Find your manual Digitales Funk - Steinbach and take your electronic device back in hand. On this page are published all the documents necessary for the use of your device. Digitales Funk by Steinbach.
USER MANUAL Digitales Funk Steinbach
natural_image
Two digital temperature measurement devices: a blue thermometer showing 16.5°C and a white digital thermometer displaying 16.2°C and 16.0°C, both without visible text or symbols.de Thermometer.... 4
fr Thermomètre.... 28
es Termómetro....52
hu Hőmérő....76
sk Teplomer.... 100
ro Termometru....124
bg Термометър...... 148
en Thermometer.... 16
it Termometro......40
cs Teploměr.... 64
sl Termometer....88
pl Termometr......112
hr/bs Termometar....136
tr Termometre......161
natural_image
Icon of a person reading a document inside a circular frame (no text or symbols)natural_image
Symbol of a trash bin crossed with a diagonal line and a black rectangle below (no text or labels)natural_image
Simple line drawing of a trash bin with crossed lines indicating no waste or restriction (no text or symbols)Scope of delivery/device components
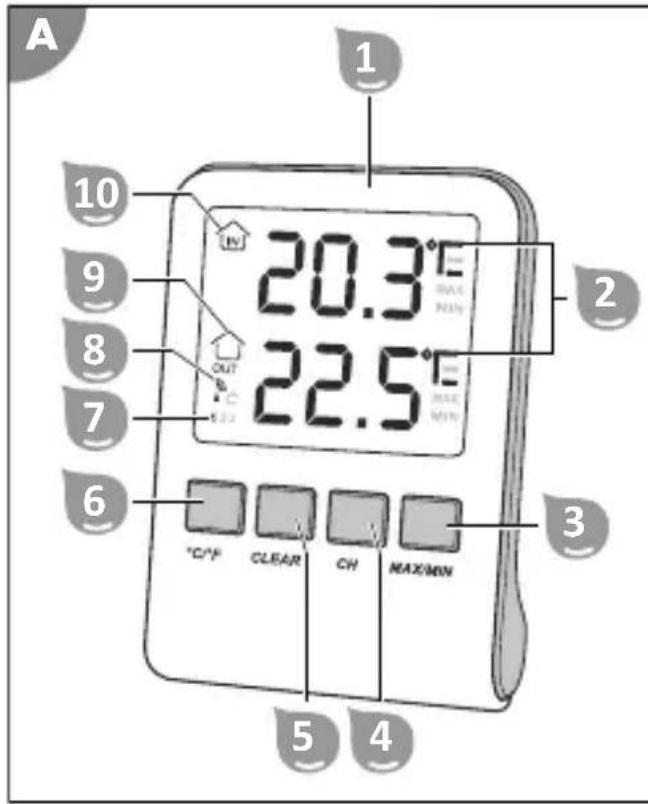
1 Indoor unit
2 Temperature unit (°C/°F)
3 MAX/MIN button
4 CH button
5 CLEAR button
6 °C/°F button
7 Channel display
8 Signal symbol
9 Outdoor temperature symbol
10 Indoor temperature symbol
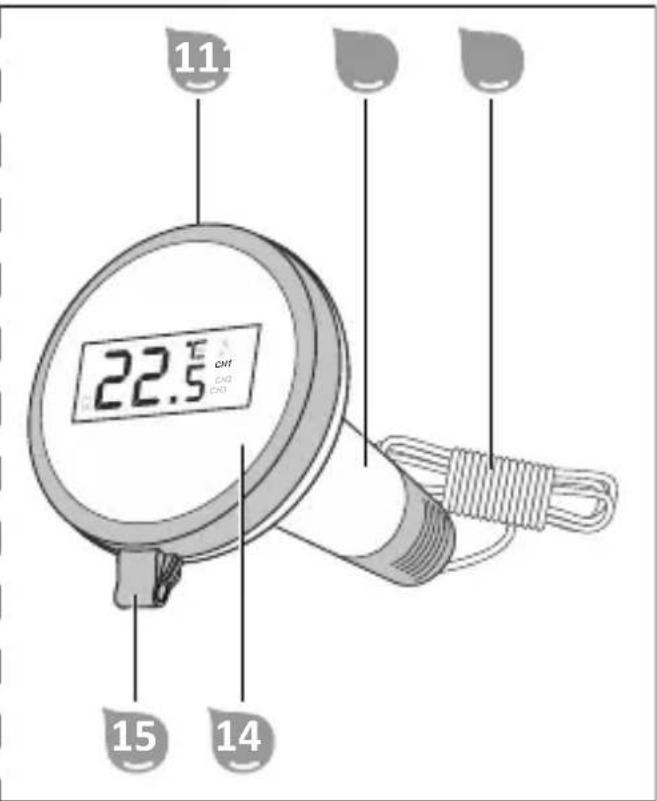
11 Locking ring
12 Outdoor unit
13 Fastening cord
14 Display screen
15 Attachment location
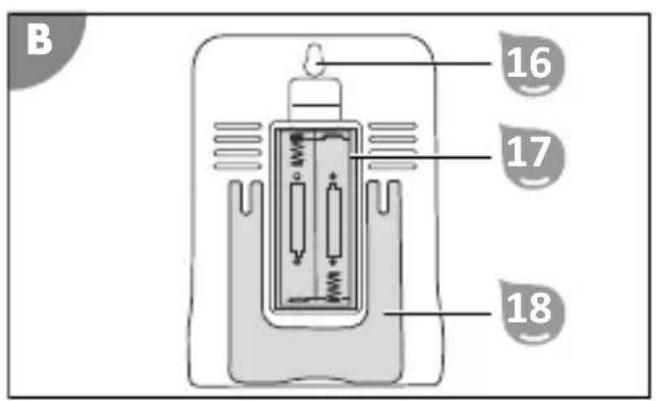
16 Wall mount
17 Battery compartment
18 Support stand
19 Screw
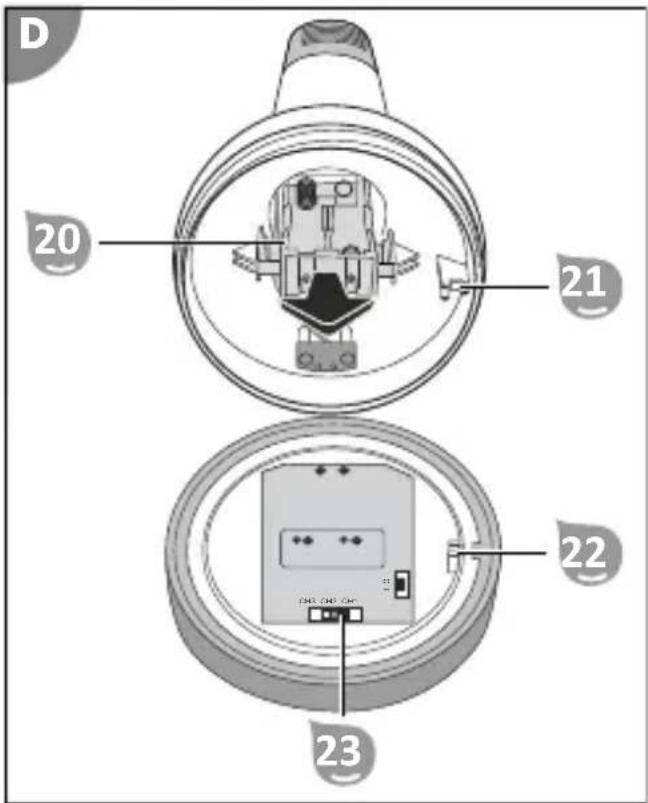
20 Battery holder
21 Locking pin
22 Recess
23 Channel switch
Contents
Overview....2
Scope of delivery/device components....15
General Information....17
Reading and storing the user manual....17
Intended use.... 17
Explanation of Symbols.... 17
Safety.... 17
Explanation of instructions....17
General safety instructions.... 18
Before First Use.... 19
Checking the delivery for completeness and damage.... 19
Initial cleaning of the product.... 20
Operation.... 20
Inserting or changing batteries....20
Manual transmitter search.... 21
Maximum/minimum function.... 21
Temperature unit....22
Additional outdoor units.... 22
Cleaning....24
Storage....24
Troubleshooting....24
Technical data.... 25
Declaration of Conformity....25
Disposal....25
Disposing of the packaging....25
Disposal of the product.... 25
General Information
Reading and storing the user manual

This operating manual is part of this digital remote pool thermometer (in the following also called "product"). It contains important handling information. Read the user manual carefully, in particular the safety instructions, before using the product. Failure to follow this user manual may lead to severe injuries or product damage.
Keep this user manual for future reference. If you pass this product on to a third party, you must also supply this user manual.
Intended use
This product is designed exclusively to measure the temperature of water or indoors.
The product is intended for personal use only and is not suitable for commercial use. Use the product only as described in this operating manual. Any other use is improper and may lead to product damage or even personal injury. This product is not a toy.
The manufacturer or retailer assumes no liability for damage caused by improper or incorrect use.
Explanation of Symbols
The following symbols and signal words are used in this user manual, on the product or on the packaging.

Here you will find useful additional information.
Products marked with this symbol conform to protection class III.

DC voltage
Safety
Explanation of instructions
The following signal words are used in this user manual.

WARNING!
This signal symbol/word denotes a hazard with an average risk level that could lead to death or severe injury if it is not avoided.

CAUTION!
This signal symbol/word denotes a hazard with a low risk level that could lead to mild or moderate injury if it is not avoided.
NOTICE!
This signal word provides a warning about potential material damage.
General safety instructions
General notes on batteries

WARNING!
Risk of injury and damage.
Incorrect use of batteries may cause damage to the adjacent components and personal injury due to leaking battery fluid.
- Never remove the casing from batteries. Do not short-circuit batteries or attempt to recharge batteries.
- Always keep batteries away from heat sources, fire or direct sun exposure.
- Use only one kind of batteries per battery pack and do not mix used batteries or battery packs containing various remaining charge levels with new batteries.
- When inserting the batteries into the battery compartment, make sure that the battery poles face the right way.

CAUTION!
Risk of chemical burns!
Batteries can leak, especially when they are older. If you come into direct contact with the battery acid, there is a risk of chemical burns.
- Avoid battery acid coming into contact with your skin, eyes and mucous membranes.
- If you have come into contact with battery acid, wash the affected areas right away with plenty of clean water and consult a doctor immediately.
- If the battery acid comes into contact with your eyes, immediately rinse your eyes with cold water for at least 10 minutes. Consult a doctor as soon as possible.
- Remove the leaking batteries from the battery compartment right away.
Before First Use
NOTICE!
Careless opening of the packaging, especially with the help of sharp or pointed objects, may cause damage to the product.
- Open the packaging very carefully.
- Do not penetrate the packaging with sharp or pointed objects.
NOTICE!
There is a higher risk of damage to the product if it is stored or transported without the packaging.
- Do not dispose of the packaging.
- In the case of damage, substitute the packaging with an at least similar box.
Checking the delivery for completeness and damage
- Open the packaging carefully.
- Take all parts out of the packaging.
- Check the completeness of the delivery.
- Check the delivery for damage.
Initial cleaning of the product
- Remove the packaging material and all protective foils if present.
- Clean all parts of the delivery as described in the "Cleaning" section.
The product has been cleaned and prepared for use.
Operation
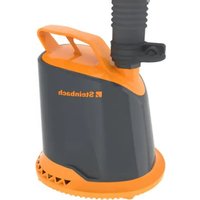
The digital remote pool thermometer consists of 2 measuring devices:
- Indoor unit 1 (receiver)
- Outdoor unit 12 (transmitter).
The outdoor unit is intended for measuring the temperature in the water (e.g. pool, pond) while the indoor unit measures the inside temperature in the house.
The indoor unit displays both the temperature of the location where it is set up and the water temperature transmitted wirelessly by the outdoor unit on the display.
NOTICE!
Water or other liquids may cause the batteries to short-circuit in the battery compartment.
- Make sure that neither water nor other liquids enter the battery compartment.
Inserting or changing batteries
Outdoor unit
Change the batteries of the outdoor unit 12 as soon as the battery symbol appears on the display.
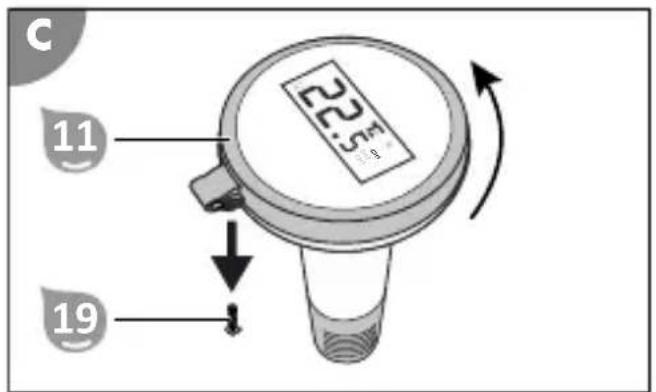
- Remove the screw 19 to undo the locking device (see Fig. C).
- Open the housing by turning the locking ring 11 counter-clockwise.
- Remove the locking ring 11 together with the transparent display cover and the display screen 14.
The housing is open.
- Pull the battery holder 20 out of the housing (see Fig. D).
- Remove the old batteries. At delivery there are no batteries in the battery compartment.
- Insert 2 new AAA batteries. Never mix batteries with different charge levels. Use only batteries that are listed in the "Technical Data" section.
- Push the battery holder 20 all the way into the housing.
- Place the display screen 14 on the housing so that the locking pin 21 protrudes into the recess 22 (see Fig. D).
- Place the transparent display cover on the display screen 14 so that it fits snugly against the sealing ring.
- Place the locking ring 1 on the display cover.
-
Screw the locking ring 11 clockwise into the housing.
-
Screw the screw 19 into the tab 15 (see Fig. C).
The display elements of the display appear briefly. The measured outdoor temperature is displayed next to the outdoor temperature symbol ⑨. The set channel is displayed by the channel display ⑦.
Indoor unit
Change the batteries of the indoor unit 1 as soon as the battery symbol appears on the display.
- Remove the battery compartment cover from the battery compartment 17.
- Remove the old batteries.
At delivery there are no batteries in the battery compartment.
- Insert 2 new AAA batteries.
Never mix batteries with different charge levels. Use only batteries that are listed in the "Technical Data" section.
- Close the battery compartment 17 with the battery compartment cover.
The display elements of the display appear briefly. The measured indoor temperature is displayed next to the indoor temperature symbol 10. The signal symbol 8 flashes for approximately 3 minutes while the indoor unit 1 searches for the signal of the outdoor unit 12. As soon as the indoor unit receives the signal from the outdoor unit, the temperature measured by the outdoor unit 12 is displayed.
Manual transmitter search
When exceeding the transmitter range, the indoor unit 1 occasionally loses the wireless signal of the outdoor unit 12 (e.g., in the event of a signal failure or after a battery change). If the indoor unit is not receiving the signal from the outdoor unit, 3 horizontal lines (--.-") are displayed next to the outdoor temperature symbol 9 instead of the measured temperature. In order to restore the wireless connection, it might be necessary to initiate the transmitter search manually.
Activating the transmitter search manually
- During the transmitter search, place the indoor and outdoor unit approximately 1.5 m from possible sources of interference (electronic devices and radio equipment).
- Repeatedly press the CH button 4.
The channel display 7 (indoor unit) displays the same channel that is set via the channel switch 23 (outdoor unit).
- Press and hold the CH button 4 for 3 seconds.
The signal symbol 8 blinks while the indoor unit 1 searches for the wireless signal of the outdoor unit 12.
The temperature measured by the outdoor unit appears next to the outdoor temperature symbol 9 as soon as the indoor unit receives the wireless signal via the set channel.
Maximum/minimum function
The maximum/minimum function displays the highest and the lowest temperatures measured since the last time the memory was cleared.
Displaying maximum and minimum temperature
- Press the MAX/MIN button
3
"MAX" lights up below the temperature unit (°C/°F) 2. The measured maximum temperatures of the indoor and outdoor unit appear on the display. After no more than 10 seconds the display switches back to the current measurement values.
- Press the MAX/MIN button
3
"MIN" lights up below the temperature unit (°C/°F) 2. The measured minimum temperatures of the indoor and outdoor unit appear on the display. After no more than 10 seconds the display switches back to the current measurement values.
- Press the MAX/MIN button
3
The currently measured temperatures of the indoor and outdoor unit are displayed.
Clearing the memory
- Press the MAX/MIN button
3
"MAX" lights up below the temperature unit (°C/°F) 2.
- Press the CLEAR button
5
The saved maximum temperature values are deleted.
- Press the MAX/MIN button
3.
"MIN" lights up below the temperature unit (°C/°F) ^2 .
- Press the CLEAR button
5
The saved minimum temperature values are deleted.
Temperature unit
The digital remote pool thermometer can display the temperatures measured by the indoor and outdoor unit in ^ C or ^ F.
Switch temperature unit
- Repeatedly press the °C/°F button
6
The temperature unit (°C/°F) 2 switches between "°C" and "°F" and the temperatures are displayed in the selected unit.
Additional outdoor units
The digital remote pool thermometer has 3 channels. This means that you can use one indoor unit with up to 3 outdoor units. To do this, each outdoor unit must be set to a different channel.
Setting the channel
- Open the housing of the outdoor unit 12 (see "Inserting or changing batteries").
- Set the desired channel (CH1, CH2 or CH3) with the channel switch 21 (see Fig. D).
- Close the housing of the outdoor unit 12.
The set channel is displayed on the display of the outdoor unit.
Establishing wireless connection
-
During the transmitter search, place the indoor and outdoor unit approximately 1.5 m from possible sources of interference (electronic devices and radio equipment).
-
Repeatedly press the CH button 4.
The channel display 7 (indoor unit) shows the same channel that is set at the selected outdoor unit. The temperature measured at the outdoor unit is displayed on the display of the indoor unit next to the outdoor temperature symbol 9.
Alternating channel display
- Repeatedly press the CH button 4.
The channel display 7 shows "CH3".
- Press the CH button 4 again.
Alternating channel display is activated. The temperatures of the outdoor units are displayed alternately at 5-second intervals.
- Press the CH button 4.
Alternating channel display is deactivated. The channel display 7 displays "CH1". The outdoor temperature symbol 9 indicates the measured temperature of the outdoor unit that has been assigned to "CH1".
Cleaning
Only clean the product with a standard bathroom cleaner, clear tap water and a lint-free cloth. Aggressive cleaning agents can damage the product. Dry the product with a lint-free cloth.
Storage
- Clean the product as described in the section "Cleaning".
- Stow away the product as soon as the outdoor temperature permanently falls below +5°C to prevent damage through ice formation (frost burst).
The product is stowed away.
Troubleshooting
| Error Possible cause and solutions | |
| Temperature display shows "HH.H". | The measurement values are above the measuring range. |
| Temperature display shows "LL.L". | The measurement values are below the measuring range. |
| Temperature display shows "--." . The signal from the outdoor unit is not being received.- see "Manual transmitter search" | |
| Temperature display shows "--." . The batteries of the outdoor unit are dead.- see "Inserting or changing batteries" | |
| Temperature display shows "--." . There is too much distance between the outdoor unit and the indoor unit.- Position the stations closer to each other (max. 60 m/65 yds.) | |
| Temperature display shows "--." . Incorrect channel is set on the indoor unit.- see "Additional outdoor units" | |
| Outdoor unit shows "-50 °C" or "ERROR" | Contacts on the circuit board are not properly aligned - values are not transmitted correctly.- Open the housing of the outdoor unit and make sure that the display screen is inserted as described in the section "Inserting or changing batteries" and that the housing of the outdoor unit is locked correctly. |
If the problem cannot be solved, contact the customer service listed on the last page.
Technical data
Model: 061333
Materials used: ABS
Measuring accuracy: ±1 °C (±2 °F) from 0 °C to 50 °C (32 °F to 122 °F)
Signal frequency: 433 MHz
Effective radiated power (ERP): -17.22 dBm
Signal range: max. 60 m (65 yds.) (open ground)
INDOOR UNIT
Power supply: 2 x 1.5 V, AAA/LR3 batteries
Protection class: III
Measuring range: -10 °C – 60 °C (14 °F – 140 °F)
OUTDOOR UNIT
Power supply: 2 x 1.5 V, AAA/LR3 batteries
Protection class: III
Safety class: IPX7 (protection against temporary immersion)
Measuring range (water): -20 °C - 60 °C (-4 °F - 140 °F)
Declaration of Conformity

Steinbach International GmbH hereby declares that the wireless system type pool thermometer (061333) complies with Directive 2014/53/EU.
The full text of the EU Declaration of Conformity is available at the
following internet address: www.steinbach-group.com
Disposal
Disposing of the packaging
Sort the packaging before you dispose of it. Dispose of paperboard and cardboard with the recycled paper service and wrappings with the appropriate collection service.
Disposal of the product
Dispose of the product in line with the guidelines and regulations valid in your country.
natural_image
Symbol of a trash bin crossed with no text or labels, accompanied by a black rectangle below (no readable text or symbols)Old appliances must not be disposed of in the household waste!
Once the product can no longer be used, every consumer is obligated by law to separate old appliances from household waste and return them to a collection point in their community/urban district, for example. This ensures that old equipment is recycled properly and negative effects on the environment are avoided. Therefore electrical appliances are marked with the above symbol.
natural_image
Simple line drawing of a trash bin with crossed lines indicating no waste or restriction (no text or symbols)Batteries and battery packs must not be disposed of in the household waste!
As a consumer, you are obligated by law to return all batteries and battery packs, whether they contain harmful substances* or not, to a collection point in your community/urban district or to a retailer so that they can be disposed of in an environmentally friendly manner. Batteries
and battery packs must be disposed of separately from the product.
* marked with: Cd = cadmium, Hg = mercury, Pb = lead, Li = lithium
natural_image
Icon of a person reading a document inside a circular frame (no text or symbols)natural_image
Symbol of a trash bin crossed with a diagonal line and a black rectangular block below (no text or labels)natural_image
Simple line drawing of a trash bin with crossed lines indicating no waste or restriction (no text or symbols)natural_image
Symbol of a trash bin crossed with no text or labels, accompanied by a black rectangular block below (no readable text or symbols)natural_image
Simple line drawing of a trash bin with crossed lines indicating no waste or restriction (no text or symbols)natural_image
Symbol of a trash bin crossed with a diagonal line and a black rectangle below (no text or labels)natural_image
Symbol of a trash bin crossed with no text or numbers, representing waste sorting or anti-smoking (no text present)natural_image
Icon of a person reading a book inside a circular frame (no text or symbols)natural_image
Symbol of a trash bin crossed with a diagonal line and a black rectangular block below (no text or labels)natural_image
Symbol of a trash bin with crossed lines indicating no waste or restriction (no text or labels)natural_image
Icon of a person reading a document inside a circular frame (no text or symbols)natural_image
Symbol of a trash bin crossed with no text or labels, accompanied by a black rectangular block below (no readable text or symbols)natural_image
Simple line drawing of a trash bin with crossed lines indicating no waste or restriction (no text or symbols)natural_image
Icon of a person reading a document inside a circular frame (no text or symbols)natural_image
Symbol of a trash bin crossed with two crossed lines, no text or numbers presentnatural_image
Simple line drawing of a trash bin with crossed lines indicating no waste or restriction (no text or symbols)natural_image
Icon of a person reading a book inside a circular frame (no text or symbols)natural_image
Symbol of a trash bin crossed with a diagonal line and a black rectangular block below (no text or labels)natural_image
Simple line drawing of a trash bin with crossed lines indicating no waste or restriction (no text or symbols)Batérie a akumulátory nevyhadzujte do komunálneho odpadu!
natural_image
Symbol of a trash bin crossed with two crossed lines, no text or labels presentnatural_image
Symbol of a trash bin with crossed lines indicating no waste or restriction (no text or labels)natural_image
Symbol of a trash bin crossed with no text or numbers, representing waste sorting or disposal (no text present)natural_image
Simple line drawing of a trash bin with crossed lines indicating no waste or restriction (no text or symbols)natural_image
Symbol of a trash bin crossed with no text or labels, accompanied by a black rectangular block below (no text or symbols present)Stari uređaji ne smiju se bacati u kućni otpad!
Ako ovaj proizvod jednog dana postane neupotrebljiv, svaki potrošač ima zakonsku obavezu predati stare uređaje, odvojeno od kućnog otpada, npr. na mjestu prikupljanja u svojoj općini/dijelu grada. Na taj način se osigurava da se stari uređaji pravilno recikliraju i da se izbjegnu negativni utjecaji na okoliš. Zbog toga su električni uređaji označeni gore navedenim simbolom.

natural_image
Simple line drawing of a trash bin with crossed lines indicating no waste or restriction (no text or symbols)Obične i punjive baterije ne smiju se bacati u kućni otpad!
natural_image
Symbol of a trash bin crossed with two crossed lines and a solid black rectangle below (no text or labels)natural_image
Symbol of a trash bin with crossed lines indicating no waste or restriction (no text or labels)natural_image
Icon of a person reading a document (no text or symbols)natural_image
Symbol of a trash bin crossed with two crossed lines, no text or labels presentnatural_image
Simple line drawing of a trash bin with crossed lines indicating no waste or restriction (no text or symbols)
- Scope of delivery/device components
- Contents
- General Information
- Reading and storing the user manual
- Intended use
- Explanation of Symbols
- Safety
- Explanation of instructions
- WARNING!
- CAUTION!
- NOTICE!
- General safety instructions
- Risk of injury and damage.
- Risk of chemical burns!
- Before First Use
- Checking the delivery for completeness and damage
- Initial cleaning of the product
- Operation
- Inserting or changing batteries
- Outdoor unit
- Indoor unit
- Manual transmitter search
- Activating the transmitter search manually
- Maximum/minimum function
- Displaying maximum and minimum temperature
- Clearing the memory
- Temperature unit
- Switch temperature unit
- Additional outdoor units
- Setting the channel
- Establishing wireless connection
- Alternating channel display
- Cleaning
- Storage
- Technical data
- Declaration of Conformity
- Disposal
- Disposing of the packaging
- Disposal of the product
- Batteries and battery packs must not be disposed of in the household waste!
- Batérie a akumulátory nevyhadzujte do komunálneho odpadu!
- Obične i punjive baterije ne smiju se bacati u kućni otpad!
Brand : Steinbach
Model : Digitales Funk
Category : Thermometer