
DCMCST632N - Saw DEWALT - Free user manual and instructions
Find the device manual for free DCMCST632N DEWALT in PDF.

| Product Type | Top-handle chainsaw |
| Brand | DeWalt |
| Model | DCMCST632N |
| Voltage | 54 V DC |
| Battery type | Li-ion |
| Chain pitch | .325 inch |
| Drive link thickness | 1.1 mm |
| Guide bar length | 250 mm - 400 mm |
| Maximum chain speed (at no load) | 23.6 m/s |
| Oil capacity | 140 ml |
| Weight (without battery) | 3.1 kg |
| Protection rating | IPx4 |
| Intended use | High pruning by experienced arborists |
| Chain brake | Automatic and manual |
| Lubrication system | Automatic, adjustable flow |
| Chain type | Low kickback |
| Guide bar type | Reduced kickback |
| Maintenance | Regular cleaning, sharpening, lubrication |
| Spare parts available | Guide bar, chain, sprocket, sprocket cover |
| Supplied accessories | Combination wrench, sharpening file, guide bar scabbard |
Frequently Asked Questions - DCMCST632N DEWALT
User questions about DCMCST632N DEWALT
0 question about this device. Answer the ones you know or ask your own.
Ask a new question about this device
Download the instructions for your Saw in PDF format for free! Find your manual DCMCST632N - DEWALT and take your electronic device back in hand. On this page are published all the documents necessary for the use of your device. DCMCST632N by DEWALT.
USER MANUAL DCMCST632N DEWALT
English (original instructions) 38
Bender risiko for brand.
GENERELLE SIKKERHEDSADVARSLER FOR ELVARKTØJER
www.2helpU.com/DoC/or
www.2helpU.com/DoC/index/xxx*
*For direct access, replace "xxx" with the product's model number given on the product rating label or packaging.

Instruction Manual
Declaration of Conformity (DoC)
Product Emission Data (PED): Information about Noise, Vibration and Dust (not applicable for all products)

WARNING: Read all safety warnings, instructions, illustrations, and specifications in this manual.

including the battery and charger sections provided in an original tool manual or the separate Batteries and
Chargers manual. Manuals can be obtained by contacting Customer Service (refer to the back page of this manual).
Technical Data
| DCMCST632 | |
| Voltage V | DC 54 |
| Type 1 | |
| Battery type Li-Ion | |
| Chain pitch inch .325 | |
| Drive link thickness mm 1.1 | |
| Bar Length | |
| Minimum Length mm 250 | |
| Maximum Length mm 400 | |
| Maximum Chain Speed (no-load) m/s 23.6 | |
| Oil Capacity ml 140 | |
| Weight (without battery pack) kg 3.1 | |
| IP Rating: IPx4. This product has been tested under conditions defined by the applicable product safety standard, which may not reflect all possible effects of exposures. After the tested exposure to rain, the product has been safe. However, to prevent hazards, do not use or store it in wet conditions. If the product gets wet, disconnect the battery, dry it thoroughly, and carefully check its functionality. If it does not work, allow it to dry completely before further use. | |

WARNING: Shock hazard. Batteries, which become wet, could cause electric shock to the operator. Do not touch them until they have been allowed to dry fully.

WARNING: To reduce the risk of injury, read the instruction manual before using this product.
Definitions: Safety Guidelines
The definitions below describe the level of severity for each signal word. Please read the manual and pay attention to these symbols.

DANGER: Indicates an imminently hazardous situation which, if not avoided, will result in death or serious injury.

WARNING: Indicates a potentially hazardous situation which, if not avoided, could result in death or serious injury.

CAUTION: Indicates a potentially hazardous situation which, if not avoided, may result in minor or moderate injury.
NOTICE: Indicates a practice not related to personal injury which, if not avoided, may result in property damage.

Denotes risk of electric shock.

Denotes risk of fire.
GENERAL POWER TOOL SAFETY WARNINGS

WARNING: Read all safety warnings, instructions, illustrations and specifications provided with this power tool. Failure to follow all instructions listed below may result in electric shock, fire and/or serious injury.
SAVE ALL WARNING AND INSTRUCTIONS FOR FUTURE REFERENCE
The term "power tool" in the warnings refers to your mains-operated (corded) power tool or battery-operated (cordless) power tool.
1) Work Area Safety
a) Keep work area clean and well lit. Cluttered or dark areas invite accidents.
b) Do not operate power tools in explosive atmospheres, such as in the presence of flammable liquids, gases or dust. Power tools create sparks which may ignite the dust or fumes.
c) Keep children and bystanders away while operating a power tool. Distractions can cause you to lose control.
2) Electrical Safety
a) Power tool plugs must match the outlet. Never modify the plug in any way. Do not use any adapter plugs with earthed (grounded) power tools. Unmodified plugs and matching outlets will reduce risk of electric shock.
b) Avoid body contact with earthed or grounded surfaces, such as pipes, radiators, ranges and refrigerators. There is an increased risk of electric shock if your body is earthed or grounded.
c) Do not expose power tools to rain or wet conditions. Water entering a power tool will increase the risk of electric shock.
d) Do not abuse the cord. Never use the cord for carrying, pulling or unplugging the power tool. Keep cord away from heat, oil, sharp edges or moving parts. Damaged or entangled cords increase the risk of electric shock.
e) When operating a power tool outdoors, use an extension cord suitable for outdoor use. Use of a cord suitable for outdoor use reduces the risk of electric shock.
f) If operating a power tool in a damp location is unavoidable, use a residual current device (RCD) protected supply. Use of an RCD reduces the risk of electric shock.
3) Personal Safety
a) Stay alert, watch what you are doing and use common sense when operating a power tool. Do not use a power tool while you are tired or under the influence of drugs, alcohol or medication. A moment of inattention while operating power tools may result in serious personal injury.
b) Use personal protective equipment. Always wear eye protection. Protective equipment such as a dust mask, non-skid safety shoes, hard hat or hearing protection used for appropriate conditions will reduce personal injuries.
c) Prevent unintentional starting. Ensure the switch is in the off-position before connecting to power source and/or battery pack, picking up or carrying the tool. Carrying power tools with your finger on the switch or energising power tools that have the switch on invites accidents.
d) Remove any adjusting key or wrench before turning the power tool on. A wrench or a key left attached to a rotating part of the power tool may result in personal injury.
e) Do not overreach. Keep proper footing and balance at all times. This enables better control of the power tool in unexpected situations.
f) Dress properly. Do not wear loose clothing or jewellery. Keep your hair and clothing away from moving parts. Loose clothes, jewellery or long hair can be caught in moving parts.
g) If devices are provided for the connection of dust extraction and collection facilities, ensure these are connected and properly used. Use of dust collection can reduce dust-related hazards.
h) Do not let familiarity gained from frequent use of tools allow you to become complacent and ignore tool safety principles. A careless action can cause severe injury within a fraction of a second.
4) Power Tool Use and Care
a) Do not force the power tool. Use the correct power tool for your application. The correct power tool will do the job better and safer at the rate for which it was designed.
b) Do not use the power tool if the switch does not turn it on and off. Any power tool that cannot be controlled with the switch is dangerous and must be repaired.
c) Disconnect the plug from the power source and/ or remove the battery pack, if detachable, from the power tool before making any adjustments,
changing accessories, or storing power tools. Such preventive safety measures reduce the risk of starting the power tool accidentally.
d) Store idle power tools out of the reach of children and do not allow persons unfamiliar with the power tool or these instructions to operate the power tool. Power tools are dangerous in the hands of untrained users.
e) Maintain power tools and accessories. Check for misalignment or binding of moving parts, breakage of parts and any other condition that may affect the power tool's operation. If damaged, have the power tool repaired before use. Many accidents are caused by poorly maintained power tools.
f) Keep cutting tools sharp and clean. Properly maintained cutting tools with sharp cutting edges are less likely to bind and are easier to control.
g) Use the power tool, accessories and tool bits, etc. in accordance with these instructions, taking into account the working conditions and the work to be performed. Use of the power tool for operations different from those intended could result in a hazardous situation.
h) Keep handles and grasping surfaces dry, clean and free from oil and grease. Slippery handles and grasping surfaces do not allow for safe handling and control of the tool in unexpected situations.
5) Battery Tool Use and Care
a) Recharge only with the charger specified by the manufacturer. A charger that is suitable for one type of battery pack may create a risk of fire when used with another battery pack.
b) Use power tools only with specifically designated battery packs. Use of any other battery packs may create a risk of injury and fire.
c) When battery pack is not in use, keep it away from other metal objects, like paper clips, coins, keys, nails, screws or other small metal objects, that can make a connection from one terminal to another. Shorting the battery terminals together may cause burns or a fire.
d) Under abusive conditions, liquid may be ejected from the battery; avoid contact. If contact accidentally occurs, flush with water. If liquid contacts eyes, additionally seek medical help. Liquid ejected from the battery may cause irritation or burns.
e) Do not use a battery pack or tool that is damaged or modified. Damaged or modified batteries may exhibit unpredictable behaviour resulting in fire, explosion or risk of injury.
f) Do not expose a battery pack or tool to fire or excessive temperature. Exposure to fire or temperature above 130^ may cause explosion.
g) Follow all charging instructions and do not charge the battery pack or tool outside the temperature range specified in the instructions. Charging improperly or at temperatures outside the specified range may damage the battery and increase the risk of fire.
6) Service
a) Have your power tool serviced by a qualified repair person using only identical replacement parts. This will ensure that the safety of the power tool is maintained.
b) Never service damaged battery packs. Service of battery packs should only be performed by the manufacturer or authorised service providers.
General Chain Saw SafetyWarnings
a) This chain saw is not intended for tree felling. Use of the chain saw for operations different than intended could result in serious injury to the operator or bystanders.
b) Do not operate a chain saw in a tree unless you have been specifically trained in safe climbing techniques and in the use of all recommended additional safety equipment. Operation of a chain saw in a tree without proper training could increase the risk of serious personal injury.
c) Wear eye protection, ear protection and protective equipment for head, forearms, hands, legs tand feet that is suitable for tree climbing. Adequate protective equipment will reduce personal injury from flying debris or accidental contact with the saw chain.
d) Cut wood only. Do not use chain saw for purposes not intended. For example: do not use chain saw for cutting metal, plastic, masonry or nonwood building materials. Use of the chain saw for operations different than intended could result in a hazardous situation.
e) Always hold the chain saw with your right hand on the rear handle and your left hand on the front handle. Holding the chain saw with a reversed hand configuration increases the risk of personal injury and should never be done.
f) Hold the chain saw by insulated gripping surfaces only, because the saw chain may contact hidden wiring. Saw chains contacting a "live" wire may make exposed metal parts of the chain saw "live" and could give the operator an electric shock.
g) Keep all parts of the body away from the saw chain when the chain saw is operating. Before you start the chain saw, make sure the saw chain is not contacting anything. A moment of inattention while operating chain saws may cause entanglement of your clothing or body with the saw chain.
h) When cutting a limb that is under tension, be alert for spring back. When the tension in the wood fibres is released, the spring loaded limb may strike the operator and/or throw the chain saw out of control.
i) Use extreme caution when cutting thin branches. The slender material may catch the saw chain and be whipped toward you or pull you off balance.
j) Follow all instructions when clearing jammed material, storing or servicing the chain saw. Make sure the switch is off and the battery pack is removed. Unexpected actuation of the chain saw while clearing jammed material or servicing may result serious personal injury.
k) Carry the chain saw by the front handle with the chain saw switched off and away from your body. When transporting or storing the chain saw, always fit the guide bar cover. Proper handling of the chain saw will reduce the likelihood of accidental contact with the moving saw chain.
1) Follow instructions for lubricating, chain tensioning and changing the bar and chain. An improperly tensioned or lubricated chain may either break or increase the chance for kickback.
Causes and Operator Prevention of Kickback:
Kickback may occur when the nose or tip of the guide bar touches an object, or when the wood closes in and pinches the saw chain in the cut.
Tip contact in some cases may cause a sudden reverse reaction, kicking the guide bar up and back towards the operator.
Pinching the saw chain along the top of the guide bar may push the guide bar rapidly back towards the operator.
Either of these reactions may cause you to lose control of the saw which could result in serious personal injury. Do not rely exclusively upon the safety devices built into your saw. As a chain saw user, you should take several steps to keep your cutting jobs free from accident or injury.
Kickback is the result of tool misuse and/or incorrect operating procedures or conditions and can be avoided by taking proper precautions as given below:
a) Maintain a firm grip, with thumbs and fingers encircling the chain saw handles, with both hands on the saw and position your body and arm to allow you to resist kickback forces. Kickback forces can be controlled by the operator, if proper precautions are taken. Do not let go of the chain saw.
b) Do not overreach. This helps prevent unintended tip contact and enables better control of the chain saw in unexpected situations.
c) Only use replacement guide bars and saw chains specified by the manufacturer. Incorrect replacement guide bars and saw chains may cause chain breakage and/or kickback.
d) Follow the manufacturer's sharpening and maintenance instructions for the saw chain. Decreasing the depth gauge height can lead to increased kickback.
The Following Precautions Should Be Followed to Minimize Kickback:
- Grip saw firmly. Hold the chain saw firmly with both hands when the motor is running. Use a firm grip with thumbs and fingers encircling the chain saw handles. Chain saw will pull forward when cutting on the bottom edge of the bar, and push backward when cutting along the top edge of the bar.
- Do not over reach.
- Keep proper footing and balance at all times.
- Don't let the nose of the guide bar contact a log, branch, ground or other obstruction.
-
Don't cut above shoulder height.
-
Use devices such as low kickback chain and reduced kickback guide bars that reduce the risks associated with kickback.
- Only use replacement bars and chains specified by the manufacturer or the equivalent.
- Never let the moving chain contact any object at the tip of the guide bar.
- Keep the working area free from obstructions such as other trees, branches, rocks, fences, stumps, etc. Eliminate or avoid any obstruction that your saw chain could hit while you are cutting through a particular log or branch.
- Keep your saw chain sharp and properly tensioned. A loose or dull chain can increase the chance of kickback. Check tension at regular intervals with the motor stopped and tool unplugged, never with the motor running.
- Begin and continue cutting only with the chain moving at full speed. If the chain is moving at a slower speed, there is a greater chance for kickback to occur.
- Cut one log at a time.
- Use extreme caution when re-entering a previous cut. Engage bucking spikes into wood and allow chain to reach full speed before proceeding with cut.
- Do not attempt plunge cuts or bore cuts.
- Watch for shifting logs or other forces that could close a cut and pinch or fall into chain.
Kickback Safety Features
WARNING: The following features are included on your help reduce the hazard of kickback; however such features will not totally eliminate this dangerous reaction. As a chain saw user do not rely only on safety devices. You must follow all safety precautions, instructions, and maintenance in this manual to help avoid kickback and other forces which can result in serious injury.
- Reduced-Kickback Guide Bar, designed with a small radius tip which reduces the size of the kickback danger zone on bar tip. A reduced - kickback guide bar is one which has been demonstrated to significantly reduce the number and seriousness of kickbacks when tested in accordance with safety requirements for electric chain saws.
- Low-Kickback Chain, designed with a contoured depth gauge and guard link which deflect kickback force and allow wood to gradually ride into the cutter.
- Do not operate chain saw while on a ladder, on a scaffold, or from any unstable surface.
- Hold tool by insulated gripping surfaces when performing an operation where the cutting tool may contact hidden wiring. Contact with a "live" wire will make exposed metal parts of the tool "live" and shock the operator.
- Do not attempt operations beyond your capacity or experience. Read thoroughly and understand completely all instructions in this manual.
-
Before you start chain saw, make sure saw chain is not contacting any object.
-
Do not operate a chain saw with one hand! Serious injury to the operator, helpers, or bystanders may result from one handed operation. A chain saw is intended for two-handed use only.
- Keep the handles dry, clean, and free of oil or grease.
- Do not allow dirt, debris, or sawdust to build up on the motor or outside air vents.
- Stop the chain saw before setting it down.
- Do not cut vines and/or small under brush.
- Use extreme caution when cutting small diameter branches because slender material may catch the saw chain and be whipped toward you or pull you off balance.
Chainsaw Names and Terms
- Bucking - The process of cross cutting a felled tree or log into lengths. (NOT to be done with this chainsaw.)
- Motor Brake (if equipped) - A device used to stop the saw chain when the trigger is released.
- Chainsaw Powerhead - A chainsaw without the saw chain and guide bar.
- Drive Sprocket or Sprocket - The toothed part that drives the saw chain.
- Felling - The process of cutting down a tree. (NOT to be done with this chainsaw.)
- Felling Back Cut - The final cut in a tree felling operation made on the opposite side of the tree from the notching cut. (NOT to be done with this chainsaw.)
- Front Handle - The support handle located at or toward the front of the chainsaw.
- Front Hand Guard - A structural barrier between the front handle of a chainsaw and the guide bar, typically located close to the hand position on the front handle.
- Guide Bar - A solid railed structure that supports and guides the saw chain.
Scabbard/Guide Bar Cover - Enclosure fitted over guide bar to help prevent tooth contact when saw is not in use. - Kickback - The backward or upward motion, or both of the guide bar occurring when the saw chain near the nose of the top area of the guide bar contacts any object such as a log or branch, or when the wood closes in and pinches the saw chain in the cut.
- Kickback, Pinch - The rapid pushback of the saw which can occur when the wood closes in and pinches the moving saw chain in the cut along the top of the guide bar.
- Kickback, Rotational - The rapid upward and backward motion of the saw which can occur when the moving saw chain near the upper portion of the tip of the guide bar contacts an object, such as a log or branch.
- Limbing - Removing the branches from a fallen tree. (NOT to be done with this chainsaw.)
- Low-Kickback Chain - A chain that complies with the kickback performance requirements of ANSI B175.1-2012 (when tested on a representative sample of chainsaws).
EnGLish
Normal Cutting Position - Those positions assumed in performing the bucking and felling cuts.
- Notching Undercut - A notch cut in a tree that directs the tree's fall.
- Rear Handle - The support handle located at or toward the rear of the saw.
- Reduced Kickback Guide Bar - A guide bar which has been demonstrated to reduce kickback significantly.
- Replacement Saw Chain - A chain that complies with kickback performance requirements of ANSI B175.1-2012 when tested with specific chainsaws. It may not meet the ANSI performance requirements when used with other saws.
- Saw Chain - A loop of chain having cutting teeth, that cut the wood, and that is driven by the motor and is supported by the guide bar.
- Bucking Spikes - The spikes are used, when sawing, to pivot the saw and maintain position while sawing.
- Switch - A device that when operated will complete or interrupt an electrical power circuit to the motor of the chainsaw.
- Switch Linkage - The mechanism that transmits motion from a trigger to the switch.
- Switch Lockout - A movable stop that prevents the unintentional operation of the switch until manually actuated.
Residual Risks
In spite of the application of the relevant safety regulations and the implementation of safety devices, certain residual risks cannot be avoided. These are:
Impairment of hearing.
- Risk of personal injury due to flying particles.
- Risk of burns due to accessories becoming hot during operation.
- Risk of personal injury due to prolonged use.
SAVE THESE INSTRUCTIONS
Battery Type
These battery packs may be used:
| Battery (kg) |
| DCB546 1.08 |
| DCB547/G 1.46 |
| DCB548 1.46 |
| DCB549 2.12 |
Refer to the battery/charger manual for more information.
The following chargers can be used: DCB094K, DCB116, DCB117.
Markings on Tool
The following pictograms are shown on the tool:

Read instruction manual before use.

Wear eye, ear and head protection.

Wear gloves.

Wear proper foot protection.

Wear protective clothing for legs and forearms.

Do not expose the tool to rain or high humidity or leave outdoors while it is raining.

Contact of the guide bar tip with any object should be avoided.

Rotational direction of the saw chain.
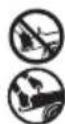
Always use two hands when operating the chainsaw.
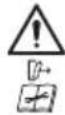
Switch the tool off. Before performing any maintenance on the tool, remove the battery from the tool.

Directive 2000/14/EC guaranteed sound power.
Date Code Position (Fig. K)
The production date code 26 consists of a 4-digit year followed by a 2-digit week and is extended by a 2-digit factory code.
Description (Fig. A)
WARNING: Never modify the power tool or any part of it. Damage or personal injury could result.
1 Rear handle
2 Front handle
3 Variable speed trigger switch
4 Lock-off lever
5 On/Off button
6 State of charge indicator LEDs
7 Overload LED
8 Chain brake LED
9 Oil flow adjust screw
10 Chain brake / front hand guard
11 Guide bar
12 Saw chain
13 Sprocket cover
14 Bar lock nut
15 Chain tensioning screw
16 Oil level indicator
17 Oil cap
18 Guide bar scabbard
19 Battery housing
20 Battery pack
21 Battery release button
22 Wrench
23 Harness attachment point
24 Bucking spikes
25 Sharpening file
Included in some packages.
Intended Use
WARNING: Top-handled chainsaws are only meant to be off the ground, by trained tree service operators, and are not meant for use by non-qualified consumers.
This special use DCMCST632 chain saw is designed only for in-tree cutting applications, up to 25cm in diameter when using a 30~cm bar and chain, by trained tree service operators. Operating this chain saw in a tree without proper training could increase the risk of serious personal injury (or death).
This special use chain saw is designed with handles that are close together for improved maneuverability in confined spaces when aloft in trees and should only be used by trained tree service operators that are properly secured by safety harnesses, etc. For other uses such as ground cutting or felling, a standard chain saw with longer spacing between handles which provides greater control should be used.
DO NOT use this chain saw on the ground or to fell trees.
DO NOT use under wet conditions or in presence of flammable liquids or gases.
DO NOT use this chain saw in twilight or darkness.
The DCMCST632 is a professional chain saw.
DO NOT let children come into contact with the tool. Supervision is required when inexperienced operators use this tool.
- Young children and the infirm. This tool is not intended for use by young children or infirm persons without supervision.
- This product is not intended for use by persons (including children) suffering from diminished physical, sensory or mental abilities; lack of experience, knowledge or skills.
Children should never be left alone with this product.
ASSEMBLY AND ADJUSTMENTS
WARNING: To reduce the risk of serious personal injury, turn tool off and disconnect battery pack before making any adjustments or removing/ installing attachments or accessories. An accidental start-up can cause injury.

NING: Use only DEWALT batteries and chargers.
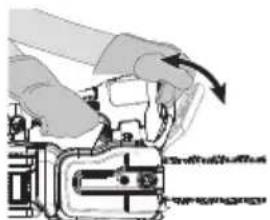
Inserting and Removing the Battery Pack from the Tool (Fig. B)
NOTE: Make sure your battery pack 20 is fully charged.
To Install the Battery Pack into the Tool Handle
- Align the battery pack with the rails inside the tool's handle (Fig. B).
- Slide it into the handle until the battery pack is firmly seated in the tool and ensure that you hear the lock snap into place.
To Remove the Battery Pack from the Tool
- Press the battery release button 21 and firmly pull the battery pack out of the tool handle.
- Insert battery pack into the charger.
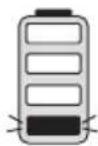
Fuel Gauge Battery Packs (Fig. B)
Some DEWALT battery packs include a fuel gauge which consists of three green LED lights that indicate the level of charge remaining in the battery pack.
To actuate the fuel gauge, press and hold the fuel gauge button 42. A combination of the three green LED lights will illuminate, designating the level of charge left. When the level of charge in the battery is below the usable limit, the fuel gauge will not illuminate and the battery will need to be recharged.
NOTE: The fuel gauge is only an indication of the charge left on the battery pack. It does not indicate tool functionality and is subject to variation based on product components, temperature and end-user application.
Installing the Guide Bar and Saw Chain (Fig. A, C-G)
CAUTION: Sharp chain. Always wear protective gloves handling the chain. The chain is sharp and can cut you when it is not running.
WARNING: Sharp moving chain. To prevent accidental operation, ensure that battery is removed from the tool before performing the following operations. Failure to do this could result in serious personal injury.
If the saw chain 12 and guide bar 11 are packed separately in the carton, the chain has to be attached to the bar, and both must be attached to the body of the tool.
- Place the saw on a flat, firm surface.
- Rotate the bar lock nut 14 counterclockwise with the wrench 22 provided.
- Remove sprocket cover 13, and bar lock nut 14.
- Wearing protective gloves, grasp the saw chain 12 and wrap it around the guide bar 11, ensuring the teeth are facing the correct direction (Fig. F).
- Ensure the chain is properly set in the slot around the entire guide bar.
- Place the saw chain around the sprocket 29. Line up the slot on the guide bar with chain tensioning pin 28, and the bolt 27, on the side of the tool as shown in Fig. D.
- Once in place, hold the bar still, replace sprocket cover 13. Install the rear of the sprocket cover first, rotate it down and make sure the bolt hole on the cover lines up with the bolt 27, on the main housing.
- Install the bar lock nut 14 and rotate clockwise with the wrench 22 provided until snug, then loosen nut one full turn, so that the saw chain can be properly tensioned.
- Rotate the chain tensioning screw 15 clockwise to increase tension as shown in Fig. E. Make sure the saw chain 12 is snug around the guide bar 11. Tighten the bar lock nut 14 until snug.
- Follow the instructions in the section Adjusting Chain Tension.
Adjusting Chain Tension (Fig. A, C-H)
WARNING: Incorrect saw chain tension can cause the same chain to come off of the guide bar and could cause serious injury or death.
NOTE: Saw chain tension should be adjusted regularly before each use.
- With the saw still on a firm surface check the saw chain 12 tension. The tension is correct when the saw chain snaps back after being pulled 1/8 (3 mm) away from the guide bar 11 with light force from the middle finger and thumb as shown in Fig. F. There should be no "sag" between the guide bar and the saw chain on the underside as shown in Fig. G.
- To adjust saw chain tension, loosen bar lock nut 14.
- Rotate the chain tension screw 15 in the front of the housing using the flat screwdriver end of the wrench 22.
- Check saw chain tension, adjust if needed.
- Do not over-tension the saw chain as this will lead to excessive wear and will reduce the life of the guide bar and saw chain.
- Once saw chain tension is correct, tighten bar lock nut 14 until snug. Torque the bar lock nut 14 to 6 ft-lbs (8 Nm).
- A new chain stretches slightly during the first few hours of use. It is important to check the tension frequently (after disconnecting battery, remove the battery pack) during the first two hours of use.
Replacing the Saw Chain (Fig. A, C-G)
CAUTION: Sharp chain. Always wear protective gloves handling the chain. The chain is sharp and can cut you when it is not running.
WARNING: Sharp moving chain. To prevent accidental operation, ensure the battery is removed from the tool before performing the following operations. Failure to do this could result in serious personal injury.
- To remove the saw chain 12, place the saw on a flat, firm surface.
- Remove sprocket cover 13 as described in Installing the Guide Bar and Saw Chain section.
- Rotate the chain tension screw 15 using the flat screwdriver end of the wrench 22. Turning the screw counterclockwise allows the guide bar 11 to recede and reduces the tension on the chain so that it may be removed.
- Wearing protective gloves, grasp the saw chain and lift the worn saw chain out of the groove in the guide bar.
- Flip guide bar over every time you replace the chain to ensure even wear.
- Place the new chain in the slot of the guide bar, making sure the saw teeth are facing the correct direction by matching the arrow and graphic of the saw chain on the housing 35 shown in Fig. D.
- Follow instructions for Installing the Guide Bar and Saw Chain.
Replacement chains and bars are available from your nearest authorised service center.
The DCMCST632 chainsaw is supplied with a .325" pitch,
7-tooth sprocket 29 (NA265339) and the following bar and chain:
SAW CHAIN GUIDE BAR
30cmDZ06530 30cmDZ06430
The DCMCST632 chainsaw is compatible with the following DEWALT accessories when using the supplied 0.325" pitch, 7-tooth sprocket 29 (NA265339):
SAW CHAIN GUIDE BAR
25cmDZ0652525cmDZ06425
30cmDZ06530 30cmDZ06430
35cmDT20692 35cmDT20691
Adjusting the Guide Bar Oil Flow (Fig. A, I)
This DCMCST632 is equipped with an adjustable oiling system. The flow of saw chain and guide bar lubrication can be set for different types of wood and cutting techniques. The saw chain and guide bar lubrication feed rate is suitable for most applications when the oil flow adjust screw 9 is positioned in between the maximum 31 and minimum 30 positions.
To reduce the flow:
- Using the screwdriver end of the wrench 22, twist the oil flow adjust screw 9 clockwise towards the minimum 30 position.
To increase the flow:
- Using the screwdriver end of the wrench 22, twist the oil flow adjust screw 9 anticlockwise maximum 31 position.
Saw Chain and Guide Bar Oiling (Fig. A, I)
Auto Oiling System
This chain saw is equipped with an auto oiling system that keeps the saw chain and guide bar constantly lubricated.
- The oil level indicator 16 shows the level of the oil in the chain saw. If the oil level is less than a quarter full, remove the battery from the chain saw and refill the oil reservoir with the correct type of oil.
- Always empty oil reservoir when finished cutting.
- Always empty oil reservoir before storing this unit.
NOTE: Do not operate this chain saw without oil. And replenish it before the oil reservoir is empty.
NOTE: Always use DEWALT bar and chain oil, which has been designed for optimal performance. Other lubricants could clog or damage the dispenser. Always use a high-quality, biodegradable bar and chain oil for proper saw chain and bar lubrication. When pruning trees, vegetable-based bar and chain oil is recommended, as mineral-based oils may harm living trees. Never use dirty, used, or contaminated oil. Doing so may damage the tool.
Filling the Oil Reservoir
- Unscrew counterclockwise and then remove the oil cap 17. Fill the reservoir with the recommended bar and chain oil until the oil level has reached the top of the oil level indicator 16.
-
Refit the oil cap and tighten clockwise.
-
Periodically switch the chain saw off and check the oil level indicator to ensure the bar and chain are being properly oiled.
Transporting Chain Saw (Fig. A, J)
- Always remove the battery from the tool and cover the guide bar 11 with the scabbard 18 when transporting or storing the saw.
OPERATION
Instructions for Use
WARNING: Always observe the safety instructions and applicable regulations.
WAPING: To reduce the risk of serious personal injury, a tool off and disconnect battery pack before making any adjustments or removing/installing attachments or accessories. An accidental start-up can cause injury.
Proper Hand Position (Fig. A, K)
WARNING: To reduce the risk of serious personal injury, AYs use proper hand position as shown.
WARNING: To reduce the risk of serious personal injury, ALWAYS hold securely in anticipation of a sudden reaction.
DANGER: Never use the chain saw with only one hand. It is more difficult to control reactive forces.
Proper hand position requires the left hand on the front handle 2, with the right hand on the rear handle 1.
State of Charge Indicator (Fig. A, L)
The DCMCST632 is equipped with a state of charge indicator. This will display the current level of charge in the battery during use. It does not indicate tool functionality and is subject to variation based on product components, temperature and end-user application.
The state of charge indicator LEDs 6 will illuminate, indicating the percent of charge in the battery.
- When all four state of charge indicator LEDs 6 illuminate, the battery is fully charged.
- When one state of charge indicator LEDs 6 illuminates, charge is low and then it will flash when the battery is discharged. Remove the battery and charge it.
State of Charge Indicator LED Status
| LEVEL OF CHARGE CHARGE INDICATOR LED COLOR | |
| 100% - 75% White | |
| 50% - 75% White | |
| 20% - 50% White | |
| ≤20% White | |
| Low battery shutdown White and blinking. | |
| Battery too hot All four, red and blinking. |
Overloaded Battery Warning (Fig. A, L)
All four state of charge indicator LEDs 6 will illuminate red and then blink when the battery has reached a high temperature. To clear the overloaded battery warning, allow the battery to cool down then restart the saw and begin your cut again, this time with less force. Allow the saw to cut at its own pace.
Chain Brake LED (Fig. L, N)
The DCMCST632 has a chain brake LED 8. The chain brake LED 8 will illuminate red when the chain brake/front hand guard 10 is engaged. The chain brake LED 8 will not be illuminated when the chain brake/front hand guard 10 is in the "set" position.
Overload LED (Fig. A, L)
The DCMCST632 has an overload LED 7. The overload LED 7 will illuminate amber and then blink when the motor or module is overloaded during operation. To clear the overload LED 7, restart the saw and begin your cut again, this time with less force. Allow the saw to cut at its own pace.
The overload LED 7 will illuminate red and then blink when the module has reached a high temperature. To clear the overload LED 7, allow the chainsaw to cool down then restart the saw and begin your cut again, this time with less force. Allow the saw to cut at its own pace.
Harness Attachment Point (Fig. M)
WARNING: To reduce the risk of injury from the tool on operators or bystanders, make sure it is supported securely when using the harness attachment point, or resting in a secure and stable location when not in use. Be sure to keep the area below clear to reduce the risk of the tool falling and striking someone or something below it.
WARNING: Before use, inspect the harness attachment for damage. If damaged do not use, contact a DEWALT service centre.
The DCMCST632 has a convenient harness attachment point 23 that allows it to hang while not in use when an appropriate harness is connected. Ensure you follow the harness manufacturer's instructions.
NOTE: DO NOT simultaneously wear multiple belt harnesses and/or multiple shoulder harnesses that could impair safety by interfering with each other.
Operating the Chain Saw (Fig. A, K)
WARNING: Read and understand all instructions. Failure to follow all instructions listed below may result in electric shock, fire and/or serious personal injury.
- Guard Against Kickback which can result in severe injury or death. See General Power Tool SafetyWarnings and General Chainsaw SafetyWarnings, and Causes and Operator Prevention of Kickback and Kickback Safety Features, to avoid the risk of kickback.
- Do not overreach. Do not cut above chest height. Make sure your footing is firm. Keep feet apart. Divide your weight evenly on both feet.
EnGLish
Use a firm grip with your left hand on the front handle 2 and your right hand on the rear handle 1 so that your body is to the left of the guide bar.
- Do not hold chain saw by chain brake/front hand guard 10. Keep elbow of left arm locked so that left arm is straight to withstand a kickback.
WARNING: Never use a cross-handed grip (left hand on the ar handle and right hand on the front handle).
WARNING: Never allow any part of your body to be in line. The guide bar when operating the chain saw.
- Never operate while in any awkward position or on a ladder or other unstable surface. You may lose control of saw causing severe injury.
- Keep the chain saw running at full speed the entire time you are cutting.
- Allow the saw chain to cut for you. Exert only light pressure. Do not put pressure on chainsaw at end of cut.
WARNING: Inspect chain saw after dropping or other impacts for damage.
WARNING: When not in use always have the chain engaged and battery removed.
CAITION: Maximum saw chain speed is 23.6m / s
Before Use
- Inspect the chain brake/front hand guard 10 for any damage.
- Ensure that the chain brake/front hand guard 10 can move freely.
- Check non-manually brake function (check that the chain brake/front hand guard 10 can be activated by forward inertia), but with motor off for safety.
- Check that the chain brake will stop the saw chain 12, from motor on to motor off when activated.
Setting the Chain Brake (Fig. N)
Your chainsaw is equipped with a chain braking system which will stop the chain quickly in case of kickback.
- To manually engage the chain brake, push the chain brake/ front hand guard 10 forward until it clicks into place. The chain brake LED 8 will illuminate.
- Pull the chain brake/front hand guard 10 towards the front handle 2 into the "set" position as shown in Fig. N. The chain brake LED 8 will not be illuminated.
- The tool is now ready to use.
Testing the Chain Brake (Fig. A, N)
WARNING:Recommended that first time users should use ice cutting logs on a saw horse or log cradle.
WING: Make sure to set chain brake before cutting.
Test the chain brake before every use to make sure it operates correctly.
- Place the tool on a flat, firm surface. Make sure the saw chain 12 is clear of the ground.
- Grip the tool firmly with both hands and turn the chain saw on.
- Rotate your left hand forward around the front handle 2 so the back of your hand comes in contact with the chain brake/front hand guard 10 and push it forward, toward the workpiece. The saw chain should stop immediately. The chain brake LED 8 will illuminate.
nOtE: If saw does not stop immediately, stop use of tool and bring it to an authorized service center nearest you.
Chain Brake Reactions to Kickback
WARNING: A kickback can be very sudden and intense, which throws the guide bar and saw chain in the direction of the operator. Most kickbacks are small and do not always require that the chain brake engage.
The chain brake engages manually by pressing against your left hand as the guide bar is kicked upward or automatically by a built in safety mechanism. Kickback can occur if the kickback zone of the guide bar touches an object or the workpiece as shown below.
WARNING: DO NOT allow the kickback zone of the guide touch an object or workpiece.

Kickback zone
- The automatic chain brake is engaged due to the force of the kickback. If there is an intense kickback while the kickback zone is farther away from the operator, the automatic chain brake will engage by using the built in safety mechanism. The chain brake LED 8 will illuminate. The chain brake/front hand guard 10 will be in the engaged position and will need to placed in the set position to release the chain brake.
- If the kickback force is small or the kickback zone is closer to the operator, the chain brake will engage manually by pressing the chain brake/front hand guard 10 against your left hand as the guide bar kicks upward. The chain brake LED 8 will illuminate.
- If the chain brake is activated, manually or automatically, pull the chain brake/front hand guard 10 towards the front handle 2 into the "set" position as shown in Fig. N. The chain brake LED 8 will not be illuminated.
Starting the Chain Saw (Fig. A, O)
WARNING: Never attempt to lock a switch in the position.
Always be sure of your footing and grip the chain saw firmly with both hands with the thumb and fingers encircling both handles.
-
Ensure a fully charged battery pack 20 is installed.
-
Engage the chain brake. Push the chain brake/front hand guard 10 forward until it clicks into place.
- To turn the unit on, push the On/Off button 5.
nOtE: The unit will power off after 60 seconds if the trigger switch has not been activated. You will need to press the On/Off button 5 again.
- Pull the chain brake/front hand guard 10 towards the front handle 2 .
- Flip the lock-off lever 4 forward, and squeeze the trigger switch 3.
- Once the unit is running, you may release the lock-off lever 4.
- In order to keep the unit running you must continue to squeeze the trigger.
- To stop the saw chain between cuts, release the trigger. nOtE: The unit will power off if the trigger switch has not been activated within 60 seconds. You will need to repeat steps 2 through 5 to start the unit.
nOtE: If too much force is applied while making a cut the saw will stop and the overload LED 7 will illuminate. To restart saw, you must release the trigger switch 3 before the saw will restart. Begin your cut again this time with less force. Allow the saw to cut at its own pace.
Working With Chain Saws at Height
General Recommendations
The operator of a chain saw working at height from a rope and harness should never work alone. A ground worker trained in appropriate emergency procedures should be present to assist.
The operator should be trained in general safe climbing and work positioning techniques and should be properly equipped with harness, ropes, strops, carabiners and other equipment for maintaining secure and safe working positions for both himself and the chain saw.
Preparing the chain saw for use
The chain saw should be checked by the ground worker and then switched off before being sent up to the operator in the tree as follows.
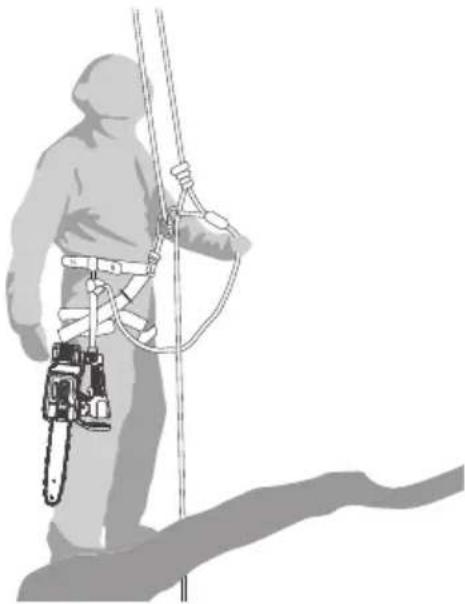
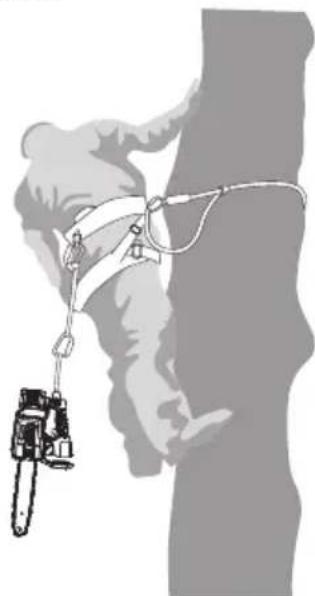
- The chain saw should be fitted with a suitable strip for attachment to the operator's harness as shown below.
- Secure the strop around the attachment point on the rear of the chain saw.
- Provide suitable carabiners to allow indirect (i.e. via the strop) and direct attachment (i.e. at the attachment point on the chain saw) of the chain saw to the operator's harness.
- Ensure the chain saw is securely attached when sent up to the operator.
- Ensure the chain saw is secured to the harness before disconnecting it from the means of ascent.
- Example of attachment of chain saw to operator's harness.
The ability to directly attach the chain saw to the harness reduces the risk of damage to equipment when moving around the tree. The chain saw should always be switched off when directly attached to the harness.
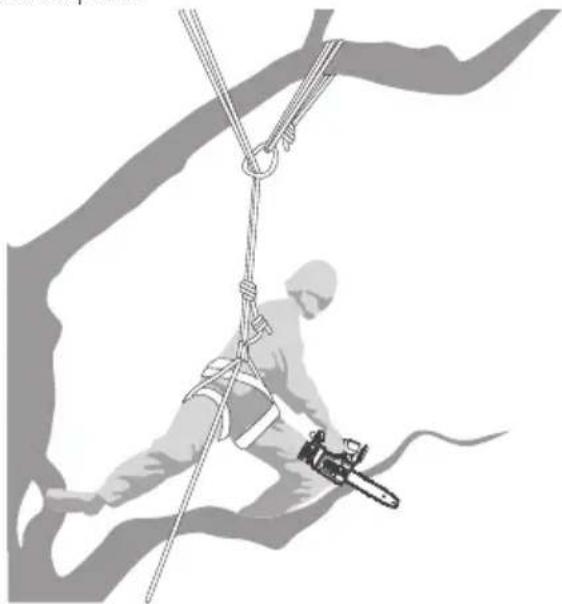
When moving the chain saw from any one attachment point to another, the operator should ensure that it is secured in the new position before releasing it from the previous attachment point. The chain saw should only be attached to the recommended attachment points on the harness. These may be at mid-point (front or rear) or at the sides. Wherever possible, the chain saw should be attached to the centre rear mid-point to keep it clear of climbing lines and to support its weight centrally down the operator's spine as shown below.
- Example of attachment of chain saw to centre rear midpoint on harness.
Using the chain saw in the tree
An analysis of accidents with these chain saws during tree service operations shows the primary cause as being inappropriate one-handed use of the chain saw. In the vast majority of accidents, operators fail to adopt a secure work position that allows them to hold both handles of the chain saw, resulting in an increased risk of injury due to:
not having a firm grip on the chain saw if it kicks back;
EnGLish
- a lack of control of the chain saw, such that it is more likely to come into contact with climbing lines and the operator's body (particularly the left hand and arm); and
- loss of control owing to an insecure work position and resulting in contact with the chain saw (unexpected movement during operation of the chain saw).
Securing the work position for two-handed use
-
In order to allow the chain saw to be held with both hands, as a general rule, operators should aim for a secure work position in which the chain saw is operated at
-
hip level, when cutting horizontal sections; and
-
solar-plexus level, when cutting vertical sections
-
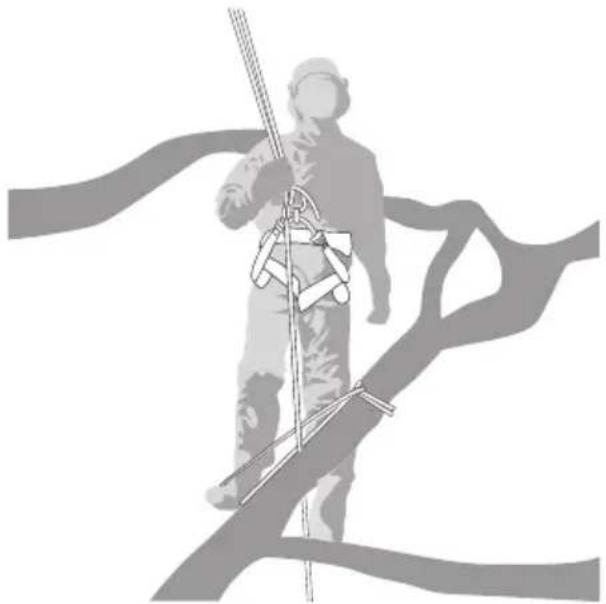
Where the operator is working close into vertical stems with low lateral forces on the work position, secure footing could be all that is needed for maintaining a secure work position. However, as operators move away from the stem, they will need to take measures to remove or counteract increasing lateral forces by, for example, redirecting the main line via a supplementary anchor point or using an adjustable strip directly from the harness to a supplementary anchor point as shown below.
-
Example of redirection of main line via supplementary anchor point.
- Gaining a secure footing at the work position can be aided by the use of a temporary foot stirrup created from an endless sling as shown below.
- Example of temporary foot stirrup created from endless sling.
Freeing a trapped guide bar
If the guide bar becomes trapped during cutting, operators should:
- Switch off the chain saw and attach it securely to the tree inboard (i.e. towards the trunk side) of the cut or to a separate tool line;
- Pull the chain saw from the kerf while lifting the branch as necessary; and
- If necessary, use a handsaw or second chain saw to release the trapped guide bar by cutting a minimum of 30 cm away from the trapped guide bar.
Whether a handsaw or a chain saw is used to free a trapped guide bar, the release cuts should always be outboard (toward the tips of the branch), in order to prevent the chain saw being taken with the section and further complicating the situation.
Common Cutting Techniques
The DCMCST632 chainsaw is not intended to be used ground, therefore this manual does not contain instructions for felling trees,limbing and bucking trees. For instructions on these techniques when using other DEWALT chainsaws refer to the instruction manuals for those DEWALT chainsaws. For a copy of those DEWALT chainsaw instruction manuals please contact DEWALT or visit an authorised DEWALT service centre.
WARNING: These in-tree instructions apply to DEWALT and handle chainsaws, designed exclusively for in-tree cutting applications by trained tree service operators.
WARNING: Blocking can result in injury. It should only be performed by a trained person.
WARNING: Recommended that first time users should be informed sufficiently before using.
WARNING: Do not work in trees with high wind conditions.
WARNING: Ensure all bystanders are clear of the fall area starting operation.
WARNING: Always keep yourself and your equipment of the material being removed.
CAUTION: Be sure battery is fully charged before working
WARNING: When tree climbing ensure you wear appropriate eye (visor or glasses), head, hand, leg, forearm and slip-resistant foot protection suitable for tree climbing.
WARNING: This tool emits lubrication oil mist and must during operation. Inhalation or prolonged exposure may cause irritation to the respiratory system, skin, or eyes. Always wear appropriate personal protective equipment (safety glasses, dust mask, protective gloves) and operate the tool in a well-ventilated area.
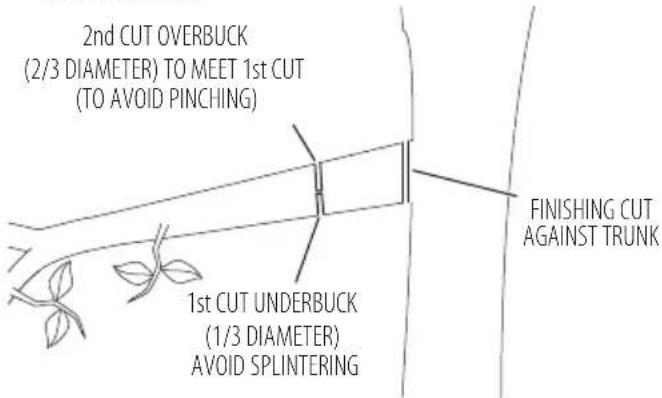
Pruning
- Make the first cut from the under of the limb,underbuck (1/3 diameter) to avoid splintering as shown below.
- Then make the second cut from the top of the limb, overbuck (2/3 diameter), to meet 1st cut as shown below. NOTE: The limb will fall, ensure you are clear of it before completing the cut.
- Make the finishing cut, flush against the main trunk as shown below.
Blocking
Removing sections from a standing tree
Before blocking is started have wedges (wood, plastic or aluminum) and a heavy mallet handy. Remove loose bark, nails, staples, and wire from the tree where the blocking cuts are to be made.
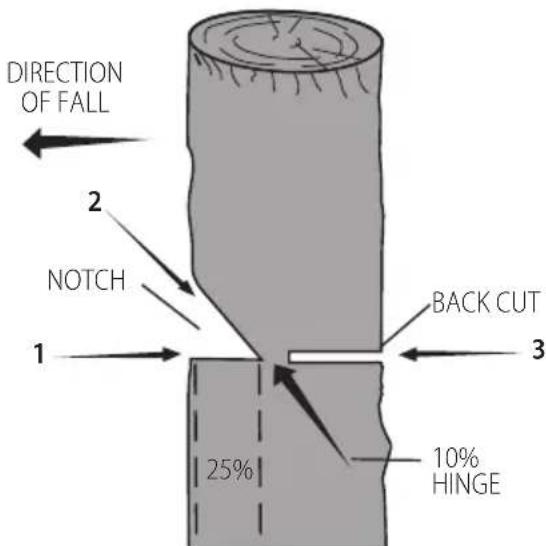
Conventional Notch
- Notching Undercut - Cut the notch 25% of the diameter of the tree block, perpendicular to the direction of the fall. Make the lower horizontal notching cut first as shown below. This will help to avoid pinching of either the saw chain or the guide bar when the second notch cut is being made. Consider conditions such as wind, tree lean, slope of the ground that could affect the direction of fall.
- Back Cut - Cut the back cut at the same level as the first horizontal notching cut. Keep the back cut parallel to the horizontal notching cut as shown below. Make the back cut so approximately 10% of the tree block remains to act as a hinge as shown below. The hinge wood keeps the tree block from falling in the wrong direction. Do not cut through the hinge.
- As the felling cut gets close to the hinge the tree block should begin to fall. If there is any chance that the tree block may not fall in the desired direction or it may rock back and bind the guide bar, stop cutting before the felling cut is complete and use wedges to open the cut and drop the tree block along the desired line of fall. When the tree block begins to fall remove the chain saw from the cut, release the trigger switch and activate the chain brake.
MAINTENANCE
Your power tool has been designed to operate over a long period of time with a minimum of maintenance. Continuous satisfactory operation depends upon proper tool care and regular cleaning.
WARNING: To reduce the risk of serious personal injury, turn tool off and disconnect battery pack before making any adjustments or removing/ installing attachments or accessories. An accidental start-up can cause injury.
The charger and battery pack are not serviceable.
Please refer to the back page of this manual for service centre contact information, or visit www.2helpU.com.
Saw Chain and Guide Bar
After every few hours of use, remove the sprocket cover, guide bar and chain and clean thoroughly using a soft bristle brush. Ensure oiling hole on bar is clear of debris. When replacing dull chains with sharp chains it is good practice to flip the chain bar from bottom to top.
For best performance, have sharpening and maintenance of the saw chain performed by an authorised DEWALT service centre.
Sprocket and Sprocket Cover (Fig. A, C-G)
CAUTION: Sharp chain. Always wear protective gloves when handling the chain. The chain is sharp and can cut you when it is not running.
WARNING: Sharp moving chain. To prevent accidental operation, ensure the battery is removed from the tool before performing the following operations. Failure to do this could result in serious personal injury.
- Place the saw on a flat, firm surface.
- Remove sprocket cover 13 as described in Installing the Guide Bar and Saw Chain section.
- Wearing protective gloves, use a clean, soft bristle brush to wipe away any saw dust, sticks, vines or other debris that may have collected inside the sprocket cover 13 and around the saw chain 12 or sprocket 29.
- Rotate the chain tension screw 15 using the flat screwdriver end of the wrench 22. Turning the screw counterclockwise
allows the guide bar 11 to recede and reduces the tension on the chain so that it may be removed.
- Wearing protective gloves, grasp the saw chain and guide bar and lift them away from the tool.
- Wearing protective gloves, use a clean, soft bristle brush to wipe away any saw dust or other debris that may have collected on the guide bar 11 and around the saw chain 12.
- Install the chain, guide bar and sprocket cover 13 as described in Installing the Guide Bar and Saw Chain, Replacing the Saw Chain sections and adjust chain tension properly before use as described in the Adjusting Chain Tension section.
Removing and Installing the Sprocket (Fig. D, P)
CAUTION: Sharp chain. Always wear protective gloves when handling the chain. The chain is sharp and can cut you when it is not running.
WARNING: Sharp moving chain. To prevent accidental operation, ensure the battery is removed from the tool before performing the following operations. Failure to do this could result in serious personal injury.
Replacement sprockets are available from your nearest authorised DEWALT service centre: NA265339.
NOTE: The sprocket bolt 32 is left-hand thread.
- Engage the chain brake. Push the chain brake/front hand guard 10 forward until it clicks into place.
- Remove sprocket cover 13 as described in Installing the Guide Bar and Saw Chain section.
- Remove saw chain 12 and guide bar 11 as described in Replacing the Saw Chain section.
- Hold the sprocket 29 in place with a pair of adjustable pliers (not included).
- With a 10mm wrench (not included) rotate the left-hand thread sprocket bolt 32 clockwise and remove it.
- Lift the sprocket 29 off of the D-shaped shaft 33.
- Clean the sprocket 29 of any debris or replace it with a new sprocket 29.
- Align the D-slot 34 on the sprocket 29 with the D-shaped shaft 33 and install the sprocket 29.
- Hold the sprocket 29 in place with a pair of adjustable pliers. Use a 10mm wrench (not included) to rotate the left-hand thread sprocket bolt 32 counterclockwise.
- Using a torque wrench, tighten the sprocket bolt 32 to 6 ft.lbs (8 N.m).
- Follow instructions for Installing the Guide Bar and Saw Chain.
Saw Chain Sharpening (Fig. Q-S)
CAUTION: Sharp chain. Always wear protective gloves handling the chain. The chain is sharp and can cut you when it is not running.
WARNING: Sharp moving chain. To prevent accidental operation, ensure that battery is removed from the tool before performing the following operations. Failure to do this could result in serious personal injury.
WARNING: Do not over file chain rakers, this will increase risk of kickback. If the chain has been sharpened more than four times, replace it.
Each time the chain is sharpened, it loses some of the low kickback qualities and extra caution should be used.
It is recommended that a saw chain be sharpened no more than four times.
NOTE: The cutters will dull immediately if they touch the ground/dirt or a nail while cutting.
To get the best possible performance from your chainsaw it is important to keep the teeth of the saw chain sharp. Follow these helpful tips for proper saw chain sharpening:
- For best results use a 5/32" (4 mm) file and a file holder or filing guide to sharpen your saw chain. This will ensure you always get the correct sharpening angles.
- Place the file holder flat on the top plate and depth gauge of the cutter.
- Keep the correct top plate 38 filing angle line of 30^ on your file guide parallel with your chain (file at 60^ from chain viewed from the side) as shown in Fig. R.
- Sharpen cutters on one side of the chain first. File from the inside of each cutter to the outside. Then turn your saw around and repeat the processes (2, 3, 4) for cutters on the other side of the chain.
NOTE: Use a flat file to file the tops of the rakers (portion of chain link in front of the cutter) so they are about .025" (.635 mm) below the tips of the cutters as shown in Fig. Q.
- Keep all cutter lengths equal as shown in Fig. S.
- If damage is present on the chrome surface of the top plates or side plates, file back until such damage is removed.
CAUTION: After filing, the cutter will be sharp, use extra 10-15 minutes during this process.
Lubrication
Refer to Auto Oiling System described in the Saw Chain and Guide Bar Oiling section.
Cleaning
WARNING: Always switch off the tool and remove the before storage. Clean wood dust and oil residues from the chain, guide bar, and ventilation openings, and check the tool for damage or loose parts. Failure to clean and maintain the tool may result in malfunction or fire hazards during storage.
WARNING: Electrical shock and mechanical hazard.
Connect the plug from the power source and/or remove the battery pack, if detachable, from the product before cleaning.
WARNING: To ensure safe and efficient operation, always use the product and the ventilation slots (if applicable) clean. Ventilation slots can be cleaned using a dry, soft non-metallic brush and/or a suitable vacuum cleaner. Do not use water or any cleaning solutions.
WARNING: Blow dirt and dust out of the main housing dry air as often as dirt is seen collecting in and around the ventilation slots. Wear approved eye protection and approved dust mask when performing this procedure.
WARNING: Never use solvents or other harsh chemicals for cleaning the non-metallic parts of the product. These chemicals may weaken the materials used in these parts. Use a cloth dampened only with water and mild soap. Never let any liquid get inside the product. Never immerse any part of the product into a liquid.
Optional Accessories
WARNING: Since accessories, other than those offered by WALT, have not been tested with this product, use of such accessories with this tool could be hazardous. To reduce the risk of injury, only DEWALT recommended accessories should be used with this product.
Consult your dealer for further information on the appropriate accessories.
Protecting the Environment


Products/batteries are recyclable, but if marked with the crossed-out bin, they must not be disposed of with normal household waste.
Run the batteries down completely and separate them, and separate any light sources from the product if possible. It is the user's responsibility to delete personal data from the product. Then take the waste to an official waste collection centre or a participating retailer who will often accept it free of charge. Packaging should be discarded based on the marked material code. Operating and safety instructions should only be discarded once the applicable product is no longer in use.
Please check with your local community/municipality for waste management guidance. For further information, visit www.2helpU.com and scan the above QR code.
DCMCST632 TROUBLESHOOTING
Problem Solution
| Unit will not start. Check battery installation. Check battery charging requirements. Press the On/Off button before squeezing the lock-off lever and trigger switch. Check that chain brake is disengaged. Disengage the chain brake/front hand guard. Pull the chain brake/front hand guard towards the front handle into the "set" position as shown in Fig. N. Restart the unit. Check that lock-off lever is fully pushed forward prior to moving trigger switch. | |
| Unit shuts down in use. | Charge battery. Unit is being forced. Restart and apply less pressure. |
| Battery won't charge. | Insert battery into charger until red charging light illuminates. Charge up to 8 hours if battery is totally drained. Plug charger into a working outlet.. Check current at receptacle by plugging in a different appliance. Check to see if receptacle is connected to a light switch which turns power off when you turn out the lights. Move charger and appliance to a surrounding air temperature of above 4.5 °C (40 °F) or below 40.5 °C (104 °F). |
| Bar / Chain overheated. | Refer to Adjusting Chain Tension section. Refer to Chain Oiling section. |
| Chain is loose. | Refer to Adjusting Chain Tension section. |
| Poor cut quality. | Refer to Adjusting Chain Tension section. NOTE: Excessive tension leads to excessive wear and reduction in life of bar and chain. Lubricate before each cut. Refer to Replacing the Saw Chain section. |
| Unit runs but does not cut. | Chain could be installed backwards. Refer to sections for Installing and Removing Chain. |
| Unit does not oil. Refill oil reservoir. Clean guide bar, sprocket and sprocket cover. Refer to Maintenance section. | |
LED Indicator Guide
The section provides a list of possible LED blink patterns, the causes and corrective solutions. The user or maintenance personnel can perform some corrective actions, while others may require the assistance of a qualified DEWALT technician or an authorised DEWALT service centre.
Overload LED
ORANGE LED
Problem Solution
Unit stopped working. Unit is being forced. Restart and apply less pressure. If problem continues, contact an authorised DeWALT service centre.
REDLED
Problem Solution
Unit module is too hot. Unit is being forced. Let the unit rest and cool down. Restart and apply less pressure. If problem continues, contact an authorised DeWALT service centre.
Chain Brake LED
REDLED
Problem Solution
Unit will not start. Disengage the chain brake/front hand guard. Pull the chain brake/front hand guard towards the front handle into the "set" position as shown in Fig. N. Restart the unit. If problem continues, contact an authorised DEWALT service centre.
State of Charge Indicator LEDs
BLINKING WHITE LEDs
Problem Solution
Battery pack Remove and replace the battery pack. is depleted. If problem continues, contact an authorised DEWALT service centre.
BLINKING RED LEDs
Problem Solution
Battery is too hot.. Unit is being forced. Let the unit rest and cool down. Restart and apply less pressure. Remove and replace the battery pack. Restart and apply less pressure. If problem continues, contact an authorised DeWALT service centre.
www.2helpU.com/DoC/or www.2helpU.com/DoC/index/xxx*
www.2helpU.com/DoC/ of www.2helpU.com/DoC/index/xxx*
WAARSCHUWING: Lees alle
BEWAAR ALLE WAARSCHUWINGEN EN INSTRUCTIES ALS TOEKOMSTIG REFERENTIEMATERIALIAA
DCMCST635 VIANMAÄRITYS
Ongelma Ratkaisu
www.2helpU.com/DoC/or www.2helpU.com/DoC/index/xxx*
*For direkt atkomst, ersatt "xxx" med Produkten modellnummer som anges pa Produkten markskylt eller forpackning.
www.2helpU.com/DoC/ veya www.2helpU.com/DoC/index/xxx*