
YT-84861 - Rototiller Yato - Free user manual and instructions
Find the device manual for free YT-84861 Yato in PDF.

| Brand | Yato |
| Model | YT-84861 |
| Product type | Petrol tiller |
| Weight | 15.5 kg |
| Fuel tank capacity | 1.05 L |
| Tilling width | 300 mm |
| Maximum tilling depth | 150 mm |
| Engine displacement | 52 cm³ |
| Engine power | 1.45 kW |
| Maximum engine speed | 7500 min⁻¹ |
| Sound pressure level | 89.5 ± 3.0 dB(A) |
| Sound power level | 109.5 ± 3.0 dB(A) |
| Vibration level (handle) | 7.102 ± 1.5 m/s² |
| Fuel type | Petrol/oil mixture 25:1 |
| Spark plug type | L7RTC |
| Key functions | Loosen and cultivate small soil surfaces |
| Maintenance and cleaning | Clean after each use; replace blades every 2 years or 50 h; check spark plug and air filter regularly |
| Safety | Wear PPE; do not use in confined space; stop engine before maintenance |
| Spare parts and repairability | Use only original parts; replace blades with identical ones; contact customer service for complex repairs |
| General information | 120-page manual available in several languages |
Frequently Asked Questions - YT-84861 Yato
User questions about YT-84861 Yato
0 question about this device. Answer the ones you know or ask your own.
Ask a new question about this device
Download the instructions for your Rototiller in PDF format for free! Find your manual YT-84861 - Yato and take your electronic device back in hand. On this page are published all the documents necessary for the use of your device. YT-84861 by Yato.
USER MANUAL YT-84861 Yato
natural_image
Sequence of three-step automotive assembly showing wheelbase adjustment and mounting bracket (no text or symbols)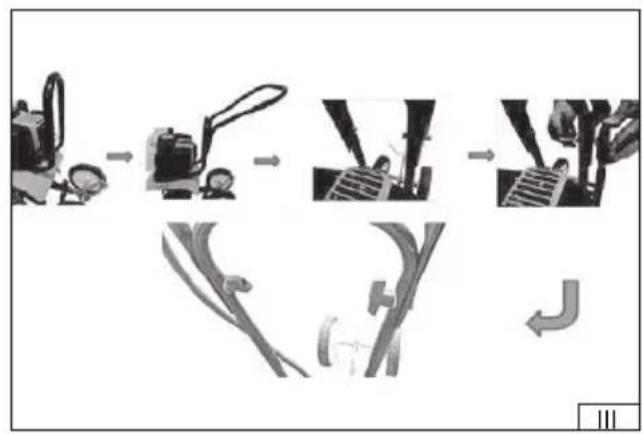
flowchart
graph TD
    A["Start"] --> B["Carriage"]
    B --> C["Lift"]
    C --> D["Drive"]
    D --> E["Lift-up"]
natural_image
Diagram showing a mechanical assembly before and after division, with no visible text or symbols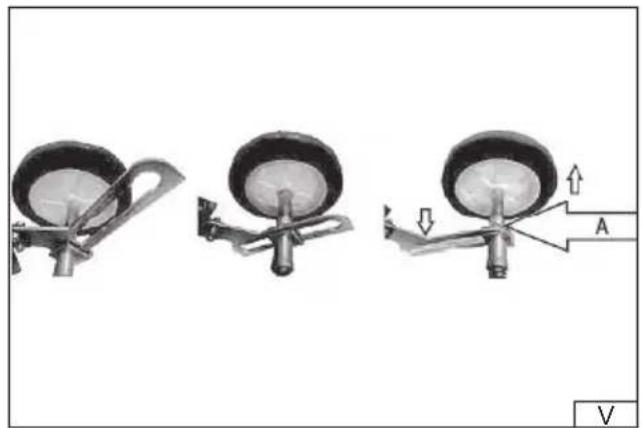
natural_image
Three sequential diagrams showing mechanical components with arrows indicating motion, no text or symbols present.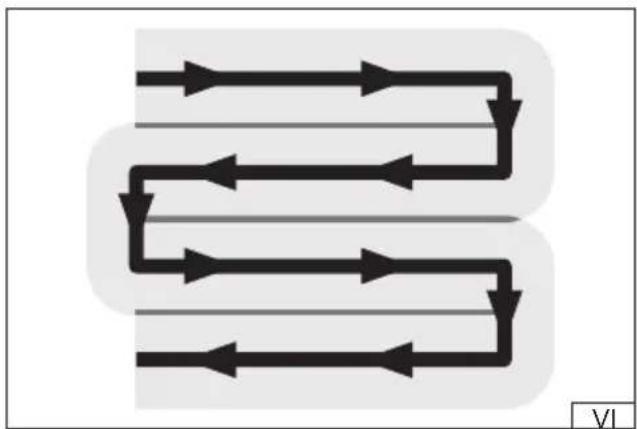
flowchart
graph TD
    A["Start"] --> B["Path 1"]
    B --> C["Path 2"]
    C --> D["..."]
    D --> E["End"]
    style A fill:#000,stroke:#000,color:#fff
    style E fill:#000,stroke:#000,color:#fff
    style B fill:#000,stroke:#000,color:#fff
    style C fill:#000,stroke:#000,color:#fff
    style D fill:#000,stroke:#000,color:#fff
    style E fill:#000,stroke:#000,color:#fff
natural_image
Illustration of a hand pouring liquid into a container with a ring and handle, no text or symbols presentPL
-
engine
-
working handle
-
throttle lever
-
switch
-
fuel filler cap
-
knives
-
knife guard
-
transport wheel
-
air filter
-
spark plug
-
muffler and exhaust pipe
-
starting rope
-
choke lever
-
fuel pump
DE
Read the operating instruction
Wear protective goggles
Wear hearing protectors
Keep away from rotating parts
Rated rotational speed
Nenndrehzahl
Mix petrol with oil in a ratio of petrol to oil - 25:1
PRODUCT CHARACTERISTICS
The petrol tiller is designed for loosening and cultivating small areas of soil. It significantly facilitates the cultivation of soil in gardens and allotments. Soil cultivation is carried out using rotating blades. It is not permissible to use the tiller for cultivating larger areas of land. The correct, reliable and safe operation of the product depends on proper use, therefore:
Before using the tool, read the entire manual and keep it.
The supplier is not liable for any damage or injury resulting from use of the product for purposes other than its intended use, failure to comply with safety regulations and recommendations in this manual. Use of the product for purposes other than its intended use also results in loss of the user's rights to warranty and guarantee.
EQUIPMENT
The tiller is supplied complete, but assembly is required before first use.
TECHNICAL DATA
| Parameter Unit of measurement Value | ||
| Catalogue number YT-84861 | ||
| Libra [kg] 15.5 | ||
| Fuel tank capacity [l] 1.05 | ||
| Furrow width [mm] 300 | ||
| Max. groove depth [mm] 150 | ||
| Engine | ||
| number of cylinders 1 | ||
| number of bars 2 | ||
| cooling | By air | |
| Spark plug type | L7RTC | |
| Engine displacement | [cm^3] | 52 |
| Engine power | [kW] | 1.45 |
| Maximum engine speed | [min^-1] | 7500 |
| Noise | ||
| sound pressure | [dB (A)] | 89.5 ± 3.0 |
| power L_WA | [dB (A)] | 109.5 ± 3.0 |
| Vibration level - handle | [m/s^2] | 7.102 ± 1.5 |
SAFETY INSTRUCTIONS
IMPORTANT! READ CAREFULLY BEFORE USE RETAIN FOR FUTURE USE
Teaching
Read the instructions carefully. Familiarize yourself with the controls and proper use of the machine. If you pass the machine on to someone else, always include the operating instructions with the machine. The machine should always be used in accordance with the recommendations in the operating instructions.
Never allow children or people unfamiliar with the machine's operating instructions to operate the machine. National regulations may specify the exact age of the operator.
Never work when other people, especially children or pets, are nearby. Before starting work, designate a safety zone that is off -limits to people and pets.
Remember that the operator or user is responsible for accidents or hazards occurring to other people or the surroundings.
Preparation
Always wear sturdy shoes and long pants when working. Do not operate the machine barefoot or in open sandals. Avoid worn clothing that is too loose or has hanging straps or ribbons. Loose clothing can become caught in moving parts of the machine, which can cause injuries.
Check the area where the machine will be working and remove all objects that could get into the machine. Caught objects can cause damage to the machine, they can also be thrown at high speed, which is a threat to the operator and the surroundings.
WARNING – Gasoline is highly flammable:
EN
- store fuel in containers designed for this purpose,
- only refuel outdoors and do not smoke while refueling,
- add fuel before starting the engine. Never remove the fuel tank cover or add fuel if the engine is running or hot,
- if petrol is spilled, do not attempt to start the engine but move the machine away from the area of spillage and avoid creating any sources of ignition until the petrol vapours have dissipated,
- safely replace the fuel tank and tank cover.
Replace a damaged muffler. Working with a damaged muffler is not only noisier, but can cause fires, burns and exhaust poisoning. Before use, always check that the blades, screws and blade assembly hardware are not worn or damaged. Replace worn or damaged parts in sets to maintain balance. Replace damaged or illegible labels.
Use
Do not operate the engine in a confined space where dangerous carbon monoxide (CO) fumes may accumulate.
Work only in daylight or with good artificial lighting. Inadequate lighting of the work area can cause accidents.
Always make sure your feet are steady on the slope.
Walk, never run.
Work across the slope, never up or down. Controlling the machine will become much easier.
Use extra caution when changing direction on a slope.
Do not work on excessively steep slopes.
Use extra caution when reversing or pulling the machine towards you.
Do not change engine governor settings and do not exceed maximum engine speed.
Disengage the drive to the cutting element(s) if the machine must be tilted when moving it across surfaces other than the work site and when transporting it to and from the work site.
Do not use the machine with damaged guards or housings or without safety devices such as the supplied guards.
Start the engine carefully according to the instructions, making sure your feet are away from the cutting element.
Do not tilt the machine when starting the engine, except when it requires tilting during starting. In this case, do not tilt more than necessary and only lift the part that is away from the operator.
Do not keep hands and feet near rotating parts.
Do not carry the machine with the engine running.
Stop the engine and make sure all moving parts have stopped:
Stop the machine's engine and make sure all moving parts are stationary:
- every time you walk away from the machine,
- before refueling,
- before checking, cleaning or repairing the machine,
- after being struck by a foreign object. Check the machine for damage and, if necessary, repair it before restarting and operating it. If the machine starts vibrating excessively (check immediately)
- check for damage,
- replace or repair any damaged part,
- check and tighten loose parts.
Maintenance and storage
Keep all nuts, bolts and screws in proper condition to be sure the machine is in safe operating condition.
Never store a machine with gasoline in the tank inside a building where fumes may reach an open flame or spark.
Allow the engine to cool before storing.
To reduce the risk of fire, keep the engine, muffler, battery compartment and fuel storage area free of plant material and excessive grease.
In the case of multi-knife machines, be careful as the rotation of one cutting element may cause the rotation of the other knives.
Be careful when adjusting the machine to avoid getting your fingers caught between the moving knives and fixed parts of the machine.
Always allow the machine to cool down before next use, store it closed.
Be careful when handling the blades even when the drive is switched off, as the blades may still be rotating. Always wait until the blades have come to a complete stop before continuing.
Replace worn or damaged parts for safety reasons. Use only original spare parts and accessories.
If fuel needs to be drained from the tank, this must be done outdoors.
Noise and vibration risks
The machine has been designed to reduce the risk of user exposure to noise and vibrations as much as possible. However, it is not possible to completely eliminate these hazards. In addition, people in the vicinity of the machine are also exposed to noise hazards.
However, you can reduce the risk associated with the above threats by following these guidelines:
- the product should be used in accordance with its intended use as described in the instructions,
- make sure that the machine is in good condition and is regularly maintained,
- use proper and well-sharpened cutting tools,
EN
- use a fi rm grip on the product handle,
- plan your work so that you can take frequent breaks.
Residual risk
Even if all safety instructions are followed during work, there is still a potential risk of injury. Due to the design of the product, the following hazards still remain.
Vibration injuries caused by working too long, working incorrectly, or working with poorly maintained machinery.
Injuries caused by unexpected impact from hidden, thrown objects.
PRODUCT SERVICE
Preparation for assembly
The product should be unpacked and all packaging elements removed. It is recommended to keep the packaging, which may be useful during transport or storage of the product.
Check whether any part of the product has not been damaged during transport. Any damage observed, e.g. cracks or deformations, disqualifies the product from further use until the damaged parts are repaired or replaced.
It is recommended to place all parts on a flat, hard and clean surface.
Personal protective equipment such as protective gloves, eye protection and protective clothing should be worn during installation.
Machine assembly
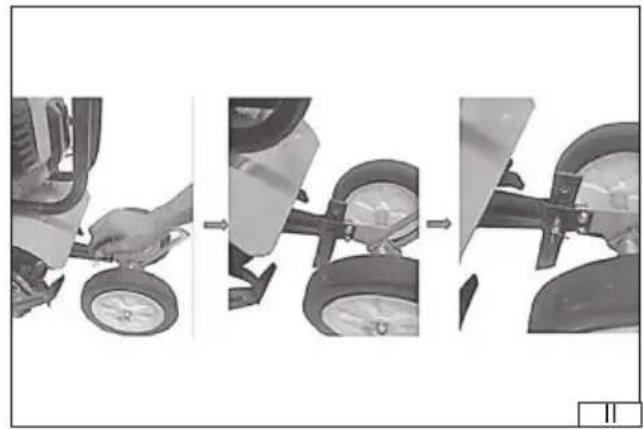
Insert the furrow depth limiter into the hole at the rear of the tiller base and secure it with the pin and cotter pin (II). When assembling the machine, set the limiter to the lowest position.
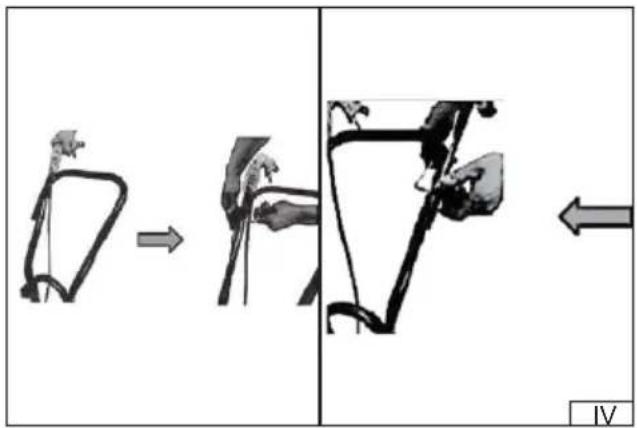
Using screws and wing nuts, mount the middle element of the work handle to its lower element mounted in the machine (III). Then, using screws and wing nuts, mount to the middle element of the work handle on both sides of the handle (IV).
Make sure that all screw connections are tight and secure and will not change position during operation.
A correctly assembled tiller should look as shown in illustration (I).
Preparing for work
-refi lling fuel
The tiller is powered by a fuel mixture designed for two-stroke engines. It is forbidden to use gasoline alone. Gasoline should be mixed with oil in the proportions of gasoline: oil - 25: 1. The mixture should be mixed before pouring into the fuel tank. Mixing and pouring fuel should be carried out away from sources of fire. Do not smoke while refueling. Refueling should be carried out at a distance of at least 3 meters from the place where the device is started and operated.
To protect your engine, use good quality unleaded petrol and good quality oil designed for
two-stroke, air-cooled engines. Do not use oil intended for four-stroke engines. Do not use oil intended for liquid-cooled engines. If fuel is spilled, wipe up any remaining fuel before starting the machine.
Do not use a mixture older than 30 days.
After refueling the tank, close the filler cap firmly and tightly.
- height adjustment of transport wheels (V)
Adjusting the height of the transport wheels involves setting them in one of the three grooves located in the connecting plate. During operation, the wheels should be in the highest groove, while during breaks or transport to and from the workplace - in the middle or lower groove, depending on the height of the operator. To change the position, pull down on the marked point (A) to release the spring and set the appropriate position, then release to lock the wheels in the selected position.
Preparing the workplace
The tiller is used only for tilling the soil. The soil cannot be too hard. If the soil is too hard or dry, it should be moistened before starting work and wait until the water has soaked into the soil.
It is prohibited to work on hard surfaces such as concrete or wood.
Before starting work, remove all visible stones, roots, wires and other things that can damage the tiller blades. Pay special attention to electrical cables. Keep in mind that electrical cables may be hidden underground.
The tiller only works properly when driven forward. Avoid reversing the machine.
Starting and stopping the machine (I)
CAUTION! Do not operate the tiller without the blades and blade guard properly installed.
WARNING! Do not press the throttle lever when starting the machine. Pressing the lever will cause the cutting blades to rotate, which could result in loss of control of the machine, which could result in serious injury. Before starting the engine, make sure that the throttle lever is fully released.
WARNING! To prevent serious injury, never lift or carry the tiller while the engine is running. Always turn the engine off before moving the tiller to another location.
EN
Place the tiller at the starting point. The tiller can only be started when it is in a vertical position.
The tiller's auxiliary wheels should be moved to the upper position as described in the section „Adjusting the height of the transport wheel”.
Warning! The wheel position can only be changed when the engine is switched off.
Set the slotting depth limiter to one of the available positions.
Warning! The limiter position can only be changed when the engine is switched off.
Turn the switch on the right handle to the "I - on" position.
Press the fuel pump 10 times.
Move the choke lever to the upper "CLOSED" position.
Holding the machine handle with one hand, use the other hand to pull the starter rope briskly several times until the engine starts.
Move the choke lever to the "OPEN" position and pull the starter rope briskly until the engine starts.
Do not unwind the rope to its full length, as this may cause it to break. Be careful to pull the starter rope along the axis of the hole, pulling the rope at an angle will lead to premature wear of the starter rope.
To stop the engine, release the throttle button, wait until the cutting element stops rotating, and then turn the switch to the "O - off" position. If you hear any suspicious sounds or feel any vibrations, immediately turn off the tiller by switching the switch to the "O - off" position.
Note! When starting a warm engine, e.g. during short breaks in work lasting up to several minutes, it is not necessary to move the choke lever to the „OPEN” position.
If there is a need to stop the engine in an emergency, the switch should be moved to the „O - off” position, which will stop the engine and consequently the cutting element. However, it should be taken into account that after the machine is switched off, the cutting element may continue to rotate for some time. It is forbidden to stop the cutting element by pressing it to the ground or hitting obstacles.
Working with a tiller
With the engine running and the blades off the ground, pull the throttle lever toward the operating handle to increase engine speed. Caution! Increasing engine speed will cause the blades to rotate. Keep your feet and hands away from rotating parts of the machine.
Holding both handles firmly, slowly lower the tiller until the blades touch the ground. When the tines start to rotate in the soil, drive the machine forward at a moderate pace, allowing the blades to gradually penetrate the ground. After loosening the soil, continue working until you have fully mastered the operation and guidance of the tiller. If you feel resistance, you can stop the machine for a moment, allowing the blades to dig in deeper on their own, or retract it slightly.
When working, you need to be prepared for unexpected situations. The blades may hit a previously invisible stone, root or other obstacle. In such a case, you should immediately turn off the machine, wait for it to cool down and start inspecting. If any damage is detected, further work is prohibited.
Do not apply excessive pressure to the tiller. The blades should not penetrate more than 3 to 4 centimeters.
Take regular breaks during work to avoid fatigue and overwork. This will allow you to better control the product and reduce the risk of accidents.
Attention! Always push the tiller during operation, never pull it towards yourself. Pulling the machine causes the operator to move backwards, which means that he does not control the area behind him.
The tiller should be pushed slowly, always walking, never running. This will provide better control over the machine and reduce the time it takes to react to unexpected events.
When working, move in rows (VI). Keep the rows of equal width, slightly overlapping so as not to miss any space. Be especially careful when changing direction.
Warning! If a foreign object hits the machine during operation. Immediately turn off the machine, wait until the blades stop and the machine cools down. Then check whether the tiller has not been damaged. If damage is detected, do not continue working until it has been repaired. Excessive vibration during operation may be caused by damage to the machine. Stop working, wait until the blades and engine stop. Then wait until the machine cools down and check the product.
PRODUCT MAINTENANCE
During the warranty period, the user may not dismantle the machine or replace any other components or parts than those listed below, as this will void the warranty. Any irregularities observed during inspection or during operation are a signal to carry out repairs at a service point.
After finishing work, the housing, ventilation slots, switches, additional handle and covers should be cleaned, for example, with an air jet (pressure not exceeding 0.3 MPa), brush or dry cloth without using chemicals and cleaning fluids. Tools and handles should be cleaned with a dry, clean cloth.
Periodic inspections
Periodic inspection and maintenance of the machine components listed below should be performed.
EN
NOTE! All maintenance procedures should be performed with the machine switched off and not working. Before starting any of the operations described below, switch off the tiller. Make sure that the engine is cool. Disconnect the spark plug wire to prevent accidental starting of the machine's engine.
NOTE! If the course of a service is not described below. This means that the machine must be taken to a specialist service point for this service.
NOTE! Where solvents are used for cleaning, avoid contact of the solvent with skin and eyes. Use personal protective equipment.
General maintenance activities
The product must not be cleaned with a water jet or by immersing it in water.
Check the degree of wear and damage to the blades. If excessive wear or damage is observed, replace the blade with a new one.
The blades will lose their paint coating during operation, this is normal and does not indicate damage to the blades. However, the lack of paint coating makes the blades more susceptible to corrosion. Therefore, each time after cleaning, they should be covered with a thin layer of anti-corrosion agent or a thin layer of light machine oil. Before starting work, the blades should be cleaned of any residue of the agent to prevent it from penetrating the soil.
Blades should always be replaced with original ones, identical to those that were installed in the tiller at the factory. Only the use of original spare parts allows you to maintain the safety of the product. The blade should be replaced by an experienced user. In case of doubt, contact an authorized service center of the manufacturer.
The blades should be replaced every two years or every 50 hours of use.
If the internal cable connecting the product switch to the engine is damaged, it must be replaced by an authorized service center of the manufacturer. It is forbidden to work with any of the cables damaged.
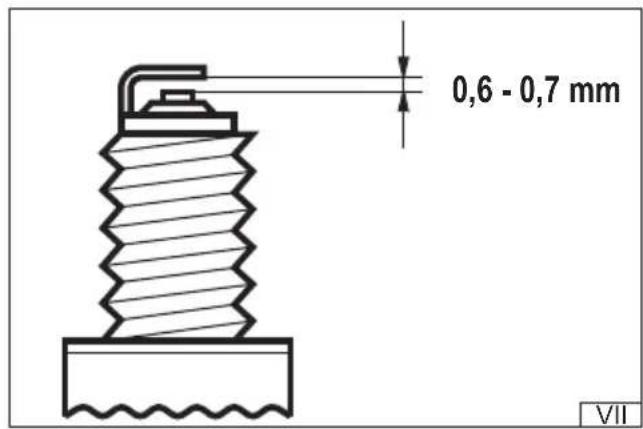
Spark plug replacement and maintenance (VII)
Remove the spark plug socket cover. Remove the rubber cover from the spark plug contact, disconnect the cable, and unscrew the spark plug with a spark plug wrench. Check the condition of the spark plug electrodes. The distance between the electrodes should be between 0.6 and 0.7 mm. If you notice dirt, try cleaning the spark plug electrodes with a brass wire brush. If cleaning does not bring the expected results, replace the spark plug with a new one. Check the condition of the spark plug at least once a month.
Air fi Iter maintenance (VIII)
Air filter maintenance should be performed after each use of the tiller.
Unscrew the screw holding the filter cover, remove the cover.
Remove the filter and rinse it in warm, soapy water.
Dry the filter completely and reinstall it in place.
Screw on the filter cover.
Other maintenance activities
After each use, the general condition of the device should also be checked. Loose screw connections should be tightened. Check Check for fuel leaks. Check that the ventilation holes are clear. Check that all covers and housings are in good technical condition, free from cracks or other damage. Before continuing work, remove any observed faults.
Muffi er and exhaust system maintenance
Depending on the fuel, oil and mixture ratio used, carbon deposits may build up in the muffler and exhaust system. or soot. This may cause a drop in the performance of the appliance. To restore the previous performance, return machine to the manufacturer's authorized service center.
Storing and transporting the tiller
Proper maintenance prior to storage will ensure longer, trouble-free operation of the machine.
Before storing the tiller for an extended period of time, empty the fuel tank and system.
Check the fuel system for leaks. If any are found, repair them before starting
storage. For this purpose, the machine must be taken to an authorized service center.
Empty the fuel from the tank, for example using a commercially available plastic fuel pump.
Start the engine and let it idle until it stops. This will clear the carburetor of any debris.
fuel. Allow the engine to cool.
Remove the spark plug. Pour one teaspoon of two-stroke engine oil through the hole. Pull the spark plug carefully several times. starter rope, this will distribute the oil in the combustion chamber. Install the spark plug.
Clean the machine of any remaining soil and other dirt. Store the product in a dark, cool, dry and frost-free place with good ventilation. Away from sources of ignition. Store the machine upright, in a dry, closed place, protected from access by unauthorized persons, especially children.
Transport the product by carrying it by the handles. Transport in such a position that the blades do not have contact with the ground. During transport, the product should be protected from impacts and strong vibrations. During transport, the product should be secured against slipping or tipping over.
DE
PRODUKTMERKMALE
PRODUKTA RAKSTUROJUMS
CARACTÉRISTIQUES DU PRODUIT
WAARSCHUWING – Benzine is zeer brandbaar:
We declare and guarantee with full responsibility that the following products:
meet requirements of the following European Standards / Technical Specifications:
and fulfill requirements of the following European Directives:
Machinery and safety elements
Emissions from non-road mobile machinery
Serial number: concern all serials numbers of item(s) mentioned in this declaration
Measured sound power level on an equipment representative for this type: 109,5 dB(A)
Guaranteed sound power level for this equipment: 112 dB(A)
The person authorized to compile the technical file: