YT-82936 - Vacuum Cleaner Yato - Free user manual and instructions
Find the device manual for free YT-82936 Yato in PDF.

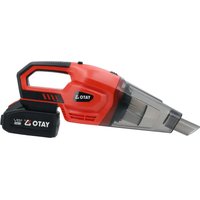
| Product type | Cordless handheld vacuum/blower |
| Brand | Yato |
| Model | YT-82936 |
| Rated voltage | 5 V DC |
| Rated current | 2 A |
| Maximum speed | 130,000 rpm |
| Battery type | Lithium-ion (Li-ion) |
| Battery voltage | 7.4 V DC |
| Battery capacity | 4000 mAh |
| Dimensions (L x W x H) | 135 x 98 x 35 mm |
| Weight | 0.28 kg |
| Runtime | Approx. 4 hours (at lowest speed) |
| Charging time | Approx. 4 hours |
| Functions | Blowing, vacuuming, inflation |
| Included accessories | Blow nozzle, inflation adapter, dust cup, flat nozzle, vacuum brush |
| Safety | Automatic shutdown in standby (1 min), overheat protection (100 °C) |
| Maintenance | Clean filter and empty cup after each use; clean exterior with compressed air (max 0.3 MPa) |
| Filter | Removable filter, dry washable |
Frequently Asked Questions - YT-82936 Yato
User questions about YT-82936 Yato
0 question about this device. Answer the ones you know or ask your own.
Ask a new question about this device
Download the instructions for your Vacuum Cleaner in PDF format for free! Find your manual YT-82936 - Yato and take your electronic device back in hand. On this page are published all the documents necessary for the use of your device. YT-82936 by Yato.
USER MANUAL YT-82936 Yato

natural_image
Two views of a gray handheld device with a conical tip and a side panel, shown from front and side angles (no text or symbols visible)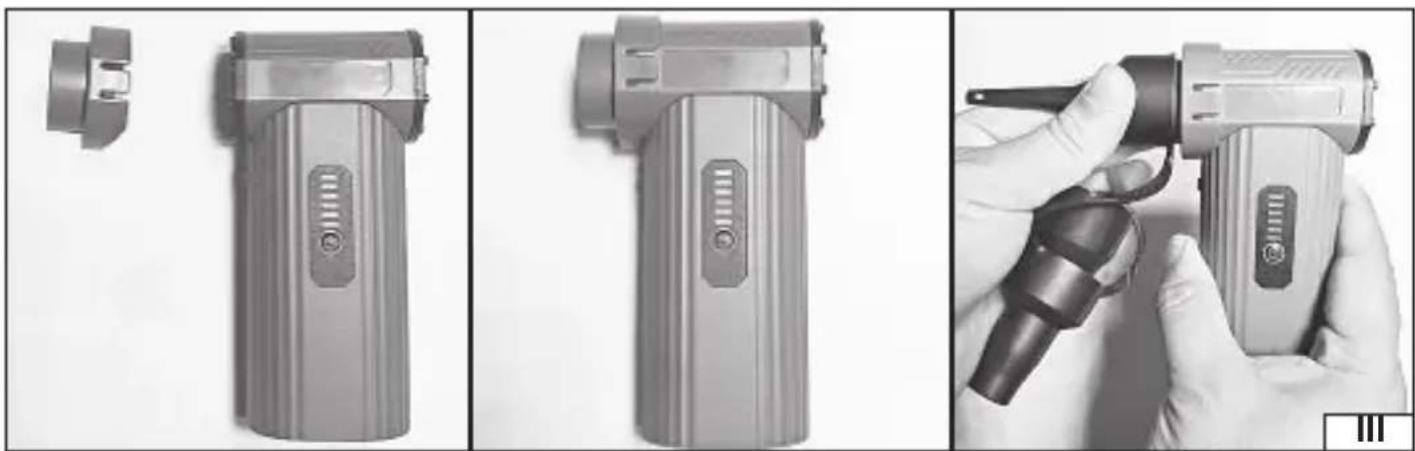
natural_image
Three-panel image showing a handheld device with a separate close-up view, before and after being adjusted for a flashlight (no text or symbols visible)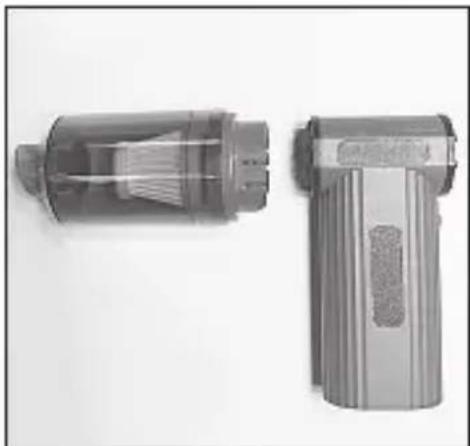
natural_image
Two cylindrical electronic devices with internal blades, shown from different angles (no visible text or symbols)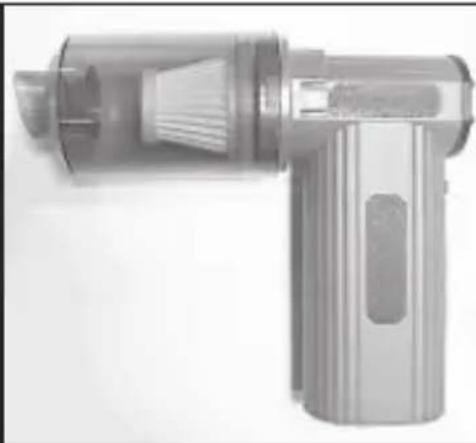
natural_image
Exterior view of a modern office building (no signage)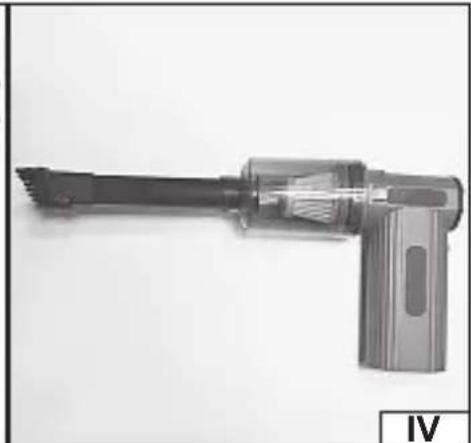
natural_image
Exterior view of a precision soldering iron with a pointed tip and handle (no text or symbols visible)PL
- air intake
- air outlet
- charging socket
- blower nozzle
- pumping nozzle
- nozzle adapter
- dust container
- crevice nozzle
- vacuum cleaner brush
- blowing power indicator
- battery indicator
- flow button
- switch / speed controller
DE
Read the operating instruction
This symbol indicates that waste electrical and electronic equipment (including batteries and storage cells) cannot be disposed of with other types of waste. Waste equipment should be collected and handed over separately to a collection point for recycling and recovery, in order to reduce the amount of waste and the use of natural resources. Uncontrolled release of hazardous components contained in electrical and electronic equipment may pose a risk to human health and have adverse effects for the environment. The household plays an important role in contributing to reuse and recovery, including recycling of waste equipment. For more information about the appropriate recycling methods, contact your local authority or retailer.
WYPOSAŻENIE PRODUKTU
PRODUCT CHARACTERISTICS
The portable turbo blower with accessories is a compact tool designed to generate a powerful airflow, perfect for a variety of technical and home applications. Its battery-powered operation ensures portability and extended runtime, while the included accessories enable precise blowing, vacuuming, and inflating mattresses, for example. Proper, reliable, and safe operation of the tool depends on proper use, therefore:
Before using the tool, read the entire manual and keep it.
The supplier is not liable for any damage resulting from failure to comply with the safety regulations and recommendations of this manual.
PRODUCT EQUIPMENT
The factory packaging should include: blower, accessories, charging cable.
TECHNICAL DATA
| Parameter Unit of measurement Value | ||
| Catalog number YT-82936 | ||
| Nominal voltage [V d.c.] 5 | ||
| Rated current [A] 2 | ||
| Max rotational speed [min | -1] 130,000 | |
| Battery type Li- lon | ||
| Nominal battery voltage [V d.c] 7.4 | ||
| Battery capacity [mAh] 4000 | ||
| Battery energy | [Wh] | 29.6 |
| Dimensions | [mm] | 135x98x35 |
| Mass | [kg] | 0.28 |
| Charging time | [h] ~4 |
SAFETY INSTRUCTIONS
Before use, read this manual thoroughly. Following these instructions will reduce the risk of electric shock, personal injury, fire, and damage to the product or other objects. This product is intended only for technical and household use as described in the manual. Do not use it for purposes other than its intended use, in particular as an artificial respiration device, for spraying substances, or for any other purpose not described in the documentation. Never direct the air flow towards yourself or other people or animals. Do not allow fingers, hair, loose clothing, or any other objects to come close to the inlet and outlet openings during operation. To protect your eyes and respiratory system, it is recommended to wear safety goggles and a dust mask when blowing. Use the blowing function at a distance from sensitive
EN
components to avoid damaging them and dangerously dispersing contaminants. The product must only be used in a dry environment. Do not use in high humidity or in the immediate vicinity of water (e.g., bathrooms, kitchens, bathtubs and sinks), and do not expose to precipitation. Operation with wet hands is prohibited. Do not use near fl ammable liquids, gases, or explosive materials, or in areas at risk of explosion. Do not cover the ventilation openings, even when the product is not in use. To prevent overheating, keep the openings clear and remove debris regularly. Do not leave the product unattended while it is running. If you notice any unusual symptoms, such as a burning smell, smoke, a lack of response when switched on, or noticeable overheating of the housing, discontinue use immediately and contact service. This product is not a toy and should be kept out of the reach of children and animals. Persons with limited physical, sensory, or mental capabilities should only use the product under supervision. Before use, inspect the general condition of the product and accessories and only use undamaged components. The installed filter must be used for the vacuum function. Do not use the vacuum cleaner without a filter or with a damaged filter. The filter should be cleaned and replaced regularly according to the manufacturer's recommendations; using a dirty filter can lead to reduced efficiency, overheating, dust release into the environment, and product damage. Dry operation only is permissible: vacuuming water, wet ash, or other wet waste is prohibited. Do not vacuum hot, glowing, or burning materials; the temperature of the vacuumed debris should not exceed 40°C. Vacuuming fine dust such as flour or plaster, as well as hazardous or explosive dust (e.g., aluminum dust, coal dust) is not recommended. The dust container should be emptied regularly. Do not use alcohol, solvents, or sharp cleaning tools to avoid damaging the surface. Disassembly or modifications are prohibited; repairs should be performed by an authorized service center. Do not
EN
use the device in high-temperature or high-pressure environments. The permissible operating temperature range is -10^ to +40^ .
Battery Charging Safety Instructions
Lithium - ion batteries do not exhibit the so-called „memory effect,” allowing them to be recharged at any time. However, it is recommended to discharge the battery during normal operation and then charge it to full capacity. If, due to the nature of the operation, this treatment is not possible every few or a dozen cycles. Under no circumstances should batteries be discharged by shorting the electrodes, as this causes irreversible damage! Also, do not check the battery’s charge status by shorting the electrodes and checking for sparks.
Battery storage
If possible, it is recommended to disconnect the battery from the product during storage. Proper storage conditions will extend the battery's lifespan. The battery can withstand approximately 500 charge-discharge cycles. The battery should be stored in a temperature range of 0 to 30 degrees Celsius, with a relative humidity of 50% . To store the battery for extended periods, charge it to approximately 70% capacity. For longer storage, periodically charge the battery once a year. Do not over-discharge the battery, as this will shorten its lifespan and may cause irreversible damage. During storage, the battery will gradually discharge due to leakage. The self-discharge process depends on the storage temperature; the higher the temperature, the faster the discharge. Improper storage of batteries may result in electrolyte leakage. In the event of a leak, seal the leak with a neutralizing agent. If the electrolyte comes into contact with eyes, rinse thoroughly with water and seek immediate medical attention. It is forbidden to use a tool with a damaged battery. If the battery is completely worn out, it should be taken to a specialized waste disposal facility.
Battery transportation
Lithium -ion batteries are legally considered hazardous materials. The user of the tool can transport the product with the battery, or the batteries themselves, by road. No additional requirements are required. If transport is outsourced to third parties (e.g., by courier), regulations regarding the transport of hazardous materials must be followed. Before shipping, contact a qualified person. Damaged batteries must not be transported. During transport, removed batteries must be removed from the product and exposed contacts must be protected, e.g., with insulating tape. Secure the batteries in the packaging so that they do not shift within the packaging during transport. National regulations regarding the transport of hazardous materials must also be observed.
Charging the battery
Note: Before using the blower for the first time or after long periods of storage, fully charge it. Also, fully charge the battery before long-term storage. Leaving the battery in a deeply discharged state may prevent it from recharging or cause problems with the device's proper operation.
A full charge takes approximately 4 hours. Once fully charged, the product can be used continuously for approximately 4 hours at the lowest level.
To charge the device, connect the charging cable plug to the charging port on the blower. The other plug should be connected to the USB port on the charger or another device with a standard USB port with the current output specified in the technical data table. During charging, the built-in indicator informs about the charging status – flashing LEDs indicate the process is in progress, and a steady light indicates a full charge. The product should be supervised throughout the charging process. Do not turn on the device while charging. Once charging is complete, the product is ready for use. Immediately disconnect the cable from the USB port and then from the device.
WARNING! Leaving the blower with a fully charged battery connected to the charger may cause irreversible damage to the battery and may also cause a fire or electric shock.
Installation and removal of accessories
NOTE! Before assembling or disassembling accessories, turn off the device and disconnect the charging cable.
Depending on the type of work being performed, the product must be prepared accordingly. The installation method is shown in the following illustrations:
(II) – Blower Nozzle. To prepare the product for blower operation, install the nozzle so that the protrusions on the end of the air outlet are properly seated in the nozzle holes. The blower nozzle is equipped with a magnet that ensures a secure attachment to the air outlet. To remove the nozzle, grasp it and disconnect it from the air outlet.
(III) – Inflation Nozzle. To prepare the product for inflation, slide the nozzle adapter onto the blower's air outlet until its latches engage.
Then, slide one of the inflation nozzles onto the adapter's tip. Verify that the components are properly installed and will not shift during operation. To disassemble, release the adapter's latches and slide it out of the blower's outlet.
(IV) – Dust Bin. Remove any accessories attached to the blower outlet. To prepare the product for vacuuming, slide the dust bin
EN
onto the air inlet until its latches engage. Then, insert the crevice tool into the opening at the front of the dust bin. If necessary, attach the vacuum cleaner brush to the end of the crevice tool. When vacuuming, no accessories should be attached to the blower outlet. To remove the bin, gently release the latches and slide the bin out of the blower inlet.
Inside the dust container, there's a filter that prevents dirt from entering the blower. After each use, the container should be emptied and the filter cleaned. To do this, remove the crevice nozzle, hold the dust container mount, and then turn the container counterclockwise as far as it will go. Grasp the filter by the inner edge and slide it out of the container. After emptying the container and cleaning the filter, reinsert the filter so that its flange rests inside the container all the way around. The filter flange must be flush with the container walls all the way around and remain parallel to the edge; otherwise, proper sealing of the filter system will not be ensured. Install the container with the filter by inserting the mounting tabs into the corresponding recesses in the container. After aligning the edges all the way around, hold the mounting and turn the container clockwise as far as it will go. A properly assembled dust container will fit evenly against the mounting all the way around.
Getting ready for work – vacuuming function
Check the dust container and empty it if necessary. If dirty, dry clean the dust container filter using a compressed air jet at a pressure of no more than 0.3 MPa. If dirt cannot be removed from the filter, replace it with a new one. Check the condition of the filter seals; if damaged, replace the filter with a new one.
WARNING! Do not use the dust container without a properly installed air filter. This may result in damage to the blower and electric shock.
WARNING! The vacuum function is designed for dry use only. Do not vacuum water or any other liquids, or hot ash or debris exceeding 40^ C. This may damage the blower and cause electric shock.
Blower operation
Warning! The lower part of the blower may become hot during prolonged use. Do not touch it, as this may cause burns. This product has a powerful blowing force – before starting work, remove any valuables or sharp objects from the area to avoid damage or injury.
Make sure all preparations have been completed and the battery is fully charged.
To turn on the blower, hold down the power/speed control for approximately 2 seconds. Once turned on, the device enters standby mode and the LED indicators change from flashing to solid.
By briefly pressing the on/off button, you can select the desired blower speed. The current blower speed setting is indicated by the blower speed indicator: the first level is indicated by one LED, the second level by two LEDs, and the third level by three LEDs.
Once you've selected a speed, press the flow button to start the blower. At the first and second speeds, a short press activates the blower, while another short press stops it. At the third speed, for safety reasons, hold the flow button to keep the blower running – releasing the button stops it immediately.
The battery status is indicated by the battery indicator located above the blower speed indicator. Three lit LEDs indicate a full charge (100%), two LEDs indicate a medium charge (approximately 60%), and one LED indicates a low charge (approximately 30%). Flashing all three LEDs indicates a very low battery and the need to recharge.
After finishing work, hold down the on/speed control to turn off the device, wait for the product to cool down and then proceed with maintenance.
Protective functions
The blower has an auto-shutoff function – if left in standby mode for 1 minute, it will automatically turn off. The device is also protected against overheating. If the temperature exceeds 100^ C, the blower will automatically stop for 1 second to protect internal components.
Note! If vibrations, a drop in suction power, or increased engine noise occur during operation, this may indicate that the dust container is full or the suction nozzle is clogged. Immediately turn off the blower, empty the container, and check the air inlet and suction nozzle for obstructions. If necessary, unclog or replace the nozzle.
If there is a lack of air flow, frequent stops, smoke, excessive heat or other unusual symptoms, stop working and do not use the device as this may result in injury or fire.
Maintenance and storage
NOTE! Before performing any maintenance, turn off the device and disconnect the charging cable.
After each use of the product for vacuuming, check the dust container and air filter as described in the section: „Preparing for operation - vacuuming function”.
Clean the outside of the blower with a jet of compressed air at a pressure of no more than 0.3 MPa. Pay particular attention to the airflow openings, both inlet and outlet, being clear. Check the vacuum cleaner nozzles for obstructions. If necessary, clean with a jet of compressed air at a pressure of no more than 0.3 MPa. Do not use sharp metal objects to clean the airflow openings or accessories. Do not immerse the blower in water to clean it. Remove any larger dirt from the housing with a soft cloth.
Store the product in its original packaging, in a closed, dry place and protected from unauthorized access, especially children.