Duo View - Baby monitors Chipolino - Free user manual and instructions
Find the device manual for free Duo View Chipolino in PDF.

| Product type | Digital video baby monitor |
| Brand | Chipolino |
| Model | Duo View |
| Operating frequency | 2.4 GHz |
| Maximum range (open space) | 300 m |
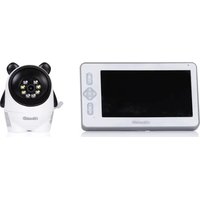
| Monitor screen | LCD FULL HD 5 inches |
| Camera resolution | 3.0 megapixels |
| Night vision | Up to 5 meters |
| Camera rotation (Pan/Tilt) | 330° horizontal / 110° vertical |
| Power supply | 2 power adapters (included) + Li-Pol battery 5000 mAh |
| Battery life | Not specified (fully charge before first use) |
| Mobile app | TuyaSmart (iOS/Android) |
| Wi-Fi connectivity | 2.4 GHz (5 GHz not supported) |
| VOX function | Yes, automatic activation upon sound detection |
| Two-way communication | Yes |
| Built-in lullabies | 6 melodies |
| Temperature alarm | Yes, adjustable high/low |
| Digital zoom | Yes, 4 levels |
| Recording | Screenshots and videos (on phone or memory card) |
| Motion/cry detection | Yes via the app |
| Privacy mode | Yes |
| Protection rating | Indoor use only, not waterproof |
| Maintenance | Clean with a dry cloth after disconnecting |
| Safety | Adult use only, keep out of reach of children, do not place in the crib |
| Spare parts | Contact the retailer or authorized service; use only the provided adapters |
Frequently Asked Questions - Duo View Chipolino
User questions about Duo View Chipolino
0 question about this device. Answer the ones you know or ask your own.
Ask a new question about this device
Download the instructions for your Baby monitors in PDF format for free! Find your manual Duo View - Chipolino and take your electronic device back in hand. On this page are published all the documents necessary for the use of your device. Duo View by Chipolino.
USER MANUAL Duo View Chipolino
natural_image
Two grayscale images: one showing a sleeping baby on a screen, the other a camera with a lens (no text or symbols visible)продуктов номер/ item number/ cikkszám/ número de artículo/ codice articolo/artikelnummer/ numéro d'article/ broj proizvoda/ број производа/ продуктов број/ numri i produktit/ αριθμός προϊόντος/ numărul produsului/ número de produto/productnummer/ číslo produktu/ ʒιπερεγρύξησί θδιθήση:
VIBEFDV02501WH/ JLT- D503Dual mode
ФИГУРИ/ FIGURES/ ÁBRÁK/ CIFRAS/ FIGURE/ FIGUREN/ LES FIGURES/ ОБЛИЦИ/ ОБЛИЦИ/ FORMA/ FIGURE/ ФІГОΥΡΕΣ/ FIGURILE/ FIGURAS/ FIGUREN/ OBRÁZKY / ๑๒๐๓๕๖๖
1

natural_image
Newborn baby lying on a white surface, viewed through a digital display (no text or symbols visible)① x1 x1
natural_image
White remote camera with a circular lens and attached cable (no text or symbols visible)2

natural_image
Line drawing of a rectangular electronic component with two pins inserted (no text or symbols)3452 x2 x1
natural_image
Pure diagram of a USB cable with connector ends, no text or symbols present○

natural_image
Simple line drawing of a coiled spring or rope (no text or symbols)O
2
natural_image
White spherical device with a circular lens and a small protrusion, shown against a plain background (no text or symbols visible)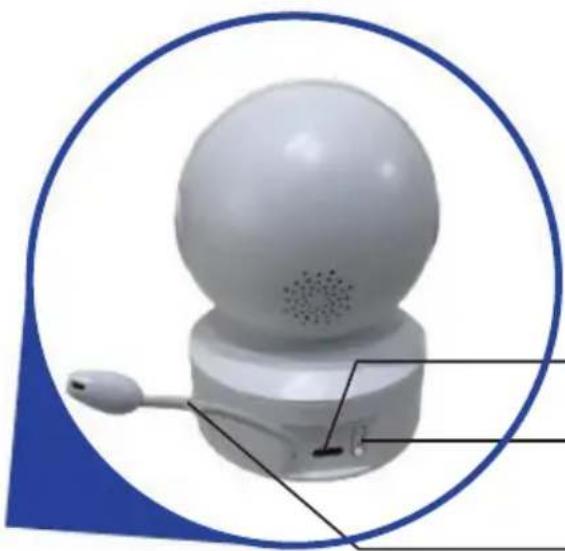
natural_image
3D rendering of a white spherical device with a sensor and antenna, enclosed in a blue circular border (no text or symbols)ФИГУРИ/ FIGURES/ ÁBRÁK/ CIFRAS/ FIGURE/ FIGUREN/ LES FIGURES/ ОБЛИЦИ/ ОБЛИЦИ/ FORMA/ FIGURE/ ФІГОΥΡΕΣ/ FIGURILE/ FIGURAS/ FIGUREN/ OBRÁZKY / ๑๒๐๓๕๖๖๖
3

4

5.1

ФИГУРИ/ FIGURES/ ÁBRÁK/ CIFRAS/ FIGURE/ FIGUREN/ LES FIGURES/ ОБЛИЦИ/ ОБЛИЦИ/ FORMA/ FIGURE/ ФІГОΥΡΕΣ/ FIGURILE/ FIGURAS/ FIGUREN/ OBRÁZKY / ๑๒๐๓๕๖๖
5.2
6.1

flowchart
graph TD
    A["Tuya Smart"] --> B["Add Device"]
    B --> C["Add Device"]
    C --> D["Security monitoring - Intelligent cameras"]
    D --> E["QR code network distribution in the"]
    E --> F["Reset the device Choose QR code network configuration"]
    F --> G["Select and tick here"]
ФИГУРИ/ FIGURES/ ÁBRÁK/ CIFRAS/ FIGURE/ FIGUREN/ LES FIGURES/ ОБЛИЦИ/ ОБЛИЦИ/ FORMA/ FIGURE/ ФІГОΥΡΕΣ/ FIGURILE/ FIGURAS/ FIGUREN/ OBRÁZKY / ๑๒๐๓๕๖๖
6.2
flowchart
graph LR
    A["Select 2.4 GHz Wi-Fi Network and enter password.<br>If your Wi-Fi is 5GHz, please set it to be 2.4GHz Common router setting method"] --> B["1. Select Wi-Fi 2.4GHz<br>✓ Wi-Fi: 2.4GHz"]
    B --> C["JLT02<br>Password<br>✓"]
    C --> D["2. The name of this Wi-Fi router<br>It is the name of the WiFi connected to the camera, enter the Wi-Fi password<br>Select Next Action"]
    D --> E["File in SSIO and PASSWORD"]
    E --> F["The generated QR code"]
    F --> G["Adding devices"]
    G --> H["Add Device"]
    H --> I["1 device(s) added successfully<br>Security Camera<br>added successfully"]
    I --> J["Done"]
7.1
ФИГУРИ/ FIGURES/ ÁBRÁK/ CIFRAS/ FIGURE/ FIGUREN/ LES FIGURES/ ОБЛИЦИ/ ОБЛИЦИ/ FORMA/ FIGURE/ ФІГОΥΡΕΣ/ FIGURILE/ FIGURAS/ FIGUREN/ OBRÁZKY / ๑๒๐๓๕๖๖
7.2
8
ФИГУРИ/ FIGURES/ ÁBRÁK/ CIFRAS/ FIGURE/ FIGUREN/ LES FIGURES/ ОБЛИЦИ/ ОБЛИЦИ/ FORMA/ FIGURE/ ФІГОΥΡΕΣ/ FIGURILE/ FIGURAS/ FIGUREN/ OBRÁZKY / ๑๒๐๓๕๖๖
9
a

b
natural_image
3D model of a white spherical device with speaker and ports, labeled with number 1 pointing to the speaker (no text or symbols on the device itself)10a
10b
ФИГУРИ/ FIGURES/ ÁBRÁK/ CIFRAS/ FIGURE/ FIGUREN/ LES FIGURES/ ОБЛИЦИ/ ОБЛИЦИ/ FORMA/ FIGURE/ ФІГОΥΡΕΣ/ FIGURILE/ FIGURAS/ FIGUREN/ OBRÁZKY / ๑๒๐๓๕๖๖
11
12
ФИГУРИ/ FIGURES/ ÁBRÁK/ CIFRAS/ FIGURE/ FIGUREN/ LES FIGURES/ ОБЛИЦИ/ ОБЛИЦИ/ FORMA/ FIGURE/ ФІГОΥΡΕΣ/ FIGURILE/ FIGURAS/ FIGUREN/ OBRÁZKY / ๑๒๐๓๕๖๖
13
14
ФИГУРИ/ FIGURES/ ÁBRÁK/ CIFRAS/ FIGURE/ FIGUREN/ LES FIGURES/ ОБЛИЦИ/ ОБЛИЦИ/ FORMA/ FIGURE/ ФІГОΥΡΕΣ/ FIGURILE/ FIGURAS/ FIGUREN/ OBRÁZKY / ๑๒๐๓๕๖๖
15

flowchart
graph TD
    A["Register\nUnited States of America +1\nMobile number/e-mail address\nObtain verification code"] --> B["Enter verification code"]
    B --> C["Device with R-3/8 device and a warning label at bottom"]
ФИГУРИ/ FIGURES/ ÁBRÁK/ CIFRAS/ FIGURE/ FIGUREN/ LES FIGURES/ ОБЛИЦИ/ ОБЛИЦИ/ FORMA/ FIGURE/ ФІГОΥΡΕΣ/ FIGURILE/ FIGURAS/ FIGUREN/ OBRÁZKY / ๑๒๐๓๕๖๖
4.3
4.4
ФИГУРИ/ FIGURES/ ÁBRÁK/ CIFRAS/ FIGURE/ FIGUREN/ LES FIGURES/ ОБЛИЦИ/ ОБЛИЦИ/ FORMA/ FIGURE/ ФІГОΥΡΕΣ/ FIGURILE/ FIGURAS/ FIGUREN/ OBRÁZKY / ๑๒๐๓๕๖๖๖
ВНИМАНИЕ! ПРЕДУПРЕЖДЕНИЯ!
ТОЗИ ПРОДУКТ Е ПРЕДНАЗНАЧЕН ДА ВИ ПОМАГА И НЕ МОЖЕ ДА БЪДЕ ЗАМЕСТИТЕЛ НА ИСТИНСКИ И ОТГОВОРЕН НАДЗОР ОТ ВЪЗРАСТЕН!
TO ASSURE SAFE USAGE OF THIS PRODUCT FOLLOW ALL WARNINGS, INSTRUCTIONS AND RECOMMENDATIONS GIVEN IN THIS USER MANUAL!
WARNING! SAFETY INSTRUCTIONS!
THIS PRODUCT IS INTENDED TO ASSIST YOU AND CANNOT REPLACE PROPER AND RESPONSIBLE ADULT SUPERVISION!
USE THE PRODUCT ONLY AS INTENDED!
✿ WARNING! THIS PRODUCT MUST BE USED ONLY BY ADULTS!
WARNING! THIS DEVICE IS NOT A TOY AND MUST BE KEPT OUT OF CHILDREN'S REACH! Do not allow children to play with the camera!
✿ WARNING! NEVER PLACE THE CAMERA INSIDE THE CRIB OR CHILD'S BED!
WARNING! ALWAYS KEEP THE ADAPTERS, PARENT AND BABY UNITS (MONITOR AND CAMERA) OUT OF REACH OF CHILDREN TO AVOID INJURY OR SUFFOCATION!
✿ WARNING! NEVER USE THE BABY MONITOR IN HUMID ENVIRONMENTS, NEAR WATER, OR IMMERSED IN WATER!
✿ WARNING! USE THE CAMERA IN INDOOR ENVIRONMENTS ONLY! The camera is not waterproof and not suitable for outdoor use!
✿ WARNING! ALWAYS CHECK THE CONDITION OF ALL PARTS BEFORE USE. Do not use the product if any parts are missing or damaged!
✿ WARNING! KEEP AWAY FROM FIRE! To avoid overheating, keep the camera and adapters away from heat sources or appliances that emit heat.
✿ WARNING! DO NOT PLACE ADAPTERS WHERE A CHILD COULD STEP ON THEM. Impact to a plugged-in adapter can cause it to break and poses risk of serious injury!
Use only the adapters provided by the manufacturer.
✿ Mount the camera securely on load-resistant surfaces. Do not mount the camera above a crib or near water.
Do not cover or block the camera's ventilation openings.
If using a cordless phone, wireless video device, Wi-Fi network, microwave, or Bluetooth devices operating at 2.4 GHz, and interference occurs in the transmitter or receiver, move the baby unit (camera) further away until the interference disappears.
Do not use spare parts or components not provided by the manufacturer! The manufacturer is not responsible for safety if non-original or unapproved parts are used.
Do not make changes or modifications to the product! Do not alter the product's electrical system or add electrical components! If needed, contact the seller or authorized service center for support.
Before plugging in the adapters, check that the voltage listed on them matches your local mains voltage. Otherwise, the product may be damaged!
Do not use damaged adapters.
Do not remove the labels or warnings placed on the product! They are important for safe use.
Do not expose the camera to high temperatures, direct sunlight, or moisture.
When using a memory card: switch off the camera before inserting/removing the card.
- Keep plastic packaging away from children to avoid the risk of suffocation.
SAFETY WARNINGS FOR LITHIUM-POLYMER BATTERIES
The adapter must be connected ONLY by an adult!
Do not bend, puncture (especially with metal objects), or otherwise damage the battery.
◆ Charge the battery only using the adapters provided by the manufacturer!
Do not allow short-circuiting!
◆ Store at room temperature.
Do not expose to direct sunlight!
✿ Never leave a charging battery unattended!
TIP: Fully charge the battery before first use to preserve its condition and extend its lifespan.
IMPORTANT! To replace the battery, please contact the retailer or an authorized service center!
WARNING! Upon the end of this product's life cycle, do not dispose of it with regular household waste. Instead, take it to an official collection point for recycling. Waste generated from damaged electronic and video devices, batteries, and adapters must be collected separately.
Do not dispose of them in containers for mixed household waste! Dispose of them only at designated collection points. This will be your significant contribution to protecting the environment and reducing the potential harmful effects of substances contained in batteries and adapters on the environment and human health.
PRODUCT SPECIFICATION
◆ Digital video baby monitor operating at 2.4 GHz frequency
◆ Transmission power: 17 dBm
✿ Range (unobstructed): up to 300 m in open space
Power adapters: 2 units
◆ Li-Pol battery: 5000 mAh
◆ 5" FULL HD video display
◆ Camera: 3.0-megapixel sensor
◆ Night vision range: up to 5 meters
◆ Temperature sensor
✿ VOX function (automatic activation of the baby unit upon sound detection)
✿ Pan & Tilt camera control: 330° horizontal / 110° vertical
◆ Alarm function
Music player
◆ Recording capabilities
◆ Two-way communication
8 LED lights
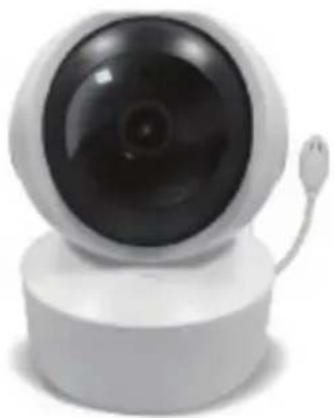
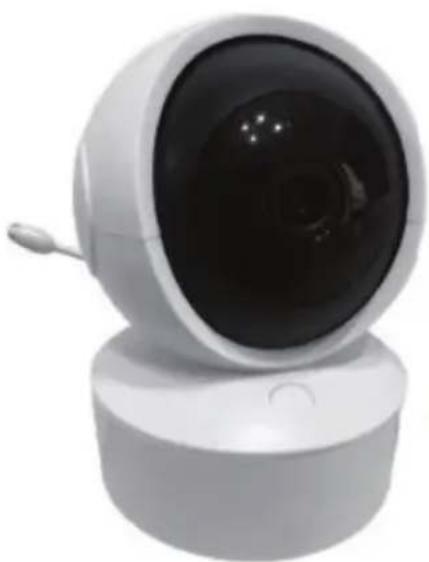
1. MAIN COMPONENTS
The package includes:
- Monitor (1 pc)
-
Camera (1 pc)
-
Power plug adapters (2 pcs)
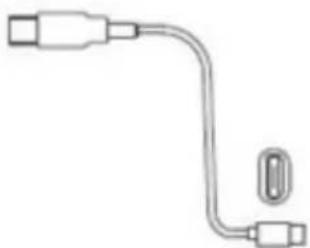
- USB cable (2 pcs)
- Silicone camera holder (1 pc)
Note: Please ensure all components are present.
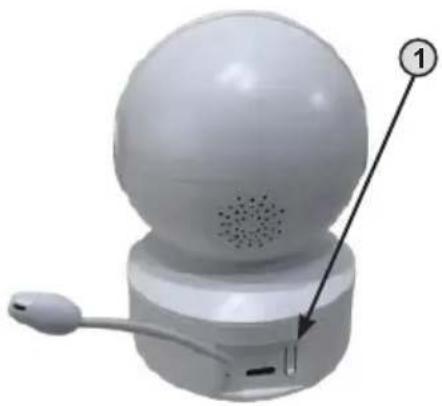
2. CAMERA BUTTONS AND INTERFACE
- USB charging port
- Pairing button (short press to pair the camera and monitor / Long press is to reset the wifi linking of the camera)
- The temperature sensor
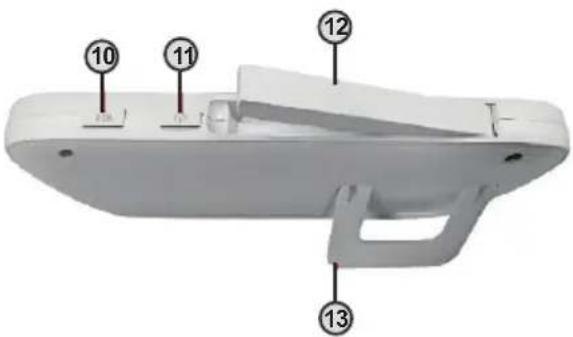
3. MONITOR BUTTONS AND INTERFACE
- Enter Home/menu button / a return button (when in the menu mode)
- Two-way communication button: Press and start speaking
- Left button
- Up button
- OK button
- Right button
- Down button
- Volume up button
- Volume down button
- VOX button
EN
- Power on/off button
- External antenna
- Monitor stand
4. SETUP FOR USE VIA MOBILE APPLICATION
To use the mobile application, follow the steps below:
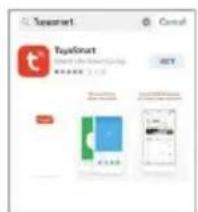
4.1. Download the TuyaSmart app from the App Store or Google Play.
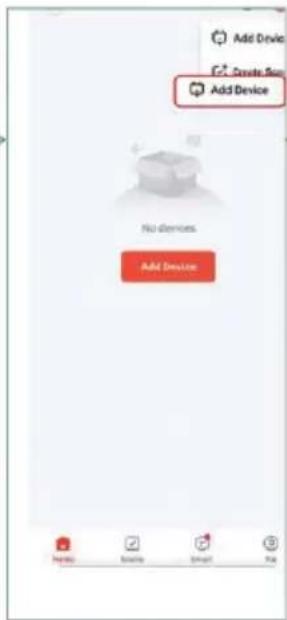
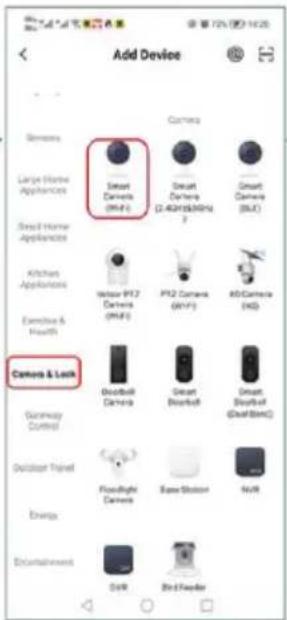
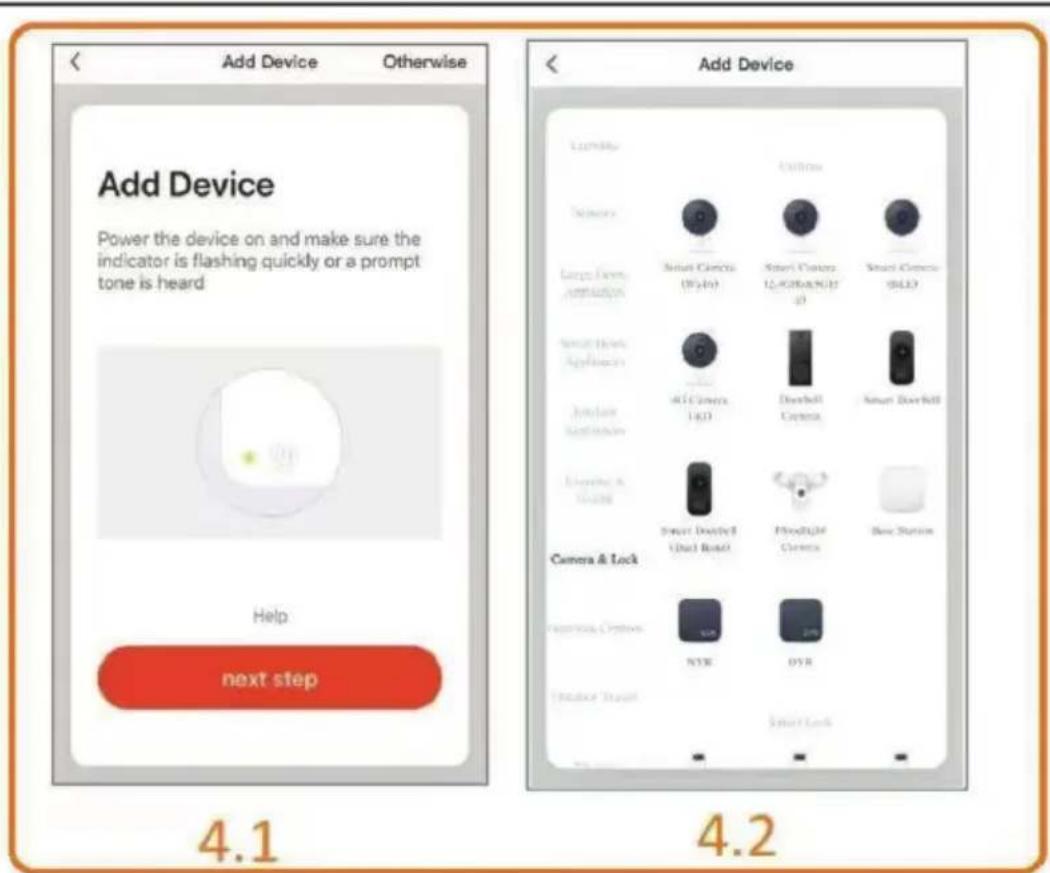
4.2. Add a device:
- Open the app and tap the "Add Device" button in the top right corner.
- Select the category "Cameras & Lock" > "Smart Camera (Wi-Fi)".
- Reset the camera by pressing and holding button 2 (reset) for a few seconds. The LED indicator will start flashing rapidly.
5. CONNECTING THE CAMERA VIA WI-FI
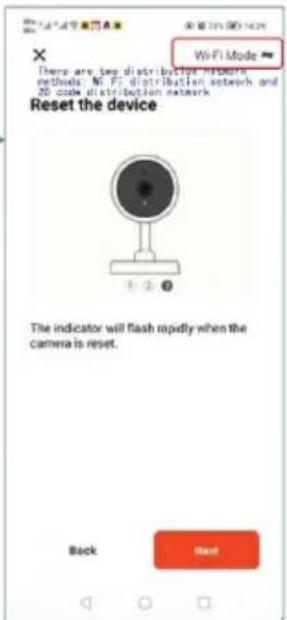
Press the "Next" button to proceed to the next step – selecting a Wi-Fi mode or scanning a QR code (in the top right corner of the screen).
Wi-Fi mode selection: On the "Wi-Fi Mode" screen, select the Wi-Fi Mode option from the dropdown menu.
-
Press the reset button – the LED indicator will start flashing rapidly (configuration mode).
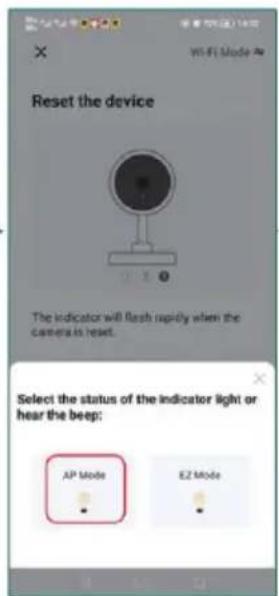
– Choose the appropriate mode: -
AP Mode – (Access Point mode is suitable for unstable routers to maintain a more stable connection)
- EZ Mode – (Quick setup mode is suitable when the router supports automatic configuration, the device is close to the router, or the network environment has minimal interference).
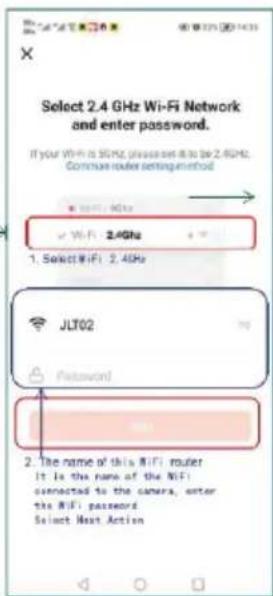
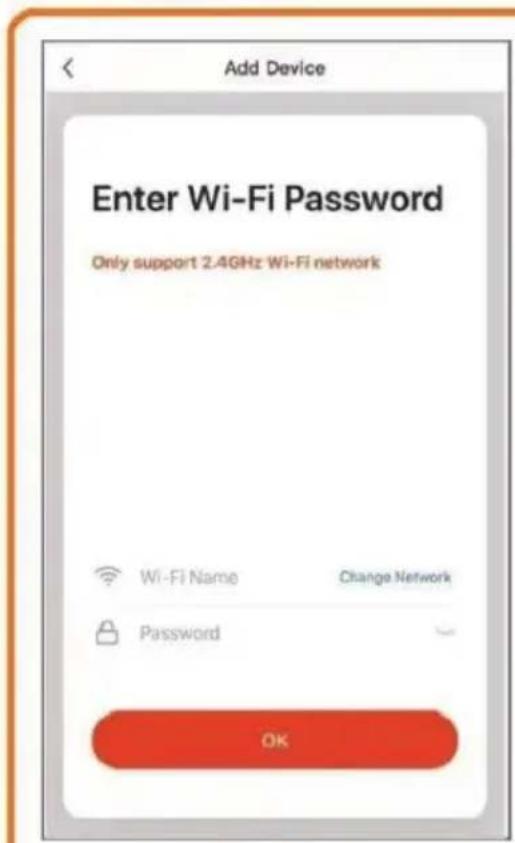
5.1. Connecting to a Wi-Fi network
- Select a 2.4 GHz Wi-Fi network (5 GHz is not supported)
- Enter the password for the selected network
- Press the "Next" button to continue.
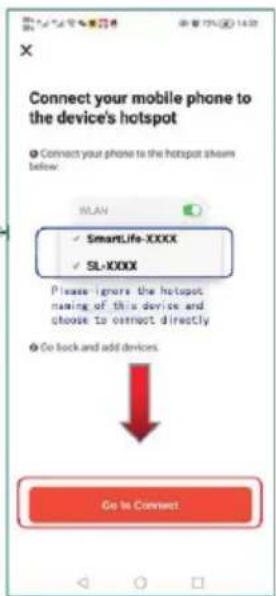
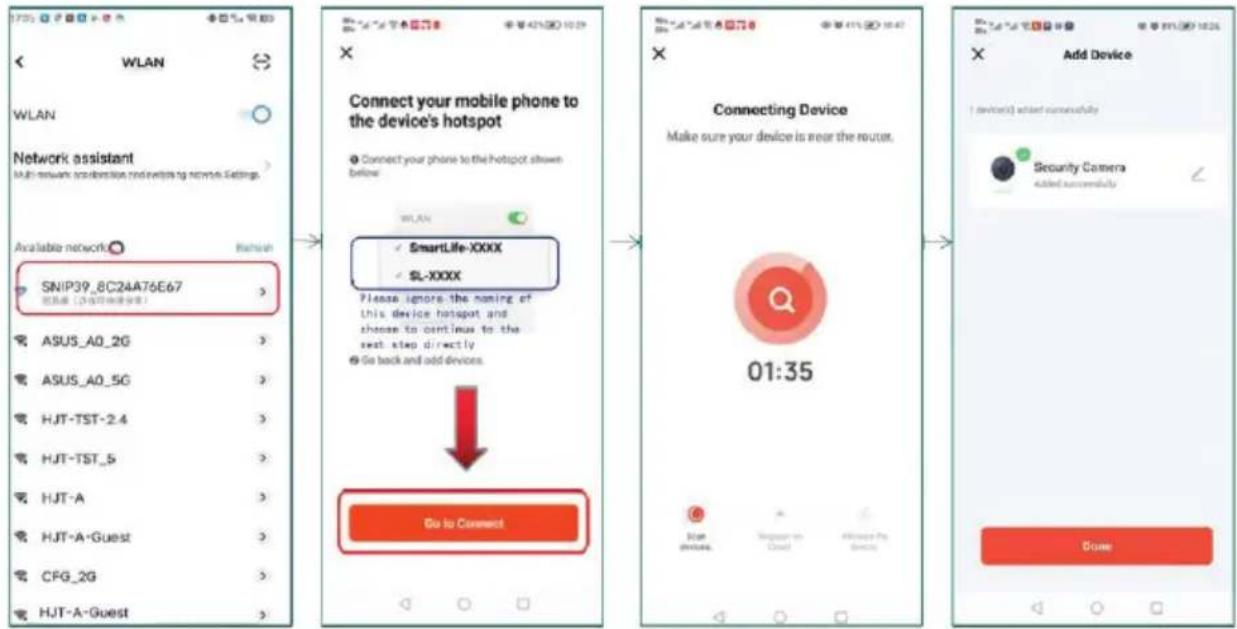
5.2. Connecting to the device's Wi-Fi access point:
- Open the Wi-Fi settings on your mobile phone
- Select one of the networks broadcasted by the device:
Note: The access point name may vary.
- Tap "Go to Connect" to start the device-adding process
- Open your phone's Wi-Fi settings and select a network named SNIP39_8C2A47E6E7.
Note: The network name may differ, but it will always start with SNIP, SL, or SmartLife — this is the network broadcasted by the camera itself.
- Once connected, return to the Tuya Smart app and tap "Go to Connect" to continue
- The app will begin searching and connecting to the device automatically. Please wait until the scanning and registration is complete (this may take up to 2 minutes).
Note: Make sure the device is close to the router.
– A message will appear on the screen: "Security Camera — Added successfully"
- Tap "Done" to complete the configuration.
5.3. Unsuccessful Wi-Fi Connection
A steady light on the camera indicates that it is connected to the network. A slowly blinking indicator means there is no network connection. If the screen displays SNIP39_XXXX, this means the device is in configuration mode.
When using the device for the first time, wait until the LED indicator starts blinking slowly before proceeding to the next step.
The pairing button (1) is used to pair the camera with the monitor – press and hold the button for about 3 seconds to restart the device and return it to configuration mode.
Note: All button operations should be performed only after the device has fully started up.
- If the network configuration fails – wait for the app to show the configuration interface → press and hold the pairing button (1). After approximately 50 seconds, the device will automatically return to configuration mode.
- When changing the router (Wi-Fi network), the device must be reset – wait for it to start (about 20 seconds) → press and hold the pairing button (1) for 3 seconds → the device will return to network distribution mode and can be added again via the app.
6. CONNECTING THE CAMERA VIA QR CODE
When the camera is not connected to a Wi-Fi network, it automatically enters hotspot (access point) pairing mode by default.
6.1. Resetting the Device
Press and hold the pairing (Reset) button for approximately 3 seconds. The LED indicator will begin to blink slowly, and the device will switch to QR code mode. → Open the Tuya Smart application→ Tap "Add Device" → Select: Security & Video Surveillance > Smart Camera (Wi-Fi) → In the top right corner, change the pairing mode from "Wi-Fi Mode" to "QR Code".
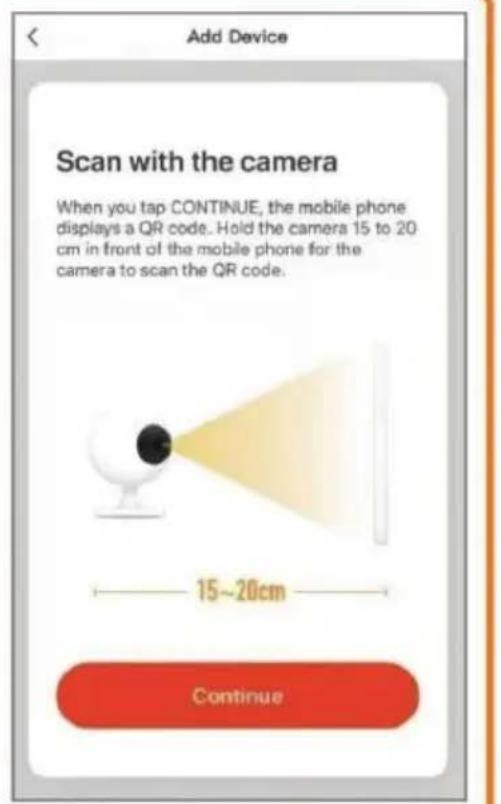
- Confirmation and continuation - Confirm that QR Code mode is active. Tap "Next" to proceed to the screen that will generate a QR code for the camera to scan.
Note: The QR code will appear on your phone screen and should be pointed toward the camera lens to be scanned. This allows the camera to automatically receive your Wi-Fi credentials.
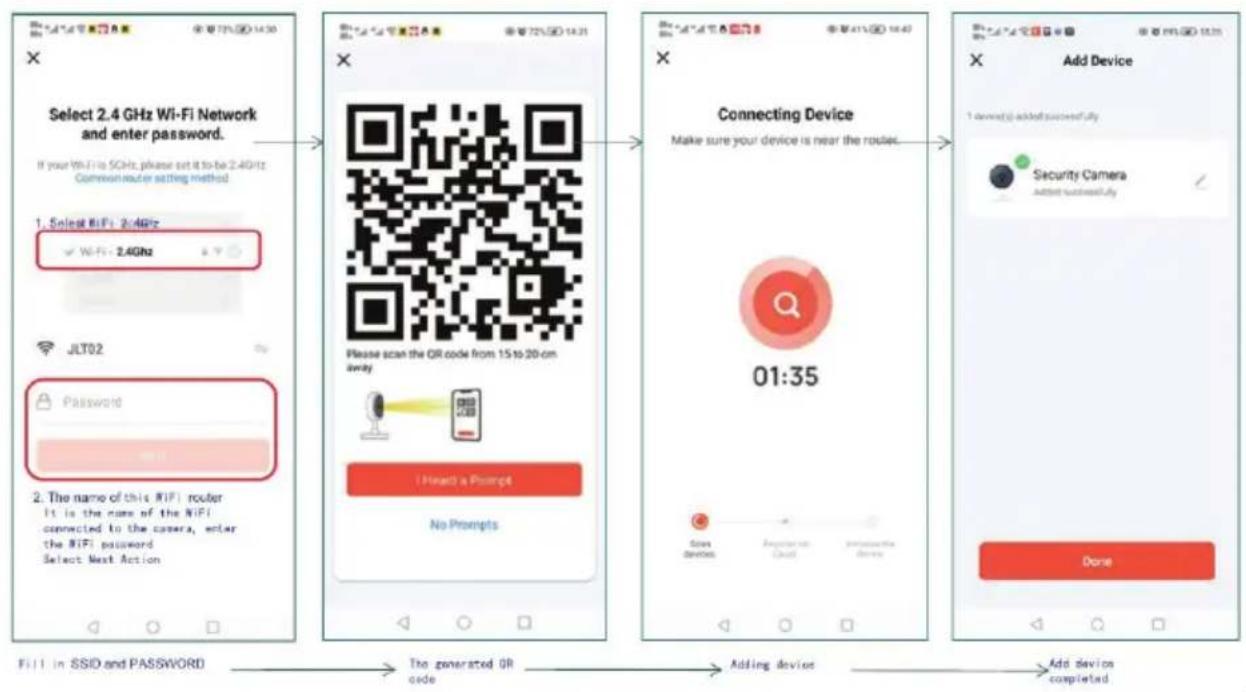
6.2. Selecting a Wi-Fi Network
- Choose a 2.4 GHz Wi-Fi network from the list Enter the network password Tap "Next" to continue.
Note: The camera does not support 5 GHz networks. Make sure you are connected to a 2.4 GHz network.
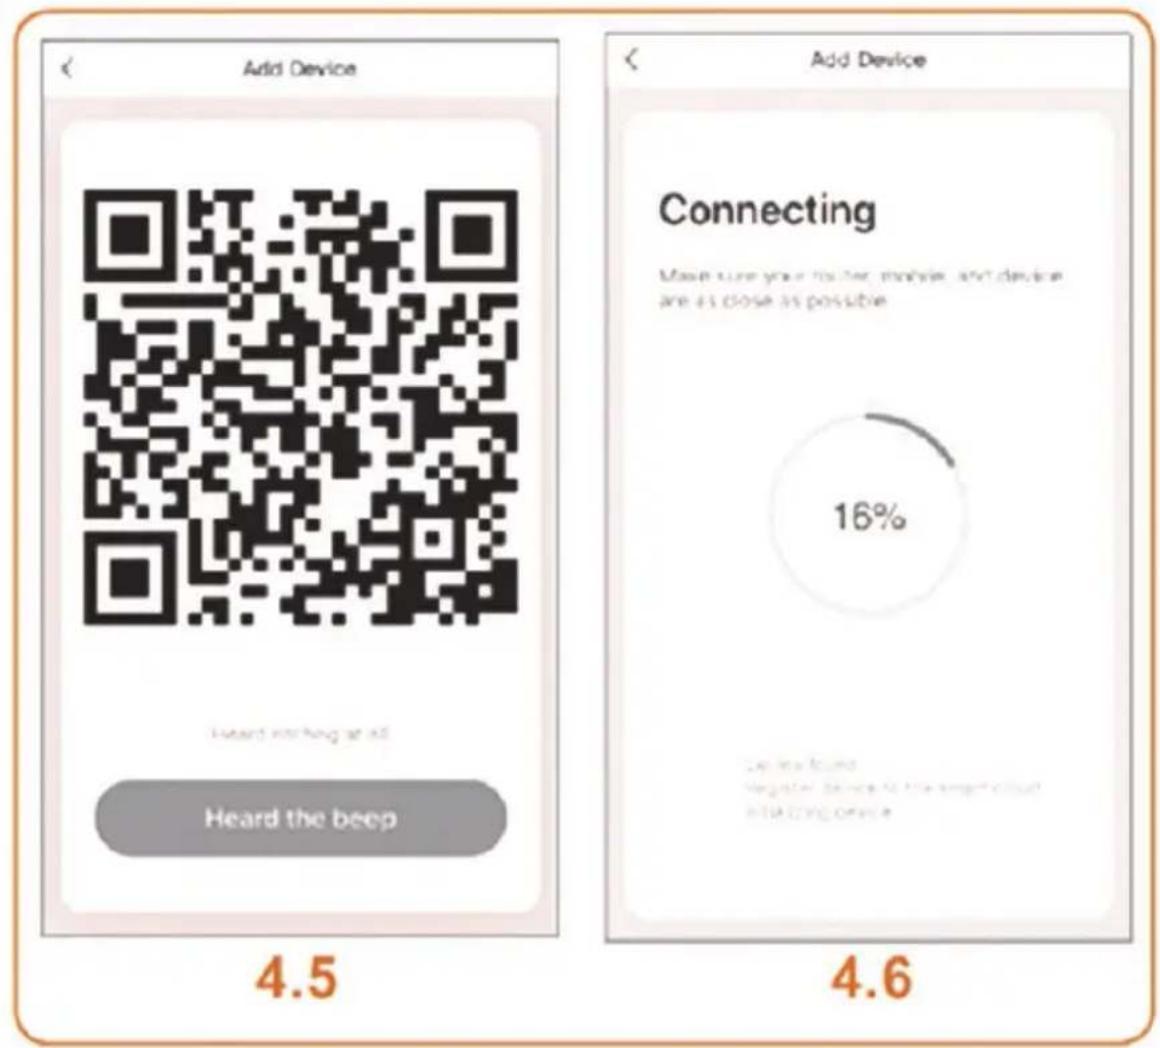
- Generating the QR Code - After entering the Wi-Fi credentials, the app will generate a unique QR code. Hold the QR code in front of the camera lens at a distance of 15–20 cm Once the camera emits a beep sound, tap "I Heard a Prompt".
- Connecting and Adding the Device – The app will begin the connection and initialization process. → Wait until the message “Security Camera – Added Successfully” appears → Tap “Done” to complete the configuration. The device has now been successfully configured via QR code and added to the application. It is ready for use.
7. CAMERA FUNCTIONS VIA THE MOBILE APPLICATION
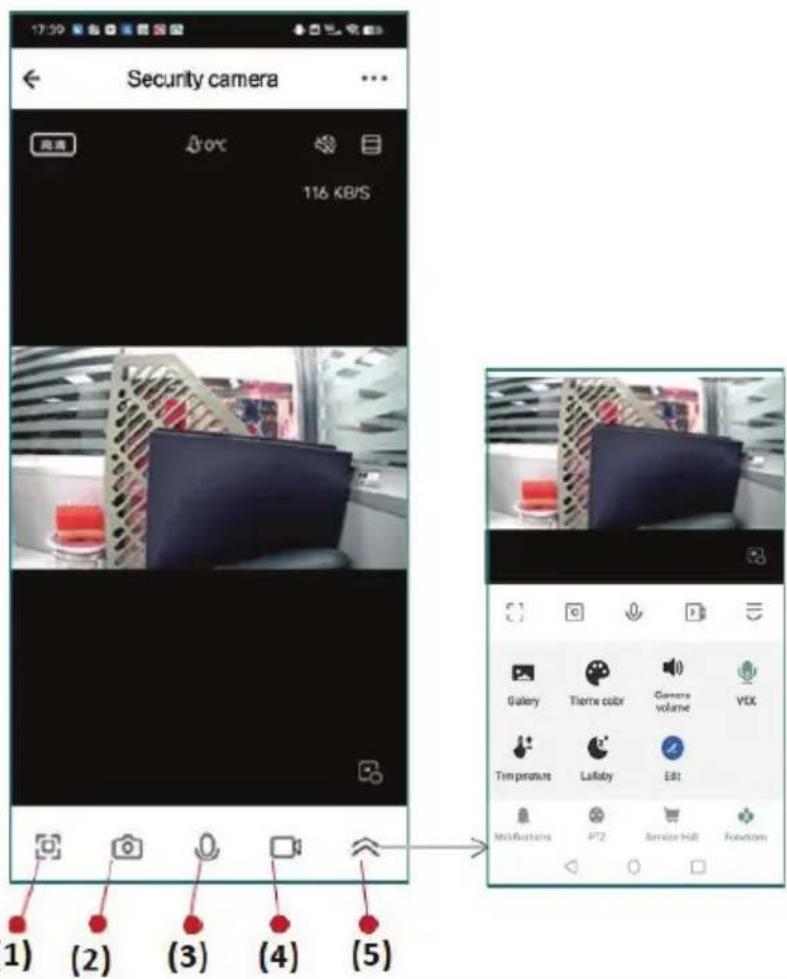
7.1. Main Interface Buttons:
(1) Full Screen – Expands the video feed to full screen for better monitoring.
(2) Snapshot – Captures a still image of the current frame and saves it directly to the phone.
(3) Two-Way Communication – Allows you to speak through the camera.
(4) Video Recording – Records the current video stream to the phone.
(5) Additional Functions (accessible via the dropdown menu):
Gallery – Displays a gallery of captured photos and videos.
Theme Color – Allows customization of the interface color scheme.
Camera Volume - Adjusts the volume level of the camera.
VOX – Automatically activates the baby unit when sound is detected.
Temperature – Displays the temperature reading.
Lullaby – Plays lullabies.
Edit – Allows editing or customization of settings.
Note: Captured images and videos are stored in the phone's local memory unless a cloud service is also connected.
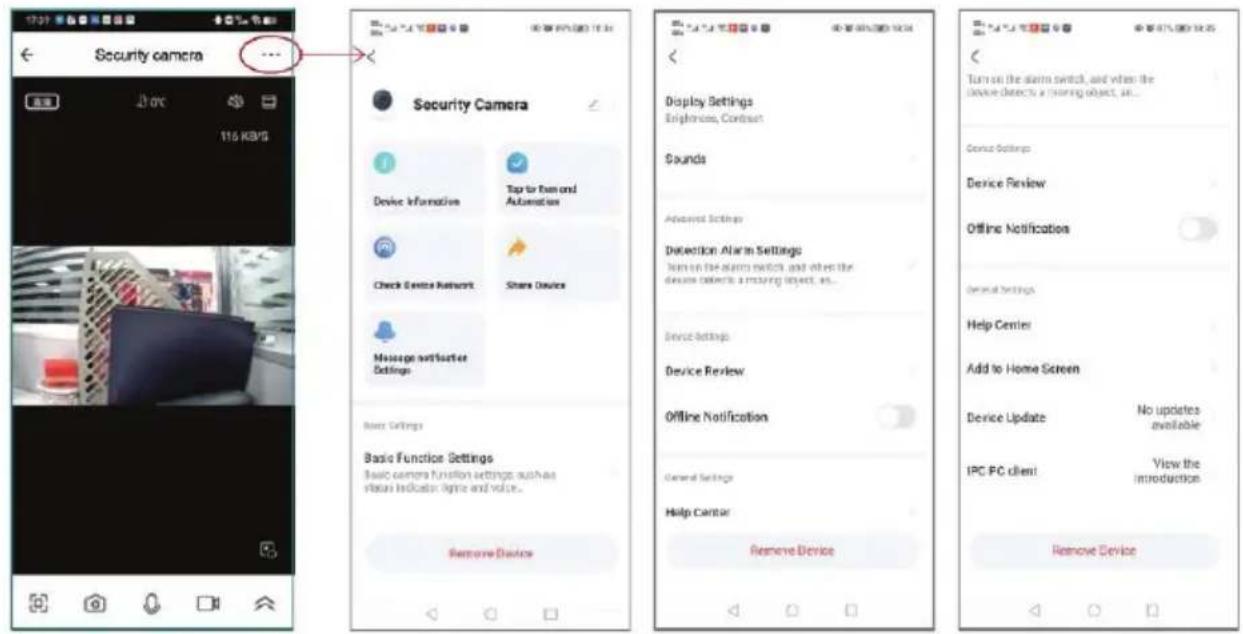
7.2. Advanced Camera Settings via the Mobile Application:
Accessing the settings menu: Open the camera in the app → Tap the three-dot menu in the upper-right corner of the screen → A settings interface will open with various configuration and control options.
Privacy Mode – Enables privacy protection mode.
Night Vision Mode – Enables or disables night vision.
Device Sound Adjustment – Adjusts the camera's audio output.
Detection Alarm Settings – Configures alarms for motion, crying, or other sounds.
Shared Device – Allows sharing the camera with other users (they can view it simultaneously).
Save Setting – Saves the current configuration.
Video Recording Settings – Allows customization of video recording behavior.
Offline Reminder – Sends a notification when the device loses connection.
Screen Flipping – Rotates the video display horizontally or vertically.
EN
Device Information – Shows technical details about the device.
Check Device Network – Verifies network connection status.
Share Device – Shares device access with additional users.
Remove Device – Removes the device from the user account.
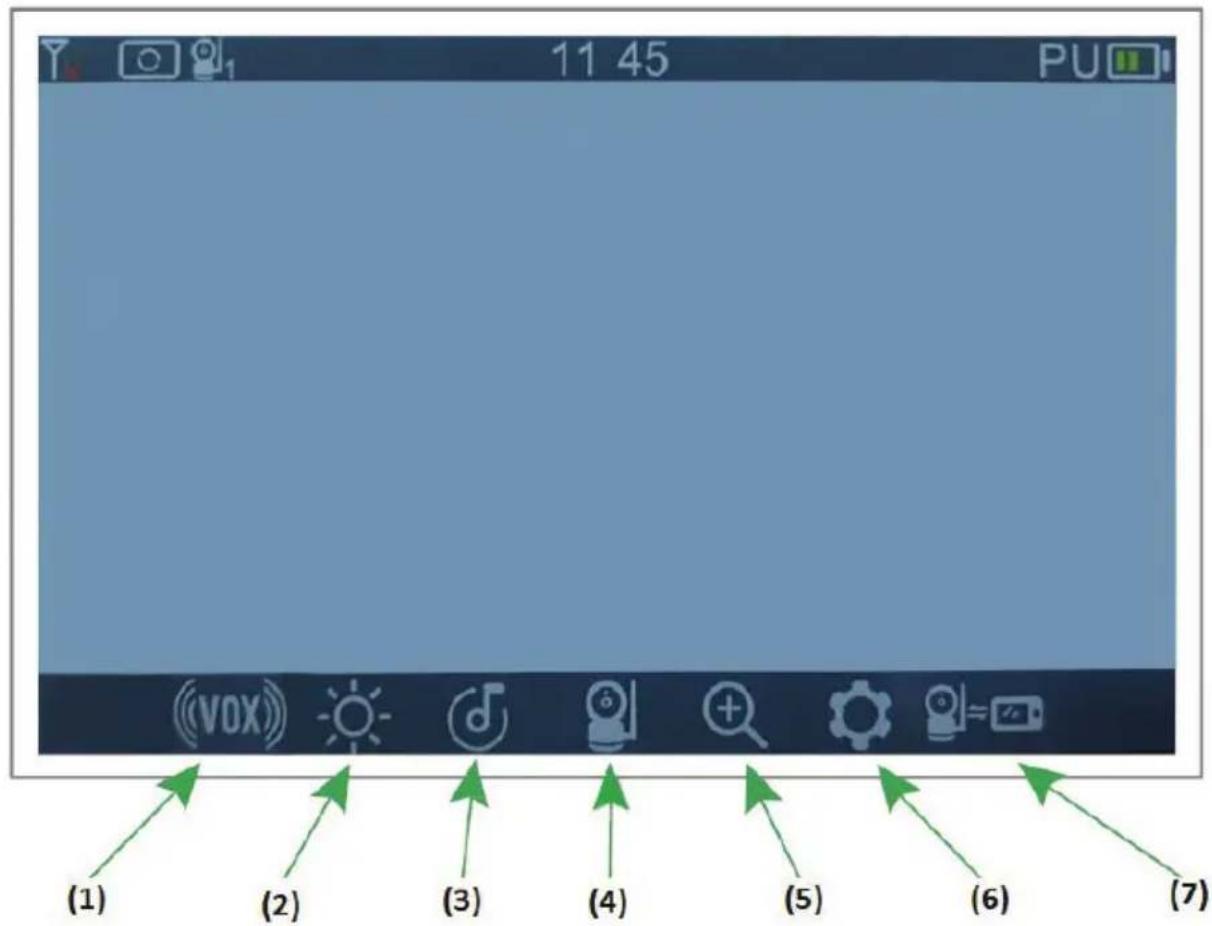
8. MONITOR DISPLAY FUNCTIONS
Enter the main menu by pressing the MENU button. Use the arrow keys and OK/Menu button to select a function:
(1) VOX – Screen-off mode to save power
(2) Brightness Adjustment – Adjusts the brightness of the display
(3) Lullaby – Plays lullaby music
(4) Camera – Camera preview and control
(5) Digital Zoom – Digitally zooms the image
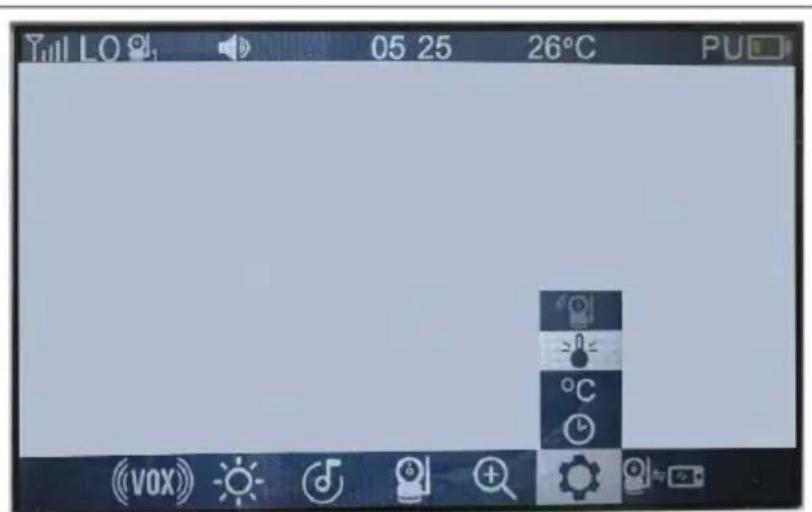
(6) Set up (temperature and time setting)
(7) Pairing
9. PAIRING THE CAMERA WITH THE MONITOR
9a) Go to the main menu on the monitor display. Select the Camera icon (Camera function). Press the OK button to start pairing (Camera Pair).
9b) Briefly press the pairing button (1) on the camera.
- If pairing is successful, a success icon will appear.
– If pairing fails, a failure icon will be displayed.
IMPORTANT! Ensure the camera is powered on and in standby mode during the pairing process.
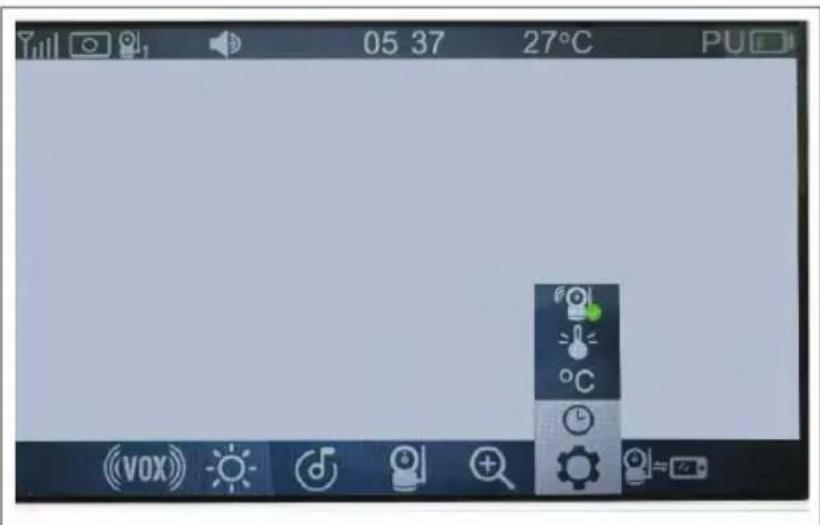
10. TIME AND TEMPERATURE SETTINGS
The menu

includes below functions:
10.1. Setting the Time – Select the option → Use the left and right arrow buttons to choose hours or minutes → Use the up and down buttons to set the correct time.
Note: You can select a one-time schedule or a recurring mode.
10.2. Selecting the Temperature Unit ^ C – Allows you to choose whether the temperature is displayed in Celsius ( ^ C) or Fahrenheit ( ^ F) → Use the left/right buttons to select and confirm with OK.
10.3. Selecting High / Low temperature alarm –


Select the option ☐ – Use the up and down arrow to choose H (High) or L (Low) temperature alarm – Use the up and down arrow to choose the desired alarmed temperature or OFF.
10.4. Viewing the Wi-Fi camera status –

means the camera is linked to WI-FI.
the camera is not linked to WI-FI.
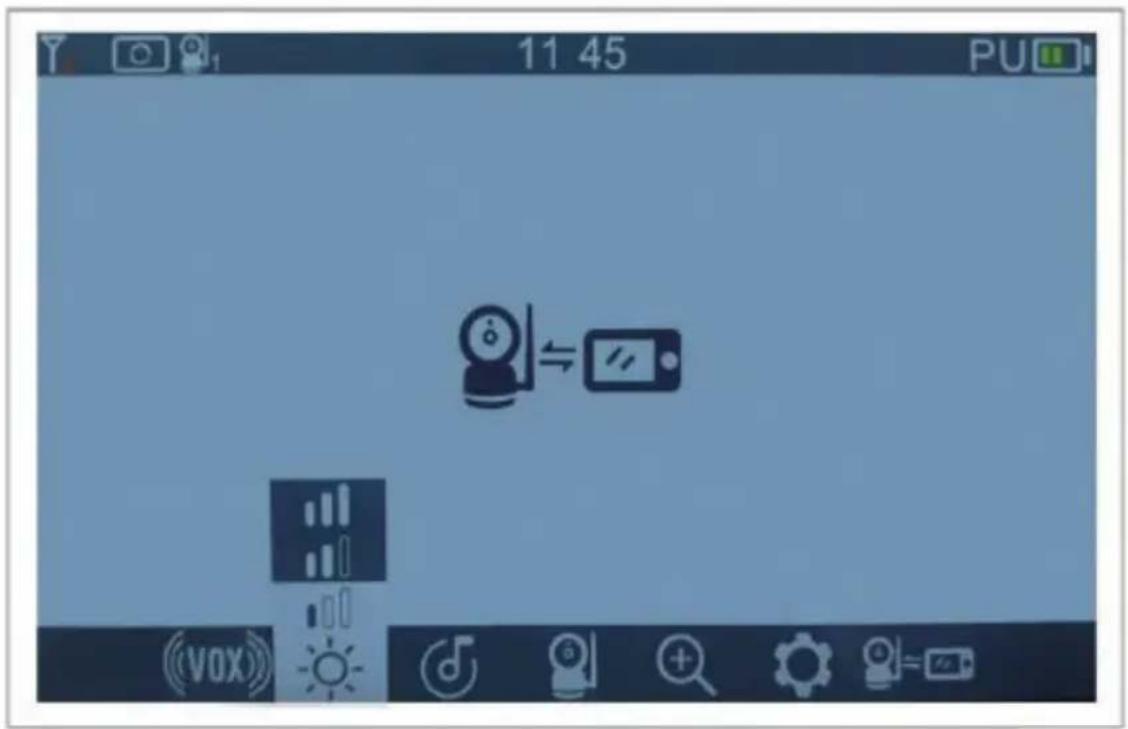
11. BRIGHTNESS ADJUSTMENT
Enter the menu → Use the left and right arrow buttons to adjust the brightness level. Brightness levels range from 0 to 3 (0 = lowest, 3 = highest).
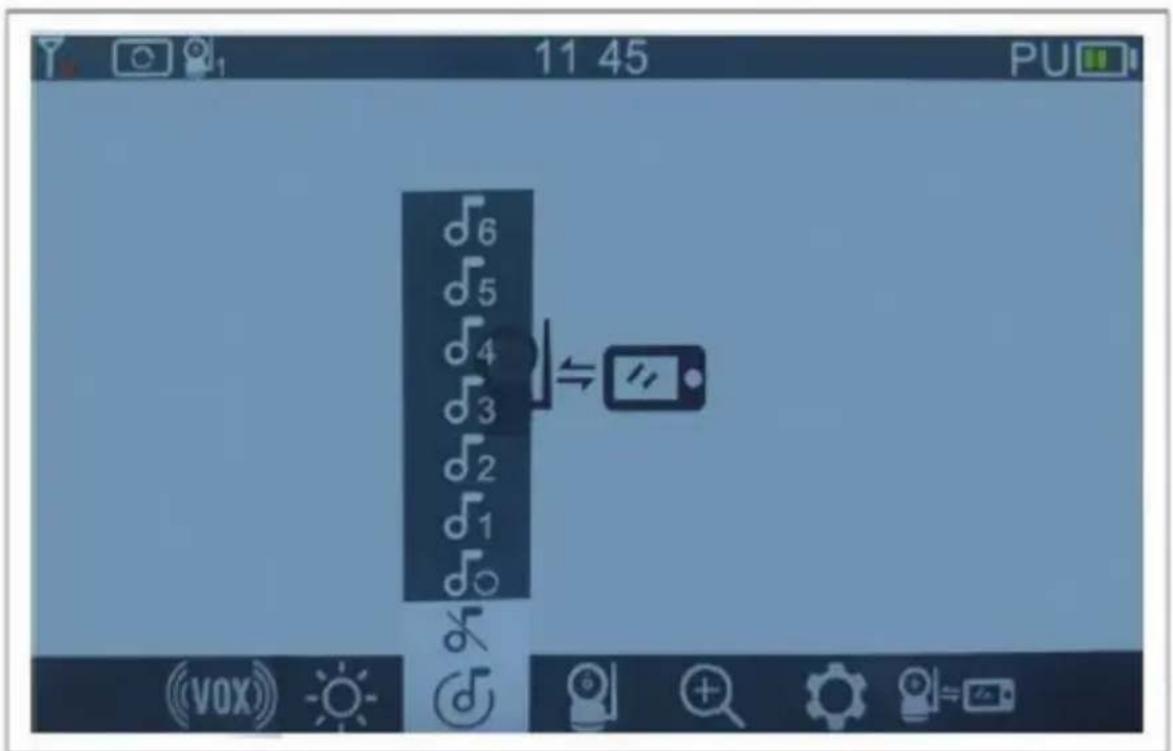
12. LULLABY PLAYBACK
Enter the menu and select a lullaby from No. 1 to No. 6. The melodies can be played individually (one at a time) or in loop mode → Use the up and down buttons to select the desired melody → Press the OK button to start playback.
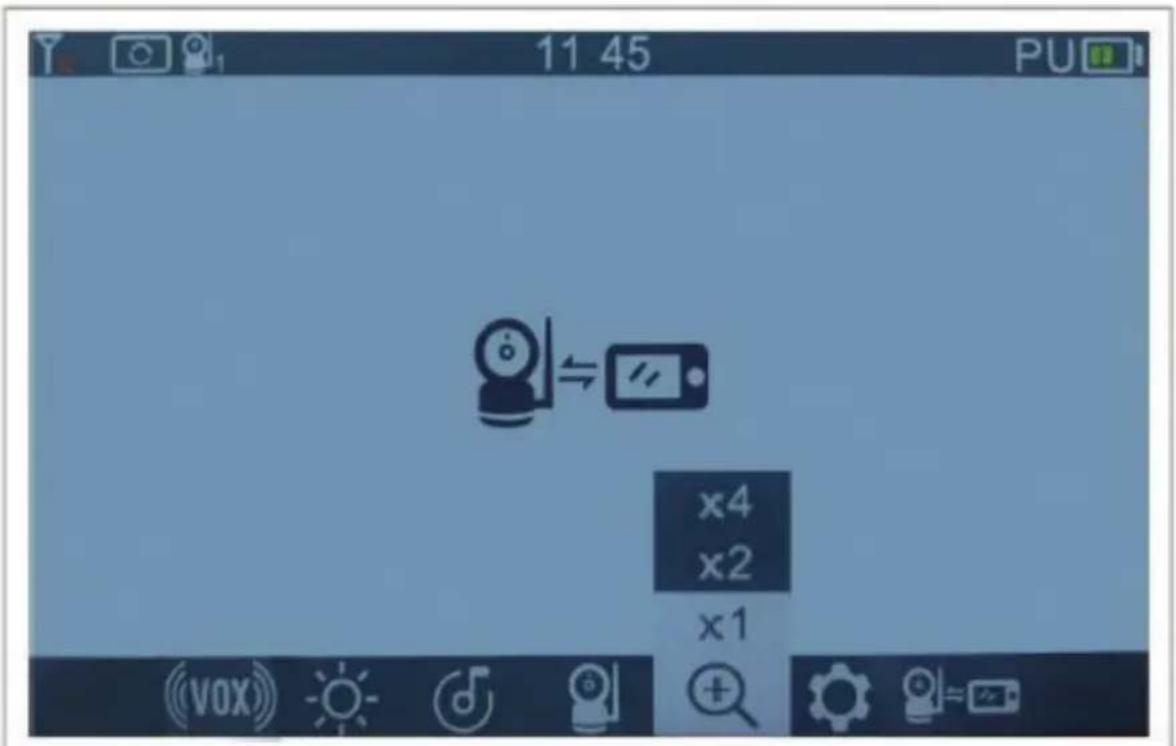
13. DIGITAL ZOOM
Enter the menu 📋, use the navigation buttons to select the desired zoom level (there are 4 zoom options available for the image). Confirm your selection by pressing the OK button.
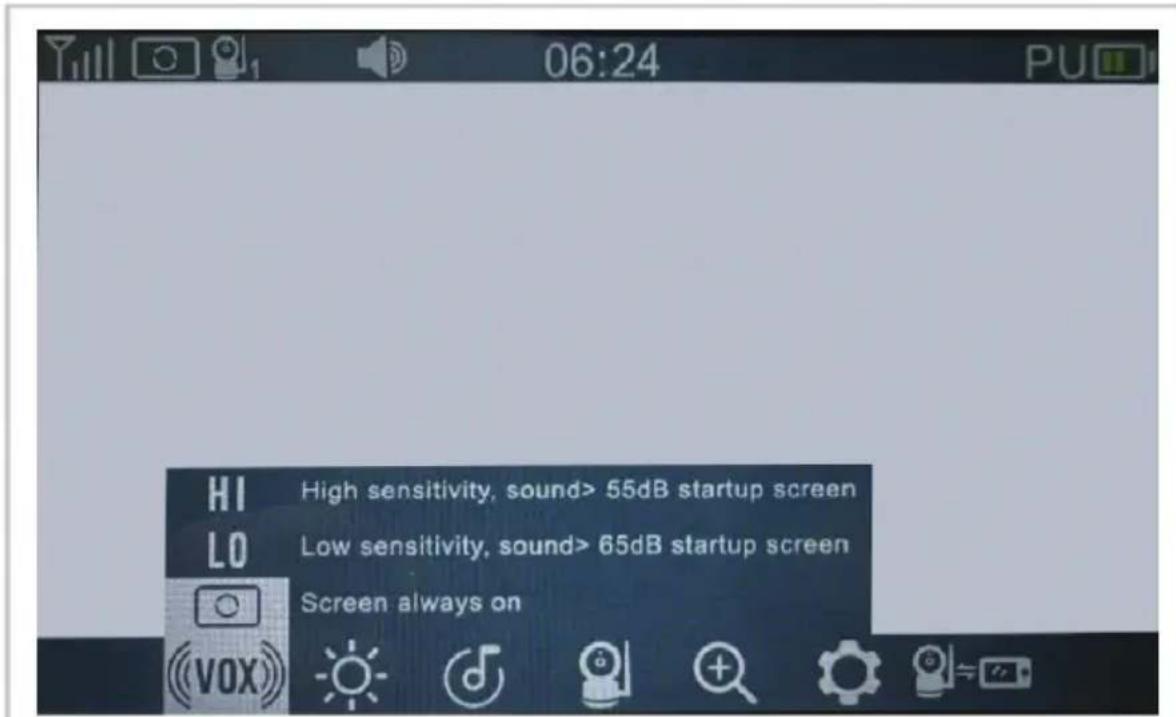
14. VOX
HI - High sensitivity microphone
LO - Low sensitivity microphone

- Screen always on (VOX off)
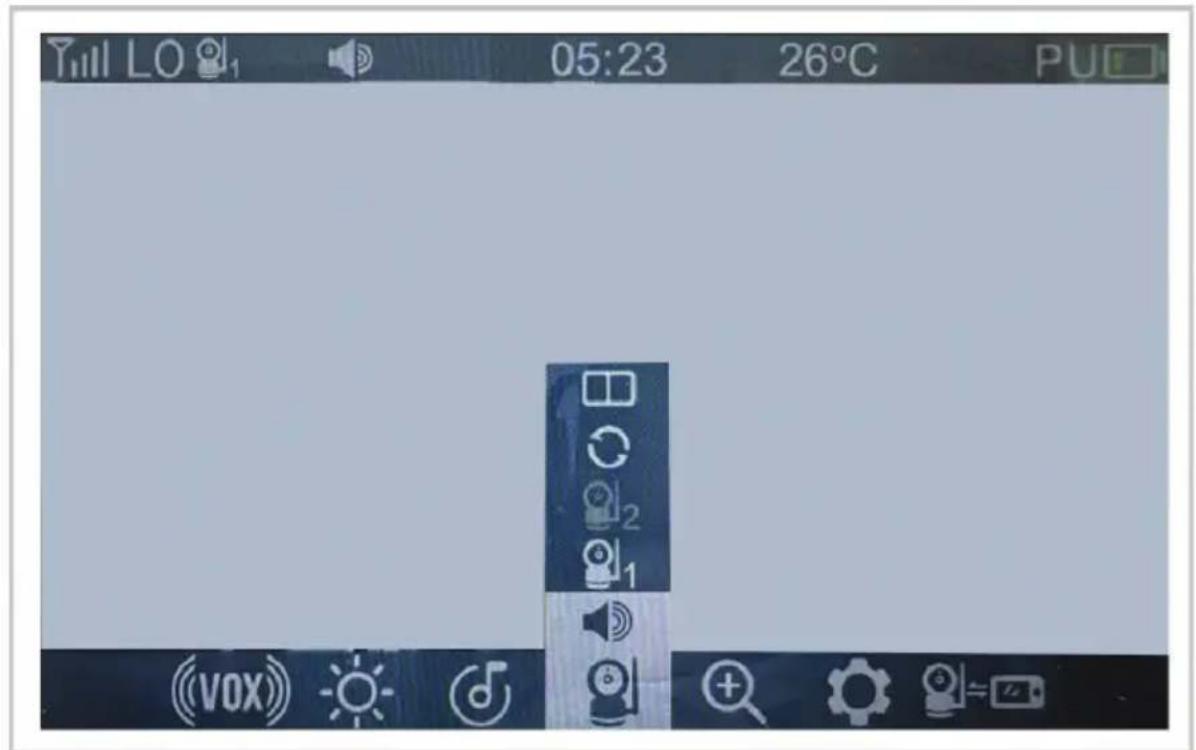
15. CAMERA STATUS
 | Camera volume adjustment |
 | View camera 1 |
 | View camera 2 |
 | Split screen |
 | Switching camera (only function when 2 cameras are connected) |
CARE AND MAINTENANCE INSTRUCTIONS
Do not step on the power cord or allow it to become pinched, especially at the plugs, power outlet, or the point where the cord exits the device.
✿ Position both the parent and baby units, as well as the power adapters, to allow adequate ventilation. Do not cover them with clothing, towels, blankets, or similar materials.
❖ Always unplug the devices during thunderstorms or if they will not be used for an extended period.
Do not immerse the parent or baby units in water, and do not wash them under running water.
- Clean the baby monitor parts and adapters with a dry cloth after disconnecting the devices and unplugging the adapters from the power outlet.
✿ Fingerprints or dust on the baby unit's lens may affect camera performance. Avoid touching the lens with your fingers.
- Store the product in a cool and dry place.
A TERMÉK BIZTONSÁGOS HASZNÁLATÁNAK BIZTOSÍTÁSA ÉRDEKÉBEN KÖVESSE A FELHASZNÁLÓI KÉZIKÖNYVBEN TALÁLHATÓ ÖSSZES FIGYELMEZTETÉST, UTASÍTÁST ÉS AJÁNLÁST!
FIGYELEM! BIZTONSÁGI UTASÍTÁSOK!
EZ A TERMÉK SEGÍTSÉGNYÚJTÁSRA SZOLGÁL, ÉS NEM HELYETTESÍTI A FELELŐSSÉGTELJES FELNŐTT FELÜGYELETET!
A TERMÉKET KIZÁRÓLAG RENDELTETÉSSZERÜEN HASZNÁLJA!
SPÉCIFICATIONS DU PRODUIT
◆ Câmera: sensor de 3,0 megapixels
WAARSCHUWING! VEILIGHEIDSINSTRUCTIES!
DIT PRODUCT IS BEDOELD ALS HULPMIDDEL EN KAN GEEN VERANTWOORDE EN ADEKWATE TOEZICHT VAN EEN VOLWASSENE VERVANGEN!
GEBRUIK DIT PRODUCT ALLEEN VOOR HET DOEL WAARVOOR HET IS BEDOELD!
10. NASTAVENÍ ČASU A TEPLOTY
bān bān gān gān gān gān – dān gān gān gān gān bān gān gān gān gān gān.
(5) borough district government agency - Borough district government address and government
natural_image
Two modern medical devices: a remote screen displaying a sleeping baby and a spherical device with a speaker (no visible text or symbols)CE
DECLARATION OF CONFORMITY
I the undersigned Nina Mitkova, General Manager of Chipolino Ltd., with its place of business at 1 Golyamokonarsko Shosse Str., s. Tzaratzovo, Maritza Municipality, Plovdiv, Bulgaria, as being recognized as the manufacturer according to the Consumer Protection Law, hereby
DECLARE
The product Digital Video Baby Monitor Model "DUO VIEW" with its item No VIBEFDV02501WH/ / JLT- D503Dual mode, for which this declaration is about, complies with The European Community and it has been manufactured in accordance with the requirements of:
√ Regulation (EC) No 1907/2006 of the European Parliament and of the Council concerning the Registration, Evaluation, Authorisation and Restriction of Chemicals (REACH)
√ Regulation (EU) 2023/988 of the European Parliament and on general product safety;
√ Directives of the European Parliament and the Council:
√ 2014/53/EO, about a radio equipment,
√ European Standards:
√ EN IEC 62321-4:2013+AMD1:2017
√ EN IEC 62321-5:2014
√ EN IEC 62321-6:2015
√ EN IEC 62321-7-1:2015
√ EN IEC 62321-7-2:2017
√ EN IEC 62321-8:2017
√ EN IEC 62368-1:2020+A1:2023
√ ETSI EN 62311:2020
√ EN 55032:2015/A11:2020
√ ETSI EN 300 328 V2.2.2 (2020-02)
√ EN 55035:2017/A1:2020
√ EN 61000-3-3:2013/A1:2019/A2:2021
√ EN IEC 61000-3-2:2019/A1:2021
The conformity of the product is certified with:
√ Certificate of conformity No BT250445927122EC/ 08.04.2025, issued by Fujian Berton Testing Service Co., Ltd., China;
√ Test report with No BT250445927122EN / 08.04.2025, issued by Fujian Berton Testing Service Co., Ltd., China.
√ Test report with No CTG2504115927D_SR126-1AY/08.04.2025, issued by Shenzhen CTG Testing Co., Ltd Co., Ltd., China
√ Test report with Ne CTG2504115927D_SR126-1AY/08.04.2025r., issued by Shenzhen CTG Testing co., LTD., China
√ Test report with No CTG2504115927D_SR126-3AY/08.04.2025, issued by Shenzhen CTG Testing co., LTD., China;
√ Test report with No CTG2504115927D_SR126-4AY/08.04.2025, issued by Shenzhen CTG Testing co., LTD., China;
√ Certificate of conformity No CTG2504115927D-SC126AY/08.04.2025, issued by Shenzhen CTG Testing co., LTD., China
The product is marked with CE
The product Digital Video Baby Monitor Model "DUO VIEW" with its item No VIBEFDV02501WH/ / JLT- D503Dual mode allows you to monitor your baby at any time through audio, camera, and a color video surveillance monitor.
Main characteristics:
Frequency range: 2.4 GHz* 3.0-megapixel camera*3.0-megapixel CMOS sensor * 6 LED lights * Pan and Tilt control * Two-way audio support * Power supply: DC 5V, 1A * Temperature sensor.
The product Digital Video Baby Monitor Model "DUO VIEW" with its item No VIBEFDV02501WH/ / JLT- D503Dual mode, for which this declaration is about, is safe for the consumers and does not present any risk for the health during its use in accordance with the manufacturer's instruction manuals for use and servicing.
Дата/Date: 02.06.2025
Гр. Пловдив/Plovdiv
НИНА МИТКОВА/NINA МИТКОВА, Управител на „ЧИПОЛИНО“ ВООД GENERAL MANAGER OF CHIPOLINO LTD.

Chipolino
Производител / Manufacturer / Gyártó / Fabricante / Produttore / Hersteller / Fabricant / Proizvođač / Произвођач / Производител / Prodhues / Катаσκευαστής / Producător / Fabricante / Fabrikant / Výrobce / მნარმობელი:
ЧИПОЛИНО ЕООД