PLK 60 B1 - Welding machine PARKSIDE - Free user manual and instructions
Find the device manual for free PLK 60 B1 PARKSIDE in PDF.

User questions about PLK 60 B1 PARKSIDE
0 question about this device. Answer the ones you know or ask your own.
Ask a new question about this device
Download the instructions for your Welding machine in PDF format for free! Find your manual PLK 60 B1 - PARKSIDE and take your electronic device back in hand. On this page are published all the documents necessary for the use of your device. PLK 60 B1 by PARKSIDE.
USER MANUAL PLK 60 B1 PARKSIDE
LÖTKOLBEN-SET/SOLDERING IRON SET/ FER À SOUDER AVEC ACCESSOIRES PLK 60 B1
DE AT CH
LÖTKOLBEN-SET
Bedienungsanleitung
GB IE
SOLDERING IRON SET
User manual
FR BE
FER À SOUDER AVEC ACCESSOIRES
Mode d'emploi
NL BE
SOLDEERBOUTSET
Gebruiksaanwijzing
PL
ZESTAW KOLB LUTOWNICZYCH
Instrukcja obsługi
CZ
PÁJECÍ SADA
Návod na obsluhu
SK
SPÁJKOVACIA SÚPRAVA
Návod na obsluhu
ES
GB/IE User manual Page 34
Intended use.... Page 37
Scope of delivery ...... Page 38
Description of parts ...... Page 38
Technical data. Page 39
Safety instructions ...... Page 39
Before first use ...... Page 47
Unpacking the product. Page 47
Preparation Page 48
Soldering iron stand .... Page 48
Inserting/replacing the soldering tip ..... Page 48
Operation...... Page 49
Switching on/off Page 49
Setting the working temperature . . . . . . . . . . . . . . . . . . . . . . . . . . . . . . . . . . . . . . . . . . . . . . . . . . . . . . . . . . . . . . . . . . . . . . . . . 50
Sponge Page 51
Soldering.... Page 51
Stripping knife. Page 53
Desoldering..... Page 53
Cleaning and care ...... Page 54
Cleaning Page 54
Maintenance Page 55
Repair Page 55
Storage Page 55
Spare parts/Accessories ...... Page 55
Disposal Page 55
Warranty.... Page 57
Warranty claim procedure. Page 58
Service Page 59
| List of pictograms used | |
 | Read the user manual. |
 | DANGER! – Designating a hazard with high risk, which will result in death or severe injury if not avoided (e.g. risk of suffocation) |
 | WARNING! – Designating a hazard with moderate risk, which can result in death or severe injury if not avoided (e.g. risk of electric shock) |
 | CAUTION! – Designating a hazard with low risk, which could result in minor or moderate injury if not avoided (e.g. risk of scalding) |
 | NOTICE! – Warns of possible damage to property/the product if not avoided (e.g. risk of short circuit) |
 | Risk of electric shock |
 | Before working on the product: Switch off the soldering iron, disconnect the mains plug from the socket-outlet and allow the soldering iron to cool down completely. |
| ~ | Alternating current/voltage |
Do not inhale vapours.

Safety information

Instructions for use

CE mark indicates conformity with relevant EU directives applicable for this product.
SOLDERING IRON SET
● Introduction
We congratulate you on the purchase of your new product. You have chosen a high quality product. The instructions for use are part of the product. They contain important information concerning safety, use and disposal. Before using the product, please familiarise yourself with all of the safety information and instructions for use. Only use the product as described and for the specified applications. If you pass the product on to anyone else, please ensure that you also pass on all the documentation with it.
Intended use
The product is intended for electronic soldering for leisure and DIY purposes.
The product is not intended for commercial or industrial use.
■ Only use the product as described and only for the indicated fields of application.
■ Any other use or modification of the product is considered to be unauthorised use and entails considerable risk of accidents.
The manufacturer assumes no liability for damages resulting from unauthorised use.
The operator or user of the product is responsible for any accidents or personal injury and/or material damage to third parties or their property.
- Scope of delivery

DANGER!
The product and the packaging are not children's toys! Children must not play with plastic bags, sheets and small parts! There is a danger of choking and suffocation!
After unpacking the product, check if the delivery is complete and if all parts are in good condition. Remove all packaging materials before use.
1 Soldering iron
6 Soldering tips
(1× pre-mounted)
1 Desoldering pump
1 Soldering iron stand
1 Sponge
1 Soldering tin (spool)
1 Desoldering braid (spool)
2 Tweezers*
1 Stripping knife
1 Plastic box
1 User manual
• Description of parts
Before reading, unfold the page containing the illustrations and familiarise yourself with all functions of the product.
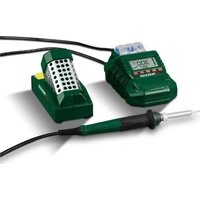
Fig. A
1 Mains cord with mains plug
2 On/off switch
3 LED indicator (red: heating/green: temperature reached)
4 Temperature control
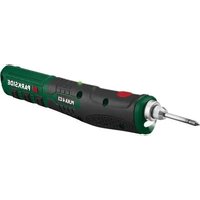
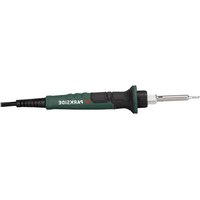
5 Soldering iron
6 Holding fixture (for soldering tip)
7 Fixing ring
8 Sleeve
9 Soldering tip
10 Coil spring
11 Soldering iron stand
12 Sponge
13 Desoldering pump
Fig. B
| 14 | Soldering tips |
| 15 | Soldering tin |
| 16 | Stripping knife |
| 17 | Tweezers (ESD 11) |
| 18 | Tweezers (ESD 15) |
| 19 | Desoldering braid |
● Technical data
| Rated voltage: 230 V~ | |
| Rated frequency: 50 Hz | |
| Rated power consumption: 30 W (max. 60 W) | |
| Protection class: I | |
| Temperature range: 200 °C to 480 °C | |

Safety instructions
BEFORE USING THE PRODUCT, FAMILIARISE YOURSELF WITH ALL OF THE SAFETY INFORMATION AND INSTRUCTIONS FOR USE! WHEN
PASSING THIS PRODUCT ON TO OTHERS, ALSO INCLUDE ALL THE DOCUMENTS!
In the case of damage resulting from non-compliance with these operating instructions the warranty claim becomes invalid! No liability is accepted for consequential damage! In the case of material damage or personal injury caused by incorrect handling or non-compliance with the safety instructions, no liability is accepted!
⚠ WARNING! Read all safety warnings and all instructions. Failure to follow the warnings and instructions may result in electric shock, fire and/or serious injury.
Children and persons with limitations

⚠ WARNING! DANGER OF DEATH AND ACCIDENTS FOR TODDLERS AND CHILDREN! Never leave children unsupervised with the packaging material. The packaging material represents a danger of suffocation. Children frequently underestimate the dangers.
This product may be used by persons with limited physical, sensory or mental capabilities or lack of experience and knowledge, provided that they are under supervision or have been told how to use the product safely and are aware of the potential risks.
- Do not allow children to play with the product.
■ The product and its connecting cable must be kept away from children.
Intended use
⚠ WARNING! Risk of injury! Misuse may lead to injury. Use this product solely in
accordance with these instructions. Do not attempt to modify the product in any way.
■ Use the product in dry indoor spaces only
Electrical safety
WARNING! Risk of electric shock! Do not attempt to repair the product yourself. In case of malfunction, repairs are to be conducted by qualified personnel only.
WARNING! Risk of electric shock! Do not immerse the product's electrical components in water or other liquids. Never hold the product under running water.
⚠ WARNING! Risk of electric shock! Never use a damaged product. Disconnect the product from the mains supply and contact your retailer if it is damaged.
Before connecting the mains plug to the mains supply: Check that the voltage and the current rating correspond with the mains supply details shown on the product's rating label.
■ Regularly check the mains plug and the mains cord for damages. If the mains cord is damaged, it must be replaced by the manufacturer, its service agent or similarly qualified persons in order to avoid a hazard.
■ Protect the mains cord against damages Do not let it hang over sharp edges, do not squeeze or bend it. Keep the mains cord away from hot surfaces and open flames.
The product must only be connected to a socket-outlet via a residual-current circuit breaker (RCD) with a rated leakage current of not more than 30 mA.
Operation
⚠ WARNING! Risk of electric shock! Do not use the product if the handle, the mains cord or the mains plug are damaged. Never open the product.
⚠️ CAUTION! Risk of burns! Before use, make sure that the soldering tip is properly attached to the product. Do
not touch the heated soldering tip or the molten solder. Allow the product to cool down before changing components, cleaning or checking the product.
⚠️ CAUTION! Risk of fire! Only use the special holder or another fireproof surface when you put the hot product down.
⚠️ CAUTION! Risk of poisoning! Do not inhale vapours.
⚠️ CAUTION! Risk of injury! Keep your hands away from the heated workpiece. The heat can be emitted through the workpiece.
⚠ NOTICE! Risk of product damage! Do not exert any excessive pressure on the soldering tip during use. Otherwise the soldering tip could bend.
⚠ NOTICE! Risk of product damage! Avoid contact between the hot soldering tip and the plastic parts of the holder.
■ After work, allow the product to cool down in the air only. Do not immerse the product in water to cool it down.
- Place the product in the stand when not use.
- Keep the product away from flammable material. Before use, remove any flammable objects, liquids and gases from the work area.
■ To help prevent accidents, always keep the work area clean and tidy.
■ Never leave the product unsupervised when it is switched on.
In the event of danger, remove the mains plug from the socket-outlet immediately.
During work over an extended period in which hazardous vapours can be created, always ensure sufficient ventilation of the workplace. In addition, protective gloves, a face mask and a work apron are recommended. - Avoid eating, drinking and smoking in rooms where soldering work is taking place. Otherwise, lead residues on your hands might contaminate the food, drink or cigarettes and be absorbed into your body.
■ Always wash your hands thoroughly after soldering.
- Do not dispose of solder waste in normal household waste. Solder waste should be disposed of with hazardous waste.
■ Disconnect the product from the socket-outlet
- when a malfunction occurs,
- before attaching/changing accessories,
– before cleaning the product,
– during a thunderstorm and
-after each use.
■ Disconnect the product from the socket-outlet by pulling the mains plug, but not by pulling on the mains cord.
■ Only use spare parts and accessories which are supplied and recommended by the manufacturer. Using foreign parts results in the immediate loss of any warranty claim.
- Do not use the product anymore if it has been dropped.
- Do not use the product if you are tired, lacking in concentration or have
consumed alcohol or tablets. Always have a break on time. Use common sense when using the product.
Cleaning and storage
⚠️ CAUTION! Risk of injury! Disconnect the product from the mains supply before cleaning work and when not in use.
■ Protect the product, its mains cord and mains plug against dust, direct sunlight, dripping and splashing water.
■ After each use: Clean the product (see “Cleaning and care”).
■ Store the product in a cool, dry place, protected from moisture and out of the reach of children.
Before first use
- Unpacking the product
- Take the product out of the packaging and remove all packaging materials and plastic wrappings.
- Check to make sure that all listed parts are included (see "Scope of delivery").
- Check whether the product and all parts are in good condition, if any damage or defect is detected, do not use the product, but follow the procedure described in chapter "Warranty".
NOTE
The soldering in 5 was checked for proper function at the end of the manufacturing process. It is therefore possible that the soldering iron may have a slight discolouration. This does not constitute a defect. The originally packaged product is brand new.
● Preparation
● Soldering iron stand
■ The soldering iron stand 11 is pre-assembled.
☐ Use the soldering iron stand 11 to lay down the soldering iron 5 safely during work breaks.
Do not allow the mains cd 1 to hang down. Otherwise the soldering iron stand 11 could tip over due to the weight of the soldering iron 5.
☐ Securing the soldering iron stand 11 (optional): Use the opening in the centre of the soldering iron stand to screw it to the worktop (mounting material is not included).
- Inserting/replacing the soldering tip
CAUTION! Risk of burns!
Before inserting/replacing the soldering 9 14:
-Switch off the soldering iron 5.
- Disconnect the mains plug 1 from the socket-outlet.
- Allow the soldering iron 5 including the soldering tip 9 14 to cool down completely.
▶ Never heat up the soldering in 5 without the soldering tip 9 14 inserted.
NOTE
Before first use and when using a new soldering 9, 14: The soldering tip must be tinned first (see “Soldering”).
- Unscrew the fixing ring 7.
- Pull off the sleeve 8.
- Pull the soldering tip 9 14 out of the holding fixture 6.
- Push the desired soldering tip 9 14 into the holding fixture 6 until it stops.
- Push the sleeve 8 over the soldering tip 9 14 until it stops.
- Tighten the fixing ring 7.
Operation
- Switching on/off
Switching on
- Connect the mains plug 1 to a suitable socket-outlet.
- Press and hold the on/off switch ② for approx. 2 seconds. The LED indicator ③ lights up.
| LED indicator 3 | Meaning |
| Lights up red | The soldering iron 5 is heating up. |
| Lights up green The | set temperature is reached. The soldering iron 5 is ready for use. |
| Off | The soldering iron 5 is switched off. |
Switching off
NOTE
After each use: Put the soldering in 5 into the coil spring 10 of the soldering iron stand 11.
- Press the on/off switch 2. The LED indicator 3 goes out.
- After use: Disconnect the mains plug 1 from the socket-outlet.
- Setting the working temperature
NOTE
A prerequisite for flawless soldering is the use of a suitable soldering tin. Perfect solder joints can only be achieved if the correct soldering temperature is reached. If the soldering temperature is too low, the soldering tin does not flow sufficiently and causes unclean solder joints (so-called cold solder joints). If the soldering temperature is too high, the soldering flux burns and the soldering tin does not flow. In addition, the materials to be processed can be destroyed.
The following table lists the temperature settings for the most common applications. Deviations are possible depending on the soldering tin/manufacturer.
| Temperature Application | |
| approx. 200 °C | Melting point of the most frequently used soft solders |
| approx. 300 °C | Normal operation, e.g. when using lead-free soldering tin |
| approx. 400 °C | High soldering temperature, e.g. for desoldering small solder joints |
| approx. 480 °C | Maximum soldering temperature, e.g. for desoldering large solder joints |
☐ Rotate the temperature control 4 until the ▽ mark points to the desired temperature.
- Sponge
⚠️ NOTICE! Risk of product damage!
Do not allow the hot soldering 9 14 to come into contact with a dry sponge 12. Otherwise, the sponge can be damaged.
☐ Use the sponge 12 to clean the soldering tip 9 14.
Before use:
-Slightly moisten the sponge ^12 .
-If the sponge ^12 is too moist: Wring out the sponge away from the soldering iron ^5 .
Soldering
CAUTION!
Inhaling vapours can lead to headaches and symptoms of fatigue, among other things.
NOTE
The soldering in 5 is ideal for soldering electronics.
NOTE
Due to its design, the soldering in 5 is especially suited for hard-to-reach areas and fine soldering work.
For extensive soldering work, we recommend cleaning the soldering tip 9 14 occasionally and re-tinning it if necessary.
Use the tweez 17 18 to precisely grip and hold small objects such as wires, chips or other electronic components. The tweezers are protected against electrostatic discharge (ESD).
The straight tweez ^17 are suitable for small to medium-sized objects.
The angled tweez 18 are suitable for hard-to-reach areas and for soldering work on circuit boards or for soldering jewellery.
- Clean the soldering tip 9 14 on the moist sponge 12.
- Tinning the soldering tip 9 14 (before starting the soldering work):
- Heat up the unused or cleaned soldering tip 9 14.
-Tin the soldering tip 9 14 through contact with the soldering tin 15. - If possible, connect the parts to be soldered together mechanically, e.g. by twisting wires into each other.
- Guide the soldering tip 9 14 to the solder joint and heat it.
- Melt the soldering tin 15 between the solder joint and soldering tip 9 14.
-
Add more soldering tin 15 until the entire solder joint is covered.
-
Remove the soldering tip 9 14 immediately so as not to overheat the molten solder.
- Allow the solder to harden. Avoid any knocks or vibrations.
Stripping knife
NOTE
Use the stripping kr16 to expose the cable strands.
- Insert your cable into the appropriate recess on the blade of the stripping knife 16.
- Carefully cut into the cable insulation by pressing the movable part of the stripping knife 16 onto the blade and rotating it around the cable.
For thinner cables, use the blade at the tip of the stripping knife 16.
- Pull off the insulation.
Desoldering
NOTE
▶ Use the desoldering br19 to soak up excess soldering tin 15.
Use the desoldering pur13 to desolder faulty solder joints. The desoldering pump extracts the liquid solder.
Desoldering braid
☐ Heat the desoldering braid 19 together with the workpiece. When the temperature is reached, the desoldering braid absorbs the excess soldering tin 15.
Desoldering pump
- Press the pump plunger down until you hear it click into place.
- Guide the soldering tip 9 14 to the faulty solder joint and heat it.
- As soon as the metal has melted:
–Guide the desoldering pump ^13 directly to the melting point.
-Press the red suction button so that the soldering material is extracted and the area is desoldered.
● Cleaning and care

WARNING! Risk of injury!
Before working on the product: Switch off the soldering iron, disconnect the mains plug from the socket-outlet and allow the soldering iron to cool down completely.
Cleaning
- Do not immerse the product in water or other liquids.
- Do not allow liquids to enter the inside of the product.
- Do not use chemical, alkaline, abrasive or other aggressive detergents or disinfectants to clean this product as they might be harmful to its surfaces.
□ Keep the product clean, dust-free, dry and free from oil or grease.
□ Clean the product after each use.
□ Clean the product with a soft, dry and lint-free cloth. For stubborn stains, use a slightly damp cloth and a mild detergent.
□ Cleaning the desoldering pump 13:
–Unscrew the desoldering pump 13.
–Pull both parts apart and remove the steel spring inside.
-Wipe off loose soldering tin residues with a dry cloth.
-Remove adhering residues with a brush.
-Reassemble the desoldering pump ^13 in reverse order.
Maintenance
Before and after each use: Check the product and its accessories for wear and damage.
Repair
This product does not contain any parts that can be repaired by the user.
☐ Contact an authorised service centre or a similarly qualified person to have the product checked and repaired.
Storage
☐ Before storage: Allow the product to cool down.
☐ Store the product in a cool, dry place, protected from moisture and out of the reach of children.
- Spare parts/Accessories
□ Customers can obtain compatible spare parts and accessories via e-mail or our service hotline (see “Service”).
□ Have the item number (IAN 484598_2501) ready for your order.
- Disposal
The packaging is made entirely of recyclable materials, which you may dispose of at local recycling facilities.
Observe the marking of the packaging materials for
waste separation, which are marked with abbreviations
(a) and numbers (b) with following meaning: 1–7:
plastics/ 20–22: paper and fibreboard/ 80–98: composite materials.
Product:
flowchart
graph LR
    A["FR"] --> B["+"]
    B --> C["FR"]
    D["Cet appareil se recycle"] --> E["A DEPOSER EN MAGASIN"]
    E --> F["A DEPOSER EN DÉCHÉTERIE"]
The product and packaging materials are recyclable and are subject to extended producer responsibility.
Dispose them separately, following the illustrated Info-tri (sorting information), for better waste treatment.
The Triman logo is valid in France only.

Contact your local refuse disposal authority for more details of how to dispose of your worn-out product.
To help protect the environment, please dispose of the product properly when it has reached the end of its useful life and not in the household waste. Information on collection points and their opening hours can be obtained from your local authority.
Warranty
The product has been manufactured to strict quality guidelines and meticulously examined before delivery. In the event of material or manufacturing defects you have legal rights against the retailer of this product. Your legal rights are not limited in any way by our warranty detailed below.
The warranty for this product is 3 years from the date of purchase. The warranty period begins on the date of purchase. Keep the original sales receipt in a safe location as this document is required as proof of purchase.
Any damage or defects already present at the time of purchase must be reported without delay after unpacking the product.
Should the product show any fault in materials or manufacture within 3 years from the date of purchase, we will repair or replace it – at our choice – free of charge to you. The warranty period is not extended as a result of a claim being granted. This also applies to replaced and repaired parts.
This warranty becomes void if the product has been damaged, or used or maintained improperly.
The warranty covers material or manufacturing defects. This warranty does not cover product parts subject to normal wear and tear, thus considered consumables (e.g. batteries, tubes, cartridges), nor damage to fragile parts, e.g. switches or glass parts.
● Warranty claim procedure
So that your request can be processed quickly, please observe the following instructions:
For all inquiries, please have the receipt and item number (IAN 484598_2501) ready as proof of purchase.
The article number can be taken from the identification label on the product, engraving on the product, the front cover of your manual (at the bottom left), or the sticker on the back or bottom of the product.
If malfunctions or other defects arise, first contact the service department indicated below by phone or email.
You can then send a product recorded as defective to the communicated service address postage-free, making sure to enclose proof of purchase (receipt) and information on the details of the defect and when it occurred.
You can download and view this and numerous other manuals at parkside-diy.com. This QR code takes you directly to parkside-diy.com. Choose your country and use the search screen to search for the operating instructions. Entering the item number (IAN) 484598_2501 takes you to the operating instructions for your item.


Service
GB
Service Great Britain
Tel.:0800 0569216
E-Mail:owim@lidl.co.uk
IE
Service Ireland
Tel.:1800 200736
E-Mail:owim@lidl.ie
CE
Activer/désactiver. Page 77