PLK 60 A1 - Welding machine PARKSIDE - Free user manual and instructions
Find the device manual for free PLK 60 A1 PARKSIDE in PDF.

User questions about PLK 60 A1 PARKSIDE
0 question about this device. Answer the ones you know or ask your own.
Ask a new question about this device
Download the instructions for your Welding machine in PDF format for free! Find your manual PLK 60 A1 - PARKSIDE and take your electronic device back in hand. On this page are published all the documents necessary for the use of your device. PLK 60 A1 by PARKSIDE.
USER MANUAL PLK 60 A1 PARKSIDE
natural_image
Black soldering iron with coiled spring and base (no text or symbols visible)SOLDERING IRON SET / LÖTKOLBEN-SET /
FER À SOUDER AVEC ACCESSOIRES PLK 60 A1
GB / IE
SOLDERING IRON SET
Translation of the original instructions
FR / BE
FER À SOUDER AVEC ACCESSOIRES
Before reading, unfold the page containing the illustrations and familiarise yourself with all functions of the device.
DE / AT / CH
GB/IE Translation of the original instructions Page 1
| DE/AT/CH | Originalbetriebsanleitung | Seite | 11 | |
| FR/BE | Traduction des instructions d’origine Page 21 | |||
| NL/BE | Vertaling van de originele gebruiksaanwijzing Pagina 35 | |||
| CZ | Překlad originálního provozního návodu Strana 45 | |||
| PL | Tłumaczenie oryginalnej instrukcji obsługi | Strona 55 | ||
| SK | Preklad originálneho návodu na obsluhu | Strana 65 | ||
| ES | Traducción del manual de instrucciones original | Página 75 | ||
| DK | Oversættelse af den originale driftsvejledning | Side 85 | ||
| IT | Traduzione delle istruzioni d’uso originali | Pagina 95 | ||
| HU | Az originál használati utasítás fordítása | Oldal 105 | ||
Contents
Introduction 2
Intended use....2
Warnings and symbols used 2
Features 3
Package contents 3
Technical data....3
Safety information 3
Before use....5
Soldering iron stand....5
Inserting/replacing the soldering tip....5
Use....5
Switching on/off 5
Setting the temperature 6
Soldering sponge....6
Soldering 6
Desoldering 7
Maintenance and cleaning 7
Ordering replacement parts 7
Disposal....8
Disposal of the appliance....8
Disposal of the packaging 8
Disposal of the soldering tin and solder waste 8
Kompernass Handels GmbH warranty....8
Service....10
Importer....10
Introduction
Congratulations on the purchase of your new appliance. You have selected a high-quality product.
The operating instructions are part of this product. They contain important information about safety, usage and disposal. Before using the product, please familiarise yourself with all instructions regarding safety and use. Use the product only as described and for the specified range of applications. Please also pass on all documents to any future owner.
Intended use
This appliance is intended for electronic soldering for leisure and DIY purposes. Use this appliance only as described and for the areas of applications specified. The appliance is not intended for commercial use. Any other usage or modification of the appliance is deemed to be improper and carries a significant risk of accidents. The manufacturer accepts no responsibility for damage attributable to misuse.
Warnings and symbols used
The following warnings and symbols are used in these instructions for use, on the packaging and on the appliance (where applicable):
 | DANGER! A warning with this symbol and the signal word "DANGER" indicates an immi- nently hazardous situation which will result in death or serious injury if not avoided. |
 | WARNING! A warning with this symbol and the signal word "WARNING" indicates a potentially hazardous situation which could result in death or serious injury if not avoided. |
 | CAUTION! A warning with this symbol and the signal word "CAUTION" indicates a potentially hazardous situation that could result in a minor or moderate injury if not avoided. |
| [xwx8] | ATTENTION! A warning with this symbol and the signal word "ATTENTION" indicates a potential situation which could result in property damage if not avoided. |
| [wx5w] | Note: A note identifies additional information that facilitates the use of the appliance. |
 | Risk of electric shock. |
 | Do not breathe in vapours. |
| ~ | AC current/voltage. |
| [3x84] | Read the instructions. |
Features
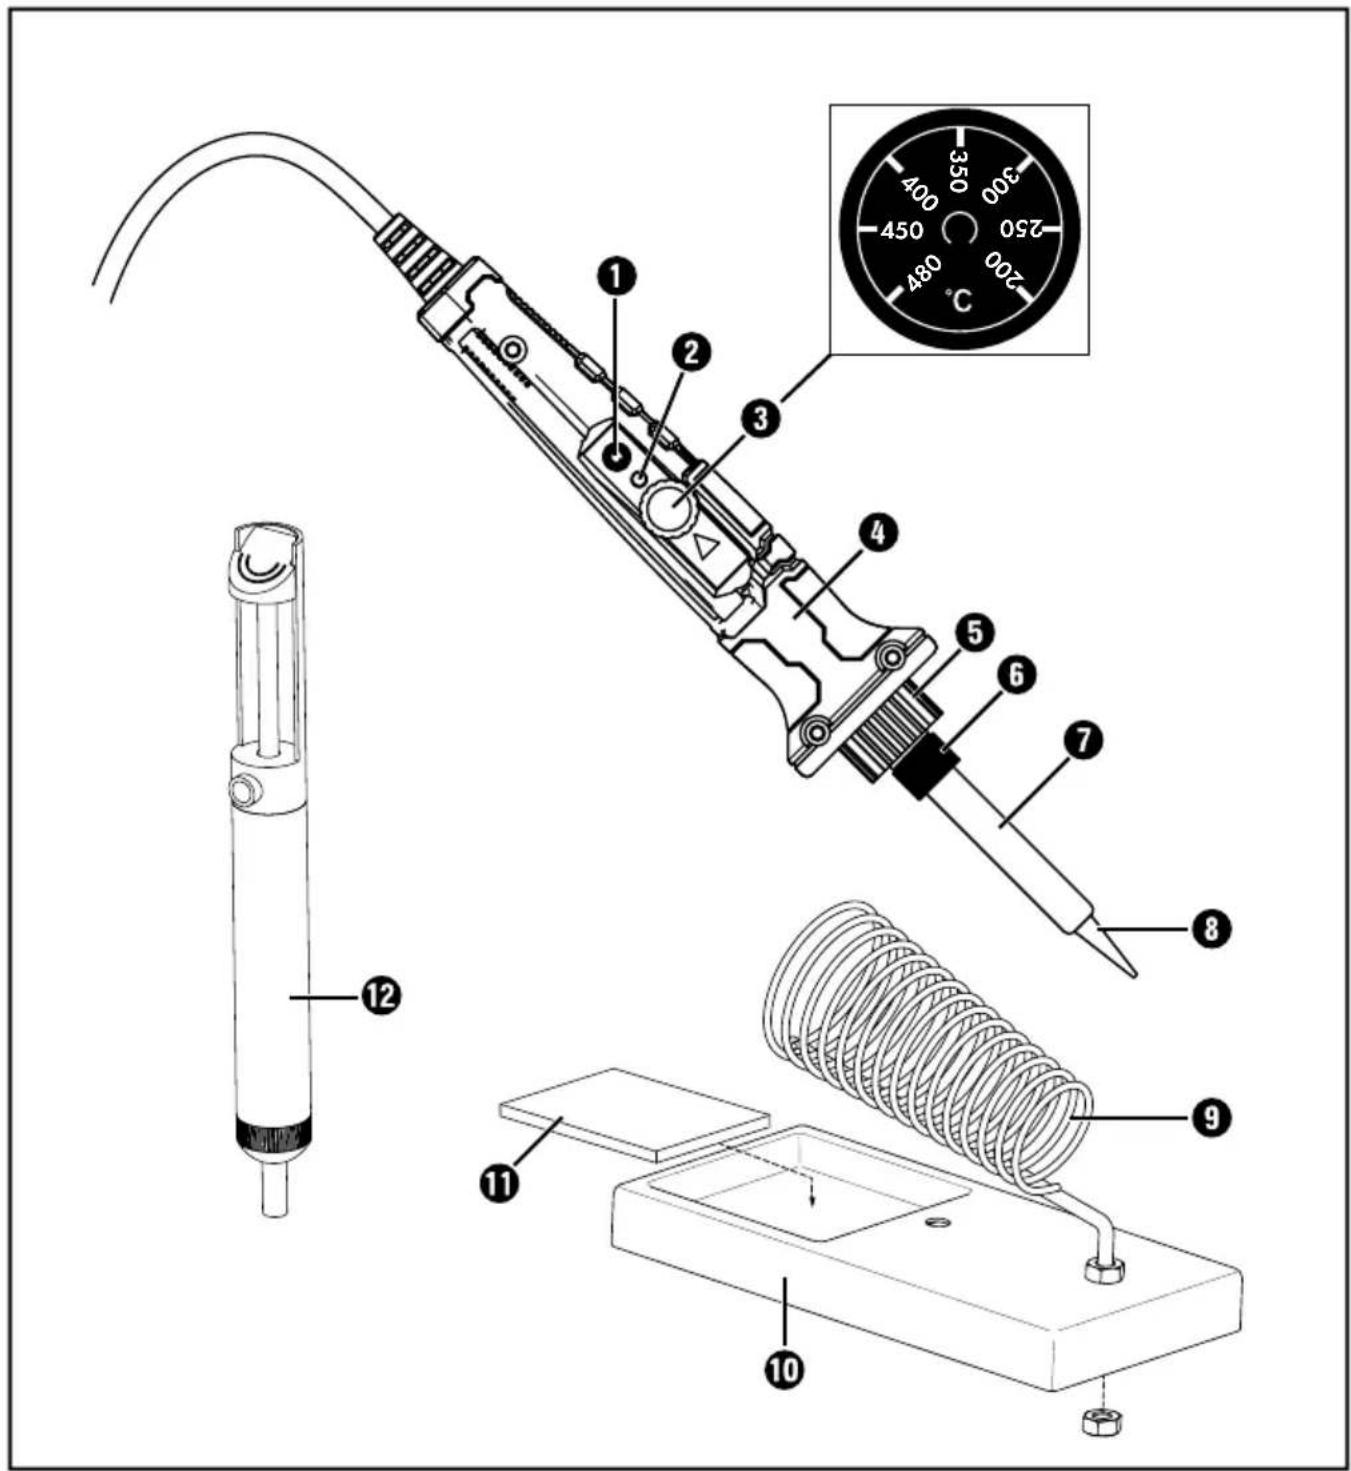
See fold-out page for illustrations:
① On/Off switch
② LED indicator (red: heating green: temperature reached)
③ Temperature control
4 Soldering iron
⑤ Holder for the soldering tip
6 Fixing ring
⑦Sleeve
8 Soldering tip
⑨ Coil spring
10 Soldering iron stand
⑪ Soldering sponge
⑫ Desoldering pump
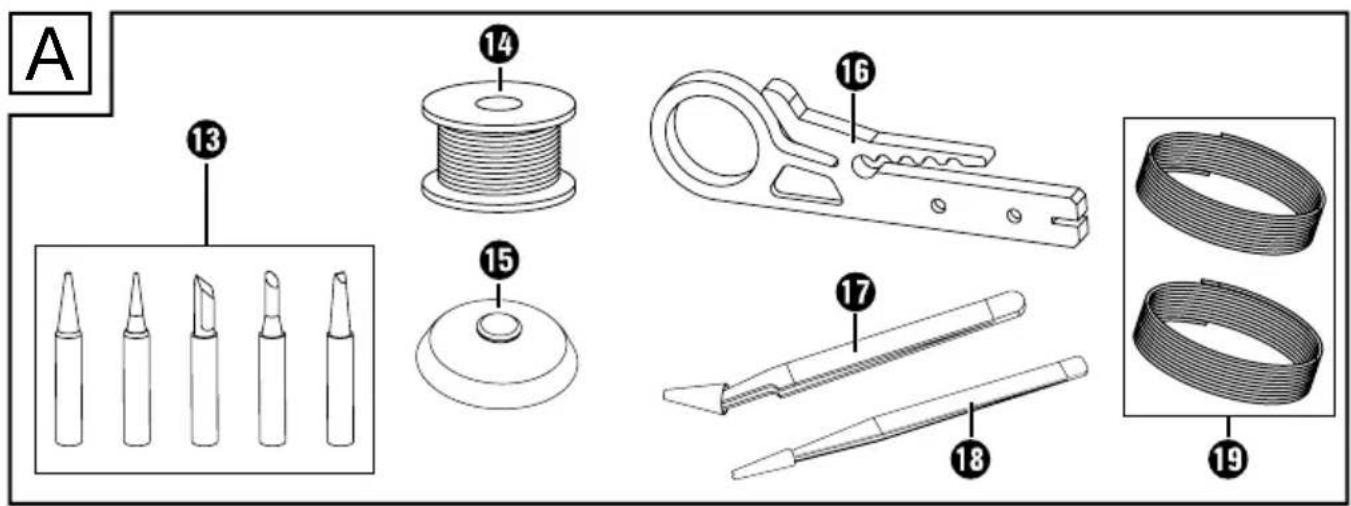
Fig. A:
⑬ Soldering tips
14 Solder
15 Desoldering braid
16 Stripping knife
⑰ Tweezers ESD 15
18 Tweezers ESD 11
19 Cable wires
Package contents
1 soldering iron
6 soldering tips (1 x pre-mounted)
1 desoldering pump
1 soldering iron stand with sponge
1 spool of soldering tin
1 spool of desoldering braid
2 antistatic tweezers
2 x wires (1 m each red and black, 0.5 mm ^4 )
1 stripping knife
1 carrying case
1 set of instructions for use
Technical data
Rated voltage: 230 V \~
Rated frequency: 50 Hz
Rated power consumption: 30 (max. 60 W)
Protection class: I
Temperature range: 200 - 480°C
Safetyinformation
WARNING!
▶ Read all safety warnings and all instructions. Failure to follow the warnings and instructions may result in electric shock, fire and/or serious injury.
The soldering iron is suitable for indoor use only.
■ This appliance may be used by persons with limited physical, sensory or mental capabilities or lack of experience and knowledge, provided that they are under supervision or have been told how to use the appliance safely and are aware of the potential risks.
■ Do not allow children to play with the appliance.
■ The appliance and its connecting cable must be kept away from children.
■ To avoid potential risks, damaged power cords should be replaced by the manufacturer, their customer service department or a similarly qualified person.
■ WARNING! RISK OF ELECTRIC SHOCK!
Do not use the soldering iron if the handle, the power cord or the plug are damaged. Never open the appliance!
■ CAUTION! RISK OF BURNS! Always make sure that the soldering tip is properly attached to the appliance before use. Do not touch the heated soldering tip or the molten solder. There is a risk of being burnt. Always allow the appliance to cool down completely before changing components, cleaning or checking it.
■ After work, allow the soldering iron to cool down in the air only. Do not attempt to quench it with water!
■ CAUTION! RISK OF FIRE! Always use the special holder or another fireproof surface when you put the hot soldering iron down.
■ The soldering iron must be stored in its stand when not in use.
- Keep the appliance away from flammable material.
■ Remove any flammable objects, liquids and gases from the working area of the appliance before use. To help prevent accidents, always keep your work area clean and tidy.
■ Never leave a switched-on appliance unsupervised.
■ CAUTION! RISK OF INJURY! Keep your hands away from the heated workpiece. The heat can be emitted through the workpiece.
■ In the event of danger, remove the power plug from the outlet immediately.
■ CAUTION! RISK OF POISONING! Do not breathe in vapours.
■ During work over an extended period in which hazardous vapours can be created, always ensure sufficient ventilation of the workplace. In addition, protective gloves, a face mask and work apron are recommended.
■ Avoid eating, drinking and smoking in rooms where soldering work is taking place. Otherwise, lead residues on your hands might contaminate the food, drink or cigarettes and be absorbed into your body.
■ Always wash your hands thoroughly after soldering.
■ Do not dispose of solder waste in normal household waste. Solder waste should be disposed of with hazardous waste.
ATTENTION! Do not exert any excessive pressure on the soldering tip during use. Otherwise it could bend.
■ Avoid contact between the hot soldering tip and the plastic parts of the holder. Otherwise, the appliance might be damaged.
Before use
(i) Note:
▶ All devices are checked for function at the end of the manufacturing process. Therefore the soldering iron ④ might have a slight discolouration. This does not mean your originally packaged appliance is not brand new.
Soldering iron stand
The soldering iron stand 10 is pre-assembled. Always use it to store the soldering iron 4 safely during work breaks. Take care not to let the power cord hang down, otherwise the soldering iron stand 10 could tip over due to the weight of the soldering iron 4. If you want to attach it to the worktop, you can use the opening in the centre of the soldering iron stand 10 to screw it to the base.
Inserting/replacing the soldering tip ⚠️ CAUTION! RISK OF BURNS!
▶ Never heat the soldering iron ④ without the soldering tip ⑧/⑬.
The soldering tip 8/13 may only be removed when the appliance is switched off and the soldering tip 8/13 has cooled down.
Unscrew the fixing rinsg ⑥ and remove the sleeve ⑦ from the soldering tip ⑧/13.
Pull the soldering tip 8/13 out of the holder 5 and attach a new one. Make sure that you lower it into the holder 5 as far as it will go.
Put the sleeve ⑦ back onto the soldering tip ⑧/⑬ and screw the fixing ring ⑥ back on.
Use
Switching on/o
Switching on:
◆ Plug the mains plug into a suitable power outlet and press the ON/OFF switch ① for approx. 2 seconds.
◆ The LED indicator ② lights up red. The appliance starts to heat up.
As soon as the set temperature is reached, the LED indicator lights up green.
(i) Note:
Before using the soldering iron ④ for the first time and also when using any new soldering tip, the soldering tip ⑧/⑬ must first be tinned (see section Soldering).
Switching off:
i Note:
▶ Always put the soldering iron ④ back into the soldering iron stand ⑩ after use.
◆ Press the ON/OFF switch ①. Always remove the plug from the outlet when not in use.
Setting the temperature
i Note:
▶ Fault-free soldering requires the use of appropriate solders. Furthermore, it is not possible to make perfect soldered joints unless the correct soldering temperature is used. If the soldering temperature is too low, the solder is not sufficiently fluid and causes dirty solder joints (so-called cold solder joints). If the soldering temperature is too high, the soldering flux can burn and the solder will not flow. In addition, the materials to be processed can be destroyed.
■ Use the temperature settings below for the most common applications. These may vary depending on the solder/manufacturer.
| approx. 200°C | Melting point of the most frequently used soft solders. |
| approx. 300°C | Normal operation, e.g. when using lead-free solder. |
| approx. 400°C | High soldering temperature, e.g. for de-soldering small solder joints. |
| approx. 480°C | Maximum soldering temperature, e.g. for de-soldering larger solder joints. |
Setting the working temperature
Turn the temperature control ③ until the desired temperature corresponds with the arrow △
Soldering sponge
ATTENTION!
The hot soldering tip ⑧/⑬ must never come into contact with a dry soldering sponge ⑪. Otherwise, the soldering sponge ⑪ can be damaged.
i Note:
▶ The soldering sponge ⑪ is used to clean the soldering tip ⑧/⑬.
▶ Moisten the soldering sponge ⑪ only slightly before using it. Squeeze out excess liquid away from the appliance before use.
Soldering

Vapours can lead to headaches and fatigue if inhaled.
■ The soldering iron ④ is ideal for soldering electronics.
■ Its design makes it perfectly suited for hard-to-reach areas and fine soldering work.
Clean the soldering tip 8/13 on the moist soldering sponge 11.
The soldering tip 8/13 must be tinned before starting soldering work. To do this, heat up the unused or cleaned soldering tip 8/13 and tin it by contact with the solder 14.
If possible, connect the parts to be soldered together mechanically, e.g. by twisting wires into each other.
◆ Guide the soldering tip ⑧/⑬ to the solder joint and heat it.
♦ Melt the solder 14 between the solder joint and soldering tip 8/13.
- Add more solder 14 until the entire solder joint is covered.
Then withdraw the soldering tip 8/13 immediately so as not to overheat the molten solder.
◆ Allow the solder to harden and avoid any knocks or vibrations.
i Note:
▶ For extensive soldering work, we recommend cleaning the tip from time to time and re-tinning if necessary.
▶ Use the tweezers 17/18 to accurately grip and hold small objects such as wires, chips or other electronic components. The straight tweezers 18 are suitable for small to medium-sized objects. The angled tweezers 17 are best suited for hard-to-reach areas and for soldering work on circuit boards or for soldering jewellery.
- You can use the supplied cable wire 19 to connect electrical cables. Use the stripping knife 16 to expose the cable strands.
To do this, insert the cable into the appropriate recess on the blade of the stripping knife 16. Carefully cut the cable insulation by pressing the movable part of the stripping knife 16 onto the blade and rotating it around the cable. For thinner cables, use the blade at the tip of the stripping knife 16. Then remove the insulation.
Desoldering
■ You can soak up excess solder with the desoldering braid 15.
The desoldering braid 15 is heated together with the workpiece for this purpose. When the temperature is reached, the desoldering braid 15 absorbs the excess solder.
■ Defective solder joints can be desoldered again using the desoldering pump ⑫. This is used to extract the liquid solder. Proceed as follows to desolder:
◆ Press the pump plunger down until you hear it click into place.
◆ Guide the soldering tip 8/13 to the defective solder joint and heat it.
As soon as the metal has melted, bring the desoldering pump ⑫ directly up to the melting point and press the red suction button so that the soldering material is sucked out and the point is desoldered.
Maintenance and cleaning
WARNING! RISK OF INJURY!
Always pull the mains plug out of the mains socket and let the appliance cool down before you carry out any work on the appliance.
■ Always clean the appliance after completion of work.
■ To clean the housing, use a cloth and a mild detergent if necessary.
■ Never use sharp objects, petrol, solvents or cleaning agents that can damage plastic.
■ Do not allow any liquids to get into the interior of the appliance.
■ To clean the desoldering pump ⑫ unscrew it, pull both parts apart and remove the steel spring inside. Loose solder residues can be wiped off with a dry cloth, adhering residues can be removed with a brush. Then reassemble the cleaned desoldering pump ⑫ in reverse order.
Ordering replacement parts
You can order replacement parts for this product on the Internet at www.kompernass.com.

Scan the QR code with your smart-phone/tablet. You can use this QR code to go directly to our website to view and order the available spare parts.
i Note:
▶ If you have problems with your online order, you can contact our service centre by phone or e-mail.
▶ Always quote the article number (IAN) 457925_2401 in your order.
▶ Please note that online ordering of replacement parts is not possible for all countries.
Disposal
Applies only to France:
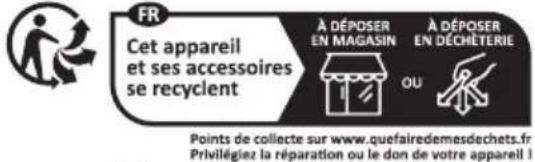
The product, its packaging and the operating instructions are recyclable. They are subject to an extended manufacturer responsibility and will be collected separately.
Disposal of the appliance
The adjacent symbol of a crossed-out dustbin means that this appliance is subject to Directive 2012/19/EU. This directive states that this appliance may not be disposed of in the normal household waste at the end of its useful life, but must be taken to specially set-up collection locations, recycling depots or disposal companies.
The disposal is free of charge for the user. Protect the environment and dispose of this appliance properly.
If your old appliance has stored any personal data, you are responsible for deleting it yourself before returning it.

Your local community or municipal authorities can provide information on how to dispose of the worn-out product.
Disposal of the packaging

The packaging materials have been selected for their environmental friendliness and ease of disposal and are therefore recyclable. Dispose of packaging materials that are no longer needed in accordance with applicable local regulations.
Dispose of the packaging in an environmentally friendly manner. Note the labelling on the packaging and separate the packaging material components for disposal, if necessary. The packaging material is labelled with abbreviations (a) and numbers (b) with the following meanings: 1–7: plastics, 20–22: paper and cardboard, 80–98: composites.
Disposal of the soldering tin and solder waste
Discard the soldering tin and solder waste at a recycling facility. Do not dispose it along with the household waste.
KompernassHandelsGmbH warranty
Dear Customer,
This appliance has a 3-year warranty valid from the date of purchase. If included with the product on delivery, the battery packs of the X12V and X20V Team series also come with a 3-year warranty from the date of purchase. If this product has any faults, you, the buyer, have certain statutory rights. Your statutory rights are not restricted in any way by the warranty described below.
Warranty conditions
The warranty period starts on the date of purchase. Please keep your receipt in a safe place. This will be required as proof of purchase.
If any material or manufacturing fault occurs within three years of the date of purchase of the product, we will either repair or replace the product for you or refund the purchase price (at our discretion). This warranty service requires that you present the defective appliance and the proof of purchase (receipt) within the three-year warranty period, along with a brief written description of the fault and of when it occurred.
If the defect is covered by the warranty, your product will either be repaired or replaced by us. The repair or replacement of a product does not signify the beginning of a new warranty period.
Warranty period and statutory claims for defects
The warranty period is not prolonged by repairs effected under the warranty. This also applies to replaced and repaired components. Any damage and defects present at the time of purchase must be reported immediately after unpacking. Repairs carried out after expiry of the warranty period shall be subject to a fee.
Scope of the warranty
This appliance has been manufactured in accordance with strict quality guidelines and inspected meticulously prior to delivery.
The warranty covers material faults or production faults. The warranty does not cover product parts that are subject to normal wear and tear and can therefore be considered wearing parts, such as saw blades, replacement blades, abrasive papers, etc. or for damage to fragile parts, such as switches or parts made of glass.
The warranty does not apply if the product has been damaged, improperly used or improperly maintained. The directions in the operating instructions for the product regarding proper use of the product are to be strictly followed. Uses and actions that are discouraged in the operating instructions or which are warned against must be avoided.
This product is intended solely for private use and not for commercial purposes. The warranty shall be deemed void in cases of misuse or improper handling, use of force and modifications/repairs which have not been carried out by one of our authorised Service centres.
The warranty does not apply to
■ Normal reduction of the battery capacity over time
■ Commercial use of the product
■ Damage to or alteration of the product by the customer
■ Non-compliance with safety and maintenance instructions, operating errors
■ Damage caused by natural hazards
Warranty claim procedure
To ensure quick processing of your case, please observe the following instructions:
■ Please have the till receipt and the item number (IAN) 457925_2401 available as proof of purchase.
■ You will find the item number on the type plate on the product, an engraving on the product, on the front page of the operating instructions (below left) or on the sticker on the rear or bottom of the product.
If functional faults or other defects occur, please first contact the service department listed below by telephone or use our contact form, which you can find on parkside-diy.com in the Service category.
■ You can return a defective product to us free of charge to the service address that will be provided to you. Ensure that you enclose the proof of purchase (till receipt) and information about what the defect is and when it occurred.

You can view and download these instructions along with many other manuals at parkside-diy.com. This QR code will take you directly to parkside-diy.com. Select your country and use the search box to search for the operating instructions. Enter the article number (IAN) 457925_2401 to find the operating instructions for your article.
Service
GB Service Great Britain
Tel.: 0800 051 897 0
Contact form on parkside-diy.com
IEServicelreland
Tel.: 1800 851251
Contact form on parkside-diy.com
IAN 457925_2401
Importer
Please note that the following address is not the service address. Please use the service address provided in the operating instructions.
KOMPERNASS HANDELS GMBH
BURGSTRASSE 21
44867 BOCHUM
GERMANY
www.kompernass.com
Inhaltsverzeichnis
Einleitung 12
KOMPERNASS HANDELS GMBH
BURGSTRASSE 21
44867 BOCHUM
DEUTSCHLAND
www.kompernass.com
Table des matières
Introduction 22
KOMPERNASS HANDELS GMBH
BURGSTRASSE 21
44867 BOCHUM
ALLEMAGNE
www.kompernass.com
Inhoud
Inleiding....36
KOMPERNASS HANDELS GMBH
BURGSTRASSE 21
44867 BOCHUM
DUITSLAND
www.kompernass.com
Obsah
Úvod 46
KOMPERNASS HANDELS GMBH
BURGSTRASSE 21
44867 BOCHUM
NĚMECKO
www.kompernass.com
Spis treści
KOMPERNASS HANDELS GMBH
BURGSTRASSE 21
44867 BOCHUM
NIEMCY
www.kompernass.com
Obsah
Úvod 66
KOMPERNASS HANDELS GMBH
BURGSTRASSE 21
44867 BOCHUM
NEMECKO
www.kompernass.com
Índice
Introducción....76
Uso previsto....76
KOMPERNASS HANDELS GMBH
BURGSTRASSE 21
44867 BOCHUM
ALEMANIA
www.kompernass.com
Indholdsfortegnelse
Indledning 86
Anvendelsesområde....86
KOMPERNASS HANDELS GMBH
BURGSTRASSE 21
44867 BOCHUM
TYSKLAND
www.kompernass.com
Indice
Introduzione 96
Uso conforme. 96
KOMPERNASS HANDELS GMBH
BURGSTRASSE 21
44867 BOCHUM
GERMANY
www.kompernass.com
Last Information Update · Stand der Informationen · Version des informations
Stand van de informatie · Stav informací · Stan informacji · Stav informácií
Estado de las informaciones · Tilstand af information · Versione delle informazioni