DWS225R - Sander Toolson - Free user manual and instructions
Find the device manual for free DWS225R Toolson in PDF.


User questions about DWS225R Toolson
0 question about this device. Answer the ones you know or ask your own.
Ask a new question about this device
Download the instructions for your Sander in PDF format for free! Find your manual DWS225R - Toolson and take your electronic device back in hand. On this page are published all the documents necessary for the use of your device. DWS225R by Toolson.
USER MANUAL DWS225R Toolson
natural_image
Two industrial tools: a black tool holder and a black power saw, both with no visible text or symbols.DWS225R
| DE | TrockenbauschleiferOriginalbedienungsanleitung | 5 |
| GB | Drywall SanderTranslation of original instruction manual | 17 |
| FR | Ponceuse sol / mur / plafondTraduction des instructions d'origine | 27 |
| NL | WandschuurmachineVertaling van originele handleiding | 38 |
| IT | Levigatrice per muratura a seccoTraduzione dal manuale originale | 49 |
| DK | TørvægssliberOversættelse af original-vejledning | 60 |
| NO | PlansliperOversettelse av originalinstruksjoner | 70 |
| FI | Hiomakone kuivarakentamiseenAlkuperäisen ohjeen käännös | 80 |
| CZ | Bruska pro suché stavbyPřeklad originálního návodu k obsluze | 90 |
| SK | Brúska pre suché stavbyPreklad originálneho návodu na obsluhu | 100 |
| SI | Brusilnik za suhomontažne materialePrevod originalnih navodil za uporabo | 111 |
| ES | Lijadora de paredTraducción del manual original | 121 |
| SE | TorrslipareÖversättning av originalbruksanvisningen | 132 |
| EE | ViimistluslihvijaOriginaalikasutusjuhendi tõlge | 142 |
| HR | Brusilica za gipsane pločePrijevod originalnog priručnika za uporabu | 152 |
| HU | Száraz építési csiszolóAz eredeti útmutató fordítása | 162 |
| BA | Brusilica za suhu gradnjuPrijevod originalnog uputstva za upotrebu | 173 |
| RS | Brusilica za suve zidovePrevod originalnog priručnika | 183 |
| BG | Шлайфмашина за сухо строителствоПревод на оригиналното ръководство | 193 |
| RU | Гипсокартон СандерПеревод оригинального руководства | 205 |
| IS | Slípunartæki fyrir gifsveggРýðing a upprunalegu notkunarleiðbeiningunum | 217 |
1
natural_image
Mechanical tool with rotating base and clamping mechanism, no visible text or symbols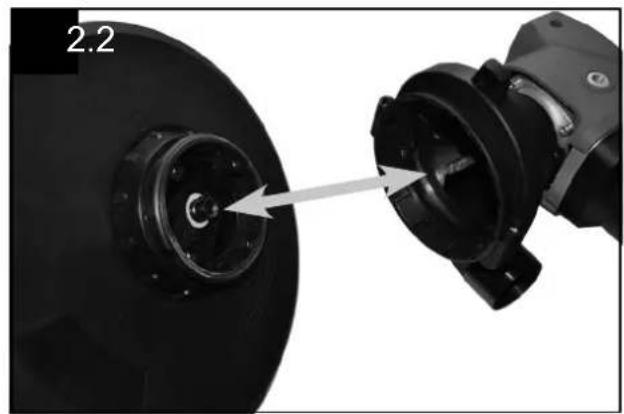
natural_image
Close-up of a mechanical component with a circular housing and a cylindrical shaft, showing a close-up view (no text or symbols visible)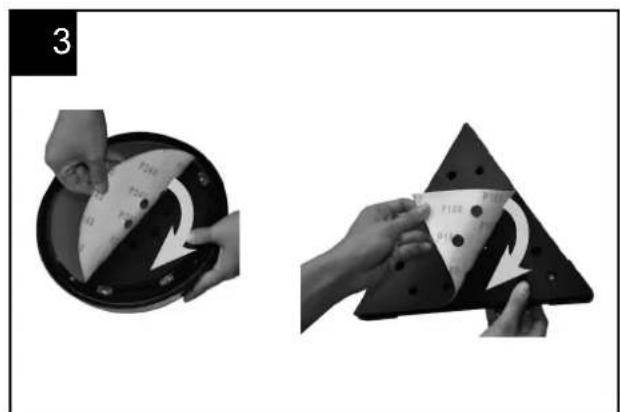
natural_image
Two-step diagram showing hands holding a circular device with a slice being turned, and a triangular plate with a sliced slice being cut (no text or symbols)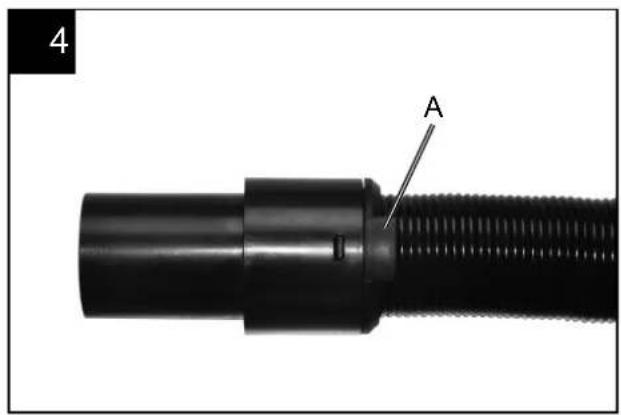
text_image
4 A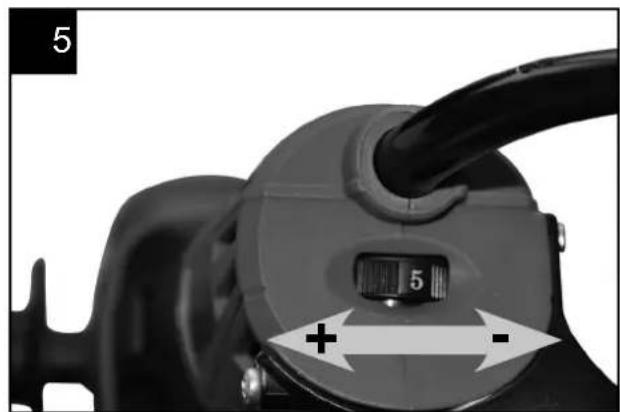
natural_image
Close-up of a mechanical component with a dial indicator and directional arrows, no readable text or symbols present.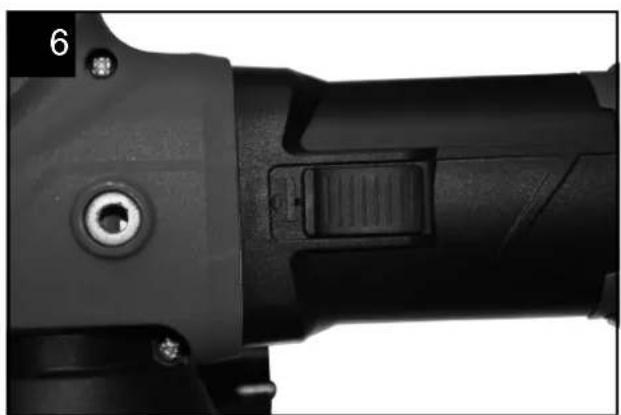
natural_image
Close-up of a black mechanical component with a circular screw and adjustment knob (no visible text or symbols)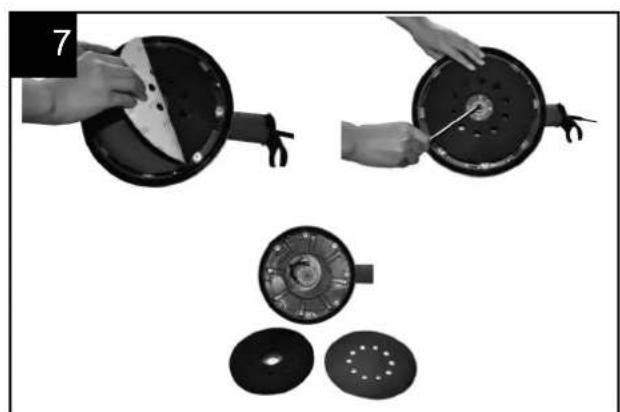
natural_image
Three-step diagram showing hands operating a circular device with a tool, plus two separate circular components (no text or symbols)Günzburger Straße 69
D-89335 Ichenhausen
Verehrter Kunde,
Explanation of the symbols on the device
 | Warning! Failure to comply with possible danger to life, risk of injury or damage to the tool! | |
 | Read the operating and safety instructions before start-up and follow them! | |
 | Wear safety goggles! | |
 | Wear ear-muffs! | |
 | Wear a breathing mask! | |
 | Protection class II | |
Table of contents: Page:
- Introduction.... 19
- Device description.... 19
- Intended use....20
- Safety instructions ....20
- Technical Specifications....23
- Before starting the equipment 23
- Working with the power tool 24
- Electrical connection 24
- Cleaning, maintenance and storage....25
- Transport 25
- Disposal and recycling 25
- Troubleshooting....26
1. Introduction
Manufacturer:
scheppach
Günzburger Straße 69
D-89335 Ichenhausen
Dear Customer,
We wish you much joy and success in working with your new appliance.
Note:
According to the applicable product liability laws, the manufacturer of the device does not assume liability for damages to the product or damages caused by the product that occurs due to:
- Improper handling,
• Non-compliance of the operating instructions, - Repairs by third parties, not by authorized service technicians,
- Installation and replacement of non-original spare parts,
• Application other than specified, - A breakdown of the electrical system that occurs due to the non-compliance of the electric regulations and VDE regulations 0100, DIN 57113 / VDE0113.
We recommend:
Read through the complete text in the operating instructions before installing and commissioning the device.
The operating instructions are intended to help the user to become familiar with the machine and take advantage of its application possibilities in accordance with the recommendations.
The operating instructions contain important information on how to operate the machine safely, professionally and economically, how to avoid danger, costly repairs, reduce downtimes and how to increase reliability and service life of the machine.
In addition to the safety regulations in the operating instructions, you have to meet the applicable regulations that apply for the operation of the machine in your country.
Keep the operating instructions package with the machine at all times and store it in a plastic cover to protect it from dirt and moisture. Read the instruction manual each time before operating the machine and carefully follow its information.
The machine can only be operated by persons who were instructed concerning the operation of the machine and who are informed about the associated dangers. The minimum age requirement must be complied with.
In addition to the safety notes contained in the present operating instructions and the special regulations of your country, the generally recognized technical rules for the operation of machines must be observed.
We accept no liability for damage or accidents which arise due to non-observance of these instructions and the safety information.
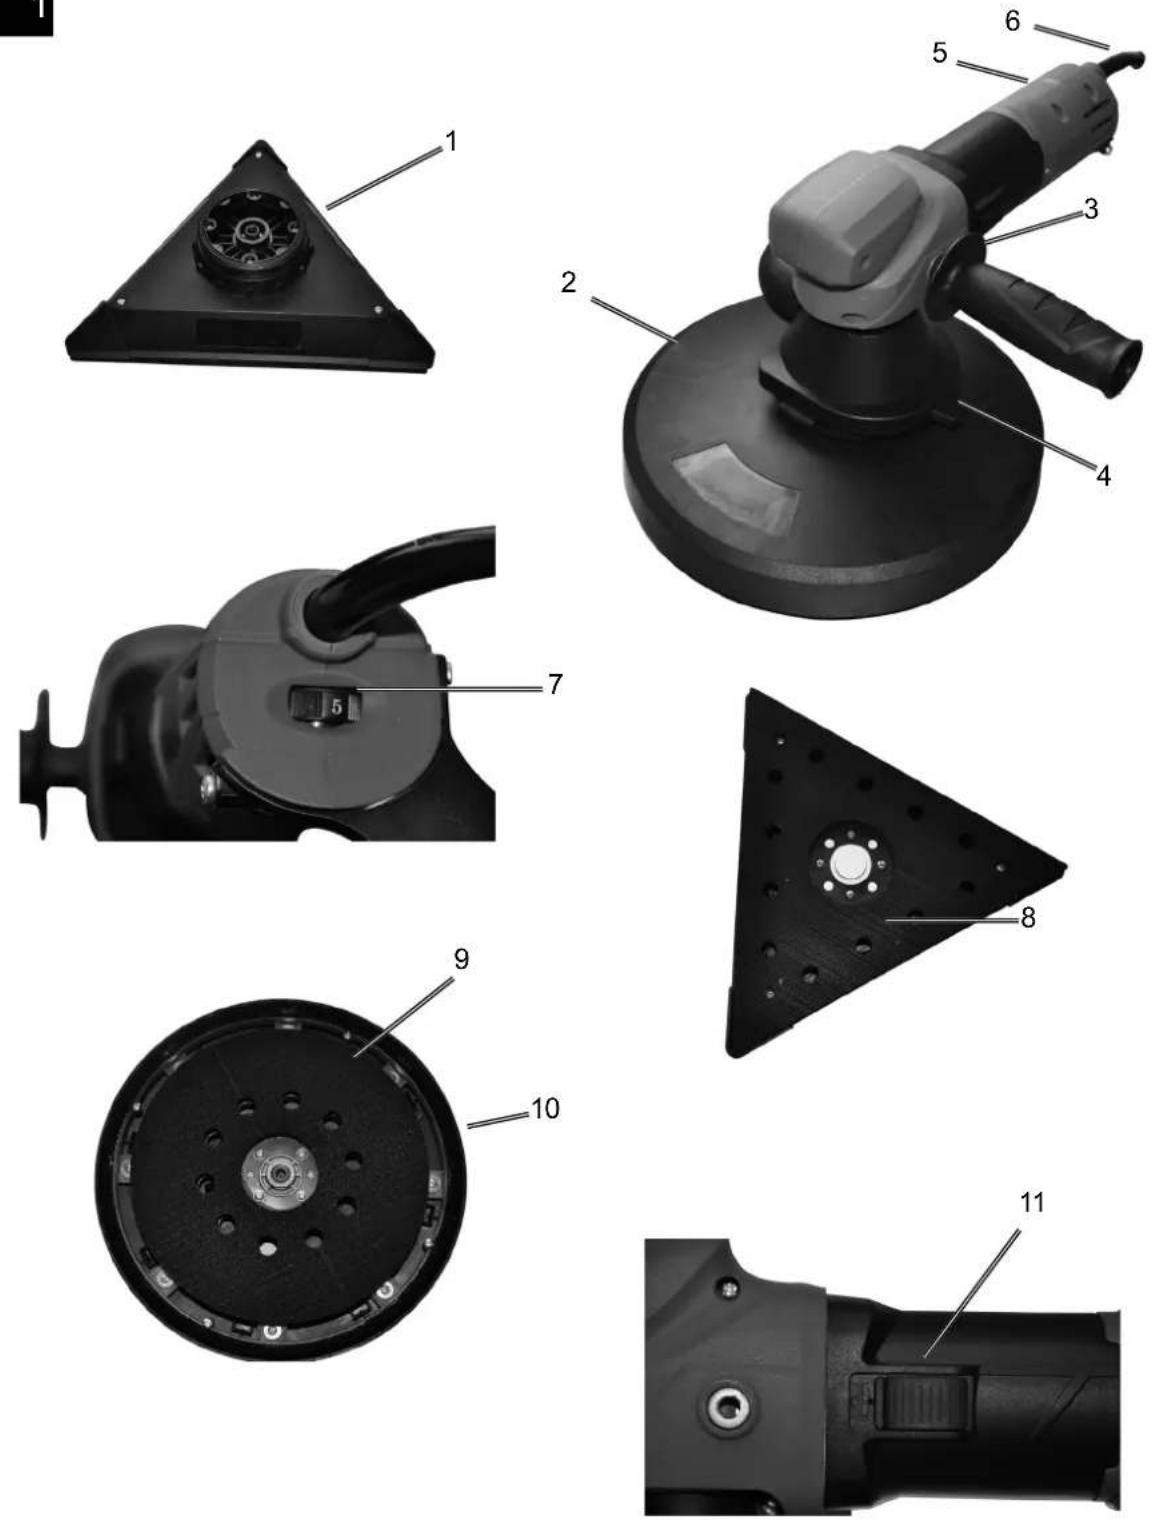
2. Device description (Fig. 1)
- Triangular sanding head
- Round sanding head
- Front handle
- Lock button
- Rear handle
- Power cord with plug
- Speed adjuster
- Triangular velcro sanding plate with extraction holes
- Round velcro sanding plate with extraction holes
- Brush ring
- Power switch
Standard accessories
6x Round sandpaper
6x Triangular sandpaper
1x Telescopic dust hose
1x Internal hexagonal wrench
1x Connector
1x Front handle
General information
- After unpacking, check all parts for possible transportation damages. In the event of complaints, inform the supplier immediately. Any complaints made after this time will not be accepted.
- The shipment is to be checked for completeness upon receipt.
- Read through the manual carefully in order to make yourself familiar in dealing with the device before using it for the first time.
- Only use original equipment regarding accessories, as well as consumable items and spare parts.
- Spare parts can be obtained from your specialized dealer.
- When ordering, please specify our part numbers, as well as type and construction year of the device.
ATTENTION
The device and packaging materials are not toys! Children must not be allowed to play with plastic bags, film and small parts! There is a risk of swallowing and suffocation!
Please note that our equipment has not been designed for use in commercial, trade or industrial applications. Our warranty will be voided if the equipment is used in commercial, trade or industrial businesses or for equivalent purposes.
3. Intended use
As one of our products, the device belongs to the hand-held electric tools. The device mainly caters for lime surface, including the interior wall, ceiling, exterior wall, corridor, etc. Remove the painting lime mud from the wall, and make the surface even or smooth.
4. Safety instructions
General power tool safety warnings
⚠ WARNING: Read all safety warnings, instructions, illustrations and specifications provided with this power tool.
Failure to follow all instructions listed below may result in electric shock, fire and/or serious injury.
Save all warnings and instructions for future reference.
The term "power tool" in the warnings refers to your mains-operated (corded) power tool or battery-operated (cordless) power tool.
1. Work area safety
a) Keep work area clean and well lit. Cluttered or dark areas invite accidents.
b) Do not operate power tools in explosive atmospheres, such as in the presence of flammable liquids, gases or dust. Power tools create sparks which may ignite the dust or fumes.
c) Keep children and bystanders away while operating a power tool. Distractions can cause you to lose control.
2. Electrical safety
a) Power tool plugs must match the outlet. Never modify the plug in any way. Do not use any adapter plugs with earthed (grounded) power tools. Unmodified plugs and matching outlets will reduce risk of electric shock.
b) Avoid body contact with earthed or grounded surfaces, such as pipes, radiators, ranges and refrigerators. There is an increased risk of electric shock if your body is earthed or grounded.
c) Do not expose power tools to rain or wet conditions. Water entering a power tool will increase the risk of electric shock.
d) Do not abuse the cord. Never use the cord for carrying, pulling or unplugging the power tool. Keep cord away from heat, oil, sharp edges or moving parts. Damaged or entangled cords increase the risk of electric shock.
e) When operating a power tool outdoors, use an extension cord suitable for outdoor use. Use of a cord suitable for outdoor use reduces the risk of electric shock.
f) If operating a power tool in a damp location is unavoidable, use a residual current device (RCD) protected supply. Use of an RCD reduces the risk of electric shock.
3. Personal safety
a) Stay alert, watch what you are doing and use common sense when operating a power tool. Do not use a power tool while you are tired or under the influence of drugs, alcohol or medication. A moment of inattention while operating power tools may result in serious personal injury.
b) Use personal protective equipment. Always wear eye protection. Protective equipment such as a dust mask, non-skid safety shoes, hard hat or hearing protection used for appropriate conditions will reduce personal injuries.
c) Prevent unintentional starting. Ensure the switch is in the off-position before connecting to power source and/or battery pack, picking up or carrying the tool. Carrying power tools with your finger on the switch or energising power tools that have the switch on invites accidents.
d) Remove any adjusting key or wrench before turning the power tool on. A wrench or a key left attached to a rotating part of the power tool may result in personal injury.
e) Do not overreach. Keep proper footing and balance at all times. This enables better control of the power tool in unexpected situations.
f) Dress properly. Do not wear loose clothing or jewellery. Keep your hair and clothing away from moving parts. Loose clothes, jewellery or long hair can be caught in moving parts.
g) If devices are provided for the connection of dust extraction and collection facilities, ensure these are connected and properly used. Use of dust collection can reduce dust-related hazards.
h) Do not let familiarity gained from frequent use of tools allow you to become complacent and ignore tool safety principles. A careless action can cause severe injury within a fraction of a second.
4. Power tool use and care
a) Do not force the power tool. Use the correct power tool for your application. The correct power tool will do the job better and safer at the rate for which it was designed.
b) Do not use the power tool if the switch does not turn it on and off. Any power tool that cannot be controlled with the switch is dangerous and must be repaired.
c) Disconnect the plug from the power source and/or remove the battery pack, if detachable, from the power tool before making any adjustments, changing accessories, or storing power tools. Such preventive safety measures reduce the risk of starting the power tool accidentally.
d) Store idle power tools out of the reach of children. Do not allow persons unfamiliar with the power tool or these instructions to operate the power tool. Power tools are dangerous in the hands of untrained users.
e) Maintain power tools and accessories. Check for misalignment or binding of moving parts, breakage of parts and any other condition that may affect the power tool's operation. If damaged, have the power tool repaired before use. Many accidents are caused by poorly maintained power tools.
f) Keep cutting tools sharp and clean. Properly maintained cutting tools with sharp cutting edges are less likely to bind and are easier to control.
g) Use the power tool, accessories and tool bits etc. in accordance with these instructions, taking into account the working conditions and the work to be performed. Use of the power tool for operations different from those intended could result in a hazardous situation.
h) Keep handles and grasping surfaces dry, clean and free from oil and grease. Slippery handles and grasping surfaces do not allow for safe handling and control of the tool in unexpected situations.
5. Service
a) Have your power tool serviced by a qualified repair person using only identical replacement parts. This will ensure that the safety of the power tool is maintained.
Safety instructions for all operations - Safety warnings common for grinding, sanding, wire brushing, polishing or abrasive cutting-off operations
a) This power tool is intended to function as a sander. Read all safety warnings, instructions, illustrations and specifications provided with this power tool. Failure to follow all instructions listed below may result in electric shock, fire and/or serious injury.
b) Operations such as grinding, wire brushing, polishing or cutting-off are not recommended to be performed with this power tool. Operations for which the power tool was not designed may create a hazard and cause personal injury.
c) Do not use accessories which are not specifically designed and recommended by the tool manufacturer. Just because the accessory can be attached to your power tool, it does not assure safe operation.
d) The rated speed of the accessory must be at least equal to the maximum speed marked on the power tool. Accessories running faster than their rated speed can break and fly apart.
e) The outside diameter and the thickness of your accessory must be within the capacity rating of your power tool. Incorrectly sized accessories cannot be adequately guarded or controlled.
f) Threaded mounting of accessories must match the grinder spindle thread. For accessories mounted by flanges, the arbour hole of the accessory must fit the locating diameter of the flange. Accessories that do not match the mounting hardware of the power tool will run out of balance, vibrate excessively and may cause loss of control.
g) Do not use a damaged accessory. Before each use inspect the accessory such as abrasive wheels for chips and cracks, backing pad for cracks, tear or excess wear, wire brush for loose or cracked wires. If power tool or accessory is dropped, inspect for damage or install an undamaged accessory. After inspecting and installing an accessory, position yourself and bystanders away from he plane of the rotating accessory and run the power tool at maximum no-load speed for one minute. Damaged accessories will normally break apart during this test time.
h) Wear personal protective equipment. Depending on application, use face shield, safety goggles or safety glasses. As appropriate, wear dust mask, hearing protectors, gloves and workshop apron capable of stopping small abrasive or workpiece fragments. The eye protection must be capable of stopping flying debris generated by various operations. The dust mask or respirator must be capable of filtrating particles generated by your operation. Prolonged exposure to high intensity noise may cause hearing loss.
i) Keep bystanders a safe distance away from work area. Anyone entering the work area must wear personal protective equipment. Fragments of workpiece or of a broken accessory may fly away and cause injury beyond immediate area of operation.
j) Hold the power tool by insulated gripping surfaces only, when performing an operation where the cutting accessory may contact hidden wiring or its own cord. Cutting accessory contacting a "live" wire may make exposed metal parts of the power tool "live" and could give the operator an electric shock.
k) Position the cord clear of the spinning accessory. If you lose control, the cord may be cut or snagged and your hand or arm may be pulled into the spinning accessory.
I) Never lay the power tool down until the accessory has come to a complete stop. The spinning accessory may grab the surface and pull the power tool out of your control.
m) Do not run the power tool while carrying it at your side. Accidental contact with the spinning accessory could snag your clothing, pulling the accessory into your body.
n) Regularly clean the power tool's air vents. The motor's fan will draw the dust inside the housing and excessive accumulation of powdered metal may cause electrical hazards.
o) Do not operate the power tool near flammable materials. Sparks could ignite these materials.
p) Do not use accessories that require liquid coolants. Using water or other liquid coolants may result in electrocution or shock.
Further safety instructions for all operations & kickback
Kickback is a sudden reaction to a pinched or snagged rotating wheel, backing pad, brush or any other accessory. Pinching or snagging causes rapid stalling of the rotating accessory which in turn causes the uncontrolled power tool to be forced in the direction opposite of the accessory's rotation at the point of the binding.
For example, if an abrasive wheel is snagged or pinched by the workpiece, the edge of the wheel that is entering into the pinch point can dig into the surface of the material causing the wheel to climb out or kick out. The wheel may either jump toward or away from the operator, depending on direction of the wheel's movement at the point of pinching. Abrasive wheels may also break under these conditions.
Kickback is the result of power tool misuse and/or incorrect operating procedures or conditions and can be avoided by taking proper precautions as given below.
a) Maintain a firm grip on the power tool and position your body and arm to allow you to resist kickback forces. Always use auxiliary handle, if provided, for maximum control over kickback or torque reaction during start-up. The operator can control torque reactions or kickback forces, if proper precautions are taken.
b) Never place your hand near the rotating accessory. Accessory may kickback over your hand.
c) Do not position your body in the area where power tool will move if kickback occurs. Kickback will propel the tool in direction opposite to the wheel's movement at the point of snagging.
d) Use special care when working corners, sharp edges etc. Avoid bouncing and snagging the accessory. Corners, sharp edges or bouncing have a tendency to snag the rotating accessory and cause loss of control or kickback.
Safety warnings specific for sanding operations
a) Do not use excessively oversized sanding disc paper. Follow manufacturers recommendations, when selecting sanding paper. Larger sanding paper extending beyond the sanding pad presents a laceration hazard and may cause snagging, tearing of the disc or kickback.
Additional safety instructions
a) Connect a vacuum cleaner to the supplied adapter before starting your operations.
b) Attention! Keep away sanding dust from open fire. Dust may be explosive.
c) Always wear goggles and a dust mask when sanding, in particular during overhead work and when processing critical materials! When sanding certain materials (e.g. lead paint, certain types of wood and metal) harmful or noxious dust may be generated. Touching or breathing in such dust may imply risks for the operator or bystanders.
Warning
This machine produces an electromagnetic field during operation. This field may under some circumstances interfere with active or passive medical implants. To reduce the risk of serious or fatal injury, we recommend persons with medical implants to consult their physician and the medical implant manufacturer before operating this machine.
Additional safety instructions for sanding operations
Safety Warnings Specific for Sanding Operations
- Do not use excessively oversized sanding disc paper. Follow manufacturer recommendations, when selecting sanding paper. Larger sanding paper extending beyond the sanding pad presents a laceration hazard and may cause snagging, tearing of the disc or kickback
WARNING
Touching or inhaling harmful/toxic dust is a hazard to the operator and to people in the vicinity.
- It is not recommended to sand lead paint. Lead paint should be removed by a specialist only.
- Do not work on materials which release hazardous substances(e,g, asbestos). Take precautions if hazardous, combustible or explosive dust is likely to occur. Wear protective dust mask. Use dust extraction system.
Voltage
Before connecting electric tool to the socket, make sure that the supply voltage be in accordance with rated voltage. If the former is greater than latter and the device is powered on by mistake, it may result in damage of devices and injuries of people. As for indefinite supply voltage of socket, never try to plug for use. Besides, the damage of devices may also occur if the supply voltage falls below rated voltage.
Notes regarding vibration and noise emissions
Reduce noise emissions and vibrations to a minimum!
- Only use power tools which are free of defects.
- Maintain and clean the power tool on a regular basis.
- Adjust your way of working to the power tool.
- Do not overload your power tool.
- Have your power tool inspected, if necessary.
- Switch off the power tool when it is not in use.
Remaining risks
Even if you use this power tool in compliance with the regulations, there are still remaining risks. The following risks may occur due to the type and design of the power tool:
a) Damage caused to your health resulting from hand/arm vibrations if the power tool is used over a longer period of time or if it is not properly used and maintained.
b) Injury and damage to property caused by flying off insertion tools which are unexpectedly expelled from the power tool due to sudden damage, wear or incorrect insertion.
c) Burns and cuts if the insertion tools are touched directly after use and/or with your bare hands.
5. Technical Specifications
Dimensions L x W x H 450 x 270 x 210 mm
| Round sanding head | ∅ 225 mmn: 1000-2200 1/min |
| Triangular sanding head edge length 280 mm | |
| Oscillation 3000-6000 1/min | |
| Weight 3.8 kg | |
| Motor 230 V / 50 Hz | |
| Input Power P1 750 W | |
| Protection class II | |
| Sound pressure level L_PA | 91.3 dB(A), K_pA : 3 dB (A) |
| Sound power level L_WA | 102.3 dB(A), K_wA : 3 dB (A) |
| Vibration | a_h : 7.66 m/s ^2 K: 1.5 m/s ^2 |
Subject to technical changes!
Warning
The declared vibration total value has been measured in accordance with a standard test method and may be used for comparing one tool with another. The declared vibration total value may also be used in a preliminary assessment of exposure.
The vibration emission during actual use of the power tool can differ from the declared total value depending on the ways in which the tool is used. There is the need to identify safety measures to protect the operator that are based on an estimation of exposure in the actual conditions of use (taking account of all parts of the operating cycle such as the times when the tool is switched off and when it is running idle in addition to the trigger time).
6. Before starting the equipment
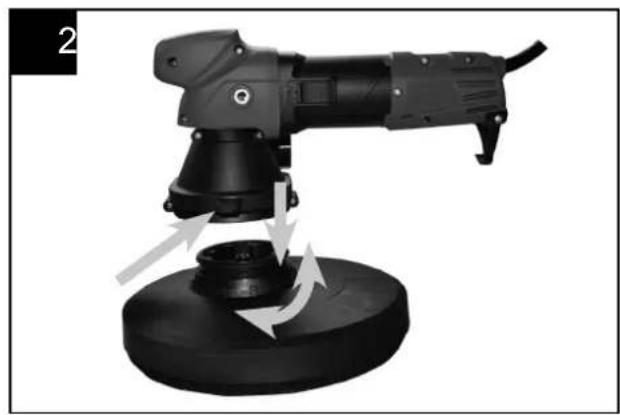
Attaching/changing the sanding head
(Fig. 2.1, 2.2)
Before performing any work on the electric power tool, pull out the main plug.
To attach:
- Press the lock button on the side of the tool;
- Put the tool on the sanding head and rotate to get the correct position
- Release the lock button to engage.
To change: Press the lock button on the tool change head and remove sanding head. The triangular sanding head is attached/changed in the same way. When attaching the tool change head, ensure that the locks engage correctly.
Installation & Sandpaper Replacement (Fig. 3)
To ensure the replacement procedures, place the device on the smooth ground prior to installation. Take the sandpaper from the toolbox, and then fix it onto the disk. The back of the sandpaper (Item I) will automatically glue with the disk/adhesive disk, making both connection and conduction available. In order to promote the sanding efficiency, it is necessary to change the sandpaper after the device has been operational for a certain period.
Firstly, switch off the device and disconnect the socket. Then, remove the previous sandpaper entirely from the disk, so as to lay new sandpaper neatly as well as facilitate future replacement. At last, fix new sandpaper in position.
For round sanding head only:
Conduct a test run to check that the sanding tool is Clamped in the centre.
Sandpaper Overview
The Sandpaper is used for sanding the wall or objects by its grains. The sandpaper is classified into various categories according to its dimensions. It is recommended to select the sandpaper in accordance with actual size of the disk. The more abrasive grains included on the sandpaper, the better flatness and parallelism can be achieved via sanding, while the sanding efficiency will fall accordingly and vice versa. Therefore, the sandpaper ( 225mm) is recommended upon actual needs.
Connecting the extractor (Fig. 4)
Installation Guide: Insert the hose into the connector. Push item A into the connector to lock the hose with the sander.
Preselecting the speed (Fig. 5)
To select the operating speed, move the dial to the required value. Stage 1 indicates the minimum speed. Stage 5 indicates the maximum speed.
Switching on and off (Fig. 6)
The switch of the machine is two step switch. As shown in following picture,
- Press the rear end of the switch and push the switch forward to power on
- Press the front end of the switch down to lock the switch in on"position
- Press the rear end of the switch to power off.
7. Working with the power tool
Always hold the wall sander with both hands! Keep your hands away from the sanding head. Otherwise, your hand could become caught, as the sanding head swivels in different directions.
- Attach sanding head.
- Attach sanding tool.
- Connect dust extraction system.
- Insert mains plug.
- Switch on dust extraction system.
-
Switch on the device.
-
Grip the wall sander by both handles. Press the wall sander gently against work surface (the pressure should be just enough to ensure that the sanding head is flush with the work surface).
Sanding head operation instruction
a) Brushing ring
A brush type rim surrounds the round sanding head. This time has two functions:
As the ring projects above the surface of the sanding plate, it is the ring which comes into contact with the work surface first. As a result the sanding head is brought parallel to the work surface before the and-ing tool comes into contact with the work surface.
This avoids a sickle-shaped depression ca used by the edge of the sanding disc.
The ring also retains the dust until it is extracted by the dust extractor. If the brush ring is damaged or shows excessive wear, it should be replaced.
b) Round sanding head
When working on the round sanding head, apply only as much pressure as is required to keep the sanding tool in contact with the work surface. Excessive pressure may result in a disagreeable spiral pattern of scratches and an uneven work surface. Move the sander constantly while the sanding tool is in contact with the work surface.
In doing so, ensure that you move the sander evenly and over a wide area, if you stop the sander on the work surface or move the sander unevenly, this may result in a disagreeable spiral pattern of scratches and an uneven work surface. The sanding disc can be replaced if it is damaged or severely abraded.
c) Triangular sanding head
The triangular sanding head does not rotate, but vibrate.
8. Electrical connection
The electrical motor installed is connected and ready for operation. The connection complies with the applicable VDE and DIN provisions. The customer's mains connection as well as the extension cable used must also comply with these regulations.
Damaged electrical connection cable
The insulation on electrical connection cables is often damaged.
This may have the following causes:
- Passage points, where connection cables are passed through windows or doors.
- Kinks where the connection cable has been improperly fastened or routed.
- Places where the connection cables have been cut due to being driven over.
- Insulation damage due to being ripped out of the wall outlet.
- Cracks due to the insulation ageing.
Such damaged electrical connection cables must not be used and are life-threatening due to the insulation damage.
Check the electrical connection cables for damage regularly. Make sure that the connection cable does not hang on the power network during the inspection. Electrical connection cables must comply with the applicable VDE and DIN provisions. Only use connection cables with the marking „H05VV-F“.
The printing of the type designation on the connection cable is mandatory.
AC motor
- The mains voltage must be 220 - 240 V\~ 50 Hz.
- Extension cables up to 25 m long must have a cross-section of 1.5 mm ^2 .
Connections and repairs of electrical equipment may only be carried out by an electrician.
Please provide the following information in the event of any enquiries:
- Type of current for the motor
• Machine data - type plate
9. Cleaning, maintenance and storage
⚠️ Important!
Pull out the power plug before doing any cleaning and maintenance work on the equipment. Risk of injury from electric shock!
⚠️ Important!
Wait until the equipment has cooled down completely! Risk of burns!
Cleaning
- Keep the equipment free of dirt and dust as far as possible. Wipe the equipment with a clean cloth or blow it down with compressed air at low pressure.
- We recommend that you clean the equipment immediately after you use it.
- Clean the equipment regularly with a damp cloth and some soft soap. Do not use cleaning agents or solvents; these may be aggressive to the plastic parts in the equipment. Ensure that no water can get into the interior of the equipment.
Maintenance
Check the power tool and accessory parts (e.g. insertion tools) for wear and damage before and after each operation. If necessary, replace worn out or damaged parts with new parts and make sure to comply with the operating instructions. Observe any technical requirements.
Replacing the sanding plate on the round sanding head.
If the round viscid disc is damaged in the work, a new viscid disc can be purchased from our company for replacement. Remove the sandpaper, put the Allen wrench into the hexagon hole in the center of the viscid disc and then rotate to take off the damaged viscid disc. Install the new viscid disc.
Service information
Please note that the following parts of this product are subject to normal or natural wear and that the following parts are therefore also required for use as consumables.
Wear parts*: V-belts, abrasives, worm gears, carbon brushes, pulleys
* Not necessarily included in the scope of delivery!
Storage
⚠️ Important! Pull out the mains plug!
- Whenever you do not use the power tool, you must keep it in a dry and well ventilated place out of the reach of children, e.g. on a high cabinet or in a closed place.
- Keep power tool, instruction manual and accessory parts, if any, together in the original packaging, if possible. Thus you have all information and parts available at any time.
10. Transport
⚠️ Important! Pull out the mains plug!
- Always hold the power tool by its handle.
- To avoid transport damages, you must pack the power tool or use the original packaging.
- Protect the power tool against vibrations and shock, especially during transport in vehicles.
11. Disposal and recycling
The equipment is supplied in packaging to prevent it from being damaged in transit. The raw materials in this packaging can be reused or recycled. The equipment and its accessories are made of various types of material, such as metal and plastic. Defective components must be disposed of as special waste. Ask your dealer or your local council.
Old devices must not be disposed of with household waste!
This symbol indicates that this product must not be disposed of together with domestic waste in compliance with the Directive (2012/19/EU) pertaining to waste electrical and electronic equipment (WEEE). This product must be disposed of at a designated collection point. This can occur, for example, by handing it in at an authorised collecting point for the recycling of waste electrical and electronic equipment.
Improper handling of waste equipment may have negative consequences for the environment and human health due to potentially hazardous substances that are often contained in electrical and electronic equipment. By properly disposing of this product, you are also contributing to the effective use of natural resources. You can obtain information on collection points for waste equipment from your municipal administration, public waste disposal authority, an authorised body for the disposal of waste electrical and electronic equipment or your waste disposal company.
12. Troubleshooting
| Fault Possible cause Remedy | ||
| Power tool does not start | Power supply interrupted | Check power supply by connecting another power tool |
| Power cord or plug defective Electrician must check the tool | ||
| Other electrical defect of the power tool Electrician must check the tool | ||
| Power tool does not operate with full power | Extension cord too long and/or cross-section too small | Use extension cord with permissible length and/or adequate cross-section |
| Power supply (e. g. generator) voltage too low | Connect power tool to an appropriate power supply | |
| Poor operation results | Sanding paper worn out Replace sanding paper | |
| Abrasive plate worn out Replace abrasive plate by specialist | ||
| Considerable dust formation | Brush edge (around the sanding disc) worn out | Replace brush edge by specialist |
| Dust extraction not connected / switched on Connect / switch on dust extraction | ||
Günzburger Straße 69
D-89335 Ichenhausen
Cher client,
Standard accessories
Günzburger Straße 69
D-89335 Ichenhausen
Geachte klant,
Günzburger Straße 69
D-89335 Ichenhausen
Egregio cliente,
Günzburger Straße 69
D-89335 Ichenhausen
Kære kunde,
Günzburger Straße 69
D-89335 Ichenhausen
Kjære kunde,
Günzburger Straße 69
D-89335 Ichenhausen
Arvoisa asiakas,
Günzburger Straße 69
D-89335 Ichenhausen
Vážený zákazníku,
Günzburger Straße 69
D-89335 Ichenhausen
Vážený zákazník,
Günzburger Straße 69
D-89335 Ichenhausen
Spoštovani kupec,
želimo vam veliko veselja in uspeha pri delu z vašim novim strojem.
Ob vestilo :
Günzburger Straße 69
D-89335 Ichenhausen
Estimado cliente,
Günzburger Straße 69
D-89335 Ichenhausen
Ärade kund,
Günzburger Straße 69
D-89335 Ichenhausen
Austatud klient!
Günzburger Straße 69
D-89335 Ichenhausen
Poštovani kupci,
Günzburger Straße 69
D-89335 Ichenhausen
Tisztelt vásárló!
Günzburger Straße 69
D-89335 Ichenhausen
Poštovani kupci,
Želimo vam mnogo radosti i uspjeha u radu sa svojim novim aparatom.
Napomena:
Proizvođač ovog uređaja u skladu s važećim zakonom o odgovornosti za poizvode ne preuzima nikakvu odgovornost za štete koje nastanu na ovom uređaju ili zbog ovog uređaja uslijed:
- nepropisnog rukovanja,
- nepoštovanja uputstava za rukovanje,
- popravki od strane trećih lica koja nisu ovlaštena stručna lica,
- ugradnje i zamjene neoriginalnih rezervnih dijelova.
- nenamjenske upotrebe,
- ispada električnog sistema zbog nepoštovanja električnih propisa i VDE odredbi 0100, DIN 57113 / VDE 0113.
Günzburger Straße 69
D-89335 Ichenhausen
Cijenjeni kupče,
Želimo Vam mnogo radosti i uspjeha u radu s Vašom novom mašinom.
Napomena:
Proizvođač ovog uređaja u skladu s važećim zakonom o odgovornosti za poizvode ne preuzima nikakvu odgovornost za štete koje nastanu na ovom uređaju ili zbog ovog uređaja uslijed:
- nepropisnog rukovanja,
- nepoštovanja uputstava za rukovanje,
- popravki od strane trećih lica koja nisu ovlaštena stručna lica,
- ugradnje i zamjene neoriginalnih rezervnih dijelova,
- nenamjenske upotrebe,
- ispada električnog sistema zbog nepoštovanja električnih propisa i VDE odredbi 0100, DIN 57113 / VDE 0113.
Günzburger Straße 69
D-89335 Ichenhausen
Уважаеми Клиенти,
Günzburger Straße 69
D-89335 Ichenhausen
Уважаемый Клиент,
Günzburger Straße 69
D-89335 Ichenhausen
text_image
Exploded view diagram of a mechanical assembly with numbered parts and labeled sections A1 and B1CE - Declaration of Conformity
DRYWALL SANDER - DWS225R
PONCEUSE SOL / MUR / PLAFOND - DWS225R
| 2014/29/EU | 2004/22/EC | 89/686/EC_96/58/EC | 2000/14/EC_2005/88/EC | |||||
| 2014/35/EU | 2014/68/EU | 90/396/EC | Annex V | |||||
| X | 2014/30/EU | X | 2011/65/EU* | Annex VINoise: measured L_WA = xx dB(A); guaranteed L_WA = xx dB(A)P = xx KW; L/∅ = cmNotified Body:Notified Body No.: | ||||
| X 2006/42/EC | ||||||||
| Annex IVNotified Body:Notified Body No.:Certificate No.: | 2010/26/EC | |||||||
| Emission. No: | ||||||||
Standard references:
EN 60745-1; EN 60745-2-3; EN 62841-1; EN 62841-2-4, EN 55014-1; EN 55014-2; EN 61000-3-2; EN 61000-3-3
This declaration of conformity is issued under the sole responsibility of the manufacturer.
Apparent defects must be notified within 8 days from the receipt of the goods. Otherwise, the buyer's rights of claim due to such defects are invalidated. We guarantee for our machines in case of proper treatment for the time of the statutory warranty period from delivery in such a way that we replace any machine part free of charge which provably becomes unusable due to faulty material
or defects of fabrication within such period of time. With respect to parts not manufactured by us we only warrant insofar as we are entitled to warranty claims against the upstream suppliers. The costs for the installation of the new parts shall be borne by the buyer. The cancellation of sale or the reduction of purchase price as well as any other claims for damages shall be excluded.