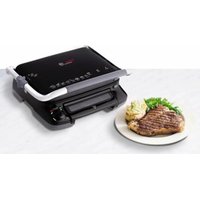
OptiGrill+ - Grill plate TEFAL - Free user manual and instructions
Find the device manual for free OptiGrill+ TEFAL in PDF.

| Brand | Tefal |
| Model | OptiGrill+ |
| Appliance type | Electric grill plate |
| Automatic programs | 6 (red meat, ground beef steak, sausage, chicken, fish, sandwich) |
| Manual mode | 4 temperature settings: 110-125°C, 180-195°C, 220-235°C, 255-275°C |
| Cooking indicator | LED with colors (white, blue, yellow, orange, red) and audible signal |
| Defrost function | For frozen foods (automatic mode only) |
| Keep warm function | Automatic after cooking with audible reminder |
| Preheating | Required before each cooking, with flashing then steady white indicator |
| Maximum food thickness | 4 cm |
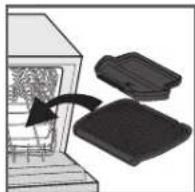
| Cooking plates | Removable, dishwasher safe |
| Drip tray | Removable, dishwasher safe |
| Body cleaning | Damp sponge, do not immerse |
| Safety | Automatic shut-off if opened too long, after inactive preheating or in keep warm mode |
| Power supply | 230 V ~, 50/60 Hz, 2000 W |
| Warranty | Contact Tefal customer service |
Frequently Asked Questions - OptiGrill+ TEFAL
User questions about OptiGrill+ TEFAL
0 question about this device. Answer the ones you know or ask your own.
Ask a new question about this device
Download the instructions for your Grill plate in PDF format for free! Find your manual OptiGrill+ - TEFAL and take your electronic device back in hand. On this page are published all the documents necessary for the use of your device. OptiGrill+ by TEFAL.
USER MANUAL OptiGrill+ TEFAL
natural_image
Modern black and silver digital kitchen grater with a colorful control knob (no visible text or symbols)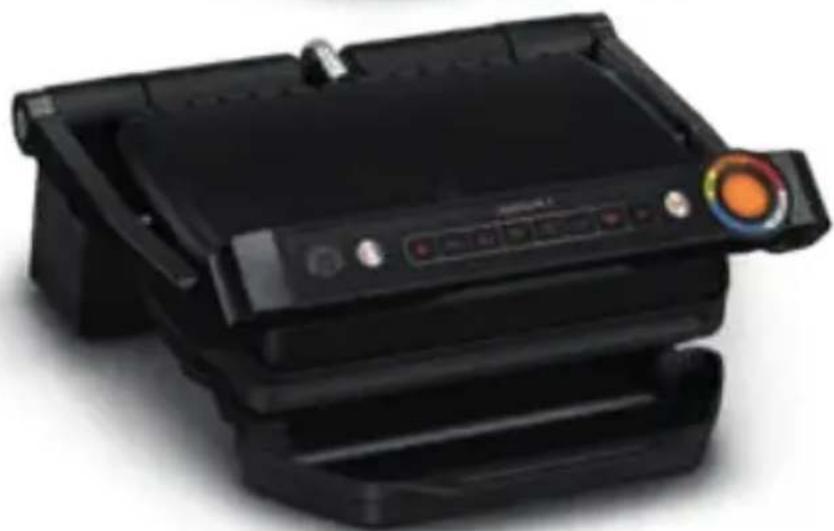
natural_image
Black portable TV or DVD device with a colorful lens and control buttons (no visible text or symbols)en - Instructions for use
de - Bedienungsanleitung
nl - Instructies voor gebruik
fr - Mode d'emploi
it - Istruzioni d'uso
el - Οδηγίες χρήσης
pl - Instrukcja użytkowania
It - Naudojimo instrukcija
et - Kasutusjuhend
Iv - Lietošanas instrukcijas
cs - Pokyny k použití
sk - Návod na použitie
hu - Használati útmutató
ro - Instructiuni de utilizare
bg - Инструкции за употреба
hr - Upute za uporabu
sl - Navodila za uporabo
bs - Uputstvo za upotrebu
sr - Uputstvo za upotrebu
ru - Инструкция по эксплуатации
kk - Колдану нускаулары
uk - Інструкція з використання
en - Please read the "Use & Safety instructions" booklet carefully before first use.
de - Bitte lesen Sie die Broschüre „Gebrauchs- und Sicherheitshinweise“ vor dem ersten Gebrauch sorgfältig durch.
nl - Neem vóór het eerste gebruik het boekje met de veiligheids- en gebruiksinstructies aandachtig door.
fr - Veuillez lire attentivement le livret "Consignes de sécurité et d'utilisation" avant la première utilisation.
it - Leggere con attenzione il libretto "Norme di sicurezza e d'uso" prima del primo utilizzo.
el - Διαβάστε προσεκτικά το φυλλάδιο "Οδηγίες χρήσης και ασφαλείας" πριν από την πρώτη χρήση.
pl - Przed pierwszym użyciem zapoznaj się uważnie z broszurą „Instrukcja obsługi i bezpieczeństwa”.
It - Prieš pirmą kartą naudodami, perskaitykite brošiūrą „Naudojimo ir saugumo instrukcijos“
et - Enne esimest kasutuskorda lugege tähelepanelikult ohutus- ja kasutusjuhendit.
Iv - Pirms pirmās izmantošanas reizes, lūdzu, uzmanīgi izlasiet brošūru “Ekspluatācijas un drošības noteikumi”.
CS - Před prvním použitím si přečtěte příručku „Návod k použití a bezpečnostní pokyny“.
sk - Pred prvým použitím si pozorne prečítajte brožúru „Používanie a bezpečnostné pokyny“.
hu · Az első használat előtt figyelmesen olvassa el a „Biztonsági és használati utasítások” című kézikönyvet.
ro - Citiți cu atenție broșura „Instrucțiuni de utilizare și siguranță” înainte de prima utilizare.
bg - Моля, прочетете внимателно книжката „Инструкции за работа и безопасност“ преди първа употреба.
hr - Prije prve uporabe pažljivo pročitajte knjižicu „Upute za uporabu i sigurnost”.
sl - Pred prvo uporabo natančno preberite "Navodila za uporabo in varnostna navodila".
bs - Prije prve upotrebe pažljivo pročitajte knjižicu "Uputstva za sigurnost i upotrebu".
sr - Pre prvog korišćenja pažljivo pročitajte knjižicu "Uputstva za korišćenje i bezbednost".
ги - Перед первым использованием внимательно ознакомьтесь с брошюрой «Инструкции по эксплуатации и технике безопасности».
kk - Бірінші пайдалану алдында «Қауіпсіздік және пайдалану жөніндегі нұсқауларды» оқып шығыңыз.
uk - Перед першим використанням виробу уважно прочитайте брошуру «Інструкції з використання та техніки безпеки».
TABLE OF CONTENTS
- Description 4
• Cooking level indicator 5 - Before first use 6
- Grill position 7
a) Using an automatic program 7
b) Using the manual mode 10
c) Cooking guide 11
- End of use 12
- Cleaning
- Troubleshooting guide 14

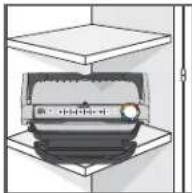
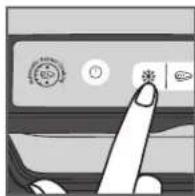
DESCRIPTION
A Control panel
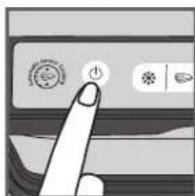
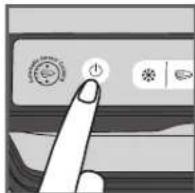
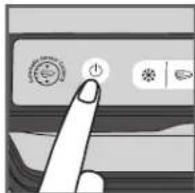
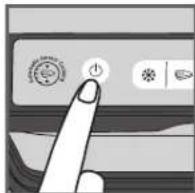
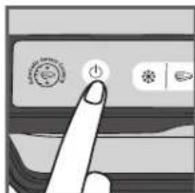
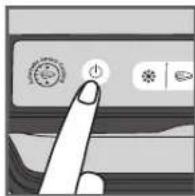
A1 On/off button
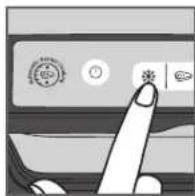
A2 Frozen food mode
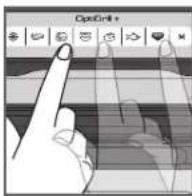
A3 Cooking programs
A4 4 temperature settings in manual mode; see specific manual mode in the quick start guide
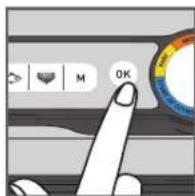
A5 OK button
A6 Cooking level indicator
B Body
C Handle
D Cooking plates
E Drip tray
F Power cord
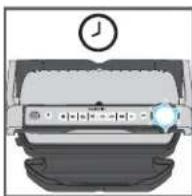
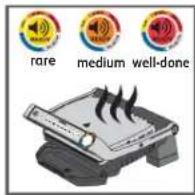
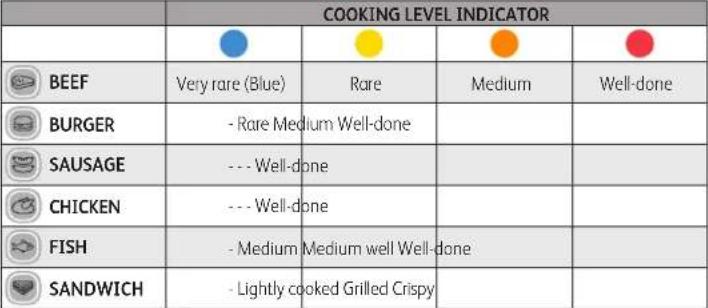
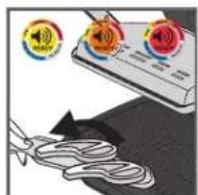
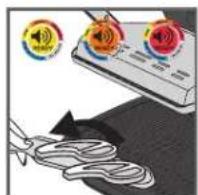
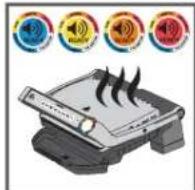
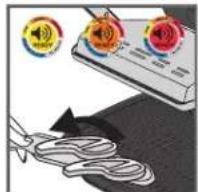
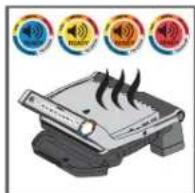
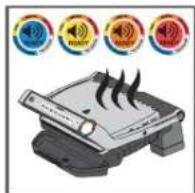
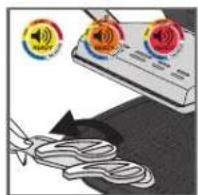
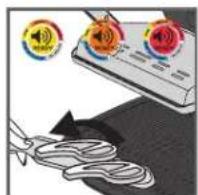
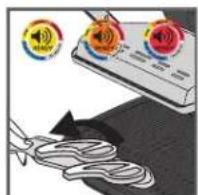
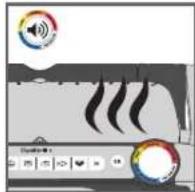
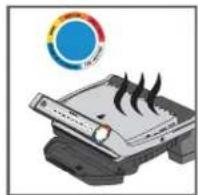
COOKING LEVEL INDICATOR
Preheating

Flashing white coloured light: preheating in progress

Steady white coloured light and beeping: ready to cook
en

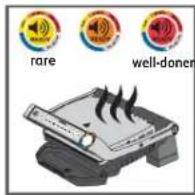
First cooking level in progress

Rare level in progress

Rare level reached

Medium level in progress

Medium level reached

Well- done level in

Well- done level reached
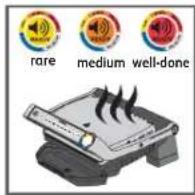
For each automatic program, Optigrill lets you know when your food has reached the desired cooking level. When a cooking level is reached, the grill beeps to notify you.
BEFORE FIRST USE
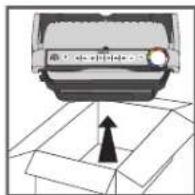
1

2
3

4

5
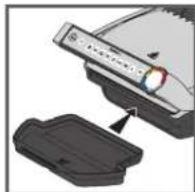
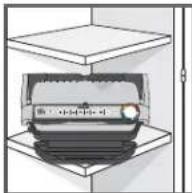
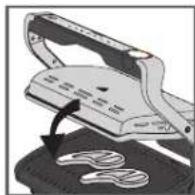
- Remove all packaging materials, stickers and accessories from the inside and the outside of the appliance.
- Before using for the first time, thoroughly clean the plates with warm water and a little dishwashing liquid, rinse and dry thoroughly.
- Position the removable drip tray at the front of the appliance.
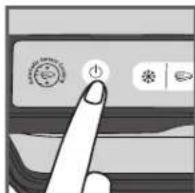
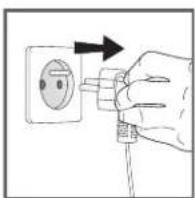
- Make sure that the upper and lower plates are correctly positioned in the product. Do not activate preheating without the plates. Connect the appliance to the mains supply (the cable must be completely unwound).
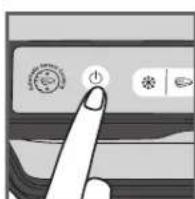
- Press the on/off button.
Caution: Make sure there is no food between the plates
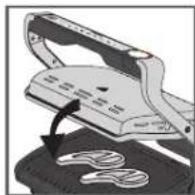
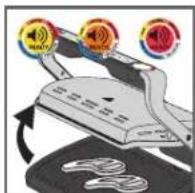
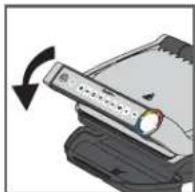
GRILL POSITION
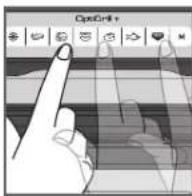
A) USING AN AUTOMATIC PROGRAM
6 automatic programs:
red meat, burger, sausage, poultry, fish, sandwiches


1
2
3
4
5
- If the food you wish to cook is frozen, press the corresponding button.
This function is only available when cooking with the automatic programs, not in manual mode. - Select the appropriate cooking program according to the type of food you wish to cook.
Tip, especially for meat: The cooking results on the automatic programs may vary depending on origin, cut and quality of the food being cooked, the programs have been set and tested for good quality food.
Similarly, the thickness of the meat must be taken into account during cooking; you should not cook foods with a thickness greater than 4 cm.
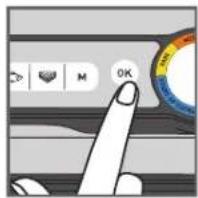
If you are uncertain about which cooking program to use, please refer to the cooking guide page 11. - Press the "OK" button: the appliance starts preheating and the cooking level indicator flashes white.
NB: If you have selected the wrong program, turn off the appliance and repeat the steps. - Wait for preheating to be complete.
- When the level indicator stops flashing white and the grill beeps, the preheating is complete, the grill is ready to cook.
Comments: At the end of preheating, if the appliance remains closed, the safety system will turn off the appliance after a while.
GRILL POSITION
6

7
8
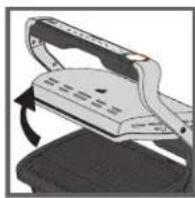
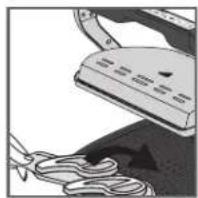
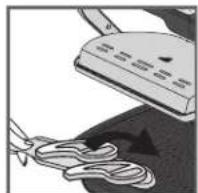
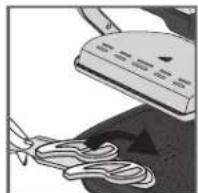
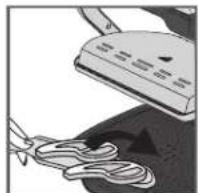
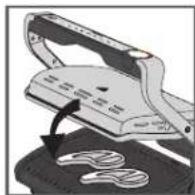
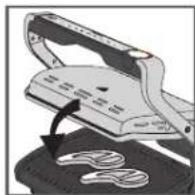
- Open the grill and place the food on the cooking plate.
Comments: If the appliance remains open for too long, the safety system will turn off the appliance automatically after a while.
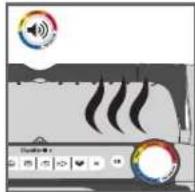
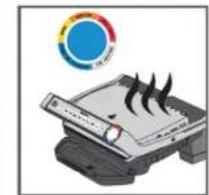
- Close the appliance to start the cooking cycle. The cooking level indicator turns blue to indicate the cooking is in progress (for the best results, do not open or move your food during the cooking process). The appliance automatically adjusts the cooking cycle (time and temperature) according to the food thickness and quantity.
Note for very thin pieces of food: Close the appliance, the button OK will flash and the indicator will stay steady white until you press OK. Press OK to ensure the appliance recognizes the food and that the cooking cycle starts.
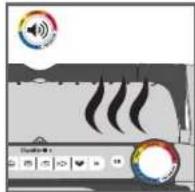
- According to the level of cooking, the indicator light changes color. While cooking is in progress, a beep alerts you each time a cooking level is reached. When the indicator light is yellow with a beep, food is rare, orange with a beep, food is medium and red with a beep, food is well done.
N.B.: If you like your meat very rare, remove the meat when the cooking level indicator reaches steady blue.
Please note, especially on meat, it is normal that cooking results vary depending on type, quality and origin of food.
GRILL POSITION
9
10
- When the color corresponding to your desired cooking level becomes steady and the beep sounds, open the appliance and remove your food.
Note: If you want to cook food to different personal tastes, open the grill and remove the food when it has reached the desired level and then close the grill and continue cooking the other food. The program will continue its cooking cycle until it reaches the final level.
- When finished cooking, remove food and close the appliance. The control panel will light up and set itself to 'choice of program' mode.
Comment: The security system will turn off automatically after a while if no program selection is made
Keep warm function
Once the red level is reached, the cooking is finished, the appliance automatically activates the keep warm function, the indicator light is red, and the device begins to beep every 20 seconds. If food is left on the grill, it will continue to cook while the cooking plates cool. You may deactivate the beep by pressing the button "OK".
Note: The security system will power off the appliance automatically after a while.
Cooking a second batch straight away:
Once your first batch of food has finished cooking:
a) Make sure that the appliance is closed, and that no food is remaining inside.
b) Select the cooking program (this step is necessary even if the program is the same as for the foods you have just finished cooking).
c) Press the button "OK" to begin preheating. While preheating, the color level indicator will flash white.
d) Once preheating is complete, the appliance will beep, and the indicator light will be steady white.
e) The appliance is ready to be used once preheating is complete. Open the grill and place the food inside the appliance.
Important:
- Please note that preheating is required for each new batch. Before preheating, make sure that the appliance is closed, and that no food is remaining inside. Wait for preheating to finish before opening the grill and placing food inside.
- If the new preheating cycle is activated immediately after the end of the previous cycle, the preheating time will be reduced.
GRILL POSITION
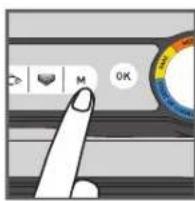
B) USING THE MANUAL MODE
1

2
3

4

5

6
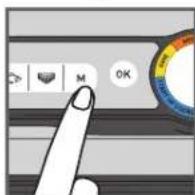
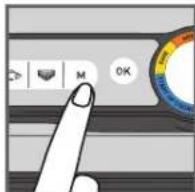
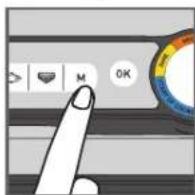
- Select the manual mode and the cooking temperature by clicking on M several times until the colour matches your desired temperature:
| 110-125°C | |
| 180-195°C | |
| 220-235°C | |
| 255-275°C |
- Press OK to start preheating. The cooking level indicator flashes with the selected colour: preheating in progress. Wait until preheating is finished.
- When the desired temperature is reached, the light stops flashing and the grill beeps: the grill is ready to cook.
- Add the food on the grill, the cooking process begins.
- You can adjust the temperature during cooking.
- Watch the food cook and remove it when you consider it cooked as desired.
GRILL POSITION
C) COOKING GUIDE
6 AUTOMATIC COOKING PROGRAMS
 |
MANUAL MODE IN GRILL POSITION
| 180-195°C | 220-235°C | 255-275°C | |
| POTATOES | |||
| ZUCCHINI / SQUASH | |||
| EGGPLANT | |||
| TOMATOES | |||
| ASPARAGUS | |||
| MUSHROOMS | |||
| ONIONS | |||
| BROCOLI | |||
| BABY CARROTS | |||
| FENNEL | |||
| SWEET POTATOES | |||
| APPLE SLICES | |||
| PINEAPPLE | |||
| PEACH | |||
| PORC | |||
| SEAFOOD | |||
| PEPPER |
END OF USE

1

2
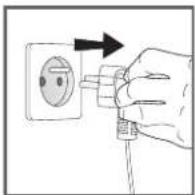
- Tum off the appliance by pressing the on/off button on the handle.
- Unplug the appliance from outlet.
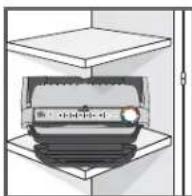
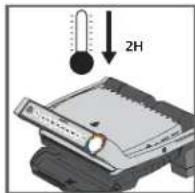
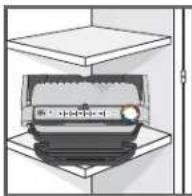
- Allow to cool for at least 2 hours. To avoid accidental burns, allow grill to cool thoroughly before cleaning.

3
CLEANING

1
2

3

natural_image
Illustration of a printer with a magnified view of its cover (no text or symbols visible)4

5
6
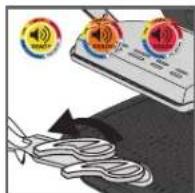
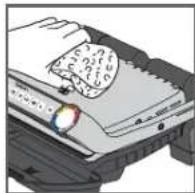
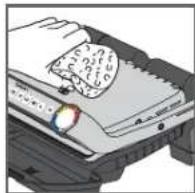
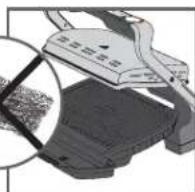
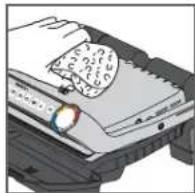
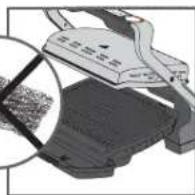
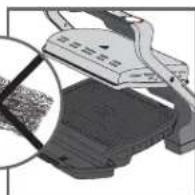
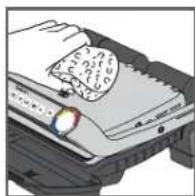
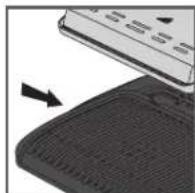
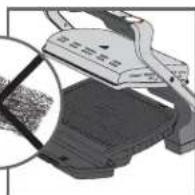
- Before cleaning, unlock and remove the plates and drip tray to prevent damage to the cooking surface.
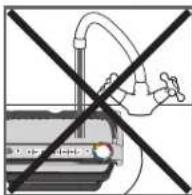
Drain the drip tray and wash it in mild soapy water, then dry thoroughly with a paper towel. - Do not immerse the body of grill in water or any other liquid.
- The appliance and its cord cannot be placed in the dishwasher. The heating elements, visible and accessible parts, should not be cleaned after removing the plates. If they are very dirty, wait until the appliance has completely cooled down and clean them with a dry cloth.
- If you do not wish to wash the cooking plates and drip tray in the dishwasher, use hot water and a little washing up liquid to clean, then rinse thoroughly to remove any residue. Wipe them carefully with a paper towel.
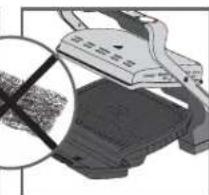
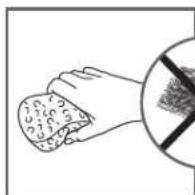
Do not use metal scouring pads, steel wool or abrasive cleaners to clean any part of the grill, use only nylon or non-metallic cleaning pads.
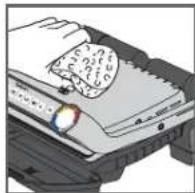
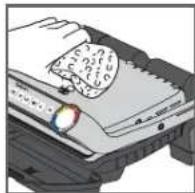
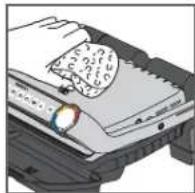
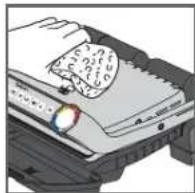
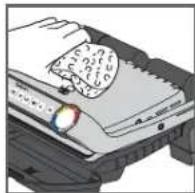
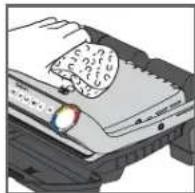
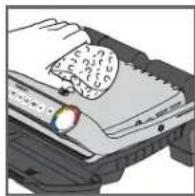
- To clean the grill cover, wipe with a warm, wet sponge and dry with a soft, dry cloth.
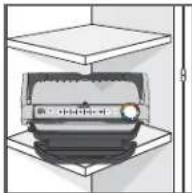
- Always make sure the grill is clean and dry before storing.
Any repairs must be carried out by an approved service representative.
5
6
Troubleshooting guide
| Problem | Cause Solution | |
| + Indictor light solid blue+ I on [047A] [030B] [047T] [028V] [047S] [022Z] | · Switching on the appliance or starting an automatic cooking cycle with food and without plates preheating (manual mode is automatically activated). | · 2 possible options:– Choose the temperature setting by pressing theMbutton and then pressOK.Allow to cook, but you must monitor the cooking (manual mode).– stop the appliance, remove the food, close the appliance properly, re-program the appliance and wait until end of preheating. |
| The appliance stops during the cycle of pre-heating or cooking. | · The appliance has been kept open for too long while cooking.· The appliance has been idle too long after the end of warm up or keep warm. | · Disconnect the appliance from the outlet and leave for 2-3 mins., restart the process. The next time you use the appliance, make sure you open and close it quick for best cooking results. If the problem occurs again contact your local Tefal customer service. |
| [046A] [030B] [047A] [047S] [047S] [028V] [028V] [028S] [028S] [028S] [028S] [028S] [028S] [028S] [028S] [028S] [028S] [028S] [028S] [028S] [028S] [028S] [028S] [028S] [030A] [030B] [030B] [030B] [030B] [030B] [030B] [030B] [030B] [030B] [030B] [030B] [030B] [030B] [030B] [030B] [030B] [030B] [028A] [028A] [028A] [028A] [028A] [028A] [028A] [028A] [028A] [028A] [028A] [028A] [028A] [028A] [028A] [028A] [028A] [030A] [030B] [030B] [030B] [030B] [030B] [030B] [030B] [030B] [030B] [030B] [030B] [030B] [030B] [030B] [030B] [028C] [028C] [028C] [028C] [028C] [028C] [028C] [028C] [028C] [028C] [028C] [028C] [028C] [028C] [028C] [028C] [028C] [030C] [030B] [030B] [030B] [030B] [030B] [030B] [030B] [030B] [030B] [030B] [030B] [030B] [030B] [030B] [030B] [030B] [019C] [019C] [019C] [019C] [019C] [019C] [019C] [019C] [019C] [019C] [019C] [019C] [019C] [019C] [019C] [019C] [019C] [028A] [028A] [028A] [028A] [028A] [028A] [028A] [028A] [028A] [028A] [028A] [028A] [028A] [028A] [028A] [028A] [019C] [019C] [019C] [019C] [019C] [019C] [019C] [019C] [019C] [019C] [019C] [019C] [019C] [019C] [019C] [019C] [030C] [030B] [030B] [030B] [030B] [030B] [030B] [030B] [030B] [030B] [030B] [030B] [030B] [030B] [030B] [030B] [O30C] [O30C] [O30C] [O30C] [O30C] [O30C] [O30C] [O30C] [O30C] [O30C] [O30C] [O30C] [O30C] [O30C] [O30C] [O30C] [O30C] [O28A] [O28A] [O28A] [O28A] [O28A] [O28A] [O28A] [O28A] [O28A] [O28A] [O28A] [O28A] [O28A] [O28A] [O28A] [O28A] [O28A] [O30C] [O30C] [O30C] [O30C] [O30C] [O30C] [O30C] [O30C] [O30C] [O30C] [O30C] [O30C] [O30C] [O30C] [O30C] [O30C] [O19C] [O19C] [O19C] [O19C] [O19C] [O19C] [O19C] [O19C] [O19C] [O19C] [O19C] [O19C] [O19C] [O19C] [O19C] [O19C] [O19C] [N55] | · The appliance has been kept open for too long while cooking.· The appliance has been idle too long after the end of warm up or keep warm. | · Disconnect the appliance from the outlet and leave for 2-3 mins., restart the process. The next time you use the appliance, make sure you open and close it quick for best cooking results. If the problem occurs again contact your local Tefal customer service. |
| + Button [O30C] [O30C] [O30C] [O30C] [O30C] [O30C] [O30C] [O30C] [O30C] [O30C] [O30C] [O30C] [O30C] [O30C] [O30C] [O30C] [O319C] [O319C] [O319C] [O319C] [O319C] [O319C] [O319C] [O319C] [O319C] [O319C] [O319C] [O319C] [O319C] [O319C] [O319C][O319C] [O319C] [O319C] [O319C] [O319C] [O319C] [O319C] [O319C] [O319C] [O319C] [O319C] [O319C] [O319C] [O319C] [O19C] | · Appliance failure.· Appliance stored or used in a room that is too cold. | · Disconnect and reconnect your appliance and immediately restart a preheat cycle. If the problem persists, contact your Customer Service. |
| + Button [O30C] [O30C] [O30C] [O30C] [O30C] [O30C] [O30C] [O30C] [O30C] [O30C] [O30C] [O30C] [O30C] [O30C] [O30C] [O319C] [O19C] | · Appliance failure.· Unplug the appliance and contact customer service. | |
| + Button [O30C] [O30C] [O30C] [O30C] [O30C] [O30C] [O30C] [O30C] [O30C] [O30C] [O30C] [O30C] [O30C] [O30C] [O30C] [O30 C] | · The quantity of food inside the appliance is greater than 4 cm. | · The quantity of food should not exceed 4 cm. |
| + Button [O30C] [O30C] [O30C] [O30C] [O30C] [O30C] [O30C] [O30C] [O30C] [O30C] [O30C] [O30C] [O30C] [O30C] [O30C] [O379C] [O379C] [O379C] [O379C] [O379C] [O379C] [O379C] [O379C] [O379C] [O379C] [O379C] | · The grill was not opened completely when placing the food inside. | · Open the grill completely and close it again. |
| + Button [O30C] [O30C] [O30C] [O30C] [O30C] [O30C] [O30C] [O30C] [O30C] [O30C] [O30C] [O30C] [O30C] [O30C] [O30C] [O389C] [O389C] [O389C] [O389C] [O389C] [O389C] [O389C] [O389C] [O389C] [O389C] [O389C] [O389C] [O389C] [O389C] [O389C 1787777777777777777777777777777777777777777777777777777777777777777777777777777777777777777777777777777 | · The appliance does not detect food inside The quantity of food is insufficient, "OK" is blinking. | · Confirm cooking activation by pressing the button OK. |
| The appliance will activate in manual mode + The indicator light will blink red. + button temp control and light fixed [O30C] [O30C] [O30C] [O30C] [O30C] [O30C] [O30C] [O30C] [O30C] [O30C] [O30C] [O30C] [O30C] [O30C] [O30C] [O30C] [O389C] [O19C] | · Preheating time was cut short. | · Monitor the cooking periodically (for use in manual mode).Or· Stop the grill, remove food, close the grill, select the new cooking programme you wish to use and wait for the preheating cycle to finish. |


anc
a o
INHALTSVERZEICHNIS
4

5
1

2

3

4

5

6
natural_image
Illustration of a hand holding a textured object with a crossed-out black symbol, next to an industrial machine (no text or symbols present)4

5

6
natural_image
Row of eight circular icons with speaker and signal icons, no text or symbols presentErste
garingsniveau
in uitvoering
Eerste
garing
bereikt
Niveau
"Rare" in
uitvoering
Niveau
"Rare"
bereikt
Niveau
"Medium
rare in
uitvoering
Niveau
Medium
rare
bereikt
Niveau
We
done* in
uitvoering
Niveau
Well
done"
bereikt
4
5
1

2

3
4

5

6
4

5
1

2

3

4

5
6
natural_image
Illustration of a hand holding a textured object with a crossed-out black symbol, next to a mechanical device (no text or symbols present)4

5
6
4
5
natural_image
Illustration showing a hand holding a textured object with a crossed-out black cross symbol, next to an industrial machine (no text or symbols present)4
5

6
natural_image
Row of eight circular icons with speaker and audio signal icons, no text or symbols presentΓρύτο
επίτεδος
μογειρεματος
σε εξελιξη
Груно
Επίπεδο
Jouyidao
ολοκήρωθηκε
Bofuóz
Sevino
exen
Bouk
Σενάν
дэскиприэгнке
BoGuo;
"Ενιόν προς
μετρούσε
ecch
Boêpóc Teváv
прос métréo
CLOKNIPOHKE
(1)本说明仅供参考。
Βοθμός
Καδομημένο
3E5807
BoEquos
Κολοψηρένο
σενοκήτρούθηκε
4

5
1

2

3

4

5

6
natural_image
Illustration of a hand holding a textured object with a crossed-out black symbol, alongside an open mechanical device (no text or symbols present)4
5
6
natural_image
Row of eight circular icons with speaker and audio signal icons, no text or symbols present4

5
1

2

3

4

5
6
natural_image
Illustration of a printer with a magnified view of its cover (no text or symbols visible)4
5

6
natural_image
Row of eight circular icons with speaker and audio icons, no text or symbols present4

5
1
2

3

4
5

6
RANKINIS REŽIMAS KEPTUVO PADETYJE
| 180-195°C | 220-235°C | 255-275°C | |
| BULVÉS | |||
| CUKINIJA / MOLIÜGAS | |||
| BAKLAŽANAS | |||
| POMIDORAI | |||
| ŠPARAGAI | |||
| GRYBAI | |||
| SVOGÜNAI | |||
| BROKOLIS | |||
| NEDIDELÉS MORKOS | |||
| PANKOLIS | |||
| SALDŽIOSIOS BULVÉS | |||
| OBUOLIŲ GRIEŽINĖLIAI | |||
| ANANASAS | |||
| PERSIKAS | |||
| KIAULIENA | |||
| JŪROS GÉRYBĖS | |||
| PAPRIKA |
NAUDOJIMO PABAIGA
1

2
natural_image
Illustration of a hand holding a textured object with a crossed-out black symbol, next to an open device (no text or symbols present)4
5

6
natural_image
Row of eight circular icons with speaker and audio icons, no text or symbols presentEsimene kūpsetustase on pooleli
4

5
natural_image
Illustration of a hand washing clothes with a steam iron (no text or symbols)6


natural_image
Illustration of a printer with heat burn and a colorful circular logo above it (no text or symbols)7

8
natural_image
Illustration of a printer with a magnified view of its cover (no text or symbols visible)4

5

6
m = 311
Mo
Nup
katke
ade
Mo
Nup
pide
rast
dam irau
a.
[Non-Text]
[Non-Text]
tab
[Non-Text]
te
valg
[Non-Text]
-
[Non-Text]
[Non-Text]
[Non-Text]
[Non-Text]
[Non-Text]
0
[Non-Text]
[Non-Text]
pp Nup
[Non-Text]
[Non-Text]
[Non-Text]
SATURA RĀDĪTĀJS
4

5
1

2

3

4

5

6
4
m = 311

5

6
4
5
B) POUŽITÍ MANUÁLNÍHO REŽIMU

1

2
3

4
5
6
MANUÁLNÍ REŽIM V POLOZE GRILU
[076D]  | 180-195°C | 220-235°C | 255-275°C | |
 | ||||
BRAH  | Y | |||
| CUKETA / DYNÉ | ● | |||
LILEI  | ● | |||
| RAJČA TA | ● | |||
CHŘE  | ● | |||
| HOUI [TWZT] | ● | |||
CIBU  | ● | |||
| BROJ [TYT8] | CE | |||
| KARO [SYHA] | ||||
| FENY [2HXZ] | ● | |||
BATÁ  | ||||
| PLÁT [CHYA] | ● | |||
| ANAÍ [TATH] | ● | |||
BROS  | ● | |||
| VEPŘ [KHDJ] | ● | |||
MOR  | LODY | |||
| PAPRIKY | ● | |||


VAŘENÍM
UTOMATICKÝCH PROGRAMŮ PŘÍPRAVY
MANUÁLNÍ REŽIM V POLOZE GRILU
| 180-195°C | 220-235°C | 255-275°C | |
| ● | |||
| ● | |||
| ● | |||
| ● | |||
| ● | |||
| ● | |||
| ● | |||
| ● | |||
| ● | |||
| ● | |||
| ● | |||
| ● | |||
| ● | |||
| ● | |||
| ● | |||
| ● | |||
| ● | |||
| ● |
UKONČENÍ POUŽÍVÁNÍ

1
2
natural_image
Illustration of a printer with a magnified view of its cover (no text or symbols visible)4

5

6
flowchart
graph LR
    A["Blue Circle"] --> B["Yellow Circle"]
    B --> C["Orange Circle"]
    C --> D["Red Circle"]
4

5
1

2
3
4

5

6
MANUÁLNY REŽIM V POLOHE GRILU
| 180-195°C220-235°C | 255-275°C | ||
| ZEMIAKY | |||
| CUKETA/DYÑA | |||
| BAKLAŽÁN | |||
| PARADAJKY | |||
| ŠPARGŁA | |||
| HUBY | |||
| CIBUŁA | |||
| BROKOLICA | |||
| BABY KAROTKA | |||
| FENIKEL | |||
| SLADKĚ ZEMIAKY | |||
| JABLKO (PLÁTKY) | |||
| ANANÁS | |||
| BROSKYÑA | |||
| BRAVČOVÉ MÄSO | |||
| MORSKÉ PLODY | |||
| PAPRIKA |
UKONČENIE POUŽÍVANIA
1

2
natural_image
Illustration of a mechanical device with a magnified inset showing internal components (no text or symbols visible)4
5
6
4

5
4

m = 311

5
6
4

5
1

2
3
4
5
6
MODUL MANUAL ÎN POZITIA GRILL
| 180-195°C 220-235°C | 255-275°C | |
| CARTOFI | ||
| DOVLECEL / DOVLEAC | ||
| VĂNĂTĂ | ||
| ROȘIE | ||
| SPARANGHEL | ||
| CIUPERCI | ||
| CEAPĂ | ||
| BROCCOLI | ||
| MORCOVI BABY | ||
| FENICUL | ||
| CARTOFI DULCI | ||
| FELII DE MĂR | ||
| ANANAS | ||
| PIERSICĂ | ||
| PORC | ||
| FRUCTE DE MARE | ||
| ARDEI |
DUPĂ UTILIZARE

1
2
4
m = 311
5
6
natural_image
Row of circular icons with speaker and audio icons, no text or symbols presentПървото
HYBO HA
печене е
ВХОД
Пъревото
НИВО НА
печене е
достигнато
Ниво
,алангле"
e вход
| HBO
,алангне'е
достигнато
HIBO
,средно
изпечено
свход
HUBC
,средно
изпечено ^3 е
ДОСТАГНАТО
HUBO
добре
изпечено
свхол
Ниво добре
изпечено"е
достигнато

4

5
4
m = 311
5

6
4

5
natural_image
Illustration of a hand washing clothes with a steam iron (no text or symbols)6


natural_image
Illustration of a printer with heat pipes and a colorful circular logo above it (no text or symbols)7

8
- Otvorite roštilj i stavite hranu na ploču za pripremu hrane.
Komentari: Ako uredaj predugo ostane otvoren, sigurnosni sustav automatski će isključti uredaj nakon nekog vremena.
1

2

3

4

5
6
- Odabente ručni načn rada i temperaturu pripreme hrane pritiskom na tipku M nekoliko puta dok se boja ne počne podudarati sa željenom temperaturom.
| 110-125°C | |
| 180-195°C | |
| 220-235°C | |
| 255-275°C |
natural_image
Illustration of a hand holding a textured object with a crossed-out black symbol, next to an industrial machine (no text or symbols present)4
- Prije čišćenja otključajte i uklonite tanjure i posude za kapljevinu da biste spriječili oštećenje povišine za pripremu hranc. Ispraznite posude za kapljevinu i operite ih blagorn otopinom sredstva za čišćenje, a zatim ih temeljito osušite papiratim ručnikom.
- Kućište roštilja nemojte uranjati u vodu ni bilo koju drugu tekućinu.
- Uređaj i njegov kabel ne mogu se stavlti u perilicu posuda. Grijači elementi, vidljivi i pristupačni dijelovi ne bi se trebali čstiti nakon što izvodite tanjure. Ako su stvarno prljavi, pričekajte da se uređaj u potpunosti ohladi te ih openite suhom krpom.
- Ako ne želite prati ploče za pripremu hrane i posude za kapljevinu u perilici posuđa, upotrijebite vruću vodu i malo tekućine za pranje posuđa, a zatim temeljito isperite i uklonite sve ostatke. Pažljivo ih obrišite papimatim ručnikom.
Nijedan dio roštilja nemojte čistiti metalnim spužvicama, čeličnom vunom ni abrazivnim sredstvima za čišćenje, rabite samo najlonske ili nemetalne spužvice za čišćenje.
- Za čišćenje poklopca roštilja, obrišite je toplom, mokrom spužvom i osušite mekom, suhom krpom.
- Uvljek provjerite je li roštilj čist i suh prije no što ga spremite.
Sve popravke smije obavljati samo ovlašteni servisni centar.
5
6
Vodič za otklanjanje poteškoća
| Poteškoća | Uzrok Rješenje | |
[G8C2]  [ZD04] S [SRA1D] [TRA01] ikatora svijetli plavo+ - [SRA02] a [G8R02] tr[PAV03]eri [ZD04] S [SRA1D] [TRA01] ikatora svijetli plavo+ - [SRA02] a [G8R02] tr[PAV03]eri | • Uključenje uređaja ili automatsko pokretanje ciklusa pečenja hrane a bez predgrijavanja ploče (automatski se aktivira ručni način rada). | • 2 mogućnosti:– Odaberite postavku temperature pritiskom na tipku M a zatim pritisnite tipku OK (U redu). Ostavite da se peče, ali morate pratiti pečenje (ručni način).– Zaustave rad uređaja, izvadite hranu, pravilno zatvorite uređaj, ponovno odaberite program uređaja i pričekajte da završi zagrijavanje. |
| Uređaj se zaustavlja tijekom ciklusa zagrijavanja ili pečenja. | • Uređaj je za vrijeme pečenja predugo držan otvoren.• Uređaj je u stanju mirovanja predugo nakon završetka zagrijavanja ili održavanja topline. | • Odspojite uređaj iz utičnice i ostavite ga 2-3 minute, a zatim ponovno pokrenite postupak. Sljedeći put kada koristite uređaj, pazite da brže otvorite i zatvorite uređaj radi boljih rezultata pečenja. Ako se poteškoća pojavi ponovo obratite se lokalnoj službi za korisnike tvrtke Tefal. |
| [IMAGE] je [SRA01D] [ZD04] ikator treperi ljubičasta+ [SRA02] a [G8R02] / [TRA01] treperi+ F [SRA03] er [G8R03] i zvučni signal | • Kvar uređaja.• Uređaj je bio pohranjen ili se koristi u prostoriji u kojoj je prehladno." | • Odspojite i ponovno spojite uređaj i odmah ponovno pokrenite ciklus zagrijavanja. Ako se poteškoća pojavi ponovo obratite se lokalnoj službi za korisnike |
| Uređaj ne oglašava zvučni signal. | ||
| [IMAGE] je [SRA01D] [ZD04] indikator treperi ljubičasta+ [SRA02] a [G8R02] treperi+ N [SRA03] re [G8R03] i zvučni signal | • Kvar uređaja. | • Odspojite uređaj i obratite se lokalnoj službi za korisnike. |
| Hročnje je [SRA01D] kon zagrijavanja postavljena u roščnja ročnja je zvjetlosni indikator zržnaje vijela i pečenje ne počinje. | • Hrana u uređaju je deblja od 4 cm. | • Hrana u uređaju ne smije premašiti 4 cm. |
| • Roštilj nije u potpunosti otvoren prilikom postavljanja hrane u njega. | • Otvorite roštilj i ponovno ga zatvorite. | |
| • Uređaj ne prepoznaje da ima hrane i treperi The quantity of food is insufficient (Nedovoljna količina hrane), "OK" (U redu). | • Potvrdite početak pečenja pritiskom na tipku OK . | |
| Urečnje će [SRA01D] ak [SRA02] ati u ručnom načinu rada+ [SRA02] lo [G8R02] indikator treperi crveno.+ [SRA03] ok [G8R03] u [TRA03] vljanja temperaturom i OK [OJK] tr[PAV03] [G8R04] [CYK02] | • Prekratko vrijeme zagrijavanja. | • Povremeno pratite stanje pečenja (za upotrebu u ručnom načinu rada).Ili• Zaustavite rad roštilja, izvadite hranu, zatvorite roštilj, odaberite novi program pečenja po želji i pričekajte da se dovrši ciklus zagrijavanja. |
KAZALO VSEBINE
- Opis 196
- Indikator stopnje priprave 197
• Pred prvo uporabo 198 - Položaj za gril 199
natural_image
Row of eight circular icons with speaker and audio icons, no text or symbols present4

5
1

2

3

4

5
6
natural_image
Illustration of a mechanical device with a magnified inset showing internal components (no text or symbols visible)4
natural_image
Row of eight circular icons with speaker and audio icons, no text or symbols presentPrvi nivo pečenja u toku
4
5
- Uklonite svu ambalažu, naljepnice i dodatke s unutrašnje ili vanjske strane aparata. Dostupne su dodatne okrugle naljepnice u boji. Mažete na originalni krug u boji zalijepiti preferirani jezik.
- Prije prvog korištenja ploče dobro očistite toplom vodom sa malo deterdženta za posuđe, isperite i do kraja osušite.
- Postavite odvojivi spremnik za otkapavanje na prednju stranu aparata.
- Provjerite da li su gomja i donja ploča pravilno postavljene na aparat. Nemojte zagrijavati aparat bez ploča. Aparat prikjučite na struju (kabal se mora do kraja odmotati).
- Pritisnite tipku za uključivanje/isključvanje. Oprez: Pazite da između ploča nema hrane
POZICIJA ZA GRILOVANJE
A) KORISTENJE AUTOMATSKOG PROGRAMA
6 automatskih programa: govedina, pljeskavica, kobasica, piletina, riba, sendvici

1
2

3

4
5
- Ako je hrana koju želite ispeći smrznuta, pritisnite odgovarajuću tipku. Ta funkcija je dostupna sarna u automatskim programima, nije dostupna u ručnom načinu rada.
- Izaberite odgovarajući program prema tipu hrane koju želite ispeći.
Savjet, pogotovo za meso: Kada se koriste automatski programi, mogu se dobiti različiti rezultati zavisno od porijekla, komada i kvaliteta hrane koja se sprema. Programi su podešeni i testirani za kvalitetnu hranu.
Isto tako tokom pečenja treba uzeti u obzir debljinu mesa; nemojte peći komade koji su deblji od 4 cm.
Ako niste sigurni koji program treba upotrijebiti, pogledajte stranicu 203 u vodiču za kuhanje.
- Pritisnite tipku OK: aparat se počinje zagrijavati i indikator nivoa pečenja treperi bijelo.
Napomena: Ako ste izabrali pogrešan program, isključite aparat i ponovite korake. - Sačekajte da se aparat zagrije.
- Kada indikator nivoa prestane treperiti bijelo i roštilj da zvučni signal, zagrijavanje je gotovo i roštilj je spreman za pečenje.
Komentari: Ako aparat ostane zatvoren na kraju zagrijavanja, sigumosni sistem će nakon nekog vremena isključiti aparat.
POZICIJA ZA GRILOVANJE

6

7

8
- Otvorite roštilj i stavite hranu na ploču za kuhanje.
Komentari: Ako aparat predugo ostane otvoren, sigurnosni sistem će automatski isključti aparat nakon nekog vremena.
- Zatvorite aparat da biste pokrenuli ciklus pečenja. Indikator nivoa pečenja postoje plavi da bi se označilo da je pečenje u toku (da bi rezultati bilišto bolji, nemojte otvarati aparat ni pomjerati hranu tokom pečenja). Aparat automatski podešava ciklus pečenja (vrijeme i temperaturu) prema debljini i količini hrane.
natural_image
Illustration of a hand holding a textured object with a crossed-out black symbol, next to an industrial machine (no text or symbols present)4
5

6
- Prije čišćenja otključajte i odvojite ploče i spremnike za otkapavanje da se površina za kuhanje ne bi oštetila.
Ocijedite spremnike za otkapavanje i operite ih u vodi sa malo sapunice, a zatim ih temeljito osušite papirnatim ubrusom. - Roštilj nemojte uranjati u vodu ni bilo koju drugu tečnost.
- Aparat i kabal se ne smiju stavljati u mašinu za posuđe. Grijači, vidljivi i dostupni dijelovi ne smiju se čistiti kada se skinu ploče. Ako su veorna prljavi, sačekajte da se aparat do kraja ohkladi očistite ih suhom krpom.
- Ako ploče za pečenje i spremnike za otkapavanje ne želite prati u mašini za posuđe, očistite ih u toploj vodi sa malo deterdženta za posuđe, a zatim ih dobro ispente da biste skinuli sve ostatke. Pažljvo obrišite paplimim ubrusom.
Nemojte koristiti metalnu žicu za ribanje, čeličnu vunu ni bilo kakva abrazivna sredstva za čišćenje bilo kojeg dijela roštija, koristite samo najlonske ili nemetalne dodatke za čišćenje.
- Poklopac roštilja obrišite spužvom koje ste namočili u toplu vodu i osušite mekanom suhom krpom.
- Uvijek pozite darostilj prije odlaganja bude čist i suh.
Sve popravke mora obaviti ovlašteni serviser.
Vodič za otklanjanje problema
| Problem | Uzrok Rješenje | |
| Tipka treperi+ Svjetlosni indikator je plava+ Tipka OK treperi | Uključivanje aparata ili pokretanje automatskog c i klusa pečenja s namirnicama i bez predzagrijavanja ploča (automatski je aktiviran ručni režim rada). | 2 moguće opcije:– Odaberite postavku temperature pritiskom na tipku M, a zatim pritisnite tipku OK. Nastavite s pečenjem, ali morate pratiti postupak pečenja (ručni režim rada).– Zaustavite aparat, izvadite namirnice, propisno zatvorite aparat, ponovo programirajte aparat i pričekajte završetak postupka predzagrijavanja. |
| Aparat se zaustavlja tokom ciklusa predzagrijavanja ili pečenja. | Aparat je predugo držan otvoren tokom postupka pečenja.Aparat je predugo ne a k t i v an na k on završetka postupka zagrijavanja ili održavanja toplote. | Isključite aparat iz strujne utičnice i pričekajte 2-3 minute, a zatim ponovo pokrenite postupak. Radi najboljih rezultata pečenja, sljedeći put kada budete koristili aparat pobrinite se da ga brzo otvarate i zatvarate. Ako se problem ponovo pojavi, obratite se centru korisničke službe proizvođača Tefal. |
| Svjetlosni indikator će treperiti u purpurnoj boji+ Tipka 📄 / 🐃 treperi+ Periodični zvučni signal | Kvar aparata.Aparat je odložen ili se koristi u previše hladnoj prostoriji. | Isključite i ponovo spojite aparat i odmah ponovo pokrenite ciklus predzagrijavanja. Ako problem i dalje postoji, obratite se svojoj korisničkoj službi. |
| Aparat se ne oglašava zvučnim signalom. | ||
| Svjetlosni indikator će treperiti u purpurnoj boji+ Tipka 🐃 treperi+ Kontinuirani zvučni signal | Kvar aparata. | Isključite aparat iz strujnog napajanja i obratite se centru korisničke službe. |
| Nakon postupka predzagrijavanja, stavila sam namirnice u aparat i zatvorila aparat, ali svjetlosni indikator ostao je u bjelo boji i postupak pečenja nije započeo." | Količina namirnica u aparatu deblja je od 4 cm. | Debljina namirnica ne smije prekoračiti 4 cm. |
| Tokom stavljanja namirnica roštilj se nije potpuno otvarao. | Potpuno otvorite roštilj i ponovo ga zatvorite. | |
| Aparat nije detektovao namirnice unutra. Količina namirnica je nedovoljna. Tipka “OK” treperi. | Potvrdite aktivaciju postupka pečenja pritiskom na tipku OK. | |
| Aparat će se aktivirati u ručnom režimu rada.+ Swjetlosni indikator će svijetliti u crvenoj boji.+ Svjetlo tipke 🐘 za praćenje temperature i tipke OK je fiksno | V r i j e m e predzagrijavanja je skraćeno. | Periodično pratite postupak pečenja (za korištenje u ručnom režimu rada).IliZaustavite roštilj, izvadite namirnice, zatvorite roštilj, odaberite novi željeni program pečenja i pričekajte završetak ciklusa predzagrijavanja. |
| Problem | Uzrok Rješenje | |
| Tipka tfeperi+ Svjetlosni indikator je plava+ Tipka OK treperi | Uključivanje aparata ili pokretanje automatskog c i klusa pečenja s namirnicama i bez predzagrijavanja ploča (automatski je aktiviran ručni režim rada). | 2 moguće opcije:– Odaberite postavku temperature pritiskom na tipku M , a zatim pritisnite tipku OK. Nastavite s pečenjem, ali morate pratiti postupak pečenja (ručni režim rada).– Zaustavite aparat, izvadite namirnice, propisno zatvorite aparat, ponovo programirajte aparat i pričekajte završetak postupka predzagrijavanja. |
| Aparat se zaustavlja tokom ciklusa predzagrijavanja ili pečenja. | Aparat je predugo držan otvoren tokom postupka pečenja.Aparat je predugo ne a k t i v an na k on završetka postupka zagrijavanja ili održavanja toplote. | Isključite aparat iz strujne utičnice i pričekajte 2-3 minute, a zatim ponovo pokrenite postupak. Radi najboljih rezultata pečenja, sljedeći put kada budete koristili aparat pobrinite se da ga brzo otvarate i zatvarate. Ako se problem ponovo pojavi, obratite se centru korisničke službe proizvođača Tefal. |
| Svjetlosni indikator će treperiti u purpurnoj boji+ Tipka 📄 / 📁 treperi+ Periodični zvučni signal | Kvar aparata.Aparat je odložen ili se koristi u previše hladnoj prostoriji. | Isključite i ponovo spojite aparat i odmah ponovo pokrenite ciklus predzagrijavanja. Ako problem i dalje postoji, obratite se svojoj korisničkoj službi. |
| Aparat se ne oglašava zvučnim signalom. | ||
| Svjetlosni indikator će treperiti u purpurnoj boji+ Tipka 📄 treperi+ Kontinuirani zvučni signal | Kvar aparata. | Isključite aparat iz strujnog napajanja i obratite se centru korisničke službe. |
| Nakon postupka predzagrijavanja, stavila sam namirnice u aparat i zatvorila aparat, ali svjetlosni indikator ostao je u bjelo boji i postupak pečenja nije započeo." | Količina namirnica u aparatu deblja je od 4 cm. | Debljina namirnica ne smije prekoračiti 4 cm. |
| Tokom stavljanja namirnica roštilj se nije potpuno otvarao. | Potpuno otvorite roštilj i ponovo ga zatvorite. | |
| Aparat nije detektovao namirnice unutra. Količina namirnica je nedovoljna. Tipka “OK” treperi. | Potvrdite aktivaciju postupka pečenja pritiskom na tipku OK. | |
| Aparat će se aktivirati u ručnom režimu rada.+ Swjetlosni indikator će svijetliti u crvenoj boji.+ Svjetlo tipke M za praćenje temperature i tipke OK je fiksno | V r i j e m e predzagrijavanja je skraćeno. | Periodično pratite postupak pečenja (za korištenje u ručnom režimu rada).IliZaustavite roštilj, izvadite namirnice, zatvorite roštilj, odaberite novi željeni program pečenja i pričekajte završetak ciklusa predzagrijavanja. |
SADRŽAJ
- Opis 220
- Indikator nivoa pečenja 221
• Pre prve upotrebe 222 - Položaj grila 223
a) Korišćenje automatskog programa 223
b) Korišćenje manuelnog režima 226
c) Vodič za pečenje 227
natural_image
Row of eight circular icons with speaker and audio signal icons, no text or symbols present4

5
- Uklonite svu ambalažu, nalepnice i priboriz unutrašnjosti i sa spoljne strane aparata. Obezbedene su dodatne nalepnice u boji u vidu prstena. Možete zalepiti željeni jezik na prsten originalne boje.
- Pre prve upotrebe, dobro očistite tanjire toplom vodom i sa malo tečnosti za pranje sudova, isperite i dobro osušite.
- Postavite demontažne posude za kapanje na prednjoj strani aparata.
- Uverite se da su gornja i donja ploča pravilno postavljene u proizvodu. Ne aktivirajte prethodno zagrevanje bez ploča. Priključite aparat na električnu mrežu (kobl mora biti potpuno odmotan).
- Pritisite taster za uključivanje/isključivanje.
Oprez: Uverite se da između tanjira nema hrane
POLOŽAJ GRILA
A) KORIŠĆENJE AUTOMATSKOG PROGRAMA
6 automatskih programa: govedina, burger, kobasica, piletina, riba, sendvic


1

2

3
4
5
- Ako je hrana koju želite da pečete zamrznuta, pritisnite odgovarajući taster. Ova funkcija je dostupna samo kada pečete sa automatskim programima, a ne u namuelnom režimu.
- Izaberite odgovarajući program pečenja prema vrsti hrane koju želite da pečete. Savet, posebno za meso: Rezultati pečenja na automatskim programima mogu variirati u zavisnosti od porekla, sečenja i kvaliteta hrane koja se peče, programi su podešeni i testirani za hranu dobrog kvaliteta.
Slično tome, tokom pečenja mora se uzeti u obzir debljina mesa; ne treba peći hranu koja je deblja od 4 cm.
Ako niste sigurni koji program pečenja da koristite, pogledajte stranicu vodiča za pečenje 215.
- Pritisnite taster "OK" aparat počinje da se zagreva, a indikator nivoa pečenja trepen belo.
NB: Ako ste izabrali pogrešan program, isključite aparat i ponovite korake. - Sačekajte da se prethodno zagrevanje završi.
- Kada indikator nivoa prestane da treperi belo i roštilj se oglasi zvučnim signalom, predgrevanje je zavišeno, roštilje spreman za pečenje.
Komentari: Na kraju predgrevanja, ako aparat ostane zatvoren, sigurnosni sistem će ga isključti nakon nekog vremena.
POLOŽAJ GRILA


6

7
8
- Otvorite roštilj i stavite hranu na ploču za pečenje.
MANUELNI REŽIM NA POLOŽAJU GRILA
  | 180-195°C | 220-235°C | 255-275°C | |
| KRON |  | ● | ||
| TIKVICE/BUNDEVA | ● | |||
| PATL |  | ● | ||
| PARADAIZ | ● | |||
| ŠPAR |  | ● | ||
| PEČUPKE | ● | |||
| CRNI |  | ● | ||
| BROKOLI | ● | |||
| BEJB |  | ● | ||
| KOMPOK | ● | |||
| BATA |  | ● | ||
| KRIŠ |  | ● | ||
| ANALOG | ● | |||
| BRES |  | ● | ||
| SVINJETINA | ● | |||
| MOR |  | ● | ||
| PAPRIKA | ● | |||

KRAJ KORIŠĆENJA
1

2
- Sključite aparat tako da pritisnete taster za uključivanje/isključivanje na ručki.
- Isključte aparat iz utičnice.
- Ostavite da se ohladi najmanje 2 sata. Da biste izbegli slučajne opekotine, ostavite roštilj da se dobro ohkadi pre čišćenja.
3
ČIŠĆENJE
1

2
3
4
m = 311
5

6
- Pre čišćenja, otključajte i uklonite plače i posude za kapanje da biste sprečili oštećenje površine za pečenje.
Ocedite posude za kapanje i operite ih u toploj vodi s malo tečnosti za pranje sudova i dobro ih osušite papirnim ubrusom. - Ne uranjajte roštilj u vodu ili bilo koju drugu tečnost.
- Aparat i njegov kabl se ne mogu staviti u mašinu za pranje sudova. Grejne elemente, vidljive i pristupačne delove, ne treba čistiti nakon skidanja ploča. Ako su jako prljave, sačekajte da se aparat potpuno ohladi i očistite ih suvom kripom.
- Ako ne želite da perete ploče za pečenje, tepsije i posude za kapanje u mašini za sudove, za čišćenje koristite toplu vodu i malo tečnosti za pranje, a zatim dobro isperite da biste uklonili ostatke. Pažljivo ih obrišite papimim ubrusom.
Nemojte koristiti metalne jastučice za ribanje, čeličnu vunu ili obrazivna sredstva za čišćenje bilo kog dela rošulja, koristite samo najlonske ili nemetalne jastučice za čišćenje.
- Da biste očistili poklopac roštilja, obrišite ga toplim, mokrim sunderom i osušite mekom, suvom krpom.
- Uvek provente da li je roštilj čst i suv pre skladištenja.
Sve popravke mora da obavi ovlašćeni predstavnik servisa.
Vodič za otklanjanje problema
| Problem | Uzrok Rešenje | |
| Taster treperi+ Svetlosni indikator je plavo+ Taster OK treperi | Uključivanje aparata ili pokretanje automatskog ciklusa pečenja sa namirnicama i bez predzagrevanja ploča (ručni režim rada je automatski aktiviran). | 2 moguće opcije:– Izaberite postavku temperature pritiskom na taster M, a zatim pritisnite taster OK. Nastavite postupak pečenja, ali morate da ga pratite (ručni režim rada).– Zaustavite aparat, izvadite namirnice, propisno zatvorite aparat, ponovo programirajte aparat i pričekajte završetak postupka predzagrevanja. |
| Aparat se zaustavlja tokom ciklusa predzagrevanja ili pečenja. | Aparat je predugo držan otvoren tokom postupka pečenja.Aparat je predugo neaktivan posle završetka postupka zagrevanja ili održavanja toplote. | Isključite aparat iz strujne utičnice i sačekajte 2-3 minute pa ponovo pokrenite postupak. Radi najboljih rezultata pečenja, sledeći put kada budete koristili aparat, pobrinite se da ga brzo otvarate i zatvarate. Ako se problem ponovo pojavi, kontaktirajte ovlašćeni Tefal servis. |
| Svetlosni indikator će da treperi u ljubičasta boji+ Taster / / treperi+ Periodični zvučni signal | Kvar aparata.Aparat je skladišten ili se koristi u previše hladnoj prostoriji. | Demontirajte i ponovo spojite aparat i odmah ponovo pokrenite ciklus predzagrevanja. Ako problem i dalje postoji, obratite se ovlašćenom servisu. |
| Aparat se neće oglasiti zvučnim signalom. | ||
| Svetlosni indikator će da treperi u ljubičasta boji+ Taster treperi+ Kontinuirani zvučni signal | Kvar aparata. | Isključite aparat iz napajanja strujom i kontaktirajte ovlašćeni servis. |
| Posle postupka predzagrevanja, stavila sam namirnice u aparat i zatvorila aparat, ali svetlosni indikator je ostao u 6eoboji i postupak pečenja nije počeo. | Količina namirnica u aparatu je deblja od 4 cm. | Debljina namirnica ne sme da prekorači 4 cm. |
| Roštilj se nije potpuno otvarao tokom stavljanja namirnica. | Potpuno otvorite roštilj i ponovo ga zatvorite. | |
| Aparat nije detektovao namirnice unutra. Količina namirnica je nedovoljna. Taster “OK” treperi. | Potvrdite aktivaciju postupka pečenja pritiskom na taster OK. | |
| Aparat će da se aktivira u ručnom režimu rada.+ Svetlosni indikator će da treperi u crvenoj boji.+Svetlotasteraza pračenje temperature i tastera OK je fiksno. | Vreme predzagrevanja je skraćeno. | Periodično pratite postupak pečenja (za korišćenje u ručnom režimu rada).IliZaustavite roštilj, izvadite namirnice, zatvorite roštilj, izaberite novi željeni program pečenja i pričekajte završetak ciklusa predzagrevanja. |
| Problem | Uzrok Rešenje | |
| Taster treperi+ Svetlosni indikator je plavo+ Taster OK treperi | Uključivanje aparata ili pokretanje automatskog ciklusa pečenja sa namirnicama i bez predzagrevanja ploča (ručni režim rada je automatski aktiviran). | 2 moguće opcije:- Izaberite postavku temperature pritiskom na taster M, a zatim pritisnite taster OK. Nastavite postupak pečenja, ali morate da ga pratite (ručni režim rada).- Zaustavite aparat, izvadite namirnice, propisno zatvorite aparat, ponovo programirajte aparat i pričekajte završetak postupka predzagrevanja. |
| Aparat se zaustavlja tokom ciklusa predzagrevanja ili pečenja. | Aparat je predugo držan otvoren tokom postupka pečenja.Aparat je predugo neaktivan posle završetka postupka zagrevanja ili održavanja toplote. | Isključite aparat iz strujne utičnice i sačekajte 2-3 minute pa ponovo pokrenite postupak. Radi najboljih rezultata pečenja, sledeći put kada budete koristili aparat, pobrinite se da ga brzo otvarate i zatvarate. Ako se problem ponovo pojavi, kontaktirajte ovlašćeni Tefal servis. |
| Svetlosni indikator će da treperi u ljubičasta boji+ Taster 📄 / 🐃 treperi+ Periodični zvučni signal | Kvar aparata.Aparat je skladišten ili se koristi u previše hladnoj prostoriji. | Demontirajte i ponovo spojite aparat i odmah ponovo pokrenite ciklus predzagrevanja. Ako problem i dalje postoji, obratite se ovlašćenom servisu. |
| Aparat se neće oglasiti zvučnim signalom. | ||
| Svetlosni indikator će da treperi u ljubičasta boji+ Taster 🐃 treperi+ Kontinuirani zvučni signal | Kvar aparata. | Isključite aparat iz napajanja strujom i kontaktirajte ovlašćeni servis. |
| Posle postupka predzagrevanja, stavila sam namirnice u aparat i zatvorila aparat,ali svetlosni indikator je ostao u 6eoboji i postupak pečenja nije počeo. | Količina namirnica u aparatu je deblja od 4 cm. | Debljina namirnica ne sme da prekorači 4 cm. |
| Roštilj se nije potpuno otvarao tokom stavljanja namirnica. | Potpuno otvorite roštilj i ponovo ga zatvorite. | |
| Aparat nije detektovao namirnice unutra.Količina namirnica je nedovoljna. Taster “OK” treperi. | Potvrdite aktivaciju postupka pečenja pritiskom na taster OK. | |
| Aparat će da se aktivira u ručnom režimu rada.+ 🎂 Svetlosni indikator će da treperi u crvenoj boji.+Svetlotasteraza pračenje temperature i tastera ✗ je fiksno. | Vreme predzagrevanja je skraćeno. | Periodično pratite postupak pečenja (za korišćenje u ručnom režimu rada).IliZaustavite roštilj, izvadite namirnice, zatvorite roštilj, izaberite novi željeni program pečenja i pričekajte završetak ciklusa predzagrevanja. |
СОДЕРЖАНИЕ
natural_image
Row of eight circular icons with speaker and audio icons, no text or symbols present4

5
4
5
6
natural_image
Row of eight circular icons with speaker and audio icons, no text or symbols present4
5
natural_image
Illustration of a hand washing clothes with a handheld device (no text or symbols visible)6
natural_image
Illustration of a printer with heat burn and a colorful circular logo above (no text or symbols)7
8
4

5

6
natural_image
Row of eight circular icons with speaker and audio icons, no text or symbols present4

5
natural_image
Illustration of a hand pressing down on a fabric or material surface with a mechanical device above (no text or symbols visible)6

natural_image
Illustration of a printer with heat burners and a colorful circular logo above (no text or symbols)7

8
natural_image
Illustration of a mechanical device with a magnified inset showing internal components (no text or symbols visible)4

5

6