
AD 8097 - Refrigerator ADLER - Free user manual and instructions
Find the device manual for free AD 8097 ADLER in PDF.
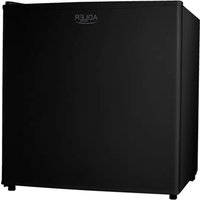

 FR
FR
 AZ
AZ
 BG
BG
 CS
CS
 DA
DA
 DE
DE
 EL
EL
 EN
EN
 ES
ES
 ET
ET
 FI
FI
 HU
HU
 IT
IT
 KA
KA
 LT
LT
 LV
LV
 MK
MK
 NL
NL
 PL
PL
 PT
PT
 RO
RO
 RU
RU
 SK
SK
 SL
SL
 SQ
SQ
 SR
SR
 SV
SV
 UK
UK
| Product Type | Refrigerator |
| Model | AD 8097 |
| Brand | Adler |
| Climate Class | N/ST |
| Electrical insulation class | I |
| Supply Voltage | 220-240 V ~ 50 Hz |
| Rated Current | 0.35 A |
| Refrigerant type and quantity | R600A / 17 g |
| Net Capacity | 58 L |
| Annual Energy Consumption | 81 kWh / year |
| Insulation Type | Cyclopentane |
| Temperature Setting | 7 positions (OFF to 6) |
| Defrosting | Manual, every 2 hours approximately if frost > 5 mm |
| Reversible Door | Yes |
| Ice Tray | Included |
| Shelves | Removable shelves |
| Drip Tray | Included |
| Cleaning | Baking soda solution and hot water |
| Minimum ventilation distance | 12 cm from walls |
| Adjustable Foot | Yes, for leveling |
| Child Safety | Use possible from 8 years under supervision |
| Materials | Sturdy, plastic interior |
Frequently Asked Questions - AD 8097 ADLER
User questions about AD 8097 ADLER
0 question about this device. Answer the ones you know or ask your own.
Ask a new question about this device
Download the instructions for your Refrigerator in PDF format for free! Find your manual AD 8097 - ADLER and take your electronic device back in hand. On this page are published all the documents necessary for the use of your device. AD 8097 by ADLER.
USER MANUAL AD 8097 ADLER

| AD 8097 | |||||
| EN | User Manual | 4 | PL | Instrukcja obsługi | 90 |
| DE | Bedienungsanleitung | 9 | IT | Manuale d'uso | 96 |
| FR | Mode d'emploi | 15 | SV | Bruksanvisning | 101 |
| ES | Manual de usuario | 20 | BG | Ръководство за употреба | 107 |
| PT | Manual de Instruções | 26 | DA | Brugsanvisning | 112 |
| LT | Naudojimo instrukcija | 31 | SK | Používatel'ská príručka | 118 |
| LV | Lietošanas instrukcija | 36 | BS | Korisnički priručnik | 123 |
| ET | Kasutusjuhend | 42 | MK | Упатство за употреба | 128 |
| HU | Használati útmutató | 47 | HR | Korisnički priručnik | 134 |
| RO | Manual de utilizare | 52 | UK | Керівництво користувача | 139 |
| CS | Návod k použití | 57 | SR | Упутство за употребу | 145 |
| RU | Руководство пользователя | 63 | AR | دليل المستخدم | 150 |
| EL | Еүхειρίδιο хрήσης | 69 | AZ | İstifadəçi tõlimatı | 153 |
| NL | Gebruikershandleiding | 74 | SQ | Manuali i përdorimit | 158 |
| SL | Navodila za uporabo | 80 | KA | Общегزطلاوي | 164 |
| FI | Käyttöohje | 85 | |||
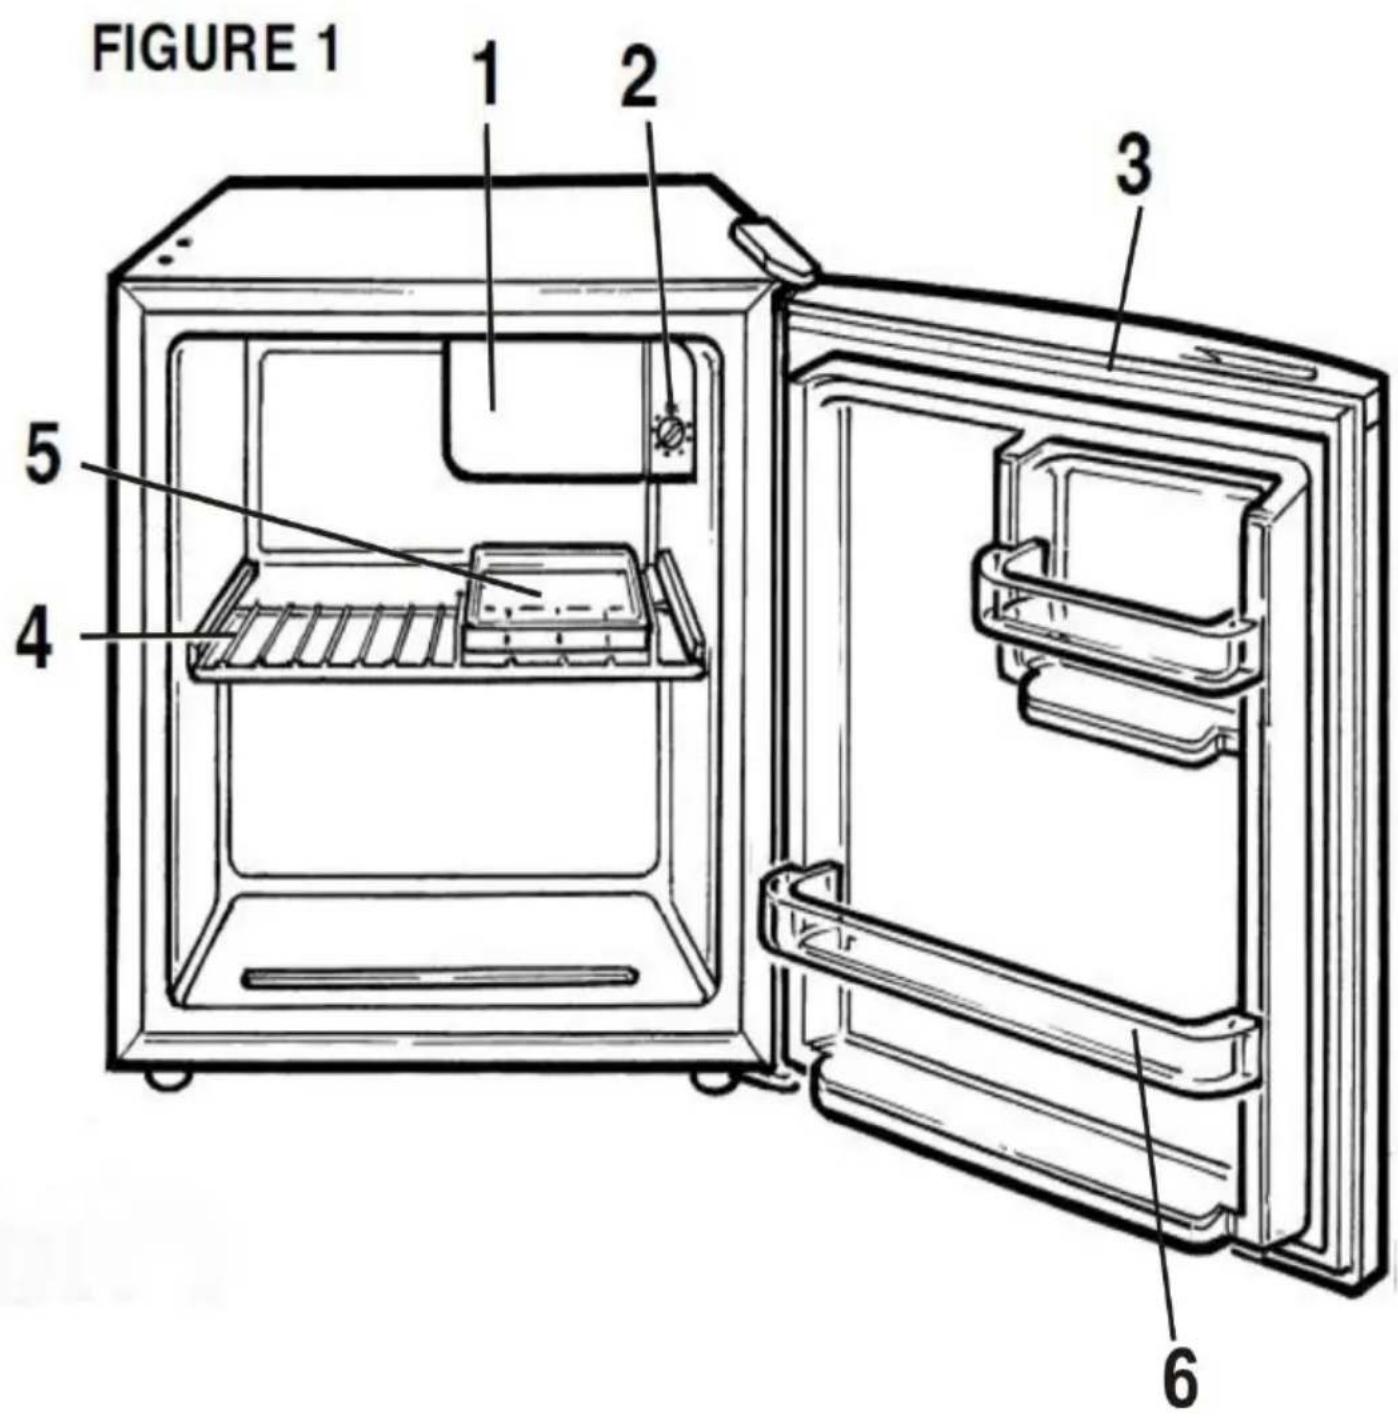
FIGURE 2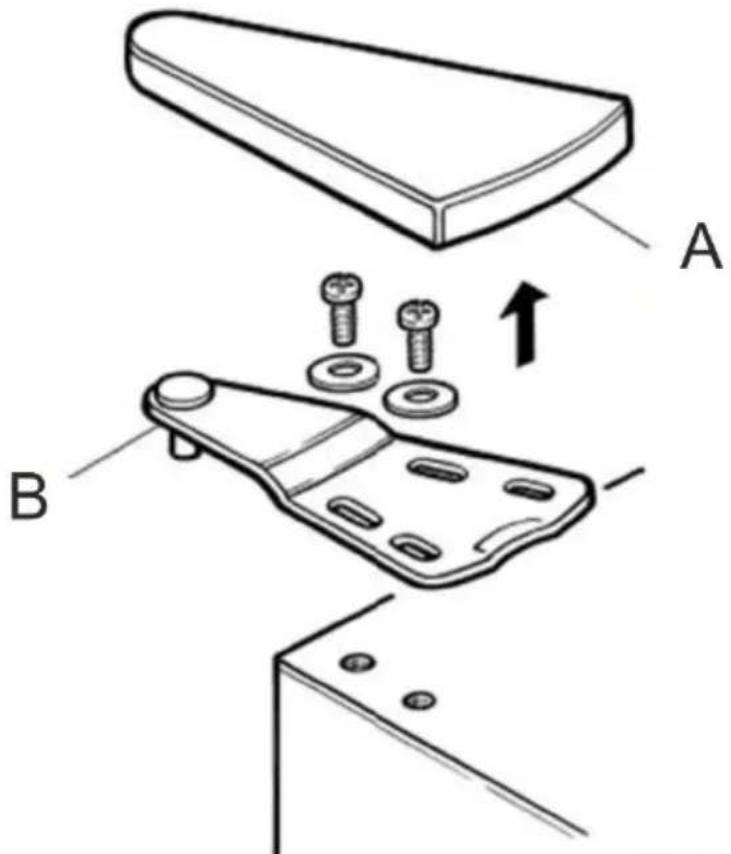
FIGURE 3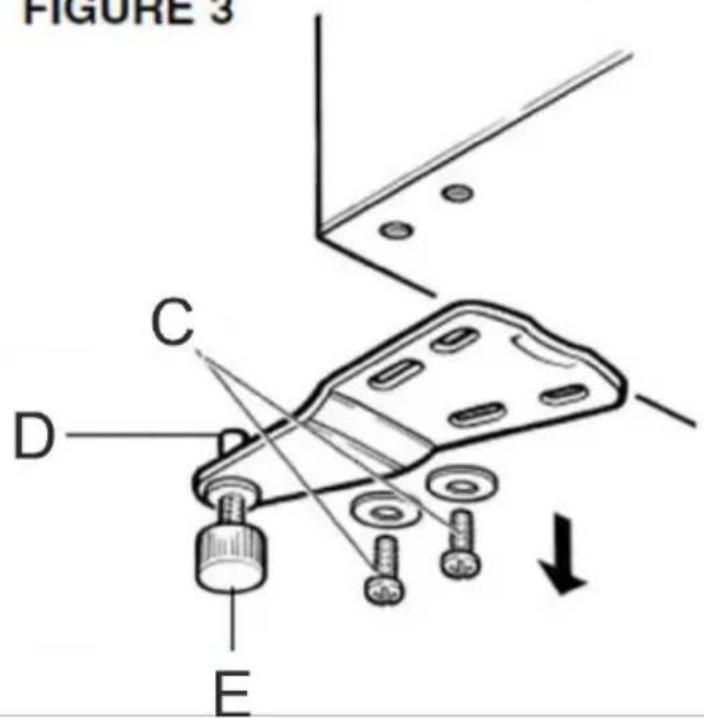
FIGURE 4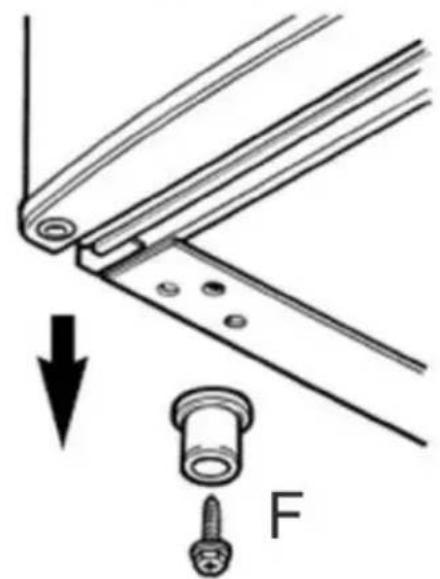
User Manual (EN)
GENERAL SAFETY CONDITIONS
IMPORTANT SAFETY INSTRUCTIONS FOR USE
READ CAREFULLY AND KEEP FOR FUTURE REFERENCE
- Before using the device, read the instruction manual and follow the instructions contained therein. The manufacturer is not responsible for damage caused by using the device contrary to its intended use or improper operation.
- The device is for domestic use only. Do not use for other purposes incompatible with its intended use.
- The device should be connected to a 220-240 V ~ 50-60 Hz power outlet. In order to increase the safety of use, multiple electrical appliances should not be connected to a single circuit at the same time.
- Be especially careful when using the device when children are around. Do not allow children to play with the appliance; do not allow children or persons unfamiliar with the appliance to use it.
- WARNING: This equipment may be used by children over 8 years of age and persons with limited physical, sensory or mental ability, or persons without experience or familiarity with the equipment, if this is done under the supervision of a person responsible for their safety or they have been given instructions on the safe use of the equipment and are aware of the dangers associated with its use. Children should not play with the equipment. Cleaning and maintenance of the equipment should not be performed by children unless they are over 8 years of age and these activities are performed under supervision.
- Always remove the plug from the power outlet after use by holding the outlet with your hand. DO NOT pull on the power cord.
- Do not immerse the cord, plug and the entire device in water or other liquid. Do not expose the unit to weather conditions (rain,
sun, etc.) or use in high humidity conditions (bathrooms, damp camping houses).
- Periodically check the condition of the power cord. If the power cord is damaged, it should be replaced by a specialized repair facility to avoid danger.
- Do not use the device with a damaged power cord or if it has been dropped or damaged in any other way or is not working properly. Do not repair the device yourself, as there is a risk of electrocution. Return a damaged device to a competent service center for inspection or repair. All repairs may be made only by authorized service centers. Improper repair may cause serious danger to the user.
- Place the appliance on a cool, stable, level surface that can withstand the weight of the appliance and all its contents, away from heating kitchen appliances such as an electric stove, gas burner, etc.
- Do not use the device near flammable materials.
- The power cord must not hang over the edge of the table or touch hot surfaces.
- To provide additional protection, it is advisable to install in the electrical circuit a residual current device (RCD) with a rated residual current of not more than 30 mA. In this regard, consult a specialist electrician.
- Do not use the device if the connection sockets are wet.
- When using the device in a car or boat, check that the fuse protecting the power supply system is in working order.
- Protect the device from heat sources and sunlight.
- Put already cooled products into the device.
- Place the device in a place with proper ventilation. The distance from other objects should be at least 12 cm.
- WARNING: Do not cover the ventilation holes in the device housing.
- WARNING: Protect the circuit containing the refrigerant from
damage.
- WARNING: Do not use or store electrical equipment inside the food storage compartment.
- WARNING: Opening the door for an extended period of time, may cause the temperature in the appliance chambers to rise significantly.
- WARNING: Regularly clean surfaces that may come into contact with food.
- WARNING: Store raw meat and fish in designated containers so that the products do not come into contact with each other, and so that they do not drip onto other food.
- WARNING: If the refrigeration unit remains empty for an extended period of time (longer than 3 weeks), turn it off, defrost, clean, dry and leave the door open to prevent mold in the unit.
- WARNING: Do not store explosive materials, such as cans containing flammable aerosol, etc., inside the refrigerator.
- WARNING: When setting up the unit, make sure the power cord is not pinched by the refrigerator, or damaged.
- WARNING: Do not place extension cords or portable power supplies near or behind the unit.
- WARNING: Do not use mechanical devices or means to accelerate the defrosting process.
Warning: risk of fire.
Device Description:
- Ice bin and evaporator with door (Never use sharp tools to remove ice or frost - it may puncture the evaporator)
- Temperature and control knob
- Door gasket
- Refrigerator shelves
- Drip tray
- Refrigerator door shelf
Before first use:
- Remove all packing materials from outside and inside the unit.
- Using a soft cloth and a mild detergent such as dishwashing liquid, wipe the unit from the outside and inside.
- Set the device in its destination, do not cover the compressor or the space in front or behind the device. This will result in the correct operation of the device for a long time. The device should be at least 12 cm away from surfaces that may cause inadequate ventilation such as walls, furniture and other appliances.
NOTE: THE DEVICE IS NOT DESIGNED FOR BUILT-IN.
- Wait a minimum of 4 hours after moving the device.
Use of the device:
- Set up the device at the destination.
- Wait a minimum of 4 hours after moving the device. DO NOT TURN ON THE DEVICE BEFORE THIS TIME.
- Plug the device into the mains.
- Using the temperature knob (2). Set the desired cooling power. The unit has 7 settings from "OFF" to "6".
- Wait 2-3 hours for the interior of the refrigerator to cool down before putting food inside.
- After 24-48 hours at a constant temperature, check if the setting is sufficient.
- Setting "3" should be sufficient for home use.
NOTE: DO NOT OVERFILL THE UNIT MAY CAUSE INSUFFICIENT COOLING ON LOWER SETTINGS. NOTE: IF THE UNIT LOSES POWER OR IS TURNED OFF YOU MUST WAIT FROM 3-5 MINUTES BEFORE TURNING THE UNIT BACK ON. OTHERWISE THE REFRIGERATOR WILL NOT START.
Cleaning and maintenance:
Defrosting:
Defrosting should be carried out regularly or if the ice/frost layer on the ice bin (1) exceeds 5 mm.
- Empty the refrigerator.
- Set the temperature knob to the "OFF" position.
- Disconnect the unit from the power supply.
- Place a drip tray (5) under the ice container.
- Open the door of the ice container (1).
- Place a dry cloth or paper towels under the drip tray to catch water droplets that do not fall into the drip tray.
- Leave the appliance with the door open until
- The defrosting should last about 2 hours after which time pour the water out of the drip tray and use a dry paper towel or cloth to wipe dry the ice container and the interior of the refrigerator.
Cleaning the refrigerator:
- Empty the refrigerator.
- Set the temperature knob to the "OFF" position.
- Disconnect the unit from the power supply.
- Check if the unit should not first go to the defroster section according to the instructions in the "Defroster" section
- Using a solution of 2 tablespoons of baking soda per 1 liter of warm water. Wash the plastic parts of the refrigerator interior.
NOTE: WHEN WASHING THE TEMPERATURE KNOB AND OTHER ELECTRONIC PARTS OF THE UNIT, USE ONLY A SLIGHTLY DAMP CLOTH TO AVOID DAMAGING THE ELECTRONICS.
- Wash the refrigerator shelves and external parts of the appliance, using warm water and dishwashing liquid.
- Using a dry cloth or paper towels, wipe the entire unit dry inside and out.
Change the direction of door opening:
- Remove hinge housing A, hinge screws and hinge B. As shown in Figure 2 page 3.
- Remove the door from the lower hinge.
- Unscrew the lower hinge as shown in illustration 3 page 3.
- Unscrew the left fixed foot as shown in illustration 4 page 3.
- Unscrew the adjustable foot (E) from the bottom hinge and turn the hinge upside down.
- Screw the adjustable foot (E) back into the hinge in the new position.
- Remove the caps from the side to which you want to reposition the door.
- Apply the bottom hinge to the holes and screw it in place.
- Remove the blanking plugs from the door and apply them to the lower hinge.
- Apply the upper hinge first to the door and then to the refrigerator and screw it on.
- Screw the fixed foot on the other side of the unit.
- Put the caps on the previously used holes.
- Using the adjustable foot (E), level the unit.
Problems and solutions:
Problem: The device does not turn on.
Possible causes:
- Unplugged.
- The refrigerator temperature light is set to "OFF".
Problem: The refrigerator frequently turns off and on.
Possible causes:
- The room temperature is higher than normal.
- A large amount of food has been added to the refrigerator.
- The door is opened too often.
- The door is not completely closed.
- The temperature control is not set correctly.
- The door seal does not seal properly.
- The refrigerator does not have proper clearances.
Problem: Vibration
Possible solution: Make sure the unit is level.
Problem: The refrigerator makes too much noise.
Possible causes:
- The rattling sound may come from refrigerant flow, which is normal.
- At the end of each cycle, you may hear a bubbling sound caused by refrigerant flow in the refrigerator.
- The contraction and expansion of the inner walls can cause popping and crackling noises.
- The refrigerator is not level.
Problem: The door does not close properly.
Possible causes:
- The refrigerator is not level.
- The door has been inverted and incorrectly installed.
- The gasket is dirty.
- Shelves, garbage cans or baskets are out of place.
Technical data:
Climate class: N/ST
Electrical insulation class: I
Voltage: 220-240V~50Hz
Coolant type and quantity: R600A/17G
Rated current: 0.35A
Annual energy consumption: 81kWh/year
Capacity: 58L
Type of insulation: Cyclopentane
For the sake of the environment. Cardboard packaging and polyethylene (PE) bags should be disposed of in the appropriate containers for separate collection of municipal waste according to their description. If there are batteries in the device, remove them and separately return them to the collection and storage facility. Return the used device to a suitable collection and storage facility, as the hazardous substances in it may pose a threat to health and the environment. The marking on the product indicates that the device should not be disposed of in the container with municipal waste. Waste electrical equipment is waste that contains substances harmful to humans, animals and the environment. These substances can lead to contamination of the soil, water or air, and through this they can get into the human body and lead to numerous health ailments, such as: vision, hearing, speech disorders, they can also lead to kidney, liver and heart damage, and cause skin diseases. Harmful substances can also have adverse effects on the respiratory and reproductive systems and lead to cancerous changes. Consumption of plants growing on the contaminated soils, and products made from them may risk the above-mentioned health effects. Do not dispose of the device in the municipal waste container!!!
Service: If you wish to purchase spare parts or report any complaints, please contact directly the seller who issued the receipt.
Warning: Fire hazard.
Device description:
Type of insulation: Cyclopentane
Warning: Fire hazard.
Rated current: 0.35A
Annual energy consumption: 81kWh / year
Capacity: 58L
Warning: Fire hazard.
Device description:
Warning: Fire hazard.
Device description:
Warning: Fire hazard.
Warning: fire hazard.
Description of the device:
- Ice bucket and evaporator with door (Never use sharp tools to remove ice or frost - this can puncture the evaporator)
- Temperature and control button
- Door gasket
- Refrigerator shelves
- Drip tray
- Refrigerator door shelf
Before first use:
- Remove all packaging materials from the outside and inside of the device.
- Using a soft cloth and a mild cleaning agent, such as dishwashing liquid, wipe the device inside and out.
- Place the device in the intended location, do not cover the compressor or the space in front of or behind the device. This will ensure that the device operates correctly for a long time. The device should be at least 12 cm away from surfaces that could cause a lack of adequate ventilation, such as walls, furniture, and other appliances.
NOTE: THE DEVICE IS NOT INTENDED TO BE BUILT-IN.
- Wait at least 4 hours after moving the device.
Using the device:
- Place the device in the intended location.
- Wait at least 4 hours after moving the device. DO NOT PLUG IN THE DEVICE BEFORE THIS TIME.
- Connect the device to the electrical power supply.
- Using the temperature button (2), set the desired cooling power. The device has 7 settings from "OFF" to "6".
- Before placing food in the device, wait 2-3 hours for the interior of the refrigerator to cool down.
- After 24-48 hours at a constant temperature, check if the setting is sufficient.
- Setting "3" should be sufficient for household use.
NOTE: DO NOT OVERFILL THE DEVICE AS THIS MAY RESULT IN INSUFFICIENT COOLING AT LOWER SETTINGS.
NOTE: IF THE DEVICE LOSES POWER OR IS TURNED OFF, YOU MUST WAIT 3-5 MINUTES BEFORE TURNING THE DEVICE BACK ON. Otherwise, the refrigerator will not start.
Cleaning and maintenance:
Defrosting:
Defrosting should be done regularly or if the layer of ice/frost on the ice tray (1) exceeds 5 mm.
- Empty the refrigerator.
- Turn the temperature button to the "OFF" position.
- Unplug the device from the power supply.
- Place the drip tray (5) under the ice container.
- Open the ice container door (1).
- Place a dry cloth or paper towels under the drip tray to catch any water drops that do not fall into the drip tray.
- Leave the appliance with the door open until
- Defrosting should take about 2 hours. After that time, pour out the water from the drip tray and wipe the ice container and the inside of the refrigerator with a dry paper towel or cloth.
Cleaning the refrigerator:
IMPORTANT SAFETY INSTRUCTIONS
READ CAREFULLY AND SAVE FOR FUTURE REFERENCE
- Before using the appliance, read the user manual and follow the instructions contained in it. The manufacturer is not responsible for damage caused by using the appliance contrary to its intended purpose or by unprofessional operation.
- The appliance is for household use only. Do not use it for any other purpose that is not in accordance with its intended use.
- The appliance should be connected to a 220-240 V ~ 50-60 Hz outlet. To increase operational safety, do not connect multiple electrical appliances to one circuit at the same time.
- Be especially careful when using the appliance when children are nearby. Children should not be allowed to play with the appliance. Do not allow children or persons unfamiliar with the appliance.
- WARNING: This equipment can be used by children aged 8 years and above and persons with reduced physical, sensory or mental capabilities, or persons who lack sufficient experience or knowledge of the equipment, if they are under supervision or if they have been given instructions on how to use the equipment, instructions on safe use of the appliance and are aware of the dangers associated with its use. Children should not play with the equipment. Cleaning and maintenance of the appliance should not be performed by children unless they are older than 8 years and these activities are performed under supervision.
- Whenever you finish using it, unplug the plug from the outlet by holding the outlet with your hand. DO NOT pull the power cord.
- Do not immerse the cord, plug, or the entire appliance in water or any
Warning: fire hazard.
Device description:
- Ice container and evaporator with door (Never use sharp tools to remove ice or frost - this can puncture the evaporator)
- Temperature and control button
- Door gasket
- Refrigerator shelves
- Drip tray
- Refrigerator door shelf
Before first use:
- Remove all packaging from the outside and inside of the appliance.
- Wipe the appliance outside and inside with a soft cloth and a mild cleaning agent, such as dishwashing liquid.
- Place the appliance in the intended location; do not cover the compressor or the space in front of or behind the appliance. This will ensure that the appliance operates correctly for a long time. The appliance should be at least 12 cm away from surfaces that could cause a lack of adequate ventilation, such as walls, furniture, and other appliances. NOTE: THE APPLIANCE IS NOT INTENDED FOR BUILT-IN INSTALLATION.
- Wait at least 4 hours after moving the appliance.
Using the device:
- Place the device in the intended location.
- Wait at least 4 hours after moving the device. DO NOT TURN ON THE DEVICE BEFORE THIS TIME.
- Connect the device to the electrical mains.
- Using the temperature button (2), set the desired cooling power. The device has 7 settings from "OFF" to "6".
- Before placing food in the device, wait 2-3 hours for the interior of the refrigerator to cool down.
- After 24-48 hours at a constant temperature, check if the setting is sufficient.
- Setting "3" should be sufficient for household use.
NOTE: DO NOT OVERFILL THE DEVICE AS THIS MAY RESULT IN INSUFFICIENT COOLING AT LOWER SETTINGS.
NOTE: IF THE DEVICE LOSES POWER OR IS TURNED OFF, YOU MUST WAIT 3-5 MINUTES BEFORE TURNING THE DEVICE BACK ON. OTHERWISE, THE REFRIGERATOR WILL NOT TURN ON.
Cleaning and maintenance:
Defrosting:
Defrosting should be carried out regularly or if the layer of ice/frost on the ice tray (1) exceeds 5 mm.
Warning: fire risk.
Electric Kettle AD 1282
Burr Coffee Grinder AD 4450
Milk Frother
AD 4491
Sandwich Maker AD 3055
TOASTER 2 SLICE AD 3222
ELECTRIC GRILL AD 3052
CITRUS JUICER AD 4009
PERSONAL BLENDER AD 4081
FOOD PROCESSOR AD 4224
MIXER AD 4225
AIR FRYER AD 6310
PASTEURIZATION POT AD 4496
AIR CONDITIONER AD 7916
AIR HUMIDIFIER AD 7966
FAN HEATER AD 7725
KITCHEN SCALE AD 3166
AFTER SALE SERVICE NOTICE
| GB | If you want to buy spare parts or make any complaints, please contact the seller who issued the receipt directly. |
| DE | Wenn Sie Ersatzteile kaufen oder reklamieren möchten, wenden Sie sich bitte direkt an den Verkäufer, der die Quittung ausgestellt hat. |
| FR | Si vous souhaitez acheter des pièces de rechange ou faire des réclamations, veuillez contacter directement le vendeur qui a émis le reçu. |
| ES | Si desea comprar repuestos o presentar alguna queja, comuníquese directamente con el vendedor que emitió el recibo. |
| PT | Se você quiser comprar peças de reposição ou fazer alguma reclamação, entre em contato diretamente com o vendedor que emitiu o recibo. |
| LT | Jei norite jsigyti atsarginių dalių ar pateikti nusiskundimų, susisiekite tiesiogiai su kvitą išdavusiu pardavėju. |
| LV | Ja vēlaties iegādāties rezerves daļas vai izteikt pretenzijas, lūdzu, sazinieties tieši ar pārdevēju, kurš izsniedza čeku. |
| EST | Kui soovite osta varuosi või esitada pretensioone, võtke otse ühendust kviltungi väljastanud müūjaga. |
| HU | Ha pótalkatrészeket szeretne vásárolni, vagy panaszt szeretne tenni, forduljon közvetlenül a bizonylatot kiàllitó eladóhoz. |
| BS | Ako želite kupiti rezervne dijelove ili napraviti reklamaciju, obratite se direktno prodavaču koji je izdao račun. |
| RO | Если вы хотите купить запчасти или предъявить какие-либо претензии, пожалуйста, свяжитесь напрямую с продавцом, выдавшим чек. |
| CZ | Chcete-li zakoupit náhradní díly nebo uplatnit jakoukoli reklamaci, kontaktujte přimo prodejce, který účtenku vystavil. |
| RU | Dacă doriți să cumpărati piese de schimb sau să faceți vreo reclamație, vă rugăm să contactați direct vânzătorul care a emis chitanța. |
| GR | Eáv θέλετε να αγοράσετε ανταλλακτικά ή να κάνετε οποιαδήποτε παράπονα, επικοινωνήστε απευθείας με τον πωλητή που εξέδωσε την απόδειξη. |
| MK | Ако сакате да купите резервни делови или да поднесете какви било поплаки, контакрајте директно со продавачот кој ja издал сметката. |
| NL | Als u reserveonderdelen wilt kopen of een klacht wilt indienen, neem dan rechtstreeks contact op met de verkoper die de bon heeft afgegeven. |
| SL | Če želite kupiti nadomestne dele ali vložiti reklamacije, se obrnite neposredno na prodajalca, ki je izdal račun. |
| FI | Jos haluat ostaa varaosia tai tehdä valituksia, ota yhteyttä suoraan kuitin antaneeseen myyjään. |
| PL | W przypadku chęci zakupu części zamiennych lub zgłoszenia ewentualnych reklamacji należy kontaktować się bezpośrednio ze sprzedawcą, który wystawił paragon. |
| IT | Se desideri acquistare pezzi di ricambio o presentare reclami, contatta direttamente il venditore che ha emesso la ricevuta. |
| HR | Se desideri acquistare pezzi di ricambio o presentare reclami, contatta direttamente il venditore che ha emesso la ricevuta. |
| SV | Om du vill köpa reservdelar eller göra năgra reklamationer, vänligen kontakta säljaren som utfärdat kvittot direkt. |
| DK | Hvis du ønsker at købe reservedele eller reklamere, bedes du kontakte sælgeren, som har udstedt kvitteringen, direkte. |
| UA | Якщо ви хочете придбати запчастини або подати будь-які претензії, зверніться безпосередньо до продавца, який видав чек. |
| SR | Ако желите да купите резервне делове или да уложите рекламацију, обратите се директно продавцу који је издао рачун. |
| SK | Ak si chcete küpit' náhradně diely alebo uplatnit' akúkolvek reklamáciu, kontaktujte priamo predajcu, ktorý účtenku vystavil. |
| AR | إذا كنت ترゴب في شراء قطع غيار أو تقدميم أي شكوى، فيرجي الاتصال بالبابع الذي أصدر الإيصال مبشرة. |
| BG | Ако искате да закупите резервни части или да направите оплаквания, моля, свържете се директно с продавача, който е издал касовата бележка. |
| AZ | Ehtiyat hisseleri almaq ve ya hər hansı šikayet etmek istøyirsinizse, qebzi veren satici ile birbaşa əlaqe saxlayın. |
| ALB | Nëse dëshironi të blini pjesë këmbimi ose të bëni ndonjë ankesë, ju lutemi kontaktoni drejtpërdrejt shitësin gë ka lëshuar faturën. |
| KA | σηγ βυγβοιο λυσσμφοίησατ βαβομμούδιο δγδιβα δδ φυσθη δικβεββας, ρανθησον φυγμοσδοιφογον βυγμοσβας, φυσθησον δικβεβας, ρανθησον δικβεβας, ρανθησον δικβεβας, ρανθησον δικβεβας, ρανθησον δικβεβας, ρανθησον δικβεβας, ρανθησον δικβέας, ρανθησον δικβέας, ρανθησον δικβέας, ρανθησον δικβέας, ρανθησον δικβέας, ρανθησον δικβέας, ρανθησον διακας, ρανθησον διακας, ρανθησον διακας, ρανθησον διακας, ρανθησον διακας, ρανθησον διακας, ρανθησον διακας, θανθησον διακας, ρανθησον διακας, ρανθησον διακας, ρανθησον διακας, ρανθησον διακας, ρανθησον διακας, ρανθισον διακας, ρανθισον διακας, ρανθισον διακας, ρανθισον διακας, ρανθισον διακας, ρανθισον διακας, ρανθισονδιακας, ρανθισον διακας, ρανθισον διακας, ρανθισον διακας, ρανθισον διακας, ρανθισον διακας, ρανθισον διακοις, ρανθισον διακας, ρανθισον διακας, ρανθισον διακας, ρανθισον διακας, ρανθισον διακας, ρανθισον διακας, υανθισον διακας, υανθισον διακας, υανθισον διακας, υανθισον διακας, υανθισον διακας, υανθισον διακας, υανθησον διακας, υανθησον διακας, υανθησον διακας, υανθησον διακας, υανθησον διακας, υανθησον διακας, υανθησονδιακας, υανθησον διακας, υανθησον διακας, υανθησον διακας, υανθησον διακας, υανθησον διακας, υανθησον διακοις, υανθησον διακας, υανθησον διακας, υανθησον διακας, υανθησον διακας, υανθησον διακας, υανθησον διακας, ωανθησον διακας, υανθησον διακας, υανθησον διακας, υανθησον διακας, υανθησον διακας, υανθησον διακας, υανθισον διακας, υανθησον διακας, υανθησον διακας, υανθησον διακας, υανθησον διακας, υανθησονδιακας, υανθησονδιακας, υανθησονδιακας, υανθησονδιακας, υανθησονδιακας, υανθησονδιακας, υανθησονδιακοις, υανθησονδιακας, υανθησονδιακας, υανθησονδιακας, υανθησονδιακας, υανθησονδιακας, υανθησονδιακας, ψανθησονδιακας, υανθησονδιακας, υανθησονδιακας, υανθησονδιακας, υανθησονδιακας, υανθησονδιακας, υανθισονδιακας, υανθησονδιακας, υανθησονδιακας, υανθησονδιακας, υανθησονδιακας, υανθησονδιακας, υανθησον διακας, υανθησονδιακας, υανθησονδιακας, υανθησονδιακας, υανθησονδιακας, υανθησονδιακοις, υανθησονδια καντρόσεις, υανθησονδιακας, υανθησονδιακας, υανθησονδιακας, υανθησονδιακας, υανθησονδιακας, υανθησονδιακας, θανθησονδιακας, υανθησονδιακας, υανθησονδιακας, υανθησονδιακας, υανθησονδιακας, υανθησονδιακας, υανθεσονδιακας, υανθεσονδιακας, υανθεσονδιακας, υανθεσονδιακας, υανθεσονδιακας, υανθεσονδιακας, υανθεσον διακας, υανθεσονδιακας, υανθεσονδιακας, υανθεσονδιακας, υανθεσονδιακας, υανθεσονδιακας, υανθεσονδιακοις, υανθεσονδιακοις, υανθεσονδιακοις, υανθεσονδιακοις, υανθεσονδιακοις, υανθεσονδιακοις, υανθεσονδια καντρόσεις, υανθεσονδιακας, υανθεσονδιακας, υανθεσονδιακας, υανθεσονδιακας, υανθεσονδιακοις, υανθεσονδιακοις. |

- USER MANUAL (EN)
- GENERAL SAFETY CONDITIONS
- IMPORTANT SAFETY INSTRUCTIONS FOR USE
- READ CAREFULLY AND KEEP FOR FUTURE REFERENCE
- DEVICE DESCRIPTION
- BEFORE FIRST USE
- USE OF THE DEVICE
- DEFROSTING
- CLEANING THE REFRIGERATOR
- CHANGE THE DIRECTION OF DOOR OPENING
- DESCRIPTION OF THE DEVICE
- USING THE DEVICE
- IMPORTANT SAFETY INSTRUCTIONS
- READ CAREFULLY AND SAVE FOR FUTURE REFERENCE
Brand : ADLER
Model : AD 8097
Category : Refrigerator