
SS-14575 - Grinder Sogo - Free user manual and instructions
Find the device manual for free SS-14575 Sogo in PDF.

| Product Type | Multifunction food processor (grinder/chopper) |
| Brand | Sogo |
| Model | SS-14575 |
| Power supply | 220-240 V ~ 50-60 Hz, 1000 W |
| Bowl capacity | 1.5 L (max per batch) |
| Functions | Chopping, mixing, kneading, slicing, grating, emulsifying, citrus juicing |
| Included accessories | Processor bowl, lid with pusher, chopping blade, kneading blade, emulsifying disc, slicing/grating blades (5 types), citrus press cone, blade adapter |
| Speeds | 6 speeds + pulse function (P) |
| Safety | Double safety lock (bowl and lid), overheat protection (automatic shut-off) |
| Recommended usage time | Max 3 min continuous for chopping/cutting, max 1 min for mixing; 3 min pause between cycles |
| Cleaning and maintenance | Motor base not immersible; removable accessories dishwasher safe or washable in soapy water |
| Repairability and after-sales service | Spare parts available; after-sales service via www.sogosat.com or phone 0034 902 222 161 |
| Regulatory information | Compliant with EU directives (Low Voltage, EMC, RoHS, Ecodesign) |
| Dimensions (estimated) | Approximately 35 x 25 x 30 cm (overall) |
| Weight (estimated) | Approximately 4 kg |
Frequently Asked Questions - SS-14575 Sogo
User questions about SS-14575 Sogo
0 question about this device. Answer the ones you know or ask your own.
Ask a new question about this device
Download the instructions for your Grinder in PDF format for free! Find your manual SS-14575 - Sogo and take your electronic device back in hand. On this page are published all the documents necessary for the use of your device. SS-14575 by Sogo.
USER MANUAL SS-14575 Sogo
natural_image
Exterior view of a modern kitchen appliance with a beige base and clear glass casing (no visible text or symbols)
Descarga tu manual
Download your manual
Téléchargez votre manuel
Baixe seu manual
Laden Sie Ihr Handbuch herunter
Scarica il tuo manuale
Stáhněte si manuál
Download din manual
Prenesite svoj priročnik
Preuzmite svoj priručnik
Pobierz swoją instrukcję
Descărcati manualul dvs
Завантажте посібник
Descàrrega el teu manual
PROCESADOR DE ALIMENTOS FOOD PROCESSOR PROCESSEUR D'ALIMENTS PROCESSADOR DE ALIMENTOS LEBENSMITTELVERARBEITER PROCESSORE ALIMENTARE ZPRACOVATEL POTRAVIN FOODPROCESSOR PREDELOVALEC HRANE KUHINJSKI PROCESOR PRZETWÓRCA ŻYWNOŚCI PROCESOR ALIMENTAR PROCESOR ALIMENTAR PROCESSADOR D'ALIMENTS
ref. SS-14575

ESPAÑOL P. 3
ENGLISH P. 13
FRANÇAIS P. 23
PORTUGUESE P. 33
DEUTSCH P. 43
ITALIANO P. 53
ČEŠTINA P. 63
DANSK P. 73
SLOVENSKI P. 83
HRVATSKI P. 93
POLSKI P. 103
ROMÂNĂ P. 113
Declaration of conformity, Responsibility of Electronic products disposal, Importers Details and After-sales service on the last pages.
Notas:
• Always read the instruction book carefully before using.
- This manual can be downloaded from our web page www.sogo.es
- Keep these instructions for future reference.
2. Safety instructions for the user
GENERAL PRECAUTIONS
General precautions during the use of electrical equipment
- Do not use the appliance for any other purpose than described in this manual.
- Do not use or store the appliance outdoors.
• Always place the appliance on to the flat and even surface. - The unit must be used only for the intended purposes. No liability is accepted for damages arising from improper use or wrong handling. Misuse or improper handling may cause problems in the appliance and cause injury to the user.
- This appliance is intended to be use used in household and similar applications.
- Ensure that the voltage indicated on the nameplate matches the mains voltage before plugging in the appliance.
- Always remove the plug from the power socket when the appliance is not in use. Do not leave the appliance unattended when switched on.
- Close supervision is necessary when any appliance is being used by or near children.
- Before cleaning or storing your appliance, always unplug the appliance from the power supply and let it cool down.
- The device is not completely disconnected from the power source, even after it has been turned off. To disconnect it completely, disconnect it from the mains plug.
- The appliances are not intended to be operated by means of an external timer or separate remote-control system.

Restrictions on use to avoid personal injury
- Do not place or operate this appliance near water sources.
- Do not place or operate the appliance and its power cord on or near hot surfaces (e.g., stove plates, Ovens or Electric burners) or open flames.
-
Do not leave the power cord hanging from sharp edges and keep away from hot objects and flames. Do not wind the cord around the appliance and do not bend it.
-
Never use accessories that are not recommended by the manufacturer.
- The use of accessories not recommended or sold by the appliance manufacturer may result in fire, electric shock or injury to persons.
- When you want to remove the plug from the wall contact, please do this at the plug itself and not by pulling on the cable or the appliance itself.
- To avoid electric shock, make sure your hands are dry before plugging or unplugging.
- Do not use the device with wet hands, on damp floors or when the atmosphere is humid, there is a risk of electric shock.
- Never immerse the appliance or the plugin water or any other liquid. In the event of the appliance falling in water, disconnect immediately from the mains supply and take it to an authorized service agent for repair before reusing.
- Do not use the appliance if it has fallen on the floor, if there are visible signs of damage or if it has a leak.
- Do not use the appliance if the cable or plug is damaged. In case of the cord be damaged, it must be replaced only by the manufacturer, its service agent or similarly qualified persons in order to avoid Hazard.
- In case of appliance malfunction, or if it has been damaged in any manner, return the appliance to the nearest authorized service facility for examination, repair or adjustment.

Restrictions on use when used with children and elders
- This appliance is not intended for use by persons (including children) with reduced physical, sensory or mental capabilities, or lacking experience and knowledge, unless they have been properly instructed concerning use of the appliance and are fully supervised by a person responsible for their safety.
- Children should be supervised to ensure that they do not play with the appliance.
- Keep the appliance and its cord out of the reach of the children.
• Children shall not play with the appliance. - Cleaning and user maintenance shall not be made by children without supervision.
- Do not allow the children to use the appliance.
- Appliances can be used by children aged from 8 years and above and persons with reduced physical, sensory or mental capabilities or lack of experience and knowledge if they have been given supervision or instructions concerning use of the appliance in a safe way and understand the hazards involved.

Instructions to follow when using the appliance
- This appliance includes a safety switch which prevents operation unless the accessories are securely installed.
- This appliance is designed with a protective device in case of operation in high temperatures. If the temperature becomes too high, the unit will turn off automatically and will resume operation when the motor cools completely (after about 30-60 minutes).
Note: Do not operate the appliance for more than 3 minutes continuously. Need to use it for more than 5 minutes, it may trigger overheat protection of the motor, which may cause some damages to the appliance.
- Caution: If the operation is not completed within 3 minutes, turn off the machine and cool it for 1 minute before the next operation. If more than 5 rounds operations are required, cool the machine for 30-60 minutes to room temperature. This can lengthen lifespan of the appliance.
- The temperature of accessible surfaces may be high when the appliance is operating.
- To protect against risk of electric shock, fire or personal injury, do not immerse the power cord, plug or motor base into water or any form of liquid.
- Do not immerse the motor base into water, or rinse it under tap water.
- Do not push food with fingers, or other objects (like knives), always use the enclosed pusher for feeding food.
• Always disconnect the blender from the mains when it is left unattended and before assembling, disassembling or cleaning. - Be careful if hot liquid is poured into the food processor or blender, as it can be ejected out of the appliance due to the sudden steaming.
- WARNING: The blades are very sharp!
- Avoid contacting moving parts of the appliance while in function.
- Turn off the appliance and disconnect from the mains supply before changing accessories or approaching movable parts in use.
- Care must be taken when handling the sharp blades, emptying the bowl and during cleaning.
- Do not connect the appliance to the mains until it is completely assembled and always disconnect the appliance before disassembling or handling the blade.
-
Keep hands and utensils out of container while blending to reduce the risk of severe injury to persons or damage to the blender. A scraper may be used but must be used only when the blender is not running.
-
The unit is equipped with a security function. The unit can only be switched on if all the accessories are mounted properly.
- CAUTION: Do not operate the unit when empty.
- CAUTION: Do not put hot ingredients into the jar. Before food preparation, allow food to cool down for a few minutes.
- CAUTION: Before you eat or serve blended food, please always check for ingredients that might have not been blended adequately.
- To avoid a circuit overload when using this product, do not operate another high-wattage product on the same electrical circuit.
- A short power supply cord is provided with this product. An extension cord is not recommended for use with this product, but if one must be used:
- The marked electrical rating of the cord must be at least as great as that of the product.
- Arrange the extension cord so that it does not hang where it can be tripped over or pulled unintentionally.
- Installation of a spike protector will offer additional protection with a nominal trigger current of not more than 30 Ma in the house installation. Please consult your installing electrician.
- Always use a reliable earthed power supply to operate the appliance.
CLEANING AND MAINTENANCE
Kindly refer to the cleaning and maintenance section for details on how to clean surfaces which comes in the contact of food.
3. TECHNICAL SPECIFICATIONS
| Voltage Frequency Power | |
| AC220-240V 50-60Hz 1000W |
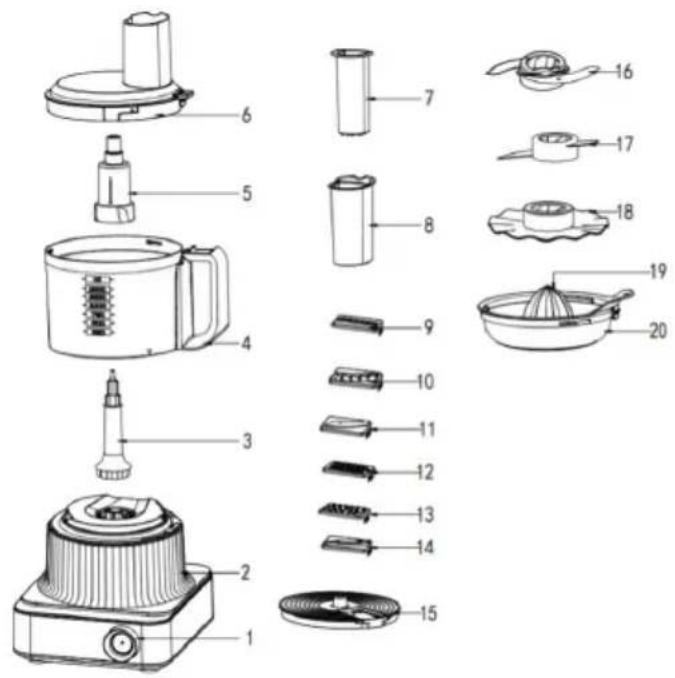
4. PARTS DESCRIPTION
Part
- Switch knob
2.Motor base - Driving shaft
- Processor bowl
- Blade adapter
- Bowl cover
- Small pusher
- Big pusher
- Wavy blade
- French fry blade
- Fine slicing blade
12.Fine shredding blade - Grating blade
- Coarse slicing blade
- Disc support
- Chopping blade
- Kneading blade
- Emulsify disc
19.Citrus juicer cone - Citrus Juicer
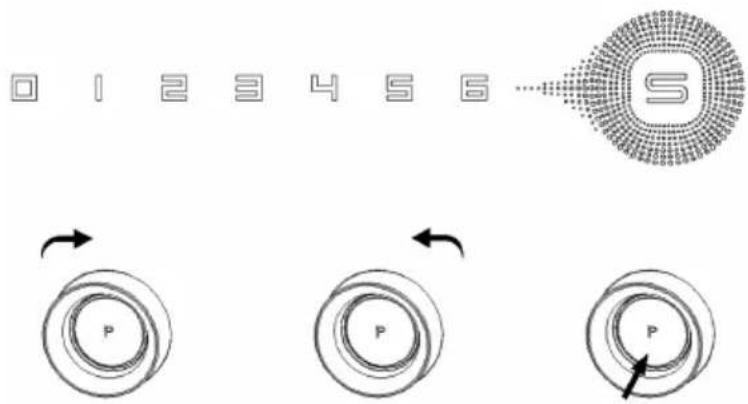
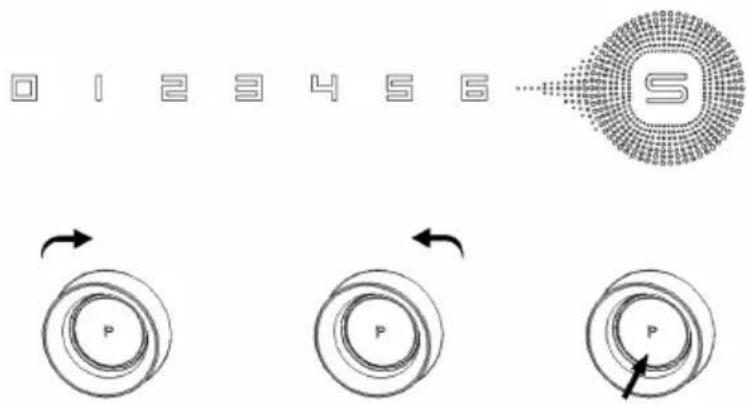
5. THE SPEED PANEL AND ROTARY SWITCH KNOB

Rotary switch knob: this unit is provided with rotary switch knob. With the help of this knob, we can change the speeds and pulse function.
In standby position Led display shows 0 Speed. We can change the speeds from 1 to 6 as per our requirement. Speed 1 is the lowest and speed 6 is the highest. By rotating knob in clockwise direction we can change the speeds from 0 to 6 and by rotating it counter clockwise, the corresponding gear indicator on the panel switches from 6-0 speed.
In order to use the "Pulse function" Rotate the switch knob to 0, Press the "P" key, and unit will start working on pulse function. By pressing the same button, we can stop using pulse function.
6. INSTRUCTIONS OF USE
How to use food processor with the help of accessories:
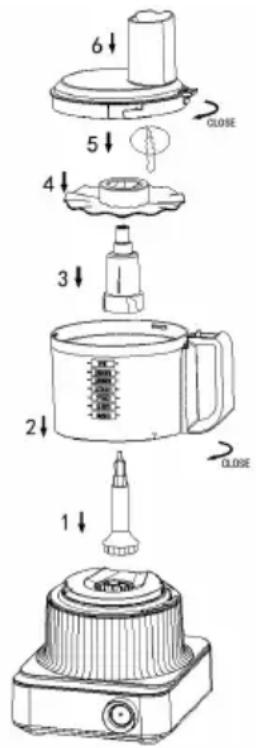
CHOPPING BLADE
- Place the appliance onto the flat and dry table, and place the driving shaft on the motor base vertically.
- Place the processor bowl on to the driving shaft and turn it clockwise to fix it firmly on the motor base until you hear a click sound. The handle of the bowl must be in the right-hand side of the switch knob.
- Place the blade adapter onto the driving shaft vertically.
- Attach firmly the chopping blade into the blade adapter.
- Turn the chopping blade to the right position and then place food into the bowl.
- Place the lid on the processor bowl, turn it clockwise until you hear a click sound, the cover interlocks on the bowl.
- Place a pusher into the feeding chute.
Please refer to the following table for the food volume per batch to use chopping blade, select the speed according to the hardness of food.
| Processed Food Me | Measurement Per batch Working time |
| Chocolate ≤100g | 30-60 sec |
| Cheese ≤200g | 30-60 sec |
| Meat ≤500g 30-60 sec | |
| Tea or Spice 50~100g 30-60 sec | |
| Fruit & Vegetable 100~300g 30-60 sec | |
| Onion ≤500g | 30-60 sec |
Notes:
• Always keep the chopping blade inside the bowl before feeding food.
- Use the PULSE function for several times to avoid cutting too fine. Do not operate it for too long while cutting hard cheese or chocolate. Otherwise, these materials will overheat and begin to melt.
- The standard chopping period is 30-60 seconds, and the speed selection can be according to the hardness of the ingredient.
KNEADING BLADE (17)
- Place the appliance onto the flat and dry table, and place the driving shaft on the motor base vertically.
- Place the processor bowl on to the driving shaft and turn it clockwise to fix it firmly on the motor base until you hear a click sound. The handle of the bowl must be in the right-hand side of the switch knob.
- Place the blade adapter onto the driving shaft vertically.
- Attach firmly kneading blade on to the blade adapter.
- Turn the kneading blade to the right position and then place food into the processor bowl.
- Place the lid on the bowl, turn it clockwise until you hear a click noise, the cover interlocks on the bowl.
- Place a pusher into the feeding chute.

Please refer to the following table for the ingredients volume per batch for the kneading process. Remember, that recommended speed for dough kneading is 4 to 6. For Liquid ingredients, such as egg stirring and milkshake use speed 1 to 3.
| Processed Food Measurement Per batch Working time | |
| Flour & Soft Cheese ≤300g 10-30 sec | |
| Eggs ≤5pcs 10-30 sec | |
Notes:
• Always keep the kneading blade inside the bowl before feeding food.
- When kneading dough, the ratio of flour and water is 1:0.6, that is, 100g flour and 60g water.
- Speed, 4 to 6 is for dough kneading, speed 1 to 3 is for stirring egg white, preparing milk shake or processing any liquid ingredient.
- While kneading the dough, please follow the working standards as mentioned below:
Run the processor for 20 seconds, then give a pause for 2 min. and then restart again for next 15 seconds, to complete one circle. The dough will be ready after 1 to 2 circles. It is suggested to use the high speed in the case where dough preparation time is long. Use of low speed will make dough stickier and can cause appliance mal function.
EMULSIFYING DISC (18)
(Refer to below assembly drawing)
- Place the appliance onto the flat and dry table, and place the driving shaft on the motor base vertically.
- Place the processor bowl on to the driving shaft and turn it clockwise to fix it firmly on the motor base until you hear a click sound. The handle of the bowl must be in the right-hand side of the switch knob.
- Place the blade adapter onto the driving shaft vertically.
- Attach firmly emulsify disc on to the blade adapter.
- Turn the emulsify disc to the right position and then place food into the processor bowl.
- Place the lid on the bowl, turn it clockwise until you hear a click sound, the lid interlocks on the bowl.
- Place a pusher into the feeding chute.
Please refer to the following table for the food volume per batch to use emulsify disc, you can use emulsify disc to make cream pudding and bearnaise sauce.
| Processed Food Measurement Per batch working time | ||
| Eggs 3-6pcs 30~70 sec | ||
| cream 125~350 ml 20 sec | ||
Note:
- Do not use an emulsify disc to knead the dough or beat the butter.
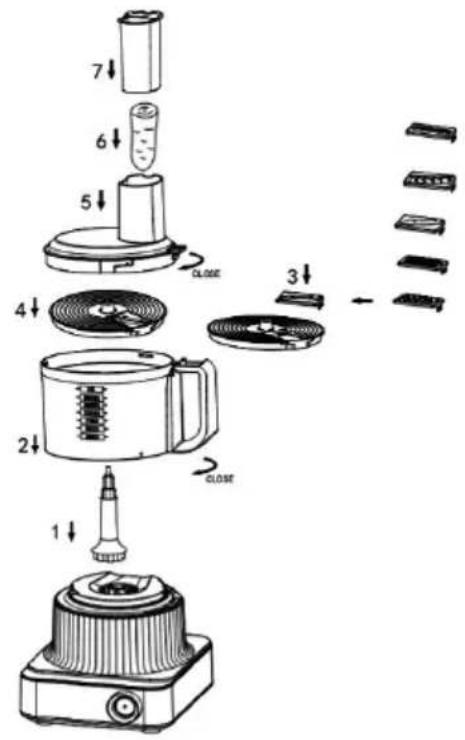
WAVY BLADE / COARSE SLICING BLADE / FINE SLICING BLADE / FINE SHREDDING BLADE / GRATING BLADE/ FRENCH FRIES BLADE (9/10/11/12/13/14)
- Place the appliance onto the flat and dry table, and place the driving shaft on the motor base vertically.
- Place the processor bowl on to the driving shaft and turn it clockwise to fix it firmly on the motor base until you hear a click sound. The handle of the bowl must be in the right-hand side of the switch knob.
- Install the blade disc onto the driving shaft with adequate blade as per requirement.
- Place the lid on the bowl, turn it clockwise until you hear a click sound, the lid interlocks on the bowl. Place food into the feeding chute.
- Use the pusher to push the food down for processing.
Notes:
- Select blade according to the food and the desired shape of food.
- Push the food down slowly when feeding.
• Make sure to cut the food in smaller pieces to fit in the diameter of feeding chute. - Keep feeding food gradually for better results. While chopping soft food, choose lower speed. If large quantity of food needs to be cut, please cut it in several batches, depending on the type of food.
- The blades are very sharp, please be careful while assembling, disassembling, cleaning and storing.
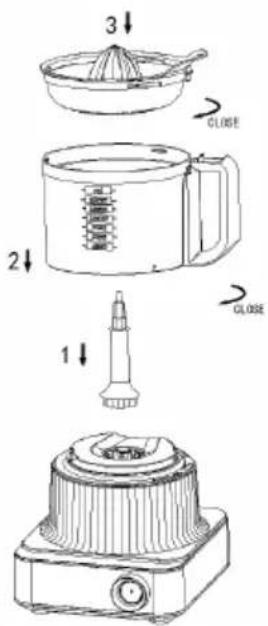
CITRUS JUICER (19 / 20)
- Place the appliance onto the flat and dry table, and place the driving shaft on the motor base vertically.
- Place the processor bowl on to the driving shaft and turn it clockwise to fix it firmly on the motor base until you hear a click sound. The handle of the bowl must be in the right-hand side of the switch knob.
- Place the citrus juicer onto driving shaft inside the processor bowl.
Citrus juicer can be used to squeeze orange juice. Cut the orange in half, place it on the juicer filter and hold it by hand, the orange juice filter rotates for juicing process.
Note: Assemble the citrus juicer as shown in the figure above. Make sure to use the lower speed for juicing process.

TIPS AND RECOMMENDATIONS
- It is recommended to choose the pulse function 2-3 times for pre-mixing the food ingredients before the operation.
• 1500ML is Max. quantity for one batch. - Make sure that the base is installed properly before the operation.
- Measuring cup can be used to add ingredients during the operation.
- Please do not operate the blender function for more than 1 minute. After operating it for 1 minute, let it cool it for 3 minutes before the next operation.
HOW TO DISASSEMBLE
- Remove the pusher. Turn the cover counterclockwise, lift and remove it.
- Lift the accessory from the driving shaft.
- Turn the processor bowl counterclockwise to unlock it from the motor base. Lift it and remove it.
CLEANING & MAINTENACE
- Please unplug the power cord to protect from electric shock while cleaning the machine. Do not immerse the motor base and power cord into water.
- All the removable accessories can be cleaned in water except the motor base. Dry the wet parts after cleaning. All the detachable accessories can be washed in a dishwasher.
- For easy cleaning, while cleaning the blender jar, you can use some warm water and detergent in the blender jar and leave it for some time.
- Always place the machine in a dry place with air circulation.
- Do not use the hard (solid) detergent to avoid any scratch on the product.
- Do not operate the appliance for more than 3 minutes at a stretch for chopping and cutting functions and do not operate it more than 1 minute for the blender function. Using this appliance more than 5 minutes, can trigger of overheating of motor. Please do not operate the appliance for too long to avoid damages to it.
- If the operation is not completed within 2 minutes, turn off the machine and let it cool for 1 minute before the next operation. In case the machine need to use more than 5 times, then cool it for 30-60 minutes to room temperature.
- DO NOT IMMERSE THE MOTOR BASE INTO WATER.
TROUBLESHOOTING
| Problem Solution | |
| The machine does not work. | Make sure to assemble correctly. Please pay attention to the lock and unlock direction, arrows and marks on the lid and base.Double safety locks are on the lid and base. Make sure the safety locks are activated.NEVER try to install the bowl (blender) with the handle on the left. It cannot be installed. Please install the bowl with the handle on the right.The bowl and lid should be firmly locked to activate the safety lock system. For a new appliance, it may be a little difficult to lock the bowl in the starting. Make sure that the handle is facing to the right side and is at a 90-degree angle to the front.Make sure the power plug is plugged in properly.Check whether the power supply is not tripped or cut off. |
| The machine stops running suddenly. | 1. The processor bowl may loosen during vigorous processing. Please re-install the bowl and cover.2. There is an over-heating protection function in appliance. Using the appliance for longer period of time reduce the lifespan of the food processor and trigger the overheat protection. Recommended time for using the appliance with food processor bowl is 3 minutes per circle. (Note: Using blender function is 1 minute per circle). After finishing one working circle please switch of the appliance and let it for cool 3 minutes before next round.3. If the overheat protection has already been triggered, please cool the appliance for 30-60 minutes, and plug it again to use it. |
| The machine shakes violently. | 1. Please insert lesser quantity of food.2. Please cut the food into smaller pieces and put it in the bowl evenly.3. Please install the blades as per instructions. The blades must be firmly installed.4. Please place the appliance in a flat smooth place. |
| The machine doesn't blend properly. | 1. Always add water or milk in the blender jar.2. Please do not add hard ice cubes bigger than 2cm. it is recommended to not to add more than 5 ice cubes at a time. |
| The machine cannot chop perfectly. | 1. Please cut food into smaller pieces if the food size is big.2. Please install the chopper blade and blade adapter firmly before putting food into the bowl. |
| The motor is running, while other components do not run. | Make sure the driving shaft is installed correctly. |

PORTANT:
5. LE PANNEAU DE VITESSE ET LE BOUTON DU COMMUTATEUR ROTATIF

Notes:
Notas:
Anmerkungen:
5. IL PANNELLO DI VELOCITÀ E LA MANOPOLA DELL'INTERRUTTORE ROTANTE

Note:
5. PANEL RYCHLOSTI A OTOČNÝ SPÍNAČ

VLNITÝ NŮŽ / HRUBÝ KRÁJECÍ NŮŽ / JEMNÝ KRÁJECÍ NŮŽ / JEMNÝ KROUHACÍ NŮŽ / STROUHACÍ NŮŽ / NŮŽ NA HRANOLKY (9/10/11/12/13/14)
Poznámky:
5. HASTIGHEDSPANLET OG DREJEKNAPPEN
Noter:
5. PLOŠČA ZA HITROST IN VRTLJIVI GUMB STIKALA

Opombe:
5. PLOČA BRZINE I ZAKRETNI PREKIDAČ

Okretni prekidač: ova jedinica je opremljena okretnim prekidačem. Pomoću ovog gumba možemo mijenjati brzine i funkciju pulsa.
Bilješke:
• Odaberite oštricu prema hrani i željenom obliku hrane.
- Tijekom hranjenja polako gurajte hranu prema dolje.
- Obavezno izrežite hranu na manje komade kako bi odgovarala promjeru otvora za hranjenje.
- Nastavite davati hranu postupno za bolje rezultate. Dok sjeckate meku hranu, odaberite manju brzinu. Ako treba rezati veću količinu hrane, režite je u nekoliko serija, ovisno o vrsti hrane.
- Oštrice su vrlo oštre, budite pažljivi prilikom sastavljanja, rastavljanja, čišćenja i skladištenja.
SOKOVNIK ZA CITRUSE (19 / 20)
- Postavite uređaj na ravan i suh stol, a pogonsku osovinu postavite okomito na bazu motora.
- Postavite zdjelu procesora na pogonsku osovinu i okrenite je u smjeru kazaljke na satu kako biste je čvrsto pričvrstili na bazu motora dok ne čujete zvuk klika. Ručka posude mora biti na desnoj strani gumba prekidača.
- Postavite sokovnik za citruse na pogonsku osovinu unutar posude procesora.
Sokovnik za citruse može se koristiti za cijedenje soka od naranče. Prerežite naranču na pola, stavite je na filtar sokovnika i držite je rukom, filtar za sok od naranče se okreće za proces cijedenja.
Napomena: sastavite sokovnik za citruse kao što je prikazano na gornjoj slici. Pazite da koristite nižu brzinu za proces cijedenja.
SAVJETI I PREPORUKE
5. PANEL PREDKOŚCI I POKRETŁO PRZEŁĄCZNIKA OBROTOWEGO

Uwagi:
5. PANOUL DE VITEZE ŞI BUTONUL COMUTATORULUI ROTATIV

Note:
Нотатки:
5. EL PANELL DE VELOCITAT I LA PERILLA GIRATÒRIA
Notes:
DÉCLARATION DE CONFORMITÉ
DECLARATION OF CONFORMITY
This device complies with EU Low Voltage Directive 2014/35/EC. Electromagnetic Compatibility Directive 2014/30/EU. Directive 2015/863/EU on the restriction of the use of certain hazardous substances in electrical. Directive 2009/125/EC on the eco-design requirements applicable to energy-related products.
This symbol on the product or on the packaging indicates that this product can't be disposed as normal rubbish or household waste. All the electrical, electronic equipment's and battery-operated units must recycle in proper manner and according to the local municipal laws. You can recycle them by taking them to government authorized disposal centres or specialized bins which you can find in any nearby big super markets, electronics or electro domestics products stores or malls who have these types of facilities available.
Designed by: SOGO based on European quality standards Imported by: Sanysan Appliances S.L, NIF: B98753056, C/ Barcas 2, 2, 46002 Valencia, Spain Product manufactured in CHINA. After-sales service: www.sogosat.com sogosat@sogosat.com / 0034 902 222 161


- Notas:
- Safety instructions for the user
- GENERAL PRECAUTIONS
- General precautions during the use of electrical equipment
- Restrictions on use to avoid personal injury
- Restrictions on use when used with children and elders
- Instructions to follow when using the appliance
- CLEANING AND MAINTENANCE
- TECHNICAL SPECIFICATIONS
- PARTS DESCRIPTION
- Part
- THE SPEED PANEL AND ROTARY SWITCH KNOB
- INSTRUCTIONS OF USE
- CHOPPING BLADE
- Notes:
- KNEADING BLADE (17)
- EMULSIFYING DISC (18)
- (Refer to below assembly drawing)
- Note:
- WAVY BLADE / COARSE SLICING BLADE / FINE SLICING BLADE / FINE SHREDDING BLADE / GRATING BLADE/ FRENCH FRIES BLADE (9/10/11/12/13/14)
- CITRUS JUICER (19 / 20)
- TIPS AND RECOMMENDATIONS
- HOW TO DISASSEMBLE
- CLEANING & MAINTENACE
- TROUBLESHOOTING
- PORTANT:
- LE PANNEAU DE VITESSE ET LE BOUTON DU COMMUTATEUR ROTATIF
- Anmerkungen:
- IL PANNELLO DI VELOCITÀ E LA MANOPOLA DELL'INTERRUTTORE ROTANTE
- PANEL RYCHLOSTI A OTOČNÝ SPÍNAČ
- VLNITÝ NŮŽ / HRUBÝ KRÁJECÍ NŮŽ / JEMNÝ KRÁJECÍ NŮŽ / JEMNÝ KROUHACÍ NŮŽ / STROUHACÍ NŮŽ / NŮŽ NA HRANOLKY (9/10/11/12/13/14)
- Poznámky:
- HASTIGHEDSPANLET OG DREJEKNAPPEN
- Noter:
- PLOŠČA ZA HITROST IN VRTLJIVI GUMB STIKALA
- Opombe:
- PLOČA BRZINE I ZAKRETNI PREKIDAČ
- Bilješke:
- SOKOVNIK ZA CITRUSE (19 / 20)
- SAVJETI I PREPORUKE
- PANEL PREDKOŚCI I POKRETŁO PRZEŁĄCZNIKA OBROTOWEGO
- Uwagi:
- PANOUL DE VITEZE ŞI BUTONUL COMUTATORULUI ROTATIV
- Нотатки:
- EL PANELL DE VELOCITAT I LA PERILLA GIRATÒRIA
- DÉCLARATION DE CONFORMITÉ
- DECLARATION OF CONFORMITY
Brand : Sogo
Model : SS-14575
Category : Grinder