SS-5815 - Grinder Sogo - Free user manual and instructions
Find the device manual for free SS-5815 Sogo in PDF.

| Product Type | Meat Grinder |
| Brand | Sogo |
| Model | SS-5815 |
| Power Supply | 220-240 V ~ 50/60 Hz, 550 W (max blocked motor power 1200 W) |
| Dimensions (L × D × H) | 446 × 256 × 195 mm |
| Net Weight | 2.5 kg |
| Gross Weight | 3.56 kg |
| Blade Material | Stainless Steel |
| Main Functions | Meat grinding, kibbe preparation, reverse function (reverse gear) |
| Safety | Automatic stop after 30 seconds of continuous use, ON/0/R switch |
| Maintenance and Cleaning | Removable parts washable with soapy water; do not immerse the motor; wipe the blades with a cloth soaked in vegetable oil |
| Included Accessories | 3 cutting plates (fine, medium, coarse), cutting blade, sausage attachment, kibbe attachment, pusher |
| After-sales Service | www.sogosat.com, phone: 0034 902 222 161 |
| Country of Manufacture | People's Republic of China (PRC) |
| Compliance | Low Voltage Directive 2014/35/EU, EMC 2014/30/EU, RoHS 2015/863/EU, Ecodesign 2009/125/EC |
| Usage | Domestic use only |
Frequently Asked Questions - SS-5815 Sogo
User questions about SS-5815 Sogo
0 question about this device. Answer the ones you know or ask your own.
Ask a new question about this device
Download the instructions for your Grinder in PDF format for free! Find your manual SS-5815 - Sogo and take your electronic device back in hand. On this page are published all the documents necessary for the use of your device. SS-5815 by Sogo.
USER MANUAL SS-5815 Sogo
natural_image
White SOGO kitchen electrician with stainless steel feed and control panel (no visible text or symbols)
PICADORA DE CARNE
MEAT GRINDER
HACHOIR À VIANDE
MOEDOR DE CARNE
FLEISCHWOLF
TRITACARNE
Caution: please read and preserve these important instructions
flowchart
graph TD
    A["1: Stacking with a bottle"] --> B["2: Stopping with a spoon"]
    B --> C["3: Stopping with a glass tube"]
    C --> D["4: Stopping with a bulb"]
    D --> E["5: Stopping with a glass tube"]
    E --> F["6: Stopping with a bulb"]
    F --> G["7: Stopping with a bowl and tray"]
FUNCIÓN INVERSA
HACER SALCHICHA
natural_image
Technical line drawing of a mechanical device with a tool and component, no visible text or symbols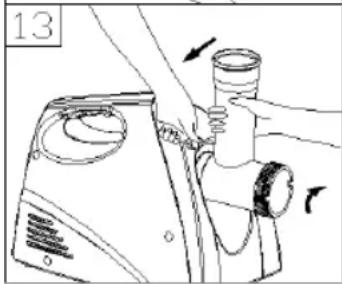
natural_image
Line drawing of a hand operating a cylindrical device with arrows indicating motion (no text or symbols)ESPECIFICACIONES
A copy of this manual can also be downloaded from our website: www.sogo.es
- When using electrical appliances, basic safety precautions should always be followed:
- Please read these instructions carefully before use.
• Home use only. Do not use for industrial purposes. - Before the first connecting of the appliance check that voltage indicated on the rating label corresponds to the mains voltage in your home.
- To protect against fire, electrical shock and injury do not immerse the cord or the appliance into water or other liquid.
- Keep away from children.
- Unplug grinder from outlet when not in use and before cleaning.
- Do not operate the appliance if the cord or the plug is damaged or if any malfunctions have happened.
- Do not use outdoors.
- Do not let cord hang over edge of table or counter or touch hot surfaces.
-
Do not touch any moving parts.
-
To disconnect the unit from the power supply never pull the cord, use the plug.
- To avoid overheating the motor, do not use the grinder more than 30 seconds.
- Return malfunctioning appliances to repair to the nearest service centre. Repair the device only by qualified persons.
- If the supply cord is damaged, it must be replaced by the manufacturer, its service agent or similarly qualified persons in order to avoid a hazard.
- This appliance is not intended for use by persons with reduced physical, sensory or mental capabilities, or lack of experience and knowledge, unless they have been given supervision or instruction concerning use of the appliance by a person responsible for their safety.
• Children should be supervised to ensure that they do not play with the appliance. - It is NOT allowed to add water or other liquid into grinder cup or chopper cup.
-
Never immerse plug cord and the base of product into water or other liquid and do not wash the appliance in dishwasher.
-
When washing blade, do not contact the sharp blade, prevent to hurt your finger.
- This appliance can be used by persons with reduced physical, sensory or mental capabilities or lack of experience and knowledge if they have been given supervision or instruction concerning use of the appliance in a safe way and understand the hazards involved. Children shall not play with the appliance. Cleaning and user maintenance shall not be made by children.
- Always disconnect the appliance from the supply if it is left unattended and before assembling, disassembling or cleaning.
- This appliance shall not be used by children. Keep the appliance and its cord out of reach of children.
- Do not use this appliance with a programmer, counter or another device which can automatically turn it on because if the appliance is covered or incorrectly positioned there is a danger of fire.
-
Do not use the appliance when it is empty.
-
The appliance should be used only by an adult.
- It is necessary to be careful when handling blades, in particular while emptying the bowl and during cleaning.
DESCRIPTION
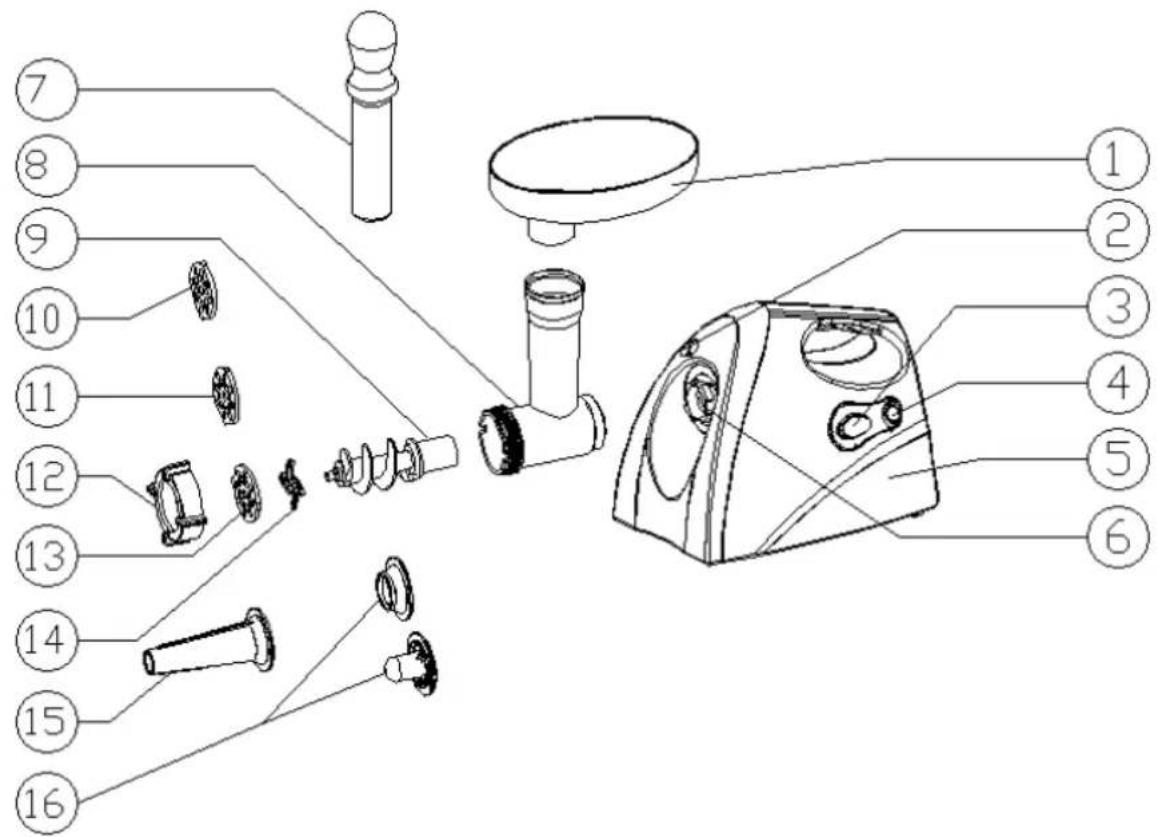
- Hopper plate
- Fasten button
- ON / 0 / R (ON / OFF / Reverse)
- I / II switch attachment
- Body
- Wave box head
- Food pusher
-
Head
-
Spiral shaft
-
Cutting plate (fine)
- Cutting plate (medium)
- Fixing ring
- Cutting plate (large)
- Cutting blade
- Sausage attachment
- Kubbe attachment
FOR THE FIRST TIME
- Check that voltage indicated on the rating label corresponds the mains voltage in your home.
- Wash all parts (except body) in warm soapy water.
- Before plug in, ensure the ON/0/R switch is in "0" position.
INSTRUCTION FOR USE ASSENBING
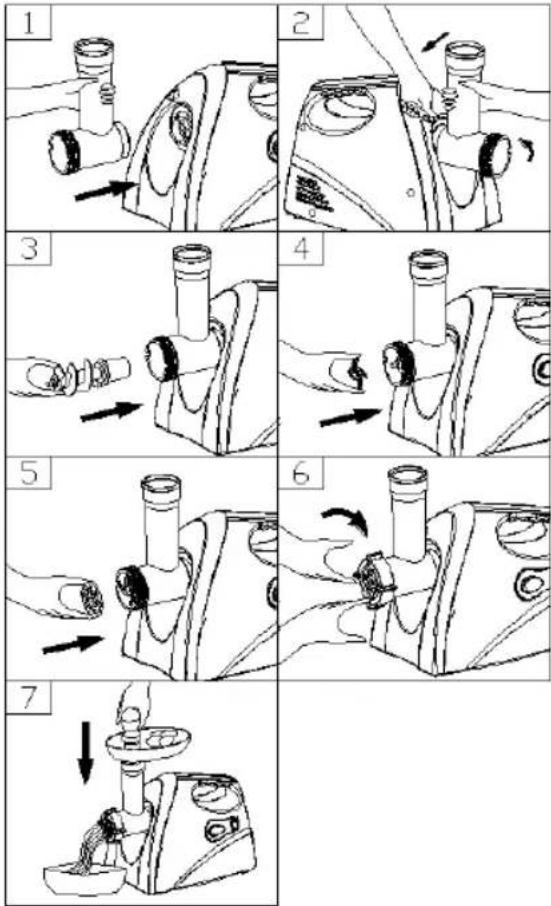
- Press the fasten button, hold the head and insert it into the inlet (when inserting pls pay attention the head must be slanted as per arrow indicated on the top, see fig.1), then move the head anticlockwise so that the head is fastened tightly (fig.2).
- Place the spiral shaft into the head, long end first, and turn slightly until it is set into the motor housing (fig.3).
- Place the cutting blade onto the spiral shaft with the blade facing the front as illustrated (fig.4). If it is not fitted properly, meat will not be grinded.
- Place the desired cutting plate next to the cutting blade, fitting protrusions in the slot (fig.5).
- Support or press the centre of the cutting plate with one finger then screw the fixing ring tight with another hand (fig.6). Do not over tighten.
- Place the hopper plate on the head and fix it into position.
- Locate the unit on a firm place.
- The air passage at the bottom and the side of the motor housing should be kept free and not blocked.
MINCING MEAT
- Cut all foods into pieces (Sinew less, boneless and fatless meat is recommended, approximate size :20 mm x 20 mm x 60 mm) so that they fit easily into the hopper opening.
- Plug the unit on and switch the knob to "ON" position. (ON/0/R)
- Feed foods into the hopper plate. Use food pusher to push the meat inside. (never use your fingers. (fig.7).
• After use switch the unit off and unplug it from the power supply.
flowchart
graph TD
    A["Step 1: Hand holding bowl"] --> B["Step 2: Stopping with brush"]
    B --> C["Step 3: Stopping with glass tube"]
    C --> D["Step 4: Stopping with bulb"]
    D --> E["Step 5: Stopping with bulb"]
    E --> F["Step 6: Stopping with bulb"]
    F --> G["Step 7: Stopping with bowl"]
REVERSE FUNCTION
• In case of jamming switch off the appliance by pressing the ON/0/R switch to "R" position.
- Spiral shaft will be rotating in the opposite direction, and the head will get empty.
- If it doesn't work, switch off the unit and clean it.
MAKING KIBBE
RECIPE STUFFING
Mutton: 100g
Olive oil: 1/tablespoons
Onion (cut finely): 1/tablespoons
Spices to your taste
Salt to your taste
Flour: 1/tablespoons
- Mince mutton once or twice.
- Fry onion until brown and add minces mutton, all spice, salt and flour.
OUTLET COVER
Lean meat: 450g
Flour: 150-200g
Spices to your taste
Nutmeg (cut finely): 1
Powdered red pepper to your taste
Pepper to your taste
- Mince meat three times and mix all ingredients together in a bowl. More meat and less flour for outlet cover create better consistency and taste.
- Grind the mixture three times.
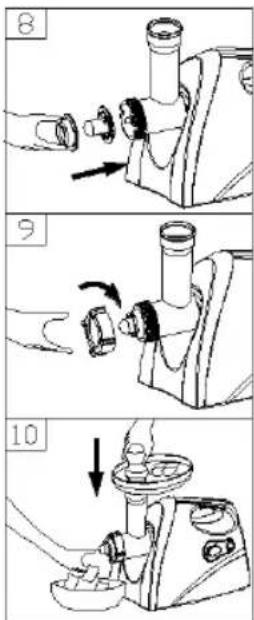
• Disassemble by reversing the steps from 5-3 to remove the cutting plate and cutting blade. - Place kibbe attachments A and B onto the feed screw shaft together, fitting protrusions in the slots (fig.8).
- Screw cap into place until tight. Do not over tighten (fig.9).
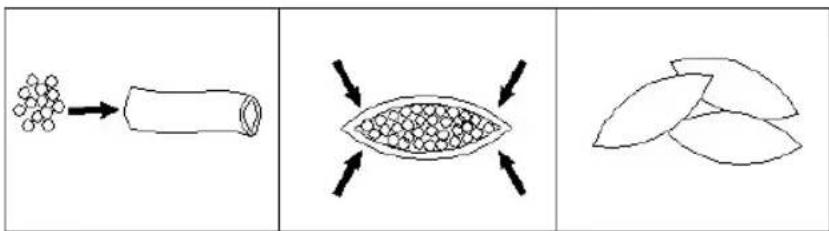
• Make the cylindrical outlet cover (fig.10). - Form kibbe as illustrated below and deep fry.
MAKING SAUSAGE
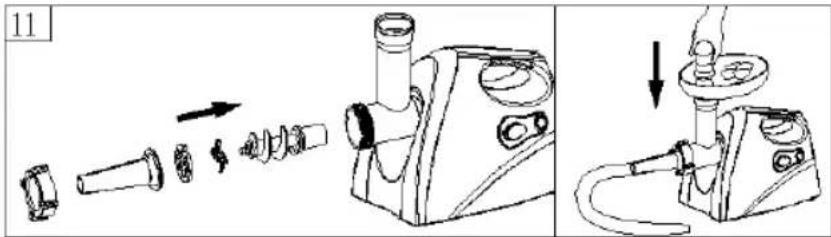
- Before starting please assemble sausage attachment as per following (fig.11)
CLEANING AND MAINTENACE
DISADDEMBLING
- Make sure that the motor has stopped completely.
- Disconnect the plug from the power outlet.
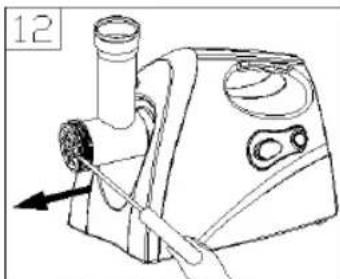
• Disassemble by reversing the steps from 1-6 pictures - To remove the cutting plate easily, place a screwdriver between the cutting plate and the head as illustrated and lift it up (fig.12).
- Press the fasten knob move the head as per direction illustrated on (fig .13), then you can take out the head.
CLEANING
- Remove meat, etc. Wash each part in warm soapy water.
- A bleaching solution containing chlorine will discolor aluminum surfaces.
- Do not immerse the motor housing in water, but only wipe it with a damp cloth.
- Thinners and petrol will crack or change the color of the unit.
- Wipe all the cutting parts by vegetable oil -wet cloth.
natural_image
Line drawing of a mechanical device with a lever and cylindrical component (no text or symbols)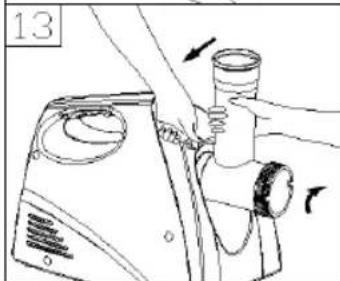
natural_image
Line drawing of a hand holding a cylindrical object with arrows indicating motion (no text or symbols)SPECIFICATION
| Power supply | AC 220-240V, 50/60Hz - 550W |
| Max. Locked motor approx. wattage 1200W | |
| Net/Gross weight 2.5Kg/3.56Kg | |
| Overall dimension(L×D×H) 446x256x195 mm |
PRÉCAUTIONS DE SÉCURITÉ
flowchart
graph TD
    A["Step 1: Hand holding bowl"] --> B["Step 2: Stopping with brush"]
    B --> C["Step 3: Stopping with glass tube"]
    C --> D["Step 4: Stopping with bulb"]
    D --> E["Step 5: Stopping with bulb"]
    E --> F["Step 6: Stopping with bulb"]
    F --> G["Step 7: Stopping with bowl"]

FAIRE SAUCISSES
natural_image
Line drawing of a hand operating a cylindrical device with arrows indicating motion (no text or symbols)SPÉCIFICATIONS
flowchart
graph TD
    A["1: Stacking with a bottle"] --> B["2: Stopping with a spoon"]
    B --> C["3: Stopping with a glass tube"]
    C --> D["4: Stopping with a bulb"]
    D --> E["5: Stopping with a glass tube"]
    E --> F["6: Stopping with a bulb"]
    F --> G["7: Stopping with a bowl and tray"]
FUNÇÃO REVERSA
FAZENDO SALSICHA
natural_image
Line drawing of a hand operating a cylindrical device with arrows indicating motion (no text or symbols)ESPECIFICAÇÕES
flowchart
graph TD
    A["1: Stacking with a bottle"] --> B["2: Stopping with a spoon"]
    B --> C["3: Stopping with a glass tube"]
    C --> D["4: Stopping with a bulb"]
    D --> E["5: Stopping with a glass tube"]
    E --> F["6: Stopping with a bulb"]
    F --> G["7: Stopping with a bowl and tray"]
RÜCKWÄRTSFUNKTION
WURST MACHEN
SPEZIFIKATIONEN
flowchart
graph TD
    A["Step 1: Hand holding a bottle"] --> B["Step 2: Stopping with a spoon"]
    B --> C["Step 3: Stopping with a glass tube"]
    C --> D["Step 4: Stopping with a bulb"]
    D --> E["Step 5: Stopping with a bulb"]
    E --> F["Step 6: Stopping with a bulb"]
    F --> G["Step 7: Stopping with a bowl and tray"]
FUNZIONE INVERSA
FARE SALSICCIA
natural_image
Line drawing of a hand operating a cylindrical device with arrows indicating motion (no text or symbols)SPECIFICHE
DECLARATION OF CONFORMITY
This device complies with Low Voltage Directive 2014/35/EC, Electromagnetic Compatibility Directive 2014/30/EU, Directive 2015/863/EU on the restriction of the use of certain hazardous substances in electrical and electronic equipment and Directive 2009/125/EC on the eco-design requirements applicable to energy-related products.
DÉCLARATION DE CONFORMITÉ
This symbol means that in case you wish to dispose of the product once its working life has ended, take it to an authorised waste agent for the selective collection of waste electrical and electronic equipment (WEEE).

Imported by:
Sanysan Appliances S.L, NIF: B98753056, C/ Barcas 2, 2
46002 Valencia, Spain
Product made in P.R.C. – Designed by SOGO based on the European Quality Standards
Customer Service: www.sogosat.com / sogosat@sogosat.com / 0034 902 222 161