SBS-LEM-40ML - Laser module STEINBERG - Free user manual and instructions
Find the device manual for free SBS-LEM-40ML STEINBERG in PDF.


| Product type | Laser module |
| Model | SBS-LEM-40ML |
| Nominal voltage | 230 V, 50 Hz |
| Nominal electrical power | 40 W |
| Laser power | 10,000 mW (10 W) |
| Maximum engraving speed | 120 mm/min |
| Control interface | 3 pins (12 V, GND, PWM) |
| Inner diameter of air nozzle | 3.5 mm |
| Maximum air flow | 30 L/min |
| Dimensions (L x W x H) | 170 x 120 x 70 mm |
| Weight | 1.5 kg |
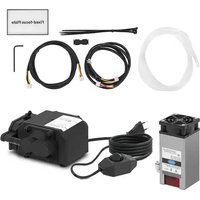
| Included accessories | Air pump, adapter, 3-pin cable, gas tube, 6mm focus plate, spacer column, M3x10 screws |
| Focusing | Fixed 6mm focus plate |
| Air pump power supply | 230 V, 50 Hz (via power adapter) |
| Maintenance | Regularly clean the air nozzle and lens with a soft, dry cloth |
| Safety | Use appropriate laser safety glasses. Do not look directly into the beam. |
| Spare parts available | Air pump, connection cable, gas tube, adapter, focus plate |
| Repairability | User-replaceable module. Contact Steinberg customer service for complex repairs. |
Frequently Asked Questions - SBS-LEM-40ML STEINBERG
User questions about SBS-LEM-40ML STEINBERG
0 question about this device. Answer the ones you know or ask your own.
Ask a new question about this device
Download the instructions for your Laser module in PDF format for free! Find your manual SBS-LEM-40ML - STEINBERG and take your electronic device back in hand. On this page are published all the documents necessary for the use of your device. SBS-LEM-40ML by STEINBERG.
USER MANUAL SBS-LEM-40ML STEINBERG
natural_image
Two-step assembly diagram showing a hand adjusting a black mechanical component, before and after transformation (no text or symbols visible)natural_image
Close-up of a mechanical component before and after assembly, showing a red arrow indicating direction (no text or symbols)natural_image
Two-step diagram showing a hand holding a plastic connector next to a battery, before and after assembly (no text or symbols)natural_image
Close-up of a mechanical assembly with labeled component M3*10 (no readable text or symbols beyond label)natural_image
Close-up of a 3D printer's internal structure before and after assembly, showing pinning and wiring (no text or symbols visible)natural_image
Close-up of a 3D printer with a metallic base and red component, mounted on a square base with a transparent tube (no visible text or symbols)natural_image
Black industrial machine with attached electrical switch and power outlet (no visible text or symbols)Hinweise
natural_image
Close-up of a mechanical component with a red arrow pointing to a cylindrical feature (no visible text or symbols)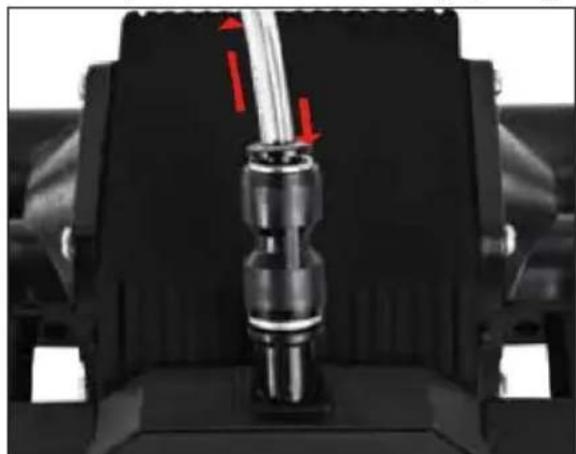
natural_image
Close-up of a mechanical component with red arrows indicating direction, no visible text or symbols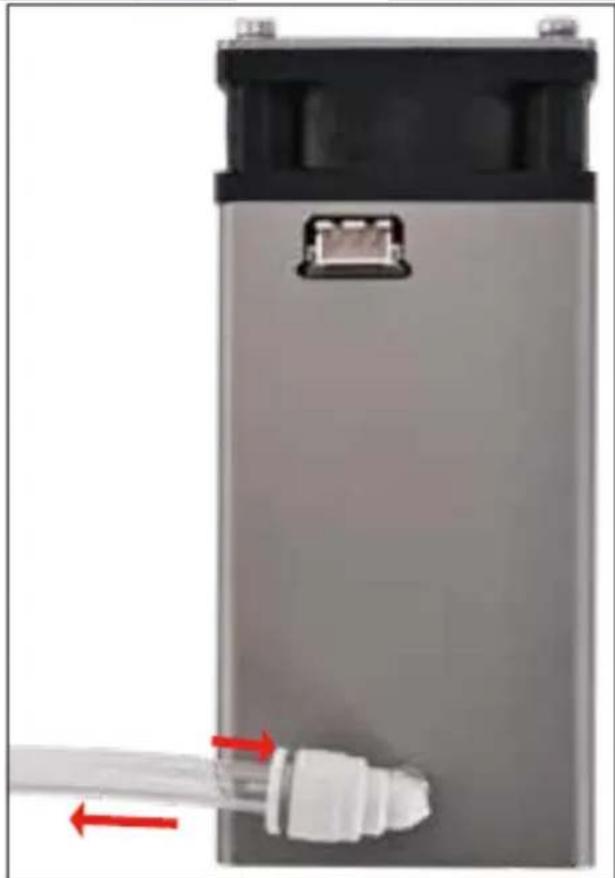
natural_image
Close-up of a gray cylindrical device with a white plastic connector and red arrows indicating flow direction (no text or symbols visible)
This User Manual has been translated for your convenience using machine translation. Reasonable efforts have been made to provide an accurate translation; however, no automated translation is perfect nor is it intended to replace human translators. The official User Manual is the English version. Any discrepancies or differences created in the translation are not binding and have no legal effect for compliance or enforcement purposes. If any questions arise related to the accuracy of the information contained in the User Manual, please refer to the English version of those contents which is the official version.
Technical data
| Parameter description | Parameter value |
| Product name | Laser module |
| Model | SBS-LEM-40ML |
| Rated voltage [V~] / Frequency [Hz] | 230 / 50 |
| Rated power [W] | 40 |
| Max speed [mm/min] | 120 |
| Output voltage/amps | 3-pole (12 V, GND, PWM) |
| Laser power [mW] | 10000 |
| Air nozzle inner diameter [mm] | 3.5 |
| Max. flow rate [L/min] | 30 |
| Dimensions [Width x Depth x Height; mm] | 170 x 120 x 70 |
| Weight [kg] | 1.5 |
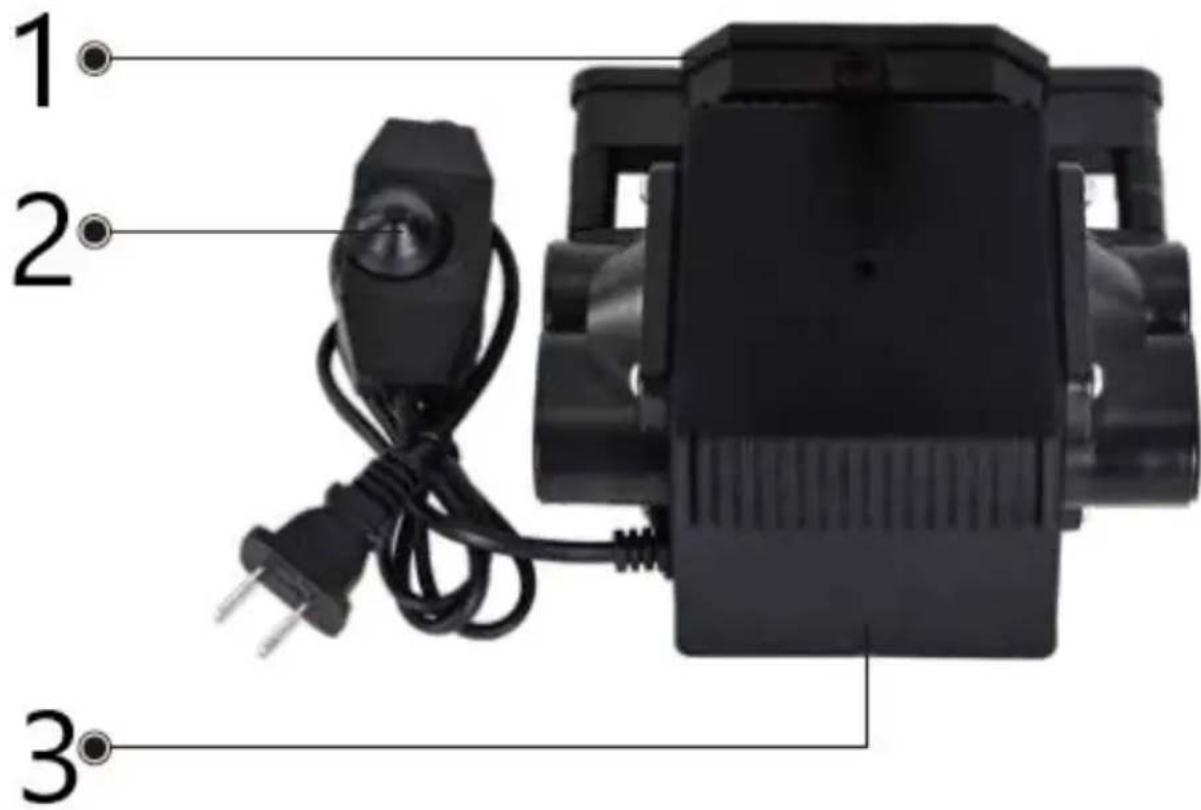
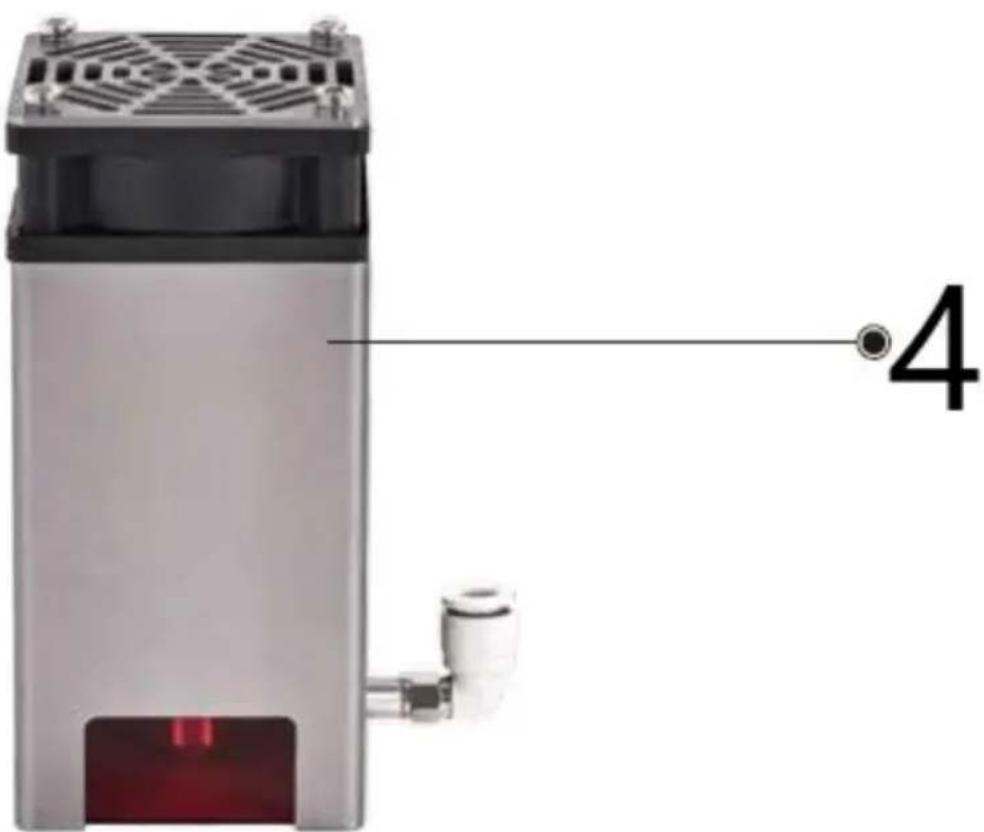
EN
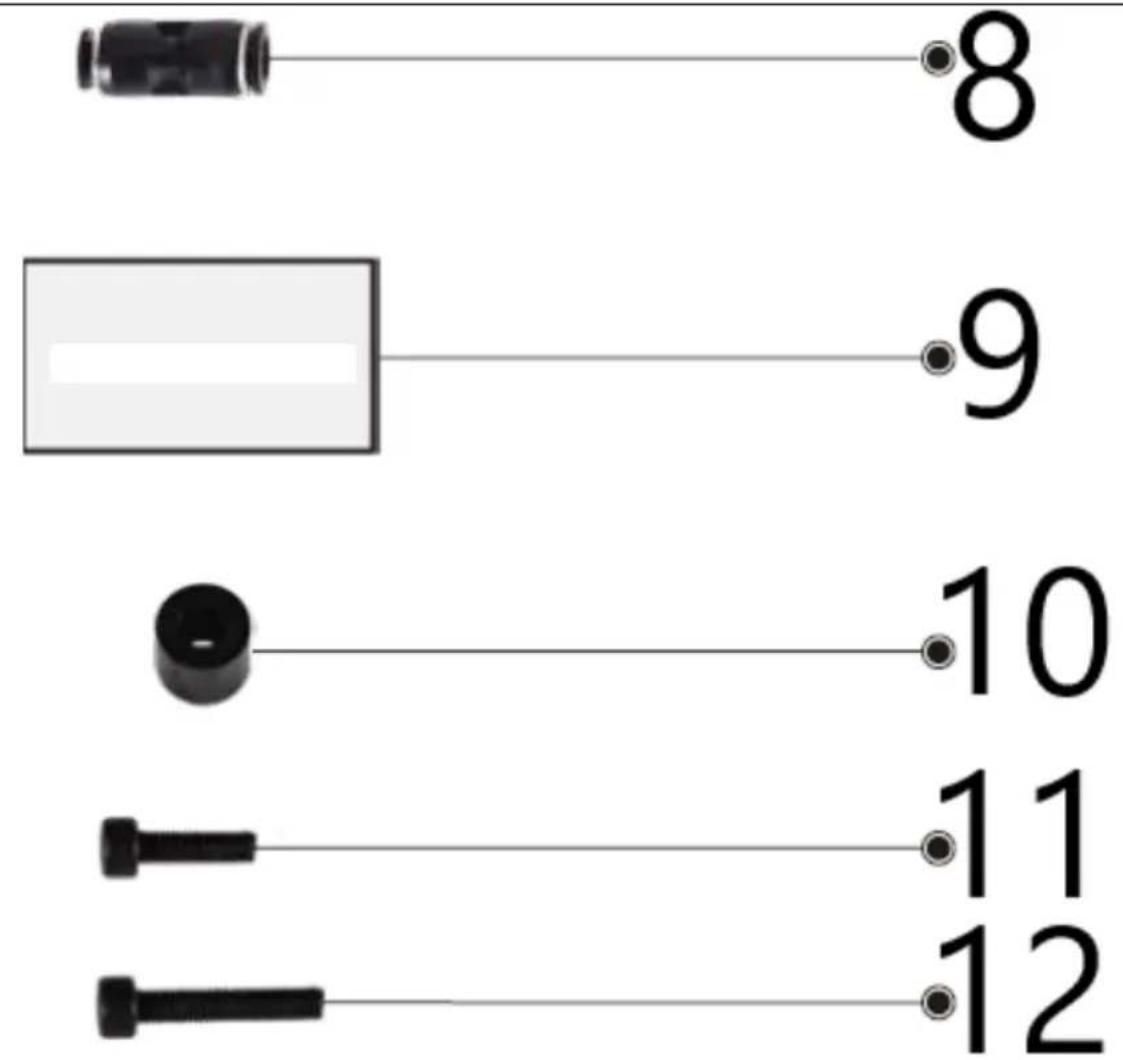
bar
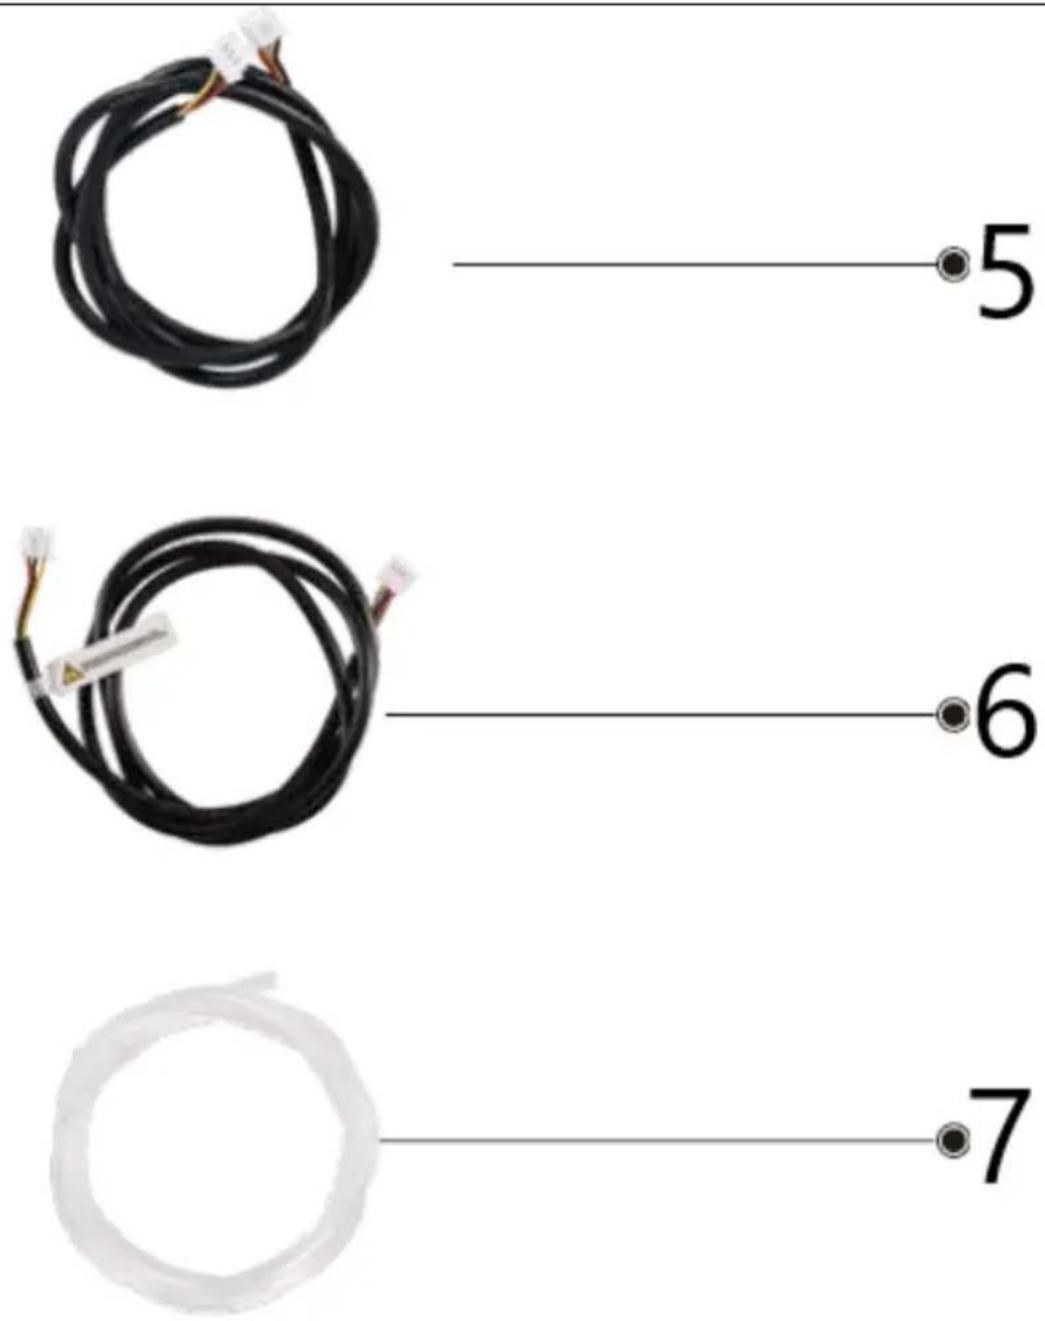
| Item | Value | |---|---| | 1 | 8 | | 2 | 9 | | 3 | 10 | | 4 | 11 | | 5 | 12 || 1 | Gas-nipple |
| 2 | Switch Knob |
| 3 | Air Pump Kit |
| 4 | Laser Module |
| 5 | Connecting Wire (cross) |
| 6 | Connecting Wire (pass through) |
| 7 | Gas Tube |
| 8 | Adapter |
| 9 | 6mm fixed focus plate |
| 10 | Spacer column |
| 11 | M3*10 screw |
Installation and Operation
Step 1: Unpack the air pump kit and parts
- Open the package.
- Remove the air pump kit and all other components.
- Insert the adapter into the port on the air pump, as shown in the diagram.
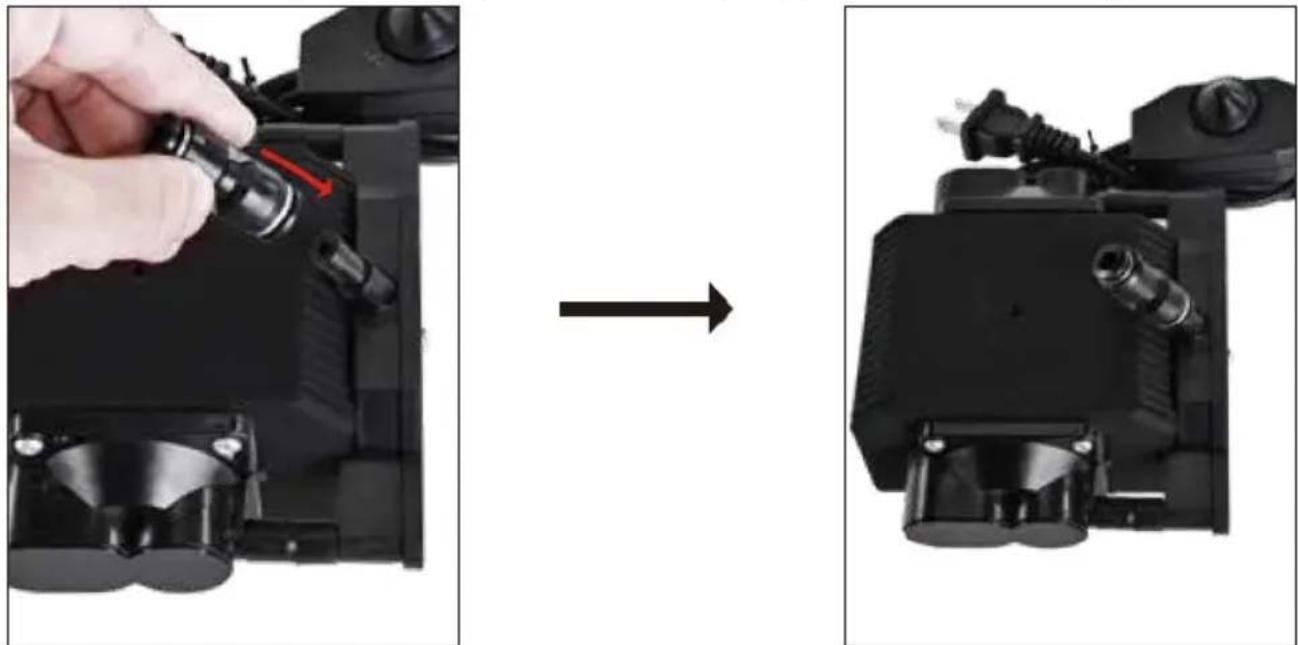
natural_image
Two-step assembly diagram showing a hand adjusting a mechanical component before and after transformation (no text or symbols present)Step 2: Connect the trachea to the air pump
- Locate the air nozzle on the air pump.
- Connect one end of the trachea to the air nozzle, as shown in the diagram.
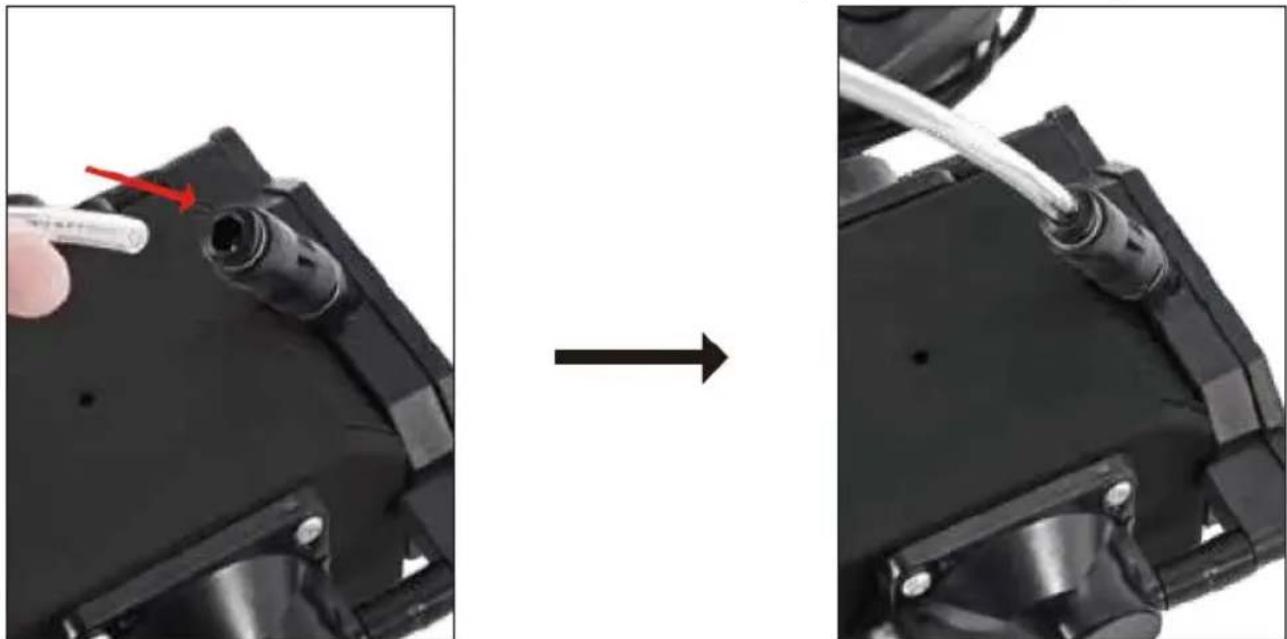
natural_image
Close-up of a mechanical component before and after assembly, showing a pipe insertion step (no text or symbols visible)Step 3: Connect the trachea to the laser module
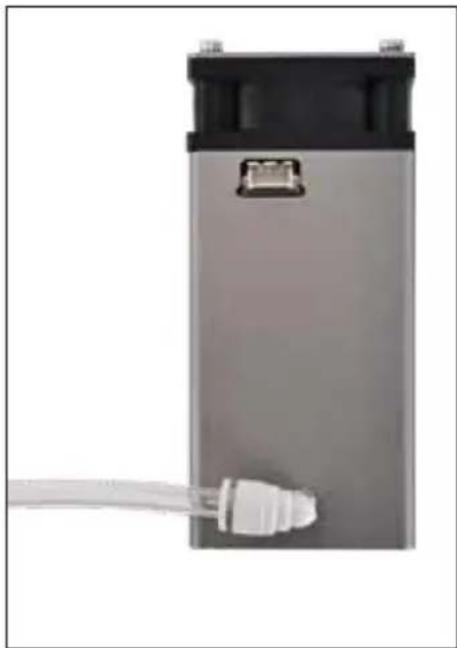
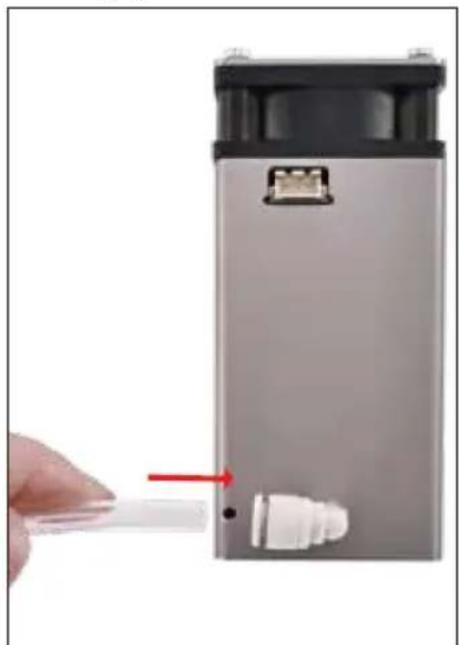
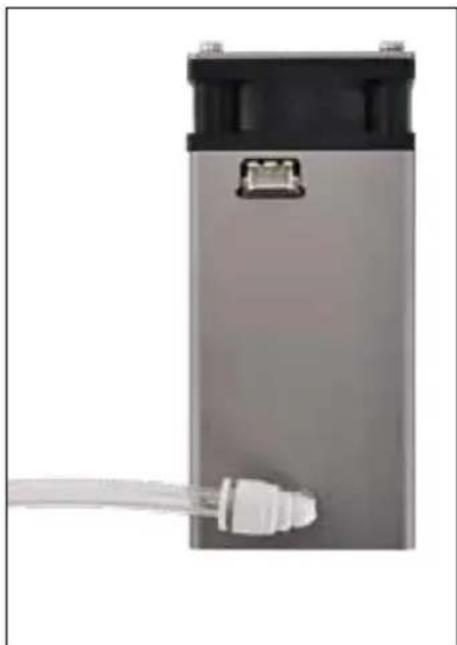
- Find the air nozzle on the laser module.
- Attach the other end of the trachea to this nozzle, as shown in the diagram.
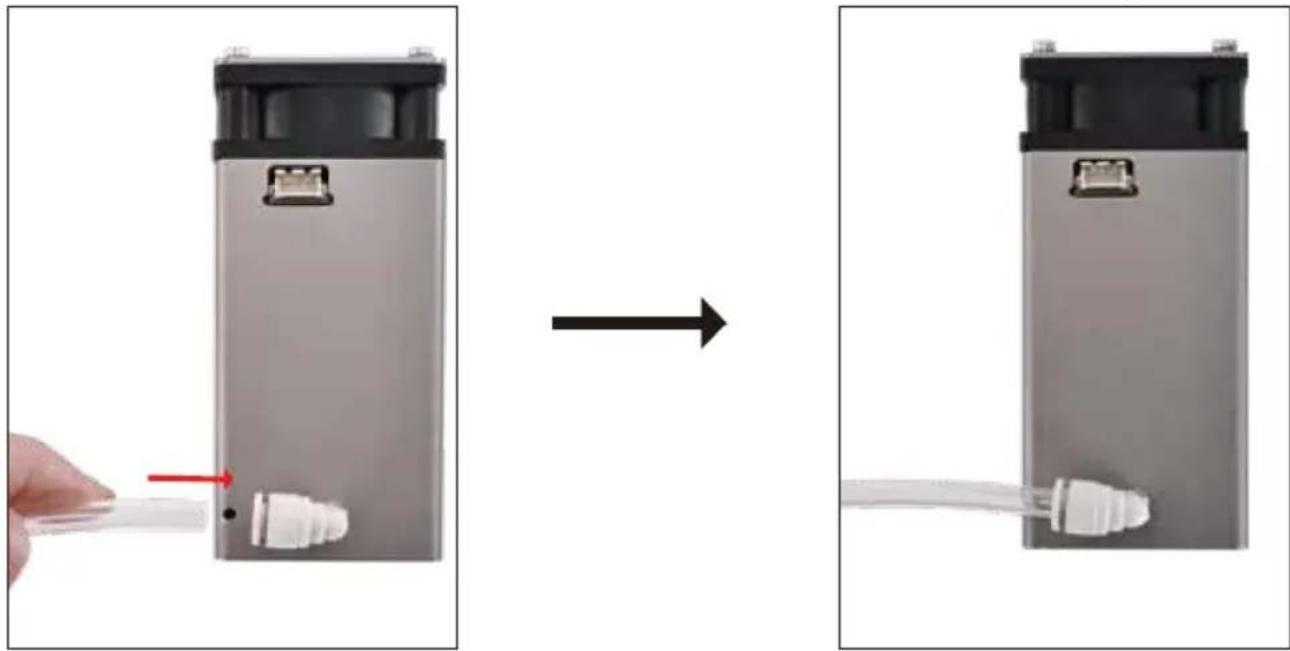
natural_image
Two-step diagram showing a hand holding a plastic connector next to a battery, before and after assembly (no text or symbols)Step 4: Attach the laser module to the machine
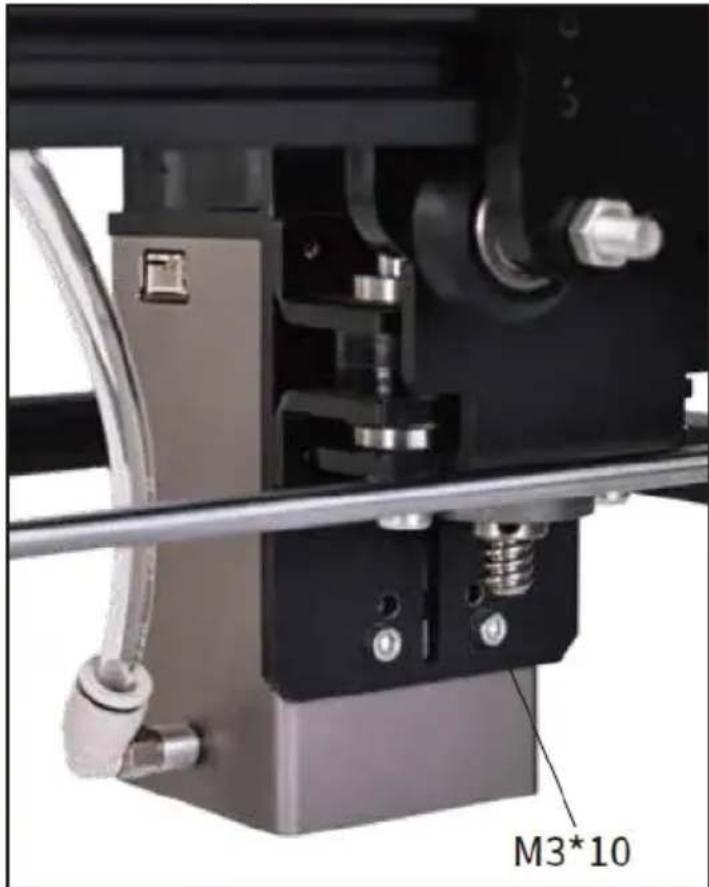
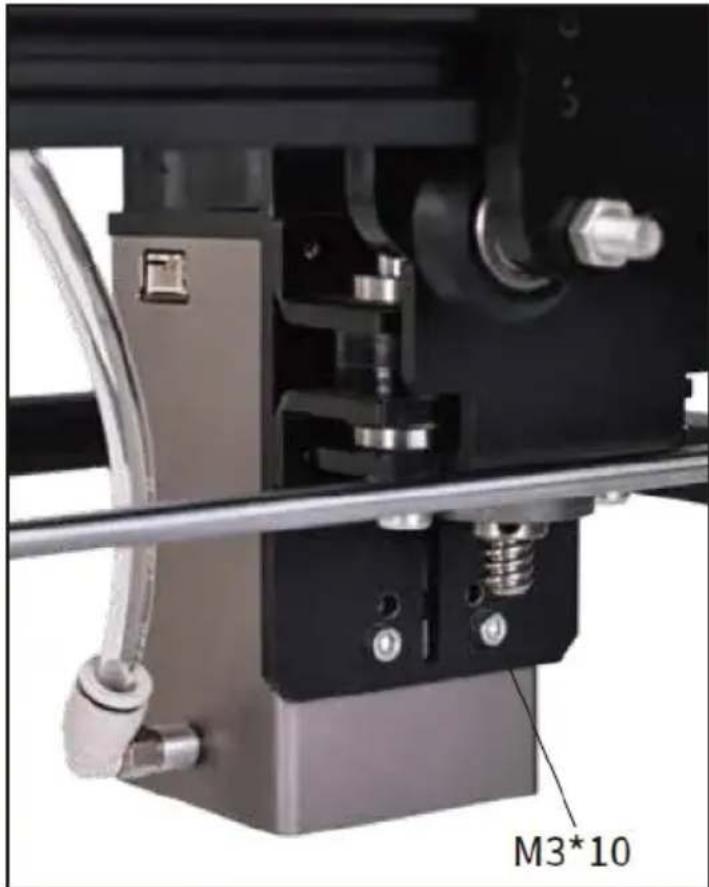
- Use M3*10 screws to fix the laser module securely to the machine, as shown in the diagram.

natural_image
Close-up of a mechanical assembly with labeled component M3*10 (no readable text or symbols beyond label)Step 5: Connect the 3-pin cable
-
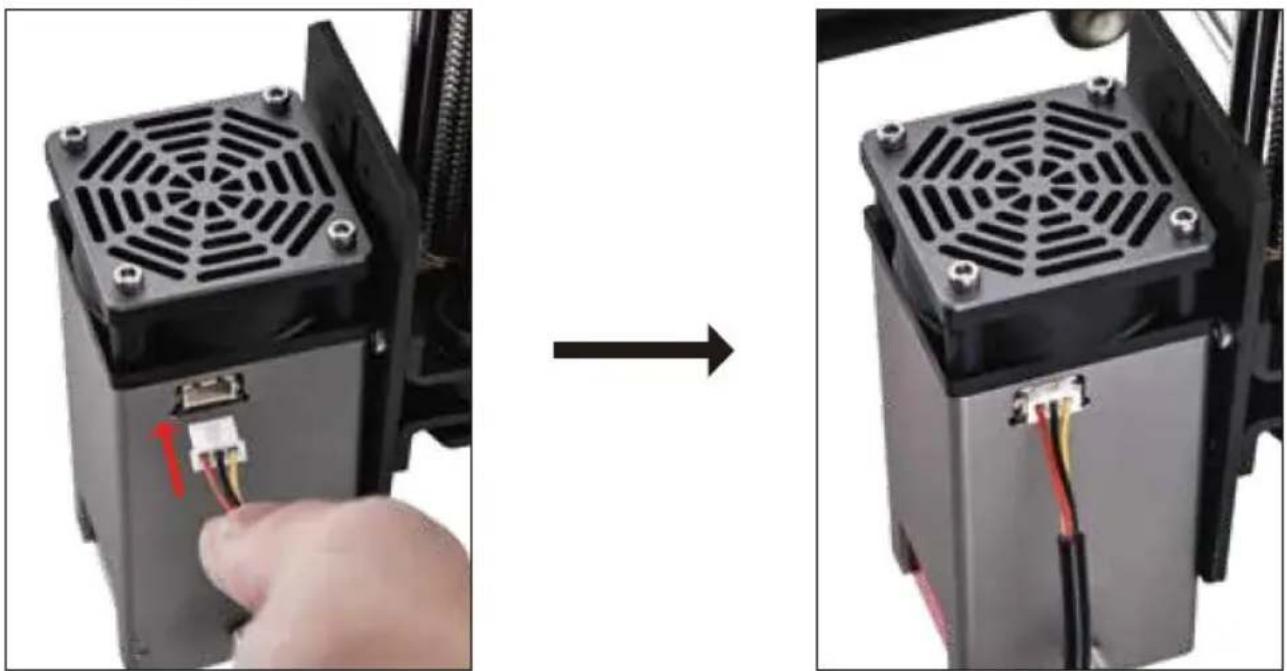
Connect the 3-pin (red, black, yellow) cable to the laser module's interface.
-
Connect the other end of the cable to your machine's control board, as shown in the diagram.
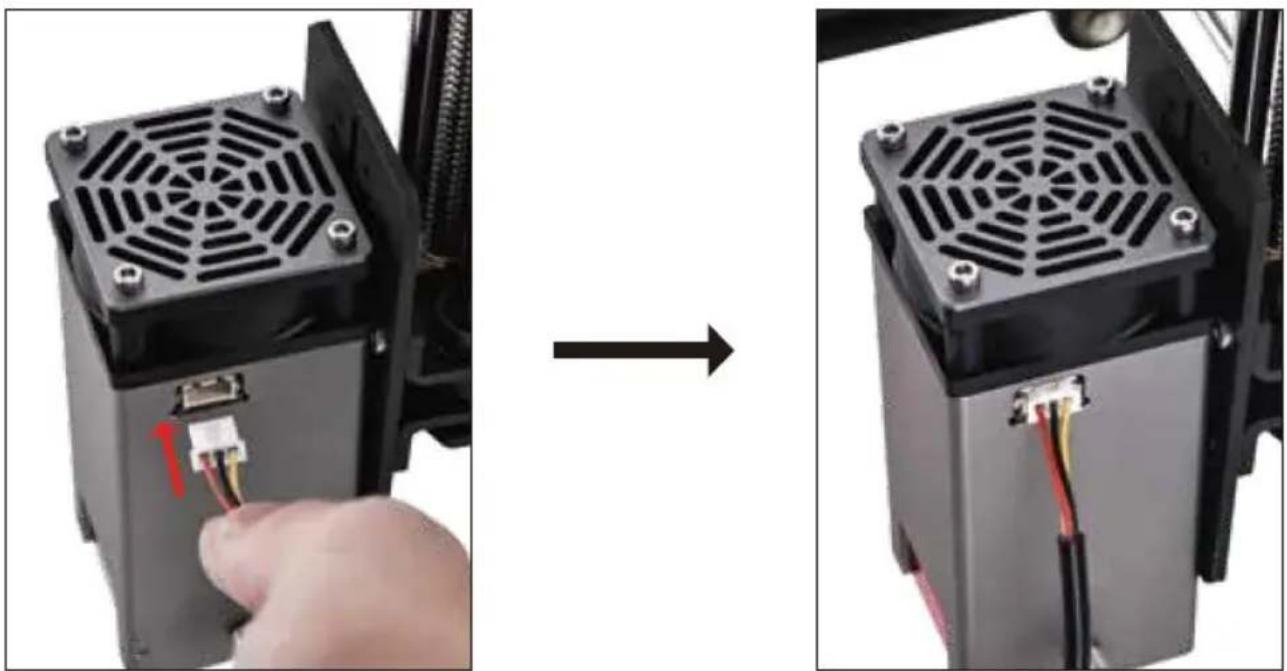
natural_image
Close-up of a 3D printer's internal structure before and after assembly, showing pinning and wiring (no text or symbols visible)Step 6: Adjust the laser focus
-
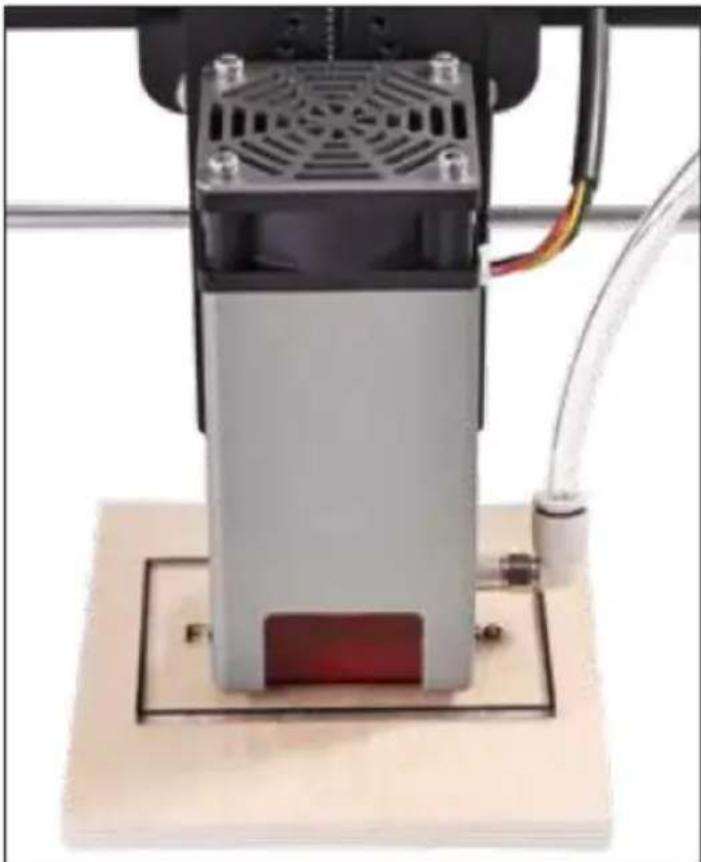
Place the 6mm fixed-focus plate directly under the laser head.
-
Ensure the plate touches both the laser head and the engraving object.
-
Once the correct focus is set, remove the fixed-focus plate.
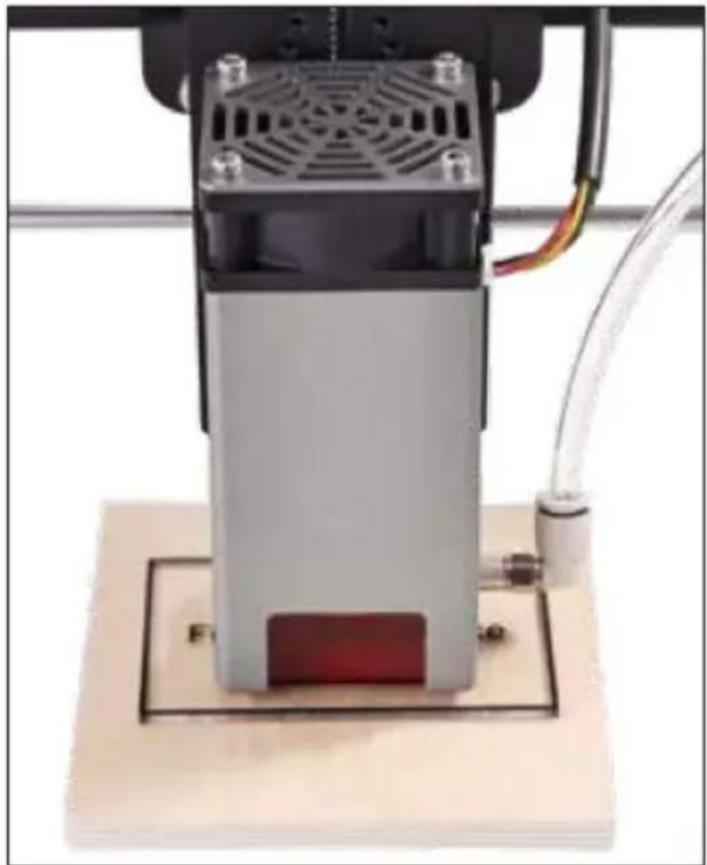
natural_image
Close-up of a 3D printer with a metallic base and wiring, mounted on a flat base (no visible text or symbols)Step 7: Power on the air pump
- Connect the air pump to a power supply.
- Turn the switch to the "ON" position.
- Adjust the air pump's power as needed.
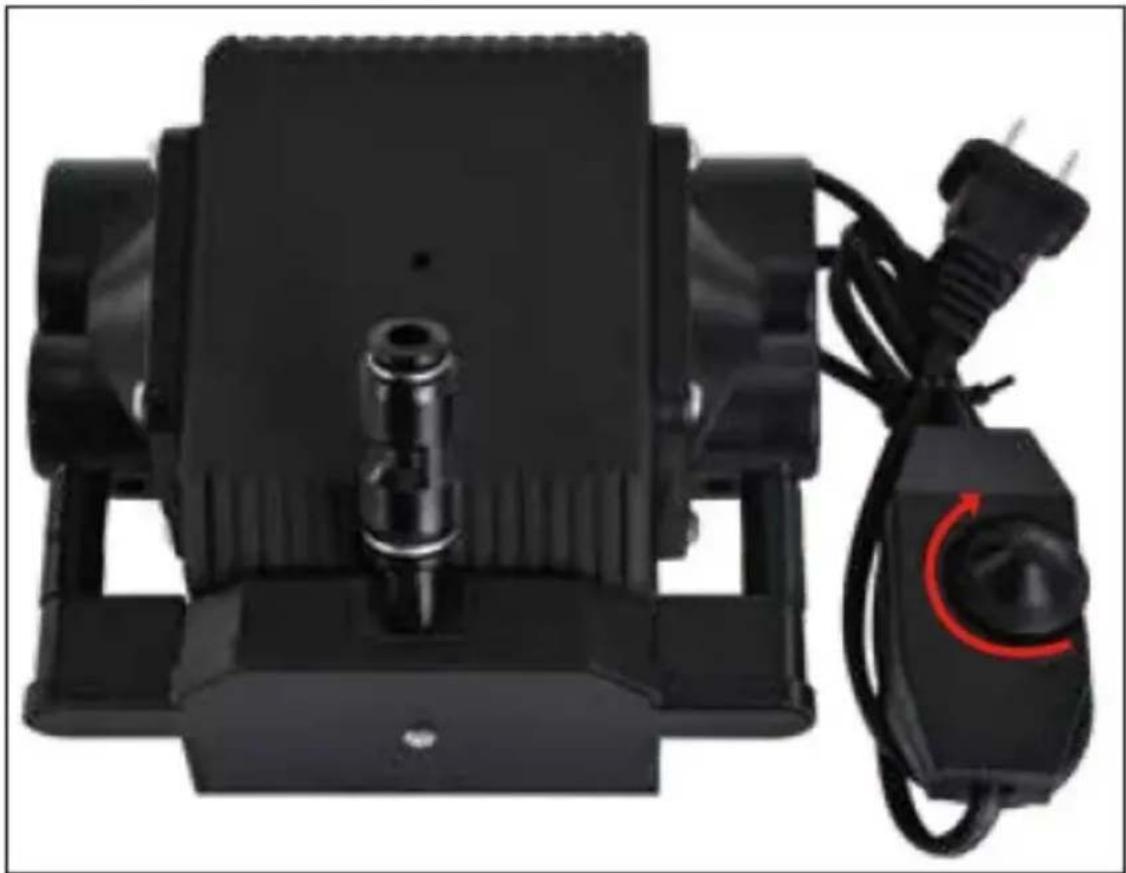
natural_image
Black industrial pump with attached electrical outlet and red circular button (no visible text or symbols)Tips:
- Spacer column usage: If needed, you can use an M3*16 screw through the spacer column to further secure the laser module.
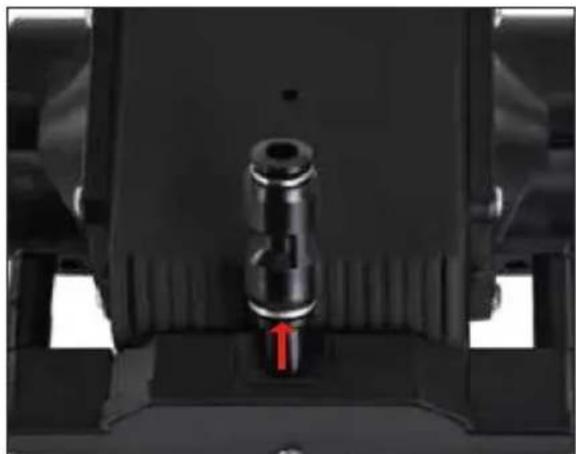
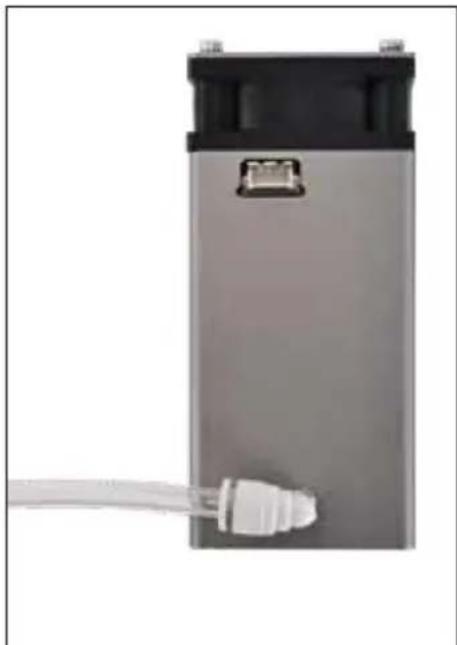
- Trachea removal: To remove the trachea, press the adapter inward by 1mm, then detach the trachea, as shown in the diagram.
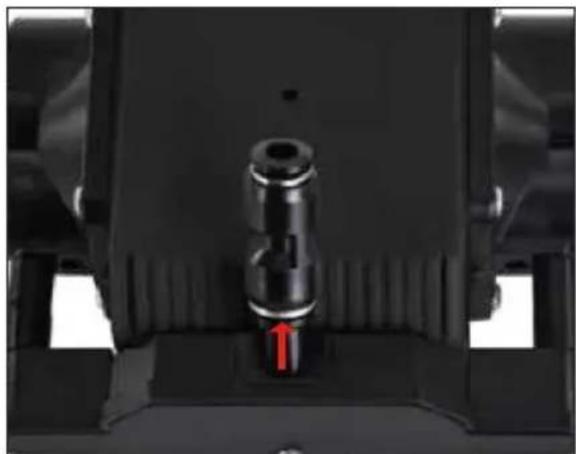
natural_image
Close-up of a mechanical component with a red arrow pointing to a cylindrical feature (no visible text or symbols)
natural_image
Close-up of a mechanical component with red arrows indicating direction, no visible text or symbols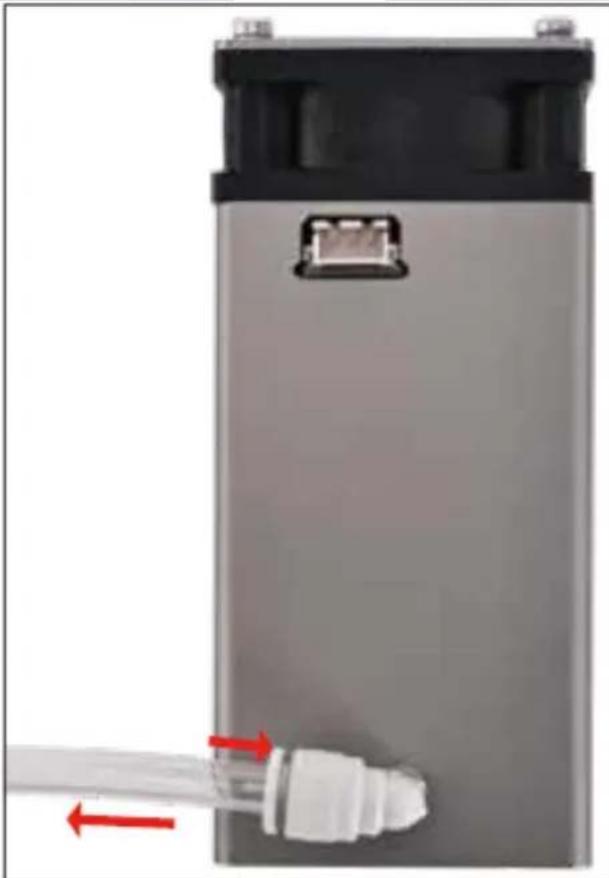
natural_image
Close-up of a gray cylindrical device with a black top and white connector, connected by a red arrow to a white plastic component (no visible text or symbols)
natural_image
Two-step assembly diagram showing a hand adjusting a black mechanical component, before and after transformation (no text or symbols visible)natural_image
Close-up of a mechanical component before and after assembly, showing a red arrow indicating direction (no text or symbols)natural_image
Close-up of a hand holding a transparent plastic clip next to a silver battery casing with a white connector (no text or symbols visible)
natural_image
Exterior view of a gray battery bank with a white connector and black top panel (no text or symbols visible)natural_image
Close-up of a mechanical assembly with labeled component M3*10 (no readable text or symbols beyond label)natural_image
Two-step assembly of a 3D printer with a small connector, showing the process from left to right (no text or symbols visible)natural_image
Close-up of a 3D printer with a metallic base and red component, mounted on a base platform (no visible text or symbols)natural_image
Black industrial machine with attached electrical switch and power outlet (no visible text or symbols)Wskazówki
natural_image
Close-up of a mechanical component with a red arrow pointing to a cylindrical feature (no visible text or symbols)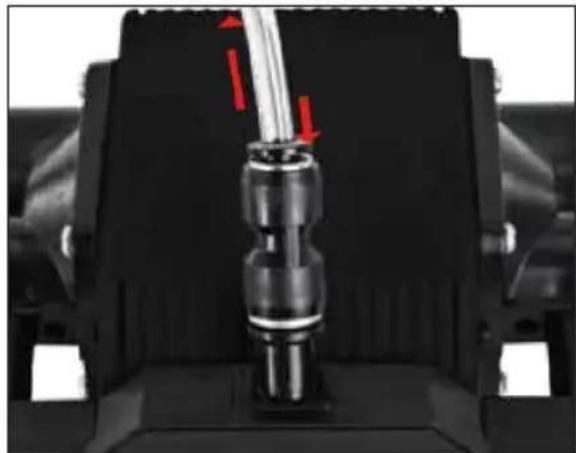
natural_image
Close-up of a mechanical component with red arrows indicating direction, no visible text or symbols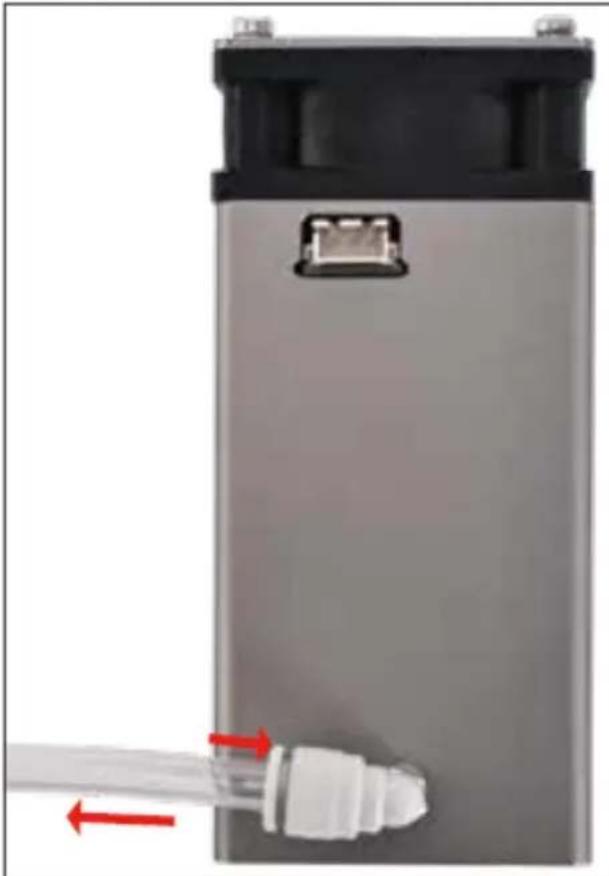
natural_image
Close-up of a gray cylindrical device with a black top and white connector, connected by a red arrow indicating direction (no text or symbols visible)
natural_image
Two-step assembly diagram showing a hand adjusting a mechanical component before and after transformation (no text or symbols present)natural_image
Close-up of a mechanical component before and after assembly, showing a red arrow indicating direction (no text or symbols)natural_image
Two-step diagram showing a hand holding a plastic connector next to a battery, before and after assembly (no text or symbols)natural_image
Close-up of a mechanical assembly with labeled component M3*10 (no readable text or symbols beyond label)natural_image
Two-step diagram showing a hand inserting a small component into a 3D printer's base, with no visible text or symbols.natural_image
Close-up of a 3D printer with a metallic base and red component, mounted on a base platform (no visible text or symbols)natural_image
Black industrial machine with attached electrical switch and power outlet (no visible text or symbols)Pokyny
natural_image
Close-up of a mechanical component with a red arrow pointing to a cylindrical feature (no visible text or symbols)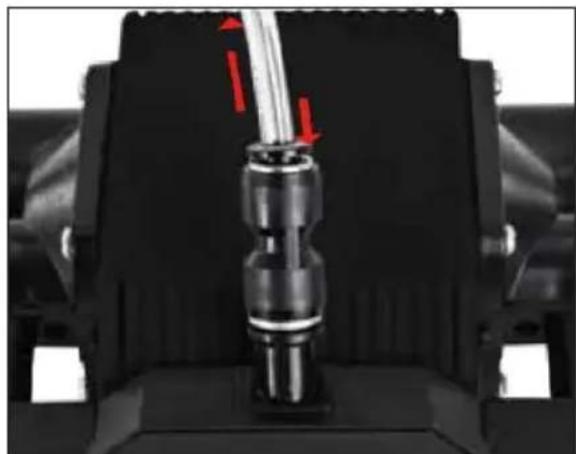
natural_image
Close-up of a mechanical component with red arrows indicating direction, no visible text or symbols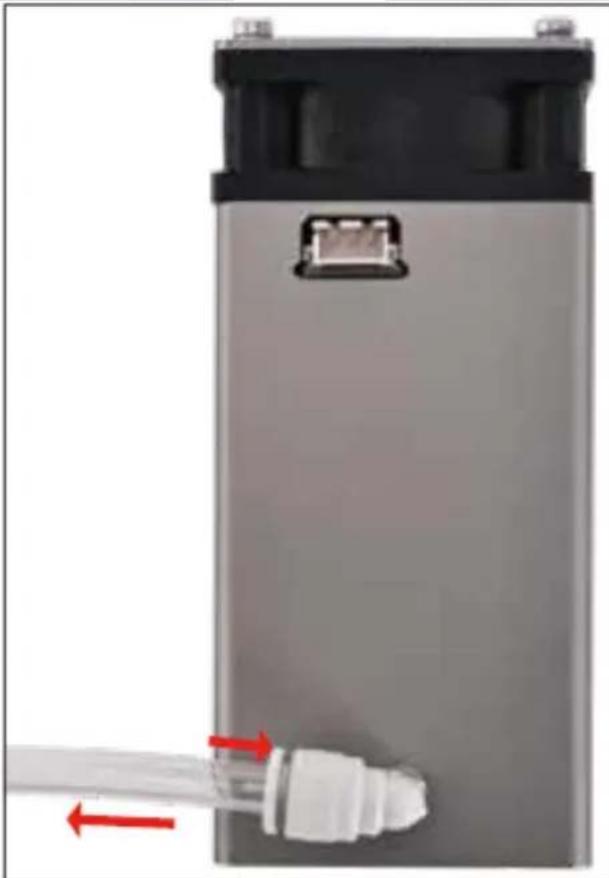
natural_image
Close-up of a gray cylindrical device with a black top and white connector, connected by a red arrow to a white plastic component (no visible text or symbols)
natural_image
Two-step assembly diagram showing a hand adjusting a mechanical component before and after transformation (no text or symbols present)natural_image
Close-up of a mechanical component before and after assembly, showing pipe insertion and disassembly (no text or symbols visible)natural_image
Two-step diagram showing a hand holding a plastic connector next to a battery, before and after assembly (no text or symbols)natural_image
Close-up of a mechanical assembly with labeled component M3*10 (no readable text or symbols beyond label)natural_image
Two-step assembly of a 3D printer with visible wiring and mounting bracket (no text or symbols)natural_image
Close-up of a 3D printer with a metallic base and red component, mounted on a base platform (no visible text or symbols)natural_image
Black industrial machine with attached electrical switch and power outlet (no visible text or symbols)Consignes
natural_image
Close-up of a mechanical component with a red arrow pointing to a cylindrical feature (no visible text or symbols)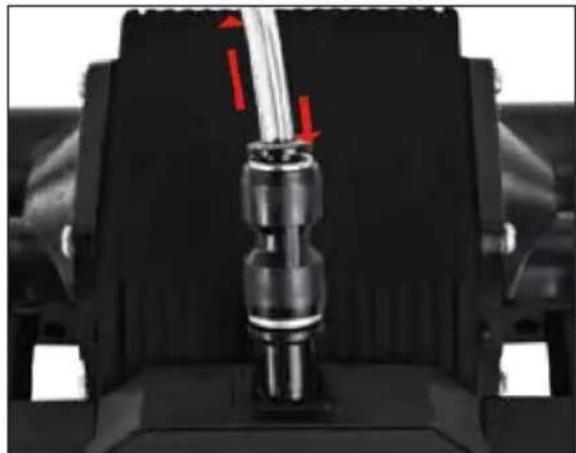
natural_image
Close-up of a mechanical component with a red arrow indicating direction, no visible text or symbols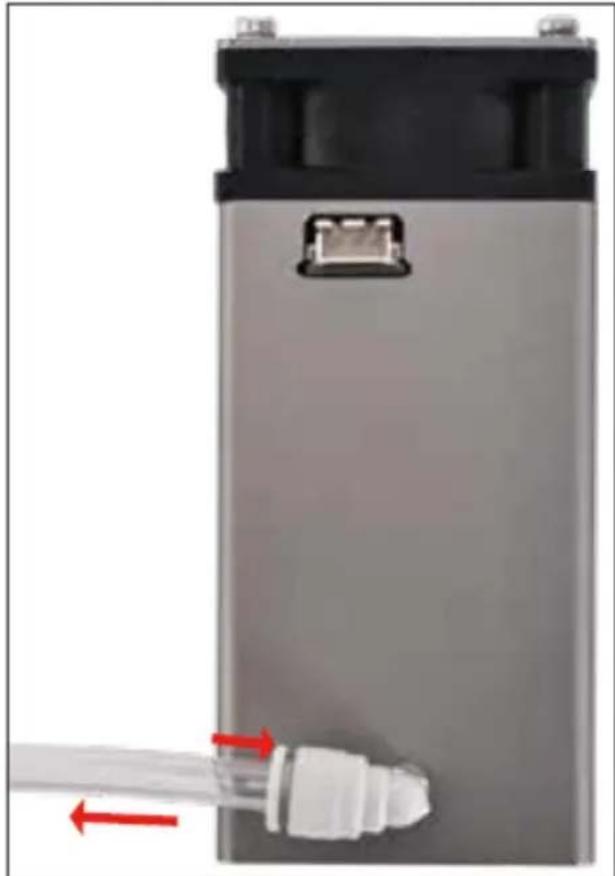
natural_image
Close-up of a gray cylindrical device with a black top and white connector, connected by a red arrow indicating direction (no text or symbols visible)
natural_image
Two-step assembly diagram showing a hand adjusting a mechanical component before and after transformation (no text or symbols present)natural_image
Close-up of a mechanical component before and after assembly, showing a red arrow indicating direction (no text or symbols)Fase 3: Collegare la trachea al modulo laser
natural_image
Two-step diagram showing a hand holding a plastic connector next to a battery pack, before and after assembly (no text or symbols)natural_image
Close-up of a mechanical assembly with labeled component M3*10 (no readable text or symbols beyond label)natural_image
Two-step diagram showing a hand inserting a small component into a 3D printer's base, with no visible text or symbols.natural_image
Close-up of a 3D printer with a metallic base and red component, mounted on a square base with a transparent tube (no visible text or symbols)natural_image
Black industrial machine with attached electrical switch and power outlet (no visible text or symbols)Suggerimenti
natural_image
Close-up of a mechanical component with a red arrow pointing to a cylindrical feature (no visible text or symbols)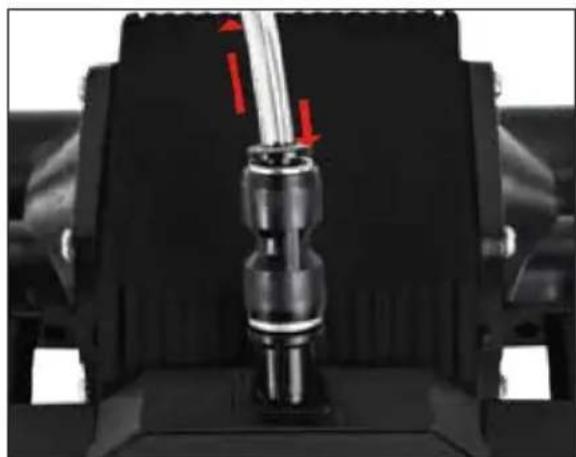
natural_image
Close-up of a mechanical component with red arrows indicating direction, no visible text or symbols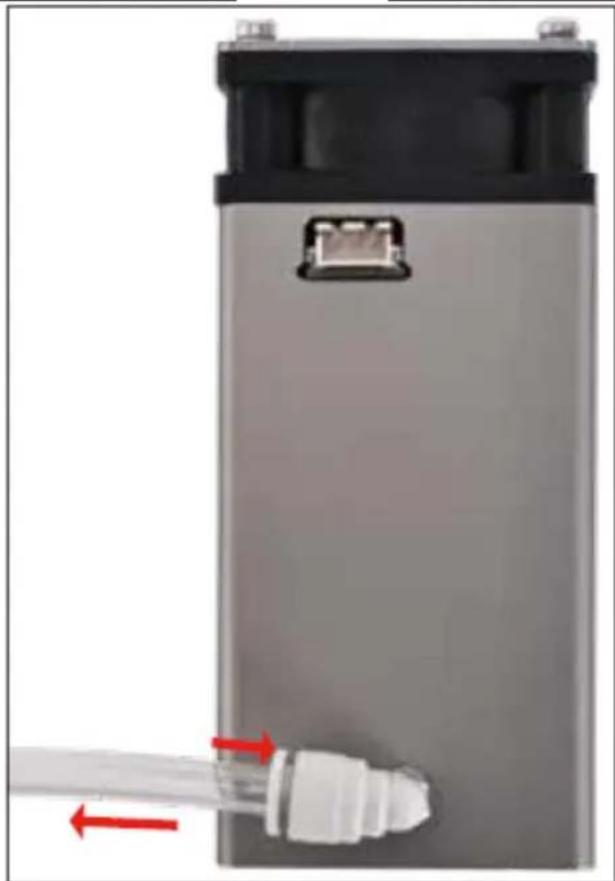
natural_image
Close-up of a gray battery casing with a white connector and red directional arrows indicating flow or movement (no text or symbols)
natural_image
Two-step assembly diagram showing a hand adjusting a black mechanical component, before and after transformation (no text or symbols visible)Paso 2: Conecte la tráquea a la bomba de aire.
natural_image
Close-up of a mechanical component before and after assembly, showing pipe insertion and disassembly (no text or symbols visible)natural_image
Two-step diagram showing a hand holding a plastic connector next to a battery, before and after assembly (no text or symbols)natural_image
Close-up of a mechanical assembly with labeled component M3*10 (no readable text or symbols beyond label)natural_image
Two-step assembly of a 3D printer with a small connector, showing the process from left to right (no text or symbols visible)natural_image
Close-up of a 3D printer with a metallic base and red component, mounted on a square base with a transparent tube (no visible text or symbols)natural_image
Black industrial machine with attached electrical switch and power outlet (no visible text or symbols)Notas explicativas
natural_image
Close-up of a mechanical component with a red arrow pointing to a cylindrical feature (no visible text or symbols)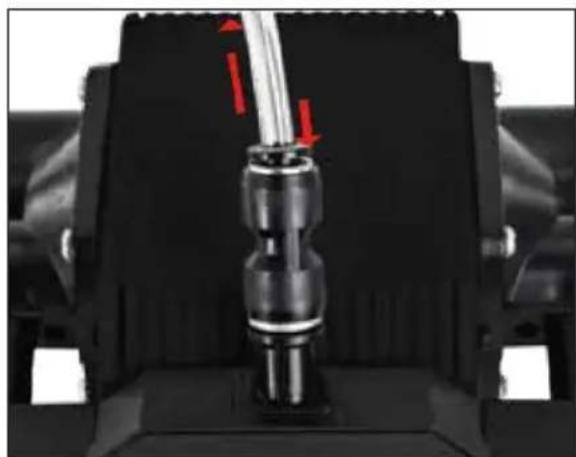
natural_image
Close-up of a mechanical component with red arrows indicating direction, no visible text or symbols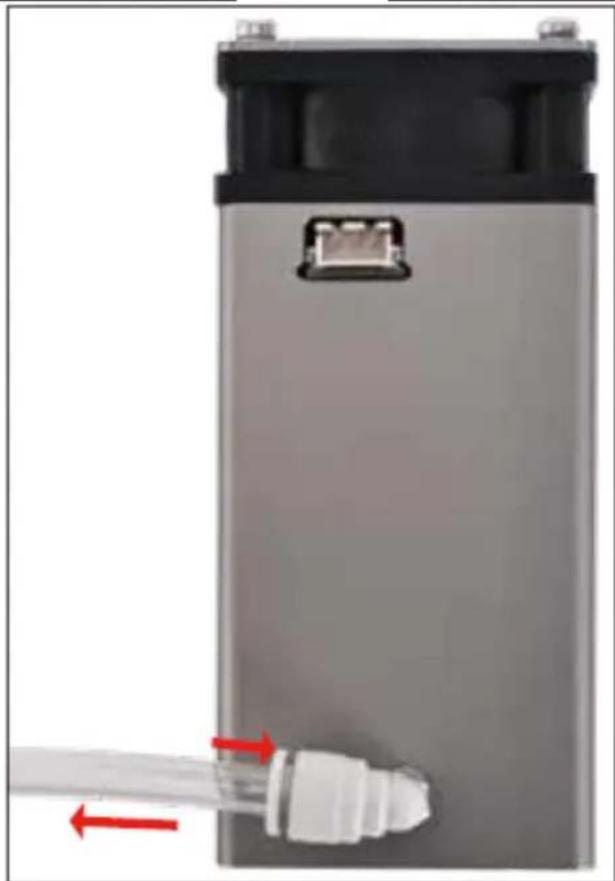
natural_image
Close-up of a gray battery casing with a white connector and red directional arrows indicating flow or movement (no text or symbols visible)
natural_image
Two-step assembly diagram showing a hand adjusting a mechanical component before and after transformation (no text or symbols present)natural_image
Close-up of a mechanical component before and after assembly, showing a red arrow indicating a pin or cable being inserted (no text or symbols visible)natural_image
Two-step diagram showing a hand holding a plastic connector next to a battery, before and after assembly (no text or symbols)natural_image
Close-up of a mechanical assembly with labeled component M3*10 (no readable text or symbols beyond label)natural_image
Two-step diagram showing a hand inserting a small component into a 3D printer's base, with no visible text or symbols.natural_image
Close-up of a 3D printer with a metallic base and red component, mounted on a base platform (no visible text or symbols)natural_image
Black industrial machine with attached electrical switch and power outlet (no visible text or symbols)Tippek
natural_image
Close-up of a mechanical component with a red arrow pointing to a cylindrical feature (no visible text or symbols)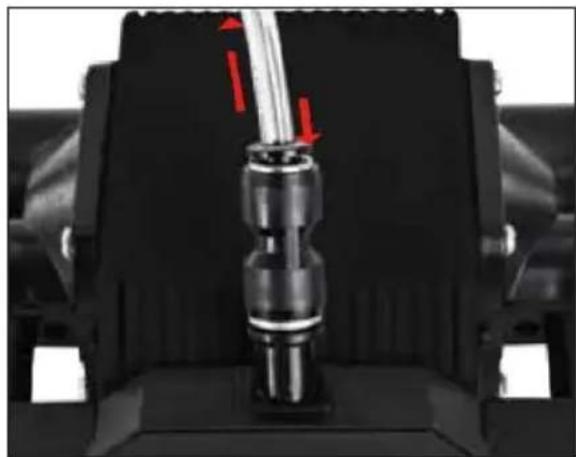
natural_image
Close-up of a mechanical component with a red arrow indicating direction, no visible text or symbols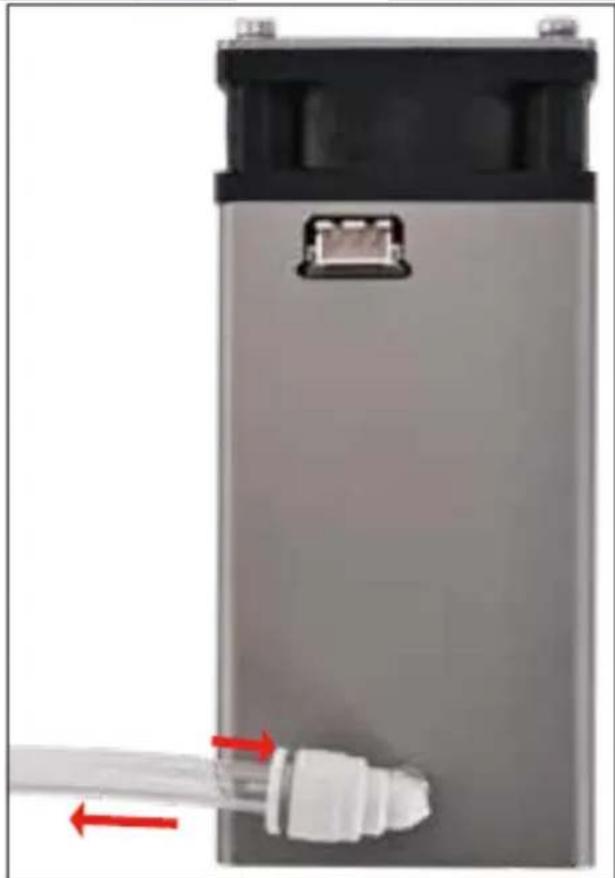
natural_image
Close-up of a gray cylindrical device with a white plastic connector and red arrows indicating flow direction (no text or symbols visible)
natural_image
Two-step assembly diagram showing a hand adjusting a mechanical component before and after transformation (no text or symbols present)natural_image
Close-up of a mechanical component before and after assembly, showing a red arrow indicating direction (no text or symbols)natural_image
Two-step diagram showing a hand holding a plastic connector next to a battery, before and after assembly (no text or symbols)Trin 4: Sæt lasermodulet på maskinen
natural_image
Close-up of a mechanical assembly with labeled component M3*10 (no readable text or symbols beyond label)natural_image
Two-step diagram showing a hand inserting a small component into a 3D printer's base, with no visible text or symbols.Trin 6: Juster laserens fokus
natural_image
Close-up of a 3D printer with a metallic base and wiring, mounted on a base platform (no visible text or symbols)natural_image
Black industrial machine with attached electrical switch and power plug (no visible text or symbols)Anvisninger
natural_image
Close-up of a mechanical component with a red arrow pointing to a cylindrical feature (no visible text or symbols)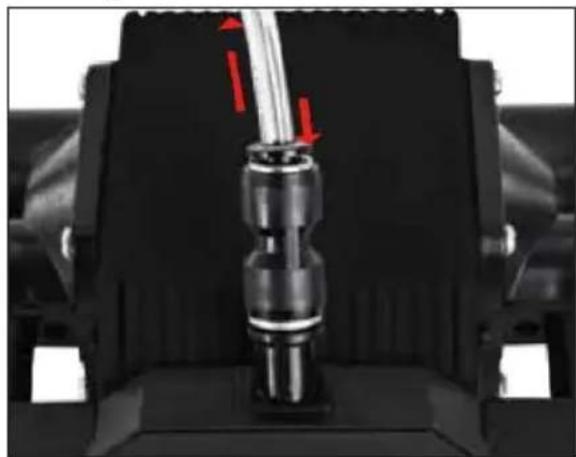
natural_image
Close-up of a mechanical component with a red arrow indicating direction, no visible text or symbols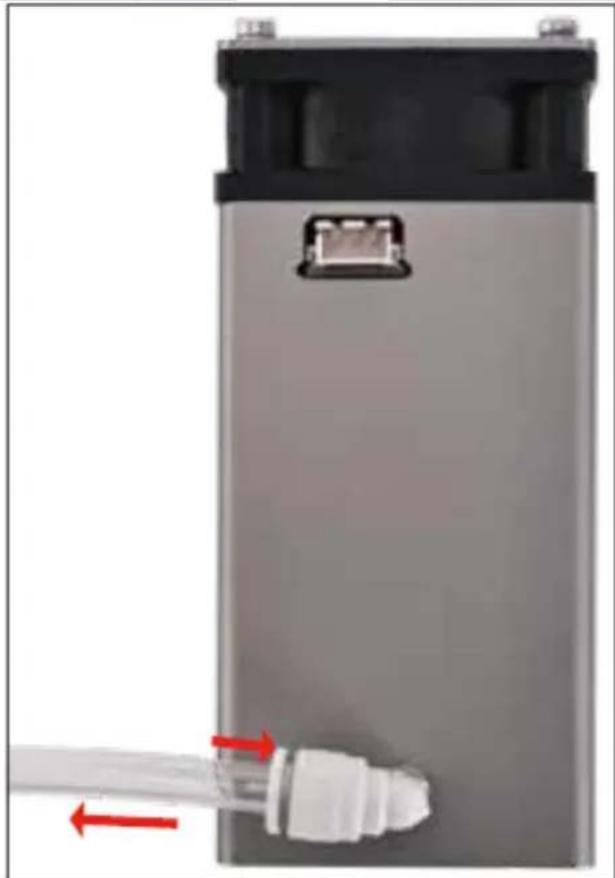
natural_image
Close-up of a gray cylindrical device with a white plastic connector and red arrows indicating flow direction (no text or symbols visible)
natural_image
Two-step assembly diagram showing a hand adjusting a mechanical component before and after transformation (no text or symbols present)natural_image
Close-up of a mechanical component before and after assembly, showing a red arrow indicating a pin or cable being inserted (no text or symbols visible)natural_image
Two-step diagram showing a hand holding a plastic connector next to a battery, before and after assembly (no text or symbols)natural_image
Close-up of a mechanical assembly with labeled component M3*10 (no readable text or symbols beyond label)natural_image
Close-up of a 3D printer's internal structure before and after assembly, showing pinning and wiring (no text or symbols visible)natural_image
Close-up of a 3D printer with a metallic base and wiring, mounted on a flat base (no visible text or symbols)natural_image
Black industrial machine with attached electrical switch and power plug (no visible text or symbols)Ohjeet
natural_image
Close-up of a mechanical component with a red arrow pointing to a cylindrical feature (no visible text or symbols)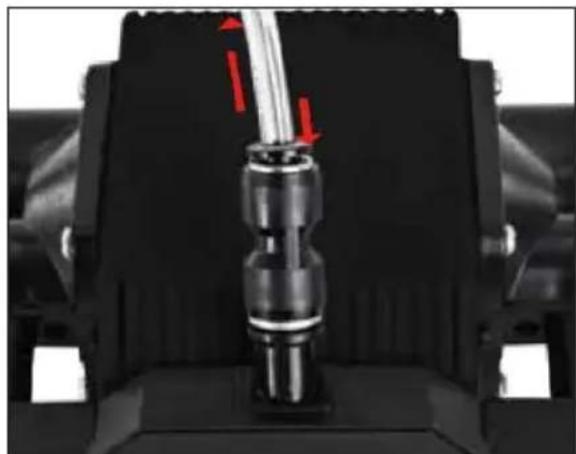
natural_image
Close-up of a mechanical component with red arrows indicating direction, no visible text or symbols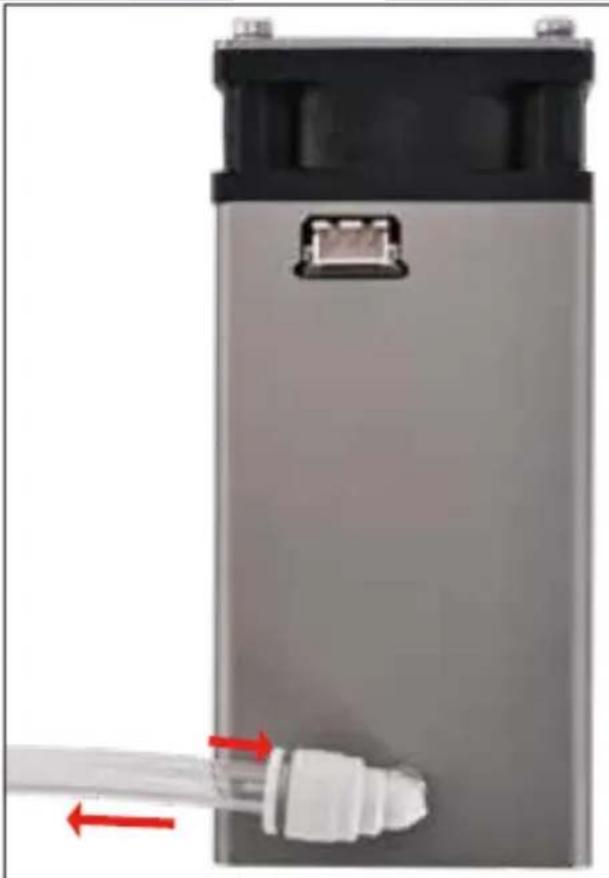
natural_image
Close-up of a gray cylindrical device with a black top and white connector, connected by a red arrow to a white plastic component (no visible text or symbols)
natural_image
Two-step assembly diagram showing a hand adjusting a mechanical component before and after transformation (no text or symbols present)natural_image
Close-up of a mechanical component before and after assembly, showing a red arrow indicating direction (no text or symbols)natural_image
Two-step diagram showing a hand holding a plastic connector next to a battery, before and after assembly (no text or symbols)natural_image
Close-up of a mechanical assembly with labeled component M3*10 (no readable text or symbols beyond label)natural_image
Two-step assembly of a 3D printer with a small connector, showing the process from left to right (no text or symbols visible)natural_image
Close-up of a 3D printer with a metallic base and red component, mounted on a square base with a transparent tube (no visible text or symbols)Stap 7: Schakel de luchtpomp in
natural_image
Black industrial machine with attached electrical switch and power outlet (no visible text or symbols)Tips
natural_image
Close-up of a mechanical component with a red arrow pointing to a cylindrical feature (no visible text or symbols)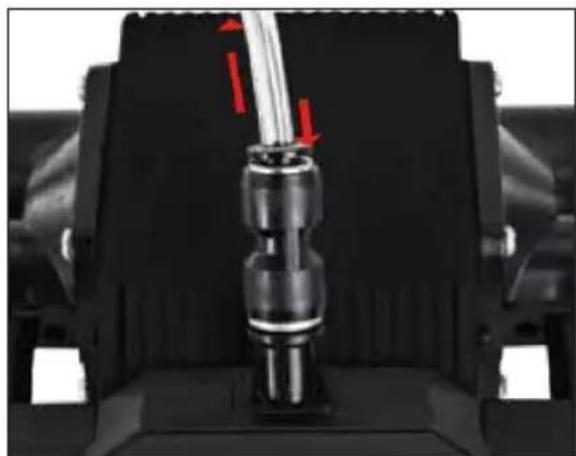
natural_image
Close-up of a mechanical component with red arrows indicating direction, no visible text or symbols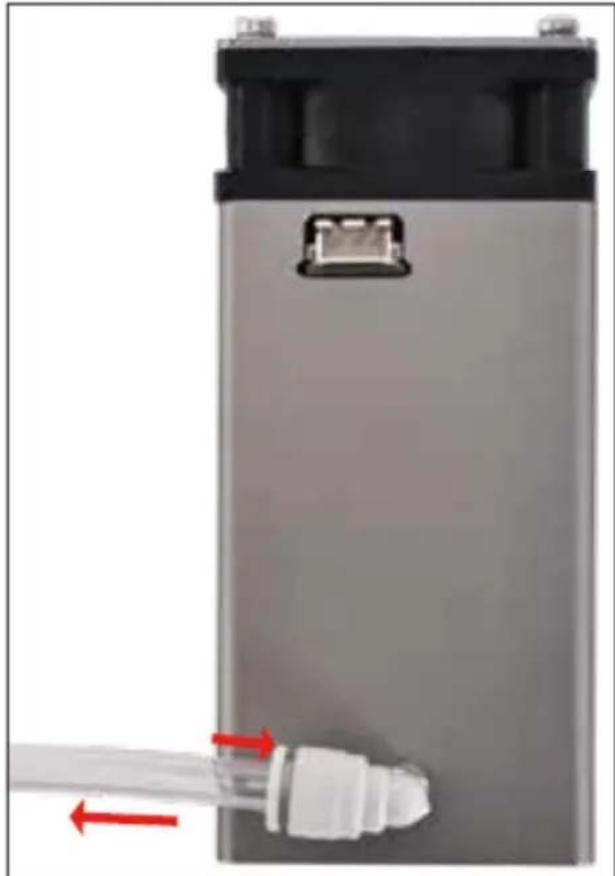
natural_image
Close-up of a gray cylindrical device with a black top and white connector, connected by a red arrow indicating direction (no text or symbols visible)
natural_image
Two-step assembly diagram showing a hand adjusting a mechanical component before and after modification (no text or symbols present)natural_image
Close-up of a mechanical component before and after assembly, showing a pipe insertion step (no text or symbols visible)natural_image
Two-step diagram showing a hand holding a plastic connector next to a battery, before and after assembly (no text or symbols)Trinn 4: Fest lasermodulen til maskinen
natural_image
Close-up of a mechanical assembly with labeled component M3*10 (no readable text or symbols beyond label)Trinn 5: Koble til den 3-pinners kabelen
-
Koble 3-pinners (rød, svart, gul) kabel til lasermodulens grensesnitt.
-
Koble den andre enden av kabelen til maskinens kontrollkort, som vist i diagrammet.
natural_image
Two-step diagram showing a hand inserting a small component into a 3D printer's base, with no visible text or symbols.Trinn 6: Juster laserfokus
natural_image
Close-up of a 3D printer with a metallic base and wiring, mounted on a flat base (no visible text or symbols)Trinn 7: Slå på luftpumpen
natural_image
Black industrial machine with attached electrical switch and power plug (no visible text or symbols)Veiledninger
natural_image
Close-up of a mechanical component with a red arrow pointing to a cylindrical feature (no visible text or symbols)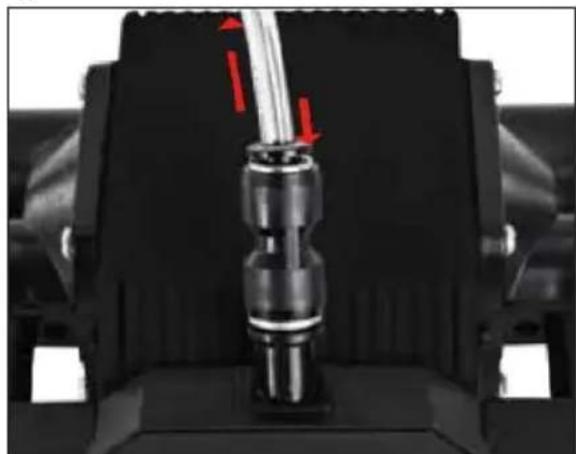
natural_image
Close-up of a mechanical component with red arrows indicating direction, no visible text or symbols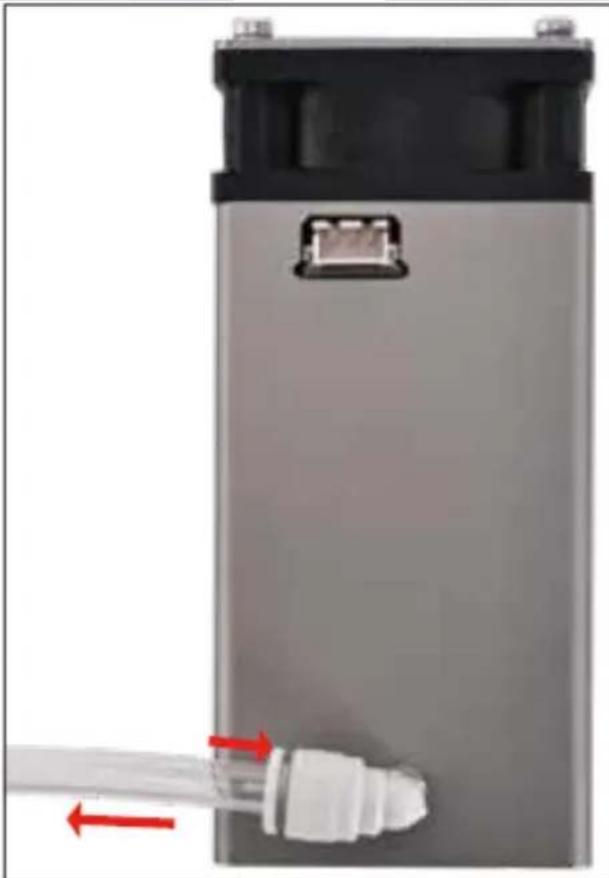
natural_image
Close-up of a gray cylindrical device with a black top and white connector, connected by a red arrow to a white plastic component (no visible text or symbols)
natural_image
Two-step assembly diagram showing a hand adjusting a mechanical component before and after transformation (no text or symbols present)natural_image
Close-up of a mechanical component before and after assembly, showing a red arrow indicating direction (no text or symbols)Steg 3: Anslut luftstrupen till lasermodulen
natural_image
Two-step diagram showing a hand holding a plastic connector next to a battery, before and after assembly (no text or symbols)natural_image
Close-up of a mechanical assembly with labeled component M3*10 (no readable text or symbols beyond label)natural_image
Close-up of a 3D printer's internal structure before and after assembly, showing pinning and wiring (no text or symbols visible)Steg 6: Justera laserfokus
natural_image
Close-up of a 3D printer with a metallic base and wiring, mounted on a flat base (no visible text or symbols)Steg 7: Slå på luftpumpen
natural_image
Black industrial machine with attached electrical switch and power outlet (no visible text or symbols)Anvisningar
natural_image
Close-up of a mechanical component with a red arrow pointing to a cylindrical feature (no visible text or symbols)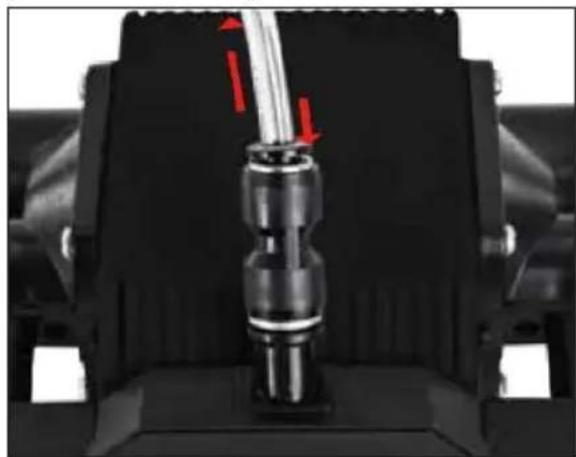
natural_image
Close-up of a mechanical component with a red arrow indicating direction, no visible text or symbols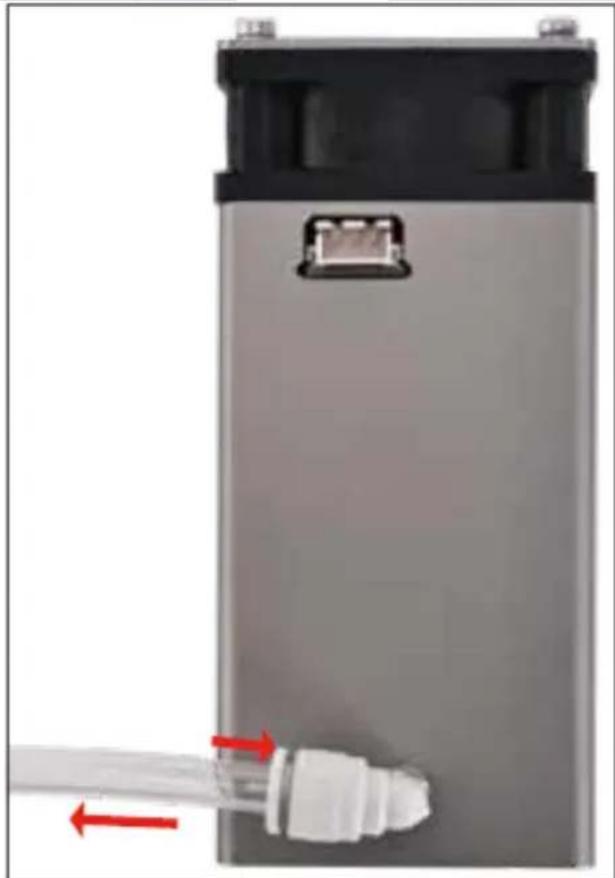
natural_image
Close-up of a gray cylindrical device with a white plastic connector and red arrows indicating flow direction (no text or symbols visible)
natural_image
Two-step assembly diagram showing a hand adjusting a mechanical component before and after transformation (no text or symbols present)Etapa 2: Conecte a traqueia à bomba de ar
natural_image
Close-up of a mechanical component before and after assembly, showing a red arrow indicating direction (no text or symbols)Etapa 3: Conecte a traqueia ao módulo laser
natural_image
Two-step diagram showing a hand holding a plastic connector next to a battery, before and after assembly (no text or symbols)Etapa 4: Conecte o módulo laser à máquina
- Use parafusos M3*10 para fixar o módulo laser com segurança à máquina, conforme mostrado no diagrama.
natural_image
Close-up of a mechanical assembly with labeled component M3*10 (no readable text or symbols beyond label)Etapa 5: Conecte o cabo de 3 pinos
-
Conecte o cabo de 3 pinos (vermelho, preto, amarelo) à interface do módulo laser.
-
Conecte a outra extremidade do cabo à placa de controle da máquina, conforme mostrado no diagrama.

natural_image
Two-step assembly of a 3D printer with a small connector, showing the process from left to right (no text or symbols visible)natural_image
Close-up of a 3D printer with a metallic base and red component, mounted on a square base with a transparent tube (no visible text or symbols)Etapa 7: Ligue a bomba de ar
natural_image
Black industrial machine with attached electrical switch and power outlet (no visible text or symbols)Indicações
natural_image
Close-up of a mechanical component with a red arrow pointing to a cylindrical feature (no visible text or symbols)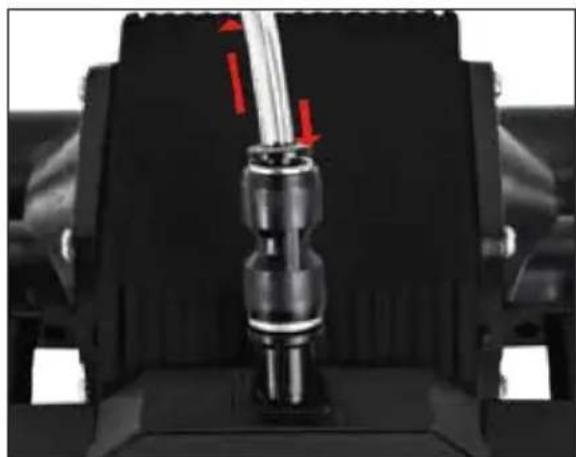
natural_image
Close-up of a mechanical component with red arrows indicating direction, no visible text or symbols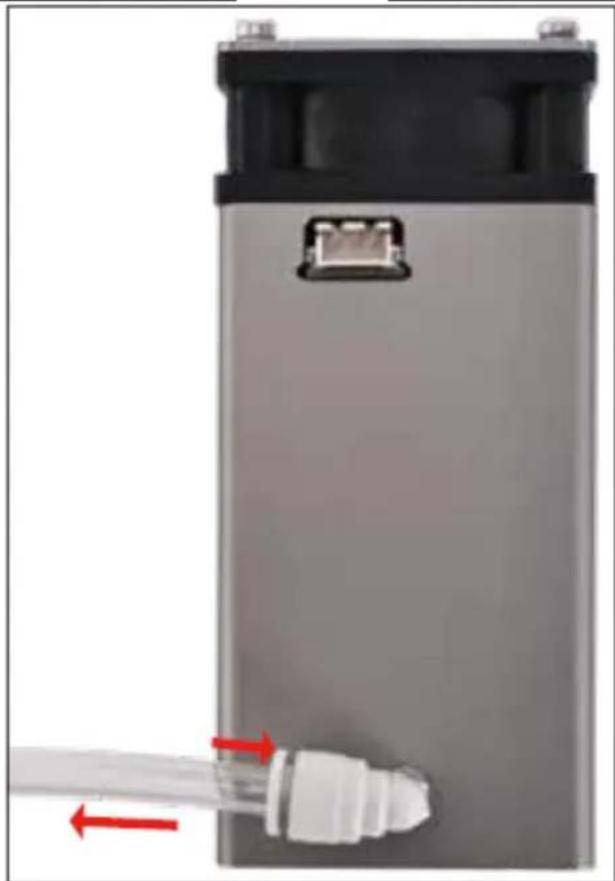
natural_image
Close-up of a gray battery casing with a white connector and red directional arrows indicating flow or movement (no text or symbols visible)
natural_image
Two-step assembly diagram showing a hand adjusting a mechanical component before and after transformation (no text or symbols present)natural_image
Close-up of a mechanical component before and after assembly, showing pipe connection (no text or symbols visible)Krok 3: Pripojte tracheu k laserovému modulu
natural_image
Two-step diagram showing a hand holding a plastic connector next to a battery, before and after assembly (no text or symbols)Krok 4: Pripojte laserový modul k stroju
natural_image
Close-up of a mechanical assembly with labeled component M3*10 (no readable text or symbols beyond label)natural_image
Two-step assembly of a 3D printer with a small connector, showing the process from left to right (no text or symbols visible)Krok 6: Upravte zaostrenie lasera
natural_image
Close-up of a 3D printer with a metallic base and red component, mounted on a base platform (no visible text or symbols)natural_image
Black industrial machine with attached electrical switch and power outlet (no visible text or symbols)Tipy:
natural_image
Close-up of a mechanical component with a red arrow pointing to a cylindrical feature (no visible text or symbols)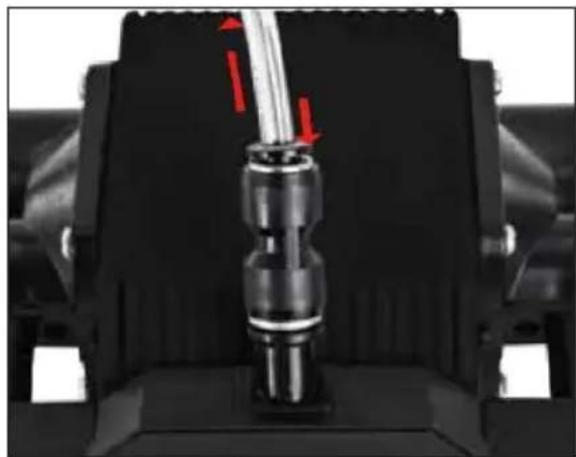
natural_image
Close-up of a mechanical component with a red arrow indicating direction, no visible text or symbols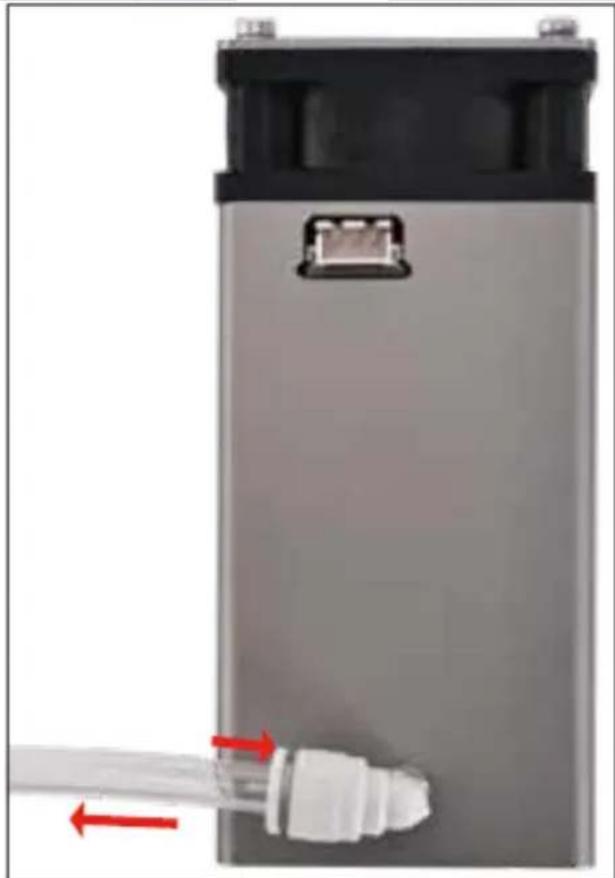
natural_image
Close-up of a gray cylindrical device with a white plastic connector and red arrows indicating flow direction (no text or symbols visible)
natural_image
Two-step assembly diagram showing a hand adjusting a mechanical component before and after transformation (no text or symbols present)natural_image
Close-up of a mechanical component before and after assembly, showing pipe insertion and disassembly (no text or symbols visible)natural_image
Two-step diagram showing a hand holding a plastic connector next to a battery, before and after assembly (no text or symbols)natural_image
Close-up of a mechanical assembly with labeled component M3*10 (no readable text or symbols beyond label)natural_image
Close-up of a 3D printer's internal structure before and after assembly, showing pinning and wiring (no text or symbols visible)natural_image
Close-up of a 3D printer with a metallic base and red component, mounted on a square base with a transparent tube (no visible text or symbols)natural_image
Black industrial machine with attached electrical switch and power outlet (no visible text or symbols)Съвети:
natural_image
Close-up of a mechanical component with a red arrow pointing to a cylindrical feature (no visible text or symbols)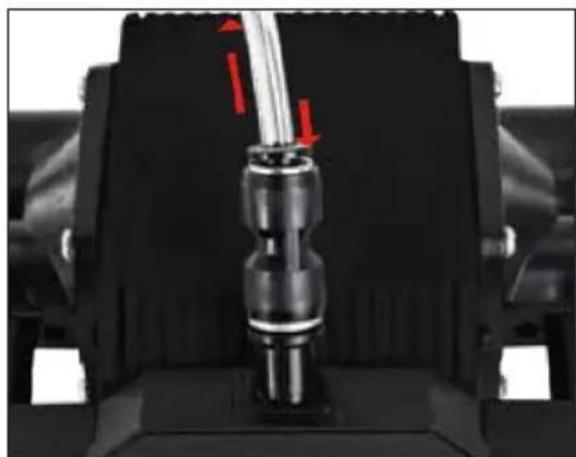
natural_image
Close-up of a mechanical component with red arrows indicating direction, no visible text or symbols
natural_image
Close-up of a gray battery casing with a white connector and red directional arrows indicating flow or movement (no text or symbols)
natural_image
Two-step assembly diagram showing a hand adjusting a mechanical component before and after transformation (no text or symbols present)natural_image
Close-up of a mechanical component before and after assembly, showing pipe insertion and disassembly (no text or symbols visible)natural_image
Two-step diagram showing a hand holding a plastic connector next to a battery pack, before and after assembly (no text or symbols)natural_image
Close-up of a mechanical assembly with labeled component M3*10 (no readable text beyond label)natural_image
Close-up of a 3D printer's internal structure before and after assembly, showing pinning and wiring (no text or symbols visible)natural_image
Close-up of a 3D printer with a metallic base and red component, mounted on a base platform (no visible text or symbols)natural_image
Black industrial machine with attached electrical switch and power outlet (no visible text or symbols)Συμβουλές:
natural_image
Close-up of a mechanical component with a red arrow pointing to a cylindrical feature (no visible text or symbols)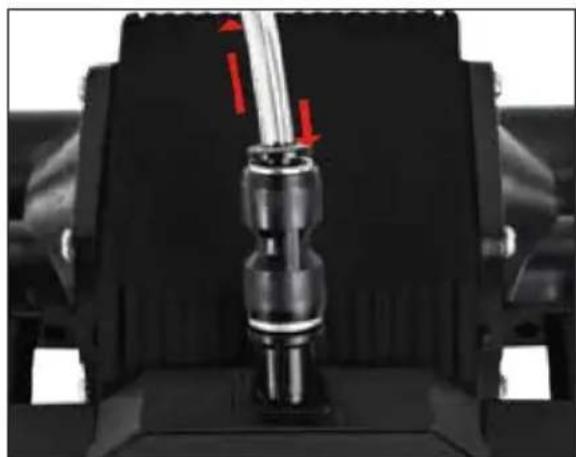
natural_image
Close-up of a mechanical component with red arrows indicating direction, no visible text or symbols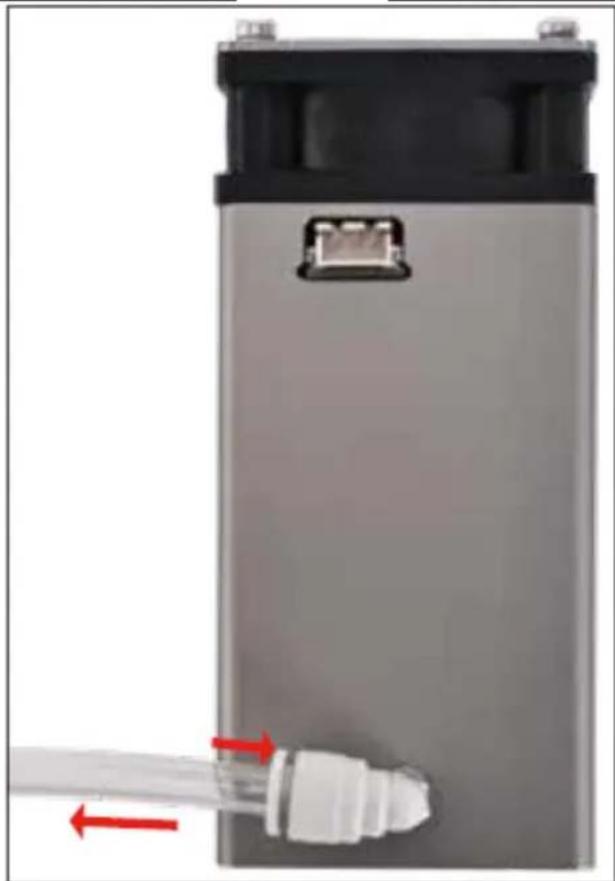
natural_image
Close-up of a gray battery casing with a white connector and red directional arrows indicating flow or movement (no text or symbols visible)
natural_image
Two-step assembly diagram showing a hand adjusting a black mechanical component, before and after transformation (no text or symbols visible)Korak 2: Spojite dušnik na zračnu pumpu
natural_image
Close-up of a mechanical component before and after assembly, showing pipe insertion and disassembly (no text or symbols visible)Korak 3: Spojite traheju na laserski modul
- Pronađite zračnu mlaznicu na laserskom modulu.
- Pričvrstite drugi kraj dušnika na ovu mlaznicu, kao što je prikazano na dijagramu.
natural_image
Close-up of a hand holding a plastic clip next to a silver battery casing with a white connector (no text or symbols visible)
natural_image
Exterior view of a gray battery bank with a white connector and black top panel (no text or symbols visible)Korak 4: Pričvrstite laserski modul na uređaj
- Koristite M3*10 vijke da sigurno pričvrstite laserski modul na uređaj, kao što je prikazano na dijagramu.
natural_image
Close-up of a mechanical assembly with labeled component M3*10 (no readable text or symbols beyond label)Korak 5: Spojite 3-pinski kabel
-
Spojite 3-pinski (crveni, crni, žuti) kabel na sučelje laserskog modula.
-
Spojite drugi kraj kabela na upravljačku ploču vašeg stroja, kao što je prikazano na dijagramu.

natural_image
Close-up of a 3D printer's internal structure before and after assembly, showing pinning and wiring (no text or symbols visible)Korak 6: Podesite fokus lasera
- Postavite ploču s fiksnim fokusom od 6 mm izravno ispod laserske glave.
- Osigurajte da ploča dodiruje lasersku glavu i predmet za graviranje.
- Nakon što postavite ispravan fokus, uklonite ploču s fiksnim fokusom.
natural_image
Close-up of a 3D printer with a metallic base and red component, mounted on a base platform (no visible text or symbols)natural_image
Black industrial machine with attached electrical switch and power plug (no visible text or symbols)Savjeti:
- Upotreba odstojnog stupa: Ako je potrebno, možete upotrijebiti M3*16 vijak kroz odstojni stup kako biste dodatno učvrstili laserski modul.
- Uklanjanje dušnika: Za uklanjanje dušnika, pritisnite adapter prema unutra za 1 mm, zatim odvojite dušnik, kao što je prikazano na dijagramu.
natural_image
Close-up of a mechanical component with a red arrow pointing to a cylindrical feature (no visible text or symbols)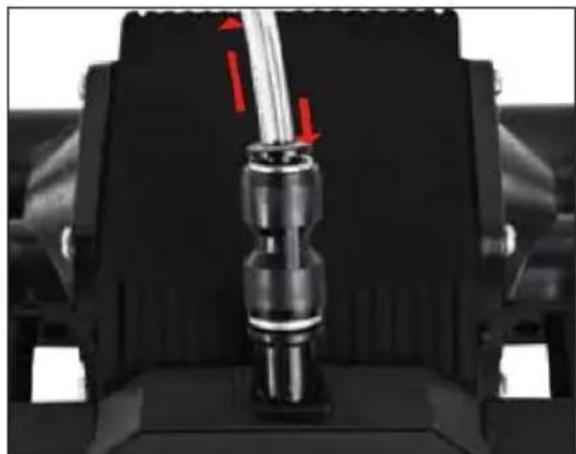
natural_image
Close-up of a mechanical component with red arrows indicating direction, no visible text or symbols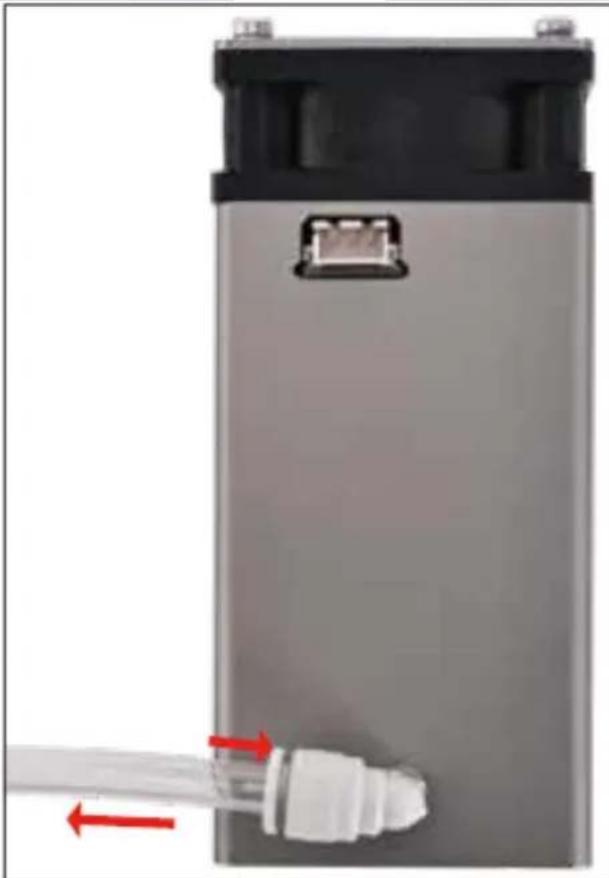
natural_image
Close-up of a gray cylindrical device with a black top and white connector, connected by a red arrow to a white plastic component (no visible text or symbols)
natural_image
Two-step assembly diagram showing a hand adjusting a mechanical component before and after transformation (no text or symbols present)natural_image
Close-up of a mechanical component before and after assembly, showing a red arrow indicating direction (no text or symbols)natural_image
Hand inserting a plastic clip into a silver battery casing (no text or symbols visible)
natural_image
Exterior view of a gray rectangular electronic device with a white connector and a black top panel (no visible text or symbols)natural_image
Close-up of a mechanical assembly with labeled component M3*10 (no readable text or symbols beyond label)natural_image
Two-step assembly of a 3D printer with visible wiring and mounting bracket (no text or symbols)natural_image
Close-up of a 3D printer with a metallic base and red component, mounted on a base platform (no visible text or symbols)natural_image
Black industrial machine with attached electrical switch and power outlet (no visible text or symbols)Patarimai:
natural_image
Close-up of a mechanical component with a red arrow pointing to a cylindrical feature (no visible text or symbols)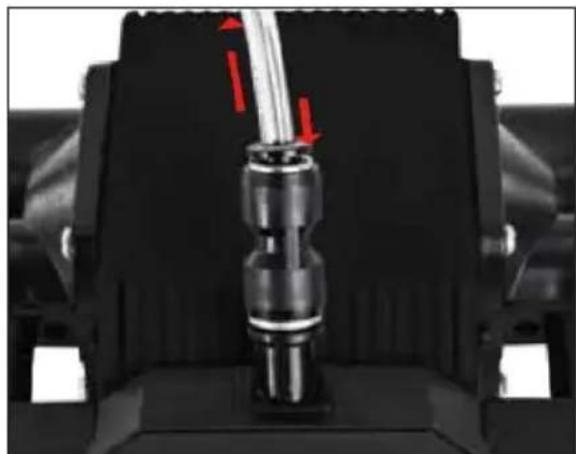
natural_image
Close-up of a mechanical component with red arrows indicating direction, no visible text or symbols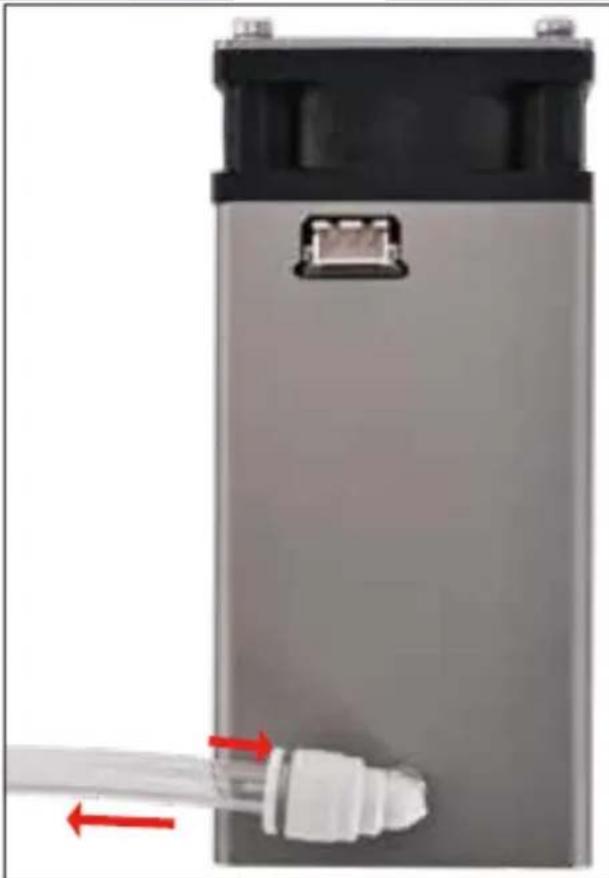
natural_image
Close-up of a gray cylindrical device with a black top and white connector, connected by a red arrow to a white plastic component (no visible text or symbols)
natural_image
Two-step assembly diagram showing a hand adjusting a mechanical component before and after transformation (no text or symbols present)natural_image
Close-up of a mechanical component before and after assembly, showing a red arrow indicating direction (no text or symbols)- Hinweise
- Installation and Operation
- Step 1: Unpack the air pump kit and parts
- Step 2: Connect the trachea to the air pump
- Step 3: Connect the trachea to the laser module
- Step 4: Attach the laser module to the machine
- Step 5: Connect the 3-pin cable
- Step 6: Adjust the laser focus
- Step 7: Power on the air pump
- Tips:
- Wskazówki
- Pokyny
- Consignes
- Fase 3: Collegare la trachea al modulo laser
- Suggerimenti
- Paso 2: Conecte la tráquea a la bomba de aire.
- Notas explicativas
- Tippek
- Trin 4: Sæt lasermodulet på maskinen
- Trin 6: Juster laserens fokus
- Anvisninger
- Ohjeet
- Stap 7: Schakel de luchtpomp in
- Tips
- Trinn 4: Fest lasermodulen til maskinen
- Trinn 5: Koble til den 3-pinners kabelen
- Trinn 6: Juster laserfokus
- Trinn 7: Slå på luftpumpen
- Veiledninger
- Steg 3: Anslut luftstrupen till lasermodulen
- Steg 6: Justera laserfokus
- Steg 7: Slå på luftpumpen
- Anvisningar
- Etapa 2: Conecte a traqueia à bomba de ar
- Etapa 3: Conecte a traqueia ao módulo laser
- Etapa 4: Conecte o módulo laser à máquina
- Etapa 5: Conecte o cabo de 3 pinos
- Etapa 7: Ligue a bomba de ar
- Indicações
- Krok 3: Pripojte tracheu k laserovému modulu
- Krok 4: Pripojte laserový modul k stroju
- Krok 6: Upravte zaostrenie lasera
- Tipy:
- Съвети:
- Συμβουλές:
- Korak 2: Spojite dušnik na zračnu pumpu
- Korak 3: Spojite traheju na laserski modul
- Korak 4: Pričvrstite laserski modul na uređaj
- Korak 5: Spojite 3-pinski kabel
- Korak 6: Podesite fokus lasera
- Savjeti:
- Patarimai:
Brand : STEINBERG
Model : SBS-LEM-40ML
Category : Laser module