6210701X61N - Snow blower NAC - Free user manual and instructions
Find the device manual for free 6210701X61N NAC in PDF.


| Product Type | Snow Blower |
| Brand | NAC |
| Model | 6210701X61N |
| Fuel Type | Unleaded gasoline (minimum 85 octane) |
| Engine Type | 4-stroke, gasoline engine |
| Recommended Engine Oil | 5W30 (synthetic possible for extreme temperatures) |
| Fuel Tank Capacity | Not specified in manual |
| Start Type | Recoil starter (manual) |
| Working Width | Not specified |
| Discharge Direction | Adjustable by crank (rotation) and deflector (height) |
| Drive | Self-propelled by auger (rubber blades) |
| Auger Control | Auger lever (engage/disengage) |
| Safety | Engine stop, disconnect spark plug before maintenance, anti-throw protection |
| Routine Maintenance | Check oil, spark plug, belt, lubricate chute |
| Oil Change Interval | Every 50 hours or once a year |
| Spark Plug | Gap 0.030 inch, torque 15 inch-pounds |
| Drive Belt | Special belt, replacement by authorized repairer |
| Weight | Not specified |
| Dimensions | Not specified |
| Warranty | 1 year private use, 90 days professional (depending on model) |
| Replacement Parts | Genuine parts recommended, order with serial number |
| Compatible Accessories | Tire chains, electric start kit (manufacturer-approved) |
Frequently Asked Questions - 6210701X61N NAC
User questions about 6210701X61N NAC
0 question about this device. Answer the ones you know or ask your own.
Ask a new question about this device
Download the instructions for your Snow blower in PDF format for free! Find your manual 6210701X61N - NAC and take your electronic device back in hand. On this page are published all the documents necessary for the use of your device. 6210701X61N by NAC.
USER MANUAL 6210701X61N NAC
1

CONTENTS
HAZARDSYMBOLSANDTHEMEANINGS8.
OPERATINGSYMBOLSANDTHEIRMEANINGS8....
RULESFORSAFEOPERATION9.
ASSEMBLY11....
OPERATION11....
MAINTENANCE13.
MAINTENANCECHART13.
TROUBLE SHOOTING CHART 15
LIMITED WARRANTY 16
GeneralInformation
This instruction book is written for a person with some mechanical ability. Like most service books, not all the steps are described. Steps on how to loosen or tighten fasteners are steps anyone can follow with some mechanical ability. Read and follow these instructions before you use the unit.
Know your product: If you understand the unit and how the unit operates, you will get the best performance. As you read this manual, compare the illustrations to the unit. Learn the location and the function of the controls. To help prevent an accident, follow the operating instructions and the safety rules. Keep this manual for future reference.
IMPORTANT: Many units are not assembled and are sold in cartons. It is the responsibility of the owner to make sure the assembly instructions in this manual are exactly followed. Other units are purchased in an assembled condition. On assembled units, it is the responsibility of the owner to make sure the unit is correctly assembled. The owner must carefully check the unit according to the instructions in this manual before it is first used.
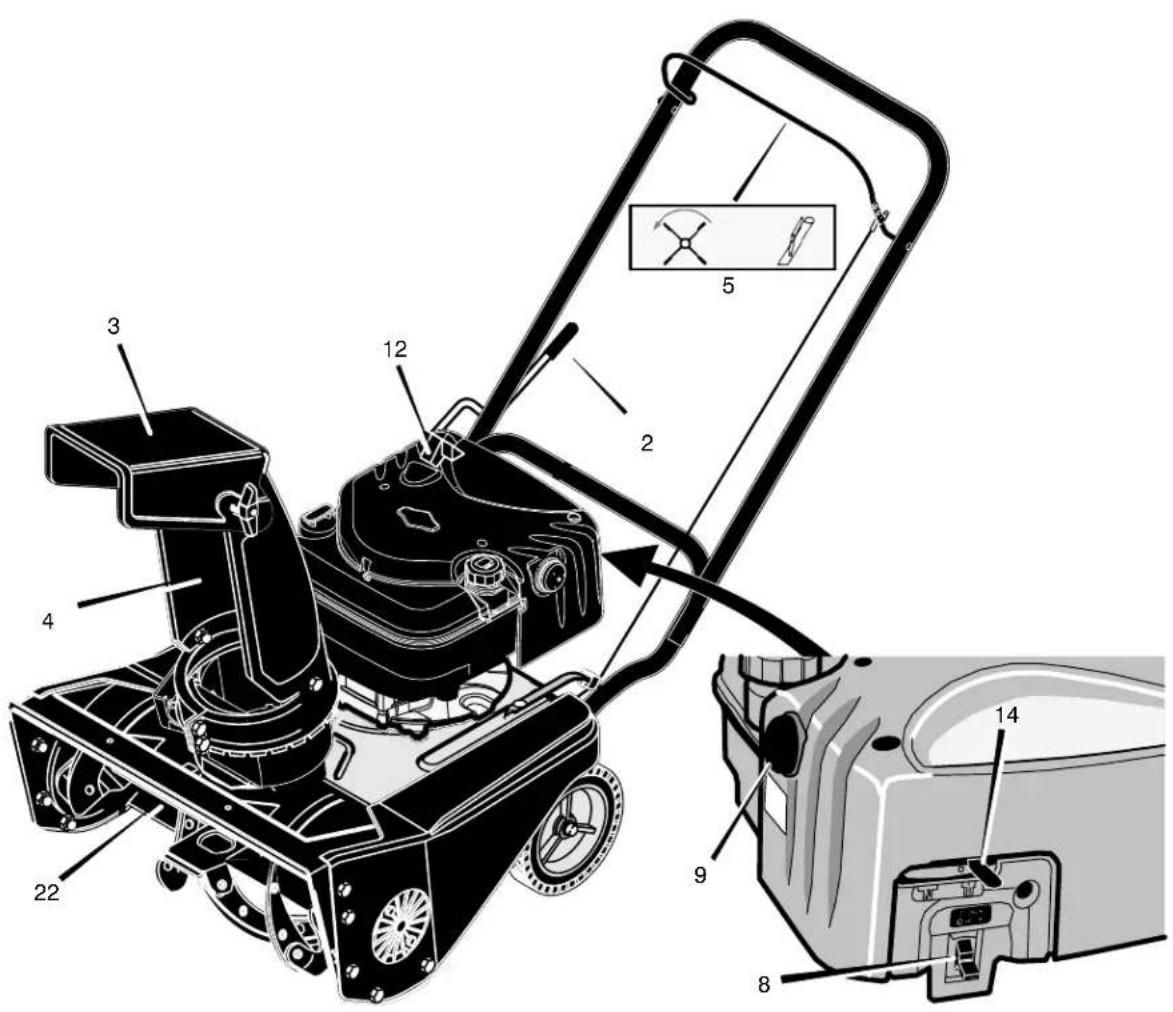
Controls & Equipment Features (see Figure 1)
Crank Assembly (2) - Changes the direction of the discharge chute.
Chute Deflector (3) - Changes the distance the snow is thrown.
Discharge Chute (4) - Changes the direction the snow is thrown.
Auger Drive Lever (5) - Starts and stops the auger (snow gathering and throwing) which also propels the snowthrower..
Engine Features
Stop Switch (8) - If equipped, move to the ON position to start the engine.
Primer Button (9) - Injects fuel directly into the carburetor for fast starts in cold weather.
Recoil Starter Handle (12) - Use to manually start the engine.
Choke Control (14) - Use to start a cold engine.


Thismanualcontainssafetyinformationtomakeyou awareofthehazardsandrisksassociatedwithsnow
throwers, and how to avoid them. Thesnow thrower is designed and intended for removal of snow, and should not be used for any other purpose. It is important that you read and understand these instructions, and anyone operating the equipment read and understand these instructions.

WARNING
The engine exhaust from this product contains chemicals known to the State of Californiatocause cancer, birth defects, or other reproductive harm.
Asignalword(DANGER, WARNING, or CAUTION) is used with the alert symbol to indicate the likelihood and the potential severity of injury. In addition, ahazardsymbol may be used to represent the type of hazard.

DANGER indicates ahazard which, if not avoided, will result in death or serious injury.

WARNING indicates ahazard which, if not avoided, could result in death or serious injury.

CAUTION indicates ahazard which, if not avoided, might result in minor or moderate injury.
CAUTION, when used without the alert symbol, indicates a situation that could result in damage to the equipment.
Hazard Symbols and the meanings
Thesesymbolsareusedonyourequirepmentanddefinedinyouroperating manual.Reviewandunderstandthemeanings.Theuseofoneofthese symbolscombinedwithasignalwordwillalertyoutopotentialhazards andhowtoavoidthem.


Safety Alert --Identifiessafetyinformationabout hazardsthatcanresultinpersonalinjury.
Operator's Manual --Readandunderstandbefore performinganyactivityorrunningequipment.
Rotatingauger
Rotatingimpeller
Toxicfumes
Rotatinggears
Thrownobjects
Keepasafedistance fromtheequipment.
Fire
Explosion

Shock
HotSurface

Neverreachinto rotatingparts.

Shutoffengineandremovesparkplugconnector beforeperformingmaintenanceorrepairwork.
Operating Symbols and their meanings
Thesesymbolsareusedonyourequipmentanddefinedinyouroperating manual.Itisimportantthatyoureviewandunderstandthemeanings. Failuretounderstandthesymbolsmightresultinharmtoyou.


Oil
Fuel
On Off
Primer bulb
Throttle
Choke off
Choke on
Stop
Slow
Fast
Engage
Engage
Traction
Auger Collector
Auger Clutch
Drive Clutch
Foward
Neutral
Reverse

Ignition On

Ignition Off

Ignition Key
Push to engage electric start

Electric Start

Engine Start

Engine Run

Engine Off

Engage

Disengage
Heated Grips
Discharge Chute

LEFT UP

RIGHT

Chute Deflector

DOWN

WARNING: This machine is capable of amputating hands and feet and throwing objects. Read the sesafety rules and follow them closely. Failure to obey these rules could result in loss of control of unit, severe personal injury or death to you, or bystanders, or damage to property or equipment. The triangle ⚠️ in text signifies important caution or warnings which must be followed.
SafeOperationPracticesforSnowthrowers
IMPORTANT: Safetystandardsrequireoperatorpresencecontrolsto minimizetheriskofinjury. Yoursnowthrowerisequippedwithsuchcontrols. Donotattempttodefeatthefunctionoftheoperatorpresencecontrolunderanycircumstances.
Training
- Read, understand, and follow all instructions on the machine and in the manuals before operating this unit. Bethoroughly familiar with the controls and the proper use of the equipment. Know how to stop the unit and disengagethe controls quickly.
- Neverallowchildrentooperatetheequipment. Neverallowadultsto operatetheequipmentwithoutproperinstruction.
- Keep the area of operation clear of all persons, particularly small children and pets.
- Exercise caution to avoid slipping or falling especially when operating in reverse.
Preparation
- Thoroughly inspect the area where the equipment is to be used and remove all doormats, sleds, boards, wires, and other foreign objects.
- Disengage all clutches and shift into neutral before starting the engine (motor).
-
Donotoperatetheequipmentwithoutwearingadequatewinterouter garments. Wearfootwearthatwillimprovefootingonslippery surfaces. Avoidloosefittingclothingthatcangetcaughtinmovingparts.
-
Handle fuel with care; it is highly flammable.
a. Useanapprovedfuelcontainer.
b. Neveraddfueltoarunningengineorhotengine.
c. Fillfueltankoutdoorswithextremecare. Neverfillfueltankindoors. Replacefuelcapsecurelyandwipeupspilledfuel.
d. Neverfill containers inside vehicle or on a truck or trailer bed with aplasticliner. Always place containers on the ground, away from your vehicle, before filling.
e. When practical, removegas--poweredequipment from the truckor trailer and refueliton the ground. If this is not possible, then refuel such on a trailer with a portable container, rather than from a gasolined dispensernozzle.
f. Keepnozzleincontactwiththerimofthefueltankorcontainer openingatalltimes,untilrefuelingiscomplete.Donotuseanozzle lock--opendevice.
g. Replace gasoline cap securely and wipe up spilled fuel.
h.Iffuelisspilledonclothing,changeclothingimmediately.
-
Use extension cords and receptacles as specified by the manufacturer for all units with the electric drivemotors or electric starting motors.
-
Adjust the collector housing height to clear gravel or crushed rock surfaces.
-
Never attempt to make any adjustments while the engine (motor) is running (except when specifically recommended by manufacturer).
-
Letengine(motor) and snowthrower adjust to outdoor temperatures before starting to clear snow.
-
Always wears safety glasses are eyeshields during operation while performing an adjustment or repair top to protect eyes from foreign objects that may be thrown from the machine.
1742311
Operation
- Donotputhandsorfeetnearorunderrotatingparts. Keepclearofthe dischargeopeningataltimes.
- Exercise extremecution when operating on or crossing gravel drives, walksorroads. Stay alert for hidden hazards or traffic.
- Afterstrikingaforeignobject, stoptheengine(motor), removethewire fromthesparkplug, disconnectthecordonelectricmotors, thoroughly inspectsnowthrowerforanydamage, andrepairthedamagebefore restartingandoperatingthesnowthrower.
- If the unit should start to vibrate abnormally, stop the engine (motor) and check immediately for the cause. Vibration is generally awarning of trouble.
- Stoptheengine(motor)wheneveryouleavetheoperatingposition, beforeuncloggingthecollector/impellerhousingordischargechuteand whenmakinganyrepairs,adjustments,orinspections.
- Whencleaning, repairing, or inspecting, make certain the collector/impeller and all moving part shavestopped. Disconnect the spark plug wire and keep the wire away from the spark plug to prevent accidental starting.
- Donotruntheengineindoors, except when starting the engine and for transporting the snow thrower in or out of the building. Open the outside doors; exhaust fumes are dangerous (containing CARBONMONOXIDE, an ODORLESS and DEADLYGAS).
- Exercise extremecution when operating on slopes. Donot attempt to clear steeps slopes.
- Never operatethesnowthrowerwithoutproperguards, plates, or other safetyprotectivedevicesinplaceandworking.
- Never direct the discharge toward people or areas where property damage can occur. Keep children and others away.
- Donotoverloadthemachinecapacitybyattempttoclearsnowat toofastarate.
- Neveroperatethemachineathightransportspeedsonslippery surfaces.Lookbehindandusecarewhenoperatinginreverse.
- Disengagepowerothecollector/impellerwhensnowthroweristransportedornotinuse.
- Useonlyattachmentsandaccessoriesapprovedbythemanufacturer ofthesnowthrower(suchascabs,tirechains,etc..).
- Neveroperatethesnowthrowerwithoutgoodvisibilityorlight.Always besureofyourfootingandkeepafirmholdonthehandles.Walk, neverrun.
- Nevertouchahotengineormuffler.
- Neveroperatethesnowthrowernearglassenclosures, automobiles, windowwells, drop--offs, and the likelihood without proper adjustment of the snowdischarge angle.
- Neverdirectdischargeatbystandersorallowanyoneinfrontofthe unit.
- Neverleave running unit unattended. Always disengag the auger and traction controls, stopengine, and remove keys.
- Donotoperatetheunitwhileundertheinfluenceofalcoholordrugs.
- Keepinmindtheoperatorisresponsibleforaccidentsoccurringto otherpeopleorproperty.
- Data indicate that operators, age 60 years and above, are involved in large percentage of power equipment --related injuries. These operators should evaluate their ability to operate the units safely enough to protect themselves and others from injury.
- DONOTwearlongscarvesorlooseclothingthatcouldbecome entangledinmovingparts.
- Snowcanhideobstacles.Makesuretoremoveallobstaclesfrom theareatobecleared.
Children
Tragicaccidentscanoccuriftheoperatorisnotalerttothepresenceofchildren.Childrenareoftenattractedtotheunitandtheoperatingactivity.Never assumethatchildrenwillremainwhereyoulastsawthem.
- Keepchildrenoutoftheareaandunderthewatchfulcareofanother responsibleadult.
- Bealertandturnoffifchildrenenterthearea.
- Neverallowchildrentooperatetheunit.
- Use extracare when approaching blind corners, shrubs, trees, or other objects that may obscure vision.
ClearingACloggedDischargeChute
Handcontactwiththerotatingimpellerinsidethedischargechuteisthe mostcommoncauseofinjuryassociatedwithsnowthrowers.Neveruse yourhandtocleanoutthedischargechute.
Toclearthechute:
1.SHUTOFFTHEENGINE.
2. Wait10 secondstobesuretheimpellerbladeshavestoppedrotating.
3. Always use a cleanout tool, not your hands.
Service,MaintenanceAndStorage
- Checkshearboltsandotherboltsatfrequentintervalsforpropertightnesstobesuretheequipmentisinsafeworkingcondition.
- Neverstorethemachinewithfuelinthetankinsideabuildingwhere ignitionsourcesarepresentsuchashotwaterandspaceheaters,or clothesdryers.Allowtheenginetocoolbeforestoringinanyenclosure.
- Always referto operator's manual for important details if the snow throwerist of bestored for an extended period.
- Maintain or replaces safety and instruction labels as necessary.
- Runthemachineafewminutesafterthrowingsnowtopreventfreeze-upofthecollector/impeller.
-
Iffuelisspilled, donotattempttostarttheenginebutmovethemachineawayfromtheareaofspillageandavoidcreatinganysourceofignitionuntilfuelvaporshavedissipated.
-
Always observes a saferefueling and fuel handling practices when refueling the unit after transportation or storage.
- Always follow the engine's manual instructions for storage preparations before storing the unit for both short and long-term periods,
- Always follow the engine manual instructions for proper start-up procedures when returning the unit to service.
- Maintain or replaces safety and instruction labels as necessary.
- Keepnutsandboltstightandkeepequipmentingoodcondition.
- Nevertamperwithsafetydevices. Check their proper operation regularly and make necessary repairs if they are not functioning properly.
- Components aresubjecttowear,damage,and deterioration. Frequently check components and replace with manufacturer's recommended parts, when necessary.
- Checkcontroloperationfrequently.Adjustandserviceasrequired.
- Use only factory authorized replacement parts when making repairs.
- Always comply with factory specifications on all settings and adjustments.
- Only authorized servicelocation should be utilized for major service and repair requirements.
- Never attempt to make major repair on this unit unless you have been properly trained. Improper service procedures can result in hazardous operation, equipment damage and voiding of manufacturer's warranty.
- Checkshearbolts(pins) and other bolts at frequent intervals for proper tightness to be sure the equipment is in safeworking condition.
Emissions
- Engineexhaustfromthisproductcontainschemicalsknown, incertain quantities, tocausecancer, birthdefects, orreproductive harm.
- If available, look for the relevant Emissions Durability Period and Air Index information on the engine emissions label.
IgnitionSystem
- This sparkignition system complies with Canadian ICES-002.
ASSEMBLY
Readandfollowtheassemblyandadjustment instructionsforyoursnowthrower.Allfasteners areinthepartsbag.Donotdiscardanypartors materialuntiltheunitisassembled.

WARNING: Before doing any assembly or maintain an octothesnow thrower, removethewire from the
sparkplug.
NOTE: In this instruction book, left and right describethelocation of apart from the operator's position behind the unit.
NOTE: Torqueis measuredinfootpounds (metricN.m). This measurement describes howtightanutorboltmustbe. Thetorqueis measuredwithatorquewrench.
NOTE: Illustrationsarelocatedonpage2 andonpages3through6.
ToolsRequired
1Knife
1 Pliers
HowToRemoveTheSnowThrower FromTheCarton
-
Locateandremovethecontainerofoil.
-
Locate all part st hata r e packed separately and remove from the carton.
-
Remove and discard the packing material from around the snowthrower.
-
Cutdownallfourcornersofthecartonand laythesidepanelsflat.
-
Holdontothelowerhandleandpullthesnow throweroffthecarton.
CAUTION:DONOTbackovercables.
- Removethepackingmaterialfromhandle assembly. Removethelowerinsertfromthe axle.
HowToAssembleTheHandle
-
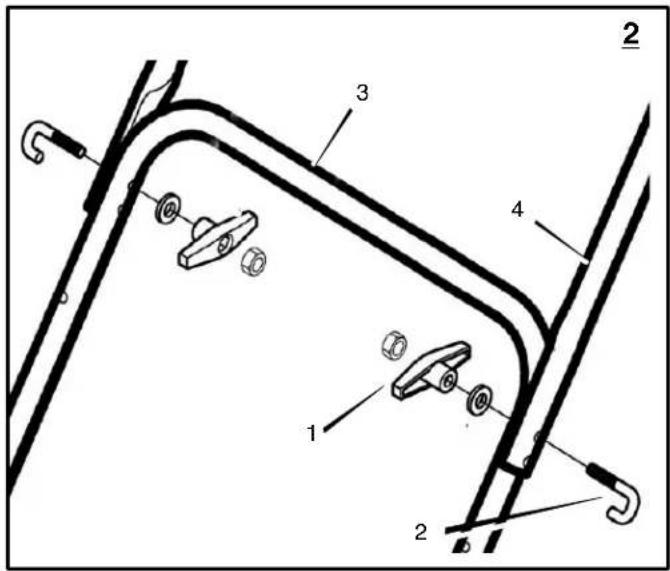
(Figure 2) Remove the T-knobs (1) and U--bolts(2) from the lower handle(3).
-
Puttheupperhandle(4)intheoperating position.
-
InstalltheU--bolts(2)andtightenthe T-knobs(1). NOTE: Makesuretheaugerdrivecableis notcaughtbetweenheupperandlower handle.
HowToPrepareTheEngine

WARNING: Follow the engine manufacturer's instructions for the type offuelandoiltouse. Always
useasafetyfuelcontainer.Donotsmoke whenaddingfueltothefueltank.When insideanenclosure,donotfillthefuel tank.Beforeyouaddthefuel,stoptheengine.Lettheenginecoolforseveralminutes.
Seetheenginemanufacturer's instructions for the type off fuel and oil tissue. Before you use the unit, read the information on safety, operation, maintenance, and storage.
NOTE: Enginehorsepowerratingsmay vary by engineadjustments, manufacturingvariances, altitude, atmosphericconditions, fuel andmaintenance.
1742311
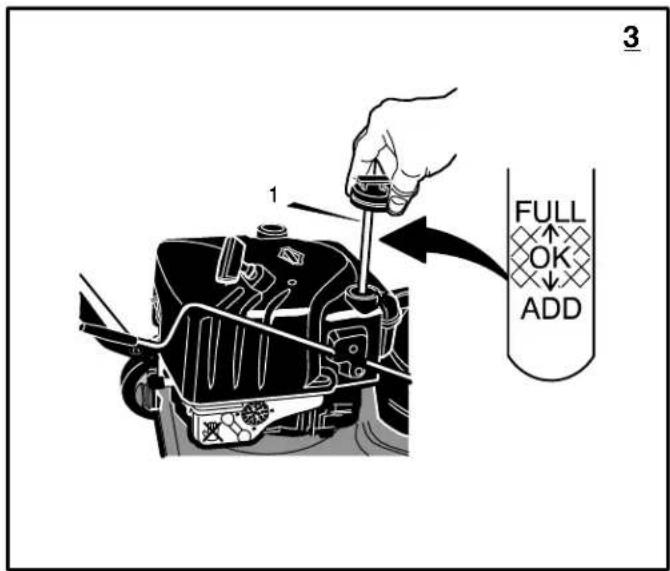
AddOilToTheEngine(Figure3) NOTE:Enginemayalreadycontainsome residualoil.Checkfrequentlywhenfilling thecrankcase.DONOToverfill.
Thesnowthrowerwasshippedwithacontainer of5W30motoroil. Thisoilmustbeaddedtothe enginebeforeoperating.
-
Makesuretheunitislevel.
-
Removetheoilfillcap/dipstick(1) and fill the crankcase to "FULL" line on dipstick. DO NOToverfill.
-
Tightentheoilfillcap/dipstick(1)securely eachtimeyouchecktheoillevel.
NOTE: Syntheticcollcanassistwithstarting inextremecoldtemperatures.Synthetic 5W30lsacceptableforalltemperatures.DO NOTmixoilwithpetrol.
AddPetrolToTheEngine
Thisengineiscertifiedtooperateonpetrol.ExhaustEmissionControlSystem:EM(Engine Modifications).

WARNING: Alcoholblendedfuels (calledgasoholorthoseusing ethanolormethanol) can attract
moisturewhichleadstoseparationand formationofacidsduringstorage.Acidic gascandamagethefuelsystemofanenginewhileinstorage.
NOTE:Toavoidengineproblems,thefuel systemmustbeemptiedbeforestoragefor 30daysorlonger.Starttheengineandletit rununtilthefuellinesandcarburetorare empty.Usefreshfuelnextseason.Seethe Storagesectioninthismanualforadditional information.
Fillthefueltankonlywithafresh,clean,unleadedregular,unleadedpremium,orreformulatedautomotivepetrolwithaminimumof85 octane.DONOTuseleadedpetrol.Makesure thatthecontaineryoupourthepetrolfromis cleanandfreefromrustorotherforeignparticles.Neverusepetrolthatmaybestalefrom longperiodsofstorageinthecontainer.
BeforeYouOperate
Beforeyouoperateyournewsnowthrower, pleasereviewthefollowingchecklist:
■ Makesureallasssemblyinstructionshave beencompleted.
■Makesurethedischargechuterotatesfreely.
■ Makesurethatnoloosepartsremaininthe carton.
Asyoulearnhowtoproperlyusethesnow thrower, payextraattentiontothefollowingimportantitems.
■Makesuretheengineoilisattheproper level.Forthetypeengineoiltouse,seethe EngineManufacturer'smanual.
■ Makesuregastankisfilledproperlywith clean,fresh,unleadedpetrolwithaminimum of85octane.
■Becomefamiliarwiththelocationofall controlsandunderstandtheirfunction.
■Beforestartingtheengine,makesureall controlsoperatecorrectly.
OPERATION
NOTE: Illustrationsarelocatedonpage2 andonpages3through6.
CAUTION: Useonlyattachmentsandaccessoriesapprovedbythemanufacturerofthe snowthrower(suchastirechains,electric startkits,etc.).
KnowYourSnowThrower(Figure1)
ReadthisInstructionBookandsafetyrulesbeforeoperationthesnowthrower. Comparethe illustrationwithyoursnowthrowertofamiliarize yourselfwiththelocationofvariouscontrolsand adjustments.
HowToControl
TheDischargeOfTheSnow

WARNING: Neverdirectthedis-chargeofsnowtowardbystanders.

WARNING:Alwaysstoptheengine beforeuncloggingthedischarge chuteortheaugerhousingandbe-
foreleavingthesnowthrower.
- (Figure 1) Turn the crank assembly (2) to changethedischargedirectionofthesnow.
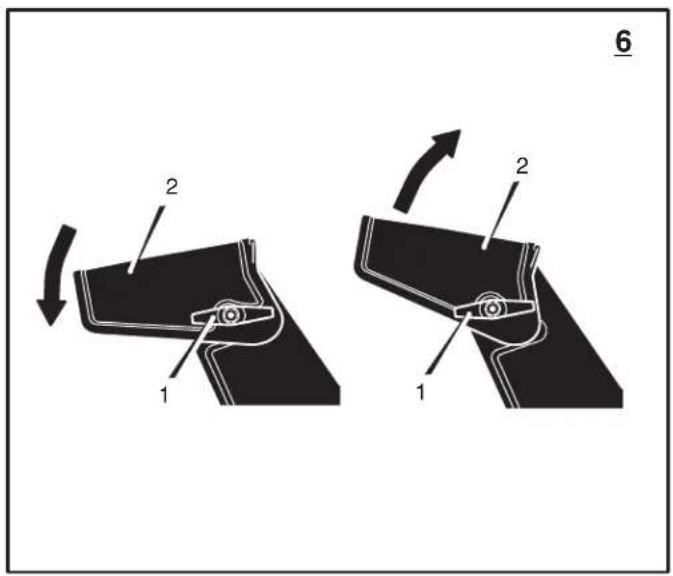
- (Figure 6) Loosen the wing knob (1) on the chutedeflector(2).
3.Movethechutedeflector(2)upformore distanceordownforlessdistance. - Tightenthewingknob(1).
HowToThrowSnow(Figure1)
- Engagetheaugerdrivelever(5).
- Tostopthrowingsnow, releasetheauger drivelever(5).

WARNING: The operation of any snowthrower can result in foreign objects being thrown into the eyes,
whichcanresultinsevereeyedamage.
Alwayswearsafetyglassesoreyeshields whileoperatingthesnowthrower.Werecommendstandardsafetyglassesorusea widevisionsafetymaskoveryourglasses.
HowToStopDischargingSnow (Figure1)
-
Tostopdischargingsnow, releasetheauger drivelever(5). NOTE: If the snow thrower continues slowly move forward, see "How To Adjust The Auger Control Cable" in the Maintenance Section.
-
Tostoptheengine, pushthestopswitch(8) totheoffposition.
CAUTION: Tostoptheengine, donotmove thechokecontrol to CHOKE position. Backfireorenginedamage can occur.
HowToMoveForward(Figure7)
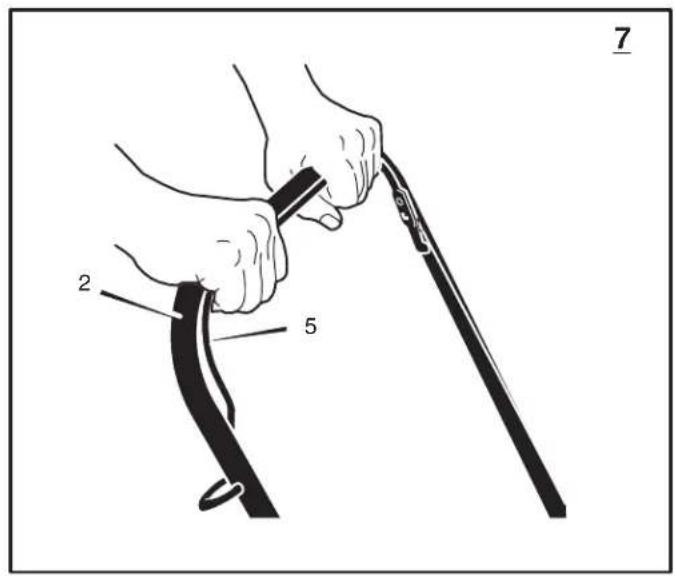
- Hold the auger drive lever (5) against the handle (2). The auger will begin rotating.
- Togoforward, raisethehandle(2) to allow the rubberaugerbladestocontact the ground. Maintain a firm hold on the handle (2) asthesnowthrower start stomove forward. Guidethesnowthrower by moving the handle(2) either left or right. Donot attempt topshthesnowthrower.
en
- Tostop, releasetheaugerdrivelever(5). NOTE: If the auger continues to rotate, see "How To Adjust The Auger Control Cable" in the Maintenance section.
BeforeStartingTheEngine
- Before you service start the engine, familiarize yourself with the snow thrower. Be sure you understand the function and location of fall controls.
- Makesurethatallfastenersaretight.
- Makesuregastankisfilledproperlywith clean,fresh,unleadedpetrolwithaminimum of85octane.
- Becomefamiliarwiththelocationofallcontrolsandunderstandtheirfunction.
- Before starting the engine, makes sure all controls operate currently.
HowToStopTheEngine(Figure1)
Tostoptheengine, pushthestopswitch(8) to theoffposition.
CAUTION: Tostoptheengine, donotmove thechokecontrol to CHOKE position. Back-fireorengined damage can occur.
HowToStartTheEngine(Figure1)
MakesurethattheengineoilisatFULLmarkon dipstick. Theengineisequippedwitharecoil starter. Beforestartingtheengine, make certain that you havereadthefollowinginformation.
Ifenginefloods, setthechoketotheOPEN/RUNpositionandcrankuntiltheenginestarts.

WARNING: Rapidretraction of the startercord (kickback) will pull your handorarmtoward theen-
ginefasterthanyoucanletgoofthestartercord.
- Whenstartingtheengine,slowlypull thestartercorduntilresistanceisfelt. Then,rapidlypullthestartercord.
- Makesurecomponents; such as impellors, pulleysorsprockets, are securely attached.
HowToStartAColdEngine(Figure1)
- (Figure 1) Push the stop switch (8) to the ONposition.
- When starting the engine, donotengagethe augerdrivelever.
- Movethechokecontrol(14)totheFULL chokeposition.
- Push the primer button(9) twotimes. Remove finger from the primer button(9) between primes.
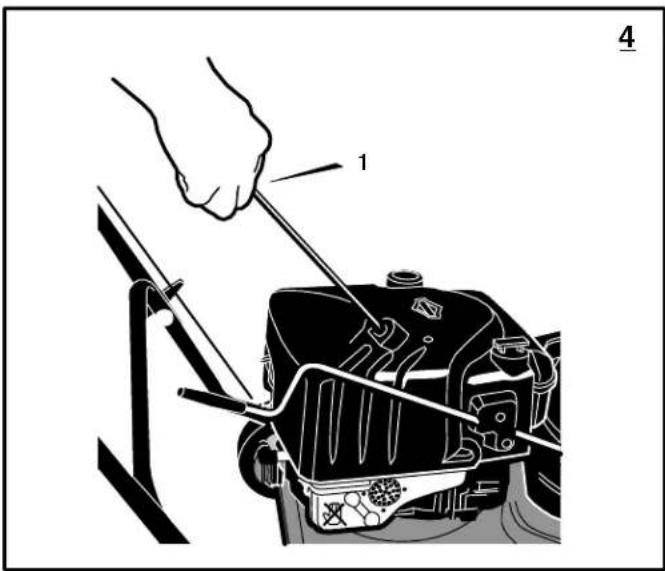
- (Figure 4) Slowly pull the recoil starter handle(1)untilresistanceisfeltandthenpull rapidlytostarttheengine.Donotallowthe recoilstarterhandle(1)tosnapback.Slowlyreturntherecoilstarterhandle(1). NOTE:Intemperaturesbelow0 °F,allow theenginetowarmupforseveralminutes beforeblowingsnow.
1742311

WARNING: Never run the engine indoorsorin enclosed, poorly ventilated areas. Engine exhaust con-
tainscarbonmonoxide,anodorlessand deadlygas.Keephands,feet,hairand looseclothingawayfromanymovingparts locatedontheengineorthesnowthrower. Thetemperatureofmufflerandnearby areasmayexceed150°F.Avoidthese areas.
HowToStartAWarmEngine(Figure1)
Ifanenginehasbeenrunningandisstillwarm, leavethechokecontrol(14)intheoffposition anddonotpushtheprimerbutton(9). If the enginefailstostart, followtheinstructions"How ToStartAColdEngine".
NOTE: Donotusetheprimerbutton(9) to startawarmengine.
HowToStartAnEngineWithAFrozenElectric Starter(Figure1)
If the starter is frozen and will not turn the engine, follow the instructions below.
- Pullouttherecoilstarterhandle(12)asfar aspossible.
- Quickly releasetherecoilstarter handle (12). Allow the recoil starter handle (12) to snapback against therecoil starter.
Iftheenginestillfailstostart,repeatthetwopreviousstepsuntiltheenginestarts.Then,continuewiththedirections"HowToStartAColdEngine".
Tohelppreventthepossiblefreeze--upofthe recoilstarterandoftheenginecontrols,proceed asfollowsaftereachsnowremovaljob.
- Beforestoring, runthesnowthrowerafew minutestopreventfreeze--upoftheauger/impeller.
- Withengineoff, allowenginetocoolforseveralminutes.
- Pullstarterropeveryslowlyuntilresistance isfelt, thenstop. Allowthestarterropetore-coil. Repeatthreetimes.
- With the engineering not running, wipe all snow and moisture from the carburetor cover in area of controls and levers. Also, move the choke control and starter handle several times.
HowToRemoveSnoworDebrisFrom TheAugerHousing (Figure1)

WARNING: Donotattempttore-movesnowordebristhatmaybe-comelodgedinaugerhousing
withouttakingthefollowingprecautions.
- Releasetheaugerdrivelever(5)
- Tostoptheengine, movethestopswitch (8) tothestopposition.
- Disconnect the spark plug wire.
- Donotplaceyourhandsintheaugerhousing (22) or the discharge chute (4). Use a prybartoremoveanysnowordebris.
SnowThrowingTips
-
Thissnowthrowerwillpropelitselfforward whenthehandleisraisedenoughtocause theaugerbladestocontacttheground.The augershouldstopwhenaugercontrolbaris released.Ifitdoesnotstop,see"HowToAdjustTheAugerControlCable"intheadadjustmentsection.
-
Mostefficientsnowthrowingisaccomplished whenthesnowisremovedimmediatelyafter iffalls.
CAUTION: Donotoverloadthemachinecapacity by attempting to clear snow at least fast arate.
-
For completes snow removal, slightly overlap each previous path.
-
Whenever possible, dischargethesnow downwind.
-
Thedistancethesnowwillbedischarged canbeadjustedbymovingthedischarge chutedeflector. Raisethedeflectorformore distanceorlowerthedeflectorforlessdistance.
-
In windy conditions, lower the chuted deflector to direct the discharges now closeto the ground where it is less likely to blow into unwanted areas.
-
Forsafety and to prevent damage to the snowthrower, keep the areate before cleared free of stones, toys and other foreign objects.
-
Donotusetheaugerpropellingfeaturewhen clearinggravelorcrushedrockdriveways. Movethehandledowntoslightlyraisethe auger.
-
The forwards speed of the snow thrower is dependent on the depth and weight of the snow. Experience will establish them most effective method of using the snow thrower under different conditions.
-
After each snow throwing job, allow the engine torun for a few minutes. Thesnow and accumulated dicewill meltoff the engine.
-
Cleanthesnowthroweraftereachuse.
-
Removeice, snowanddebrisfromtheentire snowthrower. Flushwithwatertoremoveall saltorotherchemicals. Wipesnowthrower dry.
DryAndAverageSnow
-
Snowuptoeightinchesdeepcanbere- movedrapidlyandeasilybywalkingata moderateate. Forsnowordriftsofagreater depth, slowyourpacetoallowthedischarge chutetodisposeofthesnowasrapidlyas theaugerreceivesthesnow.
-
Plantohavethesnowdischargedinthedirectionthewindisblowing.
WetPackedSnow
Moveslowlyintowet,packedsnow.Ifthewet, packedsnowcausestheaugertoslowdownor thedischargechutebeginstoclog,backoffand beginaseriesofshortbackandforthjabsinto thesnow.Theseshortbackandforthjabs,four tosixinches,will"belch"thesnowfromthe chute.
SnowBanksAndDrifts
Insnowofgreaterdepththantheunit,usethe same"jabbing"techniquedescribedabove.Turn thedischargechuteawayfromthesnowbank. Moretimewillberequiretdoremovesnowof thistypethanlevelsnow.
MAINTENANCECHART
CUSTOMERRESPONSIBILITIES
| SERVICERECORDSFillindatesasyou completeregular service. | Before Each Use | First 2 Hours | Every 5 Hours | Every 10 Hours | Every 25 Hours | Each Season | Before Storage | SERVICEDATES |
| CheckAndTightenAllScrewsandNuts | √ | √ | ||||||
| CheckSparkPlug | √ | √ | ||||||
| CheckDriveBelt | √ | |||||||
| CheckFuel | √ | |||||||
| DrainFuel | √ | |||||||
| LubricateChuteControlFlange | √ | |||||||
| CheckAdjustmentofAugerControlCable | √ | |||||||
| AugerDriveBelt | √ |
MAINTENANCE
NOTE: Illustrationsarelocatedonpage2 andonpages3through6.
Use the following maintenance section to keep your unitingoodoperating condition.
Allthemaintenanceinformationfortheengineis intheenginemanufacturer'sinstructions.Before youstarttheengine,readthisbook.

WARNING: Before you make an inspection, adjustment (except carburettor), or repair, disconnect from the spark plug.
EmissionsControl
Maintenance, replacement, or repair of the emissions control devices and systems may be performed by any non-road engine repair establishment individual. However, to obtain a "no charge" emissions control service, the work must be performed by a factory authorized dealer. See the Emissions Warranty.
GeneralRecommendations
Thewarranty on this snowthrower does not cover item sthath have been subjected to operator abuse or negligence. Toreceive full value from the warranty, the operator must maintain the snowthroweras instructed in this manual.
Someadjustmentsmustbemadeperiodically to properlymaintainthesnowthrower.
AfterEachUse
■Checkforanylooseordamagedparts.
■Tightenanyloosefasteners.
■Checkandmaintaintheauger.
■ Checkcontrolstomakesuretheyare functioningproperly.
■ Ifanypartsarewornordamaged, replace immediately.
■ Checkallsafetyandinstructiondecalsand labels.Replaceanydecalsorlabelsthatare missingorcannotbeclearlyread.
1742311
AlladjustmentsintheMaintenancesectionof thismanualshouldbecheckedatleastonce eachseason.
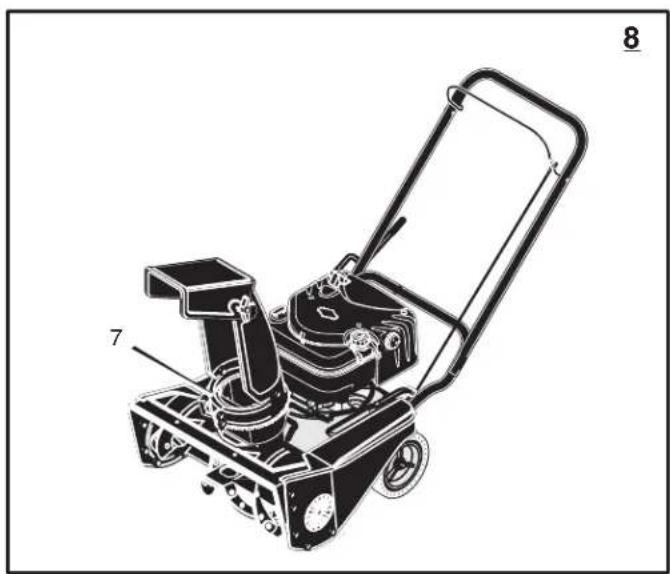
HowToRemoveTheTopCover (Figure8)
- Remove the five screws (1) from the top cover(2).
- Removethetopcover(2).
- To install the topcover(4), reverses the abovesteps.
Lubrication
BeforeStorage(Figure8)
- Lubricatetheclutecontrolflange(7). Apply aclingingtypeofgreasesuchasLubriplate.
HowToAdjustTheAugerControlCable
Theaugercontrolcableisadjustedatthefactory.Duringnormaluse,theaugercontrolcable canbecomestretchedandtheaugerdrivelever willnotproperlyengageordisengagetheauger.
- (Figure 12) Loosen the nut (1) that holds the cabletensionspring(2).
2.Slidethecabletensionspring(2) toward therearoftheunituntilallcableslackisremoved. NOTE:Theaugercontrolcableisproperly adjustedwhenthefreecableslackisremovedandthereisnotensiononthe idlerarm. - Tighten the nut (1) that holds the cable tensionspring(2).
Ifbeltstretchhasoccured, movetheendthe augercontrolcabletotheoutsideholeasfollows:
- (Figure 12) Loosen the nut (1) that holds the cabletensionspring(2).
-
Movethecabletensionspring(2) toward thefrontoftheunittoachievemaximum cableslack.
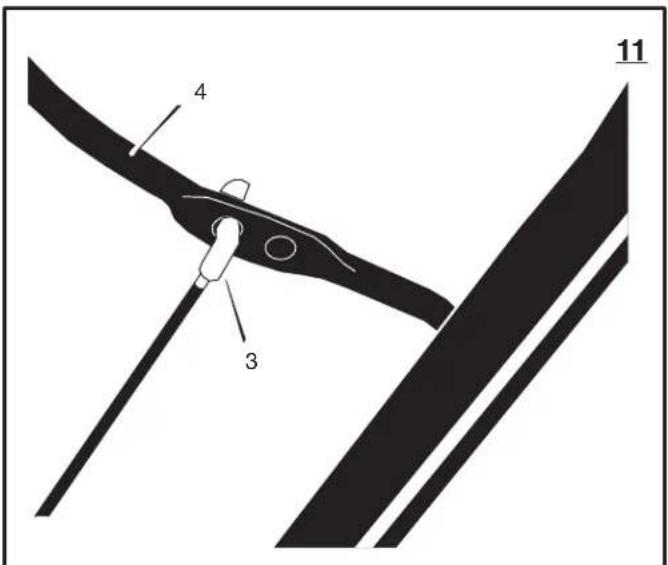
3.(Figure 11)Removetheupperendofthe augercontrolcable(3)fromtheauger drivelever(4). -
Install the auger control cable (3) in the holes shown in Figure 11.
- (Figure 12) Slide the cable tension spring (2) toward therearoftheunituntilallcable slackisremoved. NOTE: Theaugercontrolcable(3) is properlyadjustedwhenthefreecable slackisremovedandthereisnotension ontheidlerarm.
- Tighten the nut (1) that holds the cable tensionspring(2).
- To check the adjustment, start the snow thrower. Makes sure the auger does not rotate when the auger drive lever is released.
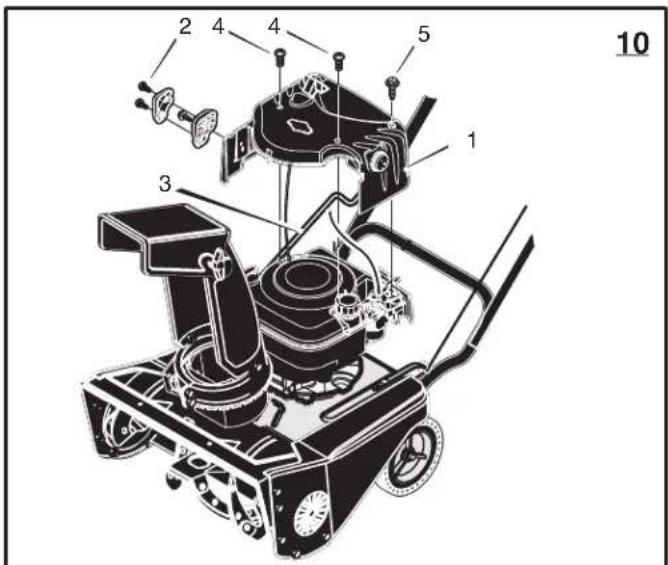
HowToRemoveTheTopCover (Figure10)
Therearenoadjustmentsunderthetopcover (1). Tocleantheenginecoolingsystem, follow thestepsbelowtoremovethetopcover(1).
- Removescrews(2)thatattachtherodsupportclampthethetopcover(1).Pivotthe crankassemblyrod(3)upandlayonunit.
2.Removescrews(4). - Remove attachmentscrews(5).
- Removethetopcover(1).
- To install the topcover(1), reverses the abovesteps.
HowToRemoveTheBeltCover (Figure9)
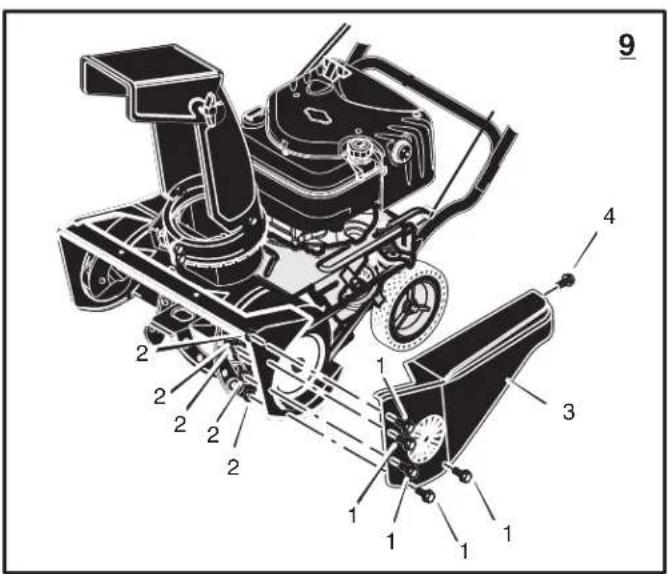
- Remove the screws (1) and nuts (2) from thebeltcover(3).
- Remove attachmentscrew(4) from therear of the belt cover(3).
- Removethebeltcover(3) from the unit.
- To install the belt cover (3), reverses the abovesteps.
NOTE: Thebeltcover(3)hasbeltguides mouldedontotheinsideofthebeltcover(3). Whenyouinstallthebeltcover(3),engage theaugerdrivelevertotightenthebelt againstthepulley. Thiswillprovideadequate clearanceforthebeltguideswheninstalling thebeltcover(3).
HowToReplaceTheAugerDriveBelt
The drive belt is of special construction and must bere placed with an original factory re-
placement belt available from your nearest authorized service center.
If the auger drive belt is damaged, the snow-thrower will not discharge snow and will not move forward. Replace the damaged belt as follows:
- Disconnect the spark plug wire.
- Remove the belt cover. See "How To Remove The Belt Cover".
- Note the path of the augerdrivebelt(1). For assistance, a diagram decal is provided.
- (Figure 14) Remove the belt guide screw (2) and the belt guide (3). To remove the beltguide(3), rotate the beltguide(3) down.
- (Figure 15) Remove the idler screw (4) and idler pulley (5) from the idler arm (6).
- (Figure 16) Remove the auger drive belt (1) from the engine pulley and pull through side of motor box.
- (Figure 17) To remove the auger drive belt (1) from the impeller pulley (7), move the idler arm to the engaged position. This will provide clearance (8) between the impeller pulley (7) and the brake arm (9) to remove the augerdrivebelt.
- To install a new augerdrivebelt(1), reverse the above steps.
- Check the adjustment of the auger drive cable. See "Adjust Auger Control Cable".
HowToRemoveTheAuger
- Remove the belt cover. See "How To Remove The Belt Cover".
- Remove the auger drive belt. See "How To Replace The Auger Drive Belt".
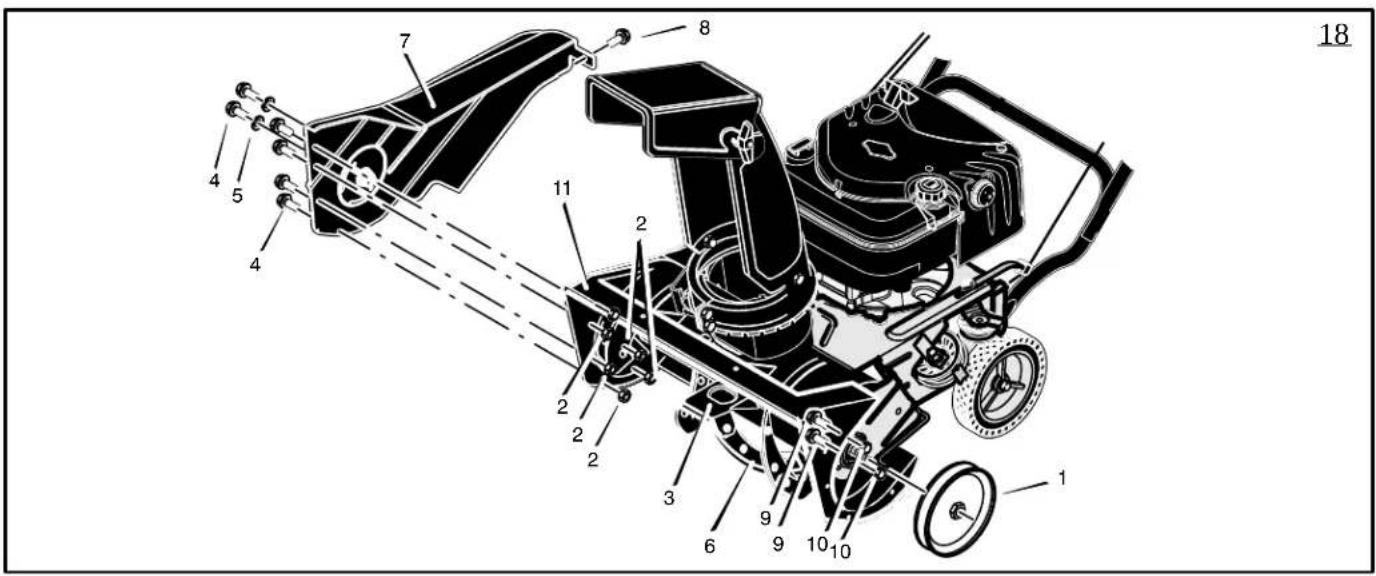
- (Figure 18) Remove the auger pulley (1) from the auger shaft (threads are left hand; turn clockwise to remove).
- To keep the auger(6) from rotating, set a 2"x4" piece of wood on the center paddle (3) to secure auger(6).
- Remove bolts (4), washer (5), and nuts (2) from front of rightcover(7).
- Remove screw (8) from back of right cover (7).
- Remove bolts(9) and nuts(10).
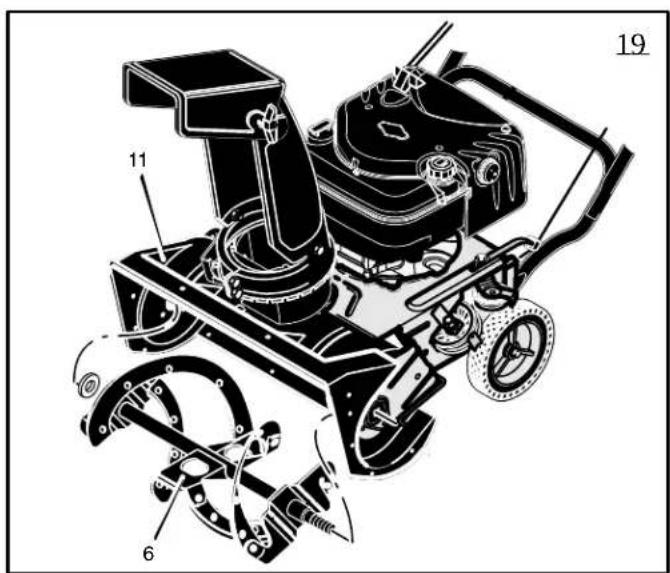
- (Figure 19) Slide the auger (6) out of the right side of the augerhousing(11).
- Slide the auger(6)out of the bearing on the left side of the augerhousing(11).
- To install auger(6), reverse the above steps.
Lubrication
HowToCheckTheEngineOil(Figure3)
Check the oil level before starting the engine and after each eight (8) hours of continuous use.
- Make sure the unit is level.
- Remove the oilfillcap/dipstick(1)and fill the crankcase to "FULL" line on dipstick. DO NOToverfill.
- Tighten the oilfillcap/dipstick(1)securely each time you check the oil level.
NOTE: Synthetic oil can assist with starting in extreme cold temperatures. Synthetic 5W30 is acceptable for all temperatures. DO NOT mix oil with petrol.
HowToChangeTheEngineOil
Change the engine oil every fifty (50) hours or at least once a year if the snow thrower is not used for fifty (50) hours.
To change the engine oil, the engine must be tilted forward and the oil drained from the oil fill tube. Change oil when the engine is warm.
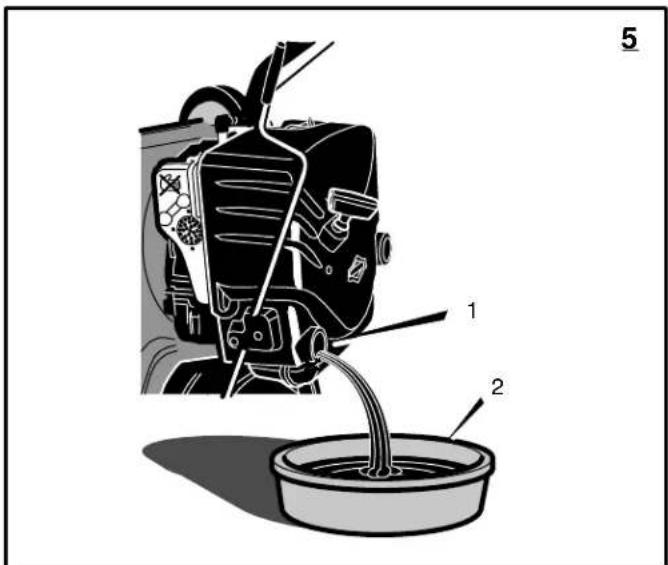
- (Figure5) Lift the rear of the snowthrower and tilt the unit forward. In the correct position, the snowthrower will be setting on the front of the auger housing.
- Put an oil drain pan (1) under the oil fill tube(2).
- Carefully remove the oil fill cap/dipstick. Oil will begin to flow into the oildrainpan(2).
- After all the oil has drained from the engine, set the snowthrower in the upright operating position.
- (Figure3) Fill the engine with S.A.E. 5W30 oil. Make sure the oil reaches the FULL mark on the oil fill cap/dipstick. DO NOT OVERFILL.
NOTE: Synthetic oil can assist with starting in extreme cold temperatures. Synthetic 5W30 is acceptable for all temperatures. DO NOT mix oil with petrol.
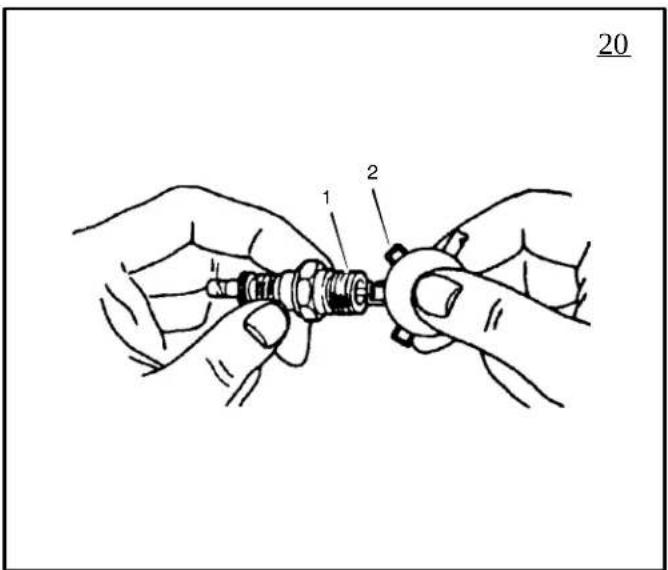
HowToReplaceTheSparkPlug (Figure20)
NOTE: This sparkignition system meets all requirements of the Canadian Interference--Causing Equipment Regulations.
NOTE: Thisenginecomplieswithallcurrent AustralianandNewZealandlimitationselectromagneticinterference.
Check the spark plug (1) every twenty-five (25) hours. Replace the sparkplug(1)if the electrodes are pitted or burned, if the porcelain is cracked, or every 100hours of use.
- Make sure the sparkplug(1) is clean. Clean the sparkplug(1) by carefully scraping the electrodes (donotsandblastoruseawire brush).
- Check the sparkplug(1)gap with a feeler gauge(2)and reset gap to 0.030" if necessary..
- Before installing the sparkplug(1), coat the threads lightly with oil for easy removal. Tighten the sparkplug(1) to a torque of 15 foot-pounds.
HowToPrepareTheSnowThrowerFor Storage

WARNING: Donotremovepetrol whileinsideabuilding, nearafire, orwhileyousmoke. Petrolfumes seanexplosionorafire.
If the snow thrower is to be stored for an extended period, refer to the engine manufactur-
er's operating manual (included with some models) for important maintenance or storage details.
- Drain the fuel tank.
- Let the engine run until it is out of gasoline.
-
Never store the snow thrower with fuel in the tank inside a building where ignition sources are present such as hot water and space heaters, clothes dryers, and the like. Allow the engine (motor) to cool before storing in any enclosure.
-
Drain the oil from the warm engine. Fill the engine crankcase with new oil.
-
Remove the spark plug from the cylinder. Pour one ounce of oil into the cylinder. Slowly pull the recoil--start grip so that the oil will protect the cylinder. Install a new spark plug in the cylinder.
-
Thoroughly clean the snow thrower.
-
Lubricate all lubrication points. See the Maintenance section.
-
Be sure that all nuts, bolts and screws are securely fastened. Inspect all visible moving parts for damage, breakage and wear. Replace if necessary.
-
Cover the bare metal parts of the blower housing and auger with spray rust preventative lubricant.
-
Put the unit in a building that has good ventilation.
-
If the machine must be stored outdoors, block up the snow thrower to be sure the entire machine is off the ground.
-
Cover the snow thrower with a suitable protective cover that does not retain moisture. Do not use plastic.
HowToOrderReplacementParts
The replacement parts are shown either on the back pages of this Instruction Book or in a separate Parts List Book.
Use only manufacturer's authorized or approved replacement parts. The letter placed on the end of the part number denotes the type of finish for the part, C for chrome, Z for zinc, a PA for purchased assembly. It is important that you include this when ordering a part. Do not use attachments or accessories not specifically recommended for this unit. In order to obtain proper replacement parts you must supply the model number (see nameplate).
Warranty service is available only through Authorized Service Dealers. Locate your nearest dealer in our locator map at www.murray.com.
Replacement parts for the engine, transaxle, or transmission, are available from the manufacturer's authorized service center found in the yellow pages of the telephone directory. Also, see the individual engine or transmission warranties to order replacement parts.
When ordering the following information is required:
(1) The Model Number
(2) Serial Number
(3) Part Number
(4) Quantity
TROUBLESHOOTINGCHART
| TROUBLECAUSECORRECTION | ||
| DifficultstartingDefectivesparkplug.Replacesparkplug. | ||
| Waterordirtinfuelsystem.Usecarburetorbowldraintofflushandrefillwithfreshfuel. | ||
| EngineunsserraticBlockedfuelline,emptygastank | orstale gasoline | Cleanfuelline;checkfuelsupply;addfresh gasoline |
| Engine stalls | Unit running on CHOKE. | Set choke lever to RUN position. |
| Engineunsserratic;Lossofpower | Waterordirtinfuelsystem.Usecarburetorbowldraintofflushandrefillwithfreshfuel. | |
| Excessive vibration | Loose parts: damaged impeller | Stop engine immediately and disconnect spark plugwire.Tightenallboltsandmakeall necessaryrepairs.Ifvibrationcontinues,have theunitservicedbyacompetentrepairman. |
| Unit fails to propel itself | Drive belt loose or damaged. | Replace drive belt. |
| Unit fails to discharge snow | Auger drive belt loose or damaged. | Adjust auger drive belt; replace if damaged. |
| Augercontrolcablenotadjustedcorrectly. | Adjustaugercontrolcable. | |
| Dischargechuteclogged. | Stopengineimmediatelyanddisconnectspark plugwire.Cleandischargechuteandinsideof augerhousing. | |
| Foreign object lodged in auger | Stop engine immediately and disconnect spark plugwire.Removeobjectfromauger. | |
BRIGGS&STRATTONCORPORATIONOWNERWARRANTYPOLICY
Effective January 1, 2006 replaces all undated warranties and all warranties dated before January 1, 2006
LIMITEDWARRANTY
Briggs & Stratton Corporation will repair or replace, free of charge, any part(s) of the product that is defective in material or workmanship or both. Transportation charges on product submitted for repair or replacement under this warranty must be borne by purchaser. This warranty is effective for the time periods and subject to the conditions stated below. For warranty service, find the nearest Authorized Service Dealer in your area. For warranty service, find the nearest Authorized Service Dealer in your area.
THEREISNOOTHEREXPRESSWARRANTY.IMPLIEDWARRANTIES,INCLUDINGTHOSEOFMERCHANTABILITYANDFITNESSFORA PARTICULARPURPOSE,ARELIMITEDTOONEYEARFROMPURCHASE,ORTOTHEEXTENTPERMITTEDBYLAWANYANDALL IMPLIEDWARRANTIESAREEXCLUDED.LIABILITYFORINCIDENTALORCONSEQUENTIALDAMAGESAREEXCLUDEDTOTHE EXTENT EXCLUSION IS PERMITTED BY LAW. Some states or countries do not allow limitations on how long an implied warranty lasts, and some states or countries do not allow the exclusion or limitation of incidental or consequential damages, so the above limitation and exclusion may not apply to you. This warranty gives you specific legal rights and you may also have other rights which vary from state to state or country to country.
WARRANTYTERMS
ConsumerCommercialConditionof
Brand/UnitUseUseWarrantyTerm
Single Stage Snowthrower ..... 1 year ..... 90 days
Dual Stage Snowthrower .... 2 year .... 90 days
The warranty period begins on the date of purchase by the first retail consumer or commercial end user, and continues for the period of time stated in the table above. “Consumer use” means personal residential household use by a retail consumer. “Commercial use” means all other uses, including use for commercial, income producing or rental purposes. Once product has experienced commercial use, it shall thereafter be considered as commercial use for purposes of this warranty.
No warranty registration is necessary to obtain warranty on Murray branded products. Save your proof of purchase receipt. If you do not provide proof of the initial purchase date at the time warranty service is requested, the manufacturing date of the product will be used to determine the warranty.
ABOUT YOUR WARRANTY
We welcome warranty repair and apologize to you for being inconvenienced. Any Authorized Service Dealer may perform warranty repairs. Most warranty repairs are handled routinely, but sometimes requests for warranty service may not be appropriate. For example, warranty service would not apply to the product if damage occurred because of misuse, lack of routine maintenance, shipping, handling, warehousing or improper installation. Similarly, the warranty is void if the serial number on the product has been removed or the product has been altered or modified.
This warranty covers product related defective material and/or workmanship only. To avoid misunderstanding which might occur between the customer and the Dealer, listed below are some of the causes of product failure that the warranty does not cover.
- Normal Wear: Small Engine Powered Equipment, like all mechanical devices, needs periodic parts and service to perform well. Warranty does not coverrepairwhennormalusehasexhaustedthelifeoftheproductorpart.
- Installation: This warranty does not apply to product that has been subjected to improper or unauthorized installation, alteration or modification. Nor installation that prevent starting, cause unsatisfactory engine performance.
- Improper Maintenance: The life of this product depends upon the conditions under which it operates, and the care it receives. Recommended maintenance and adjustment intervals are stated in the Operator's Manual. Often product, such as tillers, edgers, rotary mowers, are used in dusty or dirty conditions, which can cause what appears to be premature wear. Such wear, when caused by dirt, dust, or other abrasive material entering the product because of improper maintenance is not covered by warranty. The warranty will not cover repairs due to problems caused by replacement part that are not original manufactured part(s).
- Incorrect and/or insufficient fuel or lubrication: This warranty does not cover damage caused by the use of stale fuel, or altered gasolines. Damage to engine or engine components ie, combustion chamber, valves, valve seats, valve guides, burned starter motor windings caused by use of alternate fuels such as liquified petroleum, natural gas, are not covered unless engine is certified for this operation. Parts which are scored or broken because product was operated with insufficient, contaminated or incorrect grade of lubricating oil as well as product components damaged due to lackoflubricationarenotcovered.
- Operational Misuse: Proper operation of the product is stated in the Operator's Manual. Product damaged by overspeeding, overheating, or operation in a confined area without sufficient ventilation. Product broken by excessive vibration caused by a loose engine mounting, loose or unbalanced blades, impellers, overspeeding, or bent crankshaft due to striking of solid object. Damage or malfunctions resulting from accidents, abuse, or improper servicing or freezing or chemical deterioration, as well as operating in excess of recommended capacities as outlined in the Operator's Manualarenotcovered.
• Routine tune-up, wear items or adjustments: This warranty excludes wear items such as oil, belts, blades, o-rings, filters, etc. - Other exclusions: Repair or adjustments for part(s) that are not manufactured by Briggs & Stratton Corporation, are not covered, see warranty for respective manufacturers. This warranty excludes failures due to acts of God and other force majeure events beyond the manufacturers control. Also excluded are used, reconditioned, and demonstration products.
Warranty service is available only through Authorized Service Dealers. Locate your nearest dealer in our locator map at www.murray.com.
1742311
TABLEDESMATIÈRES
SYMBOLESDEDANGERSETSIGNIFICATIONS18...
SYMBOLESDEDANGERSETLEURSSIGNIFICATIONS18
CONSEILSDESECURITE19.
ASSEMBLAGE21....
FONCTIONNEMENT21....
ENTRETIEN24.
....TABLEAUD'ENTRETIEN24
TABLEAU DE DÉPANNAGE 26
GARANTIELIMITÉE27......
Embrayage detraction
Déversoir



Congèresetaccumulations
Avantl'entreposage(Figure8)
- Lubrifierlacouronnedelagoulotte d'éjection(7). Appliqueruntypedegraisse adhérentetellequedelaLubriplate.
...VEDLIKEHOLDSTABELL76
FEILS∅KINGSTABELL 78
BEGRENSET GARANTI 79
Generellinformasjon
Interference-Causing Equipment Regulations).
BRIGGS & STRATTON CORPORATION: RAŽOTĀJA GARANTIJU POLITIKA
GARANTIJU NOSACĪJUMI
The Ground Truth image displays a single, solid horizontal line. According to Rule 2 (UNDERSCORE & LINE RULES), this is a stylistic or background line, not a placeholder underscore. Therefore, the OCR result must ignore it and output nothing or only meaningful text. The provided OCR content is "____", which consists of four underscores. This is an incorrect interpretation of the line as a placeholder, violating the rule that stylistic lines must be ignored. The OCR has hallucinated underscores where none should exist based on the GT's visual context. Hence, the OCR result is inconsistent with the Ground Truth.
Smarowanie
- CONTENTS
- GENERALINFORMATION
- CONTROLS & EQUIPMENT FEATURES (SEE FIGURE 1)
- ENGINE FEATURES
- WARNING
- SAFEOPERATIONPRACTICESFORSNOWTHROWERS
- TRAINING
- PREPARATION
- OPERATION
- CHILDREN
- CLEARINGACLOGGEDDISCHARGECHUTE
- SERVICE,MAINTENANCEANDSTORAGE
- EMISSIONS
- IGNITIONSYSTEM
- ASSEMBLY
- TOOLSREQUIRED
- HOWTOREMOVETHESNOWTHROWER FROMTHECARTON
- HOWTOASSEMBLETHEHANDLE
- HOWTOPREPARETHEENGINE
- ADDOILTOTHEENGINE(FIGURE3) NOTE:ENGINEMAYALREADYCONTAINSOME RESIDUALOIL.CHECKFREQUENTLYWHENFILLING THECRANKCASE.DONOTOVERFILL
- ADDPETROLTOTHEENGINE
- BEFOREYOUOPERATE
- KNOWYOURSNOWTHROWER(FIGURE1)
- HOWTOCONTROL
- THEDISCHARGEOFTHESNOW
- HOWTOTHROWSNOW(FIGURE1)
- HOWTOSTOPDISCHARGINGSNOW (FIGURE1)
- HOWTOMOVEFORWARD(FIGURE7)
- BEFORESTARTINGTHEENGINE
- HOWTOSTOPTHEENGINE(FIGURE1)
- HOWTOSTARTTHEENGINE(FIGURE1)
- HOWTOSTARTACOLDENGINE(FIGURE1)
- HOWTOSTARTAWARMENGINE(FIGURE1)
- HOWTOSTARTANENGINEWITHAFROZENELECTRIC STARTER(FIGURE1)
- HOWTOREMOVESNOWORDEBRISFROM THEAUGERHOUSING (FIGURE1)
- SNOWTHROWINGTIPS
- DRYANDAVERAGESNOW
- WETPACKEDSNOW
- SNOWBANKSANDDRIFTS
- MAINTENANCECHART
- MAINTENANCE
- NOTE: ILLUSTRATIONSARELOCATEDONPAGE2 ANDONPAGES3THROUGH6
- EMISSIONSCONTROL
- GENERALRECOMMENDATIONS
- AFTEREACHUSE
- HOWTOREMOVETHETOPCOVER (FIGURE8)
- LUBRICATION
- BEFORESTORAGE(FIGURE8)
- HOWTOADJUSTTHEAUGERCONTROLCABLE
- HOWTOREMOVETHETOPCOVER (FIGURE10)
- HOWTOREMOVETHEBELTCOVER (FIGURE9)
- HOWTOREPLACETHEAUGERDRIVEBELT
- HOWTOREMOVETHEAUGER
- HOWTOCHECKTHEENGINEOIL(FIGURE3)
- NOTE: SYNTHETIC OIL CAN ASSIST WITH STARTING IN EXTREME COLD TEMPERATURES. SYNTHETIC 5W30 IS ACCEPTABLE FOR ALL TEMPERATURES. DO NOT MIX OIL WITH PETROL
- HOWTOCHANGETHEENGINEOIL
- HOWTOREPLACETHESPARKPLUG (FIGURE20)
- HOWTOPREPARETHESNOWTHROWERFOR STORAGE
- WARNING: DONOTREMOVEPETROL WHILEINSIDEABUILDING, NEARAFIRE, ORWHILEYOUSMOKE. PETROLFUMES SEANEXPLOSIONORAFIRE
- HOWTOORDERREPLACEMENTPARTS
- TROUBLESHOOTINGCHART
- BRIGGS&STRATTONCORPORATIONOWNERWARRANTYPOLICY
- LIMITEDWARRANTY
- WARRANTYTERMS
- CONSUMERCOMMERCIALCONDITIONOF
- ABOUT YOUR WARRANTY
- TABLEDESMATIÈRES
- TABLEAUD'ENTRETIEN24
- CONGÈRESETACCUMULATIONS
- AVANTL'ENTREPOSAGE(FIGURE8)
- VEDLIKEHOLDSTABELL76
- GENERELLINFORMASJON
- BRIGGS & STRATTON CORPORATION: RAŽOTĀJA GARANTIJU POLITIKA
- GARANTIJU NOSACĪJUMI
- SMAROWANIE
Brand : NAC
Model : 6210701X61N
Category : Snow blower