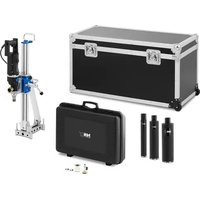
CDM 2200D TITAN KIT - Drill MSW - Free user manual and instructions
Find the device manual for free CDM 2200D TITAN KIT MSW in PDF.


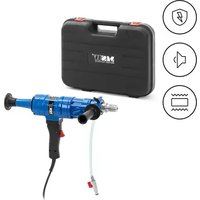
| Product type | Diamond core drill |
| Brand | MSW |
| Model | CDM 2200D TITAN KIT |
| Rated voltage | 230 V ~ / 50 Hz |
| Rated power | 2200 W |
| Protection class | II |
| No-load speed (speed 1) | 585 rpm (max. diameter 162 mm) |
| No-load speed (speed 2) | 1300 rpm (max. diameter 82 mm) |
| Dimensions (L x W x H) | 1045 x 460 x 555 mm |
| Weight | 53.3 kg |
| Spindle thread | 1-1/4" UNC (external male) and G1/2" (internal female) |
| Drill type | Diamond core bit (wet/dry) |
| Operating mode | Normal drilling and micro-impact drilling |
| Safety device | PRCD (portable residual current device, 10 mA) |
| Mechanical protection | Slip safety clutch |
| Electrical protection | Overcurrent, overvoltage, overheating protection and automatic brush stop |
| Cooling | Motor: air cooling; Bit: water cooling |
| Gearbox | 2 mechanical oil-bath speeds |
| Maintenance | Check carbon brushes, gearbox lubricant (every 300 h), seals |
| Application | Vertical and angular drilling, dry or wet |
Frequently Asked Questions - CDM 2200D TITAN KIT MSW
User questions about CDM 2200D TITAN KIT MSW
0 question about this device. Answer the ones you know or ask your own.
Ask a new question about this device
Download the instructions for your Drill in PDF format for free! Find your manual CDM 2200D TITAN KIT - MSW and take your electronic device back in hand. On this page are published all the documents necessary for the use of your device. CDM 2200D TITAN KIT by MSW.
USER MANUAL CDM 2200D TITAN KIT MSW
This User Manual has been translated for your convenience using machine translation. Reasonable efforts have been made to provide an accurate translation; however, no automated translation is perfect nor is it intended to replace human translators. The official User Manual is the English version. Any discrepancies or differences created in the translation are not binding and have no legal effect for compliance or enforcement purposes. If any questions arise related to the accuracy of the information contained in the User Manual, please refer to the English version of those contents which is the official version.
Technical data
| Parameter description Parameter value | |
| Product name | Diamond drilling machine |
| Model | MSW-CDM 2200D TITAN KIT |
| Rated voltage [V~] / frequency [Hz] | 230/50 |
| Rated power [W] | 2200 |
| Protection class | II |
| No Load Speed [rpm] / Max Diameter [mm] | 585 / 162 |
| No Load Speed [rpm] / Max Diameter [mm] | 1300 / 82 |
| Dimensions [width x depth x height; mm] | 1045 x 460 x 555 |
| Weight [kg] | 53.3 |
Read and understand this manual before start working with diamond core drill motors. Save this instruction manual for future reference.
Consult to specialists when you still feel uncertain about operating procedures after reading these instructions. If you have more questions about the use of our products, do not hesitate to contact us or our authorized distributors for more information.
The machine is designed for diamond core drilling of concrete, masonry, stone and similar materials. The user is liable for any damage resulting from unintended use of the device.
The use of products such as cutters, grinders, drills, that sand or form material can generate dust and vapours which may contain hazardous chemicals. Check the nature of the material you intend to process and use an appropriate breathing mask. Unauthenticated spare parts and any modification are prohibited on our products.
Symbols
|  | Warning of general danger. Failures in the compliance with these safety precautions and instructions can cause electric shock, fire and/or heavy injuries. |
|  | Before start working, read all safety warnings and instructions carefully. |
|  | To protect the operator, always wear approved personal protective equipment. |
|  | Always wear appropriate protective gloves. |
|  | Don't dispose of power tools, accessories and packaging together with household waste material. Used power tools must be collected separately and returned to an environmentally compatible recycling facility. |
|  | The product satisfies the relevant safety standards. |
|  | Before the beginning of the maintenance or repair works, make sure the plug disconnected from the mains. |
| Warning of dangerous voltage. |
| Danger of being ripped or cut. |
| Warning of hot surface. |
| Class II device. |
Description
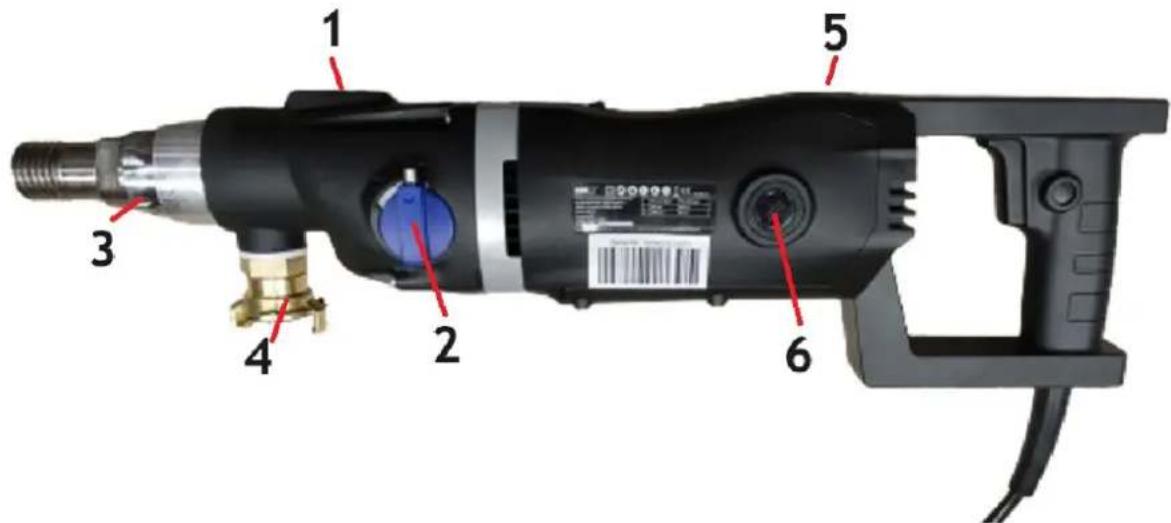
1-Bubble level.
2-Two-gear speed selector with a dowel pin.
3 - Mode selection ring for micro-impact mode and normal mode.
4 - Quick water tube connector / quick vacuum cleaner tube connector.
5 - Red / Yellow LED light.
6-Carbon brushes.
SAFETY INSTRUCTIONS
Work area safety
Keep working area clean and well lit. Cluttered or unilluminated working areas can cause accidents.
Do not operate power tool in explosive environment, such as in the presence of flammable liquids, gases or dust. Power tool emits sparks which may ignite the dust and fumes.
Keep children and other persons away while operating a power tool. When being distracted, operator may lose control on the power tool.
Electrical safety
Power tool's plug must match the outlet. Never modify the plug under any circumstance. Do not use any adapter plugs with earthed (grounded) powers. Unmodified plugs and matching outlets will reduce the risk of electric shock.
Avoid body contact with earthed or grounded surfaces, such as pipes, radiators, ranges and refrigerators.
Do not expose power tools to rain or wet conditions. Water entering a power tool will increase the risk of electric shock.
Never use the cord for carrying, pulling or unplugging the power tool. Keep cord away from heat, oil, sharp edges or moving parts. Damaged or entangled cords increase the risk of electric shock.
When operating outdoor with a power tool, only use an extension cord that is suitable for outdoor use. The use of a cord suitable for outdoor use reduces the risk of electric shock.
If operating a power tool in a humid environment is inevitable, use a residual current device (RCD). The use of an RCD reduces the risk of electric shock.
Personal safety
Stay alert and pay attention when operating a power tool. Do not use power tool while you are tired or under the influence of drugs, alcohol or medication. One moment of carelessness while using power tool may result in serious personal injury.
Always wear personal protective equipment. Protective equipment such as dust mask, boots with non-slip sole, protective helmet or hearing protection used for appropriate conditions will reduce personal injuries.
Avoid unintentional startup. Make sure the switch is in the off position before connecting to power source and/or battery pack, picking up or carrying the tool. Carrying power tools with your finger on the switch or energizing power tools that have the switch on would cause injury.
Remove any adjusting tool or wrench before switching on the power tool. A tool or a wrench left attached to a rotating part of the power tool may result in personal injury.
Do not overreach. Always keep proper footing and balance. This will ensure a better control of the power tool in unexpected situations.
Dress properly. Do not wear loose clothing or jewellery. Keep your hair, clothing and gloves away from moving parts. Loose clothes, jewellery or long hair can be caught in moving parts.
When a dust exhauster and colleting device is needed, ensure they are connected and used correctly. The use of dust exhauster can reduce dust-related hazards.
Power tool use and care
Do not overload the power tool. Use an appropriate power tool for your work. With an appropriate one, you will work in better and safer situation with its declared range of performance.
Do not use a power tool with a damaged switch. A power tool which cannot be turned on and off by its own switch is dangerous and must be repaired.
Disconnect the plug from the power source and/or remove the battery before making any adjustments, changing accessories, or storing power tools. This safety measure can prevent the power tool from starting up unintentionally.
Keep idle power tools out of reach of children and do not allow persons unfamiliar with the power tool or these instructions to operate the power tool. Power tools are dangerous in the hands of untrained users.
Maintain the power tool periodically. Check for misalignment or binding of moving parts, breakage of parts and any other condition that may affect the power tool's operation. If damaged, have the power tool repaired before use.
Keep cutting tools sharp and clean. Proper maintained cutting tools with sharp cutting edges are less likely to jam and easier to guide.
Use the power tool, accessories and drill bits etc. in accordance with this instruction manual, considering the working conditions and the work to be performed as well. Use of the power tool for operations different from those intended use could result in dangerous situation.
Service
Have your power tool repaired by qualified personnel and with original spare parts only.
Drill motor safety Precautions
Always wear hearing protection. While using drill motors, the noise in working area would cause hearing loss.
While drilling, keep a sufficient distance to the drill bit and do not touch rotating parts. Protect the danger zone and keep children and other persons away from it. Falling and splashing parts can cause injuries
This diamond core drill is only intended for professional use and may only be operated by trained personnel. The use of its intended purpose is only to the drilling of rock, concrete and masonry.
While in operation, the relevant regulations must be obeyed.
Drill motor must be checked regularly (approx. 6 months) by a specialist.
Vertical drilling only with suitable water collecting device.
Switch the power tool off if it stops for whatever reason, only to switch it on again after you make sure the drill bit can rotate freely.
OPERATING INSTRUCTIONS
Check before starting
Inspect the power tool visually, and check if the network voltage conforms to the voltage indicated on the tool's name plate.
The fixing and mounting of drill motor and stand
Ensure the power tool is unplugged when mounting to a drill stand.
Machine can also be used for standing drilling. When mounting this type of motor, a 60mm clamp bracket must be used.
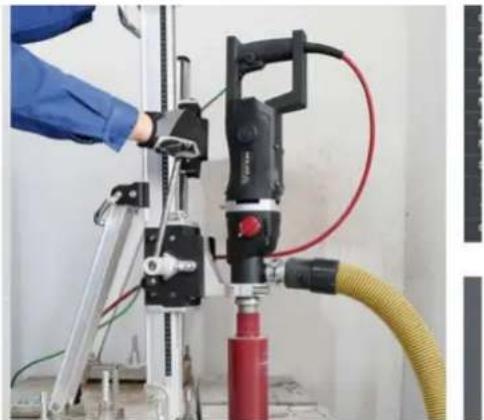
When using vacuum base to fix the drill stand, make sure the vacuum is sufficient (minimal -0.8bar), and ensure the gaskets are not worn.
Use an expansion anchor bolt together with a wing nut anchoring kit to fix the stand to the surface. The anchoring plate should be placed around the centre of the stand's base. Once fixed, adjust 4 levelling bolts on the base to achieve a good levelling position.
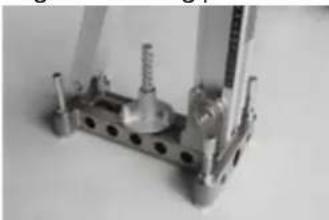
A water collecting device is highly recommended. Machine can do dry drilling with a dust exhauster attached, and wet drilling while a water supply equipment is attached.
Using and replacing the drill bit
The diamond core drill bit is a hollow drill tube which is fitted with soldered-on, or welded-on segments impregnated with diamonds. There are two main types of diamond core drill bit: wet type drill bit and dry type drill bit, and the outside male thread of the spindle is 1-1/4" UNC. Machine can do both wet and dry drilling. The thread of its spindle is 1-1/4" UNC male thread outside and G1/2" female thread inside.
With water-proof grease on both drill bit thread and spindle thread to provide with rust protection and easy drill bit removal.
To mount a drill bit, simply tighten the drill bit to the drill spindle. With an optional anti-friction ring between spindle and drill bit, you can remove the drill bit easier.
Before the beginning of sharpen and change works on the drill bit, make sure you disconnect the plug from the mains.
The power tool and the drill bit are heavy, always wear protective gloves to prevent your hands from getting cut or ripped by the segments.
Use a 32mm wrench on the drill spindle and a 41mm wrench on the drill bit the same time to change the drill bit.
For drill bits with different male thread, adapters are available as accessories.
Let the drill bit rotate with no load after mounting it on. The radial runout must meet the requirement.
The cooling methods of drill motor
Gears in the drill motor's gearbox are using splash type lubrication to cool down.
Diamond segments on the drill bit are using waterflow to cool down.
As for the motor, air cooling is used to cool down part of its stator and rotor.
Electrical connection
To reduce the risk of electric shock and protect the operator, drill motor can only be operated via a Portable Residual Current Device (PRCD) or a Ground Fault Circuit Interrupter (GFCI).
After connecting to the power supply, first press the "RESET" button on PRCD to energize the circuit to the power tool. In the event of voltage drop, PRCD will switch off and must then be switched on again once the power supply has been reestablished. The fault current at which PRCD switches off, is 10mA .
Never place PRCD in water. Before you start working, check the proper functioning by pressing the TEST button on PRCD. Never operate a diamond core drill without RCD or PRCD directly from the mains power source.
Water supply connection
EN
To connect the water supply, attach the quick-release water coupling to a water hose. Use clean water and the maximum water pressure should not exceed 3 bar.
The water serves as a coolant to avoid the drill bit from heating up enormously while drilling.
Dust and particles formed while drilling may block the water supply system. Check and dredge if necessary.
Using water that is not clean will speed up the process of water sealing ring worn-out.
Never allow water to get into the motor. It could lead to an electric shock.
As for hand-held type drill motor, there is a small indicator hole on the water feed collar. If this hole leaks water, it indicates that the water seals are worn out. Replace them immediately.
Speeds selecting
Machine is equipped with a mechanical 2-speed oil bath gearbox.
Select the speed according to the drilling diameter (ref. to the tool's name plate).
Speed selecting or gear changing may only be done when the tool is switched off. Turning the gear selector either clockwise or counterclockwise into the desired position until it locks. Slightly turn the drill spindle with a wrench to ease the speed changing.
Indicated max diameters and speeds on name plate are based on average hardness concrete. Speed varies with different material hardness. For reinforced concrete, please select to slower speed.
Drilling
Always switch on the machine with no load.
After switching on, open the water supply valve next.
When water flows from the centre of the drill bit, then begin your cut slowly and gently.
If using hand-held drilling, start the cut by approaching at certain angle to the cutting surface. Once a V notch cut is drilled on the cutting surface, straighten the bit to the correct perpendicular angle while keeping enough feed pressure on the bit.
Increase the feed pressure when the cut depth is approx. 10mm
Pay attention to the motor speed, if it is significant slower while drilling, reduce the feed pressure to keep the bit from sticking.
Also keep an eye on the motor's condition. If it is smoking and you smell the fumes, slowly pull up the power tool by its feed handle and then continue your drilling slowly and gently again to prevent the drill motor from burning down because of longstanding overload.
When the cut is almost finished, please reduce feed pressure at this point. Apply the power tool slowly and evenly until its bit breaks through.
There are vertical drilling and angular drilling. When performing an angular drilling, use drill stand's angle adjustment function.
The drill bit is more likely to get stuck when your drilling speed is too fast or feed pressure is too high.
When the feed rate gets very slow and the water generally goes clear but with metal debris in it, it suggests that the reinforced steel is encountered. If it occurs, vibration will begin. Reduce the feed pressure and let the bit go at its own pace. Please note, keep the feed pressure not too slow.
When cut through wood plank, thick asphalt or asphaltic felt, the current will increase. At this point, reduce the propulsive force and apply it slowly to continue drilling.
If you must drill deeper than the usable length of your drill bit is, please do not forget the optional drill bit extension is available.
Mode Selection Ring
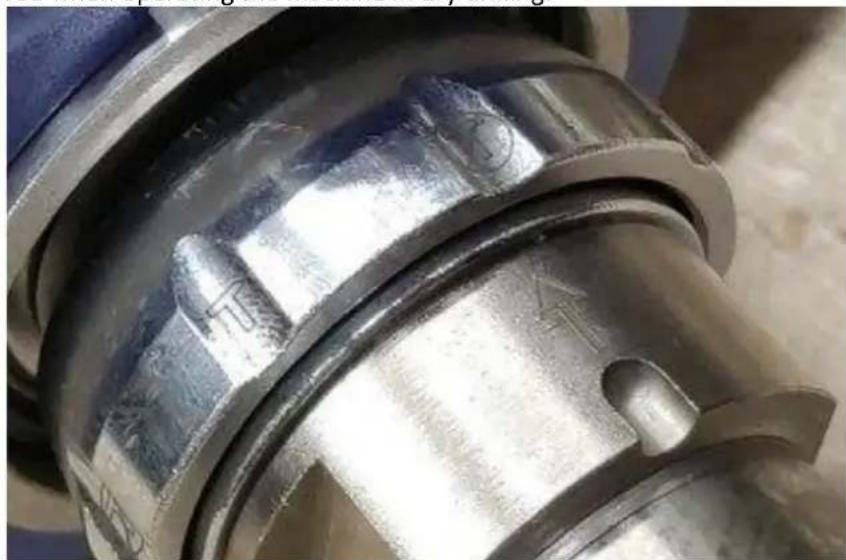
Machine motor has a mode select ring for working in 2 different operation modes: featured micro-impact drilling mode and normal drilling mode. To select micro-impact mode, first push the mode select ring following the direction of arrow on the spindle until the spring is compressed. Then turn the ring to the "T" icon for micro-impact mode, "R" icon is for normal drilling mode. Micro-impact mode is preferred when operating the machine in dry drilling.
OVERLOAD PROTECTION
Mechanical protection
This machine is equipped with a mechanical clutch to protect the operator and machine from excessive torque forces. If the drill bit suddenly stuck in the bore, this safety clutch will slip disengaging the drill spindle from the motor.
Make sure the slipping time of clutch is no more than 3-4 seconds. Otherwise, the wear and heat will increase rapidly and destroy the safety clutch. Please avoid drill bit sticking while operating.
Worn-out clutch must be replaced by a specialist in authorized repair station.
Overcurrent protection
There are 2 LED indicators on the machine. When the power tool is in overcurrent condition, a red light will be on to warn the operator that the maximum current is reached.
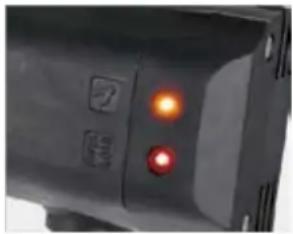
When the red light is on, the overcurrent protection will kick in and shut the motor down immediately. Before restarting the motor, a total inspection needs to be carried out. And the power tool must be discharged. Otherwise, it may damage the motor and/or result in hazardous situation.
Overvoltage Protection
The drill motor electronic can temporarily be used on 260V. Higher voltages can cause irreparable damages. Please note that when operating the machine via a generator, it will not generate higher voltage peaks.
While operating the machine, if the power tool is in overvoltage condition, the overvoltage protection will kick in and shut down the power tool entirely. Then check the voltage of the power supply, replace it with an appropriate one if necessary.
Overheat Thermal Protection
If the temperature of the motor gets too high, the thermal protection will kick in with LED indicators' yellow light on and shut the motor down. When this happens, do not restart the motor immediately. Always let the motor cool down for about 2-3 mins.
Auto-stop Carbon Brushes Protection
When the carbon brush nearly reaches the end of its lifetime, the power tool will stop automatically to protect the motor from further damaging.
The carbon brush warning system consists of 2 LED indicators with one red light and one yellow light. If both red and yellow lights are on, operator should check the carbon brushes and replace them if necessary. Remember, always replace them as a pair.
MAINTENANCE

Warning!
All repair works and maintenance must be carried out with the mains switched off and the plug disconnected.
Daily Maintenance of Power Tool (Please ref. to Maintenance Schedule)
Check if all bolts, screws and nuts are well tightened.
Check if there is a leakage on the water seals.
Check if there is a leakage inside of the gearbox.
Check if PRCD is perfectly functioning.
Keep the whole set of machine clean and dry.
Pay attention to the auto-stop carbon brushes. When they are reaching the end of their lifetime or the warning indicators are light on, please have them checked and replaced immediately. To replace, first remove the cover of carbon brush holder and pull the carbon brush out from the holder. Then insert a new one and put the cover back. Repeat the procedure with the other carbon brush.
Check gearbox lubricant condition after gearbox reaches 300 working hours. If there are too many impurities in lubricant, have the lube replaced immediately by a specialist or authorized repair station.
When not in use, please detach its drill bit first, and then clean the whole machine. Don't forget to grease on its spindle thread. Store the idle power tool out of reach of children and must in a dry environment.
Measuring the insulation resistance. Use a 500V ohmmeter to measure the insulation resistance between live parts and the housing. The value must not be less than 7M
Trouble Shooting of Power Tool (please ref. to Trouble Shooting Chart)
If the power tool malfunctions while operating, please contact nearby repair station immediately. Do not disassemble the power tool by yourself.
Electrical parts such as the rotor-stator, printed circuit board, power cord, plugs, etc. should be checked and repaired by a specialist electrician.
MAINTENANCE SCHEDULE
| Maintenance Items (Things need to check) | Every time before use | The first month or after 25 working hours | The third month or after reaches 50 working hours | Every year or after reaches 200 working hours |
| Gearbox seals leakage | ||||
| Water seals leakage | ||||
| Power cord | ||||
| PRCD functioning | ||||
| Drill spindle rotating | ||||
| Drill spindle abrasion | ||||
| Mains switch functioning | ||||
| Spindle thread greasing | ||||
| Water valve opening and shutting | ||||
| Bolts and nuts | ||||
| Carbon brushes | ||||
| Gearbox oil | ||||
| Overall cleaning |
TROUBLESHOOTING
| Fault | Possible Cause | Solution |
| Drill motor doesn't work | 1.Mains power supply interrupted or plug is loose | 1.Plug in another electric appliance and check the functioning or tighten the plug. |
| 2.PRCD is not reset or loose contact on PRCD | 2.Press the RESET button on PRCD or replace with a new one. | |
| 3.Power cord or switch damaged | 3.Have them checked by an electrical specialist and replaced if necessary. | |
| 4.Rotor-stator damaged | 4.Have them checked by an electrical specialist and replaced if necessary. | |
| 5.Loose contact on carbon brush or brushes are worn-out | 5.Checked if the length of brush is shorter than 6mm, replace it if necessary | |
| Leakage on the water seals | Water seals worn-out | Replace water seals |
| Drill bit sticking or stuck | 1.Gears are not engaged properly or disengaged. | 1.Gear selector is not lock when turning it. Turn it to desired position until it locks. |
| 2.Clutch worn-out | 2.Have clutch friction plates replaced. | |
| 3.Reinforced steel or matter causes the drill bit sticking or stuck. | 3.After switching off the machine, use wrench to adjust the bit's position a little bit. Knock carefully and gently on the tube by using a wooden hammer shank till the stuck drilling core slips out. | |
| 4.Gearbox damaged | 4.Have gearbox replaced by a specialist | |
| 1.Checked the drill bit and segments and replace them if necessary. | ||
| Drilling speed is way too slow | 1.End of drill bit's lifetime or segments are not in good condition | 2.Turn down the valve and reduce the water pressure to reduce the waterflow. |
| 2.Too much waterflow causes segments cutting inefficiently. | 3.Resharpen the segments. | |
| 3.Drill bit is dull. | 4.Reduce the pressure on the drill bit to cut through reinforced bar. Increase again when cut through. | |
| 4.Hits the reinforced bar or too many hard impurities. | 5.Addjust the cutting direction, make the drill bit perpendicular to the cutting surface. | |
| 5.Drill bit's bond matrix deforms. | ||
| Drill spindle wobbles | Drill spindle worn-out | Check if spindle is worn-out and replace it if necessary |
| Ring of fire generated on rotor commutator | 1.There is a short circuit or break circuit on rotor coils. | 1.Have the rotor checked and replaced if necessary. |
| 2.Lose effectiveness or loose contact on carbon brush spring | 2.Clean the spring or adjust its pressure, or replace the carbon brushes if necessary. | |
| 3.Commutator is worn-out. | 3 replacing the rotor with a new one. | |
| All repair works must be carried out by a specialist or in an authorized repair station! |

Abn derefter vandforsyningsventilen after taending.
NPOIPTPAMMA YNTHPHSH
For the disposal of the device please consider and act according to the national and local rules and regulations.
CONTACT
expondo Polska sp. z o.o. sp. k.

- Technical data
- Description
- SAFETY INSTRUCTIONS
- Work area safety
- Electrical safety
- Personal safety
- Power tool use and care
- Service
- Drill motor safety Precautions
- OPERATING INSTRUCTIONS
- Check before starting
- Using and replacing the drill bit
- The cooling methods of drill motor
- Electrical connection
- Water supply connection
- EN
- Speeds selecting
- Drilling
- Mode Selection Ring
- OVERLOAD PROTECTION
- Overcurrent protection
- Overvoltage Protection
- Overheat Thermal Protection
- Auto-stop Carbon Brushes Protection
- MAINTENANCE
- Warning!
- Trouble Shooting of Power Tool (please ref. to Trouble Shooting Chart)
- CONTACT
Brand : MSW
Model : CDM 2200D TITAN KIT
Category : Drill