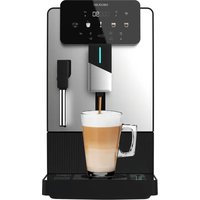
FreeStyle Compact - Coffee machine CECOTEC - Free user manual and instructions
Find the device manual for free FreeStyle Compact CECOTEC in PDF.

User questions about FreeStyle Compact CECOTEC
0 question about this device. Answer the ones you know or ask your own.
Ask a new question about this device
Download the instructions for your Coffee machine in PDF format for free! Find your manual FreeStyle Compact - CECOTEC and take your electronic device back in hand. On this page are published all the documents necessary for the use of your device. FreeStyle Compact by CECOTEC.
USER MANUAL FreeStyle Compact CECOTEC
natural_image
Exterior view of a modern CecuBec water dispenser device (no visible text or symbols on the device body)Safety instructions 6
-
Parts and components 38
-
Before use 38
-
Operation 39
-
Cleaning and maintenance 43
-
Troubleshooting 45
-
Technical specifications 45
-
Disposal of old electrical and electronic appliances 46
-
Technical support and warranty 46
-
Copyright 46
SOMMAIRE
Read these instructions thoroughly before using the appliance. Keep this instruction manual for future reference or new users.
- All safety instructions must be closely followed when using the appliance.
- This appliance can be used by children aged 8 years and above and people with reduced physical, sensory, or mental capabilities or lack of experience and knowledge if they have been given supervision or instruction concerning use of the appliance in a safe way and understand the hazards involved. Children must not play with the appliance. Cleaning and user maintenance should not be carried out by children unless they are over 8 years old and are under supervision. Keep this appliance and its power cable out of reach of children under the age of 8.
- Check the power cable regularly for visible damage. If the power cable is damaged, it must be replaced by the official Cecotec Technical Support Service or similar qualified personnel to avoid risks.
- This symbol means "Caution, Hot Surface". Accessible surfaces are likely to heat up during use.
- This appliance is designed for domestic use only and is not intended for bars, restaurants, farmhouses, hotels, motels, and offices.
- WARNING: the filling opening must not be opened during operation.
- WARNING: take precautions to avoid spillage of liquids on the cable.
- WARNING: incorrect or improper use can be dangerous for the user and damage the appliance. Use the appliance only for the purposes described in this manual. The surface of the heating element is subject to residual heat after use.
- Ensure that the mains voltage matches the voltage specified on the appliance rating label and that the plug is earthed.
- Do not immerse the cable, plug, or any other non-removable part of the device in water or any other liquid or expose electrical connections to water. Make sure your hands are dry before handling the plug or switching on the device.
- Do not twist, bend, pull, or damage the power cable. Protect it from sharp edges and heat sources. Do not allow the cable to touch hot surfaces. Do not let the cable hang over the edge of the working surface or worktop.
- Turn off and unplug the appliance from the mains supply when not in use and before cleaning it. Pull from the plug, not the cable, to disconnect it from the outlet.
- Place the appliance on a dry, stable, flat, heat-resistant surface.
- Do not use the appliance under the following circumstances:
- On or near a gas or electric hob, in heated ovens, or near open flames.
-
On soft surfaces (such as carpets) or where it may tip over during use.
-
Outdoors or in areas with high humidity levels.
- Do not wash the appliance in dishwashers.
- Maintain a minimum safety distance of 20 cm to the sides and 30 cm on top of the appliance when in operation.
- Do not place the appliance under cabinets or kitchen furniture, as the steam emitted may damage them.
- Do not overfill the filter.
- Do not operate the appliance without water.
- Never use the appliance without a suitable container under the coffee spout or the milk tank spout.
- Supervise children to prevent them from playing with the appliance. Close supervision is necessary when the appliance is being used by or near children.
INSTRUCTIONS DE SÉCURITÉ
A Coffee size icon
B Power icon
C Coffee brewing icon
D Selected coffee size indicator light
E Water tank cover
F Opening/closing lever
G Water tank
H Pods adapter
I Drip tray grille
J Drip tray
NOTE:
The graphics in this manual are schematic representations and may not exactly match the device.
2. BEFORE USE
- This appliance is packaged in a way as to protect it during transport. Take the appliance out of its box and remove all packaging materials. You can keep the original box and other packaging elements in a safe place. This will help you prevent damage to the appliance when transporting it in the future. In case the original packaging is disposed of, make sure all packaging materials are recycled accordingly.
- Make sure all parts and components are included and in good conditions. If there is any piece missing or in bad conditions, contact the official Cecotec Technical Support Service immediately.
Box content
- Pod coffee machine
- Ground coffee adapter
- Dolce Gusto pods adapter
- Nespresso pods adapter
- Instruction manual
3. OPERATION
Before use
Before using the coffee machine for the first time or when using it again after a long period of inactivity (e.g. after a holiday), it is recommended to rinse it. This process allows the internal ducts of the coffee machine to be thoroughly cleaned.
There are two ways to fill the water tank: either directly into the machine using, for example, a jug, or by removing the water tank.
1. Filling the tank without removing it. Fig. 2
- Remove the water tank cover.
- Use a jug to fill the tank with fresh water (maximum water temperature must not exceed 35^ C).
- The maximum tank capacity is 0.6 l.
- Put the tank cover back in place.
2. Filling the tank by removing it. Fig. 3
- To remove the water tank from the coffee machine, press it down slightly and pull it out.
- Fill the tank with fresh tap water up to but not exceeding the "MAX" mark (maximum tank capacity is 0.6 litres).
- Put the water tank back in place and make sure that the tabs match the slots on the appliance. Finally, press the tank down gently until it clicks into the base.
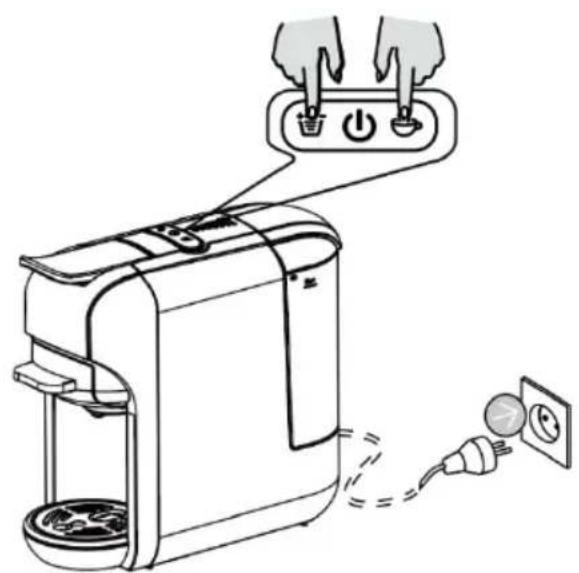
3. Connect the coffee machine to the power socket
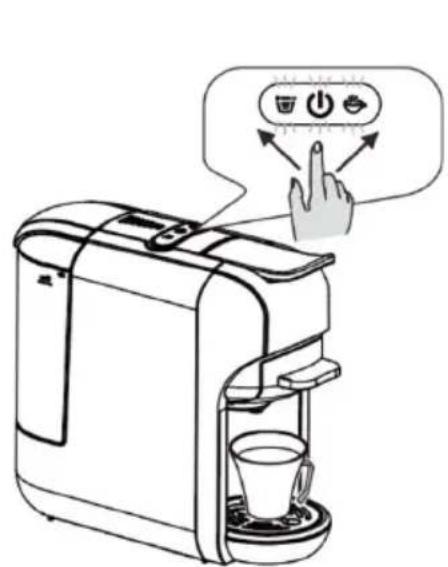
4. Press the power icon to switch on the appliance
- The icons on the control panel will flash slowly to indicate that the machine is preheating.
- This process will take between 20 and 45 seconds and, once completed, all icons will remain fix.
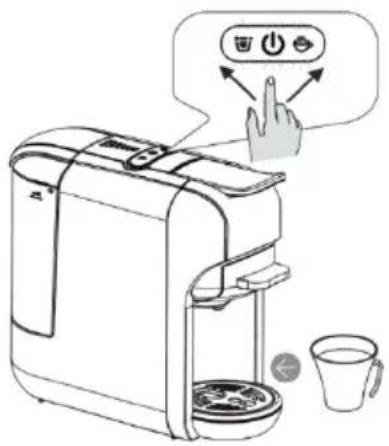
5. Dispensing coffee. Fig. 4
- Then, place a cup under the coffee spout.
- Press the coffee size icon to select the desired amount of coffee to be dispensed, then press the coffee brewing icon to start the appliance.
- Once the coffee is ready, lift the lever and remove the adapter. Discard the used pod.
- Wash the adapter thoroughly.
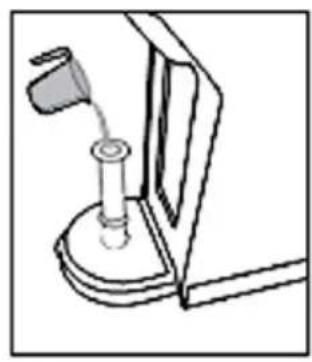
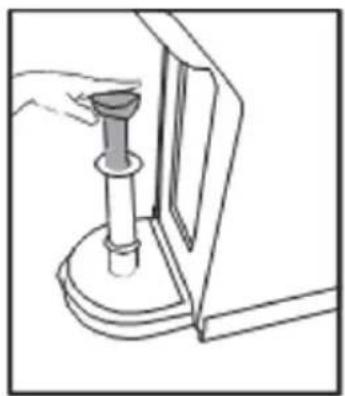
Pump purging
- Before using the coffee machine for the first time or when using it again after a long period of inactivity (e.g. after a holiday), the machine may have difficulty pumping water.
ENGLISH
- To solve this, before starting the coffee machine, it is recommended to prime or bleed the pump manually by injecting water into the internal pipes with the help of a tube.
-
Carry out the following steps:
-
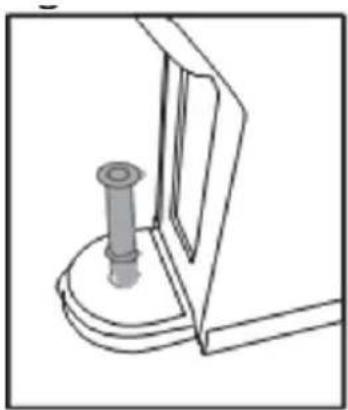
Remove the water tank and insert the tube into the inlet at the bottom of the tank to connect it to the pump. Fig. 5
- Inject a small amount of water into the tube. Fig. 6.
- Push the valve down to allow water to enter the appliance and completely expel the air from the pump lines through the pipe. Fig. 7
- Once this procedure has been carried out, the coffee machine will be able to pump water normally.
NOTE: repeat this process 2 or 3 times if necessary.
Adjusting the amount of coffee dispensed
-
The amount of coffee dispensed by the appliance can be changed by adjusting the preset brewing time.
-
To do so, press, according to your preferences.
NOTE: the machine will save your selection.
- On the adjustment has been made, press to start the extraction.
- The process can be cancelled at any time by pressing the button again.
Warning:
- When pressing, the button may flash for a few seconds before starting the extraction process, which is normal.
- To maximise the flavour of the coffee, it is recommended to brew a cup of hot water first.
Adapters
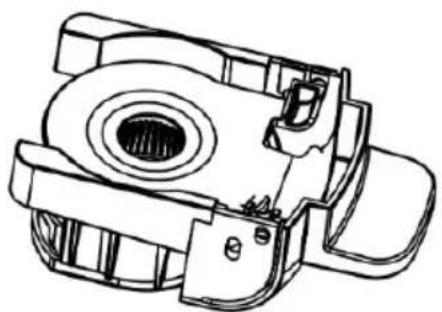
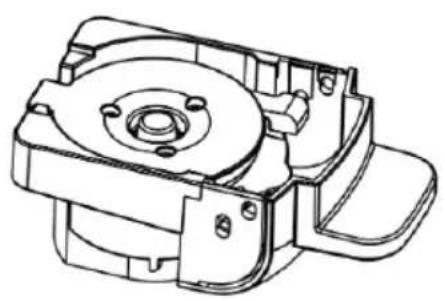
This coffee machine has three different adapters that allow you to enjoy three different types of coffee:
- Nespresso pods adapter. Fig. 8
- Dolce Gusto pods adapter. Fig. 9
- Ground coffee adapter. Fig. 10
Nespresso pods adapter
-
Removing the adapter. Fig. 11
-
Lift the lever
-
Remove the adapter
-
Placing the pod in the adapter. Fig. 12
- Open the adapter lid
- Place the Nespresso pod in the adapter and close the lid by pressing it down.
3. Insertion into the compartment
Insert the adapter into the machine's compartment and lower the lever. Fig. 13
4. Coffee preparation Fig. 14
- Place a cup under the coffee spout.
- Press to switch on the appliance. Wait 20 to 45 seconds until the preheating process is completed and the buttons on the control panel stop flashing.
- Press 📋 to select the desired amount of coffee to be dispensed, then press 📌 to start the appliance.
- Once the coffee is ready, lift the lever and remove the adapter. Discard the used pod.
- Wash the adapter thoroughly.
Dolce Gusto pods adapter
1. Removing the adapter. Fig. 15
- Lift the lever
- Remove the adapter
2. Placing the pod in the adapter. Fig. 16
- Open the adapter lid
- Place the Dolce Gusto pod in the adapter and close the lid by pressing it down.
3. Insertion into the compartment. Fig. 17
Insert the adapter into the machine's compartment and lower the lever.
4. Coffee preparation Fig. 18
- Place a cup under the coffee spout.
- Press to switch on the appliance. Wait 20 to 45 seconds until the preheating process is completed and the buttons on the control panel stop flashing.
- Press 📋 to select the desired amount of coffee to be dispensed, then press 📋 to start the appliance.
- Once the coffee is ready, lift the lever and remove the adapter. Discard the used pod.
- Wash the adapter thoroughly.
Ground coffee adapter
1. Removing the adapter. Fig. 19
- Lift the lever
- Remove the adapter
ENGLISH
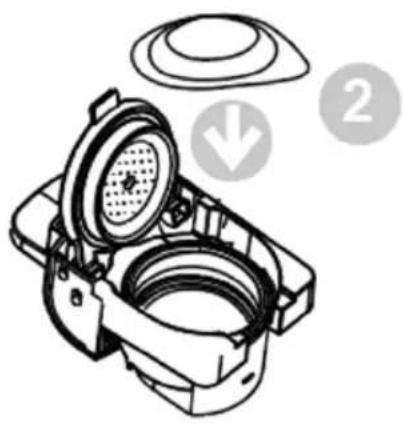
2. Putting the ground coffee into the adapter. Fig. 20
- Open the adapter lid
- Use the double-cup filter and fill it with ground coffee.
- Press the ground coffee using a pressing spoon. Do not overfill the filter, as this could cause a blockage or overflow.
WARNING: the maximum amount of ground coffee for a two-cup filter is 14 grams.
- Place the filter with the ground coffee in the adapter. Then, turn the filter clockwise.
ATTENTION: if the filter is correctly fitted, you should be able to rotate the adapter without it falling out. - Close the adapter cover.
3. Insertion into the compartment. Fig. 21
Insert the adapter into the machine's compartment and lower the lever.
4. Coffee preparation Fig. 22
- Place a cup under the coffee spout.
- Press to switch on the appliance. Wait 20 to 45 seconds until the preheating process is completed and the buttons on the control panel stop flashing.
- Press 📋 to select the desired amount of coffee to be dispensed, then press 🖱 to start the appliance.
- Once the coffee is ready, lift the lever and remove the adapter. Discard the used pod.
- Wash the adapter thoroughly.
Standby mode
Standby mode: 15 minutes
- In standby mode, the machine and the buttons on the control panel will turn off after 15 minutes of inactivity.
- To exit standby mode, simply press.
Standby mode settings. Fig. 23
-
To set the standby mode so that the machine automatically activates it when required, press, and hold the and buttons at the same time and, without releasing them, plug the power cord into the power socket.
-
will light up.
-
To deactivate the standby mode, press the coffee size button, the indicator light will turn off.
To activate the standby mode again, press the indicator light will light up.
Self-cleaning function. Fig. 24
- Place a cup under the coffee spout.
- Add a little detergent to the water tank.
- Press and hold , without releasing it, plug the power cord into the power socket.
- Once the ⏻ and ⏋ buttons light up, press ⏋ for the appliance to start the self-cleaning cycle.
NOTE: each cycle will last about 120 seconds.
- To pause or stop the cycle, press again.
Restore to factory settings. Fig. 25
- To restore the appliance to factory settings, press and hold and without releasing it, plug the power cord into the power socket.
- The buttons on the control panel will flash twice.
4. CLEANING AND MAINTENANCE

There is a risk of death by electric shock and fire.
- Never immerse the appliance in water.
- Be sure to unplug the appliance before cleaning.
- Do not use solvents or abrasive cleaning agents.
- Do not use sharp objects, brushes, or metal scouring pads.
- Never put it into the dishwasher.
Cleaning the adapters. Fig. 26
To clean the adapters, follow the steps below:
- Disconnect the machine from the mains and allow it to cool down completely.
- Remove the adapter from the machine.
- Discard any used pods or coffee grounds that may be inside the adapter.
- Wash the adapter with warm water and mild soap. You can use a soft brush or sponge to clean all surfaces, including the slots where the pods are inserted.
- Rinse the adapter thoroughly under running water to remove any soap residue.
- Dry thoroughly with a clean, soft cloth.
- If necessary, you can disinfect the adapter with a mild disinfectant solution or isopropyl alcohol.
- Once the adapter is completely dry, reattach it to the machine following the instructions above.
NOTE: regular cleaning is important to maintain the quality of the coffee and to ensure that the machine functions optimally.
ENGLISH
Full cleaning. Fig. 27
- Dry all parts with a cloth, clean towel or paper towel and put them back in place.
- Clean the coffee spout and the inside of the machine regularly with a damp cloth.
Warning:
- Do not pour water over the machine or lift the lever during the brewing process.
- Before brewing coffee, make sure that the tank contains at least 20 ml of water.
- The pods adapter has a sharp needle at the top, so avoid putting your hand or finger near the needle when removing it from the compartment.
- After the brewing process, the adapter is still very hot. Be careful not to burn yourself.
Energy saving mode
- The machine automatically enters energy saving mode after 15 minutes of inactivity.
- When it does, the icons on the control panel turn off.
- To exit the energy saving mode, press the .
- The icons on the control panel will start flashing, indicating that the machine is preheating.
- When the icons stop flashing and remain steady, the machine is ready for use.
Descaling
NOTE: water hardness varies according to the area.
- Limescale particles present in high hardness drinking water are deposited in the coffee machine in the form of residues, clogging the internal pipes and causing damage.
- To avoid this, be sure to descale the machine after 300 to 400 cups of coffee, if you notice a significant drop in performance, or after one or two months.
The descaling process must be carried out correctly to avoid damage. It is therefore essential to follow the instructions below.
Warning:
- Never clean the coffee machine with vinegar. This could damage it and make the coffee taste bad.
- Damage caused by incorrect descaling or lack of descaling is not covered by the warranty.
- Be careful with hot water, you could burn yourself.
Procedure for removing limescale deposits
- To descale the machine, use a citric acid-based liquid descaler according to the manufacturer's instructions. Pour some of the product into the water tank.
- Check that there is no pod in the adapter compartment.
- Place a container in the drip tray just below the coffee spout to collect the descaling solution and the dispensed limescale deposits.
-
Fill the rest of the tank with tap water up to the "MAX" mark to dilute the descaling liquid.
-
Press 🖱️ to activate the descaling cycle. The machine will dispense the descaling solution at regular intervals until the water tank is completely empty.
- Fill the water tank with the solution and repeat the descaling process.
- When the descaling process is complete, start a rinse cycle (without the descaling solution) to clean the internal pipes of the machine.
5. TROUBLESHOOTING
| PROBLEM POSSIBLE CAUSE | SOLUTION | |
| The coffee machine does not dispense coffee | Water tank is out of water. Fill up the water tank. | |
| Coffee is not hot enough | The glass or cup you have placed under the coffee spout is cold.Limescale has built up in the machine.The machine has not been preheated. | Preheat the cup into which the coffee is to be dispensed.Descale the appliance.Dispense a cup of hot water without using a coffee pod to preheat the machine. |
| Water leaks out from under the coffee machine | Water tank is leaking or dripping.The drip tray is full. | Check if the water tank valve is clogged.Empty the drip tray. |
| The lever cannot be lowered | The adapter is not fitted correctly. | Fit the adapter correctly. |
6. TECHNICAL SPECIFICATIONS
Product reference: 00648
Product: FreeStyle Compact
Voltage: 220 - 240 V\~
Frequency: 50/60 Hz
Rated power: 1450 W
Technical specifications may change without prior notification to improve product quality.
Made in China | Designed in Spain
7. DISPOSAL OF OLD ELECTRICAL AND ELECTRONIC APPLIANCES
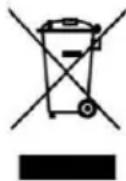
This symbol indicates that, according to the applicable regulations, the product and/or batteries must be disposed of separately from household waste. When this product reaches the end of its shelf life, you should dispose of the cells/batteries/accumulators and take them to a collection point designated by the local authorities.
Consumers must contact their local authorities or retailer for information concerning the correct disposal of old appliances and/or their batteries.
Compliance with the above guidelines will help protecting the environment.
8. TECHNICAL SUPPORT AND WARRANTY
Cecotec shall be liable to the end user or consumer for any lack of conformity that exists at the time of delivery of the product under the terms, conditions, and deadlines established by the applicable regulations.
It is recommended that repairs be carried out by qualified personnel.
If at any moment you detect any problem with your product or have any doubt, do not hesitate to contact the official Cecotec Technical Support Service at +34 963 210 728.
9. COPYRIGHT
The intellectual property rights over the texts in this manual belong to CECOTEC INNOVACIONES, S.L. All rights reserved. The contents of this publication may not, in whole or in part, be reproduced, stored in a retrieval system, transmitted, or distributed by any means (electronic, mechanical, photocopying, recording or similar) without the prior authorization of CECOTEC INNOVACIONES, S.L.
1. PIÈCES ET COMPOSANTS
Image 1
5. PROBLEEMOPLOSSING
Product: FreeStyle Compact
Voltage: 220 - 240 V\~
Frequentie: 50/60 Hz
Fig./Img./Abb./Afb./Rys.1
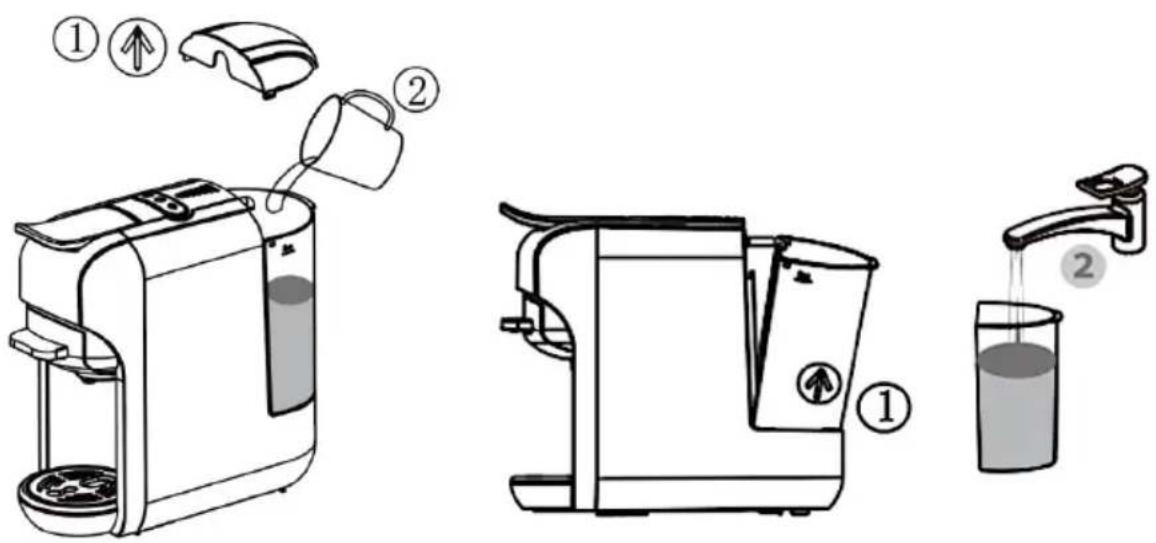
Fig./Img./Abb./Afb./Rys. 2 Fig./Img./Abb./Afb./Rys. 3
natural_image
Mechanical assembly diagram showing a lever and base mount (no text or symbols)Fig./Img./Abb./Afb./Rys. 4 Fig./Img./Abb./Afb./Rys. 5
natural_image
Line drawing of a hand using a tool to press or install a mechanical component (no text or symbols visible)Fig./Img./Abb./Afb./Rys. 6
natural_image
Technical line drawing of a mechanical component with a cylindrical pin inserted into a base (no text or symbols)Fig./Img./Abb./Afb./Rys.7
natural_image
Technical line drawing of a mechanical component with no visible text or symbols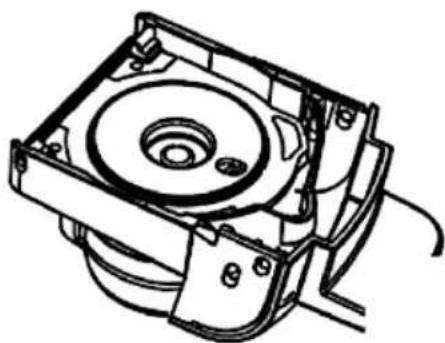
natural_image
Technical line drawing of a mechanical assembly with no visible text or symbolsFig./Img./Abb./Afb./Rys.8 Fig./Img./Abb./Afb./Rys.9
natural_image
Technical line drawing of a mechanical component with no visible text or symbols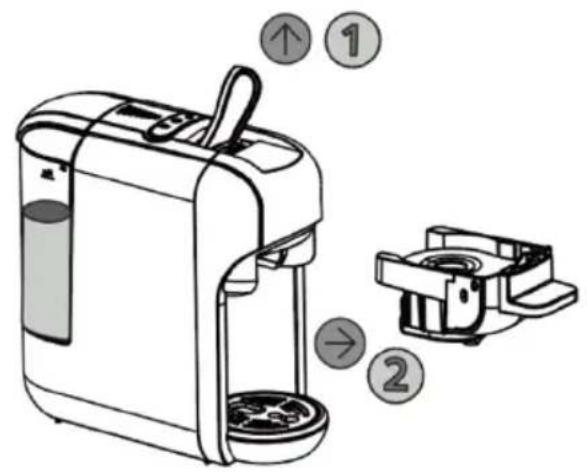
Fig./Img./Abb./Afb./Rys. 10 Fig./Img./Abb./Afb./Rys. 11
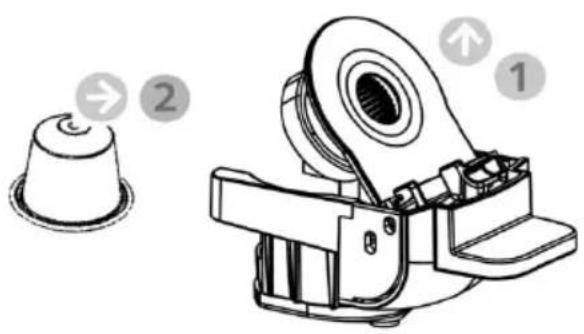
Fig./Img./Abb./Afb./Rys. 12
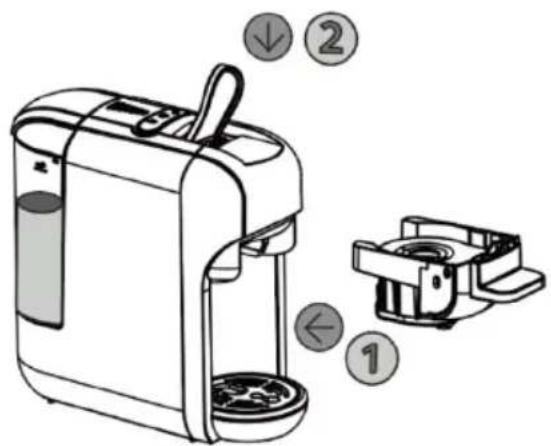
Fig./Img./Abb./Afb./Rys. 13
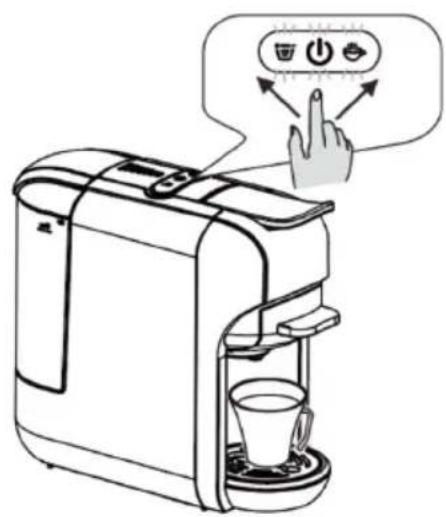
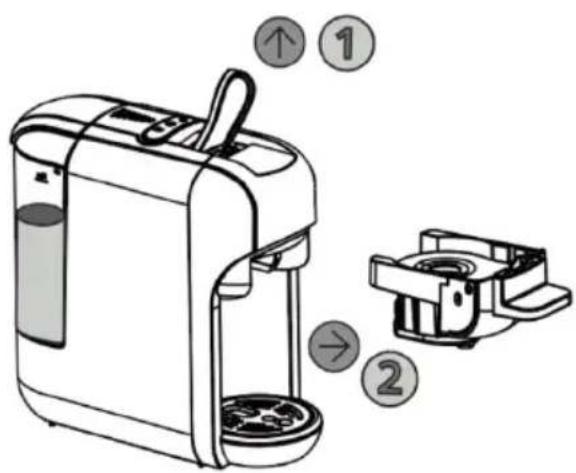
Fig./Img./Abb./Afb./Rys. 14 Fig./Img./Abb./Afb./Rys. 15

natural_image
Technical line drawing of a mechanical device with a cup and a circular component (no text or symbols)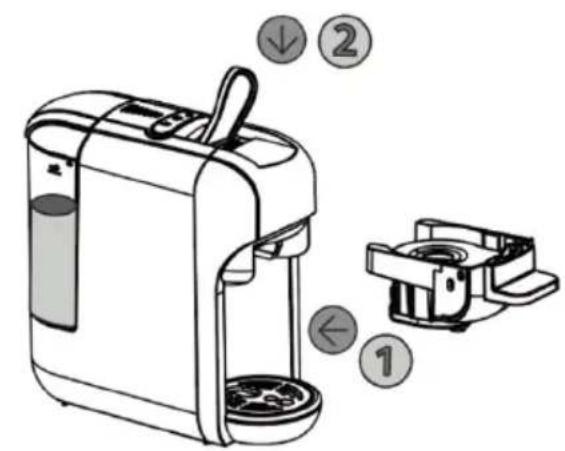
Fig./Img./Abb./Afb./Rys. 16 Fig./Img./Abb./Afb./Rys. 17
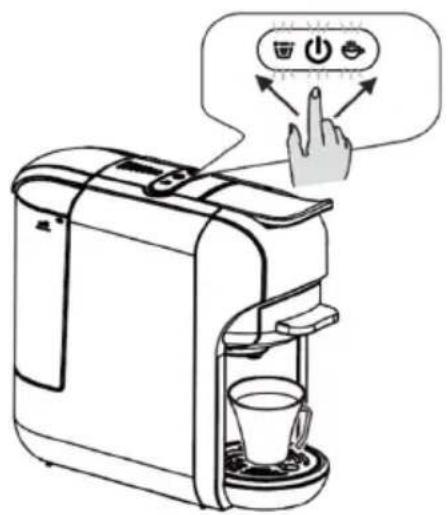

Fig./Img./Abb./Afb./Rys. 18 Fig./Img./Abb./Afb./Rys. 19
natural_image
Technical illustration of a mechanical device with labeled parts (no text or symbols present)
Fig./Img./Abb./Afb./ Rys. 20 Fig./Img./Abb./Afb./ Rys. 21
natural_image
Line drawing of a toaster with power outlets and a plug, showing hands connecting the device to a socket (no text or symbols present)Fig./Img./Abb./Afb./Rys. 22 Fig./Img./Abb./Afb./Rys. 23
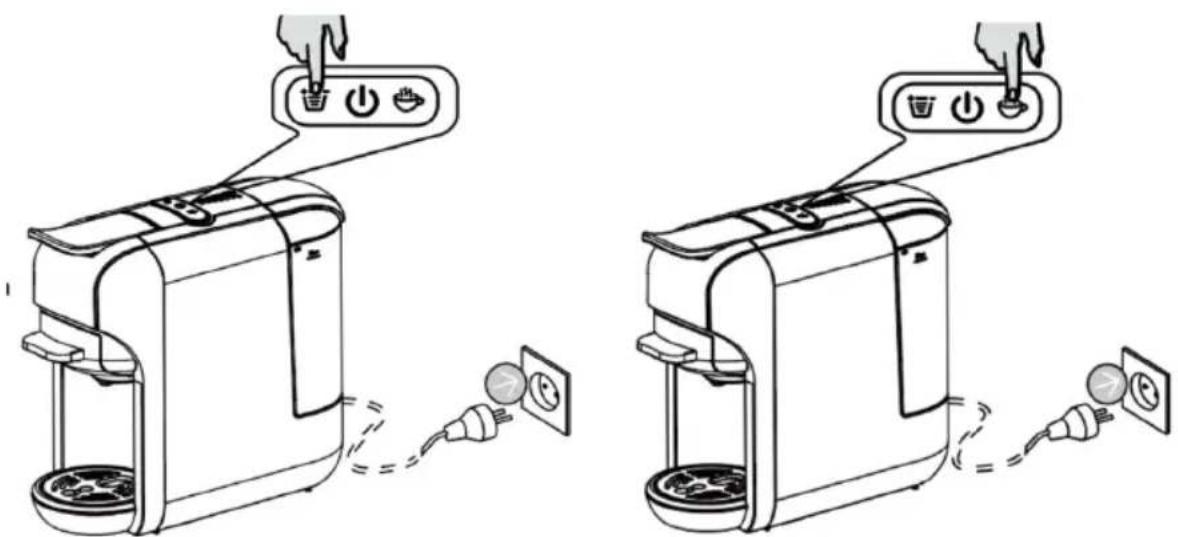
Fig./Img./Abb./Afb./Rys. 24 Fig./Img./Abb./Afb./Rys. 25
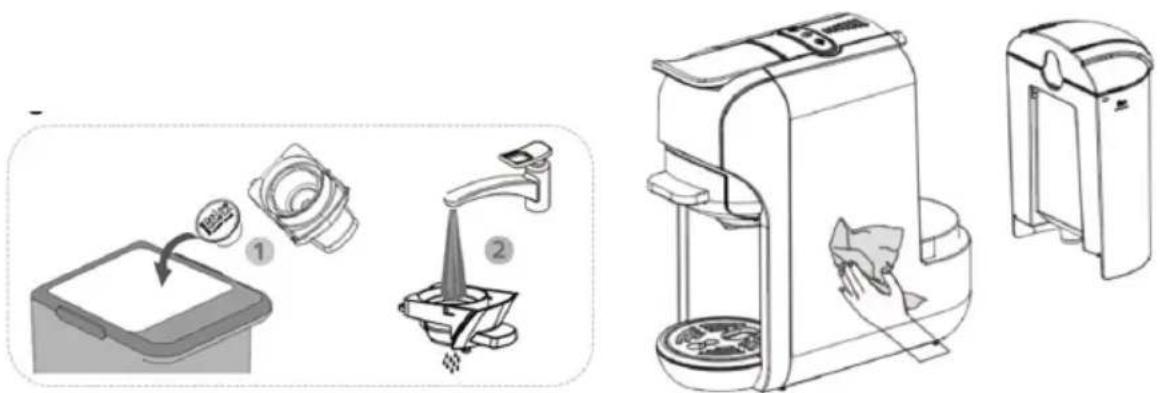
Fig./Img./Abb./Afb./Rys. 26 Fig./Img./Abb./Afb./Rys. 27
www.cecotec.es