IQ18PSHK - Saw MURRAY - Free user manual and instructions
Find the device manual for free IQ18PSHK MURRAY in PDF.

User questions about IQ18PSHK MURRAY
0 question about this device. Answer the ones you know or ask your own.
Ask a new question about this device
Download the instructions for your Saw in PDF format for free! Find your manual IQ18PSHK - MURRAY and take your electronic device back in hand. On this page are published all the documents necessary for the use of your device. IQ18PSHK by MURRAY.
USER MANUAL IQ18PSHK MURRAY
ASSEMBLY AND OWNER'S MANUAL

WARNING! Read this manual before operating your product.
Lannguages
| English (Original Instructions) 3 | ||
| Croatian | 25 | |
| Czech | ||
| Danish | 69 | |
| Dutch | 91 | |
| Finish | 113 | |
| French | 135 | |
| German | 157 | |
| Hungarian | 179 | |
| Italian | 201 | |
| Norwegian | 223 | |
| Polish | 245 | |
| Portugese | 267 | |
| Slovak | 289 | |
| Slovenian | 311 | |
| Spanish | 333 | |
| Swedish | 355 | |
IMPORTANT NOTES
Details
Thank you for purchasing your Murray product. Murray prides itself in the quality and performance of all its products.
This instruction manual will aid in the assembly, safe operation and maintenance of your product.
Please read the following warnings to ensure safety and the long life of your product.

WARNING
Do not attempt to operate this product until you have read thoroughly and understood completely all instructions, safety rules, etc, contained in this manual. Failure to comply may result in accidents involving electric shock, fire, and/or serious personal injury.
INTENDED USE (POLE HEDGE TRIMMER)
This product is intended for domestic cutting and trimming hedges, shrubs and bushes. This product is not intended for commercial use.
INTENDED USE (POLE SAW)
This pole saw is designed for cutting branches of a diameter determined by the cutting length of the guide bar. It is only designed to cut wood in an outdoor, domestic application by adults only.
General safety

Warning!
Read the directions for use before operating the machine.

Wear safety goggles and ear protection that meet safety standards.

Wear sturdy, non-slip footwear.

Wear safety gloves.

Do not use machine in wet conditions, protect the machine from rain and damp.

Be careful of objects being thrown out! Ensure bystanders are kept at least 50^ (15m) away & stop the machine if approached.
Ensure bystanders are kept at least 50^ (15m) Away & stop the machine if approached.


Beware of electric shock hazard when charging.
Read the directions before carrying out any maintenance work.
Wait for all components of the machine to completely stop & remove the battery.
Should NOT be disposed of with house hold items.
Ambient temperature 40^ Max.
Do not throw into water.
Keep away from heat and/or open flame.
Risk of fatal electric shock. Keep at least 10m from overhead lines.
Keep hands away from blade.
Table of Contents

Features & Definitions
Features & supplied items 5

Safety & Handling
General safety 7
Product disposal 9

Assembly Procedures
Unpacking
10

Fitting the front handle 10
Fitting The Belt 10
Function of Shaft Coupling 11
Fitting the Chain 11
Operating Instructions
Installing & removing battery 14
Switch ON/OFF 14
Telescopic Handle 15
Taking Off The Blade Sheath 15
Function of swivel head 16
Using the hedge trimmer 16

Maintenance & Care
Maintenance (Pole Hedge Trimmer)17
Lubrication of the blade 17
Maintenance (Pole Saw) 18
Caring For Guide Bar 18
Sharpening Chain 19
Filing Cutting Depth Gauge 20
Storing 21
Cleaning
Troubleshooting
Troubleshooting 22

Technical Specification
Product specification 23-24

Notes
NOTE: WARRANTY DETAILS ARE NOT WRITTEN WITHIN THIS OPERATOR'S MANUAL. REFER TO OTHER DOCUMENTS SUPPLIED WITH THIS MACHINE FOR WARRANTY DETAILS. THE WARRANTY DOCUMENTS MAY INCLUDE TECHNICAL SPECIFICATIONS THAT ARE SPECIFIC TO EACH MODEL THAT ARE NOT WRITTEN WITHIN THIS OPERATOR'S MANUAL.
17
Features & Supplied Items
POLE HEDGE TRIMMER
- Operating Handle
- Battery
- Trigger
- Charger
- On/Off Switch
- Charger Cord
- Harness Mounting Bracket
- Pivotting Button
- Harness
- Blade
- Tightening Knob
- Front Handle
- Shaft
- Lever
- Shaft Coupling
- Powerhead
- Blade cover
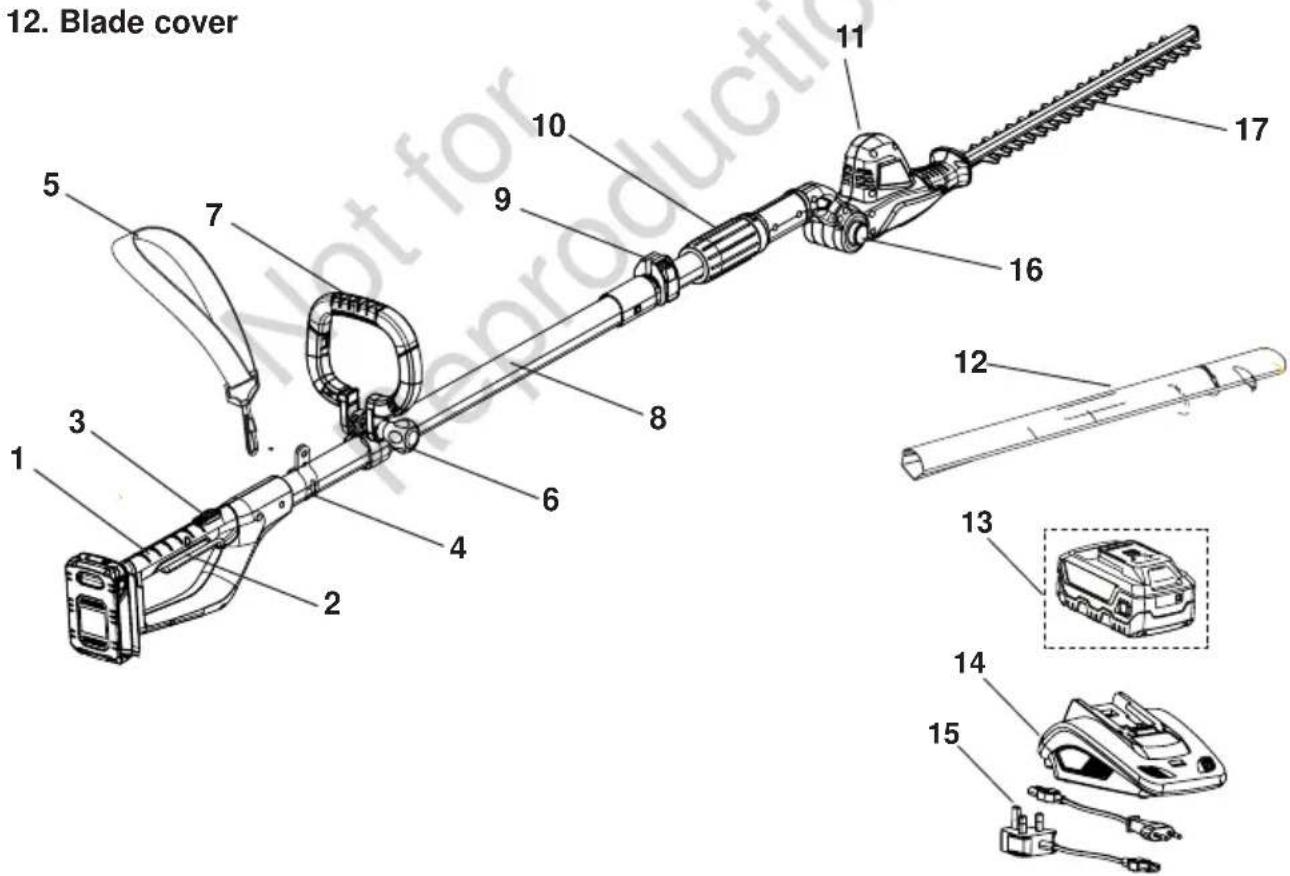
NOTE: THE HANDLE IS COMMON BETWEEN THE POLE SAW AND POLE HEDGE TRIMMER

WARNING
Do not operate the product if any component is missing or damaged. Have any missing or damaged components repaired or replaced.
Features & Supplied Items
POLE SAW
-
Operating Handle
-
Battery
-
Trigger
-
Charger
-
On/Off Switch
-
Charger Cord
-
Harness Mounting Bracket
-
Chain Tensioning Wheel
-
Harness
-
Sprocket Cover
-
Tightening Knob
-
Guide Bar
-
Front Handle
-
Oil Cap
-
Shaft
-
Chain
-
Lever
-
Shaft Coupling
-
Powerhead
- Bar cover
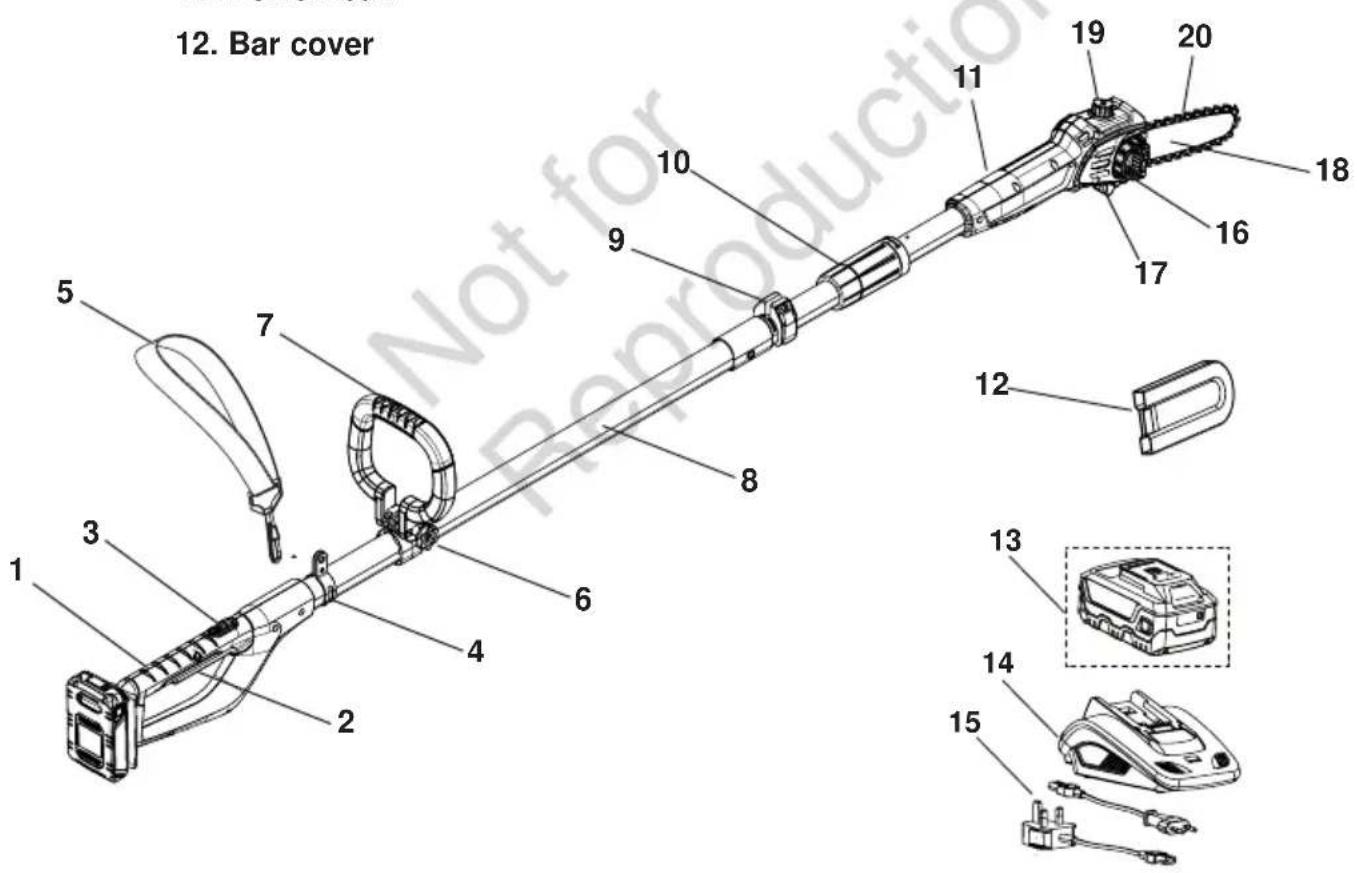
NOTE: THE HANDLE IS COMMON BETWEEN THE POLE SAW AND POLE HEDGE TRIMMER
WARNING
Do not operate the product if any component is missing or damaged. Have any missing or damaged components repaired or replaced.
General Safety

WARNING
Read all safety warnings, instructions, illustrations and specifications provided with this machine.
Work area safety
- Keep work area clean and well lit. Cluttered or dark areas invite accidents.
- Do not operate this machine in explosive atmospheres, such as in the presence of flammable liquids, gases or dust. Power tools create sparks which may ignite the dust or fumes.
- Keep children and bystanders away while operating this machine. Distractions can cause you to lose control.
Electrical safety
- Plugs must match the outlet. Never modify the plug in any way. Unmodified plugs and matching outlets will reduce risk of electric shock.
- Avoid body contact with earthed or grounded surfaces, such as pipes, radiators, ranges and refrigerators. There is an increased risk of electric shock if your body is earthed or grounded.
- Do not expose this machine to rain or wet conditions. Water entering this machine will increase the risk of electric shock.
- Do not abuse the charging cord. Keep cord away from heat, oil, sharp edges or moving parts. Damaged or entangled cords increase the risk of electric shock.
Personal safety
- Stay alert, watch what you are doing and use common sense when operating this machine. Do not use this machine while you are tired or under the influence of drugs, alcohol or medication. A moment of inattention while operating this machine may result in serious personal injury.
- Use personal protective equipment. Always wear eye protection. Protective equipment such as a dust mask, non-skid safety shoes, hard hat or hearing protection used for appropriate conditions will reduce personal injuries.
- Prevent unintentional starting. Ensure the switch is in the off-position before connecting to power source and/or battery pack, picking up or carrying this machine. Carrying this machine with your finger on the switch or energising power tools that have the switch on invites accidents.
- Remove any adjusting key or wrench before turning this machine on. A wrench or a key left attached to a rotating part of this machine may result in personal injury.
- Do not overreach. Keep proper footing and balance at all times. This enables better control of the machine in unexpected situations.
- Dress properly. Do not wear loose clothing or jewellery. Keep your hair and clothing away from moving parts. Loose clothes, jewellery or long hair can be caught in moving parts.
- If devices are provided for the connection of dust extraction and collection facilities, ensure these are connected and properly used. Use of dust collection can reduce dust-related hazards.
- Do not let familiarity gained from frequent use of this machine allow you to become complacent and
ignore tool safety principles. A careless action can cause severe injury within a fraction of a second.
Machine use and care
- Do not force the machine. Use the correct machine for your application. The correct machine will do the job better and safer at the rate for which it was designed.
- Do not use this machine if the switch does not turn it on and off. Any machine that cannot be controlled with the switch is dangerous and must be repaired.
- Disconnect the plug from the power source and/or remove the battery pack, if detachable, from this machine before making any adjustments, changing accessories, or storing the machine. Such preventive safety measures reduce the risk of starting the machine accidentally.
- Store idle machines out of the reach of children and do not allow persons unfamiliar with this machine or these instructions to operate the machine. These machines are dangerous in the hands of untrained users.
- Maintain this machine and accessories. Check for misalignment or binding of moving parts, breakage of parts and any other condition that may affect the power tool's operation. If damaged, have the machine repaired before use. Many accidents are caused by poorly maintained machines.
- Keep cutting tools sharp and clean. Properly maintained cutting tools with sharp cutting edges are less likely to bind and are easier to control.
- Use this machine and accessories in accordance with these instructions, taking into account the working conditions and the work to be performed. Use of this machine for operations different from those intended could result in a hazardous situation.
- Keep handles and grasping surfaces dry, clean and free from oil and grease. Slippery handles and grasping surfaces do not allow for safe handling and control of the tool in unexpected situations.
Product Disposal
CORRECT DISPOSAL OF THE PRODUCT
Waste electrical products should not be disposed with household waste. Please recycle where facilities exist. Check with your local authority or retailer for recycling advice.
The battery contains material which is hazardous to you and the environment. It must be removed and disposed of separately at a facility that accepts lithium-ion batteries.

Refer to Briggs & Stratton 18V Battery & Charger manual for further information relating to battery and charger disposal.
CORRECT DISPOSAL OF THE PACKAGING

The packaging consists of cardboard and correspondingly marked plastics that can be recycled. Make these materials available for recycling.
Emergency Contact
In the rare case a battery is damaged & any of the contents leaks or comes into contact with a persons skin, eyes, or is ingested, follow the first aid instructions inside the battery & charger manual. Seek further medical attention immediately.
Unpacking
This product requires assembly.
- Carefully remove the product and any accessories from the box. Make sure that all items listed in the packing list are included. Refer to page 3 and 4.
- Do not discard the packing material until you have carefully inspected and ensured product is in the right operating condition.

WARNING
Do not attempt to modify this product or create accessories not recommended for use with this product. Any such alteration or modification is misuse and could result in a hazardous condition leading to possible serious personal injury.
Do not operate this machine unless assembly is complete including guards, handles & harness.
Do not install the battery onto the product before finishing the complete assembly.
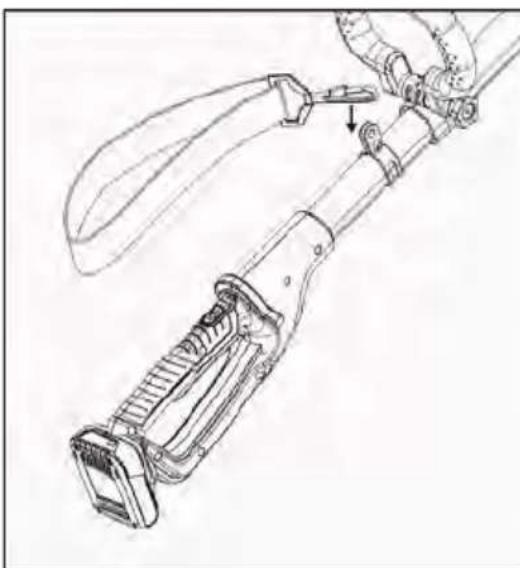
Fitting the Front handle
NOTE: Refer to figure 2.
Attach the front handle to the block on the lower handle, and insert the bolt. Tighten the knob to the bolt.
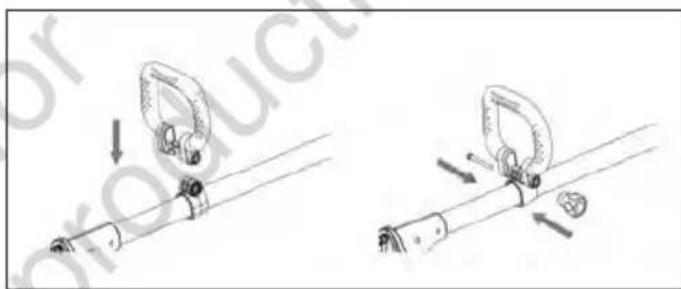
Fig 2
Fitting the Belt
NOTE: Refer to figure 2.
The brace hook buckles into the round hole of hang buckle.
ASSEMBLY PROCEDURES
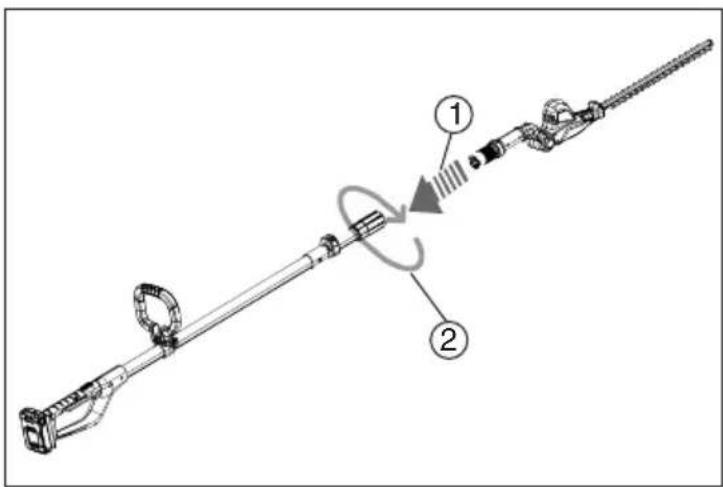
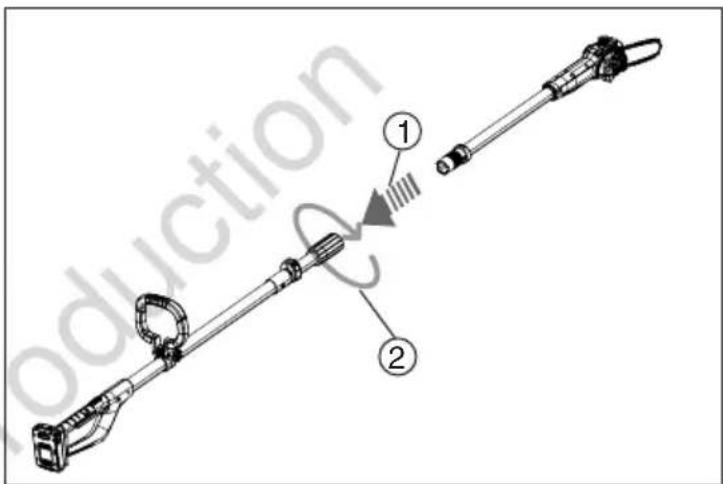
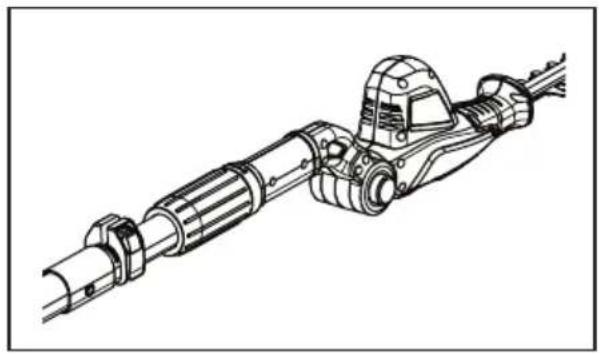
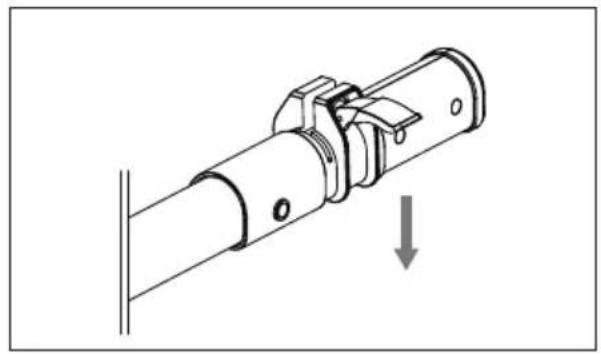
Function of Shaft Coupling
Install the shaft to the pruner attachment through the shaft coupling. Rotate to tighten the shaft coupling to secure the handle to the powerhead.
POLE SAW
Fitting the Chain

WARNING: Remove the battery from the pole saw before servicing. Severe injury or death could occur from body contact with the moving chain.

WARNING: Cutting edges on the chain are sharp. Use protective gloves when handling the chain.
IMPORTANT: Do not clamp chainsaw in vice to replace chainsaw or guide bar.
Replace chain when cutters are too worn to be sharpened or when the chain breaks. Only use a replacement chain specified by the manufacturer. Always use a new drive sprocket when replacing the chain. This will maintain proper driving of the chain.
Refer to Figure 3 while completing the following steps:
- Loosen the tension wheel.
- Remove the sprocket cover, tension wheel and the adjusting wheel.
- Remove the chain.
- Place the new chain around the drive sprocket, along the top groove of the guide bar, and around the guide bar nose. Note: Make sure cutting edges of chain are facing in the right direction. Position the chain so that the cutting edges on top of guide bar face guide bar nose (see Fig 4 and indicator on side cover of saw).
- Place sprocket cover into the Positioning groove.
- Locking the sprocket cover with the tension wheel. (IMPORTANT: Do not overtighten.)
- Adjust the chain tension.
- Securely tighten the tension wheel.

WARNING
Do not place the chain backwards. If chain is placed backwards, the saw will vibrate badly and will not cut.
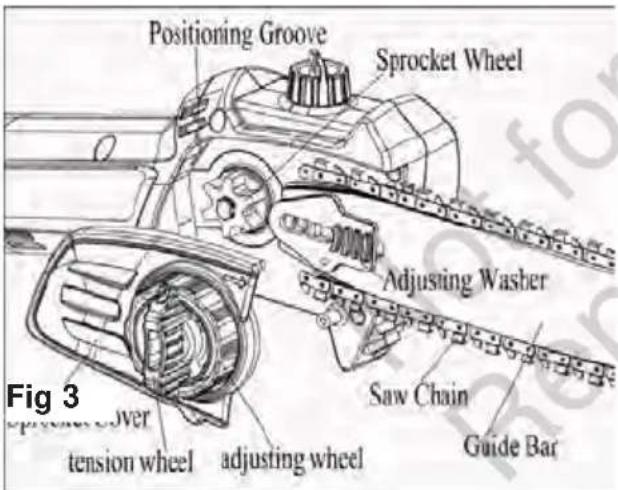

Fig 4
Chainsaw tension adjustment (Fig.5 - Fig.6)
Note: The chainsaw tension is properly set at the factory and the new chain will stretch. Check the new chain tension frequently (after disconnecting battery) during the first 2 hours of operation. Allow the chain to cool down. Follow steps below to check the chainsaw tension.
- Remove the battery from the chain saw.
- Place the chain saw on a firm surface to check the chain tension.
- Pull chain with light force 1 / 8 away from bottom of guide bar and release ( see Fig 5).
ASSEMBLY PROCEDURES
If the chain lightly snaps back into place, the tension is correct. A slight sag (1/8" or less) between chain and bottom of guide bar is acceptable.

Fig 5
- Loosen the tension wheel by turning it anti-clockwise (17) before adjusting the chain.
- Tighten the adjusting wheel by turning it clockwise (16) until slack is out of the chain.
- Wearing protective gloves, pull down the chain to check the chain tension.
- Do not over-tension the chain. Over-tensioning will cause excessive wear and will reduce the life of the guide bar and chain. Over-tensioning also reduces the amount of cuts per battery charge.
- After chain tension is correct, tighten the tension wheel (17) firmly. (See Fig 6 )
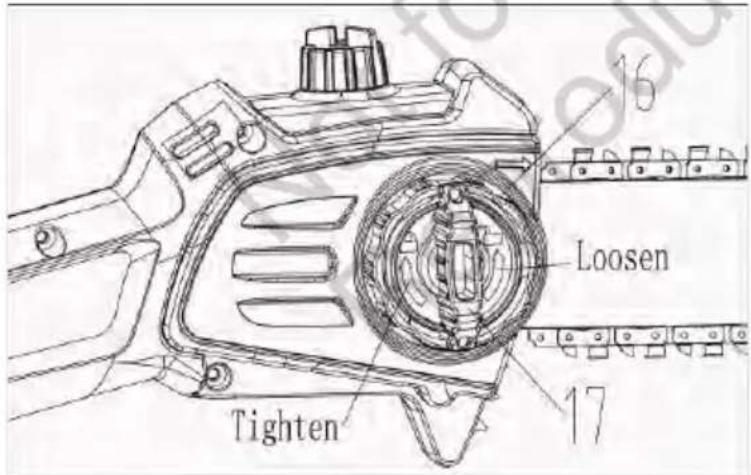
Fig 6
GENERAL
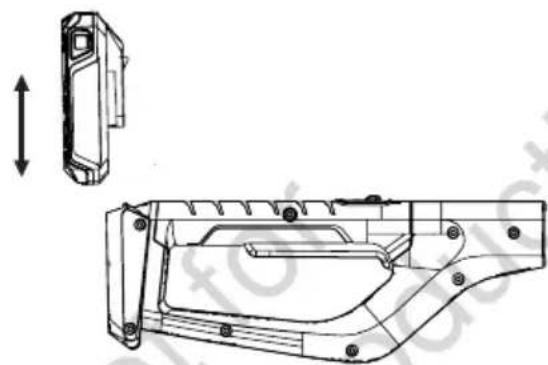
Installing & removing the Battery

WARNING! Always release the On/Off switch before inserting or removing the battery pack.
Remove the battery pack. Depress the button (A) on end of the battery pack, and then remove the pack from the tool.
Install the battery pack. Align the ribs on both side of the battery pack with the slots in the housing and slip it into place. Always insert it all the way until it locks in place with a click sound. If not, it may accidentally fall out of the tool, causing injury to you or someone around you.
To release the battery from the product, push release trigger battery while pulling it out from the handle.
Switch ON/OFF

WARNING
If any parts are missing, damaged or broken, do not operate your hedge trimmer until all damaged parts have been replaced or repaired. Failure to do so could result in serious personal injury.
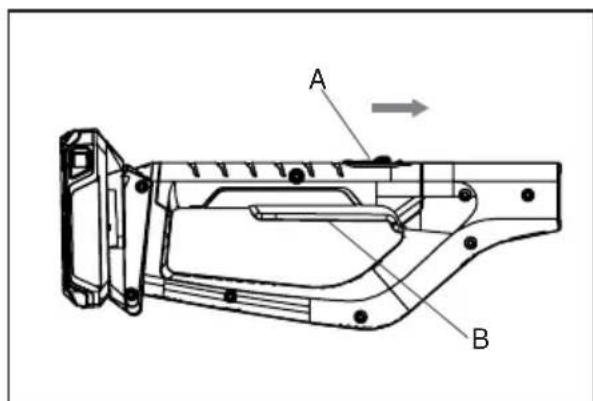
Switching the pole pruner on:
- Push forward the safety on/off switch (A) and then press the trigger (B) on the handle.
- Release the safety on/off switch (A).
Switching the pole pruner off:
- Release the trigger (B) on the handle.
OPERATING INSTRUCTIONS
Telescopic Handle
Open the clamping lever and extend upper part of handle to desired handle length. Then click the clamping lever to fix the tube tight.
Take off the blade sheath
NOTE: Refer to figure 3.
Remove the blade cover before you start the machine.
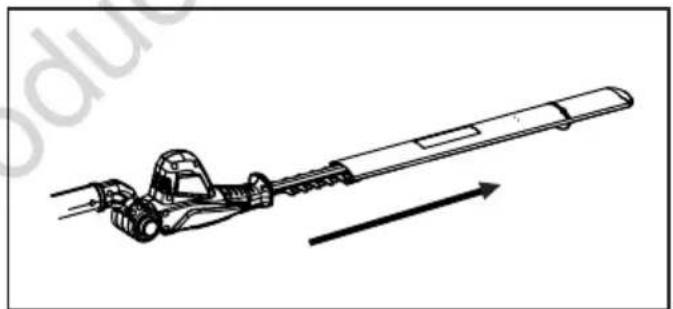
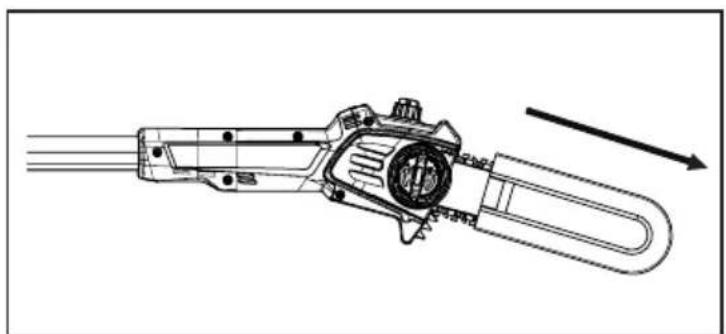
Fig 3
POLE HEDGE TRIMMER
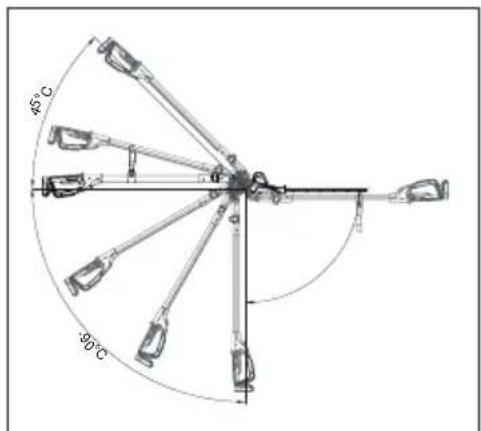
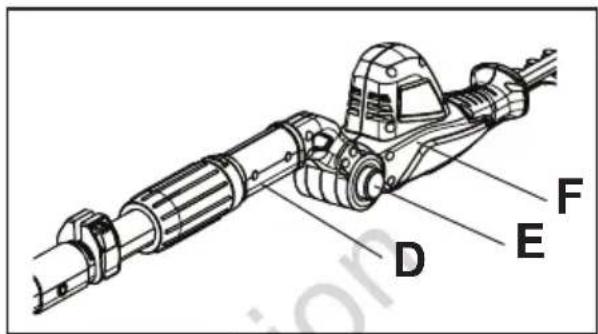
Function of swivel head
Hold the handle (D) tightly. Push the pivoting button (E) and then turn the powerhead (F) to the desired position. Release the pivoting button (E) again and check whether the powerhead is locked in place.
Note: The powerhead can be locked in 7 positions over a range of 135^ (-45^ 90^) .
Using the Pole hedge trimmer

WARNING
Remove the cut branches. DO NOT exceed the cutting capacity of this product.
With its unique design the pole trimmer can be used to trim and shape hard to reach areas of hedges and bushes such as those show in below figure.

POLE HEDGE TRIMMER

WARNING
Before any maintenance, always take off the battery pack and wear protection gloves.
Lubrication of the blade
For easier operation and longer life, lubricate the cutting blades before and after each use. Before lubricating, make sure your hedge trimmer is disconnected from the battery.
Apply lubrication oil so that it runs between the two blades.

Cleaning

WARNING
Before commencing these cleaning procedures or when clearing a blockage, make sure that the hedge trimmer is switched off and disconnected from the battery.
To ensure the best performance from the hedge trimmer, it must be kept clean. Always clean the hedge trimmer immediately after use.
Keep the pole hedge trimmer body clean. Use a Soft cloth dampened with a mild soap and water mixture. Wipe the body to clean. Do not allow cuttings and other debris to become dry and hard on any of the hedge trimmer surfaces. This will directly affect the cutting performance.
Make sure that the blade is kept clean of all cuttings and other debris. Take extra care to clean the cooling vents on the powerhead.
POLE SAW

WARNING
Before any maintenance, always take off the battery pack and wear protection gloves.

WARNING: When cleaning the pole saw body,
- Do not submerge the saw in any liquids
- Do not use products that contain ammonia, chlorine, or abrasives
- Do not use chlorinated cleaning solvents, carbon tetrachloride, kerosene, or gasoline
Cleaning
Keep the pole saw body clean. Use a Soft cloth dampened with a mild soap and water mixture. Wipe the body to clean.
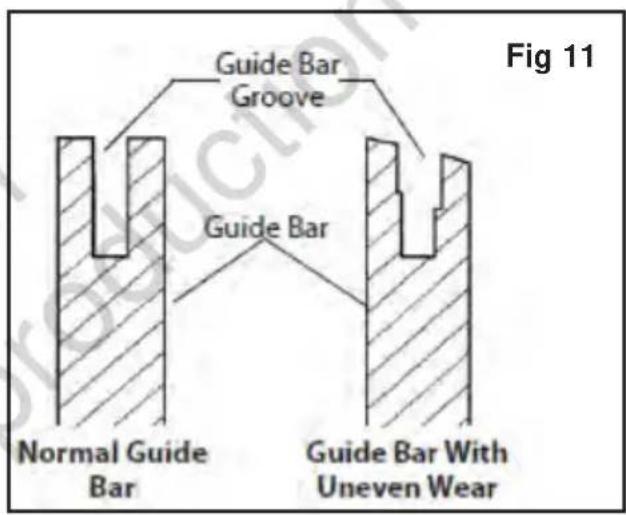
Care of guide bar
Uneven bar wear causes most guide bar problems. Incorrect sharpening of the chain cutter and depth gauge settings often cause this. When bar wears unevenly, it widens the guide bar groove, see Fig.11. This causes chain chatter and rivet popping. The saw will not cut straight. Replace the guide bar if this occurs.
Inspect the guide bar before sharpening the chain. A worn or damaged guide bar is unsafe. A worn or damaged guide bar will damage the chain. It will also make cutting harder.
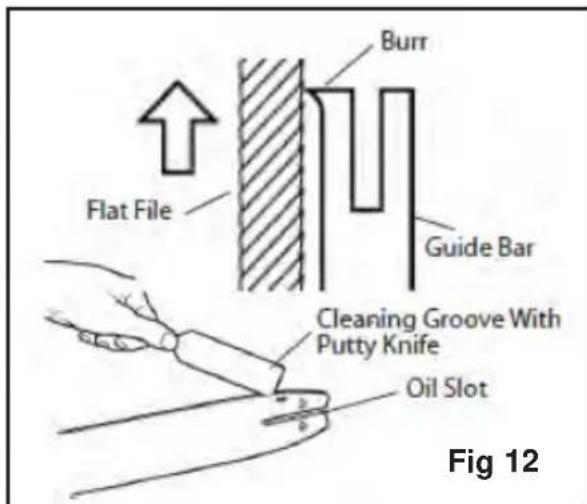
Maintenance
- Remove the guide bar from the chain saw. (Refer to instructions on removing battery)
- Remove the sawdust from the guide bar groove periodically. Use putty knife or wire, see Fig.12.
- Clean oil slots after each day of use.
- Remove burrs from the sides of the guide bar. Use a Flat File to make side edges square.
Replace guide bar when
- Bar is bent or cracked
- Inside groove of the bar is badly worn
Sharpening Chainsaw

WARNING: Remove the battery from the pole saw before servicing. Severe injury or death could occur from body contact with the moving chain.
Keep the chain sharp. When the chain is sharp, the saw will cut faster and more safely. A dull chain will cause undue sprocket, guide bar, chain, and motor wear. If you must force the chain into the wood and cutting creates only saw with few large chips, the chain is dull.
Chain Sharpening and Maintenance Tools
Purchase these items from your local dealer, hardware store, or pole saw supplies outlet. (Refer to Table 1 for recommended chainsaw sharpening and maintenance tools)
- 5/32" round file
- Depth gauge tool
File guide
Vise
Medium sized flat file
Sharpening Cutters
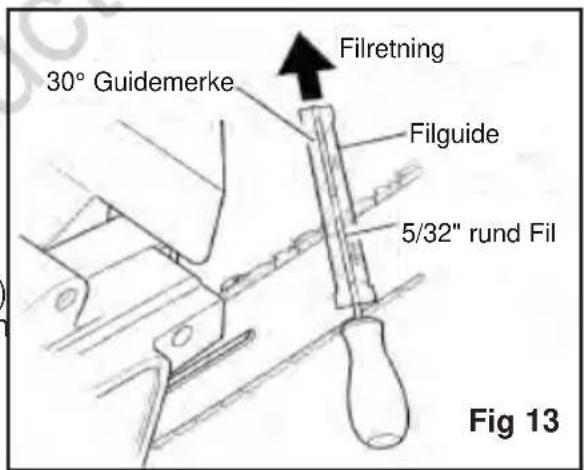
Use file guide for 30^ filing.
- Adjust the chain for proper tension.
- Clamp the guide bar in a vise to hold the saw steady.
Note: Do not clamp the chain.
- Press the 5/32" round file (attached to file guide) into the groove between the top plate and depth gauge on the chain. The file guide should rest on both the top plate and depth gauge, See Fig.13.
Note: File at the midpoint of the guide bar.
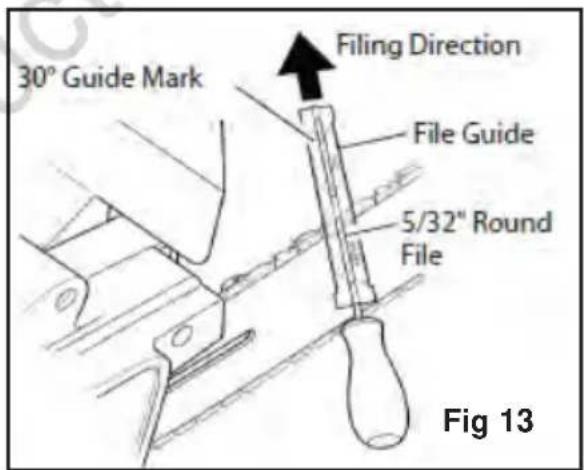
Note: This illustration shows the file guide placement and filing direction for sharpening cutters on left side of chain.
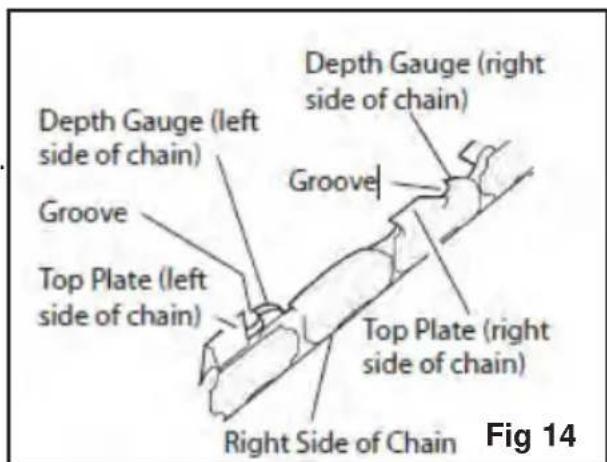
- Hold the file guide level. Make sure the 30^ mark on file guide is parallel to centre of the guide bar, See Fig.14.
This will ensure that you file cuts at a 30^ angle.
- File from inside towards outside of cutter until sharp. Only file in this one direction, see Fig.14.
Note: Two or three strokes with file should sharpen cutter.
Filing Cutter Depth Gauges
The cutter depth gauge clearance is reduced as cutters are sharpened.
After every second or third sharpening, reset the cutter depth gauges.
- Place the depth gauge tool (.025") firmly across the top of the two cutters. Make sure the depth gauge enters the slot in the depth gauge tool, See Fig.15.
- Use a medium flat file. File the depth gauge level with depth gauge tool.
- Remove the depth gauge tool with a flat file, round off front corner of cutter depth gauge, See Fig.16.
After several hand filings, have an authorized service centre or sharpening service machine sharpen chain. This will ensure even filing.
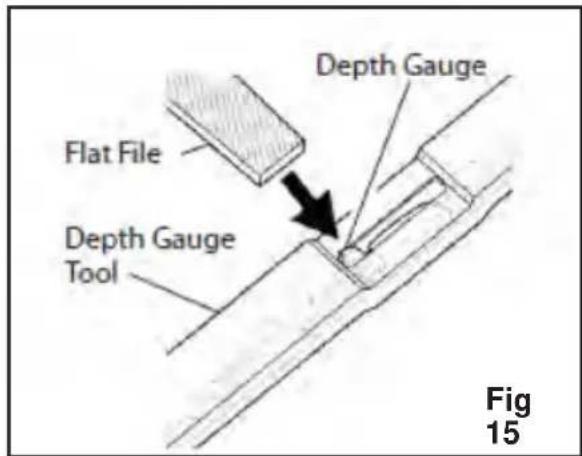
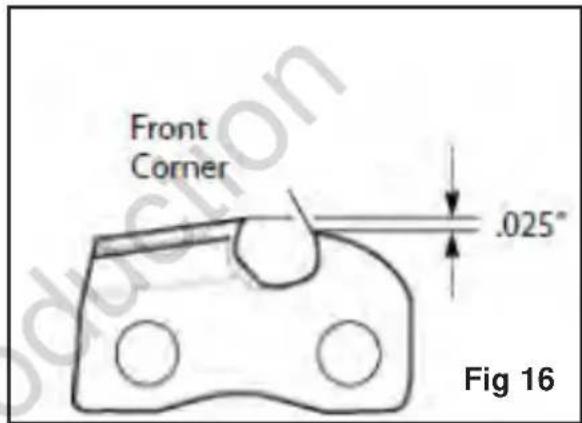
Table 1
| Tool Product number | |
| Oregon® File Guide 5/32" 37534 | |
| Oregon® Flat File & Depth Gauge Tool 40466 | |
| Oregon® Filing Vise 26368 |
Storing
If storing the machine for more than 30 days, follow steps below:
- Remove the battery from the machine.
For the pole saw:
- Remove and clean the guide bar and chain.
- Wipe a thin coating of oil over surface of guide bar.
- Wipe off outside of saw body. Do this with soft cloth dampened with a mild soap and water mixture.
- Cover the guide bar and/or blade with the cover provided.
-
Store the machine and battery:
-
In a high or secured place, out of children's reach
In a dry place
For the pole hedge trimmer:
- Make sure that the hedge trimmer has been thoroughly cleaned before storing it in a clean dry place out of the reach of children.
- Cover the blade with the cover provided.
-
Store the machine and battery:
-
In a high or secured place, out of children's reach
In a dry place
Troubleshooting
Although your new cordless hedge trimmer is really easy to operate, if you do experience problems, check the following:
| PROBLEM REMEDY | |
| If machine will not operate | Check battery pack assembly; Charge the battery: operation of the hedge trimmer is dependent upon sufficient charge in the battery pack. |
| If the battery will not charge | Check to see if the battery is properly inserted into the charging station, and make sure the indicator light is on. If not, check the power supply to the socket. |
| If the machine is not cutting properly | Check the condition of the chain/blades; if the chain/blade is blunt or damaged have them repaired by a qualified service agent. If a fault is suspected return the trimmer to an authorized dealer to repair. |
Residual risks
Additional residual risks may arise when using the tool which may not be included in the enclosed safety warnings. These risks can arise from misuse, prolonged use etc.
Even with the application of the relevant safety regulations and the implementation of safety devices, certain residual risks can not be avoided. These include:
- Injuries caused by touching any rotating/moving parts.
- Injuries caused when changing any parts, blades or accessories.
- Injuries caused by prolonged use of a tool. When using any tool for prolonged periods, ensure you take regular breaks.
Impairment of hearing. - Health hazards caused by breathing dust developed when using your tool (example: working with wood, especially oak, beech and MDF.)
TECHNICALSPECIFICATIONS
| PRODUCT SPECIFICATION 18V POLE HEDGE E TRIMMER | |
| Motor Type Brushed | |
| Motor Specification 18V | |
| Max Motor Speed 22000 RPM | |
| Blade Articulation Rate 1350 Strokes/min | |
| Effective Cutting Length 410 mm | |
| Recommended Cutting Diameter 10 mm | |
| Max Cutting Diameter 16 mm | |
| Product Weight (No Battery) 3.8 Kg | |
| Sound Pressure Level 86.3 dB(A) | |
| Sound Power Level (Measured) 97.3 dB(A) | |
| Sound Power Level (Guaranteed) 100.3 dB(A) | |
| Vibration Value1 (Max) 1.48 m/s | 2 |
1 Value for use for assessment of user exposure. Actual vibration during use of the chainsaw may differ depending on actual conditions. Uncertainty of measurement, K = 1.5 m/s^2
REMARKS:
- The declared vibration value has been measured with a standard test method and may be used to compare one tool with another.
The declared vibration value may be used in a preliminary assessment of exposure.
WARNING
The actual vibration values during use of the tool can be different from the above stated and depend on the use of the tool; and the need to identify safety measures to protect the operator are based on an estimation of exposure in the actual conditions of use (taking account all parts of the operating cycle such as the times when the tool is switched off and when it is running idle in addition to the trigger time).
TECHNICALSPECIFICATIONS
PRODUCT SPECIFICATION 18V POLE SAW
Motor Type Brushed
Motor Specification 18V
Max Motor Speed 23000 RPM
Bar Length 8"
Bar Make and Model Oregon 080SDEA041
Chain Make and Model Oregon 91PX033X
Chain Gauge 0.05"
Chain Pitch 3/8" Low Profile
Chain Speed 5.5 m/s
Bar Lubrication Capacity 80 ml
Product Weight 3.2 Kg
Sound Pressure Level 81.1 dB(A)
Sound Power Level (Measured) 94.7 dB(A)
Sound Power Level (Guaranteed)
97.7 dB(A)
Vibration Value (Max) 1.68 m/s
2
1 Value for use for assessment of user exposure. Actual vibration during use of the chainsaw may differ depending on actual conditions. Uncertainty of measurement, K = 1.5 m/s^2
REMARKS:
- The declared vibration value has been measured with a standard test method and may be used to compare one tool with another.
- The declared vibration value may be used in a preliminary assessment of exposure.
WARNING
The actual vibration values during use of the tool can be different from the above stated and depend on the use of the tool; and the need to identify safety measures to protect the operator are based on an estimation of exposure in the actual conditions of use (taking account all parts of the operating cycle such as the times when the tool is switched off and when it is running idle in addition to the trigger time).
VAZNENAPOMENE
Pojedinosti
Zahvaljujemo na kupovini Murray proizvoda. Murray se ponosi kvalitetom i performansama svojih proizvoda.
Ovaj korisniicki prirucnik pomaze pri montaži, sigurnom radu i odrzavanju vaseg proizvoda. Molimo da procitate sljedeca upozorenja kako bi osigurali sigurnost i dugi vijek trajanja vaseg proizvoda.

UPOZORENJE
Monterings Procedure
Udpakning
CORRECT AFVOEREN VAN HET PRODUCT

CORRECT AFVOEREN VAN DE VERPAKKING

Specification technique
SECURITE:MANUTENTION
ÉLIMINATION CORRECTE DU PRODUIT

RENDELTÉS (MAGASSÁGÍ AGNYESÖ)
Bruk filguide for 30^ sporing.
- Juster kjeden for riktig penning.
- Klem styrestangen med et skruestykke for a holde sagen jevn.
Merk: lkke klem kjected.
- Trykk den 5/32" runde filen (festet til filguiden)inn i sporet mellom topplaten og dybdemaleren pa kjeden. Filguiden skal hvile pa bade topplaten og dybdemaleren, Se Fig.13.
Merk: Filmidt guidestangen.
PRAWIDŁOWA UTYLIZACJA PRODUKTU

ELIMINACAO CORRETA DO PRODUCTO
©2020 Briggs & Stratton
Murray is a trademark of Briggs & Stratton Corporation.
All rights reserved. No part of this booklet may be reproduced by any means without prior written permission. All information herein is subject to change without notice.