CSA 4020 - Multitools AL-KO - Free user manual and instructions
Find the device manual for free CSA 4020 AL-KO in PDF.

| Product type | Pruning attachment for Multitool system |
| Brand | AL-KO |
| Model | CSA 4020 |
| Intended use | Tree pruning from the ground with the Multitool MT 40 base unit |
| Power supply | Requires Multitool MT 40 base unit (lithium-ion battery) |
| Chain type | Oregon 91P040X |
| Lubrication | Biodegradable cutting chain oil, integrated reservoir |
| Safety devices | Rail protective cover, tree stop claw, safety trigger (on the base unit) |
| Main functions | Pruning, branch cutting, high pruning from the ground |
| Maintenance and cleaning | Regular rail cleaning, chain sharpening, oil level check |
| Spare parts available | Cutting chain, guide rail, chain sprocket, protective cover |
| General information | Manual available in French and other languages, free download |
| Number of pages of the manual | 216 |
Frequently Asked Questions - CSA 4020 AL-KO
User questions about CSA 4020 AL-KO
0 question about this device. Answer the ones you know or ask your own.
Ask a new question about this device
Download the instructions for your Multitools in PDF format for free! Find your manual CSA 4020 - AL-KO and take your electronic device back in hand. On this page are published all the documents necessary for the use of your device. CSA 4020 by AL-KO.
USER MANUAL CSA 4020 AL-KO
AL-KO KOBER GROUP Kottz, Germany
This documentation or excerpts therefrom may not be reproduced or disclosed to third parties without the express permission of the AL-KO KOBER GROUP.

| CSA 4020 Art.-Nr. 113612 | |
| 360 W | |
| 36 V DC (40 V max.) | |
| 90 ml | |
| 2200 min-1 | |
| 4,2 m/s | |
| 2,2 kg (+0,55 kg) | |
| 203 mm | |
| LwA = 92,3 dB(A) [LpA = 73 dB(A), K = 3 dB(A)] | |
| 93 dB(A) | |
| < 2,5 m/s2[K = 1,5 m/s2, DIN EN ISO 20643] | |
| Oregon 91P033X | |
| Oregon 080SDEA041 |
1 About these operating instructions 22
1.1 Legends and signal words 22
2 Product description 23
2.1 Designated use (01) 23
2.2 Possible foreseeable misuse 23
2.3 Residual dangers 23
2.4 Symbols on the appliance 23
2.5 Safety and protective devices 23
2.6 Product overview 24
3 Safety instructions 24
3.1Operator 24
3.2 Personal protective equipment 24
3.3 Work area safety 25
3.4 Safety of persons and animals.. 25
3.5 Appliance safety 25
3.6 Electrical safety 25
3.7 Safety information for chain saws (EN 60745 Part 2-13) 26
3.8 Causes and operator prevention of kickback 27
3.9 Safety instructions for the polemounted pruner 28
3.9.1 Work instructions (01) 28
3.9.2 Vibration load 29
3.9.3 Noise pollution 30
4 Installation and start-up 30
4.1 Installing the guide rail and saw chain (02-06) 30
4.2 Tensioning and slackening the saw chain (07) 31
4.3 Filling saw chain oil (08) 31
4.4 Attaching the carrying belt to the basic appliance 31
4.5 Putting the attachment on the basic appliance 31
5 Operation 31
5.1 Switching the appliance on and off .... 32
5.2 Checking the chain tension 32
5.3 Checking the chain lubrication 32
6 Working behaviour and working technique (09-13) 32
7 Maintenance and care 32
7.1 Saw chain and guide rail 32
7.1.1 Replacing the saw chain and guide rail 32
7.1.2Turning the guide rail 33
7.1.3 Sharpening the saw chain 33
7.1.4 Cleaning the guide rail 33
7.2 Checking and cleaning the drive sprocket 33
8 Help in case of malfunction 34
9 Transport 34
10 Storage 35
11 Disposal. 35
12 Guarantee 36
13 Translation of the original EU/EC declaration of conformity. 36
1 ABOUT THESE OPERATING INSTRUCTIONS
The German version is the original operating instructions. All additional language versions are translations of the original operating instructions.
It is essential to read through these operating instructions carefully before start-up. This is essential for safe working and trouble-free handling.
Always safeguard these operating instructions so that they can be consulted if you need any information about the appliance.
Only pass on the appliance to other persons together with these operating instructions.
Comply with the safety and warning information in these operating instructions.
1.1 Legends and signal words
DANGER! Denotes an imminently dangerous situation which will result in fatal or serious injury if not avoided.
WARNING! Denotes a potentially dangerous situation which can result in fatal or serious injury if not avoided.
CAUTION! Denotes a potentially dangerous situation which can result in minor or moderate injury if not avoided.
IMPORTANT! Denotes a situation which can result in material damage if not avoided.
NOTE Special instructions for ease of understanding and handling.
2 PRODUCT DESCRIPTION
The polemounted pruner allows you to prune, trees and other shrubs conveniently and safely from the ground. This eliminates the time-consuming and dangerous work on a ladder or a tree.
2.1 Designated use (01)
The polemounted pruner attachment may only be used in interaction with the basic appliance. The whole appliance is intended to prune established trees and other shrubs from the ground. The user must stand firmly on the ground (01).
Only biodegradable saw chain oil must be used. The basic appliance as well as the attachments are solely intended for use in non-commercial applications. Any other use, as well as unauthorised conversions or add-ons, are regarded as contrary to the intended use and will result in invalidation of the warranty as well as loss of conformity (CE mark); the manufacturer will thus decline any responsibility for damage and/or injury suffered by the user or third parties.
2.2 Possible foreseeable misuse
- Do not saw off any branches that are directly or at an acute angle above the user or other persons.
- Do not operate the appliance standing on a ladder.
Only use one extension pipe, even if further extension pipes are available.
Do not use any used oil or mineral oil.
2.3 Residual dangers
Even during correct use of the appliance, there is always a certain residual risk that cannot be excluded. Depending on the use, the following po
tential risks can be derived from the type and construction of the appliance:
- Contact with wood chips and oil dust flying around
Inhalation of wood chip particles and oil dust
Injuries caused by saw chain parts flying around
Cutting injuries on the saw chain
2.4 Symbols on the appliance
Symbol Meaning

Pay special attention when handling this product.
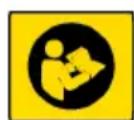
Read the operating instructions before starting operation.
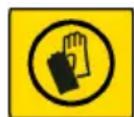
Wear protective gloves!
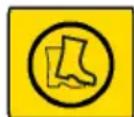
Wear sturdy shoes!

Wear a protective helmet.
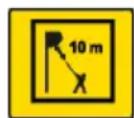
Maintain a distance of 10m from live lines.

Wear hearing protection and protective eyewear.
Do not use in the rain! Protect against moisture!
2.5 Safety and protective devices
Protective cover of the guide rail
Before transport, the protective cover must be pushed onto the guide rail and saw chain to avoid injuries to persons and damage to objects.
2.6 Product overview
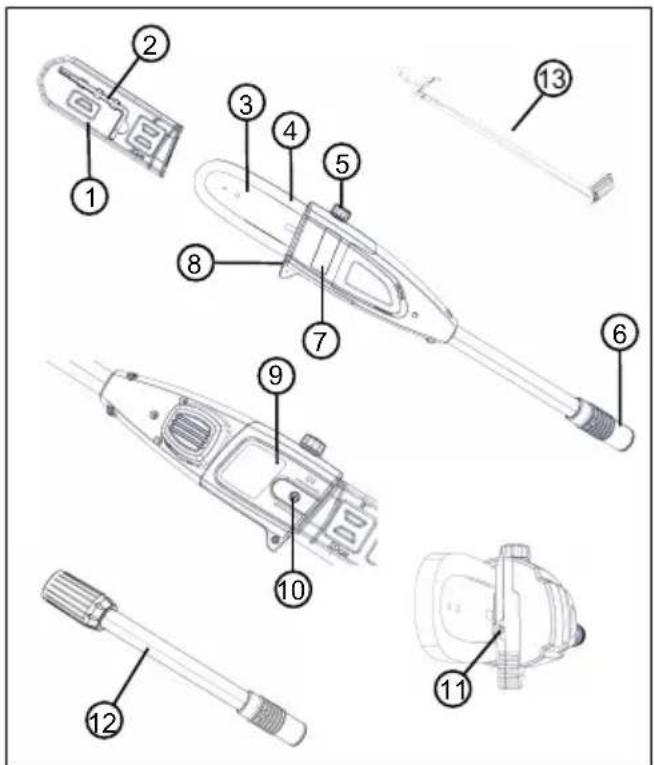
No. Component
1 Protective cover of the guide rail
2 Allen key with screwdriver
3 Chain bar
4 Saw chain
5 Fill opening of the oil tank
6 Coupling for extension pipe or basic appliance
7 Viewing aperture of the oil tank
8 Tree grip
9 Chain sprocket cover
10 Fastening screw
11 Chain tensioning screw
12 Extension pipe
13 Carrying belt for basic appliance
3 SAFETY INSTRUCTIONS
3.1 Operator
- Young people under 16 years of age and people who do not know the operating instructions are not allowed to use the tool. Heed any country-specific safety regulations concerning the minimum age of the user.
- Do not operate the appliance if you are under the influence of alcohol, drugs or medication.
3.2 Personal protective equipment
Wear clothing and protective equipment in accordance with the regulations in order to avoid injuries to the head and limbs, as well as to avoid hearing impairment.
The personal protective equipment comprises:
Protective helmet, safety goggles and breathing protection
Long trousers and solid shoes
During maintenance and care: Protective gloves
3.3 Work area safety
Only work during daylight or under very bright artificial light.
Before working, remove any dangerous objects from the working area, e.g. branches, glass or metal pieces, stones.
Make sure you are standing safely.
3.4 Safety of persons and animals
Only use the appliance for the purposes for which it is intended. Any non-intended use can lead to injury and property damage.
- Only switch on the appliance when there are no persons and/or animals in the working area.
- Keep hands, feet and other parts of the body away from moving appliance parts (e.g. saw chain, blade system).
- Appliance parts, such as engine covers and cutting tools, can heat up considerably during operation. Do not touch them. After switching off, wait until the appliance has cooled.
3.5 Appliance safety
Only use the appliance under the following conditions:
The appliance is not soiled.
The appliance show no signs of damage.
All controls function properly.
- Keep all appliance handles dry and clean.
- Do not force the power tool. It is intended for light work in the private sector. Overload can lead to damage to the appliance.
- Never operate the appliance with worn or defective parts. Always replace defective parts with original spare parts from the manufacturer. If the appliance is operated with worn or defective parts, guarantee claims against the manufacturer are excluded.
3.6 Electrical safety
To avoid short-circuits and destroying electrical components:
- Protect the appliance against humidity and do not use it in the rain.
- Do not spray the appliance with water.
Do not open the appliance.
NOTE Heed the safety instructions for the rechargeable battery and for the charging unit in the separate operating instructions.
3.7 Safety information for chain saws (EN 60745 Part 2-13)
- Keep all parts of your body away from the saw chain when the saw is running. Before starting the saw, make sure that nothing is touching the saw chain. When working with a chain saw, one moment of inattention can mean your clothing or parts of your body coming into contact with the saw chain.
Always hold the chain saw with your right hand on the rear grip and your left hand on the front grip. Holding the chain saw with your hands the other way around increases the risk of injury and is not allowed.
Hold the electrical tool using the insulated handle surfaces because the saw chain could come into contact with its own mains cable. Contact between the saw chain and a live cable can result in electrical current flow
ing through metal parts of the machine, leading to electric shock.
Wear protective goggles and ear defenders. Further protective equipment is recommended for the head, hands, legs and feet. Appropriate protective clothing reduces the risk of injury due to flying chips and inadvertent contact with the saw chain.
- Do not work with the chain saw in a tree. Risk of injury when operating in a tree.
Always make sure you are standing firmly and only use the chain saw if you are standing on firm, secure and level ground. Slippery ground or unstable standing surfaces such as on a ladder can lead to a loss of equilibrium or loss of control over the chain saw.
- When cutting a branch that is under tension, expect it to spring back. When the tension in the wood fibres is released, the branch under tension can hit the operator and/or cause a loss of control over the chain saw.
Take particular care when cutting undergrowth and young trees. The thin materi
al can get caught in the saw chain and hit you or cause you to lose your balance.
- Carry the chain saw at the front grip when it is switched off, and have the saw chain pointing away from your body. Always put on the protective cover when transporting or storing the chain saw. Careful handling of the chain saw reduces the probability of inadvertent contact with the running saw chain.
- Follow the instructions for lubrication, chain tensioning and changing accessories. An incorrectly tensioned or lubricated chain can either tear or increase the risk of kickback.
- Keep the grips dry, clean and free from oil and grease. Greasy, oily grips are slippery and result in loss of control.
Only saw wood. Do not use the chain saw for work for which it is not intended. Example: Do not use the chain saw for sawing plastic, masonry or construction materials that are not made of wood. Using the chain saw
for non-designated work can lead to dangerous situations.
3.8 Causes and operator prevention of kickback
Kickback may occur when the nose or tip of the guide bar touches an object, or when the wood closes in and pinches the saw chain in the cut.
Tip contact in some cases may cause a sudden reverse reaction, kicking the guide bar up and back towards the operator.
Pinching the saw chain along the top of the guide bar may push the guide bar rapidly back towards the operator.
Either of these reactions may cause you to lose control of the saw which could result in serious personal injury. Do not rely exclusively upon the safety devices built into your saw. As a chain saw user, you should take several steps to keep your cutting jobs free from accident or injury.
Kickback is the result of tool misuse and/or incorrect operating procedures or conditions and can be avoided by taking proper precautions as given below:
- Maintain a firm grip, with thumbs and fingers encircling the chain saw handles, with both hands on
the saw and position your body and arm to allow you to resist kickback forces.
Kickback forces can be controlled by the operator, if proper precautions are taken. Do not let go of the chain saw.
- Do not overreach and do not cut above shoulder height. This helps prevent unintended tip contact and enables better control of the chain saw in unexpected situations.
Only use replacement bars and chains specified by the manufacturer. Incorrect replacement bars and chains may cause chain breakage and/or kickback.
Follow the manufacturer's sharpening and maintenance instructions for the saw chain. Decreasing the depth gauge height can lead to increased kickback.
3.9 Safety instructions for the polemounted pruner
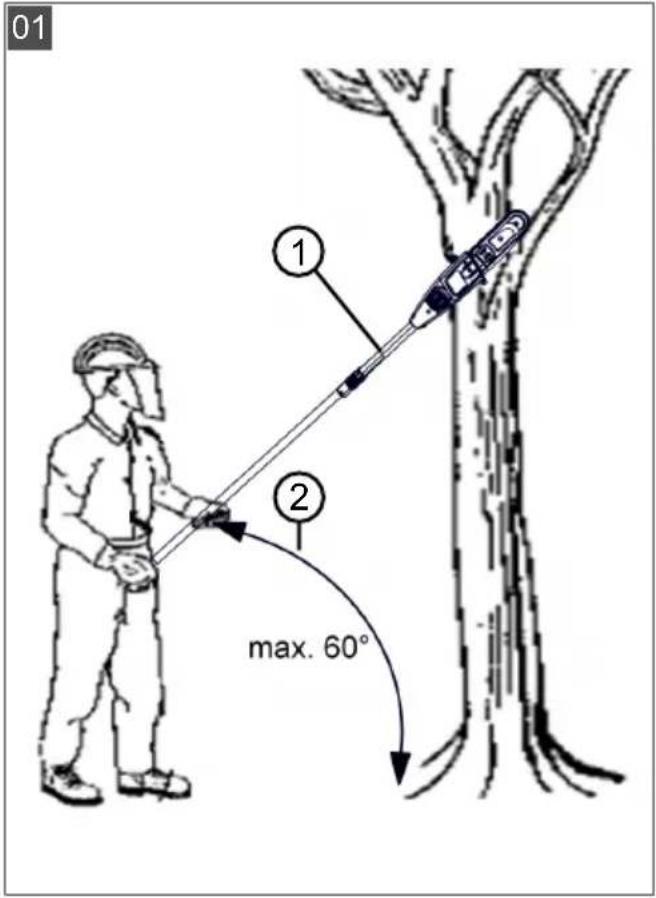
3.9.1 Work instructions (01)
During pruning, lift the pole-mounted pruner (01/1) to a maximum angle of 60^ (01/2). At a steeper angle, you inevitably get into the area where
cut-off branches can fall. Always stand outside this area.
Plan an escape route in advance for getting out of the way of falling branches. This escape route must be free of obstacles such as sawn-off branches or slippery places that could hinder getting out of the way.
- Keep a safe distance from bystanders, animals, objects or buildings, which is at least approx. 2.5x the length of the branch to be sawn off. If that is not possible, saw the branch off piece by piece.
- Do not attempt to saw a branch that has a diameter greater than the length of the chain bar.
- Avoid moving branches or objects becoming caught in the saw chain. In this case, immediately switch off the pole-mounted pruner.
- Remove the rechargeable battery from the basic appliance and push the protective cover over the saw chain for:
Testing, adjustment work and cleaning work
Work on the guide rail and saw chain
Leaving the appliance
Transport
Storage
- Maintenance and repair work
Danger
- Maintain a minimum distance of 10m to overhead electrical lines.
3.9.2 Vibration load
WARNING! Danger due to vibration. The actual magnitude of the vibration emissions during the use of the appliance may deviate from that stated by the manufacturer. Observe the following influencing factors before or during use:
Is the appliance being used as intended?
Is the material being cut or processed in the proper manner?
Is the appliance in a proper condition of use?
Is the cutting tool properly sharpened or is the correct cutting tool installed?
Are the handle grips and any optional vibration grips mounted, and are they firmly attached to the appliance?
Only operate the tool at the motor speed required for the respective work. Avoid using
the maximum speed in order to reduce noise and vibrations.
The noise and vibrations of the tool may increase due to improper use and maintenance. This leads to health damage. In this case, immediately switch off the tool and have it repaired by an authorised service workshop.
The degree of stress due to vibration depends on the work to be performed or on the use of the tool. Estimate the stress and plan appropriate work breaks. This considerably reduces stress due to vibration over the entire working time.
- Extensive use of the tool exposes the operator to vibrations, which can lead to circulatory issues ("white fingers"). To avoid this risk, wear gloves and keep your hands warm. If any symptoms of "white fingers" occur, immediately consult a physician. These symptoms include: Numbness, loss of feeling, tingling, itching, pain, reduced muscular strength, changes in the colour or condition of the skin. Normally these conditions affect the fingers, hands or
pulse. The risk increases at low temperatures.
Take long breaks during your working day so you can recover from the noise and the vibrations. Plan your work in such a way that the use of appliances that generate strong vibrations is spread over several days.
If you notice an unpleasant sensation or discolouration of the skin on your hands when using the tool, stop work immediately. Take sufficient work breaks. Without sufficient breaks, a hand/arm vibration syndrome can occur.
- Minimise your risk of being exposed to vibrations. Maintain the tool according to the instructions in the operating instructions.
If the tool is used frequently, contact your dealer to purchase anti-vibration accessories (e.g. handles).
- Avoid working with the tool at temperatures below 10^ . Define how the vibration load can be limited in a work plan.
3.9.3 Noise pollution
A certain level of noise exposure from this appliance is inevitable. Carry out noisy work at ap
proved and specified time periods. Observe rest periods as necessary and restrict the duration of the work to a minimum. For your personal protection and protection of persons in the vicinity, appropriate hearing protection must be worn.
4 INSTALLATION AND START-UP
4.1 Installing the guide rail and saw chain (02-06)
CAUTION! Risk of injury on the saw
chain. The cutting edges of the saw chain are very sharp so that cutting injuries can occur when handling the saw chain. Before all work with the saw chain, heed the following:
-
Switch off the appliance and remove the rechargeable battery.
Wear protective footwear. -
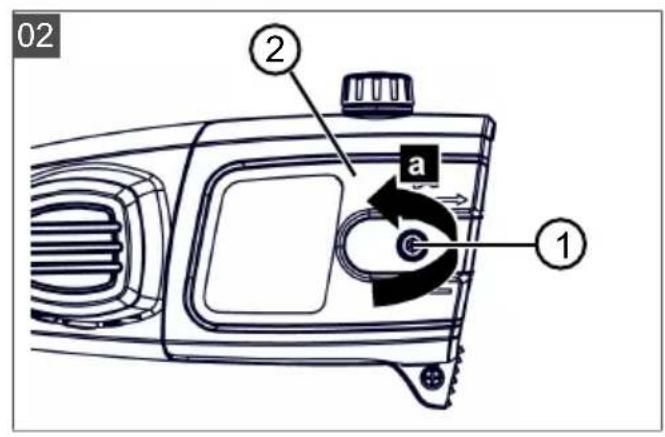
Loosen the fastening screw (02/1) of the chain sprocket cover (02/2) with the screwdriver on the Allen key (02/a). Remove the fastening screw and chain sprocket cover.
-
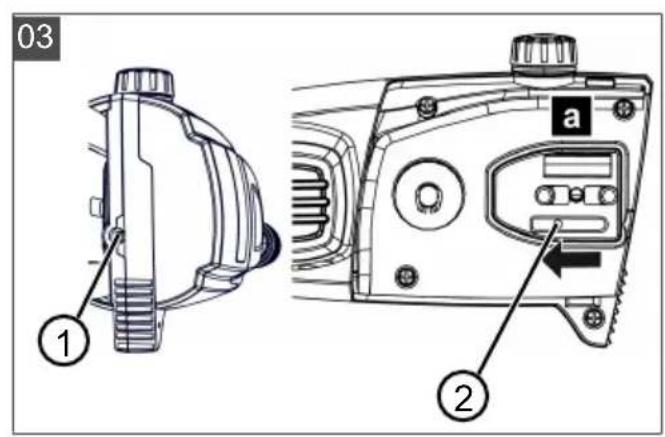
Use the screwdriver on the Allen key to loosen the chain tensioning screw (03/1). Turn the chain tensioning screw until the chain tensioning pin (03/2) is at the rear thread end (03/a).
-
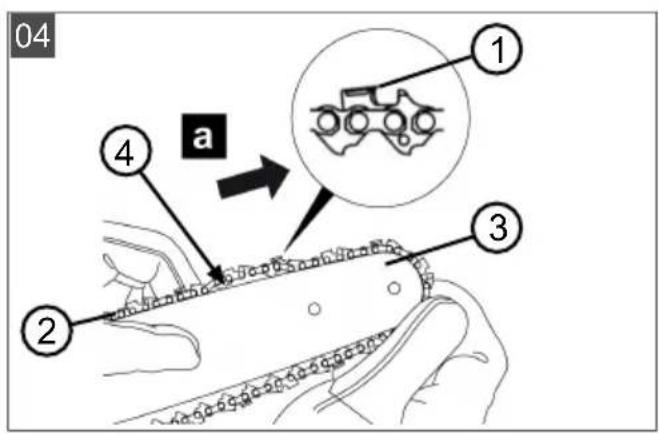
Insert the saw chain:
Align (04/a) the cutting teeth (04/1) of the saw chain (04/2) that are to lie at the top of the guide rail to the tip of the guide rail (04/3).
Note: Make sure that the chain is correctly mounted!
- Place the saw chain (04/2) in the groove (04/4) of the guide rail and guide completely around the guide rail.
- Lay the guide rail together with the saw chain laid on it in the open housing:
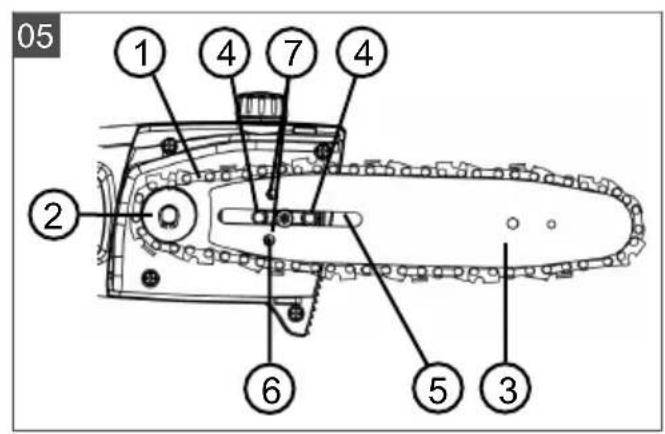
Lay the saw chain (05/1) around the drive sprocket (05/2).
Align the guide rail (05/3) in such a way that the two guide pins (05/4) grip in the slotted hole (05/5) of the guide rail.
Align the guide rail (05/3) so that the chain tensioning pin (05/6) grips in one of the two chain tensioning holes (05/7).
Align the saw chain (05/1) so that it is in contact in the groove of the guide rail (05/3) and on the drive sprocket (05/2).
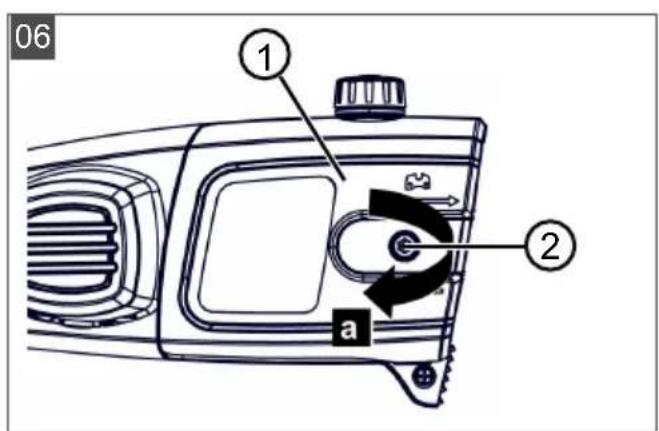
- Put on the chain sprocket cover (06/1) and insert the fastening screw (06/2) and tighten with the Allen key (06/a).
- Tension the saw chain (see chapter 4.2 "Tensioning and slackening the saw chain (07)", page 31).
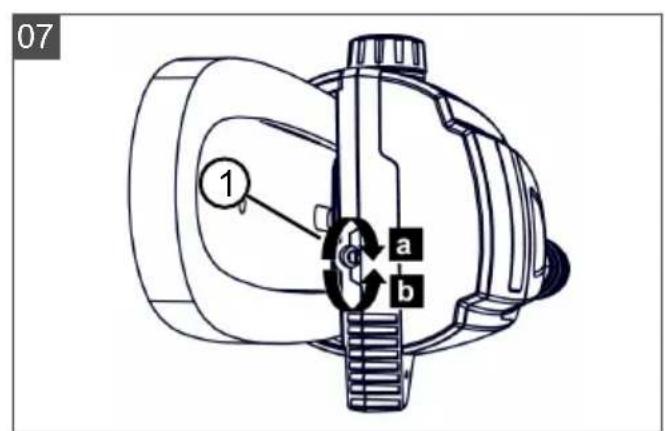
4.2 Tensioning and slackening the saw chain (07)
- Tension the saw chain; use the screwdriver on the Allen key:
Tensioning the saw chain: Turn the chain tensioning screw (07/1) clockwise (07/a).
- Slackening the saw chain: Turn the chain tensioning screw (07/1) anti-clockwise (07/b).
- Check the chain tension(see chapter 5.2 "Checking the chain tension", page 32). Repeat the previous step if necessary.
4.3 Filling saw chain oil (08)
There is no appliance saw chain oil in the appliance upon delivery.
IMPORTANT! Danger of damage to the appliance. Use of the appliance without saw chain oil leads to damage of the saw chain and the guide rail.
Never operate the appliance without saw chain oil.
Before starting work, fill the saw chain oil in the oil tank and check the oil level during the work.
At least before starting work each time, check that the chain lubrication is working.
The service life and cutting performance of the saw chain depend on optimum lubrication. The saw chain has oil applied to it automatically during operation.
IMPORTANT! Danger of damage to the appliance. Due to the metallic abrasion it contains, the use of used oil for lubricating the chain would lead to premature wear of the guide rail and saw chain. Also, the warranty of the manufacturer will become void.
Never use used oil, only biologically degradable saw chain oil.
IMPORTANT! Danger of environmental
damage. The use of mineral oil for the chain lubrication leads to serious environmental damage.
- Never use mineral oil, but only biologically degradable saw chain oil.
Each time before starting work or changing the rechargeable battery, check the oil level and replenish the saw chain oil if necessary:
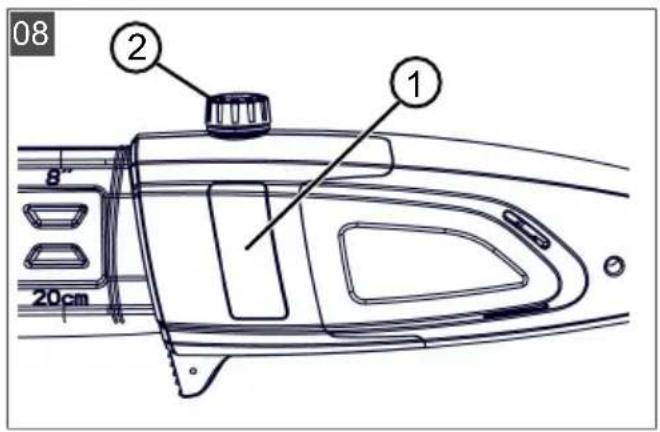
- Check the oil level in the viewing aperture (08/1) of the oil tank. It must always be possible to see oil. The minimum and the maximum oil level must not be exceeded.
- Place and hold the polemounted pruner horizontal on a firm surface.
- Clean the appliance around the oil tank cap (08/2).
- Unscrew the oil tank cap (08/2).
- Fill the oil tank with biologically degradable saw chain oil. While doing so, check the oil level in the viewing aperture (08/1) of the oil tank. Do not allow it to overrun.
Use a funnel for easier filling.
- Do not allow any dirt to get into the oil tank.
- Screw down the oil tank cap (08/2) again.
4.4 Attaching the carrying belt to the basic appliance
See "Multitool MT 40 - basic appliance" operating instructions.
4.5 Putting the attachment on the basic appliance
See "Multitool MT 40 - basic appliance" operating instructions.
5 OPERATION
CAUTION! Danger of burns. The gearbox housing becomes hot during operation.
Do not touch the gearbox housing.
5.1 Switching the appliance on and off
See "Multitool MT 40 - basic appliance" operating instructions.
5.2 Checking the chain tension
Frequently check the chain tension, because new saw chains stretch.
- Pull through the saw chain a little by hand and, while doing so, check:
When cold: The saw chain has been tensioned correctly when it can be lifted by approx. 3 - 4mm in the middle of the guide rail and can be pulled though easily by hand. At operating temperature, the saw chain stretches and hangs down.
The drive links of the saw chain are not allowed to come out of the groove on the underside of the guide rail - otherwise the saw chain could jump off.
- Re-tension the saw chain if necessary (see chapter 4.2 "Tensioning and slackening the saw chain (07)", page 31).
5.3 Checking the chain lubrication
Check the function of the automatic chain lubrication by switching on the polemounted pruner and pointing its tip towards a piece of cardboard or paper placed on the ground.
IMPORTANT! Danger of damage to the appliance. Ground contact invariably leads to blunting of the saw chain.
-
Do not make contact with the ground with the chain and maintain a safety distance of 20~cm .
-
Switch on the appliance.
- Hold the tip of the guide rail in the direction of a cardboard box or paper on the ground.
If the check produces a growing trace of oil, this indicates the automatic oiling function is operating correctly.
If there is no trace of oil even though the oil tank is full: Clean the oil entry hole in the appliance and the groove of the guide rail.
If this is not successful, please contact our customer service.
6 WORKING BEHAVIOUR AND WORKING TECHNIQUE (09 - 13)

WARNING! Increased risk of falling.
There is a greater risk of falling if work is carried out from an elevated position (e.g. ladder).
always work with the appliance from the ground and make sure that you are standing securely.
Heed the safety instructions.
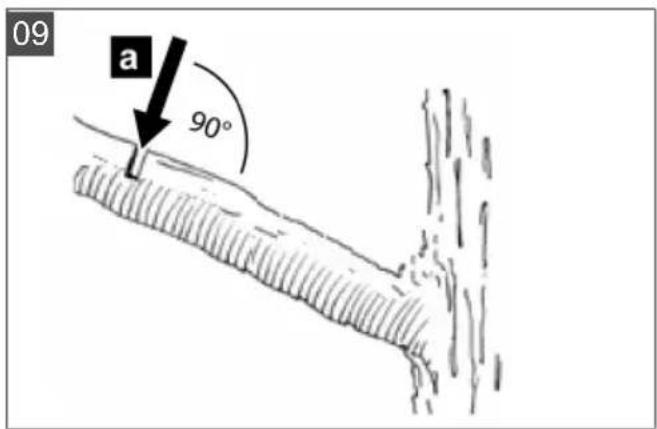
Where possible, stand so that the cut can be carried out at an angle of 90^ to the branch (09/a).
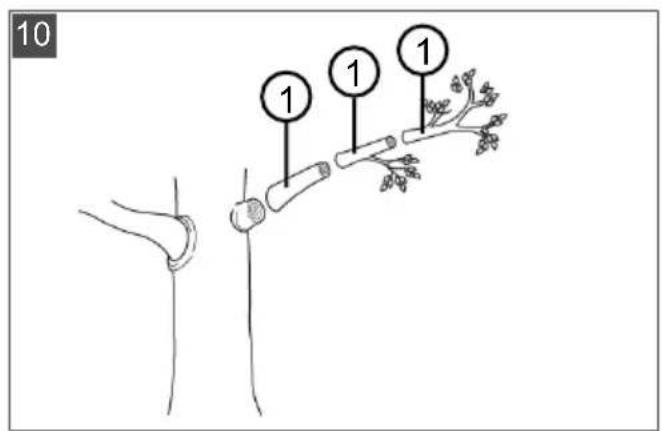
Saw off thick branches in sections in order to have better control over the point of impact (10/1).
- Never saw in the flaring at the beginning of the branch in order to improve the healing of the wound and to avoid rot (11).
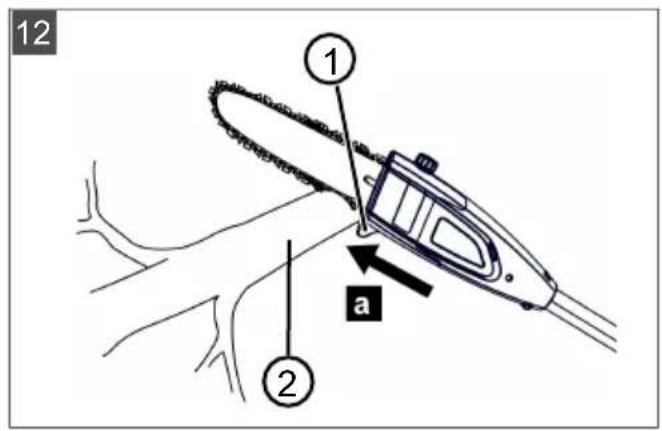
Press (12/a) the polemounted pruner against the branch (12/2) with the tree grip (12/1) when sawing to stabilise it on the branch.
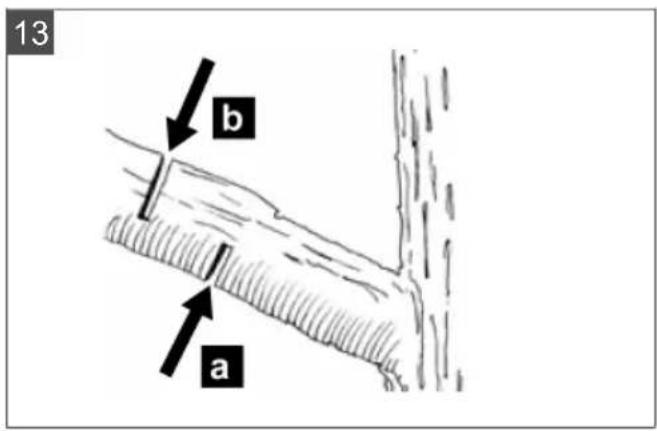
Before the branch is sawn off (13/b), make a relief cut (13/a) on the underside of the branch. This can avoid the bark tearing off and causing difficult-to-heal damage to the tree. The relief cut should not be deeper than 1/3 of the branch thickness to avoid any trapping of the polemounted pruner.
Always pull the polemounted pruner with rotating saw chain out of the branch so that it does not become trapped.
7 MAINTENANCE AND CARE

WARNING! Danger of cuts and lacera
tions. Danger of cuts and lacerations when reaching into sharp-edged, moving appliance parts and into cutting tools.
Before maintenance, care and cleaning work, always switch off the appliance. Remove the rechargeable battery.
Always wear protective gloves during maintenance, care and cleaning work.
7.1 Saw chain and guide rail
7.1.1 Replacing the saw chain and guide rail
Replacing the saw chain and guide rail
The saw chain and guide rail are exposed to significant wear. Change the saw chain and guide rail immediately if correct function is not assured.
7.1.2 Turning the guide rail
In order to avoid one-sided wear on the guide rail, turn it every time the chain is changed.
7.1.3 Sharpening the saw chain
CAUTION! Risk of injury due to kickback.
Damaged or incorrectly sharpened saw chains increase the danger of kickback! This can result in injuries.
Clean the saw chain regularly.
Check the saw chain regularly for damage and replace if necessary.
If you are not familiar with sharpening the chain: Contact our relevant customer service.
The saw chain must be sharpened in the following cases:
Only sawdust is thrown out, rather than wood chips.
The polemounted pruner must has to be forced through the wood during pruning.
For the inexperienced user: Have the saw chain sharpened by a specialist/customer service. If you are sharpening the saw chain yourself, heed the following values. Accessories can be obtained from specialist retailers.
| Chain type File diameter | Top plate angle | Down angle Head tilt angle (55°) | Depth gauge setting |
| Rotational angle of the tool | Inclination angle of the tool | Side plate angle | |
| Oregon 91P040X 5/32" 30° 0° 80° 0.025" | |||
| Depth gauge setting File | |||
NOTE Only remove a little material when sharpening! We recommend using a chain sharpening tool for sharpening your saw chain.
7.1.4 Cleaning the guide rail
- Clean the guide rail, the groove of the guide rail and the oil outlet openings regularly.
- Use a flat file to remove the burrs that have built up on the guide rail due to the saw chain.
7.2 Checking and cleaning the drive sprocket
The load on the drive sprocket (05/2) is particularly intense. Therefore, perform the following tasks:
- Check the teeth of the drive sprocket regularly for wear or damage.
- Clean the drive sprocket and guide rail attachment with a brush.
NOTE A worn or damaged drive sprocket reduces the service life of the saw chain, and so the drive sprocket should be renewed without delay by the customer service.
8 HELP IN CASE OF MALFUNCTION
CAUTION! Risk of injury. Sharp-edged and moving appliance parts can lead to injury.
Always wear protective gloves during maintenance, care and cleaning work!
| Malfunction Cause Remedy | ||
| The guide rail and saw chain become hot when running. Generation of smoke. | The saw chain is tensioned too tightly. | Check the chain tension. Re-tension the saw chain. |
| Oil tank is empty. | Replenish the saw chain oil. | |
| The oil entry hole and/or groove of the guide rail are dirty. | Clean the oil entry hole and groove of the guide rail. | |
| Motor running, but the saw chain does not move. | The saw chain is tensioned too tightly. | Check the chain tension. Re-tension the saw chain. |
| Appliance faults | Contact an AL-KO service centre. | |
| Only sawdust is thrown out, rather than wood chips. The pole-mounted pruner must be forced through the wood. | The saw chain is blunt. | Sharpen the saw chain or contact an AL-KO service centre. |
| Appliance vibrates unusually. | Appliance faults | Contact an AL-KO service centre. |
| Other faults See "Multitool MT 40 - basic appliance" operating instructions. | ||
NOTE If you encounter any malfunctions that are not listed in this table or that you cannot rectify yourself, please contact our customer service.
9 TRANSPORT
Before transporting, carry out the following measures:
- Switch off the tool.
- Remove the rechargeable battery from the basic appliance.
- Separate the basic appliance, extension pipe (if present) and attachment from each other.
NOTE The nominal energy of the rechargeable battery is more than 100 Wh. Therefore, observe the following transport instructions.
The li-ion rechargeable battery contained in the appliance is subject to the hazardous goods law, but can be transported under simplified conditions:
The rechargeable battery can be transported on public roads by the private user without further conditions provided it is packaged for retail sale and the transport serves personal purposes.
- Commercial users who carry out the transport in connection with their main activity (e.g. delivery from and to building sites, or demonstrations) can also take advantage of this simplification.
In both cases, it is essential to take the mandatory precautions mentioned above to prevent any leakage of the contents. In other cases, it is essential to comply with the regulations of the hazardous goods law. In the case of non-compliance, severe penalties can be imposed on the sender and possibly the transporter.
Additional notes on transport and shipment
Only transport or send the li-ion rechargeable battery in an undamaged condition.
For transporting the rechargeable battery, only use the original cardboard box or a suitable hazardous goods cardboard box (not required for rechargeable batteries with a nominal energy less than 100 Wh).
- Tape off exposed rechargeable battery contacts to avoid a short circuit.
- Secure the rechargeable battery against shifting in the packaging to avoid damage to the rechargeable battery.
Ensure the correct marking and documentation of the shipment for transport or shipping (e.g. by parcel service or freight forwarding).
- Check in advance that transport with the selected service provider is possible and indicate the shipment.
We recommend involving a hazardous goods specialist in preparation of the shipment. Also heed any further national regulations.
10 STORAGE
Thoroughly clean the appliance after each use and - if present - attach all covers. Store the appliance in a dry, lockable place out of the reach of children.
Carry out the following jobs before intervals in work lasting for longer than 30 days:
- Empty the oil tank for the saw chain oil.
- Remove the saw chain and guide rail, clean it and spray it with rust-proofing oil.
- Thoroughly clean the appliance and store it in a dry place.
IMPORTANT! Danger of damage to the appliance. Dried-on/sticky saw chain oil can lead to damage to oil-channelling components after lengthy storage.
- Remove the saw chain oil from the appliance before an extended period of storage.
11 DISPOSAL
Information on the German Electrical and Electronic Equipment Act (ElectroG)


Electrical and electronic appliances do not belong in household waste, but should be collected and disposed of separately.
Used batteries or rechargeable batteries that are not installed permanently in the old appliance must be removed before disposal. Their disposal is regulated by the battery law.
- Owners or users of electrical and electronic appliances are obliged by law to return them after use.
The end user bears personal responsibility for deleting his personal data from the old appliance to be disposed of.
The symbol of the crossed-through rubbish bin means that electrical and electronic appliances may not be disposed of in the household rubbish.
Electrical and electronic appliances can be handed in at the following places at no charge:
Public service disposal or collection points (e.g. municipal building yards)
Points of sale of electrical appliances (stationary and online) provided traders are obliged to take them back or offer this voluntarily.
These statements only apply to appliances that are installed and sold in the countries of the European Union and are subject to European Directive 2012/19/EU. Different provisions may apply to the disposal of electrical and electronic appliances in countries outside the European Union.
Information on the German Battery Act (BattG)

Used batteries and rechargeable batteries do not belong in household waste, but should be collected and disposed of separately.
- For safe removal of batteries or rechargeable batteries from the electrical appliance and for information on their type or chemical system, follow the further information within the operating or installation instructions.
- Owners or users of batteries and rechargeable batteries are obliged by law to return them after use. Return is limited to the handover of customary household quantities.
Used batteries can contain harmful substances or heavy metals that can cause damage to the environment and human health. Reuse of the used batteries and use of the resources contained therein contributes to the protection of these two essential commodities.
The symbol of the crossed-through rubbish bin means that batteries and rechargeable batteries may not be disposed of in household rubbish.
In addition, if the symbol Hg, Cd or Pb appears under the rubbish bin, this stands for the following:
Hg: Battery contains more than 0.0005% mercury
Cd: Battery contains more than 0.002% cadmium
- Pb: Battery contains more than 0.004% lead Rechargeable batteries and batteries can be handed in at the following places at no charge:
Public service disposal or collection points (e.g. municipal building yards)
Points of sale of batteries and rechargeable batteries
Disposal points of the common take-back system for the used batteries of appliances
Disposal point of the manufacturer (if not a member of the common take-back system)
These statements apply only to rechargeable batteries and batteries that are sold in the countries of the European Union and that are subject to European Directive 2006/66/EU. Different provisions can apply to the disposal of rechargeable batteries and batteries in countries outside the European Union.
12 GUARANTEE
We will resolve any material or manufacturing faults on the appliance during the legal warranty period for claims relating to faults, in accordance with our choice either to repair or replace. The legal warranty period is determined by the legislation of the country in which the appliance was purchased.
Our warranty promise applies only if:
These operating instructions are heeded
The appliance is handled correctly
Original spare parts have been used
The warranty becomes void in the case of:
Unauthorised repair attempts
Unauthorised technical modifications
Non-intended use
The guarantee excludes:
Paint damage that can be attributed to normal wear and tear
Wear parts that are marked with a frame xxxxx (x) on the spare parts card
The guarantee period commences with purchase by the first end user. The date on the proof of purchase is decisive. In the event of a guarantee claim, please take this guarantee declaration and the original proof of purchase, and contact your dealer or the nearest authorised customer service centre. This statement does not affect the purchaser's statutory claims for defects against the vendor.
13 TRANSLATION OF THE ORIGINAL EU/EC DECLARATION OF CONFORMITY
See "Multitool MT 40 - basic appliance" operating instructions.
TRADUCTION DE LA NOTICE D'UTILISATION ORIGINALE
Table des matieres
7.1 Veriga zage in mec. 79
7.1.1 Zamenjava verige zage in meca .. 79
7.1.2 Obracanje meca. 79
7.1.3 Ostrenje verige zage.. 79
7.1.4 Cischenje meca 80
NCKJbUyHbAbe cauekajTe DOK ce He Oxnae.
3.5Бe36eHocTypejaja
Kopncntte ypehaj camo nocneedeHm ycnoBnma:
Ypehaj Hnje 3anpbaH.
Ypehaj He noka3yje owteheha.
CbnKOMaHdHn eJeMeHTN cyHKcnoHnSy.
CBe puuue ypehaja oDpXaBajTe y cybOM n uNCTOM CTaHbY.
Hemojte ppeonTepehnbatnypehaj. Ypehaj je Hamehben3a Jankwe padobe y npNBATHOM OKpyxehy. PpeonTepehheBa doBoDe do oWteHeha ypehaja.
HnkaH HeMoJTe Da KOpIcTInTe ypehaj ca nCTpoWeHm nIi HEnCnpaBnM DeIOBnMa. YBeK 3aMehByjTe HEnCnpaBHe DeIOBe OpuHaJIHnM pe3epBnM DeIOBnMa npOn3BoJha. Ako ce ypehaj KopncTn Ca nCTpoWeHm nIi HEnCnpaBnM DeIOBnMa, Hehe 6bTu MoYHe da ce OCTBaPe IpaBa nO OCHOy rapaHcNJe y Ondocu Ha npOn3BoJha.
3.6 EneKtpnHa 6e36eHocT
YcBpxy cnpeuaBaHa kpaTknx cnojeBa n yHnUteHa eJeKtpuHnX DeNoBa:
3aHTNTTe ypehaj od BnaRe n HeMojTe ra KopnCTNTn npn KUn.
Hemojte npckaTn ypehaj BODOM.
Hemojte OTbapatn ypehaj.
HANOMEHA BoiTe paUHa o 6e36eHocnHm HAnOMeHaMa 3a akymyIaTOp n NByauy Noce6Hm ynyTCTBIma 3a ynoTpe6y.
3.7 Бeзбедносе habоме He 3a Ланчан Тecтete (EN 60745 Deo 2-13)
Држnte ca Tectepom y paDy CBe DeJIOBe TeJa DaJIbe OJ IaHuaHe Tectepe. Ipe NOKpeTaHa Tectepe Tpe6a Da ce yBepITE da Bac IaHauc Tectepe He DoInpyje. TpeHyTak HEnaxKHe npi paDy ca IaHuaHOM Tectepom MoKe IOBecTI Do TOra Da IaHauc Tectepe 3axBaTu OdeHy nIII DeJIOBe TeJa.
ДржITE панчану Тecтepy yBek ca BaшOM Левом рухом на predecessor ршци вовом Dechom рухом на задьов对接и. CBpCTO
Држа-he ЛанчаHe TecTepe 6bpyTmДржaHbem HeTo OndroBapa paDy NOBeHaBa pN3NK Od NOBpeDa n He cMe Ce npimHehBaTu.
Држnte eilektpnHn aIaT 3a n3oJIOBaHe NOBpHInHe pyuKe,poSTO IaHauc TeCTepe Moxe Da doHe y DoIDnP ca CONCTBeHM MpexHm Ka6lOM. IoDnP IaHca TeCTepe ca BODom PoI HAnOHOM MOxe IOBecTI MeTaJIHe DeIIOBe ypehaja PoI HAnOH n Do eJeKTPnHOr ydapa.
Hocnte 3aHTnThe haouape n 3aHTnTy 3a cnyx. Ipenopyyje ce daJa3aHTnTHa ONpema 3a rnaBy, pyke, Hore n CTOnaHa. Ondrobapajyhe 3aHTnHo oJeNo cMaHyje onacHOCT od IOBpeDa ycIeD ONJbaka KoJn JeTe OKOIO n CnyujHor DoOpnbAHa JAnca TeCTepe.
He paIte ca IaHuaHOM TecTePOM Ha HeKOM dpBeTy. Ppi paIy Ha dpBeTy noCToJn onaCHOCT OI NOBpeJa.
I Na3nTe Ha YBpCTo cTajaHe n KOpNCTnTe IaHcy HteCTepy camo aKO cTojnte Ha YBpCToJ, cnYprHoJ npABHOJ NOJIO3n. KIn3aBa IOnlora NII NHeCTa6nJIne
IOBpHInHe, KAO Ha
MepeBnHaMa, MOry DoBecTn
do rYbNTka paBHOteKe IJIi
rYbNTka KOHTPOJe Na
IaHuaHOM TeCTepom.
При Тессторь Heke
гране koja Stojn 3aTeHyTa,
paЧиajte Ha To Da ce можe
Вразпту Ha3aД.Са
ocno6aHaBJem Hanpe3aHb a y
ДрВЕнм ВlaКнИма,
Затерны Грана може дa
удари рukoвAoцa n / nii ce
ланчана Тесстара можe OTetN
КоHTPoJIи.
Будnte посeбно onpe3нnpи песьы НСКогдрveha mlaадordpveha.Tanak matepnjaI ce moxe 3aJIpeTn y JaHcy TeCTepe n ydapITN BAC NII Bac n36aHTN n3 paBhote.
Hocnte IaHcAny TecTepy 3a npedbU dpkU y NCKbUyeHOM CTaHy, a IaHauc TeCTepe Ha cynpoTHoj cTpaHn Od TeJa. Ppi TpaHcNoptu nIu ChyBaHy IaHcAne TeCTepe YBeK HabyCHTe 3aHTHTN pOKlOna. PaJbNBO pyKOBaHe IaHcAHOM Tectepom CMaByje BepoBaTHoHy clyuajHor DoInpBaHa ca IaHcEm Tectepe y POKpety.
Држnte ce ynytctaba 3a
помаЗиВанbe, 3aTe3aHbe
ланca и помechу пибopa.
HectpyuHo 3aTerHyT подмаЗан Ланac може да ce
OTКИне пова ризIK od
ПОВРАТHor ударca.
Држnte Дршke cyBe,Чистен 6e3 yIba n MactN. Mache, HayJIbeHe Дршke cy KIIn3aBe n yTnuy Ha ry6Itak KOHTpOne.
Tecternnte camo npBO.
IaHany tecepy He
ynoTppe6JbabajTe 3a paOBe
3a koje Hnje npEdBnHeHa.
Ppimep: He Kopncntte
tecepy 3a ceyehe
IIpactke, 3nda nIi
rpaJeBnHcKor MaTepnjala
koJn HnCy Od dpBeta.
Ynotpe6a IaHuahe Tectepe
3a paOBe 3a koje Hnje
npedBnHeHa MoKe DoBectn
do OnacnX cnTuaunja.
3.8 Yзpoи И спpeчаBaHe ПовpaTHor Tp3aja
IobpaTHn ydap moKe hacTaTn aKO Bpx uHHe BOHnue DoOpnpe Hekn PpeDMET nIa aKO ce dpBO nokpeh e a IaHauc TeCTepe ce 3arIabN y npoenuy.
HnkaHa He nCnyuTajTe IaHuaHy TecTepy.
I36eRaBajTe a6HopMaJHo dpXaJIbe TeJa HHe TectepNShte N3HaD BnCInHe pameHa. Ha Taj NaUnH ce I36eRaBa HeNaMepHo IDOpINBaJIbe BpxOM ShInHe n OMoryhAba BoJa KaHTpOJa IaHuaHe Tectepe y HeoueKbBaHm CNTyaUjama.
YBek KopncTnte pe3epBHe
ShnHe n IaHcTe TecTepe Koje
je nponcao npon3Bohaj.
IorpeSHe pe3epBHe shnHe n
IaHcTI TeCTepe Mory yTuCaTn
Ha Kndahe IaHcA uJi
IOBpaTHn ydap.
IpydpxaBajte ce ynytctaba npo3Bohaya 3a owtpeHbe n OdpxabaHbe IaHca TeCTepe. Cywnse HnCKn rpaHnHnCi 3a Dy6nHy noBeHaBajy cKnHOHcT Ka IOBpaTHOM ydapy.
3.9 Cnrgyphoche Hanomehe 3a ope3nBauchpaHa
3.9.1 Hanomene y Be3n ca paam (01)
4.BoHnUy 3aJeIHO ca CTaBJIbeHIM NaHcEM CTaBNTu y OTbOpeHo KyHnUTe:
JaHaTecTepe (05/1) OMOtaN Oko noroHckor JaHuaHnka (05/2).
Bohny (05/3) no3nucnoHpaTn TaKo Da o6a BoeHa HacTaBka (05/4) 3axBaTajy y y3dUxKn OTBop (05/5) BoHnue.
Bohuy (05/3) no3nHOpaTn Tako da Hactabak 3a 3ate3aHe NaHua (05/6) 3axbata y jejah ON dBa OTbopa 3a 3ate3aBe NaHua (05/7).
JaHau TecTepe (05/1) no3nUOHNpaTn TaKo da Haneke y Xne6 BoHnue (05/3) n Ha noroHcN naHuaHnK (05/2).
- CtaBnTn noknonaunHuaHnka (06/1) nyakHytn 3aBpTaH 3a npuBpuHnBahe (06/2) n 3aterHytn (06/a) m6yc Kblyuem.
- 3aTe3aIbe IaHua TeCTepe (BnDn IooJa8JIbe 4.2 "3ame3aIbe u omnyuMaIbe IaHua mecmepe (07), cmpaHa 107).
4.2 3aTe3aIbe n OTnyuTaIbe IaHua TeCTepe (07)
- 3aTeHHTn Ihaau TceTpe, npITOM KOpNCTNTU ODbNJau Ha NmOyc KJbuy:
3aTe3aIbe IaHua TeCTepe: OkpeHyTu (07/a) 3aBpTaH 3a 3aTe3aIbe IaHua (07/1) y cMepy Ka3aJIbKe Ha caTy.
OTnyuTaIbe IaHua TeCTepe:3aBpTaIb 3a 3aTe3aIbe (07/1) IaHua OkpeTaN (07/b) y Cmepy cynpoTHOM OJ Ka3aJIbKe Ha cAty.
- KoHTpOncatn 3aTe3aHbe NaHua (BnuN PoaaeBe 5.2 "KoHmpOnucaHe 3ameaHymocmu NaHua", cmpHa 108).No Notpe6n NoHObTu nPeTxOdHn Kopak.
4.3Iyhebe yba 3a nHaau TecTepe (08)
Yypehajy ce npn ncnopuyn He hana3n yIbe 3a naHau TecTepe!
PAXHb! Onachoct od owtheheba ypehaja.
YnoTpe6a ypehaja 6e3 yba 3a naHau TecTepe IOBONDIO OwTeHeHa NaHua TecTepe N BOHnue.
HnkaHa HemojTe KopncTnTypehaj 6e3 yba 3a nhauc TecTepe.
Ipe noyetka pada yunjte ybe 3a nahaTectepe y pe3epBoap 3a ybe IN KOHTPOINHITe HNBO yba y TOKya pada.
Hajmahe npe cBAkor noyeTka pa da npOBepnte da JI NIOMa3NBAhe NaHca cyHKcnoHnWe.
KIBOTN Bek n Chara pe3aHaJaHua Tectepe 3aBnCe OOnTmAmHOr NOpMa3nBaHa.3a BpeMe paJa IaHaT Tectepe ayTomatckn Ce npcka yIbem.
IAXHb! Onachoct od owteheba ypehaja. Kopuhebe ctapor yba 3a noMa3nBaHe IanaCa 360r y HeMy caPkaHe MeTaJIHe CTpyrotIne DOBOOn Do npeBpeMeHe NCTpoWeHoCTN BoHnue n NaHc TaTeTepe. Ocm Tora npctaje da Baxn rapaHnja npoN3BoHaqa
HnkaHa HemojTe Da KopncTne CTapo yIbe, Beh camo 6nOOnk npa3rpaNBO yIbe 3a Ianau Tectepe.
PAXbA! OnachocT od wTeTe no XNBOTHCy cpeiny. KopuShneBe MInHepaHnOr yba 3a noMa3nBaHe NaHcA DOBOn Do O36nJbHnx wTeTa NO XNBOTHCy cpeiny.
HnkaHa HeMoJTe Da KopNCTNe MNHepaIHO yBe, BeH cAmO 6nOoKn pa3rpaIbO yBe 3a NaHaTecTepe.
Ipe cBAkor noyetka pa ana n npn cBAkoj 3aMeHn aKymyntopa npOBepnTe HBO yBa n DoJnTe yBe 3a NaHaT TcTepe, aKO je Notpe6Ho:
- KoHTpoJIncaTn HNBo yJbHa KaHOTpOJIHOM npo3OpuHy (08/1) pe3epBoapa 3a yJbe. YJbe yBeK Mopa Da ce BUni. MnHImaJIHn i MaKcIMaJIHn HNBo yJbA He CMejy Da ce npekopaue.
- Ope3nBaH rpaHa BOpapBHO nocTaBHTn Ha YBpCTy NOJIOrY I DpKaTn.
- Ouncntn ypehaj oko 3aTbapapa peepboapa 3a ybe (08/2).
- OvBpyTu 3aTbapau pe3epBoapa 3a yBe (08/2).
- Pe3epBoap 3a yIbe HanyHnTn 6noJooKn pa3rpaIbBO yIbe 3a IaHauc TeCTepe. PpITOM Ha KOHTpOJIHOM npO3OpuHy (08/1) pe3epBoapa 3a yIbe KOHTpOJIncATn HnBO yIba. He Do3BOJIntn npenBaHe!
3a naKwe npHebe ynoTpe6JaBaTa nEBAk.
PpBabHTHa He CMe Da Docne y pe3epBoap 3a yIbe.
- Onet 3aBpHyTn 3aTbapau pe3epBoapa 3a yBe (08/2).
4.4 MoHTaKa KaIsha 3a HOSeHBe Ha OCHOBHnypehaj
BvNi yNyTcTBo 3a yNoTpe6y "Multitool - ochOBHnypehaj".
4.5 HaTaKHyTMOHTaXHn ypehaj Ha OCHOBHn ypehaj
BnuynyntcTBO 3a ynoTpe6y "Multitool - ochOBnHypehaj".
5 ONCJNYKINBAHbE

ONPE3! OnachocT od oneKOTnHa.
KyHnWTe npehocnka ce 3aIpeBa y TOKy paJa.
He doinnpuBAtn kyhniTe npehochnka.
5.1 YKbUyNBaBe H NCKbUyNBaBe ypehaja
Bvndy yntcbo 3a ynoTpe6y "Multitool - ochOBHnypehaj".
5.2 KOnTpOJncaIbe 3aTeRHyTOCTn IaHua
YeCTO KOHTPOINIte HaneToc TnHaIca jep ce HOBn IaHcN TeCTepe N3dUxyjy.
- Rykom mano npobvyn pyky n npntom KOHTPOJNCATN:
YxnaHOM cTaHy:JaHaT TeCTepe je npabINHO 3aTeHyT aKO ce y cpeHN BOHnue MoKe Da noDnHe 3a oKO 3-4 mm nIarHo IpoBye pyKom. KoI paNHe TemnepaType JaHauc TeCTepe ce npOdyKyje nOBecn.
I Iorohckn YnaHcN JaHca TeCTepe He Cmejy Da StPue N3 XJIe6a Ha DoBoJ CTpaHb BOHnue - NaHau Tectepe 6n INhaYe MOrao Da NCKOuN.
- Ako je noTpe6Ho, doTeHnyTu IaHauc TeCTepe (BnuI Po2a8Be 4.2 "3ame3aHe u omnywmahe IaHa ca mecmepe (07)cmpaHa 107).
Sorg for at sta stabilt.