SFE 8-2 115 - Sander Flex - Free user manual and instructions
Find the device manual for free SFE 8-2 115 Flex in PDF.


User questions about SFE 8-2 115 Flex
0 question about this device. Answer the ones you know or ask your own.
Ask a new question about this device
Download the instructions for your Sander in PDF format for free! Find your manual SFE 8-2 115 - Flex and take your electronic device back in hand. On this page are published all the documents necessary for the use of your device. SFE 8-2 115 by Flex.
USER MANUAL SFE 8-2 115 Flex
text_image
SFE 8-2 115 ide Originalbetriebsanleitung 3
en Original operating instructions 12
fr Notice d'instructions d'origine 21
it Istruzioni per l'uso originali 31
es Instrucciones de funcionamiento originales ..... 40
pt Instruções de serviço originais 50
nl Originele gebruiksaanwijzing 59
da Originale driftsvejledning 68
no Originale driftsanvisningen 76
sv Originalbruksanvisning 84
fi Alkuperäinen käyttöohjekirja 92
el Auθεντικές οδηγίες χειρισμού 101
tr Orijinal işletme kılavuzu 111
pI Instrukcja oryginalna 120
hu Eredeti üzemeltetési útmutató 130
cs Originální návod k obsluze 139
sk Originálny návod na obsluhu 148
hr Originalna uputa za rad 157
sl Izvirno navodilo za obratovanje 166
ro Instructiuni de functionare originale 175
bg Оригинално упътване за експлоатация ..... 184
ru Оригинальная инструкция по эксплуатации ..... 194
et Originaalkasutusjuhend 204
It Originali naudojimo instrukcija 213
Iv Lietošanas pamācības oriģināls 222
ar 239 ترجمة لإرشادات التشفيل الأصلية
Inhalt
Verwendete Symbole 3
Symbole am Gerät 3
text_image
Labeled diagram of a cleaning or power tool with numbered parts including a handle, blade, and socket.text_image
Medical illustration showing a surgical tool with labeled steps 1 and 2, including a close-up of the insertion site.text_image
Diagram of a sewing machine with labeled parts including a handle, blade, and washertext_image
Diagram showing a door switch with an arrow pointing to the right side, labeled with 'O→I' and directional arrows.natural_image
Illustration of a person using a power shaver on a workbench (no text or symbols visible)Manager Research & Development (R & D)
Klaus Peter WeinperEckhard F
Head of Quality
Department (QD)
Symbols used in this manual ..... 12
Symbols on the power tool 12
For your safety 12
Noise and vibration 15
Technical specifications 15
Overview 16
Operating instructions ..... 17
Maintenance and care 19
Disposal information 20
C ∈-Declaration of Conformity ..... 20
Exemption from liability 20
Symbols used in this manual

WARNING!
Denotes impending danger.
Non-observance of this warning may result in death or extremely severe injuries.

CAUTION!
Denotes a possibly dangerous situation.
Non-observance of this warning may result in slight injury or damage to property.

NOTE
Denotes application tips and important information.
Symbols on the power tool

Before switching on the power tool, read the operating manual!

Wear goggles!

Disposal information for the old machine (see page 20)!
For your safety

WARNING!
Before using the power tool, please read and follow:
– these operating instructions,
- the "General safety instructions" on the handling of power tools in the enclosed booklet (leaflet no.: 315.915),
– the currently valid site rules and the regulations for the prevention of accidents.
This power tool is state of the art and has been constructed in accordance with the acknowledged safety regulations.
Nevertheless, when in use, the power tool may be a danger to life and limb of the user or a third party, or the power tool or other property may be damaged.
The power tool may be operated only if it is
- as intended,
- in perfect working order.
Faults which impair safety must be repaired immediately.
Intended use
This flat head sander is designed
– for commercial use in industry and trade,
– for sanding metal or wood surfaces,
- for sanding particularly in areas which are difficult to access such as window shutters or heaters,
- for use with sandpaper and accessories which are indicated in these instructions or which are recommended by the manufacturer.
Safety instructions for sander

WARNING!
Read all safety warnings, instructions, illustrations and specifications provided with this power tool. Failure to follow all instructions listed below may result in electric shock, fire and/or serious injury.
Save all warnings and instructions for future reference.
This electric power tool must be used as a sander. Read all safety warnings, instructions, illustrations and specifications provided with this power tool. Failure to follow all instructions listed below may result in electric shock, fire and/or serious injury.
■ Operations such as sanding, wire brushing, or for polishing and cut-off are not recommended to be performed with this power tool.
Operations for which the power tool was not designed may create a hazard and cause personal injury.
■ Do not use accessories which are not specifically designed and recommended by the tool manufacturer.
Just because the accessory can be attached to your power tool, it does not assure safe operation.
■ The rated speed of the accessory must be at least equal to the maximum speed marked on the power tool.
Accessories running faster than their rated speed can break and fly apart.
■ The outside diameter and the thickness of your accessory must be within the capacity rating of your power tool.
Incorrectly measured insertion tools cannot be adequately shielded or controlled.
■ Sanding discs, sanding pads or other accessories must fit exactly on the grinding spindle of your electric power tool. Insertion tools, which do not fit exactly on the grinding spindle of the electric power tool, rotate unevenly, vibrate violently and may result in loss of control.
■ Do not use a damaged accessory. Before use, always check insertion tools for splinters and cracks, sanding pad for cracks, wear and severe abrasion. If power tool or accessory is dropped, inspect for damage or install an undamaged accessory. After inspecting and installing an accessory, position yourself and bystanders away from the plane of the rotating accessory and run the power tool at maximum no-load speed for one minute. Damaged accessories will normally break apart during this test time.
■ Wear personal protective equipment. Depending on application, use face shield, safety goggles or safety glasses. If appropriate, wear a dust mask, hearing protection, protective gloves and/or a special apron which protect you from small sanding and material particles. The eye protection must be capable of stopping flying debris generated by various operations. The dust mask or respirator must be capable of filtrating particles generated by your operation. Prolonged exposure to high intensity noise may cause hearing loss.
- Keep bystanders a safe distance away from work area. Anyone entering the work area must wear personal protective equipment.
Fragments of workpiece or of a broken accessory may fly away and cause injury beyond immediate area of operation. - Hold power tool by insulated gripping surfaces only, when performing an operation where the cutting accessory may contact hidden wiring or its own cord. Cutting accessory contacting a “live” wire may make exposed metal parts of the power tool “live” and shock the operator.
■ Position the cord clear of the spinning accessory. If you lose control, the cord may be cut or snagged and your hand or arm may be pulled into the spinning accessory.
■ Never lay the power tool down until the accessory has come to a complete stop. The spinning accessory may grab the surface and pull the power tool out of your control.
■ Do not run the power tool while carrying it at your side. Accidental contact with the spinning accessory could snag your clothing, pulling the accessory into your body. - Regularly clean the power tool's air vents. The motor's fan will draw the dust inside the housing and excessive accumulation of powdered metal may cause electrical hazards.
■ Do not operate the power tool near flammable materials. Sparks could ignite these materials.
■ Do not use accessories that require liquid coolants. Using water or other liquid coolants may result reresult in electrocution or shock.
Special safety instructions for sanding
■ Use only those sanding tools authorised for use with your electric power tool and the guard designated for this sanding tool. Sanding tools, which are not designated for use with the electric power tool, cannot be adequately shielded and are unsafe.
■ Sanding tools may be used for the recommended applications only.
For example: Never sand with the side area of a diamond sanding pad.
Diamond sanding pads are designed to remove material with the underside of the sanding pad. If a lateral force is applied to these sanding tools, they may shatter.
■ Always use undamaged clamping flanges in the correct size and shape for the insertion tool you have selected.
Suitable flanges support the insertion tools and therefore reduce the risk of a break.
■ Do not use worn insertion tools from larger electric power tools.
Insertion tools for larger electric power tools are not designed for the higher speeds of smaller electric power tools and may break.
Kickback and Related Warnings
Kickback is the sudden reaction to a pinched or snagged rotating insertion tool, such as a sanding disc, sanding pad, wire brush, etc. Pinching or snagging may cause a rotating insertion tool to stop abruptly.
For example, if an abrasive wheel is snagged or pinched by the workpiece, the edge of the wheel that is entering into the pinch point can dig into the surface of the material causing the wheel to climb out or kick out.
The wheel may either jump toward or away from the operator, depending on direction of the wheel's movement at the point of pinching. Abrasive wheels may also break under these conditions.
For example, if a sanding disc is snagged or pinched by the workpiece, the edge of the sanding disc which is entering the workpiece may become caught and cause the sanding disc to break off or kick back.
The sanding disc then moves towards or away from the operator, depending on the direction in which the disc is rotating at the point of pinching. Sanding discs may also break under these conditions.
A recoil occurs if the electric power tool is used incorrectly or improperly. A recoil can be prevented by appropriate precautions as described below.
- Maintain a firm grip on the power tool and position your body and arm to allow you to resist kickback forces. Always use auxiliary handle, if provided, for maximum control
over kickback or torque reaction during start-up. The operator can control torque reactions or kickback forces, if proper precautions are taken.
■ Never place your hand near the rotating accessory.
Accessory may kickback over your hand.
■ Do not position your body in the area where power tool will move if kickback occurs.
Kickback propels the electric power tool in the direction opposite to the movement of the sanding disc at the point of pinching.
■ Use special care when working corners, sharp edges etc. Avoid bouncing and snagging the accessory.
Corners, sharp edges or bouncing have a tendency to snag the rotating accessory and cause loss of control or kickback.
This causes a loss of control or kickback.
■ Do not attach a saw chain woodcarving blade or toothed saw blade.
Such blades create frequent kickback and loss of control.
Additional safety instructions
■ It is not recommended to sand lead paint. Lead paint should be removed by a specia-list only.
■ Do not work on materials which release hazardous substances (e.g. asbestos). Take precautions if hazardous, combustible or explosive dust is likely to occur. Wear protective dust mask. Use dust extraction system.
■ When working, hold the electric power tool firmly with both hands and ensure that you have a secure footing. The electric power tool is controlled more securely if held with both hands.
■ Do not use the electric power tool if it has a damaged power cord. Do not touch the damaged power cord and pull out the mains plug if the power cord is damaged during work. Damaged power cords increase the risk of an electric shock.
DAMAGE TO PROPERTY!
■ The mains voltage and the voltage specifications on the rating plate must correspond.
Noise and vibration
The noise and vibration values have been determined in accordance with EN 60745.
The A evaluated noise level of the power tool is typically:
– Sound pressure level L_pA : 81 dB(A);
– Sound power level L_WA : 92 dB(A);
– Uncertainty K: 3 dB.
Total vibration value (of the handle):
- Emission value a_h : 2.5 m/s
– Uncertainty K: 1.5 m/s ^2

WARNING!
The indicated measurements refer to new power tools. Daily use causes the noise and vibration values to change.

NOTE
The vibration emission level given in this information sheet has been measured in accordance with a standardised test given in EN 60745 and may be used to compare one tool with another. It may be used for a preliminary assessment of exposure.
The declared vibration emission level represents the main applications of the tool. However if the tool is used for different applications, with different accessories or poorly maintained, the vibration emission may differ. This may significantly increase the exposure level over the total working period.
For a precise estimation of the vibration load the times should also be considered during which the power tool is switched off or even running, but not actually in use. This may significantly decrease the exposure level over the total working period.
Identify additional safety measures to protect the operator from the effects of vibration such as: maintain the tool and the accessories, keep the hands warm, organisation of work patterns.

CAUTION!
Wear ear protection at a sound pressure above 85 dB(A).
Technical specifications
| Machine type Flat head sander SFE 8-2 115 | ||
| Idling speed m/s 700–2300 | ||
| Power input W 800 | ||
| Power output W 325 | ||
| Max. grinding tool diameter mm | 115 | |
| Sanding head height | mm | 13 |
| Weight (without power cord) | kg | 2.5 |
Overview
text_image
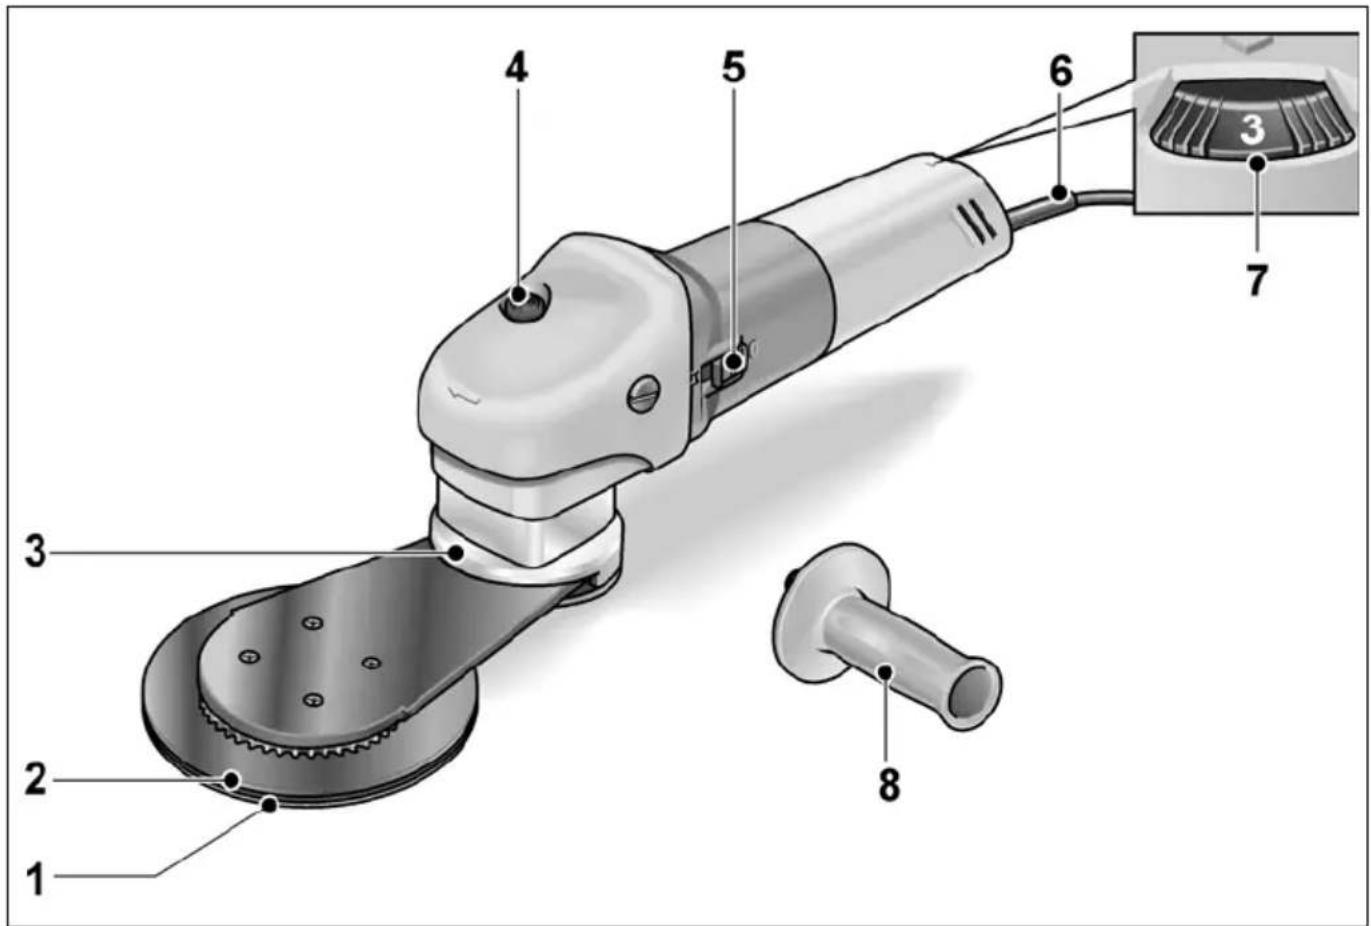
Labeled diagram of a cleaning or power tool with numbered parts and an inset showing a knob component.1 Sandpaper
2 Sanding pad
3 Sanding arm
4 Gear head
5 Switch
switches the power tool on and off.
6 4.0 m power cord with plug
7 Thumb wheel
for controlling the speed.
8 Auxiliary handle
Operating instructions

WARNING!
Before performing any work on the electric power tool, pull out the mains plug.
Before switching on the power tool
■ Unpack the electric power tool and check that no parts are missing or damaged.
■ Attach sandpaper.
■ Attach the handle.
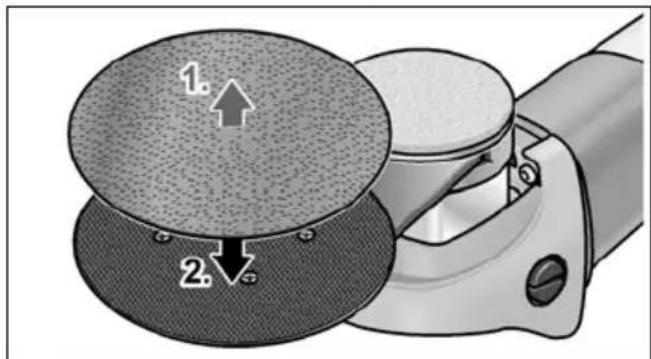
Attaching or changing sandpaper
■ Pull out the mains plug.
text_image
Diagram showing two labeled components (1 and 2) interacting with a mechanical device, likely illustrating a mechanical or electrical process.■ If required, remove attached sandpaper from the sanding disc (1.).
■ Attach new sandpaper (2.).
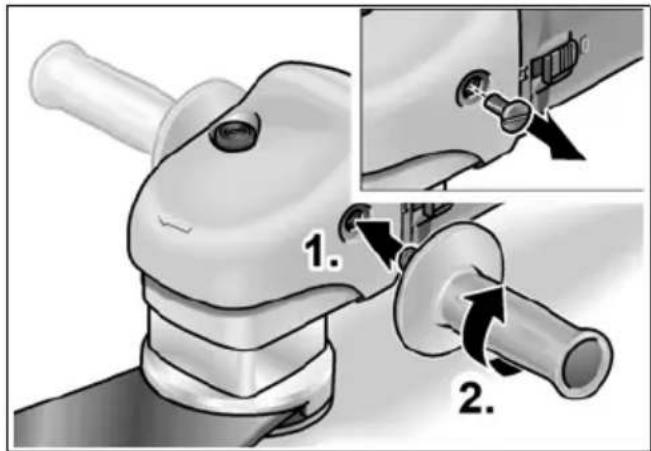
Attach the handle
text_image
Technical diagram showing a mechanical component with labeled parts and an inset view of the valve mechanism.■ Attach the auxiliary handle either to the left or right side of the housing.
■ To do this, put the handle on the thread(1.) and turn clockwise (2.).
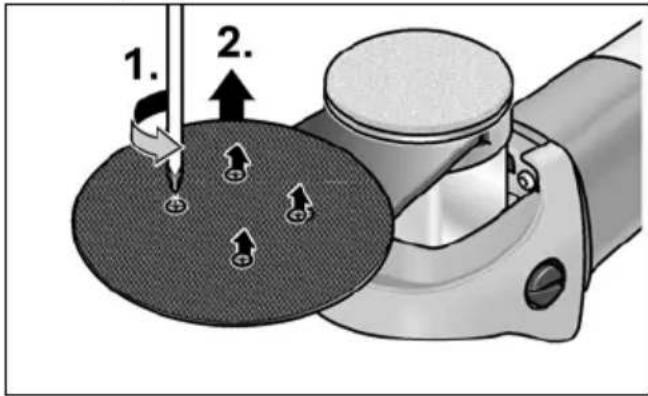
Changing the toothed belt
text_image
1. 2.■ If required, remove sandpaper from the sanding disc.
■ Loosen the 4 screws on the underside of the sanding disc (1.).
■ Remove sanding disc (2.).
text_image
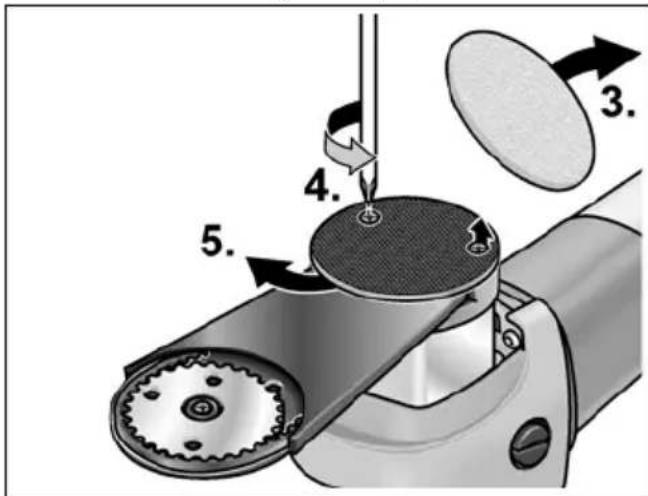
Diagram illustrating a mechanical assembly with numbered components, likely for repair or assembly instructions.■ Remove felt from the rear cover (3.).
■ Loosen screws on the rear cover (4.).
■ Push rear cover to the side or remove (5.).
text_image
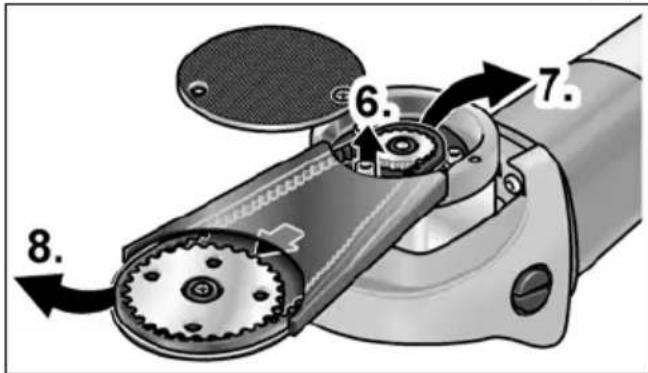
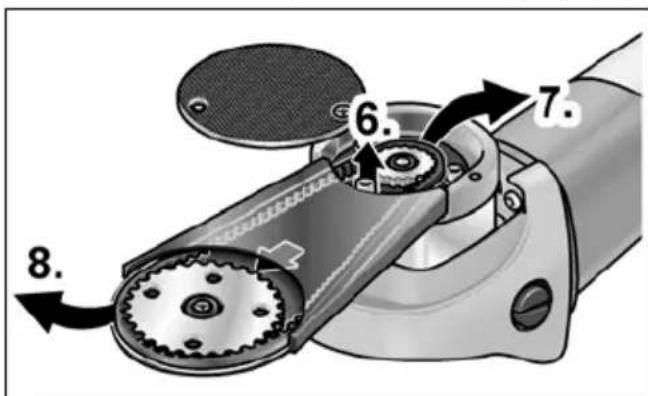
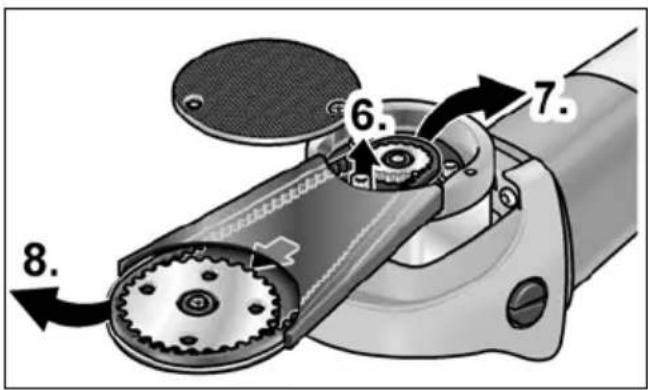
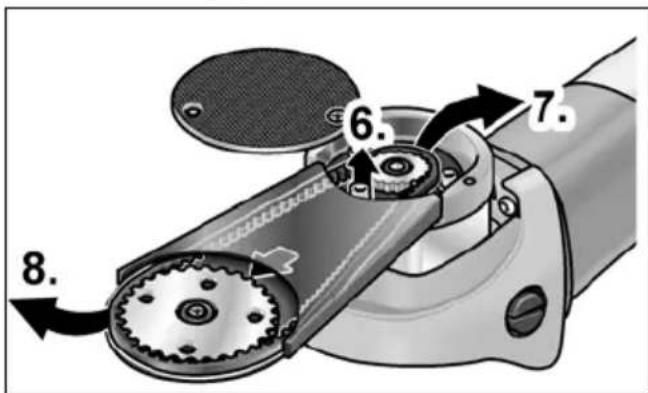
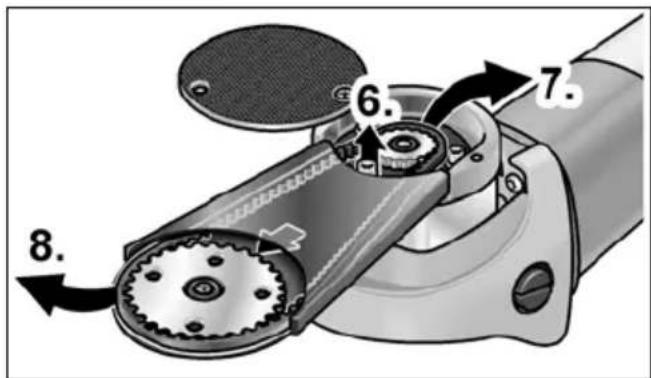
Technical diagram of a mechanical device with numbered parts and directional arrows indicating motion or assembly.■ Loosen front hexagon socket screw (6.).
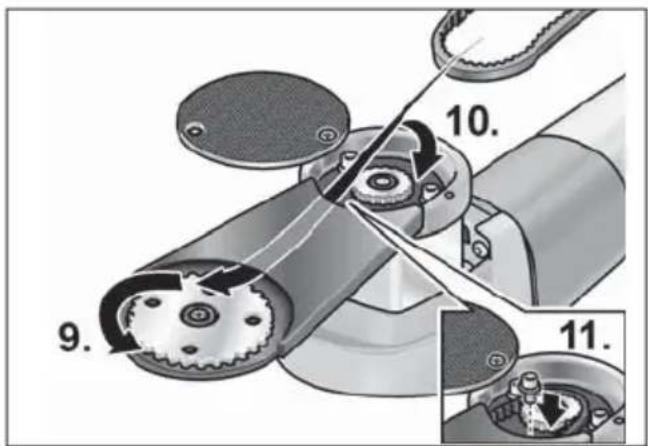
■ Remove toothed belt. To do this, strip the toothed belt off the rear small cog (7.) and pull forwards (8.).
text_image
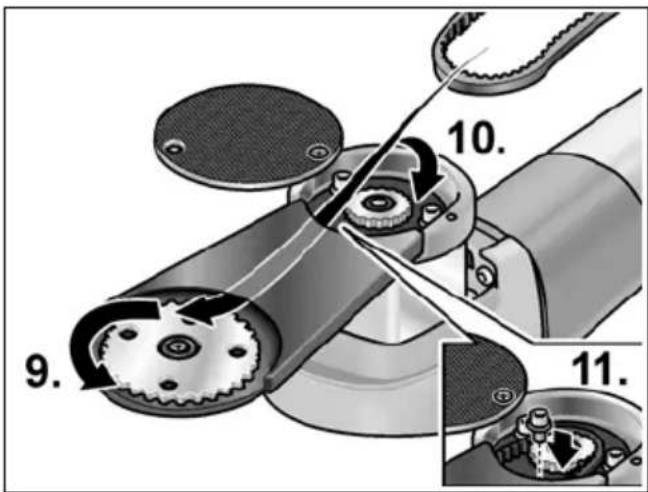
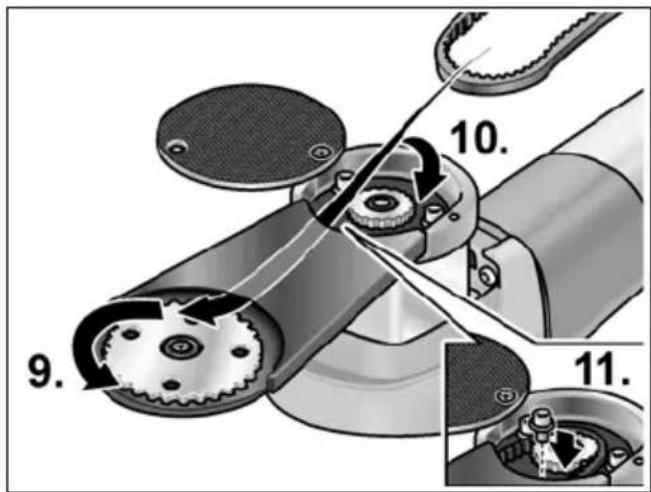
10. 9. 11.■ Attach new toothed belt. First feed the toothed belt over the front, large cog (9.), then over the rear, small cog (10.).
■ Re-attach covers and screws (11.).
Switching on and off

WARNING!
Hold the electric power tool by the insulated grip surfaces only!
Brief operation without engaged switch rocker
text_image
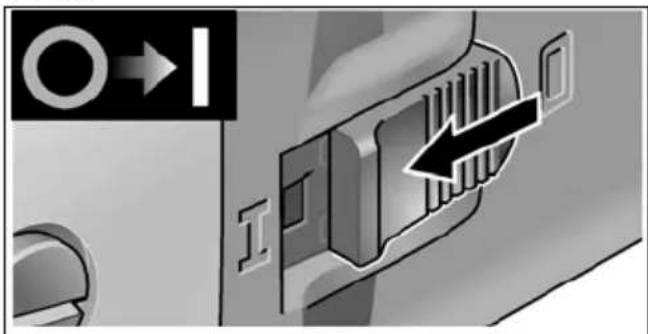
Diagram showing a directional arrow labeled 'I' pointing to a vehicle or connector panel with internal structure and a black arrow indicating flow direction.■ Push the switch rocker forwards and hold in position.
■ To switch off the power tool, release the switch rocker.
Continuous operation with engaged switch rocker
text_image
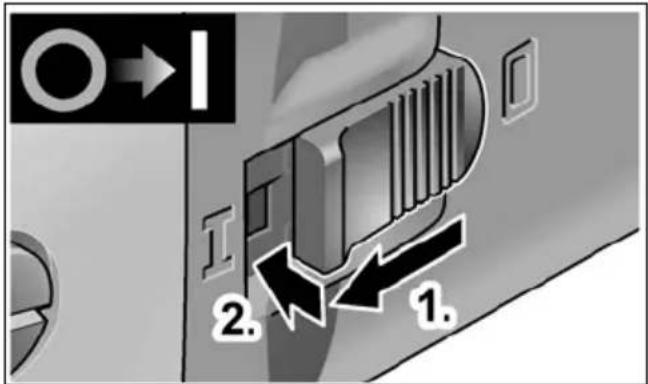
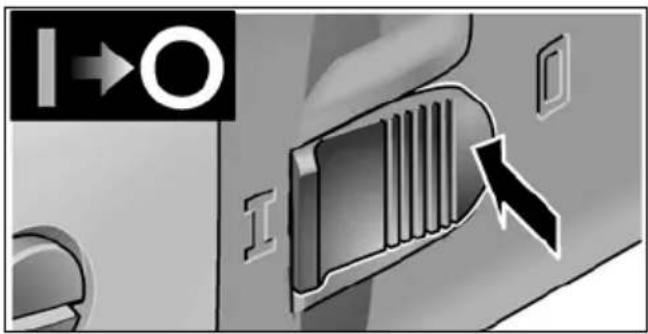
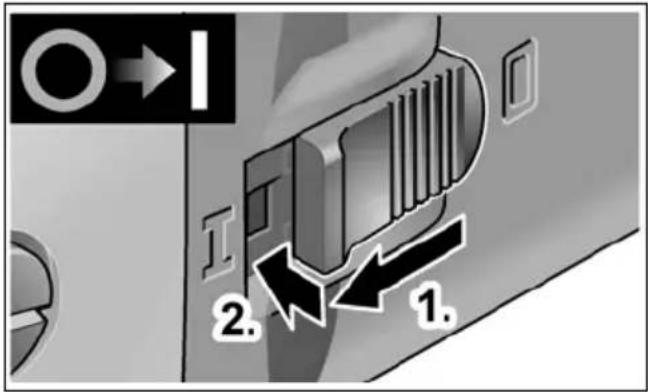
2. 1.■ Push the switch rocker forwards (1.) and engage by pressing the front end (2.).
text_image
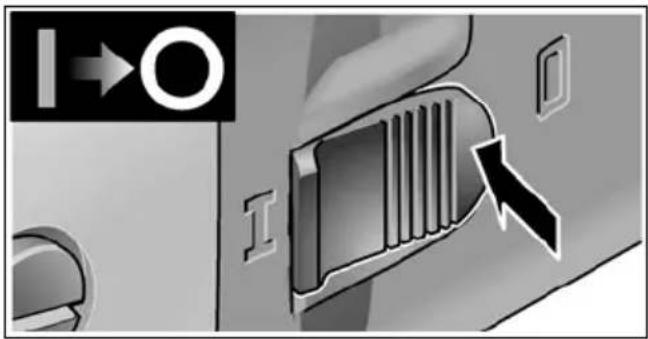
I→O I■ To switch off the power tool, release the switch rocker by pressing the rear end.
Setting the speed
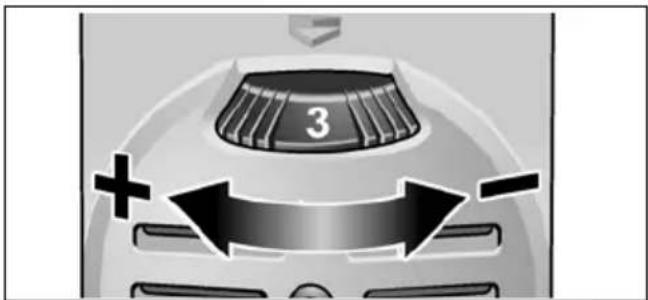
To set the speed, move the dial to the required value.
text_image
3 + -Operating instructions
i NOTE
When the electric power tool is switched off, it continues running briefly.
natural_image
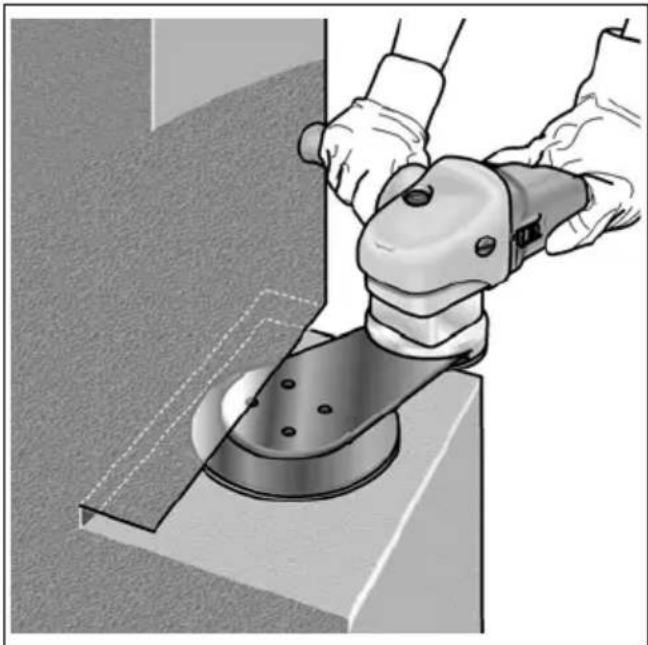
Person using a power tool on a workbench, no visible text or symbols- Do not place the sanding pad on the workpiece until the power tool has reached full speed.
- To obtain a good grinding result, move the sanding pad evenly over the surface which is to be ground down.
Do not apply excessive pressure. - When the power tool is switched off, the sanding pad continues running briefly.
Maintenance and care
WARNING!
Before performing any work on the electric power tool, pull out the mains plug.
Cleaning
WARNING!
If metals are ground or cut over a prolonged period, conductive dust may become deposited inside the housing. Impairment of the protective insulation! Operate the power tool via a residual-current-operated circuit-breaker (tripping current 30 mA).
■ Regularly clean the power tool and ventilation slots. Frequency of cleaning is dependent on the material and duration of use.
■ Regularly blow out the housing interior and motor with dry compressed air.
Carbon brushes
The electric power tool features cut-off carbon brushes. When the cut-off carbon brushes reach their wear limit, the electric power tool switches off automatically.
i NOTE
Use only original parts supplied by the manufacturer for replacement purposes. If non-original parts are used, the guarantee obligations of the manufacturer will be deemed null and void.
When the power tool is being used, the carbon brushes can be seen sparking through the rear air inlet apertures.
If the carbon brushes are sparking excessively, switch off the electric power tool immediately. Take your electric power tool to a customer service centre authorised by the manufacturer.
Gears
i NOTE
Do not loosen the screws on the gear head during the warranty period. Non-compliance will deem the guarantee obligations of the manufacturer null and void.
Repairs
Repairs may be carried out by an authorised customer service centre only.
Spare parts and accessories
Sanding belts and sanding arms for different application areas and other accessories can be found in the manufacturer's catalogues. Exploded drawings and spare-part lists can be found on our homepage:
www.flex-tools.com
Disposal information

WARNING!
Render redundant power tools unusable by removing the power cord.

EU countries only
Do not throw electric power tools into the household waste!
In accordance with the European Directive 2012/19/EC on Waste Electrical and Electronic Equipment and transposition into national law used electric power tools must be collected separately and recycled in an environmentally friendly manner.

NOTE
Please ask your dealer about disposal options!
CE-Declaration of Conformity
We declare under our sole responsibility that the product described under “Technical specification” conforms to the following standards or normative documents:
EN 60745 in accordance with the regulations of the directives 2014/30/EU, 2006/42/EC, 2011/65/EC.
Responsible for technical documents:
Manager Research & Development (R & D)
Klaus Peter WeinperEckhard F
Head of Quality
Department (QD)
Exemption from liability
The manufacturer and his representative are not liable for any damage and lost profit due to interruption in business caused by the product or by an unusable product.
The manufacturer and his representative are not liable for any damage which was caused by improper use of the product or by use of the product with products from other manufacturers.
Table des matières
text_image
Labeled diagram of a power tool with numbered parts including a base, handle, and sockettext_image
Technical diagram showing mechanical component assembly with numbered steps and close-up detailstext_image
Diagram of a sewing machine with labeled parts including a knob, washer, and base, showing mechanical assembly steps.natural_image
Person using a power tool on a workbench, no visible text or symbolsManager Research & Development (R & D)
Klaus Peter WeinperEckhard F Head of Quality Department (QD)
text_image
Labeled diagram of a power tool with numbered parts including a knob, handle, and griptext_image
Technical diagram showing a mechanical component with labeled parts and an inset view of a valve mechanism.text_image
Diagram of a sewing machine's mechanical component with numbered parts and directional arrows indicating assembly steps.text_image
Technical diagram of a mechanical device with numbered components and directional arrows indicating motion or assembly.■ Svitare la vite a brugola anteriore (6.).
natural_image
Close-up of a car hood with a numbered component and directional arrows indicating motion (no text or symbols)natural_image
Illustration of a hand using a power tool to work on a workbench (no text or symbols visible)text_image
Bolts Q - 1Manager Research & Development (R & D)
Klaus Peter WeinperEckhard F
Head of Quality Department (QD)
text_image
Labeled diagram of a power tool with numbered parts including a handle, blade, and griptext_image
Medical illustration showing a mechanical device with labeled parts and an inset close-up of the component being inserted.text_image
Technical diagram showing a mechanical assembly with numbered components and directional arrows indicating motion or assembly.text_image
Diagram showing a mechanical component with directional arrow and label 'O→I'natural_image
Close-up of a mechanical component with arrows indicating motion or flow, no visible text or symbolsnatural_image
Person using a power tool on a workbench, no visible text or symbolsManager Research & Development (R & D)
Klaus Peter WeinperEckhard F
Head of Quality Department (QD)
text_image
Technical diagram of a cleaning tool with numbered parts and an inset showing a component labeled 3.text_image
Medical illustration showing a mechanical device with labeled parts and an inset close-up of the component being inserted.text_image
Diagram of a sewing machine's mechanical component with numbered parts and directional arrows indicating assembly steps.text_image
Diagram showing a car air vent with directional arrow and label 'I', likely indicating airflow or movement.natural_image
Close-up of a kitchen pot with a numbered knob and directional arrows indicating flow or movement (no text or symbols)natural_image
Illustration of a hand using a power tool to work on a mechanical component (no text or symbols visible)EN 60745 de acordo com as determinações das directivas 2014/30/UE, 2006/42/CE, 2011/65/UE.
Manager Research & Development (R & D)
Klaus Peter WeinperEckhard F
Head of Quality
Department (QD)
text_image
Labeled diagram of a cleaning tool with numbered parts including a handle, blade, and griptext_image
Diagram showing a mechanical device with labeled parts and directional arrows, likely illustrating a process or assembly.text_image
Medical illustration showing a surgical tool with labeled parts and an inset close-up of the insertion site.text_image
Diagram of a sewing machine's mechanical component with numbered parts and directional arrows indicating assembly steps.text_image
Diagram of a mechanical device with numbered parts and directional arrows indicating motion or assembly.text_image
Diagram showing a directional arrow labeled 'I' pointing to a vehicle or component with internal structure and directional arrows.natural_image
Close-up of a kitchen appliance with a numbered knob and directional arrows indicating motion (no text or symbols)natural_image
Illustration of a person using a power shaver on a workbench (no text or symbols visible)text_image
Bolivia -1Manager Research & Development (R & D)
Klaus Peter WeinperEckhard F
Head of Quality
Department (QD)
text_image
Labeled diagram of a cleaning or cleaning tool with numbered parts and an inset showing a component labeled 3.1 Slibepapir
2 Slibetallerken
3 Slibearm
4 Gearhoved
text_image
Technical diagram showing mechanical component assembly with numbered parts and close-up detailstext_image
Diagram of a mechanical device with numbered parts and directional arrows indicating motion or assembly steps.text_image
Diagram of a mechanical device with numbered parts and directional arrows indicating motion or assembly.■ Løsn den forreste unbrakoskrue (6.).
text_image
Diagram showing a mechanical component with directional arrow and label 'I', likely indicating movement or flow direction.■ Skub vippekontakten fremad og hold den fast.
■ Slip vippekontakten for at slukke.
natural_image
Person using a power tool on a workbench, no visible text or symbolsManager Research & Development (R & D)
Klaus Peter WeinperEckhard F Head of Quality Department (QD)
text_image
Technical diagram of a power tool with numbered parts and an inset close-up showing labeled parts 3, 7, and 8.1 Slipepapir
2 Slipetallerken
3 Slipearm
4 Drivhode
5 B r y t e r
for inn- og utkopling.
text_image
Diagram showing a mechanical device with labeled parts and directional arrows, likely illustrating a process or assembly.text_image
Medical illustration showing a surgical tool with labeled steps 1 and 2, including an inset close-up of the tool's insertion.text_image
Diagram of a sewing machine with labeled parts including a drum, roller, and washertext_image
Diagram of a mechanical device with numbered parts and directional arrows indicating motion or assembly.natural_image
Person using a power tool on a workbench, no visible text or symbolsManager Research & Development (R & D)
Klaus Peter WeinperEckhard F
Head of Quality
Department (QD)
text_image
Technical diagram of a power tool with numbered parts and an inset close-up showing labeled parts 3, 6, 7, 8, and 1.text_image
Diagram showing a mechanical device with labeled parts and directional arrows, likely illustrating a process or assembly.text_image
Medical illustration showing a surgical tool with labeled parts and an inset close-up of the insertion site.text_image
Diagram of a mechanical device with numbered parts and directional arrows indicating assembly or operation.natural_image
Close-up of a car's top control knob with directional arrows and a numbered label (3), no readable text or symbols beyond the number.Arbetsanvisningar
i OBS
natural_image
Illustration of a person using a power grater on a workbench (no text or symbols visible)text_image
Labeled diagram of a cleaning or power tool with numbered parts and an inset showing a component labeled 3.text_image
Diagram showing a mechanical device with labeled parts and directional arrows, likely illustrating a process or assembly.■ Irrota tarvittaessa hiomapaperi hiomalautasesta (1.).
text_image
Medical illustration showing a mechanical device with labeled parts and an inset close-up of the component being inserted.text_image
Diagram of a mechanical device with numbered parts and directional arrows indicating assembly or operationnatural_image
Person using a power shaver on a workbench (no text or symbols visible)Manager Research & Development (R & D)
Klaus Peter WeinperEckhard F
Head of Quality Department (QD
text_image
Labeled diagram of a cleaning tool with numbered parts, showing components like power tool, brush, and handle.text_image
Diagram showing two labeled components (1 and 2) interacting with a mechanical device, likely illustrating a mechanical or electrical process.text_image
Technical diagram showing mechanical component assembly with numbered parts and close-up detailstext_image
Diagram of a sewing machine with labeled parts including a handle, blade, and washernatural_image
Close-up of a car's top control panel with arrows indicating direction (no text or symbols)Υποδείξεις εργασίας
i YΠΟΔΕΙΞΗ
natural_image
Person using a power tool on a workbench, no visible text or symbolsManager Research & Development (R & D)
text_image
Technical diagram of a power tool with numbered parts and an inset close-up showing internal components.1 Zimpara kâğıdı
2 Taşlama plakası
3 T a \$ I a m a
4 Şanzıman başı
5 \$ a l t e r
text_image
Diagram showing a mechanical device with labeled parts, including numbered callouts and directional arrows indicating movement or assembly.text_image
Medical illustration showing a surgical tool with labeled steps 1 and 2, including a close-up view of the insertion.text_image
Diagram of a mechanical device with numbered parts and directional arrows indicating assembly or operationnatural_image
Diagram of a car interior with directional arrows and a numbered badge (no text or symbols)Çalışma talimatları
i BÍLGI
natural_image
Person using a power tool on a workbench, no visible text or symbolstext_image
B. H. S. Q. - 1Manager Research & Development (R & D)
Klaus Peter WeinperEckhard F Head of Quality Department (QD)
text_image
Technical diagram of a cleaning tool with numbered parts and an inset showing a labeled component1 Papier ścierny
2 T a l e r z w s
text_image
Medical illustration showing a surgical tool with labeled steps 1 and 2, including an inset close-up of the tool's insertion.text_image
Diagram of a sewing machine with labeled parts including a knob, washer, and base, showing mechanical assembly steps.text_image
Diagram showing a directional arrow labeled 'I' pointing to a mechanical component with internal structure and a black arrow indicating flow or movement.natural_image
Illustration of a person using a power shaver on a workbench (no text or symbols visible)text_image
Bikks Q - 1Manager Research & Development (R & D)
Klaus Peter WeinperEckhard F
Head of Quality
Department (QD)
text_image
Technical diagram of a power tool with numbered parts and an inset showing a labeled component1 Csiszolópapír
2 Csiszolótányér
3 Csiszolókar
4 H a j t á s f e
5 K a p c s o l ó
text_image
Technical diagram showing mechanical component assembly with numbered parts and a close-up inset of a valve mechanismtext_image
Diagram of a mechanical device with numbered parts and directional arrows indicating motion or assembly steps.text_image
Technical diagram of a mechanical device with numbered components and directional arrows indicating motion or assembly.natural_image
Close-up of a car dashboard with directional arrows and a numbered label (3), no readable text or symbols beyond the number.natural_image
Person using a power tool on a workbench, no visible text or symbolsManager Research & Development (R & D)
Klaus Peter WeinperEckhard F
Head of Quality
Department (QD)
2016.08.08
text_image
Labeled diagram of a cleaning tool with numbered parts including a handle, blade, and grip1 Brusný papír
2 B r u s n ÿ t a
3 B r u s n é r a
4 Hnací hlava
5 V y p í n a č
text_image
Technical diagram showing mechanical component assembly with numbered parts and close-up detailstext_image
Diagram of a sewing machine's mechanical components with numbered parts and directional arrows indicating assembly or repair.natural_image
Close-up of a kitchen appliance with a numbered knob and directional arrows indicating motion (no text or symbols)Pracovní pokyny
i UPOZORNĚNÍ
natural_image
Person using a power grater on a workbench, no visible text or symbolsManager Research & Development (R & D)
Klaus Peter WeinperEckhard F
Head of Quality
Department (QD)
text_image
Technical diagram of a power tool with numbered parts and an inset close-up showing internal components.1 Brúsny papier
| 2 | B | r | ú | s | n | y | t | a |
| 3 | B | r | ú | s | n | e | r | a |
| 4 | H | n | a | c | i | a | h | l |
| 5 | V | y | p | í | n | a | č |
text_image
Medical illustration showing a mechanical device with labeled parts and an inset close-up of the component's insertion.text_image
Diagram of a mechanical device with numbered parts and directional arrows indicating motion or assembly.■ Odstráňte plst na zadnom kryte (3.).
■ Vyskrutkujte skrutky na zadnom kryte (4.).
■ Odsuňte na stranu/odstráňte zadný kryt (5.).
text_image
6. 7. 8.natural_image
Close-up of a mechanical component with arrows indicating motion or flow, no visible text or symbolsPracovné pokyny

UPOZORNENIE
natural_image
Illustration of a hand using a power grater to work on a workbench (no text or symbols visible)Manager Research & Development (R & D)
Head of Quality Department (QD)
text_image
Labeled diagram of a power tool with numbered parts including handle, blade, and grip1 Brusni papir
2 B r u s n i t
3 Brusna poluga
4 Glava prijenosnika
5 Prekidač
text_image
Medical illustration showing a surgical tool with labeled steps 1 and 2, including a close-up of the tool's insertion.■ Monitrajte dodatnu dršku na lijevu ili na desnu stranu kućišta.
■ Pritom dršku stavite na navoj(1.) i okrenite u smjeru kazaljke na satu (2.).
text_image
Diagram of a sewing machine's mechanical component with numbered parts and directional arrows indicating assembly steps.■ Uklonite filc sa stražnjeg pokrova (3.).
■ Odvrnite vijke na stražnjem pokrovu (4.).
■ Stražnji pokrov gurnite u stranu/uklonite (5.).
text_image
Technical diagram of a mechanical device with numbered components and directional arrows indicating motion or assembly.■ Otpustite prednji imbus vijak (6.).
■ Uklonite zupčasti remen. Pritom zupčasti remen skinite sa stražnjeg zupčanika (7.) i povucite prema naprijed (8.).
text_image
10. 9. 11.■ Montirajte novi zupčasti remen. Zupčasti remen stavite prvo preko prednjeg, velikog zupčanika (9.), zatim preko stražnje, manjeg zupčanika (10.).
■ Ponovno montirajte pokrove i vijke (11.).
natural_image
Person using a power grinder on a workbench (no text or symbols visible)- Brusni tanjur stavite na predmet obrade kada aparat postigne potpuni broj okretaja.
- Za dobre rezultate brušenja ravnomjerno pomičite brusni tanjur po površini koju brusite. Nemojte vršiti prejaki pritisak.
- Nakon isključivanja brusni tanjur još kratko vrijeme nastavlja s radom.
Održavanje i njega
POZOR!
Manager Research & Development (R & D)
Klaus Peter WeinperEckhard F
Head of Quality Department (QD)
08.08.2016
text_image
Technical diagram of a power tool with numbered parts and an inset close-up showing internal components.1 Brusilni papir
2 Brusilni krožnik
3 Brusilna roka
4 Glava gonila
text_image
Diagram showing a mechanical device with labeled parts, including numbered callouts and directional arrows.text_image
Medical illustration showing a mechanical device with labeled parts and a close-up view of the component being inserted.text_image
Diagram of a sewing machine with labeled parts including a knob, washer, and base, showing mechanical assembly steps.■ Odstranite filc na zadnjem pokrovu (3.).
■ Sprostite vijake na zadnjem pokrovu (4.).
■ Zadnji pokrov pomaknite vstran/ odstranite (5.).
text_image
6. 7. 8.text_image
Diagram showing a directional arrow labeled 'I' pointing to a vehicle control panel with a black arrow indicating flow or movement.■ Prekucno stikalo potisnite naprej in ga pridržite.
■ Za izklop prekucno stikalo izpustite.
Neprekinjeno delovanje z uporabo prekucnega stikala
text_image
O→I I 2. 1.■ Prekucno stikalo potisnite naprej (1.) in ga s pritiskom na sprednji del zaskočite (2.).
text_image
I→O I■ Za izklop pritisnite na zadnji del prekucnega stikala, tako da sprostite zaporo.
natural_image
Person using a power shaver on a workbench (no text or symbols visible)text_image
Bolts Q - 1Manager Research & Development (R & D)
Klaus Peter WeinperEckhard F
Head of Quality Department (QD)
text_image
Technical diagram of a power tool with numbered parts and an inset close-up showing a labeled component.text_image
Medical illustration showing a surgical tool with labeled steps 1 and 2, including a close-up of the insertion site.text_image
Diagram of a sewing machine's mechanical component with numbered parts and directional arrows indicating assembly steps.natural_image
Close-up of a kitchen pot with a numbered knob and directional arrows (no text or symbols)Indicații de lucru
i INDICATIE
natural_image
Illustration of a hand using a power tool to work on a workbench (no text or symbols visible)Directivei 2014/30/UE, 2006/42/CE, 2011/65/UE.
text_image
Bolts Q -1Manager Research &
Development (R & D)
Klaus Peter WeinperEckhard F
Head of Quality
Department (QD)
text_image
Technical diagram of a power tool with numbered parts and a close-up inset showing internal components.text_image
Diagram showing a mechanical device with labeled parts and directional arrows, likely illustrating a motion or assembly process.text_image
Medical illustration showing a surgical tool with labeled steps 1 and 2, including a close-up view of the insertion.text_image
Diagram of a sewing machine's mechanical component with numbered parts and directional arrows indicating assembly steps.natural_image
Illustration of a hand using a power tool to work on a mechanical component (no text or symbols visible)Manager Research & Development (R & D)
Klaus Peter WeinperEckhard F
Head of Quality
Department (QD)
text_image
Labeled diagram of a power tool with numbered parts and a close-up inset showing a knob component.text_image
Diagram showing a mechanical device with labeled parts and directional arrows, likely illustrating a process or assembly.text_image
Diagram of a sewing machine's mechanical component with numbered parts and directional arrows indicating assembly steps.natural_image
Top-down view of a car's front grille with directional arrows and a numbered badge (no text or symbols)Указания по работе
i УКАЗАНИЕ
natural_image
Person using a power tool to clean or store floor tiles (no text or symbols visible)text_image
Bolts Q - 1Manager Research & Development (R & D)
Klaus Peter WeinperEckhard F Head of Quality Department (QD)
text_image
Labeled diagram of a power tool with numbered parts including a handle, blade, and grip1 L i h v p a b e 2 T u g i k e t a
3 Lihvimisvars
text_image
Diagram showing a mechanical device with labeled parts and directional arrows, likely illustrating a process or assembly.text_image
Medical illustration showing a surgical tool with labeled steps 1 and 2, including a close-up view of the insertion.text_image
Diagram of a sewing machine with numbered parts and directional arrows indicating process stepstext_image
Diagram of a mechanical device with numbered parts and directional arrows indicating motion or assembly.text_image
Diagram showing a car door with directional arrow and label 'I', likely indicating left-hand rule or navigation.natural_image
Person using a power tool to clean or store floor tiles (no text or symbols visible)text_image
Bolters -1Manager Research &
Development (R & D)
Klaus Peter WeinperEckhard F
Head of Quality
Department (QD)
text_image
Labeled diagram of a power tool with numbered parts including a knob, handle, and sockettext_image
Medical illustration showing a surgical tool with labeled steps 1 and 2, including a close-up of the insertion mechanism.text_image
Diagram of a sewing machine's mechanical component with numbered parts and directional arrows indicating assembly steps.■ Nuo užpakalinio dangtelio pašalinkite veltinj(3.).
■ Atsukite užpakalinio dangtelio varžtus (4.).
■ Pastumkite i šalj arba nuimkite užpakalinj dangtelj (5.).
text_image
Technical diagram of a mechanical device with numbered components and directional arrows indicating motion or assembly.natural_image
Illustration of a person using a power tool on a workbench (no text or symbols visible)text_image
Bolts Q - 1Manager Research & Development (R & D)
Klaus Peter WeinperEckhard F
Head of Quality Department (QD)
text_image
Labeled diagram of a cleaning or power tool with numbered parts and an inset showing a knob component.text_image
Medical illustration showing a surgical tool with labeled steps 1 and 2, including a close-up of the insertion mechanism.text_image
Diagram of a mechanical device with numbered parts and directional arrows indicating motion or assembly.text_image
Diagram showing a directional arrow labeled 'I' pointing to a mechanical component with internal structure and a circular symbol.natural_image
Illustration of a hand using a power tool to work on a workbench (no text or symbols visible)Manager Research & Development (R & D)
Klaus Peter WeinperEckhard F
Head of Quality
Department (QD)
text_image
Bolton Q -1Eckhard Rühle
Manager Research &
Development (R & D)
Klaus Peter Weinper
Head of Quality
Department (QD)
2016/08/80
text_image
Diagram showing a car door with a directional arrow and a stylized grille, likely indicating navigation or status.natural_image
Close-up of a car air conditioner fan with a numbered knob and directional arrows (no text or symbols)تنبيهات بشأن العمل
تنييه!

natural_image
Person using a power tool on a workbench, no visible text or symbols