
SGD2800WV - Iron GORENJE - Free user manual and instructions
Find the device manual for free SGD2800WV GORENJE in PDF.

| Product type | Steam generator (iron with station) |
| Brand | Gorenje |
| Model | SGD2800WV |
| Water tank capacity | 1,7 L |
| Power | Approximately 2000 W (estimated) |
| Supply voltage | 230 V / 50 Hz (according to rating plate) |
| Soleplate | Non-stick, stainless steel |
| Steam functions | Adjustable steam output (low, medium, high), steam burst (rapid pressure) |
| Dry ironing | Yes |
| Automatic shut-off | Yes, after 10 minutes of inactivity (steam/button) |
| Anti-scale system | Self-cleaning function with descaling indicator |
| Iron lock on station | Yes, for easy transport |
| Weight | Approximately 4 kg (estimated with full tank) |
| Dimensions (approx.) | 35 × 25 × 30 cm (L × W × H) |
| Power cord length | Approximately 1.5 m (integrated storage) |
| Steam hose length | Approximately 1.2 m (integrated storage) |
| Recommended water type | Tap water or purified water (avoid demineralized or perfumed water) |
| Maintenance | Clean soleplate with damp cloth, periodic self-cleaning, empty tank if long-term storage |
| Safety | Automatic shut-off, overheating protection, child lock (not mentioned, absent) |
| Usage | Household use only |
Frequently Asked Questions - SGD2800WV GORENJE
User questions about SGD2800WV GORENJE
0 question about this device. Answer the ones you know or ask your own.
Ask a new question about this device
Download the instructions for your Iron in PDF format for free! Find your manual SGD2800WV - GORENJE and take your electronic device back in hand. On this page are published all the documents necessary for the use of your device. SGD2800WV by GORENJE.
USER MANUAL SGD2800WV GORENJE
natural_image
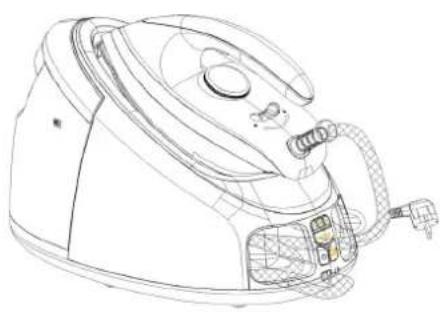
Exterior view of a purple and white steam iron with a cord, showing brand name and model (no text or symbols on the device itself)SGD2800WV
| INSTRUCTION MANUAL | EN |
| BEDIENUNGSANLEITUNG | DE |
| MANUEL D'INSTRUCTIONS | FR |
| MANUALE DI ISTRUZIONI | IT |
| MANUAL DE INSTRUCCIONES | ES |
| UPUTE ZA UPORABU | HR |
| NAVODILA ZA UPORABO | SI |
| MANUAL UDHËZIMI | SQ |
| UPUTSTVA ZA UPOTREBU | SRB |
| УПАТСТВО ЗА УПОТРЕБА | MK |
| MANUAL DE INSTRUCTIUNI | RO |
| ТРУКЦИЯ ПО ЭКСПЛУАТАЦИИ | RU |
| NÁVOD K OBSLUZE | CZ |
| HASZNÁLATI ÚTMUTATÓ | HU |
| INSTRUKCJA OBSLUGI | PL |
| NÁVOD NA POUŽITIE | SK |
| ПОСІБНИК З ЕКСПЛУАТАЦІЇ | UA |
| ИНСТРУКЦИЯ ЗА УПОТРЕБА | BG |
IMPORTANT SAFEGARDS
Before using the electrical appliance, basic precautions should always be followed including the following:
Read all instructions.
- Before using check that the voltage of wall outlet corresponds to the one shown on the rating plate.
- Do not use the appliance if the main cord, plug, light or the appliance itself shows visible damage, or the appliance has been dropped or is leaking. Take it to the nearest authorized service facility or a qualified serviceman for examination and repair in order to avoid a hazard.
- If the supply cord is damaged, it must be replaced by the manufacturer, its service agent or similarly qualified persons in order to avoid a hazard.
- Do not allow the cord to come into contact with the soleplate when it is hot.
- Burns may occur from touching hot metal parts, hot water, or steam.
- Do not let cord hang over edge of table or hot surface.
- To protect against a risk of electric shock, never immerse the iron in water or other liquids. If this has happened, do not use this appliance any more; dispose of the appliance.
- Do not leave iron unattended while connected into power supply or on an ironing board.
- Always place or use the appliance on a stable, level and horizontal surface.
- The use of accessory not recommended by manufacturer may cause injury to persons or damage to appliance.
- When placing the iron on its stand, ensure that the surface on which the stand is placed is stable.
- The knob at the bottom of unit base must be always well closed during the use.
- Never fill the water tank with hot water, scent, vinegar, starch, descaler, fabric softener or other chemical reagent.
- Unplug from outlet when not in use before filling water or cleaning.
- Do not use the appliance for other than its intended use.
- This appliance can be used by children aged from 8 years and above and persons with reduced physical, sensory or mental capabilities or lack of experience and knowledge if they have been given supervision or instruction concerning use of the appliance in a
way and understand the hazards involved.
- Children shall not play with the appliance. Cleaning and user maintenance shall not be made by children without supervision.
- The iron is not to be used if it has been dropped, if there are visible signs of damage or if it is leaking.
- Keep the iron and its cord out of reach of children less than 8 years of age when it is energized or cooling down.
- Never touch the hot soleplate unless the iron is cooled down completely and unplugged.
- Do not use outdoors.
- Save these instructions.
HOUSEHOLD USE ONLY
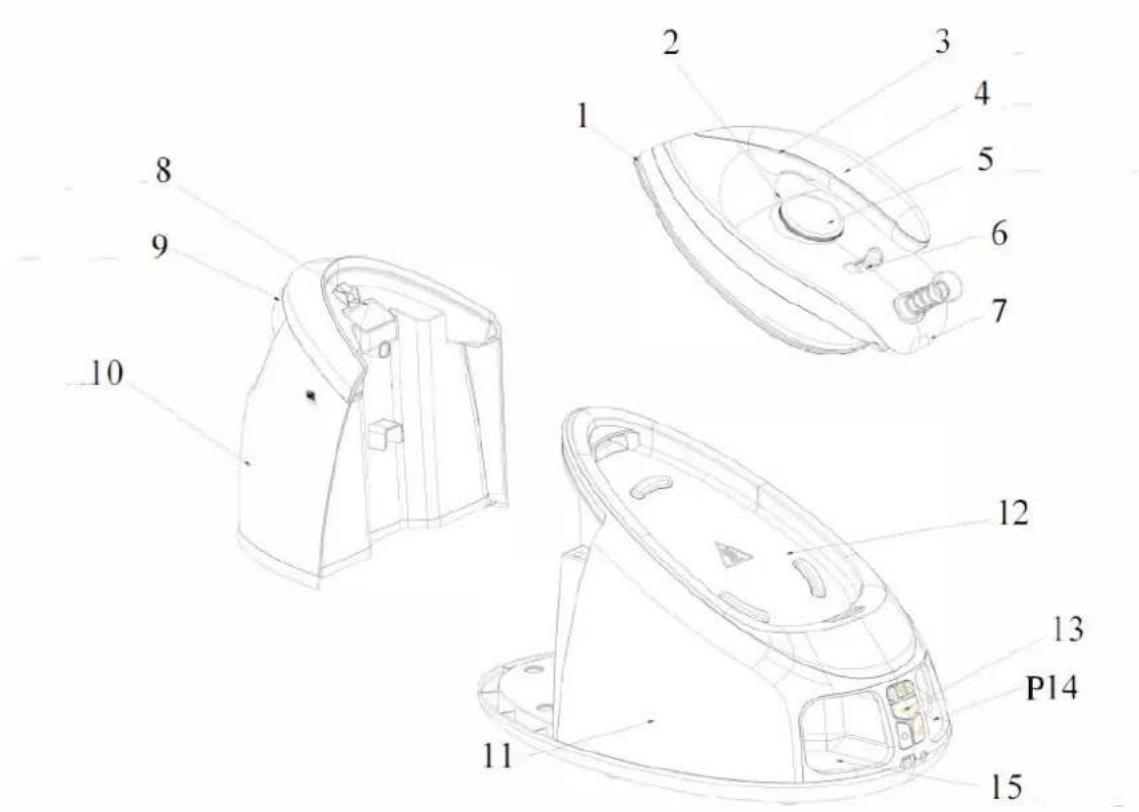
| Number | Description |
| 1 | Soleplate |
| 2 | Temperature indicator |
| 3 | Steam trigger |
| 4 | Handle |
| 5 | Temperature knob |
| 6 | Iron to station lock |
| 7 | Iron |
| 8 | Filling aperture |
| 9 | Water tank handle |
| 10 | Water tank |
| 11 | Unit base |
| 12 | Thermal insulation stand |
| 13 | Control panel |
| 14 | Power cord storage |
| 15 | Steam cord storage |
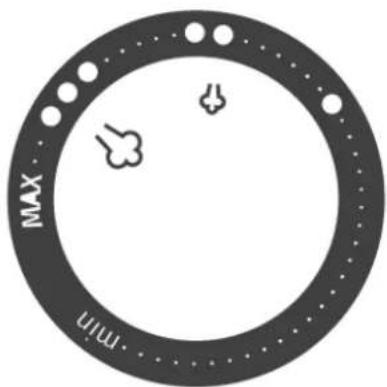
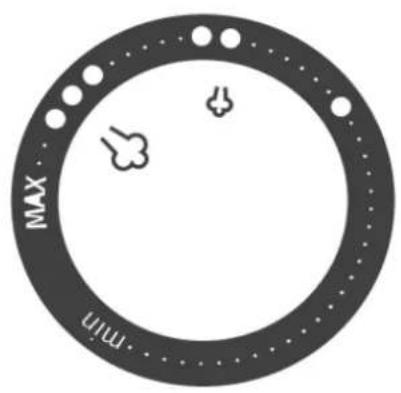
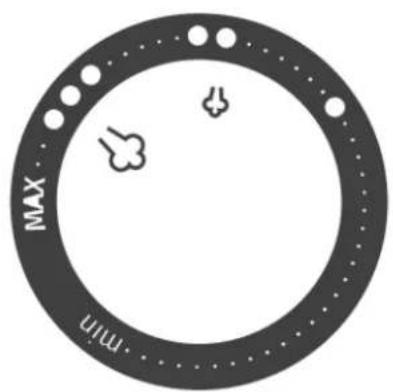
TEMPERATURE DIAL
natural_image
Circular diagram with dotted border and labeled 'MAX' and 'MIN' at corners, containing abstract cloud and arrow symbols (no readable text or numbers)| Silk 80 | |
| Wool 115 | |
| Cotton 170 | |
| MAX | Maximum 175 |
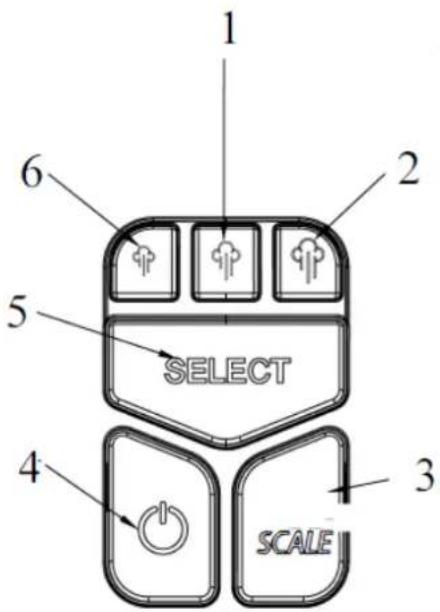
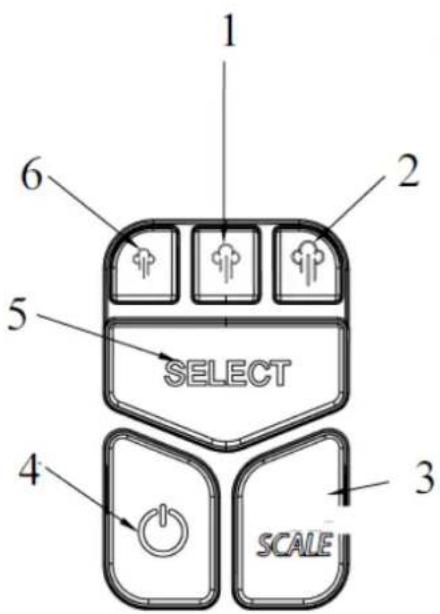
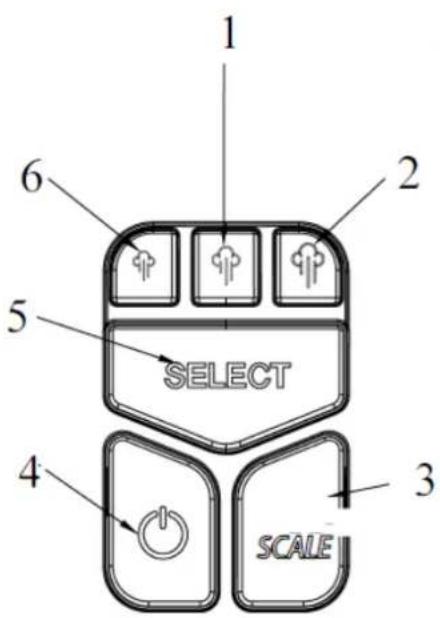
CONTROL PANEL
| Number | Description |
| 1 | Medium steam |
| 2 | High steam |
| 3 | Descaling button |
| 4 | Power button |
| 5 | Steam rate control |
| 6 | Low steam |
Filling aperture
Fill the water tank with water through the filling aperture of water tank. Make sure that the water shall not exceed the MAX mark of water tank.
Power button
Plug in the appliance and press down the power button, the power indicator will illuminate, the low steam rate is regarded as defaulted one and its indicator will blink. Hold and press the power button for more than 2 seconds, the appliance will be cut off.
Steam rate control button
The steam rate can be selected low, medium or high by the steam rate control button. Any one to be selected, its indicator will blink, and it will illuminate solidly after finish preheating, which means that the steam is ready for use. The indicator of selected steam rate will blink when the steam rate is switched from low setting to high setting, while it will illuminate solidly when the steam rate is switched from high setting to low setting.
Temperature dial
Turn the dial to set ironing temperature based on the garment needs to be ironed.
Temperature indicator
The appliance will heat up when it has not reached the selected temperature. The temperature indicator will illuminate when the appliance is heating up. Once the appliance has reached the selected temperature, the temperature indicator will extinguish. The temperature indicator will be cycled on and off as the iron maintains the selected temperature during ironing.
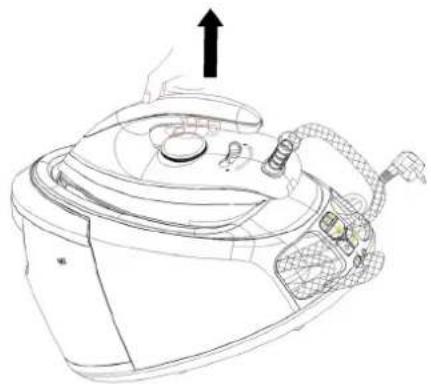
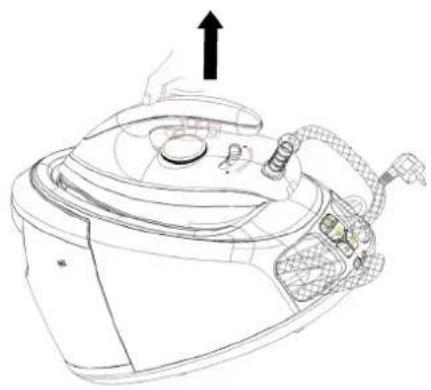
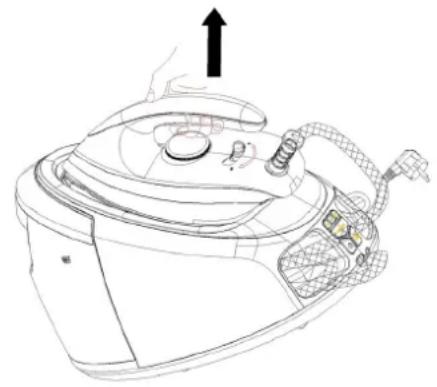
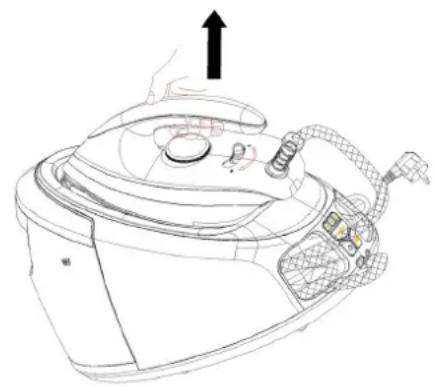
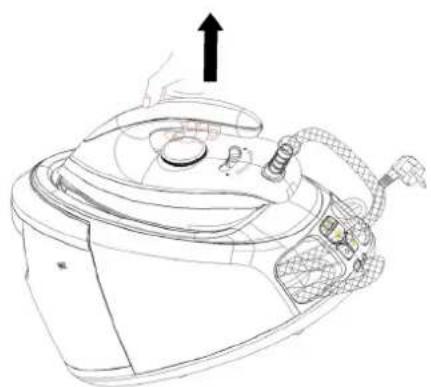
Iron lock
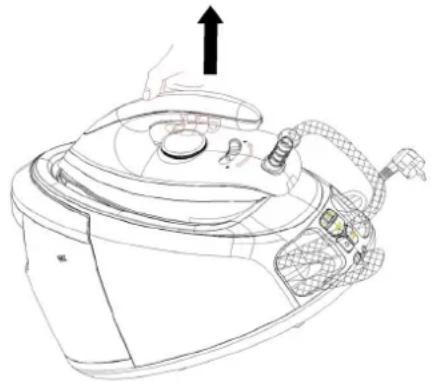
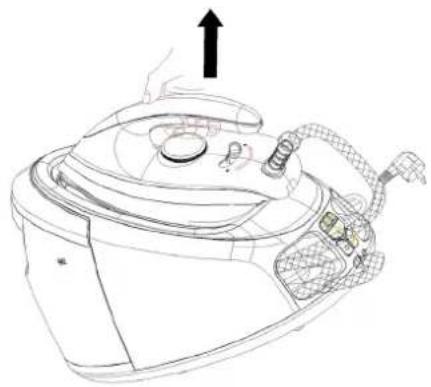
Put the iron on the thermal insulation stand of unit base, then push the iron lock to “☐” position to lock the iron on the unit base. To unlock, push the iron lock to “☐” position, then you can remove the iron to iron the clothes (see Fig.1). The whole steam station can be lifted up by grasping the iron’s handle after the iron being properly locked on the unit base (see
Fig.2).
natural_image
Line drawing of a steam iron with control panel and buttons (no text or symbols)Fig.1

natural_image
Line drawing of a steam iron with an upward arrow indicating motion (no text or symbols)Fig.2
Steam trigger
After pressing down the power button and choosing the desired steam rate, it indicates the steam can be used for ironing when the steam rate indicator changes from blinking to illuminating solidly. At that time, press the steam trigger with a little force, the steam will be sprayed from the soleplate continuously. When loosen the steam trigger, the appliance can only be used for dry ironing without steam.
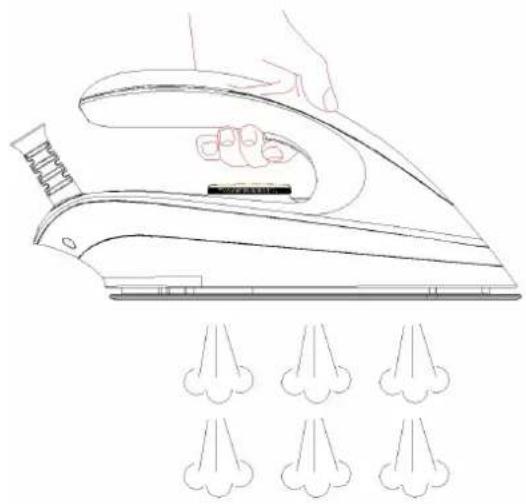
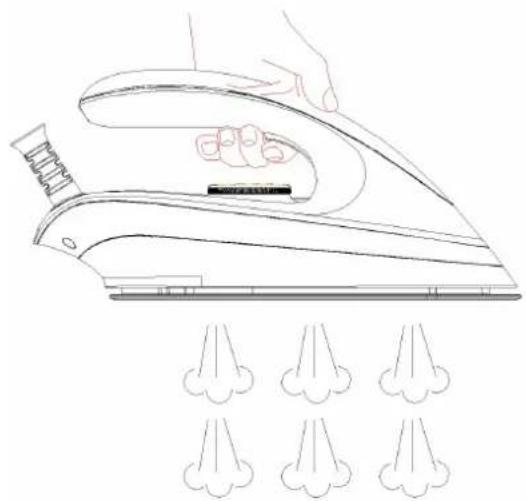
Shot of steam
Quickly press the steam trigger twice to produce shot of steam, which will last for 6 minutes (see Fig.3). If you want to stop producing shot of steam during operation, only need to press the steam trigger or any button on the control panel once.
natural_image
Line drawing of a hand using a steam iron with three cloud-shaped spray bubbles below (no text or symbols)Fig.3
Descaling indicator
If the descaling indicator illuminates, it indicates the steam generator shall be cleaned by virtue of the mineral deposits collecting to a degree. When the system ensures the mineral deposits have been removed, the indicator will extinguish.
Power cord storage box & Steam supply hose storage box
When not in use, the steam supply hose and power cord can be folded well and stored in their respective storage boxes.
Automatic power off
The appliance will turn off automatically if do not activate the “Steam” function or do not activate the control buttons on the control panel within 10 minutes.
BEFORE FIRST USE
- Remove any sticker or protective foil from the soleplate.
- Fill the water tank with water and heat up the iron at the maximum temperature, and then iron over a piece of damp cloth for several minutes for the purpose of removing any residue on the soleplate according to the section of “Steam ironing”.
NOTE:
1) It is normal that strange odour comes out from the unit for the first use. This will cease after a short while.
2) Some particles may come out of the soleplate when you use the iron for the first time. This is normal; the particles are harmless and stop coming out of the iron after a short while.
3) When you activate the "Steam" function, the appliance may produce a pumping sound. This is normal; the sound tells you that water is pumped into the steam generator.
4) During the heating process of the soleplate, there will be little steam coming out from the soleplate automatically and this phenomenon will continue for about 3 seconds, this is normal.
5) There will be little condensation water in the steam supply hose after first use.
But in the second use, the condensation water will be sprayed out together with the steam at the beginning of releasing steam. This phenomenon will continue for several seconds. This is normal.
- The appliance will shut off automatically if all the indicators blink five times together with five beeps can be heard after being powered on, at that time, please contact the after-sales service department.
The appliance has two ironing ways. You can use dry ironing or steam ironing, the details refer to the following:
Dry ironing
- Put the unit base on a stable and level surface and then put the iron on the thermal insulation stand of unit base.
- Connect the appliance with power source and press down the power button, the power indicator turns on.
- Turn temperature dial to your desired setting, which is depended on the fabric of garment. The iron starts heating, and the temperature indicator will illuminate solidly during heating.
Refer to "IRONING TIPS". - The temperature indicator will turn off when the selected temperature is reached. You can start ironing now.
WARNING: Never touch hot soleplate at any time before cooling down!
Steam ironing
- Put the unit base on a stable and level surface.
- Grasp the water tank's handle to remove the water tank, then fill it with water through the filling aperture. You had better use purified water with less calcium particles. After it, replace the water tank properly. The max capacity of water tank is 1.7L, the water level shall not be exceeded the MAX mark.
-
Put the iron on the thermal insulation stand of unit base.
-
Connect the appliance with power source, press down the power button, and the defaulted low steam rate indicator will blink. And there are three modes including low, medium and high steam rate available, you can select the desired steam rate for each garment according to your requirement. Make sure that there is enough water in the tank.
-
Turn temperature dial to your desired setting, which is depended on the fabric of garment. The iron starts heating, and the temperature indicator will illuminate solidly during heating. Refer to “IRONING TIPS” and “ADDITIONAL TABLE” as below when select temperature.
-
After a few minutes, the temperature indicator will extinguish, it indicates the soleplate temperature has achieved the selected temperature. When the indicator of selected steam rate changes from flashing to illuminating, it indicates that the iron is ready for ironing garment with steam.
-
Press the steam trigger with a little force, the steam will be sprayed from the soleplate continuously, and then you can iron the garment with steam.
-
Quickly press the steam trigger twice to produce shot of steam if you need to remove hard crease.
Note: There may be dripping water during spraying steam when the temperature of the soleplate is at and lower than the second setting. This is normal.
Caution:
1) Do not touch hot soleplate at any time before cooling down!
2) Never direct the steam at people!
3) Do not activate the steam trigger when the iron is placed on the unit base to avoid being scalded by steam.
- After ironing, press down the power button for more than 2 seconds, the appliance will be turned off and all the indicators will extinguish. Remove the plug from the wall socket. But the soleplate is still hot, never touch it with hand, place it on the thermal insulation stand until it cools down completely.
AUTO-CLEAN FUNCTION
If the “Descaling indicator” illuminates, it indicates the steam generator shall be cleaned by virtue of the mineral deposits collecting to a degree. When the system ensures the mineral deposits have been removed, the “Descaling indicator” will extinguish.
Before cleaning, make sure that the “Descaling indicator” lights solidly, then unplug the appliance and make it cool down.
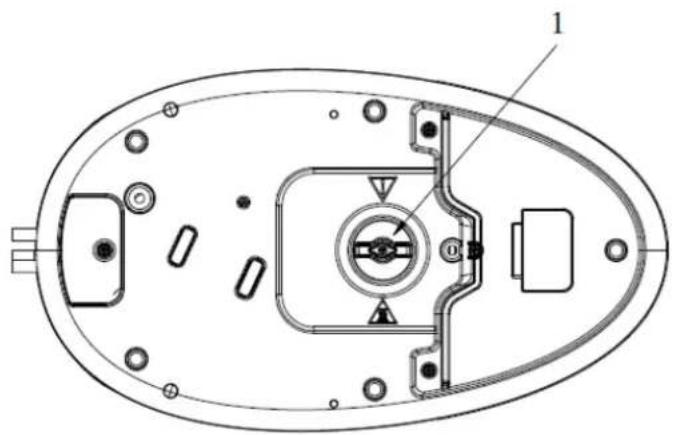
- Remove the water tank, upend the unit base and put it on a flat surface, then anticlockwise rotate the knob at the bottom of unit base to remove it.
WARNING: To avoid a risk of scald, make sure the appliance has been cooled down completely before removing the knob, position 1 on picture below.
natural_image
Technical diagram of an electronic device casing with internal components and mounting holes (no text or labels)-
Install the drain connector into the drain pipe.
-
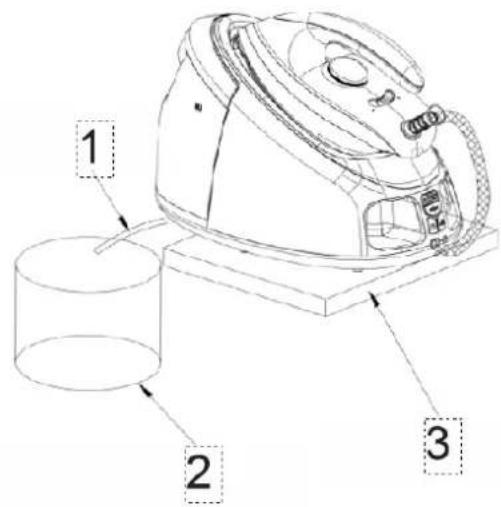
Put the unit base on a suitable and fixed table, then put the silicone tube into a container, after it, fill the water tank with water and replace it back in position (see Fig.4). Make sure that the appliance shall be placed steadily.
| Number | Description |
| 1 | Silicone tube |
| 2 | Container |
| 3 | Fixed table |

Fig.4
- Connect the appliance with power source, press down the power button, then hold and press “Descaling button” and “Steam trigger” simultaneously for about 1 second, at that time, one beep can be heard and the descaling indicator begins to blink, then the appliance starts to clean the steam generator, and the steam and scale flows out of the steam generator, about 3 minutes later, one beep can be heard, the descaling indicator extinguishes and the appliance shuts off automatically.
NOTE: Do not touch or get close to the container during cleaning to avoid being scalded.
- Unplug and remove the water tank, then put the iron on a flat surface, after it, upend the unit base and put it on a flat surface, and then rotate the knob clockwise to tighten it and install the drain connector well in position. Finally, upend the unit base and put the iron on the thermal insulation stand of unit base.
CLEANING AND MAINTENANCE
Before cleaning, firstly disconnect th Fig.8 outlet and let the appliance cools down.
- Wipe the residues and any other deposits on the soleplate with a damp cloth or a non-abrasive (liquid) cleaner.
NOTE: Do not use chemical, steel, wooden or abrasive cleaners to scrape the soleplate.
-
Clean the upper part of iron with a soft damp cloth. Wipe the water drop on the unit base and the thermal insulation stand with dry cloth.
-
Perform auto-clean by following the operation described in “AUTO-CLEAN FUNCTION” when the “Descaling indicator” illuminates.
-
When do not use the appliance for a long time, pour out the water in the tank, turn the temperature dial to the minimum setting and store the iron on the thermal insulating cushion and then push the iron lock to the lock position to lock the iron well.
Note: The whole steam station can be lifted up by grasping the iron's handle after the iron being properly locked on the unit base.
- When not in use, the steam supply hose and power cord can be folded well and stored in their respective storage boxes, then put the appliance at a place out of the reach of children.
IRONING TIPS
-Always check first whether a label with ironing instructions is attached to the article. Follow these ironing instructions in any case.
-The iron heats up quicker than cooling it down, therefore, you should start ironing the articles requiring the lowest temperature such as those made of synthetic fiber.
-If the fabric consists of various kinds of fibers, you must always select the lowest ironing temperature to iron the composition of those fibers.
- Synthetic fibre and silk fabrics should be ironed on their inner side to avoid being shone.
-Velvet and other textures that rapidly become shiny should be ironed in one direction with light pressure applied. Always keeps the iron moving at any moment.
-Pure wool fabrics (100% wool) may be ironed with the steam iron. Preferably set temperature dial to the third position and use a dry cloth as a mat.
- Never iron over zip, rivet in the cloth. This will damage the soleplate. Iron around any such object.
ENVIRONMENT FRIENDLY DISPOSAL
natural_image
Two diagonal lines on a white background, no text or symbols presentYou can help protect the environment! Please remember to respect the local regulations: hand in the non-working electrical equipments to an appropriate waste disposal center
natural_image
Circular diagram with dotted border and labeled 'MAX' and 'MIN' at bottom, containing abstract cloud-like shapes inside (no text or symbols beyond labels)natural_image
Line drawing of a steam iron with control panel and handle (no text or symbols)Abb. 1
natural_image
Line drawing of a steam iron machine with handle and control panel (no text or symbols)Abb. 2
Dampfauslöser
natural_image
Line drawing of a hand using a steam iron with three cloud-shaped spray bubbles below (no text or symbols)Abb. 3
Entkalkungsanzeige
natural_image
Technical diagram of an electronic device casing with internal components and mounting holes (no text or labels)Abb. 4
natural_image
Simple geometric lines forming a cross shape (no text or symbols)natural_image
Circular diagram with dotted border and labeled 'MAX' and 'MIN' at bottom, containing abstract cloud-like shapes inside (no text or symbols beyond labels)| Soie 80 | |
| Laine 115 | |
| Coton 170 | |
| MAX | Maximum 175 |
PANNEAU DE COMMANDE
natural_image
Line drawing of a steam iron with control panel and handle (no text or symbols)Fig. 1

natural_image
Line drawing of a steam iron or steam cooker with handle and control panel (no text or symbols)Fig. 2
Gâchette vapeur
natural_image
Line drawing of a hand using a steam iron with three cloud-shaped spray bubbles below (no text or symbols)Fig. 3
natural_image
Technical diagram of an electronic device casing with internal components and mounting holes (no text or labels)Fig.4
natural_image
Simple geometric lines forming a cross shape (no text or symbols)natural_image
Circular diagram with dotted border and two cloud-like symbols, no readable text or labels| Seta 80 | |
| Lana 115 | |
| Cotone 170 | |
| MAX | Massimo 175 |
PANNELLO DI CONTROLLO
natural_image
Line drawing of a steam iron with control panel and buttons (no text or symbols)Fig.1

natural_image
Line drawing of a steam iron machine with handle and control panel (no text or symbols)Fig.2
Pulsante del vapore
natural_image
Line drawing of a hand using a steam iron with three cloud-shaped flutes below (no text or symbols)Fig.3
natural_image
Technical diagram of an electronic device casing with internal components and mounting holes (no text or labels)Fig.4
natural_image
Simple geometric lines forming a cross shape (no text or symbols)MANDO DE TEMPERATURA

natural_image
Circular diagram with dotted border and labeled 'MAX' and 'MIN' at bottom, containing abstract cloud-like shapes (no text or symbols beyond labels)| ● | Seda 80 < T < 120 |
| ●● | Lana 115 < T < 160 |
| ●●● | Algodón 170 < T < 215 |
| MÁX. | Máximo 175 < T < 225 |
PANEL DE CONTROL
natural_image
Line drawing of a steam iron with control panel and handle (no text or symbols)Fig. 1
natural_image
Line drawing of a steam iron with an upward arrow indicating motion (no text or symbols)Fig. 2
Botón de vapor
natural_image
Line drawing of a hand using a steam iron with three cloud-shaped spray bubbles below (no text or symbols)Fig. 3
natural_image
Technical diagram of an electronic device casing with internal components and mounting holes (no text or labels)Fig.4
natural_image
Simple geometric lines forming a cross shape (no text or symbols)natural_image
Circular diagram with dotted outer ring and labeled 'MAX' and 'MIN' at bottom, containing abstract cloud and arrow symbols (no readable text or numbers)| Svila 80 | |
| Vuna 115 | |
| Pamuk 170 | |
| MAX | Maksimum 175 |
UPRAVLJAČKA PLOČA
| Broj | Opis |
| 1 | Srednja razina pare |
| 2 | Visoka razina pare |
| 3 | Gumb za uklanjanje kamenca |
| 4 | Gumb za uključivanje |
| 5 | Regulacija razine pare |
| 6 | Niska razina pare |
Otvor za punjenje
Napunite spremnik vodom kroz otvor za punjenje spremnika za vodu. Pazite da voda ne prelazi oznaku MAX spremnika za vodu.
Regulator temperature
natural_image
Line drawing of a steam iron with control panel and handle (no text or symbols)Sl. 1
natural_image
Line drawing of a mechanical device with an upward arrow indicating motion (no text or symbols)S1.2
Okidač za paru
Nakon pritiskanja gumba za uključivanje i odabira željene razine pare, gumb označava da se para može koristiti za glačanje kada indikator razine pare prestane treperiti i počne svijetliti. U tom trenutku lagano pritisnite okidač za paru, para će se neprekidno raspršivati iz ploče za glačanje. Kad otpustite okidač za paru, uređaj se može koristiti samo za suho glačanje bez pare.
Mlaz pare
natural_image
Line drawing of a hand using a steam iron with six cloud-shaped spray bubbles below (no text or symbols)Sl. 3
Indikator za uklanjanje kamenca
natural_image
Technical diagram of an electronic device casing with internal components and mounting holes (no text or labels)-
Postavite odvodni priključak u odvodnu cijev.
-
Postavite bazu na prikladan i pričvršćen stol, a zatim stavite silikonsku cijev u spremnik, nakon toga napunite spremnik vodom i vratite ga u položaj (pogledajte sl.4). Pobrinite se da uređaj bude stabilno postavljen.
| Broj | Opis |
| 1 | Silikonska cijev |
| 2 | Spremnik |
| 3 | Pričvršćeni stol |

S1.4
- Spojite uređaj na izvor napajanja, pritisnite gumb za uključivanje, zatim istodobno držite i pritisnite "Gumb za uklanjanje kamenca" i "Okidač za paru" oko 1 sekunde, tada će se začuti zvučni signal i indikator za uklanjanje kamenca počinje treperiti, a zatim uređaj počinje čistiti generator pare, a para i kamenac izlaze iz generatora pare. Nakon 3 minute začut će se jedan zvučni signal, indikator za uklanjanje kamenca se gasi i uređaj se automatski isključuje.
natural_image
Circular diagram with dotted border and labeled 'MAX' and 'MIN' at bottom, containing abstract cloud-like shapes inside (no text or symbols beyond labels)| Svila 80 | |
| Volna 115 | |
| Bombaž 170 | |
| MAX | Največja temperatura 175 |
UPRAVLJALNA PLOŠČA
Regulator temperature
natural_image
Line drawing of a steam iron with control panel and buttons (no text or symbols)Slika 1

natural_image
Line drawing of a steam iron with an upward arrow indicating motion (no text or symbols)Slika 2
Sprožilec pare
natural_image
Line drawing of a hand using a steam iron with six cloud-shaped spray bubbles below (no text or symbols)Slika 3
natural_image
Technical diagram of an electronic device casing with internal components and mounting holes (no text or labels)Slika 4
natural_image
Simple geometric lines forming a cross shape (no text or symbols)natural_image
Circular diagram with dotted border and two small icons, no text or symbols present| Mëndafsh 80 | |
| Lesh 115 | |
| Pambuk 170 | |
| MAX | Maksimumi 175 |
PANELI I KONTROLLIT
natural_image
Line drawing of a steam iron with attached circuit board (no text or symbols)Fig.1

natural_image
Line drawing of a steam iron device with an upward arrow indicating motion (no text or symbols)Fig.2
Këmbëza e avullit
natural_image
Line drawing of a hand using a steam iron to clean air by three cloud-shaped outlets (no text or symbols)Fig.3
natural_image
Technical diagram of an electronic device casing with internal components and mounting holes (no text or labels)Fig.4
natural_image
Simple geometric lines forming a cross shape (no text or symbols)natural_image
Circular diagram with dotted border and two small icons, no readable text or symbols| Svila 80 | |
| Vuna 115 | |
| Pamuk 170 | |
| MAX | Maksimum 175 |
KONTROLNA TABLA
| Broj | Opis |
| 1 | Srednji nivo pare |
| 2 | Visoki nivo pare |
| 3 | Dugme za uklanjanje kamenca |
| 4 | Dugme za uključivanje |
| 5 | Kontrola nivoa pare |
| 6 | Niski nivo pare |
Otvor za punjenje
Napunite rezervoar za vodu vodom kroz otvor za punjenje rezervoara za vodu. Uverite se da voda ne prelazi oznaku MAX rezervoara za vodu.
Regulator temperature
Okrenite regulator da biste podesili temperaturu peglanja na osnovu odeće koju treba da ispeglate.
Indikator temperature
natural_image
Line drawing of a steam iron with attached circuit board (no text or symbols)Sl. 1
natural_image
Line drawing of a steam iron device with handle and control panel (no text or symbols)S1.2
Okidač za paru
Nakon što pritisnete dugme za uključivanje i izaberete željeni nivo pare, dugme označava da se para može koristiti za peglanje kada indikator nivoa pare prestane da treperi i počne da svetli. Utom trenutku lagano pritisnite okidač za paru, para će se neprekidno raspršivati iz ploče za peglanje. Kad otpustite okidač za paru, uređaj se može koristiti samo za suvo peglanje bez pare.
Mlaz pare
Dva puta brzo pritisnite okidač za paru kako bi izašao mlaz pare, što će trajati 6 minuta (pogledajte sl. 3). Ako želite da prekinete mlaz pare tokom rada, potrebno je samo jednom pritisnuti okidač za paru ili bilo koje dugme na kontrolnoj tabli.
natural_image
Line drawing of a hand using a steam iron with three cloud-shaped spray bubbles below (no text or symbols)Sl. 3
Indikator za uklanjanje kamenca
Ako svetli indikator za uklanjanje kamenca, to znači da generator pare treba očistiti od mineralnih naslaga koje se nakupljaju do određenog stepena. Kada sistem proveri da su mineralne naslage uklonjene, indikator će se ugasiti.
natural_image
Technical diagram of an electronic device casing with internal components and mounting holes (no text or labels)-
Instalirajte odvodni konektor u odvodnu cev.
-
Postavite bazu na odgovarajući i pričvršćen sto, a zatim stavite silikonsku cev u rezervoar, nakon toga napunite rezervoar vodom i vratite ga u položaj (pogledajte sl.4). Uverite se da je uređaj stabilno postavljen.
| Broj | Opis |
| 1 | Silikonska cev |
| 2 | Rezervoar |
| 3 | Pričvršćen sto |
S1.4
- Povežite uređaj sa izvorom napajanja, pritisnite dugme za uključivanje, zatim istovremeno držite i pritisnite „Dugme za uklanjanje kamenca” i „Okidač za paru” oko 1 sekunde, tada će se čuti zvučni signal i indikator za uklanjanje kamenca počinje da treperi, a zatim uređaj počinje da čisti generator pare, a para i kamenac izlaze iz generatora pare. Nakon 3 minute čuće se jedan zvučni signal, indikator za uklanjanje kamenca se gasi i uređaj se automatski isključuje.
natural_image
Circular diagram with dotted border and two small icons, no readable text or symbols| Свила 80 | |
| Волна 115 | |
| Памук 170 | |
| MAX | Максимум 175 |
КОНТРОЛНА ТАБЛА
natural_image
Line drawing of a steam iron with control panel and air vent (no text or symbols)Слика 1

natural_image
Line drawing of a steam iron device with handle and control panel (no text or symbols)Слика 2
Копче за пареа
natural_image
Line drawing of a hand using a steam iron with three cloud-shaped spray bubbles below (no text or symbols)Слика 3
natural_image
Technical diagram of an electronic device casing with internal components and mounting holes (no text or labels)Слика 4
natural_image
Simple geometric lines forming a cross shape (no text or symbols)CADRAN DE TEMPERATURĂ
natural_image
Circular diagram with dotted border and two small icons, no readable text or symbolsnatural_image
Line drawing of a steam iron with control panel and buttons (no text or symbols)Fig.1

natural_image
Line drawing of a steam iron machine with handle and control panel (no text or symbols)Fig.2
Declanşator de abur
natural_image
Line drawing of a hand using a steam iron with three flue holders below (no text or symbols)Fig.3
Indicator de decalcifiere
natural_image
Technical diagram of an electronic device casing with internal components and mounting holes (no text or labels)Fig. 4
natural_image
Simple geometric lines forming a cross shape (no text or symbols)natural_image
Circular diagram with dotted border and two small icons, no readable text or symbolsnatural_image
Line drawing of a steam iron with control panel and buttons (no text or symbols)Рис. 1

natural_image
Line drawing of a kitchen appliance with a hand pressing a button (no text or symbols)Рис. 2
Кнопка подачи пара
natural_image
Line drawing of a hand using a steam iron with three cloud-shaped spray bubbles below (no text or symbols)Рис. 3
natural_image
Technical diagram of an electronic device casing with internal components and mounting holes (no text or labels)Рис.
4
natural_image
Simple geometric lines forming a cross shape (no text or symbols)VOLIČ TEPLOTY

natural_image
Circular diagram with dotted border and two small icons, no readable text or symbols| Hedvábí 80 | |
| Vlna 115 | |
| Bavlna 170 | |
| MAX | Maximum 175 |
OVLÁDACÍ PANEL
natural_image
Line drawing of a steam iron with control panel and buttons (no text or symbols)Obr.1
natural_image
Line drawing of a steam iron machine with handle and control panel (no text or symbols)Obr.2
Spoušt' páry
natural_image
Line drawing of a hand using a steam iron with three cloud-shaped spray bubbles below (no text or symbols)Obr.3
Indikátor odvápnění
natural_image
Technical diagram of an electronic device casing with internal components and mounting holes (no text or labels)Obr.4
natural_image
Simple geometric lines forming a cross shape (no text or symbols)natural_image
Circular diagram with dotted border and two small icons, no text or symbols present| ● | Selyem 80 |
| ●● | Gyapjú 115 |
| ●●● | Pamut 170 |
| MAX | Maximum 175 |
VEZÉRLŐ PANEL
natural_image
Line drawing of a steam iron with control panel and buttons (no text or symbols)- ábra

natural_image
Line drawing of a steam iron with an upward arrow indicating motion (no text or symbols)- ábra
Gözkioldó gomb
natural_image
Line drawing of a hand using a steam iron to clean air by three cloud-shaped outlets (no text or symbols)- ábra
natural_image
Technical line drawing of an electronic device casing with internal components and mounting holes (no text or symbols)natural_image
Circular diagram with dotted border and two small icons, no readable text or symbolsnatural_image
Line drawings of a steam iron machine with control panel and air vent (no text or symbols)Rys. 1
Rys. 2
Spust pary
natural_image
Line drawing of a hand using a steam iron to clean air by three cloud-shaped outlets (no text or symbols)Rys. 3
natural_image
Technical diagram of an electronic device casing with internal components and mounting holes (no text or labels)Rys. 4
natural_image
Simple geometric lines forming a cross shape (no text or symbols)VOLIČ TEPLOTY
natural_image
Circular diagram with dotted border and two small icons, no readable text or symbols| Hodváb 80 < T < 120 | |
| Vlna 115 < T < 160 | |
| Bavlna 170 < T < 215 | |
| MAX | Maximum 175 < T < 225 |
OVLÁDACÍ PANEL
natural_image
Line drawing of a steam iron with control panel and handle (no text or symbols)Obr. 1
natural_image
Line drawing of a steam iron with an upward arrow indicating motion (no text or symbols)Obr. 2
Spúšt' pary
natural_image
Line drawing of a steam iron with three cloud-shaped spray bubbles below (no text or symbols)Obr. 3
natural_image
Technical diagram of an electronic device casing with internal components and mounting holes (no text or labels)Obr. 4
natural_image
Simple geometric lines forming a cross shape (no text or symbols)natural_image
Circular diagram with dotted border and two small icons, no text or symbols presentnatural_image
Line drawing of a steam iron with control panel and handle (no text or symbols)М а л. 1
natural_image
Line drawing of a steam iron or steam cooker with no text or symbolsМ а л. 2
natural_image
Line drawing of a hand using a steam iron to clean air by three cloud-shaped outlets (no text or symbols)M a
natural_image
Technical diagram of an electronic device casing with internal components and mounting holes (no text or labels)Мал. 4
natural_image
Simple geometric lines forming a cross shape (no text or symbols)natural_image
Circular diagram with dotted border and two small icons, no readable text or symbolsnatural_image
Line drawing of a steam iron with control panel and handle (no text or symbols)Фиг.1

natural_image
Line drawing of a steam iron device with an upward arrow indicating motion (no text or symbols)Фиг2
Спусък за парата
natural_image
Line drawing of a hand using a steam iron with three cloud-shaped spray bubbles below (no text or symbols)Фиг3
natural_image
Technical diagram of an electronic device casing with internal components and mounting holes (no text or labels)Фиг.4
